Помимо базовой способности удалять, создавать и форматировать раздел, Windows 10/8/7 встроенная утилита управления дисками имеет расширенные функции «Сжать том» и «Расширить том», чтобы помочь изменить размер разделов без потери данных. Однако он может сжимать раздел только влево и создавать нераспределенное пространство с правой стороны. Кроме того, в некоторых случаях даже не может уменьшить объем in Windows 10/8/7. В этой статье я объясню причины почему ты не можешь сжаться Windows 10 раздел с помощью управления дисками и что делать, если вы не можете уменьшить объем в Windows 10/8/7 ноутбук/настольный/планшет.
Содержание:
- Почему Управление дисками не может уменьшить раздел в Windows 10/8/7
- Что делать, если вы не можете уменьшить объем в Windows 10/8/7
- Что делать, если вы не можете сжать диск D, чтобы расширить диск C
Почему Управление дисками не может уменьшить раздел в Windows 10/8/7
Есть 4 распространенные причины, по которым вы не можете уменьшить объем в Windows 10/8/7 с родным инструментом управления дисками.
Причина 1. Файловая система не поддерживается.
Управление дисками может сжимать и расширять только разделы, отформатированные с помощью NTFS файловая система, FAT32 и любые другие типы разделов не могут быть сжаты или расширены.

Причина 2: недостаточно свободного места
После запуска Shrink Volume Управление дисками вычисляет использование дискового пространства и по умолчанию предоставляет вам максимально доступное пространство. Если вы не введете меньшую сумму, вы можете получить сообщение об ошибке, что «недостаточно места«.

Причина 3: ошибка файловой системы
Если есть ошибка файловой системы или другая системная проблема, Disk Management не может уменьшить раздел даже до 1 МБ.

Причина 4: Есть неподвижные файлы
Если в этом разделе есть несколько неподвижных файлов, таких как файл подкачки и файлы гибернации, «Управление дисками» может только уменьшить пространство.

Что делать, если вы не можете уменьшить объем в Windows 10/8/7
Когда вы не можете уменьшить громкость в Windows 10/8/7 в разделе «Управление дисками» выясните причину, указанную выше, и следуйте соответствующим решениям, приведенным ниже.
Решение 1. Сжимайте с помощью программного обеспечения для создания разделов
Если вы хотите уменьшить FAT32 раздел, Объем усадки неактивен in Windows 10/8/7 Управление диском. В этом случае вам необходимо запустить стороннее программное обеспечение, такое как NIUBI Partition Editor.
Решение 2. Сжимайте, занимая меньше места
Как я сказал выше, Управление дисками рассчитает дисковое пространство раздела, который вы хотите сжать, а затем даст вам максимальный доступное пространство. Если вы ввели большее пространство или много файлов, сохраненных в этом разделе, прежде чем нажать кнопку «Уменьшить». Реальное доступное пространство и рассчитанный объем пространства противоречат друг другу. В этом случае вам просто нужно снова запустить «Уменьшить объем» или ввести меньшую сумму самостоятельно.
Решение 3. Исправьте ошибку файловой системы
Многие компьютеры имеют ошибку файловой системы в одном или нескольких разделах. В общем, вы не заметите никакой разницы в повседневном использовании, но вы можете столкнуться с проблемами при сжатии и расширении разделов. Если в разделе много свободного места, но в «Управлении дисками» доступно 0 МБ или кнопка «Уменьшить» неактивна, попробуйте восстановить файловую систему.
Как восстановить файловую систему, если не удается уменьшить объем в Windows 10/8/7:
- Нажмите Windows значок или Начать меню, введите CMD, то вы увидите результат, щелкните его правой кнопкой мыши и выберите Запуск от имени администратора.
- В командной строке введите chkdsk X: / v / f и нажмите Enter. (X — буква диска раздела, который вы хотите сжать.)
- На системный диск C: командное окно сообщит, что этот раздел не может быть заблокирован, и спросит вас, запланировать ли это задание, введите Y и нажмите Enter.
- Перезагрузите компьютер и снова уменьшите размер диска C.
Решение 4.Уменьшите раздел с помощью NIUBI
Если в разделе много свободного места, но Управление дисками дает мало свободного места при сжатии, это означает, что в этом разделе есть «неподвижные» файлы. В этом случае уменьшите NIUBI Partition Editor. Лучше, чем Управление дисками, NIUBI может перемещать эти неподвижные файлы, поэтому вы можете уменьшить этот том до минимального размера, если хотите.
Что делать, если не удается сжать диск D, чтобы расширить диск C
Windows Инструмент управления дисками не может изменить начальную позицию раздела, поэтому он не может уменьшить перегородку вправо in Windows 10/8/7. Он только дает вам возможность ввести сумму, а затем автоматически сжимает том влево и автоматически делает Нераспределенное пространство справа.
Если вы просто хотите сжать раздел для создания нового тома, это не имеет значения. Но это большая проблема, если вы хотите сжать D, чтобы расширить диск C, потому что нераспределенное пространство, которое сократилось с D, не может быть добавлено на диск C с помощью управления дисками.
Как вы видите на снимке экрана, после сжатия диска D E находится справа от незанятого пространства, диск C не является смежным, поэтому Расширение томов отключено для обоих разделов.

Лучше, чем управление дисками, NIUBI Partition Editor имеет больше преимуществ, в то время как перераспределение жесткого диска:
- Он может сжимать и расширять разделы NTFS и FAT32.
- Он может перемещать неподвижные файлы и сокращать раздел до минимального размера.
- Он может сделать незанятое пространство слева или справа при сжатии раздела.
- Он может объединить незанятое пространство либо в смежный, либо в любой несмежный раздел на одном диске.
NIUBI Partition Editor имеет бесплатное издание для Windows 10/8/7/Vista/XP пользователи домашних компьютеров. То же самое с коммерческой версией, за исключением отсутствия технологии 1 Second Rollback и создания загрузочных носителей. К термоусадочная перегородка в Windows 10 ноутбук/рабочий стол/планшет, вам просто нужно перетащить на карту диска.
Скачать бесплатная версия, щелкните правой кнопкой мыши диск D (или другой) и выберите «Изменить размер/переместить том». У вас есть 2 варианта во всплывающем окне.
Вариант 1: Если вы перетащите левая граница к правильно
Нераспределенное пространство будет сделано на левая сторона.

Вариант 2: Если вы перетащите правая граница к оставил
Нераспределенное пространство будет сделано на правая сторона.

Следуйте инструкциям, если хотите расширить диск C, расширить системный зарезервированный раздел or увеличить привод D сжав другой раздел на диске. Помимо уменьшения и увеличения объема, NIUBI Partition Editor помогает выполнять множество других операций, таких как перемещение, объединение, преобразование, очистка, дефрагментация, скрытие, копирование раздела. Лучше, чем другие инструменты, он имеет уникальные 1 второй откат, Виртуальный режим и Отменить-на-хорошо технологии для защиты системы и данных.
Скачать
When you happen to meet the ‘can’t shrink volume Windows 10’ issue, here is the free EaseUS disk manager and other solutions you can try:
«Hi guys, do you know why Windows 10 cannot shrink volume? It doesn’t allow me to shrink C: drive on my laptop? I want to shrink the C drive, but the Shrink button is greyed out.
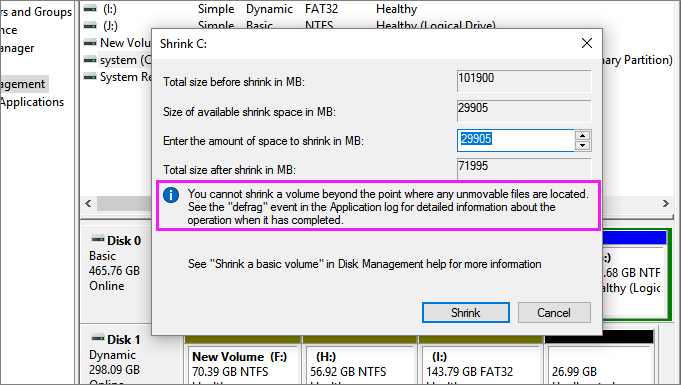
Disk Management won’t allow me to shrink or decrease C drive with an error message, saying that ‘You cannot shrink a volume beyond the point where any unmovable files are located. See the ‘defrag’ event in the Application log for detailed information about the operation where it has completed.’ Can you help me to fix the cannot shrink volume in Windows 10 issue? Thank you.»
Why Can’t Shrink Volume in Disk Management on Windows 11/10
To fix this issue effectively, it’s highly necessary to understand what causes unable to shrink C drive error. Here are the major reasons that disable you from shrinking partitions on Windows PC:
- There are unmovable files at the very end of the volume, such as the hibernation file, page files, and system volume information folder used by the System Restore.
- Not enough space for shrinking with error messages «There is not enough space available on the disk(s) to complete this operation.».
- Existing fragments separate files saved on the device.
- File system error causes volume, partition inaccessible, or invisible.
- Your partition type is FAT 32. Both Shrink and Extend Volume support NTFS partition only. You can’t shrink FAT32 volume.
Any of the factors will lead to the cannot shrink volume Windows 10 problem. In these cases, how to shrink volume or how to shrink C drive? Don’t fret. This article will learn to use a professional partition management tool to shrink volumes when Disk Management is not available. Moreover, we will also provide you effective methods to make the Shrink Volume option work again.
How to Shrink Volume with EaseUS Partition Management Free Tool
When you failed to shrink volume due to unmovable files or file system issues, don’t worry. You can use third-party free software to partition hard drive to overcome the limitation of Microsoft technology. Powerful Disk Management alternative freeware — EaseUS Partition Master Free can help you easily shrink C drive in Windows 10/8/7 with simple clicks.
Download this user-friendly free disk management tool and learn how to shrink partitions with simple steps.
Step 1: Locate and select target partition to shrink
Go to the Partition Manager section, right-click on the partition that you want to shrink and select «Resize/Move».
Step 2: Adjust to shrink partition
Use your mouse to drag the end of the target partition to shrink partition space.
You can also adjust the partition size box to shrink the target partition. Once done, click «OK» to continue.
Step 3: Execute operation
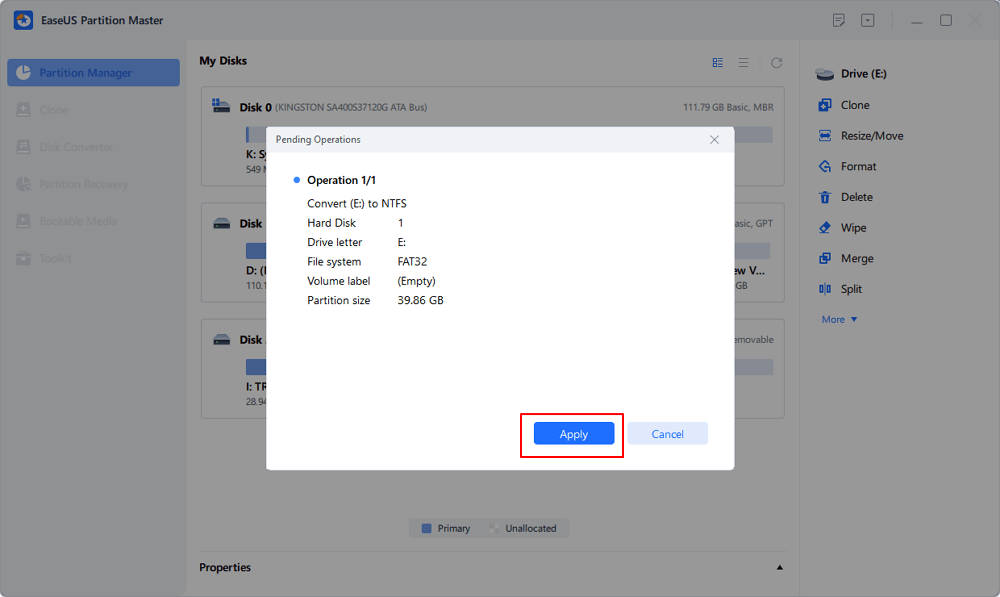
Click the «Execute Task» button and «Apply» to keep all changes.
EaseUS Partition Master Free makes it effortless to partition hard drives in Windows 10. Check the following video and learn to resize C drive, allocate space from one drive to another, delete partition, and more.
How to Fix Can’t Shrink Volume Error So That You Can Shrink C Drive
Before you shrink partitions, you should check how much available space you have on your disk so that you can avoid not enough space error if you manually resize your partitions. If there is enough space, but you still can’t shrink, take the following different solutions for different problems.
1. Convert FAT32 to NTFS to Solve FAT32 Partitions Can’t Shrink Problem
The easiest and quickest way to convert FAT32 to NTFS is using EaseUS Partition Master Free and finish the conversion with one-click. After converting, the cannot shrink volume problem won’t appear, and you can start to shrink your partitions in Disk Management.
Step 1. Install and launch EaseUS Partition Master on your computer.
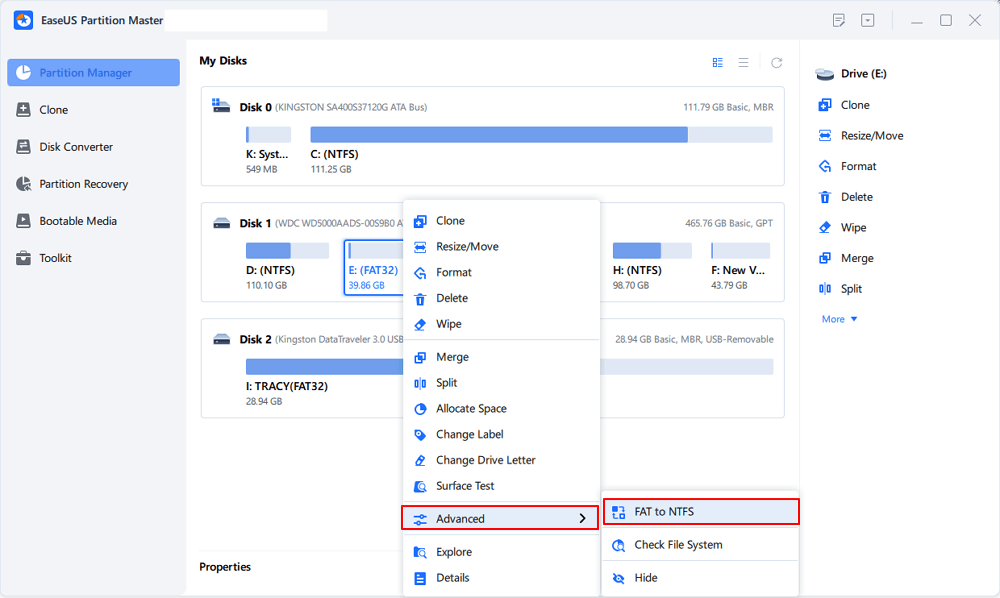
Step 2. On Partition Manager, right-click on a FAT32 partition and click «Advanced», select «NTFS to FAT».
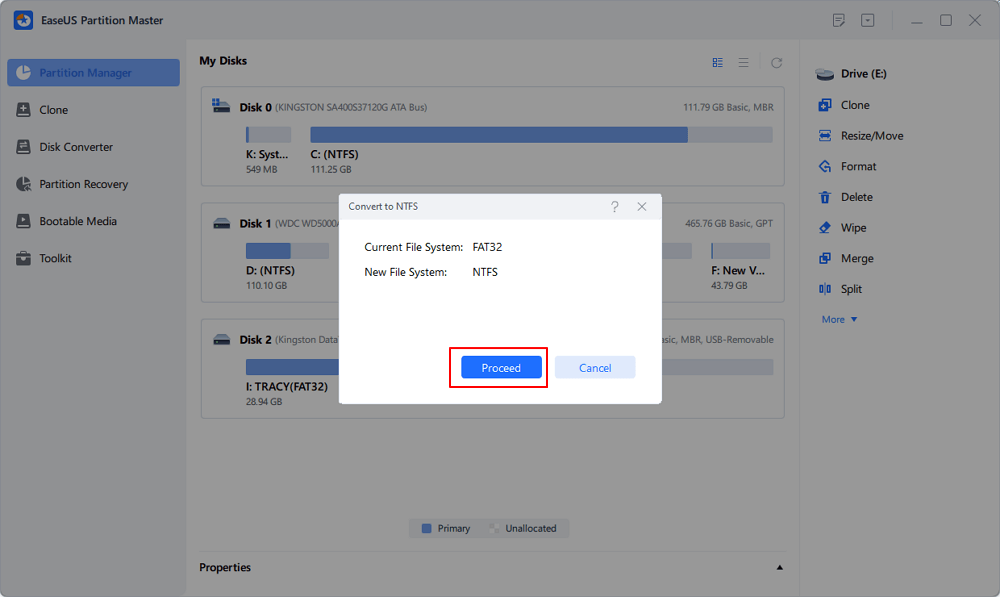
Step 3. Click «Proceed» on the pop-up dialog box to continue.
Step 4. Click «Apply» to start the converting process. Wait until the operation process is finished.
2. Defragment and Check Disk Error to Fix Windows Unable to Shrink Volume
Another method to fix the can’t shrink volume issue in Windows 10, 8, or 7 is to defragment and check disk error.
Note: To resolve this issue, you need to sign in to Windows 10/8/7 with your administrator account.
Defragment hard drive partition
Step 1. Click «Start» > Select «File Explorer».
Step 2. Expand This PC tree on the left pane, right-click «Local Disk (C:)» or other partition which can’t be shrunk in Windows PC.
Step 3. Select «Properties» > Go to the «Tools» tab and click «Optimize» under the Optimize and defragment drive section.
Step 4. Select the system drive (C) box on the Optimize Drives box, click «Analyze».
Wait until Windows completes the analysis and displays the percentage of the fragmented files in the selected drive.
Check and fix disk file system errors
If the number of bad clusters detected by dynamic bad-cluster remapping is too high, you’ll not be able to shrink the partition. So to perform a disk check and repair all file system errors is your next move:
Step 1. Right-click on the drive or partition, which can’t be shrunk in Windows PC, and select «Properties».
Step 2. Go to the Tools tab, click the Check button under «Error checking».
Wait to let the process complete and fix the drive for file system error.
3. Disable the Unmovable Files to Fix Cannot Shrink a Volume Beyond the Point
Windows won’t let you shrink the volume because there are immovable system files at the very end of the volume, like page file, hibernation file, or system volume information folder.
The fix is to temporarily disable hibernation, the Paging file, as well as the System Restore feature. Once disabled these features, restart Windows and resize (shrink) the volume using Disk Management.
Disable System Restore
Step 1. Launch systempropertiesprotection.exe from the Run dialog.
Step 2. Select the system drive and click «Configure».
Step 3. Click «Disable system protection» and then click OK.
Disable hibernation file
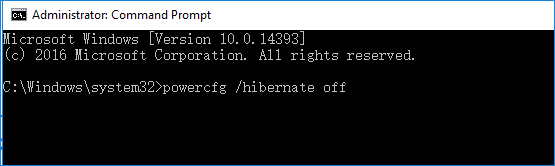
Step 1. Click on Start, type cmd, and then right-click on Command Prompt to select «Run as administrator».
Step 2. Run the following command: powercfg /hibernate off. This will turn off the hibernate feature and clear the hiberfil.sys from the system drive.
Disable paging file
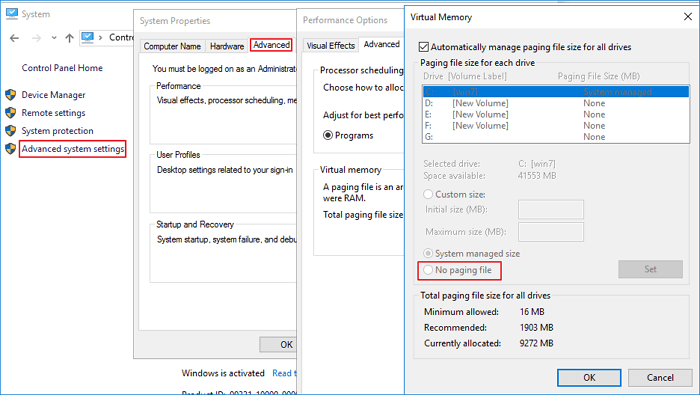
Step 1. Launch systempropertiesadvanced.exe from the Run dialog.
Step 2. Click the «Advanced» tab. Under Performance, click «Settings», click the «Advanced» tab, then click the «Change» button.
Step 3. Select «No paging file», and click «Set».
Or you can also disable kernel memory dump.
In the same Advanced Settings, go to «Startup and Recovery» > «Settings». Change the Write debugging information drop-down to «None» to disable the kernel memory dump.
Sum Up
By following the provided methods on this page, you can effectively resolve the can’t shrink volume issue on Windows 11/10. We highly recommend you try EaseUS Partition Master Free to manage and optimize your disk partitions to extend your computer’s life and capability.
Can’t Shrink Volume Windows 11/10 FAQs
Here are more relevant topics about cannot shrink volume Windows 11/10. Find solutions if you also have these questions.
Why can’t I shrink volume more?
Why can I not shrink my partition? There are several possible reasons:
- FAT32 partitions can’t be shrank.
- Not enough free space
- File system or other error
- Unmovable files are located
How do you fix cannot shrink a volume beyond the point?
When you use the Disk Management in Windows 10 to shrink a volume, you may see an error message «You cannot shrink a volume beyond the point where any unmovable files are located. See the «defrag» event in the Application log for detailed information about the operation when it has completed.».
It’s usually the pagefile.sys (an unmovable file), hiberfil.sys hibernation file or System Volume Information folder used by the System Restore feature prevents you from shrinking the drive beyond a point.
To fix «You cannot shrink a volume beyond the point» when shrinking the partition, you can try:
- Disabling System Restore.
- Disabling the hibernation feature.
- Disabling the Paging file.
How do I shrink a volume in Windows 11/10?
The simplest way to shrink a volume in Windows 10 is using EaseUS partition management software. It allows you to shrink C drive or any other partition by easy drag-and-drop.
Step 1. Open EaseUS Partition Master, right-click on the partition that you want to shrink and select «Resize/Move».
Step 2. You can use your mouse to drag one of its ends to shrink partition space. Or you can also adjust the partition size box to shrink the target partition. Then, click «OK».
Step 3. Click the «Execute Operation» button and «Apply» to keep all changes.
How long does it take to shrink a volume Windows 11/10?
It’s very quick to shrink a partition. The amount of time it takes also depends on how much data you store in your partition.
When you happen to meet the ‘can’t shrink volume Windows 10’ issue, here is the free EaseUS disk manager and other solutions you can try:
«Hi guys, do you know why Windows 10 cannot shrink volume? It doesn’t allow me to shrink C: drive on my laptop? I want to shrink the C drive, but the Shrink button is greyed out.
Disk Management won’t allow me to shrink or decrease C drive with an error message, saying that ‘You cannot shrink a volume beyond the point where any unmovable files are located. See the ‘defrag’ event in the Application log for detailed information about the operation where it has completed.’ Can you help me to fix the cannot shrink volume in Windows 10 issue? Thank you.»
Why Can’t Shrink Volume in Disk Management on Windows 11/10
To fix this issue effectively, it’s highly necessary to understand what causes unable to shrink C drive error. Here are the major reasons that disable you from shrinking partitions on Windows PC:
- There are unmovable files at the very end of the volume, such as the hibernation file, page files, and system volume information folder used by the System Restore.
- Not enough space for shrinking with error messages «There is not enough space available on the disk(s) to complete this operation.».
- Existing fragments separate files saved on the device.
- File system error causes volume, partition inaccessible, or invisible.
- Your partition type is FAT 32. Both Shrink and Extend Volume support NTFS partition only. You can’t shrink FAT32 volume.
Any of the factors will lead to the cannot shrink volume Windows 10 problem. In these cases, how to shrink volume or how to shrink C drive? Don’t fret. This article will learn to use a professional partition management tool to shrink volumes when Disk Management is not available. Moreover, we will also provide you effective methods to make the Shrink Volume option work again.
How to Shrink Volume with EaseUS Partition Management Free Tool
When you failed to shrink volume due to unmovable files or file system issues, don’t worry. You can use third-party free software to partition hard drive to overcome the limitation of Microsoft technology. Powerful Disk Management alternative freeware — EaseUS Partition Master Free can help you easily shrink C drive in Windows 10/8/7 with simple clicks.
Download this user-friendly free disk management tool and learn how to shrink partitions with simple steps.
Step 1: Locate and select target partition to shrink
Go to the Partition Manager section, right-click on the partition that you want to shrink and select «Resize/Move».
Step 2: Adjust to shrink partition
Use your mouse to drag the end of the target partition to shrink partition space.
You can also adjust the partition size box to shrink the target partition. Once done, click «OK» to continue.
Step 3: Execute operation
Click the «Execute Task» button and «Apply» to keep all changes.
EaseUS Partition Master Free makes it effortless to partition hard drives in Windows 10. Check the following video and learn to resize C drive, allocate space from one drive to another, delete partition, and more.
How to Fix Can’t Shrink Volume Error So That You Can Shrink C Drive
Before you shrink partitions, you should check how much available space you have on your disk so that you can avoid not enough space error if you manually resize your partitions. If there is enough space, but you still can’t shrink, take the following different solutions for different problems.
1. Convert FAT32 to NTFS to Solve FAT32 Partitions Can’t Shrink Problem
The easiest and quickest way to convert FAT32 to NTFS is using EaseUS Partition Master Free and finish the conversion with one-click. After converting, the cannot shrink volume problem won’t appear, and you can start to shrink your partitions in Disk Management.
Step 1. Install and launch EaseUS Partition Master on your computer.
Step 2. On Partition Manager, right-click on a FAT32 partition and click «Advanced», select «NTFS to FAT».
Step 3. Click «Proceed» on the pop-up dialog box to continue.
Step 4. Click «Apply» to start the converting process. Wait until the operation process is finished.
2. Defragment and Check Disk Error to Fix Windows Unable to Shrink Volume
Another method to fix the can’t shrink volume issue in Windows 10, 8, or 7 is to defragment and check disk error.
Note: To resolve this issue, you need to sign in to Windows 10/8/7 with your administrator account.
Defragment hard drive partition
Step 1. Click «Start» > Select «File Explorer».
Step 2. Expand This PC tree on the left pane, right-click «Local Disk (C:)» or other partition which can’t be shrunk in Windows PC.
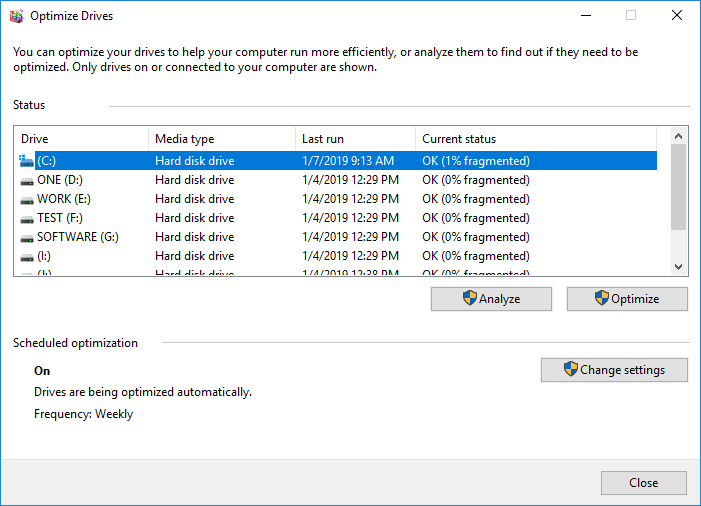
Step 3. Select «Properties» > Go to the «Tools» tab and click «Optimize» under the Optimize and defragment drive section.
Step 4. Select the system drive (C) box on the Optimize Drives box, click «Analyze».
Wait until Windows completes the analysis and displays the percentage of the fragmented files in the selected drive.
Check and fix disk file system errors
If the number of bad clusters detected by dynamic bad-cluster remapping is too high, you’ll not be able to shrink the partition. So to perform a disk check and repair all file system errors is your next move:
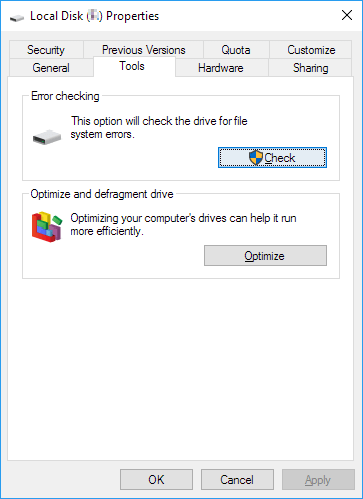
Step 1. Right-click on the drive or partition, which can’t be shrunk in Windows PC, and select «Properties».
Step 2. Go to the Tools tab, click the Check button under «Error checking».
Wait to let the process complete and fix the drive for file system error.
3. Disable the Unmovable Files to Fix Cannot Shrink a Volume Beyond the Point
Windows won’t let you shrink the volume because there are immovable system files at the very end of the volume, like page file, hibernation file, or system volume information folder.
The fix is to temporarily disable hibernation, the Paging file, as well as the System Restore feature. Once disabled these features, restart Windows and resize (shrink) the volume using Disk Management.
Disable System Restore
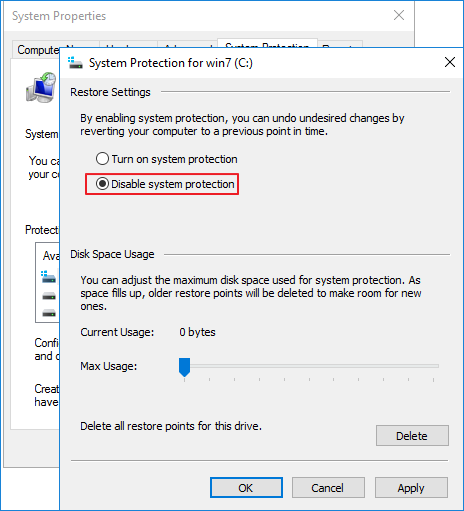
Step 1. Launch systempropertiesprotection.exe from the Run dialog.
Step 2. Select the system drive and click «Configure».
Step 3. Click «Disable system protection» and then click OK.
Disable hibernation file
Step 1. Click on Start, type cmd, and then right-click on Command Prompt to select «Run as administrator».
Step 2. Run the following command: powercfg /hibernate off. This will turn off the hibernate feature and clear the hiberfil.sys from the system drive.
Disable paging file
Step 1. Launch systempropertiesadvanced.exe from the Run dialog.
Step 2. Click the «Advanced» tab. Under Performance, click «Settings», click the «Advanced» tab, then click the «Change» button.
Step 3. Select «No paging file», and click «Set».
Or you can also disable kernel memory dump.
In the same Advanced Settings, go to «Startup and Recovery» > «Settings». Change the Write debugging information drop-down to «None» to disable the kernel memory dump.
Sum Up
By following the provided methods on this page, you can effectively resolve the can’t shrink volume issue on Windows 11/10. We highly recommend you try EaseUS Partition Master Free to manage and optimize your disk partitions to extend your computer’s life and capability.
Can’t Shrink Volume Windows 11/10 FAQs
Here are more relevant topics about cannot shrink volume Windows 11/10. Find solutions if you also have these questions.
Why can’t I shrink volume more?
Why can I not shrink my partition? There are several possible reasons:
- FAT32 partitions can’t be shrank.
- Not enough free space
- File system or other error
- Unmovable files are located
How do you fix cannot shrink a volume beyond the point?
When you use the Disk Management in Windows 10 to shrink a volume, you may see an error message «You cannot shrink a volume beyond the point where any unmovable files are located. See the «defrag» event in the Application log for detailed information about the operation when it has completed.».
It’s usually the pagefile.sys (an unmovable file), hiberfil.sys hibernation file or System Volume Information folder used by the System Restore feature prevents you from shrinking the drive beyond a point.
To fix «You cannot shrink a volume beyond the point» when shrinking the partition, you can try:
- Disabling System Restore.
- Disabling the hibernation feature.
- Disabling the Paging file.
How do I shrink a volume in Windows 11/10?
The simplest way to shrink a volume in Windows 10 is using EaseUS partition management software. It allows you to shrink C drive or any other partition by easy drag-and-drop.
Step 1. Open EaseUS Partition Master, right-click on the partition that you want to shrink and select «Resize/Move».
Step 2. You can use your mouse to drag one of its ends to shrink partition space. Or you can also adjust the partition size box to shrink the target partition. Then, click «OK».
Step 3. Click the «Execute Operation» button and «Apply» to keep all changes.
How long does it take to shrink a volume Windows 11/10?
It’s very quick to shrink a partition. The amount of time it takes also depends on how much data you store in your partition.
71 / 71 / 58
Регистрация: 12.12.2013
Сообщений: 420
1
Не могу сжать том
09.08.2015, 21:36. Показов 23985. Ответов 6

Здравствуйте! Собственно, хотел сжать том, чтобы установить рядом другую ОС. Проблема в том, что возможно сжать не более 221 мб. Это очень мало. Исходя из того, что Свободного места на этом разделе 322 Гб (общий 688 Гб.).
Предыстория: До самого процесса сжатия я сделал дефрагментацию (было фрагментировано 7%), но на пятом проходе программа висела очень долго, больше 3 часов, при этом показывая 0% (Ах да, до фрагментации я удалил ненужные файлы и почистил мусор, что дало мне 312 Гб свободного места). Я сделал отмену, после чего не досчитался 11 Гб. Далее решил снова дефрагментировать, но на этот раз все прошло быстрее, но память не вернулась.
И вот, плюнув на этот кусок памяти, решил сжать сколько есть. Но 221 мб доступной памяти слишком мало.
Поудалял еще кучу файлов, в том числе точки восстановления (+уменьшил размер зарезервированного места с 20 Гб до 6), но это не решило мою проблему.
Я так подразумеваю, что дефрагментатор скопировал данные в конец диска, а когда я отменил операцию,то она «забыла» про них.
Что делать, люди добрые?
__________________
Помощь в написании контрольных, курсовых и дипломных работ, диссертаций здесь
0
 Начиная с Vista и 7, операционная система Windows обладает функцией, которая позволяет сжать (или расширить) размеры основного раздела и логических дисков. Эта возможность может быть полезной, если вы окажитесь в ситуации, когда вам потребуется дополнительный раздел и вам не хватает дополнительных дисков. Выполнив сжатие тома, вы освободите место на диске; это незанятое пространство затем можно будет использовать для создания других необходимых разделов. Сегодня мы узнаем, как сжать базовый том или раздел, используя графический интерфейс Windows, а для более продвинутых пользователей мы также опишем метод с использованием командной строки.
Перед началом, убедитесь, что вы сделали резервную копию всех важных данных.
Сжатие тома или раздела с помощью инструмента «Управление дисками»
Если у вас Windows 7, перейдите в меню «Пуск», в поле поиска введите «управление дисками» и нажмите Enter. Если вы являетесь пользователем Windows 8.x, щелкните правой кнопкой мыши в левом нижнем углу экрана (или нажмите сочетание клавиш Win + X) и выберите «Управление дисками».

«Управление дисками» – это место, где вы найдете все диски, подключенные к вашему компьютеру (жесткие диски, USB-накопители, CD / DVD и т.д.)

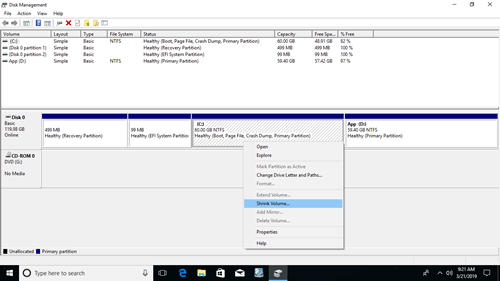
Выберите основной раздел, который требуется сжать, щелкните по нему правой кнопкой мыши и выберите «Сжать».

В результате операционная система начнет процесс определения доступного места для сжатия.

Укажите объем пространства, который вы бы хотели вернуть и нажмите «Сжать». Помните, что количество пространства вводится в мегабайтах: например, 1 ГБ равен 1024 МБ.

Освобожденное (или незанятое) таким образом пространство вы сможете использовать для создания нового раздела.
Сжатие тома или раздела с помощью командной строки
Для открытия командной строки в Windows 7 перейдите в меню «Пуск», введите «cmd», в результатах поиска щелкните правой кнопкой мыши на cmd.exe и выберите «Запуск от имени администратора». В Windows 8.x щелкните правой кнопкой мыши в левом нижнем углу экрана и выберите «Командная строка (администратор)».
Введите diskpart и нажмите Enter.

В строке DISKPART введите list volume. Эта команда отобразит список всех дисков на компьютере.

Теперь введите команду select volume и номер тома, который вы хотите сжать. Например, введите select volume 1 и нажмите Enter.

Введите shrink querymax и нажмите Enter. Эта команда позволит Windows определить максимальный объем пространства, который может быть сжат.

Теперь у вас есть два варианта: во-первых, можно просто ввести shrink, и тогда Windows сожмет все доступное пространство; во-вторых, вы можете указать желаемый объем для сжатия. Во втором случае нужно ввести команду shrink desired=объем_в_мегабайтах (например, shrink desired=2048). Вы можете ввести любое число, которое не превышает значение, указанное в строке «Максимальное количество повторно используемых байт». Таким образом, с помощью этой команды вы можете указать точное количество места, которое нужно сжать.

Если вы все сделаете правильно, то после завершения операции вы увидите сообщение:
DiskPart успешно выполнил сокращение тома на: число_в_мегабайтах
На этом все! Чтобы правильно завершить работу DISKPART, введите exit и нажмите Enter.
Что следует учесть:
- При попытке сжать основной раздел или логический диск, вы не сможете сжать раздел дальше области расположения неперемещаемых файлов (например, область хранения теневой копии, гибернации, файлов подкачки и т.д.) Предположим, если на диске с Windows имеется «первое» пустое пространство, а затем идут неперемещаемые файлы, после которых следует «второе» пустое пространство, вы сможете сжать раздел только до конца второго пустого пространства, так как в середине находятся неперемещаемые файлы.
- Если будет обнаружено большое количество поврежденных кластеров, сжатие завершится ошибкой.
- Вы можете использовать сжатие для основных разделов и логических дисков или разделов с файловой системой NTFS.
Отличного Вам дня!
При попытке сжать том в Windows 7 (“Панель управления” – “Создание и форматирование разделов жесткого диска”) я столкнулся с проблемой, что Windows не хочет сжимать диск объемом 500 Гб, на котором свободно 300 Гб. Выдает сообщение: “для сжатия тома доступно 0 Мб”. Такая проблема возникает из-за того, что данные на диске фрагментированы, т.е. разбросаны по разным частям жесткого диска, кроме того, в разных местах диска могут располагаться неперемещаемые системные файлы, такие как MFT (Master File Table), pagefile, hibernate file, NTFS metadata, exclusively locked files, System Restore Points. Вот, как мне удалось решить эту проблему. Кстати, те же самые инструменты можно применять и к другим версиям Windows:
- Сначала я запустил программу “Очистка диска” и перезагрузил компьютер. Я отмечал галочками все пункты. Программа работала около часа, включая перезагрузку компьютера. В результате добавилось всего 50 Мб доступных для сжатия. Немного, не правда ли? Ну да ладно, курочка по зернышку клюет.
- Установил бесплатную программу дефрагментации диска Auslogics Disk Defrag Free. Программа работала около 40 минут. После дефрагментации этой программой у меня стало доступно 50 Гб для сжатия. Очень хорошо, но все-таки мало!
- Установил и запустил бесплатную программу дефрагментации Power Defragmenter. Программа работала тоже минут 40. К сожалению, эта программа не добавила никакого дополнительного места доступного для сжатия. Возможно, вам повезет больше. Попробуйте запустить ее, если все другие средства не дадут желаемого результата.
- Попробовал решить проблему при помощи программы управления дисками partition manager EaseUs. Провозился 30 минут, но результат не получил, хотя в Интернете видел хорошие отзывы. Да и сама программа мне не понравилась.
- Далее я скачал и запустил программу PerfectDisk® Pro. Программа платная, но первые 30 дней бесплатны. В этой программе есть специальная функция подготовки диска к сжатию “Prep for Shrink”, которая переносит все файлы в начала диска. Кроме того, эта программа умеет перемещать файлы MFT. Как написано в описании функции Prep for Shrink, ее цель – не оптимизация и дефрагментация, а высвобождение максимального пространства, и она может приводить к фрагментации диска. Поэтому лучше сначала запускать эту стратегию, потом сжимать диск и создавать новый раздел, а только после этого оптимизировать и дефрагментировать раздел C. Программа у меня работала уже привычные 40 минут. Но свободного для сжатия места это не добавило, т.е. можно было просто запустить программу дефрагментации Auslogics Disk Defrag и на этом поставить точку с тем же результатом. Однако на этом этапе мне стало ясно, в чем проблема. На схеме жесткого диска из программы Perfect Disk видно, что неперемещаемые системные файлы, которые выделены коричневым цветом, расположены на жестком диске, начиная с середины и до его конца. Ну и гадость, эта ваша Windows!


Тут мне стало ясно, что надо постараться переместить все эти файлы в начало жесткого диска или просто удалить. Делал я это так:
- отключил “Восстановление системы” и при этом удалил все точки восстановления (Контрольная панель – Система – Защита системы – Настроить – Отключить защиту системы);
- отключил файл подкачки pagefile (Контрольная панель – Система – Дополнительные параметры системы – Дополнительно – Быстродействие – Параметры – Дополнительно – Изменить – Без файла подкачки);
- отключил запись отладочной информации (Контрольная панель – Система – Дополнительные параметры системы – Дополнительно – Загрузка и восстановление – Параметры – Запись отладочной информации – Нет (было – Дамп ядра));
- отключил режим гибернации. Как отключить и снова включить режим гибернации;
- перезагрузил компьютер. И тем самым удалил файл подкачки (c:pagefile.sys) и файл гибернации (c:hiberfil.sys). Чтобы проверить это, надо зайти в “Панель управления” – “Параметры папок” и поставить галочку “Показывать скрытые файлы, папки и диски” и снять галочку “Скрывать защищенные системные файлы”. Тем самым можно разрешить отображение срытых файлов и убедиться, что эти два файла исчезли.
К сожалению, принятые меры результата тоже не дали, и к сжатию так и осталось доступно всего 50 Гб. Поэтому я проделал все описанные в этом пункте шаги в обратном порядке, только режим гибернации включать обратно не стал.
Так что же реально помогло быстро и полностью решить проблему сжатия диска C с установленной на нем операционной системой Windows?
Бесплатная программа для управления дисками, отличная замена штатному инструменту Windows: Partition Wizard Home Edition. Всего за 15 минут жесткий диск был разбит на два равных раздела каждый из них размером 250 Гб. Проблема решена! Начинайте с этой программы, а потом дефрагментируйте диск при помощи Auslogic.
Если же последний способ не даст быстрого результата, то лучше переписать все важные данные с вашего компьютера в надежное место, т.е. сделать бэкап и просто заново переустановить Windows, и только потом сжать диск. В этом случае проблем со сжатием не возникнет. А учитывая, сколько времени я потратил на решение проблемы сжатия, в следующий раз я лучше сразу буду переустанавливать Windows. А если вы ставите второй операционной системой один из дистрибутивов Linux, то решение еще проще – полностью удалять Windows во время установки Linux. В этом случае временные затраты будут минимальны! При решении проблемы я руководствовался информацией из следующих статей:

- Working Around Windows Vista’s “Shrink Volume” Inadequacy Problems;
- How To Extend System Partition In Windows 8.1.
- Disable System Restore in Windows 7 or Vista.
- Understanding the Windows Pagefile and Why You Shouldn’t Disable It.
- What is hiberfil.sys and How Do I Delete It?