13 апреля, 2017
27 мая, 2017
Дано
ПК или ноутбук с предустановленной ОС Windows 10 и с неразмеченным жестким диском, а точнее с наличим всего одного диска С:
При попытке сжать том, для создания дополнительных дисков возникает ошибка:
|
Windows 10 невозможно сжать том дальше области расположения неперемещаемых файлов |
Анализ проблемы
В журнале Windows “Приложение” ищем событие с источником Defrag видим что-то вида:
|
Анализ сжатия тома начат для тома Windows (C:). Эта запись журнала событий содержит сведения о последнем неперемещенном файле, который мог ограничить максимальное число повторно используемых байт. Сведения диагностики: — Последний неперемещенный файл: System Volume Information{...}{...}::$DATA — Последний кластер файла: 0x74f0efb — Потенциальный целевой объект сжатия (адрес LCN): 0x89bab2 — Флаги NTFS файла: ——AD — Этап сжатия: <analysis> Для получения дополнительных сведений об этом файле используйте команду «fsutil volume querycluster \?Volume{f9ceabe5-0000-0000-0000-f01500000000} 0x74f0efb». |
После чтения информации о понятии неперемещаемых файлов Wondows 10 выяснилось, что они в некоторых случаях препятствуют сжатию тома (и обычная дефрагментация тут не поможет). К таким файлам относятся: подкачка, файлы гибернации и точки восстановление.
Решение
Необходимо проделать следующее:
- Отключаем подкачку на целевом диске
- Отключаем гибернацию
|
powercfg /H off потом после всех операци powercfg /H on (если конечно вам она нужна) |
- удаляем в панели управления точки восстановления (если у вас есть проблемы в работе ОС, то советую сначала их устранить, так как удаление точек восстановления сделает недоступным некоторые механизмы восстановления ОС).
После проделанного, сжатие тома станет доступным, и можно включить отключенные функции обратно.
P.S. Конечно же проще всего делать сжатие томов при первом запуске, непосредственно после приобретения ПК или ноутбука, тогда все действия описанные выше могут не потребоваться совсем.
When you happen to meet the ‘can’t shrink volume Windows 10’ issue, here is the free EaseUS disk manager and other solutions you can try:
«Hi guys, do you know why Windows 10 cannot shrink volume? It doesn’t allow me to shrink C: drive on my laptop? I want to shrink the C drive, but the Shrink button is greyed out.
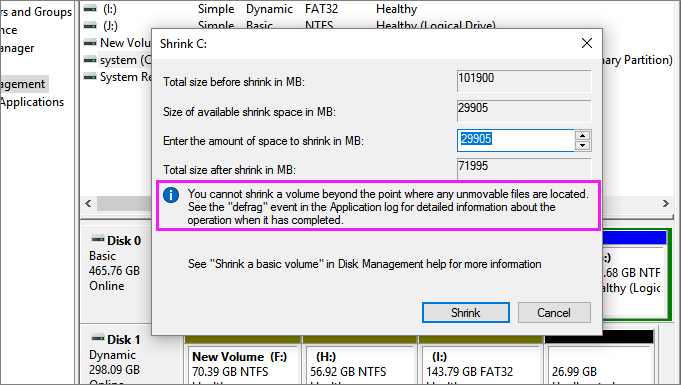
Disk Management won’t allow me to shrink or decrease C drive with an error message, saying that ‘You cannot shrink a volume beyond the point where any unmovable files are located. See the ‘defrag’ event in the Application log for detailed information about the operation where it has completed.’ Can you help me to fix the cannot shrink volume in Windows 10 issue? Thank you.»
Why Can’t Shrink Volume in Disk Management on Windows 11/10
To fix this issue effectively, it’s highly necessary to understand what causes unable to shrink C drive error. Here are the major reasons that disable you from shrinking partitions on Windows PC:
- There are unmovable files at the very end of the volume, such as the hibernation file, page files, and system volume information folder used by the System Restore.
- Not enough space for shrinking with error messages «There is not enough space available on the disk(s) to complete this operation.».
- Existing fragments separate files saved on the device.
- File system error causes volume, partition inaccessible, or invisible.
- Your partition type is FAT 32. Both Shrink and Extend Volume support NTFS partition only. You can’t shrink FAT32 volume.
Any of the factors will lead to the cannot shrink volume Windows 10 problem. In these cases, how to shrink volume or how to shrink C drive? Don’t fret. This article will learn to use a professional partition management tool to shrink volumes when Disk Management is not available. Moreover, we will also provide you effective methods to make the Shrink Volume option work again.
How to Shrink Volume with EaseUS Partition Management Free Tool
When you failed to shrink volume due to unmovable files or file system issues, don’t worry. You can use third-party free software to partition hard drive to overcome the limitation of Microsoft technology. Powerful Disk Management alternative freeware — EaseUS Partition Master Free can help you easily shrink C drive in Windows 10/8/7 with simple clicks.
Download this user-friendly free disk management tool and learn how to shrink partitions with simple steps.
Step 1: Locate and select target partition to shrink
Go to the Partition Manager section, right-click on the partition that you want to shrink and select «Resize/Move».
Step 2: Adjust to shrink partition
Use your mouse to drag the end of the target partition to shrink partition space.
You can also adjust the partition size box to shrink the target partition. Once done, click «OK» to continue.
Step 3: Execute operation
Click the «Execute Task» button and «Apply» to keep all changes.
EaseUS Partition Master Free makes it effortless to partition hard drives in Windows 10. Check the following video and learn to resize C drive, allocate space from one drive to another, delete partition, and more.
How to Fix Can’t Shrink Volume Error So That You Can Shrink C Drive
Before you shrink partitions, you should check how much available space you have on your disk so that you can avoid not enough space error if you manually resize your partitions. If there is enough space, but you still can’t shrink, take the following different solutions for different problems.
1. Convert FAT32 to NTFS to Solve FAT32 Partitions Can’t Shrink Problem
The easiest and quickest way to convert FAT32 to NTFS is using EaseUS Partition Master Free and finish the conversion with one-click. After converting, the cannot shrink volume problem won’t appear, and you can start to shrink your partitions in Disk Management.
Step 1. Install and launch EaseUS Partition Master on your computer.
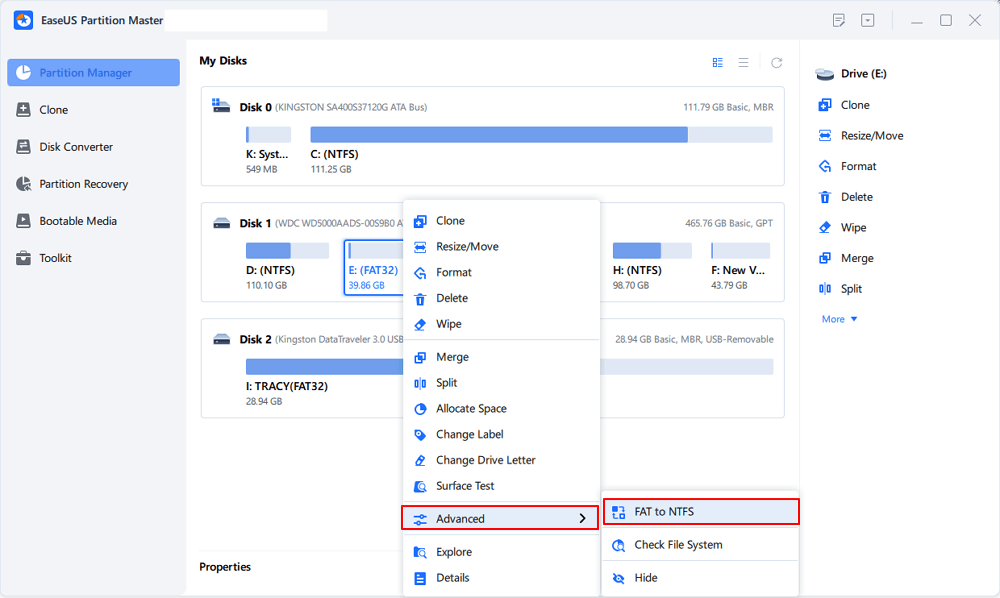
Step 2. On Partition Manager, right-click on a FAT32 partition and click «Advanced», select «NTFS to FAT».
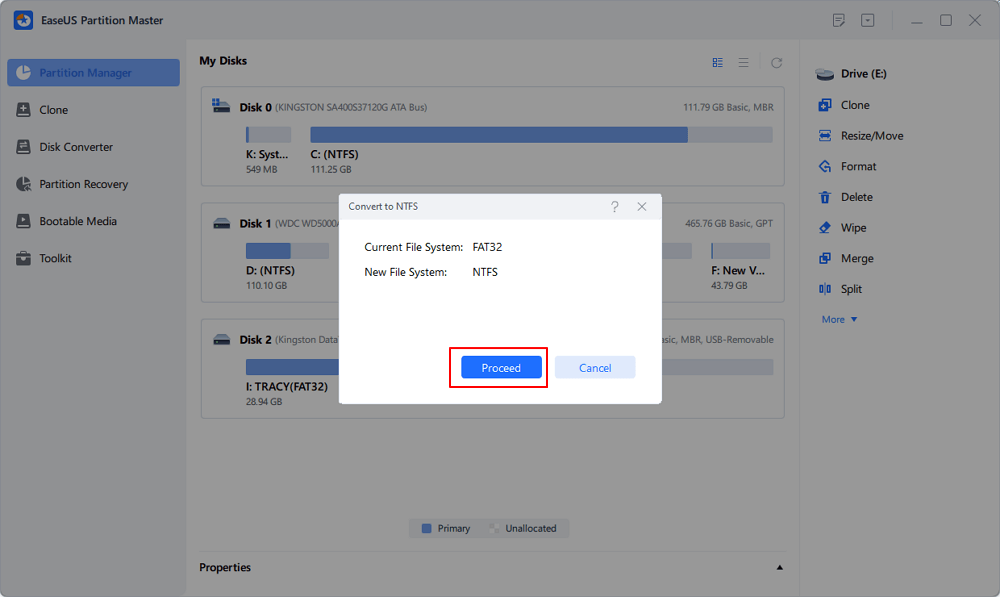
Step 3. Click «Proceed» on the pop-up dialog box to continue.
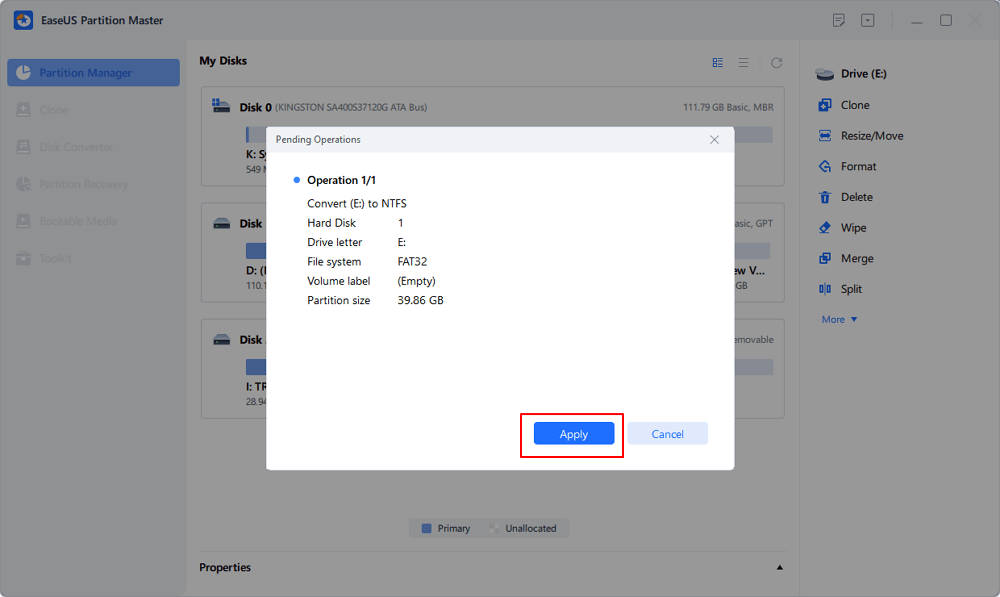
Step 4. Click «Apply» to start the converting process. Wait until the operation process is finished.
2. Defragment and Check Disk Error to Fix Windows Unable to Shrink Volume
Another method to fix the can’t shrink volume issue in Windows 10, 8, or 7 is to defragment and check disk error.
Note: To resolve this issue, you need to sign in to Windows 10/8/7 with your administrator account.
Defragment hard drive partition
Step 1. Click «Start» > Select «File Explorer».
Step 2. Expand This PC tree on the left pane, right-click «Local Disk (C:)» or other partition which can’t be shrunk in Windows PC.
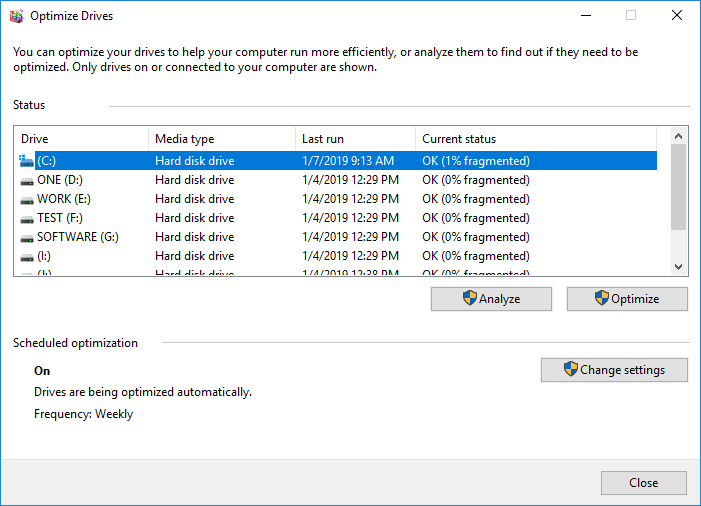
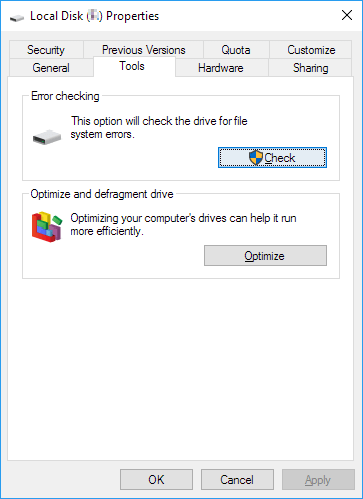
Step 3. Select «Properties» > Go to the «Tools» tab and click «Optimize» under the Optimize and defragment drive section.
Step 4. Select the system drive (C) box on the Optimize Drives box, click «Analyze».
Wait until Windows completes the analysis and displays the percentage of the fragmented files in the selected drive.
Check and fix disk file system errors
If the number of bad clusters detected by dynamic bad-cluster remapping is too high, you’ll not be able to shrink the partition. So to perform a disk check and repair all file system errors is your next move:
Step 1. Right-click on the drive or partition, which can’t be shrunk in Windows PC, and select «Properties».
Step 2. Go to the Tools tab, click the Check button under «Error checking».
Wait to let the process complete and fix the drive for file system error.
3. Disable the Unmovable Files to Fix Cannot Shrink a Volume Beyond the Point
Windows won’t let you shrink the volume because there are immovable system files at the very end of the volume, like page file, hibernation file, or system volume information folder.
The fix is to temporarily disable hibernation, the Paging file, as well as the System Restore feature. Once disabled these features, restart Windows and resize (shrink) the volume using Disk Management.
Disable System Restore
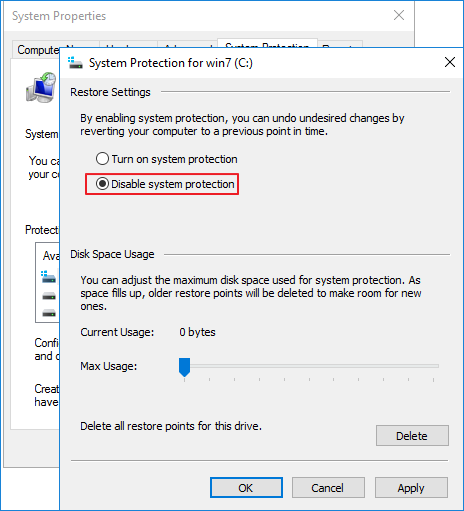
Step 1. Launch systempropertiesprotection.exe from the Run dialog.
Step 2. Select the system drive and click «Configure».
Step 3. Click «Disable system protection» and then click OK.
Disable hibernation file
Step 1. Click on Start, type cmd, and then right-click on Command Prompt to select «Run as administrator».
Step 2. Run the following command: powercfg /hibernate off. This will turn off the hibernate feature and clear the hiberfil.sys from the system drive.
Disable paging file
Step 1. Launch systempropertiesadvanced.exe from the Run dialog.
Step 2. Click the «Advanced» tab. Under Performance, click «Settings», click the «Advanced» tab, then click the «Change» button.
Step 3. Select «No paging file», and click «Set».
Or you can also disable kernel memory dump.
In the same Advanced Settings, go to «Startup and Recovery» > «Settings». Change the Write debugging information drop-down to «None» to disable the kernel memory dump.
Sum Up
By following the provided methods on this page, you can effectively resolve the can’t shrink volume issue on Windows 11/10. We highly recommend you try EaseUS Partition Master Free to manage and optimize your disk partitions to extend your computer’s life and capability.
Can’t Shrink Volume Windows 11/10 FAQs
Here are more relevant topics about cannot shrink volume Windows 11/10. Find solutions if you also have these questions.
Why can’t I shrink volume more?
Why can I not shrink my partition? There are several possible reasons:
- FAT32 partitions can’t be shrank.
- Not enough free space
- File system or other error
- Unmovable files are located
How do you fix cannot shrink a volume beyond the point?
When you use the Disk Management in Windows 10 to shrink a volume, you may see an error message «You cannot shrink a volume beyond the point where any unmovable files are located. See the «defrag» event in the Application log for detailed information about the operation when it has completed.».
It’s usually the pagefile.sys (an unmovable file), hiberfil.sys hibernation file or System Volume Information folder used by the System Restore feature prevents you from shrinking the drive beyond a point.
To fix «You cannot shrink a volume beyond the point» when shrinking the partition, you can try:
- Disabling System Restore.
- Disabling the hibernation feature.
- Disabling the Paging file.
How do I shrink a volume in Windows 11/10?
The simplest way to shrink a volume in Windows 10 is using EaseUS partition management software. It allows you to shrink C drive or any other partition by easy drag-and-drop.
Step 1. Open EaseUS Partition Master, right-click on the partition that you want to shrink and select «Resize/Move».
Step 2. You can use your mouse to drag one of its ends to shrink partition space. Or you can also adjust the partition size box to shrink the target partition. Then, click «OK».
Step 3. Click the «Execute Operation» button and «Apply» to keep all changes.
How long does it take to shrink a volume Windows 11/10?
It’s very quick to shrink a partition. The amount of time it takes also depends on how much data you store in your partition.
Иногда вам нужно сжать раздел диска C, например: вы забыли создать или отредактировать разделы при установке Windows, поэтому диск С занял все место на диске. В этом случае вам нужно сжать диск C, чтобы освободить место. Если на диске D заканчивается место, вы можете уменьшить размер диска C, чтобы расширить его. Если вы хотите обновить Windows, вам нужно уменьшить диск C до расширить системный зарезервированный раздел.
Чтобы сжать C диск в Windows 7/8/10, есть Сжать том функции в Управление дисками, но многие люди говорят, что они не может сжать диск C с помощью этого родного инструмента. В этой статье я объясню причины, по которым «Управление дисками» не может сжать диск C в Windows 10/8/7 и как легко решить эту проблему.
Почему нельзя сжать диск C Windows 10/8/7 с управлением дисками
Есть 3 распространенные причины, по которым вы не можете сжать диск C: Windows 10/8/7 с помощью инструмента управления дисками.
Причина 1. Несогласованное доступное пространство
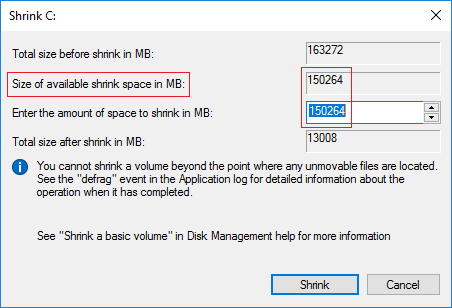
После появления сокращение раздела с функцией «Сжать том» Управление дисками вычислит используемое и доступное свободное пространство для уменьшения в первую очередь. Если вы не введете сумму самостоятельно, максимальный доступное пространство используется по умолчанию. На моем компьютере доступное количество места составляет 150264 МБ.
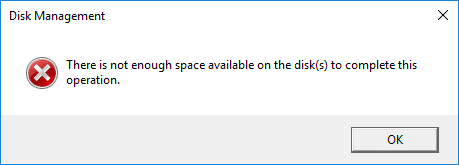
Как мы знаем, многие типы файлов постоянно записываются на диск C, поэтому доступное пространство может быть меньше 150264 МБ при нажатии кнопки «Уменьшить». Это означает, что вы не можете сжать диск C с исходным рассчитанным максимальным пространством. Я сделал это, и я получил сообщение об ошибке «Недостаточно свободного места на диске (дисках) для завершения этой операции.»
Причина 2. Неперемещаемые файлы
Устранить проблему, вызванную причиной 1, легко, но если вы столкнетесь со второй проблемой, вам понадобится профессиональное программное обеспечение для разбиения диска.
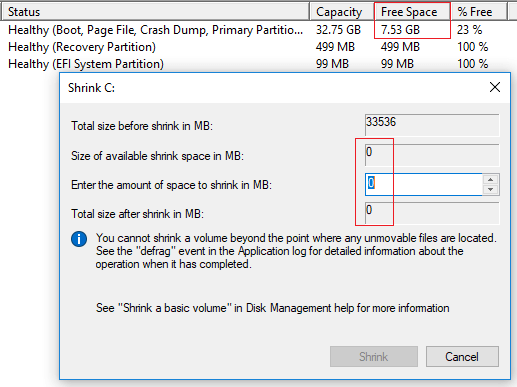
На другом моем тестовом компьютере я без проблем сжал диск C до меньшего размера, но когда я делаю это снова, Управление дисками показывает 0 доступных и Кнопка сжатия неактивна. Как видите, на диске C: все еще есть 7.53 ГБ свободного места, но Управление дисками не позволяет его уменьшить.
Вы заметили кончик посередине «Вы не можете сжать том за пределы точки, в которой находятся неподвижные файлы». Что это значит?
Например, диск C состоит из 4 блоков. Если неподвижные файлы находятся в блоке 3, вы не может сжать диск C на блок 2 или 1, хотя там есть свободное место. Неподвижные файлы включают файл подкачки, спящий режим и другие большие файлы.
Причина 3. Ошибка файловой системы
Все файлы в разделе управляются и организованы файловой системой. В Windows компьютер, NTFS и FAT32 являются наиболее распространенными файловыми системами, но обе могут быть повреждены по каким-либо причинам. На некоторых компьютерах пользователи не видят разницы в ежедневном использовании, но могут возникнуть большие проблемы, если они сожмут и увеличат этот раздел. Когда вы сжимаете диск C (и другие разделы), Управление дисками также определяет, есть ли что-то не так в файловой системе. Если да, кнопка «Сжать» также будет неактивна.
Что делать, если вы не можете сжать диск C в Windows 10/8/7
Если вы не можете сжать диск C в своем Windows 10/8/7 компьютер, следуйте соответствующему решению в соответствии с вашей конфигурацией разделов диска.
Решение 1: Введите меньшую сумму
Если вы получили сообщение об ошибке «недостаточно места» при сжатии диска C, запустите Shrink Volume еще раз, не используйте максимальное пространство по умолчанию, введите меньше сумма самостоятельно.
Решение 2: Запускать стороннее программное обеспечение
Если вы не можете сжать диск C в Windows 10/8/7 из-за неподвижных файлов запускайте стороннее программное обеспечение, такое как NIUBI Partition Editor. Он может перемещать эти неподвижные файлы, поэтому при желании он может уменьшить раздел до минимального размера. Имеется бесплатная версия для Windows 11/10/8/7/Пользователи домашних компьютеров Vista/XP. Лучше, чем Управление дисками, NIUBI может создавать нераспределенное пространство слева или справа при сжатии раздела.
В большинстве Windows компьютеры, диск C отформатирован в файловой системе NTFS. Если по каким-то причинам это FAT32, вы также должны запускать стороннее программное обеспечение, потому что Windows Управление дисками поддерживает только раздел NTFS.
Скачать NIUBI Partition Editor, вы увидите всю информацию о разделах диска и структуру справа, доступные операции перечислены слева и при щелчке правой кнопкой мыши.
Щелкните правой кнопкой мыши диск C и выберите «Изменить размер / переместить объем«, у вас есть два варианта во всплывающем окне:
① Если вы перетащите левая граница направо
Затем вы можете сжать диск C и освободить нераспределенное пространство на левая сторона.
② Если вы перетащите правая граница влево
Затем вы можете сжать диск C и освободить нераспределенное пространство на правая сторона.
Следуйте инструкциям, если хотите уменьшить C до расширить системный зарезервированный раздел или сжать C, чтобы расширить диск D.
Решение 3: Исправить ошибку файловой системы
Если вы не можете сжать раздел диска C в Windows 10/8/7 из-за ошибки файловой системы выполните следующие действия, чтобы восстановить файловую систему.
- Нажмите Windows значок или меню Пуск, введите CMD, то вы увидите результат, щелкните правой кнопкой мыши по cmd и выберите Запуск от имени администратора.
- В командной строке введите chkdsk C: / v / f и нажмите Enter.
- Он сообщит, что этот раздел не может быть заблокирован, и спросит вас, запланировать ли это задание, введите Y и нажмите Enter.
- Перезагрузите компьютер и снова сожмите диск C с помощью управления дисками или NIUBI Partition Editor.
Помимо сокращения и расширения перегородок, NIUBI Partition Editor помогает перемещать, объединять, копировать, преобразовывать, дефрагментировать, скрывать, стирать разделы, сканировать поврежденные сектора и многое другое.
Скачать
|
0 / 0 / 0 Регистрация: 18.07.2017 Сообщений: 14 |
|
|
1 |
|
Не могу разделить диск из-за неперемещаемых файлов18.07.2017, 20:52. Показов 13135. Ответов 13
Здравствуйте. Есть диск С объемом 300 Гб, свободно на нем 180 Гб. Разделить его через «управление дисками» не получается, появляется сообщение о неперемещаемых файлах. Можно ли попытаться временно отключить файлы гибернации и подкачки, разделить диск, а потом их опять включить?
__________________
0 |
|
Programming Эксперт 94731 / 64177 / 26122 Регистрация: 12.04.2006 Сообщений: 116,782 |
18.07.2017, 20:52 |
|
Ответы с готовыми решениями: После форматирования, не могу диск С, разделить на логические, через диск Win7
Диск не доступен, требует форматирование. Повреждена основная таблица файлов. Внешний диск USB 13 |
|
6507 / 3565 / 463 Регистрация: 28.06.2013 Сообщений: 11,094 |
|
|
18.07.2017, 23:14 |
2 |
|
Можно ли Можно почти всё,только сначала покажите скрин с упр.дисками,Гибернация отключается в командной строке от админа powercfg -h off ,включается — powercfg.exe -h on.ФП можно отключить совсем,или что-бы винда не ругаласть перенести на другой раздел. Как разделить системный раздел в Windows 8
0 |
|
0 / 0 / 0 Регистрация: 18.07.2017 Сообщений: 14 |
|
|
19.07.2017, 11:20 [ТС] |
3 |
|
скрин для студии Миниатюры
0 |
|
Модератор 15148 / 7736 / 726 Регистрация: 03.01.2012 Сообщений: 31,802 |
|
|
19.07.2017, 13:38 |
4 |
|
busya69, Сделайте скрин того же управления дисками, но с такой настройкой как на картинке:
0 |
|
6507 / 3565 / 463 Регистрация: 28.06.2013 Сообщений: 11,094 |
|
|
19.07.2017, 14:11 |
5 |
|
busya69, и что там можно увидеть? Покажите без «Сжать С» и так понятно что сжать не даёт. Не по теме: gecata, да там gpt от асера.
0 |
|
0 / 0 / 0 Регистрация: 18.07.2017 Сообщений: 14 |
|
|
19.07.2017, 15:40 [ТС] |
6 |
|
Простите, что отнимаю время не теми картинками. Надеюсь, сейчас так? Миниатюры
0 |
|
6507 / 3565 / 463 Регистрация: 28.06.2013 Сообщений: 11,094 |
|
|
19.07.2017, 16:27 |
7 |
|
сейчас так? Да.Читали ? Как разделить системный раздел в Windows 8 Пробовали отключить Защиту,перенестиудалить ФП,дефрагментировать и сжимать С ?
0 |
|
0 / 0 / 0 Регистрация: 18.07.2017 Сообщений: 14 |
|
|
20.07.2017, 19:58 [ТС] |
8 |
|
Премного благодарна за помощь. Все получилось. Отключила защиту и файл гибернации, файл подкачки перенесла на другой диск, диск С поделился, потом вернула ФП и ФГ.
0 |
|
1712 / 1499 / 62 Регистрация: 23.11.2011 Сообщений: 2,136 |
|
|
20.07.2017, 20:05 |
9 |
|
Зачем такие сложности. С лайв сд всё сделали за 10 — 30 минут (зависет от объёма диска) и забыли.
0 |
|
6507 / 3565 / 463 Регистрация: 28.06.2013 Сообщений: 11,094 |
|
|
20.07.2017, 21:32 |
10 |
|
Зачем такие сложности. С лайв сд всё сделали за 10 — 30 минут (зависет от объёма диска) и И ….
Отключила защиту и файл гибернации, файл подкачки перенесла на другой диск, диск С поделился, потом вернула ФП и ФГ. безопасно и по времени не дольше.
0 |
|
1712 / 1499 / 62 Регистрация: 23.11.2011 Сообщений: 2,136 |
|
|
20.07.2017, 22:34 |
11 |
|
Не по теме:
акронис начудил!ПОМОГИТЕ!! Ну извините, если руки крюки и вместо головы шишка, то любая прога апокалипсис. За пять лет ни одного сбоя. И всем клиентам, которым объяснял, как им пользоваться, ни одного нарекания. И они всем советовали только его. Самый большой грех на земле — невежество. Не по теме: Добавлено через 6 минут . Не по теме: Добавлено через 8 минут
0 |
|
6507 / 3565 / 463 Регистрация: 28.06.2013 Сообщений: 11,094 |
|
|
20.07.2017, 23:40 |
12 |
|
За пять лет ни одного сбоя. Не показатель.Внизу ссылки примеры Не работает диск D после Acronis Disk Director 12 Кликните здесь для просмотра всего текста
Это не акронис начудил, это дурная голова и кривые руки Очень часто,но не всегда.Прога не относится к категории супернадёжных и ей винда по барабану,а через упр.дисками винды дров не наломаешь 100%.
Если вы его боитесь как чёрт ладана, и никогда не пользовались, то не стоит Не боюсь.Пользуюсь только в случае крайней необходимости.Неопытным не советую,а опытные на форум за помощью не обращаются.
А после уже пишите свои впечатления, а не то, что пишут криворукие и не дружащие с головой. По вашему примеры проблем от акрониса на форуме только от криворуких и не дружащих с головой?
0 |
|
1712 / 1499 / 62 Регистрация: 23.11.2011 Сообщений: 2,136 |
|
|
21.07.2017, 07:06 |
13 |
|
По вашему примеры проблем от акрониса на форуме только от криворуких и не дружащих с головой? Ага Добавлено через 6 минут
0 |
|
6507 / 3565 / 463 Регистрация: 28.06.2013 Сообщений: 11,094 |
|
|
21.07.2017, 10:53 |
14 |
|
изначально я про акронис не писал. Я такое делаю парагоном. Хрен редьки не слаще.
Ага Извините,но холиварить нет желания.
0 |
|
IT_Exp Эксперт 87844 / 49110 / 22898 Регистрация: 17.06.2006 Сообщений: 92,604 |
21.07.2017, 10:53 |
|
Помогаю со студенческими работами здесь При записи файлов на диск, комптютер выдал ошибку, что данный диск не может дальше использоваться разделить жесткий диск Разделить жесткий диск
Не возможно разделить диск. Как разделить жёсткий диск? Искать еще темы с ответами Или воспользуйтесь поиском по форуму: 14 |
При попытке сжать том в Windows 7 (“Панель управления” – “Создание и форматирование разделов жесткого диска”) я столкнулся с проблемой, что Windows не хочет сжимать диск объемом 500 Гб, на котором свободно 300 Гб. Выдает сообщение: “для сжатия тома доступно 0 Мб”. Такая проблема возникает из-за того, что данные на диске фрагментированы, т.е. разбросаны по разным частям жесткого диска, кроме того, в разных местах диска могут располагаться неперемещаемые системные файлы, такие как MFT (Master File Table), pagefile, hibernate file, NTFS metadata, exclusively locked files, System Restore Points. Вот, как мне удалось решить эту проблему. Кстати, те же самые инструменты можно применять и к другим версиям Windows:
- Сначала я запустил программу “Очистка диска” и перезагрузил компьютер. Я отмечал галочками все пункты. Программа работала около часа, включая перезагрузку компьютера. В результате добавилось всего 50 Мб доступных для сжатия. Немного, не правда ли? Ну да ладно, курочка по зернышку клюет.
- Установил бесплатную программу дефрагментации диска Auslogics Disk Defrag Free. Программа работала около 40 минут. После дефрагментации этой программой у меня стало доступно 50 Гб для сжатия. Очень хорошо, но все-таки мало!
- Установил и запустил бесплатную программу дефрагментации Power Defragmenter. Программа работала тоже минут 40. К сожалению, эта программа не добавила никакого дополнительного места доступного для сжатия. Возможно, вам повезет больше. Попробуйте запустить ее, если все другие средства не дадут желаемого результата.
- Попробовал решить проблему при помощи программы управления дисками partition manager EaseUs. Провозился 30 минут, но результат не получил, хотя в Интернете видел хорошие отзывы. Да и сама программа мне не понравилась.
- Далее я скачал и запустил программу PerfectDisk® Pro. Программа платная, но первые 30 дней бесплатны. В этой программе есть специальная функция подготовки диска к сжатию “Prep for Shrink”, которая переносит все файлы в начала диска. Кроме того, эта программа умеет перемещать файлы MFT. Как написано в описании функции Prep for Shrink, ее цель – не оптимизация и дефрагментация, а высвобождение максимального пространства, и она может приводить к фрагментации диска. Поэтому лучше сначала запускать эту стратегию, потом сжимать диск и создавать новый раздел, а только после этого оптимизировать и дефрагментировать раздел C. Программа у меня работала уже привычные 40 минут. Но свободного для сжатия места это не добавило, т.е. можно было просто запустить программу дефрагментации Auslogics Disk Defrag и на этом поставить точку с тем же результатом. Однако на этом этапе мне стало ясно, в чем проблема. На схеме жесткого диска из программы Perfect Disk видно, что неперемещаемые системные файлы, которые выделены коричневым цветом, расположены на жестком диске, начиная с середины и до его конца. Ну и гадость, эта ваша Windows!
Тут мне стало ясно, что надо постараться переместить все эти файлы в начало жесткого диска или просто удалить. Делал я это так:
- отключил “Восстановление системы” и при этом удалил все точки восстановления (Контрольная панель – Система – Защита системы – Настроить – Отключить защиту системы);
- отключил файл подкачки pagefile (Контрольная панель – Система – Дополнительные параметры системы – Дополнительно – Быстродействие – Параметры – Дополнительно – Изменить – Без файла подкачки);
- отключил запись отладочной информации (Контрольная панель – Система – Дополнительные параметры системы – Дополнительно – Загрузка и восстановление – Параметры – Запись отладочной информации – Нет (было – Дамп ядра));
- отключил режим гибернации. Как отключить и снова включить режим гибернации;
- перезагрузил компьютер. И тем самым удалил файл подкачки (c:pagefile.sys) и файл гибернации (c:hiberfil.sys). Чтобы проверить это, надо зайти в “Панель управления” – “Параметры папок” и поставить галочку “Показывать скрытые файлы, папки и диски” и снять галочку “Скрывать защищенные системные файлы”. Тем самым можно разрешить отображение срытых файлов и убедиться, что эти два файла исчезли.
К сожалению, принятые меры результата тоже не дали, и к сжатию так и осталось доступно всего 50 Гб. Поэтому я проделал все описанные в этом пункте шаги в обратном порядке, только режим гибернации включать обратно не стал.
Так что же реально помогло быстро и полностью решить проблему сжатия диска C с установленной на нем операционной системой Windows?
Бесплатная программа для управления дисками, отличная замена штатному инструменту Windows: Partition Wizard Home Edition. Всего за 15 минут жесткий диск был разбит на два равных раздела каждый из них размером 250 Гб. Проблема решена! Начинайте с этой программы, а потом дефрагментируйте диск при помощи Auslogic.
Если же последний способ не даст быстрого результата, то лучше переписать все важные данные с вашего компьютера в надежное место, т.е. сделать бэкап и просто заново переустановить Windows, и только потом сжать диск. В этом случае проблем со сжатием не возникнет. А учитывая, сколько времени я потратил на решение проблемы сжатия, в следующий раз я лучше сразу буду переустанавливать Windows. А если вы ставите второй операционной системой один из дистрибутивов Linux, то решение еще проще – полностью удалять Windows во время установки Linux. В этом случае временные затраты будут минимальны! При решении проблемы я руководствовался информацией из следующих статей:

- Working Around Windows Vista’s “Shrink Volume” Inadequacy Problems;
- How To Extend System Partition In Windows 8.1.
- Disable System Restore in Windows 7 or Vista.
- Understanding the Windows Pagefile and Why You Shouldn’t Disable It.
- What is hiberfil.sys and How Do I Delete It?





 Не могу создать разделить диск
 акронис начудил!ПОМОГИТЕ!!!

 Тем более что примеров наличия проблем от данного софта на форуме предостаточно,и не думаю что все пострадавшие полные идиоты.