| title | author | description | monikerRange | ms.author | ms.custom | ms.date | uid |
|---|---|---|---|---|---|---|---|
|
Hosting Bundle |
rick-anderson |
Learn how to configure the .NET Core Hosting Bundle. |
>= aspnetcore-5.0 |
riande |
mvc |
02/07/2020 |
host-and-deploy/iis/hosting-bundle |
The .NET Core Hosting Bundle
The .NET Core Hosting bundle is an installer for the .NET Core Runtime and the ASP.NET Core Module. The bundle allows ASP.NET Core apps to run with IIS.
Install the .NET Core Hosting Bundle
[!IMPORTANT]
If the Hosting Bundle is installed before IIS, the bundle installation must be repaired. Run the Hosting Bundle installer again after installing IIS.If the Hosting Bundle is installed after installing the 64-bit (x64) version of .NET Core, SDKs might appear to be missing (No .NET Core SDKs were detected). To resolve the problem, see xref:test/troubleshoot#missing-sdk-after-installing-the-net-core-hosting-bundle.
[!INCLUDE]
Direct download (current version)
Download the installer using the following link:
Current .NET Core Hosting Bundle installer (direct download)
Visual C++ Redistributable Requirement
On older versions of Windows, for example Windows Server 2012 R2, install the Visual Studio C++ 2015, 2017, 2019 Redistributable. Otherwise, a confusing error message in the Windows Event Log reports that The data is the error.
Current x64 VS C++ redistributable
Current x86 VS C++ redistributable
Earlier versions of the installer
To obtain an earlier version of the installer:
- Navigate to the Download .NET Core page.
- Select the desired .NET Core version.
- In the Run apps — Runtime column, find the row of the .NET Core runtime version desired.
- Download the installer using the Hosting Bundle link.
[!WARNING]
Some installers contain release versions that have reached their end of life (EOL) and are no longer supported by Microsoft. For more information, see the support policy.
Options
-
The following parameters are available when running the installer from an administrator command shell:
OPT_NO_ANCM=1: Skip installing the ASP.NET Core Module.OPT_NO_RUNTIME=1: Skip installing the .NET Core runtime. Used when the server only hosts self-contained deployments (SCD).OPT_NO_SHAREDFX=1: Skip installing the ASP.NET Shared Framework (ASP.NET runtime). Used when the server only hosts self-contained deployments (SCD).OPT_NO_X86=1: Skip installing x86 runtimes. Use this parameter when you know that you won’t be hosting 32-bit apps. If there’s any chance that you will host both 32-bit and 64-bit apps in the future, don’t use this parameter and install both runtimes.OPT_NO_SHARED_CONFIG_CHECK=1: Disable the check for using an IIS Shared Configuration when the shared configuration (applicationHost.config) is on the same machine as the IIS installation. Only available for ASP.NET Core 2.2 or later Hosting Bundler installers. For more information, see xref:host-and-deploy/iis/advanced#aspnet-core-module-with-an-iis-shared-configuration.
[!NOTE]
For information on IIS Shared Configuration, see ASP.NET Core Module with IIS Shared Configuration.
[!NOTE]
When running the Hosting Bundle installer with options set, the value for each option is saved in the registry. Subsequent installs from the same Major.Minor version band use the same options, unless another set of options is explicitly passed from the command line. If the first install of the hosting bundle has no options passed, each option gets a default value of0written in to the registry. A value of0implies that the option is off, meaning the user is not opting out of the given component.
Restart IIS
After the Hosting Bundle is installed, a manual IIS restart may be required. For example, the dotnet CLI tooling (command) might not exist on the PATH for running IIS worker processes.
To manually restart IIS, stop the Windows Process Activation Service (WAS) and then restart the World Wide Web Publishing Service (W3SVC) and any dependent services. Execute the following commands in an elevated command shell:
net stop was /y
net start w3svc
Module version and Hosting Bundle installer logs
To determine the version of the installed ASP.NET Core Module:
- On the hosting system, navigate to
%PROGRAMFILES%IISAsp.Net Core ModuleV2. - Locate the
aspnetcorev2.dllfile. - Right-click the file and select Properties from the contextual menu.
- Select the Details tab. The File version and Product version represent the installed version of the module.
The Hosting Bundle installer logs for the module are found at C:Users%UserName%AppDataLocalTemp. The file is named dd_DotNetCoreWinSvrHosting__{TIMESTAMP}_000_AspNetCoreModule_x64.log, where the placeholder {TIMESTAMP} is the timestamp of the file.
- Remove From My Forums
-
Question
-
User-1228944606 posted
Hello:
I need to use IIS for hosting my ASP .NET Core 2.x application.
According to the link,
https://docs.microsoft.com/en-us/aspnet/core/host-and-deploy/iis/index?tabs=aspnetcore2xIt says the following.. but I cannot find the NET Core Windows Server Hosting bundle. Can someone help? Thanks!
Install the .NET Core Windows Server Hosting bundle
-
Install the .NET Core Windows Server Hosting bundle on the hosting system. The bundle installs the .NET Core Runtime, .NET Core Library, and the ASP.NET
Core Module. The module creates the reverse proxy between IIS and the Kestrel server. If the system doesn’t have an Internet connection, obtain and install the Microsoft
Visual C++ 2015 Redistributable before installing the .NET Core Windows Server Hosting bundle.- Navigate to the .NET All Downloads page.
- Select the latest non-preview .NET Core runtime from the list (.NET Core > Runtime > .NET Core Runtime x.y.z). Unless you intend
to work with preview software, avoid runtimes that have the word «preview» in their link text. - On the .NET Core runtime download page under Windows, select the Server Hosting Installer link to download the .NET Core Windows Server Hosting
bundle.
-
By Luke Latham and Rick Anderson
Sections:
- Supported operating systems
- IIS configuration
- Install the .NET Core Windows Server Hosting bundle
- Application configuration
- Deploy the application
- Configure the website in IIS
- Create a Data Protection Registry Hive
- Configuration of sub-applications
- Common errors
- Additional resources
Supported operating systems
The following operating systems are supported:
- Windows 7 and newer
- Windows Server 2008 R2 and newer*
*Conceptually, the IIS configuration described in this document also applies to hosting ASP.NET Core applications on Nano Server IIS, but refer to ASP.NET Core on Nano Server for specific instructions.
IIS configuration
Enable the Web Server (IIS) server role and establish role services.
Windows desktop operating systems
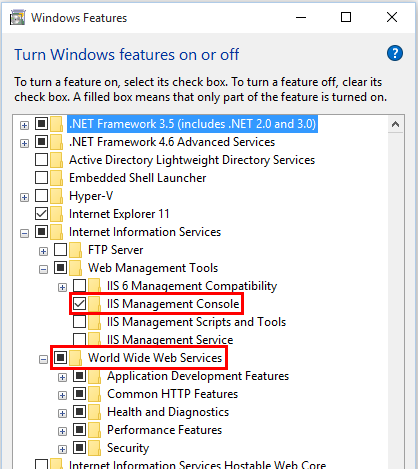
Navigate to Control Panel > Programs > Programs and Features > Turn Windows features on or off (left side of the screen). Open the group for Internet Information Services and Web Management Tools. Check the box for IIS Management Console. Check the box for World Wide Web Services. Accept the default features for World Wide Web Services or customize the IIS features to suit your needs.
Windows Server operating systems
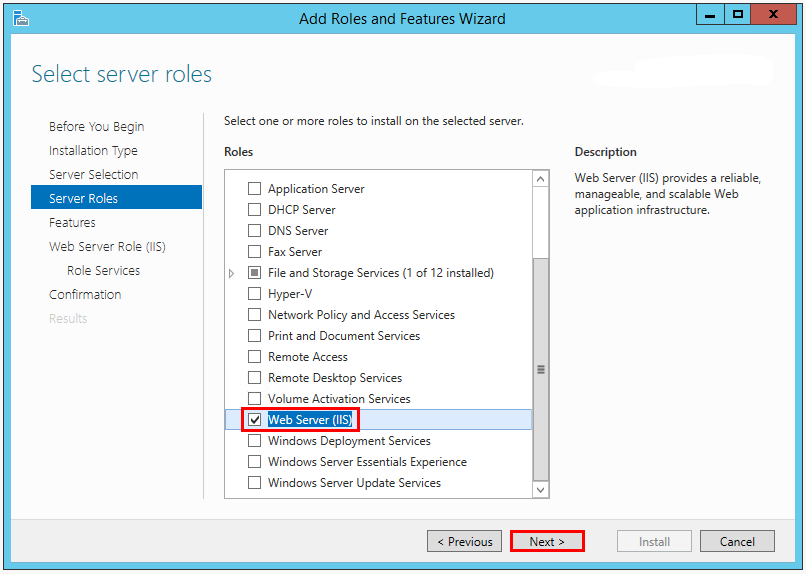
For server operating systems, use the Add Roles and Features Wizard via the Manage menu or the link in Server Manager. On the Server Roles step, check the box for Web Server (IIS).
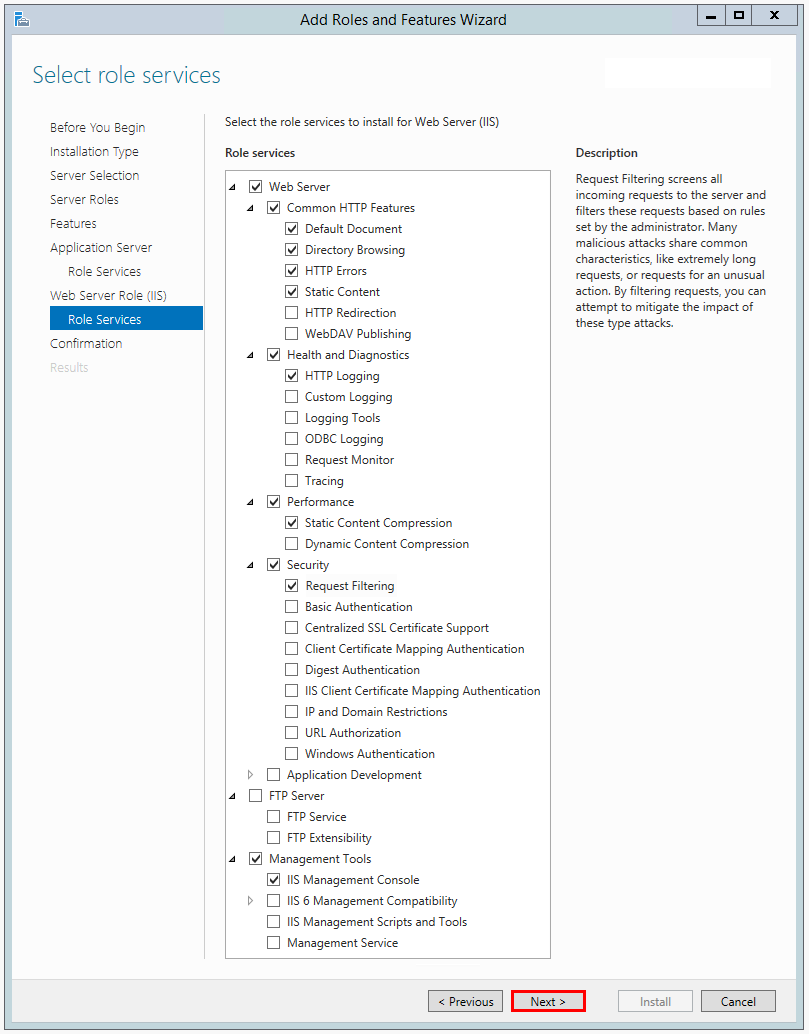
On the Role services step, select the IIS role services you desire or accept the default role services provided.
Proceed through the Confirmation step to enable the web server role and services.
Install the .NET Core Windows Server Hosting bundle
- Install the .NET Core Windows Server Hosting bundle on the server. The bundle will install the .NET Core Runtime, .NET Core Library, and the ASP.NET Core Module. The module creates the reverse-proxy between IIS and the Kestrel server.
- Restart the server or execute net stop was /y followed by net start w3svc from the command-line to pickup changes to the system PATH.
For more information on the ASP.NET Core Module, including configuration of the module and setting environment variables with web.config, the use of app_offline.htm to suspend request processing, and activation of module logging, see ASP.NET Core Module Configuration Reference.
Application configuration
Enabling the IISIntegration components
Include a dependency on the Microsoft.AspNetCore.Server.IISIntegration package in the application dependencies. Incorporate IIS Integration middleware into the application by adding the .UseIISIntegration() extension method to WebHostBuilder().
var host = new WebHostBuilder()
  .UseKestrel()
  .UseContentRoot(Directory.GetCurrentDirectory())
  .UseIISIntegration()
  .UseStartup<Startup>()
  .Build();
Note that code calling .UseIISIntegration() does not affect code portability.
Setting IISOptions for the IISIntegration service
To configure IISIntegration service options, include a service configuration for IISOptions in ConfigureServices.
services.Configure<IISOptions>(options => {
  ...
});
| Option | Setting |
|---|---|
| AutomaticAuthentication |
If true, the authentication middleware will alter the request user arriving and respond to generic challenges. If false, the authentication middleware will only provide identity and respond to challenges when explicitly indicated by the AuthenticationScheme. |
| ForwardClientCertificate |
If true and the MS-ASPNETCORE-CLIENTCERT request header is present, the ITLSConnectionFeature will be populated. |
| ForwardWindowsAuthentication |
If true, authentication middleware will attempt to authenticate using platform handler windows authentication. If false, authentication middleware won’t be added. |
Deploy the application
- On the target IIS server, create a folder to contain the application’s published folders and files, which are described in Directory Structure.
- Within the folder you created, create a logs folder to hold application logs (if you plan to enable logging). If you plan to deploy your application with a logs folder in the payload, you may skip this step.
- Deploy the application to the folder you created on the target IIS server. MSDeploy (Web Deploy) is the recommended mechanism for deployment, but you may use any of several methods to move the application to the server (for example, Xcopy, Robocopy, or PowerShell). Visual Studio users may use the default Visual Studio web publish script. For information on using Web Deploy, see Publishing to IIS with Web Deploy using Visual Studio.
Warning
.NET Core applications are hosted via a reverse-proxy between IIS and the Kestrel server. In order to create the reverse-proxy, the web.config file must be present at the content root path (typically the app base path) of the deployed application, which is the website physical path provided to IIS.
Sensitive files exist on the app’s physical path, including subfolders, such as my_application.runtimeconfig.json, my_application.xml (XML Documentation comments), and my_application.deps.json. The web.config file is required to create the reverse proxy to Kestrel, which prevents IIS from serving these and other sensitive files. Therefore, it is important that the web.config file is never accidently renamed or removed from the deployment.
Configure the website in IIS
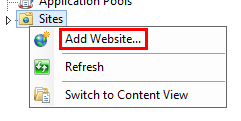
- In IIS Manager, create a new website. Provide a Site name and set the Physical path to the application’s assets folder that you created. Provide the Binding configuration and create the website.
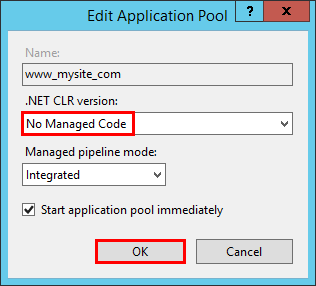
- Set the application pool to No Managed Code. ASP.NET Core runs in a separate process and manages the runtime.
Note
If you change the default identity of the application pool from ApplicationPoolIdentity, verify the new identity has the required permissions to access the application’s assets and database.
Open the Add Website window.
Configure the website.
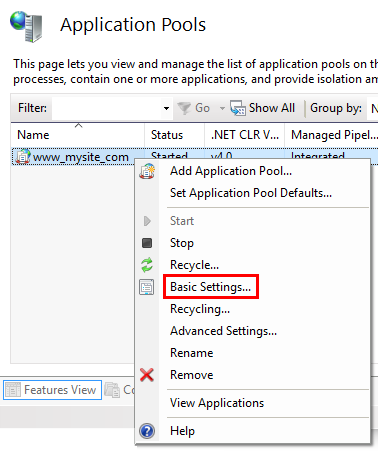
In the Application Pools panel, open the Edit Application Pool window by right-clicking on the website’s application pool and selecting Basic Settings… from the popup menu.
Set the .NET CLR version to No Managed Code.
Browse the website.

Create a Data Protection Registry Hive
Data Protection keys used by ASP.NET applications are stored in registry hives external to the applications. To persist the keys for a given application, you must create a registry hive for the application’s application pool.
For standalone IIS installations, you may use the Data Protection Provision-AutoGenKeys.ps1 PowerShell script for each application pool used with an ASP.NET Core application. The keys will be persisted in the registry.
In web farm scenarios, an application can be configured to use a UNC path to store its data protection key ring. By default, the data protection keys are not encrypted. You can deploy an x509 certificate to each machine to encrypt the key ring. See Configuring Data Protection for details.
Warning
Data Protection is used by various ASP.NET middlewares, including those used in authentication. Even if you do not specifically call any Data Protection APIs from your own code you should configure Data Protection with the deployment script or in your own code. If you do not configure data protection when using IIS by default the keys will be held in memory and discarded when your application closes or restarts. This will then, for example, invalidate any cookies written by the cookie authentication and users will have to login again.
Configuration of sub-applications
When adding applications to an IIS Site’s root application, the root application web.config file should include the <handlers> section, which adds the ASP.NET Core Module as a handler for the app. Applications added to the root application shouldn’t include the <handlers> section. If you repeat the <handlers> section in a sub-application’s web.config file, you will receive a 500.19 (Internal Server Error) referencing the faulty config file when you attempt to browse the sub-application.
Common errors
The following is not a complete list of errors. Should you encounter an error not listed here, please leave a detailed error message in the DISQUS section below (click Show comments to open the DISQUS panel).
To diagnose problems with IIS deployments, study browser output, examine the server’s Application log through Event Viewer, and enable module logging. The ASP.NET Core Module log will be found on the path provided in the stdoutLogFile attribute of the <aspNetCore> element in web.config. Any folders on the path provided in the attribute value must exist in the deployment. You must also set stdoutLogEnabled=”true” to enable module logging. Applications that use the publish-iis tooling to create the web.config file will default the stdoutLogEnabled setting to false, so you must manually provide the file or modify the file in order to enable module logging.
Several of the common errors do not appear in the browser, Application Log, and ASP.NET Core Module Log until the module startupTimeLimit (default: 120 seconds) and startupRetryCount (default: 2) have passed. Therefore, wait a full six minutes before deducing that the module has failed to start a process for the application.
A quick way to determine if the application is working properly is to run the application directly on Kestrel. If the application was published as a portable app, execute dotnet <my_app>.dll in the deployment folder. If the application was published as a self-contained app, run the application’s executable directly on the command line, <my_app>.exe, in the deployment folder. If Kestrel is listening on default port 5000, you should be able to browse the application at http://localhost:5000/. If the application responds normally at the Kestrel endpoint address, the problem is more likely related to the IIS-ASP.NET Core Module-Kestrel configuration and less likely within the application itself.
A way to determine if the IIS reverse proxy to the Kestrel server is working properly is to perform a simple static file request for a stylesheet, script, or image from the application’s static assets in wwwroot using Static File middleware. If the application can serve static files but MVC Views and other endpoints are failing, the problem is less likely related to the IIS-ASP.NET Core Module-Kestrel configuration and more likely within the application itself (for example, MVC routing or 500 Internal Server Error).
In most cases, enabling application logging will assist in troubleshooting problems with application or the reverse proxy. See Logging for more information.
Common errors and general troubleshooting instructions:
Installer unable to obtain VC++ Redistributable
- Installer Exception: Installation of the .NET Core Windows Server Hosting Bundle fails with 0x80070002 — The system cannot find the file specified.
Troubleshooting:
- If the server does not have Internet access while installing the server hosting bundle, this exception will ensue when the installer is prevented from obtaining the Microsoft Visual C++ 2015 Redistributable (x64) packages online. You may obtain an installer for the packages from the Microsoft Download Center.
Platform conflicts with RID
- Browser: HTTP Error 502.5 — Process Failure
- Application Log:
— Application Error: Faulting module: KERNELBASE.dll Exception code: 0xe0434352 Faulting module path: C:WINDOWSsystem32KERNELBASE.dll
— IIS AspNetCore Module: Failed to start process with commandline ‘“dotnet” .my_application.dll’ (portable app) or ‘“PATHmy_application.exe”’ (self-contained app), ErrorCode = ‘0x80004005’. - ASP.NET Core Module Log: Unhandled Exception: System.BadImageFormatException: Could not load file or assembly ‘teststandalone.dll’ or one of its dependencies. An attempt was made to load a program with an incorrect format.
Troubleshooting:
- If you published a self-contained application, confirm that you didn’t set a platform in buildOptions of project.json that conflicts with the publishing RID. For example, do not specify a platform of x86 and publish with an RID of win81-x64 (dotnet publish -c Release -r win81-x64). The project will publish without warning or error but fail with the above logged exceptions on the server.
URI endpoint wrong or stopped website
- Browser: ERR_CONNECTION_REFUSED
- Application Log: No entry
- ASP.NET Core Module Log: Log file not created
Troubleshooting:
- Confirm you are using the correct URI endpoint for the application. Check your bindings.
- Confirm that the IIS website is not in the Stopped state.
CoreWebEngine or W3SVC server features disabled
- OS Exception: The IIS 7.0 CoreWebEngine and W3SVC features must be installed to use the Microsoft HTTP Platform Handler 1.x.
Troubleshooting:
- Confirm that you have enabled the proper server role and features. See IIS Configuration.
Incorrect website physical path or application missing
- Browser: 403 Forbidden: Access is denied –OR– 403.14 Forbidden: The Web server is configured to not list the contents of this directory.
- Application Log: No entry
- ASP.NET Core Module Log: Log file not created
Troubleshooting:
- Check the IIS website Basic Settings and the physical application assets folder. Confirm that the application is in the folder at the IIS website Physical path.
Incorrect server role, module not installed, or incorrect permissions
- Browser: 500.19 Internal Server Error: The requested page cannot be accessed because the related configuration data for the page is invalid.
- Application Log: No entry
- ASP.NET Core Module Log: Log file not created
Troubleshooting:
- Confirm that you have enabled the proper server role. See IIS Configuration.
- Check Programs & Features and confirm that the Microsoft ASP.NET Core Module has been installed. If the Microsoft ASP.NET Core Module is not present in the list of installed programs, install the module. See IIS Configuration.
- Make sure that the Application Pool Process Model Identity is either set to ApplicationPoolIdentity; or if a custom identity is in use, confirm the identity has the correct permissions to access the application’s assets folder.
Hosting bundle not installed or server not restarted
- Browser: 502.3 Bad Gateway: There was a connection error while trying to route the request.
- Application Log: Process ‘0’ failed to start. Port = PORT, Error Code = ‘-2147024894’.
- ASP.NET Core Module Log: Log file created but empty
Troubleshooting:
- You may have deployed a portable application without installing .NET Core on the server. If you are attempting to deploy a portable application and have not installed .NET Core, run the .NET Core Windows Server Hosting Bundle Installer on the server. See Install the .NET Core Windows Server Hosting Bundle.
- You may have deployed a portable application and installed .NET Core without restarting IIS. Either restart the server or restart IIS by executing net stop was /y followed by net start w3svc from the command-line.
Incorrect processPath, missing PATH variable, or dotnet.exe access violation
- Browser: HTTP Error 502.5 — Process Failure
- Application Log: Failed to start process with commandline ‘“dotnet” .my_application.dll’ (portable app) or ‘”.my_application_Foo.exe”’ (self-contained app), ErrorCode = ‘0x80070002’.
- ASP.NET Core Module Log: Log file created but empty
Troubleshooting:
- Check the processPath attribute on the <aspNetCore> element in web.config to confirm that it is dotnet for a portable application or .my_application.exe for a self-contained application.
- For a portable application, dotnet.exe might not be accessible via the PATH settings. Confirm that C:Program Filesdotnet exists in the System PATH settings.
- For a portable application, dotnet.exe might not be accessible for the user identity of the Application Pool. Confirm that the AppPool user identity has access to the C:Program Filesdotnet directory.
- You may have deployed a portable application and installed .NET Core without restarting IIS. Either restart the server or restart IIS by executing net stop was /y followed by net start w3svc from the command-line.
Incorrect arguments of <aspNetCore> element
- Browser: HTTP Error 502.5 — Process Failure
- Application Log: Failed to start process with commandline ‘“dotnet” .my_application_Foo.dll’, ErrorCode = ‘0x80004005’.
- ASP.NET Core Module Log: The application to execute does not exist: ‘PATHmy_application_Foo.dll’
Troubleshooting:
- Examine the arguments attribute on the <aspNetCore> element in web.config to confirm that it is either (a) .my_applciation.dll for a portable application; or (b) not present, an empty string (arguments=”“), or a list of your application’s arguments (arguments=”arg1, arg2, …”) for a self-contained application.
Missing .NET Framework version
- Browser: 502.3 Bad Gateway: There was a connection error while trying to route the request.
- Application Log: Failed to start process with commandline ‘[IIS_WEBSITE_PHYSICAL_PATH] ‘, Error Code = ‘0x80004005’.
- ASP.NET Core Module Log: Missing method, file, or assembly exception. The method, file, or assembly specified in the exception is a .NET Framework method, file, or assembly.
Troubleshooting:
- Install the .NET Framework version missing from the server.
Stopped Application Pool
- Browser: 503 Service Unavailable
- Application Log: No entry
- ASP.NET Core Module Log: Log file not created
Troubleshooting
- Confirm that the Application Pool is not in the Stopped state.
IIS Integration middleware not implemented or .UseUrls() after .UseIISIntegration()
- Browser: HTTP Error 502.5 — Process Failure
- Application Log: Process was created with commandline ‘“dotnet” .my_application.dll’ (portable app) or ‘”.my_application.exe”’ (self-contained app) but either crashed or did not reponse within given time or did not listen on the given port ‘PORT’, ErrorCode = ‘0x800705b4’
- ASP.NET Core Module Log: Log file created and shows normal operation.
Troubleshooting
- Confirm that you have correctly referenced the IIS Integration middleware by calling the .UseIISIntegration() method of the application’s WebHostBuilder().
- If you are using the .UseUrls() extension method when self-hosting with Kestrel, confirm that it is positioned before the .UseIISIntegration() extension method on WebHostBuilder(). .UseIISIntegration() must set the Url for the reverse-proxy when running Kestrel behind IIS and not have its value overridden by .UseUrls().
Sub-application includes a <handlers> section
- Browser: HTTP Error 500.19 — Internal Server Error
- Application Log: No entry
- ASP.NET Core Module Log: Log file created and shows normal operation for the root application. Log file not created for the sub-application.
Troubleshooting
- Confirm that the sub-application’s web.config file doesn’t include a
<handlers>section.
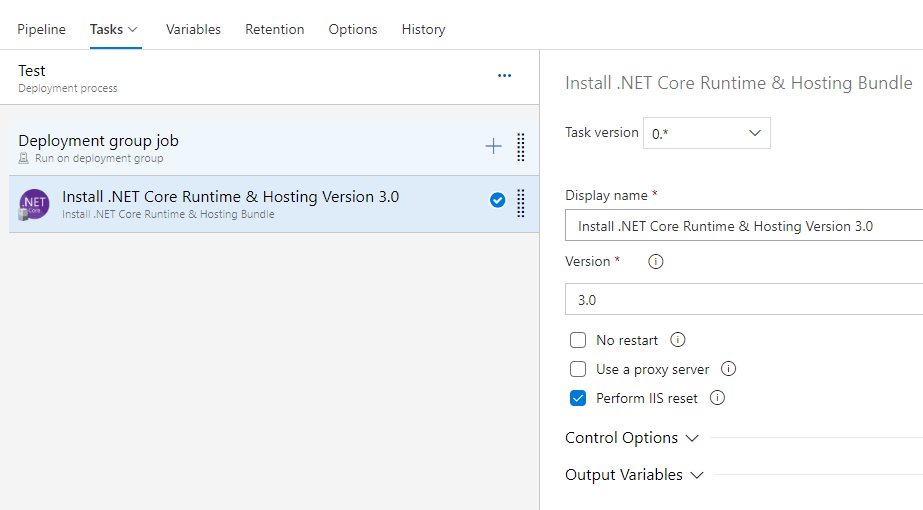
Azure DevOps pipeline task that downloads and installs the latest .NET Core runtime and hosting bundle.
.NET Core coming to Microsoft Update
Starting in December 2020 .NET Core has been added to Microsoft Update. Before you proceed and use this custom extension, have a look at .NET Core coming to Microsoft Update.
Supported .NET Core versions
- 2.1
- 2.2
- 3.0
- 3.1
- 5.0
- 6.0
YAML snippet
# Install the .NET Core runtime and hosting bundle
- task: InstallNetCoreRuntimeAndHosting@1
  inputs:
    #version: '3.0' # Options: 2.1, 2.2, 3.0, 3.1, 5.0, 6.0
    #useProxy: false
    #proxyServerAddress: # Required when useProxy == true
    #norestart: false
    #iisReset: true
    #installArguments: # Optional
Arguments
| Name | Description |
|---|---|
versionVersion |
Version of .NET Core to download and install. Options: 2.1, 2.2, 3.0, 3.1, 5.0, 6.0 |
useProxyUse a proxy server |
Enabling this option will make it possible to specify a proxy server address that will be used to download the installer. |
proxyServerAddressProxy server address |
The URL of the proxy server to use when downloading the installer. Needs to include the port number. Example: http://proxy.example.com:80 |
norestartNo Restart |
Enabling this option will pass the /norestart argument to the installer to suppress any attempts to restart. |
iisResetPerform IIS reset |
Enabling this option will reset IIS after installation. The reset is recommended for all changes to take effect. |
installArgumentsInstall arguments |
Optional arguments that will be passed to the installer. Example: 'OPT_NO_ANCM=1 OPT_NO_X86=1'. See these options for more information. |
Examples
YAML pipeline
- Install the Install .NET Core Runtime & Hosting Bundle extension from the Marketplace in your Azure DevOps organization.
- Create a new Environment with the name ‘net-core-test’. Select ‘Virtual machines’ as the resource type.
- Register a machine in the new Environment and give it the tag ‘net-core’.
- Create a new YAML pipeline with the following content.
trigger: none

stages:
- stage: 'InstallNetCore'
  jobs:
  - deployment: 'InstallNetCore'
    environment:
      name: 'net-core-test'
      resourceType: 'VirtualMachine'
      tags: 'net-core'
    strategy:
      runOnce:
        deploy:
          steps:
          - task: InstallNetCoreRuntimeAndHosting@1
            inputs:
              version: '3.1'
              useProxy: false
              norestart: false
              iisReset: true
- Save and run the pipeline.
Release pipeline with a Deployment group job
-
Install the Install .NET Core Runtime & Hosting Bundle extension from the Marketplace in your Azure DevOps organization.
-
Create a Deployment group.
-
Register a machine in the new Deployment group.
-
Create a new Release pipeline.
-
Add a Deployment group job for the new Deployment group.
-
Add the
Install .NET Core Runtime & Hosting Bundletask to the Deployment group job. -
Configure the version you want to install.

-
Save and run the pipeline.
Q & A
How does it work?
The task wraps a PowerShell script that:
- Retrieves the latest available .NET Core version from the appropriate
releases.json, like https://dotnetcli.blob.core.windows.net/dotnet/release-metadata/3.0/releases.json. - Looks in the
releases.jsonfor the download URL of the .NET Core Runtime & Hosting bundle installer (dotnet-hosting-win.exe). - Downloads the installer.
- Executes the installer.
- Uploads any logs created by the installer.
- Performs an IIS reset if specified.
The task does not use PowerShell remoting so it will download and install .NET Core on the server where the task is run.
Does it uninstall older versions of .NET Core?
No.
What OS is supported?
The .NET Core runtime and hosting bundle is only available for Windows.
What to do when I get an error downloading the installer?
In some cases you might get an error like the one below because the task is unable to download the installer.
Load release data from: https://dotnetcli.blob.core.windows.net/dotnet/release-metadata/3.0/releases.json
Exception calling "DownloadString" with "1" argument(s): "The underlying connection was closed: An unexpected error occurred on a receive."
At C:azagentA1_work_temp39753a3f-3f3e-4351-b612-3d286ccd9f29.ps1:20 char:5
+     $releases = $webClient.DownloadString($releasesJSONURL) | Convert ...
There are several reasons that might cause an error like this to occur:
- The site
https://dotnetcli.blob.core.windows.net, with the releases.json that has the download URL for the installer, is not a trusted site. - The site
https://download.visualstudio.microsoft.com/, where the installer is hosted, is not a trusted site. - The server does not have outgoing internet access.
Depending on the reason adding a site to the trusted sites might do the trick.
Open source
This task is open source on GitHub.
This is part II of the blog post series in which I share some of ways to build and deploy an ASP.NET core application to IIS running on a Windows VM. In the previous post, I cover how to build and published an ASP.NET core application. The end result is an artifact (a published directory). In this post, I go over how to deploy the artifact to IIS. Along the way, we’ll discuss:
- Enabling IIS
- .NET core runtime and hosting bundle
- IIS website and application configuration
- IIS application pool
Overview
Following are the steps for deploying a typical ASP.NET core application on IIS for the first time.
- Enable IIS.
- Install .NET core runtime and hosting bundle.
- Create and configure IIS website and root application
- Create and set application pool.
- Create IIS site.
- Add bindings
- SSL certificate
- Set physical path to the directory containing the application files.
- If deploying the application as an application separating from the root application, create and configure the application under the site.
- Set physical path to the directory containing the application files.
Enabling IIS
Follow the steps below to check and enable IIS as necessary:
- Open Server Manager
- You can search for it under the Start menu
- In Server Manager, under Quick Start, click “Add roles and features”. The “Add Roles and Features Wizard” window pops up.
- Click Next.
- Under Select installation type, check “Role-based or feature-based installation”.
- Under Select destination server, select the server which you want to enable IIS and click Next.
- Under Server Roles, check “Web Server (IIS)”.
- The system automatically select the default modules for IIS. Besides the default components, you may want to also install the “Application Initialization” module under “Application Development” if you want the app to auto initialize rather than waiting for the initial request. For more details, checkout my post: How to auto start and keep an ASP.NET core web application running on IIS.
- Click Next.
- Click Install.
.NET core runtime and hosting bundle
When publishing the application, if you choose Framework dependent deployment (FDD), the server on which your app runs need to have the appropriate .NET core runtime installed. To check the runtime available on a server, run the following command:
dotnet --info
Note: To use the dotnet command tools, you need to install the SDK.
Below shows a sample of the .net core runtimes installed on a Windows VM.
.NET Core runtimes installed:
   Microsoft.AspNetCore.All 2.1.3 [C:Program FilesdotnetsharedMicrosoft.AspNetCore
   Microsoft.AspNetCore.All 2.2.2 [C:Program FilesdotnetsharedMicrosoft.AspNetCore
   Microsoft.AspNetCore.App 2.1.3 [C:Program FilesdotnetsharedMicrosoft.AspNetCore
   Microsoft.AspNetCore.App 2.2.2 [C:Program FilesdotnetsharedMicrosoft.AspNetCore
   Microsoft.NETCore.App 2.1.3 [C:Program FilesdotnetsharedMicrosoft.NETCore.App]
   Microsoft.NETCore.App 2.2.2 [C:Program FilesdotnetsharedMicrosoft.NETCore.App]
The above runtimes mean the server can support any FDD of an application which targets .NET core between 2.0.0 and 2.2.2, thanks to the roll forward feature, which is available starting with .net core 2.0.0.
Download and install the latest runtime and hosting bundle. As of this writing, the latest stable .net core runtime is 2.2. You can find it here.
Caution: You need to enable IIS first before installing the runtime and hosting bundle. If you install the bundle without enabling IIS, then you need to run the installation again and choose “Repair”, after enabling IIS.
Restart the server after the installation.
Application Pools
An application pool essentially allows you to control the resources for a web application. For example, you can have multiple applications share the same resources by assigning them to the same pool, or you can allocate dedicated resources for an application by assigning the application to an application pool, separating from the other pools.
An application pool also acts as a sandbox to effectively isolate applications within the pool from applications within another pool. If an application runs under an application pool crashes or causes trouble, it does not affect applications running in another pool. You can have multiple applications share a same pool, and you can also have multiple pools for different applications. Each application pool represents a worker process. As such, the more application pools you have, the more memory you need.
When you stop an application pool, you essentially stop the application(s) associated with the pool.
IIS site
A site is a container for web applications. Each site has a default root application, and you can create more applications under the site. All applications under a same site share the same root URL (binding).
Although applications under a same site share the same bindings, each application can have its own application pool. As such, you can still achieve application isolation when hosting multiple applications under a same site. Ofcourse, you can also host multiple applications under multiple sites.
You may want to host multiple applications under a same site to reuse DNS, or if the applications are closely related. For example, suppose you have two related applications; perhaps two different API versions of a same app. You can host both applications under the same site. They both share the same root URL, but different ending path (e.g myapi.com/v1 and myapi.com/v2).
Binding
A site binding basically suggests to IIS that a site can handle a request if the request’s header matches one or more parts of the binding. The primary parts of a binding are type, IP address, port and hostname. When an incoming request hits the server, based on the sites’ bindings, IIS can determine which site is the best match to handle the request.
A binding consists primarily of the following:
Type: Either http or https. In the case of https, you can associate a SSL certificate with the binding.
Host name: A server can have one or more host names assigned to it. The default value is blank, or localhost. The hostname in the request address must match the hostname in the binding for the site to process the request.
Port: The TCP port number. This is a required configuration. Specify the port number on which you want to bind the site. The port number specified in the request address must match the port number in the binding for the site to process the request.
IP Address: A server can have more than 1 IP address assigned to it. When configuring a binding for a site, you can select a specific IP assigned to a server. You can also select the value “All Unassigned”, meaning all the ip addresses that have not been assigned to other IIS sites. If the request address has the form of an IP address, the request’s IP address must match the IP address of the binding for the site to process the request.
SSL certificate
An SSL certificate is for establishing a secured communication between a server and a client to prevent a Man-in-the-middle attack.
Below I give a recap of how SSL works. For more details, checkout the article.
To obtain an SSL certificate:
- Create a Certificate Signing Request.
- Send the Certificate Signing Request to a Certificate Authority (CA). The request contains the public key.
- The CA creates the certificate based on the public key. It does not know about the private key.
- Install the certificate on your server.
Communication between browser and server using SSL:
- Browser creates a session key and encrypts it with the server’s public key.
- Browser sends the encrypted key to the server.
- Server decrypts the session key using its private key.
- Browser and server now encrypt and decrypt data using the session key which only the browser and server know.
For testing purpose, you can also use a self signed certificate. See this post.
Deploying sample ASP.NET core application
For demonstration purpose, I have built and published a simple ASP.NET core application. The app targets .NET core 2.2.
On the remote server, I have the published folder under “C:inetpubMyAspNetCoreApp”.
I. Create IIS application pool
To create an application pool,
- In IIS, click on the server name.
- Select and right click on “Application Pools”.
- Click “Add Application Pool .” to open the Add Application Pool dialog.
- Under Name, enter “MyAspNetCoreAppPool”.
- Under .NET CLR version, select “No Managed Code”.
- Under Managed pipeline mode, leave the default as “Integrated”.
- Check the box “Start application pool immediately”.
.NET CLR version:
The .NET CLR version refers to the version of the Common Language Runtime which the .NET framework includes. For this example, since we deploying an ASP.NET core application that targets .NET core, not .NET, so we choose “No Managed Code”.
Displays the version of the .NET Framework that an application pool uses. If the application pool was configured to not use the .NET Framework, the value is No Managed Code.
Application Pools
Managed pipeline mode: Integrated vs Classic
This stackoverflow post talks about the differences between integrated vs classic mode. The main points come from the documentation. Below is just my summary.
Integrated mode is the newer mode available since IIS 7.0. Integrated mode unifies the processing models of IIS and ASP.NET. In integrated mode, an order list of events process a request and then generate a response.
Classic mode separates the processing models of IIS and ASP.NET. In classic mode, a request goes through native processing in IIS. Then, it goes through Aspnet_isapi.dll for processing of managed code.
Some of the processing steps, such as authentication and authorization are the same in IIS and ASP.NET processing models. As such, it is less performant than integrated mode because of the duplicate processings a request has to go through. If you are deploying a new application, definitely choose integrated mode.
II. Create IIS site.
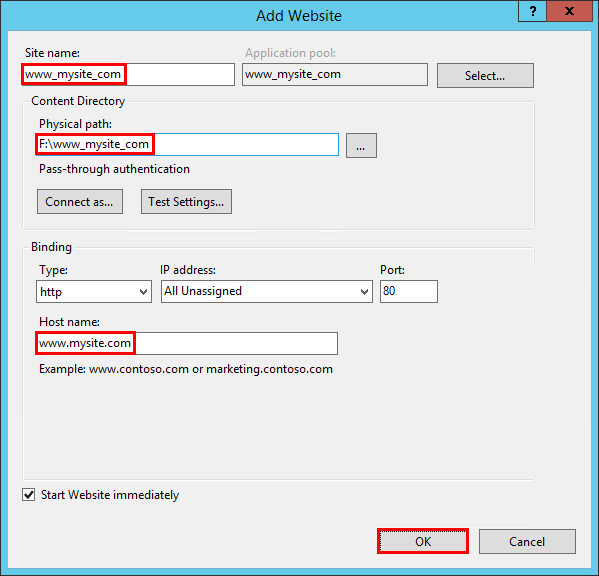
- In IIS, under “Sites”, right click and select “Add Website” to open the Add Website dialog.
- Under Site name, enter “MyAspNetCoreApp”.
- Click “Select” to open the “Select Application Pool” dialog and select the “MyAspNetCoreApp” pool created earlier.
- Under physical path, click “Browse” and select the path to the published app. For this example, I have placed the published app at “C:inetpubMyAspNetCoreApp”
- Enter the information for the binding. For more details, see the above section. For this example, just use the defaults.
- Select “http” for Type.
- Select “All Unassigned” for IP address.
- Select 8080 for port
- For Host name, leave blank to use the default localhost.
- Click “OK” to create the site.
- Run the application.
- Under Sites, select your site “MyAspNetCoreApp”. On the right panel, under Manage WEbsite, click “Start” if your site has not started already.
- On the server, open the browser, and enter “http://localhost:8080”
You should see the site loads. If so, congratulations.
Next steps: Once you are able to load the site locally, you can configure the binding to allow the world to reach your site.
- Add a new binding in which you use the DNS that maps to your server.
- Use https.
In the next post, I’ll share how to automate the build and deployment process using azure pipelines.
IV. Troubleshooting
If you get HTTP 500.19 – Internal Server Error. It can be the server does not have the correct .Net core runtime installed. See this cd .
One way to troubleshoot is running the application directly using the dotnet command.
Open the command line, CD to the directory containing the application files: C:inetpubMyAspNetCoreApp. Then type the command
dotnet AspNetCoreApp.dll
You should be able to browse to the application on port 5000.
V. Where to go from here?
Read my next post in this series to learn how to automate the build and deployment process so you can save time, reduce human errors and focus more on building your application.
References
Build and publish an ASP.NET core application using Visual Studio 2017.
Quick Reference: IIS Application Pool
Application Pools
Understanding IIS Bindings, Websites, Virtual Directories, and lastly Application Pools
Differences between Integrated vs Classic mode in App Pool
SSL-Certificate
How to set up site bindings in Internet Information Services (IIS)
In this tutorial, we will learn how to download and install .Net Core or Dot Net Core. The downloads consist of three parts. The SDK, runtime & Hosting bundle. Learn the difference between the SDK, Runtime & Hosting bundle. We have also listed dependencies that you must install before. Also the list of supported OS. ASP.NET Core is not a separate download. It is installed as part of the .NET core.
Table of Contents
- Download .NET Core
- Difference Between SDK Vs Runtime Vs Hosting Bundle
- SDK
- Runtime
- Runtime & Hosting Bundle
- .NET Core Dependencies
- Supported OS
- Windows
- macOS
- Ubuntu
- Debian
- Install .NET Core
- How to find out which .Net Core version is installed on your PC
You can download NET Core from the link https://dotnet.microsoft.com/download/dotnet-core

As of the writing of this article .NET Core 3.1 is the latest stable version. Choose the recommended version from the list. Also, make sure to check whether your OS supports the version by scrolling down to the Supported OS Section
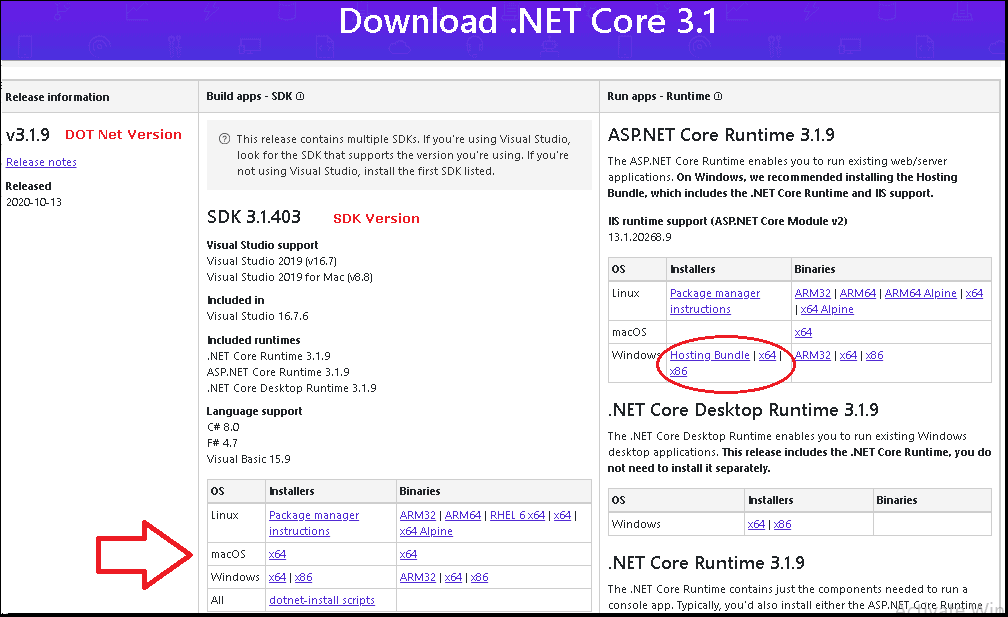
The section contains 3 downloads underlined in red.
Difference Between SDK Vs Runtime Vs Hosting Bundle
SDK
The SDK stands for Software Development Kit contains the everything you need to build and run .NET Core Applications. You can build app either using command-line tools or using any editor like Visual Studio/Visual Studio Code.
SDK also includes the runtime
Runtime
The Run time includes everything you need to run a .NET core Applications.
The SDK is to build the App. The Runtime is to run the App.
Runtime & Hosting Bundle
The Hosting bundle is required if you wish the ASP.NET Core web application on the IIS Server. It also contains the .NET Core run time.
.NET Core Dependencies
The .NET Core has a dependency on the following Packages.
Supported OS
Windows
| OS | .NET Core |
| Windows 7SP1+ | All |
| Windows 8.1 | All |
| Windows 10 Version 1609+ | All |
| Nano Server Version 1803+ | >=.NET Core 2.2 |
macOS
| OS | .NET Core |
| Mac OS X 10.15 | .NET Core 3.1 .NET Core 2.1 |
| Mac OS X 10.14 | .NET Core 3.1 .NET Core 2.1 |
| Mac OS X 10.13 | .NET Core 3.1 .NET Core 2.1 |
| Mac OS X 10.12 | NET Core 1.0 .NET Core 2.2 |
Ubuntu
| OS | Architecture | .NET Core |
| Ubuntu 16.04+,18.04, 20.04 | x64, ARM32, ARM64 | .NET Core 3.0 |
| Ubuntu 18.10, 18.04, 16.04 | x64, ARM32 | .NET Core 2.2 |
| Ubuntu 19.04, 18.04, 16.04 | x64, ARM32 | .NET Core 2.1 |
| Ubuntu 16.04, 18.04 (1.1) | x64 | .NET Core 1.0 |
Debian
| OS | Architecture | .NET Core |
| Debian 10+ | x64, ARM32, ARM64 | .NET Core 3.1 .NET Core 2.1 |
| Debian 9+ | x64, ARM32, ARM64 | .NET Core 3.1 .NET Core 2.1 |
| Debian 8.2+ | x64 | .NET Core 1.0 |
Install .NET Core
Installing .Net Core is quite straight forward. Double click on the Downloaded Installer
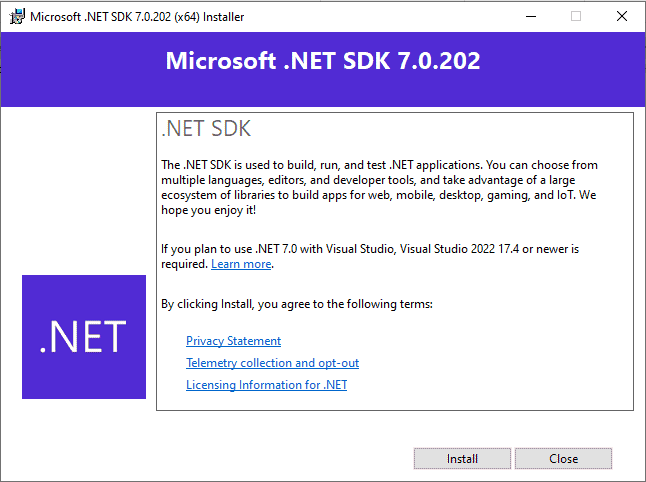
Click on Install to begin the installation.
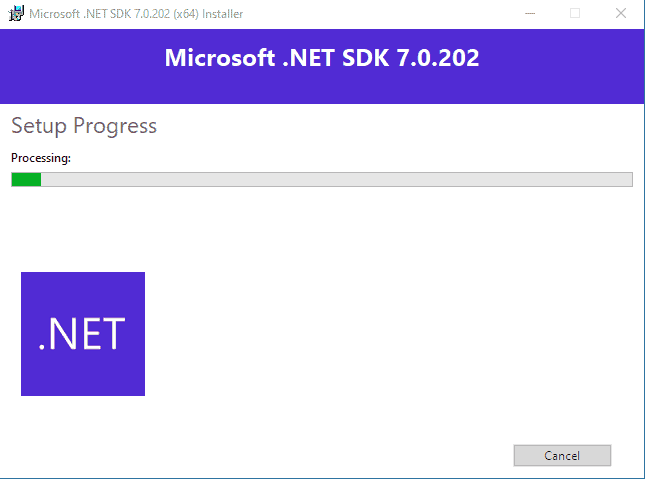
It will take some time. In the end, you will see the installation successful window. It will give you the details of the component installed.

How to find out which .Net Core version is installed on your PC
Open the folder C:Program Filesdotnetsdk or C:Program Files (x86)dotnetsdk. You should be able to see all the Dot net Core versions installed in your PC

You can check the version of the Dot net core runtime from the folder C:Program FilesdotnetsharedMicrosoft.NETCore.App

Path to dotnet.exe using where
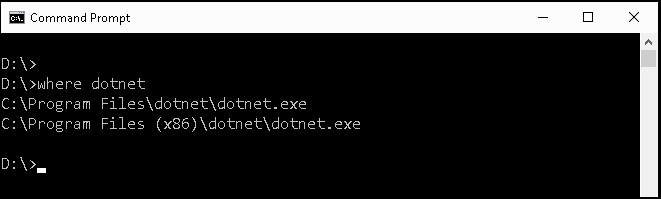
dotnet --info will give you more information is about the .Net core installation as shown below

Данное руководство устарело. Актуальное руководство: Руководство по ASP.NET Core 7
Последнее обновление: 26.03.2018
После завершения работы над приложением приложение его можно опубликовать, чтобы оно стало доступно широкому кругу пользователей.
Как правило, для хостирования приложения будет применяться один из внешних хостингов, список которых можно посмотреть здесь.
В данном же случае рассмотрим основные моменты публикации и развертывания приложения на локальном компьютере.
Традиционно веб-сервер IIS (Internet Information Services) применялся для развертывания веб-приложений. Для хостирования веб-приложений ASP.NET Core
также может применяться IIS, только в отличие от предыдущих версий ASP.NET теперь его роль будет сводиться к прокси-серверу.
Хостирование приложений ASP.NET Core на IIS происходит с помощью нативного модуля AspNetCoreModule, который сконфигурирован таким
образом, чтобы перенаправлять запросы на веб-сервер Kestrel. Этот модуль управляет запуском внешнего процесса dotnet.exe, в рамках которого хостируется
приложение, и перенаправляет все запросы от IIS к этому хостирующему процессу.
При разработке в Visual Studio публиковать приложения очень легко — среда разработки имеет для этого весь необходимый инструментарий.
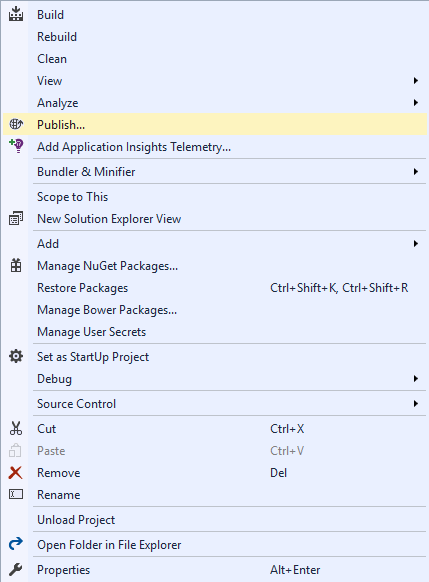
Так, возьмем какой-нибудь проект и в Visual Studio нажмем на него правой кнопкой мыши и в появившемся контекстном меню выберем пункт Publish:
И перед нами откроется окно публикации приложения:
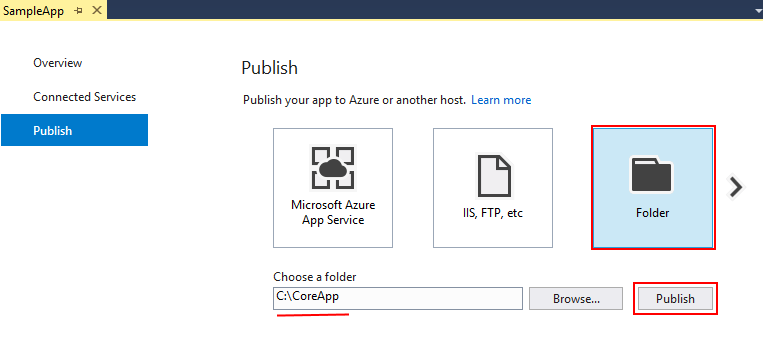
Здесь нам доступно несколько вариантов публикации:
-
Microsoft Azure App Service: публикация в облаке Azure
-
IIS, FTP, etc: публикация через FTP
-
Folder: публикация в виде отдельного пакета в файловой системе текущей рабочей машины
-
Import Profile: импорт профиля, который содержит настройки публикации
-
Microsoft Azure Virtual Machines: публикация в облаке Azure, по сравнению с первой опцией обладает большими возможностями по управлению инфраструктурой развертывания
В данном случае выберем опцию Folder для создания пакета для публикации в файловой системе. И также укажем путь, по которому будет находиться
пакет. В моем случае это каталог «C:CoreApp». И в конце нажмем на кнопку Publish.
Далее откроется окно, где будут оображаться выбранные настройки конфигурации, и для продолжения публикации нажмем в нем кнопку Publish:
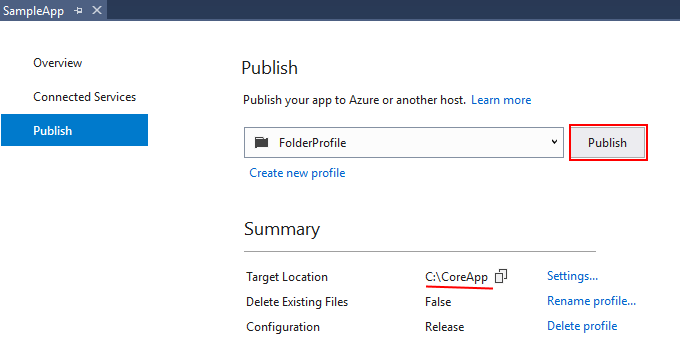
И после окончания публикации по указанному пути (в моем случае это каталог C:CoreApp) появятся опубликованные файлы.
Настройка IIS
Прежде всего нам надо включить функциональность Web Server (IIS) и настроить роли сервера. Для этого перейдем по пути Панель управления ->
Программы и компоненты -> Включение или отключение компонентов Windows. В списке компонентов найдем Службы IIS (Internet Information Services) и отметим ее:
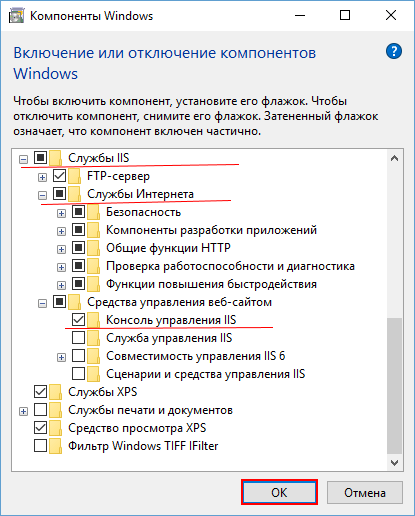
Здесь также надо отметить подпункт «Службы Интернета» (World Wide Web Services) и все его подпункты, а также подпункт «Консоль управления IIS»
(IIS Management Console).
Нажмем на ОК, и весь необходимый функционал будет добавлен в операционную систему.
Затем нам необходимо установить специальный пакет .NET Core Windows Server Hosting. Его можно найти, перейдя на страницу https://www.microsoft.com/net/download/all.
Далее на этой странице надо выбрать нужную версию .NET Core Runtime (.NET Core Runtime > .NET Core Runtime x.y.z. Далее
на странице выбранной версии .NET Core Runtime перейти к подразделу Windows и выбрать Server Hosting Installer.
После этого загрузится нужный пакет. Этот пакет устанавливает .NET Core Runtime, .NET Core Library и модуль ASP.NET Core Module.
Данный модуль, как говорилось выше, как раз и создает проксирование между IIS и сервером Kestrel.
После установки этого пакета выполним в командной строке команду iisreset или вручную перезапустим IIS, чтобы сервер применил изменения.
Конфигурация сервера
Для конфигурации IIS перейдем к консоли управления веб-сервером. Для этого перейдем по пути
Панель управления -> Администрирование -> Диспетчер служб IIS:
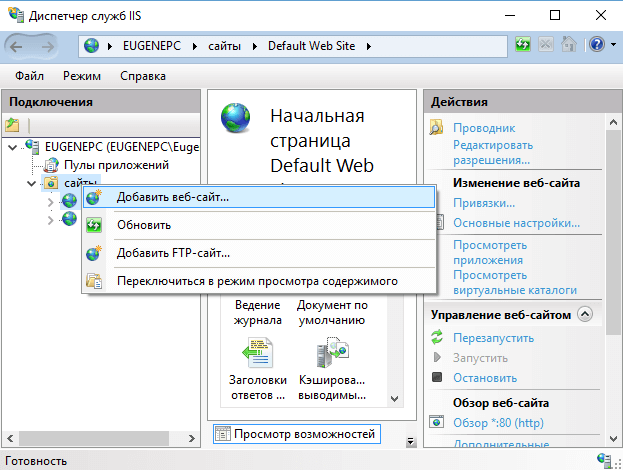
Нажмем правой кнопкой на узел «сайты» и в контекстном меню выберем пункт «Добавить веб-сайт…». После этого нам откроется окно для добавления нового сайта:
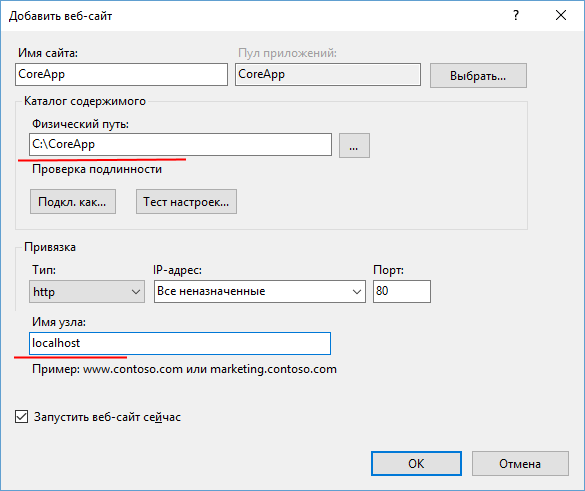
В поле «Физический путь» здесь укажем каталог, в котором опубликовано приложение. А в качестве имени узла определим «localhost». Нажмем на OK, и приложение будет запущено.
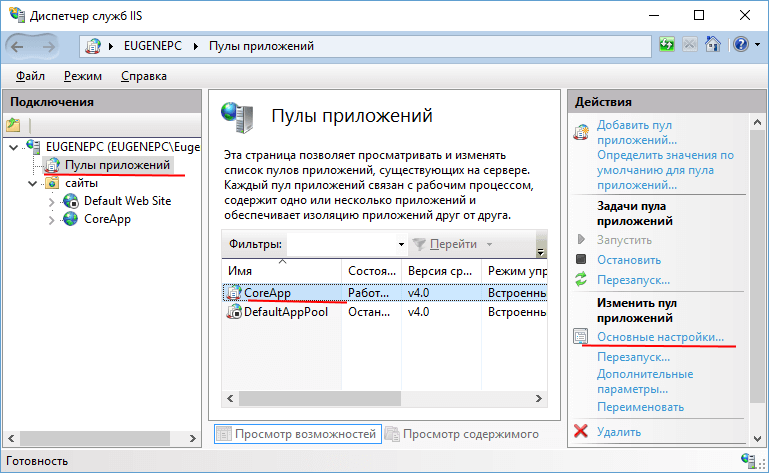
Теперь перейдем к пункту Пулы приложений. Выберем пул нашего приложения и справа нажмем на ссылку Основные настройки:
В открывшемся окне для параметра Версия среды CLR .NET установим значение Без управляемого кода:
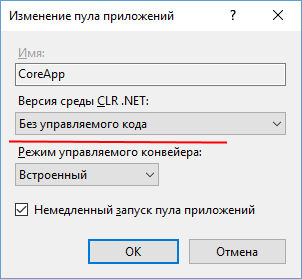
После этого пул будет перезапущен, и мы сможем обращаться к нашему приложению по адресу localhost.
In this post, we’ll see how to host your brand new shiny ASP.NET Core web application on a Windows IIS server, so that it can be used at production level.
We’ll not cover anything about .NET Core development, or about IIS as a general purpose web server on Windows computers. If you have already created some ASP.NET Core application and run them locally (e.g. from Visual Studio), and you have some familiarity with IIS, this post will show you how to quickly host your ASP.NET Core application on IIS. The purpose of existence of this post is, the deployment process is different from that of full .NET Framework applications. Along the way, we’ll cover some basic concepts and explain few things in brief.
If you are not looking for hosting your application on Windows IIS, head over to this official documentation to learn how to host it on Linux, MacOS, Docker or Azure. If you want to learn about .NET Core, check out this series on Working with .NET Core 2.0.
TL;DR If you already know how to host a website on IIS and the deployment options for .NET Core applications (FDD & SCD), the most important step for hosting ASP.NET Core applications on IIS server is that, you’ll need to install the ASP.NET Core IIS Module.
Just before we jump in, one might be wondering, when ASP.NET Core application already comes with its own web server Kestrel, why would anyone host it on IIS! Kestrel is very lean (and fast), and does only what is required, i.e. serve a HTTP request with a response. On the other hand, mature web servers like IIS, Nginx, Apache etc. have much more functionality built into them. So, it is always advised to use Kestrel behind a full web server as reverse proxy, for production use. That means, the web server will receive the request from internet, and forward it to Kestrel after some general preliminary work and send the response back from Kestrel.

With a full web server, viz. IIS, you can do stuffs that are not possible with Kestrel. Some examples are — running multiple apps on same server sharing same port (e.g. mysite.com and othersite.com both listening to HTTP port 80), public domain & SSL certificate management, security & authentication, request limiting, caching, URL re-writing etc.
The basic steps to host an ASP.NET Core application on IIS are
- Publish or package your application
- Install/Enable the IIS server
- Install .NET Core Runtime & Hosting Bundle
- Create a new website for your application
- Configure
[1] Package your application
Build your application. Once successfully built, publish your ASP.NET Core web application. The 2 basic ways to publish are
- Right-click the project in
Visual Studioand select publish - Use the
dotnet CLIcommand for publish, i.e.dotnet publish
Whichever way you prefer among the two above, there are 2 types of deployment
- FDD or Framework-Dependent Deployment. Here, only your app, NuGet and other related packages & configurations are packed in the published package. It needs the .NET Core runtime to be present on the target machine to run. The published package is platform independent and can run on any supported platform like
Windows,LinuxorMacOS. Practically, FDD also has options like- Portable — totally platform independent (there are some catch though, see later). Total binary size is pretty small, comes with your own DLLs, some .NET Core base types and a few specific to different runtimes
- Runtime specific — not the ideal framework dependent, and comes with bunch of runtime specific files (that can avoid the catch situations of portable option above). Binary size much larger than the portable one
- SCD or Self-Contained Deployment. Here the whole (the required parts) .NET Core runtime and Kestrel web server is packed with your application code. So, you can directly deploy the package on a machine and run, it does not need the .NET Core runtime to be pre-installed on the machine. This is a platform specific deployment, so you must choose the target runtime at the time of publish e.g.
win-x64orlinux-x64. The binary size much larger compared those FDD options.
If you are deploying on Windows-IIS, generally you’ll have the .NET Core installed, so you can publish your applications as FDD win-x64, so that published binaries are not very large and also you avoid some issues with portable deployment.
Note: In .NET Core, you specify a target platform with a runtime ID. A runtime ID is nothing but a combination of a specific OS and processor architecture e.g. win-x86, linux-x64 or osx-x64.
Note: Actual size of the published binaries will vary based on the type, size & complexity of the project. And they’ll also change, probably, with future releases of .NET Core. But, just to give an idea, for one of my not-so-large ASP.NET Core MVC project with .NET Core 2.0, the sizes are — 10 MB (FDD Portable), 40 MB (FDD Win-x64) and 100 MB (SCD Win-x64).
[2] Setup IIS web server
Now you need IIS web server up & running on your Windows desktop or server. If you already have a running IIS, skip this step. Then you need to have ASP.NET Core Module installed on the system, that comes as part of the .NET Core Runtime & Hosting Bundle.
Install the IIS. IIS comes as part of Windows OS, so you basically need to enable them. Follow instructions from here and enable it from Windows features in Control Panel. Note that, you’ll need to have Administrator role to install and configure IIS.
[3] Install .NET Core Runtime & Hosting Bundle
Now we’ll need the ASP.NET Core IIS Module configured for IIS, which comes as part of .NET Core Hosting Bundle. This enables IIS to serve ASP.NET Core applications. Remember that ASP.NET Core web applications run as separate process with Kestrel web server. IIS needs this module to handle this setup.
- Next we’ll get .NET Core Hosting Bundle, which needs Microsoft Visual C++ to run. It’ll be auto downloaded during installation. But, if you are working on a machine that does not have active internet connection, you first need to install it separately. So, if you have active internet on target machine, skip step 1 & 2. Go to the download the latest version (
x64orx86) of Microsoft Visual C++ latest Redistributable. - Install the Microsoft Visual C++ latest Redistributable package downloaded, double click on installer or run from command prompt.
- Now, we’ll install the .NET Core Hosting Bundle. Go to .NET Downloads page. Click Download .NET Core Runtime, under
.NET Coremenu. It’ll download the required installers. - Install the Microsoft .NET Core Hosting Bundle. To avoid installing the x86 components on a x64 machine, run the installer from command prompt with
OPT_NO_X86switch e.g.
C:Dir_with_installer> dotnet-hosting-2.1.4-win.exe OPT_NO_X86=1
Now, restart the system or restart IIS so that the ASP.NET Core module is recognized by IIS. You can do that without system restart with following commands in admin mode — net stop was /y followed by net start w3svc. It’ll show messages similar to following.
c:SomeDirectory>net stop was /y
The following services are dependent on the Windows Process Activation Service service.
Stopping the Windows Process Activation Service service will also stop these services.

   World Wide Web Publishing Service

The World Wide Web Publishing Service service is stopping.
The World Wide Web Publishing Service service was stopped successfully.

The Windows Process Activation Service service is stopping.
The Windows Process Activation Service service was stopped successfully.

c:SomeDirectory>net start w3svc
The World Wide Web Publishing Service service is starting.
The World Wide Web Publishing Service service was started successfully.
Just in case you thought what is this .NET Core Hosting Bundle that you just installed, the download page says it clearly.
The .NET Core Runtime & Hosting Bundle contains everything you need to run existing .NET Core apps, including hosting ASP.NET Core apps. The bundle includes the .NET Core runtime, the ASP.NET Core runtime, and if installed on a machine with IIS it will also add the ASP.NET Core IIS Module.
Now you might be wondering, if you published your application as SCD, why do you need this ASP.NET Core runtime? Shouldn’t you package be self-sufficient? The answer is yes, you app can run on its own (with Kestrel on Windows and with Kestrel/other web servers on other OS). But this runtime and module is required by IIS so that it can host your ASP.NET Core application, which was originally built to host full .NET Framework ASP.NET applications.
[4] Create a new website on IIS
If you have hosted any ASP.NET application on IIS before, you already know how to create a new website. If you have not done it before, follow step by step instructions from here.
Here, we’ll quickly create a new website on IIS for our application and do so minimal configuration.
- Open IIS. Search for IIS or run
inetmgrfrom run command (Windows + R). Remember you need to be an admin on the system to access IIS. - Under the server node on the left, right-click on
Sitesand selectAdd Website. Give the site a name (e.g. mycoreweb.com), use the same name forhostand select the directory where the app is published asPhysical path. - It’ll also create a new
app_poolwith the same name as the website host. You can use the same, select a different one or rename it if you want. It’s important you configure your application pool and set pipeline mode = Integrated, .NET CLR Version = No Managed Code. This basically tells the IIS it need not load full .NET Framework CLR, and the application will run on it’s own process. This is optional though. - If you just want to host a web app quickly and test on a dev machine, rather than step [2] it might be easier to just
Add Applicationon theSites > Default Web Site. If you give it a name likemysite, locally you can access this ashttp://localhost/mysiteon the browser.
Make sure your app_pool and the website are running, and you can browse your ASP.NET Core application now. See below for more configuration options.
[5] Configure
You should already have a running application, but few more configuration will help you manage & troubleshoot your application.
ASP.NET Core applications do not have a web.config (to know about configuration in .NET Core applications, read this), but when you publish it for Windows, a web.config gets generated. This is required by IIS and it has some minimal configuration.
It’s good you enable logs. Then it’ll create simple text logs for events like application start-up and errors, comes handy when trying to find problems. To enable logging
- Create a
logsdirectory in the application root i.e. in the published folder that IIS points to. This directory will host the ASP.NET Core Module stdout logs when stdout logging is enabled (see config below) - Turn on the logs by changing this flag
stdoutLogEnabled="true"in web.config
<?xml version="1.0" encoding="utf-8"?>
<configuration>
  <system.webServer>
    <handlers>
      <add name="aspNetCore" path="*" verb="*" modules="AspNetCoreModule" resourceType="Unspecified" />
    </handlers>
    <aspNetCore processPath="dotnet" arguments=".Web.Project.dll" stdoutLogEnabled="true" stdoutLogFile=".logsstdout" />
  </system.webServer>
</configuration>
This is a FDD config, so the processPath points to the dotnet.exe that’ll run the process, and host the main web dll (e.g. Web.Project.dll). On the other hand, for SCD on Windows, it’ll create an executable for the main web (e.g. Web.Project.exe) and that’ll be the target process.
NOTE: When built with version ASP.NET Core 3.1.3 (April 2020), other changes are not required, just enable the logging with stdoutLogEnabled="true".
See the last section “Accessing the website locally and on network” if you are having trouble accesing the page from browser.
Some common problems
[1] If you get HTTP Error 502.5 — Process Failure that basically means IIS could not start the process, for which most common reason is — it could not find .NET Core executable (discussed just above). To fix this, the options are
- Add the .NET Core path to system environment PATH (e.g. C:ProgramFilesdotnet)
- Mention the full path to
dotnet.exein (for FDD) or.Web.Project.exe(for SCD) inaspNetCore processPathattribute ofweb.config
[2] If you get an error that says dependencies manifest was not found, that means, well as it says. Some manifest files are missing that is used by the system. The error might look like this
Error:
  An assembly specified in the application dependencies manifest (Web.Project.deps.json) was not found:
    package: 'Microsoft.ApplicationInsights.AspNetCore', version: '2.1.1'
    path: 'lib/netstandard1.6/Microsoft.ApplicationInsights.AspNetCore.dll'
  This assembly was expected to be in the local runtime store as the application was published using the following target manifest files:
    aspnetcore-store-2.0.0-linux-x64.xml;aspnetcore-store-2.0.0-osx-x64.xml;aspnetcore-store-2.0.0-win7-x64.xml;aspnetcore-store-2.0.0-win7-x86.xml
This SO post and this GitHub issue talks about the problem. To fix this, you have to either of the following three options
- Install .NET Core full SDK (not just the runtime) on the server
- If it is a Framework Dependent Deployment, publish your app with specific runtime ID (e.g. win-x64 or linux-x64) rather than “Portable” (the catch mentioned above)
- Add this flag to your main
web.csprojand publish
<PropertyGroup>
    ...
    <PublishWithAspNetCoreTargetManifest>false</PublishWithAspNetCoreTargetManifest>
</PropertyGroup>
[3] If you get HTTP Error 500.31 — ANCM Failed to Find Native Dependencies, that might be because of multiple reasons. And the error text is generally not very helpful (for me, it said “The specified version of Microsoft.NetCore.App or Microsoft.AspNetCore.App was not found”).
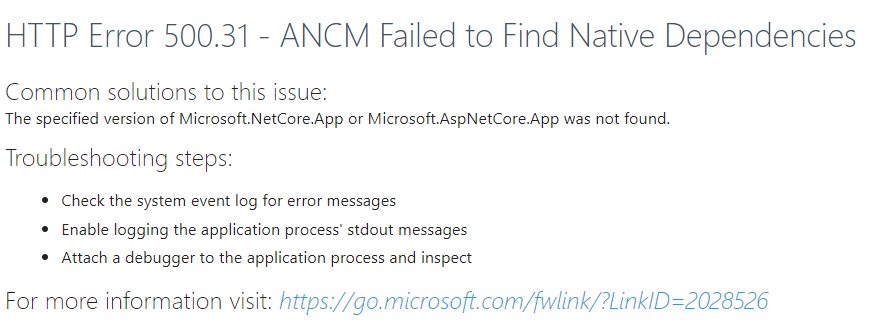
In my case, it happened when migrating to ASP.NET Core Runtime 3.1.3! It’s weird and hard to find the cause. As suggested in this SO post and GitHub issue, the fix is simple though. In the generated web.config file, the handler line might have modules="AspNetCoreModuleV2". Just remove V2 from it.
<handlers>
    <add name="aspNetCore" path="*" verb="*" modules="AspNetCoreModule" resourceType="Unspecified" />
</handlers>
[4] Some other common problems with fix suggestions are listed here
[5] Also good to know, standard IIS Logs are available at following locations
%SystemDrive%inetpublogsLogFiles%SystemDrive%WindowsSystem32LogFilesHTTPERR- In the Event Viewer, check this custom view to easily locate IIS event logs:
Event Viewer>Custom Views>ServerRoles>Web Server
Accessing the website locally and on network
This is not related to .NET Core, but if you are struggling to access your IIS hosted website on the same machine or over the LAN, you need to set the bindings properly and tweak the hosts file.
The hosts file bit is only required if you’re trying to access the website with a custom domain name like mycoolsite.com. The hosts file works like the first level DNS lookup, so you can setup any domain name to IP mapping here, for local use.
[1] To run the app locally with a custom domain name (e.g. mycoolsite.com in our example), add it to the Windows hosts file so that browsers can find it. For that, open any text editor in admin mode, open the file hosts file, and add the custom domain name with localhost IP address i.e. 127.0.0.1 on a new line, and save
# in C:WindowsSystem32driversetchosts
127.0.0.1 mycoolsite.com
[2] To make it available over LAN, add another binding for your website with the IP address of the hosting machine and a port (check this post for help). So you’ll actually have two bindings for your site
#For Local:
Type: http
Ip Address: All Unassigned
Port: 80
Host name: mycoolsite.com

#For network LAN:
Type: http
Ip Address: <Network address of the hosting machine ex. 190.168.10.50>
Port: 8080 <make sure this port is allowed to have incoming traffic>
Host name: <Leave it blank>
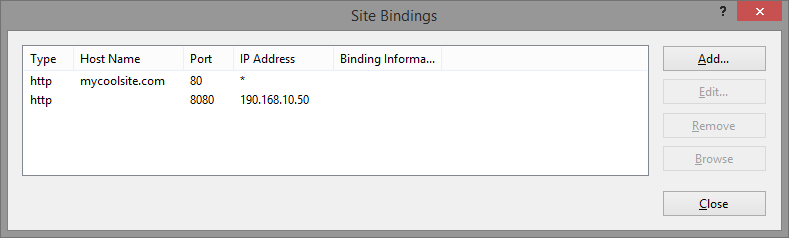
Also, make sure that the port that you used (e.g. 8080) is allowed to receive inbound requests and is not blocked by firewall.
comments powered by

In my previous post, I have mentioned how to create Serverless .Net Core application which you can find here and you can find my all .Net Core posts here.
In this post, I will explain how to hostdeploy your .Net Core 2.0 application to IIS.
prerequisite:
- Visual studio 2017 community edition, download here
- .Net Core 2.0 SDK from here (I have written a post to install SDK here)
- Make sure you have enabled the Web Server (IIS) role and established the role services
Install .NET Core Windows Server Hosting Bundle
Since .Net Core is a new framework, at this moment IIS is not aware of how to run .Net Core applications. So we need to inform IIS to set up an environment for the .Net Core applications.
For this, we need to install .Net Core Windows Server Hosting bundle which will install the .NET Core runtime, libraries, and the ASP.NET Core module for IIS.
Please note that this is a very important step and you must install the bundle before you publish the application on IIS.
You can download it from here(download will start once you click the link):
.NET Core Windows Server Hosting bundle
Wait till the installation is over:

Once the installation is completed, either restart your system or run below commands in sequence in command prompt:
- net stop was /y
- net start w3svc
The first command will stop the World Wide Web publishing service and the second command will start the service again.
Create the Web application using .Net Core 2.0 template in VS 2017
Once you have all these installed, open your Visual Studio 2017 -> Create New Project -> Select Core Web application:

Click on Web Application in next window and then click on Ok:

Visual Studio will create a well-structured application for you.
Right click on the solution and click on Publish:

In next window, click on Folders and give the folder path. I created Publish folder under wwwroot folder:

It will publish the application on the above-mentioned path:

Create Website on IIS
Open your IIS Manager and add new website:

Now go to Application Pools panel, open the Edit Application Pool window by right-clicking on the website’s app pool and selecting Basic Settings and set .NET CLR version to No Managed Code:

Check if .Net Core Windows Server Hosting bundle is installed properly
Next step is to check whether the hosting bundle which we installed earlier is installed properly or not.
For this click on Modules(in IIS Manager) of your newly created website and search for AspNetCoreModule. If it is available, it indicates that IIS is now aware of how to run a .Net Core application.

You might be wondering what is Asp .Net Core Module?
- ASP.NET Core Module lets you run ASP.NET Core applications on IIS for what it’s good for i.e. security, manageability, and lots more
- On the other hand, ASP.NET Core Module lets you run ASP.NET Core applications using Kestrel for what it’s good at for example being really fast
- Thus it is getting the benefits of both technologies at once
- Asp .Net Core Module handles all incoming traffic to IIS and acts as the reverse proxy that knows how to hand the traffic off to your ASP.NET Core application
You may have noticed that when we published the code to a particular folder, a web.config was created in which you can see aspNetCore under Handler section as below. This is only used when deploying your application to IIS and It registers the AspNetCoreModule as an HTTP handler.
<?xml version="1.0" encoding="utf-8"?>
<configuration>
<system.webServer>
<handlers>
<strong><add name="aspNetCore" path="*" verb="*" modules="AspNetCoreModule" resourceType="Unspecified" /></strong>
</handlers>
<aspNetCore processPath="dotnet" arguments=".NeelCorePublishIIIS.dll" stdoutLogEnabled="false" stdoutLogFile=".logsstdout" />
</system.webServer>
</configuration>
That is it.
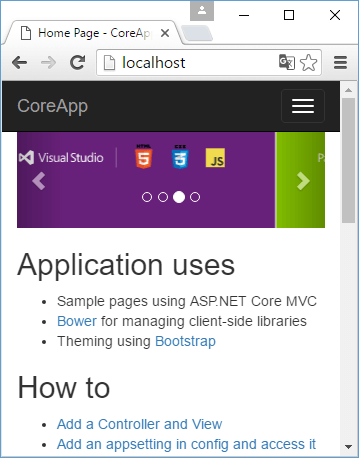
Just load your IIS site and it should load just fine:

Now the application is hosted on IIS.
Hope it helps.

Published by Neel
Senior Software Engineer at Coolblue | Tech Blogger | Top 4% Overall on StackOverflow
View all posts by Neel
Published
January 30, 2018