Windows 11 теперь официально доступна в качестве бесплатного обновления для всех систем, отвечающих требованиям к оборудованию. Но уже прошло пятое октября, а вы все еще не получили официального обновления. Почему это так и что вы можете сделать, чтобы получить Windows 11 прямо сейчас? Вот все, что вам нужно знать.
Хотя Windows 11 была выпущена 5 октября, очень много людей ждали, затаив дыхание, но безрезультатно. Это связано с тем, что Microsoft хочет выпускать обновление поэтапно, подобно тому, как это делалось с функциями Windows в прошлом.
Помимо получения дополнительных доходов от OEM-производителей, таких как Dell и HP, которые лицензируют ОС Windows, поэтапный выпуск также гарантирует, что любые обнаруженные проблемы могут быть исправлены до того, как большинство пользователей получат обновление. Однако ждать осталось недолго. Microsoft ожидает, что все совместимые Windows 10 получат обновление Windows 11 к лету 22 года.
Как исправить обновление Windows 11, которое не отображается (7 методов)
Сказав это, вы можете оставить все каналы открытыми на случай, если обновление действительно будет выпущено на ваш компьютер. Поэтому, если вы обнаружите, что обновление Windows 11 не отображается, и вы не можете официально обновить свой компьютер, вот несколько вещей, которые вы должны проверить, чтобы обновление прошло.
Исправление № 01: проверьте, соответствует ли ваш компьютер системным требованиям.
Во-первых, проверьте, действительно ли ваш компьютер соответствует требованиям системные требования для запуска Windows 11. Microsoft не будет выпускать обновление, если не будут соблюдены технические характеристики оборудования. Хотя пользователи могут обойти это и установить Windows 11, даже если их системное оборудование не на должном уровне, обычно это не рекомендуется.
Исправление № 02: убедитесь, что Центр обновления Windows работает.
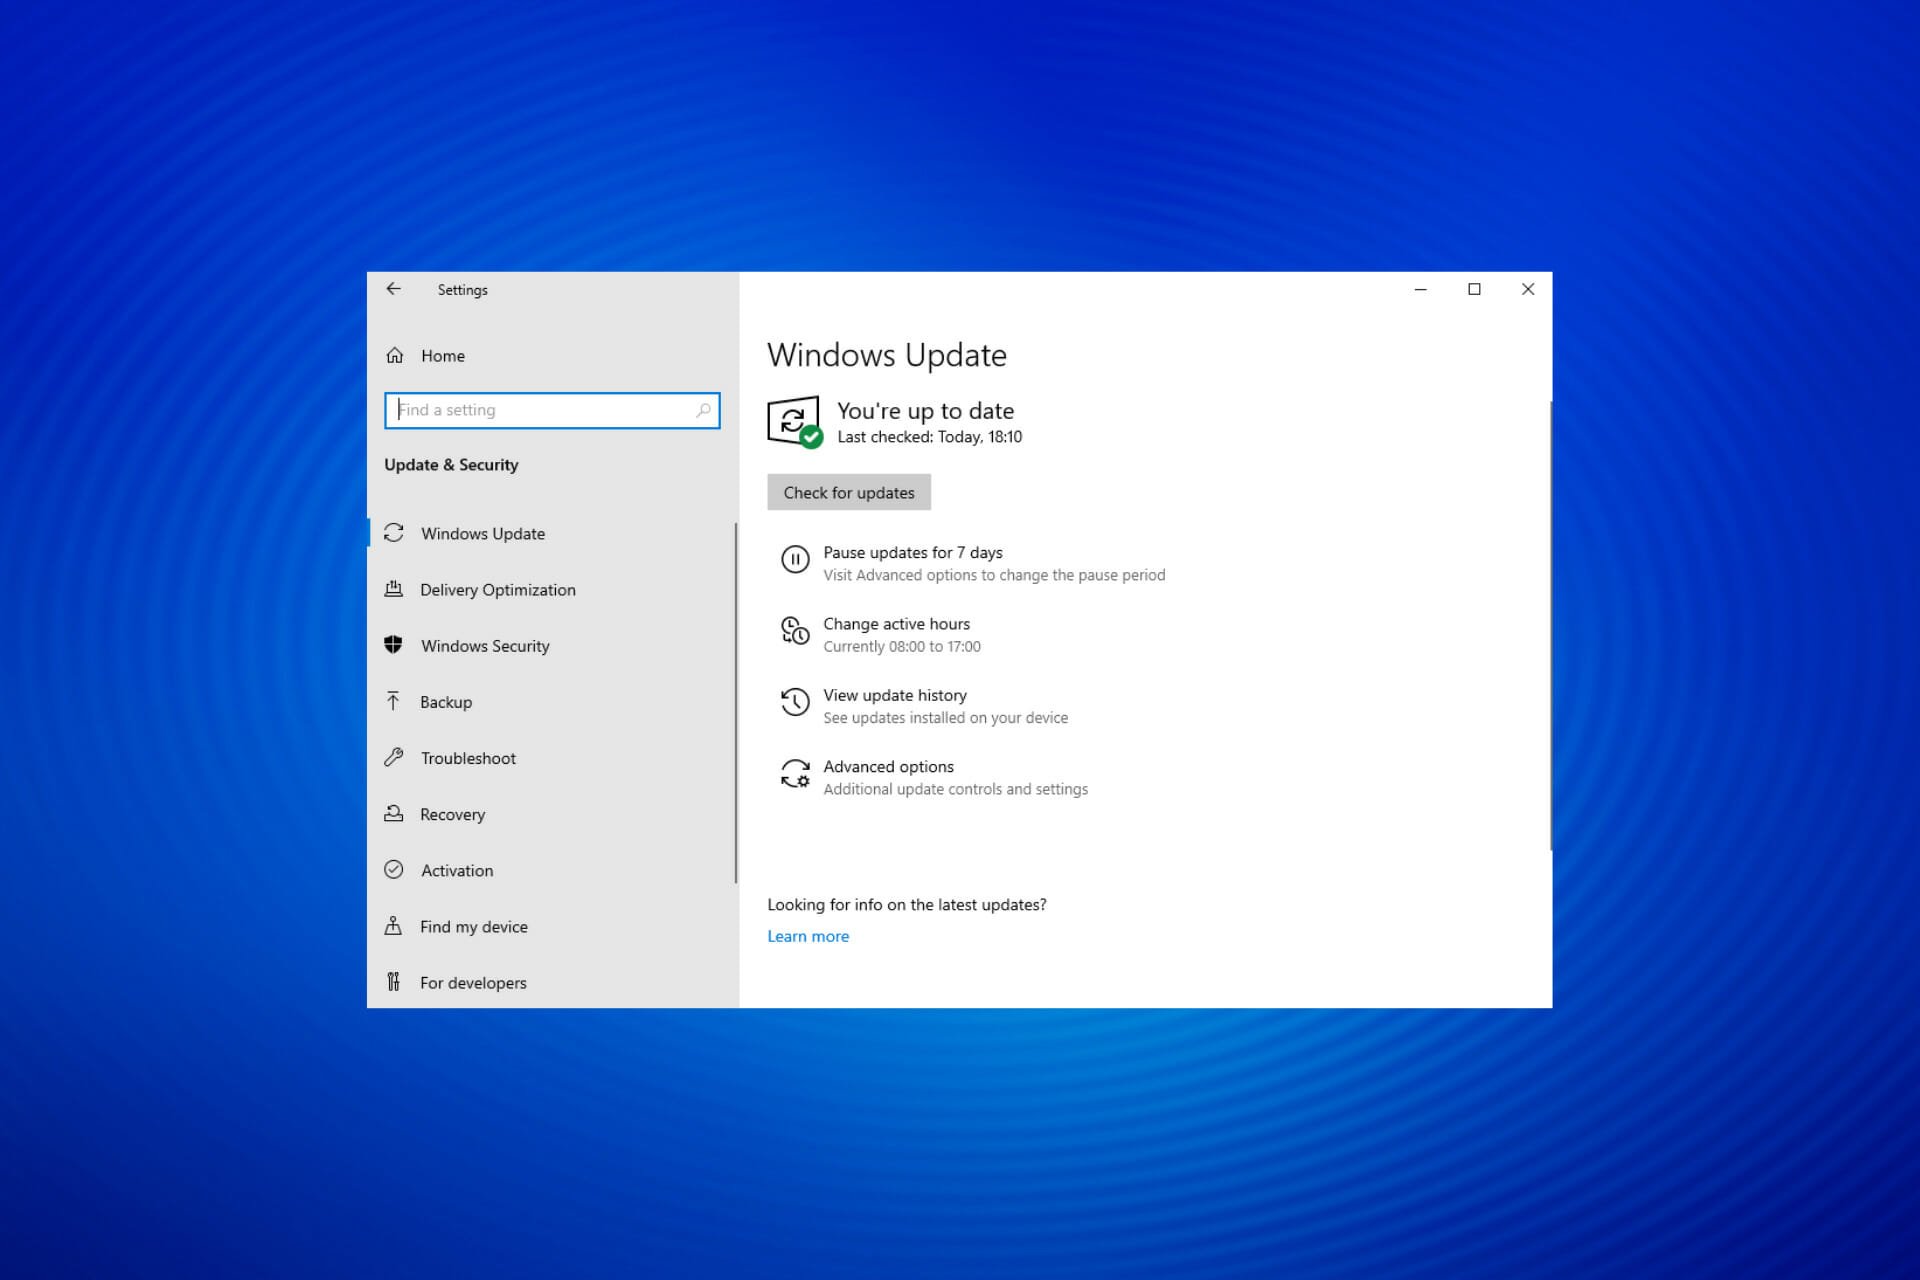
Также возможно, что вы, возможно, приостанавливали обновления Windows в прошлом и забыли об этом, или что функция была отключена приложением или ошибкой. Чтобы проверить, так ли это, нажмите Win + I, чтобы открыть Настройки. Кликните Обновление и безопасность.
Если ваши обновления приостановлены, нажмите «Возобновить обновления».
Исправление № 03: перезагрузите компьютер.
Иногда поврежденные временные файлы могут помешать обновлению Windows, и самый быстрый способ исправить это — перезагрузить компьютер. Это простое и легкое решение, которое не требует времени на выполнение.
Поэтому обязательно перезагрузите компьютер и проверьте, доступны ли какие-либо обновления. Чтобы перезагрузить компьютер, нажмите клавиши Win + X, затем нажмите «Завершить работу или выйти», а затем «Перезагрузить».
Исправление № 04: устранение неполадок Центра обновления Windows
В Windows есть собственное встроенное средство устранения неполадок для диагностики проблем и предложения исправлений. Во многих случаях средство устранения неполадок Центра обновления Windows обнаружит, что препятствует установке обновлений, и порекомендует решения. Вот как это запустить:
Нажмите Win + I, чтобы открыть приложение «Настройки». Затем нажмите «Обновление и безопасность» внизу.
Нажмите «Устранение неполадок» слева.
Кликните Дополнительные средства устранения неполадок.
Кликните Центр обновления Windows.
Затем нажмите Запустить средство устранения неполадок.
Средство устранения неполадок начнет поиск проблем и предложит возможные исправления, если будут обнаружены какие-либо проблемы.
Исправление № 05: обновление с помощью Помощника по установке Windows 11.
Вышеупомянутые исправления гарантируют, что все доступные каналы будут открыты и восприимчивы к обновлениям Windows 11, когда они появятся. Но если вы хотите получить Windows 11 сейчас, эти несколько последних методов помогут вам получить ее.
Выпуск Windows 11 означает, что теперь вы можете найти официальный помощник по установке Windows 11 на сайте Microsoft. Установить Windows 11 с помощью этого помощника очень просто. Мы рассмотрели пошаговое руководство для этого — поэтому проверьте его ниже, чтобы точно знать, что делать.
Может быть интересно: Как использовать Помощник по установке Windows 11 для обновления с Windows 10
Исправление № 06: Запуск обновления на месте с помощью Windows 11 Media Creation Tool.
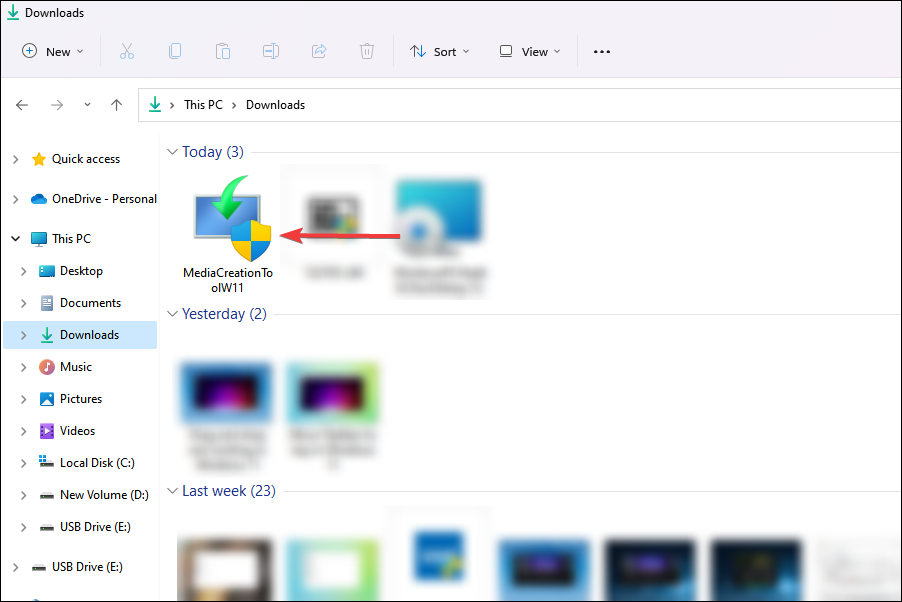
Если вы еще не получили обновление Windows 11, вы также можете выполнить обновление на месте самостоятельно с помощью установочного носителя Windows 11. Для этого вам понадобится пустая флешка (не менее 8 ГБ).
Скачать: Установочный носитель Windows 11
На странице, указанной выше, нажмите Загрузить сейчас в разделе «Создать установочный носитель Windows 11».
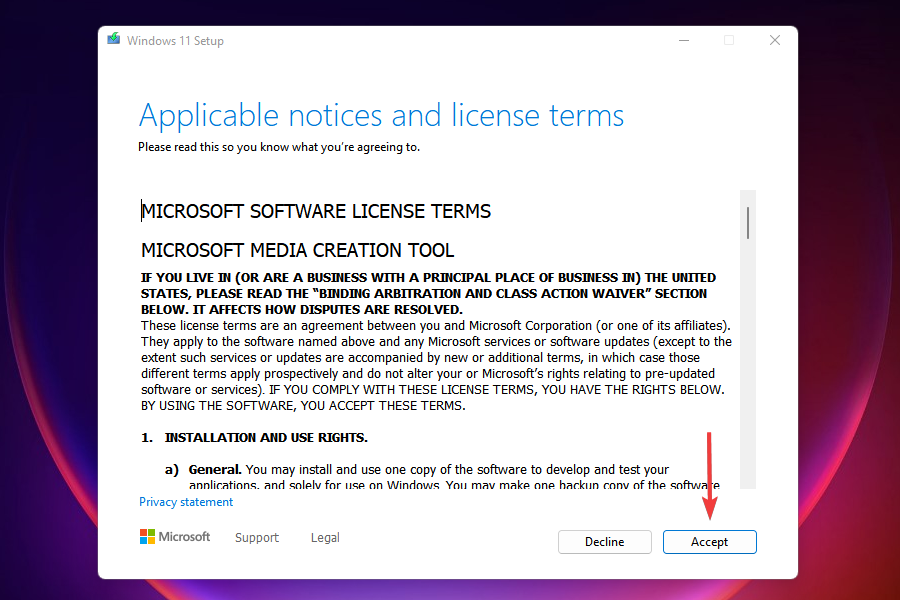
Подключите USB-накопитель и запустите загруженный инструмент создания мультимедиа. Кликните «Принять«.
Нажмите «Далее».
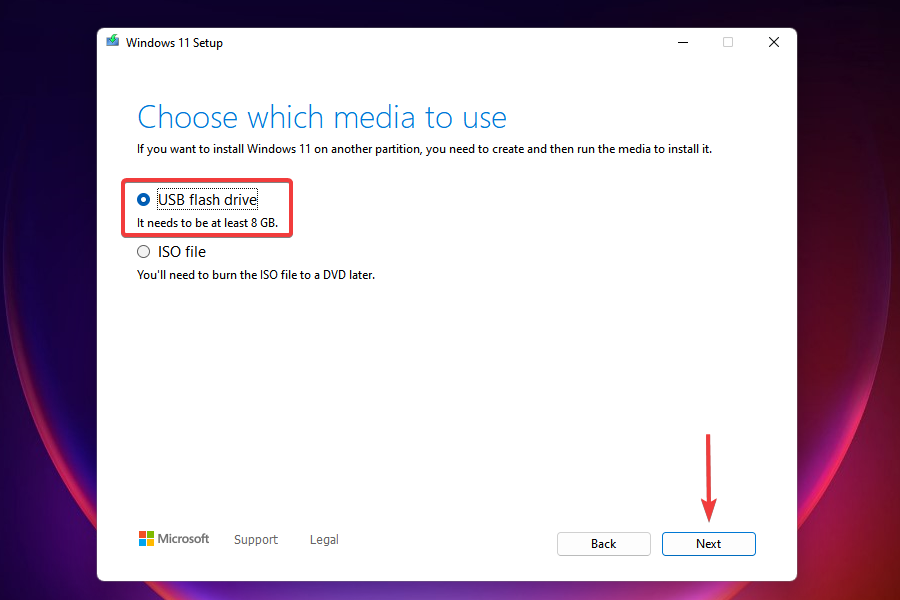
Выбрав параметр «Флэш-накопитель USB», нажмите «Далее».
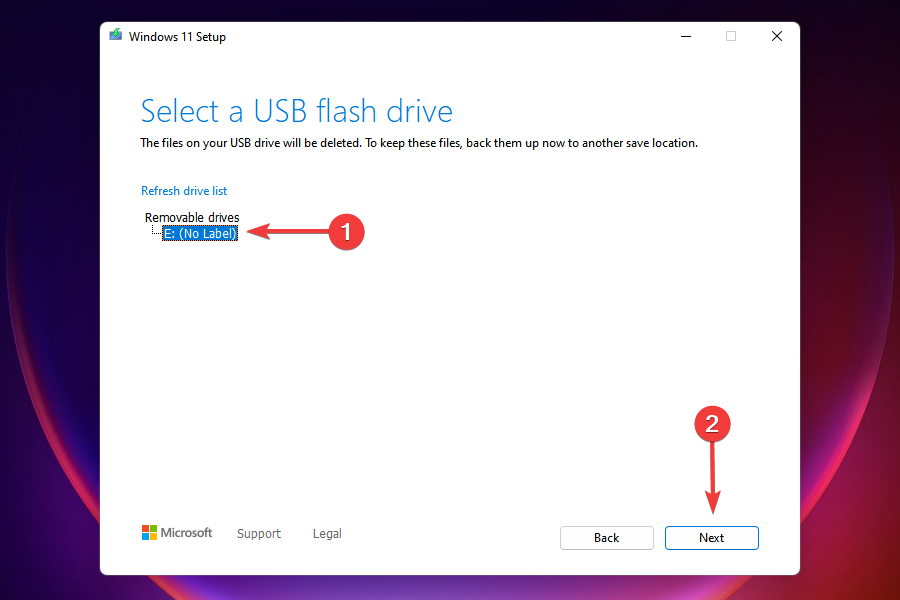
В списке «Съемные диски» выберите USB-накопитель и нажмите «Далее».
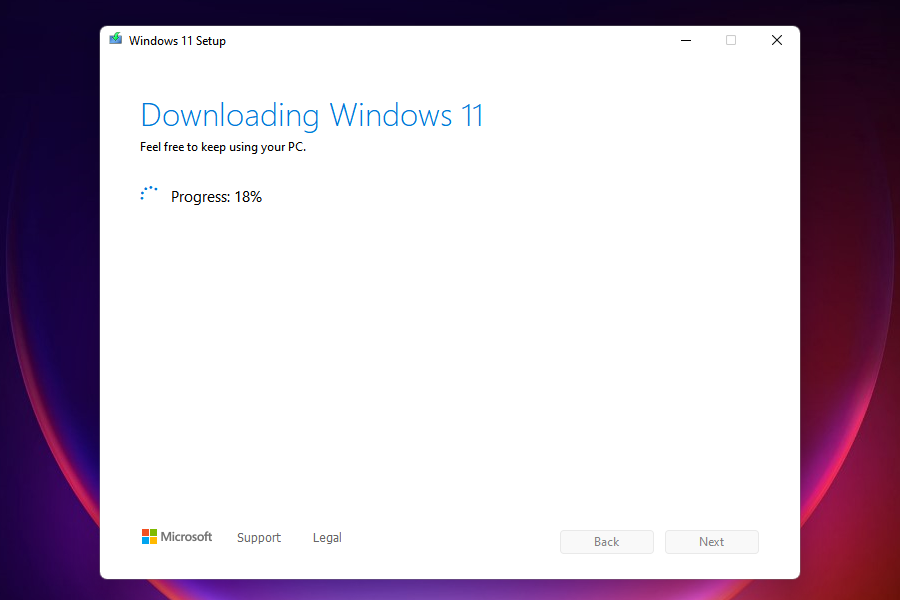
Для загрузки и установки обновления Windows 11 потребуется некоторое время.
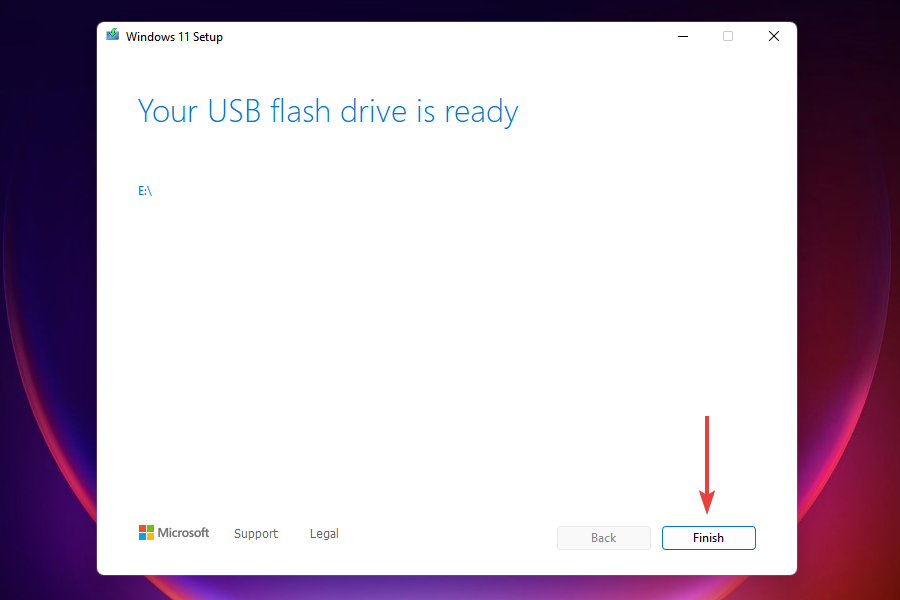
После завершения процесса ваше USB-устройство будет готово для обслуживания вас (или любого другого совместимого ПК, на котором оно используется) с Windows 11. Вы можете сделать это, загрузившись с USB-накопителя и выполнив инструкции на экране. Или вы можете зайти на свой USB-накопитель (через проводник) и запустить setup.exe.
Откроется окно установки Windows 11. Следуйте инструкциям на экране, чтобы выполнить обновление до Windows 11.
Исправление № 07: дождитесь, пока Microsoft выпустит обновление для Windows 11 на ваш компьютер.
Если обновление Windows 11 еще не доступно для вашего ПК и вы не хотите выполнять обновление вручную, единственное, что вы можете сделать, это подождать. Microsoft медленно внедряет обновление Windows 11 на все ПК, отвечающие системным требованиям. Ожидайте, что он будет доступен для вашего ПК к середине 2022 года.
Windows 11 не поддерживает мой компьютер или процессор?
Что ж, если приведенные выше исправления не работают, возможно, ваш компьютер не поддерживается Windows 11.
Загрузите приложение Windows 11 Health Check для проверки работоспособности ПК отсюда. Он автоматически начнет загрузку, но если этого не произойдет, нажмите кнопку «Загрузить» в левом верхнем углу.
Дважды кликните загруженный файл, чтобы запустить приложение PC Health Check на вашем компьютере.
Нажмите кнопку «Проверить сейчас».
Если ваш компьютер совместим с Windows 11, вы увидите этот экран:
Если ваш компьютер соответствует требованиям, снова воспользуйтесь Помощником по установке Windows 11. Это должно работать.
Однако, если ваш компьютер НЕ совместим с Windows 11, вы получите следующий экран:
В этом случае см. Исправление для установки Windows 11 на неподдерживаемом ПК прямо ниже.
Как установить Windows 11 на неподдерживаемый компьютер
Как ни странно, да. И довольно легко. Проверьте ссылку ниже.
Простой способ установить Windows 11 на неподдерживаемое оборудование — отключить проверку TPM и безопасной загрузки.
Вы можете сделать это, открыв редактор реестра и перейдя по этому адресу:
HKEY_LOCAL_MACHINE SYSTEM Setup MoSetup
Здесь создайте новое значение DWORD (32-разрядное) с именем AllowUpgradesWithUnsupportedTPMOrCPU. Теперь дважды кликните новое значение, чтобы отредактировать его, и замените данные значения с 0 на 1, а затем нажмите кнопку ОК, чтобы сохранить его.
Теперь установите Windows 11 с помощью Помощника по установке Windows 11. Кроме того, вы также можете использовать ISO- файл Windows 11.
Приведенный выше метод действительно лучший, так как даже сама Microsoft предложенный Это. Однако, если вы боитесь редактировать файл реестра, вы настраиваете ISO-файл Windows 11, чтобы он не проверял требования безопасной загрузки и TPM, и сразу же устанавливаете обновление Windows 11.
Все, что вам нужно сделать, это установить Windows 11 с помощью ISO-файла, предоставленного Microsoft, но сначала удалить appraiserres.dll внутри него.
Мы надеемся, что с помощью этого руководства вы смогли установить на свой компьютер Windows следующего поколения.
This issue prevents the installation of the new OS
by Kazim Ali Alvi
Kazim has always been fond of technology, be it scrolling through the settings on his iPhone, Android device, or Windows. And at times, unscrewing the device to take… read more
Published on November 28, 2022
Reviewed by
Vlad Turiceanu

Passionate about technology, Windows, and everything that has a power button, he spent most of his time developing new skills and learning more about the tech world. Coming… read more
- A lot of users have reported being the Windows 11 update not showing in Windows 10 on the Windows Update tool.
- If you using a PC that meets that minimum requirement, you should receive the update in a while since the roll-out is in a phased manner. However, there are ways to make the jump even sooner.
- Check for any issues with the Windows Update, namely, if they are paused, stuck, or the presence of conflicting programs.
- Also, learn how to install Windows 11 on unsupported PCs.
XINSTALL BY CLICKING THE DOWNLOAD FILE
- Download Restoro PC Repair Tool that comes with Patented Technologies (patent available here).
- Click Start Scan to find broken files that are causing the problems.
- Click Repair All to fix issues affecting your computer’s security and performance
- Restoro has been downloaded by 0 readers this month.
Windows 11 has been rolled out for users, though in a phased manner. PCs that are compatible should receive an update in the days to follow. However, many users have reported Windows 11 not showing up in Windows Update.
The Windows 11 update not showing up issue could be due to a bunch of reasons, some related to your computer’s compatibility while others to the phased rollout. Whatever the case, there are ways you can get your hands on the latest Windows iteration from Microsoft.
If you have been checking the Windows Update section time and again to upgrade but to no avail, read ahead to find out the various ways you can install Windows 11 on your computer.
Why don’t I see the Windows 11 update?
A large number of computers wouldn’t be able to upgrade to Windows 11 owing to the strict system requirements. And Microsoft has its reasoning for that.
Can my PC run Windows 11?
To check whether a computer can run Windows 11, Microsoft has released the PC Health Check app. Just download and install the app, run it, and you will find out whether or not your system is compatible.
If you get the message This PC meets Windows 11 requirements, your computer is compatible. Head over to the next section to find out ways to make the upgrade even if Windows 11 is not showing up in Windows Update.
For those of you who see This PC doesn’t currently meet the Windows 11 system requirements, you wouldn’t be receiving the upgrade via Windows Update. Head over to the end to find out how you can install Windows 11 on an unsupported PC.
What can I do if the Windows 11 update is not showing up?
- Why don’t I see the Windows 11 update?
- Can my PC run Windows 11?
- What can I do if the Windows 11 update is not showing up?
- 1. Resume Windows Update
- 2. Reboot the computer
- 3. Run the Windows Update troubleshooter
- 4. Repair Windows Update components
- 5. Restart the Windows 11 update
- 6. Disable or uninstall conflicting apps
- 7. Use the Installation Media
- Can I use the Windows 11 Installation Assistant to upgrade?
- What do I do if my PC doesn’t meet the system requirements for Windows 11?
1. Resume Windows Update
- Press Windows + I to launch the Settings app.
- Select Update & Security from the various options listed here.

- In the Windows Update tab that opens by default, check if there is a Resume Updates button on the right. If there’s one, click on it to start receiving updates.

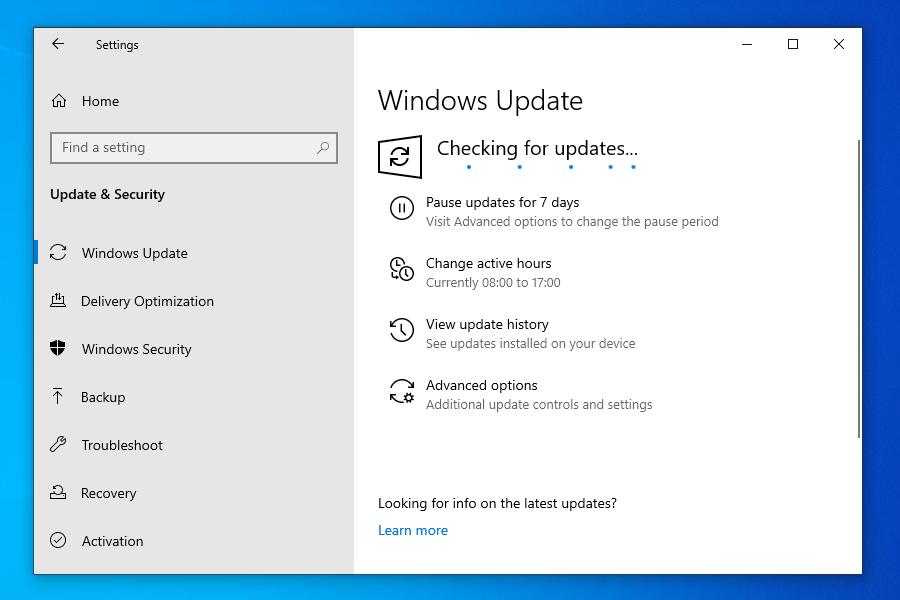
- Your system will now automatically start scanning for any available update including those for Windows 11.

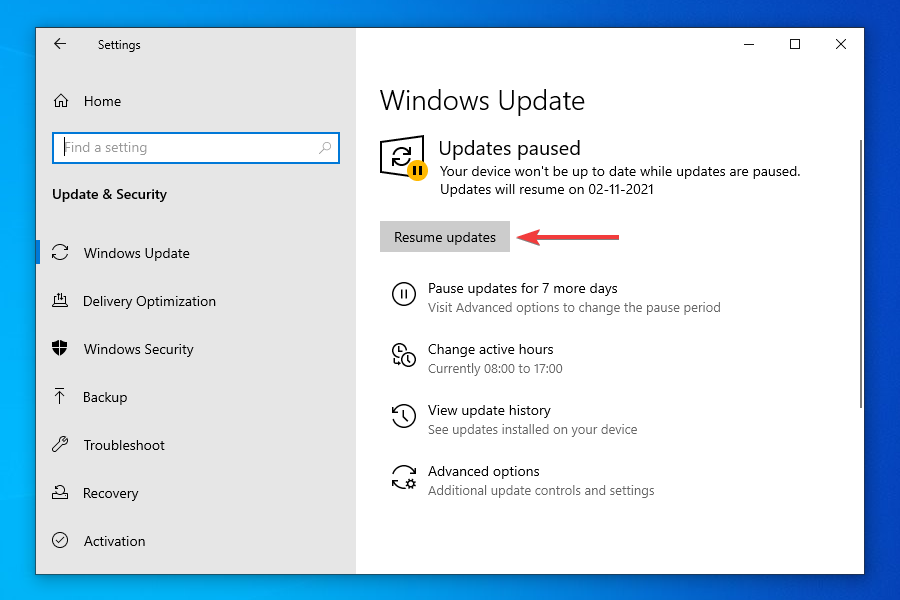
If you have paused updates, you wouldn’t be receiving any, including the one for Windows 11. Even if you don’t remember doing it, there’s no harm in cross-checking before we proceed further.
After you enable updates, if an upgrade for Windows 11 is available, it would be shown in Windows Update, and subsequently, downloaded and installed on your computer.
2. Reboot the computer
- Navigate to the desktop and press Alt + F4 to launch the Shut Down Windows box.
- Click on the dropdown menu and select Restart from the list of options.
- Click on OK to restart the computer.
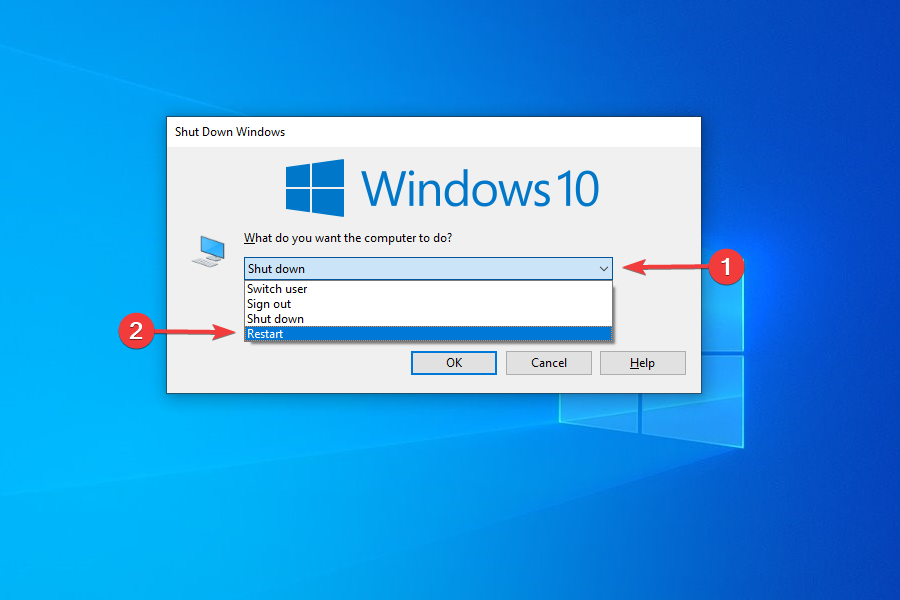
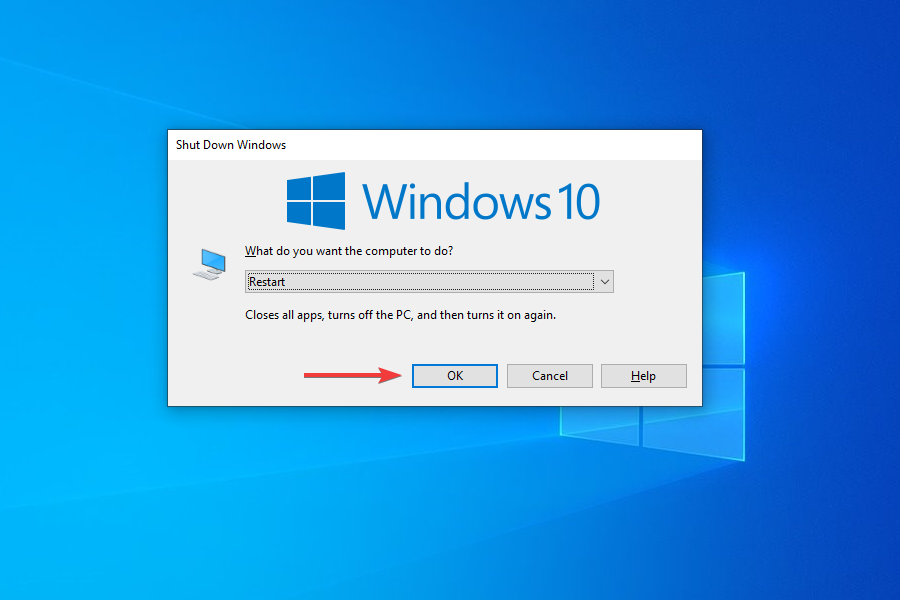
Before restarting, make sure to save any open files to avoid data loss. Rebooting the computer restarts the OS and fixes any trivial bugs that may be interfering with the Windows 11 update.
3. Run the Windows Update troubleshooter
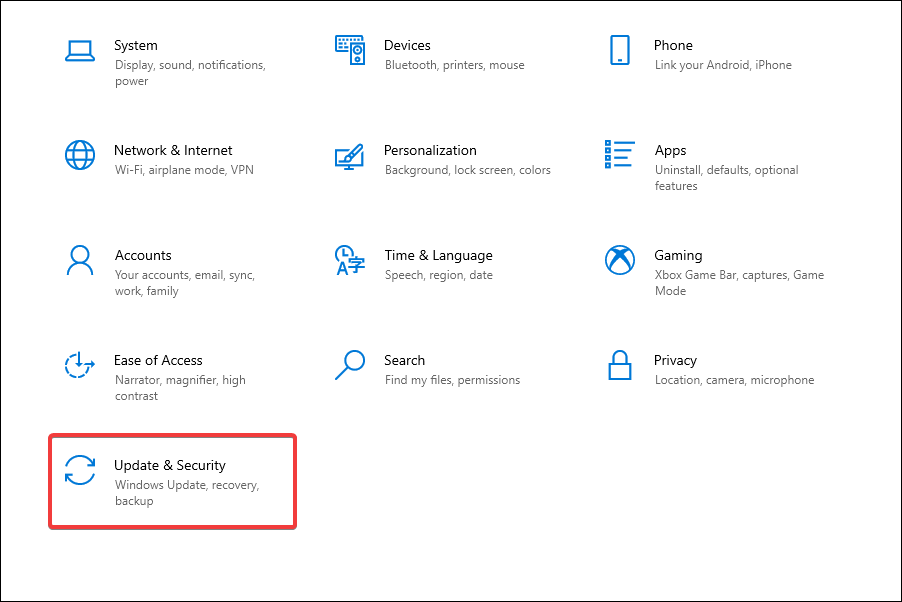
- Press Windows + I to launch the Settings app.
- Select Update & Security from the list of options listed in the Settings.
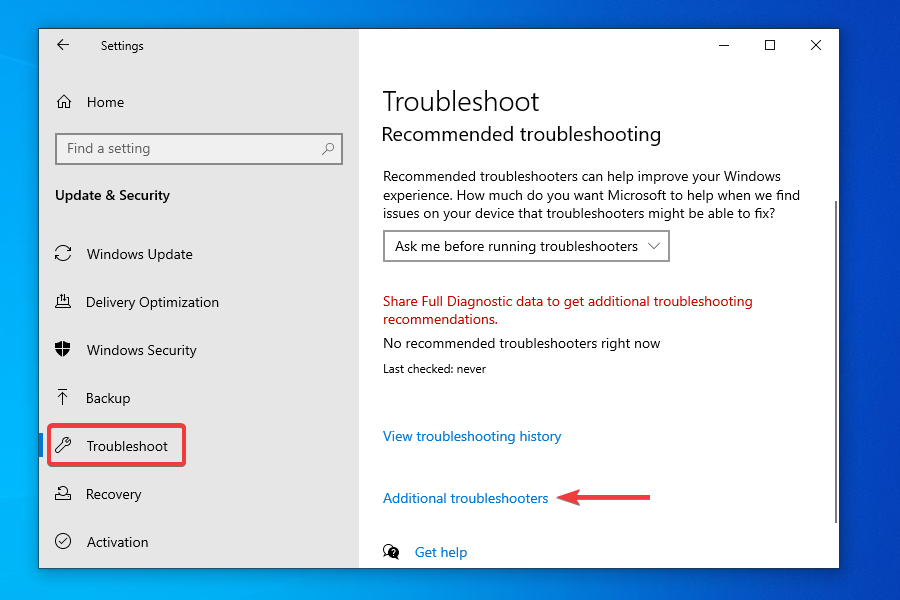
- Select Troubleshoot from the tabs listed in the navigation pane and click Additional troubleshooters on the right.
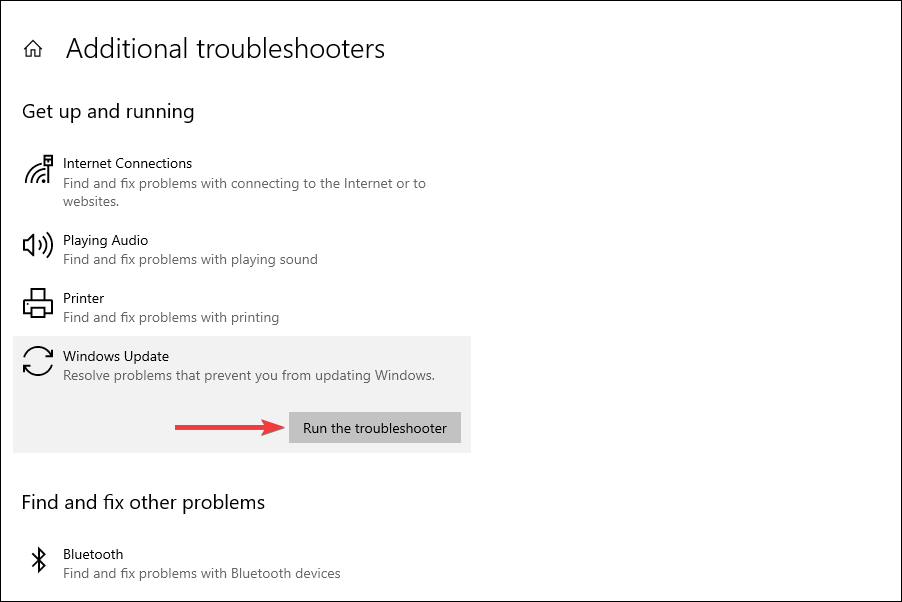
- Click on Windows Update.
- Click Run troubleshooter to diagnose and fix issues preventing your PC from receiving the update for Windows 11.
- The troubleshooter will now start running. Follow the instructions and choose the appropriate response, if and when prompted, to complete the process.

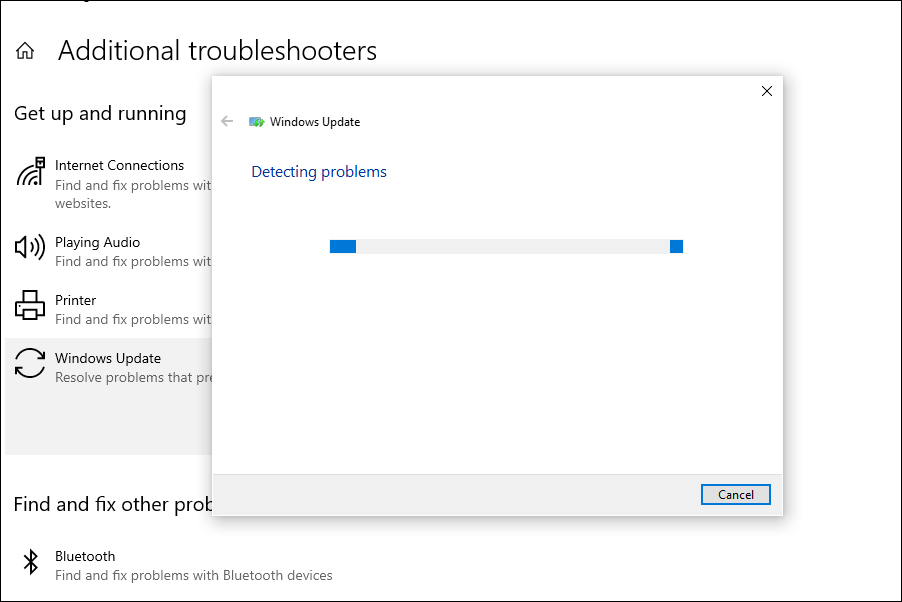
The built-in troubleshooters offered by Microsoft are excellent in identifying and fixing small bugs, misconfigured settings, and other issues. After the troubleshooter is done running, check if Windows 11 is now showing up in Windows Update.
4. Repair Windows Update components
Although you are required to repair or reset Windows Update components when encountering an error, it may also help you get the Windows 11 update in this case.
If they have become corrupt or have run into a bug that is leading to the Windows 11 not showing up in Windows update issue, repairing or resetting them should come in handy.
5. Restart the Windows 11 update
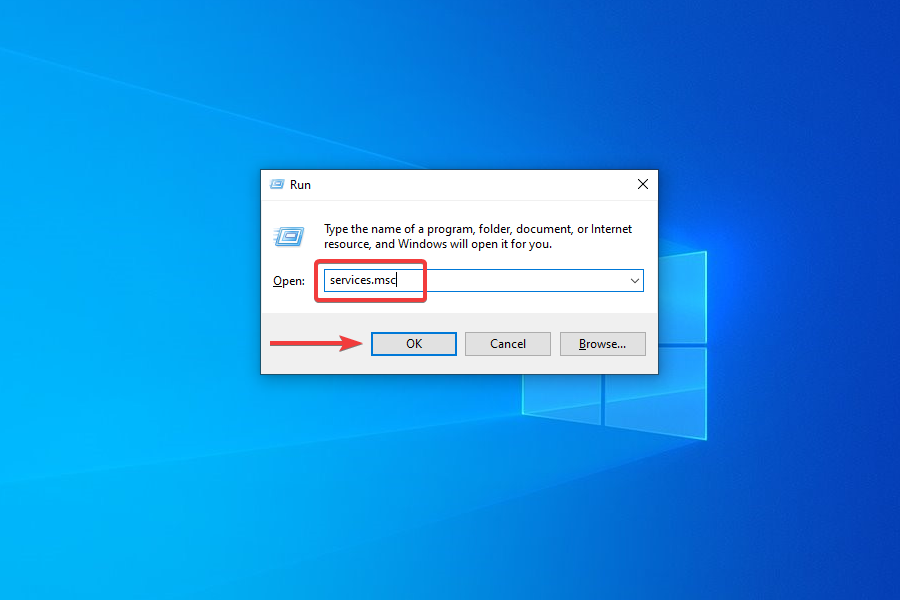
- Press Windows + R to launch the Run command.
- Type services.msc in the text field, and either click on OK or press Enter to launch the Services app.
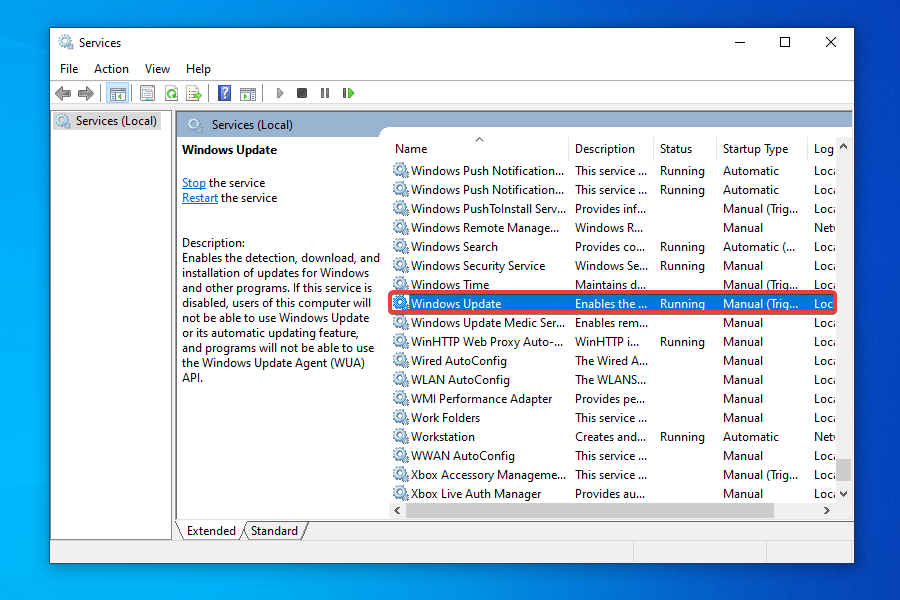
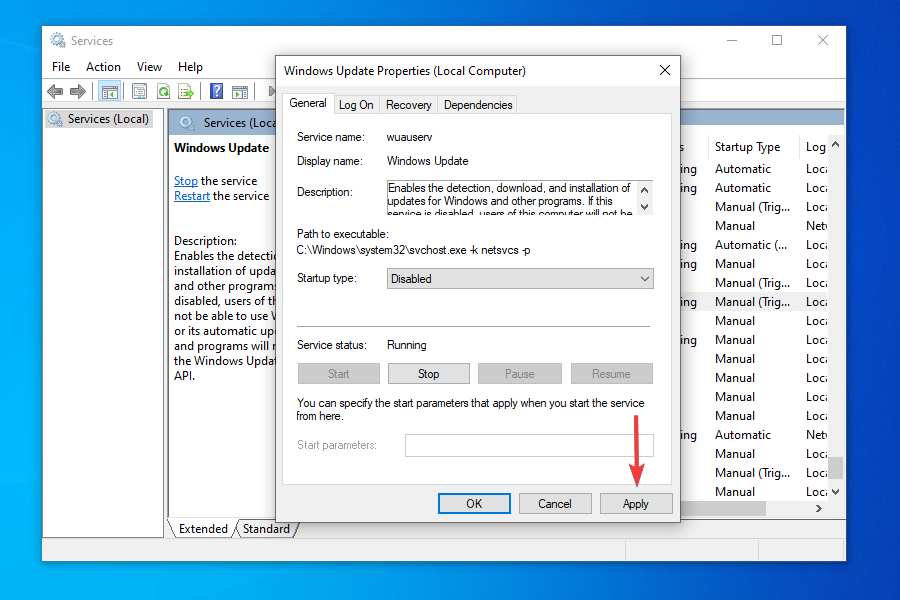
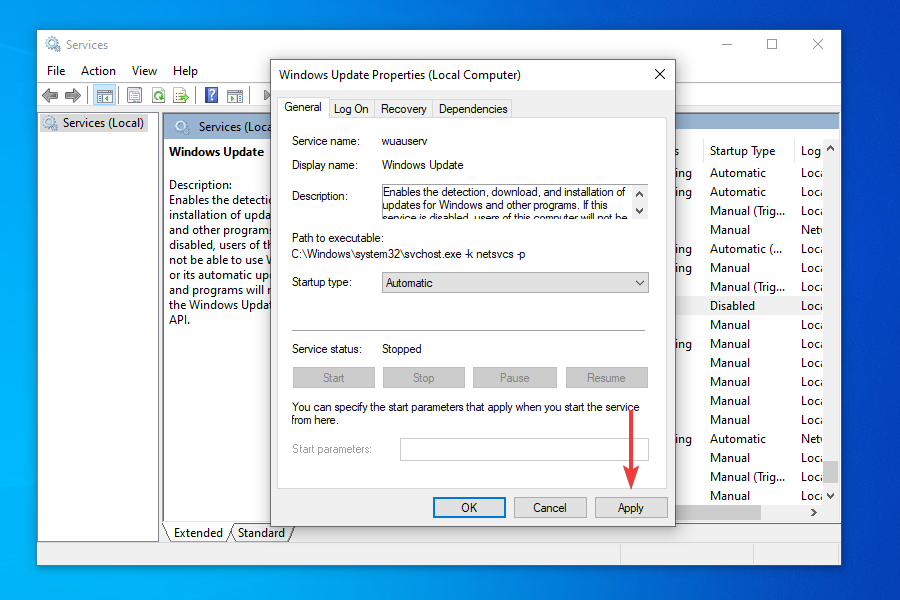
- Locate and double-click on the Windows Update service.
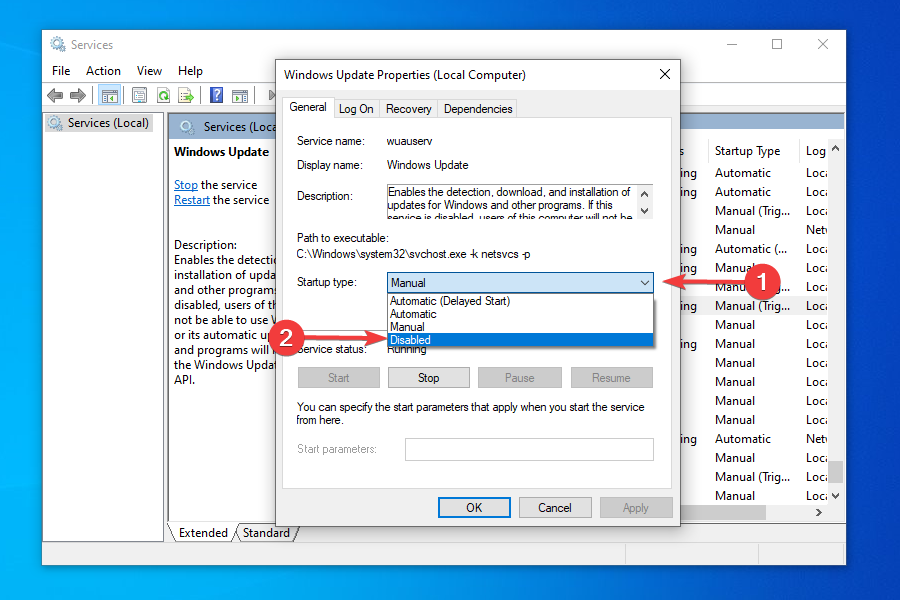
- Click on the Startup type dropdown menu and select Disabled from the list of options that appear.
- Click on Apply to save the changes.
- Next, click OK to close the properties window.
- Close the Services app.
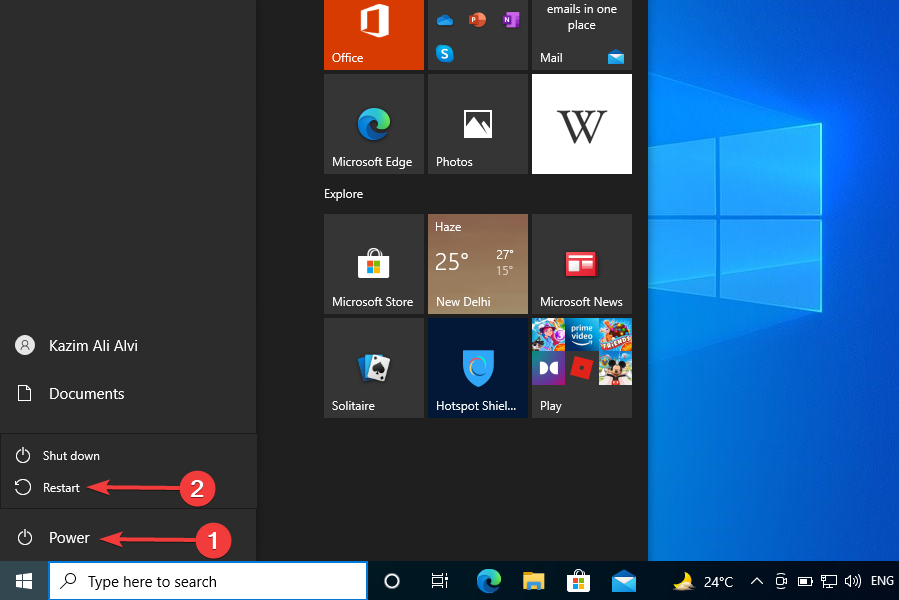
- Now, you need to reboot the computer. To do that, press the Windows key, click on the Power button, and select Restart from the menu that appears.

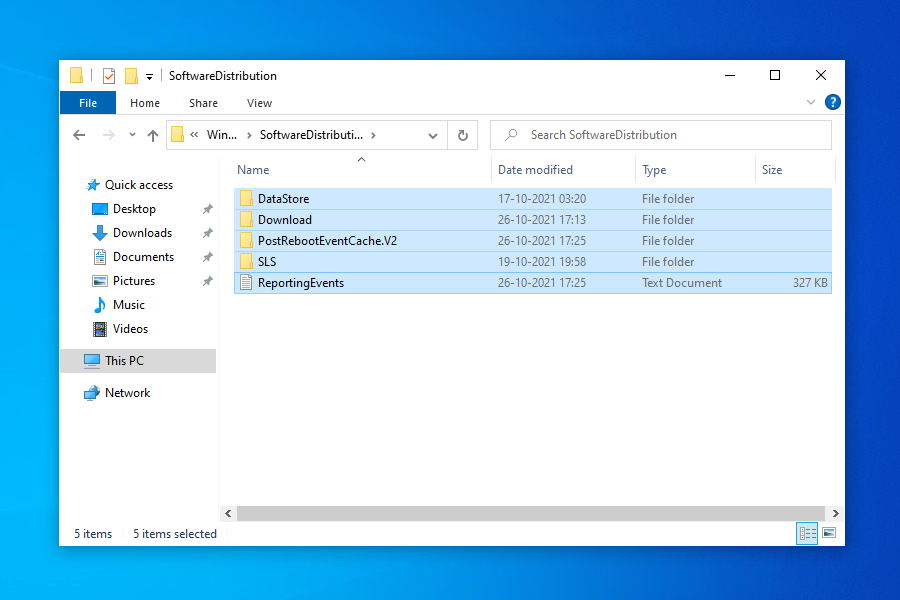
- Press Windows + E to launch the File Explorer, and navigate to the following path or paste it in the addressbar at the top and hit Enter.
C:WindowsSoftwareDistribution - Press Ctrl + A to select all the files saved here, and hit the Del key to delete them.
- Choose the appropriate response in case a confirmation box pops up.
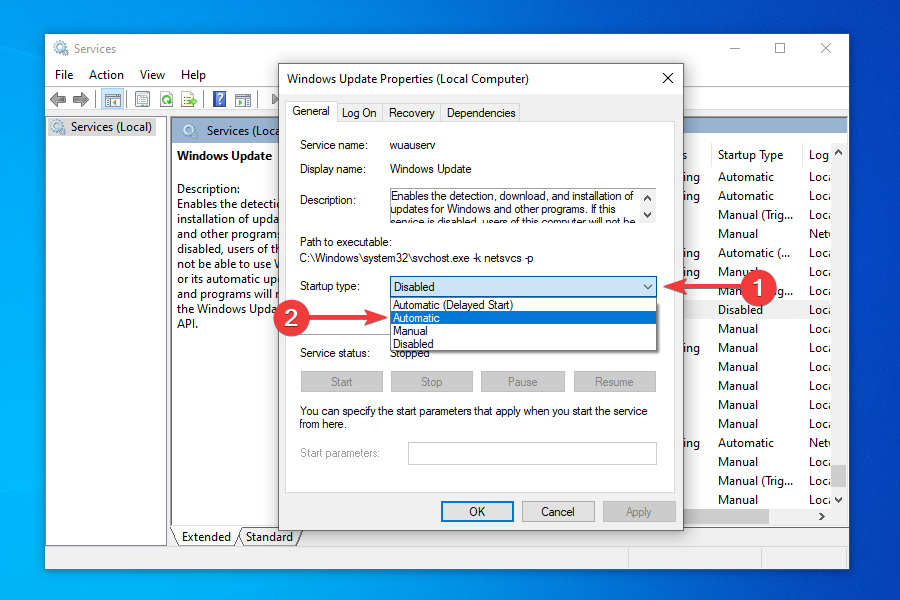
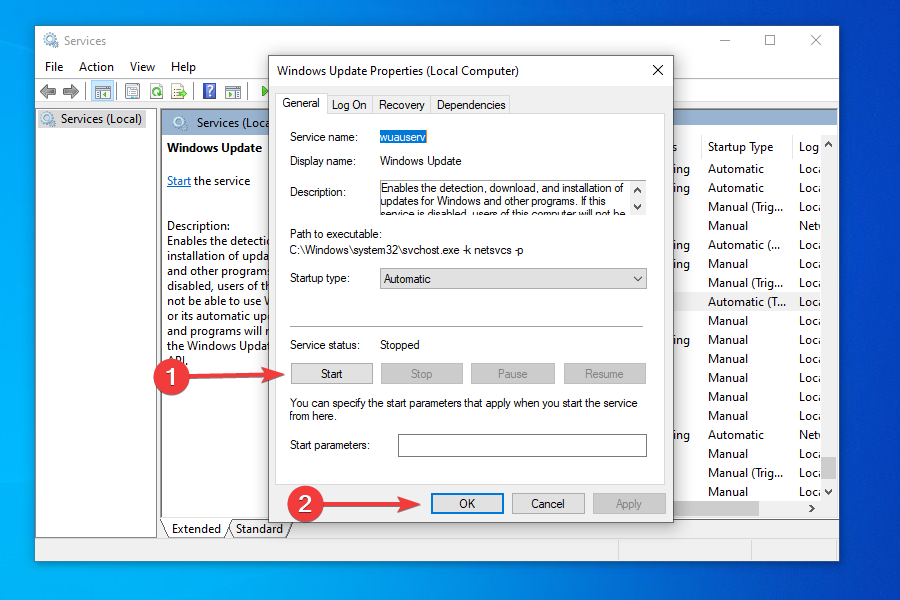
- Now, again launch the Services app as you did earlier, and double-click on the Windows Update service.
- Select Automatic from the Startup type dropdown menu this time.
- Click on Apply to save the changes.
- Click on Start under Service status to run the service, and then click on OK at the bottom.
- Go to the Windows Update section in Settings and check if you can now install Windows 11.

In some cases, the update for Windows 11 may seem stuck at 100% for hours without any progress. In such cases, following the steps mentioned here will get things up and running and allow you to upgrade.
6. Disable or uninstall conflicting apps
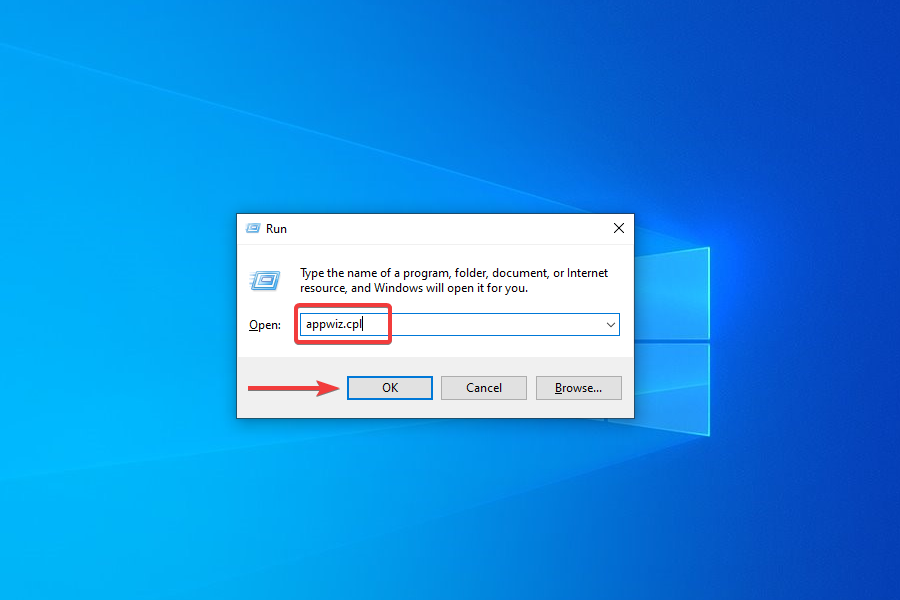
- Press Windows + R to launch the Run command.
- Enter appwiz.cpl in the text field and click on OK or hit Enter to launch the Programs and Features window.
- Locate and select the app you want to remove, and click on Uninstall at the top.
- Choose the appropriate response in case a confirmation box pops up.

To disable an app, you can go to its built-in Settings and turn on/off the required toggle or choose the appropriate response.
The method to disable each app is different and there should be an option for it somewhere in the app’s built-in Settings. Search the FAQ section on the official website for the program to find out the exact steps.
Some PC issues are hard to tackle, especially when it comes to corrupted repositories or missing Windows files. If you are having troubles fixing an error, your system may be partially broken.
We recommend installing Restoro, a tool that will scan your machine and identify what the fault is.
Click here to download and start repairing.
If disabling the app didn’t work or you couldn’t find the option for it, follow the steps above to uninstall the app.
Certain programs are known to block the Windows Updates, thus leading to the current issue.
You should look out for third-party firewalls and disable or uninstall them. Also, apps like Pi-hole or other similar ones, have been found to be the culprit, and uninstalling them fixed the problem.
Once you are done disabling or uninstalling the problematic apps, check if you are able to find and install Windows 11 from Windows Update.
7. Use the Installation Media

NOTE
For this method, you will require a USB flash drive with more than 8 GB of storage to create a bootable USB for installing Windows 11.
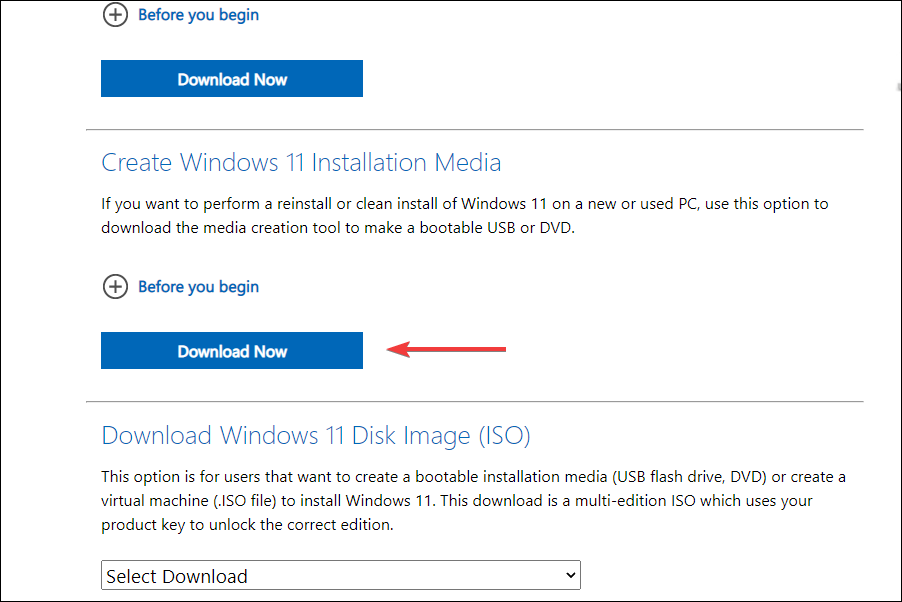
- Plug in the flash drive to your sytem.
- Go to the download page for Windows 11 and click on Download Now under Create Windows 11 Installation Media.
- Navigate to the location where the downloaded file is saved and double-click on it.
- Click Yes on the UAC prompt that appears.
- The setup will take a few moments to get things ready.
- Click on Accept to agree to the license terms.
- Now, you will find the recommended language and edition already selected. In case you want to make any changes, untick the checkbox for Use the recommended options for this PC and choose the appropriate settings. Finally, click on Next.
- Choose the USB flash drive option and click Next.
- Select the removable drive that you earlier plugged in from the list and click on Next.
- Wait for the setup to create a bootable USB drive. You can monitor the progress in this window.
- After the bootable flash drive is created, click on Finish to close the setup.

Once done, you can now easily install the OS from the bootable USB drive. Although the guide is for Windows 10, it would assist you when installing Windows 11 as well, since the process remains the same.
After the flash drive is booted, follow the on-screen instructions to complete the installation process.
A major advantage of this method is that you will always have a bootable USB at your disposal, which would make things a lot easier in case you have to reinstall Windows 11.
We’ve written extensively around the issue of people either not being able to complete the upgrade process to Windows 11 or not seeing the option, at all. Here are some resources we’re suggesting for you to check out:
- How to fix Windows 11 Windows Update errors
- How to fix Windows 11 errors after update from Windows 10
- How to make Windows 11 update after restart
- How to fix Windows Update troubleshooter in Windows 11
- How to fix a stuck Windows 11 download
- How to solve Windows 11 installation woes
Can I use the Windows 11 Installation Assistant to upgrade?
Yes, the Windows 11 Installation Assistant is another tool at your disposal to upgrade to the latest iteration. However, you cannot use it if the PC doesn’t meet the minimum system requirements, since the Installation Assistant wouldn’t run.
You can download and use the Windows 11 Installation Assistant with the help of our guide. Simply, go to the How to use the Windows 11 Installation Assistant? heading and follow the steps listed there.
What do I do if my PC doesn’t meet the system requirements for Windows 11?
As promised earlier, we would now list out the ways you can install Windows 11 on an unsupported PC. However, Microsoft has stated that such PCs may have compatibility issues and might not receive updates, including those for security. You will thus be exposing the system to a major risk.
Though if you have made up your mind, you can install Windows 11 after bypassing SecureBoot and TPM checks. This would require making some minor changes to the Registry.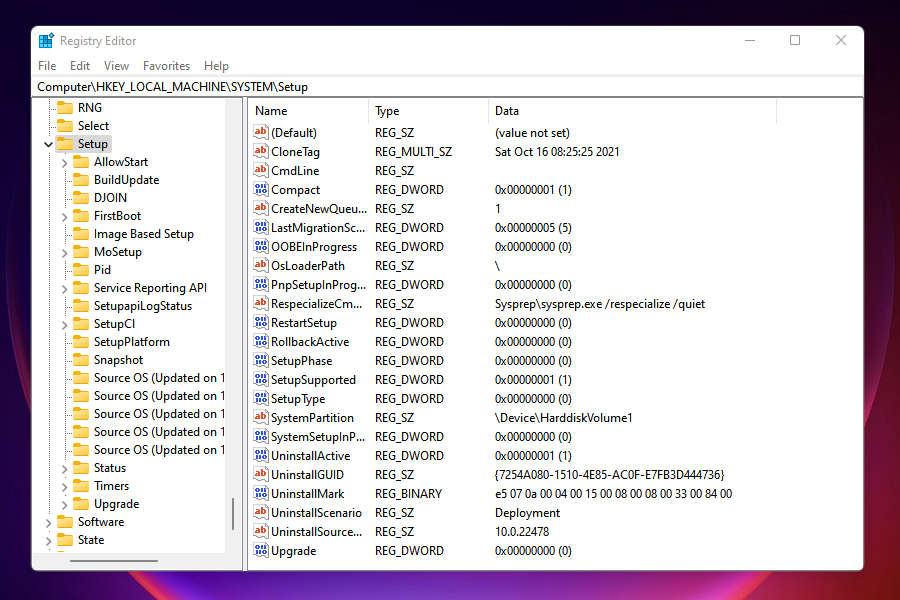
It’s also possible to install Windows 11 without TPM, another workaround users had been looking for due to the TPM 2.0 requirement.
If you are still unsure, learn how to install Windows 11 on a Virtual Machine, try it out and then make the upgrade. Nevertheless, if you have already made the jump, it’s easy to roll back from Windows 11 to Windows 10.
By the time you reach the end of this article, you know a bunch of ways to install the latest iteration from Microsoft on both supported and unsupported PCS. Also, the Windows 11 not showing up in Windows Update issue would be fixed.
Let’s know which method worked for you and your experience thus far with Windows 11.
![]()
Newsletter
This issue prevents the installation of the new OS
by Kazim Ali Alvi
Kazim has always been fond of technology, be it scrolling through the settings on his iPhone, Android device, or Windows. And at times, unscrewing the device to take… read more
Published on November 28, 2022
Reviewed by
Vlad Turiceanu
Passionate about technology, Windows, and everything that has a power button, he spent most of his time developing new skills and learning more about the tech world. Coming… read more
- A lot of users have reported being the Windows 11 update not showing in Windows 10 on the Windows Update tool.
- If you using a PC that meets that minimum requirement, you should receive the update in a while since the roll-out is in a phased manner. However, there are ways to make the jump even sooner.
- Check for any issues with the Windows Update, namely, if they are paused, stuck, or the presence of conflicting programs.
- Also, learn how to install Windows 11 on unsupported PCs.
XINSTALL BY CLICKING THE DOWNLOAD FILE
- Download Restoro PC Repair Tool that comes with Patented Technologies (patent available here).
- Click Start Scan to find broken files that are causing the problems.
- Click Repair All to fix issues affecting your computer’s security and performance
- Restoro has been downloaded by 0 readers this month.
Windows 11 has been rolled out for users, though in a phased manner. PCs that are compatible should receive an update in the days to follow. However, many users have reported Windows 11 not showing up in Windows Update.
The Windows 11 update not showing up issue could be due to a bunch of reasons, some related to your computer’s compatibility while others to the phased rollout. Whatever the case, there are ways you can get your hands on the latest Windows iteration from Microsoft.
If you have been checking the Windows Update section time and again to upgrade but to no avail, read ahead to find out the various ways you can install Windows 11 on your computer.
Why don’t I see the Windows 11 update?
A large number of computers wouldn’t be able to upgrade to Windows 11 owing to the strict system requirements. And Microsoft has its reasoning for that.
Can my PC run Windows 11?
To check whether a computer can run Windows 11, Microsoft has released the PC Health Check app. Just download and install the app, run it, and you will find out whether or not your system is compatible.
If you get the message This PC meets Windows 11 requirements, your computer is compatible. Head over to the next section to find out ways to make the upgrade even if Windows 11 is not showing up in Windows Update.
For those of you who see This PC doesn’t currently meet the Windows 11 system requirements, you wouldn’t be receiving the upgrade via Windows Update. Head over to the end to find out how you can install Windows 11 on an unsupported PC.
What can I do if the Windows 11 update is not showing up?
- Why don’t I see the Windows 11 update?
- Can my PC run Windows 11?
- What can I do if the Windows 11 update is not showing up?
- 1. Resume Windows Update
- 2. Reboot the computer
- 3. Run the Windows Update troubleshooter
- 4. Repair Windows Update components
- 5. Restart the Windows 11 update
- 6. Disable or uninstall conflicting apps
- 7. Use the Installation Media
- Can I use the Windows 11 Installation Assistant to upgrade?
- What do I do if my PC doesn’t meet the system requirements for Windows 11?
1. Resume Windows Update
- Press Windows + I to launch the Settings app.
- Select Update & Security from the various options listed here.
- In the Windows Update tab that opens by default, check if there is a Resume Updates button on the right. If there’s one, click on it to start receiving updates.
- Your system will now automatically start scanning for any available update including those for Windows 11.
If you have paused updates, you wouldn’t be receiving any, including the one for Windows 11. Even if you don’t remember doing it, there’s no harm in cross-checking before we proceed further.
After you enable updates, if an upgrade for Windows 11 is available, it would be shown in Windows Update, and subsequently, downloaded and installed on your computer.
2. Reboot the computer
- Navigate to the desktop and press Alt + F4 to launch the Shut Down Windows box.
- Click on the dropdown menu and select Restart from the list of options.
- Click on OK to restart the computer.
Before restarting, make sure to save any open files to avoid data loss. Rebooting the computer restarts the OS and fixes any trivial bugs that may be interfering with the Windows 11 update.
3. Run the Windows Update troubleshooter
- Press Windows + I to launch the Settings app.
- Select Update & Security from the list of options listed in the Settings.
- Select Troubleshoot from the tabs listed in the navigation pane and click Additional troubleshooters on the right.
- Click on Windows Update.
- Click Run troubleshooter to diagnose and fix issues preventing your PC from receiving the update for Windows 11.
- The troubleshooter will now start running. Follow the instructions and choose the appropriate response, if and when prompted, to complete the process.
The built-in troubleshooters offered by Microsoft are excellent in identifying and fixing small bugs, misconfigured settings, and other issues. After the troubleshooter is done running, check if Windows 11 is now showing up in Windows Update.
4. Repair Windows Update components
Although you are required to repair or reset Windows Update components when encountering an error, it may also help you get the Windows 11 update in this case.
If they have become corrupt or have run into a bug that is leading to the Windows 11 not showing up in Windows update issue, repairing or resetting them should come in handy.
5. Restart the Windows 11 update
- Press Windows + R to launch the Run command.
- Type services.msc in the text field, and either click on OK or press Enter to launch the Services app.
- Locate and double-click on the Windows Update service.
- Click on the Startup type dropdown menu and select Disabled from the list of options that appear.
- Click on Apply to save the changes.
- Next, click OK to close the properties window.
- Close the Services app.
- Now, you need to reboot the computer. To do that, press the Windows key, click on the Power button, and select Restart from the menu that appears.
- Press Windows + E to launch the File Explorer, and navigate to the following path or paste it in the addressbar at the top and hit Enter.
C:WindowsSoftwareDistribution - Press Ctrl + A to select all the files saved here, and hit the Del key to delete them.
- Choose the appropriate response in case a confirmation box pops up.
- Now, again launch the Services app as you did earlier, and double-click on the Windows Update service.
- Select Automatic from the Startup type dropdown menu this time.
- Click on Apply to save the changes.
- Click on Start under Service status to run the service, and then click on OK at the bottom.
- Go to the Windows Update section in Settings and check if you can now install Windows 11.
In some cases, the update for Windows 11 may seem stuck at 100% for hours without any progress. In such cases, following the steps mentioned here will get things up and running and allow you to upgrade.
6. Disable or uninstall conflicting apps
- Press Windows + R to launch the Run command.
- Enter appwiz.cpl in the text field and click on OK or hit Enter to launch the Programs and Features window.
- Locate and select the app you want to remove, and click on Uninstall at the top.
- Choose the appropriate response in case a confirmation box pops up.
To disable an app, you can go to its built-in Settings and turn on/off the required toggle or choose the appropriate response.
The method to disable each app is different and there should be an option for it somewhere in the app’s built-in Settings. Search the FAQ section on the official website for the program to find out the exact steps.
Some PC issues are hard to tackle, especially when it comes to corrupted repositories or missing Windows files. If you are having troubles fixing an error, your system may be partially broken.
We recommend installing Restoro, a tool that will scan your machine and identify what the fault is.
Click here to download and start repairing.
If disabling the app didn’t work or you couldn’t find the option for it, follow the steps above to uninstall the app.
Certain programs are known to block the Windows Updates, thus leading to the current issue.
You should look out for third-party firewalls and disable or uninstall them. Also, apps like Pi-hole or other similar ones, have been found to be the culprit, and uninstalling them fixed the problem.
Once you are done disabling or uninstalling the problematic apps, check if you are able to find and install Windows 11 from Windows Update.
7. Use the Installation Media
NOTE
For this method, you will require a USB flash drive with more than 8 GB of storage to create a bootable USB for installing Windows 11.
- Plug in the flash drive to your sytem.
- Go to the download page for Windows 11 and click on Download Now under Create Windows 11 Installation Media.
- Navigate to the location where the downloaded file is saved and double-click on it.
- Click Yes on the UAC prompt that appears.
- The setup will take a few moments to get things ready.
- Click on Accept to agree to the license terms.
- Now, you will find the recommended language and edition already selected. In case you want to make any changes, untick the checkbox for Use the recommended options for this PC and choose the appropriate settings. Finally, click on Next.
- Choose the USB flash drive option and click Next.
- Select the removable drive that you earlier plugged in from the list and click on Next.
- Wait for the setup to create a bootable USB drive. You can monitor the progress in this window.
- After the bootable flash drive is created, click on Finish to close the setup.
Once done, you can now easily install the OS from the bootable USB drive. Although the guide is for Windows 10, it would assist you when installing Windows 11 as well, since the process remains the same.
After the flash drive is booted, follow the on-screen instructions to complete the installation process.
A major advantage of this method is that you will always have a bootable USB at your disposal, which would make things a lot easier in case you have to reinstall Windows 11.
We’ve written extensively around the issue of people either not being able to complete the upgrade process to Windows 11 or not seeing the option, at all. Here are some resources we’re suggesting for you to check out:
- How to fix Windows 11 Windows Update errors
- How to fix Windows 11 errors after update from Windows 10
- How to make Windows 11 update after restart
- How to fix Windows Update troubleshooter in Windows 11
- How to fix a stuck Windows 11 download
- How to solve Windows 11 installation woes
Can I use the Windows 11 Installation Assistant to upgrade?
Yes, the Windows 11 Installation Assistant is another tool at your disposal to upgrade to the latest iteration. However, you cannot use it if the PC doesn’t meet the minimum system requirements, since the Installation Assistant wouldn’t run.
You can download and use the Windows 11 Installation Assistant with the help of our guide. Simply, go to the How to use the Windows 11 Installation Assistant? heading and follow the steps listed there.
What do I do if my PC doesn’t meet the system requirements for Windows 11?
As promised earlier, we would now list out the ways you can install Windows 11 on an unsupported PC. However, Microsoft has stated that such PCs may have compatibility issues and might not receive updates, including those for security. You will thus be exposing the system to a major risk.
Though if you have made up your mind, you can install Windows 11 after bypassing SecureBoot and TPM checks. This would require making some minor changes to the Registry.
It’s also possible to install Windows 11 without TPM, another workaround users had been looking for due to the TPM 2.0 requirement.
If you are still unsure, learn how to install Windows 11 on a Virtual Machine, try it out and then make the upgrade. Nevertheless, if you have already made the jump, it’s easy to roll back from Windows 11 to Windows 10.
By the time you reach the end of this article, you know a bunch of ways to install the latest iteration from Microsoft on both supported and unsupported PCS. Also, the Windows 11 not showing up in Windows Update issue would be fixed.
Let’s know which method worked for you and your experience thus far with Windows 11.
![]()
Newsletter
Не приходит обновление Windows 11? Проверьте факт включения этой опции в настройках, убедитесь в соответствии требованиям ОС с помощью PC Health Check, установите лицензионную Виндовс или воспользуйтесь обходными путями. Ниже подробно рассмотрим, чем можно объяснить, что не приходит 11-я версия, и как решить вопрос.
Причины и пути решения
Для начала разберемся, почему не пришло обновление на Windows 11 в обычном режиме.
Этому может быть несколько объяснений:
- Отключено автоматическая загрузка.
- Установлена старая версия Виндовс, которую уже нельзя обновить, к примеру, Windows 7 или 8.
- Компьютер / ноутбук не соответствует минимальным требованиям.
- Устройство подключено к сети школы, компании или другой организации.
- Нехватка места на диске.
- Лишнее подключенное оборудование.
- Устаревшие драйвера.
- Ошибки в диспетчере устройств.
Зная, почему до Windows 11 не обновляется ПК / ноутбук через Центр обновления, можно принимать решение по дальнейшим шагам. Рассмотрим базовые моменты.
Проверьте наличие ПО вручную
Если Винда 11 не приходит, убедитесь, что в настройках правильно заданы параметры. Для этого сделайте следующие шаги:
- Войдите в «Пуск».
- Перейдите в «Параметры».

- Жмите на «Обновление и безопасность».

- Зайдите в «Центр обновления Windows».
- Кликните на пункт «Проверить наличие …».

Здесь же внизу можно задать параметры, когда будет приходить новое ПО, посмотреть журнал таких загрузок и т. д.
Проверьте минимальные требования
Одна из причин, почему не приходит обновление Windows 11 — несоответствие вашего ПК / ноутбука требованиям. Основные параметры:
- Количество ядер процессора — от двух и более.
- Частота CPU — от 1 ГГц.
- ОЗУ — 4 Гб и более.
- Хранилище — от 64 Гб.
- Системная прошивка — UEFI.
- ТРМ — наличие доверенного платформенного модуля ТРМ версии 2.0.
- Видеоадаптер — совместимость DirectX 12.
- Дисплей — 9-дюймовый с HD-разрешением.
Если ПК / ноутбук вроде соответствует требованиям, но все равно не приходит и не обновляется Виндовс 11, проверьте устройство с помощью специальной программы. Для этого сделайте следующие шаги:
- Перейдите по ссылке microsoft.com/ru-ru/windows/windows-11#pchealthcheck.
- Жмите на кнопку «Загрузить приложение PC Health Check».

- Дождитесь загрузки и установите ПО.
- Войдите в него и запустите проверку соответствия.
- Посмотрите, что именно «не нравится», и устраните проблему.
Чаще всего не прилетает обновление Windows 11 из-за отключенного TPM 2.0. Для решения вопроса его можно включить или обойти это ограничение. На самом сайте Майкрософт предлагается следующее решение:
- Жмите на сочетание Win+R.
- Введите Regedit.

- Кликните на кнопку «Выполнить», а после «Ввод».
- Зайдите по ссылке HKEY_LOCAL_MACHINESYSTEMSetupMoSetup.
- Дважды кликните правой кнопкой мышки на правой панели редактора реестра, выберите «Создать», далее «Параметр DWORD (32 бита) и сделайте параметр AllowUpgradesWithUnsupportedTPMOrCPU.

- Два раза кликните по показателю и установите для него значение «1».
- Закройте редактор и переходите к установке Виндовс 11.

Этот способ реально помогает, если не приходит обновление Виндовс 11 из-за TPM 2.0. При этом поддержка TPM 1.2 является обязательной, а сам модуль должен быть включен.
Установите лицензионную версию или замените ОС
Распространенная причина, почему не появляется обновление Windows 11 в центре обновления — наличие нелицензионной версии. Это легко проверить в Центре обновления Виндовс. Если проблема именно в этом, единственный выход — откат до 10 и установка официальной версии, без которой новое ПО не приходит.
Такая же неисправность актуальна для ситуаций, когда на ПК / ноутбуке стоит старая версия Windows без возможности обновления до одиннадцатой Винды. В таком случае единственным вариантом также является установка более свежего ПО. После этого проверьте, приходит новый софт или нет.

Используйте обходной путь
Если Центр обновления не предлагает обновить ПК / ноутбук до Windows 11, попробуйте обойти имеющиеся ограничения. Для этого можно использовать простой скрипт под названием Universal Media Creation Tool. Он специально создан для установки старых версий систем, но позволяет поставить и Виндовс 11 без TPM 2.0.
Если не приходит обновление, сделайте следующее:
- Перейдите по ссылке github.com/AveYo/MediaCreationTool.bat и загрузите указанную выше утилиту. Для этого жмите на кнопку Code, а после этого Download ZIP.

- Активируйте MediaCreationTool.bat из папки.
- Подтвердите выполнение даже при появлении предупреждений.
- Откройте командную строку и окно, где выберите версию Windows 11.

- Установите пункт «Автоматическая установка» или Auto Setup.

- Дождитесь, пока утилита загрузит необходимые файлы с сайта Майкрософт, а после этого запустится сама программа установки.
- Не обращайте внимание на то, что в программе установки указывается Виндовс 10. На практике приходит обновление до Windows 11.
- Дождитесь завершения загрузки и перезапуска ПК / ноутбука.
В дальнейшем при необходимости можно откатиться до предыдущей версии, если программное обеспечение по какой-то причине загрузилось некорректно, или вам не понравилась операционная система.
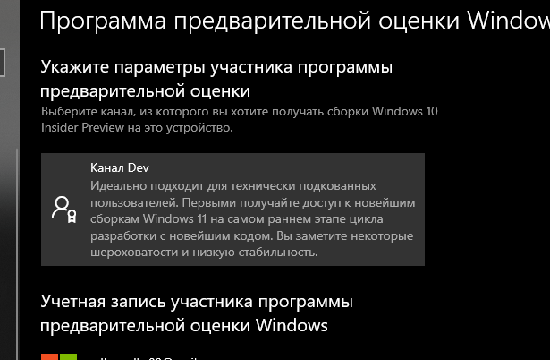
Решение с каналом DEV
В Интернете встречаются жалобы, что не приходит обновление Windows 11 для канала Dev. В таком случае необходимо почистить кэш Центра обновления. Сделайте следующие шаги:
- Остановите службу Windows Update (найдите ее в поиске ОС).
- Жмите на Win+R.
- Введите C:WindowsSoftwareDistribution и жмите «Ввод».
- Зайдите в папку Download, выделите файлы и удалите их. Если система запрашивает права администратора, не обращайте на это внимание и просто продолжайте процесс.
- Перезагрузите ПК / ноутбуке и проверьте, приходит ли ПО.

Дополнительные шаги
Иногда в ситуации, когда система не находит обновления Windows 11, попробуйте следующие шаги:
- Освободите место на диске.
- Отбросьте постороннее внешнее оборудование.
- Обновите сторонние драйвера до последней версии.
- Проверьте диспетчер устройств на факт ошибок и устраните их.
После каждого из шагов проверяйте, приходит ли Виндовс 11.
Как установить
Зная, почему ПК / ноутбук не видит обновление до Windows 11, можно с легкостью решить проблему. Если неисправность устранена, то ничего делать и не нужно — новое ПО должно прийти самостоятельно. Если же этого не произошло, проделайте работу через официальный сайт microsoft.com/ru-ru/windows/get-windows-11 или с помощью обходного метода, который рассмотрен выше.
Официальный алгоритм такой:
- Скачайте помощника по ссылке microsoft.com/ru-ru/software-download/windows11.
- Убедитесь, что на устройстве имеется 9 Гб свободного места и оно соответствует требованиям.
- Жмите «Запустить» от имени администратора.
- Примите условия.

- Жмите «Перезагрузить сейчас» для завершения установки.
- Дождитесь завершения процесса.
В комментариях расскажите, почему в вашем случае не приходит обновление Windows 11, и как удалось решить вопрос.
Отличного Вам дня!
Недавно запущена компания по бесплатному обновлению до новой операционной системы Windows 11. Это особенно актуально для новых устройств, хотя потом ОС сделают доступной практически для любого совместимого оборудования. Но надо учитывать некоторые нюансы.
Есть несколько причин того, почему так происходит.
- Ошибки в диспетчере устройств.
- Использование старых драйверов.
- Дополнительное подключенное оборудование.
- Недостаточно места на диске.
- Подключение к различным общественным сетям.
- Не выполняются минимальные требования.
- Старая операционная система. Например, Windows 7 или 8.
- Отключение автоматической загрузки.
Благодаря выявлению причин будет легче понять, какие действия предпринять в дальнейшем.

Способы запустить обновление до Windows 11
Проверка минимальных системных требований — первый шаг, который для многих пользователей станет и единственным. Но есть и другие способы решения вопросов.
Проверка обновлений вручную
Предполагается прохождение следующих шагов:
- Посещение меню «Пуск».
- Переход к Параметрам.
- Использование пункта «Обновление и безопасность».
- Переход к центру обновления.
- Выбор пункта «Проверить наличие…».
Здесь же пользователи просматривают журналы загрузок, выбирают время для обновлений, и так далее.
Проверка соответствию требованиям
Основные параметры для обновления выглядят следующим образом:
- Экран минимум на 9 дюймов, поддерживающий разрешение HD.
- Видеоадаптер, совместимый с DiectX
- Наличие доверенного платформенного модуля из серии TPM, второй версии.
- UEFI в качестве системной прошивки.
- Хранилище от 64 Гигабайт.
- 4 Гигабайта ОЗУ и более.
- От 1 ГГц частоты CPU.
- От двух и более ядер в процессоре.
Можно пользоваться специальными программами для проверки компьютера. Приложение PC Health Check — одна из таких разработок, от создателей самой Виндоус.
Остаётся только загрузить приложение, открыть его, запустить проверку. Иногда проблемы связаны с отключенным модулем TPM 2.0.
Сам сайт от Майкрософт предлагает следующее решение для этой проблемы:
- Сочетание Win+R.
- Ввод команды Regedit.
- Использование кнопки выполнения, а потом ввода.
- Посещение ссылки HKEY_LOCAL_MACHINESYSTEMSetupMoSetup.
- На редакторной панели справа два раза нажимают правой кнопкой мыши. Остаётся выбрать команду Создания, чтобы перейти к пункту «Параметр DWORD (32 бита). Элементу присваивают наименование AllowUpgradesWithUnsupportedTPMOrCPU.
- По показателю нажимают два раза, чтобы установить значение 1.
- Редактор закрывают. После этого начинают установку Windows 11.
Установка лицензионной версии
Наличие нелицензионных версий программ становится одной из самых популярных проблем, с которой сталкиваются пользователи. В Центре обновления легко проверить, соответствует ли система минимально необходимым условиям в этом направлении. Если так и есть, то надо снизить версию до 10, а потом установить всё официально.
Иногда ситуация связана с тем, что на компьютере установлена слишком старая операционная система, которую в принципе невозможно обновить. Тогда программное обеспечение ставят до более свежей версии. Потом проверяют, подходит всё или нет.
Устранение неполадок Центра обновлений
Иногда пользователи сами отключают функцию обновления, но забывают об этом. Или подобный эффект связан с ошибкой. Для проверки применяют комбинацию Win+I, далее открывают настройки. Выбирают раздел, связанный с обновлениями и безопасностью.

Если функция и правда приостановлена, её остаётся только возобновить.
Перезагрузка компьютера помогает избавиться от временных повреждённых файлов, если ранее они присутствовали в системе. Это одно из самых простых и доступных решений, которому требуется минимум времени.
В операционной системе имеются собственные встроенные средства для устранения неполадок или диагностики. Они же высылают предложения относительно того, как всё исправить.
- Запускают программу, нажав на win+i, а потом с помощью приложения настроек. Внизу выбирают пункт с обновлениями и безопасностью.
- Слева есть раздел с устранением неполадок. Нужно только выбрать дополнительные средства. В этом разделе переходят к центру обновления Windows. Затем нажимают на запуск средства для устранения проблем.
- Процесс начнётся автоматически. Потом пользователю покажут рекомендации, если это нужно.
Обновление через Помощник по установке Windows 11
Это приложение стало доступно практически сразу после появления самой операционной системы. Программу требуется запускать от имени администратора.
Остаётся принять все имеющиеся условия и установить обновление.
Файлы будут загружены в локальное хранилище. Время уходит разное, в зависимости от скорости сети.
После загрузки запускается проверка, которая идёт в фоновом режиме. После завершения указанного этапа автоматически переходят к самой установке.
Компьютер перезагружается тоже автоматически, если пользователь не возражает. Настройка после этого продолжается, потом пользователь попадает на рабочий стол. Главное — чтобы сохранились данные, а установленные приложения остались не затронутыми.
Windows 11 Media Creation Tool
Это один из сторонних инструментов, благодаря которому проблему тоже можно решить.
Нужно скачать программу. В интернете постоянно публикуются ссылки страниц, где она находится. Рекомендуется выбрать страницу на GitHub. Потом нажимают на кнопку Code, выбирают вариант с Donwload Zip.
Архив распаковывают в выбранную папку, потом переходят к запуску файла MediaCreationTool.bat. В результате система отправляет пользователю предупреждение. Ему остаётся только перейти на вкладку «подробнее», а затем — «Выполнить в любом случае».
- Появляется так называемое окно PowerShell, здесь отображается список версий Windows 10. Но в данном случае интересует именно 11.
- В следующем меню со списком действий выбираем Auto Setup. После этого Media Creation Tool запустится, начнётся обновление до последней версии.
- Процесс проходит в автоматическом режиме. Велика вероятность нескольких перезагрузок компьютера, пока программа работает. Это нормально. Затем у пользователя должна появиться новая версия Виндоус 11.
- Допустимо отключение проверок по совместимости. В этом случае из реестра удаляется файл с названием appraiserres. dll. Взамен создаётся раздел, благодаря которому вопрос решится даже без модуля TPM 2.0.
- Нужно только открыть папку MCT, в ней выбирают файл, названный как «Skip_TPM_Check_on_Dynamic_Update_v1.cmd». Его выбирают, используя правую кнопку мыши. Так запускается помощник, связанный с установкой новой операционной системы. После этого совместимость проверяться не будет, всё обновится само.
Стоит ли обновляться до Windows 11, если не поддерживается
Это действие никогда не было обязательным. Разработчики иногда отвечают на просьбы пользователей и разрешают ставить систему даже на устройства, которые выполняют не все требования. Планируется продолжать поддерживать Windows 10 минимум до 2025 года. До этого времени владельцы компьютеров могут не спешить с обновлениями, тем более, что пока многое в новой версии дорабатывается.
Заключение
Windows 11 при желании можно установить даже на несовместимые устройства. Для этого пользуются рекомендациями от других владельцев устройств и самих разработчиков. Процесс перехода со старых версий максимально простой. То же самое касается установки операционной системы на новые компьютеры. Но каждый пользователь сам решает, насколько это необходимо.
( 1 оценка, среднее 5 из 5 )

В последнее время все чаще в сети появляется информация о том, что обновление до версии Windows 11 для россиян стало недоступно. Эксперт «М.Клик» Алексей Петровский убил двух зайцев одним махом: проверил работоспособность инструкций из сети и заодно обновил свой компьютер.
![]()
Пишу о гаджетах с 2006 года, знаю всё о технике и технологиях
46
Содержание
- На какие компьютеры можно поставить Windows 11
- Какие способы обновления до Windows 11 существуют
- Стоит ли сейчас обновляться до Windows 11
Важно: информация актуальна на момент публикации статьи, в дальнейшем ситуация может измениться.
На какие компьютеры можно поставить Windows 11
Прежде чем разбираться, как установить новую ОС, надо понять, поддерживает ли ее ваш компьютер. Компания Microsoft сформировала весьма прозрачный и понятный список требований к конфигурации компьютера, на который можно установить Windows 11. Я выделил жирным самые важные пункты, на которые нужно обратить пристальное внимание.
- Процессор: частота 1 ГГц или выше, с двумя или более ядрами на совместимом 64-битном процессоре или система на кристалле (SoC).
- ОЗУ: 4 ГБ или больше.
- Место на диске: свободное пространство объемом 64 ГБ или более.
- Для загрузки обновлений и работы определенных функций может потребоваться дополнительное место в хранилище.
- Графическая карта: совместимость с DirectX 12 или более поздней версией и драйвер WDDM 2.0.
- Системное встроенное ПО: UEFI, возможность безопасной загрузки.
- TPM: доверенный платформенный модуль (TPM) версии 2.0.
- Дисплей: дисплей высокой четкости (720p), монитор 9 дюймов или более, 8 бит на цветовой канал.
- Подключение к интернету: необходимо для выполнения обновлений, а также для загрузки и использования некоторых функций.
- Подключение к интернету и учетная запись Microsoft: потребуется при первом использовании «Windows 11 Домашняя».
На самом деле все проще: сам компьютер может подсказать вам, готов ли он потянуть Windows 11. Для этого нужно зайти в «Параметры» — «Обновление и безопасность».
Еще по теме

Какие способы обновления до Windows 11 существуют
Самый простой — зайти в соответствующий пункт в меню «Обновление и безопасность», который находится в разделе «Параметры» вашего компьютера.

Впрочем, далеко не у всех пользователей появляется кнопка «Скачать и установить Windows 11». Например, на моем подопытном компьютере с Windows 10 было лишь сообщение, что на нем можно запустить Windows. Однако активной кнопки для установки, как видите, нет. Более того, многие пользователи в сети жалуются на то же самое. Значит, нужно искать другие способы.

Первое, что я сделал, — зашел на официальный сайт Microsoft. Там, пусть и на английском языке, получил исчерпывающую информацию, как еще можно установить Windows 11:
1. С помощью ассистента установки Windows 11.
2. С помощью создания загрузочного носителя Windows.
3. Через скачивание образа диска (ISO) Windows 11.
Я опробовал каждый из них и расскажу, есть ли ограничения и можно ли их обойти.
Способ 1: через ассистента установки Windows 11
Первый способ — при помощи ассистента установки — показался мне самым удобным, понятным и простым. К тому же я не столкнулся ни с какими ограничениями.
Я просто скачал с сайта Microsoft сам установочный файл ассистента (он совсем небольшой) и запустил его. Все дальнейшее происходило автоматически в фоновом режиме, а интерфейс запущенного приложения на русском языке.
Как видите, никаких проблем с загрузкой самого обновления нет. У меня все загрузилось без VPN и других хитростей. Какое-то время ушло на скачивание установочных файлов и их проверку, а затем стартовало обновление операционной системы. Оно также прошло без проблем.

Способ 2: создание загрузочного носителя
Второй способ — это создание загрузочного носителя. С официального сайта нужно скачать утилиту, которая поможет создать загрузочную флешку или диск. На них и будут размещены установочные файлы Windows 11. Такой способ пригодится для компьютеров, на которых вообще не установлено никакой операционной системы. Разве что потом придется решать проблему с активацией, но сам образ скачивается без проблем и для обновления уже имеющейся лицензионной системы подойдет.
Я скачал утилиту и уже с ее помощью создал загрузочную флешку. Прошло без проблем и не потребовало использования VPN. Объем носителя подсказывает сама утилита: от 8 ГБ. Таким же образом можно скачать ISO-файл загрузочного диска, который после записывается на DVD.
Способ 3: скачивание образа установочного диска с сайта Microsoft
В третьем случае предлагается скачать образ диска для установки Windows 11 не через утилиту, а непосредственно с самого сайта.

Вот тут и кроется главный подвох. Я, как и другие пользователи из России, столкнулся с проблемой при скачивании ISO-файла. Microsoft заблокировала возможность загрузки официальных ISO-образов последних сборок Windows из России.


Но это ограничение на данный момент можно сравнительно легко обойти. Если вам непременно нужен ISO-образ для установки Windows 11, достаточно воспользоваться каким-либо VPN-сервисом. Я пользуюсь AdGuard VPN: скачивание прошло без проблем.
Единственное, от выбора VPN-сервиса и его настроек может сильно зависеть скорость загрузки. Также не все бесплатные тарифы VPN-сервисов потянут скачивание такого большого объема данных — ISO-образ Windows 11 весит более 4 ГБ.
Еще по теме

Стоит ли сейчас обновляться до Windows 11
На фоне все новых и новых блокировок хочется как можно больше успеть сделать, пока «все работает». Однако не стоит поддаваться паническим настроениям. Во-первых, ситуация с ограничениями на обновления пока явно не выглядит катастрофической.
Во-вторых, вышедшая в сентябре 2022 г. версия 22H2 стала крупнейшим обновлением Windows 11 за все время. Не обошлось и без сюрпризов: сборка получила ряд нареканий от геймеров из-за некорректной работы видеокарт Nvidia. К моменту написания статьи проблемы уже были найдены и частично решены. Но опыт показывает, что лучше дождаться наиболее стабильных сборок, которые появляются через пару-тройку месяцев после выхода большого обновления.