Choose the perfect internet speed monitor for your device
by Matthew Adams
Matthew is a freelancer who has produced a variety of articles on various topics related to technology. His main focus is the Windows OS and all the things… read more
Updated on January 19, 2023
Reviewed by
Vlad Turiceanu

Passionate about technology, Windows, and everything that has a power button, he spent most of his time developing new skills and learning more about the tech world. Coming… read more
- You can add a Windows 11 network speed monitor that provides real-time download and upload speed info to the desktop.
- Feel free to choose a dedicated app that adds a network monitor to the taskbar.
- You may also consider a network speed monitor that comes with numerous customization settings.
XINSTALL BY CLICKING THE DOWNLOAD FILE
- Download Restoro PC Repair Tool that comes with Patented Technologies (patent available here).
- Click Start Scan to find Windows 11 issues that could be causing PC problems.
- Click Repair All to fix issues affecting your computer’s security and performance
- Restoro has been downloaded by 0 readers this month.
Are you wondering what your PC’s Internet speed is? If so, a network speed monitor is what you need. These monitors show your Internet connection’s download and upload speed in real-time.
Sure, there are numerous Internet speed test webpages you can open in browsers. However, those web apps generally provide only a max speed figure for your connection. They don’t display real-time upload and download speeds.
If you want a real-time network speed monitor for Windows 11 that shows download/upload speeds on the desktop, you’ll need to check out some third-party apps. You can add taskbar and sidebar network speed monitors to Windows 11 by using our recommendations below.
The widgets bar comes like a new gadget sidebar for Windows 11, which you can open by clicking its taskbar button. That seems an obvious place to include a new network speed monitor for the latest desktop platform.

However, that widget panel doesn’t include a network speed monitor. There are 11 widget options available there, and none of them add a net speed meter to the panel. So, you’ll have to check out the third-party software below.
How can I add a Windows 11 net speed monitor?
1. Get Net Speed Meter
1. First, you’ll need to sign in to your Microsoft account to download a UWP app from MS Store. If you don’t have such an account, set one up from the Microsoft account page.
2. Click Start on Windows 11’s taskbar.
3. Then select the Microsoft Store app on the Start menu to open it.
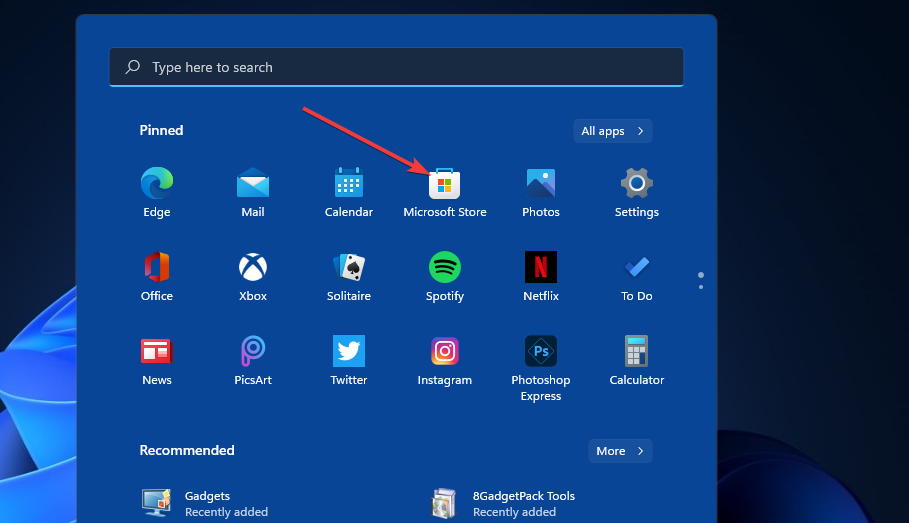
4. Type Net Speed Meter in the MS Store’s search box.
5. Then select the Net Speed Meter app in the search results.
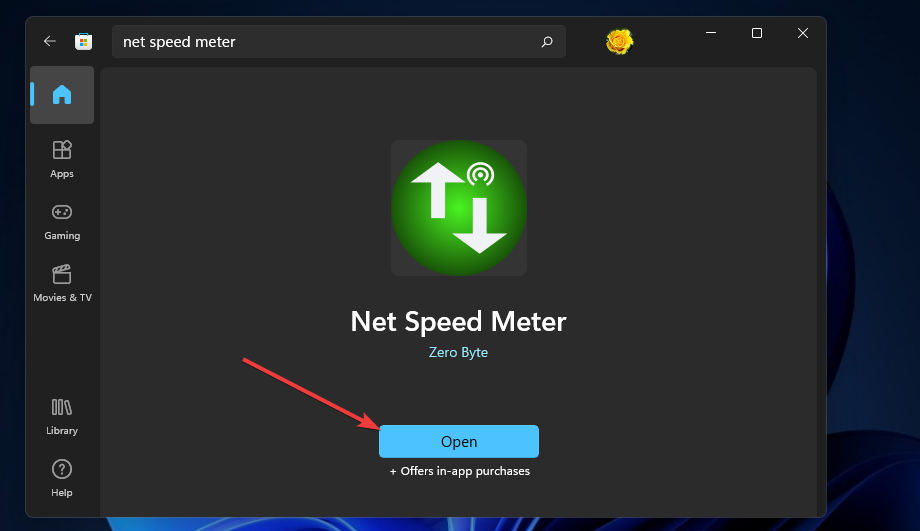
6. Click the Get button for Net Speed Meter to install it.
7. When installed, click the Open button on the Net Speed page.
8. Select the Yes option when asked to keep Net Speed Meter on the taskbar. Then you’ll see Net Speed Meter on the desktop.
9. You can drag and that meter around the desktop by left-clicking it and holding the left mouse button.
10. To add that speed meter to the taskbar, right-click it and select the Keep in Taskbar button.
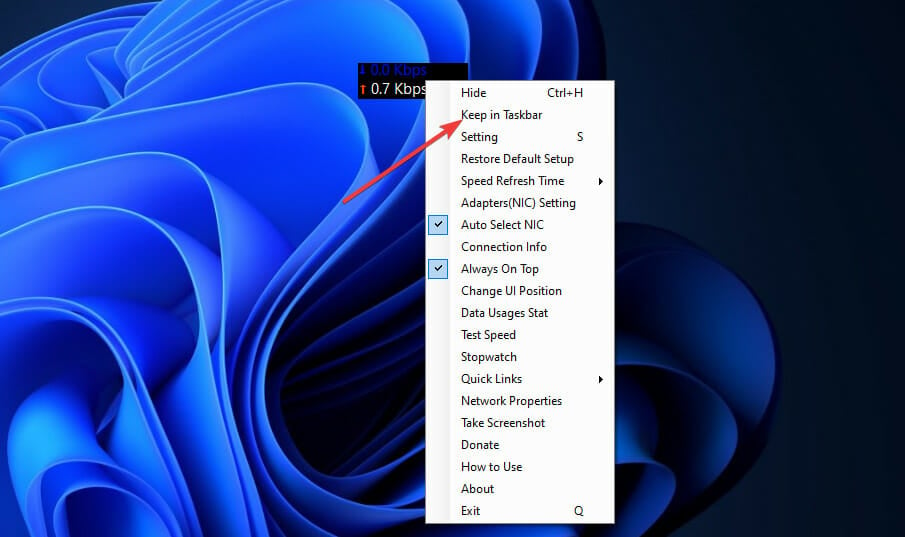
11. You can customize Net Speed Meter by right-clicking it and selecting Setting. Then change the options according to preference.
Some PC issues are hard to tackle, especially when it comes to corrupted repositories or missing Windows files. If you are having troubles fixing an error, your system may be partially broken.
We recommend installing Restoro, a tool that will scan your machine and identify what the fault is.
Click here to download and start repairing.
12. For further instructions, you can right-click Net Speed Meter and select the How to use option.
If you’re looking for an internet speed meter for Windows 11, you should know that our first recommendation is Net Speed Meter. It is a Microsoft Store application that can be downloaded for free by all users with an account.
The Net Speed Meter app can be customized to your liking via Settings, and can be added to your Windows 11 taskbar for quick access.
2. Get 8GadgetPack
2.1 Install 8GadgetPack
- Click the Download button on the 8GadgetPack webpage.
- Then press the File Explorer taskbar button.
- Open the folder that includes the 8GadgetPack setup wizard.
- Double-click 8GadgetPackSetup to open the installer window.
- Click the Install button on the 8GadgetPack Setup window.

- Select the Show gadgets when setup exits checkbox.

- Press the Finish button. Then the 8GadetPack sidebar will open on the right of the Windows 11 desktop.


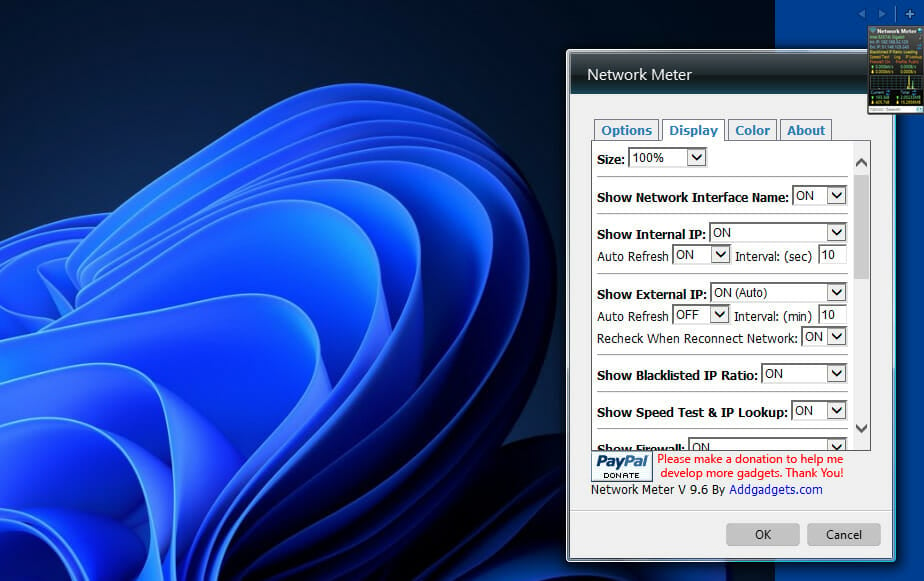
- Right-click the sidebar and select Add gadgets.

- Double-click Network Meter on the third page of the gadget list to add it to the sidebar.

- To configure the Network Meter, right-click its sidebar gadget and select Options.
- Select the Display tab.

- You can add or remove details the gadget displays by selecting ON or OFF drop-down menu options for them.
- To change the gadget’s colors, select the Color tab. Then you can click the codes there to open color palettes.


- Slow LAN speed on Windows 10/11 PCs [FIX]
- How to Change Real Time Update Speed in Task Manager
- How to Check Your Windows Experience Index on Windows 11
Can I check the connection speed in Windows 11 without third-party apps?
Windows doesn’t have any desktop feature that displays connection speed details.
However, the status window for your connection includes speed info. You can open that window via the Control Panel as follows:
- Open the search utility by clicking the magnifying glass taskbar button.
- Enter Control Panel within the search utility’s text box.
- Click Control Panel to open that window.
- Select the Network and Internet category.

- Then click Network and Sharing Centre.

- Select the Change adapter settings on the left of the window.

- Then double-click your connection to open its status window, which displays the speed info.

- Click Close to exit the window


- How to Change Real Time Update Speed in Task Manager
- How to Check Your Windows Experience Index on Windows 11
- Browser Not Working on Windows 11: How to Fix This
How can I speed up my PC’s download speed?
If your PC’s download speed is a little slow, there are various ways you can speed it up. Firstly, close as many background apps as you can on your PC. You can do that by turning off the Let apps run in the background option on the Settings’ Background apps tab.
Windows 11’s system updates can hog bandwidth, which slows down downloads. So, reducing bandwidth usage for updates might boost your download speed. You can limit bandwidth for updates via the Windows Update tab’s advanced options in Settings.

Also, turn off any other devices you have connected to the Internet, such as tablets, smartphones, consoles, etc. Select to disable their Internet connections if you can, and turn them off. By doing so, you’ll maximize network bandwidth for your Windows 11 PC.
As for your PC’s network adapter card, keep in mind that it connects your PC to the Internet. Learn how to check network card speed to see the speed of all your network devices right away. The steps from this Windows 10 procedure may be applied in Windows 11 too.
You can also try updating your network adapter’s driver if your PC’s download speed seems a lot lower than what it should be.
You can do that by scanning your computer with a third-party driver updater utility, such as DriverFix. Driver updater software enables you to download and install new drivers for PC devices in no time.
Moreover, don’t hesitate to use the best bandwidth limiter tools for those programs that use more bandwidth. Even if they are for Windows 10, you can also use them to see exactly what apps are more demanding in terms of network data.
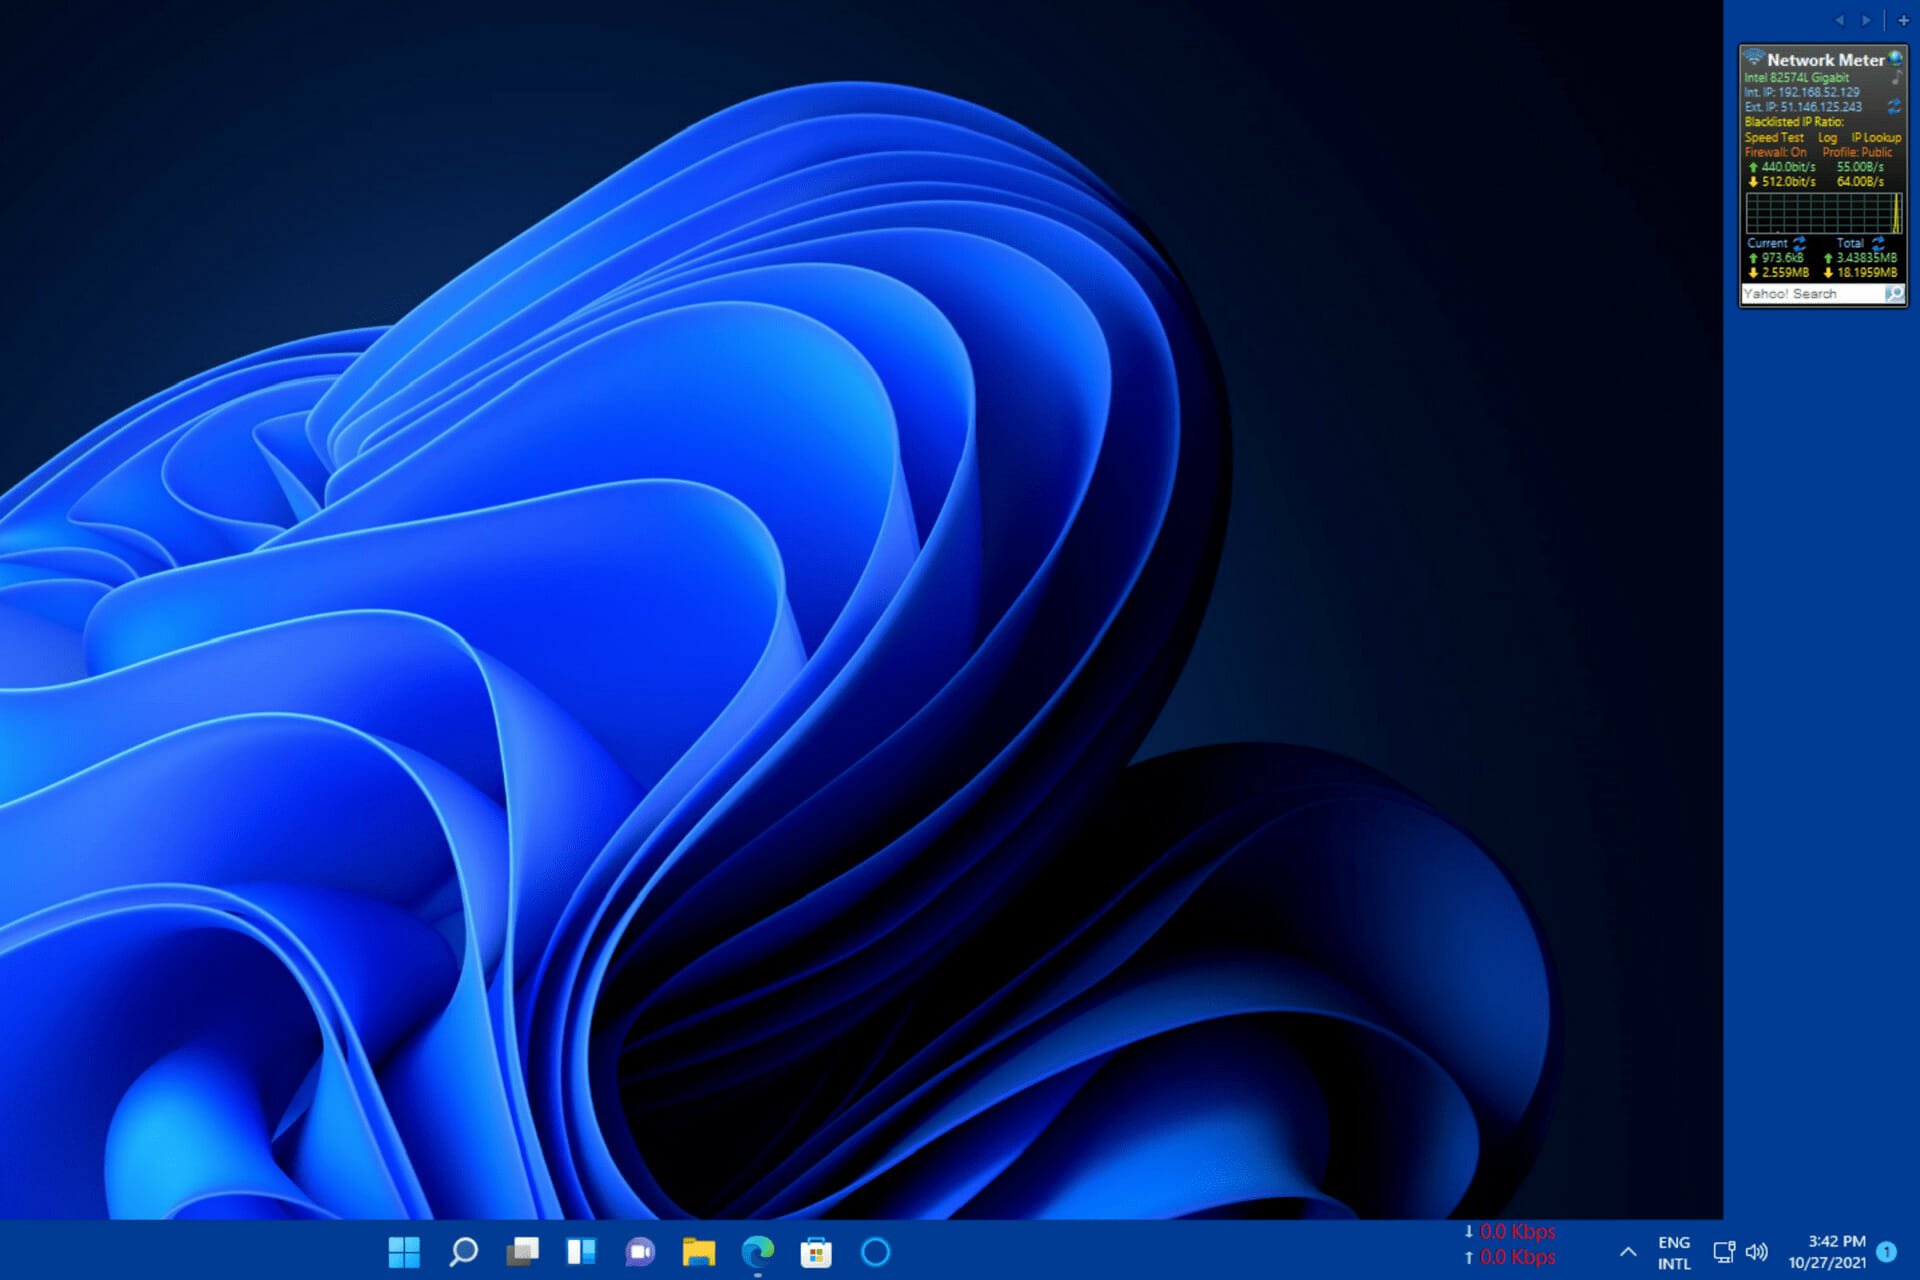
A Windows 11 net speed monitor is a nice addition to the desktop. Net Speed Meter and 8GadgetPack’s Network Meter are two freely available ones that pack in numerous customization settings.
8GadgetPack’s Net Meter gadget provides more network info than Net Speed Meter. With all the additional gadgets that software comes with, some users might prefer 8GadgetPack. However, you can’t add Net Meter to Windows 11’s taskbar.
Either of those network speed monitors on your desktop will make it clearer how long your downloads and uploads might take. With one of those apps installed, you can proactively monitor your PC’s network speed. So, 8GadgetPack and Net Speed Meter are two Windows 11 apps worth noting.
Even more, check out the best resource monitor software for Windows 10. Most of these tools can be enjoyed by Windows 11 users as well.
Which network speed monitor is your choice? Let us know in the comments area below.
![]()
Newsletter
Recently, Microsoft released Windows 11 stable build for the general public. But still, Windows 11 doesn’t come with any Internet Speed Meter. Like, we get in the Android status bar. Yes, by going into Task Manager > Performance > Wi-Fi (Or Ethernet). You can check your current Internet speed. But, there isn’t any option to get a real-time internet speed meter in the Windows Taskbar. That means, there isn’t any way to check, that, how much your Computer is consuming the internet in real-time.
In this situation, third-party network speed indicator Software comes in handy. There are many free and paid tools available to show internet speed in the Taskbar. But, In this post, I will suggest to you some best tools. These tools will show you real-time internet upload and download speed on your Windows PC.
How Internet Speed Meter is helpful?.
Network Speed Meter is very helpful if you don’t have a high-speed or stable Internet connection. In Windows 10, updates get download automatically. And, if you have a slow connection, then, it can affect the work that you’re doing. Also, If your Internet speed fluctuates. Then, keeping an eye on real-time Internet speed is useful. Basically, it will help you to track connection problems.
Best Internet Speed Meter for Windows 10 & Windows 11.
NetSpeedMonitor. (Free)
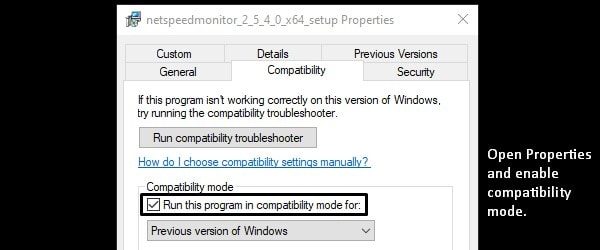
If you’re looking for free Internet Speed Monitor software. That can show you real-time download and upload speed. Then, this is the best tool, which you can use. There isn’t any specific site to download this software. You can download it from Softpedia for free. Though, this tool is designed to run only in Windows XP, Vista, and 7. So, it might not work directly in Windows 8 and 10. You have to run the installer in compatibility mode.
1. Download NetSpeedMonitor from Softpedia. Right-Click on the installer > Click on Properties.
Click on Compatibility tab > Mark the “Run this program in compatibility mode for” and click on OK.
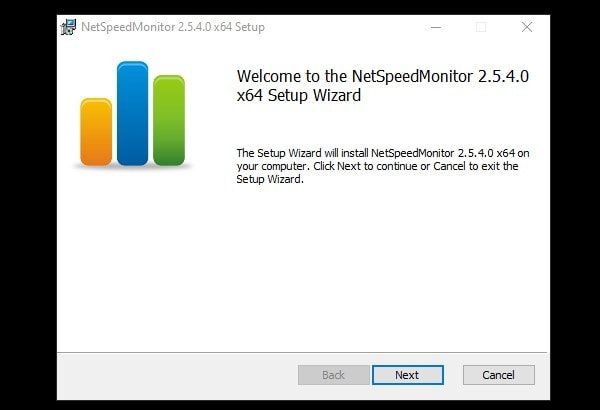
2. Now, you can install it and you will not get any compatibility error.
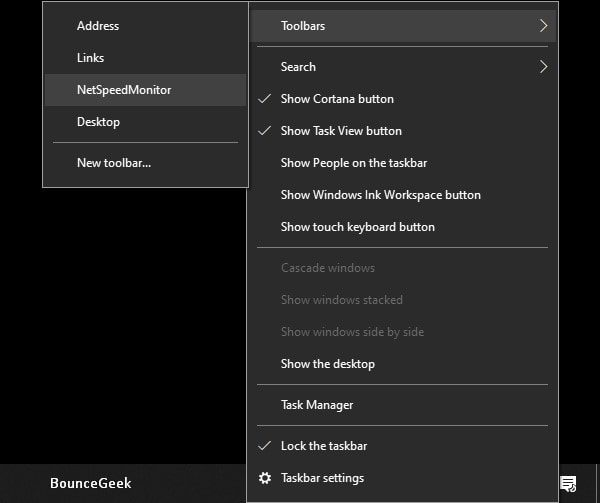
3. After installing NetSpeedMonitor, Right-click on the taskbar. Go to Toolbars and click on “NetSpeedMonitor”.
4. NetSpeedMonitor one-time setup window will now appear. Select the right network interface from it. And, click on save.
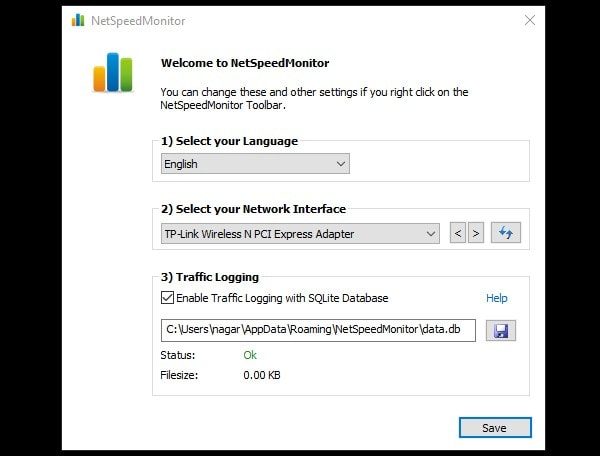
That’s it. You will now be able to see the speed meter by NetSpeedMonitor in Taskbar.
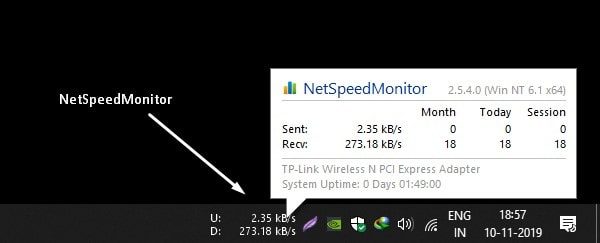
Right-Click on Net Speed Meter, and choose the “Configuration” option. You can select Bitrate and customize it.
NetWorx (Windows, macOS, and Linux.)
NetWorx is one of the most powerful tools to measure Internet Speed. It also helps to track suspicious activity on the network, like, hacker attacks and trojan horses. You can also use it as a bandwidth monitor if you have limited Internet. NetWorx also can identify the possible reasons or sources of network issues. The Software also can send you a visual and sound alert when the connection is down. Or, when some suspicious activity is occurring in Windows. With Networx, You can always see statistics of monthly and weekly bandwidth usage.
And, yes, you can enable Internet Speed Meter in Windows Taskbar or Toolbar. And, the speed meter will show you real-time upload and download speed. You can also customize the speed indicator graph. There are multiple graph types available to select. Like, histogram, numeric, polyline, and columns. You can also select the transfer rate unit between Bytes and Bits. But, I suggest you select Bytes/s.
Install Networx and Show Internet Speed Meter in Taskbar.
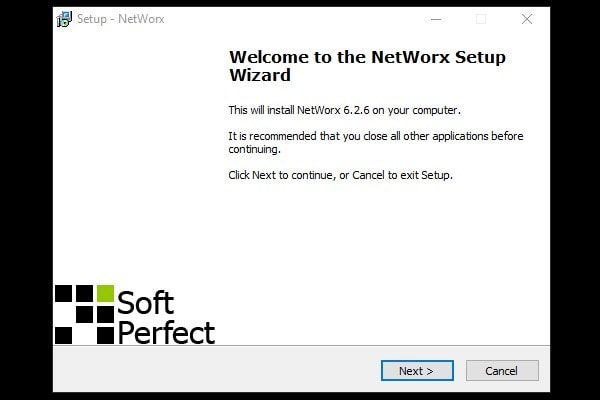
1. First, download the latest version of Networx and install it like normal Windows software. (During installation select recommended settings only.)
2. After installing it successfully, NetWorx welcome window will appear. Select Language and Click on next.
3. Now NetWorx will ask you to select your Internet Connection. You can either select a specific connection or can keep it on “All Connections”.
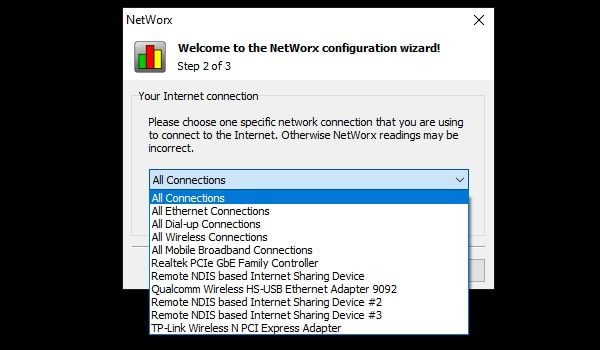
4. Click on Next, and then click on Finish.
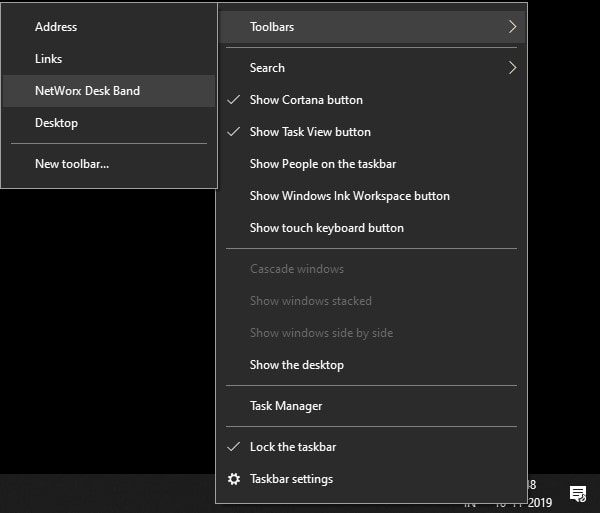
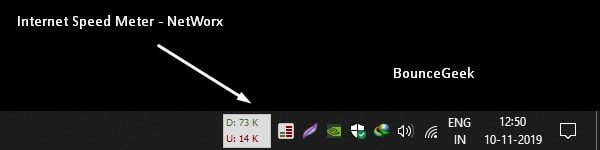
5. To show the Internet speed meter now in the toolbar. Right-Click anywhere in the taskbar. And then, take the mouse pointer over Toolbars. And, mark the “NetWorx Desk Band” option.

That’s it. You will be able to see real-time download/upload speed in Taskbar.
And, to customize graph settings, Right-Click on the Networx icon, and then click on Settings. (Don’t forget to select Bytes/s in transfer unit rate. And, Apply the settings.)
DU Meter.
After NetWorx, DU Meter is the best Internet Speed Meter for Windows 10. DU Meter comes with 30 days of free trial. And, if you find it useful then you can buy its license. There are two license plans available to choose from. Single-user and business licenses and Family Pack. Currently, for Indian users, it is available for $9.95. DU meter also allows adding speed meter in the taskbar. And, that’s all you wanted.
You can customize the color & sound of the DU Meter. So basically, you can do audible network monitoring. Also, you can customize the traffic monitor Graph. Apart from the taskbar or toolbar, you can enable a floating window of the DU Speed monitor. The data transfer rate unit option is also available. It also shows the highest Internet speed.
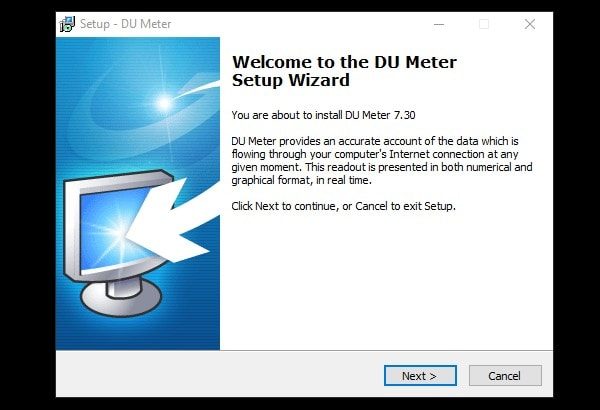
1. Download DU Meter and install it on your Windows PC.
2. To enable Network Speed Monitor in the taskbar. Right-Click on the toolbar. Take mouse pointer on Toolbars > Click on “DU Meter” to enable.

That’s it, now you will be able to see upload and download speed in Taskbar.
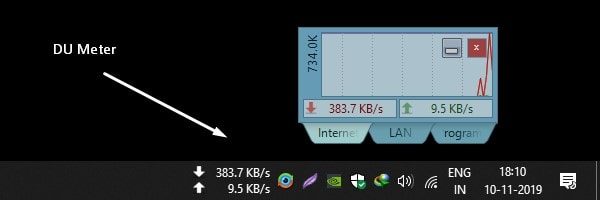
To enable or disable floating Internet speed Monitor, Right-Click on the DU Meter icon. And, click on the Show/Hide DU Meter option. And, by clicking on “User options”, you can access settings. Can customize DU Meter.
Summing-up.
So, these are some of the best speed tracking software for Windows 10. Personally, I found “NetSpeedMonitor” best. Because it’s free and offers what exactly you want. DU Meter and Networx come with a trial period. But, offers many other features, that’s why you need to buy a subscription. Though, if you don’t want to spend to get some extra features. Then, NetSpeedMonitor is best for you.
Article Contents
- 1 Best Internet Speed Meter for Windows 10 & Windows 11.
- 1.1 NetSpeedMonitor. (Free)
- 1.2 NetWorx (Windows, macOS, and Linux.)
- 1.3 DU Meter.
- 1.4 Summing-up.
Microsoft известна тем, что прислушивается к отзывам своих пользователей. Однако требование наличия встроенного монитора скорости сети Windows какое-то время игнорировалось и даже отсутствовало в последней настольной операционной системе этого технологического гиганта, Windows 11.

Монитор скорости сети полезен, если вы хотите проверить текущую скорость Интернета и убедиться, что ваш провайдер Интернет-услуг обеспечивает обещанные скорости.
Однако знаете ли вы, что вы также можете включить монитор скорости сети в Windows 11? Звучит воодушевляюще, правда? Давайте подробно рассмотрим некоторые способы включения сетевого монитора Windows.
1. Измеритель чистой скорости — включение мониторинга сети в Windows 11
Вероятно, лучший способ включить мониторинг сети Windows — это использовать приложение под названием Net Speed Meter.
Во-первых, приложение можно легко загрузить и установить из Microsoft Store, а во-вторых, оно безупречно работает в Windows 10 и 11.
И так, чего же ты ждешь? Давайте посмотрим, как можно использовать Net Speed Monitor, чтобы включить мониторинг скорости сети Windows.
- Запустите Microsoft Store на своем ноутбуке / ПК и найдите Монитор чистой скорости.
- Ударил установить и войдите в свою учетную запись Microsoft.
- После этого начнется установка Net Speed Monitor на ваш ноутбук / ПК.
- Запустите приложение после завершения установки, и все готово.
- Теперь это возможно, если вы хотите навсегда разместить его на панели задач, чтобы не мешать, когда вы работаете на своем ПК.
- Кликните правой кнопкой мыши в виджете Скорость сети и выберите Сохранить на панели задач из раскрывающегося списка.
- Кроме того, вы также можете настроить общий вид виджета скорости сети. От смены шрифта до смены цветов возможно все.
2. 8GadgetPack — боковая панель с большим, чем просто монитор скорости сети Windows.
Если по какой-то причине вы не предпочитаете Network Speed Monitor, то 8GadgetPack — отличная альтернатива. Он не только детально отображает вашу текущую сеть, но и содержит несколько впечатляющих хитростей, на которые мы должны обратить внимание.
- Скачать 8GadgetPack
- После того, как вы успешно загрузили установочный файл 8GadgetPack, запустите установочный файл на вашем ноутбуке / ПК.
- Теперь следуйте инструкциям на экране, чтобы настроить и установить 8gadgetPack.
- После успешной установки программного обеспечения на рабочий стол будет добавлена боковая панель.
- Кликните правой кнопкой мыши в любом месте боковой панели и нажмите добавить гаджет вариант.
- Теперь вы увидите множество виджетов, перейдите на страницу 3 и выберите Монитор скорости сети.
- Бум, теперь он добавит монитор скорости сети на вашу боковую панель прямо на рабочем столе.
- Помните, я сказал, что у него есть несколько хитростей в рукаве? Что ж, виджет скорости сети — это очень подробный виджет, содержащий информацию о скорости (скорость загрузки и выгрузки), IP-адрес, состояние подключения и многое другое. Кроме того, вы также можете выбрать из множества других полезных параметров виджета, чтобы добавить их на свою боковую панель в Windows 11.
3. Проверка состояния подключения непосредственно в Windows 11
Знаете ли вы, что вы можете изначально проверить состояние сетевого подключения в Windows? И знаете, что самое лучшее? Он работает с большинством версий Windows, включая Windows 7 и 8.
Но будьте осторожны: собственный метод предоставляет только ограниченную информацию, например, активно ли интернет-соединение или какую максимальную скорость вы можете ожидать от своего Wi-Fi-соединения в Windows.
Разобравшись с этим, давайте посмотрим, как вы можете использовать мониторинг скорости сети Windows изначально.
- Откройте меню «Пуск» и найдите Панель управления.
- Под панелью управления нажмите на Сеть и Интернет.
- Здесь выберите просмотреть статус сети в разделе «Сеть и общий доступ».
- Теперь щелкните свой SSID в Интернете рядом с подключениями.
- Теперь он будет отображать информацию, относящуюся к вашему интернет-соединению.
4. Проверка скорости интернета с помощью браузера.
Однако, если вы хотите проверять скорость своего интернета только в определенное время, лучше всего использовать браузер.
Просто запустите браузер и посетите любой из этих веб-сайтов, чтобы с легкостью проверить текущую скорость интернета.
Беспрепятственное использование монитора скорости сети Windows
Windows 11 не имеет встроенного монитора скорости сети, но с помощью одного из описанных выше методов вы сможете легко включить функцию мониторинга скорости сети Windows и проверить скорость вашего интернет-соединения.
Сообщите нам в комментариях ниже, если вы нашли эту статью полезной и успешно включили мониторинг сети Windows на своем ноутбуке / ПК.
Что бы вы ни делали в Интернете, скорость Интернета стала основной и необходимой информацией для вашей проверки и мониторинга производительности и поиска решений для ее оптимизации. Хотя многие сторонние инструменты могут отлично работать в Windows 11, чтобы помочь проверить скорость интернета, и мы хотели бы вам сказать как включить интернет-счетчик скорости в Windows 11 после прохождения через несколько инструментов.
Поскольку в системе Windows нет встроенного инструмента для отслеживания скорости загрузки и загрузки вашего интернет-соединения. Измеритель чистой скорости был разработан как настольный счетчик, который проверяет скорость загрузки и выгрузки вашего интернет-соединения в режиме реального времени. И он также может работать в системном трее Windows.
Всего 4 простых шага, необходимых для установки и настройки Internet Speed Meter на Windows 11, чтобы получить всю необходимую информацию в Интернете.
Шаг 1: Получить Измеритель чистой скорости из Microsoft Store, нажав синюю кнопку «Получить»; то он будет установлен.
Шаг 2. Откройте его после завершения установки и оставьте Net Speed Meter на панели задач Windows 11, когда вас спросят, следует ли оставить Net Speed Meter на панели задач.

Шаг 3: Net Speed Meter будет успешно установлен в Windows 11;
Шаг 4: Щелкните правой кнопкой мыши на значке, а затем выберите Сохранить на панели задач;

Затем информация о скорости интернета будет отображаться на панели задач Windows 11.
Если вам нужны дополнительные настройки, щелкните правой кнопкой мыши значок и выберите «Настройка». Если у вас низкая скорость интернета, вы можете узнать как ускорить виндовс 11 or как ускорить интернет на виндовс 11.
[UPD 09.12.2021 / ДОБАВИЛ ИНФОРМАЦИЮ ДЛЯ WINDOWS 11]
Всем доброго времени суток! Совсем недавно “по заявкам зрителей” я написал небольшое руководство о мониторинге системы в играх… однако далеко не все играют, а вот компьютер без привычных нам сайтов и социальных сетей уже невозможно себе представить. Поэтому это будет небольшим приложением к прошлой заметке и сегодня рассмотрим как настроить виджет скорости интернета для Windows 10 в трее (панели задач).
![]()
Вы можете подумать, что начало немного странное – суть посыла в потребности многих пользователей видеть перед собой информацию о скорости вашего интернет соединения в любой момент времени (как это удобно реализовано в стандартных настройках Android).
Во времена Windows 7 данный вопрос не был актуальным и особой потребности выводить “коннект” на видное место не имел практического смысла… все изменилось с приходом десятки. Спокойно себе работаешь и не понимаешь – чего это музыка заикаться стала? Открываешь диспетчер задач и видишь, что система обновляется и сожрала весь интернет канал (Windows 10 постоянно что-то подгружает и подкачивает в фоне, поэтому удобно расположить перед глазами компактный виджет с информацией о вашей скорости интернета)
Содержание:
- 1 Net Speed Monitor. Виджет скорости интернета для Windows 10
- 1.1 Руководство по установке Net Speed Monitor
- 1.2 Как отобразить скорость интернета в панели задач Windows 10
- 1.3 Полезные советы по настройке индикации скорости интернета
- 1.4 TrafficMonitor для Windows 11
- 2 От автора
Net Speed Monitor. Виджет скорости интернета для Windows 10
Начиная с Windows 8 в диспетчере задач можно посмотреть текущую нагрузку на сетевой адаптер – это удобно и часто достаточно, но нас интересует отображение скорости интернет соединения перед глазами.

Протестировал несколько вариантов и остановился на Net Speed Monitor – приложение на русском, оно бесплатное и отлично работает на Windows 10 крайней версии (1909 на момент написания заметки). Однако утилитка давно не обновлялась и в процессе установки на свежую десятку есть некоторые нюансы.
Руководство по установке Net Speed Monitor
Утилита разрабатывалась под Windows 7, Windows Vista и для старушки Windows XP… и сразу вижу вопрос – чего ты там эту древность рекомендуешь?! На самом деле это один из лучших способов вывести скорость на панели рядом с часами (к тому же бесплатный).
Я всегда рекомендую загружать актуальные версии программ с официальных сайтов, однако на сайте разработчиков ничего интересного нет, программа сто лет не обновлялась, поэтому позволю себе (для вашего удобства) разместить файлы дистрибутива у себя на сервере.
https://www.itshneg.com/downloads/netspeedmonitor_2_5_4_0_x86_setup.msi
https://www.itshneg.com/downloads/netspeedmonitor_2_5_4_0_x64_setup.msi
Качаете установочный пакет необходимой разрядности (если сомневаетесь – загружайте x86) и при запуске сталкиваетесь с ошибкой…

Чуть выше я уже писал что Windows 10 еще был только в планах, когда разрабатывалась данная утилита. Следовательно нам необходимо поставить режим совместимости.
Кликните правой кнопкой мыши по загруженному файлу и в появившемся меню выберите пункт “Свойства”. Перейдите на вкладку “Совместимость” и в категории “Режим совместимости” выберите “Предыдущая версия Windows” (в какой версии Windows 10 успели убрать расширенные варианты совместимости со старыми редакциями?) и не забываем нажать кнопочку “Применить”

После применения параметров совместимости проблем с установкой программы не будет (во время установки инсталлятор не предлагал установить никакой сторонний софт, поэтому можете не беспокоиться что вместе с Net Speed Monitor) установиться в нагрузку что-то еще!
Как отобразить скорость интернета в панели задач Windows 10
Почему я решил написать данную заметку? Как видите есть некоторые нюансы с установкой… и после ее решения вы не найдете программу в списке установленных приложений! (на мой взгляд – это просто издевательство над неопытным пользователем).
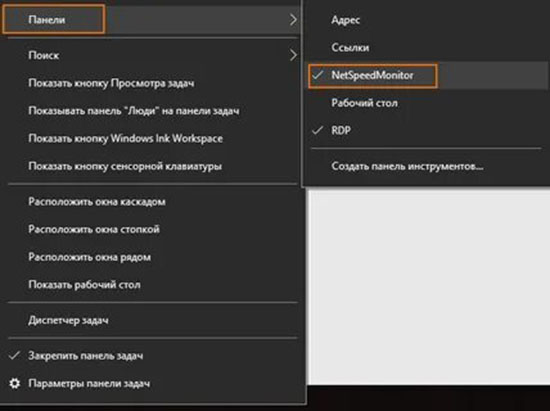
Кликните правой кнопкой по панели задач Windows и в появившемся списке выберите “Панели” и активируйте пункт “NetSpeedMonitor”

Вы попадете на экран приветствия (окно первичной настройки программы) где необходимо выбрать язык (само собой Русский) и вашу сетевую карту, для которой необходимо отображать скорость загрузки (обычно поставляется нужная) и жмем “Сохранить”.

Теперь на панели задач будут отображаться исходящая скорость (U:) и скорость закачки (D:) – как видите все просто и наглядно!

С развитием высокоскоростного интернета не совсем логично отображать в kbit/s – далее рассмотрим как поставить привычные всем мегабиты (или даже мегабайты).
Полезные советы по настройке индикации скорости интернета
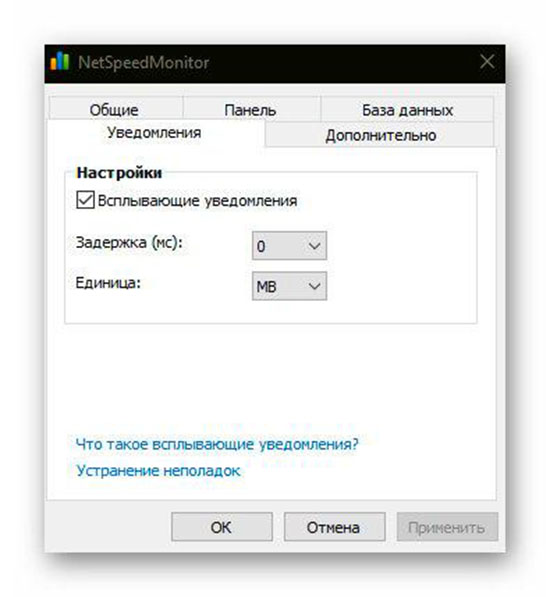
Чтобы поменять вариант отображения виджета – кликаем по нему правой кнопкой мыши и выбираем пункт “Конфигурация”.
В строке “Размерность” ставим Mbit/s и радуемся привычному отображению (если хотите как в торрентах мегабайты а не мегабиты, то выбираем MB/s) и не забываем применить настройки.

Я не спроста просил оставить настройки программы по умолчанию. Помимо отображения скорости у вас будет вестись статистика, где вы всегда можете посмотреть сколько трафика вы потратили в определенный день – это очень удобно для пользователей мобильного интернета на компьютере (а у нас в России я знаю таких очень много).
TrafficMonitor для Windows 11
После обновления до Windows 11 не обратил внимание, что виджет теперь не работает, да и в целом логика работы с панелью задач немного изменилась. В комментариях мне указали о невозможности использовать предложенную мной утилиту (да я и сам не нашел способ заставить ее работать на 11 винде). Предлагаю решение – TrafficMonitor. На мой взгляд – даже более функционально и отличный вариант для тех, кому необходим такой виджет с информацией о загрузке вашего интернет канала!
Скачать можно на GitHub (я рекомендую обычную zip версию – она не требует установки). Распакуйте в удобное для вас место и запускайте приложение. В стандартном виде это парящий виджет, который можно таскать куда угодно (а при наведении на него отобразится дополнительная информация).

Что на нужно? – Отображение информации в панели задач, поэтому кликаем правой кнопкой мыши по значку с программой и выбираем “Show Main Window” (к сожалению не умеет в русский язык). Тут же можно перейти в настройки или выбрать для отображения в панели необходимый сетевой интерфейс. В целом, все и так уже работает – стандартные настройки наверняка покроют потребность 99% пользователей.

Осталось только перейти в “General Settings” в “Options…” для автозапуска. Вам просто необходимо поставить галочку “Auto run when Windows starts” для автоматической загрузки виджета при включении компьютера.

Теперь у вас рабочий способ вывести виджет скорости сети для новейшей Windows 11! (Кстати, как она вам?!)
От автора
Жаль, конечно, что идея из Windows Vista так и не прижилась – панель с гаджетами была очень удобной и интересной… и виджет скорости интернета был очень полезен вместе с отображением загрузки процессора или оперативной памяти.
P.S. К сожалению скорость интернета зависит не только от вашего провайдера и на нее влияет много факторов. Устраивает ли вас ваш провайдер?! В последнее время все чаще слышу негатив в их сторону все зависимости от компании.
If you are looking for a free internet speed test app for Windows 11/10, this list is for you. Here, we are going to mention multiple free Microsoft Store apps that let you measure your internet speed on your Windows 11/10 PC.
Earlier, we shared a list of free online Internet Speed Test Online Services. This list is specifically for Microsoft Store apps. You can simply download and install any of these apps from Microsoft Store and then run an internet speed test on your computer. All these apps determine and display download speed and upload speed, while some also display jitter and ping stats. You can also view your network details as well as browse your speed test history. Each of these apps has a different set of features. You can check out the details below and then get the one you like.
Here are the best free internet speed test apps for Windows 11/10 available in the Microsoft Store:
- Network Speed Test
- Speedtest by Ookla
- Net Speed Meter
- Data Usage
- Speed Test – Free Internet Speed Test Tools
Let us discuss the main features of these apps now!
1] Network Speed Test

Network Speed Test is a free internet speed test app for Windows 11/10. Using this app by Microsoft Research, you can easily measure your download and upload speed. Plus, it also lets you measure network delay time. It lets you run multiple internet speed tests and see the history of each test in a dedicated section. In addition to that, you can also view details on your internet connection including access points (BSSID), authentication, encryption, etc.
This internet speed test app also tells you what you will be able to do based on your connection’s speed. For example, whether or not you can stream high-quality videos, email, voice calls, stream music, etc. You can see a gauge chart on its interface to determine that.
To run an internet speed test, launch the app and click on the Start button to initiate a speed test. In a few seconds, you will be able to view the results on its screen.
Read: How to display Internet speed on the Taskbar.
2] Speedtest by Ookla
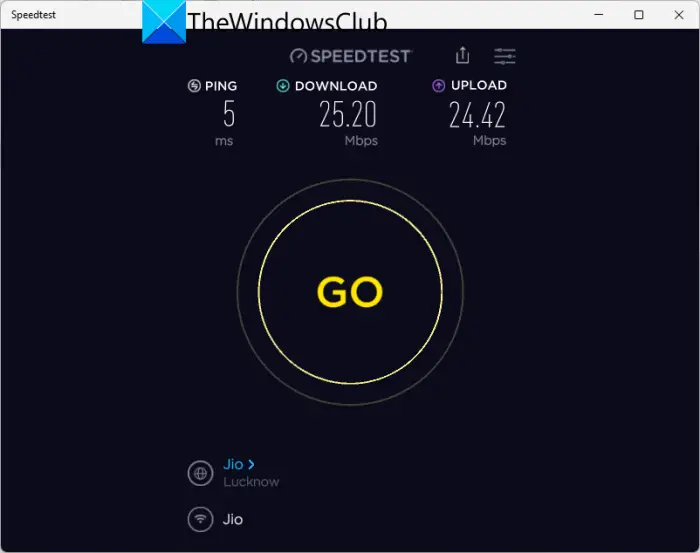
Another good free internet speed test app for Windows 11/10 is Speedtest by Ookla. It is a handy app that lets you measure your connections’ speed including statistics like download speed, upload speed, and ping speed. You can install this app from Microsoft Store and then launch this app. Then, click on the GO button to start the test. It will then display different connection speed stats on the screen.
It also lets you browse through the internet speed test history and check out the previous statistics. Furthermore, you can also save the history to a CSV file. Plus, you can even share the internet speed test results via email, link, or some other installed app.
If you liked it, you can get it from Microsoft Store.
See: How to check your Internet Connection Speed using Google Chrome.
3] Net Speed Meter
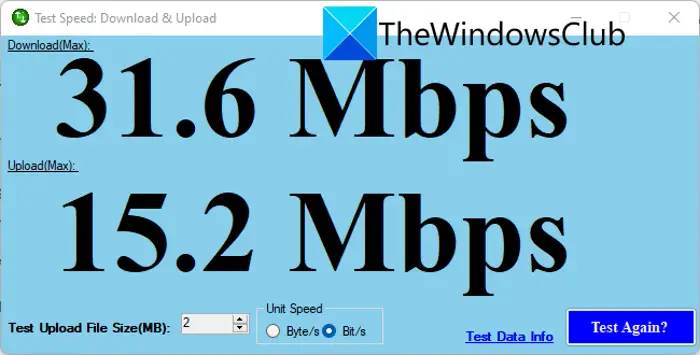
Net Speed Meter is a free Windows 11/10 app to test internet speed. It shows you real-time download and upload speeds. Plus, you can also run an internet speed test by right-clicking on the app icon from the system tray. And then, select the Test Speed option and click on the Run button to start the internet speed test. You can also enter test upload file size and then start the test to measure upload speed.
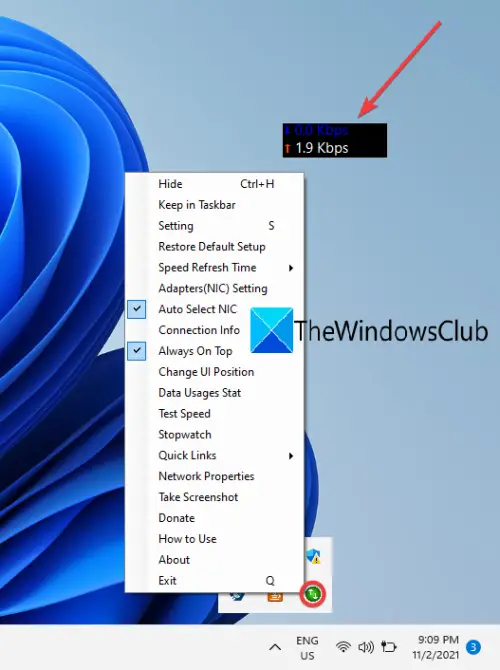
This app is like a widget that stays on the top of your desktop and applications and shows you the real-time download and upload speeds. You can also access several handy features from its right-click context menu including Data Usages Stat (shows total data usage), Network Properties (view network details), Stopwatch, Speed Refresh Time, Adapter Settings, Take Screenshot, Change UI position (change widget position on the desktop), etc.
All in all, it is another nice internet speed test app for Windows 11/10 that you can try. You can download it from here.
Read: Measure Local Area Network speed with LAN Speed Test tool.
4] Data Usage
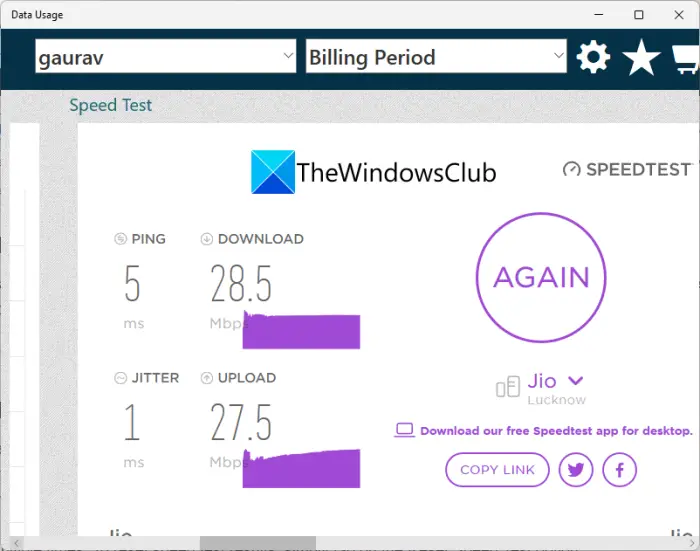
Data Usage is a dedicated free app to measure data usage of an internet connection as well as internet speed. On its home screen, you can view different dedicated sections to determine different statistics. Simply scroll through the right-side and you will see a Speed Test section. From here, click on the GO button and it will start measuring your internet speed. When the test is done, you will be able to view stats including ping, jitter, download speed, and upload speed. You can copy the link of test results or directly share it on Twitter or Facebook.
Besides internet speed, you can also view network usage chart, network billing details, network usage report, network pie chart, and current connection details.
To use this handy app, you can get it here.
See: How to check Network Adapter Speed on Windows.
5] Speed Test – Free Internet Speed Test Tools
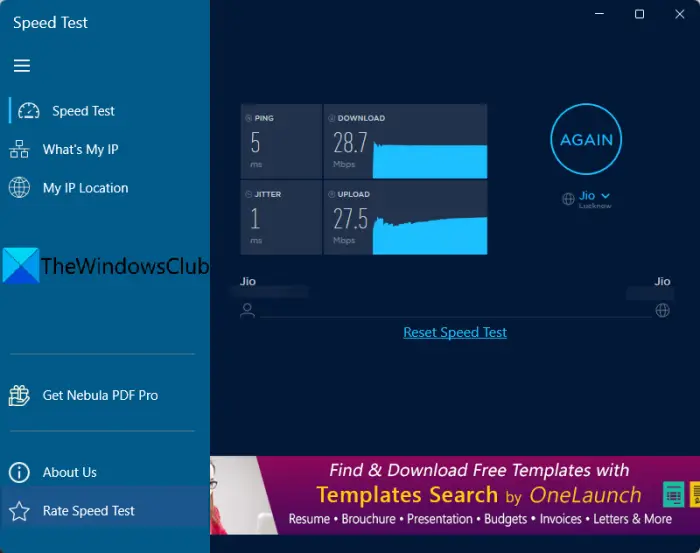
As the name suggests, Speed Test – Free Internet Speed Test Tools is a set of tools to measure different statistics about your internet including internet speed. You can install it from Microsoft Store and then start using it by pressing the GO button present on its GUI. It will then display internet speed including jitter, delay, download speed, and upload speed. You can perform internet speed tests multiple times. To reset speed test results, simply tap on the Reset Speed Test option.
Apart from the internet speed test, it also provides features to find out your external IP address and IP location. You can download this Windows 11/10 app from here.
See: Best free Browser speed & performance online test tools.
Which is the best app for Internet speed test?
In my opinion, Network Speed Test is one of the best internet speed test apps for Windows 11/10. It is an app from Microsoft Research and provides accurate results. Plus, it even lets you know what you are capable of doing with your current internet connection. Besides this app, Speedtest by Ookla is also an accurate and good internet speed test app for Windows 11/10. You can even export the internet speed test results in this app. Plus, there is a web version of this app which is quite popular for testing your internet speed. You can also try it to quickly determine your internet speed.
Read: Check if your Internet connection is capable of streaming 4K content.
Is Ookla speed test free?
Yes, the Ookla speed test app is free for everyone and we have listed it in our article above. It is also available for iPhone, Android, and web browsers. You can check out its main features above in this article.
What is a good download speed?
A good internet speed would be above 25 Mbps using which you can perform generic internet tasks including streaming videos, video calls, stream music, etc. However, a fast download speed is a minimum of 100 Mbps on which you can stream HD videos, play extensive games, download HD movies, etc.
Hope this list helps you find a good internet speed test app for Windows 11/10.
Now read: Free HTML5 Bandwidth testing sites that don’t need Flash.
When you’re linked to the internet 24 hours per day, you can access an endless amount of information on a variety of topics. This could be information about politics, games, or other kinds of content. You can even communicate with people whom you know.
⚠ Note: Run a Program in Compatibility Mode.
Unfortunately, not all internet connections are perfect. Sometimes you may experience a slower connection or one with spikes and disconnects that happen randomly. The NetSpeedMonitor 64 bit app is a monitoring tool that can help you fix these connectivity issues.
If you are looking for NetSpeedMonitor (64-bit) alternatives, we recommend you to download PRTG Network Monitor or GlassWire.
Watch Your Internet Connection
This tool won’t let you surveil other people’s internet activities. It is more of a visual equalizer that showcases information about your internet connection that allows you to spot problems as they happen.
The main screen is nothing to be concerned about because the app can operate discretely by staying in your system tray. When you’re ready to use some of its advanced options, you can activate the app. However, you will always see the app’s toolbar which lets you keep track of the speed of your downloads and uploads.
Compatibility Problems (Install and Use NetSpeedMonitor On PC)
Net Speed Monitor is not a new release, so don’t be surprised if you experience a few bugs. For instance, if you’re trying to run the app on a computer with Windows 8.0 or some later version, then you’ll experience these bugs and other issues.
One way around this compatibility issue is to set “Compatibility Mode” on the installer before running it. This will tell the computer to execute the installer as if you were running a more compatible version of Windows.
Under Properties, Then Click the Compatibility tab. Here, check the box next to ’Run the program in compatibility mode for.’ The dropdown should show’ Previous version of Windows.’ Hit Ok to Conserve the changes.
Simple Interface
Since the app has not been updated in quite a while, its visual appeal is not that impressive by today’s standards. So, doesn’t expect a lot of fancy animations or movies when using the tool.
As for the controls, they’re all organized quite simply on the interface. You’ll have no trouble operating them and understanding what they do, even if you’re a novice computer user. All these controls can be accessed by the tool’s little icon in the system tray.
Monitor Your Network Activity
Overall, this tool is great for keeping tabs on your internet connection by monitoring the values of your upload and download speeds. You can also see all the outbound and inbound connections of your computer as well.
Download NetSpeedMonitor (64-bit) Latest Version
Компания Майкрософт выпустила ОС Виндовс 11, в котором не предусматривается персонального приложения, которое предназначено для круглосуточного мониторинга скорости интернета. Поэтому целесообразно пользоваться сторонним программным обеспечением.
Что собой представляет NetSpeedMonitor
NetSpeedMonitor – специализированное программное обеспечение, с помощью которого предоставляется возможность в режиме реального времени отобразить показатели заявленной скорости интернета непосредственно на панели задач. Рассматриваемый инструмент оказывает посильную помощь в процедуре отслеживания интересующих показателей загрузки и одновременно скачивания на используемом устройстве, к примеру, стационарном компьютере либо ноутбуке.

Счастливым обладателям ОС Виндовс сложно установить специализированное программное обеспечение с последующей установкой персональных параметров. Поэтому крайне важно ознакомиться с имеющимися особенностями, чтобы снизить риски возникновения ошибок.
Как добавить на панель задач
Чтобы произвести добавление рассматриваемого программного обеспечения на панель задач, требуется придерживаться четкой последовательности действий. Алгоритм включает в себя:
- Изначально требуется загрузить рассматриваемое программное обеспечение с проверенного портала. Оно находится в открытом доступе и является бесплатным. Установка после скачивания осуществляется в автоматическом режиме. Дополнительных действий предпринимать не требуется.
- По завершении процедуры установки требуется выполнить переход в раздел внесения пользовательских настроек и произвести дальнейшую инсталляцию в классическом режиме. С помощью правой клавиши мыши осуществляется переход в раздел свойств, после чего выбирается совместимость и отмечается интересующий режим. С целью внесения изменения требуется нажать на клавишу сохранения результатов.
- На следующем этапе требуется с помощью двойного нажатия клавиши нажать на имеющийся установочный файл, чтобы произвести требуемую инсталляцию.
- Далее пользователям требуется нажать правой клавишей мыши на Виндовс панели инструментов с последующим выбором одноименного раздела из предложенного системой перечня доступных вариантов.
В завершении требуется активировать работу программного обеспечения. Для выполнения поставленной задачи пользователям требуется нажать на графическое изображение ярлыка ПО. После предварительного выбора утилиты, показатели скорости параметров загрузки и непосредственно скачивания в сети в автоматическом режиме отображаются на встроенной панели задач, которая расположена в правом углу рабочего стола.
Почему не работает счетчик
Часто встречается у пользователей ситуация, когда рассматриваемое программное обеспечение непрерывно показывает 0, даже при условии стабильного интернет-соединения. В таком случае оптимальным решением станет соблюдение представленной исчерпывающей последовательности действий:
- С помощью правой клавиши мыши требуется нажать на значение измерителя рассматриваемого программного обеспечения, которое расположено по умолчанию на панели инструментов.
- Из представленного перечня разделов требуется нажать на конфигурацию.
- Во вновь открывшейся форме требуется произвести нажатие на главное меню сетевого интерфейса с последующим выбором альтернативного предложения. Это позволяет удостовериться в наличие бесперебойного функционирования счетчика.
- В случае обнаружения проблем требуется произвести смену установленного по умолчанию интерфейса и подтвердить отсутствие проблем с отображением интересующих данных.
Требуется обращать внимание на то, что программное обеспечение по умолчанию отображает показатели скорости в кБ/с. Пользователям предлагается на выбор альтернативные системы измерений. Дополнительно предусматривается активация либо деактивация значения скорости интернет-соединения путем двойного нажатия на панели инструментов.
Полезные советы по NetSpeedMonitor для новичков
Каждый пользователь, который только начинает знакомство с программным обеспечением, сталкивается с определенными сложностями. Чтобы исключить ошибки, рекомендуется изучить имеющиеся особенности подробней.
Изменение единицы скорости
Чтобы пользователям внести первичные изменения в установленные по умолчанию параметры скорости, требуется скорректировать метод отображения виджета. Для этого требуется предварительно нажать правой клавишей мыши для последующего перехода в подкатегорию «Конфигурация».
В имеющейся открывшейся строке требуется определить интересующие показатели. Чтобы изменения вступили в силу, требуется сохранить нажатием на одноименную клавишу.
Просмотр использования данных
Отображение в режиме реального времени во встроенной по умолчанию осуществляется в панели задач. Поэтому для получения исчерпывающей информации по интересующему вопросу, требуется нажать на Show Main Window. После этого в открывшейся форме требуется указать на предпочитаемый вариант получения полного отчета. Сразу после этого программное обеспечение в автоматическом режиме отображает требуемые данные. Технические сбои либо ошибки исключены, о чем свидетельствуют многочисленные отзывы пользователей.
Изменение действие двойного щелчка
Чтобы откорректировать действие двойного щелчка, требуется воспользоваться разделом пользовательских настроек. Для этого пользователям после перехода установить интересующее значение и сохранить нажатием на соответствующую одноименную клавишу.
Настройка шрифт инструмента
Каждый пользователь вправе изменить установленный по умолчанию шрифт. Для выполнения поставленной задачи требуется предварительно перейти в раздел пользовательских настроек, после чего выбрать одноименную категорию. После внесения правок требуется нажать на клавишу сохранения параметров. Изменения вступают вы силу мгновенно. Сложностей либо перезапуска программного обеспечения не требуется.
Экспорт БД
Функционал рассматриваемого программного обеспечения позволяет инициировать экспорт базы данных. Для этого требуется открыть главное меню, после чего выбрать одноименную опцию. В результате несложных действий поставленная задача выполняется за максимально короткие сроки.
( 2 оценки, среднее 1 из 5 )