Установка .NET Framework 3.5 на Windows Server 2012/2016
Запустите службу «Центр обновления Windows»
Нажмите «Пуск» и выберите «Администрирование»:
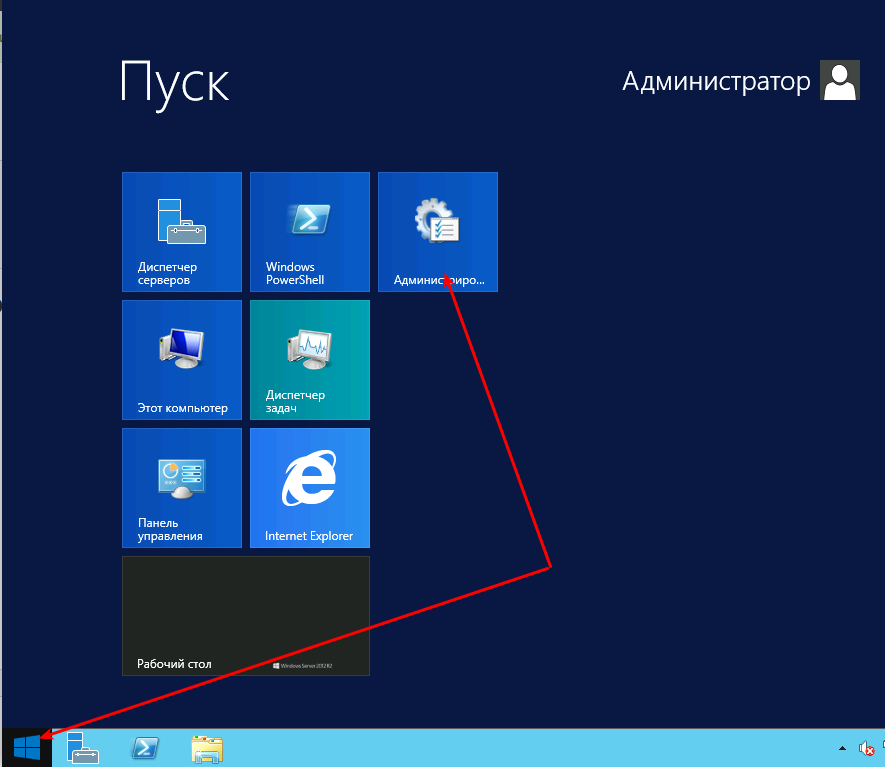
В открывшемся окне перейдите в «Службы»:

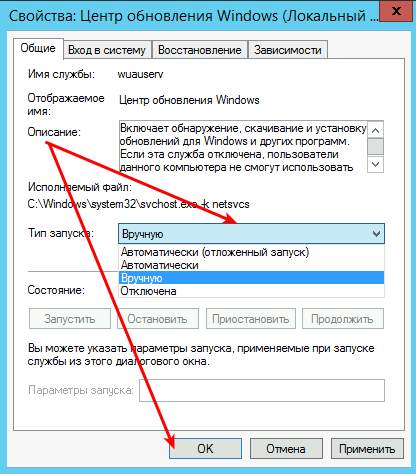
Нажмите правой кнопкой мыши на службе «Центр обновления Windows» и выберите «Свойства»:

Установите тип запуска «Вручную» и нажмите «ОK»:
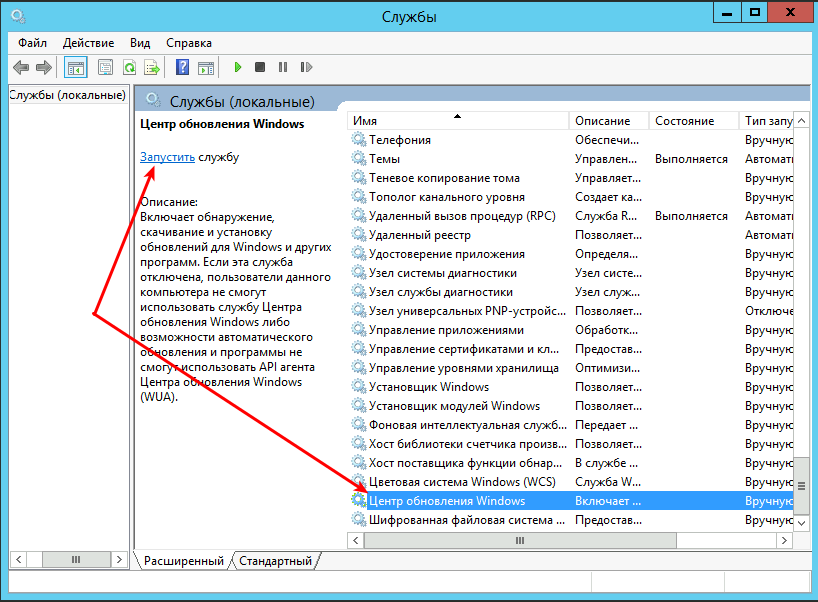
Запустите службу:
Установите .NET Framework 3.5
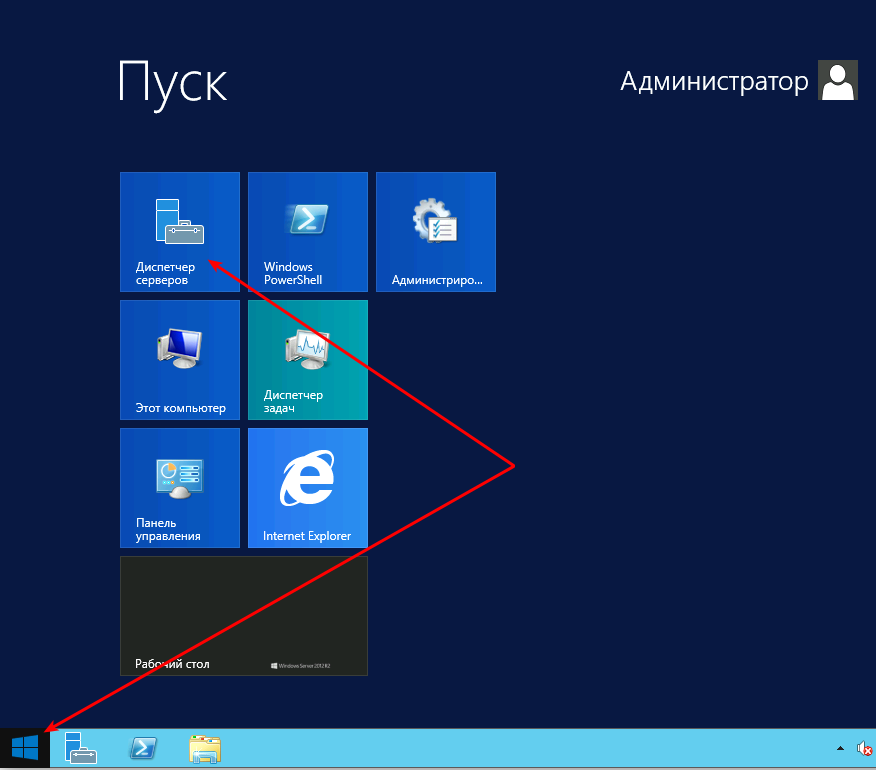
Нажмите «Пуск» и откройте «Диспетчер серверов»:
Нажмите «Управление» и выберите «Добавить роли и компоненты»:

Нажмите «Далее»:
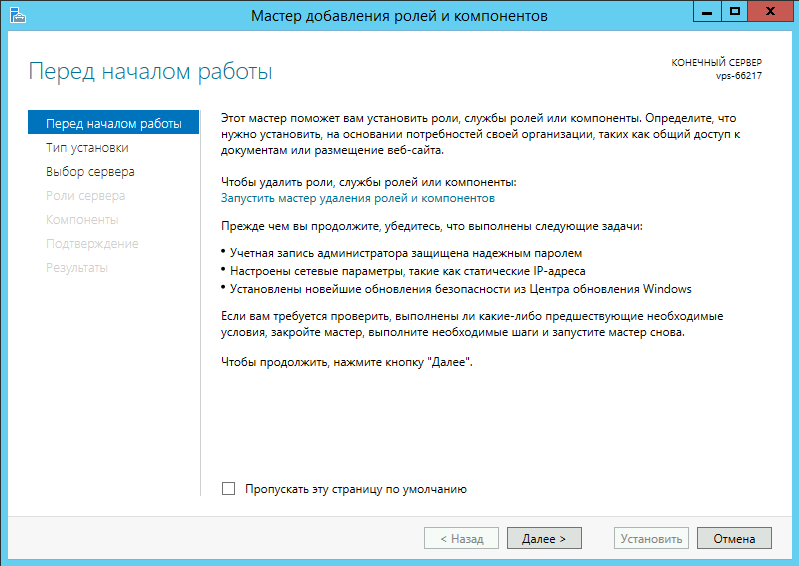
«Далее»:
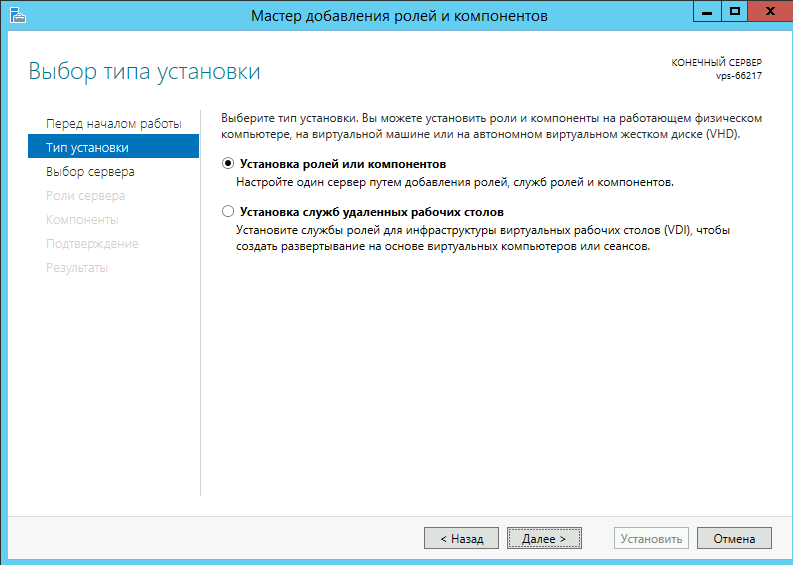
«Далее»:

«Далее»:
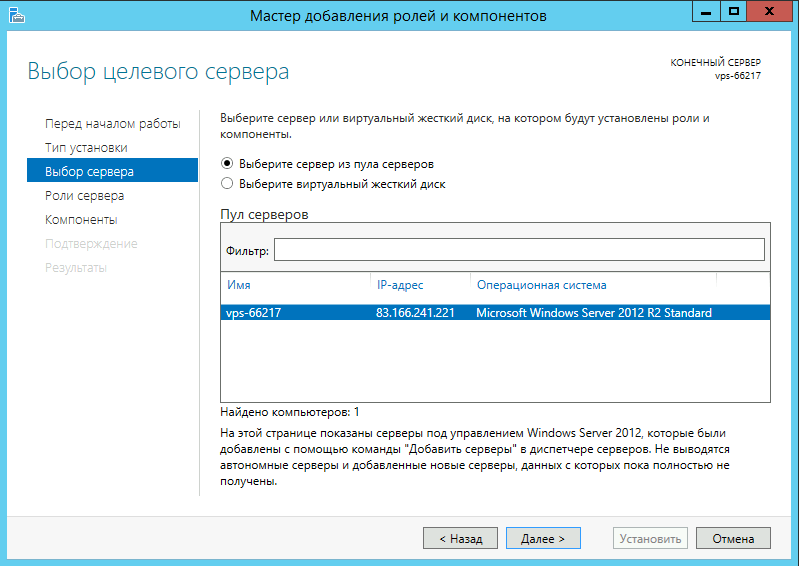
«Далее»:
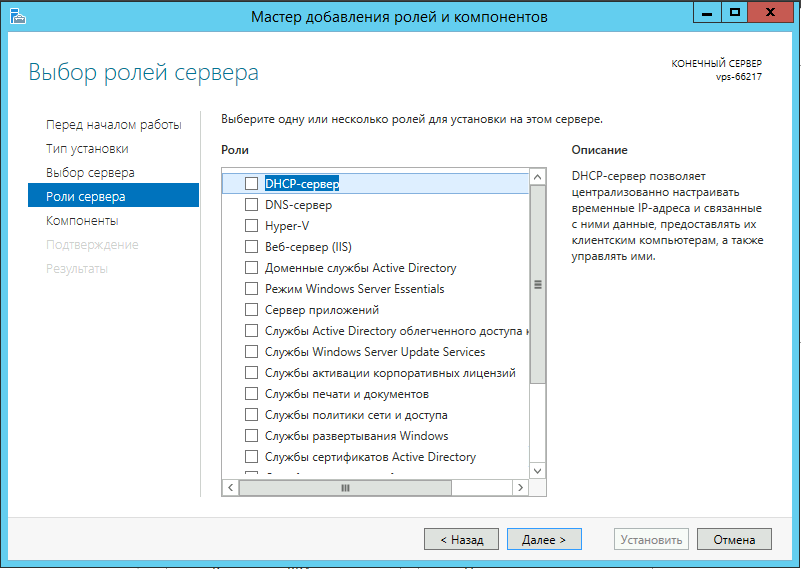
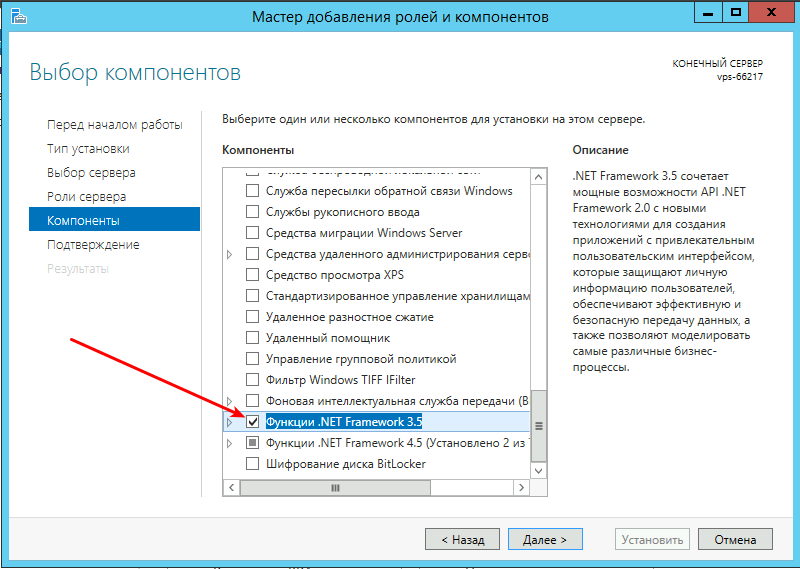
Поставьте галочку напротив компонента «Функции .NET Framework 3.5» и нажмите «Далее»:
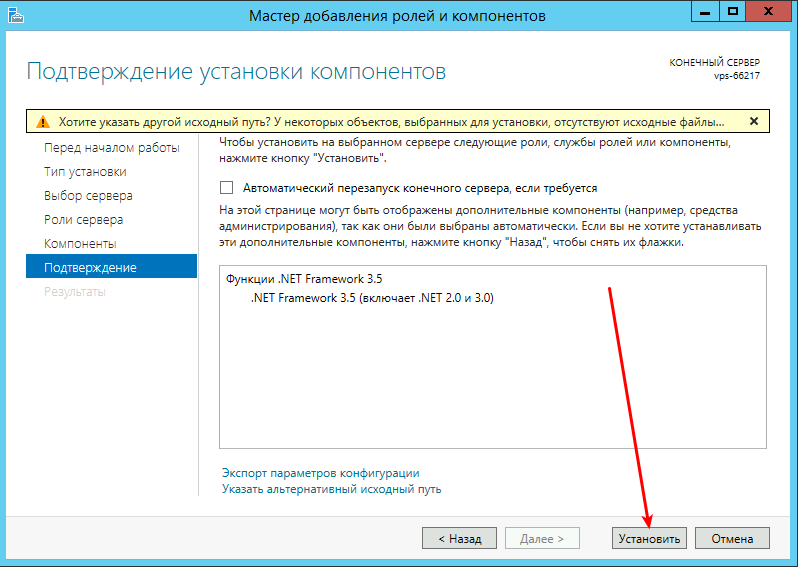
Нажмите «Установить»:
Дождитесь завершения установки:
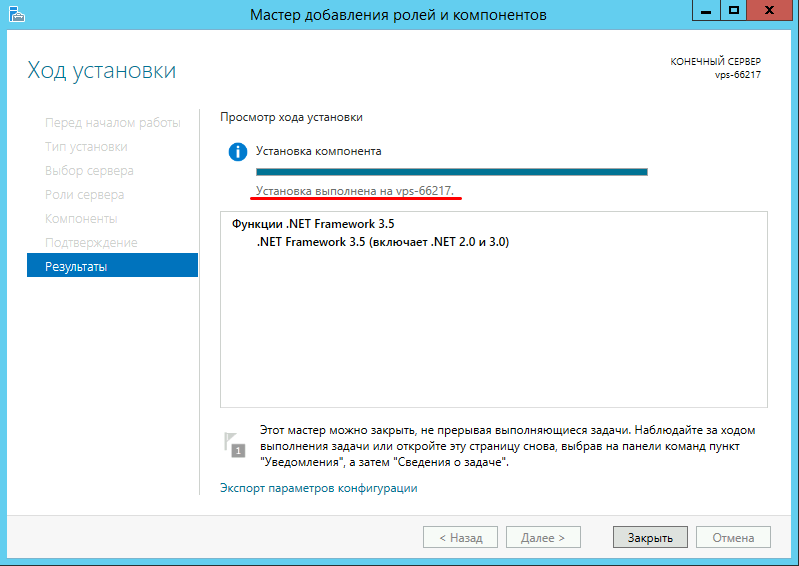
Можете закрыт окно, — .NET Framework 3.5 установлен.
Установка .NET Framework 3.5 на Windows Server 2019
1. Скачайте архив с необходимыми компонентами sources.zip
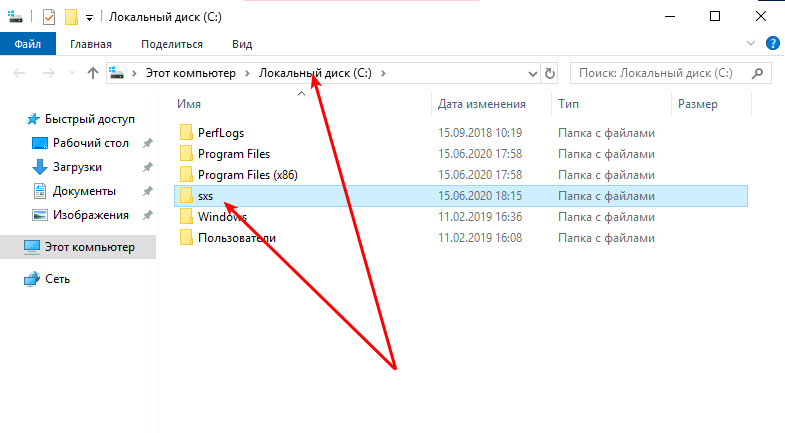
2. Распакуйте файлы в корень диска С::
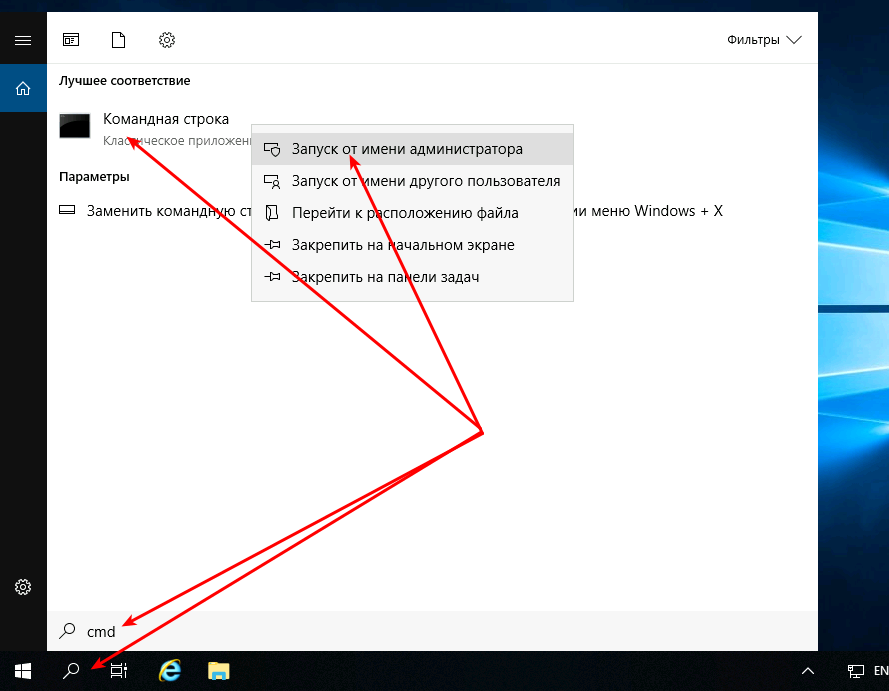
3. Запустите «Командную строку» от имени администратора:
4. Выполните команду с учётом пути к распакованным файлам из архива:DISM /Online /Enable-Feature /FeatureName:NetFx3 /All /LimitAccess /Source:C:sxs
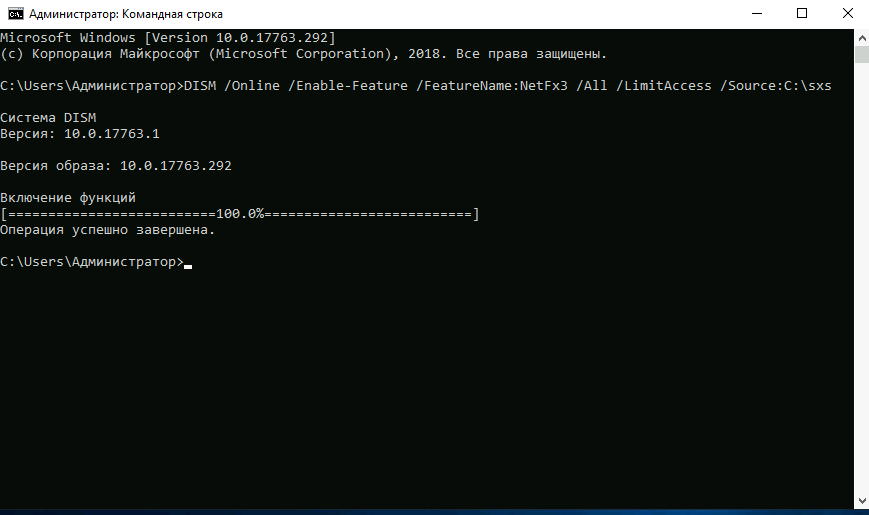
Таким образом компонент Microsoft .NET Framework 3.5 установлен.
Lots of applications require the .NET Framework 3.5 installed on your Windows Server 2016 and later. By default, the .NET Framework 3.5 is not installed on these Operating Systems and must be installed manually by an administrator. You can install the .NET Framework 3.5 also on Windows Server 2022 by following the steps described in this blog post.
There are multiple ways to install the .NET Framework 3.5 feature on Windows Server 2016 and later:
- By using the “Add Roles and Features” Wizard of the Windows Server Manager
- By using PowerShell
- By using the DISM tool
- By using the Group Policy Feature on Demand setting
In this blog post I will focus on just two of them: The installation using the Windows Server Manager and the installation via the Windows PowerShell.
If you are using Windows 10, Windows Server 2016, or Windows Server 2019, Microsoft recommends installing .NET Framework 3.5 through the control panel or the methods listed above.
You can find more information about this installation within the official documentation published by Microsoft: Microsoft .NET Framework 3.5 Deployment Considerations.
Prerequisites
To install the .NET Framework on your system running Windows Server 2016 and later you need the Windows Server installation media that was used to setup the server. Within this blog post, we will need the contents from the subfolder [ISO]:SourcesSxS on the installation media.
If you are using a Windows Server installation ISO, you can simply mount the ISO file on your server or extract the contents of the [ISO]:SourcesSxS to a local directory, for example D:SourcesSxS. To mount the ISO file using the Windows Explorer, simply select Mount from the context menu of the ISO file:

Mount a ISO file using the Windows Explorer
Additionally, the user account used to run the steps described in this blog required administrative privileges on the system. This means the user must be a member of the local Administrators group.
Install the .NET Framework 3.5 Feature using the Server Manager
First you must open the Server Manager on the system where you want to install the .NET Framework 3.5.
- In the Server Manager, open the Add Roles and Features Wizard by clicking Manage –> Add Roles and Features.
- Step forward to Installation Type and select Role-based or feature-based installation.
- Ensure that you have selected the correct server in the step Server Selection.
- Continue to the step Select features and select the (Sub-)feature .NET Framework 3.5 (includes .NET 2.0 and 3.0).
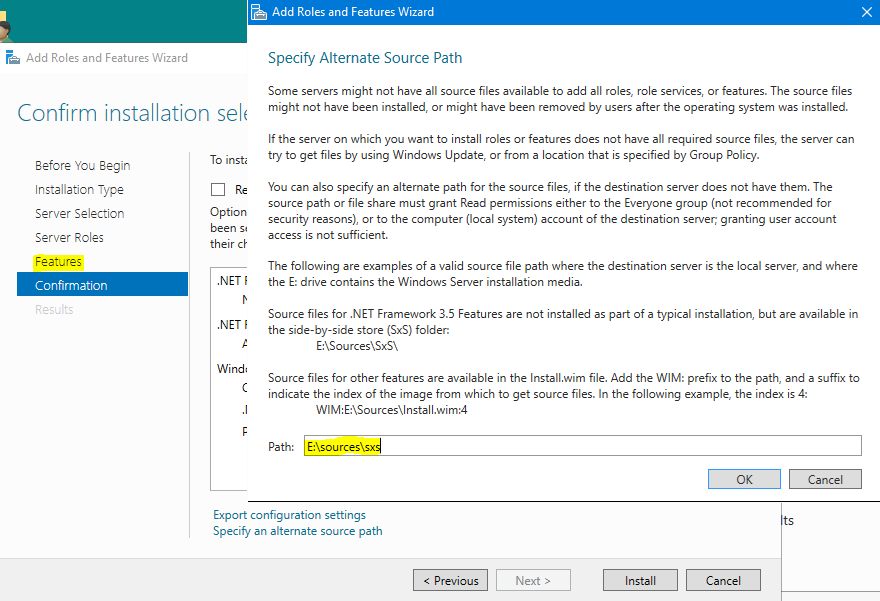
- Within the step Confirmation you must specify an alternate source path. On the bottom of the Confirm installation selections screen, click Specify an alternate source path. In the new dialog window Specify Alternate Source Path type the path to the [ISO]:SourcesSxS on the installation media or the local directory where you have copied the files to. In this example the files were copied to D:SourcesSxS. Close the dialog window with Ok and start the feature installation by clicking Install on the Confirm installation selections screen.

Select the Installation Type

Select the destination server

Select the feature “.NET Framework 3.5 (includes .NET 2.0 and 3.0)”

Specify an alternate source path

Specify an alternate source path
Install the .NET Framework 3.5 Feature using PowerShell
The following commands must be executed within a PowerShell that was started as an administrator.
You can verify if the .NET Framework 3.5 is already installed by running the following PowerShell command:
PS> Get-WindowsFeature -Name "NET-Framework-Core"
If the .NET Framework 3.5 is not installed, you will receive an output like the following:
Display Name                                            Name                       Install State

------------                                            ----                       -------------

    [ ] .NET Framework 3.5 (includes .NET 2.0 and 3.0)  NET-Framework-Core               Removed
To install the .NET Framework 3.5 Windows feature, you must run the following command:
PS> Install-WindowsFeature -Name "NET-Framework-Core" -Source "D:SourcesSxS"
After the command has finished, you will receive an output like this:
Success Restart Needed Exit Code      Feature Result

------- -------------- ---------      --------------

True    No             Success        {.NET Framework 3.5 (includes .NET 2.0 and...
If you run the following command again, the column Install State should show Installed for the .NET Framework 3.5 (includes .NET 2.0 and 3.0) feature:
PS> Get-WindowsFeature -Name "NET-Framework-Core"

Display Name                                            Name                       Install State

------------                                            ----                       -------------

    [X] .NET Framework 3.5 (includes .NET 2.0 and 3.0)  NET-Framework-Core             Installed
Known Issues
There are some system configurations that are incompatible with the described installation options in this blog post and result in weird errors.
For example, we observed such issues on systems that have been upgraded from Windows Server 2008 (R2) to Windows Server 2012 (R2) to Windows Server 2016 and Windows Server 2019 by using the Windows In place Upgrade.
To get the installation of the .NET Framework 3.5 feature working on such systems, we recommend additional research in the internet or to contact the Microsoft Support.
Nevertheless, in this case you can try to install the .NET Framework 3.5 using the Offline Installer provided by Microsoft.
Conclusion
This blog post describes two ways how to install the .NET Framework 3.5 feature on Windows Server 2016 and later. These two ways should work for most of your servers.
However, there are some system configurations that break the described installation options and require manual work to get the installation working. Solutions for these systems are not provided by this blog post!
Программная платформа .NET Framework была разработана компанией Microsoft для того, чтобы дать возможность разработчикам абстрагироваться от системного окружения конкретного компьютера, на котором будет исполняться их программа. В этом случае не будет иметь значения какая операционная система установлена, какой процессор и другое аппаратное обеспечение используется — главное, чтобы на компьютере была установлена среда .NET Framework, которая обеспечивает исполнение кода и взаимодействие с необходимыми компонентами окружения. Для работы с этой платформой были разработаны или адаптированы специальные языки программирования C#.NET, VB.NET, C++.NET, J#.NET, F#.NET и т.д.
Достаточно большое количество программ написано под эту платформу, поэтому нужно знать, как установить ее на сервер.
.NET Framework актуальной версии (4.x) уже включен на серверах Windows, развернутых из наших шаблонов. Если требуется включить предыдущую версию (3.5) или же сервер развернут из собственного шаблона/установлен из дистрибутива, можно воспользоваться нижеследующей инструкцией.
Установка компонента .NET Framework в ОС Windows Server
Включение компонента .NET Framework в OC Windows Server возможно с использованием Windows Update или с использованием локального хранилища компонентов (потребуются файлы с дистрибутива ОС). Рассмотрим оба варианта.
Вариант 1
Самый простой и быстрый способ, при наличии подключения к сети Интернет, это установка компонента .NET Framework 3.5 с сервера Microsoft Windows Update (актуально для Windows Server 2008R2/2012R2/2016/2019).
Запускаем PowerShell с правами администратора: Пуск — правый клик по ярлыку Windows Powershell — Запуск от имени Администратора (Run as Administrator):

В открывшемся окне PowerShell набираем команду:
DISM /Online /Enable-Feature /FeatureName:NetFx3 /All
Eсли установка производится на Windows Server 2008R2:
DISM /Online /Enable-Feature /FeatureName:NetFx3
Нажимаем Enter и ожидаем завершения установки:

Вариант 2
Для установки с использованием локального хранилища (или дистрибутива ОС Windows) через графический интерфейс (Windows Server 2012R2/2016/2019 ):
Запускаем Диспетчер серверов (Server Manager), нажимаем Управление (Manage) – Добавить роли и компоненты (Add Roles and Features):

В появившемся окне нажимаем Далее (Next):

В окне Выбор типа установки (Select installation type) убеждаемся, что выбран пункт установка ролей и компонентов (Role-based or feature-based installation), нажимаем Далее (Next):

Выбор целевого сервера (Select destination server) – проверяем, что в списке выбран требуемый сервер, нажимаем Далее (Next):

Пропускаем Выбор ролей сервера (Select server roles), нажимаем Далее (Next):

В окне Выбор компонентов (Select features) находим в списке требуемую версию .NET Framework и отмечаем галкой, нажимаем Далее (Next):

В случае установки актуальной версии .NET Framework (4.x) в данном окне можно нажимать кнопку Установить (Install), после чего начнется процесс инсталляции из локального хранилища. Если же мы устанавливаем предыдущую версию (3.5), то появится предупреждение, что необходимые для установки файлы отсутствуют и нужно указать путь к данным файлам. Понадобится либо дистрибутив установленной версии дистрибутива ОС Windows, либо копия папки SourcesSxS с этого дистрибутива. Нажимаем на ссылку Указать альтернативный исходный путь (Specify an alternate source path):

В открывшейся форме указываем путь к папке SourcesSxS дистрибутива текущей версии (или копии этой папки – в нашем примере папка скопирована на локальный диск в c:tempsxs), нажимаем ОК:

Вернувшись на форму Подтверждение компонентов установки (Confirm installation selections) нажимаем Установить (Install) и ожидаем окончания установки. Закрываем форму:

Установка на Windows server 2008R2 также производится через Диспетчер серверов:
Запускаем Диспетчер серверов, переходим в раздел Компоненты, нажимаем Добавить компоненты:

В списке компонентов находим и ставим галку на .NET Framework, нажимаем Далее:

В следующем окне нажимаем кнопку Установить:

Дожидаемся успешного окончания установки и закрываем окно:

Установка актуальной версии .NET Framework (4.x) в ОС Windows Server 2008R2 через добавление компонентов не работает. Для инсталляции потребуется скачать автономный установщик с сайта Microsoft (например, по ссылке https://www.microsoft.com/ru-RU/download/details.aspx?id=55167) и установить как обычную программу.
Аverage rating : 3.3
Оценок: 3
220140
Минск
ул. Домбровская, д. 9
+375 (173) 88-72-49
![]()
700
300
ООО «ИТГЛОБАЛКОМ БЕЛ»
220140
Минск
ул. Домбровская, д. 9
+375 (173) 88-72-49
![]()
700
300
ООО «ИТГЛОБАЛКОМ БЕЛ»
![]()
700
300
- Remove From My Forums
-
Question
-
Hi,
I am trying to install .net framework 3.5 on Win server 2016 but it is giving following error

also if selected to source file option, it asks for souce files.
Can any one tell from where to get source files for .net framework 3.5?
Where is SxS folder located?
Pratik Tayde
-
Moved by
Wednesday, June 1, 2016 6:21 PM
-
Moved by
Answers
-
«Where is SxS folder located?«
Mount the TP media. <drive>:sourcessxs
. : | : . : | : . tim
-
Marked as answer by
Pratik2911
Friday, June 3, 2016 5:13 AM
-
Marked as answer by
-
I found cabinet file «microsoft-windows-netfx3-ondemand-package» at sourcessxs.
Do we need to extract it or pass directly as source?
Just specifiy <drive>:sourcessxs. I just did that and it worked fine.
. : | : . : | : . tim
-
Marked as answer by
Pratik2911
Friday, June 3, 2016 5:13 AM
-
Marked as answer by
In this article, we will explain How to Install .NET Framework 3.5 on Windows Server 2016 (Offline Mode) and (Online Mode).
-
1
Install .NET Framework 3.5 on Windows Server 2016-
1.1
Why I can’t install .Net Framework 3.5 on Windows Server 2016? -
1.2
How to Install .NET Framework 3.5 on Windows Server 2016 (Offline)? -
1.3
How to Install .NET Framework 3.5 on Windows Server 2016 (Offline) using Command prompt? -
1.4
How to Install .NET Framework 3.5 on Windows Server 2016 (Online)?
-
1.1
You might also like to read telnet is not recognized Windows Server 2016
- We have tried to install Workflow Manager on SharePoint 2016 environment on Windows Server 2016, we got the below message:
The .Net Framework 3.5 is not installed on your server.
- So that, we tried to add a new feature from Server Manager.

- We have followed the wizard until we got the Features section, and we checked the .NET Framework 3.5 Features, then we clicked on Install button.

- But , we got the below error:
The feature Installation failed because the source files could not be found!

- Again, we have tried to specify an alternative source path as shown below.

- Then we specified the source path to the .Net Framework 3.5 offline package that located in a newly created folder located in the path
E:sourcesSxS. - Press > OK > Install.

But, we still can’t install .Net Framework 3.5 on Windows Server 2016!!
Why I can’t install .Net Framework 3.5 on Windows Server 2016?
In Windows Server 2012 R2 as well as Windows Server 2016, the .Net Framework 3.5 feature is an on-demand feature that its files are not saved on the server with the windows installation due to decreasing the disk space taken by the Operating System.
How to Install .NET Framework 3.5 on Windows Server 2016 (Offline)?
The .Net 3.5 Framework feature should be installed from the below sources:
- The same Windows media that was used when the Windows is being installed.
- The Windows media with the same current installed version (eg. If Windows server 2016 has been installed on your machine, you must use an installation media for Windows Server 2016).
If you don’t have the same Windows installation media. you can download the corresponding Windows ISO for your current installed Windows from Microsoft as a trial version.
Steps
- Mount the Windows installation media (ISO/CD) with the same version of the current installed windows.
- Specify the alternative source path to
U:SourcesSXS- Note:
U:is the drive that Windows Server 2012 ISO has mounted.
- Note:
- Click install > wait a moment till the feature installed successfully. 🙂

How to Install .NET Framework 3.5 on Windows Server 2016 (Offline) using Command prompt?
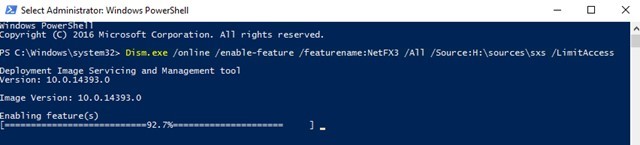
Alternatively, you can use the Deployment Image Servicing and Management (DISM) command-line tool to enables the .NET Framework 3.5 feature without internet connection as the following:
Note: Deployment Image Servicing and Management (DISM) is a command-line tool that is used to mount and service Windows images before deployment. for more details check DISM – Deployment Image Servicing and Management.
Steps
- Open Command prompt as Administrator.
- Type the below cmdlet.
DISM /Online /Enable-Feature /FeatureName:NetFx3 /All /LimitAccess /Source:d:sourcessxs- d: is the drive that the Windows Server ISO has mounted.
- /All to enable all parent features of the specified feature.
- /LimitAccess to prevent DISM from contacting Windows Update/WSUS.
- /Source to specify the location of the files that are needed to restore the feature.

How to Install .NET Framework 3.5 on Windows Server 2016 (Online)?
You can also use the Deployment Image Servicing and Management (DISM) command-line tool to enables the .NET Framework 3.5 feature with an internet connection as the following:
Steps
- Open Command prompt as Administrator.
- Type the below cmdlet.
DISM /online /enable-feature /featurename:NetFx3 /all
Conclusion
In this article, we have explained How to install .NET Framework 3.5 feature on Windows Server 2016 (Online/Offline).
Applies To
- Windows Server 2016.
- Windows Server 2012.
See Also
- DISM – Deployment Image Servicing and Management.
- Enable or Disable Windows Features Using DISM.
- Evaluation Period expired for Windows Server 2012 R2, How to extend it?
Windows OS Hub / Windows 10 / How to Install .NET Framework 3.5 on Windows 11/10 and Windows Server?
Most modern Windows apps require the .NET Framework to be installed. For example, NET Framework 4.8 is installed by default on Windows 11/10 and Windows Server 2022/2019. However, some old and legacy applications require the .NET Framework 3.5, 2.0, or even 1.0 to be installed.
In this article, we’ll walk you through how to install .NET 3.5 on Windows 11/10/8.1 and Windows Server 2022/2019/2016/2012R2.
Contents:
- Installing .NET Framework 3.5 on Windows 11 and 10
- How to Install .NET Framework 3.5 on Windows Server 2022/2019/2016?
- Configure .Net Framework Offline Installation Options with GPO
Installing .NET Framework 3.5 on Windows 11 and 10
Check that .NET Framework 3.5 (includes .NET 2.0 and 3.0) is not installed on your computer. Open a PowerShell console as an administrator and run the command:
Get-WindowsCapability -Online -Name NetFx3
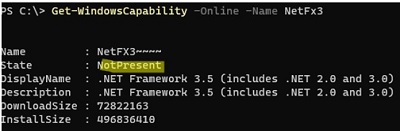
In our case, .NET 3.5 is not installed (State=NotPresent).
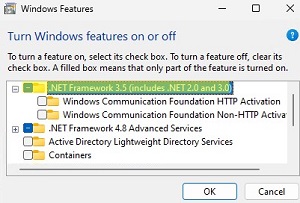
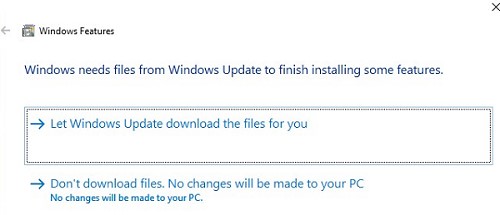
On Windows 10/11, you can install the .Net Framework from the Turn Windows Features on or off panel:
- Run the command
optionalfeatures.exe; - Select .NET Framework 3.5 (includes .NET 2.0 and 3.0) in the list of components, click OK;

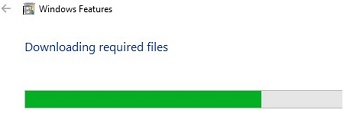
- If your computer has direct Internet access, select “Let Windows Update download the files for you”;

- Windows will download and install the latest version of the .NET Framework 3.5 component from the Microsoft Update servers.

You can also install .NET Framework 3.5 from the command line:
- Using DISM:
DISM /online /Enable-Feature /FeatureName:"NetFx3" - Or with PowerShell:
Enable-WindowsOptionalFeature -Online -FeatureName "NetFx3"
If your computer is not connected to the Internet or disconnected from the network, then an error will appear when installing .NET 3.5:
Windows couldn’t complete the requested changes.
The changes couldn’t be completed. Please reboot your computer and try again
Error code: 0x8024402C

In this case, you can manually install the NET 3.5 feature from your Windows installation media. To do this, you will need an installation USB flash drive or an ISO image file with your Windows version (how to check the version of Windows in an ISO image):
- Connect your media with the Windows installation image to your computer. In my case, I have the file Windows 11 ISO image file. Click on the file and choose Mount to connect the image to a virtual DVD drive (or use the PowerShell command:
Mount-DiskImage -ImagePath "C:ISOWindows11-22h2.iso"); - In my case, the virtual drive with the image was assigned the drive letter
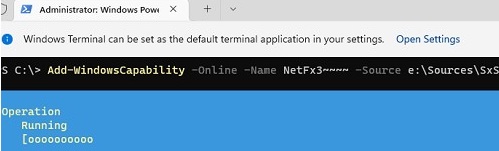
E:(we will use this drive letter in the following commands); - To install .Net 3.5 from the component source files on the installation disk, use the command:
DISM /online /enable-feature /featurename:NetFX3 /All /Source:E:sourcessxs /LimitAccess
Or (a similar PowerShell command):
Add-WindowsCapability -Online -Name NetFx3~~~~ -Source E:SourcesSxS

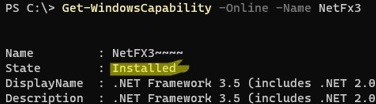
To make sure that the .NET Framework is successfully installed, run the command:
Get-WindowsCapability -Online -Name NetFx3~~~~
Name         : NetFX3~~~~
State        : Installed
DisplayName  : .NET Framework 3.5 (includes .NET 2.0 and 3.0)
Description  : .NET Framework 3.5 (includes .NET 2.0 and 3.0)
DownloadSize : 72822163
InstallSize  : 496836410
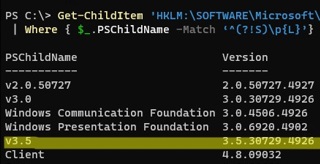
List the versions of the .NET Framework that are installed on your computer:
Get-ChildItem 'HKLM:SOFTWAREMicrosoftNET Framework SetupNDP' -Recurse | Get-ItemProperty -Name version -EA 0 | Where { $_.PSChildName -Match ‘^(?!S)p{L}’} | Select PSChildName, version
How to Install .NET Framework 3.5 on Windows Server 2022/2019/2016?
On Windows Server 2022, 2019, 2016, and 2012 R2, you can install NET Framework 3.5 in several ways:
- Via Server Manager: Add roles and features -> Features -> .NET Framework 3.5 Features -> .NET Framework 3.5 (includes .NET 2.0 and 3.0 );
- Using DISM:
DISM /Online /Enable-Feature /FeatureName:NetFx3 /All - With PowerShell:
Install-WindowsFeature NET-Framework-Core
In this case, all the necessary .NET 3.5 installation files for your Windows Server version will be downloaded from the Windows Update servers. For this installation method to work, you need to check the following:
- Your Windows Server must have direct Internet access. Proxy and firewall settings should not restrict access to Windows Update servers;
- Your host must not be configured to receive updates from the local WSUS server. Check your current Windows Update settings using the Group Policy result report (
rsop.msc) or directly in the registry;Check the value of the UseWUServer parameter in the registry:
Get-ItemProperty -Path "HKLM:SOFTWAREPoliciesMicrosoftWindowsWindowsUpdateAU" -Name "UseWUServer" | select -ExpandProperty UseWUServer
If the parameter value is1, then your host is configured to receive Windows updates from the local WSUS server. In this case, you will receive error 0x800F0954 when installing .NET 3.5. Change the registry parameter to0or remove it to connect directly to the Microsoft Windows Update servers.
If you can access the Internet from your Windows Server host, but it is configured to receive updates from WSUS, you will see error 0x800f081f when installing NET Framework.
Solution: Install .Net 3.5 online from Microsoft servers and ignore local WSUS:
- Export the current Windows Update settings from the HKLMSoftwarePoliciesMicrosoftWindowsWindowsUpdate registry key to a REG file:
reg export HKLMSoftwarePoliciesMicrosoftWindowsWindowsUpdate c:WindowsUpdateRegFile.reg - Delete this key (
Remove-Item -Path HKLM:SoftwarePoliciesMicrosoftWindowsWindowsUpdate -Recurse) and restart the service:net stop wuauserv & net start wuauserv - Run the .Net 3.5 installation from the web:
DISM /Online /Enable-Feature /FeatureName:NetFx3 /All - After the installation is complete, return the previous WU settings: import the reg file (
Reg import c:WindowsUpdateRegFile.reg) and restart the Windows Update service again
If there is no direct Internet access from the server, then when you try to install .NET 3.5 on Windows Server through the Server Manager, you will receive the error 0x800F081F (The source files could not be found), 0x800F0950, 0x8024402c, 0x800F0906, or 0x800F0907 (depending on the version of Windows Server).
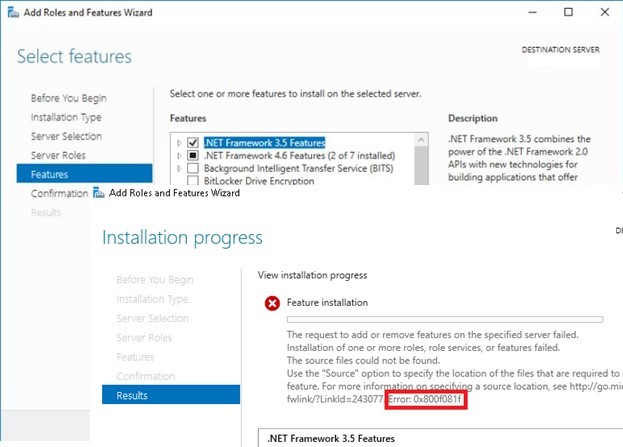
Although .NET Framework 3.5 is listed as a feature of Windows Server 2022/2019/2016/2012R2, its binary files are missing from the Windows component store (Features on Demand concept). This is done to reduce the size of the operating system image on the disk. You can check if the .NET Framework 3.5 source files are available in the local component store of Windows Server with the command:
Get-WindowsFeature *Framework*

As you can see the status of the NET-Framework-Core feature is Removed.
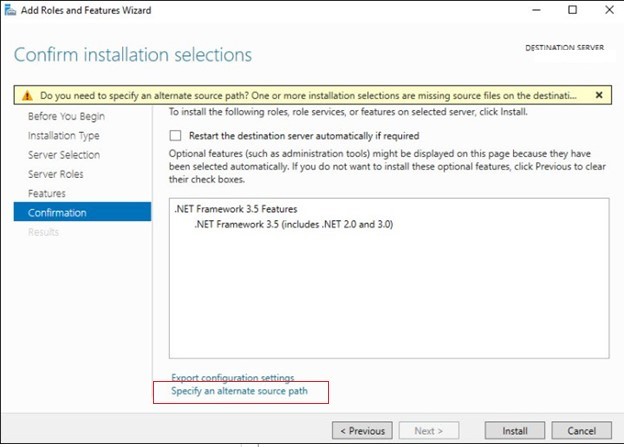
In order to install the NET-Framework-Core, you will need a distribution with your version of Windows Server in the form of an ISO file, or in the extracted form in a network folder. Mount the ISO file with the Windows Server install image as a virtual drive (for example, drive D:). Now, you can install the Windows features from the GUI or using PowerShell.
You can install the .Net 3.5 feature from the Server Manager graphical console:
- Select the .Net Framework 3.5 feature as earlier, but prior to clicking Install, click a small link Specify an alternate source path at the bottom of the form;

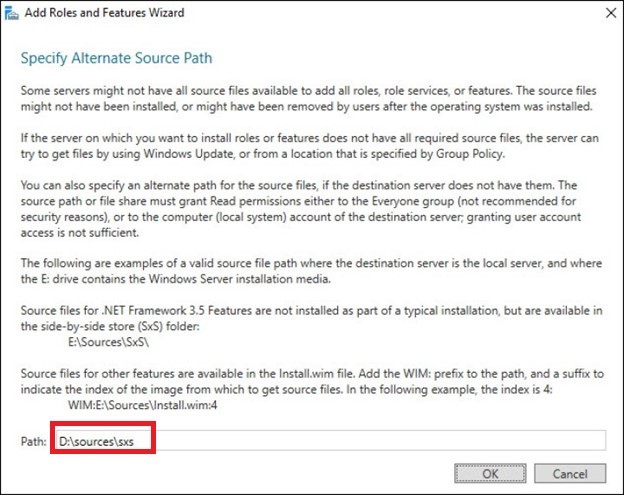
- Specify the path to the Component Store (SXS) folder in your Windows Server distro. If you mounted the ISO image as a virtual disk, the path may look like
D:sourcessxs. It can also be a network share, where you copied the distribution files (for example,\fs1isows2016sourcessxs). Then click OK.
It is much easier to install .NET Framework 3.5 feature from the elevated command prompt or PowerShell console. Just run the command:
Dism.exe /online /enable-feature /featurename:NetFX3 /All /Source:D:sourcessxs /LimitAccess
Where D: is the drive with Windows Server source files.
The LimitAccess parameter prevents DISM from connecting to Windows Update servers to receive feature binary files. Only source files in the specified folder are used.
If you want to install the Windows Server feature using PowerShell, use the Add-WindowsFeature command:
Add-WindowsFeature NET-Framework-Core -Source d:sourcessxs
After the component installation is completed, a server restart is not required.
You can also manually copy 2 CAB files microsoft-windows-netfx3... from the sourcessxs folder of your Windows Server install image. In this case, to install .NET 3.5, just run the command:
dism /online /Add-Package /PackagePath:C:distribnet35microsoft-windows-netfx3-ondemand-package~31bf3856ad364e35~amd64~~.cab.
Configure .Net Framework Offline Installation Options with GPO
You can configure specific settings for installing Windows components from a local source or Windows Update even when using WSUS with the Group Policy option Specify settings for optional component installation and component repair (located under GPO section Computer Configuration -> Administrative Templates -> System).
On a standalone computer, you can enable this policy setting using the Local Group Policy Editor (gpedit.msc). In an Active Directory environment, you can create a GPO for all computers/servers using the GPMC console (gpmc.msc).
Here you can specify that when installing or repairing Windows components, you should always download files from the Windows Update servers (Internet) instead of the local WSUS server (the “Download repair content and optional features directly from Windows Update instead of Windows Server Update Services” option).
You can also specify the path to the shared folder with Windows Server components that you want to use for offline installation in the “Alternate source file path” parameter:
- Specify the path to network shared folder in the UNC format (
\fs01distrws22sxs) (here you can specify multiple UNC paths separated by semicolons:\fs01ws22sxs;\man02ws22sxs;\fs03sxs) - It is also possible to specify a WIM file as a source:
WIM:\fso1distrws16install.wim:2(in this case,2is the index of your edition of Windows Server’s image in the WIM file. You can list available Windows Server edition in a WIM file with a command:DISM /Get-WimInfo /WimFile:"\serverdistrws2016install.wim")
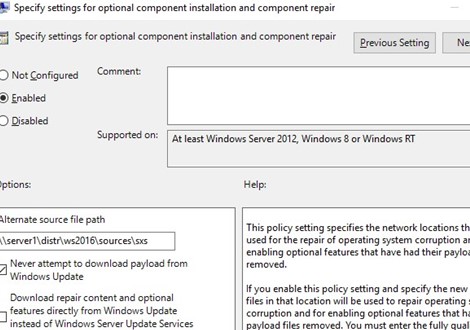
Use the different SXS sources for different versions of Windows Server. If you are running multiple versions of Windows Server on your network, you will need to create separate GPOs with different UNC paths to SXS sources. You can use Group Policy WMI filters to apply a GPO only to hosts that are running specific versions of Windows Server.
When you need to install a new software on an old version of Windows operating system, it requires having installed the latest .Net framework. But in Windows server 2016, I want to install the old software which requires a bit older libraries to run and having performance. Let’s install .Net framework 3.5 on Server 2016.
Simply installing features on Windows server is easy to perform through server manager or command line and PowerShell. But in this case the .Net framework needs a source directory to completely install on Windows server.
Using the latest Windows Server 2016, you install .net framework 3.5 easily through server manager with a graphical interface.
1. Open Server Manager and navigate to Manage and add rule and features.

2. Just click next to Features section and select the .Net framework 3.5 then click Next. On the Confirmation page click the Specify an alternative source path. Then type the path of Windows server 2016 image exactly like below screenshot.
It will let you Install .NET Framework 3.5 without having internet connection on your Windows server. You can install this with command line also. Read the (Install Windows Features Offline Using DISM) article to find out more.
Using DISM command line is easy, but sometimes make trouble to install some feature with. Instead, you can do it with this method.
3. Finally, when the dot net framework 3.5 has been installed successfully on Windows server 2016, click Close to finalizing the installation.

After installing Install .NET Framework 3.5, you can install and use old software on Windows server 2016. It works the same for older versions of Dot Net Framework on all Windows server operating system.
Just try to install for old OS newest framework and for new OS install old dot net framework. Finally, unmount the Windows Server disc from DVD Rom or Images from virtual drive.