
Shortcuts
TCP/IP tweaks for Windows 8,10,2012,2019 Server to speed up your broadband internet
2014-12-12 (updated: 2022-08-15) by
Tags: CTCP, Windows 8, TCP/IP, PowerShell, tweaks, Chimney Offload, TCP Window, ICW, netsh, DCA, Windows 10, RWIN

The TCP/IP speed tweaks below work with Windows 8, 10, 2012/2019 Server. The Windows 8/10 TCP/IP implementation shares many traits with earlier Windows versions, however, there are many subtle differences and updates, new syntax for applying tweaks using PowerShell cmdlets, and some new settings. Windows 10 generally works well by default for many broadband connections, yet there is always some room for improvement and we will try to cover all relevant settings and their effect on your connection in detail below.
To run some of the outlined commands, you will need to use an administrator account. With earlier Windows versions, we used the netsh command in elevated command prompt to tweak most of the TCP/IP settings. With the introduction of Windows 8/Server 2012, some of those parameters are only tweakable by using the Windows PowerShell, that is why we will be using it for settings when possible. Note that netsh and other DOS commands are still available under PowerShell , just as with Command Prompt.
The settings outlined bellow work with Windows 8, 8.1, Windows 10, Creators Update, Windows Server 2012, and Server 2019 (with only minor syntax differences). If you’d rather use our free software to apply all those settings, try the SG TCP Optimizer (v.4).
Windows PowerShell
The Windows PowerShell is a tool developed by Microsoft designed to replace and extend the functionality of the command prompt. It allows you to run all DOS commands similarly to command prompt, however, it also provides additional functionality in the form of many customizable commands called cmdlets. We will be using PowerShell to tweak TCP/IP settings, as some of the parameters are no longer tweakable using command prompt netsh in Windows 8 and newer OSes.
In Windows 8/10, the easiest way to find PowerShell is by searching for PowerShell on your Start screen/menu. It can also be accessed from the Windows System folder. You should right-click on PowerShell and choose «Run as administrator» so that you have sufficient permissions to tweak all applicable settings.
The PowerShell commands below are an overview of what we can use to tweak TCP/IP settings under Windows 10:
Get-NetTCPSetting — this can be used to view TCP parameters
Set-NetTCPSetting — this can be used to set TCP parameters
netsh int tcp show global — you can still see and change some (not all) parameters using netsh


There are a few different networking profiles called «templates» in Windows 8 PowerShell under Get-NetTCPSetting.
In Windows 8 (and 2012 Server): Automatic, Internet, Datacenter, Compat
In Windows 8.1 (also Windows 10, Windows 2012 Server R2): Automatic, Internet, InternetCustom, Datacenter, DataCenterCustom, Compat
Theoretically, only one of the above templates can be modified by default — «Custom» under Windows 8, «InternetCustom» under Windows 8.1 (and Windows 10). The «DatacenterCustom» template can only be modified if Windows is installed on a server. If you try to modify one of the other templates, you will get an error, something like:
Set-NetTCPSetting : Only the custom templates InternetCustom and DatacenterCustom can be modified under Windows 8 and older Windows 10 versions.
Even though theoretically only the «Custom» templates can be modified, many of the commands below (both netsh and PowerShell TCP cmdlets) are global and modify all templates simultaneously.
By default, the «Internet» template/profile is applied to TCP connections. To find the currently used template type either:
using PowerShell cmdlets (run as Administrator):
Get-NetTransportFilter
or, using netsh:
netsh int tcp show supplemental
To view the current template settings, use:
Get-NetTCPSetting -SettingName «Internet» (or your current template name)
Notes:
PowerShell cmdlets are not case-sensitive. Even though some settings below modify all templates, it may still be necessary to sometimes change the default template used for TCP connections from Internet to Custom/InternetCustom. The following command supposedly changes the default (does not work as documented by MS under Windows 8/8.1):
set-NetTCPConnection -AutomaticUseCustom true
(acceptable parameters are [true|false], doesn’t seem to work in Windows 8.1 ?)
Other Useful TCP/IP connection related PowerShell cmdlets:
Get-NetOffloadGlobalSetting (view current TCP Offload settings)
Get-Help Get-NetTCPSetting -detailed (help on NetTCPSetting)
Get-NetTCPConnection (see active connections)
(Get-NetTransportFilter | Where DestinationPrefix -eq ‘*’ | Get-NetTCPSetting) — view current template settings
(Get-NetTransportFilter | Where DestinationPrefix -eq ‘*’ | Get-NetTCPSetting).CongestionProvider — view only «CongestionProvider» setting in currently used template
See also: MS TechNet Set-NetTCPSetting
Netsh
It is still possible to check the current status of Windows TCP/IP parameters with netsh, both in PowerShell and elevated command prompt. We recommend using the PowerShell for changes. While most settings can still be changed using the «netsh» tool, others require the Windows PowerShell interface and cmdlets. Netsh (and the command prompt) is being deprecated by Microsoft, and some of the netsh commands are bugged in Windows 8/8.1 and Server 2012/2012 R2.
To see current tcp parameters in netsh, use:
netsh int tcp show global
You will see something like the following:


There are two extra settings in Windows 8.1 and Windows 10 (right image above)
Explanation of all the tweakable TCP/IP parameters, possible ways to change them, as well as their default/recommended states for broadband internet connections are listed below. We recommend using the Windows PowerShell for all changes. The parameters are loosely sorted in order of importance with the parameters that generally have more significant impact listed first.
Receive Window Auto-Tuning Level
The TCP Receive Window has a very important role in TCP connections. It can limit throughput, especially in high-speed, high-latency environments, such as most internet connections. For more information on how it limits your speed, check our TCP Window article.
The possible settings are as follows:
disabled: uses a fixed value for the tcp receive window. Limits it to 64KB (limited at 65535).
highlyrestricted: allows the receive window to grow beyond its default value, very conservatively
restricted: somewhat restricted growth of the tcp receive window beyond its default value
normal: default value, allows the receive window to grow to accommodate most conditions
experimental: allows the receive window to grow to accommodate extreme scenarios (not recommended, it can degrade performance in common scenarios, only intended for research purposes. It enables RWIN values of over 16 MB)
Default setting: normal
Our recommendation: normal (unless you’re experiencing problems)
To modify, in PowerShell (or elevated command prompt) type:
netsh int tcp set global autotuninglevel=normal
(where «normal» is one of the above listed possible states)
Same can also be accomplished using PowerShell cmdlets, just type:
Set-NetTCPSetting -SettingName InternetCustom -AutoTuningLevelLocal Normal
Note: You can also try «highlyrestricted» autotuninglevel for up to 10Mbps connections, as it actually uses a higher unscaled RWIN value (16384 vs. 256 bytes), and still scales up to 262140 bytes.
Disable Windows Scaling heuristics
Windows 8 (as with Windows 7) has the ability to automatically change its own TCP Window auto-tuning behavior to a more conservative state regardless of any user settings. When heuristics restricts your autotuning level, you may see this message when viewing netsh settings:
«** The above autotuninglevel setting is the result of Windows Scaling heuristics overriding any local/policy configuration on at least one profile.»
When heuristics restricts autotuning level, the «netsh int tcp show global» command will still (incorrectly) show your user-set autotuning level, you have to use «netsh int tcp show heuristics» to see the actual current heuristics restriction. To enforce the user-set TCP Receive Window autotuning level and prevent heuristics from restricting how the TCP Receive Window grows, disable heuristics. It is best to disable this before applying autotuning level to ensure your user-set autotuning level is retained.
default state: OS-dependent (disabled in Windows 8.1, enabled in Windows 7)
possible settings are: disabled,enabled,default (sets to the Windows default state)
recommended: disabled (to retain user-set RWIN auto-tuning level)
To disable explicitly using netsh:
netsh int tcp set heuristics disabled
To see the current heuristics state:
netsh int tcp show heuristics
Using PowerShell cmdlets:
Set-NetTCPSetting -SettingName InternetCustom -ScalingHeuristics Disabled
Notes:
If heuristics are not explicitly disabled, Windows can restrict the RWIN autotuninglevel at any time. When that happens, viewing your settings with «netsh int tcp show global» will still incorrectly show user-set autotuninglevel, only «netsh int tcp show heuristics» reveals the restriction.
The registry value that was used in Windows 7 and earlier is no longer present in the Windows Registry (HKEY_LOCAL_MACHINESYSTEMCurrentControlSetservicesTcpipParametersEnableWsd=0 (not present for Windows 8))
Add-On Congestion Control Provider (CTCP)
The traditional slow-start and congestion avoidance algorithms in TCP help avoid network congestion by gradually increasing the TCP window at the beginning of transfers until the TCP Receive Window boundary is reached, or packet loss occurs. For broadband internet connections that combine high TCP Window with higher latency (high BDP), these algorithms do not increase the TCP windows fast enough to fully utilize the bandwidth of the connection.
Compound TCP (CTCP) is a newer congestion control method that increases the TCP Send Window more aggressively for broadband connections (with large RWIN and BDP). CTCP attempts to maximize throughput by monitoring delay variations and packet loss. It also ensures that its behavior does not impact other TCP connections negatively. CTCP is available in Windows 8/10 and Server editions. Using CTCP can significantly increase throughput and packet loss recovery.
Possible settings are: none, ctcp, dctcp (Datacenter TCP), also CUBIC and New-Reno in newer Windows 10 variants.
CTCP — Compound TCP increases the receive window and amount of data sent. It improves throughput on higher latency/broadband internet connections.
DCTCP — Data Center TCP adjusts the TCP Window based on network congestion feedback based on Explicit Congestion Notification (ECN) signaling, it is designed to improve throughput on low latency/local links.
CUBIC — New default setting as of Windows 10 Creators update, default in Linux kernels 2.6 through 3.2. Uses a cubic TCP congestion window growth function. The algorithm uses the amount of time since the last congestion event (instead of ACK timing) to advance the TCP congestion window. It is designed for high-speed TCP transfers. The only downside is that it can possibly cause some bufferbloat in large BDP networks (like the Internet) with unmanaged queues, such as ADSL and LTE. Theoretically it performs as well as CTCP.
NewReno — RFC 6582 (old RFC 3782) implementation for fast retransmit and fast recovery algorithm. There is an issue with more than 3 reordered packets where New Reno enters fast recovery. Older congestion control algorithm, not recommended.
Unfortunately, the PowerShell cmdlet allows for changing this only in some Windows builds, and the netsh is deprecated and may be bugged in some Windows 10 builds, so it could be challenging to change the congestion provider. Yay for Microsoft! Fortunately, the default setting is already CTCP for earlier Windows 10 builds, and CUBIC for newer ones (as per the PowerShell Get-NetTCPSetting cmdlet.
Default setting: CUBIC or CTCP ** (netsh incorrectly shows «none» by default in Windows 8 and early Windows 10 builds, while PowerShell Get-NetTCPSetting shows «CTCP» or «CUBIC» depending on build)
Recommended setting: CTCP for gaming/latency/speed if network congestion/packet loss is expected, CUBIC for pure throughput on stable networks with no congestion/packet loss
To check the current Congestion provider, use:
Get-NetTcpSetting
Alternatively, you can go wild and use the cmdlet below to see only the congestion provider of the currently used template:
(Get-NetTransportFilter | Where DestinationPrefix -eq ‘*’ | Get-NetTCPSetting).CongestionProvider
To see only the Congestion providers from all templates, use: Get-NetTCPSetting | Select SettingName, CongestionProvider
To change using PowerShell cmdlet (does not work in some older Windows builds):
Set-NetTCPSetting -SettingName InternetCustom -CongestionProvider CTCP
(«InternetCustom» template is for Windows 8.1 and 10, «Custom» for Windows 8, «Internet» for newer Windows builds since «Creators Update». Above command may may be read-only in some Windows versions, use the alternate netsh command instead)
To change using netsh in elevated command prompt:
netsh int tcp set supplemental Internet congestionprovider=ctcp
Notes: For Windows 10 Creators Update and later, it is also possible to set congestionprovider=cubic. The «Internet» template is for later Windows 10 builds, for Windows 8 it may be «InternetCustom».
Notes:
Supposedly the netsh congestionprovider setting is deprecated, and one should use the PowerShell cmdlets when possible. Changing CTCP directly with netsh is not possible by default under Windows 8, the commands are still listed below for reference, and other OSes:
netsh int tcp show supplemental (see the currently used supplemental template)
netsh int tcp set supplemental custom 300 10 ctcp disabled 50 (minrto=300ms, initial congestion window icw=10 packets, congestionprovider=ctcp, enablecwndrestart=disabled, delayedacktimeout=100 ms) netsh int tcp set supplemental custom (tell Windows to use the custom template)
You can still «hack» Windows 8 to change to CTCP in netsh by doing the following:
1. Open notepad and copy this code into it:
How to set the congestion provider to <a class=»term1 piterm» href=»/_iframe_term.php?seek=CTCP» title=»What is ctcp ?» rel=»sg-term»>ctcp</a>
Windows Registry Editor Version 5.00
[HKEY_LOCAL_MACHINESYSTEMCurrentControlSetControlNsi{eb004a03-9b1a-11d4-9123-0050047759bc}]
«0200»=hex:00,00,00,00,00,00,00,00,00,00,00,00,00,00,00,00,00,00,00,00,00,00,
00,00,00,00,00,00,02,00,00,00,00,00,00,00,00,00,00,00,00,00,00,00,00,00,00,
00,00,00,ff,00,00,00,00,00,00,00,00,00,00,00,00,00,00,00,00,00,00,00,00,00,
ff,00,00,00,00,00,00,00,00,00,00,00,00,00,00,00
«1700»=hex:00,00,00,00,00,00,00,00,00,00,00,00,00,00,00,00,00,00,00,00,00,00,
00,00,00,00,00,00,02,00,00,00,00,00,00,00,00,00,00,00,00,00,00,00,00,00,00,
00,00,00,ff,00,00,00,00,00,00,00,00,00,00,00,00,00,00,00,00,00,00,00,00,00,
ff,00,00,00,00,00,00,00,00,00,00,00,00,00,00,00
2. Save file with .reg extension, for example: «enable-ctcp.reg»
3. Import the registry file into the Windows Registry (double-clicking on it should do it, after a warning).
4. Reboot
Alternatively, get [this file] (right-click, «save target as», save with .reg extension so that it can be merged with the registry automatically when double-clicked).
Here is a screenshot from Windows 8.1 after merging the above with the registry and rebooting:

You can also just copy all the text to the appropriate registry hive directly. Merging the above with the registry and rebooting will show CTCP as the addon congestion control algorithm. Still, as per Microsoft, netsh is deprecated and you should be using Powershell.
Note that the above registry hack will change not only CTCP, but other related parameters as well, here is some additional info:
The binary values above affect many parameters: «Chimney Offload State» (offset 04, 00=disabled,01=enabled,02=auto), RSS (offset 05, 00=default/enabled,01=disabled), ECN Capability (offset 06, 00=disabled/default, 01=enabled), CTCP (offset 28, 00=none, 02 = ctcp), etc.
See Also: Windows 10 Manual Registry Tweaks
TCP Chimney Offload
TCP chimney offload enables Windows to offload all TCP processing for a connection to a network adapter (with proper driver support). Offloads are initiated on a per-connection basis and reduce networking-related CPU overhead, theoretically enabling better overall system performance by freeing up CPU time for other tasks. TCP Chimney Offload controls what is referred to as the «TCP Offload Engine» (TOE) in Windows in general. It is a global setting that has to be enabled for many of the other offloads to work. Enabling this setting had some negative effects in the past because of buggy network adapter drivers, however its implementation has gotten much better with time. It is useful for CPU-bound client computers and very fast broadband connections, not recommended in some server environments.
Possible states of this setting are as follows:
automatic — offloads if the connection is 10 GbE, has a RTT default — this setting restores chimney offload to the system default.
disabled — chimney offload disabled.
enabled — chimney offload enabled.
Default: automatic
Recommended: disabled
To check the setting:
Get-NetOffloadGlobalSetting
netsh int tcp show global
To disable TCP Chimney Offload using netsh:
netsh int tcp set global chimney=disabled
To set using Powershell cmdlets:
Set-NetOffloadGlobalSetting -Chimney Disabled (recommended: disabled*)
Notes:
* There were issues with buggy Network adapter drivers and the implementation of offloading with older OSes (Windows 2003 Server), however, this has improved over time. One should be more careful using offloading in server environments, as there have been some reports of issues with TCP Chimney Offload and SQL servers under heavy load, affecting both application concurrency and throughput. See this MSDN reference and MS KB942861.
Chimney Offload does not work together with NetDMA (mute point with Windows 8/8.1 as NetDMA is not supported).
Chimney Offload may not be supported with NAT/ICS (reference: Technet TCP Chimney Offload Compatibility for Windows 2008 R2). However, this only applies if NAT/ICS is enabled on the computer running Windows itself, and that is rarely the case.
Setting Chimney Offload to disabled is recommended for VMWare servers, and the setting is now considered deprecated by Microsoft. See: Obsolete RFCs and Overview of TCP Timers
NetDMA State
NetDMA (TCPA) enables support for advanced direct memory access. In essence, it provides the ability to more efficiently move network data by minimizing CPU usage. NetDMA frees the CPU from handling memory data transfers between network card data buffers and application buffers by using a DMA engine.
Default: disabled
Recommended: leave alone, don’t bother (setting not supported in Windows 8 and later, according to MS)
You can still edit it using:
netsh int tcp set global netdma=disabled
Notes:
According to Microsoft, NetDMA is not supported in Windows 8/8.1 and changing this setting will have no effect. See: MSDN NetDMA
NetDMA (TCPA) does not work together with Chimney Offload either, you have to choose one or the other. For NetDMA to work, it must be enabled/supported by your BIOS and your CPU must support Intel I/O Acceleration Technology (I/OAT).
Direct Cache Access (DCA)
Direct Cache Access (DCA) allows a capable I/O device, such as a network controller, to deliver data directly into a CPU cache. The objective of DCA is to reduce memory latency and the memory bandwidth requirement in high bandwidth (Gigabit) environments. DCA requires support from the I/O device, system chipset, and CPU(s).
Possible states are: enabled, disabled
Default state: disabled
Recommended: enabled (provided the CPU/Chipset/NIC support it)
To set DCA using netsh:
netsh int tcp set global dca=enabled
Note: The impact of DCA is more significant with older CPUs. Not present in Windows 10 Creators’ update.
Checksum Offload
The PowerShell Enable-NEtAdapterChecksumOffload cmdlet enables checksum offloads on the network adapter. Checksum offloading is also required for some other stateless offloads to work, including Receive Side Scaling (RSS), Receive Segment Coalescing (RSC), and Large Send Offload (LSO).
Default state: adapter-dependent
Recommended: enabled
In PowerShell:
Enable-NetAdapterChecksumOffload -Name * (use to enable checksum offload on all adapters that support it)
Disable-NetAdapterChecksumOffload -Name * (use to disable checksum offload for all network adapters)
Get-NetAdapterChecksumOffload (use to view network adapters that support checksum offload and their state)
The above PowerShell cmdlet example enables checksum offloads on all visible network adapters for all UDP/TCP/IP version 4 and version 6 traffic (and restarts the network adapters). Alternatively, you can specify only a single network adapter and/or protocol by using command-line switches. For more information on customizing the command, refer to this Technet article. To pick a single adapter and only modify its checksum offload state, find installed adapters using this cmdlet: Get-NetAdapter
Receive-Side Scaling State (RSS)
The receive-side scaling setting enables parallelized processing of received packets on multiple processors, while avoiding packet reordering. It avoids packet reordering by separating packets into «flows», and using a single processor for processing all the packets for a given flow. Packets are separated into flows by computing a hash value based on specific fields in each packet, and the resulting hash values are used to select a processor for processing the flow. This approach ensures that all packets belonging to a given TCP connection will be queued to the same processor, in the same order that they were received by the network adapter.
Default: enabled
Recommended: enabled (provided you have 2 or more processor cores and a NIC that can handle RSS)
To check current RSS setting:
Get-NetOffloadGlobalSetting (view global setting)
Get-NetAdapterRss -Name * (use cmdlet to view RSS capable Network Adapters)
netsh int tcp show global
To change RSS using netsh:
netsh int tcp set global rss=enabled
To change using PowerShell cmdlets:
Enable-NetAdapterRss -Name * (use this to enable RSS for all adapters that support it)
Disable-NetAdapterRss -Name * (use this to disables RSS for all adapters)
Set-NetOffloadGlobalSetting -ReceiveSideScaling Enabled (alternate global command for all adapters)
Notes:
Needs Checksum Offload to be enabled. Only supported by some network adapters.
Receive Segment Coalescing State (RSC)
Receive Segment Coalescing (RSC) allows the NIC to coalesce multiple TCP/IP packets that arrive within a single interrupt into a single larger packet (up to 64KB) so that the network stack has to process fewer headers, resulting in a 10% to 30% reduction in I/O overhead depending on the workload, thereby improving performance. Receive Segment Coalescing (RCS) is able to collect packets that are received during the same interrupt cycle and put them together so that they can be more efficiently delivered to the network stack. This can significantly increase the amount of traffic that can be handled without severely impacting the CPU.
Possible states: enabled, disabled, default
Default state: enabled in Windows 10, disabled in some older versions.
Recommended: disabled for lower latency and gaming, or when using Wi-Fi adapters. Enable for slightly higher throughput when lower CPU utilization is important. Microsoft recommends disabling it for Web, Mail, or Database Servers, enabling it for File, FTP or Media servers.
To check current RSC state:
netsh int tcp show global (Receive Segment Coalescing State)
Get-NetOffloadGlobalSetting (view global state)
GetNetAdapterRsc -Name * (view RSC setting for all adapters)
To disable using netsh:
netsh int tcp set global rsc=disabled
To disable using PowerShell cmdlets globally:
Set-NetOffloadGlobalSetting -ReceiveSegmentCoalescing disabled
To disable using PowerShell cmdlets for a single adapter:
Disable-NetAdapterRsc -Name * (use to disable RSC for all adapters)
Enable-NetAdapterRsc -Name * (use to enables RSC for all adapters that support it)
Set-NetOffloadGlobalSetting -ReceiveSegmentCoalescing Disabled (alternate syntax for globally changing all adapters)
Notes:
Needs Checksum Offload to be enabled. Only supported by some network adapters.
For gaming, where latency is more important than pure throughput, any type of packet/memory coalescing should be disabled or used very sparingly. Packet/memory coalescing reduces CPU utilization and increases throughput, however, it causes the network adapter to combine packets before interacting with other hardware, which may slightly increase latency. Also see our gaming tweaks article.
Packet Coalescing
This setting defines the grouping of network packets in general, to limit the number of receive interrupt and reduce the amount of required processing. In network adapters using Network Driver Interface Specification (NDIS) versions 6.3 and later, packet coalescing is used to group both random and multicast traffic for efficiency. This should be left enabled for pure throughput and efficiency, disabled for gaming and where lower latency is desired at the expense of a bit higher CPU utilization, and a bit more multicast traffic. It must be enabled if using RSC (Receive Segment Coealescing).
Possible states: enabled, disabled, default
Default state under Windows 10: enabled
Recommended: disabled (for gaming and slightly lower latency at the expense of higher CPU usage and more multicast traffic, and when using Wi-Fi adapters), enabled (for pure throughput when lower CPU utilization is important)
To check in Powershell: Get-NetOffloadGlobalSetting
To enable:
Set-NetOffloadGlobalSetting -PacketCoalescingFilter enabled (or disabled)
Large Send Offload (LSO)
This setting enables Large Send Offload. When enabled, the network adapter hardware is used to complete data segmentation, theoretically faster than operating system software. Theoretically, this feature may improve transmission performance, and reduce CPU load. LSO reduces the interrupt rate and the amount of bus transactions to the NIC. The problem with this setting is buggy implementation on many levels, including Network Adapter Drivers. Intel and Broadcom drivers are known to have this enabled by default, and may have many issues with it. It should only be enabled with the newest Gigabit NICs with recent drivers. Because of the issues mentioned above, we recommend disabling LSO at both the Network Adapter properties, and at the OS level with the setting below.
Default: adapter-dependent
Recommended: disable (both in network adapter properties and in the TCP/IP stack at the OS level)
To check using Powershell:
Get-NetAdapterLso -Name * (get a list of network adapters that support LSO)
Get-NetAdapterAdvancedProperty -Name * (get a list of all network adapter settings)
To change:
Disable-NetAdapterLso -Name * (disable LSO for all visible network adapters)
Enable-NetAdapterLso -Name * (enable LSO for both IPv4 and IPv6 on all network adapters. Be careful with this setting, test before using in production)
Notes: Default state is network adapter dependent. Needs Checksum Offload to be enabled to work. LSO is another buffer that may impact latency, it is not recommended for interactive connections and gaming.
See Also: Should I enable TCP Offloading ?
ECN Capability
ECN (Explicit Congestion Notification, RFC 3168) is a mechanism that provides routers with an alternate method of communicating network congestion. It is aimed to decrease retransmissions. In essence, ECN assumes that the cause of any packet loss is router congestion. It allows routers experiencing congestion to mark packets and allow clients to automatically lower their transfer rate to prevent further packet loss. Traditionally, TCP/IP networks signal congestion by dropping packets. When ECN is successfully negotiated, an ECN-aware router may set a bit in the IP header (in the DiffServ field) instead of dropping a packet in order to signal congestion. The receiver echoes the congestion indication to the sender, which must react as though a packet drop were detected. ECN is disabled by default in modern Windows TCP/IP implementations, as it is possible that it may cause problems with some outdated routers that drop packets with the ECN bit set, rather than ignoring the bit.
Possible settings are: enabled, disabled, default (restores the state to the system default).
Default state: disabled
Recommendation: «enabled» only for short-lived, interactive connections and HTTP requests with routers that support it, in the presence of congestion/packet loss, «disabled» otherwise (for pure bulk throughput with large TCP Window, no regular congestion/packet loss, or outdated routers without ECN support). May be worth trying «enabled» for gaming with unstable connections.
To change using netsh:
netsh int tcp set global ecncapability=default
To change using PowerShell cmdlets:
Set-NetTCPSetting -SettingName InternetCustom -EcnCapability Disabled
Notes:
Alternative netsh syntax is: netsh int tcp set global ecn=default
ECN is only effective in combination with AQM (Active Queue Management) router policy. It has more noticeable effect on performance with interactive connections, online games, and HTTP requests, in the presence of router congestion/packet loss. Its effect on bulk throughput with large TCP Window are less clear. Currently, we do not recommend enabling this setting, as reportedly it has negative impact on throughput with some residential US ISPs. EA multiplayer games that require a profile logon do not support ECN as well (you will not be able to logon). However, it can also reduce latency in some games with ECN-capable routers in the presence of packet loss (dropped packets).
See also: Wikipedia — ECN, RFC 3168
TCP 1323 Timestamps
RFC 1323 ads many useful options, most notably scaling of the TCP Window. «Timestamps» (TSOpt) is a less commonly used 1323 option that is intended to increase transmission reliability by retransmitting segments that are not acknowledged within some retransmission timeout (RTO) interval. The problem with timestamps is that they add 12 bytes to the 20-byte TCP header of each packet, so turning them on causes considerable overhead.
Possible states: enabled,disabled,default
Default state: disabled
Recommended: disabled
To set using netsh:
netsh int tcp set global timestamps=disabled
To set using PowerShell cmdlets:
Set-NetTCPSetting -SettingName InternetCustom -Timestamps Disabled
Initial RTO and Min RTO
Retransmit timeout (RTO) determines how many milliseconds of unacknowledged data it takes before the connection is aborted. The default timeout for Initial RTO of 3 seconds can usually be lowered for low-latency modern broadband connections, unless you’re in a remote location, on a satellite internet connection, or experiencing high latency. In high-latency situations, this can increase retransmissions if the RTO value is reached on a regular basis.
InitialRTO
Default value: 3000 (3 seconds)
Recommended: between 2000 (2 seconds) and 3000 (3 seconds).
To set using netsh:
netsh int tcp set global initialRto=3000
To set using PowerShell cmdlets:
Set-NetTCPSetting -SettingName InternetCustom -InitialRto 3000
MinRTO
Default value: 300 (ms)
Recommended: 300 (ms)
MinRTO can’t be changed under Windows 8 (read-only error), it may be editable under server OSes. The command is:
set-NetTCPSetting -SettingName InternetCustom -MinRto 300
Non Sack Rtt Resiliency (Windows 8.1)
Enables/Disables RTT resiliency for non SACK clients. This can help slow clients/connections as it makes TCP/IP less aggressive in retransmitting packets when enabled.
Possible states: enabled,disabled,default
Default state: disabled
Recommended: «disabled» for stable connections without much latency variations, «enabled» for connections with fluctuating ping and in the presence of packet loss.
To set using netsh:
netsh int tcp set global nonsackrttresiliency=disabled
To set using PowerShell cmdlets:
Set-NetTCPSetting -SettingName InternetCustom -NonSackRttResiliency disabled
Note: This property only supported in Windows 8.1 and Windows Server 2012 R2.
Max SYN Retransmissions (Windows 8.1)
Sets the number of times to attempt to reestablish a connection with SYN packets.
Possible values: 2 to 8
Default value: 2
Recommended: leave at 2
To set using netsh:
netsh int tsp set global maxsynretransmissions=2
To set using PowerShell cmdlets:
Set-NetTCPSetting -SettingName InternetCustom -MaxSynRetransmissions 2
To view the current setting under PowerShell:
Get-NetTCPSetting -SettingName InternetCustom
Or, to view only the current MaxSynRetransmissions setting as a number:
(Get-NetTCPSetting -SettingName InternetCustom).MaxSynRetransmissions
Note: This property only supported in Windows 8.1 and Windows Server 2012 R2. Windows 7 hotfix displays it in netsh as a read-only setting.
InitialCongestionWindow (ICW)
When creating a TCP connection, the sending side performs a «TCP slow start» regardles of the receiver RWIN value. TCP slow start only sends two frames, waits for ACK response, and increases speed exponentially provided there are no dropped packets. This slow start algorithm can also be activated if there is no traffic for 200ms. This is not optimal for fast internet connections with intermittent bursts of data. This bottleneck can be avoided by increasing the «InitialcongestionWindow» from the default 2 (or 4) frames to 10+ (See RFC 3390 and RFC 6928).
The following should work for 2012 server, however it does not work in Windows 8.1, or Windows 10 workstation variants (read-only setting error).
Default setting: 2, 4, or 10, depending on OS version.
Recommended: 10
To set using Powershell cmdlets (only available in server variants):
Set-NetTCPSetting -SettingName InternetCustom -InitialCongestionWindow 10
To set using elevated command prompt:
netsh int tcp set supplemental template=custom icw=10
(works for Server 2008 R2 with hotfix KB2472264)
Setting MTU
It is sometimes useful to view and set the Maximum Transmission Unit (MTU) value for a specific network adapter manually. To view a list of active network interfaces, their names and their respective MTU values in Windows 8, open PowerShell (or command prompt) as administrator and run the following command:
netsh int ipv4 show subinterface
or, if you are using IP version 6:
netsh int ipv6 show subinterface
Alternative netsh syntax: netsh int ipv4 show interfaces
Alternative PowerShell syntax: Get-NetAdapter (to view all advanced properties: Get-NetAdapterAdvancedProperty)
You will be presented with a list of interfaces, and their respective MTU values as follows:

To change the MTU value of a specific network card, type the following:
netsh int ipv4 set subinterface «network interface name» mtu=#### store=persistent
Where «network interface name» is your specific network adapter name as obtained above (also viewable under Network adapters), and mtu=#### is the desired MTU value. For example, if the name of your network card is «Wi-Fi» and you’d like to set its MTU to 1500, you’d have to type:
netsh int ipv4 set subinterface «Wi-Fi» mtu=1500 store=persistent
Notes:
For IPv6, you can set the MTU using: netsh int ipv6 set subinterface «Wi-Fi» mtu=1500 store=persistent
The maximum MTU value is usually 1500, and up to 1492 for PPPoE connections.
The PowerShell cmdlet using Set-NetAdapterAdvancedProperty SetMTU doesn’t seem to work yet. See this nice attempt to set MTU using PowerShell at Serverfault.
Registry Tweaks
This section lists a number of TCP/IP related Windows Registry parameters that work with Windows 8/8.1 and 2012 Server. Some of the settings we’ve tested are the same/similar parameters as with previous Windows versions that we have confirmed to work with Windows 8/8.1 as well, although they may have different default values. Below is a list of what we’ve confirmed to work. To edit the Windows Registry, click the Windows button, and type: regedit in the search dialog (you may have to right-click regedit and choose to run as administrator to have the proper write permissions). It is always a good idea to create a restore point and backup the registry before making changes.
DefaultTTL
TTL does not directly affect speed, and can be safely left alone in many cases. It is a limit to the time and number of hops/routers a packet will travel before being discarded. A number that’s too small risks packets being discarded before reaching their destination. A number that’s too large (over 128) will cause delay in when lost IP packets are discarded. The default, when the setting is not present in the Windows 8/10/2012 registry the system assumes a value of 128.
HKEY_LOCAL_MACHINESYSTEMCurrentControlSetServicesTcpipParameters
DefaultTTL=64 (DWORD, not present by default denoting 128, valid range is 1-255, recommended: 64)
Host Resolution Priority Tweak
This is intended to increase the priority of DNS/hostname resolution, by increasing the priority of four related processes from their defaults. It is important to note that this increases their priority compared to the hundreds of other running processes, while keeping their order. See our Host Resolution Priority Tweak article for more details. The registry location under Windows 8, 8.1, 10, 2012 Server, and 2012 R2 is:
HKEY_LOCAL_MACHINESYSTEMCurrentControlSetServicesTcpipServiceProvider
LocalPriority = 4 (DWORD, default 499, recommended 4)
HostPriority = 5 (DWORD, default 500, recommended 5)
DnsPriority = 6 (DWORD, default 2000, recommended 6)
NetbtPriority = 7 (DWORD, default 2001, recommended 7)
MaxUserPort and TCPTimedWaitDelay (port allocation)
Short lived (ephemeral) TCP/IP ports above 1024 are allocated as needed by the OS. The Windows 8/2012 defaults are usually sufficient under normal network load. However, under heavy network load it may be necessary to adjust these two registry settings to increase port availability and decrease the time to wait before reclaiming unused ports.
If the default limits are exceeded under heavier loads, the following error is observed «address in use: connect exception«. To tweak, add/edit the following keys using regedit:
HKEY_LOCAL_MACHINESYSTEMCurrentControlSetServicesTcpipParameters
MaxUserPort=65534 (DWORD, not in the registry by default, uses ports 1024-5000 by default. recommended: 16384 to 65534 decimal as necessary) — maximum number of ports to use. 1024 is automatically subtracted from entered value to allow for reserved ports under 1024.
TcpTimedWaitDelay=30 (DWORD, not present in registry by default, 120 seconds when not present. Recommended: 30 decimal, denoting 30 seconds) — time to wait before reclaiming ports, in seconds. Default time before reclaiming ports, if value is at 0xffffffff or not present in the registry is 120 (or 240) seconds, depending on your OS. Just reducing the delay is often sufficient without changing MaxUserPort, as it allows for reusing ports more efficiently.
See:
MSDN ms737757
Technet MaxUserPort
QoS Reserved Bandwidth
The Windows «QoS Packet Scheduler» under Windows 8/8.1 (as with previous Windows versions) reserves 20% of bandwidth by default for QoS-aware applications that request priority traffic. Note this only has effect in the presence of running QoS applications that request priority traffic, like Windows Update, for example. To prevent QoS applications from getting priority to 20% of available bandwidth, customize the following registry setting:
HKEY_LOCAL_MACHINESOFTWAREPoliciesMicrosoftWindowsPsched
NonBestEffortLimit=0 (DWORD, not present in the registry by default. When not present it reserves 20% of bandwidth. Recommended: 0 , possible values between 0 and 100) — indicates the percentage value of reserved bandwidth for QoS applications. Set to 0 to disable.
Notes:
The NonBestEffort tweak applies only when the Windows Qos Packet Scheduler is enabled, and has effect ONLY in the presence of running QoS applications.
QoS reserved bandwidth can also be disabled from the Gourp Policy Editor: Start -> Run: gpedit.msc -> open Local Group Policy EditorLocal Computer PolicyComputer ConfigurationAdministrative TemplatesNetworkQoS Packet Scheduler -> in the right pane, edit/enable «Limit reservable bandwidth» and reduce the percentage of «Bandwidth limit» to zero.
QoS Policy
QoS Policy settings under Windows 7/8 can be edited using the Group Policy Editor (gpedit.msc): Computer Configuration -> Windows Settings -> Policy-based QoS
In order to define DiffServ (DSCP) values, according to Microsoft the machine needs to have joined a domain, and interfaces have to see the domain controller. To overcome this limitation, so that you can tag DSCP values even for adapters that do not have access to a domain, use the following hidden registry key:
HKEY_LOCAL_MACHINESystemCurrentControlSetServicesTcpipQoS (you may have to create the QoS key)
«Do not use NLA»=»1» (REG_SZ string value, not DWORD, not present by default, recommended: 1 if you plan to edit DSCP values via gpedit.msc)
Notes:
gpedit.msc is only provided with the Professional/Ultimate and Server Windows variants.
This registry key may also be needed in systems with multiple network adapters present.
Network Memory Allocation (Event ID 2017 error)
When using Windows to serve many/large files over the local network, it is possible to sometimes run into memory allocation errors related to the Windows share, especially with clients that use different operating systems. When this happens, you can usually see the following error in the Event Viewer System log:
Event ID: 2017 «The server was unable to allocate from the system nonpaged pool because the server reached the configured limit for nonpaged pool allocations.» It is also possible to get an error indicating that «Not enough server storage is available to process this command». To avoid those errors, you need to change the way Windows allocates memory for network services and file sharing. The below settings optimize the machine as a file server so it would allocate resources accordingly. There are two related registry settings:
HKEY_LOCAL_MACHINESYSTEMCurrentControlSetControlSession ManagerMemory Management
LargeSystemCache=1 (DWORD, default value: 0, recommended value: 1 for LAN file transfers, 0 for gaming)
A value of zero establishes a cache of ~8 MB, a value of 1 allows the cache to expand up to the amount of physical memory minus 4 MB, as necessary. Reportedly some ATI video card drivers may have an issue with corrupt cache and degraded application performance when this is enabled, so we recommend to leave it off/zero for gaming.
HKEY_LOCAL_MACHINESYSTEMCurrentControlSetServicesLanmanServerParameters
Size=3 (DWORD, default value: 1, recommended value: 3)
minimizes used memory
balance used memory
optimal setting for file sharing and network applications
Internet Explorer Web Browser Tweaks
MaxConnectionsPerServer / MaxConnectionsPer1_OServer Internet Explorer browser tweaks adjust the maximum number of concurrent connections your web browser can establish to any single website.
HKEY_LOCAL_MACHINESOFTWAREMicrosoftInternet ExplorerMAINFeatureControl
FEATURE_MAXCONNECTIONSPER1_0SERVERexplorer.exe=10 (DWORD, default: 4, recommended: 8, valid range: 2-128)
FEATURE_MAXCONNECTIONSPERSERVERexplorer.exe=10 (DWORD, default: 2, recommended: 8, valid range: 2-128)
In addition to explorer.exe, you can also add a 32bit DWORD «iexplore.exe» (according to MSDN), and set it to the same corresponding value as «explorer.exe»
FEATURE_MAXCONNECTIONSPER1_0SERVERiexplore.exe=10 (DWORD, not present by default, recommended: 8, valid range: 2-128)
FEATURE_MAXCONNECTIONSPERSERVERiexplore.exe=10 (DWORD, not present by default, recommended: 8, valid range: 2-128)
For more information, see our Web Browser Tweaks article
Note: Increasing this setting much over 10 can cause incomplete page loading and other issues with some pages.
Network Throttling Index (Gaming)
By default, Windows 8 continues to implement a network throttling mechanism to restrict the processing of non-multimedia network traffic to 10 packets per millisecond (a bit over 100 Mbits/second). The idea behind such throttling is that processing of network packets can be a resource-intensive task, and it may need to be throttled to give prioritized CPU access to multimedia programs. In some cases, such as Gigabit networks and some online games, for example, it is beneficial to turn off such throttling all together for achieving maximum throughput.
HKEY_LOCAL_MACHINESOFTWAREMicrosoftWindows NTCurrentVersionMultimediaSystemProfile
NetworkThrottlingIndex=ffffffff (DWORD, default: 10, recommended: 10 for media sharing, ffffffff for gaming and max throughput, valid range: 1 through 70 decimal or ffffffff to completely disable throttling)
It is only recommended to change this setting in saturated Gigabit LAN environments, where you do not want to give priority to multimedia playback. Reportedly, disabling throttling by using ffffffff can also help reduce ping spikes in some online games. Games that may be affected by this throttling: Source Engine games (TF2, Left 4 Dead, CS:S), HoN, CoD, Overlord series.
SystemResponsiveness (Gaming and Multimedia)
In Windows 8/8.1, just like with Windows 7, multimedia applications use the «Multimedia Class Scheduler» service (MMCSS) to ensure priritized access to CPU resources, without denying CPU resources to lower-priority background applications. However, this also reserves 20% of CPU by default for background processes, your multimedia streaming and some games can only utilize up to 80% of the CPU. This setting, in combination with the above «NetworkThrottlingIndex» can help some games and video streaming. We recommend reducing the reserved CPU for background processes from the default of 20%.
Navigate to:
HKEY_LOCAL_MACHINESOFTWAREMicrosoftWindows NTCurrentVersionMultimediaSystemProfile
SystemResponsiveness=10 (DWORD, default is 20 denoting 20% of CPU reserved, recommended: decimal 10, or 0 for pure gaming/multimedia performance)
Notes: The number in this key is rounded by MMCSS to the nearest 10. In some server operating systems (Windows 2008 Server), the SystemResponsiveness may be set to 100, instead of 20 by default. This is by design, giving higher priority to background services over multimedia.
See also: MSDN ms684247
Disable Nagle’s algorithm (Gaming)
Nagle’s algorithm is designed to allow several small packets to be combined together into a single, larger packet for more efficient transmissions. While this improves throughput efficiency and reduces TCP/IP header overhead, it also briefly delays transmission of small packets. Disabling «nagling» can help reduce latency/ping in some games. Keep in mind that disabling Nagle’s algorithm may also have some negative effect on file transfers. Nagle’s algorithm is enabled in Windows by default. To implement this tweak and disable Nagle’s algorithm, modify the following registry keys.
This setting configures the maximum number of outstanding ACKs:
HKEY_LOCAL_MACHINESYSTEMCurrentControlSetServicesTcpipParametersInterfaces{NIC-id}
There will be multiple NIC interfaces listed there, for example: {1660430C-B14A-4AC2-8F83-B653E83E8297}. Find the correct one with your IP address listed. Under this {NIC-id} key, create a new DWORD value:
TcpAckFrequency=1 (DWORD value, not present by default interpreted as 2, 1=disable, 2=default, specifies number of outstanding ACKs before ignoring delayed ACK timer). For gaming performance, recommended is 1 (disable). For pure throughput and data streaming, you can experiment with small values over 2. Wifi performance may see a slight improvement with disabled TcpAckFrequency as well.
In the same location, add a new DWORD value:
TCPNoDelay=1 (DWORD value, not present by default, 0 to enable Nagle’s algorithm, 1 to disable)
To configure the ACK interval timeout (only has effect if nagling is enabled), find the following key:
TcpDelAckTicks=0 (DWORD value, not present by default interpreted as 2, 0=disable nagling, 1-6=100-600 ms). Note you can also set this to 1 to reduce the nagle effect from the default of 200ms without disabling it.
For Server Operating Systems that have Microsoft Message Queuing (MSMQ) installed, or if you have the MSMQ registry hive present, also add TCPNoDelay to:
HKEY_LOCAL_MACHINESOFTWAREMicrosoftMSMQParameters
TCPNoDelay=1 (DWORD, not present by default, 0 to enable Nagle’s algorithm, 1 to disable)
See also: Gaming Tweaks article
SG TCP Optimizer (version 4 Beta)
The SG TCP Optimizer is a free program that allows for easy tweaking of all the above TCP/IP settings for broadband with a couple of clicks. Note that only version 4 of the prorgam supports Windows 8 (and newer) and works with PowerShell cmdlets. There program is available in our downloads section.
The SG TCP Optimizer is a standalone application that does not require installation, you can just save it to the desktop, right-click -> choose «Run as administrator», and apply the «optimal» settings, or customize them to your liking. More detailed information about all available options is provided in the TCP Optimizer documentation, answers to frequently asked questions are available in the Optimizer FAQ, and personalized help is available through our forums.
References
Technet — Network Adapter Cmdlets
TechNet set-NetTCPSetting
MSDN MSFT_NetTCPSetting class
Increasing TCP Initial congestion Window in Windows 2008 Server R2
MS Hotfix for netsh errors in Windows Server 2008 R2 — MSKB 2472264
See Also
Quality of Service — ToS DSCP WMM
Windows 8 FAQs
Windows 7, Vista, 2008 Tweaks
Firefox / Internet Explorer Browser Tweaks
Congestion Control Algorithm Comparison
Notes
Some templates/settings, as well as changing the default NetTransportFilter are no longer editable in client Windows versions (Windows 8, 8.1), only Server variants (Server 2008, Server 2012/2012 R2).
The tweaks were tested and confirmed to work with Windows 10 Technical Preview build 10041.
Feedback and suggestions are always appreciated.

Экспериментальные твики
Данные настройки не обязательны, но в них есть немного для каждого.
- Отключение патчей Meltdown, Spectre, Zombieload v2
- Настройка сети

Отключение патчей Meltdown, Spectre, Zombieload v2
💡 Для дальнейшей настройки необходимо ознакомиться c
Работа с реестром.
Windows Registry Editor Version 5.00

; отключение патчей Meltdown и Spectre
[HKEY_LOCAL_MACHINESYSTEMCurrentControlSetControlSession ManagerMemory Management]
"FeatureSettings"=dword:00000001
"FeatureSettingsOverride"=dword:00000003
"FeatureSettingsOverrideMask"=dword:00000003

; отключение патча Zombieload v2
[HKEY_LOCAL_MACHINESYSTEMCurrentControlSetControlSession ManagerKernel]
"DisableTsx"=dword:00000001
Значения по-умолчанию:
Windows Registry Editor Version 5.00

[HKEY_LOCAL_MACHINESYSTEMCurrentControlSetControlSession ManagerMemory Management]
"FeatureSettings"=dword:00000000
"FeatureSettingsOverride"=-
"FeatureSettingsOverrideMask"=-

[HKEY_LOCAL_MACHINESYSTEMCurrentControlSetControlSession ManagerKernel]
"DisableTsx"=-
В своё время обнаружение Meltdown [?] и Spectre [?] наделало не мало шума, и зачастую противники этих патчей выдвигают основной аргумент в пользу его отключения – уменьшение производительности CPU. С одной стороны некоторое падение производительности действительно есть [?], тоже самое касается и Zombieload [?] – что-то в районе пары процентов, что не критично и в пределах погрешности, с другой стороны это всё же потенциальная дыра и в приличном обществе такое выставлять на показ не принято.
✨ На слабых CPU есть смысл поэкспериментировать с данной настройкой.
Настройка сети
💡 Для дальнейшей настройки необходимо ознакомиться c
Работа с реестром,
Определение Class GUID.
⚠️ Все настройки сети необходимо тестировать, чтобы определить оптимальные для вашего качества соединения.
Windows Registry Editor Version 5.00

[HKEY_LOCAL_MACHINESOFTWAREMicrosoftWindows NTCurrentVersionMultimediaSystemProfile]
"NetworkThrottlingIndex"=dword:ffffffff
Значения по-умолчанию:
Windows Registry Editor Version 5.00

[HKEY_LOCAL_MACHINESOFTWAREMicrosoftWindows NTCurrentVersionMultimediaSystemProfile]
"NetworkThrottlingIndex"=dword:0000000a
По-умолчанию в Windows используется механизм регулирования сети, где ограничивается обработка не мультимедийного сетевого трафика до 10 пакетов в миллисекунду (чуть больше 100 Mb/s). Смысл такого регулирования заключается в том, что обработка сетевых пакетов может быть ресурсоёмкой задачей, и может потребоваться регулирование, чтобы обеспечить приоритетный доступ CPU к мультимедийным программам. Но т.к. мы хотим избавиться от дополнительных вмешательств, то данную настройку так же рекомендуется отключить, особенно при наличии гигабитной сети.
Windows Registry Editor Version 5.00

[HKEY_LOCAL_MACHINESYSTEMCurrentControlSetServicesTcpipParametersInterfaces***]
"TCPNoDelay"=dword:00000001
"TcpAckFrequency"=dword:00000001
"TcpDelAckTicks"=dword:00000000
"MTU"=dword:000005dc
Значения по-умолчанию:
Windows Registry Editor Version 5.00

[HKEY_LOCAL_MACHINESYSTEMCurrentControlSetServicesTcpipParametersInterfaces***]
"TCPNoDelay"=-
"TcpAckFrequency"=-
"TcpDelAckTicks"=-
"MTU"=-
В качестве части имени ветки мы используем ***, где *** надо заменить на Class GUID нашего сетевого адаптера.
Параметр TCPNoDelay отвечает за включение Алгоритма Нейгла [?], который предназначен для повышения эффективности протокола TCP [?] за счёт уменьшения количества сетевых пакетов, путём объединения несколько небольших пакетов в один крупный пакет для более эффективной передачи (nagling). Однако было доказано [?], что в некоторых играх он увеличивает сетевую задержку, поэтому рекомендуется отключить его.
⚠️ Имейте в виду, что отключение данной функции уменьшит скорость загрузки/отдачи из-за меньшего количества данных, передаваемых за пакет.
Параметр TcpAckFrequency определяет количество подтверждений TCP (ACK), чтобы уменьшить количество пакетов [?]. Для увеличения пропускной способности можете поэкспериментировать с небольшими значениями, превышающими 2. Производительность Wi-Fi также может немного улучшиться, если с отключить данную функцию установив 1.
Параметр TcpDelAckTicks служит для настройки тайм-аута TCP (ACK) [?]. Если вы отключили nagling, то данный параметр так же стоит отключить установив параметр в 0.
⚠️ Вы также можете установить значение параметра
1, чтобы уменьшитьnaglingс 200ms по умолчанию, не отключая его.
Параметр MTU, как ясно из названия, явно задаёт использовать MTU [?] равный 1500 байт [?] для избежания авто-установки в не правильное значение, т.к. по-умолчанию все сетевые устройства используют это значение равное 1500, а разные значения на устройствах могут привести с потери пакетов.
Congestion Control Provider [?] – специальные алгоритмы используемые чтобы улучшить пропускную способность. Доступны несколько вариантов:
CTCP[?] – может улучшить пропускную способность при более высоких задержках или широкополосном соединении.DCTCP– используется для повышения пропускной способности на локальных каналах с низкой задержкой, если у вас есть LAN-сеть или гигабитное соединение. Используется на серверах.NewReno– аналогиченCTCP, но так же использует дополнительные алгоритмы Fast Retransmit & Fast Recovery.
Включение CTCP:
netsh int tcp set supplemental Internet congestionprovider=ctcp > nul
netsh int tcp set heuristics disabled > nul
Включение DCTCP:
netsh int tcp set supplemental Internet congestionprovider=dctcp > nul
netsh int tcp set heuristics disabled > nul
Включение NewReno (по-умолчанию):
netsh int tcp set supplemental Internet congestionprovider=NewReno > nul
netsh int tcp set heuristics disabled > nul
Автоматическая настройка TCP [?] — поможет улучшить пропускную способность в сетях с высокой пропускной способностью и большими задержками. Отключение фиксирует значение для TCP Window ограничивая его до 64Kb. Normal обычно является лучшим выбором, но, возможно, стоит попробовать отключить эту настройку.
Отключение:
netsh int tcp set global autotuninglevel=disabled > nul
netsh int tcp set global chimney=disabled > nul
netsh int tcp set global rss=enabled > nul
netsh int tcp set global rsc=disabled > nul
Режим Normal (по-умолчанию):
netsh int tcp set global autotuninglevel=normal > nul
netsh int tcp set global chimney=disabled > nul
netsh int tcp set global rss=enabled > nul
netsh int tcp set global rsc=disabled > nul
ECN Capability [?] – это механизм, который предоставляет маршрутизаторам альтернативный метод сообщения о перегрузке сети. Используется для уменьшения повторных передач пакетов. ECN предполагает, что причиной потери пакетов является перегрузка маршрутизатора, что позволяет им, испытывающим перегрузку, маркировать пакеты, из-за чего клиенты автоматически снижают скорость передачи данных, чтобы избежать дальнейшую потерю пакетов.
Включить ECN Capability:
netsh int tcp set global ecncapability=enabled > nul
netsh int tcp set global timestamps=disabled > nul
Отключить ECN Capability (по-умолчанию):
netsh int tcp set global ecncapability=disabled > nul
netsh int tcp set global timestamps=disabled > nul
Рекомендуется включать только при наличии перегрузки, потери пакетов или при нестабильном подключении.
⚠️ Не включайте эту настройку, если вы используете старый маршрутизатор или компьютер.
Retransmit TimeOut (RTO) [?] – сколько времени неподтверждённые пакеты будут бегать по сети, прежде чем соединение будет прервано. В сетях с высокой задержкой это может увеличить количество повторных передач пакетов.
Установить таймаут в 2s:
netsh int tcp set global initialRto=2000 > nul
powershell -Command "Set-NetTCPSetting -SettingName InternetCustom -MinRto 300" > nul
Установить таймаут в 3s (по-умолчанию):
netsh int tcp set global initialRto=3000 > nul
powershell -Command "Set-NetTCPSetting -SettingName InternetCustom -MinRto 300" > nul
⚠️ Рекомендуется уменьшить таймаут для современных широкополосных сетей с малой задержкой.

Get the most out of your Windows 10 network and game performance. With these tweaks you can significantly reduce latency in multiple online games and online applications. Additionally it generally improves system performance as it relates to internet related activities. You will need access to the administrator account or administrative privileges.
Windows 10 optimized features in the TCP/IP stack, including CTCP, and TCP Window Auto-Tuning. The new implementation works much better by default than previous Windows versions with broadband internet connections and is able to adjust many values on the automatically.
However, there is room for improvement and you can adjust some values to better meet your use of your system.
To enter some of the commands below, you will need to run “elevated” command prompt or “as administrator”.
To do this.
- Press and Hold the Windows Key, or type in CMD in Contra
- Right Click,
- Choose “Run As Administrator”
Check the TCP/IP state
To check the current status of the Vista TCP/IP tweakable parameters, in elevated command prompt type the following command:
netsh int tcp show global
The settings, as well as their default and recommended state are explained below. The two most important tweakable parameters are “Auto-Tuning Level” and “Congestion Control Provider”.
Disable TCP Auto-Tuning
At the command prompt type:
netsh int tcp set global autotuninglevel=disabled
Enable Compound TCP
At the command prompt type:
netsh int tcp set supplemental custom congestionprovider = ctcp
Enable ECN Capability
At the command prompt type:
netsh int tcp set global ecncapability=enabled
Enable Receive-side Scaling
At the command prompt type:
netsh int tcp set global rss=enabled
Enable TCP Chimney Offload
At the command prompty type:
netsh int tcp set global chimney=enabled
Setting
At the command prompt type:
netsh interface ipv4 show subinterface
This will display a list of interfaces, and their respective MTU values.
Change the MTUvalue of a specific network card, at the command prompt type:
netsh interface ipv4 set subinterface “some network interface name” mtu=#### store=persistent
Example, the name of the network card you want to change iis “Wireless Network Connection” and you want to set its MTU to 1500, at the command prompt type:
netsh interface ipv4 set subinterface “Wireless Network Connection” mtu=1500 store=persistent
Registry Tweaks
Note that for changes to these settings to take effect the computer needs to be rebooted.
Moderate understanding of the Windows Registry is needed.
As with everything on this site, You are responsible for your own actions. See Evilware.com Terms of Use
- Go to Start
- Run
- type: regedit
- Press Enter
while logged in as administrator), you can navigate and edit the following keys.
TCP 1323 Options
HKEY_LOCAL_MACHINESYSTEMCurrentControlSetServicesTcpipParameters
Tcp1323Opts=1 (DWORD, entry created automatically by Windows when you run the “netsh int tcp set global autotuninglvl=…” command, set to 0 by default).
Setting this seems to have no effect, since auto-tuning uses the TCP 1323 scale factor and changes it on the fly, disregarding this setting. Additional testing may be required to determine it’s the effect if auto-tuning is turned off. Setting it to 1 is best for cable & fiber connections.
NetDMA
NetDMA enables support for advanced direct memory access. In essence, it provides the ability to more efficiently move network data by minimizing CPU usage. NetDMA frees the CPU from handling memory data transfers between network card data buffers and application buffers by using a DMA engine.
HKEY_LOCAL_MACHINESYSTEMCurrentControlSetServicesTcpipParameters
EnableTCPA=1 (DWORD, 1 to enable, 0 to disable NetDMA. Value not present by default in Windows 10)
Recommended setting is 1, a new DWORD value may need to be created if not already present in the registry.
DefaultTTL
HKEY_LOCAL_MACHINESYSTEMCurrentControlSetServicesTcpipParameters
DefaultTTL=64 (DWORD, set to a decimal value between 32 and 128. Recommended: 64)
TcpMaxDataRetransmissions
HKEY_LOCAL_MACHINESYSTEMCurrentControlSetServicesTcpipParameters
TCPMaxDataRetransmissions=7 (DWORD, recommended: between 3 and 10, default registry value 255, default 5 in documentation)
SynAttackProtect
This setting provides protection against SYN denial of service (DoS) attacks. When enabled, connections timeout sooner if SYN attack is detected. When set at 1, TCPMaxDataRetransmissions can be lowered further.
HKEY_LOCAL_MACHINESYSTEMCurrentControlSetServicesTcpipParameters
SynAttackProtect=1 (DWORD, recommended: 1, not present in registry by default)
Set DNS and Hosts Priority
The setting can improve DNS and hostname resolution by increasing the priority of related services while keeping their order. Lower numbers mean higher process priority. The corresponding registry settings are as follows:
HKEY_LOCAL_MACHINESYSTEMCurrentControlSetServicesTcpipServiceProvider
LocalPriority=4 (DWORD, recommended: 4, default: 499) – local names cache
HostsPriority=5 (DWORD, recommended: 5, default: 500) – the HOSTS file
DnsPriority=6 (DWORD, recommended: 6, default: 2000) – DNS
NetbtPriority=7 (DWORD, recommended: 7, default: 2001) – NetBT name resolution, including WINS
TcpTimedWaitDelay (port allocation)
Windows 10 improved upon some of the features in previous Windows versions, and are usually sufficient under normal load. In some inst

ances under heavy load it it may be necessary to adjust the settings to tweak the availability of user ports requested by an application. This is often the case with online games such as World of Warcraft.
The following registry values need to be edited:
HKEY_LOCAL_MACHINESYSTEMCurrentControlSetServicesTcpipParameters
MaxUserPort=65535
Recommended: leave at default, or use a number above 16384 up to 65535, decimal value. maximum number of ports to use. 1024 is automatically subtracted from entered value to allow for reserved ports under 1024.
HKEY_LOCAL_MACHINESYSTEMCurrentControlSetServicesTcpipParameters
TcpTimedWaitDelay=30
(DWORD Off in the registry by default Recommended: 30 decimal, denoting 30 seconds) – time to wait before reclaiming ports, in seconds. Default time before reclaiming ports, if value is at 0xffffffff or not present in the registry is 120 seconds. Just reducing the delay is often sufficient without changing MaxUserPort, as it allows for reusing ports more efficiently.
Ephemeral ports can be checked and changed using netsh as well.
To list the current values, in command prompt, type:
netsh int ipv4 show dynamicportrange tcp
To set both the starting, and max user port using netsh, in elevated command prompt type:
netsh int ipv4 set dynamicportrange protocol=tcp start=1025 num=64511 (start=NNN denoting the starting port, and num=NNN denoting the number of ports)
QoS Reserved Bandwidth
Windows 10 nework adapters have a “QoS Packet Scheduler” enabled by default, which reserves 20% of bandwidth by default for QoS enabled applications that request priority traffic.
Change this value to
HKEY_LOCAL_MACHINESOFTWAREPoliciesMicrosoftWindowsPsched
NonBestEffortLimit=0
In some cases you will need to Create a New Key Value of “Psched” in HKEY_LOCAL_MACHINESOFTWAREPoliciesMicrosoftWindows
Then create the DWord Value NonBestEffortLimit.
Gaming Tweak – Disable Nagle’s algorithm – Gaming Tweak
The tweak below allows for tweaking or disabling Nagle’s alogrithm. Disabling nagle allows for small packets to be transferred immediately without delay. Note that disabling Nagle’s algorithm is only recommended for some games, and it may have negative impact on file transfers such as Bit Torrent.
To implement this tweak, in the registry editor find:
This setting configures the maximum number of outstanding ACKs in Windows 10/ Windows 7/ Windows 8 / Windows Vista/2008/Windows 2012/Windows 2016/ Windows 2019:
HKEY_LOCAL_MACHINESYSTEMCurrentControlSetServicesTcpipParametersInterfaces{NIC-id}
There will be multiple NIC interfaces listed there, for example: {1660430C-B14A-4AC2-8F83-B653E83E8297}. Find the correct one with your IP address listed. Under this {NIC-id} key, create a new DWORD value:
TcpAckFrequency=1 (DWORD value, 1=disable, 2=default, 2-n=send ACKs if outstanding ACKs before timed interval. Setting not present by default).
For gaming performance, recommended is 1 (disable). For pure throughput and data streaming, you can experiment with values over 2.
Also, find the following key (if present):
HKEY_LOCAL_MACHINESOFTWAREMicrosoftMSMQParameters
Add a new DWORD value:
TCPNoDelay=1 (DWORD value, 0 to enable Nagle’s algorithm, 1 to disable, not present by default)
Configure the ACK interval timeout (only has effect if nagling is enabled), find the following key:
HKEY_LOCAL_MACHINESYSTEMCurrentControlSetServicesTcpipParametersInterfaces{NIC-id}
TcpDelAckTicks=0 (DWORD value, default=2, 0=disable nagling, 1-6=100-600 ms).
Note you can also set this to 1 to reduce the nagle effect from the default of 200ms without disabling it.
Hello!
Seems like I can’t operate within netsh int tcp set supplemental preferences. When I try to set congestion provider the ‘old way’ with
«netsh int tcp set global congestionprovider=ctcp«
in elevated command prompt, Windows 8 saying that I must do it now with
«netsh int tcp set supplemental«
But that doesn’t work either. All I can do with that new command is set template, but only one is available — «internet», and it’s already set to it.
I want to set ctcp, ICW and minrto, but I can’t, here’s what me getting:
http://s10.postimage.org/jrpkudg53/suplemental.png
The syntax is right, even example doesn’t work.
The problem exists in Windows 8 CP, RP and in this build.
Sorry for my English. Thanks in advance.
-
Edited by
Tuesday, September 11, 2012 9:05 AM
-
Changed type
Niki Han
Wednesday, September 19, 2012 3:29 AM
Низкая скорость интернета — это бесконечная проблема, которая время от времени мучает пользователей интернета. Иногда это проблема конфигурации сети, иногда проблема может быть связана с ПК или даже с самим провайдером.
Однако многие распространенные проблемы, связанные с DNS, TCP и IP-адресами, можно решить с помощью командной строки Windows. Ниже приведены некоторые команды, которые вы должны попробовать использовать, когда скорость интернет-соединения ниже, чем обычно.
Доступ к командной строке
Прежде чем начать, давайте сначала посмотрим, как вы можете открыть окно командной строки с повышенными правами.
Существует много способов доступа к командной строке с правами администратора, и каждый из них зависит от версии Windows. Однако простой и надежный метод — просто набрать cmd строку поиска Windows и щелкнуть правой кнопкой мыши по параметру командной строки .
Теперь выберите « Запуск от имени администратора » из контекстного меню и подтвердите диалоговое окно, чтобы открыть командную строку с правами администратора.
Примечание. Все перечисленные ниже команды лучше всего запускать в командной строке с правами администратора.
1. Обновить IP-адрес
Множество проблем может повлиять на ваш текущий IP-адрес и замедлить работу вашего интернета или браузера. Это может быть конфликт IP или даже проблема на сервере DHCP. К счастью, в большинстве случаев простой сброс IP-адреса — это все, что вам нужно для решения таких проблем.
Вы можете использовать две команды в командной строки, чтобы сначала освободить соединение с текущим IP-адресом, а затем обновить его.
- Введите команду ipconfig /release и нажмите Enter, и появятся несколько больших столбцов текста.
- Введите команду ipconfig /renew и снова нажмите Enter. Эта команда должна сбросить ваш IP-адрес и решить любые проблемы с интернетом, которые могут произойти из-за проблемы с IP-адресом.
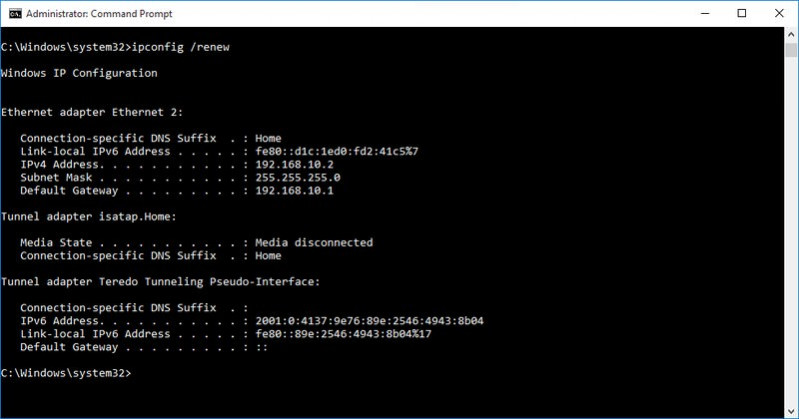
Примечание. Помните, что переназначение того же IP-адреса, что и раньше, является нормальным. Дело в том, чтобы отключить и создать новое соединение.
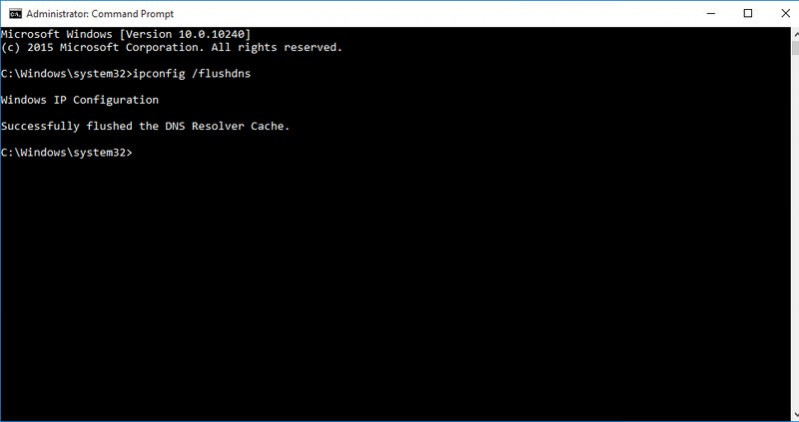
2. Очистить кэш сопоставителя DNS
Ваш ПК хранит список имен хостов и IP-адресов веб-сайтов, которые вы посещаете, и сохраняет его в кэше сопоставителя DNS. Это облегчает создание соединения с веб-сайтом, к которому вы ранее обращались.
Однако существует вероятность того, что любое повреждение кэша сопоставителя DNS может привести к замедлению или отсутствию доступа к веб-сайтам. Он не может замедлить ваш реальный интернет, но может замедлить ваш общий просмотр. Если вы столкнулись с такой ситуацией, вы можете просто очистить кеш DNS распознавателя, чтобы решить эту проблему.
Чтобы очистить кэш сопоставителя DNS, введите команду ipconfig /flushdns и нажмите Enter. Вы должны увидеть подтверждение «Кэш сопоставителя DNS успешно очищен».
3. Сброс Winsock
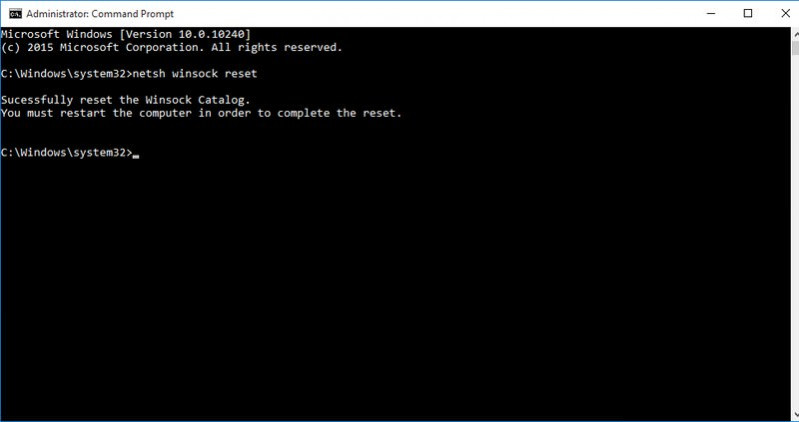
Windows использует несколько сетевых сокетов для обмена информацией, и программы могут устанавливать LSP (многоуровневые поставщики услуг) для управления трафиком и перенаправлять его по правильному пути. Однако любое повреждение в сокетах или зараженный LSP может привести к медленному подключению, перенаправлению веб-сайтов или даже к отсутствию доступа к веб-сайтам.
Если это произойдет, вы можете восстановить сетевые сокеты Windows по умолчанию. Для этого введите команду netsh winsock reset в командной строке и нажмите Enter .
После успешного выполнения вам придется перезагрузить компьютер, чтобы изменения вступили в силу.
4. Используйте команду Netsh
Команда netsh позволяет вам настроить несколько параметров сети, которые напрямую влияют на производительность вашего соединения. Если вашему интернету требуется много времени для подключения к веб-сайтам, вы можете сделать несколько изменений в сети, чтобы ускорить соединение .
Ниже приведены некоторые команды netsh, которые вы можете использовать для ускорения вашего соединения. Помните, что некоторые из этих команд могут не работать на вашем компьютере из-за ограниченной совместимости.
- netsh int tcp set global chimney=enabled
- netsh int tcp set global autotuninglevel=normal
- netsh int tcp set supplemental
- netsh int tcp set global dca=enabled
- netsh int tcp set global netdma=enabled
- netsh int tcp set global ecncapability=enabled
- netsh int tcp set global congestionprovider=ctcp (Для пользователей windows 7)
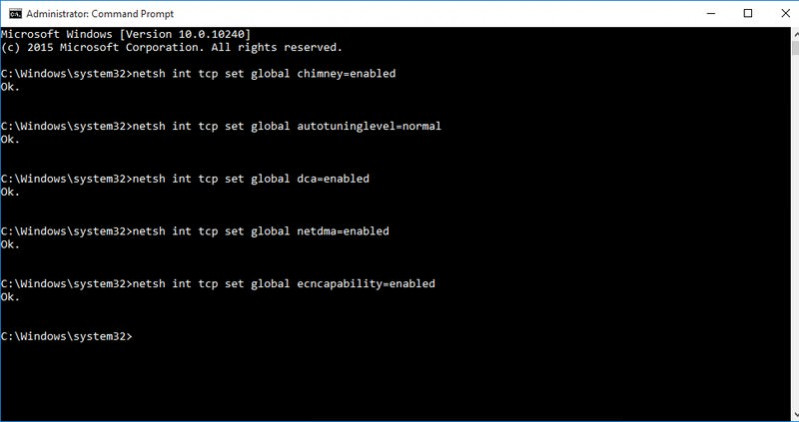
Введите все эти команды, а затем перезагрузите компьютер, чтобы настройки вступили в силу. В большинстве случаев они должны ускорить подключение, а также общую скорость интернета.
Если вы столкнулись с какой-либо проблемой, замените некоторые команды со строкой ebabled на disabled
Например, команда netsh int tcp set global chimney=disabled отключит функцию TCP Offload Engine
5. Ускорение потоковой передачи
Если вы получаете наилучшую доступную скорость интернета, но веб-сайты потокового видео, такие как YouTube, работают медленно, то есть вероятность, что ваш интернет-провайдер ограничивает ваше соединение. Обычно ISP ограничивают потоковую передачу для экономии полосы пропускания. К счастью, простая команда может решить эту проблему.
В командной строке введите указанную ниже команду и нажмите Enter:
netsh advfirewall firewall add rule name=»StopThrottling» dir=in action=block remoteip=173.194.55.0/24,206.111.0.0/16 enable=yes
Эта команда просто добавляет правило в ваш брандмауэр, которое не позволит вашему провайдеру ограничить ваше соединение во время потоковой передачи.
Заключение
Если вы столкнулись с какими-либо проблемами с интернетом, то сначала вам нужно попробовать все вышеперечисленные команды. В большинстве случаев непредвиденное замедление скорости интернета или ошибка доступа к веб-странице обычно вызваны проблемами в этих областях.
Привет.
Сетевая подсистема в Windows NT прошла достаточно длительный путь – изначально являясь сетевой операционной системой, NT сразу ставила задачу предоставлять надежные, сбалансированные и эффективные сетевые решения.
Беда в том, что с точки зрения большинства админов под “настройкой сетевых параметров” понимаются видные глазом базовые минимальные пункты – как задание IP-адреса, маски и шлюза, а даже тот факт, что IP-адресов на интерфейсе может быть несколько, уже вызывает удивление.
Фактически же количество сетевых настроек в Windows NT достаточно велико, и, хорошо зная работу сетевой подсистемы, можно ощутимо улучшить работу ОС. И наоборот тоже. Поэтому данная статья обязательна к ознакомлению тем, кто хочет “покрутить параметры”.
Диспозиция
Я предполагаю, что Вы, товарищ читатель, знаете на приемлемом уровне протокол TCP, да и вообще протоколы сетевого и транспортного уровней. Чем лучше знаете – тем больше КПД будет от прочтения данной статьи.
Речь будет идти про настройку для ядра NT 6.1 (Windows 7 и Windows Server 2008 R2). Всякие исторические ссылки будут, но сами настройки и команды будут применимы к указанным ОС, если явно не указано иное.
В тексте будут упоминаться ключи реестра. Некоторые из упоминаемых ключей будут отсутствовать в официальной документации. Это не страшно, но перед любой серьёзной модификацией рабочей системы лучше фиксировать то, что Вы с ней делаете, и всегда иметь возможность удалённого доступа, не зависящую от состояния сетевого интерфейса (например KVM).
Это – первая часть статьи. Потому что настроек достаточно много. В следующей части я расскажу про другие.
Содержание
- Работаем с RSS
- Работаем с CTCP
- Работаем с NetDMA
- Работаем с DCA
- Работаем с ECN
- Работаем с TCP Timestamps
- Работаем с WSH
- Работаем с MPP
Поехали.
Настраиваем RSS в Windows
Аббревиатура RSS обычно ассоциируется совсем с другим, нежели с настройкой TCP. Хотя, в общем, это у всех по-разному – кто-то PHP с ходу расшифровывает как Penultimate Hop Popping, а кто-то думает, что КВД – это НКВД без первой буквы. Все люди разные. Мы будем говорить про тот RSS, который Receive Side Scaling.
Суть технологии RSS достаточно проста – входящий поток данных сетевого уровня разбивается на несколько очередей, обработка каждой из которых (вызов прерываний, копирование информации) производится выделенным виртуальным процессором (т.е. или отдельным физическим, или ядром). То есть в случае наличия нескольких процессоров Вы можете распределить интенсивный сетевой трафик по ним, снизив количество вызовов прерываний, переключений контекста, очистки кэша и прочих неприятностей, которые, если происходят много тысяч раз в секунду, могут ощутимо навредить производительности системы в целом.
Суть-то простая, да вот в реализации столько тонкостей, что можно написать отдельную статью. Пока это не является целью, поэтому постараюсь описать оные тонкости сжато и компактно 
Для начала необходимо, чтобы сетевая карта умела формировать вышеупомянутые очереди, и умела делать это хорошо. По сути, эта задача требует от сетевой карты функционала, отдалённо напоминающего CEF (который Cisco Express Forwarding) – коммутации 3го уровня с определением и разделением отдельных потоков пакетов. Давайте попробуем разобраться на примере, как и зачем это может работать.
Допустим, у Вас есть быстрый сетевой адаптер (например, 10Гбит), и по нему к Вам приходит много данных. И эти данные хорошо разделяются на много потоков (например, когда мы ведём вебинары, на каждого слушателя идёт почти по десятку TCP-сессий, а слушателей бывает и 40). По сути, все эти потоки данных выглядят потоками только на транспортном уровне, а на сетевом сливаются в общий поток. Это, в общем, и есть работа протоколов транспортного уровня – мультиплексировать потоки данных от различных приложений на различных хостах. Но от этого нашей принимающей стороне не легче – ведь ей надо из входящего потока сформировать:
- Отдельные сессии TCP – т.е. для каждой поддерживать session state, буферы данных, состояние cwnd/rwnd, состояние sack’ов и ack’ов вообще
- Отдельные буферы для каждого фрагментированного IP-пакета
- Отдельные очереди (ведь трафик может обладать приоритетами)
И практически каждое событие во всей этой пачке сессий – это вызов прерывания и его обработка. Крайне затратно, особенно учитывая, допустим, негативный сценарий (10 гигабит поток, ip-пакеты по 1КБ). Можно даже сказать проще – ощутимое количество процентов мощности процессора (весьма дорогого, заметим) уйдёт на решение этих задач тех.обслуживания. Как с этим бороться? Да просто – пусть адаптер формирует отдельные очереди пакетов – тогда на каждую из них можно “привязать” свой процессор/ядро, и нагрузка в плане прерываний и прочего распределится. Но тут нас поджидает неочевидная проблема.
Дело в том, что просто так распределить не получится. Т.е. если мы придумаем очень простой критерий распределения (например, две очереди, четные пакеты – налево, нечетные – направо), то у нас может получиться следующая ситуация – у потоков данных часть пакетов попадёт в “четную” очередь, а часть – в “нечетную”. А в этом случае мы потеряем все возможные бонусы, возникающие при обработке непрерывного потока пакетов (обычно эти бонусы выглядят как “первый пакет обрабатываем по-полной, кэшируем все возможные результаты обработки, и все последующие пакеты обрабатываем по аналогии”). Т.е. нам надо всячески избегать ситуации, когда одному процессору придётся, обрабатывая, например, поток очень однотипных мультимедийных пакетов (какой-нибудь RTP например), пытаться “сбегать почитать” в соседнюю очередь. Скажем проще – никуда он вообще бегать тогда не будет, а придётся тогда нам выключать всяческие ускорения обработки TCP/UDP/IP-потоков, потому что работать они будут только в случае ситуации, когда весь поток однотипных пакетов обрабатывается одним ядром/процессором. А это приведёт к тому, что на процессоры придётся переводить вообще всю нагрузку по обработке сетевых данных, что с гарантией “убьёт” даже достаточно мощный CPU.
То есть, наша задача-максимум – это распределить входящие данные по нескольким отдельным очередям приёма, да так, чтобы потоки пакетов легли в очереди “целиком”, да и ещё желательно, чтобы заполнились эти очереди равномерно. Тогда мы и распределим нагрузку по процессорным ядрам, и не потеряем другие возможности по ускорению обработки потоков пакетов. Для решения этой задачи нам надо будет действовать сообща – и ОС, и оборудованию.
Хороший RSS начинается с сетевой карты. В сетевых картах, которые умеют RSS (а уже понятно, что это не карты минимального уровня), такой функционал есть – например в очень даже недорогой Intel 82576 (в моём случае – встроена в сервер) есть функционал и включения RSS сразу, и выбора количества очередей – 1, 2, 4 или 8.
Почему же количество очередей RSS будет выбираться из целочисленных степеней двойки? Тут начинается интересное, что будет роднить логику работы RSS и, допустим, логику балансировки у etherchannel.
Дело в том, что для того, чтобы определить “принадлежность” пакета к потоку, RSS использует следующую логику – берутся несколько ключевых полей пакета – SRC IP, DST IP, код протокола L4, SRC PORT, DST PORT – и от них вычисляется хэш, по последним битам которого (соответственно, для 2х очередей достаточно и одного бита, для 4х – двух, для 8 – трёх) и определяется принадлежность пакета к буферу. Соответственно, пакеты одного протокола, идущие с одного фиксированного порта и IP-адреса на другой адрес и порт, будут формировать поток и попадать в одну очередь. Такой подход достаточно быстр и прост с точки зрения балансировщика, но, как понятно, никак не решает ситуацию “Есть два стула две TCP-сессии – одна 1% канала занимает, другая 99%”. И даже не гарантирует, что обе эти сессии не попадут (с вероятностью 1/2) в одну и ту же очередь, что вообще превратит всю задачу в бессмыслицу.
Поэтому, в общем-то, остановимся на следующем факте – если у сетевой карты есть поддержка RSS, то её надо как минимум включить, чтобы первичное разделение входящего трафика на несколько очередей, притом с сохранением потоков, происходило без участия CPU.
Ну а вот дальше – уже задача операционной системы – что есть не один, а несколько потоков, и на каждый надо выделить свой процессор или ядро. Это как раз и будет тот самый RSS, который мы будем включать. Он уже будет создавать в драйвере NDIS отдельные очереди и выделять на каждую из них по процессору/ядру.
Нововведением в Windows Server 2008 R2 является то, что этим можно управлять – правда, только через реестр. В частности, управлению будут поддаваться 2 параметра – стартовое количество процессорных ядер, выделяемое для всех RSS-очередей на адаптере, и максимальное количество ядер для данной задачи. Параметры эти будут находиться по адресу HKLMSYSTEMCurrentControlSetControlClassгуид сетевого адаптераномер сетевого адаптера и называться, соответственно, *RssBaseProcNumber и *MaxRSSProcessors.
Пример использования данных параметров – допустим, у Вас есть сервер с 16 ядрами (2 процессора по 8 ядер или 4 по 4 – не суть). Есть три сетевых адаптера – один используется для управления системой, два других – для привязки к ним виртуальных машин. Вы можете выставить указанные параметры только у двух интерфейсов, на которых будет подразумеваться высокая нагрузка, притом следующим образом – поставить RssBaseProcNumber равным 2, а MaxRSSProcessors – например, 12. Тогда тот интерфейс, который будет активнее принимать трафик, сможет “отъесть” до 12 ядер системы на обработку очередей, при этом не надо будет жестко задавать этот параметр вручную (это удобно, если нагрузка переместится на другой интерфейс). Безусловно, в этом примере надо, чтобы сетевые адаптеры тоже поддерживали RSS, и, желательно, хотя бы очередей 8.
Подводя итоги – RSS – это достаточно практичная и нужная технология, требующая поддержку и со стороны оборудования, и со стороны операционной системы. И становящаяся всё более актуальной, так как на данный момент скорости сетевых интерфейсов растут, равно как и количество процессорных ядер, а, следовательно, старый подход, когда одно ядро “разгребает” единую входящую очередь, становится всё менее эффективным.
Как включить RSS в Windows
netsh interface tcp set global rss=enabled
Настраиваем логику алгоритма контроля перегрузки (CTCP) в Windows
Compound TCP – это Microsoft’овский протокол управления “окном перегрузки” (congestion window). Адресно предназначен для форсированного изменения окна при работе в сетевых средах с относительно большой задержкой (например, по WiMax или спутниковым каналам). Соответственно, не сильно полезен в сценарии широкополосного доступа в Интернет или работе по локальной сети.
По сути, всё, что он делает, это форсирует быстрое увеличение окна со стороны отправителя в случае, если обнаруживается, что сеть имеет малое время отклика, и быстро уменьшает окно в случае задержек на канале.
Как включить CTCP в Windows
netsh interface tcp set global congestionprovider=ctcp
Настраиваем использование NetDMA в Windows
NetDMA – достаточно интересная функция. Смысл её применения есть тогда, когда у Вас не поддерживается Chimney Offload и Вы хотите ускорить обработку сетевых подключений. NetDMA позволяет копировать без участия CPU данные (в общем, как и любой DMA-доступ) из приемных буферов сетевого стека сразу в буферы приложений, чем снимает с CPU данную задачу по тупому выполнению чего-то типа rep movsd.
Говоря проще, если Ваша сетевая плата не может “вытащить” на себя полную обработку TCP-соединений, то NetDMA хотя бы разгрузит процессор от самой унылой части задачи по обслуживанию сетевых соединений – копированию данных между сетевой подсистемой и использующими её приложениями.
Что нужно для включения NetDMA в Windows
Нужно оборудование, которое поддерживает NetDMA – в случае Windows это процессор с поддержкой технологий семейства Intel® I/O Acceleration Technology (I/OAT), которые, в свою очередь, входят в Intel Virtual Technology for Connectivity (VT-c). Включение NetDMA на оборудовании AMD эффекта, увы, не принесёт – не поверив, проверил на домашнем феноме 1055T – действительно, NetDMA не включается.
Как включить NetDMA в Windows
Локально:
netsh interface tcp set global netdma=enabled
Через Group Policy:
Откройте ключ HKEY_LOCAL_MACHINESYSTEMCurrentControlSetServicesTcpipParameters, создайте в нём параметр EnableTCPA вида 32bit DWORD и поставьте его в единицу
Секретный уровень
Если Вы дочитали до этого места, то дальше не читайте – опасно. Но вообще, в том же ключе – HKEY_LOCAL_MACHINESYSTEMCurrentControlSetServicesTcpipParameters – есть параметр MinPacketSizeToDma, тоже типа 32bit DWORD, который, что и логично, исходя из его названия, указывает минимальный размер пакета, для которого имеет смысл инициировать DMA-передачу. Параметр данный выставляется автоматически и его тюнинг имеет слабый практический смысл – т.е. в принципе можно представить ситуацию, когда система поставит слишком малый параметр, и будет слишком часто переключаться на DMA, а Вы это поправите вручную, но очень слабо могу представить себе КПД этой операции – выяснять сие путём достаточно кропотливых синтетических тестов, чтобы выиграть призрачные доли процента на единственной операции в единственной подсистеме, притом доли эти будут укладываться в погрешность измерений, весьма уныло.
Настраиваем использование DCA (прямого доступа к кэшу NetDMA) в Windows
По сути, Direct Cache Access – это дополнение к NetDMA, которое появляется только в NetDMA 2.0 и является опциональным (т.е. факт наличия NetDMA не говорит о том, что DCA будет работать). Задачи, которые решает DCA, просты – он “привязывает” конкретную сетевую сессию к определённому ядру процессора, и позволяет копировать данные не по трассе “сетевой интерфейс”->”оперативная память”->”кэш процессора”, а напрямую с сетевого интерфейса в кэш процессора. В ряде сценариев (быстрая сеть и много сессий и ядер CPU) выигрыш может быть ощутимым – судя по исследованиям IEEE за 2009й год, в случае загруженной на ~80% 10Gbit сети плюс 12ти ядер нагрузка CPU падает примерно на треть.
Технология работоспособна для гигабитных и более быстрых сетевых адаптеров. И, как понятно, имеет смысл только в случае, когда сетевой адаптер не умеет Chimney Offload (что, в общем-то, уже достаточно сложно – в случае наличия нагрузки, при которой DCA эффективен, обычно используются сетевые адаптеры, которые на аппаратном уровне умеют обрабатывать TCP).
Кстати, интересный момент – DCA есть в Windows Server 2008, но не работает в Vista. В NT 6.1 работает везде, включая Windows 7.
Как включить DCA в Windows
Предварительно – обязательно включить NetDMA.
Локально:
netsh interface tcp set global dca=enabled
Через Group Policy:
Откройте ключ HKEY_LOCAL_MACHINESYSTEMCurrentControlSetServicesTcpipParameters, создайте в нём параметр EnableDCA вида 32bit DWORD и поставьте его в единицу
Настраиваем уведомления о перегрузке (ECN’ы) в Windows
Технология ECN в явном виде относится и к IP, а не только к TCP, но все равно про неё стоит тут написать.
Протокол IP изначально не особо любил технологии класса Quality of Service – QOS, поэтому в заголовке IPv4 выделен байт с целью “использовать для целей управления качеством”. Притом этот байт может содержать данные в разных форматах, и то, как его интерпретировать, решает конкретный хост. Используется два возможных формата данного байта – DSCP (он же DiffServ) и IP Precedence. По умолчанию этот байт (называющийся ToS – Type of Service) обрабатывается как IP Precedence и представляет собой копию данных канального уровня (в него копируются три бита от CoS – Class of Service, которые передаются в 802.3 кадре в составе 802.1p компонента заголовка 802.1Q).
Но нас будет интересовать ситуация, когда в заголовке IP-пакета – в поле ToS, разумеется – данные интерпретируются в формате DSCP. В этом случае на номер класса трафика отдаётся 6 бит (что даёт возможность сделать в организации 2^6 = 64 класса трафика и удобно управлять приоритетами), а оставшиеся 2 бита отдаются как раз на сигнализацию о “заторах”.
Говоря проще, если у промежуточного устройства буфер пакетов близок к перегрузке, то оно сигнализирует Вам, отправляя служебный пакет на IP отправителя, что “пакеты скоро будет некуда девать и придётся их выбрасывать, притормози”. Отправляет их, выставляя как раз специфические биты в поле ToS. Соответственно, включая поддержку данной технологии, Вы будете включать и возможность генерации подобных пакетов, и возможность анализа оных.
Простейший пример ситуации, в которой это поможет – на пути Вашего трафика стоит маршрутизатор, который в Вашу сторону смотрит интерфейсом со скоростью 1 Gbit, а дальше – интерфейсом со скоростью 100 Mbit. Если Вы будете отдавать ему трафик с максимально возможной скоростью, то его очередь пакетов, пытающихся “выйти” через интерфейс со скорость 100 Mbit, очень быстро переполнится, и если он не сможет Вам об этом сказать (ну или если Вы не включите со своей стороны возможность услышать эти сообщения от него), то ему придётся просто в определённый момент перестать принимать пакеты, сбрасывая их. А это приведёт к тому, что начнётся потеря данных, которые надо будет восстанавливать – а служебный трафик при восстановлении данных достаточно значителен. Т.е. гораздо проще передать чуть медленнее, чем потерять много пакетов и выяснить это на уровне TCP-подключения, после чего запрашивать их повторно, теряя время и тратя трафик.
Кстати, проверить поддержку ECN ближайшим маршрутизатором можно бесплатной утилитой Internet Connectivity Evaluation Tool.
Как включить ECN в Windows
netsh interface tcp set global ecn=enabled
Настраиваем TCP Timestamps (по RFC 1323) в Windows
TCP Timestamps – базовая низкоуровневая технология, которая позволяет стеку TCP измерять два важных параметра для соединения: RTTM (задержку канала) и PAWS (защита от дублирующихся TCP-сегментов). В случае, если TCP Timestamps не включены хотя бы с одной стороны подключения, оба механизма вычисления этих параметров отключены и система не может высчитать данные значения. Это приводит к тому, что становится невозможным быстро и эффективно менять размер окна TCP (без знания времени задержки на канале-то). Поэтому включать TCP Timestamps в случае работы с большими объёмами данных (например, обращение к быстрому серверу в локальной сети – типовой сценарий корпоративной LAN) необходимо – ведь иначе протокол TCP не сможет быстро “раскачать” окно передачи.
Как включить TCP Timestamps в Windows
netsh interface tcp set global timestamps=enabled
Побочные эффекты включения TCP Timestamps в Windows
Практически не наблюдаются. Рост локальной загрузки CPU отсутствует, т.к. алгоритм достаточно прост, рост объёмов служебного трафика – так же (RTTM высчитывается, исходя из “времени оборота” обычных сегментов TCP, а не каких-то специальных дополнительных).
Настраиваем автоматический подбор размера окна TCP (WSH) в Windows
Данный параметр достаточно прост. Эта настройка – Window Scale Heuristic – говорит о том, будете ли Вы сами выбирать логику поведения протокола TCP для выбора размеров окна, либо отдадите это на усмотрение операционной системе.
То есть при включенном алгоритме WSH вышеупомянутый тюнинг окна TCP – выбор между disabled/highlyrestricted/restricted/normal/experiemental – будет делаться автоматически и Ваша настройка параметра autotuninglevel будет просто игнорироваться. При просмотре будет появляться служебное окно с текстом "The above autotuninglevel setting is the result of Windows Scaling heuristics overriding any local/policy configuration on at least one profile".
Как включить Window Scaling Heuristic в Windows
netsh interface tcp set heuristics wsh=enabled
Настраиваем базовую безопасность TCP (параметр Memory Pressure Protection) в Windows
Данная функция предназначена для защиты от достаточно известной атаки – локального отказа в обслуживании, вызванного тем, что удалённый атакующий инициирует множество TCP-сессий к нашей системе, система выделяет под каждую сессию буферы и оперативная память, возможно, заканчивается (ну или просто забивается до степени, когда начинается свопинг и производительность ощутимо падает.
Параметр включен по умолчанию в Windows Server 2008 R2, поэтому обычно нет смысла его настраивать, но если что – Вы можете его включить вручную. Более того, Вы можете выбрать, на каких портах эту защиту включать, а на каких – нет. Это имеет смысл, если доступны снаружи лишь некоторые порты, а не все.
Как включить Memory Pressure Protection в Windows
netsh interface tcp set security mpp=enabled
Включение MPP для отдельного порта (например, у нас наружу опубликован веб-сервер)
netsh int tcp set security startport=80 numberofports=1 mpp=enabled
Выключение MPP для всех портов, кроме указанного (например, кроме LDAP)
netsh int tcp set security startport=1 numberofports=65535 mpp=disabled
netsh int tcp set security startport=389 numberofports=1 mpp=enabled
netsh int tcp set security startport=636 numberofports=1 mpp=enabled
Дополнительно
На самом деле, можно включать или выключать MPP для протоколов IP разных версий отдельно, а не глобально для всех. Для этого будут два ключа реестра с предсказуемыми названиями:
HKEY_LOCAL_MACHINESYSTEMCurrentControlSetServicesTcpipParametersEnableMPPHKEY_LOCAL_MACHINESYSTEMCurrentControlSetServicesTcpip6ParametersEnableMPP
Параметр EnableMPP в каждом из случаев имеет тип 32bit DWORD и ставится либо в единицу, либо в нуль.
Вместо заключения
Данный краткий обзор части возможностей настроек сетевой подсистемы Windows имеет собой цель не побудить к немедленной правке всего вышеупомянутого, а показать то, что в данной ОС присутствует достаточно много инструментов тюнинга, хорошее знание которых может очень позитивно повлиять на работу системы. Только надо учитывать, что хорошее знание – это не “какая утилитка какие ключики правит”, а в первую очередь – отличное знание базовых сетевых технологий, которое, увы, сейчас в сообществе специалистов по Windows встречается крайне редко. Но я верю, что у Вас, при надлежащем системном подходе, всё будет хорошо.
UPDATE
Написал вторую часть статьи.