Today the world is driven by the Internet and has become an inevitable part of daily life. Be it, doing work on the computer, social networking, or entertainment, everywhere the internet is needed. When it comes to the internet, the most important thing is the internet speed. The more your internet speed, the better will be the experience.
If you are facing any issue while accessing the internet then just call your Internet Service Provider (ISP) and ask to increase the internet speed. It seems easy, right? Yes, it’s easy and your ISP will be happy to do that but here is the twist; he will not do it freely. You need to spend extra bucks to get better internet speed.
So, what’s the solution?
First, identify how much internet speed you really need. Generally for online streaming of the videos 5 – 10 Mbps is sufficient and if you are playing online games then 10 Mbps is enough. Of course, if you are using 4K or HDRR for streaming then you will need more internet speed.
If your ISP is saying that he is already providing the required amount of speed and still you are facing the issue, then it’s time to look into your system. Instead of paying more money for internet speed, first, try to optimize your current internet bandwidth usage to boost internet speed on your computer.
We have shared 15 different ways which will help you to optimize your internet usage and will increase your internet speed on a Windows 10 computer. However, you can use these tricks on other versions of Windows as well with minor tweaks.
1. Increase internet speed on Windows using command prompt
If your internet is taking longer than usual to access data from the internet then it’s always recommended to check network configuration.
Windows has provided some default utilities that you can run using Command Prompt to view and modify network configuration.
Here are 15 methods you can use to tweak your network configuration which will improve your internet speed almost instantly.
Method 1: Use Netsh (Network Shell) command-line utility

Step 2: List TCP Global Parameters
Type below command in the command prompt screen and hit enter
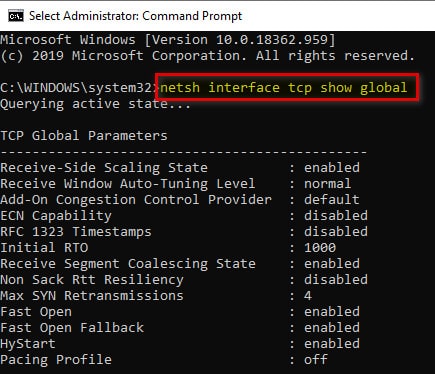
netsh interface tcp show global
It will display all TCP Global Parameters
Step 3: Enable Direct Cache Access (DCA)
By default, Windows disables Direct Cache Access as all the motherboards do not support DCA.
Type the below command in the cmd screen to enable DCA and hit Enter.
netsh interface tcp set global dca=enabled
You will receive an OK message after the successful execution of the command.
Step 4: Enable netdma
Enabling netdma will allow network adapters to transfer data directly to your applications.
Type the below command to enable netdma and press Enter.
netsh interface tcp set global netdma=enabled
You will receive an OK message after the command is executed.
Step 5: Set windows auto tuning level
By default, Windows enables the auto tuning feature that improves TCP data transfer over the network.
If it is disabled then enter the following command to enable the Auto Tuning feature.
netsh interface tcp set global autotuninglevel=normal
Note: Here, the parameter normal means enabled.
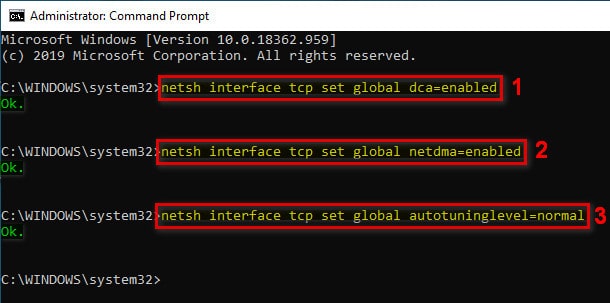
You will receive an OK message after the command is executed.
Step 6: Display TCP Window Scaling Heuristics parameters
If this parameter is enabled then Windows Auto-Tuning Level automatically sets to restricted or highly restricted. Heuristics overrides custom configuration and restricts Windows to go beyond its default value. This ultimately downgrades your internet speed.
First, check whether Windows Scaling Heuristics is disabled or not by typing the following command in the command prompt.
netsh interface tcp show heuristics
If it is enabled then go to step 7.
Step 7: Disable Window Scaling Heuristics
copy and run the below command in the cmd window.
netsh interface tcp set heuristics disabled
You will get an OK message after the command is executed.
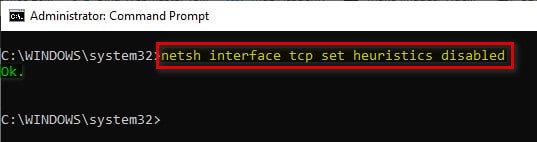
To apply these changes, restart your computer.
Read also: Turn off Windows S mode
Method 2: Pinging default gateway
Default gateway is an access point for other networks. When the IP address of another network doesn’t match with the routing node in the network, they get routed to the default gateway node. Pinging the default gateway determines the ability of the host computer to communicate with nodes in the network.
Follow below steps to identify and ping default gateway of your network
Step 1: Run the command prompt in administrator mode
Open command prompt in administrator mode by selecting cmd → Right Click → Run as Administrator.
Step 2: Identify Default Gateway
Input ipconfig in command prompt and press enter.
- If you are using an ethernet connection then you will see the default gateway under “Ethernet adapter Local Area Connection”.
- If you are using Wireless connection then you will find the default gateway under “Wireless LAN adapter Wireless Network Connection”.
Step 3: Ping Default Gateway
Type following command and hit Enter
Ping -t <your_default_gateway_address>
e.g. ping -t 192.168.11.22
Note: Do not close the window, minimize it. You can do this activity daily and observe the change in internet speed.
Method 3: Reset Windows Network Socket
Winsock is a Windows Socket API (WSA) that defines information exchange between Windows network software and TCP/IP network services.
If you are facing network or internet connection issues on Windows 10 then using winsock utility, you can reset Windows network socket to default configuration.
Step 1: Open Command prompt in admin mode
Open command prompt in administrator mode by selecting cmd → Right Click → Run as Administrator.
Step 2: Execute winsock
Type the below command in the command prompt and press Enter.
netsh winsock reset
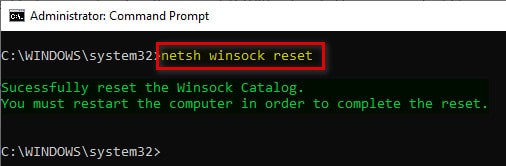
You will receive the“Successfully reset the Winsock Catalog” message and you need to restart your computer in order to complete the reset.
Method 4: Flush DNS Cache
DNS Stands for the Domain Name System. DNS cache stores the domain name and IP address of the recently visited websites on the local machine. Next time, if you want to visit the same website then the network will take values from DNS cache and will fetch the required webpage. It helps to get results faster.
But if domain name becomes unavailable or if there is a change of websites IP address then the stored information in the DNS cache becomes redundant. So it’s better to clear the DNS cache from time to time to improve network or internet performance.
Here are a few simple steps to clear DNS cache on your computer.
Step 1: Run the command prompt in administrator mode
Open command prompt in administrator mode by selecting cmd → Right Click → Run as Administrator.
Step 2: Execute flushdns command
Type ipconfig/flushdns command in command prompt and hit enter.
A message “Successfully flushed the DNS Resolver Cache” appears after the execution.
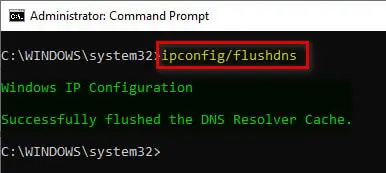
Exit the command prompt and check your internet speed.
Method 5: Renew IP Address
There are different factors that may affect the current IP address of the system. This can slow down your internet browsing and downloading speed. If the above methods do not resolve your internet speed issue then it’s time to try renewing your computer’s IP Address.
For renewing the IP address, you must release the existing IP address connection then go for the renew steps.
Keep in mind, renewing the IP address may assign the same IP address again but don’t worry. The main purpose is to disconnect existing connections and connect again.
Step 1: Open Command prompt in admin mode
Open command prompt in administrator mode by selecting cmd → Right Click → Run as Administrator.
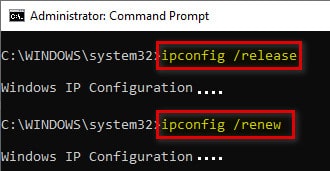
Step 2: Release existing IP address connections
Type following command in command line
ipconfig /release
Step 3: Renew Windows IP Address
Type following command and hit enter
ipconfig /renew
Read also: 15 ways to Fix Err_Network_Changed in Chrome on Windows 10/8/7 and Android
2. Change DNS Servers
When you take an internet connection, your Internet Service Provider (ISP) gives you DNS servers IP addresses. By default Dynamic Host Configuration Protocol (DHCP) configures your system to use the DNS server provided by your ISP.
Sometimes these DNS servers provided by ISP won’t give you the internet speed as expected. However, you can use other DNS servers such as Google Public DNS Server or Open DNS Server for better performance.
Here are the steps to change the DNS server.
Step 1: Open Control Panel
Step 2: Go to Network & Internet
Step 3: Select the Network and Sharing Centre
Step 4: On the left side select Change Adapter Settings
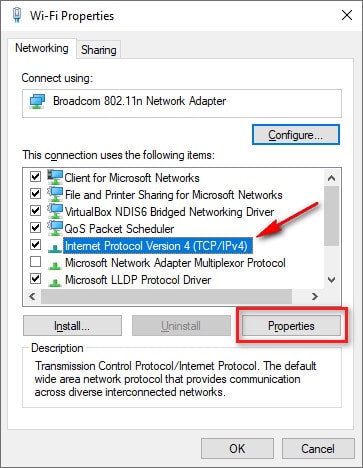
Step 5: Select Network connection → Right-Click → Properties
In the Networking tab select Internet Protocol Version 4 (TCP/IPv4) network connection and click on properties button.
Step 6: Select “Use the following DNS server address” radio button to assign DNS servers
Enter required values and click OK.
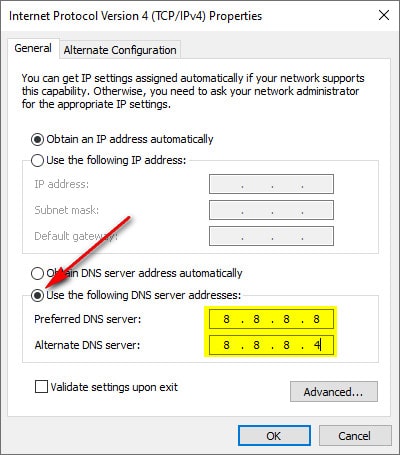
- For Google Public DNS Server use following values
Preferred DNS Server: 8.8.8.8
Alternate DNS Server: 8.8.8.4
- For Open DNS Server use following values
Preferred DNS Server: 208.67.222.222
Alternate DNS Server: 208.67.220.220
You can also try using other DNS servers and check whether it improves internet speed on your computer.
3. Modify Reservable Bandwidth and Outstanding Packets settings using Group Policy Editor
Before modifying these settings first understand, what is Reservable Bandwidth and Outstanding Packets in windows configuration.
Reservable Bandwidth:
By default Windows 10 reserves some percentage of bandwidth for system applications and operations. You cannot use that percentage of bandwidth for general purposes. By reducing the reserved bandwidth we can allocate more bandwidth for general use.
This will boost internet speed.
Outstanding Packets:
Over the internet, data is transmitted in the form of packets. Packet Scheduler schedules the transmission of packets over the network. Outstanding packets are the number of packets that have not been sent yet on the network.
When the number of Outstanding Packets reaches its permissible limit then Packet Scheduler postpones all the packets submission until the number falls below the permissible limit. This slows down the internet speed. To avoid this set Outstanding Packets limit to the maximum.
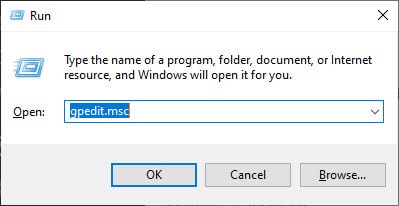
Step 1: Open Group Policy Editor Press Windows + R or Search Run command from Windows search bar and enter gpedit.msc and click OK.
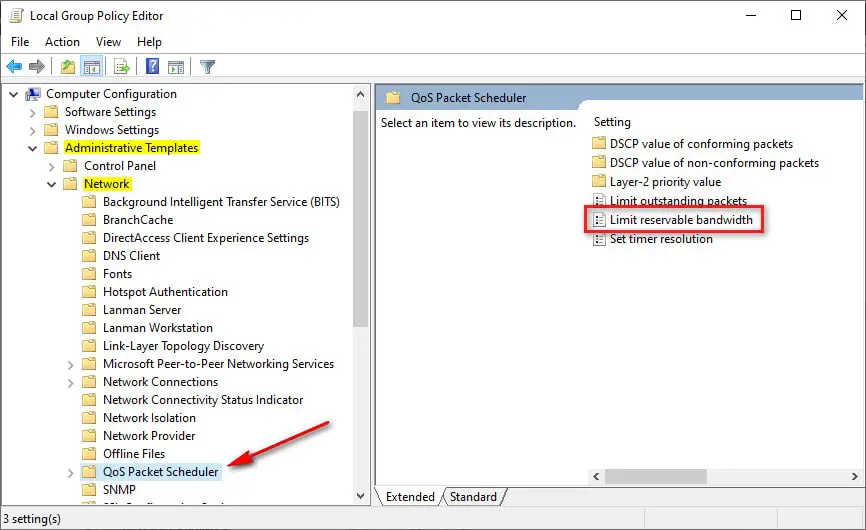
Step 2: Open QoS Packet Scheduler settings
In the Local Group Policy Editor expand to QoS Packet Scheduler and select Limit reservable bandwidth as shown below.
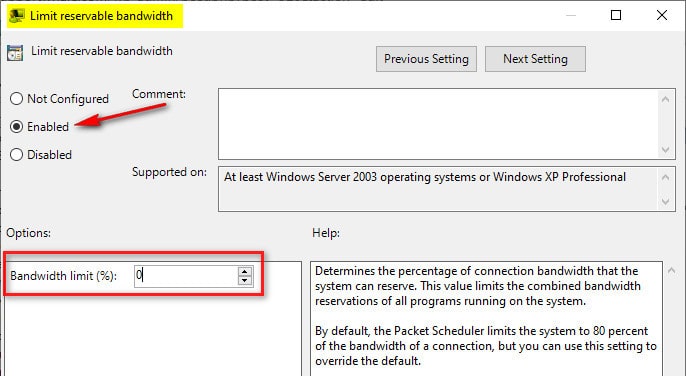
Step 3: Change reservable bandwidth limit
In the Next Settings tab select Enabled radio button and set Bandwidth Limit (%) to 0
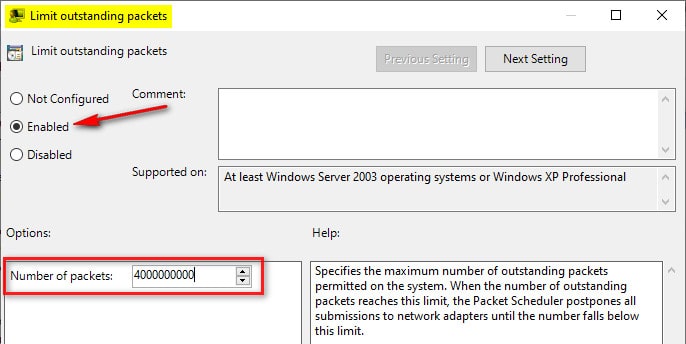
Step 4: Change Outstanding packets limit
Similarly open the “Limit outstanding packets” policy and select Enabled radio button
In the Number of Packets section, enter 4000000000 and click on OK button
Close the group policy editor.
4. Disable background applications
Background applications also consume a significant amount of bandwidth that slows down your internet speed.
It’s always a good practice to disable background applications that you are not using. Background applications like Torrent, Antivirus, and Cloud sharing applications eat out internet bandwidth. Enable these applications, only when needed otherwise disable those using the following steps.
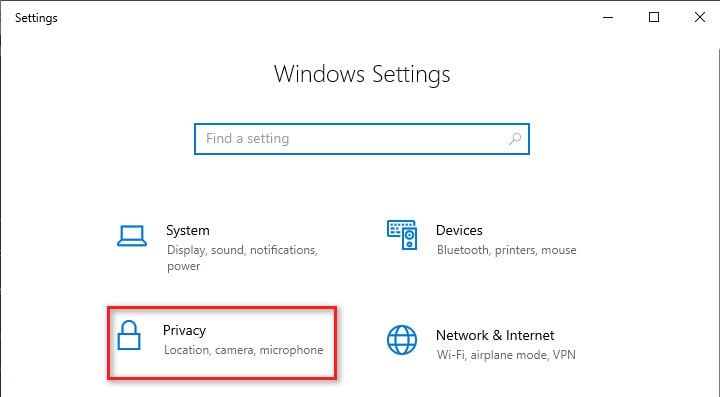
Step 1: Open Windows Settings and click on Privacy as shown below
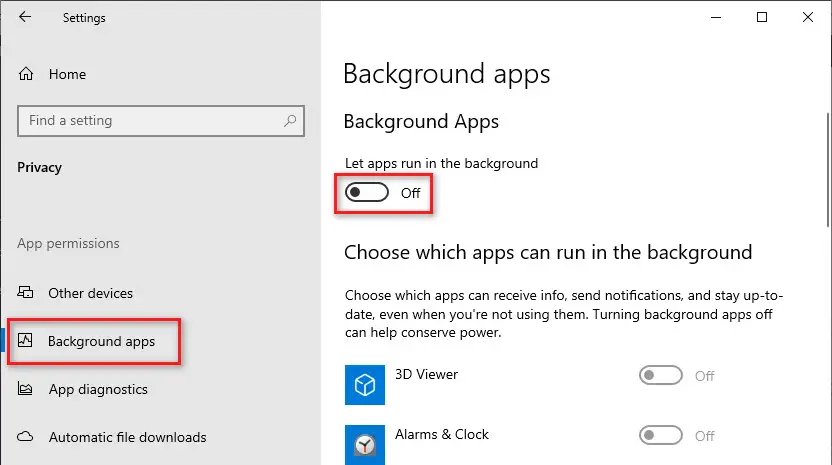
Step 2: Select Background Apps from left side and Turn off Background apps in right side
Use can also enable required apps that you want to keep running in the background
5. Disable Windows Updates
Windows 10 consumes a large amount of bandwidth for regularly updating Windows applications. This slows down your internet speed.
It’s always recommended to install the latest Windows updates. But you can install Windows updates manually also when you are not doing any other work over the internet.
So if you want to utilize maximum internet speed then disable automatic Windows update and install the latest Windows update manually when you are not consuming data for other usages.
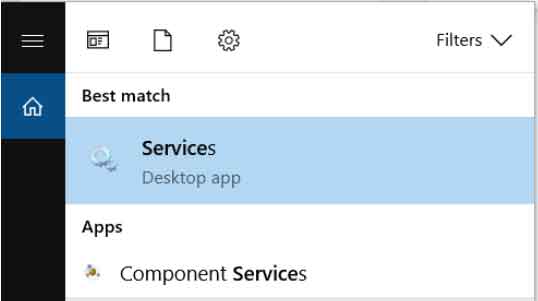
Step 1: Open Service Manager Window
Type Services in the Windows search bar and select services to open services manager window.
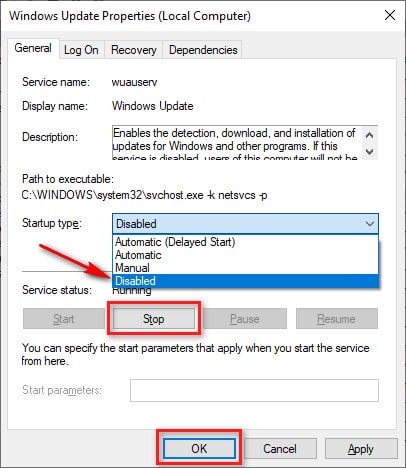
Step 2: Disable Windows Update Service
Search for “Windows Update” service and open the properties window by double clicking on it. The Service Properties window will open.
Stop the service. Also, from the Startup type drop down list, select Disabled to disable it completely.
Click OK to save your preference and close the pop up.
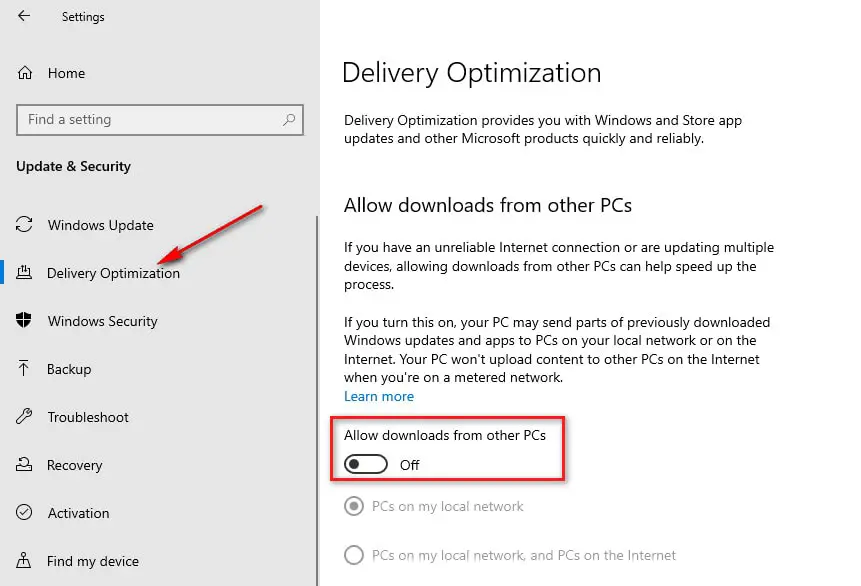
6. Disable or Limit Downloading and Uploading from other Computers
Windows has a Delivery Optimization Feature that downloads updates from other computers available on the local network or from the internet. It also uploads updates on the other computers of the local network.
For data exchange over the peer-to-peer network, a Windows 10 computer uses your internet connection. Though this feature keeps the system updated, it slows down your internet speed.
If you want to utilize the maximum bandwidth of your internet to increase internet speed, then disable this function or reduce the default bandwidth assigned for this functionality.
Here is a step by step procedure to get better internet speed in both ways.
a. Disable Downloading from other computers
Step 1: Go to the Windows search bar. Search and Open Windows Settings.
Step 2: Select Update & Security in Windows setting panel.
Step 3: From the left panel, select Delivery Optimization.
Step 4: Turn Off the “Allow downloads from other PCs” toggle switch.
b. Limit Downloading and Uploading from other computers
If you want to enable the above option and limit the download and upload setting, here are the steps to do so.
Step 1: While the “Allow downloads from other PCs” is on, select “PCs on my local network and PCs on the Internet” option.
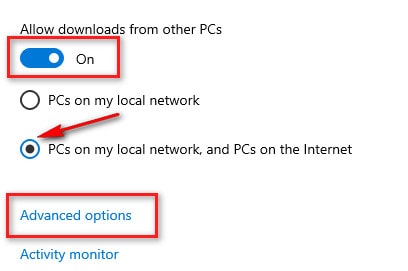
Step 2: Click on Advanced options.
Modify Settings as per your convenience in the advanced option panel by selecting the check box and updating the values.
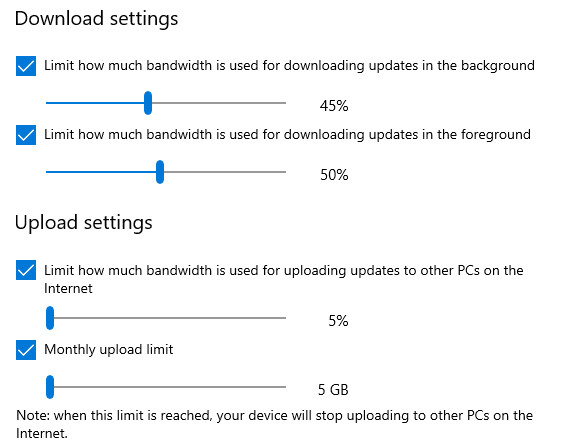
- In the Download Settings, select the checkbox of “Limit how much bandwidth is used for downloading updates in the background”. Use the slider to adjust bandwidth.
- In the Upload Settings select checkbox of “Limit how much bandwidth is used for uploading updates to other PCs on the internet”. Use the slider to reduce bandwidth
You can also set a Monthly Upload limit as well. Upon reaching the limit, the computer will stop uploading the updates.
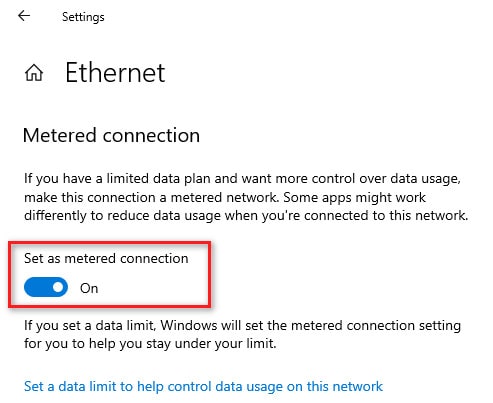
7. Enable Metered Connection
If you are using a limited internet connection plan, then it becomes necessary to control data usage by background applications. By configuring the network adapter, you can control downloading and uploading updates on PCs connected to the network or over the internet which in turn helps to increase internet speed on Windows 10 machines.
Follow below steps to configure your network adapter for metered connection.
Step 1: Open Windows Settings.
Step 2: Click on Network & Internet.
Step 3: Select Ethernet and Click on the Network connection.
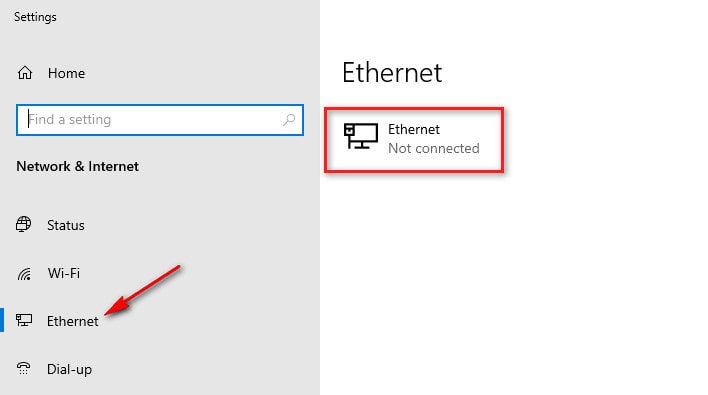
Step 4: In the Metered Connection panel turn on “Set as metered connection” toggle switch.
8. Disable Large Send Offload
Large Send Offload (LSO) restricts TCP from breaking large data packets into a series of smaller packets. Keep in mind that this feature is dependent on the network adapter. Some network adapters don’t support this feature. If your network adapter does not support this feature then you will not see it on the list.
Step 1: Open Device Manager.
Step 2: Expand Network adaptors and double click on your network adaptor.

Step 3: Click on Advanced Tab
Step 4: Search and Select Large Send Offload v2 (IPv4) and select Disabled value from the dropdown option.
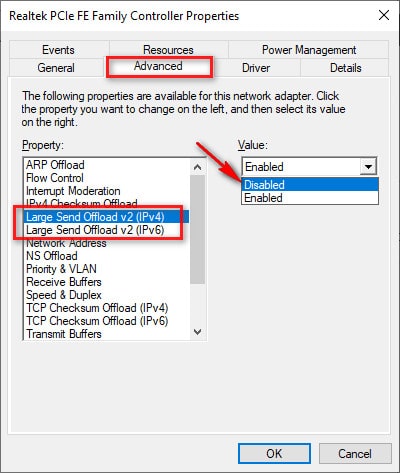
Step 5: Repeat same for Large Send Offload v2 (IPv4) and click OK.
9. Uninstall OneNote Application
Microsoft OneNote application lets you create and store notes in an electronic notebook. You can also store audio clips from the internet and web pages.
OneNote Application keeps synchronizing whenever your computer is connected to internet connection. That slows down your internet speed. Uninstall Microsoft OneNote application using control panel to speed up your internet connection.
10. Update LAN or Ethernet Drivers
Outdated, corrupted, or incompatible driver software can cause limited connectivity or bandwidth issues. Make sure to download and update the latest driver software from trusted sources.
If you are using Wi-Fi on your computer, then use the latest updated Wi-Fi adaptor software. It will not increase internet speed blazingly but it will resolve if there is any connectivity issue and you will be able to use full bandwidth.
Step 1: Go to Device Manager.
Step 2: Expand Network Adapter and select your network adapter.
Step 3: Right-click on the selected adapter and click on Update Driver Software.
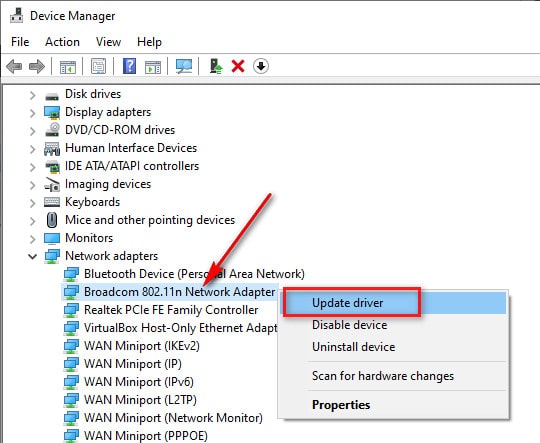
Restart your computer after updating the driver software.
11. Optimize Internet Browser
For accessing anything on the internet you need an Internet browser. If your internet browser is slow then it definitely impacts your internet activity. So always optimize and update your internet browser for better internet experience.
Follow the below activities to optimize your internet browser.
Remove Browser Extensions
When you open the browser, the extensions start synching with respective extension sites for updates. Though it’s a good practice, it slows down your browser speed. So it’s recommended to remove unnecessary extensions.
Remove Bookmarks
Internet users have a habit of adding bookmarks of websites that we frequently visit. It provides ease of use but we forget to remove these bookmarks when they are no longer needed. Those additional bookmarks consume space and make the browser slow.
So remove unnecessary bookmarks from whatever browser you are using.
Clear Browser Cache
When you visit any website then the browser stores some of that website’s information in the browser cache. If you accept website cookies then the website creates some files in your browser cache. This helps the web page open faster during your next visit.
But if you don’t visit those websites frequently then these files are unnecessary and slows down browser experience. So it’s good practice to clear browser cache from time to time.
12. Delete Temp files and cached files
Windows services, system applications, and almost all other software applications create some temporary files while executing some operations. These files get stored in Temp Folder on your local drive.
You might have guessed already, the “Temp” folder is used to store temporary files. When you reboot the system, Windows automatically deletes these temporary files. But some files won’t get deleted and unnecessarily consumes disk space which slows down system performance. The best practice is to delete these temporary files frequently for better system experience.
There are different ways to clear or delete these temporary files.
Method 1: Delete Temp files manually
Go to Windows Search bar and search Run or Press Windows + R
Type %temp% and click OK.

It will list all the temporary files. Select all files and press Shift + Delete to permanently delete these files.
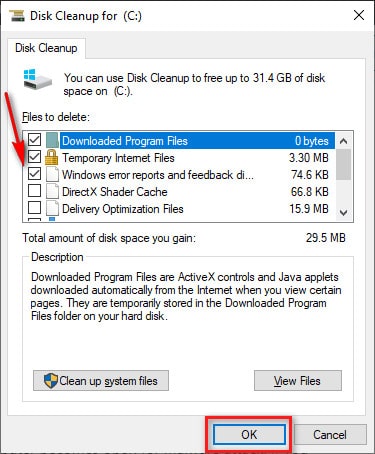
Method 2:Use Disk Cleanup
In the Windows search box type disk cleanup and select Disk Cleanup from the list
- Select the drive/file you want to clean and click OK.
- Select Temporary files to delete and click OK.
13. Scan for virus
When you use an internet connection on your computer, the computer becomes open for malware attacks. If you are not using any antivirus software then these malware attacks can do serious damage to your system files and can also steal private documents.
If some malware is present in your computer or laptop then it slows down system performance. So it’s recommended to use a premium antivirus to protect your computer. And scan your system with antivirus from time to time to detect and remove malware and viruses.
14. Secure your Wi-Fi connection
If you are using Wi-Fi for internet connection then secure your connection with a high-security password. If you don’t provide any password to your connection then anyone can connect to it and can access the internet.
If multiple devices are connected to a single internet connection, it will slow down your internet speed. So, don’t share this password and keep changing the password from time-to-time.
15. Reconnect the Router
If you are using a Wi-Fi router for internet connection then try to reconnect the router. Remove the power supply from the router and also remove data cable. Wait for 10 – 15 seconds and plug-in the internet cable again.
Most of the time this will resolve the slow internet connection issue.
That’s it. These are all the possible ways to increase internet speed on Windows 10 computer. Do let us know in the comments which way worked for you in boosting the internet speed.
Cheers !!!

Shortcuts
TCP/IP tweaks for Windows 8,10,2012,2019 Server to speed up your broadband internet
2014-12-12 (updated: 2022-08-15) by
Tags: CTCP, Windows 8, TCP/IP, PowerShell, tweaks, Chimney Offload, TCP Window, ICW, netsh, DCA, Windows 10, RWIN

The TCP/IP speed tweaks below work with Windows 8, 10, 2012/2019 Server. The Windows 8/10 TCP/IP implementation shares many traits with earlier Windows versions, however, there are many subtle differences and updates, new syntax for applying tweaks using PowerShell cmdlets, and some new settings. Windows 10 generally works well by default for many broadband connections, yet there is always some room for improvement and we will try to cover all relevant settings and their effect on your connection in detail below.
To run some of the outlined commands, you will need to use an administrator account. With earlier Windows versions, we used the netsh command in elevated command prompt to tweak most of the TCP/IP settings. With the introduction of Windows 8/Server 2012, some of those parameters are only tweakable by using the Windows PowerShell, that is why we will be using it for settings when possible. Note that netsh and other DOS commands are still available under PowerShell , just as with Command Prompt.
The settings outlined bellow work with Windows 8, 8.1, Windows 10, Creators Update, Windows Server 2012, and Server 2019 (with only minor syntax differences). If you’d rather use our free software to apply all those settings, try the SG TCP Optimizer (v.4).
Windows PowerShell
The Windows PowerShell is a tool developed by Microsoft designed to replace and extend the functionality of the command prompt. It allows you to run all DOS commands similarly to command prompt, however, it also provides additional functionality in the form of many customizable commands called cmdlets. We will be using PowerShell to tweak TCP/IP settings, as some of the parameters are no longer tweakable using command prompt netsh in Windows 8 and newer OSes.
In Windows 8/10, the easiest way to find PowerShell is by searching for PowerShell on your Start screen/menu. It can also be accessed from the Windows System folder. You should right-click on PowerShell and choose «Run as administrator» so that you have sufficient permissions to tweak all applicable settings.
The PowerShell commands below are an overview of what we can use to tweak TCP/IP settings under Windows 10:
Get-NetTCPSetting — this can be used to view TCP parameters
Set-NetTCPSetting — this can be used to set TCP parameters
netsh int tcp show global — you can still see and change some (not all) parameters using netsh


There are a few different networking profiles called «templates» in Windows 8 PowerShell under Get-NetTCPSetting.
In Windows 8 (and 2012 Server): Automatic, Internet, Datacenter, Compat
In Windows 8.1 (also Windows 10, Windows 2012 Server R2): Automatic, Internet, InternetCustom, Datacenter, DataCenterCustom, Compat
Theoretically, only one of the above templates can be modified by default — «Custom» under Windows 8, «InternetCustom» under Windows 8.1 (and Windows 10). The «DatacenterCustom» template can only be modified if Windows is installed on a server. If you try to modify one of the other templates, you will get an error, something like:
Set-NetTCPSetting : Only the custom templates InternetCustom and DatacenterCustom can be modified under Windows 8 and older Windows 10 versions.
Even though theoretically only the «Custom» templates can be modified, many of the commands below (both netsh and PowerShell TCP cmdlets) are global and modify all templates simultaneously.
By default, the «Internet» template/profile is applied to TCP connections. To find the currently used template type either:
using PowerShell cmdlets (run as Administrator):
Get-NetTransportFilter
or, using netsh:
netsh int tcp show supplemental
To view the current template settings, use:
Get-NetTCPSetting -SettingName «Internet» (or your current template name)
Notes:
PowerShell cmdlets are not case-sensitive. Even though some settings below modify all templates, it may still be necessary to sometimes change the default template used for TCP connections from Internet to Custom/InternetCustom. The following command supposedly changes the default (does not work as documented by MS under Windows 8/8.1):
set-NetTCPConnection -AutomaticUseCustom true
(acceptable parameters are [true|false], doesn’t seem to work in Windows 8.1 ?)
Other Useful TCP/IP connection related PowerShell cmdlets:
Get-NetOffloadGlobalSetting (view current TCP Offload settings)
Get-Help Get-NetTCPSetting -detailed (help on NetTCPSetting)
Get-NetTCPConnection (see active connections)
(Get-NetTransportFilter | Where DestinationPrefix -eq ‘*’ | Get-NetTCPSetting) — view current template settings
(Get-NetTransportFilter | Where DestinationPrefix -eq ‘*’ | Get-NetTCPSetting).CongestionProvider — view only «CongestionProvider» setting in currently used template
See also: MS TechNet Set-NetTCPSetting
Netsh
It is still possible to check the current status of Windows TCP/IP parameters with netsh, both in PowerShell and elevated command prompt. We recommend using the PowerShell for changes. While most settings can still be changed using the «netsh» tool, others require the Windows PowerShell interface and cmdlets. Netsh (and the command prompt) is being deprecated by Microsoft, and some of the netsh commands are bugged in Windows 8/8.1 and Server 2012/2012 R2.
To see current tcp parameters in netsh, use:
netsh int tcp show global
You will see something like the following:


There are two extra settings in Windows 8.1 and Windows 10 (right image above)
Explanation of all the tweakable TCP/IP parameters, possible ways to change them, as well as their default/recommended states for broadband internet connections are listed below. We recommend using the Windows PowerShell for all changes. The parameters are loosely sorted in order of importance with the parameters that generally have more significant impact listed first.
Receive Window Auto-Tuning Level
The TCP Receive Window has a very important role in TCP connections. It can limit throughput, especially in high-speed, high-latency environments, such as most internet connections. For more information on how it limits your speed, check our TCP Window article.
The possible settings are as follows:
disabled: uses a fixed value for the tcp receive window. Limits it to 64KB (limited at 65535).
highlyrestricted: allows the receive window to grow beyond its default value, very conservatively
restricted: somewhat restricted growth of the tcp receive window beyond its default value
normal: default value, allows the receive window to grow to accommodate most conditions
experimental: allows the receive window to grow to accommodate extreme scenarios (not recommended, it can degrade performance in common scenarios, only intended for research purposes. It enables RWIN values of over 16 MB)
Default setting: normal
Our recommendation: normal (unless you’re experiencing problems)
To modify, in PowerShell (or elevated command prompt) type:
netsh int tcp set global autotuninglevel=normal
(where «normal» is one of the above listed possible states)
Same can also be accomplished using PowerShell cmdlets, just type:
Set-NetTCPSetting -SettingName InternetCustom -AutoTuningLevelLocal Normal
Note: You can also try «highlyrestricted» autotuninglevel for up to 10Mbps connections, as it actually uses a higher unscaled RWIN value (16384 vs. 256 bytes), and still scales up to 262140 bytes.
Disable Windows Scaling heuristics
Windows 8 (as with Windows 7) has the ability to automatically change its own TCP Window auto-tuning behavior to a more conservative state regardless of any user settings. When heuristics restricts your autotuning level, you may see this message when viewing netsh settings:
«** The above autotuninglevel setting is the result of Windows Scaling heuristics overriding any local/policy configuration on at least one profile.»
When heuristics restricts autotuning level, the «netsh int tcp show global» command will still (incorrectly) show your user-set autotuning level, you have to use «netsh int tcp show heuristics» to see the actual current heuristics restriction. To enforce the user-set TCP Receive Window autotuning level and prevent heuristics from restricting how the TCP Receive Window grows, disable heuristics. It is best to disable this before applying autotuning level to ensure your user-set autotuning level is retained.
default state: OS-dependent (disabled in Windows 8.1, enabled in Windows 7)
possible settings are: disabled,enabled,default (sets to the Windows default state)
recommended: disabled (to retain user-set RWIN auto-tuning level)
To disable explicitly using netsh:
netsh int tcp set heuristics disabled
To see the current heuristics state:
netsh int tcp show heuristics
Using PowerShell cmdlets:
Set-NetTCPSetting -SettingName InternetCustom -ScalingHeuristics Disabled
Notes:
If heuristics are not explicitly disabled, Windows can restrict the RWIN autotuninglevel at any time. When that happens, viewing your settings with «netsh int tcp show global» will still incorrectly show user-set autotuninglevel, only «netsh int tcp show heuristics» reveals the restriction.
The registry value that was used in Windows 7 and earlier is no longer present in the Windows Registry (HKEY_LOCAL_MACHINESYSTEMCurrentControlSetservicesTcpipParametersEnableWsd=0 (not present for Windows 8))
Add-On Congestion Control Provider (CTCP)
The traditional slow-start and congestion avoidance algorithms in TCP help avoid network congestion by gradually increasing the TCP window at the beginning of transfers until the TCP Receive Window boundary is reached, or packet loss occurs. For broadband internet connections that combine high TCP Window with higher latency (high BDP), these algorithms do not increase the TCP windows fast enough to fully utilize the bandwidth of the connection.
Compound TCP (CTCP) is a newer congestion control method that increases the TCP Send Window more aggressively for broadband connections (with large RWIN and BDP). CTCP attempts to maximize throughput by monitoring delay variations and packet loss. It also ensures that its behavior does not impact other TCP connections negatively. CTCP is available in Windows 8/10 and Server editions. Using CTCP can significantly increase throughput and packet loss recovery.
Possible settings are: none, ctcp, dctcp (Datacenter TCP), also CUBIC and New-Reno in newer Windows 10 variants.
CTCP — Compound TCP increases the receive window and amount of data sent. It improves throughput on higher latency/broadband internet connections.
DCTCP — Data Center TCP adjusts the TCP Window based on network congestion feedback based on Explicit Congestion Notification (ECN) signaling, it is designed to improve throughput on low latency/local links.
CUBIC — New default setting as of Windows 10 Creators update, default in Linux kernels 2.6 through 3.2. Uses a cubic TCP congestion window growth function. The algorithm uses the amount of time since the last congestion event (instead of ACK timing) to advance the TCP congestion window. It is designed for high-speed TCP transfers. The only downside is that it can possibly cause some bufferbloat in large BDP networks (like the Internet) with unmanaged queues, such as ADSL and LTE. Theoretically it performs as well as CTCP.
NewReno — RFC 6582 (old RFC 3782) implementation for fast retransmit and fast recovery algorithm. There is an issue with more than 3 reordered packets where New Reno enters fast recovery. Older congestion control algorithm, not recommended.
Unfortunately, the PowerShell cmdlet allows for changing this only in some Windows builds, and the netsh is deprecated and may be bugged in some Windows 10 builds, so it could be challenging to change the congestion provider. Yay for Microsoft! Fortunately, the default setting is already CTCP for earlier Windows 10 builds, and CUBIC for newer ones (as per the PowerShell Get-NetTCPSetting cmdlet.
Default setting: CUBIC or CTCP ** (netsh incorrectly shows «none» by default in Windows 8 and early Windows 10 builds, while PowerShell Get-NetTCPSetting shows «CTCP» or «CUBIC» depending on build)
Recommended setting: CTCP for gaming/latency/speed if network congestion/packet loss is expected, CUBIC for pure throughput on stable networks with no congestion/packet loss
To check the current Congestion provider, use:
Get-NetTcpSetting
Alternatively, you can go wild and use the cmdlet below to see only the congestion provider of the currently used template:
(Get-NetTransportFilter | Where DestinationPrefix -eq ‘*’ | Get-NetTCPSetting).CongestionProvider
To see only the Congestion providers from all templates, use: Get-NetTCPSetting | Select SettingName, CongestionProvider
To change using PowerShell cmdlet (does not work in some older Windows builds):
Set-NetTCPSetting -SettingName InternetCustom -CongestionProvider CTCP
(«InternetCustom» template is for Windows 8.1 and 10, «Custom» for Windows 8, «Internet» for newer Windows builds since «Creators Update». Above command may may be read-only in some Windows versions, use the alternate netsh command instead)
To change using netsh in elevated command prompt:
netsh int tcp set supplemental Internet congestionprovider=ctcp
Notes: For Windows 10 Creators Update and later, it is also possible to set congestionprovider=cubic. The «Internet» template is for later Windows 10 builds, for Windows 8 it may be «InternetCustom».
Notes:
Supposedly the netsh congestionprovider setting is deprecated, and one should use the PowerShell cmdlets when possible. Changing CTCP directly with netsh is not possible by default under Windows 8, the commands are still listed below for reference, and other OSes:
netsh int tcp show supplemental (see the currently used supplemental template)
netsh int tcp set supplemental custom 300 10 ctcp disabled 50 (minrto=300ms, initial congestion window icw=10 packets, congestionprovider=ctcp, enablecwndrestart=disabled, delayedacktimeout=100 ms) netsh int tcp set supplemental custom (tell Windows to use the custom template)
You can still «hack» Windows 8 to change to CTCP in netsh by doing the following:
1. Open notepad and copy this code into it:
How to set the congestion provider to <a class=»term1 piterm» href=»/_iframe_term.php?seek=CTCP» title=»What is ctcp ?» rel=»sg-term»>ctcp</a>
Windows Registry Editor Version 5.00
[HKEY_LOCAL_MACHINESYSTEMCurrentControlSetControlNsi{eb004a03-9b1a-11d4-9123-0050047759bc}]
«0200»=hex:00,00,00,00,00,00,00,00,00,00,00,00,00,00,00,00,00,00,00,00,00,00,
00,00,00,00,00,00,02,00,00,00,00,00,00,00,00,00,00,00,00,00,00,00,00,00,00,
00,00,00,ff,00,00,00,00,00,00,00,00,00,00,00,00,00,00,00,00,00,00,00,00,00,
ff,00,00,00,00,00,00,00,00,00,00,00,00,00,00,00
«1700»=hex:00,00,00,00,00,00,00,00,00,00,00,00,00,00,00,00,00,00,00,00,00,00,
00,00,00,00,00,00,02,00,00,00,00,00,00,00,00,00,00,00,00,00,00,00,00,00,00,
00,00,00,ff,00,00,00,00,00,00,00,00,00,00,00,00,00,00,00,00,00,00,00,00,00,
ff,00,00,00,00,00,00,00,00,00,00,00,00,00,00,00
2. Save file with .reg extension, for example: «enable-ctcp.reg»
3. Import the registry file into the Windows Registry (double-clicking on it should do it, after a warning).
4. Reboot
Alternatively, get [this file] (right-click, «save target as», save with .reg extension so that it can be merged with the registry automatically when double-clicked).
Here is a screenshot from Windows 8.1 after merging the above with the registry and rebooting:

You can also just copy all the text to the appropriate registry hive directly. Merging the above with the registry and rebooting will show CTCP as the addon congestion control algorithm. Still, as per Microsoft, netsh is deprecated and you should be using Powershell.
Note that the above registry hack will change not only CTCP, but other related parameters as well, here is some additional info:
The binary values above affect many parameters: «Chimney Offload State» (offset 04, 00=disabled,01=enabled,02=auto), RSS (offset 05, 00=default/enabled,01=disabled), ECN Capability (offset 06, 00=disabled/default, 01=enabled), CTCP (offset 28, 00=none, 02 = ctcp), etc.
See Also: Windows 10 Manual Registry Tweaks
TCP Chimney Offload
TCP chimney offload enables Windows to offload all TCP processing for a connection to a network adapter (with proper driver support). Offloads are initiated on a per-connection basis and reduce networking-related CPU overhead, theoretically enabling better overall system performance by freeing up CPU time for other tasks. TCP Chimney Offload controls what is referred to as the «TCP Offload Engine» (TOE) in Windows in general. It is a global setting that has to be enabled for many of the other offloads to work. Enabling this setting had some negative effects in the past because of buggy network adapter drivers, however its implementation has gotten much better with time. It is useful for CPU-bound client computers and very fast broadband connections, not recommended in some server environments.
Possible states of this setting are as follows:
automatic — offloads if the connection is 10 GbE, has a RTT default — this setting restores chimney offload to the system default.
disabled — chimney offload disabled.
enabled — chimney offload enabled.
Default: automatic
Recommended: disabled
To check the setting:
Get-NetOffloadGlobalSetting
netsh int tcp show global
To disable TCP Chimney Offload using netsh:
netsh int tcp set global chimney=disabled
To set using Powershell cmdlets:
Set-NetOffloadGlobalSetting -Chimney Disabled (recommended: disabled*)
Notes:
* There were issues with buggy Network adapter drivers and the implementation of offloading with older OSes (Windows 2003 Server), however, this has improved over time. One should be more careful using offloading in server environments, as there have been some reports of issues with TCP Chimney Offload and SQL servers under heavy load, affecting both application concurrency and throughput. See this MSDN reference and MS KB942861.
Chimney Offload does not work together with NetDMA (mute point with Windows 8/8.1 as NetDMA is not supported).
Chimney Offload may not be supported with NAT/ICS (reference: Technet TCP Chimney Offload Compatibility for Windows 2008 R2). However, this only applies if NAT/ICS is enabled on the computer running Windows itself, and that is rarely the case.
Setting Chimney Offload to disabled is recommended for VMWare servers, and the setting is now considered deprecated by Microsoft. See: Obsolete RFCs and Overview of TCP Timers
NetDMA State
NetDMA (TCPA) enables support for advanced direct memory access. In essence, it provides the ability to more efficiently move network data by minimizing CPU usage. NetDMA frees the CPU from handling memory data transfers between network card data buffers and application buffers by using a DMA engine.
Default: disabled
Recommended: leave alone, don’t bother (setting not supported in Windows 8 and later, according to MS)
You can still edit it using:
netsh int tcp set global netdma=disabled
Notes:
According to Microsoft, NetDMA is not supported in Windows 8/8.1 and changing this setting will have no effect. See: MSDN NetDMA
NetDMA (TCPA) does not work together with Chimney Offload either, you have to choose one or the other. For NetDMA to work, it must be enabled/supported by your BIOS and your CPU must support Intel I/O Acceleration Technology (I/OAT).
Direct Cache Access (DCA)
Direct Cache Access (DCA) allows a capable I/O device, such as a network controller, to deliver data directly into a CPU cache. The objective of DCA is to reduce memory latency and the memory bandwidth requirement in high bandwidth (Gigabit) environments. DCA requires support from the I/O device, system chipset, and CPU(s).
Possible states are: enabled, disabled
Default state: disabled
Recommended: enabled (provided the CPU/Chipset/NIC support it)
To set DCA using netsh:
netsh int tcp set global dca=enabled
Note: The impact of DCA is more significant with older CPUs. Not present in Windows 10 Creators’ update.
Checksum Offload
The PowerShell Enable-NEtAdapterChecksumOffload cmdlet enables checksum offloads on the network adapter. Checksum offloading is also required for some other stateless offloads to work, including Receive Side Scaling (RSS), Receive Segment Coalescing (RSC), and Large Send Offload (LSO).
Default state: adapter-dependent
Recommended: enabled
In PowerShell:
Enable-NetAdapterChecksumOffload -Name * (use to enable checksum offload on all adapters that support it)
Disable-NetAdapterChecksumOffload -Name * (use to disable checksum offload for all network adapters)
Get-NetAdapterChecksumOffload (use to view network adapters that support checksum offload and their state)
The above PowerShell cmdlet example enables checksum offloads on all visible network adapters for all UDP/TCP/IP version 4 and version 6 traffic (and restarts the network adapters). Alternatively, you can specify only a single network adapter and/or protocol by using command-line switches. For more information on customizing the command, refer to this Technet article. To pick a single adapter and only modify its checksum offload state, find installed adapters using this cmdlet: Get-NetAdapter
Receive-Side Scaling State (RSS)
The receive-side scaling setting enables parallelized processing of received packets on multiple processors, while avoiding packet reordering. It avoids packet reordering by separating packets into «flows», and using a single processor for processing all the packets for a given flow. Packets are separated into flows by computing a hash value based on specific fields in each packet, and the resulting hash values are used to select a processor for processing the flow. This approach ensures that all packets belonging to a given TCP connection will be queued to the same processor, in the same order that they were received by the network adapter.
Default: enabled
Recommended: enabled (provided you have 2 or more processor cores and a NIC that can handle RSS)
To check current RSS setting:
Get-NetOffloadGlobalSetting (view global setting)
Get-NetAdapterRss -Name * (use cmdlet to view RSS capable Network Adapters)
netsh int tcp show global
To change RSS using netsh:
netsh int tcp set global rss=enabled
To change using PowerShell cmdlets:
Enable-NetAdapterRss -Name * (use this to enable RSS for all adapters that support it)
Disable-NetAdapterRss -Name * (use this to disables RSS for all adapters)
Set-NetOffloadGlobalSetting -ReceiveSideScaling Enabled (alternate global command for all adapters)
Notes:
Needs Checksum Offload to be enabled. Only supported by some network adapters.
Receive Segment Coalescing State (RSC)
Receive Segment Coalescing (RSC) allows the NIC to coalesce multiple TCP/IP packets that arrive within a single interrupt into a single larger packet (up to 64KB) so that the network stack has to process fewer headers, resulting in a 10% to 30% reduction in I/O overhead depending on the workload, thereby improving performance. Receive Segment Coalescing (RCS) is able to collect packets that are received during the same interrupt cycle and put them together so that they can be more efficiently delivered to the network stack. This can significantly increase the amount of traffic that can be handled without severely impacting the CPU.
Possible states: enabled, disabled, default
Default state: enabled in Windows 10, disabled in some older versions.
Recommended: disabled for lower latency and gaming, or when using Wi-Fi adapters. Enable for slightly higher throughput when lower CPU utilization is important. Microsoft recommends disabling it for Web, Mail, or Database Servers, enabling it for File, FTP or Media servers.
To check current RSC state:
netsh int tcp show global (Receive Segment Coalescing State)
Get-NetOffloadGlobalSetting (view global state)
GetNetAdapterRsc -Name * (view RSC setting for all adapters)
To disable using netsh:
netsh int tcp set global rsc=disabled
To disable using PowerShell cmdlets globally:
Set-NetOffloadGlobalSetting -ReceiveSegmentCoalescing disabled
To disable using PowerShell cmdlets for a single adapter:
Disable-NetAdapterRsc -Name * (use to disable RSC for all adapters)
Enable-NetAdapterRsc -Name * (use to enables RSC for all adapters that support it)
Set-NetOffloadGlobalSetting -ReceiveSegmentCoalescing Disabled (alternate syntax for globally changing all adapters)
Notes:
Needs Checksum Offload to be enabled. Only supported by some network adapters.
For gaming, where latency is more important than pure throughput, any type of packet/memory coalescing should be disabled or used very sparingly. Packet/memory coalescing reduces CPU utilization and increases throughput, however, it causes the network adapter to combine packets before interacting with other hardware, which may slightly increase latency. Also see our gaming tweaks article.
Packet Coalescing
This setting defines the grouping of network packets in general, to limit the number of receive interrupt and reduce the amount of required processing. In network adapters using Network Driver Interface Specification (NDIS) versions 6.3 and later, packet coalescing is used to group both random and multicast traffic for efficiency. This should be left enabled for pure throughput and efficiency, disabled for gaming and where lower latency is desired at the expense of a bit higher CPU utilization, and a bit more multicast traffic. It must be enabled if using RSC (Receive Segment Coealescing).
Possible states: enabled, disabled, default
Default state under Windows 10: enabled
Recommended: disabled (for gaming and slightly lower latency at the expense of higher CPU usage and more multicast traffic, and when using Wi-Fi adapters), enabled (for pure throughput when lower CPU utilization is important)
To check in Powershell: Get-NetOffloadGlobalSetting
To enable:
Set-NetOffloadGlobalSetting -PacketCoalescingFilter enabled (or disabled)
Large Send Offload (LSO)
This setting enables Large Send Offload. When enabled, the network adapter hardware is used to complete data segmentation, theoretically faster than operating system software. Theoretically, this feature may improve transmission performance, and reduce CPU load. LSO reduces the interrupt rate and the amount of bus transactions to the NIC. The problem with this setting is buggy implementation on many levels, including Network Adapter Drivers. Intel and Broadcom drivers are known to have this enabled by default, and may have many issues with it. It should only be enabled with the newest Gigabit NICs with recent drivers. Because of the issues mentioned above, we recommend disabling LSO at both the Network Adapter properties, and at the OS level with the setting below.
Default: adapter-dependent
Recommended: disable (both in network adapter properties and in the TCP/IP stack at the OS level)
To check using Powershell:
Get-NetAdapterLso -Name * (get a list of network adapters that support LSO)
Get-NetAdapterAdvancedProperty -Name * (get a list of all network adapter settings)
To change:
Disable-NetAdapterLso -Name * (disable LSO for all visible network adapters)
Enable-NetAdapterLso -Name * (enable LSO for both IPv4 and IPv6 on all network adapters. Be careful with this setting, test before using in production)
Notes: Default state is network adapter dependent. Needs Checksum Offload to be enabled to work. LSO is another buffer that may impact latency, it is not recommended for interactive connections and gaming.
See Also: Should I enable TCP Offloading ?
ECN Capability
ECN (Explicit Congestion Notification, RFC 3168) is a mechanism that provides routers with an alternate method of communicating network congestion. It is aimed to decrease retransmissions. In essence, ECN assumes that the cause of any packet loss is router congestion. It allows routers experiencing congestion to mark packets and allow clients to automatically lower their transfer rate to prevent further packet loss. Traditionally, TCP/IP networks signal congestion by dropping packets. When ECN is successfully negotiated, an ECN-aware router may set a bit in the IP header (in the DiffServ field) instead of dropping a packet in order to signal congestion. The receiver echoes the congestion indication to the sender, which must react as though a packet drop were detected. ECN is disabled by default in modern Windows TCP/IP implementations, as it is possible that it may cause problems with some outdated routers that drop packets with the ECN bit set, rather than ignoring the bit.
Possible settings are: enabled, disabled, default (restores the state to the system default).
Default state: disabled
Recommendation: «enabled» only for short-lived, interactive connections and HTTP requests with routers that support it, in the presence of congestion/packet loss, «disabled» otherwise (for pure bulk throughput with large TCP Window, no regular congestion/packet loss, or outdated routers without ECN support). May be worth trying «enabled» for gaming with unstable connections.
To change using netsh:
netsh int tcp set global ecncapability=default
To change using PowerShell cmdlets:
Set-NetTCPSetting -SettingName InternetCustom -EcnCapability Disabled
Notes:
Alternative netsh syntax is: netsh int tcp set global ecn=default
ECN is only effective in combination with AQM (Active Queue Management) router policy. It has more noticeable effect on performance with interactive connections, online games, and HTTP requests, in the presence of router congestion/packet loss. Its effect on bulk throughput with large TCP Window are less clear. Currently, we do not recommend enabling this setting, as reportedly it has negative impact on throughput with some residential US ISPs. EA multiplayer games that require a profile logon do not support ECN as well (you will not be able to logon). However, it can also reduce latency in some games with ECN-capable routers in the presence of packet loss (dropped packets).
See also: Wikipedia — ECN, RFC 3168
TCP 1323 Timestamps
RFC 1323 ads many useful options, most notably scaling of the TCP Window. «Timestamps» (TSOpt) is a less commonly used 1323 option that is intended to increase transmission reliability by retransmitting segments that are not acknowledged within some retransmission timeout (RTO) interval. The problem with timestamps is that they add 12 bytes to the 20-byte TCP header of each packet, so turning them on causes considerable overhead.
Possible states: enabled,disabled,default
Default state: disabled
Recommended: disabled
To set using netsh:
netsh int tcp set global timestamps=disabled
To set using PowerShell cmdlets:
Set-NetTCPSetting -SettingName InternetCustom -Timestamps Disabled
Initial RTO and Min RTO
Retransmit timeout (RTO) determines how many milliseconds of unacknowledged data it takes before the connection is aborted. The default timeout for Initial RTO of 3 seconds can usually be lowered for low-latency modern broadband connections, unless you’re in a remote location, on a satellite internet connection, or experiencing high latency. In high-latency situations, this can increase retransmissions if the RTO value is reached on a regular basis.
InitialRTO
Default value: 3000 (3 seconds)
Recommended: between 2000 (2 seconds) and 3000 (3 seconds).
To set using netsh:
netsh int tcp set global initialRto=3000
To set using PowerShell cmdlets:
Set-NetTCPSetting -SettingName InternetCustom -InitialRto 3000
MinRTO
Default value: 300 (ms)
Recommended: 300 (ms)
MinRTO can’t be changed under Windows 8 (read-only error), it may be editable under server OSes. The command is:
set-NetTCPSetting -SettingName InternetCustom -MinRto 300
Non Sack Rtt Resiliency (Windows 8.1)
Enables/Disables RTT resiliency for non SACK clients. This can help slow clients/connections as it makes TCP/IP less aggressive in retransmitting packets when enabled.
Possible states: enabled,disabled,default
Default state: disabled
Recommended: «disabled» for stable connections without much latency variations, «enabled» for connections with fluctuating ping and in the presence of packet loss.
To set using netsh:
netsh int tcp set global nonsackrttresiliency=disabled
To set using PowerShell cmdlets:
Set-NetTCPSetting -SettingName InternetCustom -NonSackRttResiliency disabled
Note: This property only supported in Windows 8.1 and Windows Server 2012 R2.
Max SYN Retransmissions (Windows 8.1)
Sets the number of times to attempt to reestablish a connection with SYN packets.
Possible values: 2 to 8
Default value: 2
Recommended: leave at 2
To set using netsh:
netsh int tsp set global maxsynretransmissions=2
To set using PowerShell cmdlets:
Set-NetTCPSetting -SettingName InternetCustom -MaxSynRetransmissions 2
To view the current setting under PowerShell:
Get-NetTCPSetting -SettingName InternetCustom
Or, to view only the current MaxSynRetransmissions setting as a number:
(Get-NetTCPSetting -SettingName InternetCustom).MaxSynRetransmissions
Note: This property only supported in Windows 8.1 and Windows Server 2012 R2. Windows 7 hotfix displays it in netsh as a read-only setting.
InitialCongestionWindow (ICW)
When creating a TCP connection, the sending side performs a «TCP slow start» regardles of the receiver RWIN value. TCP slow start only sends two frames, waits for ACK response, and increases speed exponentially provided there are no dropped packets. This slow start algorithm can also be activated if there is no traffic for 200ms. This is not optimal for fast internet connections with intermittent bursts of data. This bottleneck can be avoided by increasing the «InitialcongestionWindow» from the default 2 (or 4) frames to 10+ (See RFC 3390 and RFC 6928).
The following should work for 2012 server, however it does not work in Windows 8.1, or Windows 10 workstation variants (read-only setting error).
Default setting: 2, 4, or 10, depending on OS version.
Recommended: 10
To set using Powershell cmdlets (only available in server variants):
Set-NetTCPSetting -SettingName InternetCustom -InitialCongestionWindow 10
To set using elevated command prompt:
netsh int tcp set supplemental template=custom icw=10
(works for Server 2008 R2 with hotfix KB2472264)
Setting MTU
It is sometimes useful to view and set the Maximum Transmission Unit (MTU) value for a specific network adapter manually. To view a list of active network interfaces, their names and their respective MTU values in Windows 8, open PowerShell (or command prompt) as administrator and run the following command:
netsh int ipv4 show subinterface
or, if you are using IP version 6:
netsh int ipv6 show subinterface
Alternative netsh syntax: netsh int ipv4 show interfaces
Alternative PowerShell syntax: Get-NetAdapter (to view all advanced properties: Get-NetAdapterAdvancedProperty)
You will be presented with a list of interfaces, and their respective MTU values as follows:

To change the MTU value of a specific network card, type the following:
netsh int ipv4 set subinterface «network interface name» mtu=#### store=persistent
Where «network interface name» is your specific network adapter name as obtained above (also viewable under Network adapters), and mtu=#### is the desired MTU value. For example, if the name of your network card is «Wi-Fi» and you’d like to set its MTU to 1500, you’d have to type:
netsh int ipv4 set subinterface «Wi-Fi» mtu=1500 store=persistent
Notes:
For IPv6, you can set the MTU using: netsh int ipv6 set subinterface «Wi-Fi» mtu=1500 store=persistent
The maximum MTU value is usually 1500, and up to 1492 for PPPoE connections.
The PowerShell cmdlet using Set-NetAdapterAdvancedProperty SetMTU doesn’t seem to work yet. See this nice attempt to set MTU using PowerShell at Serverfault.
Registry Tweaks
This section lists a number of TCP/IP related Windows Registry parameters that work with Windows 8/8.1 and 2012 Server. Some of the settings we’ve tested are the same/similar parameters as with previous Windows versions that we have confirmed to work with Windows 8/8.1 as well, although they may have different default values. Below is a list of what we’ve confirmed to work. To edit the Windows Registry, click the Windows button, and type: regedit in the search dialog (you may have to right-click regedit and choose to run as administrator to have the proper write permissions). It is always a good idea to create a restore point and backup the registry before making changes.
DefaultTTL
TTL does not directly affect speed, and can be safely left alone in many cases. It is a limit to the time and number of hops/routers a packet will travel before being discarded. A number that’s too small risks packets being discarded before reaching their destination. A number that’s too large (over 128) will cause delay in when lost IP packets are discarded. The default, when the setting is not present in the Windows 8/10/2012 registry the system assumes a value of 128.
HKEY_LOCAL_MACHINESYSTEMCurrentControlSetServicesTcpipParameters
DefaultTTL=64 (DWORD, not present by default denoting 128, valid range is 1-255, recommended: 64)
Host Resolution Priority Tweak
This is intended to increase the priority of DNS/hostname resolution, by increasing the priority of four related processes from their defaults. It is important to note that this increases their priority compared to the hundreds of other running processes, while keeping their order. See our Host Resolution Priority Tweak article for more details. The registry location under Windows 8, 8.1, 10, 2012 Server, and 2012 R2 is:
HKEY_LOCAL_MACHINESYSTEMCurrentControlSetServicesTcpipServiceProvider
LocalPriority = 4 (DWORD, default 499, recommended 4)
HostPriority = 5 (DWORD, default 500, recommended 5)
DnsPriority = 6 (DWORD, default 2000, recommended 6)
NetbtPriority = 7 (DWORD, default 2001, recommended 7)
MaxUserPort and TCPTimedWaitDelay (port allocation)
Short lived (ephemeral) TCP/IP ports above 1024 are allocated as needed by the OS. The Windows 8/2012 defaults are usually sufficient under normal network load. However, under heavy network load it may be necessary to adjust these two registry settings to increase port availability and decrease the time to wait before reclaiming unused ports.
If the default limits are exceeded under heavier loads, the following error is observed «address in use: connect exception«. To tweak, add/edit the following keys using regedit:
HKEY_LOCAL_MACHINESYSTEMCurrentControlSetServicesTcpipParameters
MaxUserPort=65534 (DWORD, not in the registry by default, uses ports 1024-5000 by default. recommended: 16384 to 65534 decimal as necessary) — maximum number of ports to use. 1024 is automatically subtracted from entered value to allow for reserved ports under 1024.
TcpTimedWaitDelay=30 (DWORD, not present in registry by default, 120 seconds when not present. Recommended: 30 decimal, denoting 30 seconds) — time to wait before reclaiming ports, in seconds. Default time before reclaiming ports, if value is at 0xffffffff or not present in the registry is 120 (or 240) seconds, depending on your OS. Just reducing the delay is often sufficient without changing MaxUserPort, as it allows for reusing ports more efficiently.
See:
MSDN ms737757
Technet MaxUserPort
QoS Reserved Bandwidth
The Windows «QoS Packet Scheduler» under Windows 8/8.1 (as with previous Windows versions) reserves 20% of bandwidth by default for QoS-aware applications that request priority traffic. Note this only has effect in the presence of running QoS applications that request priority traffic, like Windows Update, for example. To prevent QoS applications from getting priority to 20% of available bandwidth, customize the following registry setting:
HKEY_LOCAL_MACHINESOFTWAREPoliciesMicrosoftWindowsPsched
NonBestEffortLimit=0 (DWORD, not present in the registry by default. When not present it reserves 20% of bandwidth. Recommended: 0 , possible values between 0 and 100) — indicates the percentage value of reserved bandwidth for QoS applications. Set to 0 to disable.
Notes:
The NonBestEffort tweak applies only when the Windows Qos Packet Scheduler is enabled, and has effect ONLY in the presence of running QoS applications.
QoS reserved bandwidth can also be disabled from the Gourp Policy Editor: Start -> Run: gpedit.msc -> open Local Group Policy EditorLocal Computer PolicyComputer ConfigurationAdministrative TemplatesNetworkQoS Packet Scheduler -> in the right pane, edit/enable «Limit reservable bandwidth» and reduce the percentage of «Bandwidth limit» to zero.
QoS Policy
QoS Policy settings under Windows 7/8 can be edited using the Group Policy Editor (gpedit.msc): Computer Configuration -> Windows Settings -> Policy-based QoS
In order to define DiffServ (DSCP) values, according to Microsoft the machine needs to have joined a domain, and interfaces have to see the domain controller. To overcome this limitation, so that you can tag DSCP values even for adapters that do not have access to a domain, use the following hidden registry key:
HKEY_LOCAL_MACHINESystemCurrentControlSetServicesTcpipQoS (you may have to create the QoS key)
«Do not use NLA»=»1» (REG_SZ string value, not DWORD, not present by default, recommended: 1 if you plan to edit DSCP values via gpedit.msc)
Notes:
gpedit.msc is only provided with the Professional/Ultimate and Server Windows variants.
This registry key may also be needed in systems with multiple network adapters present.
Network Memory Allocation (Event ID 2017 error)
When using Windows to serve many/large files over the local network, it is possible to sometimes run into memory allocation errors related to the Windows share, especially with clients that use different operating systems. When this happens, you can usually see the following error in the Event Viewer System log:
Event ID: 2017 «The server was unable to allocate from the system nonpaged pool because the server reached the configured limit for nonpaged pool allocations.» It is also possible to get an error indicating that «Not enough server storage is available to process this command». To avoid those errors, you need to change the way Windows allocates memory for network services and file sharing. The below settings optimize the machine as a file server so it would allocate resources accordingly. There are two related registry settings:
HKEY_LOCAL_MACHINESYSTEMCurrentControlSetControlSession ManagerMemory Management
LargeSystemCache=1 (DWORD, default value: 0, recommended value: 1 for LAN file transfers, 0 for gaming)
A value of zero establishes a cache of ~8 MB, a value of 1 allows the cache to expand up to the amount of physical memory minus 4 MB, as necessary. Reportedly some ATI video card drivers may have an issue with corrupt cache and degraded application performance when this is enabled, so we recommend to leave it off/zero for gaming.
HKEY_LOCAL_MACHINESYSTEMCurrentControlSetServicesLanmanServerParameters
Size=3 (DWORD, default value: 1, recommended value: 3)
minimizes used memory
balance used memory
optimal setting for file sharing and network applications
Internet Explorer Web Browser Tweaks
MaxConnectionsPerServer / MaxConnectionsPer1_OServer Internet Explorer browser tweaks adjust the maximum number of concurrent connections your web browser can establish to any single website.
HKEY_LOCAL_MACHINESOFTWAREMicrosoftInternet ExplorerMAINFeatureControl
FEATURE_MAXCONNECTIONSPER1_0SERVERexplorer.exe=10 (DWORD, default: 4, recommended: 8, valid range: 2-128)
FEATURE_MAXCONNECTIONSPERSERVERexplorer.exe=10 (DWORD, default: 2, recommended: 8, valid range: 2-128)
In addition to explorer.exe, you can also add a 32bit DWORD «iexplore.exe» (according to MSDN), and set it to the same corresponding value as «explorer.exe»
FEATURE_MAXCONNECTIONSPER1_0SERVERiexplore.exe=10 (DWORD, not present by default, recommended: 8, valid range: 2-128)
FEATURE_MAXCONNECTIONSPERSERVERiexplore.exe=10 (DWORD, not present by default, recommended: 8, valid range: 2-128)
For more information, see our Web Browser Tweaks article
Note: Increasing this setting much over 10 can cause incomplete page loading and other issues with some pages.
Network Throttling Index (Gaming)
By default, Windows 8 continues to implement a network throttling mechanism to restrict the processing of non-multimedia network traffic to 10 packets per millisecond (a bit over 100 Mbits/second). The idea behind such throttling is that processing of network packets can be a resource-intensive task, and it may need to be throttled to give prioritized CPU access to multimedia programs. In some cases, such as Gigabit networks and some online games, for example, it is beneficial to turn off such throttling all together for achieving maximum throughput.
HKEY_LOCAL_MACHINESOFTWAREMicrosoftWindows NTCurrentVersionMultimediaSystemProfile
NetworkThrottlingIndex=ffffffff (DWORD, default: 10, recommended: 10 for media sharing, ffffffff for gaming and max throughput, valid range: 1 through 70 decimal or ffffffff to completely disable throttling)
It is only recommended to change this setting in saturated Gigabit LAN environments, where you do not want to give priority to multimedia playback. Reportedly, disabling throttling by using ffffffff can also help reduce ping spikes in some online games. Games that may be affected by this throttling: Source Engine games (TF2, Left 4 Dead, CS:S), HoN, CoD, Overlord series.
SystemResponsiveness (Gaming and Multimedia)
In Windows 8/8.1, just like with Windows 7, multimedia applications use the «Multimedia Class Scheduler» service (MMCSS) to ensure priritized access to CPU resources, without denying CPU resources to lower-priority background applications. However, this also reserves 20% of CPU by default for background processes, your multimedia streaming and some games can only utilize up to 80% of the CPU. This setting, in combination with the above «NetworkThrottlingIndex» can help some games and video streaming. We recommend reducing the reserved CPU for background processes from the default of 20%.
Navigate to:
HKEY_LOCAL_MACHINESOFTWAREMicrosoftWindows NTCurrentVersionMultimediaSystemProfile
SystemResponsiveness=10 (DWORD, default is 20 denoting 20% of CPU reserved, recommended: decimal 10, or 0 for pure gaming/multimedia performance)
Notes: The number in this key is rounded by MMCSS to the nearest 10. In some server operating systems (Windows 2008 Server), the SystemResponsiveness may be set to 100, instead of 20 by default. This is by design, giving higher priority to background services over multimedia.
See also: MSDN ms684247
Disable Nagle’s algorithm (Gaming)
Nagle’s algorithm is designed to allow several small packets to be combined together into a single, larger packet for more efficient transmissions. While this improves throughput efficiency and reduces TCP/IP header overhead, it also briefly delays transmission of small packets. Disabling «nagling» can help reduce latency/ping in some games. Keep in mind that disabling Nagle’s algorithm may also have some negative effect on file transfers. Nagle’s algorithm is enabled in Windows by default. To implement this tweak and disable Nagle’s algorithm, modify the following registry keys.
This setting configures the maximum number of outstanding ACKs:
HKEY_LOCAL_MACHINESYSTEMCurrentControlSetServicesTcpipParametersInterfaces{NIC-id}
There will be multiple NIC interfaces listed there, for example: {1660430C-B14A-4AC2-8F83-B653E83E8297}. Find the correct one with your IP address listed. Under this {NIC-id} key, create a new DWORD value:
TcpAckFrequency=1 (DWORD value, not present by default interpreted as 2, 1=disable, 2=default, specifies number of outstanding ACKs before ignoring delayed ACK timer). For gaming performance, recommended is 1 (disable). For pure throughput and data streaming, you can experiment with small values over 2. Wifi performance may see a slight improvement with disabled TcpAckFrequency as well.
In the same location, add a new DWORD value:
TCPNoDelay=1 (DWORD value, not present by default, 0 to enable Nagle’s algorithm, 1 to disable)
To configure the ACK interval timeout (only has effect if nagling is enabled), find the following key:
TcpDelAckTicks=0 (DWORD value, not present by default interpreted as 2, 0=disable nagling, 1-6=100-600 ms). Note you can also set this to 1 to reduce the nagle effect from the default of 200ms without disabling it.
For Server Operating Systems that have Microsoft Message Queuing (MSMQ) installed, or if you have the MSMQ registry hive present, also add TCPNoDelay to:
HKEY_LOCAL_MACHINESOFTWAREMicrosoftMSMQParameters
TCPNoDelay=1 (DWORD, not present by default, 0 to enable Nagle’s algorithm, 1 to disable)
See also: Gaming Tweaks article
SG TCP Optimizer (version 4 Beta)
The SG TCP Optimizer is a free program that allows for easy tweaking of all the above TCP/IP settings for broadband with a couple of clicks. Note that only version 4 of the prorgam supports Windows 8 (and newer) and works with PowerShell cmdlets. There program is available in our downloads section.
The SG TCP Optimizer is a standalone application that does not require installation, you can just save it to the desktop, right-click -> choose «Run as administrator», and apply the «optimal» settings, or customize them to your liking. More detailed information about all available options is provided in the TCP Optimizer documentation, answers to frequently asked questions are available in the Optimizer FAQ, and personalized help is available through our forums.
References
Technet — Network Adapter Cmdlets
TechNet set-NetTCPSetting
MSDN MSFT_NetTCPSetting class
Increasing TCP Initial congestion Window in Windows 2008 Server R2
MS Hotfix for netsh errors in Windows Server 2008 R2 — MSKB 2472264
See Also
Quality of Service — ToS DSCP WMM
Windows 8 FAQs
Windows 7, Vista, 2008 Tweaks
Firefox / Internet Explorer Browser Tweaks
Congestion Control Algorithm Comparison
Notes
Some templates/settings, as well as changing the default NetTransportFilter are no longer editable in client Windows versions (Windows 8, 8.1), only Server variants (Server 2008, Server 2012/2012 R2).
The tweaks were tested and confirmed to work with Windows 10 Technical Preview build 10041.
Feedback and suggestions are always appreciated.
In this article, I will take you through 31 Most Useful netsh command examples in Windows. netsh also known as Network Shell is a windows based command line utility to manage network interfaces and its configurations. netsh command can also be used for network troubleshooting purposes. You can capture network packets in a local file to help troubleshooting the networking issues. There are several other tasks that can be accomplished using netsh command which we will see in detail using some real world examples in below Section. More on Microsoft docs.

Also Read: 27 Useful net command examples to Manage Windows Resources
Example 1: How to Check all Windows Firewall Rules
If you want to check all the current Windows Firewall Rules then you need to use netsh advfirewall firewall show rule name=all command as shown below.
C:>netsh advfirewall firewall show rule name=all

Rule Name: Microsoft Edge (mDNS-In)
----------------------------------------------------------------------
Enabled: Yes
Direction: In
Profiles: Domain,Private,Public
Grouping: Microsoft Edge
LocalIP: Any
RemoteIP: Any
Protocol: UDP
LocalPort: 5353
RemotePort: Any
Edge traversal: No
Action: Allow
Example 2: How to Show all Firewall rules for Current Profile
If you are only interested in current profile firewall rules then you need to use netsh advfirewall show currentprofile command as shown below.
C:>netsh advfirewall show currentprofile

Public Profile Settings:
----------------------------------------------------------------------
State ON
Firewall Policy BlockInbound,AllowOutbound
LocalFirewallRules N/A (GPO-store only)
LocalConSecRules N/A (GPO-store only)
InboundUserNotification Enable
RemoteManagement Disable
UnicastResponseToMulticast Enable

Logging:
LogAllowedConnections Disable
LogDroppedConnections Disable
FileName %systemroot%system32LogFilesFirewallpfirewall.log
MaxFileSize 4096

Ok.
Example 3: How to Check Network Interface Status
If you want to check all the network interface status then you need to use netsh interface show interface command as shown below.
C:>netsh interface show interface

Admin State State Type Interface Name
-------------------------------------------------------------------------
Enabled Connected Dedicated Wi-Fi
Enabled Disconnected Dedicated Ethernet 2
Enabled Connected Dedicated VirtualBox Host-Only Network
Enabled Disconnected Dedicated Ethernet
Example 4: How to Check Index Number of all the Network Interfaces
If you want to check the Index number(Idx) of all the network interfaces then you can use netsh interface ip show interfaces command as shown below. This will show you all connected as well as disconnected interfaces Index number.
C:>netsh interface ip show interfaces

Idx Met MTU State Name
--- ---------- ---------- ------------ ---------------------------
1 75 4294967295 connected Loopback Pseudo-Interface 1
17 35 1500 connected Wi-Fi
18 65 1500 disconnected Bluetooth Network Connection
19 25 1500 disconnected Local Area Connection* 1
5 5 1500 disconnected Ethernet
7 25 1500 disconnected Local Area Connection* 10
6 35 1500 disconnected Ethernet 2
13 25 1500 connected VirtualBox Host-Only Network
Example 5: How to Check all the Wireless Profiles
If you want to check all the wireless profiles then you need to use netsh wlan show profile command as shown below.
C:>netsh wlan show profile

Profiles on interface Wi-Fi:

Group policy profiles (read only)
---------------------------------
<None>

User profiles
-------------
All User Profile : Fibre You
All User Profile : AndyAP
All User Profile : Fibre You 1
All User Profile : vivo 1902
All User Profile : Bright you
All User Profile : redmi
All User Profile : cherry
All User Profile : TP-LINK_8976A
All User Profile : John_5G
Example 6: How to Check all the Available Wireless Connections
If you want to check all the available wireless connections then you need to use netsh wlan show networks command as shown below. As you can see we have 4 wireless network connections currently visible.
C:>netsh wlan show networks

Interface name : Wi-Fi
There are 4 networks currently visible.

SSID 1 : Fibre You
Network type : Infrastructure
Authentication : WPA2-Personal
Encryption : CCMP

SSID 2 : ServiceNet-2mbps
Network type : Infrastructure
Authentication : WPA2-Personal
Encryption : CCMP

SSID 3 :
Network type : Infrastructure
Authentication : WPA2-Personal
Encryption : CCMP
...............................
Example 7: How to Check the Strength of all the Available Wireless Connections
If you are looking to check the strength of all the available wireless connections then you need to use netsh wlan networks mode=bssid command as shown below. This command will provide the Signal strength of the available wireless network connections along with other important informations like Radio type, Channel, Basic rates and other rates.
C:>netsh wlan show networks mode=bssid

Interface name : Wi-Fi
There are 4 networks currently visible.

SSID 1 : Fibre You
Network type : Infrastructure
Authentication : WPA2-Personal
Encryption : CCMP
BSSID 1 : a8:da:0a:6d:8c:67
Signal : 100%
Radio type : 802.11ac
Channel : 149
Basic rates (Mbps) : 6 12 24
Other rates (Mbps) : 9 18 36 48 54
Example 8: How to Disconnect from Currently Connected Wireless Device
If you want to disconnect from currently connected wireless device then all you need to do is to run netsh wlan disconnect command as shown below.
C:>netsh wlan disconnect
Disconnection request was completed successfully for interface "Wi-Fi".
Example 9: How to Connect to an Available Wireless Device
If you want to connect to an available wireless device by its name then you need to use netsh wlan connect name="<wireless_device_name>" syntax. In this example we are connecting to Fibre You wireless device by using netsh wlan connect name="Fibre You" command as shown below.
C:>netsh wlan connect name="Fibre You"
Connection request was completed successfully.
Example 10: How to Show all the Wireless Interfaces
If you want to check all the information about your Wireless Interface then you need to use netsh wlan show interfaces command as shown below. As you can see in my case, I have only one Qualcomm Wireless Adapter currently available in my System. Similarly, you can check in your System as well.
C:>netsh wlan show interfaces

There is 1 interface on the system:

Name : Wi-Fi
Description : Qualcomm QCA9377 802.11ac Wireless Adapter
GUID : e90ba5b7-5926-4d9f-b09a-3ef5d7357b09
Physical address : 80:7c:a5:41:31:f9
State : connected
SSID : Fibre You
BSSID : a8:da:0a:6d:8c:67
Network type : Infrastructure
Radio type : 802.11ac
Authentication : WPA2-Personal
Cipher : CCMP
Connection mode : Profile
Channel : 149
Receive rate (Mbps) : 433.3
Transmit rate (Mbps) : 433.3
Signal : 100%
Profile : Fibre You

Hosted network status : Not available
Example 11: How to Show Drivers of Wireless Interfaces
If you want to check the wireless interface driver information then you need to use netsh wlan show drivers command as shown below. This will give you complete information about the Wi-fi device driver like vendor details, provider information and driver version.
C:>netsh wlan show drivers

Interface name: Wi-Fi

Driver : Qualcomm QCA9377 802.11ac Wireless Adapter
Vendor : Qualcomm Communications Inc.
Provider : Qualcomm Communications Inc.
Date : 14-06-2020
Version : 12.0.0.953
INF file : oem41.inf
Type : Native Wi-Fi Driver
Radio types supported : 802.11b 802.11a 802.11g 802.11n 802.11ac
FIPS 140-2 mode supported : Yes
Example 12: How to Check Current Proxy Setting in Windows
If you want to check your current proxy setting in Windows then you need to use netsh winhttp show proxy command as shown below.
C:>netsh winhttp show proxy

Current WinHTTP proxy settings:

Direct access (no proxy server).
Example 13: How to Check TCP Global Parameters Status
If you want to check all the TCP Global parameters then you need to use netsh interface tcp show global command as shown below.
C:>netsh interface tcp show global
Querying active state...

TCP Global Parameters
----------------------------------------------
Receive-Side Scaling State : enabled
Receive Window Auto-Tuning Level : normal
Add-On Congestion Control Provider : default
ECN Capability : disabled
RFC 1323 Timestamps : disabled
Initial RTO : 1000
Receive Segment Coalescing State : enabled
Non Sack Rtt Resiliency : disabled
Max SYN Retransmissions : 4
Fast Open : enabled
Fast Open Fallback : enabled
HyStart : enabled
Proportional Rate Reduction : enabled
Pacing Profile : off
Example 14: How to Check UDP Global Parameters Status
If you want to check UDP global parameters status then you need to use netsh interface udp show global command as shown below.
C:>netsh interface udp show global
Querying active state...

UDP Global Parameters
----------------------------------------------
Receive Offload State : disabled
Example 15: How to Disable TCP RSS Global Parameter
If you are looking to disable any of the TCP Global parameter like RSS in this case then you need to use netsh interface tcp set global rss=disabled command as shown below.
C:>netsh interface tcp set global rss=disabled
Ok.
Example 16: How to Enable TCP RSS Global Parameter
Similarly, if you want to enable any of the TCP Global Parameter like RSS in this case then you need to use netsh interface tcp set global rss=enabled command as shown below.
C:>netsh interface tcp set global rss=enabled
Ok.
Example 17: How to List all the defined Aliases
If you want to list all the defined aliases then you need to use netsh show alias command as shown below.
C:>netsh show alias
Example 18: How to Reset Winsock entries to default
If you are facing any issue and want to reset winsock catalog entries then you need to use netsh winsock reset catalog command as shown below.
C:>netsh winsock reset catalog

Sucessfully reset the Winsock Catalog.
You must restart the computer in order to complete the reset.
Example 19: How to Reset TCP/IP Stack to Installation Default
If you are looking to reset TCP/IP stack then you can use netsh int ip reset reset.log command as shown below.
C:>netsh int ip reset reset.log
Reseting Global, OK!
Reseting Interface, OK!
Restart the computer to complete this action.
Example 20: How to Set Proxy in Windows using netsh command
If you want to set proxy in Windows then you can use below netsh command.
C:>netsh winhttp set proxy "myproxy.proxyaddress.com:8484" "<local>;*.proxyaddress.com"

Current WinHTTP proxy settings:

Proxy Server(s) : myproxy.proxyaddress.com:8484
Bypass List : <local>;*.proxyaddress.com
Example 21: How to Change the IP Address of an Interface
You can change the IP address of a network interface using below netsh command.
C:>netsh int ip set address "local area connection" static 192.168.29.101 255.255.255.0 192.168.29.254 1
Now if you check again using ipconfig command then you can see the new IP on below output.
C:>ipconfig

Windows IP Configuration


Ethernet adapter Local Area Connection:

Connection-specific DNS Suffix . :
IPv6 Address. . . . . . . . . . . : 2405:201:a40a:e85d:2160:65ab:c836:964b
Temporary IPv6 Address. . . . . . : 2405:201:a40a:e85d:a5c5:71c7:b0bc:3226
Link-local IPv6 Address . . . . . : fe80::2160:65ab:c836:964b%11
IPv4 Address. . . . . . . . . . . : 192.168.29.101
Subnet Mask . . . . . . . . . . . : 255.255.255.0
Default Gateway . . . . . . . . . : fe80::aada:cff:fe6d:8c46%11
192.168.29.254

Tunnel adapter isatap.{8A0A0AB5-6B66-452F-89EB-265C6BDD1E38}:

Media State . . . . . . . . . . . : Media disconnected
Connection-specific DNS Suffix . :
Example 22: How to Show Multicast Joins for all Network Interfaces
If you want to show multicast joins for all network interfaces then you need to use netsh interface ip show joins command as shown below.
C:>netsh interface ip show joins

Interface 1: Loopback Pseudo-Interface 1

Scope References Last Address
---------- ---------- ---- ---------------------------------
0 1 Yes 239.255.255.250

Interface 17: Wi-Fi

Scope References Last Address
---------- ---------- ---- ---------------------------------
0 0 Yes 224.0.0.1
0 2 Yes 224.0.0.251
0 1 Yes 224.0.0.252
0 1 Yes 239.255.255.250
Example 23: How to Allow a Port from Windows Firewall using netsh command
If you are looking to allow a port from windows firewall then you need to use below netsh advfirewall command. In this example we are allowing Port 3389 from Windows firewall by using netsh advfirewall firewall add rule name="Open Remote Desktop" protocol=TCP dir=in localport=3389 action=allow command as shown below.
C:>netsh advfirewall firewall add rule name="Open Remote Desktop" protocol=TCP dir=in localport=3389 action=allow
Ok.
Example 24: How to Add a Primary DNS Server to an Interface
If you want to add a Primary DNS Server then you need to use netsh interface ip add dns name="<Interface_name>" addr=<IPv4 Address> syntax. In this example we are adding DNS Server 230.92.45.130 to Local Area Connection using netsh interface ip add dns name="Local Area Connection" addr=230.92.45.130 command as shown below.
C:/>netsh interface ip add dns name="Local Area Connection" addr=230.92.45.130
Example 25: How to Allow Ping requests through Windows Firewall
If you want to allow ICMPv4 protocol through Windows Firewall then you need to use netsh advfirewall firewall add rule name="All ICMP V4" dir=in action=allow protocol=icmpv4 command as shown below.
C:>netsh advfirewall firewall add rule name="All ICMP V4" dir=in action=allow protocol=icmpv4
Ok.
Example 26: How to Block Ping requests through Windows Firewall
Similarly if you want to block ICMPv4 protocol through Windows Firewall then you need to use netsh advfirewall firewall add rule name="All ICMP V4" dir=in action=block protocol=icmpv4 command as shown below.
C:>netsh advfirewall firewall add rule name="All ICMP V4" dir=in action=block protocol=icmpv4
Ok.
Example 27: How to Disable Windows Firewall in all Profiles
If you are looking to disable Windows Firewall in all the profiles then you need to use netsh advfirewall set allprofiles state off command as shown below.
C:>netsh advfirewall set allprofiles state off
Ok.
Example 28: How to Reset Windows Firewall Settings to Default
If you are looking to reset windows firewall settings to default values then you need to use netsh advfirewall reset command as shown below.
C:>netsh advfirewall reset
Ok.
Example 29: How to Capture Packets using netsh command
If you are troubleshooting any network issues then you might want to capture the Network Packets to analyze the issue further. This can be easily done by using below netsh trace command. In this example we are starting network packets capture in trace.etl file under C drive using netsh trace start capture=yes tracefile=c:trace.etl persistent=yes maxsize=4096 command as shown below.
C:>netsh trace start capture=yes tracefile=c:trace.etl persistent=yes maxsize=4096

Trace configuration:
-------------------------------------------------------------------
Status: Running
Trace File: c:trace.etl
Append: Off
Circular: On
Max Size: 4096 MB
Report: Off
Example 30: How to Stop Trace using netsh command
If you want to stop the Network trace then you need to use netsh trace stop command as shown below.
C:>netsh trace stop
Merging traces ... done
Generating data collection ... done
The trace file and additional troubleshooting information have been compiled as "c:trace.cab".
File location = c:trace.etl
Tracing session was successfully stopped.
Example 31: How to Check all the Options available with netsh command
If you are looking to check all the options available with netsh command then you need to use netsh /? command as shown below.
C:>netsh /?

Usage: netsh [-a AliasFile] [-c Context] [-r RemoteMachine] [-u [DomainName]UserName] [-p Password | *]
[Command | -f ScriptFile]

The following commands are available:

Commands in this context:
? - Displays a list of commands.
add - Adds a configuration entry to a list of entries.
advfirewall - Changes to the `netsh advfirewall' context.
bridge - Changes to the `netsh bridge' context.
delete - Deletes a configuration entry from a list of entries.
dhcpclient - Changes to the `netsh dhcpclient' context.
dnsclient - Changes to the `netsh dnsclient' context.
dump - Displays a configuration script.
exec - Runs a script file.
firewall - Changes to the `netsh firewall' context.
help - Displays a list of commands.
С выходом Vista в операционной системе Windows появилась функция под названием TCP/IP Receive Window Auto-Tuning, предназначенная для повышения производительности приложений, участвующих в обмене TCP-пакетами по сети. Имеется она и в Windows 10 Anniversary Update, но в отличие от более ранних версий системы, в «десятке» она включена по умолчанию.
Как уже было сказано, главной ее задачей является оптимизация работы сетевых приложений, однако при определенных условиях TCP/IP Receive Window Auto-Tuning может снижать скорость интернет-подключения. Проверить, не вызывает ли она снижение производительности сети, вместо того чтобы ее повышать, очень просто. Откройте от имени администратора командную строку и выполните в ней следующую команду:
netsh interface tcp show global
В результате выполнения команды вы получите список глобальных параметров TCP. Найдите в нем запись «Уровень автонастройки окна получения» и для начала убедитесь, что он имеет значение normal.

Это будет означать, что функция включена. Теперь протестируйте с помощью любых удобных для вас средств скорость интернет-подключения, запишите данные, а затем отключите TCP/IP Receive Window Auto-Tuning командой netsh int tcp set global autotuninglevel=disabled.
После этого еще раз протестируйте скорость интернета и сравните полученные данные. Если функция работала некорректно, скорость соединения должна будет увеличиться. В этом случае функцию автотюнинга можно оставить отключенной. Если же ничего не изменилось, либо напротив, скорость подключения снизилась, сетевой автотюнинг следует включить заново, выполнив в консоли CMD команду netsh int tcp set global autotuninglevel=normal.
Отличного Вам дня!
You can optimize TCP/IP settings in Windows 10 either manually or using a third-party app. Optimizing it can potentially improve your internet connection speed. If you’re wondering whether it’s necessary, what settings you need to change, and how, we’ll walk you through the process. But before that, let’s get some basics out of the way.
What Is TCP/IP?
TCP/IP, short for Transmission Control Protocol/Internet Protocol, is a group of communication protocols that allow network devices to communicate when they’re connected. TCP/IP is a set of rules and procedures that dictate the way data is transmitted and received over the internet.

Your computer system interacts with countless other systems on a network, but at any given point in time, only two systems can communicate with each other. For this communication to work effectively, computers need protocols.
A protocol is a set of rules that computers use for interacting with each other. TCP/IP is a standard communication protocol that allows all computers to interact, regardless of the vendor. IP (Internet Protocol) is like an address where the data is to be sent, while TCP is the method of delivering the data to that address.
TCP and IP are different things, but they’re mostly used together because they rely on each other. Think of a text message for example. An IP address is similar to your phone number; it helps determine where the data is sent. TCP is the technology that transmits the message, plays the notification tone, and allows you to read the text message.
Do You Need to Optimize TCP/IP Settings on Windows 10?
In most cases, there’s no need to optimize TCP/IP settings unless you know a setting that you want to change for a specific purpose.
However, Windows Vista introduced a new feature called Receive Window Auto-Tuning, which monitors several parameters of the TCP including bandwidth and network delay in real-time. It determines the optimal receive window size by measuring products that delay application retrieve rates and bandwidth. Next, it tries to capitalize on the surplus bandwidth by adjusting the receive window size.

This is how the feature scales the TCP receive window to maximize network performance and throughput. Essentially, Windows added a feature to optimize TCP such that it maximizes your network speed.
That said, there are still a few cases where manual optimization may be warranted. For instance, if you’re using Windows XP or an older version of Windows, an old router or modem that doesn’t support the Auto-Tuning feature, or you want to change a specific TCP/IP setting, you’ll need to optimize TCP/IP settings manually.
How to Disable the Auto-Tuning Feature in Windows?
If you have an older version of Windows than Windows Vista or have a router that doesn’t support Auto Tuning, you can easily disable it.
Most third-party TCP optimization tools allow disabling Auto-Tuning from within their interface. However, if yours doesn’t, you can run a few commands to disable Auto-Tuning.
Start by launching the Command Prompt, and run the following commands:
- Check if Auto-Tuning is enabled:
netsh interface tcp show global

If Receive Window Auto-Tuning Level appears as normal, Auto-Tuning is enabled.
- Disable Auto-Tuning:
netsh int tcp set global autotuninglevel=disabled
At this point, you’ll have disabled Auto-Tuning. If you want to re-enable it, run the following command:
netsh int tcp set global autotuninglevel=normal
You can also disable Auto-Tuning from the Registry Editor. Press Win + R, type regedit, and press Enter. Paste the following address in the navigation bar:
HKEY_LOCAL_MACHINESoftwareMicrosoftWindowsCurrentVersionInternet SettingsWinHttp
You’ll need to create a new value in the WinHttp subkey. Right-click in the whitespace and select New > DWORD (32-bit) Value.
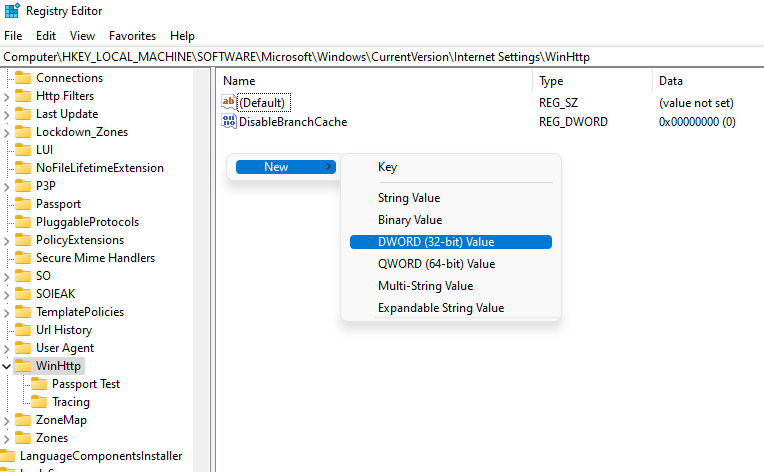
Name the value TcpAutotuning. Double-click on the DWORD, insert 1 in the Value data field and select OK.
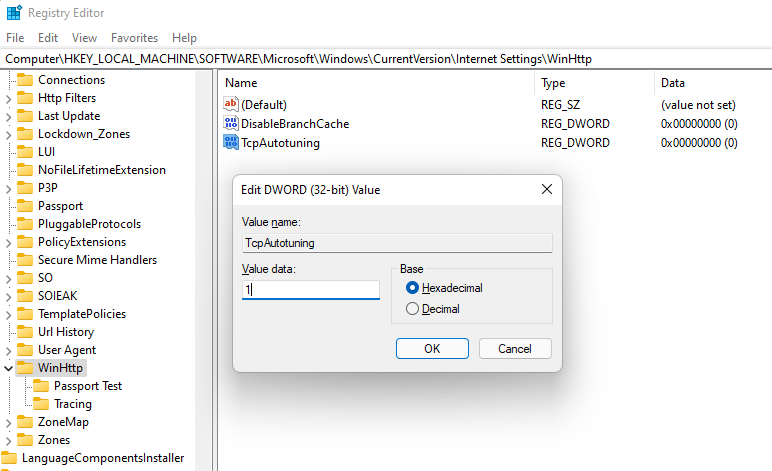
To re-enable, delete the value or set Value data to 0.
The Auto-Tuning feature and TCP/IP settings are pre-configured on Windows 10, which means they’re the same for everyone who uses Microsoft Windows unless they have changed them manually. But even people with the same operating systems can, of course, have different types of internet connections or old routers.
Internet connections may be broadband or fiber, offer different bandwidths, or have different latency. You can tweak your TCP/IP settings such that they work best for the specific characteristics of your internet connection.
If you’re tech-savvy, you can optimize TCP/IP on Windows 10 by changing Windows registry settings, or by running a combination of commands in the Command Prompt. But the process is much simpler with a third-party tool because you’ll be able to do everything using an interface and from one place.
Download TCP Optimizer
Before you can start optimizing your TCP/IP settings, you’ll need to download a third-party tool like TCP Optimizer.
Download it, right-click on the downloaded file, and select Run as administrator.
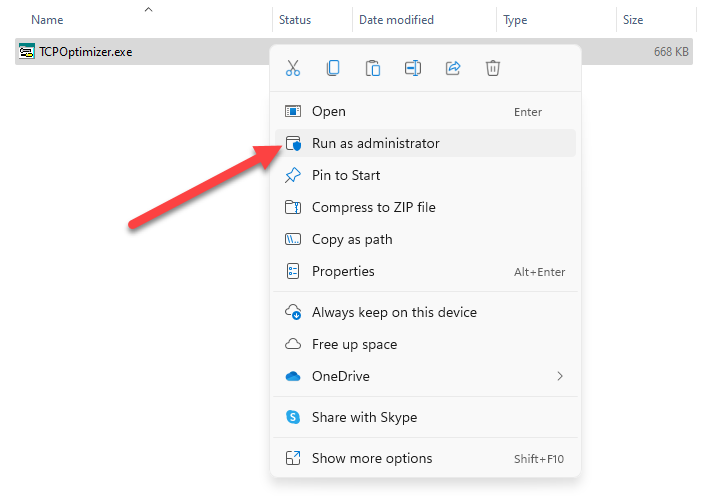
You’ll see the interface on your screen now.
Optimize TCP/IP
To start, you’ll need to only insert your internet speed into the TCP Optimizer and it will optimize all settings accordingly. Set the speed to the maximum speed that your internet connection offers. This is the maximum bandwidth available, not your LAN speed. For instance, if your bandwidth is 50Mbps connection, set the speed to 50 Mbps.
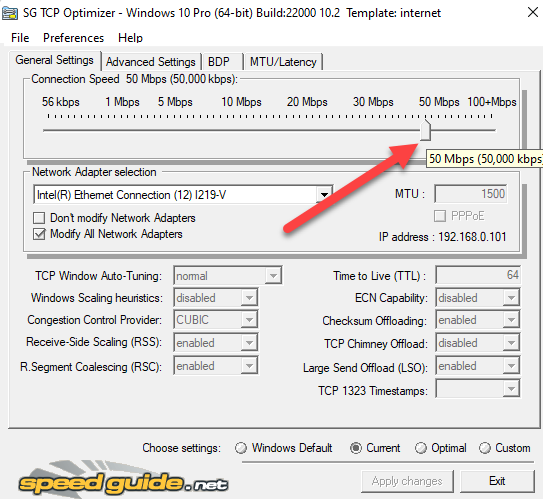
Then, select Optimal from the Choose settings section at the bottom and select Apply changes.
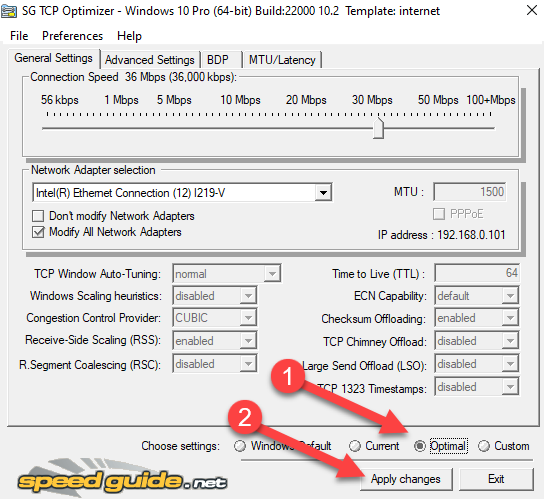
On the window that pops up, check both boxes next to Backup and Create Log at the bottom right, and select OK.
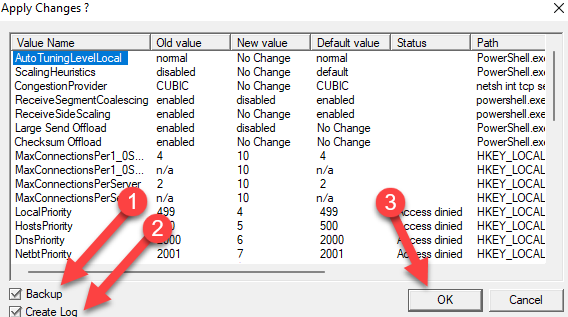
You’ll be prompted for a reboot, click Yes. Click No if you want to reboot later. Changes are applied only after the reboot, though.
That’s it, you’re done.
If something goes wrong, you can always revert to the default settings because TCP Optimizer automatically creates a backup of your settings before applying any changes.
If you know your way around networking and you want to change individual settings, start by selecting Custom in the Choose settings section at the bottom. Once you do this, you’ll see that all settings that were grayed out before can now be tweaked.
Before you change any settings, make sure that you’ve selected the correct network adapter in the Network Adapter selection section.
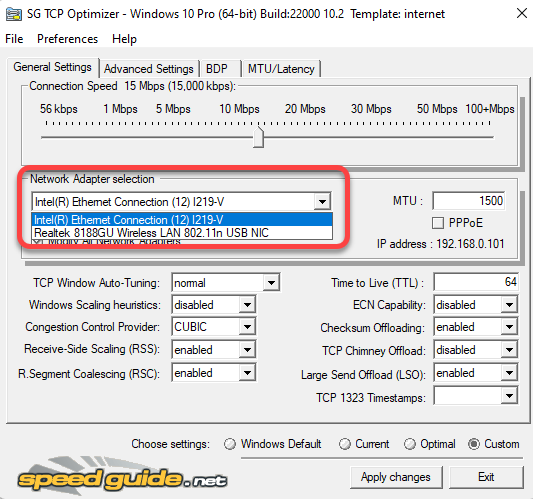
You can then change the MTU, Congestion Control Provider, and even advanced TCP/IP parameters like QoS. But these are typically helpful when you have an exact problem you’re trying to solve and know how to solve it using these settings.
For instance, if you’re a gamer trying to optimize your internet speed, you can switch over to the Advanced Settings tab and disable the Network Throttling Index and Nagle’s algorithm.
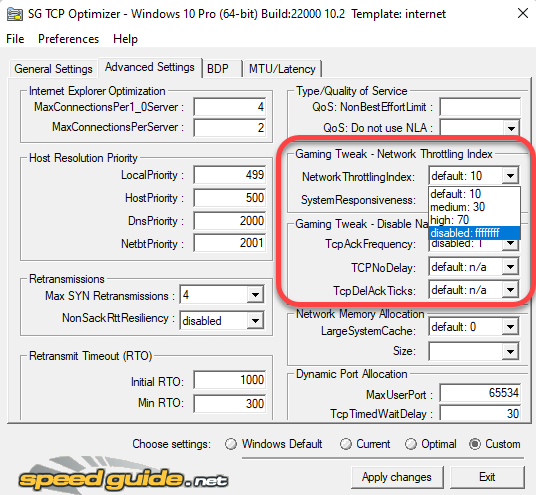
TCP Optimizer comes with a lot of advanced functionality, but it’s best not to tinker with those unless you know what you’re doing. Plus, applying the optimal settings using TCP Optimizer, in most cases, is more than enough to optimize your TCP/IP settings on Windows 10.
If you do mess something up, you can always apply the default Windows settings and reset TCP/IP and WINSOCK from the File menu at the top.

TCP Settings, Optimized
Optimizing TCP can be very helpful when you want to ensure high performance from your network connections. If the current settings aren’t allowing you to leverage your internet plan’s full potential, you may try optimizing TCP settings.
Of course, it’s best to ensure that optimization is in fact warranted. For instance, it’s possible that all you need to do is improve your WiFi signal to get better internet speeds. Note that there are several other ways of improving your upload and download speeds too.
На чтение 12 мин Просмотров 28.3к.

Сергей Сакадынский
Работал в сфере IT-консалтинга, занимался созданием и администрированием интернет-ресурсов. 10 лет опыта работы по проектированию и обслуживанию компьютерных сетей.
Домашний интернет подключен, провайдер заявляет высокую скорость, а на компьютере видео с YouTube воспроизводится рывками, окна в браузере открываются медленно, загрузка файлов жутко тормозит. При этом с подключением проблем нет и на других устройствах всё работает без проблем. Помучавшись день-другой, пользователь начинает переустанавливать Windows. А зря, ведь есть способы решить эту проблему средствами системы.
Ниже речь пойдёт о том, как увеличить скорость интернета в Windows 10 без переустановки операционки.
Содержание
- Причины медленного интернета
- Проверьте скорость
- Способы ускорения
- Проверка загруженности
- Средство устранения неполадок
- Отключение ограничения QoS и настройка адаптера
- Приостановка обновлений Windows
- Отключение автоподстройки TCP
- Увеличение кэша DNS
- Оптимизация torrent
- Обновление драйвера
- Включение турборежима в браузерах
- Вирусы, очистка ПК
- Настройка роутера
- Программы для оптимизации
- Ashampoo Internet Accelerator
- Advanced System Care
- Cfosspeed
- Netscream
Причины медленного интернета
Интернет на компьютере или ноуте с Windows 10 действительно может работать медленно из-за неверных параметров операционной системы или внутренних сбоев. Скорость режется по таким причинам:
- проблемы с сетевой картой: установлены устаревшие драйверы или адаптер неисправен;
- неправильные настройки системы, сетевой карты, браузера, роутера;
- установлены лимиты скорости интернета;
- работа в фоновом режиме приложений, потребляющих трафик;
- на компьютере есть вирусы.
Подробнее о причинах медленного интернета читайте по ссылке. Почти все эти проблемы пользователь может решить самостоятельно.
Проверьте скорость
Для начала проверьте реальную скорость интернета на вашем компьютере.
Перед проверкой закройте все программы, которые могут потреблять трафик. Сравните результат теста с заявленной скоростью в тарифном плане провайдера. Лучше выполнить несколько проверок в разное время суток, потому что кратковременное ухудшение работы интернета может быть связано с чрезмерной загрузкой сети, сбоями, погодными условиями и другими факторами. Если скорость стабильно маленькая (меньше ожидаемой), значит, проблема действительно существует.
Параллельно проведите замеры с другого устройства. Удостоверьтесь, что проблема проявляется на конкретном компьютере, а не в сети.
Теперь можно переходить к диагностике и устранению неисправностей.
Способы ускорения
Разберёмся детально, как ускорить интернет на Windows 10.
Проверка загруженности
Первым делом разберёмся с программами, которые могут «воровать» трафик.
Если вы закрыли все окна браузера, отключили торрент и автозагрузку обновлений, это еще не означает, что на компьютере фоновые приложения не используют подключение к интернету. Выявить «нарушителей» на компьютере с Windows поможет диспетчер задач.
Запускаем его одновременным нажатием клавиш Ctrl+Shift+Esc. Или кликаем правой кнопкой мыши на меню «Пуск», выбираем «Диспетчер задач» и попадаем на вкладку «Процессы».

Обратите внимание на цифры в последней колонке «Сеть». Здесь отображается информация о том, сколько каждое приложение в данный момент потребляет трафика. Просмотр этих сведений позволит понять общую ситуацию с нагрузкой на сеть.

Для получения детальной информации перейдите на вкладку «Производительность» и внизу окна кликните ссылку «Открыть монитор ресурсов». Здесь выберите вкладку «Сеть». На ней будут отображены программы, использующие интернет-подключение в текущий момент. Отключите самые прожорливые. Для этого кликните на имя приложения в списке правой кнопкой и выберите пункт «Завершить процесс».

Снова проверьте скорость интернета. Если она в норме, значит, проблема найдена. Удалите ненужные приложения или в настройках запретите им самостоятельно подключаться к интернету.
Средство устранения неполадок
Для автоматического поиска и решения проблем с подключением используйте встроенную утилиту Windows.
- В правом нижнем углу, рядом с часами найдите значок подключения к сети и кликните на него правой кнопкой мышки. Выберите пункт «Диагностика неполадок».

- Запустится средство диагностики. Дождитесь завершения процесса и следуйте подсказкам.


Отключение ограничения QoS и настройка адаптера
QoS — это технология, которая управляет приоритетами трафика на вашем компьютере. Устроена она довольно сложно, поэтому разбирать детально её мы не будем. Нам только нужно проверить, включена ли она у вас, и снять установленные в её настройках ограничения.
Для начала проверяем, активна ли QoS на компьютере. Правой кнопкой нужно кликнуть на сетевое подключение в трее, выбрать «Параметры сети и интернет», а в открывшемся окне перейти в раздел Ethernet (неважно у вас проводной или wi-fi wireless адаптер). Здесь жмём ссылку «Настройка параметров адаптера».

Откроется список ваших сетевых адаптеров. Выберите тот, который используется для подключения к интернету, кликните на него правой кнопкой мыши и откройте свойства. Здесь должна стоять галочка напротив пункта «Планировщик пакетов QoS».

Установите её, если галочки нет.
Теперь снимаем ограничения QoS. Дело в том, что планировщик резервирует до 20% скорости для служебных программ и обновлений. Нам это ни к чему.
Жмём клавиши Win + R, вводим команду gpedit.msc и в открывшемся окне ищем раздел «Конфигурация компьютера».
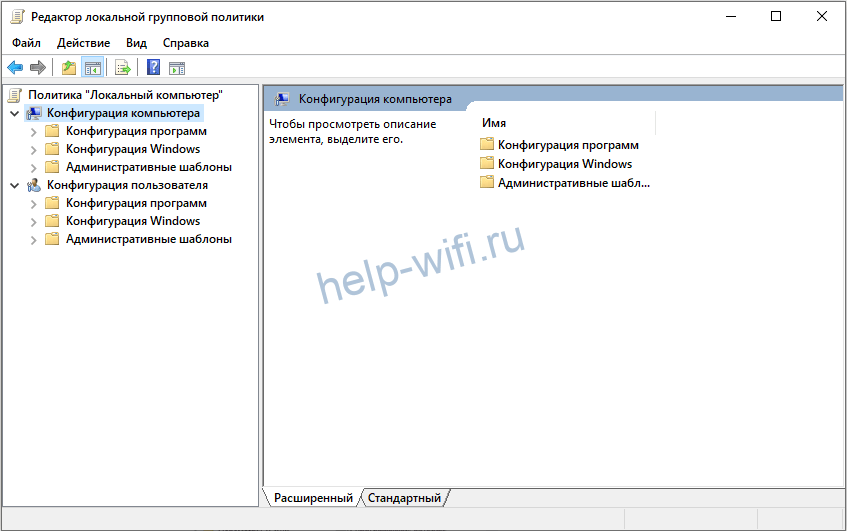
Открываем папку «Административные шаблоны», подпапку «Сеть» — «Планировщик пакетов QoS». Дважды кликните пункт «Ограничить резервируемую пропускную способность». В отрывшемся окне установите флажок «Включено», а в окошке «Ограничение пропускной способности» замените цифру на 0. Нажмите кнопку «ОК» для сохранения настроек.

Приостановка обновлений Windows
Если у вас включена функция автоматического обновления Windows, система сама будет загружать требуемые файлы по мере их появления на сервере Microsoft. Это удобно, потому что не требует вмешательства пользователя. Но проблема в том, что загрузку обновлений ОС может начать в самое неподходящее время – когда вы смотрите фильм в интернете или скачиваете его на компьютер. Можно ограничить эту функцию, чтобы застраховаться от падения скорости в такие моменты.
Нажмите одновременно клавиши Win + i на клавиатуре. Откроется окно «Параметры Windows». В самом низу кликните пункт «Обновление и безопасность», а в следующем окне «Центр обновления Windows». Здесь можно приостановить обновление Windows на 7 дней или до определённой даты (используйте пункт «Дополнительные параметры»).

Отключение автоподстройки TCP
Эта функция используется для повышения производительности служб Windows. Можно попробовать её отключить, чтобы улучшить интернет на компьютере с Windows 10. Для этого понадобится ввести пару команд в консоли.
Кликните правой кнопкой на меню «Пуск» и выберите пункт «Командная строка (администратор)», подойдет и PowerShell.
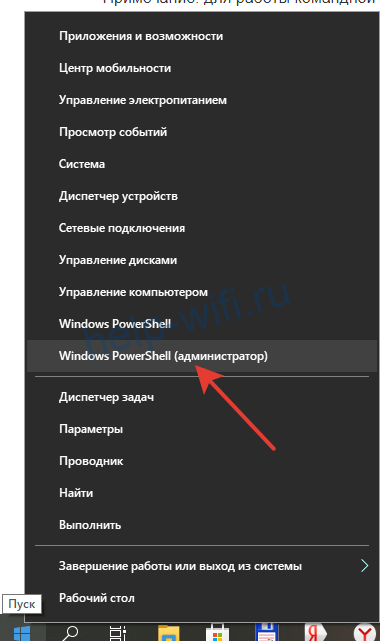
Сначала проверяем статус функции. Вводим команду netsh interface tcp show global и жмём Enter. По умолчанию значение интересующего нас параметра normal.
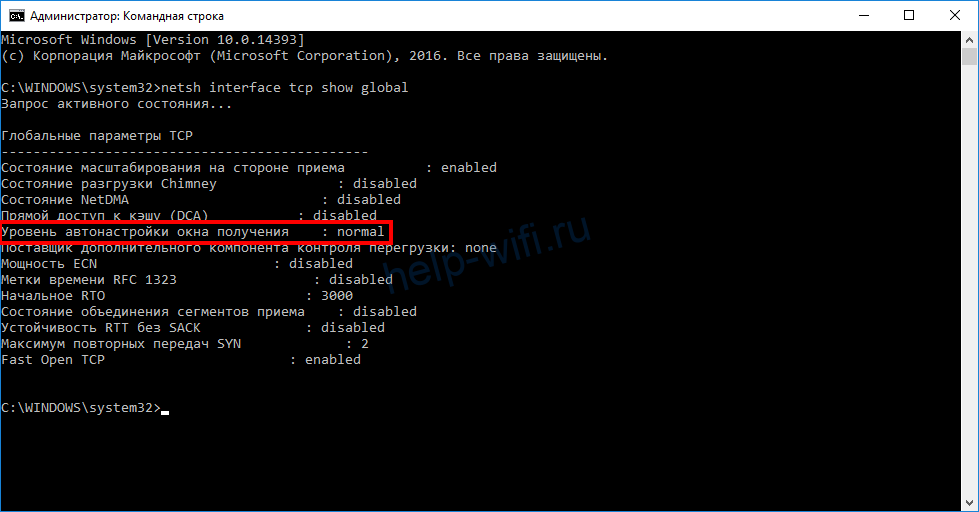
Отключаем функцию командой netsh int tcp set global autotuninglevel=disabled и снова проверяем статус.

Значение должно измениться на disabled.
Если после внесённых изменений скорость интернета не изменилась или, наоборот, возникли проблемы, вернуть исходные параметры вы можете командой netsh int tcp set global autotuninglevel=normal.
Увеличение кэша DNS
Кэш DNS — это место на диске, зарезервированное для хранения адресов часто посещаемых сайтов. Если оно слишком мало, браузер начинает тормозить. Для решения проблемы увеличиваем дисковое пространство для файлов DNS. Это поможет повысить скорость интернета на Windows 10.
Нажимаем Win+R и командой regedit открываем редактор реестра. Переходим в раздел HKEY_LOCAL_MACHINESYSTEMCurrentControlSetServicesDNScacheParameters и кликаем на пустом месте или на названии раздела правой кнопкой мыши. В появившемся меню выбираем «Создать» — «Параметр DWORD (32 бита)».

Нужно создать четыре параметра с такими названиями и значениями:
- CacheHashTableBucketSize со значением — 1;
- CacheHashTableSize, значение — 384;
- MaxCacheEntryTtlLimit, значение — 64000;
- MaxSOACacheEntryTtlLimit, значение — 301

Вводить данные нужно в десятичной системе, так что обязательно переставьте флажок в этот пункт.
Перезагрузите компьютер. Затем очистите кэш. Для этого запустите командную строку и последовательно выполните команды ipconfig /registerdns, ipconfig /release и ipconfig /renew.
Это позволит существенно ускорить загрузку страниц, которые вы посещаете чаще всего.
Оптимизация torrent
Если вы используете торрент или другой менеджер загрузок, в фоновом режиме он продолжает раздавать файлы, даже если сейчас вы ничего не качаете. Это может значительно нагружать канал связи.
Тут есть два варианта.
Первый – когда вы не скачиваете файлы, полностью закрывайте программу. В случае с торрентом при нажатии на крестик в правом верхнем углу этого не происходит. Приложение сворачивается в трей и продолжает работать. Чтобы выйти из программы, откройте меню Файл (File) и нажмите «Выход» (Exit).

Если же вы не хотите отключать раздачу, тогда установите лимиты скорости для торрент-клиента. Это можно сделать в настройках программы для всех файлов или ограничить скорость каждой раздачи в отдельности.
Простой способ установить ограничение скорости для torrent – кликнуть правой кнопкой мыши на значок в трее и установить значения для Download Limit и Upload Limit.
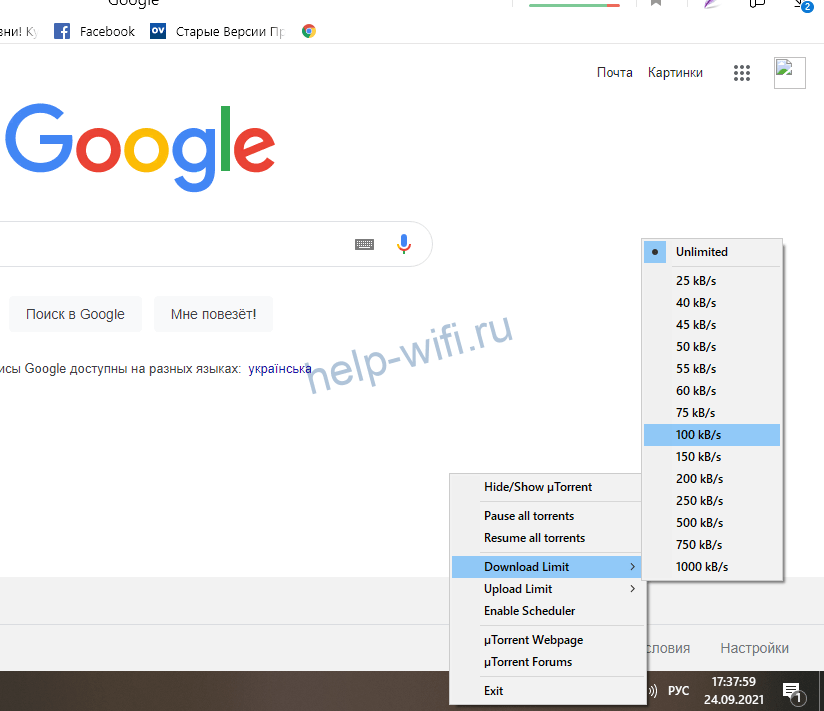
Обновление драйвера
Плохой инет на компьютере может быть из-за неправильно установленных или устаревших драйверов сетевой карты.
Часто после переустановки Windows система сама устанавливает свои драйвера. Но они не всегда полностью соответствуют устройству. Адаптер при этом вроде бы работает, но скорость соединения низкая, происходят обрывы связи. Поэтому рекомендуется устанавливать оригинальные драйвера с прилагаемого к компьютеру диска или скачать их с сайта производителя.
Если нужного файла у вас нет и вы не знаете, где его взять, попробуйте обновить драйвер автоматически. Правой кнопкой кликните на значок «Этот компьютер» и откройте «Диспетчер устройств». Найдите ваш сетевой адаптер, также нажмите на нём правой кнопкой мыши и выберите «Обновить драйвер». В открывшемся окне кликните «Автоматический поиск обновлённых драйверов».

Если это не помогло, воспользуйтесь одной из программ для поиска и установки драйверов — Driver Booster Free, DriverHub, DriverPack Solution, Carambis Driver Updater, Auslogics Driver Updater · SlimDrivers.
При условии, что ваша карта исправна, обновление драйверов поможет улучшить её работоспособность.
Включение турборежима в браузерах
В некоторых интернет-браузерах есть функция турборежим, ускоряющая загрузку веб-страниц.
К сожалению, в Яндекс.Браузере с мая 2021 года на ПК турборежим не поддерживается. Его можно использовать только в мобильной версии. В Opera эту функцию убрали ещё раньше, в 2019 году.
Для Google Chrome нужно установить дополнение «Экономия трафика» из магазина приложений. Оно будет активно постоянно.

Если кликнуть на иконку дополнения, отобразится информация о том, сколько трафика сэкономлено.
Для Firefox работает такой способ. В адресной строке введите about:config. Откроется окно с предупреждением. Здесь нужно установить галочку и согласиться принять все риски, связанные с изменением конфигурации.
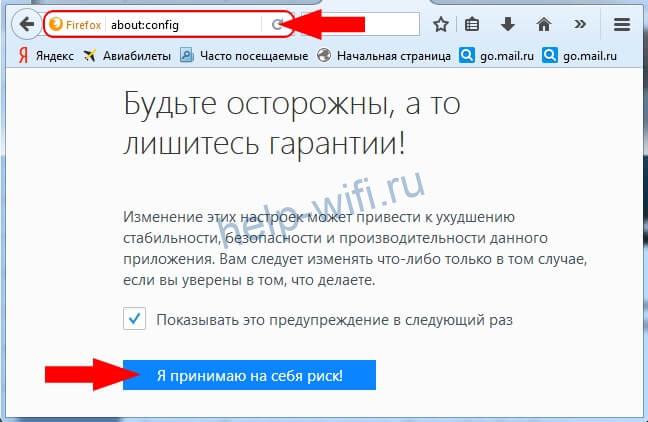
В следующем окне в поисковую строку впишите network.prefetch-next. Появится строка с настройкой. По ней нужно дважды кликнуть левой кнопкой, чтобы значение изменилось с true на false. Закройте окно и перезапустите браузер.
Правда, использование турбо режима не повысит пропускную способность канала, а только уменьшит расход трафика.
Вирусы, очистка ПК
Распространённая проблема – заражение компьютера вирусами. Эти вредоносные программы используют интернет-канал для загрузки или выгрузки файлов, рассылки спама или самих себя, а бывает, просто блокируют трафик. Не пренебрегайте антивирусами. А если уже начались проблемы с интернетом, помимо всего выше перечисленного, обязательно просканируйте компьютер на предмет наличия незваных гостей. Обычно это позволяет ускорить интернет по вайфай или кабелю на ноутбуке и ПК с Виндовс 10.
Также неплохо будет использовать CCleaner и почистить ваш ПК от накопившегося мусора. Помимо интернета это поможет ускорить работу самой ОС.
Настройка роутера
Возможно, проблема кроется в маршрутизаторе. Для проверки попробуйте подсоединить кабель провайдера напрямую к компьютеру и замерить скорость. Если скорость с роутером в разы меньше, чем без него, нужно провести некоторые действия.
- Для начала заходим в веб интерфейс роутера и проверяем настройки интернета. Далее сравниваем с настройками провайдера, если все в порядке, переходим к следующему пункту.
- Обновляем версию прошивки устройства. Ищем раздел Обновления и обновляем версию до последней.
- Возможно, нужно поменять канал на wi-fi роутере и увеличить мощность сигнала. Подробная статья по ссылке.

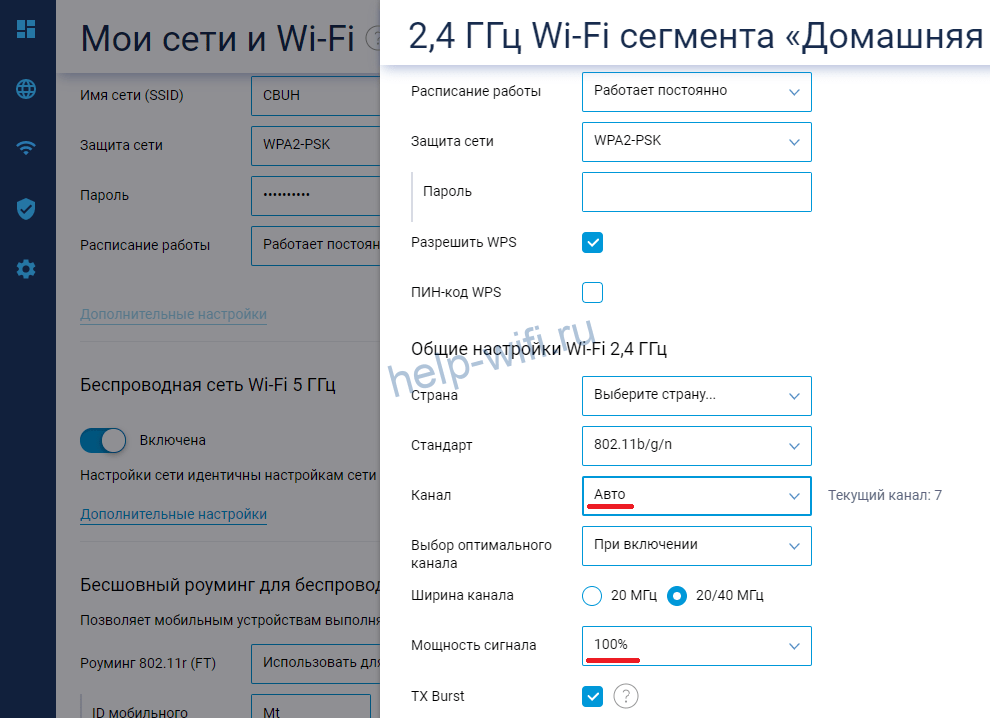
Программы для оптимизации
Для оптимизации интернет-соединения на Windows 10 существуют программы и утилиты, позволяющие настроить всё в одном окне. Это способ для тех, кто не хочет ковыряться в параметрах системы и изменять их вручную.
Ashampoo Internet Accelerator
Эта программа предельно проста в использовании. Она автоматически оптимизирует веб-трафик. Качаем программу и устанавливаем на компьютер. После первого запуска выбираем автоматический режим. Здесь из выпадающего списка выбираем подключения, которые будем оптимизировать, и жмём «Начать».
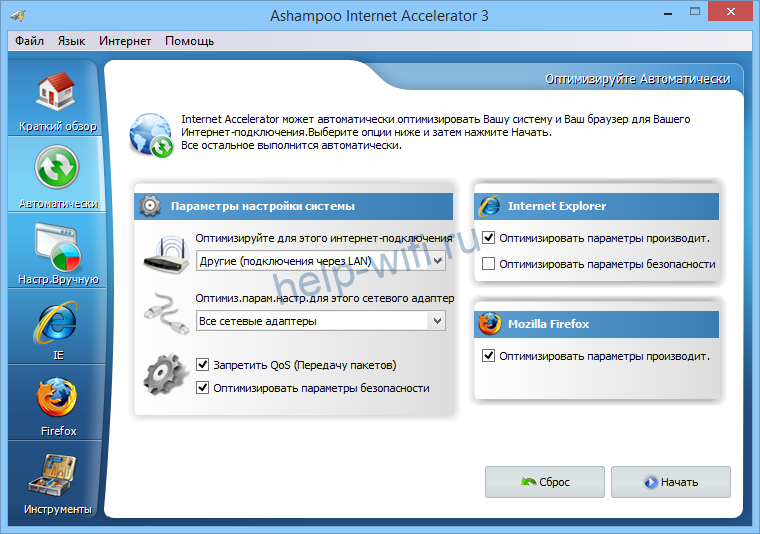
В открывшемся окошке подтверждаем выбор. Программа выполнит действия по оптимизации соединения и выдаст сообщение о готовности.
Advanced System Care
Это многофункциональная программа, которая позволяет не только ускорить интернет, но ещё и очистить компьютер от мусора, настроить параметры безопасности и многое другое.
После установки программы в главном окне выберите действия, которые хотите выполнить, и нажмите кнопку «Пуск».

Программа запустит оптимизацию системы, удалит ненужные файлы, очистит кэш.
Для ускорения работы интернета на вкладке «Защита» нужно включить опцию «Защита серфинга и Удаление рекламы».

Cfosspeed
Утилита позволяет улучшить работу программ и интернета на Виндовс 10. Рекомендуется для повышения скорости в онлайн-играх.
После установки и запуска в первом окне (общие настройки) ставим галочки во всех трёх пунктах.
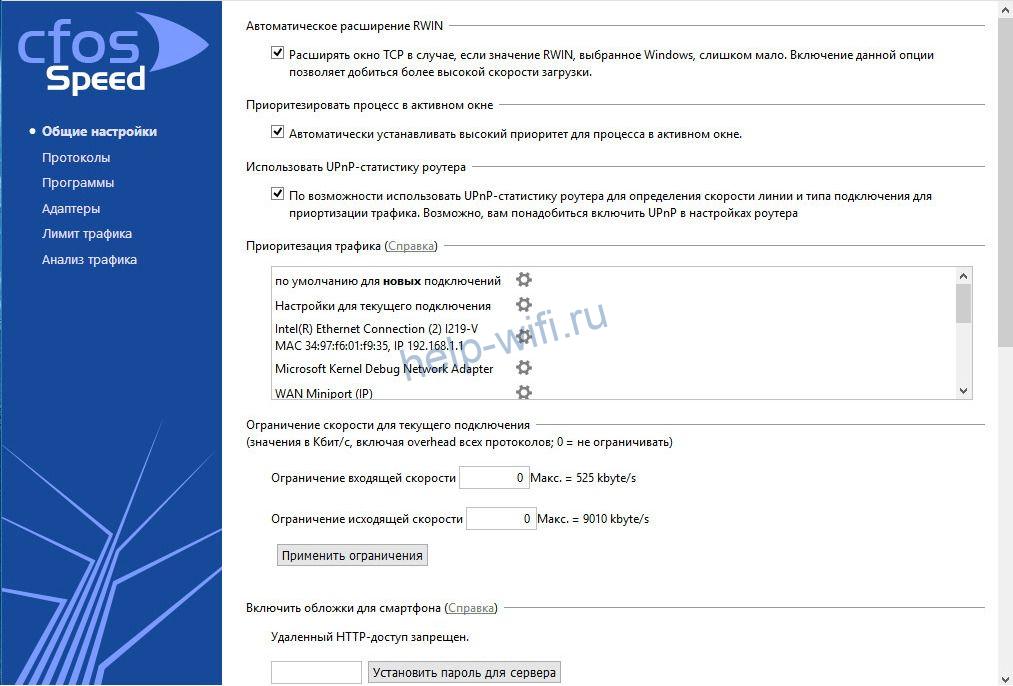
В разделах «Протоколы» и «Программы» установить приоритеты с помощью ползунков. Всё интуитивно понятно – для каждого приложения настраивается приоритет в зависимости от того, как часто вы им пользуетесь.
При желании можно настроить лимит трафика в соответствующем разделе.
Netscream
Программа умеет работать с разными типами соединений и может заметно поднять скорость интернета. При первом запуске, если она неверно определила вашу операционную систему и тип подключения, выставьте их вручную.
Ползунок Speed Setting переместите в положение Maximum Boost и нажмите кнопку Optimize now. Подтвердите ваши действия нажатием кнопки ОК и перезагрузите компьютер.