При обслуживании больших сетей системные администраторы часто сталкиваются с проблемами аутентификации на сетевом оборудовании. В частности, довольно сложно организовать нормальную работу нескольких сетевых администраторов под индивидуальными учетными записями на большом количестве оборудования (приходится вести и поддерживать в актуальном состоянии базу локальных учетных записей на каждом устройстве). Логичным решение было бы использовать для авторизации уже существующей базы учетных записей — Active Directory. В этой статье мы разберемся, как настроить доменную (Active Directory) аутентификацию на активном сетевом оборудовании (коммутаторы, маршрутизаторы).
Не все сетевое оборудование популярных вендоров (CISCO, HP, Huawei) поддерживает функционал для непосредственного обращения к каталогу LDAP, и такое решение не будет универсальным. Для решения нашей задачи подойдет протокол AAA (Authentication Authorization and Accounting), фактически ставший стандартом де-факто для сетевого оборудования. Клиент AAA (сетевое устройство) отправляет данные авторизующегося пользователя на сервер RADIUS и на основе его ответа принимает решение о предоставлении / отказе доступа.
Протокол Remote Authentication Dial In User Service (RADIUS) в Windows Server 2012 R2 включен в роль NPS (Network Policy Server). В первой части статьи мы установим и настроим роль Network Policy Server, а во второй покажем типовые конфигурации сетевого устройств с поддержкой RADUIS на примере коммутаторов HP Procurve и оборудования Cisco.
Содержание:
- Установка и настройка сервера с ролью Network Policy Server
- Настройка сетевого оборудования для работы с сервером RADUIS
Установка и настройка сервера с ролью Network Policy Server
Как правило, сервер с ролью NPS рекомендуется устанавливать на выделенном сервере (не рекомендуется размещать эту роль на контроллере домена). В данном примере роль NPS мы будем устанавливать на сервере с Windows Server 2012 R2.
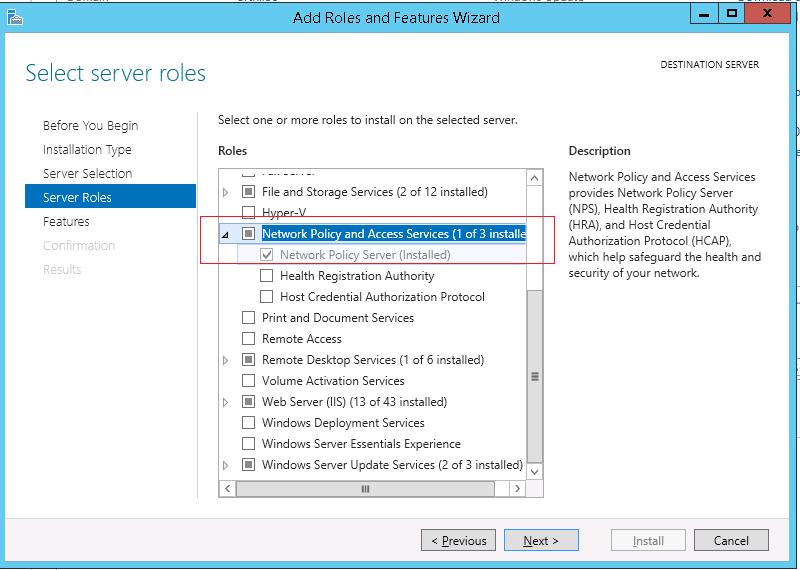
Откройте консоль Server Manager и установите роль Network Policy Server (находится в разделе Network Policy and Access Services).
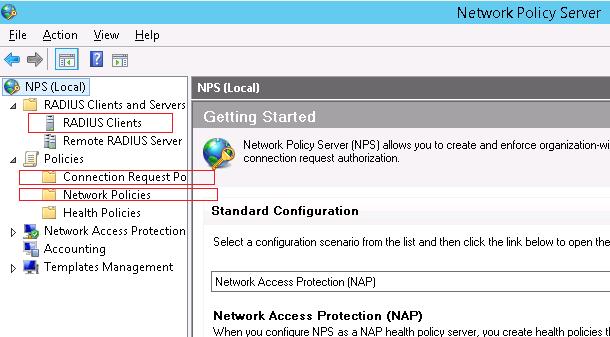
 После окончания установки запустите mmc-консоль управления Network Policy Server. Нас интересуют три следующих раздела консоли:
- RADIUS Clients — содержит список устройств, которые могут аутентифицироваться на сервере
- Connection Request Policies – определяет типы устройств, которые могут аутентифицироваться
- Network Polices – правила аутентификации
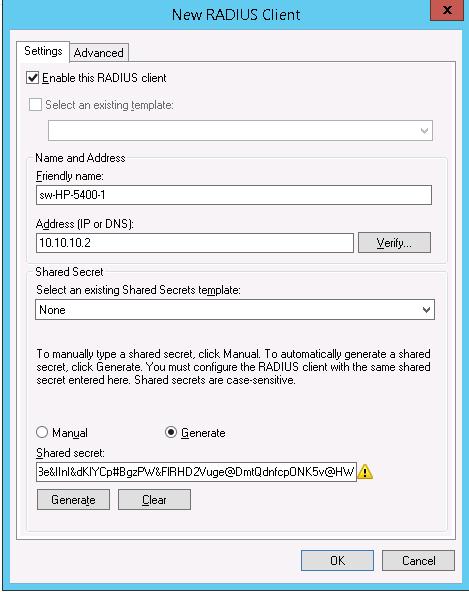
 Добавим нового клиента RADIUS (это будет коммутатор HP ProCurve Switch 5400zl), щелкнув ПКМ по разделу RADIUS Clients и выбрав New. Укажем:
- Friendly Name:sw-HP-5400-1
- Address (IP or DNS): 10.10.10.2
- Shared secret (пароль/секретный ключ): пароль можно указать вручную (он должен быть достаточно сложным), либо сгенерировать с помощью специальной кнопки (сгенерированный пароль необходимо скопировать, т.к. в дальнейшем его придется указать на сетевом устройстве).
 Отключим стандартную политику (Use Windows authentication for all users) в разделе Connection Request Policies, щелкнув по ней ПКМ и выбрав Disable.
Создадим новую политику с именем Network-Switches-AAA и нажимаем далее. В разделе Сondition создадим новое условие. Ищем раздел RADIUS Client Properites и выбираем Client Friendly Name.
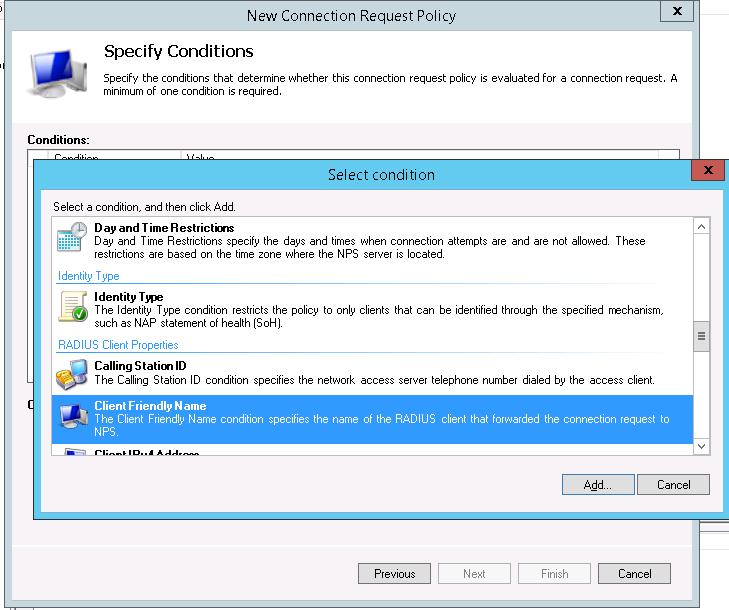 В качестве значения укажем sw-?. Т.е. условие будет применяться для всех клиентов RADIUS, начинающийся с символов :”sw-“. Жмем Next->Next-> Next, соглашаясь со всеми стандартными настройками.
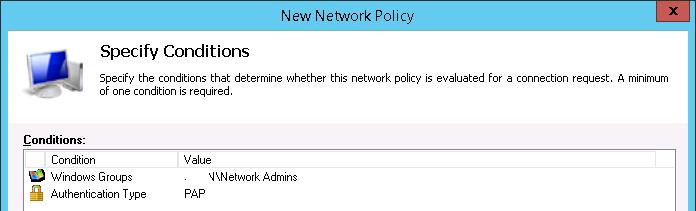
Далее в разделе Network Policies создадим новую политику аутентификации. Укажите ее имя, например Network Switch Auth Policy for Network Admins. Создадим два условия: в первом условии Windows Groups, укажем доменную группу, члены которой могут аутентифицироваться (учетные записи сетевых администраторов в нашем примере включены в группу AD Network Admins) Второе условие Authentication Type, выбрав в качестве протокола аутентификации PAP.
 Далее в окне Configure Authentication Methods снимаем галки со всех типов аутентификации, кроме Unencrypted authentication (PAP. SPAP).
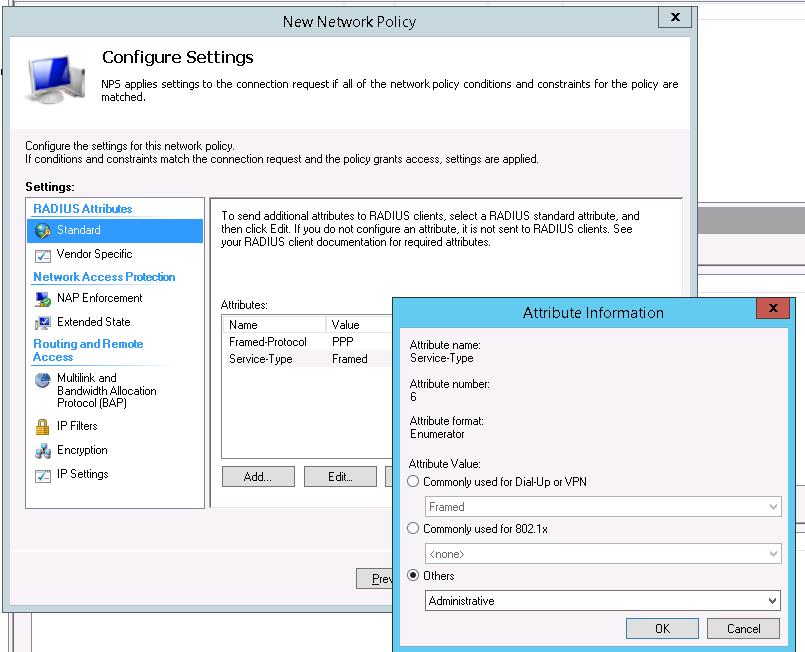
В окне Configure Settings изменим значение атрибута Service-Type на Administrative.
 В остальных случаях соглашаемся со стандартными настройками и завершаем работу с мастером.
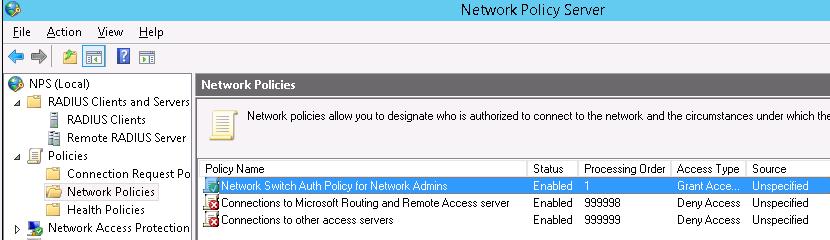
И, напоследок, переместим новую политику на первое место в списке политик.
Настройка сетевого оборудования для работы с сервером RADUIS
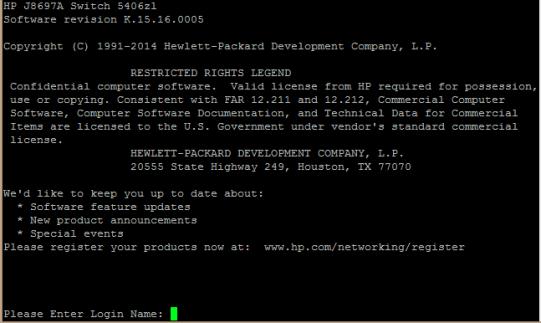
Осталось настроить наше сетевое оборудование для работы с сервером Radius. Подключимся к нашему коммутатору HP ProCurve Switch 5400 и внесем следующе изменение в его конфигурацию (измените ip адрес сервера Raduis и пароль на свои).
aaa authentication console enable radius local

aaa authentication telnet login radius local

aaa authentication telnet enable radius local

aaa authentication ssh login radius local

aaa authentication ssh enable radius local

aaa authentication login privilege-mode

radius-server key YOUR-SECRET-KEY

radius-server host 10.10.10.44 YOUR-SECRET-KEY auth-port 1645 acct-port 1646

radius-server host 10.10.10.44 auth-port 1645

radius-server host 10.10.10.44 acct-port 1646
Совет. Если в целях безопасности вы запретили подключаться к сетевому оборудованию через telnet, эти строки нужно удалить из конфига:
aaa authentication telnet login radius local

aaa authentication telnet enable radius local
Не закрывая консольное окно коммутатора (это важно!, иначе, если что-то пойдет не так, вы более не сможете подключиться к своему коммутатору), откройте вторую telnet-сессию. Должно появиться новое окно авторизации, в котором будет предложено указать имя и пароль учетной записи. Попробуйте указать данные своей учетной записи в AD (она должна входить в группу Network Admins ). Если подключение установлено – вы все сделали правильно!
 Для коммутатора Cisco конфигурация, предполагающая использование доменных учетных записей для аутентификации и авторизации, может выглядеть так:
Примечание. В зависимости от модели сетевого оборудования Cisco и версии IOS конфигурация может несколько отличаться.
aaa new-model
radius-server host 10.10.10.44 auth-port 1645 acct-port 1646 key YOUR-SECRET-KEY
aaa authentication login default group radius local
aaa authorization exec default group radius local
ip radius source-interface Vlan421
line con 0
line vty 0 4
line vty 5 15
Примечание. В такой конфигурации для аутентификации сначала используется сервер RADIUS, а если он не доступен – локальная учетная запись.
Для Cisco ASA конфигурация будет выглядеть так:
aaa-server RADIUS protocol radius
aaa-server RADIUS host 10.10.10.44 key YOUR-SECRET-KEY
radius-common-pw YOUR-SECRET-KEY
aaa authentication telnet console RADIUS LOCAL
aaa authentication ssh console RADIUS LOCAL
aaa authentication http console RADIUS LOCAL
aaa authentication http console RADIUS LOCAL
Совет. Если что то-не работает, проверьте:
- Совпадают ли секретные ключи на сервере NPS и коммутаторе (для теста можно использоваться простой пароль).
- Указан ли правильный адрес NPS сервера в конфигурации. Пингуется ли он?
- Не блокируют ли межсетевые экраны порты 1645 и 1646 между коммутатором и сервером?
- Внимательно изучите логи NPS сервера
Network Policy Server, what is NPS all about?
NPS enables you to create and enforce organization-wide network access policies for client health, connection request authentication, and connection request authorization.
You also can use NPS as a RADIUS proxy to forward connection requests to NPS or other RADIUS servers that you configure in remote RADIUS server groups.
You can use NPS to implement network-access authentication, authorization, and client health policies with any combination of the following 3 functions:
• RADIUS server
• RADIUS proxy
• NAP policy server
More information please log in to : http://msdn.microsoft.com/en-us/library/cc732912.aspx
This will be a very long step to go through, so please take your time and make sure you have a working domain lab for you to install & configure NPS…
What you will find in my post today will be straight forward process to deploy & configure NPS, there was many things you can do with NPS.. so please spend some time browsing to Microsoft technet for more details information…
Lets get started by installing NPS role and this NPS role later will be use to support RADIUS…
1 – On the Domain server (OSI-ADDS01), open Server Manager, click Add roles and features…

2 – Next, on the Select installation type interface, click Role-based or feature based installation, and then click Next to proceed…

3 – On the Select destination server interface, click Next…

4 – On the Select server roles interface, select the Network Policy and Access Services check box and then click Next…

5 – On the Select features interface, just click Next to proceed…

6 – Next, on the Network Policy and Access Services page, click Next…

7 – Next, on the Select role services interface, click Network Policy Server check box, and then click Next…

8 – On the Confirm installation selections interface, click Install…

9 – Next, verify that our installation was successful, and then click Close…

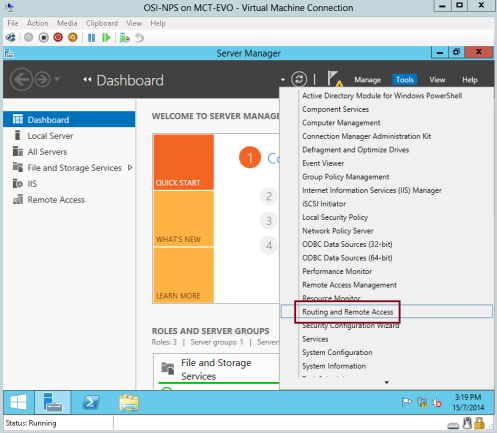
10 – Next, on the Server Manager, click Tools and then click Network Policy Server…

11 – In Network Policy Manager interface, in the navigation pane, right-click NPS (Local), and then click Register server in Active Directory…

12 – In the Network Policy Server message box, just click OK to proceed…

13 – In the subsequent Network Policy Server interface, click OK…

14 – Next, lets continue with configuring NPS Templates… In the Network Policy Server console, right-click Shared Secrets, and then click New…

15 – Next, in the New RADIUS Shared Secret Template interface, in the Template name box, type OSI Security (you can fill in any name you prefer), then in the Shared secret and Confirm shared secret boxes, type your preferred password and then click OK…

16 – Next, right-click RADIUS Clients, and then click New…

17 – Next, in the New RADIUS Client interface, in the Friendly name box, type OSI-NPS, then you need to key in the IP Address of the NPS Server, which in my case 172.16.0.106, click Verify to confirm the IP Address, then click Resolve so that it will identify the correct IP Address, click OK to proceed…

18 – Next, in the New RADIUS Client interface, under Shared Secret, in the Select an existing Shared Secrets template area, click OSI Security, and then click OK.

19 – Next, lets configure RADIUS accounting for logging purposes…

20 – In the Accounting Configuration introduction Wizard, click Next…

21 – On the Select Accounting Options interface, click Log to a text file on the local computer, and then click Next…

22 – On the Configure Local File Logging interface, click Next…

23 – On the Summary interface, click Next…

24 – On the Conclusion interface, click Close…

25 – Next, we need to configure and test our RADIUS Client.. In the Network Policy Server console, expand RADIUS Clients and Servers, then right-click RADIUS Clients, and then click New…

26 – In the New RADIUS Client interface, please clear the Enable this RADIUS client check box, then you can click Select an existing template check box.. verify that your existing template listed in the list then click OK…

We have done installing & configuring NPS in our domain server which OSI-ADDS01 server, now it’s time for us to configure Routing and Remote Access in RADIUS Client (OSI-NPS server)…
27 – On the OSI-NPS Server, open Server Manager, click Add Roles and features…

28 – On the Before you begin interface, click Next…

29 – On the Select installation type interface, click Next…

30 – On the Select destination server, click Next to proceed…

31 – On the Select server roles interface, click Remote Access box and click Next…

32 – On the Select features interface, click Next…

33 – Next, on the Remote Access interface, click Next…

34 – On the Select role services, make sure you click DirectAccess and VPN (RAS) check box, and then click Next…

35 – On the Web Server Role (IIS) interface, proceed with Next…

36 – On the Select role services interface, proceed with Next…

37 – On the Confirm installation selections interface, click Install…

38 – On the Installation progress interface, click close…

39 – Next, open Server Manager click Tools and click Routing ans Remote Access…
40 – Next, in the Routing and Remote Access console, right-click NPS (Local), and then click Configure and Enable Routing and Remote Access…

41 – On the Routing and Remote Access Server Wizard interface, click Next…

42 – On the Configuration interface, make sure you click Remote access (dial up or VPN)…

43 – ON the Remote Access interface, click VPN check box…

44 – Next, in the VPN Connection interface, click the network interface named Ethernet 3, but make sure you clear the Enable security on the selected interface by setting up static packet filters check box, and then click Next…

45 – On the IP Address Assignment interface, select From a specified range of addresses, and then click Next…

46 – On the Address Range Assignment interface, click New…

47 – On the New IPv4 Address Range interface, in the Start IP address, type 172.16.0.201, then in the End IP address, type 172.16.0.220, verify that 20 IP addresses were assigned for remote clients, and then click Next…

48 – On the Address Range Assignment interface, click Next…

49 – On the Managing Multiple Remote Access Servers interface, click Yes, set up this server to work with a RADIUS server, and then click Next…

50 – On the RADIUS Server Selection interface, in the Primary RADIUS server box, type ADDS01… In the Shared secret box, type your password and then click Next…

51 – In the Routing and Remote Access Server Setup Wizard, click Finish…

52 – In the Routing and Remote Access dialog box, click OK…

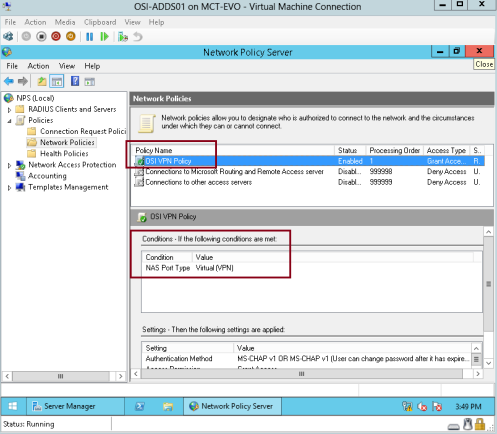
53 – Next, switch to the OSI-ADDS01 domain server so that we can configure a Network Policy for RADIUS… in the Network Policy Server console, expand Policies, and then click Network Policies, in the details pane, right-click the policy at the top and bottom of the list, and then click Disable…

54 – Next, right click Network Policies, and then click New…

55 – In the New Network Policy Wizard, in the Policy name box, type OSI VPN Policy, and then in the Type of network access server list, click Remote Access Server(VPN-Dial up), and then click Next…

56 – Next, on the Specify Conditions page, click Add, then in the Select condition dialog box, click NAS Port Type, and then click Add…

57 – In the NAS Port Type dialog box, select the Virtual (VPN) check box, and then click OK…

58 – Next, on the Specify Conditions interface, click Next…

59 – Next on the Specify Access Permission interface, click Access granted, and then click Next…

60 – On the Configure Authentication Methods interface, click Next…

61 – On the Configure Constraints interface, click Next…

62 – On the Configure Settings interface, click Next…

63 – On the Completing New Network Policy interface, click Finish…

64 – Next, on the Network Policy Server console, verify your setting…
65 – Now lets test our RADIUS configuration with Windows 8.1 client, switch to Windows 8.1 client and log in as Administrator, then open Network and Sharing Center control panel, in the Network and Sharing Center, click Set up a new connection on network…

66 – On the Choose a connection option interface, click Connect to a workplace, and then click Next…

67 – On the How do you want to connect interface, click Use my Internet connection (VPN)…

68 – Click I’ll set up an Internet connection later…

69 – On the Type the Internet address to connect to interface, in the Internet address box, type 172.16.0.109, in the Destination name box, type OSI VPN, then select the Allow other people to use this connection check box, and then click Create…

70 – In the Network And Sharing Center window, right-click the OSI VPN connection, and then click Properties…

71 – On the OSI VPN Properties, click the Security tab and then in the Type of VPN list, click Point to Point Tunneling Protocol (PPTP), then under Authentication, click Allow these protocols, and then click OK…

72 – Next, right-click the OSI VPN connection, and then click Connect/Disconnect…

73 – Next, in Network sign-in, in the User name box, type osiadministrator and password and then click OK…

74 – Lastly, wait few second for the VPN connection to be established. Ensure that your connection is successful…

The article is going to show you how to install and configure Network Policy Server (NPS) on Windows Server 2012 R2. NPS in Windows Server is used to create and enforce network access policies for client health, authentication and authorization of connection requests. You configure the NPS as a Remote Authentication Dial-In User Service (RADIUS) server…. So let’s Installing the Network Policy on Windows Server.
How to Install Network Policy Server?
To install and configure Network policy server, go to Server Manager dashboard and installing from Add Roles and Features.
1. Just click Next on the before you begin page of Add Roles and Features Wizard page.
2. Select Role-based or feature-based installation on Installation Type page then click Next.
3. On the Server Selection page click Next if you have only one server or select the server you want to install NPS.
4. Select Network Policy and Access Services on Server Roles page and add the required features by clicking the Add Features button then click Next.
5. On the Features page click Next.
6. For the first time, it is good to read once the network policy and access services details page and then click Next.
7. On the Role Services of Network Policy and Access Services page select Network Policy Server and click Next.
8. On the Confirmation page click Install to start installing Network Access Protection.
9. Finally when the installation finished successfully, click Close and go to do the next step and no need to restart the Server.
10. Go to Server Manager, click Tools then click Network Policy Server or simply type NPS.msc on Windwos Run to open the Network Policy Server console.
Here is the Network Policy Server.
Installing Network Policy Server with PowerShell
You can simply install NPS using Windows PowerShell command line without shooting too many clicks!
1. Search with “Get-WindowsFeature npas*” command whether it’s installed or not.
2. Install it with “Install-WindowsFeature -Name npas,npas-policy-server -IncludeManagementTools” command.
Yes, that is installed successfully. If you want to uninstall it with PowerShell command, just do it with Uninstall-WindowsFeature command.
Uninstall-WindowsFeature -Name npas,npas-policy-server
Uninstall Network Policy Server
Hop you completely understood the installation of Network Access Policy on Windows Server 2012 R2. Feel free to ask your question about network policy server and other Windows Server roles and features.
In this post, we’ll learn the steps to configure Network Policy Server (NPS). In the previous post, we learned the steps to install the Network Policy Server in Windows Server 2012 R2. NPS allows you to create Network Access Protection (NA) for client health. Through NAP, we can restrict the network access or provide limited network access to the unhealthy clients from using organization’s network.
Let’s take a scenario, we have an OU naming Sales in Active Directory Users and Computers. We have to apply the Network Access Policy on the client computers in the Sales OU. NAP policy will verify if Firewall is enable on the client computers. If Firewall is not enable then it would block or restrict the network access. However, we can also define the policy to verify Antivirus and Anti spyware applications.
How to configure Network Access Protection in Network Policy Server
Step 1. Open Network Policy Server from the Administrative Tools in Start menu.
Step 2. On Network Policy Server console, click on “Configure NAP” to configure the NAP policy server.

Step 3. On Select Network Connection Method For Use with NAP console, select the Dynamic Host Configuration Protocol (DHCP) from the options in the drop-down menu of Network connection method.
Enter the Policy name and click on Next to continue.
In this practical, we have entered “NAP DHCP” as the policy name.

Step 4. On Specify NAP Enforcement Servers Running DHCP Server console, click on Add to configure Radius clients.
Remote Authentication Dial-In User Service (RADIUS) is set of rules that authorize and authenticate users when they connect to a network.
As DHCP Server services are running on this server therefore we can skip this setting and click on Next to continue.

Step 5. On Specify DHCP Scopes console, click on Add to enable the NAP policy on DHCP scope. We can do this later also.
If you don’t specify any scope here then this policy would be enabled on all the NAP enabled DHCP scopes.
Click on Next to continue.

Step 6. On Configure Machine Groups console, click on Add to add the group of machines to grant or deny access to the computers.
If no groups are selected then this policy applies to all computers.
Click on Next to continue.

Step 7. On Specify a NAP Remediation Server Group and URL console, enter the name of the Remediation Server Group, if we already have any configured in our environment.
Click on New Group to create a new Remediation Server Group.
Enter the URL of the web page, if a web page is configured to instruct the users for complying their devices with the NAP health policy.
As for Firewall it is not required therefore we can click on Next to continue.

Step 8. On Define Nap Health Policy console, all the installed system health validators are listed. Select the System Health Validator that we want to enforce with the health policy.
In this practical, we have selected “Windows Security Health Validator“.
Check “Enable auto-remediation of client computers” this will grant limited network access to NAP-capable client computers so that they can obtain software updates from remediation server.
If this option is not selected then the client computers cannot update automatically. We have to manually update them for full network access.
Check the option “Deny full network access to NAP-ineligible client computers.
Allow access to restricted network only“. So that, NAP-ineligible client computers can access restricted network for automatic updates from remediation server.
Click on Next to continue.

Step 9. On Completing NAP Enforcement Policy and RADIUS Client Configuration console, we can verify the options and policies that we have selected on previous consoles.
Click on Finish to complete this configuration.

Step 10. To configure Network Policy server, on the console, under Network Access Protection expand System Health Validators.
Now, expand Windows Security Health Validator. Under Settings, double click on “Default Configuration” to modify its settings.

Step 11. On Windows Security Health Validator console, choose policy settings for Windows Security Health Validator.
Here, we can define the settings for Windows8/Windows7/Windows Vista clients.
For Windows XP clients we can define it separately.
Here, we have to only enable “A firewall is enabled for all network connections” option for Windows 8/Windows 7/Windows Vista clients. Click on Ok.
This policy would check if Firewall is enabled for the client computers or not. If Firewall is not enabled then it would try to Enable the Firewall automatically else it would grant restricted access to user.
Step 12. To configure Network Policy Server, on the NPS console, expand Policies and click on Network Policies.
Now, click on NAP DHCP Noncompliant to modify the policy settings.

Step 13. On NAP DHCP Noncompliant Properties console, under Access Permission setting, the first option is “Grant access.
Grant access if the connection request matches this policy“.
When this option is enabled then the client computer connects to the network only when the connection request matches this policy.
The second option is “Deny access. Deny access if the connection request matches this policy“.
When this option is enabled then client computers cannot connect to the network if connection request matches this policy.
In this practical, we have selected the first option i.e. Grant Access. Click on Ok.

Step 14. Now go to DHCP Server, we have already configured a DHCP server and a scope is also defined to assign IP addresses.
We have to define our NAP policy on DHCP scopes.
On DHCP console, right-click on IPv4 and then click Properties.

Step 15. To configure Network Policy Server, on IPv4 Properties console, under Network Access Protection settings click on “Enable on all scopes” and select “Restricted Access” under the setting of DHCP server behavior when NPS is unavailable.
Click on Apply and Ok.

Step 16. To configure Network Policy server GPO needs to be created. On Group Policy Management console, right-click on the OU “Sales“.
Then click on “Create a GPO in this domain, and Link it here“.

Step 17. On New GPO console, enter the GPO name and click on OK.
In this practical, the name of our GPO is “NPS“.

Step 18. To configure Network Policy Server, right click on the GPO “NPS” and click on Edit to modify the GPO settings.

Step 19. To configure Network Policy Server, on Group Policy Management Editor console, we have to modify four policy settings for this GPO.
Following are the four policies:
- The path of first policy is “Computer ConfigurationPoliciesWindows SettingsSecurity SettingsNetwork Access ProtectionNAP Client ConfigurationEnforcement Clients“. Right click on “DHCP Quarantine Enforcement Client” and click on Enable.

- The path of second policy is “Computer ConfigurationPoliciesAdministrative TemplatesWindows ComponentsSecurity Center“. Double click on “Turn on Security Center (Domain PCs only)” and click on Enabled to enable this policy.

- The path of third policy is “Computer ConfigurationPoliciesWindows SettingsSecurity SettingsSystem Services”. Double click on “Network Access Protection Agent” to modify its settings. On Network Access Protection Agent Properties console, select the option of “Define this policy setting” and select Automatic as service startup mode. Click on Apply and OK.

- The path of fourth policy is “Computer ConfigurationPoliciesAdministrative TemplatesWindows ComponentsNetwork Access Protection“. Double click on “Allow the Network Access Protection client to support the….” and click on Enabled to enable the policy.

Step 20. Now, go to any client computer that is part of OU “Sales” and is receiving the IP address from DHCP server.
Verify that the firewall is on.
If we try to turn off the firewall then NAP would again automatically turns on the Firewall because of NAP policies.

Hope you understood the steps to configure Network Policy Server for Firewall policies. Please share your experience, comments and suggestions in the comment section.
| title | description | ms.topic | ms.author | author | ms.date |
|---|---|---|---|---|---|
|
Install and Configure the NPS Server |
NPS server processing of connection requests that are sent by the VPN server verifies that the user has permission to connect, the user’s identity, and logs the aspects of the connection request that you chose when you configured RADIUS accounting in NPS. |
article |
wscontent |
Teresa-MOTIV |
08/30/2018 |
Step 4. Install and configure the Network Policy Server (NPS)
Applies to: Windows Server 2022, Windows Server 2019, Windows Server 2016, Windows Server 2012 R2, Windows 10
- Next: Step 3. Configure the Remote Access Server for Always On VPN
- Next: Step 5. Configure DNS and Firewall Settings
In this step, you’ll install Network Policy Server (NPS) for processing of connection requests that are sent by the VPN server:
- Perform authorization to verify that the user has permission to connect.
- Performing authentication to verify the user’s identity.
- Performing accounting to log the aspects of the connection request that you chose when you configured RADIUS accounting in NPS.
The steps in this section allow you to complete the following items:
-
On the computer or VM that planned for the NPS server, and installed on your organization or corporate network, you can install NPS.
[!TIP]
If you already have one or more NPS servers on your network, you do not need to perform NPS Server installation — instead, you can use this topic to update the configuration of an existing NPS server.
[!NOTE]
You can not install the Network Policy Server service on Windows Server Core.
- On the organization/corporate NPS server, you can configure NPS to perform as a RADIUS server that processes the connection requests received from the VPN server.
Install Network Policy Server
In this procedure, you install NPS by using either Windows PowerShell or the Server Manager Add Roles and Features Wizard. NPS is a role service of the Network Policy and Access Services server role.
[!TIP]
By default, NPS listens for RADIUS traffic on ports 1812, 1813, 1645, and 1646 on all installed network adapters. When you install NPS, and you enable Windows Firewall with Advanced Security, firewall exceptions for these ports get created automatically for both IPv4 and IPv6 traffic. If your network access servers are configured to send RADIUS traffic over ports other than these defaults, remove the exceptions created in Windows Firewall with Advanced Security during NPS installation, and create exceptions for the ports that you do use for RADIUS traffic.
Procedure for Windows PowerShell:
To perform this procedure by using Windows PowerShell, run Windows PowerShell as Administrator, enter the following cmdlet:
Install-WindowsFeature NPAS -IncludeManagementTools
Procedure for Server Manager:
-
In Server Manager, select Manage, then select Add Roles and Features.
The Add Roles and Features Wizard opens. -
In Before You Begin, select Next.
[!NOTE]
The Before You Begin page of the Add Roles and Features Wizard is not displayed if you had previously selected Skip this page by default when the Add Roles and Features Wizard ran. -
In Select Installation Type, ensure that Role-Based or feature-based installation is selected, and select Next.
-
In Select destination server, ensure that Select a server from the server pool is selected.
-
In Server Pool, ensure that the local computer is selected and select Next.
-
In Select Server Roles, in Roles, select Network Policy and Access Services. A dialog box opens asking if it should add features required for Network Policy and Access Services.
-
Select Add Features, then select Next
-
In Select features, select Next, and in Network Policy and Access Services, review the information provided, then select Next.
-
In Select role services, select Network Policy Server.
-
For features required for Network Policy Server, select Add Features, then select Next.
-
In Confirm installation selections, select Restart the destination server automatically if required.
-
Select Yes to confirm the selected, and then select Install.
The Installation progress page displays the status during the installation process. When the process completes, the message «Installation succeeded on ComputerName» is displayed, where ComputerName is the name of the computer upon which you installed Network Policy Server.
-
Select Close.
Configure NPS
After installing NPS, you configure NPS to handle all authentication, authorization, and accounting duties for connection request it receives from the VPN server.
Register the NPS Server in Active Directory
In this procedure, you register the server in Active Directory so that it has permission to access user account information while processing connection requests.
Procedure:
-
In Server Manager, select Tools, and then select Network Policy Server. The NPS console opens.
-
In the NPS console, right-click NPS (Local), then select Register server in Active Directory.
The Network Policy Server dialog box opens.
-
In the Network Policy Server dialog box, select OK twice.
For alternate methods of registering NPS, see Register an NPS Server in an Active Directory Domain.
Configure Network Policy Server Accounting
In this procedure, configure Network Policy Server Accounting using one of the following logging types:
-
Event logging. Used primarily for auditing and troubleshooting connection attempts. You can configure NPS event logging by obtaining the NPS server properties in the NPS console.
-
Logging user authentication and accounting requests to a local file. Used primarily for connection analysis and billing purposes. Also used as a security investigation tool because it provides you with a method of tracking the activity of a malicious user after an attack. You can configure local file logging using the Accounting Configuration wizard.
-
Logging user authentication and accounting requests to a Microsoft SQL Server XML-compliant database. Used to allow multiple servers running NPS to have one data source. Also provides the advantages of using a relational database. You can configure SQL Server logging by using the Accounting Configuration wizard.
To configure Network Policy Server Accounting, see Configure Network Policy Server Accounting.
Add the VPN Server as a RADIUS Client
In the Configure the Remote Access Server for Always On VPN section, you installed and configured your VPN server. During VPN server configuration, you added a RADIUS shared secret on the VPN server.
In this procedure, you use the same shared secret text string to configure the VPN server as a RADIUS client in NPS. Use the same text string that you used on the VPN server, or communication between the NPS server and VPN server fails.
[!IMPORTANT]
When you add a new network access server (VPN server, wireless access point, authenticating switch, or dial-up server) to your network, you must add the server as a RADIUS client in NPS so that NPS is aware of and can communicate with the network access server.
Procedure:
-
On the NPS server, in the NPS console, double-click RADIUS Clients and Servers.
-
Right-click RADIUS Clients and select New. The New RADIUS Client dialog box opens.
-
Verify that the Enable this RADIUS client check box is selected.
-
In Friendly name, enter a display name for the VPN server.
-
In Address (IP or DNS), enter the NAS IP address or FQDN.
If you enter the FQDN, select Verify if you want to verify that the name is correct and maps to a valid IP address.
-
In Shared secret, do:
-
Ensure that Manual is selected.
-
Enter the strong text string that you also entered on the VPN server.
-
Reenter the shared secret in Confirm shared secret.
-
-
Select OK. The VPN Server appears in the list of RADIUS clients configured on the NPS server.
Configure NPS as a RADIUS for VPN Connections
In this procedure, you configure NPS as a RADIUS server on your organization network. On the NPS, you must define a policy that allows only users in a specific group to access the Organization/Corporate network through the VPN Server — and then only when using a valid user certificate in a PEAP authentication request.
Procedure:
-
In the NPS console, in Standard Configuration, ensure that RADIUS server for Dial-Up or VPN Connections is selected.
-
Select Configure VPN or Dial-Up.
The Configure VPN or Dial-Up wizard opens.
-
Select Virtual Private Network (VPN) Connections, and select Next.
-
In Specify Dial-Up or VPN Server, in RADIUS clients, select the name of the VPN Server that you added in the previous step. For example, if your VPN server NetBIOS name is RAS1, select RAS1.
-
Select Next.
-
In Configure Authentication Methods, complete the following steps:
-
Clear the Microsoft Encrypted Authentication version 2 (MS-CHAPv2) check box.
-
Select the Extensible Authentication Protocol check box to select it.
-
In Type (based on the method of access and network configuration), select Microsoft: Protected EAP (PEAP), then select Configure.
The Edit Protected EAP Properties dialog box opens.
-
Select Remove to remove the Secured Password (EAP-MSCHAP v2) EAP type.
-
Select Add. The Add EAP dialog box opens.
-
Select Smart Card or other certificate, then select OK.
-
Select OK to close Edit Protected EAP Properties.
-
-
Select Next.
-
In Specify User Groups, complete the following steps:
-
Select Add. The Select Users, Computers, Service Accounts, or Groups dialog box opens.
-
Enter VPN Users, then select OK.
-
Select Next.
-
-
In Specify IP Filters, select Next.
-
In Specify Encryption Settings, select Next. Do not make any changes.
These settings apply only to Microsoft Point-to-Point Encryption (MPPE) connections, which this scenario doesn’t support.
-
In Specify a Realm Name, select Next.
-
Select Finish to close the wizard.
Autoenroll the NPS Server Certificate
In this procedure, you refresh Group Policy on the local NPS server manually. When Group Policy refreshes, if certificate autoenrollment is configured and functioning correctly, the local computer is auto-enrolled a certificate by the certification authority (CA).
[!NOTE]
Group Policy refreshed automatically when you restart the domain member computer, or when a user logs on to a domain member computer. Also, Group Policy periodically refreshes. By default, this periodic refresh happens every 90 minutes with a randomized offset of up to 30 minutes.
Membership in Administrators, or equivalent, is the minimum required to complete this procedure.
Procedure:
-
On the NPS, open Windows PowerShell.
-
At the Windows PowerShell prompt, type gpupdate, and then press ENTER.
Next steps
Step 5. Configure DNS and firewall settings for Always On VPN: In this step, configure DNS and firewall settings for VPN connectivity.
The Microsoft description for this exam includes “Import and export NPS policies” as a covered item, but this is likely a remnant from an older version. The relevant technologies for NPS are the import and export of templates, and the import and export of the entire NPS configuration.
Configuring connection request policies
NPS creates a dial-up or VPN connection policy when you initially configure the RADIUS server. You can modify that policy or create a new one from scratch. Each policy is evaluated as part of the network policies to determine whether access is granted or denied.
Creating a new connection request policy
To create a new connection request policy, follow these steps:
1. In the Network Policy Server console, expand Policies and right-click Connection Request Policies.
2. Select New from the menu to open the New Connection Request Policy Wizard.
3. Enter a name in the Policy Name box and select the type of policy from the Type Of Network Access Server list, as shown in Figure 4-32.
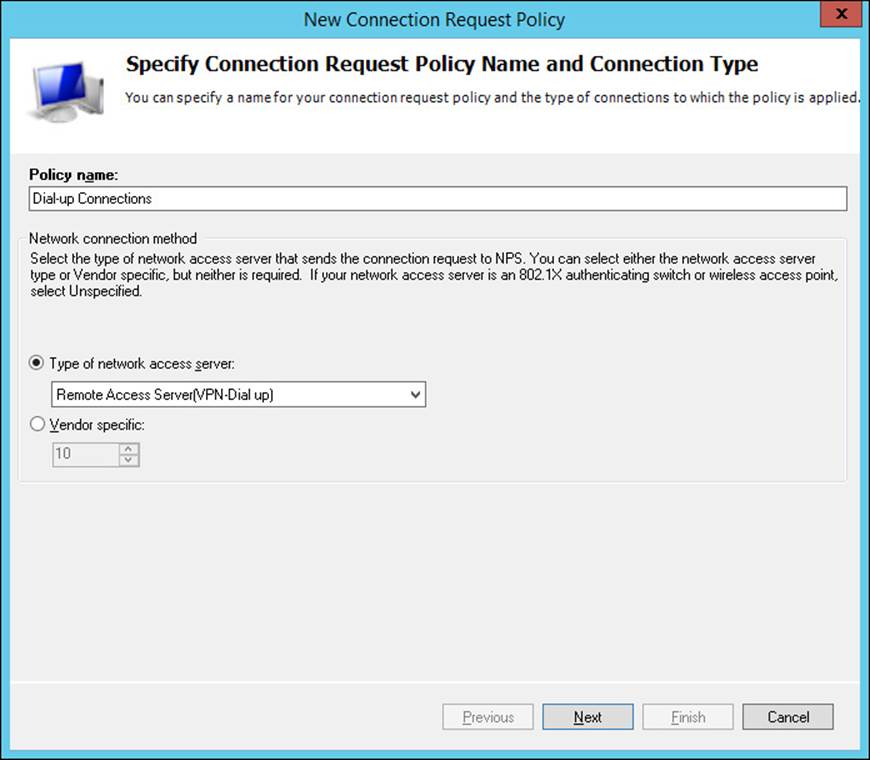
FIGURE 4-32 The Specify Connection Request Policy Name And Connection Type page
4. Click Next to open the Specify Conditions page. Click Add to open the Select Condition dialog box shown in Figure 4-33. For a full list of conditions, see Table 4-1.
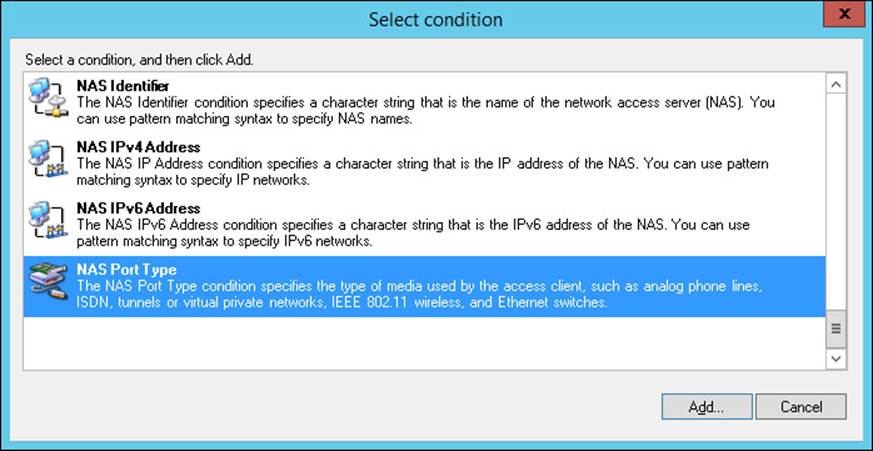
FIGURE 4-33 The Select Condition dialog box
5. Select the condition type and click Add. Fill in additional details appropriate to the condition type and click OK.
6. Add additional conditions as appropriate. The conditions are additive, meaning that all separate conditions must be met before a connection request is accepted. Within conditions, the conditions are OR’d.
7. Click Next to open the Specify Connection Request Forwarding page shown in Figure 4-34. On this page, specify whether requests are authenticated locally, or forwarded to a RADIUS server group (RADIUS proxy). Only users who meet the conditions specified can be accepted without validating credentials.
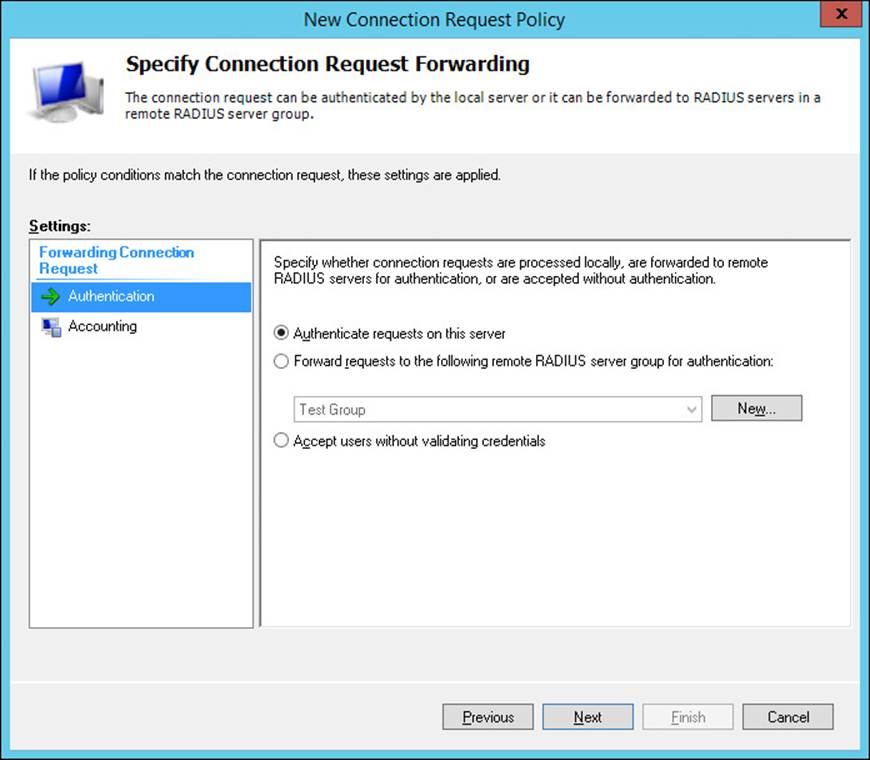
FIGURE 4-34 The Specify Connection Request Forwarding page
8. Click Next to open the Specify Authentication Methods page. On this page, you can choose to override the network policy authentication settings to require specific authentication for this connection policy.
9. Click Next to open the Configure Settings page. On this page, you can specify a realm name, RADIUS standard attribute, or a vendor-specific attribute.
10. Click Next and then Finish to create the policy.
Configuring an existing connection request policy
After the New Connection Request Policy Wizard completes, you can fine-tune the settings for a connection. You can configure both a connection request policy and a network policy for each connection.
To configure additional settings for the connection request policy, follow these steps:
1. Open the Network Policy Server console and expand Policies in the console tree.
2. Select the connection request policy in the console tree and right-click the policy for which you want to configure additional settings in the Connection Request Policies detail pane and select Properties from the menu.
3. On the Overview tab, you can specify the Policy Name, Type Of Network Access Server, and whether the policy is enabled or disabled. The type of access servers supported are the following:
![]() Remote Access Server (VPN-Dial up) server A Microsoft or other VPN or dial-up remote access server acting as a RADIUS client.
Remote Access Server (VPN-Dial up) server A Microsoft or other VPN or dial-up remote access server acting as a RADIUS client.
![]() Remote Desktop Gateway server A Remote Desktop Gateway (RD Gateway) server providing access to RD Session Hosts or RD Virtualization Hosts.
Remote Desktop Gateway server A Remote Desktop Gateway (RD Gateway) server providing access to RD Session Hosts or RD Virtualization Hosts.
![]() DHCP server A Dynamic Host Configuration Protocol server.
DHCP server A Dynamic Host Configuration Protocol server.
![]() Health Registration Authority server A Health Registration Authority (HRA) server obtains health certificates on behalf of NAP clients.
Health Registration Authority server A Health Registration Authority (HRA) server obtains health certificates on behalf of NAP clients.
![]() HCAP server A Host Credential Authorization Protocol (HCAP) server is used to integrate Microsoft NAP with Cisco Network Access Control Server.
HCAP server A Host Credential Authorization Protocol (HCAP) server is used to integrate Microsoft NAP with Cisco Network Access Control Server.
4. On the Conditions tab, you can specify the details for the type of connection you are configuring. These conditions can include User Names, IP addresses, Framing Protocol type, Service Type, Tunnel Type, date and time restrictions, and NAS type. For a full list of conditions, seeTable 4-1.
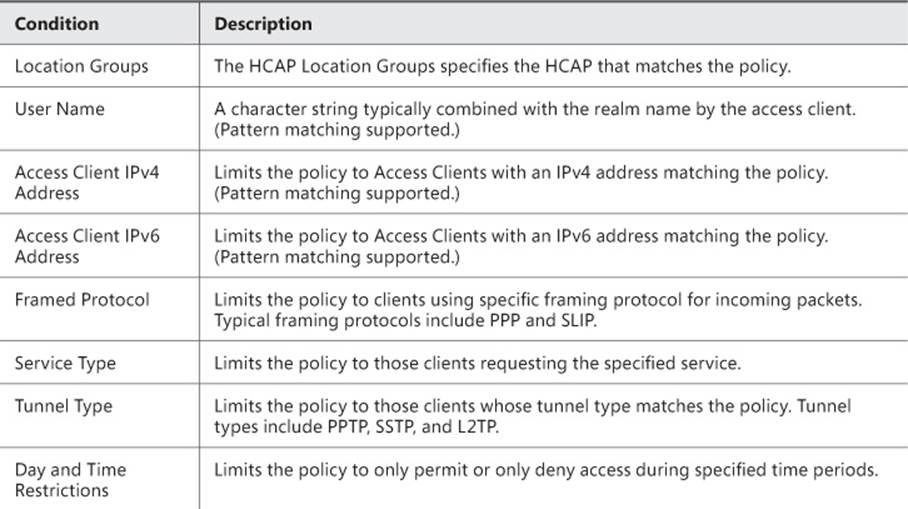
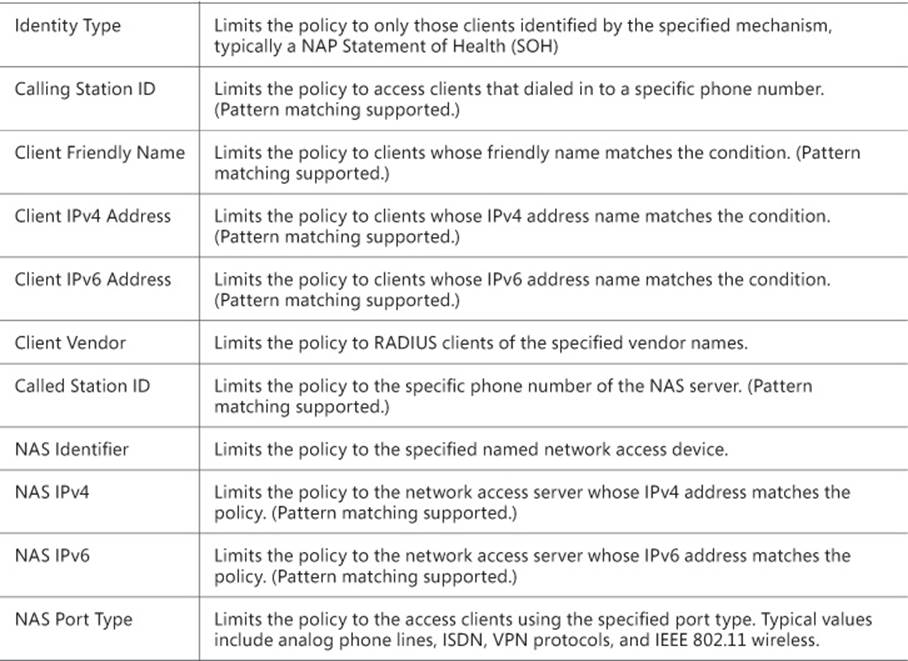
TABLE 4-1 Connection request policy conditions
5. On the Settings tab, shown in Figure 4-35, you can configure authentication methods, allowing you to override the network policy for the authentication method, and configure whether authentication occurs locally or on another RADIUS server (proxy).
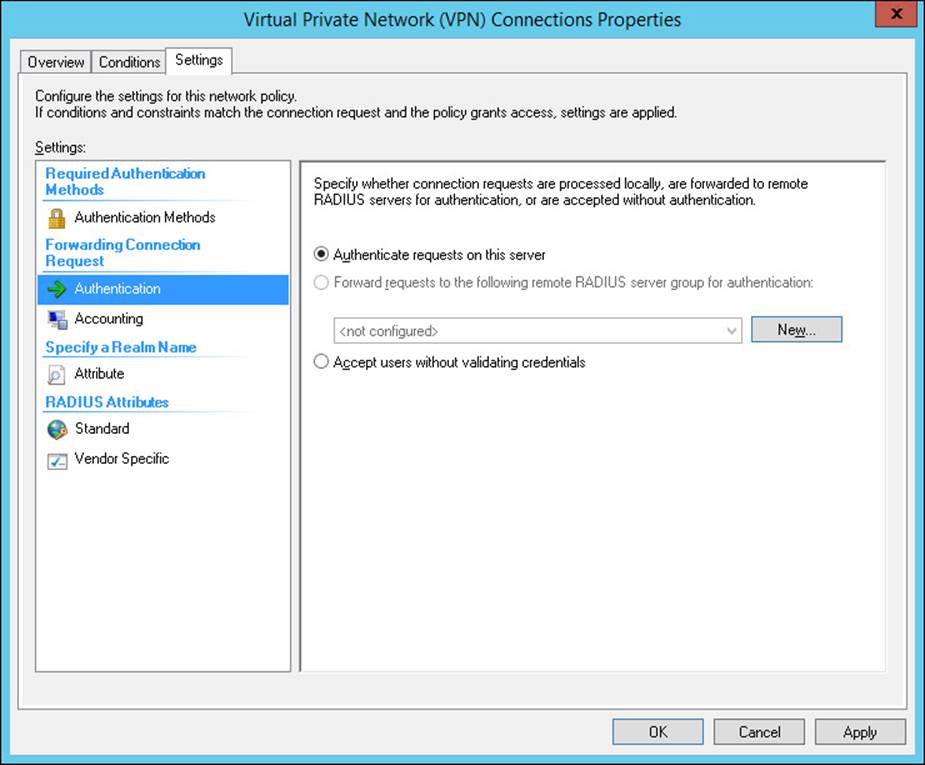
FIGURE 4-35 The Settings tab of the Virtual Private Network (VPN) Connections Properties Wizard
6. Select Accounting in the left pane to configure where accounting requests are forwarded to.
7. Configure a Realm Name, and any RADIUS Standard or Vendor-specific attributes, and then click OK to close the dialog box and implement the changes.
Configuring network policies for VPN clients
NPS has two sets of policies for all VPNs: connection request policies and network policies. Additionally, if configured to use them, NPS can apply health policies as well (these policies are covered in Objective 4.3).
Connection request policies define which connections are processed on the NPS server and which are processed on remote RADIUS servers. Network policies define who is allowed to connect to the network, how they are authenticated, and what network access is permitted. When you configure the NPS RADIUS server for a VPN connection, the wizard creates both a connection request policy and a network policy. But that default network policy can be further configured, and you can create additional new VPN network policies. Network policies are processed in the processing order defined in the network policies details pane of the NPS server.
Policy processing
When a connection request is processed, the policy conditions must all be met for the policy to succeed. If a condition is not met, NPS processes the next policy in the ordered list of policies. If all the conditions of that policy are met, the policy succeeds. If all the conditions of the second policy are not met, the third policy is processed, and so on until all policies have been processed or a policy succeeds. When a policy succeeds, it either grants access or denies access, based on the setting in the policy. If no policy succeeds, access is denied.
Configuring an existing policy
To configure an existing network policy, follow these steps:
1. In the Network Policy Server console, expand Policies and then click Network Policies.
2. In the details pane, double-click the policy you want to configure.
3. On the Overview tab, you can configure the following settings:
![]() Policy Name Sets the name of the policy.
Policy Name Sets the name of the policy.
![]() Policy Enabled When selected, the policy is processed and evaluated while authorizing. When disabled, the policy is not evaluated.
Policy Enabled When selected, the policy is processed and evaluated while authorizing. When disabled, the policy is not evaluated.
![]() Grant Access/Deny Access When set to Grant Access, access is granted if the policy matches the connection request. When set to Deny Access, the connection request is denied if it matches the policy.
Grant Access/Deny Access When set to Grant Access, access is granted if the policy matches the connection request. When set to Deny Access, the connection request is denied if it matches the policy.
![]() Ignore User Account Dial-in Properties When selected, the RADIUS network and connection properties control access regardless of what the dial-in setting is for the user account.
Ignore User Account Dial-in Properties When selected, the RADIUS network and connection properties control access regardless of what the dial-in setting is for the user account.
![]() Type of Network Access Server Typically set to Remote Access Server (VPN-Dial up) for VPN connections.
Type of Network Access Server Typically set to Remote Access Server (VPN-Dial up) for VPN connections.
4. Click the Conditions tab, shown in Figure 4-36. All network policies must have at least one condition but can also have multiple conditions. When you set conditions on a policy, all the conditions must be met for the policy to succeed. If any condition fails, the policy isn’t processed, and the next policy in the processing order is evaluated. Click Add to add additional conditions, Edit to change one of the conditions, or Remove to remove a condition. The conditions for network policies are shown in Table 4-2.
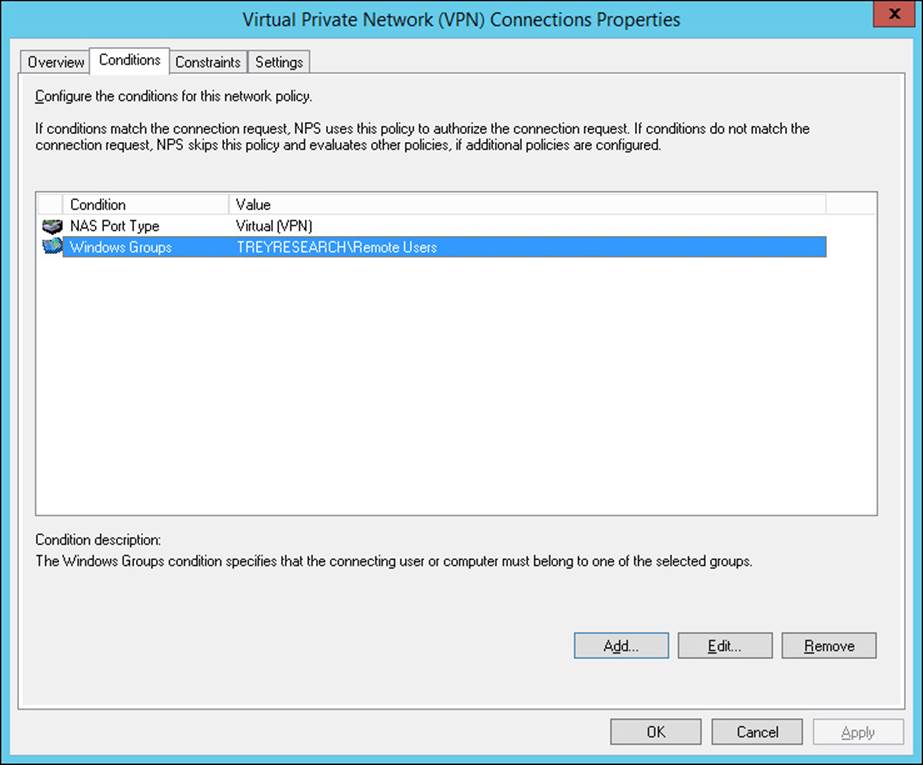
FIGURE 4-36 The Conditions tab of the network policy properties dialog box
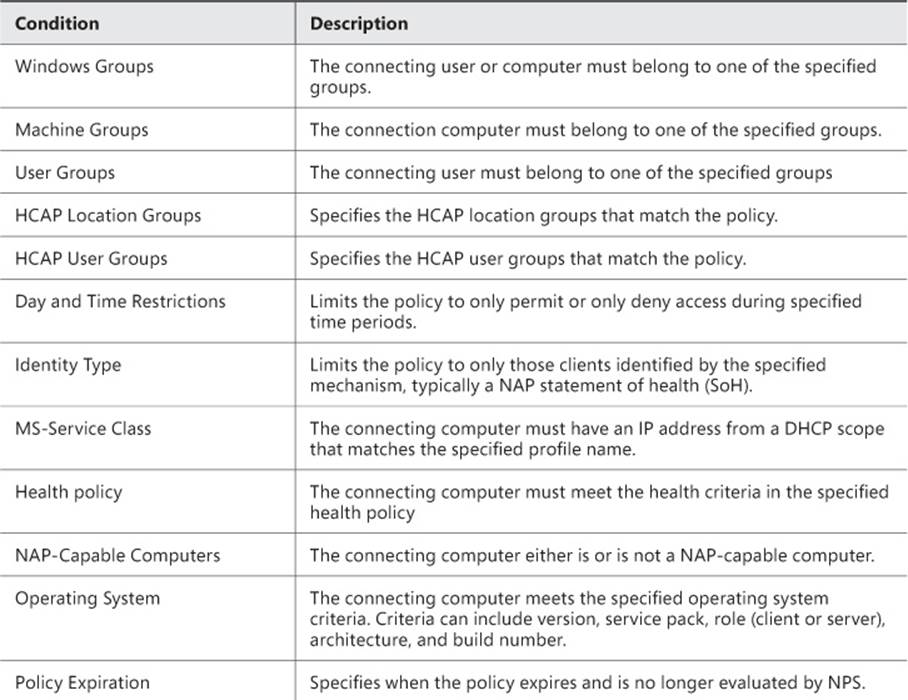
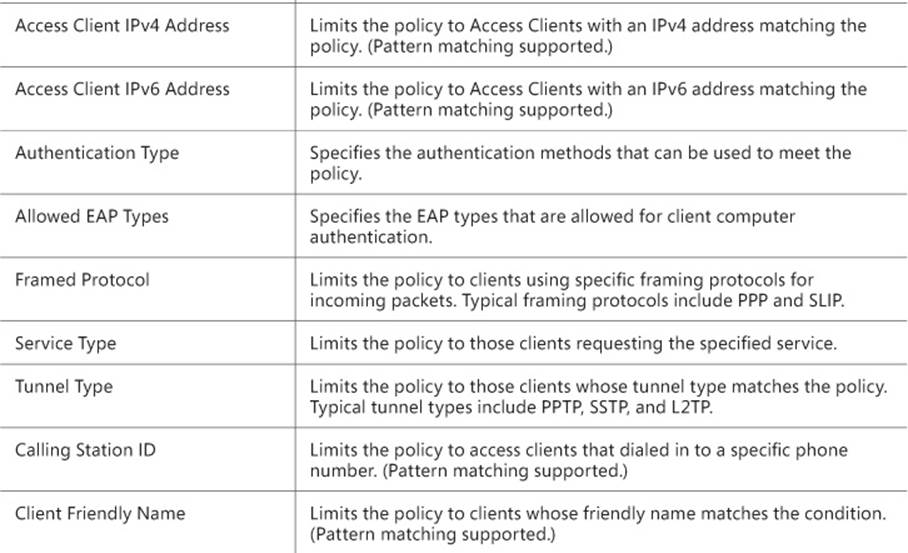
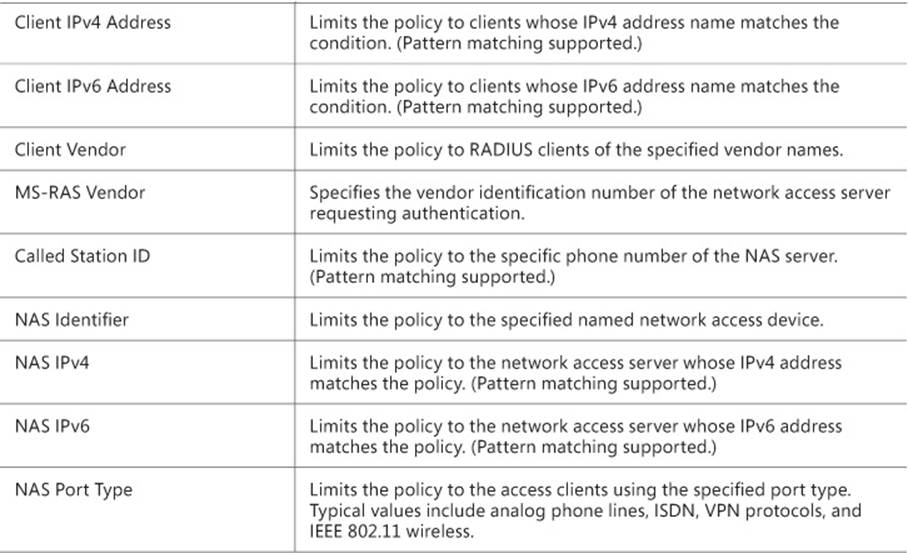
TABLE 4-2 Network policy conditions
5. Click the Constraints tab to set constraints for the network policy. If all constraints are not met by the connection request, access is denied. The constraints are detailed in Table 4-3.
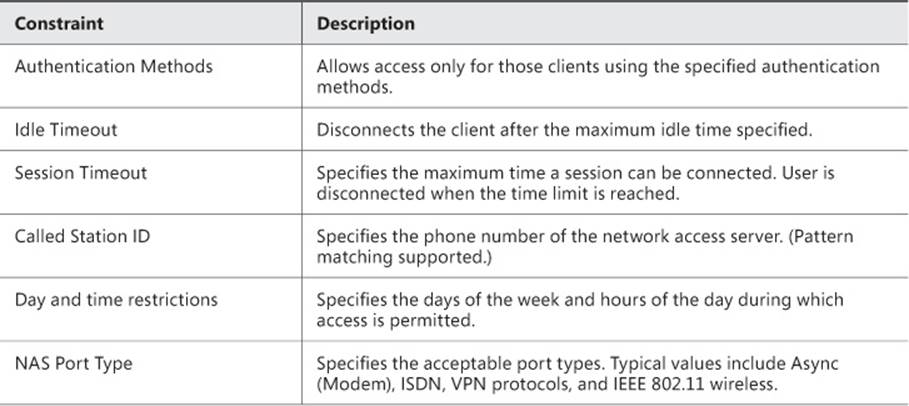
TABLE 4-3 Network policy constraints
6. Click the Settings tab. If all the conditions and constraints are met and the connection request is authorized, the settings are applied. The settings for network policies are shown in Table 4-4.
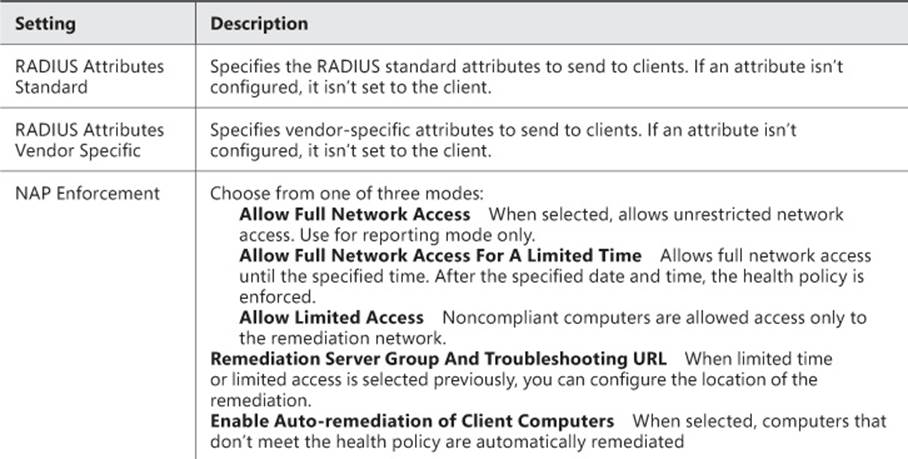
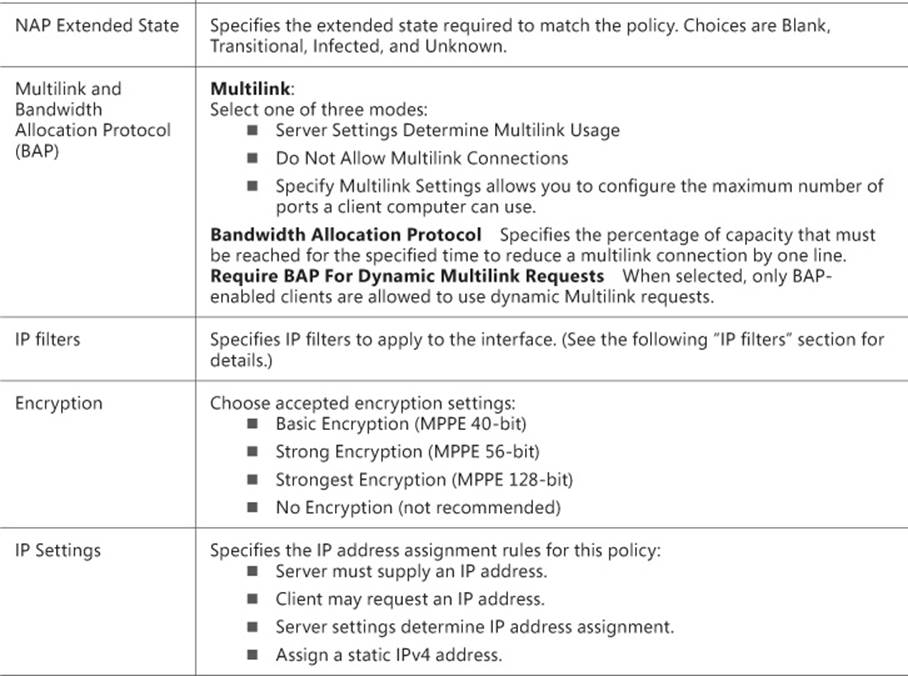
TABLE 4-4 Network policy settings
7. Click OK; the network policy is updated.
IP filters
You can use IP filters as part of a network policy or a connection request policy to control which input and output packets are allowed for both IPv4 and IPv6. You can configure IP filters individually in the policy, or create a template and apply the template. It makes sense in most cases to create an IP filter template because you can reuse the settings.
To create an IP filter template, follow these steps:
1. In the Network Policy Server, expand the Templates Management pane.
2. Right-click IP Filters and select New from the menu to open the New IP Filters Template dialog box.
3. Enter a name for the template and then click Input Filters in the IPv4 section to start creating the filter.
4. In the Inbound Filters dialog box, shown in Figure 4-37, click New to add a filter.

FIGURE 4-37 The Inbound Filters dialog box
5. In the Add IP Filter dialog box, select Destination Mask.
6. Enter an IP address and a subnet mask, and select the protocol, as shown in Figure 4-38. You can choose from the following protocols:
![]() TCP Enter a Source Port and Destination Port.
TCP Enter a Source Port and Destination Port.
![]() TCP (established) Enter a Source Port and Destination Port.
TCP (established) Enter a Source Port and Destination Port.
![]() UDP Enter a Source Port and Destination Port.
UDP Enter a Source Port and Destination Port.
![]() ICMP Enter an ICMP Type and an ICMP Code.
ICMP Enter an ICMP Type and an ICMP Code.
![]() Any Includes any protocol and any port.
Any Includes any protocol and any port.
![]() Other Specify a Protocol Number.
Other Specify a Protocol Number.
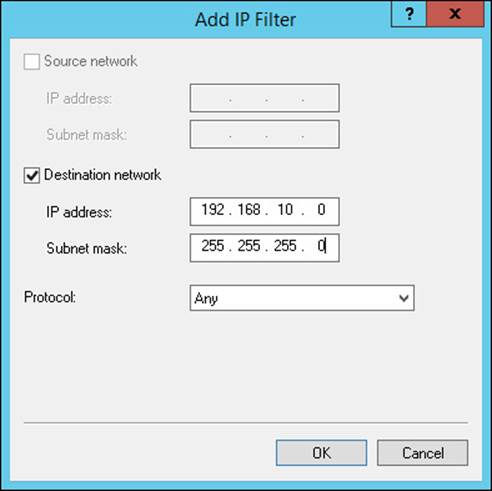
FIGURE 4-38 The Add IP Filter dialog box
7. Click OK to return to the Inbound Filters dialog box.
8. Select Do Not Permit Packets Listed Below or Permit Only the Packets Listed Below.
9. Click New to add additional Inbound IPv4 Filters. After you finish adding filters, click OK.
10. Repeat the process for IPv4 Output Filters, except select a Source IP Address and Subnet Mask.
11. Repeat for IPv6 Input Filters and IPv6 Output Filters, specifying an IPv6 Address and Prefix Length.
12. Click OK to create the template.
After you have created an IP filter, you can use it to build network policies.
Managing NPS templates
Templates that you create in NPS can be exported to a file. You export the templates to a file by right-clicking Templates Management and selecting Export Templates To A File. Files are exported as XML files that can be backed up as part of normal backup procedures.
After a set of templates has been exported to an XML file, it can then be imported to replace the templates on an NPS server. Importing templates is a destructive process that replaces any existing templates with the templates in the exported XML file.
You can import the templates from a running NPS server by importing them directly. Right-click Templates Management in the console tree and select Import Templates From A Computer. Enter the name or IP address of the remote NPS server and then click OK to import the templates. If the server isn’t available online, you can import the settings from a file by selecting Import Templates From A File.
Importing and exporting NPS configuration
You can export the configuration of an NPS server, including policies, templates, NAP configuration, and client information. The exported file includes the shared secrets used between RADIUS clients and the RADIUS server, or between the RADIUS server and remote RADIUS servers. This is sensitive information and should be stored in a secure location except when actually being used to recover a server configuration.
 Exam Tip
Let me emphasize this, since it’s very likely to show up on the exam. The exported configuration of an NPS server contains sensitive information. How you use the export, and how you store it, are significant security concerns.
Note: RADIUS accounting
If RADIUS accounting is being logged to a SQL Server database, the exported NPS configuration does not include the SQL Server logging information. After importing this to another server, you must manually reconfigure SQL Server logging.
To export the NPS configuration, follow these steps:
1. Open the Network Policy Server console.
2. Right-click NPS (Local) at the very top of the console tree.
3. Select Export Configuration from the menu.
4. Select I Am Aware That I Am Exporting All Shared Secrets and then click OK.
5. Select the location and file name for saving the XML file and click OK.
You can export the NPS server configuration by using the Export-NpsConfiguration cmdlet; for example:
Export-NpsConfiguraton -Path «C:TempNPSConfig.xml»
Exam Tip
While netsh has been deprecated, it’s still possible it will show up on the exam. The command to export the NPS server configuration using netsh is:
netsh nps export filename=c:tempnpsconfig.xml exportpsk=yes
You can import the configuration from an NPS configuration export. This import includes all policies, shared secrets, templates, RADIUS clients, and remote RADIUS server information. Follow these steps to import the NPS configuration:
1. Open the Network Policy Server console.
2. Right-click NPS (Local) at the very top of the console tree.
3. Select Import Configuration from the menu.
4. Navigate to the location where the exported XML file is stored and select the file.
5. When the import completes, click OK.
You can import the NPS server configuration by using the Import-NpsConfiguration cmdlet; for example:
Import-NpsConfiguraton -Path «C:TempNPSConfig.xml»
 Thought experiment: Copying NPS server configurations
In this thought experiment, apply what you’ve learned about this objective. You can find answers to these questions in the “Answers” section at the end of this chapter.
You are the network administrator for TreyResearch.net. Company policy requires that all sensitive company data be encrypted, and that all remote access to the corporate network use two-factor authentication (2FA). The current NPS server, remote1, is configured to enforce company policy and is working correctly, but to improve redundancy and increase throughput, you’ve been tasked with creating a second NPS server, remote2, that will use the same configuration as remote1. You need to accomplish this with the minimum administrative overhead while ensuring that the configuration is replicated accurately.
1. How should you go about copying the configuration of the existing server?
2. What security considerations does this raise?
3. How should you mitigate these security considerations? Describe the alternatives.
Objective summary
![]() The connection request policy controls the initial connection from a requesting client.
The connection request policy controls the initial connection from a requesting client.
![]() The connection request policy controls whether NPS acts as a RADIUS server or a RADIUS proxy.
The connection request policy controls whether NPS acts as a RADIUS server or a RADIUS proxy.
![]() The network policy is responsible for authorizing and authenticating the client.
The network policy is responsible for authorizing and authenticating the client.
![]() VPN and dial-up use different connection request policies, based on the different types of ports on which they request access.
VPN and dial-up use different connection request policies, based on the different types of ports on which they request access.
![]() Network policies have one or more conditions, and may have constraints.
Network policies have one or more conditions, and may have constraints.
![]() Network policies can impose IP filters to control which input and output packets are allowed for both IPv4 and IPv6.
Network policies can impose IP filters to control which input and output packets are allowed for both IPv4 and IPv6.
![]() Use NPS templates to simplify configuring policies, and deploying additional servers.
Use NPS templates to simplify configuring policies, and deploying additional servers.
![]() Export NPS configuration to store for recovery purposes or to configure a new NPS server.
Export NPS configuration to store for recovery purposes or to configure a new NPS server.
![]() Exported NPS configuration files contain unencrypted shared secrets.
Exported NPS configuration files contain unencrypted shared secrets.
Objective review
1. The connection request policy supports which of the following conditions? (Choose all that apply.)
A. User Groups
B. User Name
C. NAS Port Type
D. MS Service Class
2. You have a Windows Server 2012 R2 server (RAD1) acting as a RADIUS proxy and a RADIUS server group with a single Windows Server 2012 server (RAD2) as a RADIUS server in it. You need to configure a second RADIUS server to distribute the load. What should you do?
A. Deploy a second Windows Server 2012 R2 server (RAD3) and install the Routing and Remote access service (RRAS) on it. Export the configuration from RAD1 and import it to RAD3.
B. Deploy a second Windows Server 2012 server (RAD3) and install RRAS on it. Export the configuration from RAD2 and import it to RAD3.
C. Deploy a second Windows Server 2012 R2 server (RAD3) and install NPS Server on it. Export the configuration from RAD2 and import it to RAD3.
D. Deploy a second Windows Server 2012 server (RAD3) and install NPS on it. Export the configuration from RAD1 and import it to RAD3.
3. You need to improve the security of your remote access and want to limit the protocols that are used to connect to the RADIUS server. What condition could you use to limit the protocols?
A. Use a Tunnel Type condition in the connection request policy.
B. Use a Framed Protocol condition in the connection request policy.
C. Use an Authentication Type condition in the network policy.
D. Use an Allowed EAP Types condition in the network policy.
Objective 4.3: Configure Network Access Protection (NAP)
Network Access Protection (NAP) works with NPS server to ensure that clients connecting to the network meet specific health requirements. These requirements are validated by SHVs. NPS health policies work with connection request policies and network polices to enforce NAP health requirements and remediation. NAP is deprecated in Windows Server 2012 R2. This means that NAP is still supported in Windows Server 2012 R2 and Windows 8.1, but will not be supported in future versions of Windows.
This objective covers how to:
![]() Configure system health validators (SHVs)
Configure system health validators (SHVs)
![]() Configure health policies
Configure health policies
![]() Configure NAP enforcement using DHCP and VPN
Configure NAP enforcement using DHCP and VPN
![]() Configure isolation and remediation of noncompliant computers using DHCP and VPN
Configure isolation and remediation of noncompliant computers using DHCP and VPN
![]() Configure NAP client settings
Configure NAP client settings
Configuring system health validators (SHVs)
The only system health validator (SHV) that ships with Windows Server 2012 R2 is the Windows Security Health Validator (WSHV). You can modify the Default Configuration (ID 0) of the WSHV or you can create new configurations.
To create a new WSHV configuration, follow these steps:
1. Open the Network Policy Server console and expand NPS (Local) in the console tree.
2. In the Network Access Protection pane, expand System Health Validators and then Windows Security Health Validator.
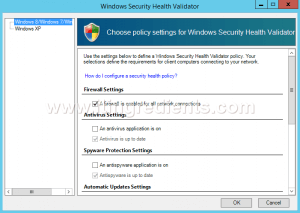
3. Right-click Settings and select New from the menu to open the Windows Security Health Validator dialog box shown in Figure 4-39.
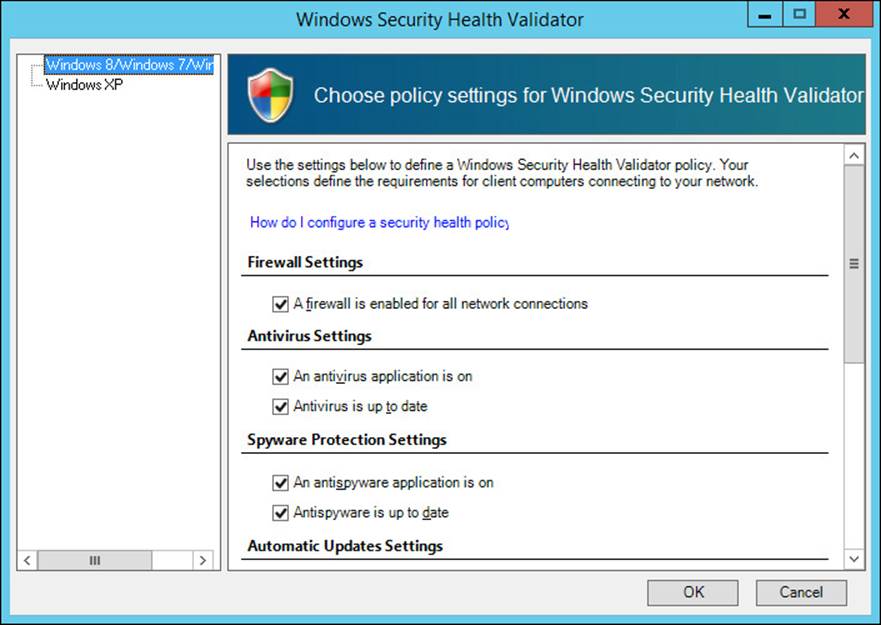
FIGURE 4-39 The Windows Security Health Validator dialog box
4. Select Windows 8/Windows 7/Windows Vista in the console tree to change the following settings for these Windows versions:
![]() Firewall Settings
Firewall Settings
![]() A Firewall Is Enabled For All Network Connections
A Firewall Is Enabled For All Network Connections
![]() Antivirus Settings
Antivirus Settings
![]() An Antivirus Application Is On
An Antivirus Application Is On
![]() Antivirus Is Up To Date
Antivirus Is Up To Date
![]() Spyware Protection Settings
Spyware Protection Settings
![]() An Antispyware Application Is On
An Antispyware Application Is On
![]() Antispyware Is Up To Date
Antispyware Is Up To Date
![]() Automatic Update Settings
Automatic Update Settings
![]() Automatic Updating Is Enabled
Automatic Updating Is Enabled
![]() Security Update Settings
Security Update Settings
![]() Restrict access for clients that do not have all available security updates installed
Restrict access for clients that do not have all available security updates installed
![]() Choose from four levels:
Choose from four levels:
![]() Critical Only
Critical Only
![]() Important And Above
Important And Above
![]() Moderate And Above
Moderate And Above
![]() Low And Above
Low And Above
![]() Specify the minimum number of hours allowed since the client has checked for new security updates (maximum allowed is 72 hours; default is 22 hours).
Specify the minimum number of hours allowed since the client has checked for new security updates (maximum allowed is 72 hours; default is 22 hours).
![]() By default, clients can receive security updates from Microsoft Update. If additional sources are required for your deployment, select one or both of the following sources:
By default, clients can receive security updates from Microsoft Update. If additional sources are required for your deployment, select one or both of the following sources:
![]() Windows Update
Windows Update
![]() Windows Server Update Services
Windows Server Update Services
5. Select Windows 8/Windows 7/Windows Vista in the console tree to change the following settings for these Windows versions:
![]() Firewall Settings
Firewall Settings
![]() A Firewall Is Enabled For All Network Connections
A Firewall Is Enabled For All Network Connections
![]() Antivirus Settings
Antivirus Settings
![]() An Antivirus Application Is On
An Antivirus Application Is On
![]() Antivirus Is Up To Date
Antivirus Is Up To Date
![]() Automatic Update Settings
Automatic Update Settings
![]() Automatic Updating Is Enabled
Automatic Updating Is Enabled
![]() Security Update Settings
Security Update Settings
![]() Restrict access for clients that do not have all available security updates installed
Restrict access for clients that do not have all available security updates installed
![]() Choose from four levels:
Choose from four levels:
![]() Critical Only
Critical Only
![]() Important And Above
Important And Above
![]() Moderate And Above
Moderate And Above
![]() Low And Above
Low And Above
![]() Specify the minimum number of hours allowed since the client has checked for new security updates (maximum allowed is 72 hours, default is 22 hours).
Specify the minimum number of hours allowed since the client has checked for new security updates (maximum allowed is 72 hours, default is 22 hours).
![]() By default, clients can receive security updates from Microsoft Update. If additional sources are required for your deployment, select one or both of the following sources:
By default, clients can receive security updates from Microsoft Update. If additional sources are required for your deployment, select one or both of the following sources:
![]() Windows Update
Windows Update
![]() Windows Server Update Services
Windows Server Update Services
6. Click OK to close the Windows Security Health Validator settings dialog box.
7. Right-click Error Codes and select Properties to change the default error codes shown in Figure 4-40.
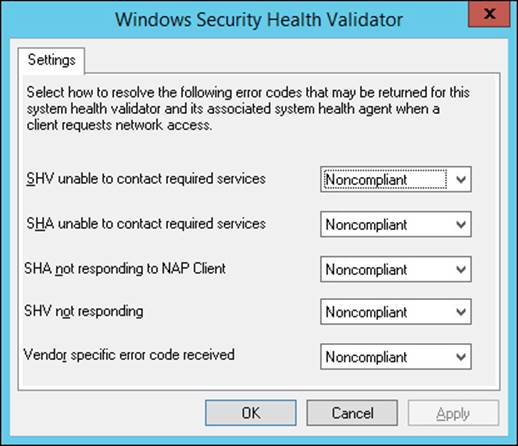
FIGURE 4-40 The Windows Security Health Validator Settings tab for error codes
The error codes can be set to Noncompliant or Compliant. If you want the WSHV to ignore a particular error, set the error code to Compliant.
8. Click OK to close the settings dialog box.
Configuring health policies
You can configure an existing health policy or create a new one. The settings available are the same. To create a new health policy, follow these steps:
1. Open the Network Policy Server console and expand NPS (Local) in the console tree.
2. In the Network Access Protection pane, and expand Policies.
3. Right-click Health Policies and select New.
4. In the Create New Health Policy dialog box, enter a Policy Name.
5. From the Client SHV Checks list, select one of the following:
![]() Client Passes All SHV Checks
Client Passes All SHV Checks
![]() Client Fails All SHV Checks
Client Fails All SHV Checks
![]() Client Passes One Or More SHV Checks
Client Passes One Or More SHV Checks
![]() Client Fails One Or More SHV Checks
Client Fails One Or More SHV Checks
![]() Client Reported AS Transitional By One Or More SHVs
Client Reported AS Transitional By One Or More SHVs
![]() Client Reported As Infected By One Or More SHVs
Client Reported As Infected By One Or More SHVs
![]() Client Reported As Unknown By One Or More SHVs
Client Reported As Unknown By One Or More SHVs
6. Select an SHV in the SHVs Used In This Health Policy list. If the SHV supports more than one configuration, choose the configuration you want.
7. Click OK to save the policy.
You can save an existing health policy as a template to use to build new health policies. To save a policy as a template, right-click the policy in the Health Policies folder and select Save And Apply As Template, as shown in Figure 4-41.
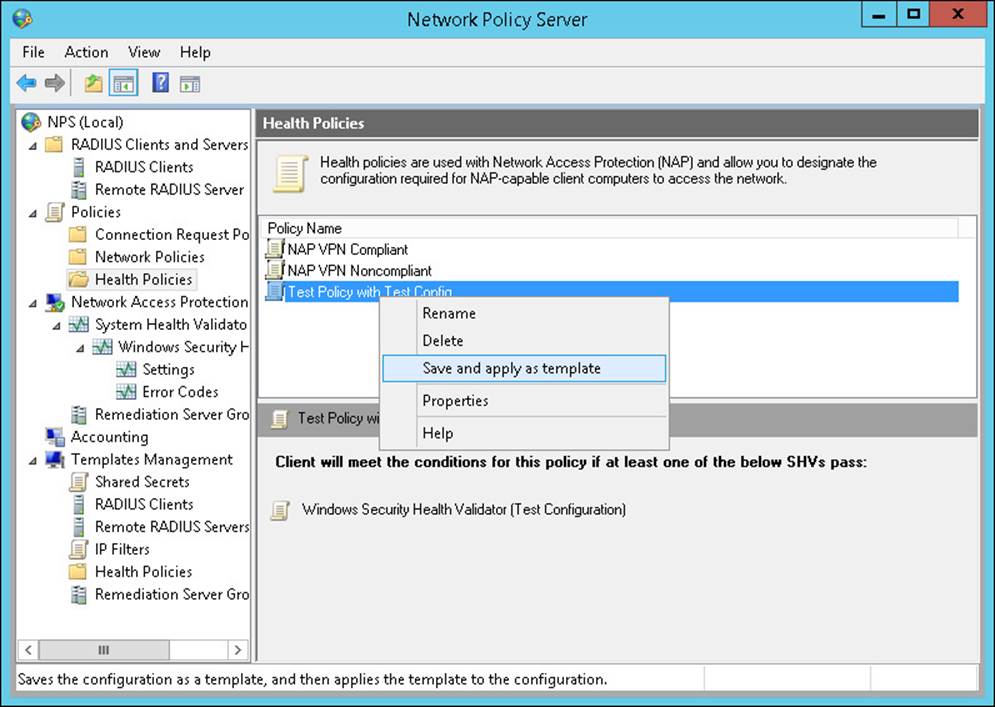
FIGURE 4-41 The Network Policy Server Health Policies details pane
Configuring NAP enforcement using DHCP and VPN
You can configure Network Access Protection enforcement to prevent noncompliant computers from connecting to the main network. They can be configured either to fail the connection or to be placed on a restricted network for remediation. There are multiple scenarios for NAP enforcement, including IEEE 802.1x for either wired or wireless connections, RD Gateway, DHCP, and VPN. The exam covers only the two most common NAP scenarios: DHCP and VPN.
NAP enforcement for DHCP
The DHCP scenario is straightforward and prevents noncompliant computers from getting a DHCP address on the main network. The scenario depends on DHCP either being installed on the main NAP computer or on a remote computer in the network that then gets NPS installed on it in RADIUS Proxy mode.
Exam Tip
NAP enforcement by using DHCP is not a secure enforcement method. The knowledgeable user can bypass it by assigning a fixed IP address from the IP address range of the network. This makes the use of the DHCP for NAP enforcement an obvious exam question scenario.
To configure NAP enforcement, use the following process:
![]() If DHCP is already running on the network, install the Network Policy Server role on the remote computer running DHCP. Configure as a RADIUS proxy, as described in Objective 4.1. Configure the Remote RADIUS Server Group to include the NAP enforcement server as the server to which RADIUS messages are forwarded. If installing DCHP on the NAP enforcement server, this step isn’t necessary.
If DHCP is already running on the network, install the Network Policy Server role on the remote computer running DHCP. Configure as a RADIUS proxy, as described in Objective 4.1. Configure the Remote RADIUS Server Group to include the NAP enforcement server as the server to which RADIUS messages are forwarded. If installing DCHP on the NAP enforcement server, this step isn’t necessary.
![]() Create a connection request policy using NAS Port as the condition and set it to the specific types of DHCP clients on which you want NAP enforcement. Configure the connection request policy to forward both authentication and accounting messages to the NAP enforcement computer.
Create a connection request policy using NAS Port as the condition and set it to the specific types of DHCP clients on which you want NAP enforcement. Configure the connection request policy to forward both authentication and accounting messages to the NAP enforcement computer.
![]() On the DHCP server, select the properties for the DHCP scope on which you want to enforce NAP and enable Network Access Protection settings for the scope, as shown in Figure 4-42.
On the DHCP server, select the properties for the DHCP scope on which you want to enforce NAP and enable Network Access Protection settings for the scope, as shown in Figure 4-42.
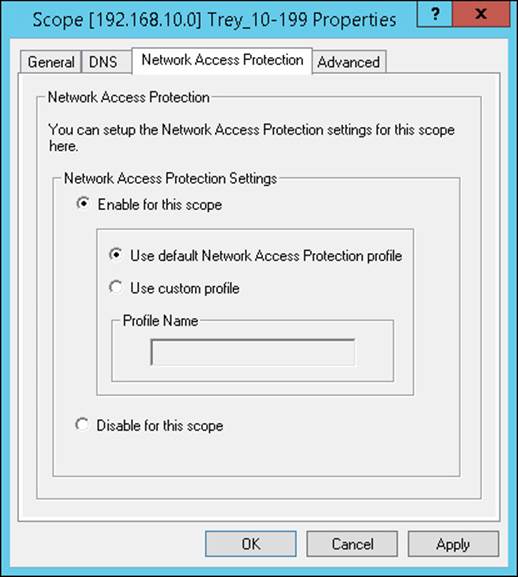
FIGURE 4-42 The Network Access Protection tab of the Properties dialog box for a DHCP scope
![]() Enable the DHCP server as a RADIUS client, as covered in Objective 4.1.
Enable the DHCP server as a RADIUS client, as covered in Objective 4.1.
![]() To enable authorization by group, create a security group in AD DS and add the users who are authorized to obtain IP addresses via DHCP to that group.
To enable authorization by group, create a security group in AD DS and add the users who are authorized to obtain IP addresses via DHCP to that group.
![]() On NAP–capable client computers, configure as described later in this chapter in the “Configuring NAP clients” section.
On NAP–capable client computers, configure as described later in this chapter in the “Configuring NAP clients” section.
![]() If using remediation servers, configure them as described in the “Configuring isolation and remediation of noncompliant computers using DHCP and VPN” section.
If using remediation servers, configure them as described in the “Configuring isolation and remediation of noncompliant computers using DHCP and VPN” section.
![]() Configure a health policy, connection request policy, and network policy to enforce NAP for DHCP.
Configure a health policy, connection request policy, and network policy to enforce NAP for DHCP.
![]() Configure the constraints in the network policy to allow health checks on DHCP IP address renewal.
Configure the constraints in the network policy to allow health checks on DHCP IP address renewal.
![]() Select the network policy you want to configure in the Network Policy Server console and double-click.
Select the network policy you want to configure in the Network Policy Server console and double-click.
![]() On the Constraints tab, ensure that Authentication Methods has Perform Machine Health Check Only selected, as shown in Figure 4-43.
On the Constraints tab, ensure that Authentication Methods has Perform Machine Health Check Only selected, as shown in Figure 4-43.
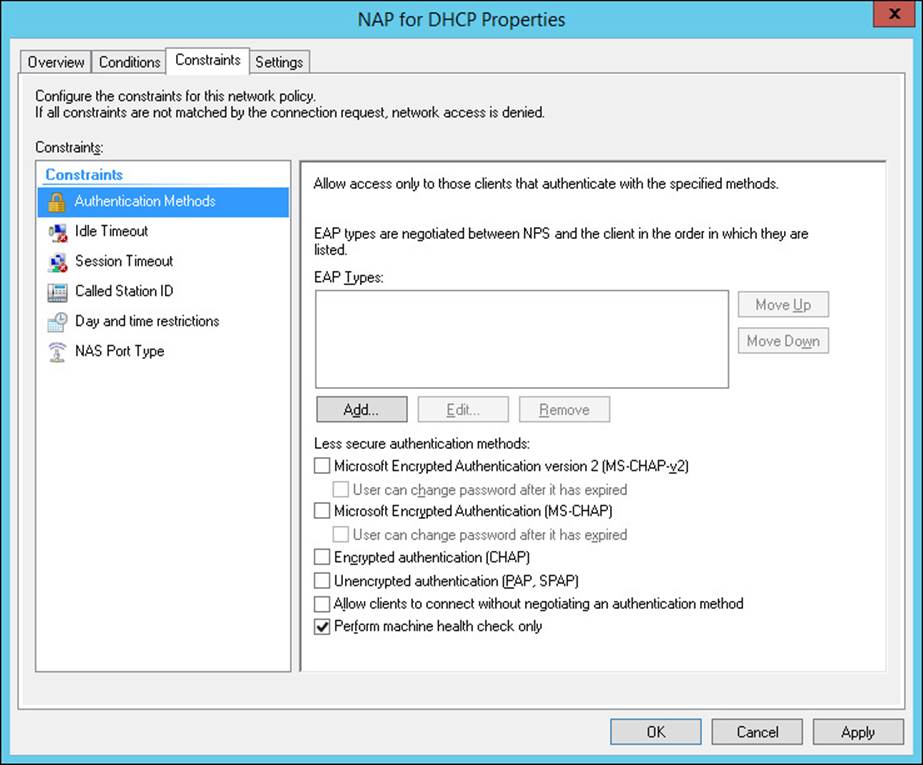
FIGURE 4-43 The Constraints tab of the network policy properties.
NAP enforcement for VPN
The VPN scenario for NAP enforcement follows a similar process to that for DHCP, but with some differences. The process flow for NAP enforcement for VPNs is as follows:
![]() Create a global security group in AD DS that has as members the users that will be permitted to use VPN.
Create a global security group in AD DS that has as members the users that will be permitted to use VPN.
![]() Configure the NPS server as a RADIUS server for VPN connections, using PEAP or EAP for authentication (see Objective 4.1 for details).
Configure the NPS server as a RADIUS server for VPN connections, using PEAP or EAP for authentication (see Objective 4.1 for details).
![]() Deploy a certification authority (CA) or buy a Server certificate for PEAP-MS-CHAPv2). (See Objective 4.1 for details on setting up certificate autoenrollment.)
Deploy a certification authority (CA) or buy a Server certificate for PEAP-MS-CHAPv2). (See Objective 4.1 for details on setting up certificate autoenrollment.)
![]() Deploy client computer and user certificates. (See Objective 4.1 for details on setting up certificate autoenrollment.)
Deploy client computer and user certificates. (See Objective 4.1 for details on setting up certificate autoenrollment.)
![]() If using multiple VPN servers, configure the NPS server as the primary RADIUS server, with the other servers being RADIUS clients of the NPS server. (See Objective 4.1 for how to configure RADIUS clients.)
If using multiple VPN servers, configure the NPS server as the primary RADIUS server, with the other servers being RADIUS clients of the NPS server. (See Objective 4.1 for how to configure RADIUS clients.)
![]() On the NPS server, configure health policies, connection request policies, and network policies for VPN that enforce NAP for those VPN connections.
On the NPS server, configure health policies, connection request policies, and network policies for VPN that enforce NAP for those VPN connections.
![]() On NAP–capable client computers, configure as described later in this chapter in the “Configuring NAP clients” section.
On NAP–capable client computers, configure as described later in this chapter in the “Configuring NAP clients” section.
![]() If using remediation servers, configure them as described in the following section, “Configuring isolation and remediation of noncompliant computers using DHCP and VPN.”
If using remediation servers, configure them as described in the following section, “Configuring isolation and remediation of noncompliant computers using DHCP and VPN.”
![]() Configure the client computers with a VPN connection, setting the configuration to PEAP or EAP.
Configure the client computers with a VPN connection, setting the configuration to PEAP or EAP.
Configuring isolation and remediation of noncompliant computers using DHCP and VPN
When creating a NAP enforcement policy, you can choose the following:
![]() Non-enforcement, allowing you to simply monitor the computers that are noncompliant with the NAP health policy
Non-enforcement, allowing you to simply monitor the computers that are noncompliant with the NAP health policy
![]() Limited enforcement, allowing computers that are noncompliant access to the network for a limited time
Limited enforcement, allowing computers that are noncompliant access to the network for a limited time
![]() Full enforcement, blocking access to the network for all noncompliant computers
Full enforcement, blocking access to the network for all noncompliant computers
![]() Full enforcement with remediation, allowing noncompliant computers access to a limited set of servers to correct the noncompliance, including the automatic corrections of some conditions that cause noncompliance.
Full enforcement with remediation, allowing noncompliant computers access to a limited set of servers to correct the noncompliance, including the automatic corrections of some conditions that cause noncompliance.
This last bullet is the one of interest in this section. To configure isolation and remediation, you have to configure a remediation server group and set NAP Enforcement to Allow Limited Network Access Only. You can also enable Auto-remediation to automatically remediate computers that fail the health check.
The first step is to configure a remediation server group and optionally a troubleshooting URL. The remediation server group is a group of one or more servers that have the resources to remediate the noncompliant servers to bring them back into compliance. The troubleshooting URL should point to a web page with descriptions of what is required for compliance and links to resources to correct noncompliance.
To configure a remediation server group, follow these steps:
1. Open the Network Policy Server console and navigate to Network Access Protection.
2. Click Configure Remediation Server Groups in the details pane shown in Figure 4-44.
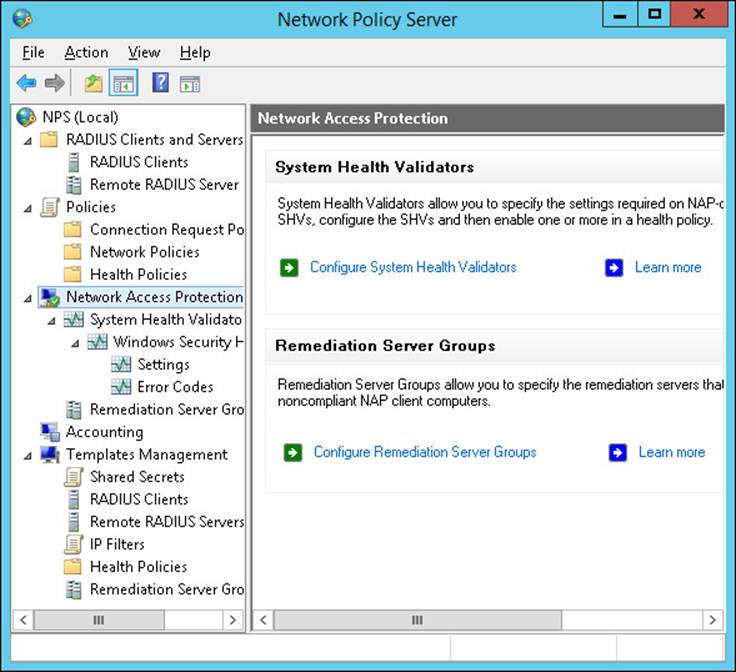
FIGURE 4-44 The Network Policy Server console
3. Right-click Remediation Server Groups and select New from the menu.
4. Select a Remediation Server Group template or create a new group.
5. Enter a Group Name and click Add to open the Add New Server dialog box shown in Figure 4-45.
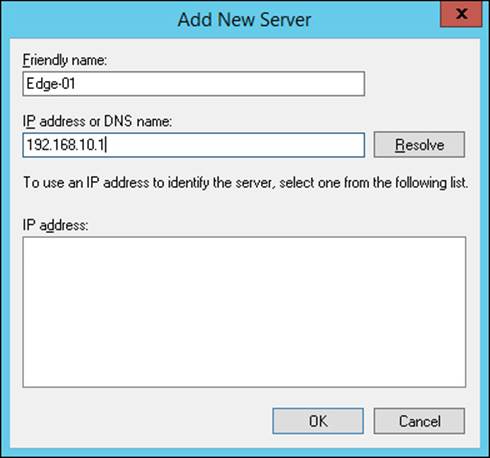
FIGURE 4-45 The Add New Server dialog box
6. Enter a Friendly Name for the server and type in an IP Address Or DNS Name.
7. Click Resolve. If you used a DNS name, and it resolves to more than one IP address, select the IP address to use and click OK. If you used an IP address and it resolves, click OK.
8. To add additional servers to the Remediation Server Group, click Add and repeat steps 6 and 7 to add servers as required.
9. After you add all the servers that need to be in the group, click OK.
10. You can now use this Remediation Server Group in network policies to allow non-compliant clients to correct the problem and return to compliance.
To create an NPS Remediation Server Group and add an NPS Remediation Server to it, use the New-NpsRemediationServerGroup and New-NpsRemediationServer cmdlets; for example:
New-NpsRemediationServerGroup -Name «RemGroup1»
New-NpsRemediationServer -RemediationServerGroup «RemGroup1» -Address «192.168.10.1»
To isolate the noncompliant clients, you need to configure a noncompliant NAP policy, as described in the earlier section, “Configuring network policies for VPN clients.” The process is similar for both VPN and DHCP policies. To create a new noncompliant network policy, follow these steps:
1. Right-click Network Policies in the Policies folder of the console tree.
2. Select New to open the New Network Policy Wizard.
3. Enter a Policy Name, such as NAP Noncompliant.
4. Select the type of Network Access Server, such as DHCP Server or Remote Access Server (VPN-Dial-up).
5. Click Next to open the Specify Conditions page and click Add to add policy conditions.
6. Scroll down and select Health Policies and click Add to open the Health Policies dialog box shown in Figure 4-46.
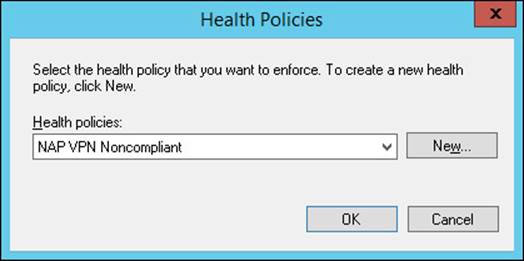
FIGURE 4-46 The Health Policies dialog box
7. Select a health policy from the Health Policies list or click New to create a new health policy, as described in the “Configuring health policies” section earlier in this objective. The policy should be one of noncompliance with one or more SHV checks.
8. Click OK after you either create a new health policy or select an existing one.
9. Click Add again to select additional conditions (such as user group or machine group), as shown in Figure 4-47.
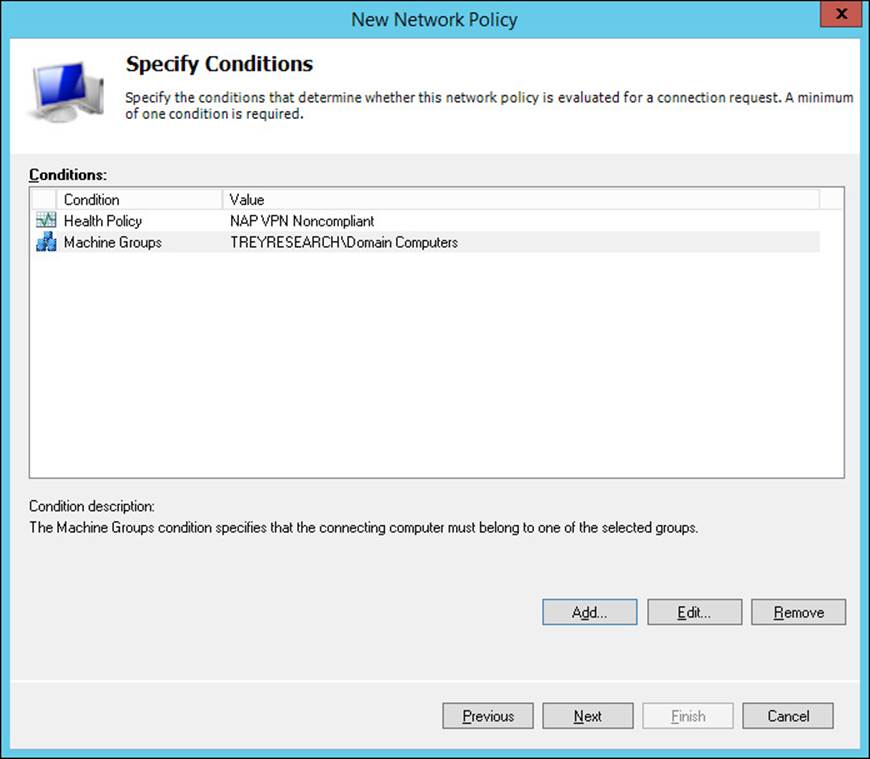
FIGURE 4-47 The Specify Conditions page of the New Network Policy Wizard
10. Click Next and select Access Granted on the Specify Access Permission page.
Exam Tip
A network policy for remediation of noncompliance must be set to Grant Access, even though you might think it should be set to Deny Access. But Deny Access would prevent the computer from reaching the remediation servers. This is an easy mistake to make, and it is one that exam writers are likely to use to make compelling distractors.
11. Select Access Is Determined By User Dial-In Properties (Which Overrides NPS Policy) to deny access to users who are not normally allowed remote access rather than continuing to the remediation steps.
12. Click Next to open the Configure Authentication Method. Select Perform Machine Health Check Only for DHCP or the authentication types you support for VPN.
13. Click Next to open the Configure Constraints page. Add constraints here only if your particular network environment requires them.
14. Click Next to open the Configure Settings page.
15. Select NAP Enforcement in the left pane, as shown in Figure 4-48.
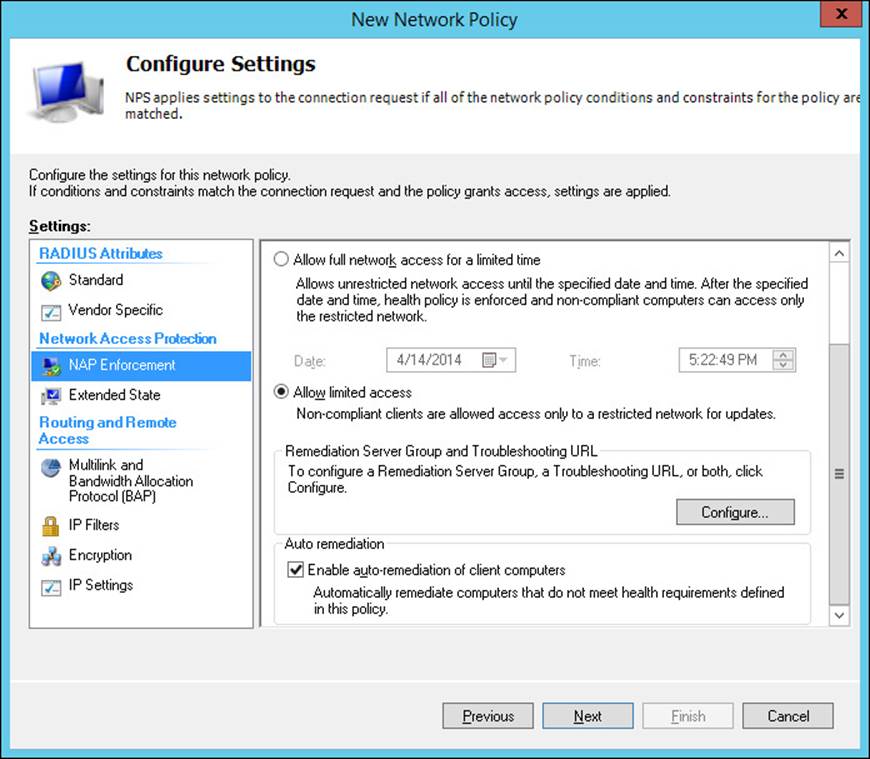
FIGURE 4-48 The Configure Settings page of the New Network Policy Wizard
16. Select Allow Limited Access and click Configure to open the Remediation Servers And Troubleshooting URL dialog box shown in Figure 4-49.

FIGURE 4-49 The Remediation Servers And Troubleshooting URL dialog box
17. Select a Remediation Server Group from the list or click New Group to create a new one.
18. Specify a troubleshooting URL if you have (or will have) a web page to provide troubleshooting information and resources for remediation. This page should be reachable by computers in the restricted network. Click OK to return to the Configure Settings page.
19. Select Enable Auto-Remediation Of Client Computers to have health requirements automatically corrected. (For example, if there is a requirement for a firewall, and the health check fails this requirement, Windows Firewall is enabled.)
20. Click Next and then Finish to create the new policy.
Note: Steps for DHCP
The steps for this procedure are those for creating a network policy for a noncompliant VPN connection. The steps for a noncompliant DHCP connection are slightly different, and you’ll be asked to specify the name of the DHCP scope to use. The scope name becomes part of the policy to match the MS-Service Class condition. Exams aren’t about exact steps, but what you’re configuring, and the basic process is the same.
Configuring NAP client settings
You need to configure NAP-capable clients to work correctly with NAP enforcement. The settings you need to configure are shown in the following steps:
1. Start the Network Access Protection Agent Windows Service.
2. Set the Network Access Protection Agent Windows Service startup type to Automatic.
3. Use the NAP Client Configuration console (Napclcfg.msc) on the client computer to enable the following enforcement clients:
![]() DHCP Quarantine Enforcement Agent
DHCP Quarantine Enforcement Agent
![]() EAP Quarantine Enforcement Agent
EAP Quarantine Enforcement Agent
4. Configure Group Policy to enable the Security Center.
5. Edit the Default Domain Policy.
6. Navigate to Computer Configuration/Administrative Templates/Windows Components/Security Center.
7. Double-click Turn On Security Center (Domain PCs Only).
8. Select Enabled. Click OK and exit the Group Policy Management Editor and the GPMC.
Thought experiment: Performing health checks
In this thought experiment, apply what you’ve learned about this objective. You can find answers to these questions in the “Answers” section at the end of this chapter.
You are the network administrator for TreyResearch.net. As a result of a recent virus attack on the network that originated with an unprotected remote user, you have been asked to immediately implement network access policies to ensure that computers that connect remotely are fully updated and protected.
1. What changes do you need to make to your existing NPS RADIUS infrastructure to support the change?
2. What changes do you need to make on remote client computers? How can you implement them?
3. What transitional steps should you take before locking out noncompliant users?
Objective summary
![]() NAP uses SHVs to verify that network clients meet specific health requirements.
NAP uses SHVs to verify that network clients meet specific health requirements.
![]() NAP health policies work with connection request policies and network policies to determine which clients are allowed to connect to the network.
NAP health policies work with connection request policies and network policies to determine which clients are allowed to connect to the network.
![]() NAP enforcement can be set to monitor, limited enforcement, or full enforcement.
NAP enforcement can be set to monitor, limited enforcement, or full enforcement.
![]() NAP enforcement can use remediation server groups to remediate noncompliant clients.
NAP enforcement can use remediation server groups to remediate noncompliant clients.
![]() NAP clients need configuration to work with NAP enforcement.
NAP clients need configuration to work with NAP enforcement.
Objective review
1. User1 has been on vacation for a week, with his laptop turned off. When he attempted to connect via modem to the Remote Access dial-in bank on day four of the vacation, his dial-in attempt was rejected. However, when he returns home three days later, he initially has a problem when he logs on to his laptop and attempts to connect to the network remotely. When he returns to the office, all is well, although his initial logon seems rather slow. When he goes home that night, he is again able to connect to the network. User1 is authorized for dial-up, and NAP policies are in place for both internal network connections and remote connections. What was a possible cause of the problem?
A. The connection request policy for dial-up connections has a condition on the Called Station ID that limits callers to the local area code.
B. The health policy for dial-up and VPN access requires that all client SHV checks must pass.
C. The health policy for internal network access requires that all client SHV checks must pass.
D. The network connection policy for dial-up connections is set to enable access.
2. What configuration changes do you need to make on client computers to support NAP?
A. Set the Network Access Protection Agent to Automatic.
B. Enable the DHCP Quarantine Enforcement Agent.
C. Enable the EAP Quarantine Enforcement Agent.
D. Use Group Policy to set the Turn On Security Center (Domain PCs Only) policy to Enabled.
E. A, B, D.
F. B, C, D.
G. All of the above.
3. When you configure NPS for DHCP, you configure the network policy to enforce the health policy. What settings do you need make in the network policy?
A. If the client SHV fails one or more SHV checks, deny access.
B. If the client SHV fails one or more SHV checks, grant access only for EAP clients.
C. If the client SHV passes one or more SHV checks, deny access.
D. If the client SHV passes one or more SHV checks, enable access.
Answers
This section contains the solutions to the thought experiments and answers to the lesson review questions in this chapter.
Objective 4.1: Thought experiment
1. You can use the Configure VPN Or Dial-up Wizard to create both VPN and dial-up connection request policies. The dial-up connection request policy works with a separate dial-up network policy to limit users to only members of the Domain Admins security group. It doesn’t require a separate NPS server.
2. Configure a network policy for HR that uses their membership in the HR Users security group to then limit access to only those authenticating with EAP Smart Card or other certificate. Because HR staff have access to sensitive data, they should be required to have TPM chips and BitLocker on their laptops, so by installing Windows 8 on their laptops, they can use a virtual smart card.
3. Although it is certainly possible to implement this policy on a single server, distributing it across multiple NPS servers enables you to have different policies for different Remote RADIUS Server Groups. The initial client access is handled by the RADIUS proxy, which distributes the load based on the priorities and weighting.
Objective 4.1: Review
1. Correct answer: A
A. Correct. The Network Policy Server role service is required for all RADIUS functionality.
B. Incorrect. The Health Registration Authority (HRA) is used only with the NAP IPsec enforcement method.
C. Incorrect. The Host Credential Authorization Protocol is used only for integration into a Cisco Network Access Control Server.
D. Incorrect. The RRAS role service is now part of the Remote Access role, not NPS.
2. Correct answers: B, D
A. Incorrect. Despite its name, the All Purpose certificate type doesn’t work for client authentication or server authentication.
B. Correct. The server authentication purpose is needed to authenticate the server to the client.
C. Incorrect. Although a root certificate for the CA used needs to be part of both the client’s and server’s root certificate store, this certificate is not used for mutual authentication.
D. Correct. The client authentication purpose is needed to authenticate the client to the server.
3. Correct answer: D
A. Incorrect. This is not how a RADIUS client works. The authentication happens at the RADIUS server.
B. Incorrect. RADIUS proxy means it acts as a RADIUS client.
C. Incorrect. RADIUS proxy means it acts as a RADIUS client.
D. Correct. As a RADIUS proxy, NPS forwards connections to a RADIUS server group for authentication and authorization.
Objective 4.2: Thought experiment
1. Export the current NPS configuration on remote1, and import it to the new NPS server, remote2. A more limited approach would be to only export and import the templates, but this would not meet the requirement.
2. An export of the NPS configuration of remote1 includes all of the shared secrets in plain text.
3. To mitigate the plain text shared secrets of an NPS export, you need to ensure that the configuration file itself is encrypted. Failure to do so would violate company policy. Two possible solutions, include:
![]() Export the NPS configuration file to a shared folder on the network that is encrypted with the EFS file system.
Export the NPS configuration file to a shared folder on the network that is encrypted with the EFS file system.
![]() Export the NPS configuration file to a USB stick, encrypted with BitLocker To Go.
Export the NPS configuration file to a USB stick, encrypted with BitLocker To Go.
Objective 4.2: Review
1. Correct answers: B, C
A. Incorrect. User groups are available only as a condition of the network policy
B. Correct. The user name is a possible condition for the connection request policy because it is part of a character string that typically includes a realm name.
C. Correct. The NAS Port Type identifies what port type was used by the client to connect to the RADIUS server.
D. Incorrect. The MS Service Class is not available in the connection request policy.
2. Correct answer: C
A. Incorrect. The RRAS service is not a RADIUS server.
B. Incorrect. The RRAS service is not a RADIUS server.
C. Correct. NPS is a RADIUS server. Copying the configuration from Windows Server 2012 is not a problem, and you should copy the configuration from another member of the same RADIUS server group.
D. Incorrect. NPS is a RADIUS server, and this is the same version of the operating system. But copying the configuration from RAD1 would copy the RADIUS proxy configuration, not the RADIUS server configuration.
3. Correct answer: A
A. Correct. The Tunnel Type condition includes the protocols that are used to connect to the RADIUS server.
B. Incorrect. The Framed Protocol primarily includes dial-up protocols such as SLIP and PPP.
C. Incorrect. Authentication Type specifies the authentication methods used, such as CHAP, EAP, and MS-CHAPv2.
D. Incorrect. Allowed EAP Types specifies which EAP authentication methods are allowed to be used.
Objective 4.3: Thought experiment
1. You need to enable NAP on your RADIUS servers and implement a health policy that requires users to have their firewall turned on, have all current updates, and be free of infection. You have to implement a remediation server group that you can redirect noncompliant users to, including clients that don’t have the NAP agent enabled.
2. You need to configure the remote computers to support NAP. Part of it can be done via Group Policy, but you’ll probably have to use a logon script during the transition phase to set the startup for the Network Access Protection Agent.
3. You need to configure remediation server groups to support remediating your current users who are not infected but just noncompliant. You need to have a separate policy that will lock out a user who is infected.
4. You probably want to start by creating the policies and setting them to monitor mode only, allowing access for noncompliant clients but logging their status. Doing this enables you to work directly with problem users who haven’t gotten compliant yet. But the infected users should be locked out anyway to prevent another incident.
Objective 4.3: Review
1. Correct answer: B
A. Incorrect. The Called Station ID is the phone number of the dial-up modem on the server, not the client.
B. Correct. The remote laptop fails because it hasn’t checked for updates in more than 72 hours.
C. Incorrect. The laptop would fail, but instead automatically routed to a remediation server that autoremediated on the local network. Makes for a slowish logon, however.
D. Incorrect. This would not prevent the remote access on day four of the vacation.
2. Correct answer: G
A. Incorrect. This answer forms part of the total answer, but is not sufficient in and of itself. The network access protection agent needs to start automatically.
B. Incorrect. This answer forms part of the total answer, but is not sufficient in and of itself. The DHCP Quarantine Enforcement Agent needs to be enabled.
C. Incorrect. This answer forms part of the total answer, but is not sufficient in and of itself. The EAP Quarantine Enforcement Agent needs to be enabled.
D. Incorrect. This answer forms part of the total answer, but is not sufficient in and of itself. The Group Policy needs to be changed.
E. Incorrect. You need all four of the items A–D.
F. Incorrect. You need all four of the items A–D.
G. Correct. This answer choice includes all four required elements of the correct answer.
3. Correct answer: D
A. Incorrect. By denying access, you prevent remediation.
B. Incorrect. EAP is a remote access protocol.
C. Incorrect. By denying access, you prevent remediation.
D. Correct. Allows the client to be forwarded to the remediation server group.