How to create an open file and folder dialog box with PowerShell
How to create an open file dialog box with PowerShell
1 — load the .NET System.Windows.Forms assembly
Add-Type -AssemblyName System.Windows.Forms
2 — Instantiate an OpenFileDialog object using New-Object
$FileBrowser = New-Object System.Windows.Forms.OpenFileDialog -Property @{ InitialDirectory = [Environment]::GetFolderPath('Desktop') }
You can see above that the OpenFileDialog class constructor has an InitialDirectory argument.
This tells the OpenFileDialog class which folder to display when the dialog box comes up.
In this case, I have the dialog box to display the desktop.
At this point, the dialog box will not display. We’re just instantiating the object.
To show the dialog box, we’ll have to use the ShowDialog() method.
3 — Show the dialog box
$Null = $FileBrowser.ShowDialog()
4 — limit the input by file type too using the Filter property
$FileBrowser = New-Object System.Windows.Forms.OpenFileDialog -Property @{
    InitialDirectory = [Environment]::GetFolderPath('Desktop')
    Filter           = 'Documents (*.docx)|*.docx|SpreadSheet (*.xlsx)|*.xlsx'
}
$Null = $FileBrowser.ShowDialog()
5 — OpenFile Dialog bow in a function : Allow filter on one file extension
function Get-FileName($InitialDirectory)
{
    $OpenFileDialog = New-Object System.Windows.Forms.OpenFileDialog
    $OpenFileDialog.InitialDirectory = $InitialDirectory
    $OpenFileDialog.filter = "CSV (*.csv) | *.csv"
    $OpenFileDialog.ShowDialog() | Out-Null
    $OpenFileDialog.FileName
}
6 — OpenFile Dialog bow in a function : Allow multiple filters
function Get-FileName($InitialDirectory)
{
    $OpenFileDialog = New-Object System.Windows.Forms.OpenFileDialog
    $OpenFileDialog.InitialDirectory = $InitialDirectory
    $OpenFileDialog.filter = "Documents (*.docx)|*.docx |SpreadSheet (*.xlsx)|*.xlsx"
    $OpenFileDialog.ShowDialog() | Out-Null
    $OpenFileDialog.FileName
}
[Nota] : As we can see, the filter applies for one or the other of the selected extensions, not both at the same time
FINALLY : OpenFile Dialog bow in a function : Allow multiple filters and multiple selections and manage errors
function Get-FileName
{
<#
.SYNOPSIS
   Show an Open File Dialog and return the file selected by the user

.DESCRIPTION
   Show an Open File Dialog and return the file selected by the user

.PARAMETER WindowTitle
   Message Box title
   Mandatory - [String]

.PARAMETER InitialDirectory
   Initial Directory for browsing
   Mandatory - [string]

.PARAMETER Filter
   Filter to apply
   Optional - [string]

.PARAMETER AllowMultiSelect
   Allow multi file selection
   Optional - switch

 .EXAMPLE
   Get-FileName
    cmdlet Get-FileName at position 1 of the command pipeline
    Provide values for the following parameters:
    WindowTitle: My Dialog Box
    InitialDirectory: c:temp
    C:Temp42258.txt

    No passthru paramater then function requires the mandatory parameters (WindowsTitle and InitialDirectory)

.EXAMPLE
   Get-FileName -WindowTitle MyDialogBox -InitialDirectory c:temp
   C:Temp41553.txt

   Choose only one file. All files extensions are allowed

.EXAMPLE
   Get-FileName -WindowTitle MyDialogBox -InitialDirectory c:temp -AllowMultiSelect
   C:Temp8544.txt
   C:Temp42258.txt

   Choose multiple files. All files are allowed

.EXAMPLE
   Get-FileName -WindowTitle MyDialogBox -InitialDirectory c:temp -AllowMultiSelect -Filter "text file (*.txt) | *.txt"
   C:TempAES_PASSWORD_FILE.txt

   Choose multiple files but only one specific extension (here : .txt) is allowed

.EXAMPLE
   Get-FileName -WindowTitle MyDialogBox -InitialDirectory c:temp -AllowMultiSelect -Filter "Text files (*.txt)|*.txt| csv files (*.csv)|*.csv | log files (*.log) | *.log"
   C:Templogrobo.log
   C:Tempmylogfile.log

   Choose multiple file with the same extension

.EXAMPLE
   Get-FileName -WindowTitle MyDialogBox -InitialDirectory c:temp -AllowMultiSelect -Filter "selected extensions (*.txt, *.log) | *.txt;*.log"
   C:TempIPAddresses.txt
   C:Templog.log

   Choose multiple file with different extensions
   Nota :It's important to have no white space in the extension name if you want to show them

.EXAMPLE
 Get-Help Get-FileName -Full

.INPUTS
   System.String
   System.Management.Automation.SwitchParameter

.OUTPUTS
   System.String

.NOTESs
  Version         : 1.0
  Author          : O. FERRIERE
  Creation Date   : 11/09/2019
  Purpose/Change  : Initial development

  Based on different pages :
   mainly based on https://blog.danskingdom.com/powershell-multi-line-input-box-dialog-open-file-dialog-folder-browser-dialog-input-box-and-message-box/
   https://code.adonline.id.au/folder-file-browser-dialogues-powershell/
   https://thomasrayner.ca/open-file-dialog-box-in-powershell/
#>
    [CmdletBinding()]
    [OutputType([string])]
    Param
    (
        # WindowsTitle help description
        [Parameter(
            Mandatory = $true,
            ValueFromPipelineByPropertyName = $true,
            HelpMessage = "Message Box Title",
            Position = 0)]
        [String]$WindowTitle,

        # InitialDirectory help description
        [Parameter(
            Mandatory = $true,
            ValueFromPipelineByPropertyName = $true,
            HelpMessage = "Initial Directory for browsing",
            Position = 1)]
        [String]$InitialDirectory,

        # Filter help description
        [Parameter(
            Mandatory = $false,
            ValueFromPipelineByPropertyName = $true,
            HelpMessage = "Filter to apply",
            Position = 2)]
        [String]$Filter = "All files (*.*)|*.*",

        # AllowMultiSelect help description
        [Parameter(
            Mandatory = $false,
            ValueFromPipelineByPropertyName = $true,
            HelpMessage = "Allow multi files selection",
            Position = 3)]
        [Switch]$AllowMultiSelect
    )

    # Load Assembly
    Add-Type -AssemblyName System.Windows.Forms

    # Open Class
    $OpenFileDialog = New-Object System.Windows.Forms.OpenFileDialog

    # Define Title
    $OpenFileDialog.Title = $WindowTitle

    # Define Initial Directory
    if (-Not [String]::IsNullOrWhiteSpace($InitialDirectory))
    {
        $OpenFileDialog.InitialDirectory = $InitialDirectory
    }

    # Define Filter
    $OpenFileDialog.Filter = $Filter

    # Check If Multi-select if used
    if ($AllowMultiSelect)
    {
        $OpenFileDialog.MultiSelect = $true
    }
    $OpenFileDialog.ShowHelp = $true    # Without this line the ShowDialog() function may hang depending on system configuration and running from console vs. ISE.
    $OpenFileDialog.ShowDialog() | Out-Null
    if ($AllowMultiSelect)
    {
        return $OpenFileDialog.Filenames
    }
    else
    {
        return $OpenFileDialog.Filename
    }
}
How to create an open folder dialog box with PowerShell
1 — load the .NET System.Windows.Forms assembly
Add-Type -AssemblyName System.Windows.Forms
2 — Instantiate an FolderBrowserDialog object using New-Object
$FolderBrowser = New-Object System.Windows.Forms.FolderBrowserDialog
3 — Show the dialog box
$Null = $FolderBrowser.ShowDialog()
4 — limit the input by file type too using the Filter property
$FolderBrowser = New-Object System.Windows.Forms.FolderBrowserDialog -Property @{
    RootFolder            = "MyComputer"
    Description           = "$Env:ComputerName - Select a folder"
}
$Null = $FolderBrowser.ShowDialog()
FINALLY — Open Folder Browser as a function
Function Get-FolderName
{
<#
.SYNOPSIS
   Show a Folder Browser Dialog and return the directory selected by the user

.DESCRIPTION
  Show a Folder Browser Dialog and return the directory selected by the user

.PARAMETER SelectedPath
   Initial Directory for browsing
   Mandatory - [string]

.PARAMETER Description
   Message Box Title
   Optional - [string] - Default : "Select a Folder"

.PARAMETER  ShowNewFolderButton
   Show New Folder Button when unused (default) or doesn't show New Folder when used with $false value
   Optional - [Switch]

 .EXAMPLE
   Get-FolderName
    cmdlet Get-FileFolder at position 1 of the command pipeline
    Provide values for the following parameters:
    SelectedPath: C:temp
    C:Temp

   Choose only one Directory. It's possible to create a new folder (default)

.EXAMPLE
   Get-FolderName -SelectedPath c:temp -Description "Select a folder" -ShowNewFolderButton
   C:TempTest

   Choose only one Directory. It's possible to create a new folder

.EXAMPLE
   Get-FolderName -SelectedPath c:temp -Description "Select a folder"
   C:TempTest
   Choose only one Directory. It's not possible to create a new folder

.EXAMPLE
   Get-FolderName  -SelectedPath c:temp
   C:TempTest

   Choose only one Directory. It's possible to create a new folder (default)


.EXAMPLE
 Get-Help Get-FolderName -Full

.INPUTS
   System.String
   System.Management.Automation.SwitchParameter

.OUTPUTS
   System.String


.NOTES
  Version         : 1.0
  Author          : O. FERRIERE
  Creation Date   : 12/10/2019
  Purpose/Change  : Initial development

  Based on different pages :
   mainly based on https://blog.danskingdom.com/powershell-multi-line-input-box-dialog-open-file-dialog-folder-browser-dialog-input-box-and-message-box/
   https://code.adonline.id.au/folder-file-browser-dialogues-powershell/
   https://thomasrayner.ca/open-file-dialog-box-in-powershell/
   https://code.adonline.id.au/folder-file-browser-dialogues-powershell/
#>

[CmdletBinding()]
    [OutputType([string])]
    Param
    (
        # InitialDirectory help description
        [Parameter(
            Mandatory = $true,
            ValueFromPipelineByPropertyName = $true,
            HelpMessage = "Initial Directory for browsing",
            Position = 0)]
        [String]$SelectedPath,

        # Description help description
        [Parameter(
            Mandatory = $false,
            ValueFromPipelineByPropertyName = $true,
            HelpMessage = "Message Box Title")]
        [String]$Description="Select a Folder",

        # ShowNewFolderButton help description
        [Parameter(
            Mandatory = $false,
            HelpMessage = "Show New Folder Button when used")]
        [Switch]$ShowNewFolderButton
    )

    # Load Assembly
    Add-Type -AssemblyName System.Windows.Forms

    # Open Class
    $FolderBrowser= New-Object System.Windows.Forms.FolderBrowserDialog

   # Define Title
    $FolderBrowser.Description = $Description

    # Define Initial Directory
    if (-Not [String]::IsNullOrWhiteSpace($SelectedPath))
    {
        $FolderBrowser.SelectedPath=$SelectedPath
    }

    if($folderBrowser.ShowDialog() -eq "OK")
    {
        $Folder += $FolderBrowser.SelectedPath
    }
    return $Folder
}
The open file/folder dialog box is a great way to receive input for your scripts interactively. It provides a file browser that makes for a much more user-friendly approach than merely prompting for a path. In this post I show you how can use OpenFileDialog in your PowerShell scripts.
- Author
- Recent Posts

Adam Bertram is a 20-year IT veteran, Microsoft MVP, blogger, and trainer.
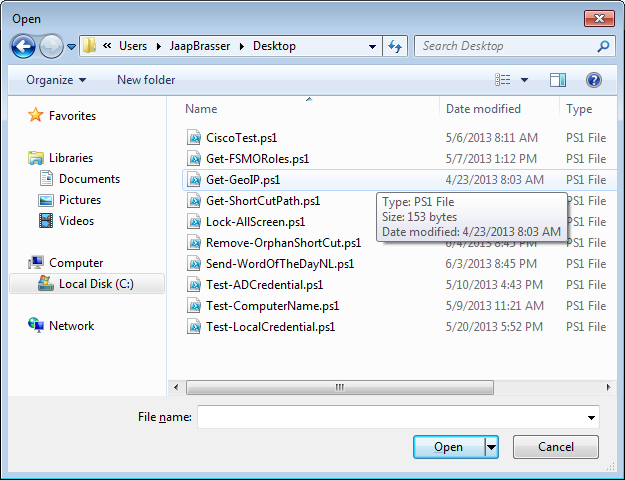
When you’re using a Windows application and need to provide input for a file or folder, you’ve probably seen the standard open file dialog.

Open file dialog
This dialog box is standard across lots of Windows applications. The software you’re using to invoke this dialog box uses a .NET assembly called System.Windows.Forms with a class inside called OpenFileDialog. Did you know you can get input to your PowerShell scripts this way too? Since PowerShell lies directly on top of .NET, we can invoke any .NET class we need, which means we can also bring up the open file dialog box.
To do this, we’ll first need to load the System.Windows.Forms assembly manually using the Add-Type cmdlet. Lots of .NET assemblies are typically loaded for you, but in this case, we have to do it manually.
Add-Type -AssemblyName System.Windows.Forms
Once we’ve loaded the assembly, we can instantiate an OpenFileDialog object using New-Object.
$FileBrowser = New-Object System.Windows.Forms.OpenFileDialog -Property @{ InitialDirectory = [Environment]::GetFolderPath('Desktop') }
You can see above that the OpenFileDialog class constructor has an InitialDirectory argument. This tells the OpenFileDialog class which folder to display when the dialog box comes up. In this case, I have the dialog box to display the desktop.
At this point, the dialog box will not display. We’re just instantiating the object. To show the dialog box, we’ll have to use the ShowDialog() method.
$null = $FileBrowser.ShowDialog()
This will display the dialog box. I’m assigning the output of ShowDialog() to $null. This is because the output does not return anything useful for our purposes. You might expect the output to return the chosen file name, but it doesn’t. The system then stores the file information in the OpenFileDialog object itself.
PS C:> $FileBrowser

CheckFileExists              : True
Multiselect                  : False
ReadOnlyChecked              : False
ShowReadOnly                 : False
SafeFileName                 : Thumbs.db
SafeFileNames                : {Thumbs.db}
AddExtension                 : True
CheckPathExists              : True
DefaultExt                   :
DereferenceLinks             : True
FileName                     : \MacHomeDesktopThumbs.db
FileNames                    : {\MacHomeDesktopThumbs.db}
Filter                       :
FilterIndex                  : 0
InitialDirectory             : \MacHomeDesktop
RestoreDirectory             : False
ShowHelp                     : False
SupportMultiDottedExtensions : False
Title                        :
ValidateNames                : True
CustomPlaces                 : {}
AutoUpgradeEnabled           : True
Tag                          :
Site                         :
Container                    :
You can see above that the OpenFileDialog object now contains all the information gathered from the file chosen.
The above example allows me to choose any file we’d like, but we also can limit the input by file type too using the Filter property.
$FileBrowser = New-Object System.Windows.Forms.OpenFileDialog -Property @{
    InitialDirectory = [Environment]::GetFolderPath('Desktop')
    Filter = 'Documents (*.docx)|*.docx|SpreadSheet (*.xlsx)|*.xlsx'
}
$null = $FileBrowser.ShowDialog()
Now when the dialog box displays, you can see below that the only options are to choose between Word and Excel documents.
Subscribe to 4sysops newsletter!

Filtering by file
For more information about this method of receiving file location input from users, refer to the Microsoft MSDN information.
Note: This tip requires PowerShell 2.0 or above.
In PowerShell, it is possible to use GUI elements to request user input. Although it is possible to create your own forms from scratch, there are also many useful pre-built dialogs available. In this tip, I will show you how to use the System.Windows.Forms.OpenFileDialog to select one or multiple files.
The following code will open a window that will prompt the user to select a single file. By setting the InitialDirectory property, the starting directory will be set to the current user’s desktop. This is done by using the [Environment] Desktop special folder:
Add-Type -AssemblyName System.Windows.Forms
$FileBrowser = New-Object System.Windows.Forms.OpenFileDialog -Property @{
    InitialDirectory = [Environment]::GetFolderPath('Desktop')
}

[void]$FileBrowser.ShowDialog()
$FileBrowser.FileNames
If documents need to be selected, it can be useful to set the starting folder to the documents folder. By setting a filter, we can ensure that only a certain type of file is selected. The next code sample will allow users to select .docx files. The filter can be changed by the user to also select an xlsx file:
Add-Type -AssemblyName System.Windows.Forms
$FileBrowser = New-Object System.Windows.Forms.OpenFileDialog -Property @{
    InitialDirectory = [Environment]::GetFolderPath('MyDocuments')
    Filter = 'Documents (*.docx)|*.docx|SpreadSheet (*.xlsx)|*.xlsx'
}
[void]$FileBrowser.ShowDialog()
$FileBrowser.FileNames
To select multiple files the MultiSelect property should be set to True.
Add-Type -AssemblyName System.Windows.Forms

$FileBrowser = New-Object System.Windows.Forms.OpenFileDialog -Property @{
    Multiselect = $true
}

[void]$FileBrowser.ShowDialog()
$FileBrowser.FileNames
For more information about this class the following MSDN article can be used:
http://msdn.microsoft.com/en-us/library/system.windows.forms.openfiledialog.aspx
Share on:
C# OpenFileDialog
C# OpenFileDialog control allows us to browse and select files on a computer in an application. A typical Open File Dialog looks like Figure 1 where you can see Windows Explorer like features to navigate through folders and select a file.

Figure 1
Creating a OpenFileDialog
We can create an OpenFileDialog control using a Forms designer at design-time or using the OpenFileDialog class in code at run-time (also known as dynamically). Unlike other Windows Forms controls, an OpenFileDialog does not have and not need visual properties like others. The only purpose of OpenFileDialog to display available colors, create custom colors and select a color from these colors. Once a color is selected, we need that color in our code so we can apply it on other controls.
Again, you can create an OpenFileDialog at design-time but it is easier to create an OpenFileDialog at run-time.
Design-time
To create an OpenFileDialog control at design-time, you simply drag and drop an OpenFileDialog control from Toolbox to a Form in Visual Studio. After you drag and drop an OpenFileDialog on a Form, the OpenFileDialog looks like Figure 2.

Figure 2
Adding an OpenFileDialog to a Form adds following two lines of code.
- private System.Windows.Forms.OpenFileDialog openFileDialog1;
- this.openFileDialog1 = new System.Windows.Forms.OpenFileDialog();
Run-time
Creating a OpenFileDialog control at run-time is merely a work of creating an instance of OpenFileDialog class, set its properties and add OpenFileDialog class to the Form controls.
First step to create a dynamic OpenFileDialog is to create an instance of OpenFileDialog class. The following code snippet creates an OpenFileDialog control object.
- OpenFileDialog openFileDialog1 = new OpenFileDialog();
ShowDialog method displays the OpenFileDialog.
- openFileDialog1.ShowDialog();
Once the ShowDialog method is called, you can browse and select a file.
Setting OpenFileDialog Properties
After you place an OpenFileDialog control on a Form, the next step is to set properties.
The easiest way to set properties is from the Properties Window. You can open Properties window by pressing F4 or right click on a control and select Properties menu item. The Properties window looks like Figure 3.

Figure 3
Initial and Restore Directories
InitialDirectory property represents the directory to be displayed when the open file dialog appears first time.
- openFileDialog1.InitialDirectory = @«C:»;
If RestoreDirectory property set to true that means the open file dialogg box restores the current directory before closing.
- openFileDialog1.RestoreDirectory = true;
Title
Title property is used to set or get the title of the open file dialog.
- openFileDialog1.Title = «Browse Text Files»;
Default Extension
DefaultExtn property represents the default file name extension.
- openFileDialog1.DefaultExt = «txt»;
Filter and Filter Index
Filter property represents the filter on an open file dialog that is used to filter the type of files to be loaded during the browse option in an open file dialog. For example, if you need users to restrict to image files only, we can set Filter property to load image files only.
- openFileDialog1.Filter = «txt files (*.txt)|*.txt|All files (*.*)|*.*»;
FilterIndex property represents the index of the filter currently selected in the file dialog box.
- openFileDialog1.FilterIndex = 2;
Check File Exists and Check Path Exists
CheckFileExists property indicates whether the dialog box displays a warning if the user specifies a file name that does not exist. CheckPathExists property indicates whether the dialog box displays a warning if the user specifies a path that does not exist.
- openFileDialog1.CheckFileExists = true;
- openFileDialog1.CheckPathExists = true;
File Name and File Names
FileName property represents the file name selected in the open file dialog.
- textBox1.Text = openFileDialog1.FileName;
If MultiSelect property is set to true that means the open file dialog box allows multiple file selection. The FileNames property represents all the files selected in the selection.
- this.openFileDialog1.Multiselect = true;
- foreach (String file in openFileDialog1.FileNames)
- {
- MessageBox.Show(file);
- }
Read Only Checked and Show Read Only Files
ReadOnlyChecked property represents whether the read-only checkbox is selected and ShowReadOnly property represents whether the read-only checkbox is available or not.
- openFileDialog1.ReadOnlyChecked = true;
- openFileDialog1.ShowReadOnly = true;
Implementing OpenFileDialog in a C# and WinForms Applications
Now let’s create a WinForms application that will use an OpenFileDialog that has two Button controls, a TextBox, and a container control. The Form looks like Figure 4.

Figure 4
The Browse button click event handler will show an open file dialog and users will be able to select text files. The open file dialog looks like Figure 5.

Figure 5
The following code snippet is the code for Browse button click event handler. Once a text file is selected, the name of the text file is displayed in the TextBox.
- private void BrowseButton_Click(object sender, EventArgs e)
- {
- OpenFileDialog openFileDialog1 = new OpenFileDialog
- {
- InitialDirectory = @«D:»,
- Title = «Browse Text Files»,
- CheckFileExists = true,
- CheckPathExists = true,
- DefaultExt = «txt»,
- Filter = «txt files (*.txt)|*.txt»,
- FilterIndex = 2,
- RestoreDirectory = true,
- ReadOnlyChecked = true,
- ShowReadOnly = true
- };
- if (openFileDialog1.ShowDialog() == DialogResult.OK)
- {
- textBox1.Text = openFileDialog1.FileName;
- }
- }
The code for Browse Multiple Files button click event handler looks like following.
- private void BrowseMultipleButton_Click(object sender, EventArgs e)
- {
- this.openFileDialog1.Filter =
- «Images (*.BMP;*.JPG;*.GIF,*.PNG,*.TIFF)|*.BMP;*.JPG;*.GIF;*.PNG;*.TIFF|» +
- «All files (*.*)|*.*»;
- this.openFileDialog1.Multiselect = true;
- this.openFileDialog1.Title = «Select Photos»;
- DialogResult dr = this.openFileDialog1.ShowDialog();
- if (dr == System.Windows.Forms.DialogResult.OK)
- {
- foreach (String file in openFileDialog1.FileNames)
- {
- try
- {
- PictureBox imageControl = new PictureBox();
- imageControl.Height = 400;
- imageControl.Width = 400;
- Image.GetThumbnailImageAbort myCallback =
- new Image.GetThumbnailImageAbort(ThumbnailCallback);
- Bitmap myBitmap = new Bitmap(file);
- Image myThumbnail = myBitmap.GetThumbnailImage(300, 300,
- myCallback, IntPtr.Zero);
- imageControl.Image = myThumbnail;
- PhotoGallary.Controls.Add(imageControl);
- }
- catch (Exception ex)
- {
- MessageBox.Show(«Error: « + ex.Message);
- }
- }
- }
- }
- public bool ThumbnailCallback()
- {
- return false;
- }
The output looks like Figure 6.

Summary
An OpenFileDialog control allows users to launch Windows Open File Dialog and let them select files. In this article, we discussed how to use a Windows Open File Dialog and set its properties in a Windows Forms application.
When I run the following, PowerShell hangs waiting for the dialog to close, even though the dialog is never displayed:
[void] [Reflection.Assembly]::LoadWithPartialName( 'System.Windows.Forms' )
$d = New-Object Windows.Forms.OpenFileDialog
$d.ShowDialog( )
Calling ShowDialog on a Windows.Forms.Form works fine. I also tried creating a Form and passing it as the parent to $d.ShowDialog, but the result was no different.
asked Oct 19, 2008 at 17:32
![]()
Emperor XLIIEmperor XLII
12.8k11 gold badges69 silver badges74 bronze badges
1
I was able to duplicate your problem and found a workaround. I don’t know why this happens, but it has happened to others.
If you set the ShowHelp property to $true, you will get the dialog to come up properly.
Example:
[void] [Reflection.Assembly]::LoadWithPartialName( 'System.Windows.Forms' )
$d = New-Object Windows.Forms.OpenFileDialog
$d.ShowHelp = $true
$d.ShowDialog( )
Good Luck!
answered Oct 19, 2008 at 17:57
![]()
4
It appears to me that the dialog is actually opening just fine, but it’s behind the powershell console window. Unfortunately it doesn’t show in the taskbar, so there’s no indication that it’s there unless you move the powershell window or Alt+Tab. It also appears that the ShowHelp workaround didn’t have any effect for me.
EDIT Here’s a way to do do it using your secondary-form idea. The basic idea is to create a new form which opens the OpenFileDialog from inside its Shown event. The key is calling Activate on the form before opening the dialog, so that the form comes to the front and the dialog appears. I moved the form offscreen by setting the Location to an offscreen value, but you could alternatively set Form.Visible = $false from inside the Shown event.
[void] [Reflection.Assembly]::LoadWithPartialName( 'System.Windows.Forms' )

$ofn = New-Object System.Windows.Forms.OpenFileDialog

$outer = New-Object System.Windows.Forms.Form
$outer.StartPosition = [Windows.Forms.FormStartPosition] "Manual"
$outer.Location = New-Object System.Drawing.Point -100, -100
$outer.Size = New-Object System.Drawing.Size 10, 10
$outer.add_Shown( {
   $outer.Activate();
   $ofn.ShowDialog( $outer );
   $outer.Close();
 } )
$outer.ShowDialog()
answered Oct 19, 2008 at 18:22
![]()
CharlieCharlie
43.7k4 gold badges43 silver badges68 bronze badges
5
Apparently this has something to do with Multi-Threaded Apartment (MTA) mode.
It appears to work fine in Single-Threaded Apartment (-STA) mode.
See also: Could you explain STA and MTA?
![]()
answered Jun 27, 2014 at 9:30
![]()
iRoniRon
18.7k10 gold badges46 silver badges75 bronze badges
Filedialog and Powershell
When I ask any input from a user in Powershell script most of the time I ask it in a parameter of the script body or just prompt for it during runtime. But with the underlying .NET Framework you can take advantage of the GUI, for example using a dialog panel. By using a dialog to specify a file you can be sure, that there is no spelling mistake in the path and you also provide a better user experience.

Use OpenFileDialog class from the System.Windows.Forms namespace to ask a user to specify a file. Read more about this at MSDN: http://msdn.microsoft.com/en-us/library/system.windows.forms.openfiledialog%28v=vs.100%29.aspx
To work with this class, first load the namespace with the following command.
[System.Reflection.Assembly]::LoadWithPartialName(“System.Windows.Forms”)
If you want to get rid of the message after this command just redirect the output with pipe or put it all to a variable:
$loadNamespace = [System.Reflection.Assembly]::LoadWithPartialName(“System.Windows.Forms”)
[System.Reflection.Assembly]::LoadWithPartialName(“System.Windows.Forms”) | Out-Null
Next you can initialize an instance of this class using New-Object, and because the constructor does not require any parameters use this command:
$myDialog = New-Object System.Windows.Forms.OpenFileDialog
To ask some help about this object just use Get-Member commadlet, any it prints you all methods and properties for OpenFileDialog
$myDialog | Get-Member

Also just type the variable name and you will see the current (default) values for properties.
$myDialog
Alter these to meet your requirements in your scenario.
For example set the title of the window:
$myDialog.Title = “Window title text”
And the actual directory:
$myDialog.InitialDirectory = “C:Windows”
And add some file type filters, for example text files:
$myDialog.Filter = “Text files (*.txt)|*.txt”
or all files:
$myDialog.Filter = “All Files (*.*)|*.*”
If you finished with configuring the outfit of the window and added all parameters, use ShowDialog() to pop it up to the user:
$result = $myDialog.ShowDialog()
In the $result variable Powershell stores the return value, based on the user pressed the Open button (the result is OK string), the cancel button or just closed the window (in both cases the result is Cancel string). So just check $result for these strings and act accordingly.
By the way, the file or files’ names are in the FileName and FileNames properties, now you can work with them.

Full code example:
$myDialog = New-Object System.Windows.Forms.OpenFileDialog
$myDialog.Title = “Please select a file”
$myDialog.InitialDirectory = “C:Windows”
$myDialog.Filter = “All Files (*.*)|*.*”
$result = $myDialog.ShowDialog()
If($result -eq “OK”) {
$inputFile = $myDialog.FileName
# Continue working with file
}
else {
Write-Host “Cancelled by user”
}
Here’s a neat little PowerShell function you can throw into your scripts. Lots of times I want to specify a CSV or TXT or some other file in a script. It’s easy to do this:
$inputfile = read-host "Enter the path of the file"
$inputdata = get-content $inputfile
But that means you have to type the whole absolute or relative path to the file. What a pain. I know what you’re thinking… There must be a better way!
There is! Use an open file dialog box. You know, like when you click File, Open and a window opens and you navigate your filesystem and select a file using a GUI. How do you do it in PowerShell? Let me show you. First things first: let’s declare a function with a couple of the items we’re going to need.
Function Get-FileName($initialDirectory)
{
    [System.Reflection.Assembly]::LoadWithPartialName("System.windows.forms") | Out-Null
}
I’m going to name this function Get-FileName because I like the Verb-Noun naming scheme that PowerShell follows. It’s got a parameter, too. $initialDirectory is the directory that our dialog box is going to display when we first launch it. The part of this that most likely looks new is line 3. We need to load a .NET item so we can use the Windows Forms controls. We’re loading via partial name because we want all the Windows Form controls, not just some. It’s faster and easier to do this than it is to pick and choose. We’re piping the output to Out-Null because we don’t want all the verbose feedback it gives when it works.
Now let’s open the thing and get to business selecting a file.
Function Get-FileName($initialDirectory)
{
    [System.Reflection.Assembly]::LoadWithPartialName("System.windows.forms") | Out-Null

    $OpenFileDialog = New-Object System.Windows.Forms.OpenFileDialog
    $OpenFileDialog.initialDirectory = $initialDirectory
    $OpenFileDialog.filter = "CSV (*.csv)| *.csv"
    $OpenFileDialog.ShowDialog() | Out-Null
}
On line 5, we’re creating a new object. That object is unsurprisingly an OpenFileDialog object. On line 6 we’re specifying that initial directory that we got in the parameter. On line 7 we’re doing something a little interesting. The filter attribute of the OpenFileDialog object controls which files we see as we’re browsing. That’s this part of the box.

I’m limiting my files to CSV only. The first part of the value is CSV (.csv) which is what the dialog box shows in the menu. The second part after the pipe character *.csv is the actual filter. You could make any kind of filter you want. For instance, if you wanted to only see files that started with “SecretTomFile”, you could have a filter like SecretTomFile.
The next item on line 8 is to open the dialog box, we do that with the ShowDialog() function. We discard the output from this command because it’s spammy in this context, just like when we added the .NET items.
One last thing! We’ve created, defined and opened our OpenFileDialog box but don’t we actually need to get the result of what file was selected? Yes, we do. That’s pretty easy, though.
Function Get-FileName($initialDirectory)
{
    [System.Reflection.Assembly]::LoadWithPartialName("System.windows.forms") | Out-Null

    $OpenFileDialog = New-Object System.Windows.Forms.OpenFileDialog
    $OpenFileDialog.initialDirectory = $initialDirectory
    $OpenFileDialog.filter = "CSV (*.csv)| *.csv"
    $OpenFileDialog.ShowDialog() | Out-Null
    $OpenFileDialog.filename
}
The Filename attribute is set when someone commits to opening a file in the OpenFileDialog box. On line 9, we’re returning it to whatever called our script.
So to use this function in the same way as the example at the top of this post, your code would look like this.
$inputfile = Get-FileName "C:temp"
$inputdata = get-content $inputfile
I think this is a lot nicer than typing a filename every time you want to run a script. I find it particularly convenient on scripts I run a lot.
Upload files with Powershell GUI
In many scenarios, we will get the requirement to upload the reports, tracker from one location to another location , so i decided to write this post to explain how to upload files like excel, txt… with the help of Powershell GUI. Instead of thinking high level, here i had split the three simple task to achieve the file upload functionality in the Powershell.
- Create Simple PowerShell UI for browsing the location of files with one textbox and two button type (upload & cancel) with help of system.Windows.Forms
- In Browse button click event, you can perform the browse with the specific file that need to be upload to destination folder using New-Object -TypeName System.Windows.Forms.OpenFileDialog. These make the selection of files or folders easy for users and prevent mistakes being made in file paths.
- In upload button click event, you can perform the Move action on the selected file to place on Target location.
When designing PowerShell scripts, I have often found it useful to incorporate a file or folder dialogue to select files or folders. These make the selection of files or folders easy for users and prevent mistakes being made in file paths.
Example:
|
#######################################################
#Project : Upload the files using Powershell
#Developer : Thiyagu S (dotnet-helpers.com)
#Tools : PowerShell 5.1.15063.1155
#E-Mail : mail2thiyaguji@gmail.com
#######################################################
$Forms = ‘system.Windows.Forms.Form’
$Button = ‘system.Windows.Forms.Button’
#Getting the font details for applying the fields
$FontStyle = ‘Microsoft Sans Serif,10,style=Bold’
$SysDrawPoint = ‘System.Drawing.Point’
# setting InitialDirectory which open as intially during the click of browse button
$InitialDirectory = «C:New folder»
Add-Type -AssemblyName System.Windows.Forms
[System.Windows.Forms.Application]::EnableVisualStyles()
#The New-Object cmdlet creates an instance of a .NET Framework or COM object.
#Specifies the fully qualified name of the .NET Framework class. You cannot specify both the TypeName parameter and the ComObject parameter.
$TrackerFileUpload = New-Object -TypeName $Forms
$TrackerFileUpload.ClientSize = ‘400,114’
$TrackerFileUpload.text = ‘dotnet-helpers.com — Please upload Daily Tracker’
$TrackerFileUpload.TopMost = $false
$txtFileName = New-Object -TypeName system.Windows.Forms.TextBox
$txtFileName.location = New-Object -TypeName $SysDrawPoint -ArgumentList (107,39)
$txtFileName.Font = $FontStyle
$btnFileBrowser = New-Object -TypeName $Button
$btnFileBrowser.BackColor = ‘#1a80b6’
$btnFileBrowser.text = ‘Browse’
$btnFileBrowser.width = 96
$btnFileBrowser.height = 30
$btnFileBrowser.location = New-Object -TypeName $SysDrawPoint -ArgumentList (200,78)
$btnFileBrowser.Font = $FontStyle
$btnFileBrowser.ForeColor = ‘#ffffff’
$btnUpload = New-Object -TypeName $Button
$btnUpload.BackColor = ‘#00FF7F’
$btnUpload.text = ‘Upload’
$btnUpload.location = New-Object -TypeName $SysDrawPoint -ArgumentList (291,78)
$btnUpload.Font = $FontStyle
$btnUpload.ForeColor = ‘#000000’
$lblFileName = New-Object -TypeName system.Windows.Forms.Label
$lblFileName.text = ‘Choose File’
$lblFileName.AutoSize = $true
$lblFileName.location = New-Object -TypeName $SysDrawPoint -ArgumentList (20,40)
$lblFileName.Font = $FontStyle
#Adding the textbox,buttons to the forms for displaying
$TrackerFileUpload.controls.AddRange(@($txtFileName, $btnFileBrowser, $lblFileName, $btnUpload))
#Browse button click event
$btnFileBrowser.Add_Click({
Add-Type -AssemblyName System.windows.forms | Out-Null
#Creating an object for OpenFileDialog to a Form
$OpenDialog = New-Object -TypeName System.Windows.Forms.OpenFileDialog
#Initiat browse path can be set by using initialDirectory
$OpenDialog.initialDirectory = $initialDirectory
#Set filter only to upload Excel file
$OpenDialog.filter = ‘.xlsx (*(.xlsx)) | *.xlsx | *.txt’
$OpenDialog.ShowDialog() | Out-Null
$filePath = $OpenDialog.filename
#Assigining the file choosen path to the text box
$txtFileName.Text = $filePath
$TrackerFileUpload.Refresh()
#Upload button click eventy
#Set the destination path
$destPath = ‘C:EMSDestination’
Copy-Item -Path $txtFileName.Text -Destination $destPath
$null = $TrackerFileUpload.ShowDialog()
|
Output:

What do you think?
I hope you have an idea of How To upload the files with help of PowerShell GUI. I would like to have feedback from my posts readers. Your valuable feedback, question, or comments about this article are always welcome.
Other Popular Articles
-
.appendTo() method in Jquery
-
How to call REST APIs using Powershell
-
animation() Effect in Jquery
-
Exporting and Importing bulk website bindings in IIS
-
How to use appcmd.exe to renew a new certificate for Bulk HTTPS URLs (Bindings)
-
How to get Sitecore Admin users for the domain using Sitecore PowerShell Extensions
-
How to Create Log File using Start-Transcript cmdlet in PowerShell
-
.insertAfter() method in Jquery
-
Getting Sitecore User Profile Data Using Sitecore PowerShell Extensions
This site uses Akismet to reduce spam. Learn how your comment data is processed.
About JQuery
Form Data
JQuery Effects
CSS Methods
Manipulation
Page load link
Several command line scripts can benefit with some graphical user interface interactions. One of the most common that come to mind is opening and saving files. This could be searching for a config file or saving the location of a log file.
With PowerShell we can call the .NET class
[System.Reflection.Assembly]::LoadWithPartialName("System.windows.forms")Saving a file
With this class we can begin our Save File function and Open File functions.
function Save-File([string] $initialDirectory){    [System.Reflection.Assembly]::LoadWithPartialName("System.windows.forms") | Out-Null    $OpenFileDialog = New-Object System.Windows.Forms.SaveFileDialog
    $OpenFileDialog.initialDirectory = $initialDirectory
    $OpenFileDialog.filter = "All files (*.*)| *.*"
    $OpenFileDialog.ShowDialog() |  Out-Null    return $OpenFileDialog.filename
}
This will open the window to choose the location of the file to save. The return will get the full path of the file we decided we wanted to save. Now to run the function and actually choose or file.
$SaveFile=Save-File $env:USERPROFILEif ($SaveFile -ne "")
{
    echo "You choose FileName: $SaveFile"
} else {
    echo "No File was chosen"
}
We specify the initial directory to start in and the $env:userprofile will start in the current users profile directory. From here you can browse for the directory and specify the filename we want to use to save our file.
Our file name we can use in our log or export process we can use the variable $SaveFile which will include the full path the to file name.
Opening a file
This process is very similar except we choose the OpenFileDialog instead of SaveFileDialog
function Open-File([string] $initialDirectory){ [System.Reflection.Assembly]::LoadWithPartialName("System.windows.forms") | Out-Null
$OpenFileDialog = New-Object System.Windows.Forms.OpenFileDialog
$OpenFileDialog.initialDirectory = $initialDirectory
$OpenFileDialog.filter = "All files (*.*)| *.*"
$OpenFileDialog.ShowDialog() | Out-Null
return $OpenFileDialog.filename
}
$OpenFile=Open-File $env:USERPROFILE
if ($OpenFile -ne "")
{
echo "You choose FileName: $OpenFile"
}
else
{
echo "No File was chosen"
}
We could use the Open-File function to read a file contents and use this as a config option or just reading the contents of a file
Get-Content $OpenFileHappy Coding!
Tags:
powershell
Found an issue? Edit on Github
← Back home