Программа Nextcloud полностью совместима с протоколом WebDAV, благодаря чему вы можете установить соединение и синхронизировать ваши файлы Nextcloud по протоколу WebDAV. В данном разделе приведена информация о том, как подключить устройства под управлением ОС Linux, macOS, Windows, а также мобильные устройства к вашему серверу Nextcloud через протокол WebDAV. Перед описанием процесса настройки WebDAV необходимо рассмотреть рекомендованный способ подключения клиентских устройств к серверам Nextcloud.
Примечание: в следующих примерах нужно поменять текст «example.com/» на URL-адрес вашего сервера Nextcloud, а «Имя_пользователя» (USERNAME) на идентификатор пользователя, для которого создается соединение.
URL-адрес для протокола webdav можно узнать в Nextcloud (настройки в нижнем левом углу).
Клиенты для настольных ПК и мобильных устройств в Nextcloud
Для синхронизации настольного ПК с сервером Nextcloud рекомендуется использовать клиенты синхронизации Nextcloud/ownCloud. Вы можете настроить клиент таким образом, чтобы файлы сохранялись в локальную директорию, и можете указать директории на сервере Nextcloud, с которыми будет выполняться синхронизация. В клиенте отображается текущее состояние соединения и регистрируются все действия, чтобы вы знали, какие удаленные файлы были загружены на ваш ПК, и могли проверить, какие файлы на вашем локальном компьютере были созданы, обновлены и синхронизированы с сервером.
Для синхронизации сервера Nextcloud с устройствами под управлением ОС Android и Apple iOS рекомендуется использовать соответствующие мобильные приложения.
Для подключения вашего мобильного приложения к серверу Nextcloud нужно использовать только базовый URL-адрес и папку:
example.com/nextcloud
Кроме мобильных приложений в Nextcloud или ownCloud, можно использовать другие приложения для подключения к Nextcloud с вашего мобильного устройства по протоколу WebDAV. Для устройств под управлением ОС Android и смартфонов IPhone отличным вариантом является запатентованное приложение WebDAV Navigator. В данном случае используется следующий URL-адрес:
example.com/nextcloud/remote.php/dav/files/USERNAME/
Конфигурация WebDAV
При необходимости вы можете также подключить настольный ПК к серверу Nextcloud, используя протокол WebDAV вместо специального клиентского приложения. Web Distributed Authoring and Versioning (WebDAV) – расширение к протоколу переноса гипертекста (HTTP), которое упрощает процесс создания, чтения и редактирования файлов на веб-серверах. С помощью протокола WebDAV вы можете получить доступ к общим данным Nextcloud через устройства под управлением ОС Linux, macOS и Windows так же, как к удаленному общему сетевому файлу, и выполнить их синхронизацию.
Доступ к файлам на устройствах под управлением ОС Linux
Доступ к файлам на устройствах под управлением операционных систем Linux осуществляется следующим образом.
Файловый менеджер Nautilus
Используйте команду davs:// для подключения файлового менеджера Nautilus к нужному общему файлу Nextcloud:
davs://example.com/nextcloud/remote.php/dav/files/USERNAME/
Примечание: если соединение с сервером не использует протокол HTTPS, следует ввести команду dav://, а не davs://.
Доступ к файлам при помощи среды KDE и файлового менеджера Dolphin
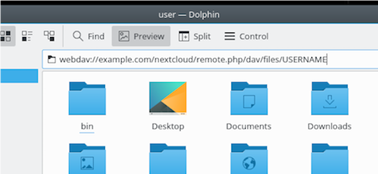
Для доступа к файлам Nextcloud при помощи файлового менеджера Dolphin в среде KDE нужно использовать команду webdav://:
webdav://example.com/nextcloud/remote.php/dav/files/USERNAME/
Вы можете создать постоянную ссылку на ваш сервер Nextcloud:
- Запустите менеджер Dolphin и нажмите кнопку «Сеть» (Network) в левой области «Места» (Places).
- Щелкните по значку «Добавить сетевую папку» (Add a Network Folder). В открывшемся диалоговом окне отобразится выбранный протокол WebDAV.
- Если это не так, следует выбрать данный протокол.
- Нажмите кнопку «Далее» (Next).
- Введите следующие настройки:
- Имя (Name): имя, которое должно отображаться для закладки «Места» (Places), например, Nextcloud.
- Пользователь (User): имя пользователя Nextcloud, используемое для входа в систему, например, «администратор» (admin).
- Сервер (Server): имя домена Nextcloud, например, example.com (без http:// в начале и без директорий в конце).
- Папка (Folder): введите путь: nextcloud/remote.php/dav/files/USERNAME/.
- (Опция) установите галочку «Добавить позицию списка» (Create icon checkbox) для закладки, отображаемой в области «Места» (Places).
- (Опция) введите специальные настройки или включите использование SSL-сертификата в строке «Порт и шифрование» (Port & Encrypted).
Создание точки монтирования WebDAV в командной строке Linux
Вы можете создать точки монтирования WebDAV с помощью командной строки Linux. Это может потребоваться в тех случаях, когда вы хотите получить доступ к Nextcloud так же, как к любой другой удаленной точке монтирования файловой системы. Ниже показано, как создать персональную точку монтирования, которая будет автоматически монтироваться при каждом входе в систему на вашем компьютере под управлением ОС Linux.
- Установите драйвер файловой системы davfs2 для WebDAV, который позволяет монтировать общие файлы WebDAV, как любую другую удаленную файловую систему. Введите следующую команду для его установки на ОС Debian/Ubuntu:
apt-get install davfs2
- Введите следующую команду для его установки в ОС CentOS, Fedora и openSUSE:
yum install davfs2
- Добавьтесь в группу davfs2:
usermod -aG davfs2 <имя_пользователя>
- Затем создайте директорию «nextcloud» в исходной директории для точки монтирования, и директорию «.davfs2/» для вашего файла конфигурации:
mkdir ~/nextcloud
mkdir ~/.davfs2
- Скопируйте файл /etc/davfs2/secrets в директорию ~/.davfs2:
cp /etc/davfs2/secrets ~/.davfs2/secrets
- Укажите себя в качестве владельца и установите права на чтение-запись только для владельца:
chown <имя_пользователя_linux >:<имя_пользователя_linux> ~/.davfs2/secrets
chmod 600 ~/.davfs2/secrets
- Добавьте ваши учетные данные Nextcloud в конец файла secrets, используя URL-адрес сервера Nextcloud и ваши имя пользователя и пароль в Nextcloud:
https://example.com/nextcloud/remote.php/dav/files/USERNAME/ <имя_пользователя> <пароль>
или
$PathToMountPoint $USERNAME $PASSWORD
Например,
/home/user/nextcloud john 1234
- Добавьте информацию для монтирования по адресу: /etc/fstab:
https://example.com/nextcloud/remote.php/dav/files/USERNAME/ /home/<имя_пользователя_linux>/nextcloud
davfs user,rw,auto 0 0
- Проверьте, монтируется и проходит ли данная точка проверку идентификации, при помощи следующей команды. При правильной настройке не нужны права суперпользователя root:
mount ~/nextcloud
- Также у вас должно получиться размонтировать данную точку:
umount ~/nextcloud
После этого при каждом входе в систему Linux ваш общий файл Nextcloud должен автоматически монтироваться через WebDAV в директории «~/nextcloud». Для выполнения монтирования вручную в файле «/etc/fstab» нужно заменить текст «автоматически» (auto) на «не автоматически» (noauto).
Известные проблемы
Проблема
Ресурс временно недоступен.
Решение
При возникновении проблем во время создания файла в директории нужно отредактировать файл /etc/davfs2/davfs2.conf и добавить строку:
use_locks 0
Проблема
Предупреждения, касающиеся сертификата.
Решение
При использовании самоподписанного сертификата будет выдаваться предупреждение. Во избежание возникновения данной ситуации нужно настроить драйвер davfs2 так, чтобы он распознавал сертификат. Скопируйте файл mycertificate.pem в директорию /etc/davfs2/certs/. Затем откройте файл /etc/davfs2/davfs2.conf и раскомментируйте строку servercert. После этого добавьте путь к вашему сертификату, как указано в примере:
servercert /etc/davfs2/certs/mycertificate.pem
Доступ к файлам на устройствах под управлением ОС macOS
Примечание: программа Finder в ОС macOS имеет ряд проблем с реализацией и должна использоваться только в тех случаях, когда сервер Nextcloud использует Apache и mod_php или Nginx 1.3.8+. К альтернативным клиентам для ОС macOS, позволяющим получить доступ к общим файлам WebDAV, можно отнести приложения с открытым кодом Cyberduck (см. инструкции по ссылке) и Filezilla. Платными клиентами являются Mountain Duck, Forklift, Transmit и Commander One.
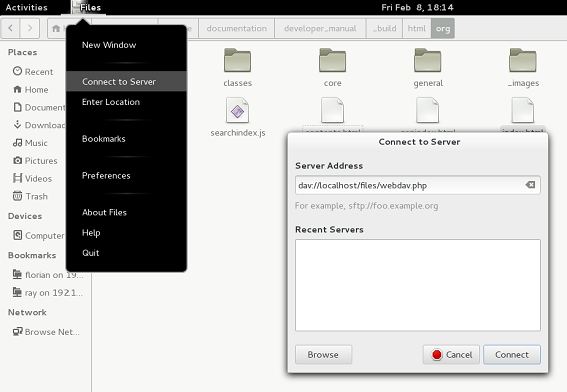
Для получения доступа к файлам через Finder в ОС macOS нужно выполнить следующее:
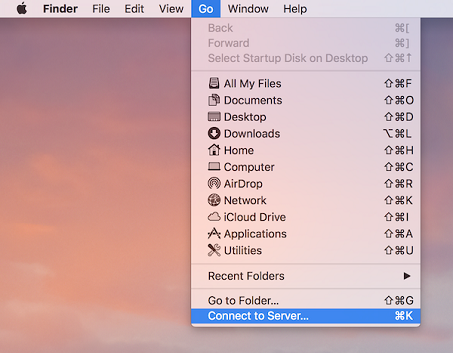
- В верхней панели меню программы Finder выберите пункты «Переход» (Go) > «Подключение к серверу…» (Connect to Server…).

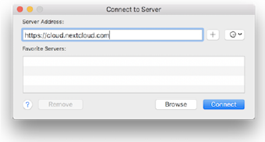
- После открытия окна «Подключение к серверу…» (Connect to Server…) введите адрес WebDAV для вашего сервера Nextcloud в поле «Адрес сервера:» (Server Address:), например:
https://cloud.YOURDOMAIN.com/remote.php/dav/files/USERNAME/
- Нажмите кнопку «Подключиться» (Connect). На настольном ПК сервер WebDAV отобразится как общий диск.
Доступ к файлам на устройствах под управлением ОС Microsoft Windows
При использовании собственной реализации Windows можно подключить Nextcloud к новому диску. Подключение к диску позволяет просматривать файлы, сохраненные на сервере Nextcloud так же, как на подключенном сетевом диске.
Для использования данной функции требуется подключение к сети. Для сохранения файлов в автономном режиме нужен клиент для настольных ПК, позволяющий синхронизировать все файлы на вашем сервере Nextcloud с одной или несколькими директориями на локальном жестком диске.
Примечание: перед подключением диска нужно разблокировать базовую аутентификацию в системном реестре ОС Windows. Данная процедура описана в статье базы знаний KB841215, причем процедуры для ОС Windows XP/Server 2003 и ОС Windows Vista/7 различаются. Перед началом работы нужно прочитать данную статью в базе знаний (при наличии ОС Windows 7 нужно выполнять инструкции для ОС Vista).
Подключение дисков при помощи командной строки
В следующем примере рассмотрен способ подключения диска при помощи командной строки. Для этого требуется выполнить следующие действия:
- Открыть консоль командной строки в ОС Windows.
- Ввести следующий текст в консоль командной строки, чтобы выполнить подключение к диску Z:
net use Z: https://<путь_к_диску>/remote.php/dav/files/USERNAME/ /user:youruser yourpassword
где <путь_к_диску> – URL-адрес сервера Nextcloud.
Пример:
net use Z: https://example.com/nextcloud/remote.php/dav/files/USERNAME/ /user:youruser yourpassword
Компьютер подключит файлы с сервера Nextcloud к диску Z.
Примечание: хотя это не рекомендуется делать, вы можете также монтировать сервер Nextcloud при помощи HTTP, оставив соединение незащищенным. Если вы собираетесь использовать HTTP-соединения на устройствах в общественных местах, настоятельно рекомендуется использовать VPN-туннель для обеспечения достаточного уровня безопасности.
Альтернативный синтаксис команды:
net use Z: \example.com@sslnextcloudremote.phpdav /user:youruser yourpassword
Подключение дисков при помощи диспетчера Windows Explorer
Для подключения дисков при помощи диспетчера Microsoft Windows Explorer требуется выполнить следующие действия:
- Перейдите на ваш компьютер в диспетчере Windows Explorer.
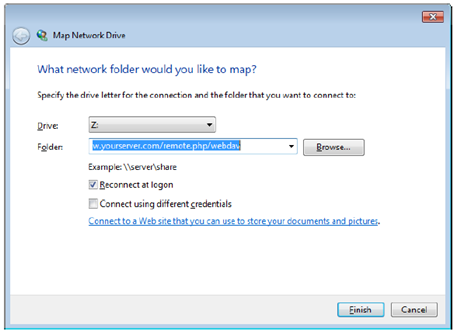
- Щелкните правой кнопкой мыши по значку «Компьютер» (Computer) и выберите пункт «Подключить сетевой диск…» (Map network drive…) в выпадающем меню.
- Выберите локальный сетевой диск, к которому нужно подключить сервер Nextcloud.
- Укажите адрес вашего экземпляра Nextcloud, а затем введите текст «/remote.php/dav/files/USERNAME/».
Пример:
https://example.com/nextcloud/remote.php/dav/files/USERNAME/
Примечание: что касается серверов с защитой при помощи SSL-сертификата, нужно установить флажок «Восстанавливать при входе в систему» (Reconnect at logon), чтобы подключение восстанавливалось после каждой последующей перегрузки. Для подключения к серверу Nextcloud в качестве другого пользователя нужно установить флажок «Использовать другие учетные записи» (Connect using different credentials).
- Нажмите кнопку «Готово» (Finish).
Диспетчер в ОС Windows подключит сетевой диск, после чего вы получите доступ к своему экземпляру Nextcloud.
Доступ к файлам при помощи Cyberduck
Cyberduck – это веб-обозреватель с открытым кодом для FTP, SFTP, WebDAV, OpenStack Swift и Amazon S3, предназначенный для передачи файлов в ОС macOS и Windows.
Примечание: в данном примере рассмотрена программа Cyberduck версии 4.2.1.
Порядок работы с Cyberduck:
- Укажите сервер без информации об используемом протоколе. Например:
example.com
- Укажите порт. Выбранный порт зависит от того, поддерживает ли ваш сервер Nextcloud SSL-сертификат. Для использования SSL-сертификата в Cyberduck нужно выбрать другой тип соединения. Например:
- 80 (для WebDAV)
- 443 (для WebDAV (HTTPS/SSL))
- С помощью выпадающего меню «Дополнительно» (More Options) можно добавить остальные URL-адреса WebDAV, используя поле «Путь» (Path). Например:
remote.php/dav/files/USERNAME/
После этого Cyberduck можно будет использовать для доступа к серверу Nextcloud.
Доступ к опубликованным общим данным по протоколу WebDAV
Nextcloud позволяет получить доступ к опубликованным общим данным по протоколу WebDAV.
Для этого необходимо ввести команду:
https://example.com/nextcloud/public.php/webdav
В качестве имени пользователя в клиенте WebDAV следует использовать маркер для общего доступа, а в качестве пароля – пароль для общего доступа (дополнительно).
Примечание: для использования данной функции нужно последовательно выбрать пункты: Настройки (Settings) → Администрирование (Administration) → Общий доступ (Sharing) → Разрешить пользователям на данном сервере отправлять общие файлы на другие сервера (Allow users on this server to send shares to other servers)
Известные проблемы
Проблема
ОС Windows не устанавливает соединение через HTTPS.
Решение 1
Клиент WebDAV для ОС Windows может не поддерживать функцию указания имени сервера (SNI) для зашифрованных соединений. В случае возникновения данной ошибки при монтировании экземпляра Nextcloud с защитой при помощи SSL-сертификата обратитесь к провайдеру, чтобы он сообщил вам выделенный IP-адрес для вашего сервера.
Решение 2
Клиент WebDAV для ОС Windows может не поддерживать соединения TSLv1.1/TSLv1.2. Если вы указали, что ваш сервер может использовать только TLSv1.1 и новее, соединение может не устанавливаться. См. дополнительную информацию в документации к WinHTTP.
Проблема
Появляется следующая ошибка: «Ошибка 0x800700DF: Размер файла превышает установленное ограничение, сохранение файла невозможно» (Error 0x800700DF: The file size exceeds the limit allowed and cannot be saved).
Решение
Windows ограничивает максимальный размер файла, передаваемого из WebDAV или в него. Вы можете увеличить предельный размер файла в байтах (FileSizeLimitInBytes) в строке HKEY_LOCAL_MACHINESYSTEMCurrentControlSetServicesWebClientParameters, выбрав пункт «Изменить» (Modify).
Для настройки максимального значения, равного 4 Гб, нужно выбрать пункт «Десятичное значение» (Decimal), ввести значение «4294967295» и перезагрузить ОС Windows или перезапустить службу «Веб-клиент».
Проблема
Невозможен доступ к вашим файлам из пакета программ Microsoft Office по протоколу WebDAV.
Решение
Известные проблемы и их решения указаны в статье из базы знаний KB2123563.
Проблема
Не удается подключить Nextcloud в качестве диска WebDAV в ОС Windows, используя самоподписанный сертификат.
Решение
- Запустите экземпляр Nextcloud при помощи веб-обозревателя.
- Щелкните левой кнопкой мыши до появления ошибки сертификата в строке состояния веб-обозревателя.
- Просмотрите сертификат, а затем выберите пункт «Копировать в файл» (Copy to File) на вкладке «Подробно» (Details).
- Сохраните файл на рабочий стол под понятным именем, например, myNextcloud.pem.
- Выберите пункты: «Пуск» (Start), «Run» (Выполнить), «Консоль управления Microsoft» (MMC).
- Выберите пункты: «Файл» (File), «Добавить/удалить оснастку» (Add/Remove Snap-In).
- Выберите пункты: «Сертификаты» (Certificates), «Добавить» (Add), «Моя учетная запись пользователя» (My User Account), «Finish» (Готово) и «OK».
- Перейдите к пункту «Доверенные корневые центры сертификации» (Trust Root Certification Authorities), «Сертификаты» (Certificates).
- Щелкните правой кнопкой по строке «Сертификат» (Certificate), выберите пункты «Все задачи» (All Tasks), «Импортировать» (Import).
- Выберите пункт «Сохранить сертификат с рабочего стола» (Save Cert from the Desktop).
- Выберите пункт «Поместить все сертификаты в следующее хранилище» (Place all Certificates in the following Store), а затем нажмите кнопку «Обзор» (Browse).
- Установите флажок «Отображать физические хранилища» (Show Physical Stores), «Развернуть доверенные корневые центры сертификации» (Expand out Trusted Root Certification Authorities) и выберите пункт «Локальный компьютер» (Local Computer), нажмите «OK», дождитесь завершения импорта.
- Проверьте, отображается ли нужный сертификат в списке. Для этого может потребоваться нажать кнопку «Обновить» (Refresh). Закройте консоль управления Microsoft (MMC).
- Откройте веб-обозреватель, выберите пункт «Инструменты» (Tools), «Удалить журнал веб-обозревателя» (Delete Browsing History).
- Выберите все, кроме «Данные фильтрации InPrivate» (In Private Filtering Data), выполните удаление.
- Перейдите в пункт «Свойства веб-обозревателя» (Internet Options), вкладка «Содержание» (Content), «Очистить состояние SSL» (Clear SSL State).
- Закройте веб-обозреватель, повторно запустите его и выполните проверку.
Проблема
Невозможно загрузить файл более 50 Мб или выгрузить большие файлы, когда выгрузка занимает более 30 минут при использовании веб-клиента в ОС Windows 7.
Решение
Решения указаны в статье из базы знаний KB2668751.
Доступ к файлам с помощью cURL
Поскольку WebDAV представляет собой расширение HTTP, служебную программу cURL можно использовать для работы с файлом сценария.
Для создания папки с текущей датой в качестве имени необходимо выполнить следующее:
$ curl -u user:pass -X MKCOL «https://example.com/nextcloud/remote.php/dav/files/
↳USERNAME/$(date ‘+%d-%b-%Y’)»
Для выгрузки файла error.log в данную директорию необходимо выполнить следующее:
$ curl -u user:pass -T error.log «https://example.com/nextcloud/remote.php/dav/files/
↳USERNAME/$(date ‘+%d-%b-%Y’)/error.log»
Для перемещения файла необходимо выполнить следующее:
$ curl -u user:pass -X MOVE —header ‘Destination: https://example.com/nextcloud/
↳remote.php/dav/files/USERNAME/target.jpg’ https://example.com/nextcloud/remote.php/
↳dav/files/USERNAME/source.jpg
Для того чтобы получить информацию о свойствах файлов в корневой папке, необходимо выполнить следующее:
$ curl -X PROPFIND -H «Depth: 1» -u user:pass https://example.com/nextcloud/
↳remote.php/dav/files/USERNAME/ | xml_pp
<?xml version=»1.0″ encoding=»utf-8″?>
<d:multistatus xmlns:d=»DAV:» xmlns:oc=»http://nextcloud.org/ns» xmlns:s=»http://
↳sabredav.org/ns»>
<d:response>
<d:href>/nextcloud/remote.php/dav/files/USERNAME/</d:href>
<d:propstat>
<d:prop>
<d:getlastmodified>Tue, 13 Oct 2015 17:07:45 GMT</d:getlastmodified>
<d:resourcetype>
<d:collection/>
</d:resourcetype>
<d:quota-used-bytes>163</d:quota-used-bytes>
<d:quota-available-bytes>11802275840</d:quota-available-bytes>
<d:getetag>»561d3a6139d05″</d:getetag>
</d:prop>
<d:status>HTTP/1.1 200 OK</d:status>
</d:propstat>
</d:response>
<d:response>
<d:href>/nextcloud/remote.php/dav/files/USERNAME/welcome.txt</d:href>
<d:propstat>
<d:prop>
<d:getlastmodified>Tue, 13 Oct 2015 17:07:35 GMT</d:getlastmodified>
<d:getcontentlength>163</d:getcontentlength>
<d:resourcetype/>
<d:getetag>»47465fae667b2d0fee154f5e17d1f0f1″</d:getetag>
<d:getcontenttype>text/plain</d:getcontenttype>
</d:prop>
<d:status>HTTP/1.1 200 OK</d:status>
</d:propstat>
</d:response>
</d:multistatus>
Доступ к файлам Nextcloud с помощью WebDAV
Nextcloud полностью поддерживает протокол WebDAV, и вы можете подключаться и синхронизироваться с файлами Nextcloud через WebDAV. В этой главе вы узнаете, как подключить Linux, macOS, Windows и мобильные устройства к вашему серверу Nextcloud через WebDAV. Прежде чем приступить к настройке WebDAV, давайте кратко рассмотрим рекомендуемый способ подключения клиентских устройств к вашим серверам Nextcloud.
В следующих примерах вы должны заменить example.com/nextcloud URL-адресом вашего сервера Nextcloud (пропустите часть каталога, если установка находится в корне вашего домена), а «USERNAME» — именем подключающегося пользователя.
См. адрес для подключения к WebDAV (снизу слева в меню настройки) на Вашей странице Nextcloud
В следующих примерах для входа Вам надо использовать пароль, который Вы можете создать в Настройках на вкладке Безопасность.
Nextcloud Desktop и мобильные клиенты
Рекомендуемый способ синхронизации настольного ПК с сервером Nextcloud заключается в использовании клиентов синхронизации Nextcloud/ownCloud. Вы можете настроить клиент для сохранения файлов в любом локальном каталоге и выбрать, какие каталоги на сервере Nextcloud синхронизировать. Клиент отображает текущее состояние соединения и регистрирует все действия, поэтому вы всегда знаете, какие удаленные файлы были загружены на ваш компьютер, и вы можете проверить, правильно ли синхронизированы файлы, созданные и обновленные на вашем локальном ПК, с сервером.
Рекомендуемый способ синхронизации сервера Nextcloud с устройствами Android и Apple iOS — использование мобильных приложений.
Чтобы подключить мобильное приложение к серверу Nextcloud, используйте только базовый URL и папку:
В дополнение к мобильным приложениям, предоставляемым Nextcloud или ownCloud, вы можете использовать другие приложения для подключения к Nextcloud со своего мобильного устройства с помощью WebDAV. WebDAV Navigator — хорошее (проприетарное) приложение для устройств Android и iPhone. URL для использования на них:
Конфигурация WebDAV
При желании вы также можете подключить свой настольный ПК к серверу Nextcloud, используя протокол WebDAV, а не специальное клиентское приложение. Web Distributed Authoring and Versioning (WebDAV) — это расширение протокола передачи гипертекста (HTTP), которое позволяет легко создавать, читать и редактировать файлы на веб-серверах. С помощью WebDAV вы можете получать доступ к общим ресурсам Nextcloud в Linux, macOS и Windows так же, как и к любому удаленному сетевому ресурсу, и сохранять синхронизацию.
Доступ к файлам с помощью Linux
Вы можете получить доступ к файлам в операционных системах Linux, используя следующие методы.
Файловый менеджер Наутилус
When you configure your Nextcloud account in the GNOME Control Center, your files will automatically be mounted by Nautilus as a WebDAV share, unless you deselect file access.
Вы также можете смонтировать файлы Nextcloud вручную. Используйте протокол davs:// для подключения файлового менеджера Nautilus к вашей папке Nextcloud:
Если ваше соединение с сервером не защищено HTTPS, используйте dav:// вместо davs:// .

Тот же метод работает для других файловых менеджеров, которые используют GVfs, таких как Caja MATE и Nepomuk Cinnamon.
Доступ к файлам с помощью KDE и файлового менеджера Dolphin
Чтобы получить доступ к файлам Nextcloud с помощью файлового менеджера Dolphin в KDE, используйте протокол webdav:// :

Вы можете создать постоянную ссылку на свой сервер Nextcloud:
Откройте Dolphin и нажмите «Сеть» в левом столбце «Места».
Нажмите на иконку с надписью Добавить сетевую папку. Результирующий диалог должен появиться с уже выбранным WebDAV.
Если WebDAV не выбран, выберите его.
Нажмите кнопку Далее.
Введите следующие настройки:
Имя: имя, которое вы хотите видеть в закладке Размещение, например Nextcloud.
Пользователь: имя пользователя Nextcloud, которое вы использовали для входа, например, admin.
Сервер: доменное имя Nextcloud, например example.com (без http:// до каталогов).
Папка — введите путь nextcloud/remote.php/dav/files/USERNAME/ .
(Необязательно) Установите флажок «Создать значок», чтобы закладка появилась в столбце «Места».
(Необязательно) Укажите любые специальные настройки или сертификат SSL в поле «Порт и шифрование».
Монтирования WebDAV в командной строке Linux
Вы можете выполнить монтирование WebDAV из командной строки Linux. Это полезно, если вы предпочитаете получать доступ к Nextcloud так же, как и к любому другому удаленному подключенному ресурсу. В следующем примере показано, как создать персональное монтирование и автоматически монтировать его при каждом входе в систему на компьютере Linux.
Установите драйвер davfs2 для файловой системы WebDAV, который позволяет вам монтировать общие ресурсы WebDAV, как и любую другую удаленную файловую систему. Используйте эту команду для установки в Debian/Ubuntu:
Используйте эту команду для установки на CentOS, Fedora и openSUSE:
Добавьте себя в группу davfs2 :
Затем создайте каталог nextcloud в вашем домашнем каталоге для точки монтирования и .davfs2/ для вашего личного файла конфигурации:
Скопируйте /etc/davfs2/secrets в
Установите себя в качестве владельца и сделайте права доступа для чтения и записи:
Добавьте свои учетные данные для входа в Nextcloud в конец файла secrets , используя URL-адрес вашего сервера Nextcloud, а также имя пользователя и пароль для Nextcloud:
Добавьте информацию о монтировании в /etc/fstab :
Затем проверьте, что он монтируется и аутентифицируется, выполнив следующую команду. Если вы установите его правильно, вам не понадобятся права root:
Вы также должны иметь возможность размонтировать его:
Теперь каждый раз, когда вы входите в систему Linux, ваша папка Nextcloud должна автоматически монтироваться через WebDAV в вашем каталоге
/nextcloud . Если вы предпочитаете монтировать его вручную, измените auto на noauto в /etc/fstab .
Известные проблемы
Проблема
Ресурс временно недоступен
Решение
Если при создании файла в каталоге возникают проблемы, отредактируйте файл /etc/davfs2/davfs2.conf и добавьте:
Проблема
Решение
Если вы используете самоподписанный сертификат, вы получите предупреждение. Чтобы изменить это, вам нужно настроить davfs2 для распознавания вашего сертификата. Скопируйте mycertificate.pem в /etc/davfs2/certs/ . Затем отредактируйте /etc/davfs2/davfs2.conf` и раскомментируйте строку servercert . Теперь добавьте путь вашего сертификата, как в этом примере:
Доступ к файлам с помощью macOS
MacOS Finder страдает от серии проблем реализации и должен использоваться, только если сервер Nextcloud работает на Apache и mod_php или Nginx 1.3.8+. Альтернативные macOS-совместимые клиенты, способные получать доступ к общим ресурсам WebDAV, включают приложения с открытым исходным кодом, такие как Cyberduck (см. Инструкции здесь) и Filezilla. Коммерческие клиенты включают в себя Mountain Duck, Forklift, Transmit и Commander One.
Чтобы получить доступ к файлам через macOS Finder:
В верхней строке меню Finder выберите Go > Подключиться к серверу…

Когда откроется окно Подключиться к серверу.., введите адрес WebDAV вашего сервера Nextcloud в поле Адрес сервера:, т.е.

Нажмите Подключить. Ваш сервер WebDAV должен появиться на рабочем столе как общий диск.
Доступ к файлам с помощью Microsoft Windows
Если вы используете собственную реализацию WebDAV в Windows, вы можете сопоставить Nextcloud с новым диском с помощью проводника Windows. Сопоставление с диском позволяет просматривать файлы, хранящиеся на сервере Nextcloud, так же, как и файлы, хранящиеся на сопоставленном сетевом диске.
Использование этой функции требует подключения к сети. Если вы хотите хранить ваши файлы в автономном режиме, используйте Desktop Client для синхронизации всех файлов вашего Nextcloud с одним или несколькими каталогами вашего локального жесткого диска.
В Windows 10 теперь по умолчанию разрешена базовая аутентификация, если HTTPS включён перед сопоставлением диска. В старых версиях Windows необходимо разрешить использование базовой аутентификации в реестре Windows: запустите regedit и перейдите к HKEY_LOCAL_MACHINESYSTEMCurrentControlSetServicesWebClientParameters . Создайте или отредактируйте значение DWORD BasicAuthLevel (Windows Vista, 7 и  или UseBasicAuth (Windows XP и Windows Server 2003) и установите его значение 1 для SSL соединений. Значение 0 означает, что базовая аутентификация отключена, значение 2 разрешает как SSL, так и не-SSL соединения (не рекомендуется). Затем выйдите из Редактора реестра и перезагрузите компьютер.
Сопоставление дисков с помощью командной строки
В следующем примере показано, как подключить диск с помощью командной строки. Чтобы сопоставить диск:
Откройте командную строку Windows.
Введите следующую строку в командной строке, чтобы сопоставить диск компьютера Z:
где находится URL вашего сервера Nextcloud.
Пример: net use Z: https://example.com/nextcloud/remote.php/dav/files/USERNAME/ /user:youruser yourpassword
Компьютер сопоставляет файлы вашей учетной записи Nextcloud с буквой диска Z.
Хотя это и не рекомендуется, вы также можете подключить сервер Nextcloud по протоколу HTTP, оставив соединение незашифрованным. Если вы планируете использовать HTTP-соединения на устройствах в общественных местах, мы настоятельно рекомендуем использовать VPN-туннель для обеспечения необходимой безопасности.
Альтернативный синтаксис команды:
Сопоставление дисков с помощью проводника Windows
Чтобы подключить диск с помощью Microsoft Windows Explorer:
Откройте Проводник Windows на компьютере под управлением MS Windows.
Щелкните правой кнопкой мыши на элементе Компьютер и выберите Подключить сетевой диск… в раскрывающемся меню.
Выберите локальный сетевой диск, к которому вы хотите подключить Nextcloud.
Укажите адрес своего экземпляра Nextcloud, /remote.php/dav/files/USERNAME/.
Для серверов, защищённых SSL, отметьте Переподключаться при входе, чтобы сопоставление сохранялось при последующих перезагрузках. Если вы хотите подключиться к серверу Nextcloud от имени другого пользователя, отметьте Подключиться, используя другие учётные данные.

Нажмите кнопку Готово .
Проводник Windows отображает сетевой диск, делая ваш экземпляр Nextcloud доступным.
Доступ к файлам с помощью Cyberduck
Cyberduck — это браузер с открытым исходным кодом для FTP и SFTP, WebDAV, OpenStack Swift и Amazon S3, предназначенный для передачи файлов в macOS и Windows.
В этом примере используется Cyberduck версии 4.2.1.
Чтобы использовать Cyberduck:
Укажите сервер без какой-либо информации протокола. Например:
Укажите нужный порт. Выбор порта зависит от того, поддерживает ли ваш сервер Nextcloud SSL. Cyberduck требует, чтобы вы выбрали другой тип подключения, если вы планируете использовать SSL. Например:
443 (для WebDAV (HTTPS/SSL))
Используйте раскрывающееся меню «Дополнительные параметры», чтобы добавить оставшуюся часть URL-адреса WebDAV в поле «Путь». Например:
Теперь Cyberduck обеспечивает доступ к файлам на сервере Nextcloud.
Доступ к общедоступным ресурсам через WebDAV
Nextcloud предоставляет возможность доступа к общим ресурсам через WebDAV.
Чтобы получить доступ к общедоступной папке, откройте:
в клиенте WebDAV используйте токен общего доступа в качестве имени пользователя и (необязательно) пароль общего ресурса в качестве пароля.
Settings → Administration → Sharing → Allow users on this server to send shares to other servers. This option also allows WebDAV access to public shares needs to be enabled in order to make this feature work, except if cURL is being used (see below).
Известные проблемы
Проблема
Windows не подключается с использованием HTTPS.
Решение 1
Клиент Windows WebDAV может не поддерживать Индикацию имени сервера (SNI) для зашифрованных соединений. Если вы обнаружите ошибку при монтировании экземпляра Nextcloud с шифрованием SSL, обратитесь к своему провайдеру о назначении выделенного IP-адреса для вашего сервера на основе SSL.
Решение 2
Клиент Windows WebDAV может не поддерживать подключения TLSv1.1/TLSv1.2. Если вы ограничили конфигурацию своего сервера только предоставлением TLSv1.1 и выше, соединение с вашим сервером может завершиться ошибкой. Пожалуйста, обратитесь к документации WinHTTP для получения дополнительной информации.
Проблема
Появляется следующее сообщение об ошибке: Ошибка 0x800700DF: размер файла превышает допустимый предел и не может быть сохранен.
Решение
Windows ограничивает максимальный размер файла, передаваемого из или в общий ресурс WebDAV. Вы можете увеличить значение FileSizeLimitInBytes в HKEY_LOCAL_MACHINESYSTEMCurrentControlSetServicesWebClient\Parameters, нажав на Modify.
Чтобы увеличить ограничение до максимального значения 4 ГБ, выберите Десятичное число, введите значение 4294967295 и перезагрузите Windows или перезапустите службу WebClient.
Проблема
Не удается получить доступ к вашим файлам из Microsoft Office через WebDAV.
Решение
Известные проблемы и способы их решения описаны в статье KB2123563.
Проблема
Невозможно сопоставить Nextcloud как диск WebDAV в Windows, используя самоподписаный сертификат.
Решение
Перейдите к своему экземпляру Nextcloud через ваш любимый веб-браузер.
Нажимайте, пока не дойдете до ошибки сертификата в строке состояния браузера.
Просмотрите сертификат, затем на вкладке «Сведения» выберите «Копировать в файл».
Сохраните на рабочий стол с произвольным именем, например myNextcloud.pem .
Пуск, Выполнить, MMC.
Файл, добавить/удалить оснастку.
Выберите «Сертификаты», нажмите «Добавить», «Моя учетная запись», «Готово» и «ОК».
Выберете доверенные корневые центры сертификации, сертификаты.
Щелкните правой кнопкой мыши Сертификат, выберите Все задачи, Импорт.
Выберите Сохранить сертификат на рабочем столе.
Выберите «Поместить все сертификаты в следующее хранилище», нажмите «Обзор»,
Установите флажок «Показать физические хранилища», «Развернуть доверенные корневые центры сертификации» и выберите «Локальный компьютер», нажмите «ОК», завершите импорт.
Проверьте список, чтобы убедиться, что он добавлен. Вам, вероятно, нужно обновить, прежде чем вы увидите это. Выйдите из MMC.
Откройте Браузер, выберите Инструменты, Удалить историю просмотров.
Выберите все, кроме Приватной фильтрации данных, завершите.
Перейдите в Свойства обозревателя, Вкладка содержимого, Очистить состояние SSL.
Закройте браузер, затем снова откройте и протестируйте.
Проблема
Вы не можете загружать более 50 МБ или загружать большие файлы, если загрузка занимает более 30 минут с помощью веб-клиента в Windows 7.
Решение
Обходные пути описаны в статье KB2668751.
Доступ к файлам с помощью cURL
Since WebDAV is an extension of HTTP, cURL can be used to script file operations.
Settings → Administration → Sharing → Allow users on this server to send shares to other servers. If this option is disabled the option —header «X-Requested-With: XMLHttpRequest» needs to be passed to cURL.
Чтобы создать папку с текущей датой в качестве имени:
Чтобы загрузить файл error.log в этот каталог:
Чтобы переместить файл:
Чтобы получить свойства файлов в корневой папке:
Источник
Имеется ли возможность подключить сетевой диск через Microsoft Windows Explorer?
Сам nextcloud крутится на ubuntu server 16.04.
Рекомендуемый вариант:
https://example.com/nextcloud/remote.php/dav/files/USERNAME/
никоим образом не срабатывает. В nautilus на ubuntu все работает.
![]()
0xdb
51.2k194 золотых знака56 серебряных знаков227 бронзовых знаков
задан 5 окт 2017 в 8:12
![]()
1
Всё прекрасно работает
Только вместо USERNAME нужно указать имя пользователя с учетом регистра
ответ дан 6 окт 2017 в 8:22
![]()
0
Accessing Nextcloud files using WebDAV
Nextcloud fully supports the WebDAV protocol, and you can connect and synchronize
with your Nextcloud files over WebDAV. In this chapter you will learn how to
connect Linux, macOS, Windows, and mobile devices to your Nextcloud server via
WebDAV. Before we get into configuring WebDAV, let’s take a quick look at the
recommended way of connecting client devices to your Nextcloud servers.
Note
In the following examples, you should replace example.com/nextcloud with the
URL of your Nextcloud server (omit the directory part if the installation is
in the root of your domain), and «USERNAME» with the username of the connecting user.
See the WebDAV URL (bottom left in settings) on your Nextcloud.
Note
In the following examples, you must use an app-password for login, which you can generate in your security settings.
Nextcloud Desktop and mobile clients
The recommended way to synchronize a desktop PC with a Nextcloud server is by
using Nextcloud/ownCloud sync clients. You can configure the
client to save files in any local directory and you can choose which
directories on the Nextcloud server to sync with. The client displays the
current connection status and logs all activity, so you always know which
remote files have been downloaded to your PC and you can verify that files
created and updated on your local PC are properly synchronized with the server.
The recommended way to synchronize Nextcloud server with Android and
Apple iOS devices is by using the mobile apps.
To connect your mobile app to a Nextcloud server use the
base URL and folder only:
example.com/nextcloud
In addition to the mobile apps provided by Nextcloud or ownCloud, you can use other apps to
connect to Nextcloud from your mobile device using WebDAV. WebDAV Navigator is
a good (proprietary) app for Android devices and iPhones. The URL to use on these is:
example.com/nextcloud/remote.php/dav/files/USERNAME/
WebDAV configuration
If you prefer, you may also connect your desktop PC to your Nextcloud server by
using the WebDAV protocol rather than using a special client application. Web
Distributed Authoring and Versioning (WebDAV) is a Hypertext Transfer Protocol
(HTTP) extension that makes it easy to create, read, and edit files on Web
servers. With WebDAV you can access your Nextcloud shares on Linux, macOS and
Windows in the same way as any remote network share, and stay synchronized.
Accessing files using Linux
You can access files in Linux operating systems using the following methods.
Nautilus file manager
When you configure your Nextcloud account in the GNOME Control Center, your files will automatically be mounted
by Nautilus as a WebDAV share, unless you deselect file access.
You can also mount your Nextcloud files manually. Use the davs://
protocol to connect the Nautilus file manager to your Nextcloud
share:
davs://example.com/nextcloud/remote.php/dav/files/USERNAME/
Note
If your server connection is not HTTPS-secured, use dav:// instead
of davs://:

Note
The same method works for other file managers that use GVfs,
such as MATE’s Caja and Cinnamon’s Nepomuk.
Accessing files with KDE and Dolphin file manager
To access your Nextcloud files using the Dolphin file manager in KDE, use
the webdav:// protocol:
webdav://example.com/nextcloud/remote.php/dav/files/USERNAME/

You can create a permanent link to your Nextcloud server:
- Open Dolphin and click «Network» in the left hand «Places» column.
- Click on the icon labeled Add a Network Folder.
The resulting dialog should appear with WebDAV already selected. - If WebDAV is not selected, select it.
- Click Next.
- Enter the following settings:
- Name: The name you want to see in the Places bookmark, for example Nextcloud.
- User: The Nextcloud username you used to log in, for example admin.
- Server: The Nextcloud domain name, for example example.com (without
http:// before or directories afterwards). - Folder — Enter the path
nextcloud/remote.php/dav/files/USERNAME/.
- (Optional) Check the «Create icon» checkbox for a bookmark to appear in the
Places column. - (Optional) Provide any special settings or an SSL certificate in the «Port &
Encrypted» checkbox.
Creating WebDAV mounts on the Linux command line
You can create WebDAV mounts from the Linux command line. This is useful if you
prefer to access Nextcloud the same way as any other remote filesystem mount.
The following example shows how to create a personal mount and have it mounted
automatically every time you log in to your Linux computer.
-
Install the
davfs2WebDAV filesystem driver, which allows you to mount
WebDAV shares just like any other remote filesystem. Use this command to
install it on Debian/Ubuntu:apt-get install davfs2
-
Use this command to install it on CentOS, Fedora, and openSUSE:
yum install davfs2
-
Add yourself to the
davfs2group:usermod -aG davfs2 <username>
-
Then create a
nextclouddirectory in your home directory for the
mountpoint, and.davfs2/for your personal configuration file:mkdir ~/nextcloud mkdir ~/.davfs2
-
Copy
/etc/davfs2/secretsto~/.davfs2:cp /etc/davfs2/secrets ~/.davfs2/secrets
-
Set yourself as the owner and make the permissions read-write owner only:
chown <linux_username>:<linux_username> ~/.davfs2/secrets
chmod 600 ~/.davfs2/secrets
-
Add your Nextcloud login credentials to the end of the
secretsfile,
using your Nextcloud server URL and your Nextcloud username and password:https://example.com/nextcloud/remote.php/dav/files/USERNAME/ <username> <password> or $PathToMountPoint $USERNAME $PASSWORD for example /home/user/nextcloud john 1234
-
Add the mount information to
/etc/fstab:https://example.com/nextcloud/remote.php/dav/files/USERNAME/ /home/<linux_username>/nextcloud davfs user,rw,auto 0 0
-
Then test that it mounts and authenticates by running the following
command. If you set it up correctly you won’t need root permissions:mount ~/nextcloud
-
You should also be able to unmount it:
umount ~/nextcloud
Now every time you login to your Linux system your Nextcloud share should
automatically mount via WebDAV in your ~/nextcloud directory. If you prefer
to mount it manually, change auto to noauto in /etc/fstab.
Known issues
Problem
Resource temporarily unavailable
Solution
If you experience trouble when you create a file in the directory,
edit /etc/davfs2/davfs2.conf and add:
use_locks 0
Problem
Certificate warnings
Solution
If you use a self-signed certificate, you will get a warning. To
change this, you need to configure davfs2 to recognize your certificate.
Copy mycertificate.pem to /etc/davfs2/certs/. Then edit
/etc/davfs2/davfs2.conf and uncomment the line servercert. Now add the
path of your certificate as in this example:
servercert /etc/davfs2/certs/mycertificate.pem
Accessing files using macOS
To access files through the macOS Finder:
- From the Finder’s top menu bar, choose Go > Connect to Server…:

-
When the Connect to Server… window opens, enter your Nextcloud server’s WebDAV address in the Server Address: field, i.e.:
https://cloud.YOURDOMAIN.com/remote.php/dav/files/USERNAME/

- Click Connect. Your WebDAV server should appear on the Desktop as a shared disk drive.
Accessing files using Microsoft Windows
If you use the native Windows implementation of WebDAV, you can map Nextcloud to a new
drive using Windows Explorer. Mapping to a drive enables you to browse files stored on a
Nextcloud server the way you would files stored in a mapped network drive.
Using this feature requires network connectivity. If you want to store your
files offline, use the Desktop Client to sync all files on your
Nextcloud to one or more directories of your local hard drive.
Note
Windows 10 now defaults to allow Basic Authentication if HTTPS is
enabled prior to mapping your drive. On older versions of Windows,
you must permit the use of Basic Authentication in the Windows
Registry: launch regedit and navigate to
HKEY_LOCAL_MACHINESYSTEMCurrentControlSetServicesWebClientParameters.
Create or edit the DWORD value BasicAuthLevel (Windows Vista, 7 and or
UseBasicAuth (Windows XP and Windows Server 2003) and set its value data
to 1 for SSL connections. Value 0 means that Basic Authentication is disabled,
a value of 2 allows both SSL and non-SSL connections (not recommended).
Then exit Registry Editor, and restart the computer.
Mapping drives with the command line
The following example shows how to map a drive using the command line. To map
the drive:
-
Open a command prompt in Windows.
-
Enter the following line in the command prompt to map to the computer Z
drive:net use Z: https://<drive_path>/remote.php/dav/files/USERNAME/ /user:youruser yourpassword
where <drive_path> is the URL to your Nextcloud server.
For example: net use Z: https://example.com/nextcloud/remote.php/dav/files/USERNAME/
/user:youruser yourpassword
The computer maps the files of your Nextcloud account to the drive letter Z.
Note
Though not recommended, you can also mount the Nextcloud server
using HTTP, leaving the connection unencrypted. If you plan to use HTTP
connections on devices while in a public place, we strongly recommend using a
VPN tunnel to provide the necessary security.
An alternative command syntax is:
net use Z: \example.com@sslnextcloudremote.phpdav /user:youruser
yourpassword
Mapping drives with Windows Explorer
To map a drive using the Microsoft Windows Explorer:
- Open Windows Explorer on your MS Windows computer.
- Right-click on Computer entry and select Map network drive… from
the drop-down menu. - Choose a local network drive to which you want to map Nextcloud.
- Specify the address to your Nextcloud instance, followed by
/remote.php/dav/files/USERNAME/.
For example:
https://example.com/nextcloud/remote.php/dav/files/USERNAME/
Note
For SSL protected servers, check Reconnect at sign-in to ensure
that the mapping is persistent upon subsequent reboots. If you want to
connect to the Nextcloud server as a different user, check Connect using
different credentials.

- Click the
Finishbutton.
Windows Explorer maps the network drive, making your Nextcloud instance
available.
Accessing files using Cyberduck
Cyberduck is an open source FTP and SFTP,
WebDAV, OpenStack Swift, and Amazon S3 browser designed for file transfers on
macOS and Windows.
Note
This example uses Cyberduck version 4.2.1.
To use Cyberduck:
- Specify a server without any leading protocol information. For example:
example.com
- Specify the appropriate port. The port you choose depends on whether or not
your Nextcloud server supports SSL. Cyberduck requires that you select a
different connection type if you plan to use SSL. For example:
80 (for WebDAV)
443 (for WebDAV (HTTPS/SSL))
- Use the ‘More Options’ drop-down menu to add the rest of your WebDAV URL into
the ‘Path’ field. For example:
remote.php/dav/files/USERNAME/
Now Cyberduck enables file access to the Nextcloud server.
Accessing public shares over WebDAV
Nextcloud provides the possibility to access public shares over WebDAV.
To access the public share, open:
https://example.com/nextcloud/public.php/webdav
in a WebDAV client, use the share token as username and the (optional) share password
as password.
Note
Settings → Administration → Sharing → Allow users on this
server to send shares to other servers. This option also allows WebDAV access
to public shares needs to be enabled in order to make this feature work,
except if cURL is being used (see below).
Known problems
Problem
Windows does not connect using HTTPS.
Solution 1
The Windows WebDAV Client might not support Server Name Indication (SNI) on
encrypted connections. If you encounter an error mounting an SSL-encrypted
Nextcloud instance, contact your provider about assigning a dedicated IP address
for your SSL-based server.
Solution 2
The Windows WebDAV Client might not support TLSv1.1 and TLSv1.2 connections. If
you have restricted your server config to only provide TLSv1.1 and above the
connection to your server might fail. Please refer to the WinHTTP documentation
for further information.
Problem
You receive the following error message: Error 0x800700DF: The file size
exceeds the limit allowed and cannot be saved.
Solution
Windows limits the maximum size a file transferred from or to a WebDAV share
may have. You can increase the value FileSizeLimitInBytes in
HKEY_LOCAL_MACHINESYSTEMCurrentControlSetServicesWebClientParameters
by clicking on Modify.
To increase the limit to the maximum value of 4GB, select Decimal, enter a
value of 4294967295, and reboot Windows or restart the WebClient
service.
Problem
Accessing your files from Microsoft Office via WebDAV fails.
Solution
Known problems and their solutions are documented in the KB2123563 article.
Problem
Cannot map Nextcloud as a WebDAV drive in Windows using self-signed certificate.
Solution
- Go to the your Nextcloud instance via your favorite Web browser.
- Click through until you get to the certificate error in the browser status
line.- View the cert, then from the Details tab, select Copy to File.
- Save to the desktop with an arbitrary name, for example
myNextcloud.pem.- Start, Run, MMC.
- File, Add/Remove Snap-In.
- Select Certificates, Click Add, My User Account, then Finish, then OK.
- Dig down to Trust Root Certification Authorities, Certificates.
- Right-Click Certificate, Select All Tasks, Import.
- Select the Save Cert from the Desktop.
- Select Place all Certificates in the following Store, Click Browse.
- Check the Box that says Show Physical Stores, Expand out Trusted Root
Certification Authorities, and select Local Computer there, click OK,
Complete the Import.- Check the list to make sure it shows up. You will probably need to Refresh
before you see it. Exit MMC.- Open Browser, select Tools, Delete Browsing History.
- Select all but In Private Filtering Data, complete.
- Go to Internet Options, Content Tab, Clear SSL State.
- Close browser, then re-open and test.
Problem
You cannot download more than 50 MB or upload large files when the upload takes
longer than 30 minutes using Web Client in Windows 7.
Solution
Workarounds are documented in the KB2668751 article.
Accessing files using cURL
Since WebDAV is an extension of HTTP, cURL can be used to script file operations.
Note
Settings → Administration → Sharing → Allow users on this
server to send shares to other servers. If this option is disabled the
option --header "X-Requested-With: XMLHttpRequest" needs to be passed to
cURL.
To create a folder with the current date as name:
$ curl -u user:pass -X MKCOL "https://example.com/nextcloud/remote.php/dav/files/USERNAME/$(date '+%d-%b-%Y')"
To upload a file error.log into that directory:
$ curl -u user:pass -T error.log "https://example.com/nextcloud/remote.php/dav/files/USERNAME/$(date '+%d-%b-%Y')/error.log"
To move a file:
$ curl -u user:pass -X MOVE --header 'Destination: https://example.com/nextcloud/remote.php/dav/files/USERNAME/target.jpg' https://example.com/nextcloud/remote.php/dav/files/USERNAME/source.jpg
To get the properties of files in the root folder:
    $ curl -X PROPFIND -H "Depth: 1" -u user:pass https://example.com/nextcloud/remote.php/dav/files/USERNAME/ | xml_pp
    <?xml version="1.0" encoding="utf-8"?>
<d:multistatus xmlns:d="DAV:" xmlns:oc="http://nextcloud.org/ns" xmlns:s="http://sabredav.org/ns">
  <d:response>
    <d:href>/nextcloud/remote.php/dav/files/USERNAME/</d:href>
    <d:propstat>
      <d:prop>
        <d:getlastmodified>Tue, 13 Oct 2015 17:07:45 GMT</d:getlastmodified>
        <d:resourcetype>
          <d:collection/>
        </d:resourcetype>
        <d:quota-used-bytes>163</d:quota-used-bytes>
        <d:quota-available-bytes>11802275840</d:quota-available-bytes>
        <d:getetag>"561d3a6139d05"</d:getetag>
      </d:prop>
      <d:status>HTTP/1.1 200 OK</d:status>
    </d:propstat>
  </d:response>
  <d:response>
    <d:href>/nextcloud/remote.php/dav/files/USERNAME/welcome.txt</d:href>
    <d:propstat>
      <d:prop>
        <d:getlastmodified>Tue, 13 Oct 2015 17:07:35 GMT</d:getlastmodified>
        <d:getcontentlength>163</d:getcontentlength>
        <d:resourcetype/>
        <d:getetag>"47465fae667b2d0fee154f5e17d1f0f1"</d:getetag>
        <d:getcontenttype>text/plain</d:getcontenttype>
      </d:prop>
      <d:status>HTTP/1.1 200 OK</d:status>
    </d:propstat>
  </d:response>
</d:multistatus>
Accessing files using WinSCP
WinSCP is an open source free SFTP client, FTP client, WebDAV client, S3 client and SCP client for Windows. Its main function is file transfer between a local and a remote computer. Beyond this, WinSCP offers scripting and basic file manager functionality.
You can download the portable version of WinSCP and run it on Linux through Wine.
To run WinSCP on Linux, download wine through your distribution’s package manager, then run it via: wine WinSCP.exe.
To connect to Nextcloud:
- Start WinSCP
- Press ‘Session’ in the menu
- Press the ‘New Session’ menu option
- Set the ‘File protocol’ dropdown to WebDAV
- Set the ‘Encryption’ dropdown to TSL/SSL Implicit encryption
- Fill in the hostname field: example.com
- Fill in the username field: NEXTCLOUDUSERNAME
- Fill in the password field: NEXTCLOUDPASSWORD
- Press the ‘Advanced…’ button
- Navigate to ‘Environment’, ‘Directories’ on the left side
- Fill in the ‘Remote directory’ field with the following: /nextcloud/remote.php/dav/files/NEXTCLOUDUSERNAME/
- Press the ‘OK’ button
- Press the ‘Save’ button
- Select the desired options and press the ‘OK’ button
- Press the ‘Login’ button to connect to Nextcloud
Note: it is recommended to use an app password for the password if you use TOTP, as WinSCP does not understand TOTP in Nextcloud at the time of writing (2022-11-07).
Accessing Nextcloud files using WebDAVпѓЃ
Nextcloud fully supports the WebDAV protocol, and you can connect and synchronize with your Nextcloud files over WebDAV. In this chapter you will learn how to connect Linux, macOS, Windows, and mobile devices to your Nextcloud server via WebDAV. Before we get into configuring WebDAV, let’s take a quick look at the recommended way of connecting client devices to your Nextcloud servers.
In the following examples, you should replace example.com/nextcloud with the URL of your Nextcloud server (omit the directory part if the installation is in the root of your domain), and “USERNAME” with the username of the connecting user.
See the webdav url (bottom left, settings) on your Nextcloud.
In the following examples, you must use an app-password for login, which you can generate in your security settings.
Nextcloud Desktop and mobile clientsпѓЃ
The recommended way to synchronize a desktop PC with a Nextcloud server is by using Nextcloud/ownCloud sync clients. You can configure the client to save files in any local directory and you can choose which directories on the Nextcloud server to sync with. The client displays the current connection status and logs all activity, so you always know which remote files have been downloaded to your PC and you can verify that files created and updated on your local PC are properly synchronized with the server.
The recommended way to synchronize Nextcloud server with Android and Apple iOS devices is by using the mobile apps.
To connect your mobile app to a Nextcloud server use the base URL and folder only:
In addition to the mobile apps provided by Nextcloud or ownCloud, you can use other apps to connect to Nextcloud from your mobile device using WebDAV. WebDAV Navigator is a good (proprietary) app for Android devices and iPhones. The URL to use on these is:
WebDAV configurationпѓЃ
If you prefer, you may also connect your desktop PC to your Nextcloud server by using the WebDAV protocol rather than using a special client application. Web Distributed Authoring and Versioning (WebDAV) is a Hypertext Transfer Protocol (HTTP) extension that makes it easy to create, read, and edit files on Web servers. With WebDAV you can access your Nextcloud shares on Linux, macOS and Windows in the same way as any remote network share, and stay synchronized.
Accessing files using LinuxпѓЃ
You can access files in Linux operating systems using the following methods.
Nautilus file managerпѓЃ
When you configure your Nextcloud account in the GNOME Control Center, your files will automatically be mounted by Nautilus as a WebDAV share, unless you deselect file access.
You can also mount your Nextcloud files manually. Use the davs:// protocol to connect the Nautilus file manager to your Nextcloud share:
If your server connection is not HTTPS-secured, use dav:// instead of davs:// .

The same method works for other file managers that use GVfs, such as MATE’s Caja and Cinnamon’s Nepomuk.
Accessing files with KDE and Dolphin file managerпѓЃ
To access your Nextcloud files using the Dolphin file manager in KDE, use the webdav:// protocol:

You can create a permanent link to your Nextcloud server:
Open Dolphin and click “Network” in the left hand “Places” column.
Click on the icon labeled Add a Network Folder. The resulting dialog should appear with WebDAV already selected.
If WebDAV is not selected, select it.
Click Next.
Enter the following settings:
Name: The name you want to see in the Places bookmark, for example Nextcloud.
User: The Nextcloud username you used to log in, for example admin.
Server: The Nextcloud domain name, for example example.com (without http:// before or directories afterwards).
Folder – Enter the path nextcloud/remote.php/dav/files/USERNAME/ .
(Optional) Check the “Create icon” checkbox for a bookmark to appear in the Places column.
(Optional) Provide any special settings or an SSL certificate in the “Port & Encrypted” checkbox.
Creating WebDAV mounts on the Linux command lineпѓЃ
You can create WebDAV mounts from the Linux command line. This is useful if you prefer to access Nextcloud the same way as any other remote filesystem mount. The following example shows how to create a personal mount and have it mounted automatically every time you log in to your Linux computer.
Install the davfs2 WebDAV filesystem driver, which allows you to mount WebDAV shares just like any other remote filesystem. Use this command to install it on Debian/Ubuntu:
Use this command to install it on CentOS, Fedora, and openSUSE:
Add yourself to the davfs2 group:
Then create a nextcloud directory in your home directory for the mountpoint, and .davfs2/ for your personal configuration file:
Copy /etc/davfs2/secrets to
Set yourself as the owner and make the permissions read-write owner only:
Add your Nextcloud login credentials to the end of the secrets file, using your Nextcloud server URL and your Nextcloud username and password:
Add the mount information to /etc/fstab :
Then test that it mounts and authenticates by running the following command. If you set it up correctly you won’t need root permissions:
You should also be able to unmount it:
Now every time you login to your Linux system your Nextcloud share should automatically mount via WebDAV in your
/nextcloud directory. If you prefer to mount it manually, change auto to noauto in /etc/fstab .
Known issuesпѓЃ
ProblemпѓЃ
Resource temporarily unavailable
SolutionпѓЃ
If you experience trouble when you create a file in the directory, edit /etc/davfs2/davfs2.conf and add:
ProblemпѓЃ
SolutionпѓЃ
If you use a self-signed certificate, you will get a warning. To change this, you need to configure davfs2 to recognize your certificate. Copy mycertificate.pem to /etc/davfs2/certs/ . Then edit /etc/davfs2/davfs2.conf and uncomment the line servercert . Now add the path of your certificate as in this example:
Accessing files using macOSпѓЃ
The macOS Finder suffers from a series of implementation problems and should only be used if the Nextcloud server runs on Apache and mod_php, or Nginx 1.3.8+. Alternative macOS-compatible clients capable of accessing WebDAV shares include open source apps like Cyberduck (see instructions here) and Filezilla. Commercial clients include Mountain Duck, Forklift, Transmit, and Commander One.
To access files through the macOS Finder:
From the Finder’s top menu bar, choose Go > Connect to Server…

When the Connect to Server… window opens, enter your Nextcloud server’s WebDAV address in the Server Address: field, ie:

Click Connect. Your WebDAV server should appear on the Desktop as a shared disk drive.
Accessing files using Microsoft WindowsпѓЃ
If you use the native Windows implementation of WebDAV, you can map Nextcloud to a new drive using Windows Explorer. Mapping to a drive enables you to browse files stored on a Nextcloud server the way you would files stored in a mapped network drive.
Using this feature requires network connectivity. If you want to store your files offline, use the Desktop Client to sync all files on your Nextcloud to one or more directories of your local hard drive.
Windows 10 now defaults to allow Basic Authentication if HTTPS is enabled prior to mapping your drive. On older versions of Windows, you must permit the use of Basic Authentication in the Windows Registry: launch „regedit“ and navigate to HKEY_LOCAL_MACHINESYSTEMCurrentControlSetServicesWebClientParameters. Create or edit the DWORD value „BasicAuthLevel“ (Windows Vista, 7 and or „UseBasicAuth“ (Windows XP and Windows Server 2003) and set its value data to 1 for SSL connections. Value 0 means that Basic Authentication is disabled, a value of 2 allows both SSL and non-SSL connections (not recommended). Then exit Registry Editor, and restart the computer.
Mapping drives with the command lineпѓЃ
The following example shows how to map a drive using the command line. To map the drive:
Open a command prompt in Windows.
Enter the following line in the command prompt to map to the computer Z drive:
where is the URL to your Nextcloud server.
For example: net use Z: https://example.com/nextcloud/remote.php/dav/files/USERNAME/ /user:youruser yourpassword
The computer maps the files of your Nextcloud account to the drive letter Z.
Though not recommended, you can also mount the Nextcloud server using HTTP, leaving the connection unencrypted. If you plan to use HTTP connections on devices while in a public place, we strongly recommend using a VPN tunnel to provide the necessary security.
An alternative command syntax is:
Mapping drives with Windows ExplorerпѓЃ
To map a drive using the Microsoft Windows Explorer:
Migrate to your computer in Windows Explorer.
Right-click on Computer entry and select Map network drive… from the drop-down menu.
Choose a local network drive to which you want to map Nextcloud.
Specify the address to your Nextcloud instance, followed by /remote.php/dav/files/USERNAME/.
For SSL protected servers, check Reconnect at sign-in to ensure that the mapping is persistent upon subsequent reboots. If you want to connect to the Nextcloud server as a different user, check Connect using different credentials.

Click the Finish button.
Windows Explorer maps the network drive, making your Nextcloud instance available.
Accessing files using CyberduckпѓЃ
Cyberduck is an open source FTP and SFTP, WebDAV, OpenStack Swift, and Amazon S3 browser designed for file transfers on macOS and Windows.
This example uses Cyberduck version 4.2.1.
To use Cyberduck:
Specify a server without any leading protocol information. For example:
2. Specify the appropriate port. The port you choose depends on whether or not your Nextcloud server supports SSL. Cyberduck requires that you select a different connection type if you plan to use SSL. For example:
443 (for WebDAV (HTTPS/SSL))
3. Use the вЂMore Options’ drop-down menu to add the rest of your WebDAV URL into the вЂPath’ field. For example:
Now Cyberduck enables file access to the Nextcloud server.
Nextcloud provides the possibility to access public shares over WebDAV.
To access the public share, open:
in a WebDAV client, use the share token as username and the (optional) share password as password.
Settings в†’ Administration в†’ Sharing в†’ Allow users on this server to send shares to other servers. This option also allows WebDAV access to public shares needs to be enabled in order to make this feature work.
Known problemsпѓЃ
ProblemпѓЃ
Windows does not connect using HTTPS.
Solution 1пѓЃ
The Windows WebDAV Client might not support Server Name Indication (SNI) on encrypted connections. If you encounter an error mounting an SSL-encrypted Nextcloud instance, contact your provider about assigning a dedicated IP address for your SSL-based server.
Solution 2пѓЃ
The Windows WebDAV Client might not support TLSv1.1 / TLSv1.2 connections. If you have restricted your server config to only provide TLSv1.1 and above the connection to your server might fail. Please refer to the WinHTTP documentation for further information.
ProblemпѓЃ
You receive the following error message: Error 0x800700DF: The file size exceeds the limit allowed and cannot be saved.
SolutionпѓЃ
Windows limits the maximum size a file transferred from or to a WebDAV share may have. You can increase the value FileSizeLimitInBytes in HKEY_LOCAL_MACHINESYSTEMCurrentControlSetServicesWebClientParameters by clicking on Modify.
To increase the limit to the maximum value of 4GB, select Decimal, enter a value of 4294967295, and reboot Windows or restart the WebClient service.
ProblemпѓЃ
Accessing your files from Microsoft Office via WebDAV fails.
SolutionпѓЃ
Known problems and their solutions are documented in the KB2123563 article.
ProblemпѓЃ
Cannot map Nextcloud as a WebDAV drive in Windows using self-signed certificate.
SolutionпѓЃ
Go to the your Nextcloud instance via your favorite Web browser.
Click through until you get to the certificate error in the browser status line.
View the cert, then from the Details tab, select Copy to File.
Save to the desktop with an arbitrary name, for example myNextcloud.pem .
File, Add/Remove Snap-In.
Select Certificates, Click Add, My User Account, then Finish, then OK.
Dig down to Trust Root Certification Authorities, Certificates.
Right-Click Certificate, Select All Tasks, Import.
Select the Save Cert from the Desktop.
Select Place all Certificates in the following Store, Click Browse,
Check the Box that says Show Physical Stores, Expand out Trusted Root Certification Authorities, and select Local Computer there, click OK, Complete the Import.
Check the list to make sure it shows up. You will probably need to Refresh before you see it. Exit MMC.
Open Browser, select Tools, Delete Browsing History.
Select all but In Private Filtering Data, complete.
Go to Internet Options, Content Tab, Clear SSL State.
Close browser, then re-open and test.
ProblemпѓЃ
You cannot download more than 50 MB or upload large files when the upload takes longer than 30 minutes using Web Client in Windows 7.
SolutionпѓЃ
Workarounds are documented in the KB2668751 article.
Accessing files using cURLпѓЃ
Since WebDAV is an extension of HTTP cURL can be used to script file operations.
To create a folder with the current date as name:
To upload a file error.log into that directory:
To get the properties of files in the root folder:
Источник