- All
- Common Tasks
- General
- MCU Side
- Nextion
- Nextion Editor
- Troubleshooting
- Useful Links
As of Nextion Editor v1.65.0, the Nextion 10 bytes of power on preamble Nextion Startup 00 00 00 FF FF FF (NIS 7.19) and Nextion Ready 88 FF FF FF (NIS 7.29) have been moved from firmware into Program.s as a printh statement printh 00 00 00 FF FF FF 88 FF FF FF. This change allows users to keep as Nextion has always been, modify to have their own custom preamble, or remove the preamble all together.
Program.s is the place for startup code prior to the first page of a users HMI to begin running. Items as global integer declarations such as int sys0, sys1, and sys2, to instructions setting defaults from brightness to baudrates such as baud=9600, dim=100, recmod=0, to launching the first HMI page such as page 0 will now be found in the new default Program.s tab. (Any code after the page instruction will not run as the HMI does not return back for Program.s to continue)
The Data Error message signifies the uploaded *.tft file can not be used
– it can be a result of line noise and *.tft did not arrive in tact, or
– it can also be a result of your device requiring to use a newer Nextion Editor.
Data Error can occur with newer Nextion devices needing v1.63.3 Nextion Editor
– if receiving Data Error, you must use v1.63.3 or above (card noting this included in box)
Due to the pandemic, second source flash ICs may be used in your Nextion device since mid 2021. Where such is the case, a card noting that the need to use Editor version 1.63.3 or higher is included. These devices have a QR code on the microSD card slot of the Nextion so it can be visually identified. For such devices, the firmware in v1.63.3 has the ability to communicate with both the existing and new second source flash ICs whereas the older Editor versions do not have the ability to communicate with the new second source flash ICs. For such devices, the ability to revert to an earlier version of the Nextion Editor is simply not available. Using an elder *.TFT file will cause a Data Error message and you will need to upgrade your project HMI and compile it with the Editor version v1.63.3 or later.
Due to the pandemic, second source flash ICs may be used in your Nextion device since mid 2021. Where such is the case, a card noting that the need to use Editor version 1.63.3 or higher is included. These devices have a QR code on the microSD card slot of the Nextion so it can be visually identified. For such devices, the firmware in v1.63.3 has the ability to communicate with both the existing and new second source flash ICs whereas the older Editor versions do not have the ability to communicate with the new second source flash ICs. For such devices, the ability to revert to an earlier version of the Nextion Editor is simply not available. Using an elder *.TFT file will cause a Data Error message and you will need to upgrade your project HMI and compile it with the Editor version v1.63.3 or later.
Important Note for Legacy Nextion devices.
Every Nextion device was factory tested to work with the Nextion Editor version that current at the time the Nextion device was made. This is to say a Nextion device purchased in Apr 2016 would work with the (current at that time) Nextion Editor version v0.33. For very old Nextion devices with project firmware v0.32 and before, some will need to upgrade to an intermediary Nextion firmware (v0.42 TFTs supplied below) BEFORE the newer Nextion Editors (LTS Edition or v0.58 or later) can be used. Note the Nextion Editor LTS Edition code is based on version v0.53, the Nextion Editor LTS Edition is not Nextion Editor version v0.53, it is Nextion Editor LTS Edition.
Which Nextion devices are classed Legacy and may need intermediary upgrade
– your Nextion is a T Series Basic Model NX----T---_011 (Basic models have blue PCBs)
– your Nextion has the Itead logo (not the Nextion logo)
– your last Nextion project uploaded used Editor v0.37 or prior
– your Nextion connect reports firmware below S62
If these conditions apply then an intermediary upgrade is needed to use the newer Nextion Editors.
An Intermediary upgrade is performed by
– creating a simple project using Nextion Editor v0.42 (found in Forum Announcements)
– compile this project and upload its TFT file to your device (over serial or microSD)
– or download v0.42 T_intermediary.zip here, extract and upload the TFT for your model
– your device is now ready to use the newer LTS and v0.58 or later Editors
– create and upload the TFT project made by the newer Editors as usual
Note: Once version v0.38 is used, you can not use an earlier than v0.38 version Editor
Q: I have a Legacy device and want to continue using my existing v0.34 Editor
A: There is no issue to use your Legacy Nextion device with the elder Nextion Editor as long as you do not A) upgrade to v0.38 or later (can not go back) or B) attempt to skip the Intermediary upgrade before using the newer Editors (LTS or v0.58 and later)
Q: How do I know my Nextion device firmware version is? ie S62
A: The Nextion firmware Ver:S--- shows in the Editor Debug Simulator Status Bar area when connecting to the Nextion Device (see Editor Guide or the Upload Protocol v1.1 published in the Blog section)
Q: I skipped the Intermediary step and went straight to the newer Editor, now what?
A: The best solution would have been following the Intermediary steps and avoid bricking. If your Legacy device is now showing a device null error, you can try to reanimate your device using the LegacyFix TFT file (download link) and exactly follow the steps in the Readme.txt file.
After uploading a HMI project to Nextion display via PC and power on, the screen shows “model does not match”.
Reasons:
– The wrong model was chosen when set up the HMI project, please go to “Device” and select the correct model, re-compile the HMI project.
– The USB to TTL module for uploading is not reliable, please try with another USB to TTL module. Our recommendation is to use the Foca Max.
Please note:
Due to the pandemic, second source flash ICs may be used in your Nextion device. Where such is the case, a card noting that the need to use Editor version 1.63.3 or higher is required. These devices have a QR code on the microSD card slot of the Nextion so it can be visually identified. For such devices, the firmware in v1.63.3 has the ability to communicate with both the existing and new second source flash ICs whereas the older Editor versions do not have the ability to communicate with the new second source flash ICs. For such devices, the ability to revert to an earlier version of the Nextion Editor is simply not available. Using an elder *.TFT file will cause a Data Error message and you will need to upgrade your project HMI and compile it with the Editor version v1.63.3 or later.
For Nextion devices not using the new second source flash ICs:
If reverting back to an earlier Nextion Editor version, use your “backup copy” of your HMI file that you backed-up before installing and trying out new software. If you forgot to make a backup (no-no-no tsk-tsk), open the “Version backup folder” and copy your old HMI file from the folder to use (and thank the Nextion Editor that it made a backup before converting into the new Editor version format).
All Editor versions before v0.38 are now prevented from use. Version v0.38 and later versions are more stable and incorporated many more features and capabilities than early Editor versions. Elder versions if truly required can found in the Forum Announcements > Nextion Editors and Change Logs. (Users must register and login to access the Forum)
The LTS Edition (Long Term Support) based on v0.53 is provided for code compatibility for existing projects created with v0.53 and prior. LTS Edition is not capable of communications with the new second source flash ICs.
Ensure that your Microsoft Visual C++ Redistributables are up-to-date. Updates from Microsoft for their Visual C++ Library Redistributables includes bug fixes for existing Microsoft Visual C++ Redistributables that for a few users has solved rare and user specific issues related to the Nextion Editor starting properly. For most users, the Redistributables are updated automatically in their periodic Microsoft Windows Updates.
Visual C++ Redistributables can be found [here] on the Microsoft website.
Programming and Electronics knowledge are prerequisite
– there are many external internet resources available
– there is no need to replicate all global information here
Nextion can be used with 68,000+ MCUs with a Hardware/Software
TTL Serial, in 130+ programming languages.
It is the User Duty to know
– their chosen MCU
– their chosen Programming Language
– their chosen Compiler
– their chosen Libraries used
The Hobby Lobby is not to be used as a Jobs Board.
– For this, Itead offers Enhanced Support and Project Units
If Enhanced Support is not the path you would like to go
– there are other Freelance sites on the Internet.
Attaching Files to your Forum Posts
To upload files (such as .HMI, .TFT, .ino, .pas, .cpp, etc) as attachments
1) please zip your files
2) then use this zip file as your attachment
3) Attachments are limited to 500K per attachment, 4 files per post allowed
Such also saves much storage space and time for others to download.
– not all community members live in super high bandwidth locales.
Create a new HMI project:
– in the Page Preinitialize Event add the code
touch_j
Compile, upload and run your project.
Follow the on-screen instructions.
It is pretty straight forward – there is no recovery.
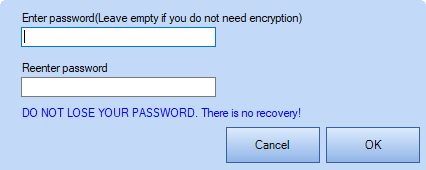
It becomes locked to protect the project
DO NOT LOSE YOUR PASSWORD, or do not use password.
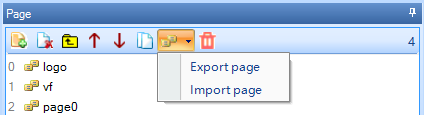
Select Import page to open dialog, select *. page file, click “Open”
Itead’s Iteadlib Arduino Nextion Library is available
via github and can be downloaded from
https://github.com/itead/ITEADLIB_Arduino_Nextion
Default configuration is for the Arduino MEGA 2560
The Arduino UNO is also supported – see readme.md file
This framework concept can be used to port to another MCU
Newer components and Intelligent Series support has not been added.
However, most components can “borrow” from another existing component
and then be extended to suit your needs.
The latest version of Nextion Editor can be downloaded [here]
To maintain code compatibility with projects created with version 0.53 or prior, an LTS Edition (Long Term Support) of the Nextion Editor can be downloaded [here]. The LTS Edition is not an excuse to be fearful of creating a new HMI project in the newer versions of the Editor (just as you were not fearful to create your current HMI).
If reverting back to the LTS Edition for code compatibility, or an earlier Nextion Editor version, use your “backup copy” of your HMI file that you backed-up before installing and trying out new software. If you forgot to make a backup (no-no-no tsk-tsk), open the “Version backup folder” and copy your old HMI file from the folder to use (and thank the Nextion Editor that it made a backup before converting into the new Editor version format).
The Nextion Datasheets can be found [here]
If it was burned by faulty operation, we certainly will not repair it for free.
The Unit of Screen Brightness is in percentage %
The Range of Screen Brightness is 0 to 100.
– Please refer to dim and dims in the Nextion Instruction Set [here]
For the brightness in NITS of your Nextion device
– Please refer to your Nextion model’s Datasheets [here]
Note that you need to use the two characters r and not n
Component .isbr attribute needs to be set to true.
Any desired whitespace padding is done via user code.
Check the back of your display. If imprinted with “TJCxxxxTxxx_xxx”, or “TJCxxxxKxxx_xxx” it means your display is a TJC model, which is not sold by ITEAD and we offer no support to such models.
Nextion’s microSD slot is primarily used to upload a TFT project file.
– The Intelligent Series has added capabilities, see Forum Announcements
Not all microSD cards are made for use with embedded devices.
– especially newer microSD cards made for cameras, etc.
Class 10 HC 8GB to 32GB cards have had good success. Others too.
Ensure
– microSD card formatted as FAT32 under Windows
– microSD card is less than 32 GB
– only 1 TFT project file exists on the microSD card
– Nextion device is powered off before inserting microSD card
– insert the microSD card containing TFT project file
– power on Nextion with recommended clean power as per Datasheets
– Nextion device is undisturbed while uploading
– after upload “successed” indication power off Nextion
– after Nextion device is powered off then remove microSD card
– power on Nextion with recommended clean power as per Datasheets
– if new version of Nextion Editor, allow time for firmware to update
– wait for uploaded project to begin running on Nextion device
Data Error can occur with newer Nextion devices needing v1.63.3 Nextion Editor
– if receiving Data Error, you must use v1.63.3 or above (card noting this included in box)
If microSD upload is unsuccessful
– Reformat the microSD card – ensuring FAT32 under Windows, and try.
– use a different microSD card (HC, Class 10, under 32GB), and try.
– compile a blank HMI project and try again.
– microSD card is not the only method to upload project – try via USB to TTL.
Using the above steps, the Nextion device will always run firmware upload
when an inserted microSD is detected at power on (power off before insert/remove)
This may be a Power supply problem. Please ensure to power your device according to the datasheet power supply range with the recommended supply of current. Under Voltage or under Current can cause damage. Over Voltage will cause damage. Too high or too low voltage is likely to damage back-light. For datasheet please refer to your model’s Datasheets [here]
Standard Support (Level 2) is offered to Itead customers.
– you must deal your Seller as per Buyer-Seller protection laws
– we only ensure the hardware itself works as expected
– please understand that we can not debug your code.
Supported is stated on the Standard Support page.
Enhanced Support is available by purchasing Tickets here
– quick and professional service, but indeed paid
Community Support is available via the Forum here
– community members will voluntarily answer when they desire.
Nextion is a 5V TTL Serial HMI device, be mindful
to ensure connecting to an appropriate adapter
The connection between Nextion and control device
Nextion Display -------- Control Device
   5V (Red) ------------------------- 5V
  GND (Black) ----------------------- GND
   TX (Blue) ------------------------ RX
   RX (Yellow)----------------------- TX
Ensure Ground with all used devices is common.
Control device: FOCA, USB-to-TTL, USB-to-UART, PC, MCU, Arduino
Ensure sufficient current supply as per Datasheets (here)
Not directly. For Basic or Enhanced Series models, animation can be frame by frame via user code. For the Intelligent Series, use the GmovMaker tool to create animations for the Gmov component.
No, this is not supported.
HMI is Human Machine Interface, not HDMI.
Sorry, No. The 2016 Goal for multiplatform was never met. Therefore, we will only support a Windows version. Ensure Microsoft .Net 3.5 is installed for Windows.
Others have used Windows under Linux and Mac (virtual machines, WINE, etc). Although user operating systems and used software is beyond the scope of Nextion support, it is indirectly possible.
No. TJC devices are not sold by Itead and we will offer no support.
TJC versions are allowed to be sold in China mainland only and supports Chinese only.
See TJC for support for TJC devices.
No. Nextion is not Open Source. Nextion will not be Open Source.
– we will not provide Nextion schematics, Nextion PCB layout, components used, Nextion Editor source code, or any of the design data involved.
What is available to the public has been made available
– please refer to your Nextion model’s Datasheet [here]
Page load link
sser
Offline
Зарегистрирован: 25.12.2016
d_tramp пишет:
Новая версия вышла. 0.58!
Ктобы обзор написал про нововведения? :)))
Вот что «гугл» перевёл:
V0.58 Обновление списка
— Новая поддержка кодировки для: Shift-JIS
Дизайн и комплектующие:
— Слоистый дизайн
— Увеличение холста и расширенное рабочее пространство холста
— Блокировка компонентов
— новые сглаженные пропорциональные шрифты кернинга
— Поддерживаются новые скорости передачи данных
— Новый компонент Xfloat
— Новый переключатель ComboBox, SLText, GMov, Video, ExPicture
— Усовершенствования компонентов серии Intelligent
— переходы страниц, перемещение компонента во время выполнения и перетаскивание
— графическая прозрачность теперь поддерживается
Улучшения инструкции
— Инструкции теперь поддерживают опциональный CRC
— Новый компонент во время выполнения перемещать и перетаскивать
— Логическое НЕ, комбинированные условия, новые события
— 2-х канальная поддержка аудио
Winehq version: 5.0.1
OS: Ubuntu 18.04.4 64bit
Wine appears to run ok. Winefile, winecfg, and notepad all start and appear to run ok.
Gecko and mono are installed:
wine uninstaller —list
Code: Select all
{92E6986F-9DE7-4D94-A27F-3601B260C881}|||Wine Gecko (32-bit)
{83F3DB41-CE50-411F-B218-93FD46CE0AB0}|||Wine Gecko (64-bit)
{0A3CE9B1-FEEE-59FE-9F5B-6AD87E9D6D55}|||Wine Mono Runtime
{8938A429-407D-5208-903D-37777470D766}|||Wine Mono Windows Support
WINEARCH is set to win32 and I’m just going with the default .wine prefix.
I’m attempting to install the Nextion Editor application. The setup
file I’ve downloaded is nextion-setup-v1-60-2.exe, currently their latest I believe.
From the Downloads directory when I execute wine nextion-setup-v1-60-2.exe, the following is
echoed to terminal and then the setup dialog starts:
Code: Select all
002d:fixme:explorerframe:taskbar_list_SetProgressValue iface 00111638, hwnd 00030054, ullCompleted 10000, ullTotal 9e000 stub!
002d:fixme:explorerframe:taskbar_list_SetProgressState iface 00111638, hwnd 00030054, flags 0 stub!
0030:fixme:ntdll:NtLockFile I/O completion on lock not implemented yet
0030:fixme:ntdll:NtQuerySystemInformation info_class SYSTEM_PERFORMANCE_INFORMATION
The installer appears to work and starts the typical install process but never gets to the expected
«Program installed» press OK type dialog, It just quits and the following lines are output
to terminal:
Code: Select all
0030:fixme:msi:internal_ui_handler internal UI not implemented for message 0x0b000000 (UI level = 5)
0030:fixme:msi:internal_ui_handler internal UI not implemented for message 0x0b000000 (UI level = 5)
Failed to run module constructor due to (null) assembly:C:windowsmonomono-2.0libmono4.5mscorlib.dll type:TypeInitializationException member:(null)
Now it appears in installed software list:
Code: Select all
{A32FC570-5615-409B-BD34-2DCBBF90A697}|||Nextion Editor
{92E6986F-9DE7-4D94-A27F-3601B260C881}|||Wine Gecko (32-bit)
{83F3DB41-CE50-411F-B218-93FD46CE0AB0}|||Wine Gecko (64-bit)
{0A3CE9B1-FEEE-59FE-9F5B-6AD87E9D6D55}|||Wine Mono Runtime
{8938A429-407D-5208-903D-37777470D766}|||Wine Mono Windows Support
An entry is created in my Applications tabs and a desktop shortcut is created with the following properties:
Code: Select all
env WINEPREFIX="/home/huw/.wine" wine C:\Program Files (x86)\Nextion Editor\Nextion Editor.exe Double click on the desktop shortcut brings up Ubuntu Untrusted dialog. Click on Trust and Launch and then nothing.
I’ve tried starting the .exe up using winefile but I get the following line in terminal:
Code: Select all
Failed to run module constructor due to (null) assembly:C:windowsmonomono-2.0libmono4.5mscorlib.dll type:TypeInitializationException member:(null)I’ve also changed into the prefix directory where it installed The Nextion app and tried
starting with wine ‘Nextion Editor.exe’ but get the same line as above.
I specified the WINEARCH=win32 intially because posts relating to Nextion Editor
software under wine (there werent that many) all seemed to reference that in their
attempts, albeit a year or more ago.
Any advice on moving forward from this point would be much appreciated.
Содержание
- Nextion editor load dll error application run resources
- Arduino.ru
- Регистрация новых пользователей и создание новых тем теперь только на новом форуме https://forum.arduino.ru
- forum.arduino.ru
- проблемы с Nextion
- Nextion is not connected. #2261
- Comments
- The problem
- What is version of ESPHome has the issue?
- What type of installation are you using?
- What platform are you using?
- Board
- Component causing the issue
- Example YAML snippet
- Anything in the logs that might be useful for us?
- Additional information
- Footer
Nextion editor load dll error application run resources
As of Nextion Editor v1.65.0, the Nextion 10 bytes of power on preamble Nextion Startup 00 00 00 FF FF FF (NIS 7.19) and Nextion Ready 88 FF FF FF (NIS 7.29) have been moved from firmware into Program.s as a printh statement printh 00 00 00 FF FF FF 88 FF FF FF. This change allows users to keep as Nextion has always been, modify to have their own custom preamble, or remove the preamble all together.
Program.s is the place for startup code prior to the first page of a users HMI to begin running. Items as global integer declarations such as int sys0, sys1, and sys2, to instructions setting defaults from brightness to baudrates such as baud=9600, dim=100, recmod=0, to launching the first HMI page such as page 0 will now be found in the new default Program.s tab. (Any code after the page instruction will not run as the HMI does not return back for Program.s to continue)
The Data Error message signifies the uploaded *.tft file can not be used
– it can be a result of line noise and *.tft did not arrive in tact, or
– it can also be a result of your device requiring to use a newer Nextion Editor.
Data Error can occur with newer Nextion devices needing v1.63.3 Nextion Editor
– if receiving Data Error, you must use v1.63.3 or above (card noting this included in box)
Due to the pandemic, second source flash ICs may be used in your Nextion device since mid 2021. Where such is the case, a card noting that the need to use Editor version 1.63.3 or higher is included. These devices have a QR code on the microSD card slot of the Nextion so it can be visually identified. For such devices, the firmware in v1.63.3 has the ability to communicate with both the existing and new second source flash ICs whereas the older Editor versions do not have the ability to communicate with the new second source flash ICs. For such devices, the ability to revert to an earlier version of the Nextion Editor is simply not available. Using an elder *.TFT file will cause a Data Error message and you will need to upgrade your project HMI and compile it with the Editor version v1.63.3 or later.
Due to the pandemic, second source flash ICs may be used in your Nextion device since mid 2021. Where such is the case, a card noting that the need to use Editor version 1.63.3 or higher is included. These devices have a QR code on the microSD card slot of the Nextion so it can be visually identified. For such devices, the firmware in v1.63.3 has the ability to communicate with both the existing and new second source flash ICs whereas the older Editor versions do not have the ability to communicate with the new second source flash ICs. For such devices, the ability to revert to an earlier version of the Nextion Editor is simply not available. Using an elder *.TFT file will cause a Data Error message and you will need to upgrade your project HMI and compile it with the Editor version v1.63.3 or later.
Important Note for Legacy Nextion devices.
Every Nextion device was factory tested to work with the Nextion Editor version that current at the time the Nextion device was made. This is to say a Nextion device purchased in Apr 2016 would work with the (current at that time) Nextion Editor version v0.33. For very old Nextion devices with project firmware v0.32 and before, some will need to upgrade to an intermediary Nextion firmware (v0.42 TFTs supplied below) BEFORE the newer Nextion Editors (LTS Edition or v0.58 or later) can be used. Note the Nextion Editor LTS Edition code is based on version v0.53, the Nextion Editor LTS Edition is not Nextion Editor version v0.53, it is Nextion Editor LTS Edition.
Which Nextion devices are classed Legacy and may need intermediary upgrade
– your Nextion is a T Series Basic Model NX—-T—_011 (Basic models have blue PCBs)
– your Nextion has the Itead logo (not the Nextion logo)
– your last Nextion project uploaded used Editor v0.37 or prior
– your Nextion connect reports firmware below S62
If these conditions apply then an intermediary upgrade is needed to use the newer Nextion Editors.
An Intermediary upgrade is performed by
– creating a simple project using Nextion Editor v0.42 (found in Forum Announcements)
– compile this project and upload its TFT file to your device (over serial or microSD)
– or download v0.42 T_intermediary.zip here, extract and upload the TFT for your model
– your device is now ready to use the newer LTS and v0.58 or later Editors
– create and upload the TFT project made by the newer Editors as usual
Note: Once version v0.38 is used, you can not use an earlier than v0.38 version Editor
Q: I have a Legacy device and want to continue using my existing v0.34 Editor
A: There is no issue to use your Legacy Nextion device with the elder Nextion Editor as long as you do not A) upgrade to v0.38 or later (can not go back) or B) attempt to skip the Intermediary upgrade before using the newer Editors (LTS or v0.58 and later)
Q: How do I know my Nextion device firmware version is? ie S62
A: The Nextion firmware Ver:S— shows in the Editor Debug Simulator Status Bar area when connecting to the Nextion Device (see Editor Guide or the Upload Protocol v1.1 published in the Blog section)
Источник
Arduino.ru
Регистрация новых пользователей и создание новых тем теперь только на новом форуме https://forum.arduino.ru
forum.arduino.ru
проблемы с Nextion

Наврятли. ТС, весь код покажи, а не этот «обрубыш».
В Nextion это и есть весь код ивента. И да, там запись исходника весьма своеобразна — место скобки имеет значение.
т.е. вы хотите сказать, что это из за того, что скобка не на той строке прописана что надо ?
Но у меня теперь новая проблема. В Nextion Editor прописываю для кнопки: print «Power» . Я делаю это для того , что б в дебаге можно было получить сигнал от кнопки что она нажата. Но print «Power» я прописываю, а эффект — нулевой. Кнопка в дебаге молчит и в ответ на нажатие ничего не отвечает, хотя меню и работает и свою функцию в меню кнопка выполняет.
Пробовал так же вывести необходимое мне значение с помощью такого кода:
Кто то может подсказать, почему команда print «Power» у меня не работает ?
Видимо по этой причине:
print Depreciated. [Send raw formatted data over Serial to MCU]
Объясните пожалуйста, я ничего не понял. Как понять «устарела» ?? ? что это означает?
Спасибо за ответ ,я не знал что это важно в Nextion Editor. Я только только начал с ней работать.
Я разобрался в чем причина. Вопрос снят .
Парни привет, очередная засада от nextion или мне так везет, приобрел еще один дисплей для очередного проекта, при попытке в него что то загрузить, пишет о каких то старых файлах которые ему не нравятся, «File Version is to Low» погуглил в нете понял в чем проблем, надо переходить на новую версию nextion editor, хотя 0.53 устраивало меня.. скачал 1.63.3, все установилось, а вот запустить софт на трех машинах с windows 7, не получается, при попытке запустить софт, открывается окно 5×5 см в нем я вижу кнопки верхнего правого угла, свернуть свернуть в окно и закрыть, через 3 секунды, закрывается само, и все. Кто сталкивался с такой проблемой, чего windows может не хватать, версия 1.60.2 запускается, из под нее то же в дисплей не чего не грузится, может у кого есть 1.62.xx? вроде она минимальна по версии для новых дисплеев, может заработает.
Источник
Nextion is not connected. #2261
The problem
I had a complex setup with Nextion working and running fine. I made some changes to the order and names of some pages on the Nextion tft file and started getting «Nextion is not connected» error in the logs and obviously it all stopped working. Very odd.
As part of my troubleshooting and because the changes I made to the Nextion tft file had no reference in the esphome yaml I reduced the esphome yaml and the Nextion tft file to bare minimium and am still getting the error.
What am I missing, please?
What is version of ESPHome has the issue?
What type of installation are you using?
Home Assistant Add-on
What platform are you using?
Board
Component causing the issue
Example YAML snippet
Anything in the logs that might be useful for us?
Additional information
The text was updated successfully, but these errors were encountered:
Thinking this is NOT an esphome issue. I have just found out I can also get this error in my working setup by disabling a single timer on the load up page in the Nextion tft.
my nextion no longer works using 1.20 either.
Yeah there are some breaking changes for Nextion in 1.20.0. I got them out of the way, now this issue.
Dunno if related but getting this sometimes.
[18:29:00][W][nextion:072]: Nextion is not connected!
[18:29:00][V][app:081]: A component took a long time in a loop() cycle (1.01 s).
[18:29:00][V][app:082]: Components should block for at most 20-30ms in loop().
[18:29:01][E][uart_esp32:147]: Reading from UART timed out at byte 0!
«bkcmd=0 // Tells the Nextion to not send responses on commands. This is the current default but can be set just in case»
This is important.
Adding this line to the program.s section of the Nextion tft seems to have solved this issue.
Sorry for wasting your time.
It says this is default. I’m surprised that made a difference. I actually can’t connect to my esp since updating to 1.20
first i just remove the old command in esphome that was replaced by «bkcmd=0»,
it works after OTA but if i unplug power and plug again, the Wemos D1 mini connect to HA but the nextion 2.4″ doesnt refresh anymore.
Same with a Wemos D1 pro and a nextion 3.5″, no more refresh after putting back power, just after a new OTA flash. lol
So i test the baud=115200 and bkcmd=0 in program.s
and it works nice, after change baud_rate: 115200 in HA, even after unplug, plug again power of the Wemos.
Happy to do not have to change everything in my nextion setup. it has take lots of hours of tweaking before and dont want to spend hours again.
Ili9341 is a better, simple and cheapest way now. 😉
@Electronlibre2012 Hi, what do you mean ‘remove the old command in esphome’?
I did some testing and found the slowest I could go was 38400, any slower and it did not like talking to the system.
Also be wary of power issues, powering the screen from a Wemos Mini 5V Pin was causing havoc with the serial communication (even though the screen works). Putting it on its own 5V circuit took all that frustration way.
@Electronlibre2012 Hi, what do you mean ‘remove the old command in esphome’?
sorry i dont remember the command and google it 👍 the old command is it.set_wait_for_ack(false); and need to be removed. replace by bkcmd=0 in program.s under nextion editor
i tested now for few days and it works like a charm. more responsive, works well. 115200 baud speed instead of the 9600 baud before.
I did some testing and found the slowest I could go was 38400, any slower and it did not like talking to the system.
Also be wary of power issues, powering the screen from a Wemos Mini 5V Pin was causing havoc with the serial communication (even though the screen works). Putting it on its own 5V circuit took all that frustration way.
i powered all my nextion (2.4″, 3.5″ and 7″ from the 5V on the wemos D1, except for the 7″ its an ESP32, otherwise it doesnt work at all) and have any issue.
perhaps you need a better filtered power supply. not the chin. cheap ones , who have very bad filtering quality. just a guess.
But yu are true on the speed, i tested with the basic 9600 baud value and it doesnt work at all with baud=9600 in program.s in nextion editor. what is surprising because its a slow speed rate. usually low speed works and highers not lol. walk on the head.
Thanks. That didn’t work for me. I’m starting to think it’s crashing due to all the new nextion stuff taking up to much memory or something as when I downgrade, all works well.
nice! happy for you @mavrick01
i have a thermostat based on nextion and wemos mini. yesterday i upgraded from version 1.19.4 to version 1.20.3 and it stopped working. the wemos restarts continuously and the nextion from the logs is not connected. i used the lines in the program.s file, but nothing.
try desactivate all sensor first,
then when the nextion will work again, activate one by one to find the «faulty» one, there is a lot of breaking change with the last EspHome for the Nextion display component.
@Giuseppe-P Yeah thats my exact issue. Its looking like the new nextion stuff is much larger and taking up a lot of the stack, If your config is quite big then this fills it and causes a stack overflow and reboot loop. Increasing the size of the stack appears to be the solution.
There is a PR for this here but I have unfortunately been unable to get this working on first attempt.
Here is a discussion about increasing on esp32 (This worked for me), i’m assuming there is a similar method for 8266.
@Electronlibre2012 this will work until the sensor that fills the stack, If it was working on 1.19.4 but not 1.20.x then there won’t be a faulty sensor.
@Giuseppe-P Sì, questo è il mio problema esatto. Sembra che la nuova roba di nextion sia molto più grande e occupi molto dello stack, se la tua configurazione è abbastanza grande, questa la riempie e provoca un overflow dello stack e un ciclo di riavvio. L’aumento delle dimensioni dello stack sembra essere la soluzione.
C’è un PR per questo qui, ma sfortunatamente non sono stato in grado di farlo funzionare al primo tentativo.
Ecco una discussione sull’aumento su esp32 (questo ha funzionato per me), presumo che ci sia un metodo simile per 8266.
@Electronlibre2012 funzionerà fino al sensore che riempie lo stack, se funzionava su 1.19.4 ma non su 1.20.x, non ci sarà un sensore difettoso.
i think my config is valid because as you said since it works with 1.19.4 i don’t see why it shouldn’t work with the latest version. the problem is that the log indicates that the nextion is not connected. from the example on esphome I see that it uses the uart2 I think through the softwarserial library and not the native TX RX hardware PINs. since i have wemos mini i cannot change the communication PINs because they are not on this board. therefore since I use docker on raspbian I have two images of esphome, and then for the nextion I compile with version 1.19.4 and for the other boards like luci etc. I compile with the latest version. this is my nextion thermostat project. https://github.com/Giuseppe-P/Thermostat_Esphome-Home-Assistant_Nextion-3.2-inches_ON-OFF-MANUAL
I believe that the communication PINs are not the problem anyway. but surely as you said many things have been added which flooding the chip. why make these changes when a component works well? I don’t understand why updates instead of improving create problems
© 2023 GitHub, Inc.
You can’t perform that action at this time.
You signed in with another tab or window. Reload to refresh your session. You signed out in another tab or window. Reload to refresh your session.
Источник
I had a complex setup with Nextion working and running fine. I made some changes to the order and names of some pages on the Nextion tft file and started getting «Nextion is not connected» error in the logs and obviously it all stopped working. Very odd.
As part of my troubleshooting and because the changes I made to the Nextion tft file had no reference in the esphome yaml I reduced the esphome yaml and the Nextion tft file to bare minimium and am still getting the error.
esphome:
  name: thermostat_dashboard
  platform: ESP32
  board: featheresp32

wifi:
  ssid: "name"
  password: "pass"

api:
  password: "pass"

ota:
  password: "pass"

logger:
  baud_rate: 0
  level: VERBOSE

uart:
  id: serial
  rx_pin: RX
  tx_pin: TX
  baud_rate: 9600

display:
  - platform: nextion
    id: nextion_display
    uart_id: serial
INFO Reading configuration /config/esphome/thermostat_dashboard.yaml...
INFO Starting log output from thermostat_dashboard.local using esphome API
INFO Connecting to thermostat_dashboard.local:6053 (192.168.0.47)
INFO Successfully connected to thermostat_dashboard.local
[15:49:04][I][app:105]: ESPHome version 1.20.0 compiled on Jul 24 2021, 15:46:24
[15:49:04][C][wifi:499]: WiFi:
[15:49:04][C][wifi:359]:   SSID: [redacted]
[15:49:04][C][wifi:360]:   IP Address: 192.168.0.47
[15:49:04][C][wifi:362]:   BSSID: [redacted]
[15:49:04][C][wifi:363]:   Hostname: 'thermostat_dashboard'
[15:49:04][C][wifi:367]:   Signal strength: -71 dB ▂▄▆█
[15:49:04][V][wifi:369]:   Priority: 0.0
[15:49:04][C][wifi:371]:   Channel: 11
[15:49:04][C][wifi:372]:   Subnet: 255.255.255.0
[15:49:04][C][wifi:373]:   Gateway: 192.168.0.1
[15:49:04][C][wifi:374]:   DNS1: 194.168.4.100
[15:49:04][C][wifi:375]:   DNS2: 194.168.8.100
[15:49:04][C][uart_esp32:088]: UART Bus:
[15:49:04][C][uart_esp32:090]:   TX Pin: GPIO17
[15:49:04][C][uart_esp32:093]:   RX Pin: GPIO16
[15:49:04][C][uart_esp32:094]:   RX Buffer Size: 256
[15:49:04][C][uart_esp32:096]:   Baud Rate: 9600 baud
[15:49:04][C][uart_esp32:097]:   Data Bits: 8
[15:49:04][C][uart_esp32:098]:   Parity: NONE
[15:49:04][C][uart_esp32:099]:   Stop bits: 1
[15:49:04][C][logger:189]: Logger:
[15:49:04][C][logger:190]:   Level: VERBOSE
[15:49:04][C][logger:191]:   Log Baud Rate: 0
[15:49:04][C][logger:192]:   Hardware UART: UART0
[15:49:04][C][nextion:117]: Nextion:
[15:49:04][C][nextion:118]:   Device Model:
[15:49:04][C][nextion:119]:   Firmware Version:
[15:49:04][C][nextion:120]:   Serial Number:
[15:49:04][C][nextion:121]:   Flash Size:
[15:49:04][C][nextion:122]:   Wake On Touch:    True
[15:49:04][C][ota:029]: Over-The-Air Updates:
[15:49:04][C][ota:030]:   Address: thermostat_dashboard.local:3232
[15:49:04][C][ota:032]:   Using Password.
[15:49:04][W][nextion:072]: Nextion is not connected!
[15:49:06][C][api:095]: API Server:
[15:49:06][C][api:096]:   Address: thermostat_dashboard.local:6053
[15:49:06][W][nextion:072]: Nextion is not connected!
[15:49:06][W][nextion:072]: Nextion is not connected!
Сегодня в уроке начнем разбирать интересную тему, как подключить к Arduino сенсорный полноцветный экран и управлять периферийными устройствами с дисплея Nextion. Кроме этого, на дисплей выведем различную информацию. Для создания интерфейса будем использовать программу Nextion Editor. Всего будет 8 уроков по данной теме и то, что у нас получится можно посмотреть в этой статье: Подсветка на ws2812, Arduino, Nextion.
Сегодня в уроке мы рассмотрим:
- Где скачать Nextion Editor?
- Установка и настройка Nextion Editor.
- Какую версию Arduino IDE скачать?
- Установка и настройка Arduino IDE.
- Загрузка примера кода в Arduino NANO.
Где скачать Nextion Editor?
Скачать программу Nextion Editor можно с сайта разработчика. Для этого достаточно в поисковой системе, например Яндекс, произвести поиск по слову «Nextion».

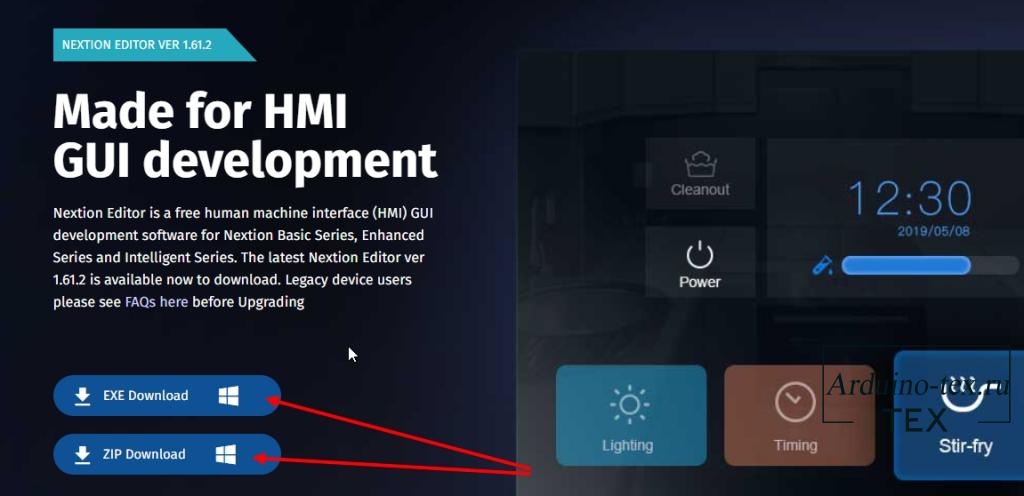
Первый сайт в поиске будет сайт разработчика «nextion.tech». На сайте переходим в раздел «DONLOAD -> Nextion Editor».
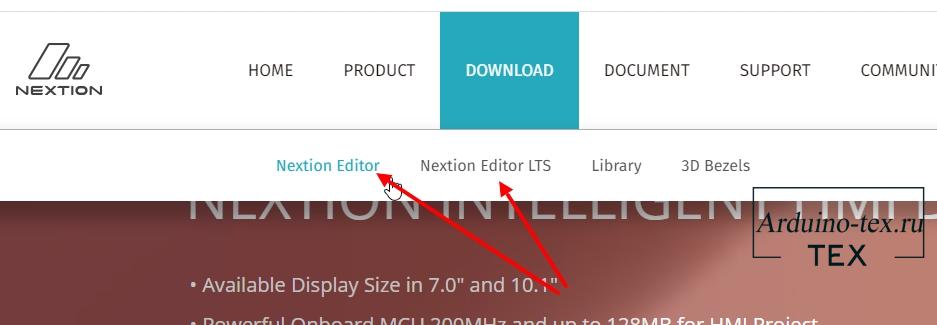
На открывшейся странице можно скачать последнюю версию программы. Доступны два варианта скачивания: установочный файл или архив с портабельной версией программы.
Если прокрутить страницу ниже, увидим дополнительные кнопки:

- NEXTION EDITOR LTS – Страница скачивания старой версии программы. Нужна если вы редактируете старый проект. Для создания новых проектов не рекомендую.
- LIBRARIES – библиотека для работы с дисплеем от разработчика. Но мы ее не будем использовать в наших уроках. Возможно, в следующем блоке уроков, если данные уроки будут востребованы.
Установка и настройка Nextion Editor.
После скачивания Nextion Editor устанавливаем ее как обычную программу.
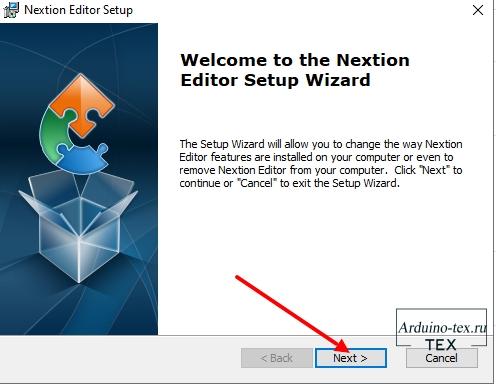
Давайте запустим Nextion Editor и создадим новый проект. Вернее, проведем все необходимые настройки, чтобы в следующем уроке можно было начать создавать дизайн нашего будущего интерфейса.
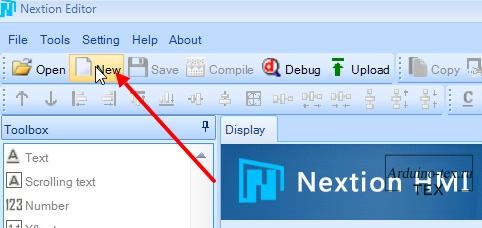
Для этого в программе нажмем на кнопку «New». Сохраним наш проект под именем «Урок1».

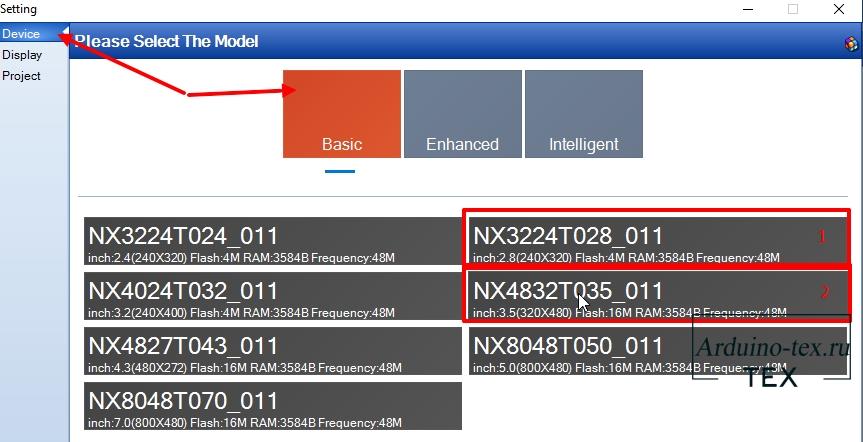
Затем нам будет предложен выбор дисплея. У меня базовая версия «Basic» с разными размерами дисплея 2,8 и 3,5 дюйма.

В уроке будем использовать дисплей 3,5 дюйма.
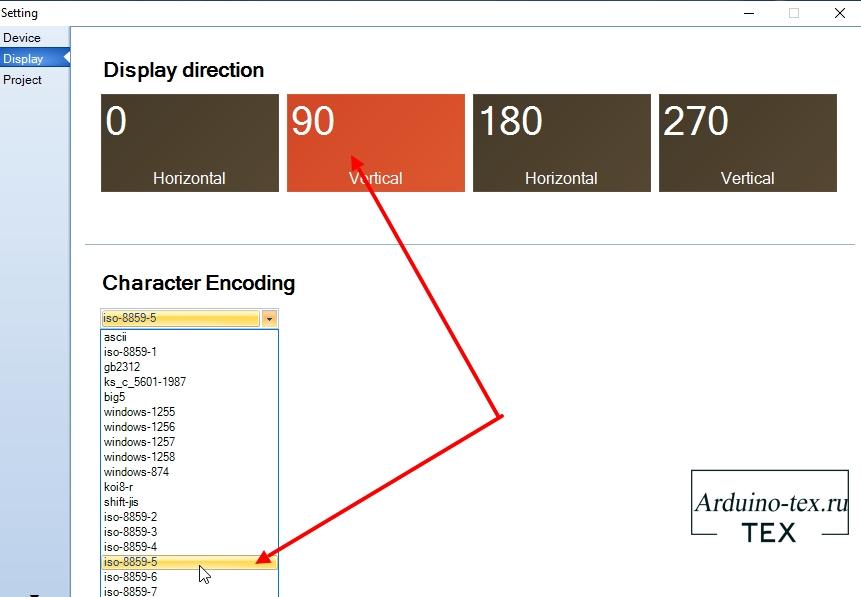
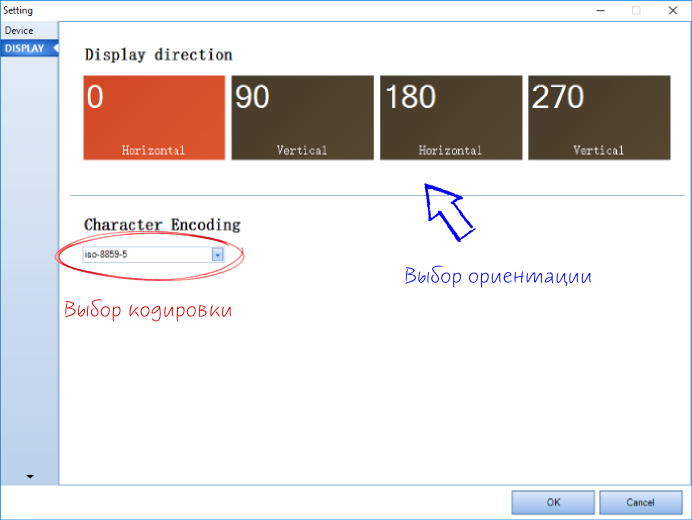
На вкладке «Display» выбираем ориентацию дисплея. В уроке будем использовать вертикальное расположение с углом поворота на 90 градусов. Кодировку выбираем iso-8859-5, для поддержки русского языка.
Во вкладке «project» можно установить пароль для доступа к проекту. Мы этого делать не будем.
После создания проекта откроется рабочее поле.
- Главное меню программы Nextion Editor.
- Меню управления выравниванием и порядком элементов.
- Библиотека элементов.
- Область отображения.
- Список страниц проекта.
- Библиотека изображений/Библиотека шрифтов.
- Окно вывода результатов компиляции.
- Окно для ввода кода, выполняемого при возникновении события.
- Зона редактирования атрибутов выбранного элемента.
Подробнее о работе с программой вы можете прочитать в моем предыдущем уроке: Nextion Editor урок. Скачиваем и первый пример hmi.
Какую версию Arduino IDE скачать?
Сейчас прейдем ко второй программе, которая нам необходима для урока — это Arduino IDE.
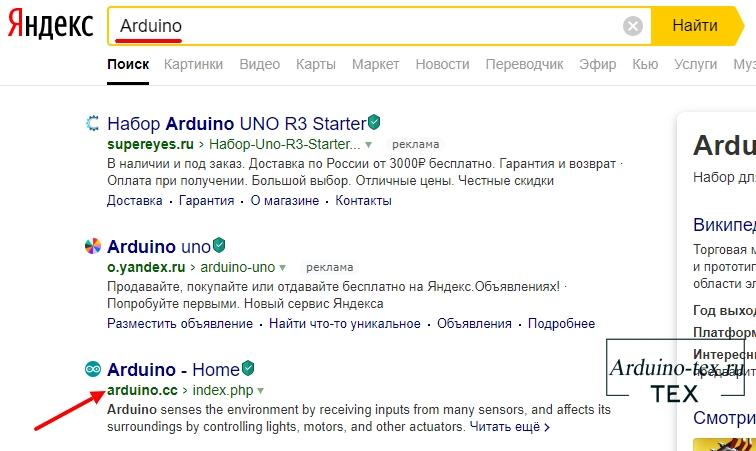
Скачать программу можно также с сайта разработчика совершенно бесплатно. Для этого по предыдущей схеме ищем в поисковике слово «Arduino». На третьей позиции идем на сайт разработчика «arduino.cc».
На сайте переходим на страницу «SOFTWARE -> DONLOAD».

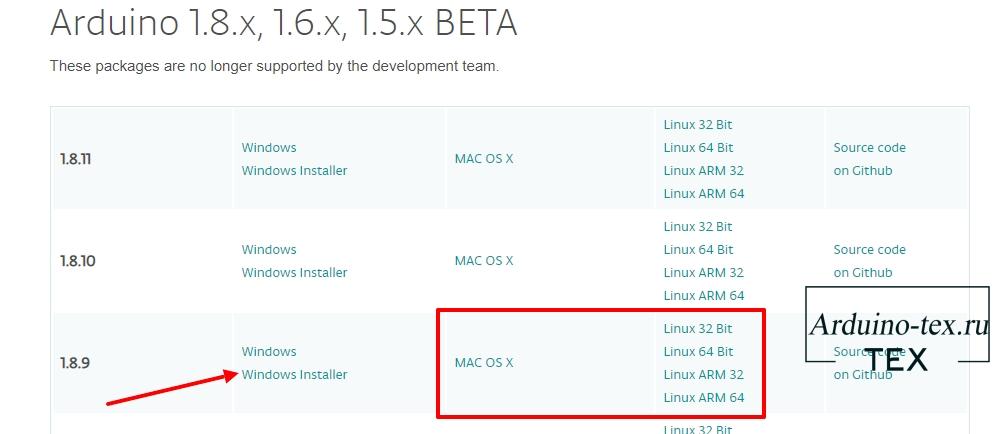
Тут вы можете скачать последнюю версию Arduino IDE для Windows, Mac OS или Linux. Но я не рекомендую использовать последнюю версию.

Так как с ней есть небольшие проблемы. Конечно, в рамках нашего проекта с данными проблемами скорее всего не столкнемся. Но все же, для того чтобы избежать ненужных проблем, рекомендую использовать версию 1.8.9. Для этого на данной странице нажмите на предыдущую версию. В момент написания урока это была версия 1.8.12.
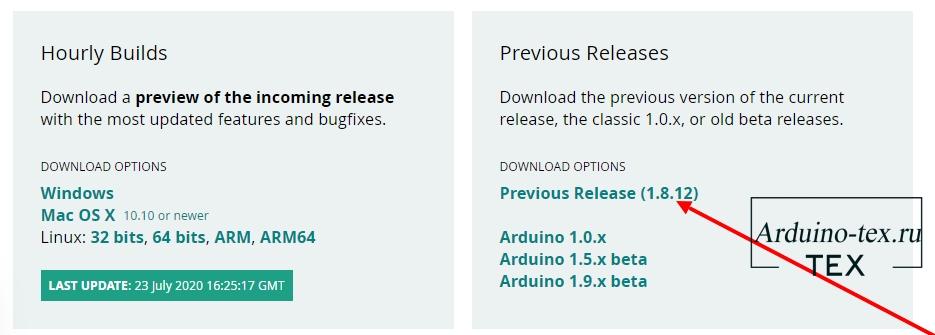
После чего вы попадете на страницу с различными версиями Arduino IDE. Скачиваем версию 1.8.9 для вашей операционной системы.
Установка и настройка Arduino IDE.
Устанавливаем программу Arduino IDE. Процесс установки простой и проблем возникнуть не должно.
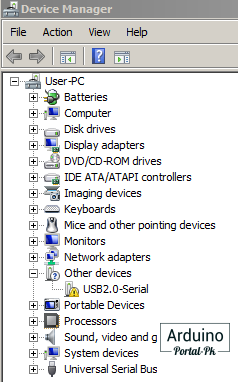 Так как большинство покупает комплектующие в Китае, нам также необходимо установить драйвер ch340 для того, чтобы компьютер распознал нашу плату.
Установка драйвера ch340 для Windows.
- Скачайте драйвер в разделе «файлы для скачивания».
- Распакуйте архив
- Запустите исполнительный файл CH341SER.EXE
- В открывшемся окне нажмите кнопку Install
- На этом установка завершена
В других операционных системах такой проблемы нет. Можно подключать и перепрошивать.
Загрузка примера кода в Arduino NANO
Для проверки того, что мы все сделали правильно и у нас все работает, загрузим самый распространенный код, позволяющий мигать встроенным светодиодом на плате. Светодиод подключен к 13 GPIO.
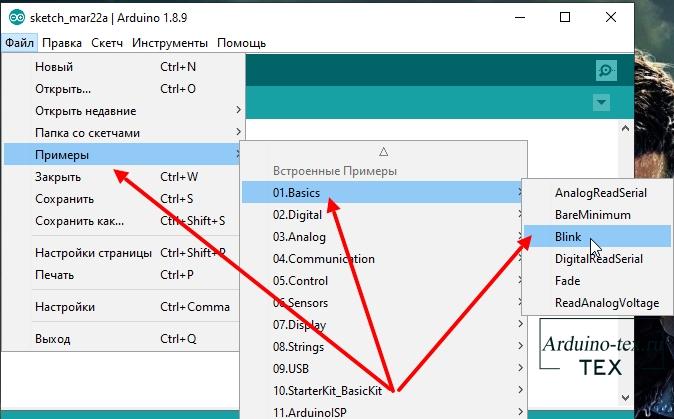
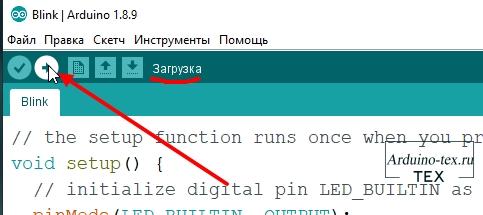
Arduino IDE устанавливается с небольшим набором примеров. В том числе есть пример, который нужен нам для урока. Для того чтобы загрузить пример, необходимо перейти в меню: «Файл -> Примеры -> 01.basics -> Blink». Откроется код примера.
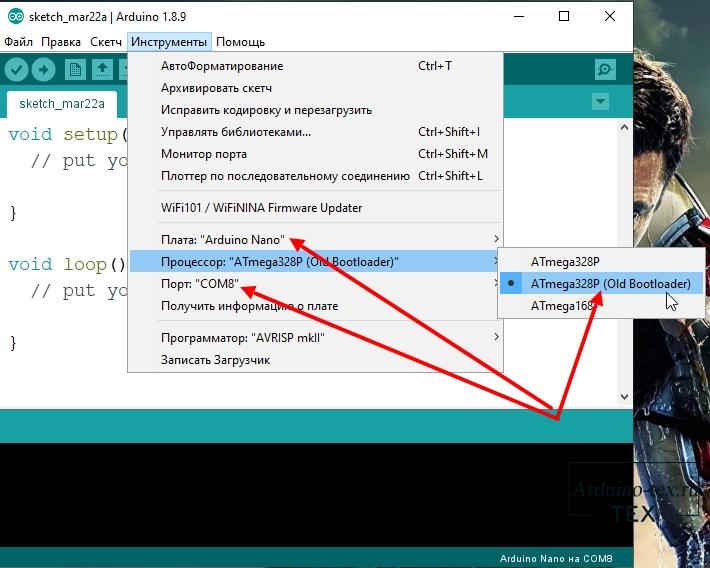
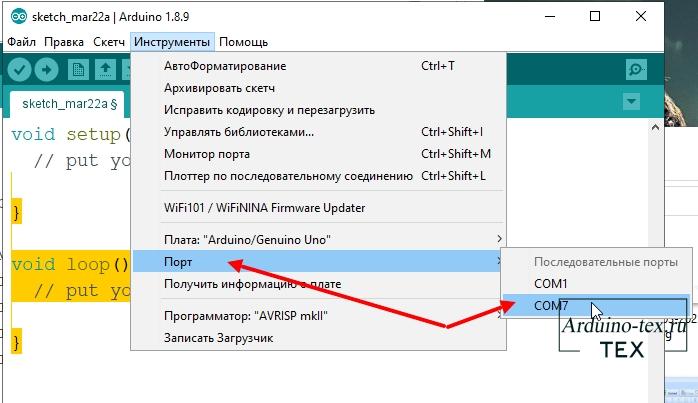
Выбираем нашу плату Arduino NANO, данная плата бывает с разными процессорами. Я использую Китайскую версию с процессором ATmega328p. Выбираю процессор «ATmega328p (Old bootloader)» также нужно выбрать порт, к которому подключена плата, у меня это «COM8»
Для Arduino UNO все еще проще. Выбираем плату и порт подключения.
После чего можно загрузить код в плату.

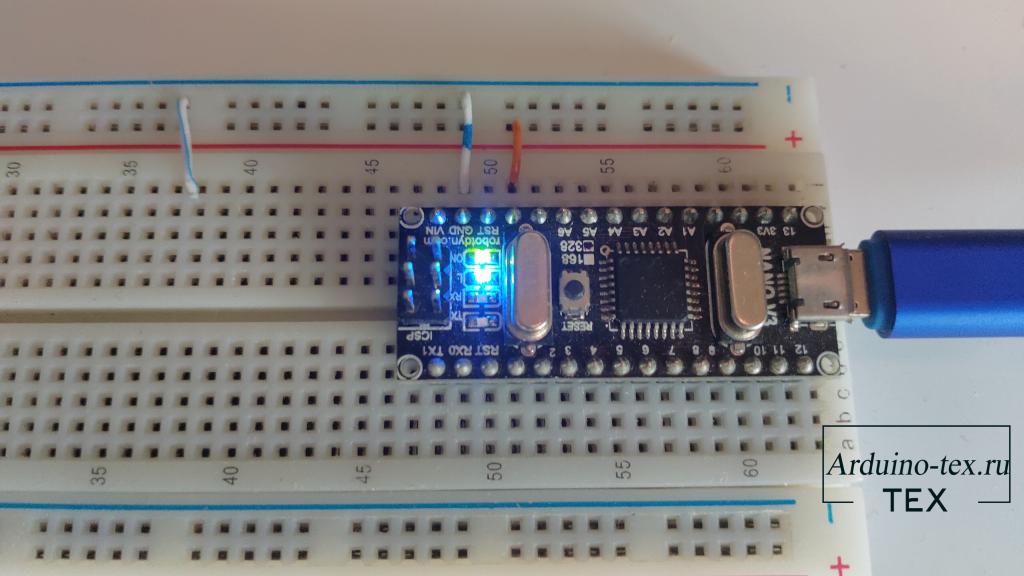
На плате увидим мигающий светодиод. У меня он синего цвета. Чаще всего он красного цвета. Но может быть и зеленого. Все зависит от производителя платы.
На этом урок заканчиваю. В следующем уроке поговорим о графике для дисплея и посмотрим подробнее как работать с программой Nextion Editor.
Понравился Урок Скачать и установить Arduino IDE, Nextion Editor? Не забудь поделиться с друзьями в соц. сетях.
А также подписаться на наш канал на YouTube, вступить в группу Вконтакте, в группу на Facebook.
Спасибо за внимание!
Технологии начинаются с простого!
Фотографии к статье
Файлы для скачивания
| CH341SER.zip | 186 Kb | 398 | Скачать | |
| Урок 1.HMI.zip | 2 Kb | 338 | Скачать |
Используйте дисплейные модули Nextion для отображения текста, изображений, анимаций, кнопок, переключателей, стрелочных индикаторов, прогресс баров и графиков. Дисплеи с лёгкостью позволяют организовывать меню с выпадающими списками и даже интерактивные игры!
Всё это становится возможным благодаря мощному 32-х разрядному процессору и визуальной среде разработки Nextion Editor. С внешним миром дисплей взаимодействует с помощью резистивного сенсора касаний с собственным контроллером и интерфейса UART. Панель подключается всего по четырём проводам (два из которых — питание). Для обновления прошивки дисплея, помимо UART, предусмотрен разъем для microSD карты.
В зависимости от версии дисплеи оснащаются большим объемом памяти, часами реального времени и даже собственными пинами GPIO, что позволяет использовать дисплей для непосредственного управления устройствами, используя реле и т.п. приборы.
Видеообзор
Комплектация
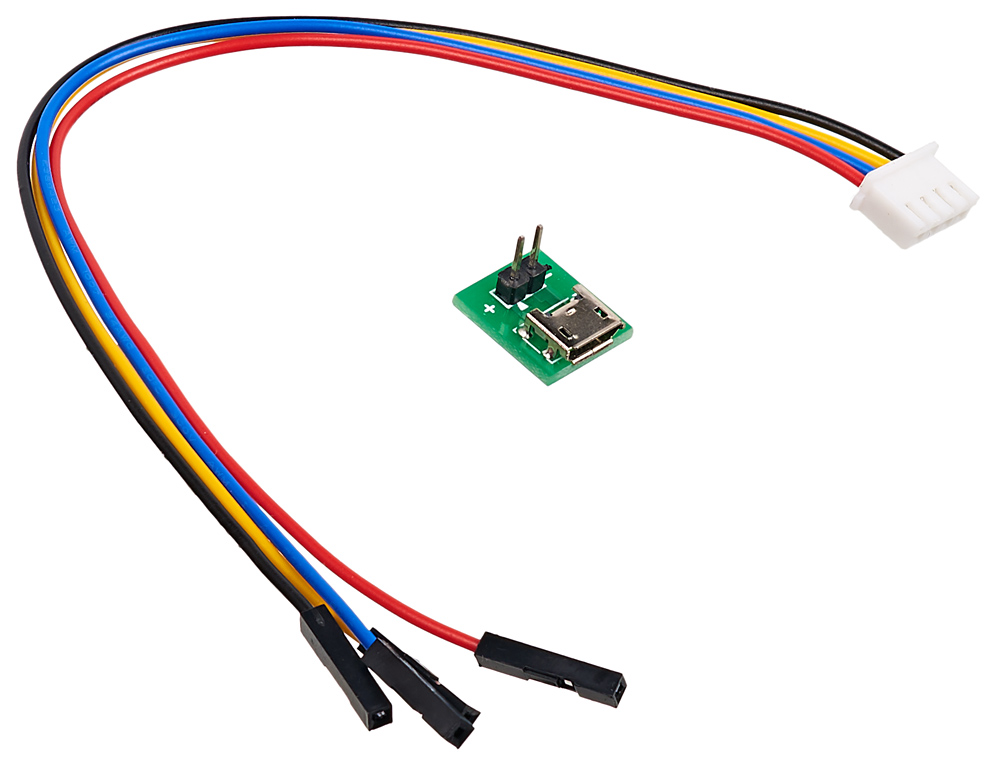
Каждый дисплей Nextion дополнен комплектующими, которые помогут соединиться с экраном:
-
Четырёхпроводной шлейф служит для подключения дисплея к питанию и управляющим пинам внешнего контроллера: например Arduino, Espruino или Raspberry Pi. С одной стороны шлейфа расположен разъём JST PH-4 (мама), а с другой — четыре свободных провода с коннекторами «мама» на концах:
-
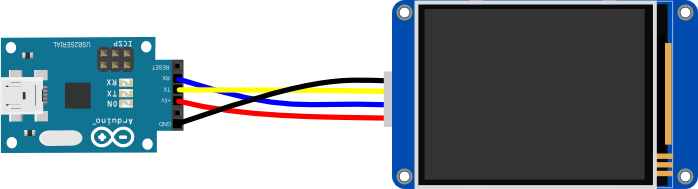
Земля (G) — чёрный провод. Соедините с землёй внешнего микроконтроллера.
-
Сигнальный (RX) — жёлтый провод, цифровой вход дисплейного модуля. Используется для приёма данных из внешнего контроллера. Подключите к пину TX внешнего микроконтроллера.
-
Сигнальный (TX) — синий провод, цифровой выход дисплейного модуля. Используется для передачи данных во внешний контроллер. Подключите к пину RX внешнего микроконтроллера.
-
Питание (V) — красный провод. Соедините с питанием внешнего микроконтроллера.
-
-
Адаптер питания «USB to 2 Pin» — используется для подключения напряжения к дисплею, другими словами включает экран.
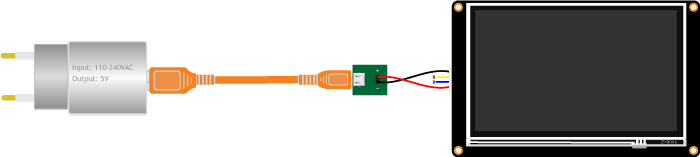
Демонстрационный режим
Дисплейные модули работают прямо из коробки с демонстрационной прошивкой. Для её старта достаточно подать питание на дисплей:
-
Соедините дисплей с переходной платой «USB to 2 pin» c помощью четырёхпроводного щлейфа.
-
Разъём JST PH-4 подключите к дисплею.
-
Питание (+5V) — красный провод, подключите к контакту платы «USB to 2 pin» с пометкой «+».
-
Земля (GND) — чёрный провод, подключите к контакту платы «USB to 2 pin» с пометкой «−».
-
Сигнальные пины (TX) и (RX) используется для обмена данных с микроконтроллером. В демонстациооном режиме не нужны, т.е. оставьте свободными.
-
-
Подключите к полученной конструкции питание через порт micro-USB. Для этого отлично подойдёт зарядник на 5В с кабелем micro USB.

-
В итоге, включится дисплей с тестовой прошивкой, которая покажет базовые возможности экрана.
Штатный режим
Состоит из этапов:
— установка среды Nextion Editor (однократно);
— создание проекта для дисплейного модуля;
— прошивка дисплейного модуля.
Установка среды Nextion Editor
Для работы с дисплеем необходимо установить и настроить среду разработки «Nextion Editor»
Для этого перейдите на официальный сайт дисплейных модулей «Nextion». Скачайте и установите последнюю версию среды.
Создание нового проекта в Nextion Editor
-
Запустите среду «Nextion Editor»
-
Создайте новый проект:, напишите название будущего проекта и нажмите кнопку
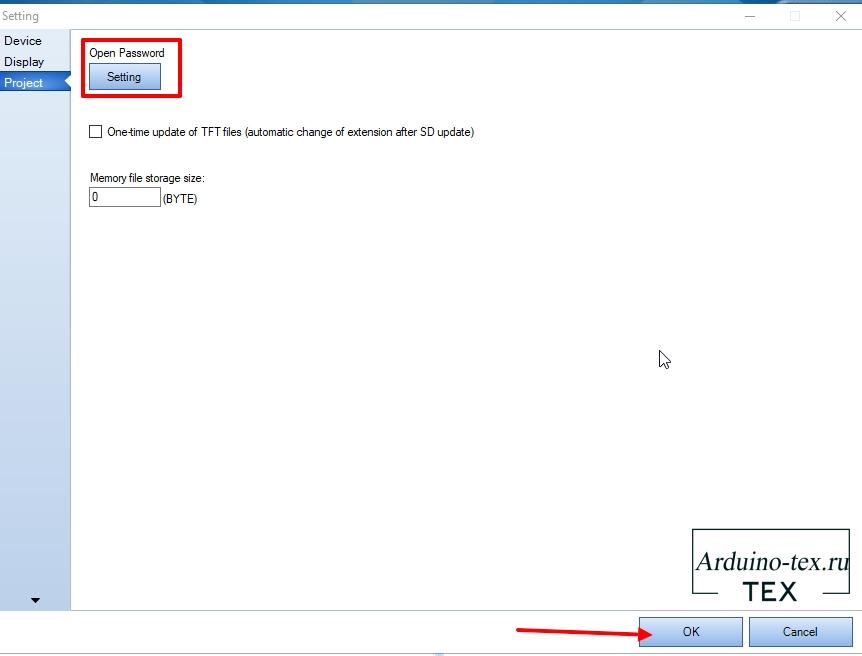
Сохранить.Откроется окно Setting, с двумя вкладками:DeviceиDisplay. -
Во вкладке
Displayвыберите ориентацию дисплея и кодировку.Для поддержки кириллицы выбирайте кодировку
iso-8859-5
-
После всех манипуляций нажимайте кнопку
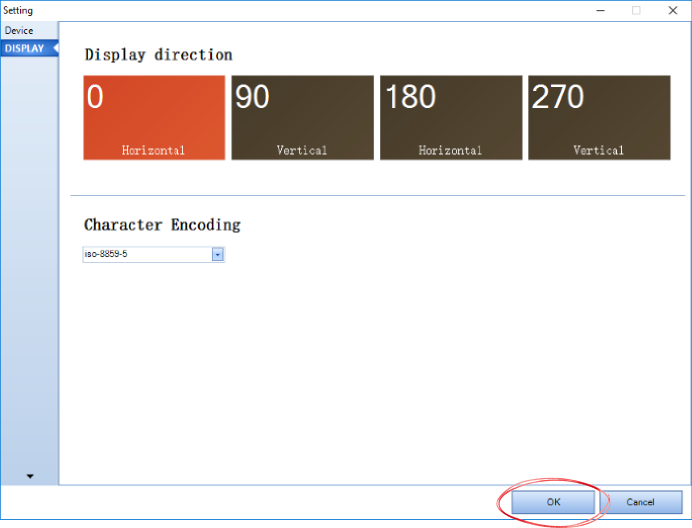
OK. Перед вами откроется графическое окно разработки. Рассмотрим его элементы.
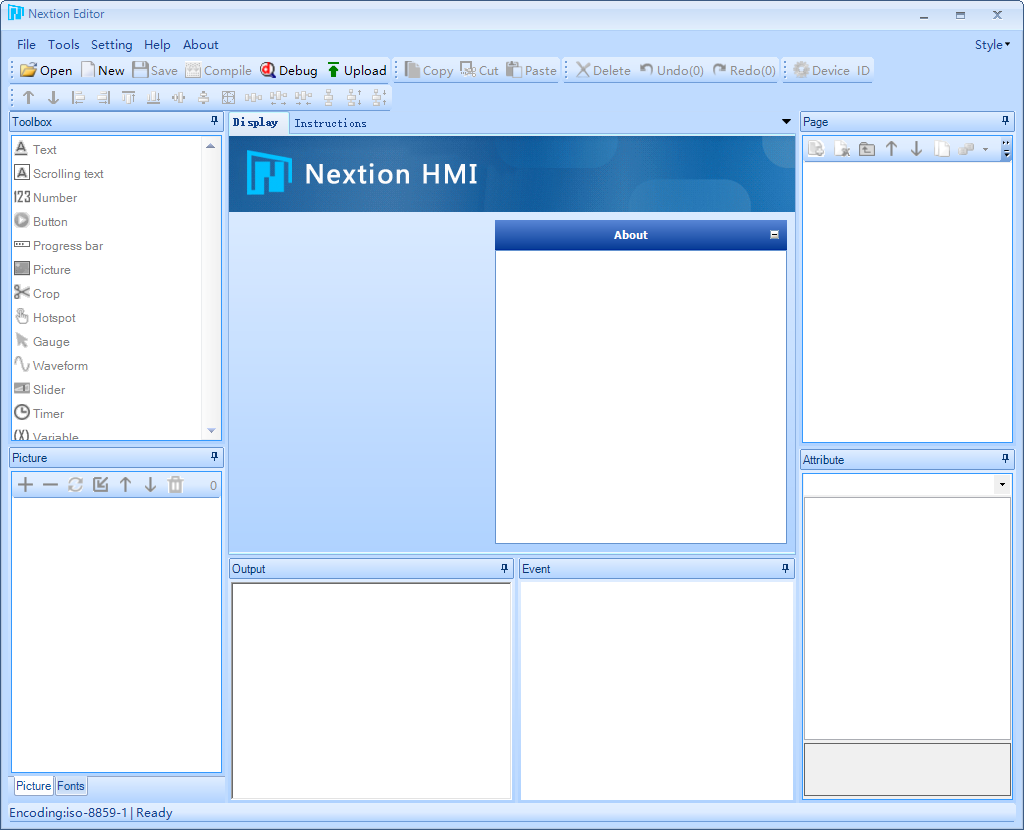
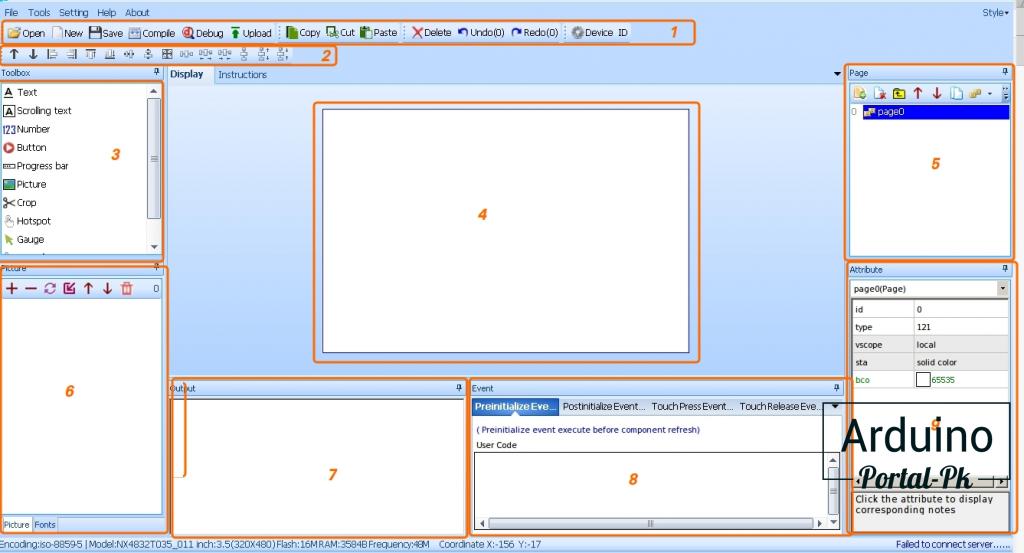
 Откроется окно
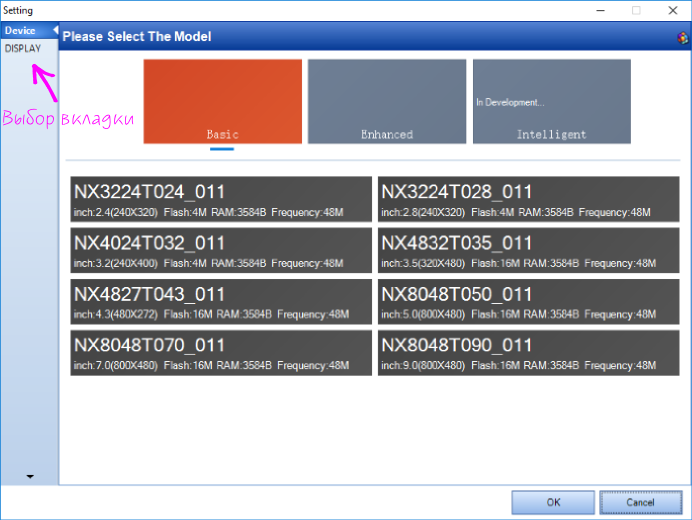
 Перед вами откроется графическое окно разработки. Рассмотрим его элементы.
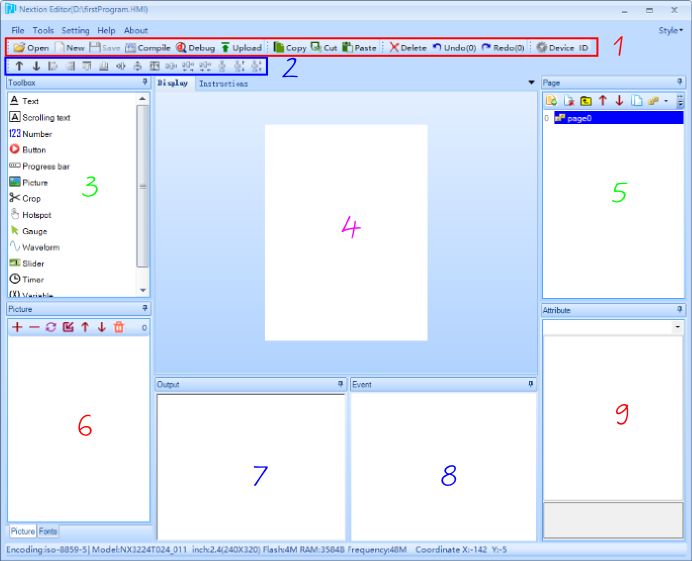
-
1 — Главное меню.
-
2 — Меню управления выравниванием и порядком элементов.
-
3 — Библиотека элементов.
-
4 — Область отображения.
-
5 — Список страниц проекта
-
6 — Библиотека изображений /Библиотека шрифтов.
-
7 — Окно вывода результатов компиляции.
-
8 — Окно для ввода кода, выполняемого при возникновении события.
-
9 — Зона редактирования атрибутов выбранного элемента.
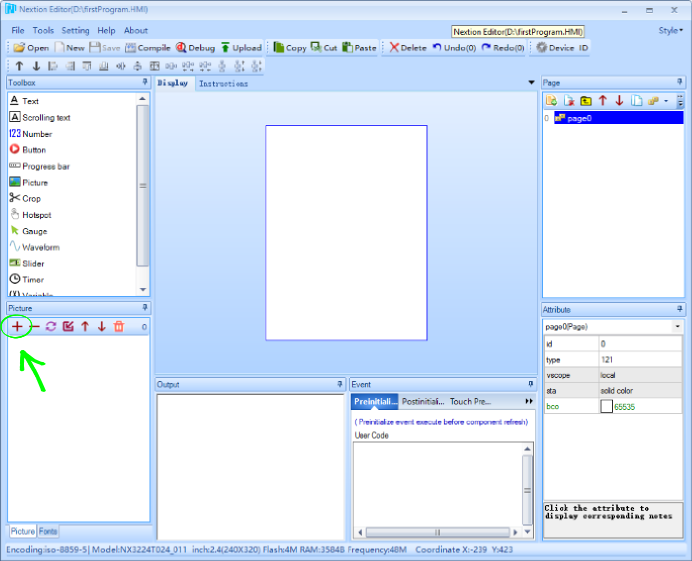
Добавление изображений
-
Нажмите в окне «библиотека изображений» на иконку

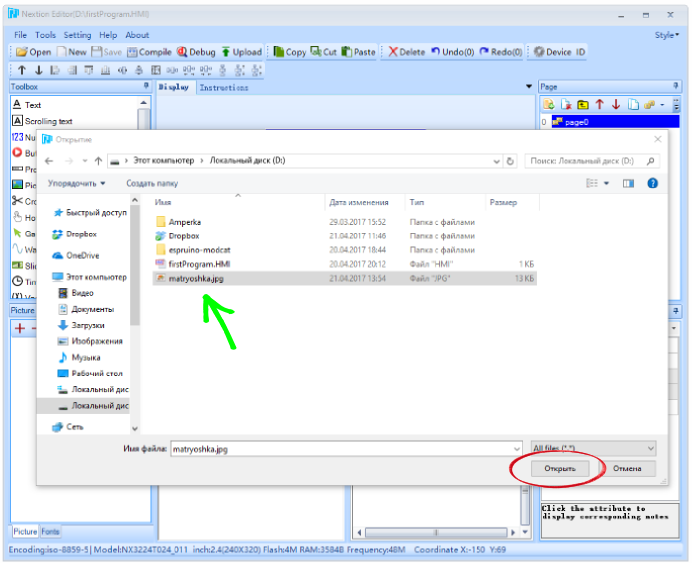
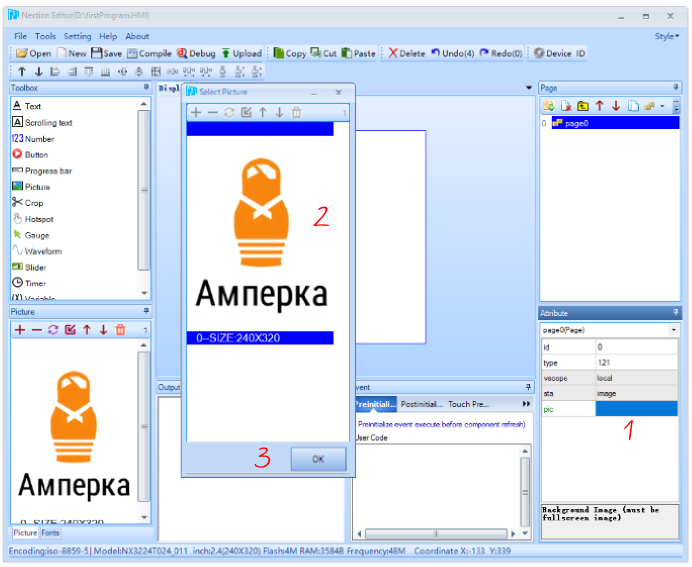
-
Выберите интересующее вас изображение на ПК и нажмите кнопку
Открыть.В окне «библиотека изображений» появиться загруженное изображение. -
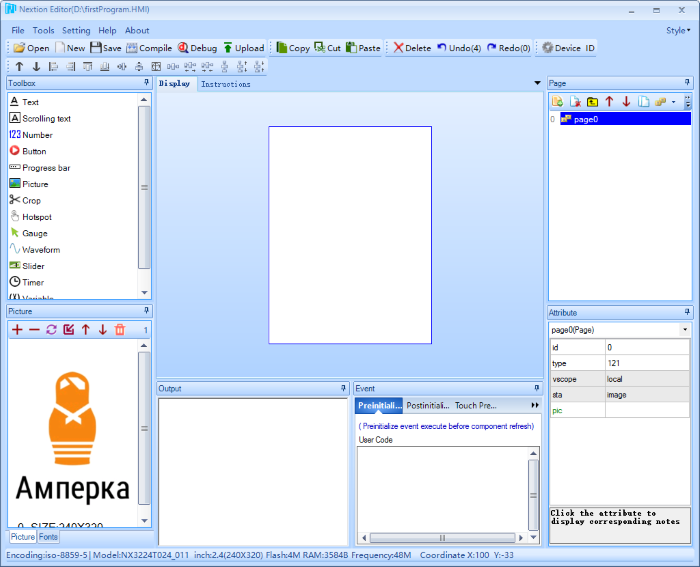
Выделите область отображение дисплея.
-
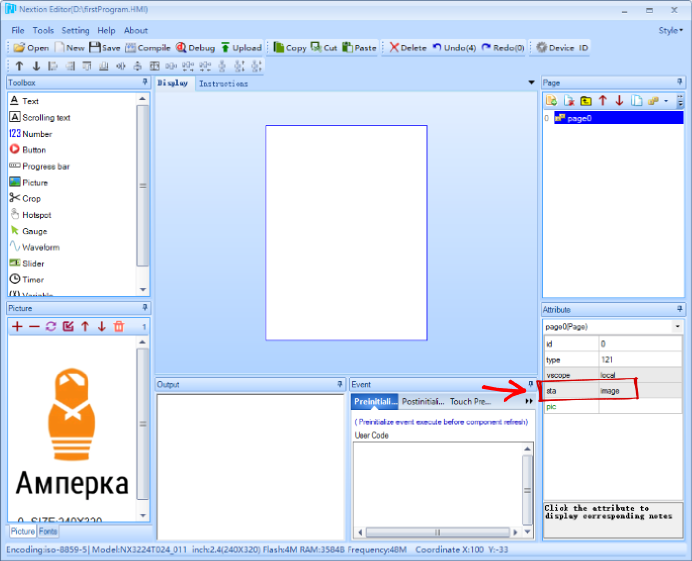
В окне «зона редактирование атрибутов» в пункте
staизмените полеsolid colorнаimage. -
В поле
picвыберите интересующую вас картинку из «библиотеки изображений» и нажмите кнопкуOK Если вы всё сделали правильно, в окне «область отображение дисплея» вы увидите вашу картинку.
 В окне «библиотека изображений» появиться загруженное изображение.
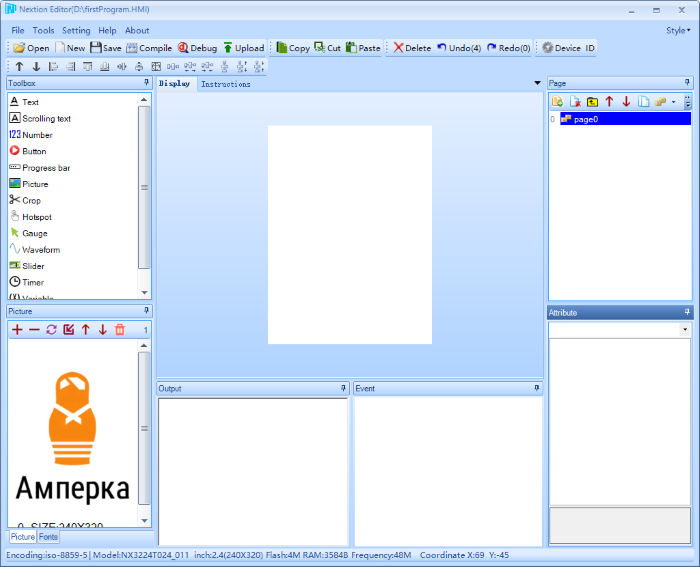
 Если вы всё сделали правильно, в окне «область отображение дисплея» вы увидите вашу картинку.
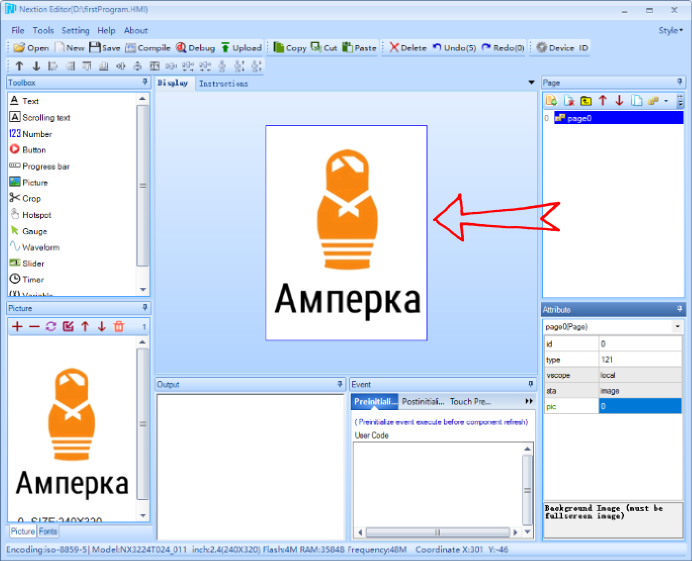
Это значит всё получилось и можно смело переходить к прошивки дисплея.
Прошивка дисплейных модулей
Компиляция проекта
Перед прошивкой проект необходимо проверить не наличие ошибок — скомпилировать. Для этого нажмите кнопку Compile. В окне «вывода результатов компиляции» вы должны увидеть сообщение об успешной компиляции.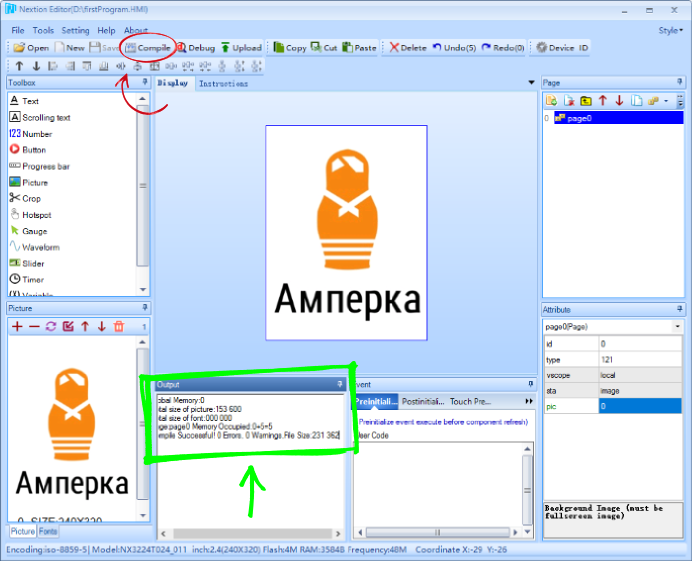
Дисплейные модули Nextion поддерживают два вида прошивки:
-
Через последовательный порт UART
-
С помощью карты microSD.
Рассмотрим их подробнее.
Прошивка через UART
Для прошивки дисплея через UART понадобится USB-Serial адаптер.
-
Подключите дисплей к адаптеру USB-Serial следующим образом:
-
Питание дисплея
+5V— к питанию USB-Serial-адаптера. -
Земля дисплея
GND— к питанию USB-Serial-адаптера. -
TXдисплея — вRXUSB-Serial-адаптера. -
RXдисплея — вTXUSB-Serial-адаптера.
-
-
Прошейте ваш дисплей, нажав на кнопку
 . Процесс прошивки будет отображаться в окошке в программы и на дисплейном модуле. После этого загруженный проект будет выполняться и отображаться на дисплейном модуле.
 . Процесс прошивки будет отображаться в окошке в программы и на дисплейном модуле.
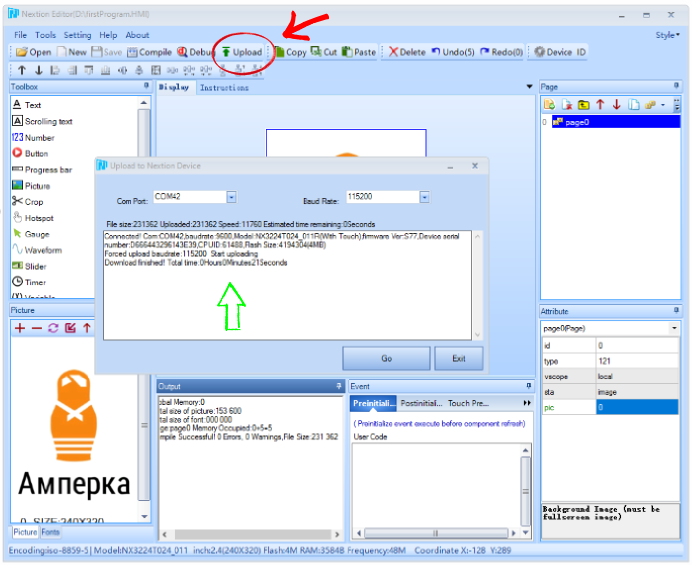 После этого загруженный проект будет выполняться и отображаться на дисплейном модуле.
Прошивка через microSD
Прошивка через UART занимает достаточно долгое время и требует дополнительного UART-преобразователя. В связи с этим существует альтернативный способ прошивки дисплеев Nextion с помощью microSD-карты.
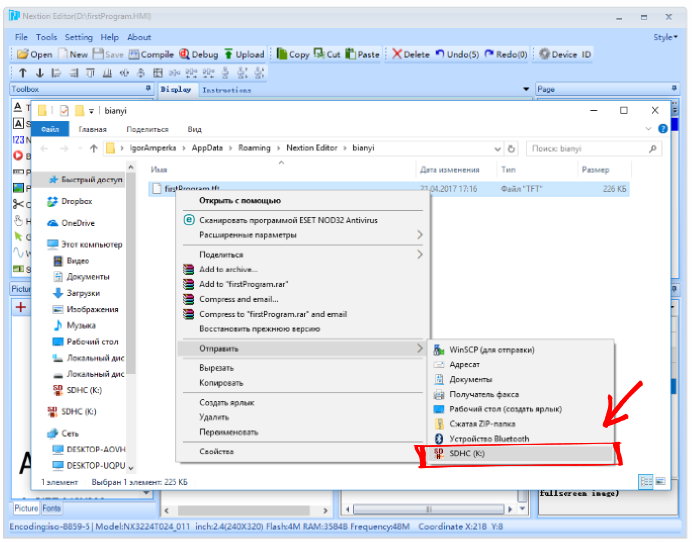
-
Откройте папку с компилированными проектами:
-
Скопируйте файл с именем вашего проекта на microSD-карту.
-
Извлеките microSD-карту из вашего ПК и вставьте её в дисплей.
-
Подключите питание на дисплей.
-
Дождитесь окончания прошивки.
-
Извлеките microSD-карту.
После всех действий загруженный проект будет выполняться и отображаться на дисплейном модуле.
Примеры работы
Линейка Nextion Enhanced
Линейка Nextion Intelligent
Ресурсы
Здравствуйте, Друзья!
Сам я далек от профессионального программирования.
С помощью FLProg получил вторую жизнь в своей радио-любительской деятельности, благодаря Автору программы FLProg, Сергею.
Уже больше трех месяцев разбираюсь с панелью NEXTION.
Буду описывать не всё по порядку, а те моменты и проблемы, с которыми я сталкиваюсь.
Общий обзор функционала панели описал Сергей здесь: https://geektimes.ru/company/flprog/blog/273868/
=================================================================================================================================
В первой рекомендации опишу, то, что не нужно делать.
На сегодняшний день (23.11.2017) существует редактор для панели Nextion Editor v0.52 https://nextion.itead.cc/resources/download/nextion-editor/
Пока еще этот редактор (на сегодняшний день) достаточно «сырой».
1. Если Вы создаете свой проект для панели в одной версии Nextion Editorr, а потом дорабатываете в другой версии, то проблем не избежать.
2. Предыдущих версий Nextion Editor на сайте пока нет, поэтому, зайдите на сайт и сохраните версию Nextion Editor на своем компьютере.
3. В дальнейшем производите все изменения именно в данной версии Nextion Editor. (Напоминаю, что это пока на сегодняшний день, (23.11.2017)., может потом исправят.
4. При редактировании проекта не изменяйте размер диагонали, и не изменяйте угол поворота по вертикали, или горизонтали, это приведет к не работоспособности Вашего проекта.
В этих статьях я буду подробно выкладывать функции и условия в панели Nextion, те, которыми пользуюсь.
У меня панель NEXTION enhanced, но разницы особой нет, в enhanced есть дополнительно RTC (часы реального времени) и GPIO.
Это не имеет особого значения, основной функционал стандартный.
Панель NEXTION Для новичков. Конвертация числа в текст.
Добавил: Siberian
Автор публикации

74
Комментарии: 26Публикации: 77Регистрация: 21-12-2017
Как уже известно из предыдущих уроков, к Ардуино можно подключить множество разных дисплеев. Для самых простых проектов пригодится символьный ЖК дисплей 1602, который мы уже изучили на одном из уроков. Для вывода простейшей монохромной графики можно использовать дисплей от телефона Nokia 5110, либо более современный OLED дисплей. Ресурсов Ардуино хватает даже на цветные дисплеи с TFT матрицей.
Однако, чем сложнее дисплей, тем тяжелее приходится нашей Ардуино. Несмотря на самые изощренные и быстрые библиотеки, ресурсов микроконтроллера Atmega328 едва хватает для работы с цветной TFT матрицей. Для полезного кода остается менее половины флеш-памяти контроллера. Что делать в такой ситуации?
Выход есть. Собственно, первое что приходит на ум — это наделить графический дисплей собственным микроконтроллером, который бы выделил весь свой вычислительный ресурс на обработку графики. Такой готовый модуль можно бы было подключать к Ардуино по одному из стандартных интерфейсов, и обмениваться с ним унифицированным командами.
Именно такой модуль мы и разберем на этом уроке. Называется этот графический модуль — Nextion HMI. Сокращение HMI означает Человеко-Машинный Интерфейс. Разработчики этого модуля предполагают, что именно такие устройства будут использоваться в элементах «умного дома», и разного рода гаджетах.
Существуют версии Nextion с различной диагональю, а также с версии с тачскрином. В нашем уроке мы используем самый простой дисплей с диагональю 2.2 дюйма и разрешением 320×240, без тачскрина.
Создание интерфейса
Как уже было сказано, дисплей Nextion имеет свой собственный контроллер, который отвечает за отрисовку графики. Чтобы этому контроллеру было что рисовать, мы должны заранее создать графические образы, связать их с командами, и загрузить всё это в память дисплея. Для этих целей мы воспользуемся специальным редактором интерфейсов, который был разработан командой Nextion. Скачать редактор можно на официальном сайте.
Для русификации редактора следует заменить файл cs.lang в папке с редактором. Переведенный файл можно взять тут:
http://git.robotclass.ru/download/NextionEditor
Наша задача будет состоять в том, чтобы сделать графический интерфейс для отображения показаний акселерометра. Соответственно, нам понадобится создать какой-то красивый фон, разместить на нем поля для вывода чисел. Также хотелось бы добавить и какие-нибудь компоненты для визуализации показаний, например шкальные индикаторы.
Итак, запускаем редактор. Перед нами появляется главная форма.

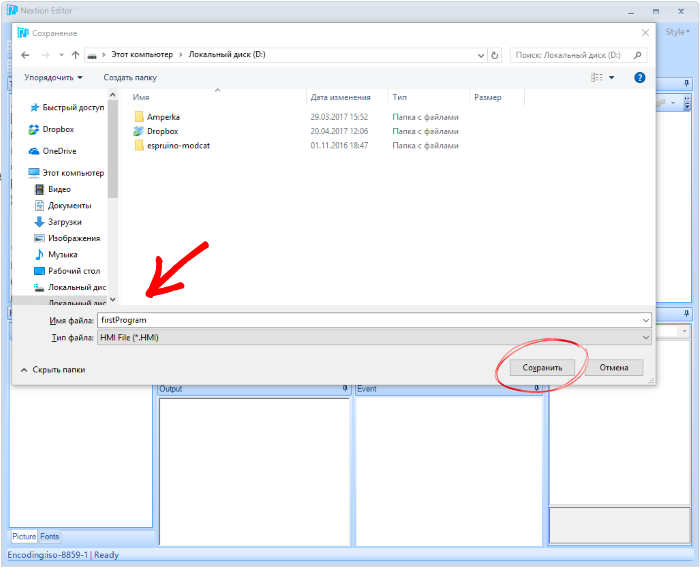
1) Первое что мы сделаем — создадим новый проект. Жмем меню «Файл/Новый», выбираем папку где будет храниться файл проекта и его имя, например, test.hmi. Затем выбираем в появившемся окне подходящий формат и ориентацию дисплея.

2) Теперь добавим фон нашего интерфейса. Жмем кнопку «Добав.» (Add) в разделе Изображения.

В появившемся окне выбираем файл картинки с разрешением 320×240. Для урока мы нарисовали свой фон, в виде трех оранжевых прямоугольных областей.
3) Добавляем в интерфейс компонент «Изображение».

По-умолчанию, компонент размещается в левом верхнем углу. Не будем его никуда двигать, и перейдем к настройкам компонента.
4) Ассоциируем компонент и ранее добавленную картинку. Для этого, в разделе настроек компонента жмем на параметр pic, и выбираем единственную в списке картинку.

5) Аналогичным образом, добавляем компонент «Индикатор выполнения». Обычно этот блок служит для отображения статуса загрузки данных, но мы используем его для визуализации показаний с нашего датчика.

Параметры bco и pco задают цвет фона элемента и цвет, которым заполняется индикатор. В нашем случае фон белый, и сам индикатор синий. Параметр val определяет степень наполнения индикатора, и варьируется от 0 до 100. Именно этот параметр мы и будем менять с помощью Arduino. Кстати, можно менять любой параметр, отмеченный зеленым цветом.
Остальные параметры отвечают за положение элемента на дисплее: x и y, а также за его размеры: w и h.
6) Добавляем на дисплей еще два таких же индикатора и настраиваем их. Затем добавляем компонент «стрелка» (gauge).

Стрелка — это что-то вроде стрелки на спидометре автомобиля. Имеет диапазон значений от 0 до 360. Размещаем её в верхней правой части дисплея. Чтобы у стрелки был красивый круглый фон (можно и циферблат нарисовать), мы переключим параметр sta в режим crop image. Потребуется заполнить параметр picc; укажем там ту же картинку, что и для фона. Crop image означает, что фон компонента станет прозрачным, и через него будет просвечивать указанная в параметре picc картинка.
7) Перед тем, как добавить числовые поля, создадим шрифт. У дисплея нет такого же хранилища шрифтов, как в MS Windows, и он не умеет пользоваться стандартными файлами ttf. Чтобы добавить шрифт, нажмем кнопку «Добав.» (Add) в блоке «Шрифты», который находится в левой части редактора.

Задаем высоту шрифта, жирность. Указываем имя шрифта. При изменении каждого параметра, в маленьком черном квадратике будет меняться написание буквы X. Не очень удобная настройка, но что поделать. Наконец, в поле «Имя шрифта» записываем подходящее название латинскими буквами и жмем «Создать шрифт». Генератор пробежится по всем буквам векторного шрифта, и создаст их растровые изображения, который мы потом загрузим в память дисплея вместе с графикой.

 Добавляем на форму три компонента «Число».

В настройках компонента указываем номер шрифта font. У нас создан пока только один шрифт, так что его номер будет — 0. Параметр val отвечает за содержимое поля, его мы будем задавать через Arduino. В примере мы так же поменяли цвет и фон компонента.
9) Последний компонент, который мы разместим на нашем дисплее — «Текст». Мы не будем менять его содержимое, просто что-нибудь напишем в параметре text.
10) Наконец, скомпилируем все что мы сделали в файл, который затем отправится в память дисплея. Жмем кнопку «Компилировать» (Compile).

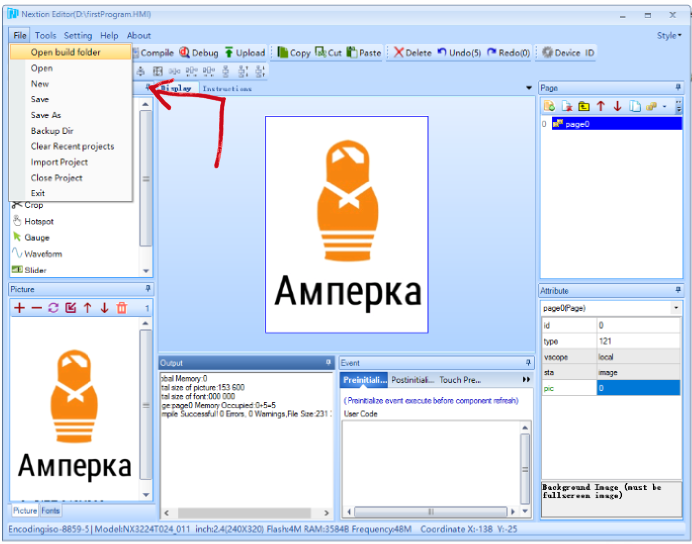
Файл имеет расширение tft и хранится в папке, которую можно открыть через меню «Файл/Открыть папку с tft файлами».
С интерфейсом всё, переходим к самой ответственной части.
Nextion и TJC
Nextion HMI — марка дисплея для европейского рынка. В Китае существует версия для внутреннего рынка, которая носит название TJC (по названию чипа). С точки зрения электроники, они полностью идентичны. Как это обычно бывает, версия для Европы стоит значительно дороже. Подвох тут в том, что европейский редактор не позволяет загружать прошивку в китайский дисплей. Делать же интерфейс в китайском редакторе, немного неудобно.
Чтобы решить эту проблему, энтузиасты разработали различные варианты программ, которые позволяют загружать любую прошивку в любой дисплей, будь то Nextion или TJC. Одной такой программой, которую мы немного модернизировали, мы и воспользуемся.
Загрузка файла интерфейса
1) Скачиваем python-скрипт из репозитория на github: https://github.com/makeitlab/software_tools/tree/master/TJCUpload
2) Чтобы его запустить, потребуется установить интерпретатор Python 2.7.
3) После установки python, установим библиотеку для работы с последовательным портом — pyserial.
4) Скрипт имеет несколько важных параметров, которые хранятся в отдельном файле config.py:
Последовательный порт, через который будет происходить загрузка. Меняем на актуальный:
PORT = ‘COM6’
Загрузка прошивки идет в два этапа, с разной скоростью. Обычно эти параметры менять не следует.
BAUDCOMM = 9600
BAUDUPLOAD = 115200
Идентификатор дисплея, который указан либо на самом дисплее, либо на коробке. В уроке мы использовали TJC3224T022.
CHECK_MODEL = ‘TJC3224T022’
Наконец, параметр определяющий временную задержку в протоколе обмена. Этот параметр нужно будет изменить только если процедура загрузки не удастся.
BAUDRATE_SWITCH_TIMEOUT = 0.5
5) Загружать прошивку будем через USB-UART мост, например такой:

Схема соединения моста и дисплея:
| Nextion/TJC | GND | VCC | RX | TX |
| USB-UART | GND | +5V | TX0 | RX1 |
6) Скопируем скомпилированный файл интерфейса tft в папку со скриптом, и запустим скрипт через командную строку:
c:путь_к_pythonpython.exe upload.py test.tft
7) После запуска скрипта на дисплее запустится процедура загрузки с индикатором хода выполнения. Если всё пошло как надо, то дисплей напишет об успешном выполнении процедуры и перезагрузится. Python-скрипт тоже отчитается о проделанной работе:

Если загрузка остановилась на 0%
Если загрузка зависла на 0%, значит следует изменить тот самый временной параметр в настройках. Рекомендую присвоить ему значение 0.05.
Также предстоит починить прошивку дисплея, иначе он не даст повторить процедуру. Для этого понадобится microSD карта. Загружаем на карту подходящую прошивку из папки со скриптом «TJCUpload/Basic Recovery». Эта прошивка минимальная, и служит лишь для ремонта. Вставляем флешку в дисплей, подаем питание. Ждем несколько секунд, пока прошивка не загрузится автоматически.
После этой процедуры можно повторить загрузку подготовленной ранее прошивки, не забыв изменить указанный параметр в файле настроек скрипта.
Программа
Приступим к написанию программы для управления HMI дисплеем. Каждый компонент имеет свой идентификатор. Индикаторы выполнения, размещенные на форме: j0, j1 и j2. Числовые поля: n0, n1 и n2. Компонент «стрелка» получил идентификатор z0.
Чтобы изменить параметр val у компонента, нам нужно передать в последовательный порт команду вида:
j0.val=44
Каждая команда должна завершаться тремя байтами 0xFF. Тестовая программа будет менять значение индикатора j0 в цикле.
void setValueJ(uint32_t number){
  char buf[10] = {0};
  String cmd;

  utoa(number, buf, 10);
  cmd += "j0.val=";
  cmd += buf;

  sendCommand(cmd.c_str());
}

void sendCommand( const char* cmd ){
  Serial.print(cmd);
  Serial.write(0xff);
  Serial.write(0xff);
  Serial.write(0xff);
}

void setup() {
  Serial.begin(9600);
  delay(2000);
  sendCommand( "" );
  sendCommand( "page 0" );
}

void loop() {
  for(int i=0; i<100; i++){
    setValueJ(i);
    delay(10);
  }
}
Загружаем программу на Ардуино, и подключаем дисплей по схеме:
| Nextion/TJC | GND | VCC | RX | TX |
| Ардуино Уно | GND | +5V | 1 | 0 |
Подаем питание на Ардуино и наблюдаем движение самого верхнего индикатора.
Визуализация показаний акселерометра
Теперь добавим в скетч управление всеми остальными компонентами.
#include <Wire.h>
#include <Adafruit_Sensor.h>
#include <Adafruit_ADXL345_U.h>

Adafruit_ADXL345_Unified accel = Adafruit_ADXL345_Unified(12345);
float acc_lpf[3] = {0,0,0};

void setValueJ(uint8_t jn, uint32_t number){
  char buf1[3] = {0};
  char buf2[10] = {0};
  String cmd;

  utoa(jn, buf1, 3);
  utoa(number, buf2, 10);
  cmd += "j"; cmd += buf1; cmd += ".val="; cmd += buf2;
  sendCommand(cmd.c_str());
}

void setValueN(uint8_t nn, uint32_t number){
  char buf1[3] = {0};
  char buf2[10] = {0};
  String cmd;
  utoa(nn, buf1, 3);
  utoa(number, buf2, 10);
  cmd += "n"; cmd += buf1; cmd += ".val="; cmd += buf2;
  sendCommand(cmd.c_str());
}

void setValueZ(uint8_t zn, uint32_t number){
  char buf1[3] = {0};
  char buf2[10] = {0};
  String cmd;
  utoa(zn, buf1, 3);
  utoa(number, buf2, 10);
  cmd += "z"; cmd += buf1; cmd += ".val="; cmd += buf2;
  sendCommand(cmd.c_str());
}

void sendCommand( const char* cmd ){
  Serial.print(cmd);
  Serial.write(0xff);
  Serial.write(0xff);
  Serial.write(0xff);
}

void setup() {
  Serial.begin(9600);
  accel.begin();
  accel.setRange(ADXL345_RANGE_8_G);
  delay(2000);
  sendCommand( "" );
  sendCommand( "page 0" );
}

void loop() {
  int r[3];
  acc_lpf[0] = acc_lpf[0]*0.7 + accel.getX()*0.3;
  acc_lpf[1] = acc_lpf[1]*0.7 + accel.getY()*0.3;
  acc_lpf[2] = acc_lpf[2]*0.7 + accel.getZ()*0.3;

  r[0] = int((acc_lpf[0]+500+61)/10);
  r[1] = int((acc_lpf[1]+500+26)/10);
  r[2] = int(((acc_lpf[2]-1500)+73+500)/10);

  setValueZ(0, r[0]*3);
  setValueJ(0, r[0]); setValueN(0, r[0]);
  setValueJ(1, r[1]); setValueN(1, r[1]);
  setValueJ(2, r[2]); setValueN(2, r[2]);
  delay(1);
}
Библиотеки для работы с акселерометром можно скачать отсюда:
https://github.com/adafruit/Adafruit_ADXL345
https://github.com/adafruit/Adafruit_Sensor
Загружаем скетч на дисплей, и крутим акселерометр вокруг осей.

Ну и небольшое видео, если у вас не грузится анимированный gif:
Заключение
На этом уроке мы разобрали работу Nextion/TJC дисплея с разрешением 320×240 без тачскрина — это самый простой вариант из линейки. Разумеется, гораздо интереснее будет поработать с компонентами, отвечающими за реакцию тачскрина. На следующем уроке мы изучим именно такой продвинутый вариант дисплея, и попробуем поработать со слайдбарами и кнопками. Также построим график с помощью специального компонента, разберемся с таймером и переменными. Успехов!