Summary: Several Windows users are posting on Microsoft and other technology forums about encountering ‘No more disk space! Delete Windows?’ error on Windows 10. In this article, we have analyzed this error and compiled the best methods for users to fix it on their own. If you have lost access to your data due to this error, you may recover it with the help of an all-in-one data recovery software.

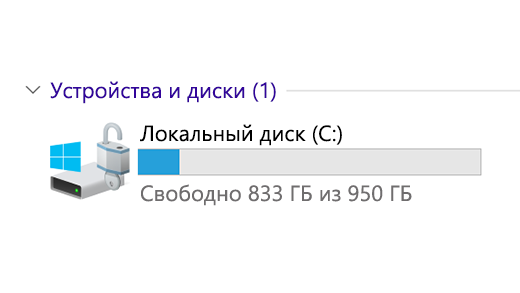
«One year ago, I purchased a 32 GB laptop. A couple of weeks into using it, I started receiving the message ‘No more disk space, delete Windows.’ I tried to clear some space by transferring all my files to the external hard disk and deleting unnecessary programs. I also removed some of the default apps to make some space. But I am still getting the same error message and there is nothing left to delete. Please tell me how to fix this error.»
(See Image 1)
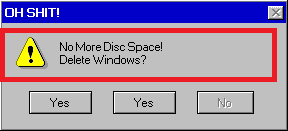
Sometimes, you may receive an error ‘No More Disk Space! Delete Windows?’ popping up on your screen while trying to access the system drive or any external storage device. This error may occur when there is a lack of space in the drive or malware attack, or a temporary file folder is taking up too much space. This error makes your drive and data inaccessible.
Restore lost or inaccessible data using a data recovery tool.
Read on to know the steps to fix error ‘No More Disk Space! Delete Windows?’
Fix ‘No More Disk Space Delete Windows’ Error
Method 1: Reset Microsoft Store
You may reset the Microsoft store to get rid of this error. To do so, follow the given troubleshooting steps:
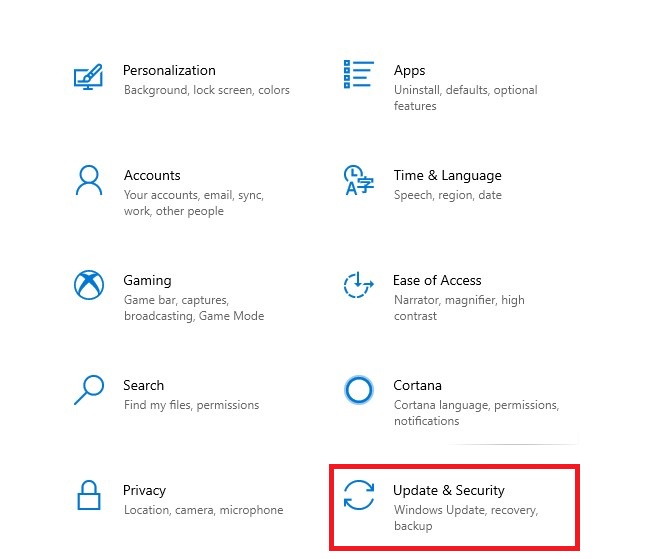
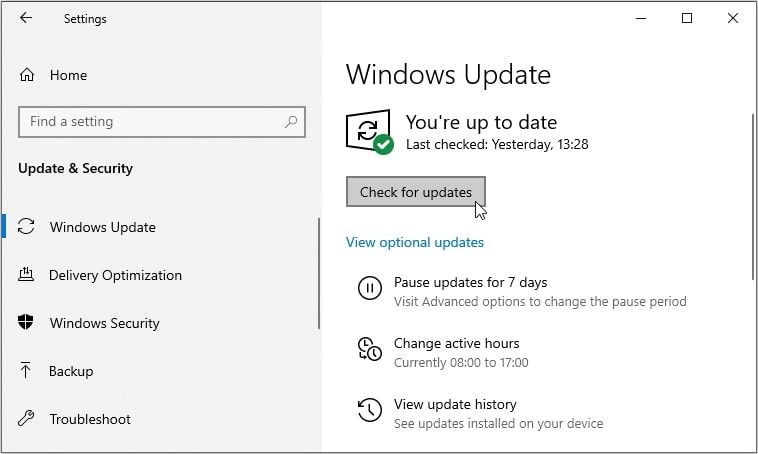
1. Open Settings by pressing Windows + I and go to Update & Security. (See Image 2)
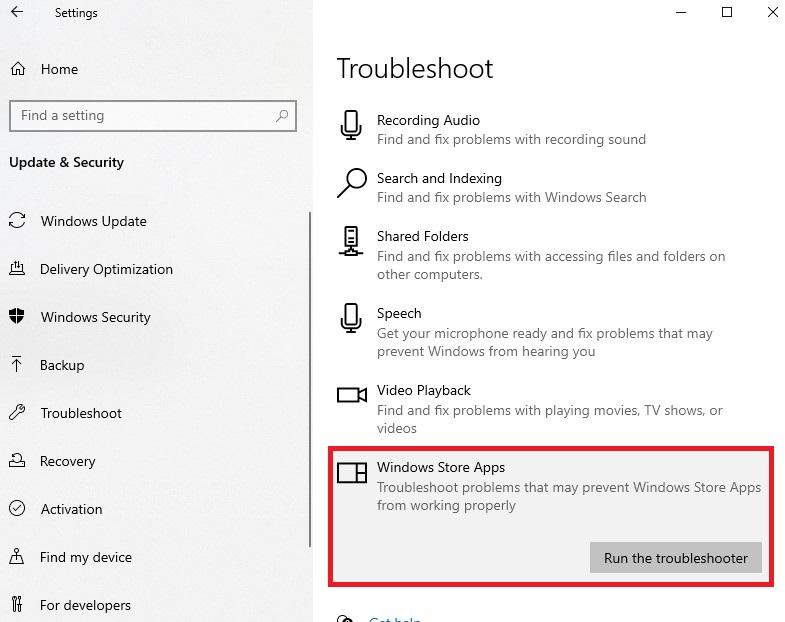
2. Next, go to Troubleshoot, and select Windows Store Apps from the list.
3. Select Run the troubleshooter. (See Image 3)
4. Restart the PC and now check if the error persists.
Method 2: Delete files with Storage sense
You may try fixing this error on Windows 10 by deleting files with the help of Storage Sense in the Settings app. Follow the given steps to perform this method:
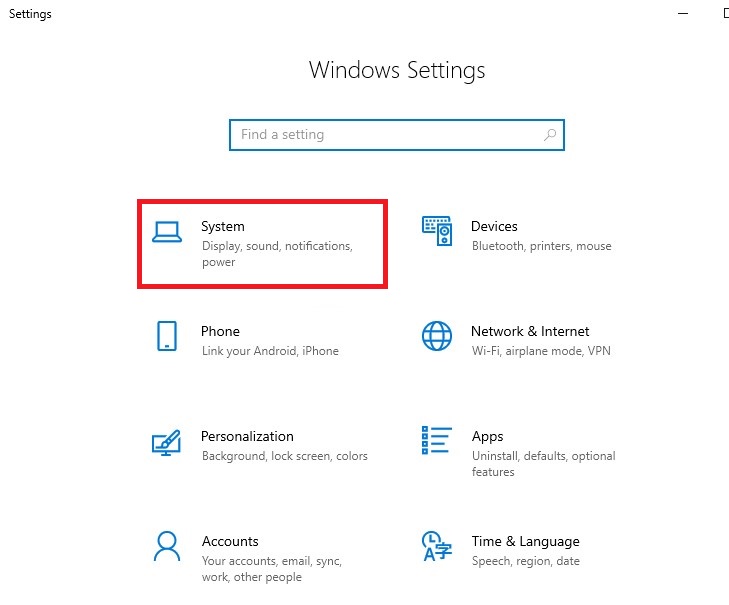
1. Press Windows + I to open the Settings app.
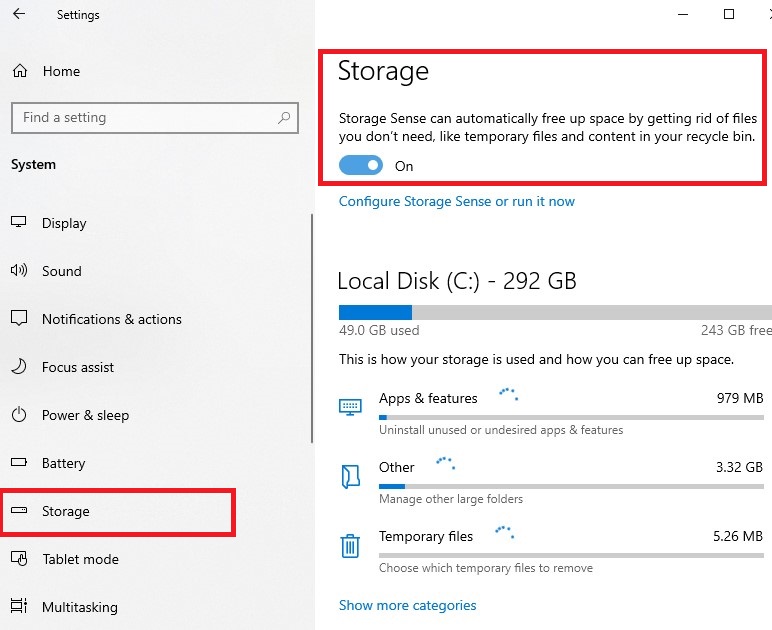
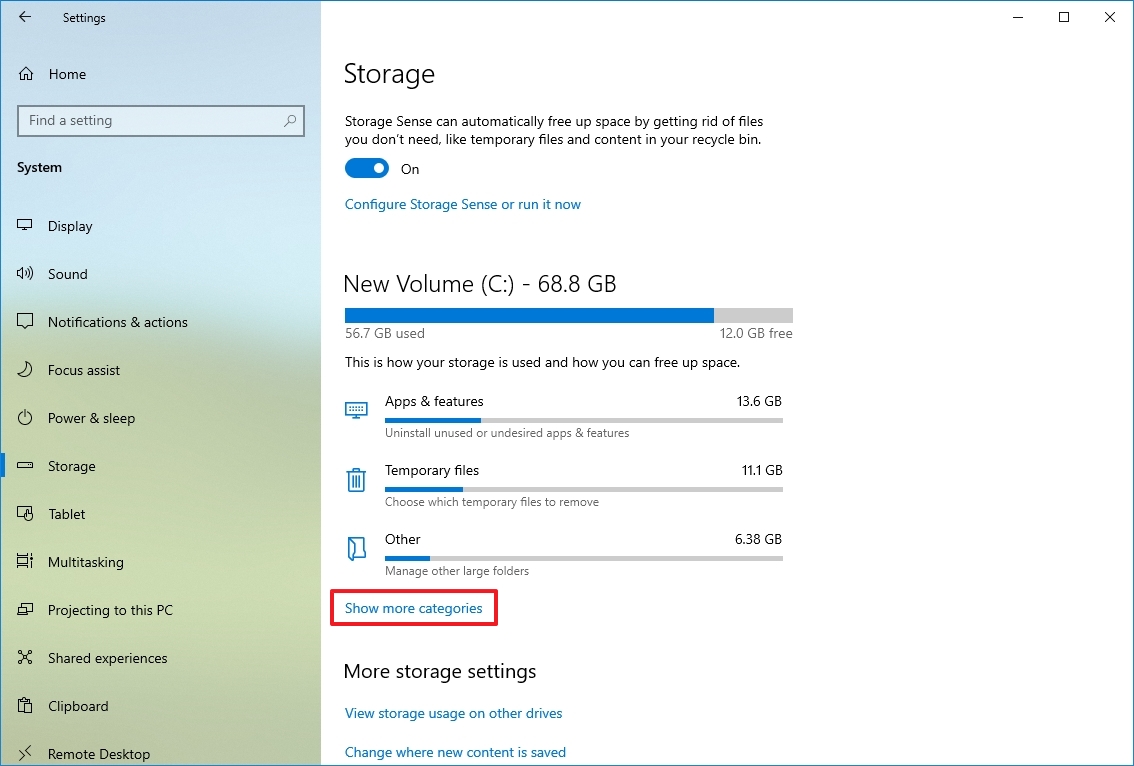
2. Find System and open it. (See Image 4)
3. On the next prompt, go to Storage on the left panel.
4. Turn on Storage Sense. (See Image 5)
7. Select the category of files/programs you want to delete.
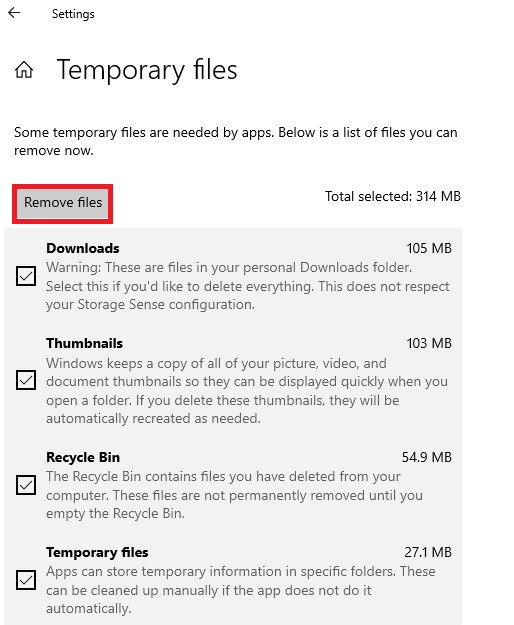
8. Afterward, choose the unwanted files/apps and click Remove files (temporary or other files)/ Uninstall (unnecessary apps/programs). (See Image 6)
9. Once done, restart the system and check if the error is still there.
Method 3: Use Disk Cleanups
Cleaning out the system frees up the disk space, and helps it run faster. To fix this error, you may use Disk Cleanup and get rid of the files that you no longer require. If you don’t know how to perform Disk Cleanup, follow the given steps:
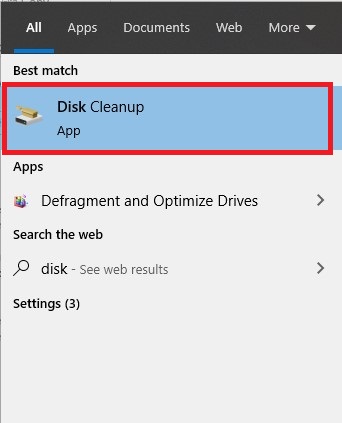
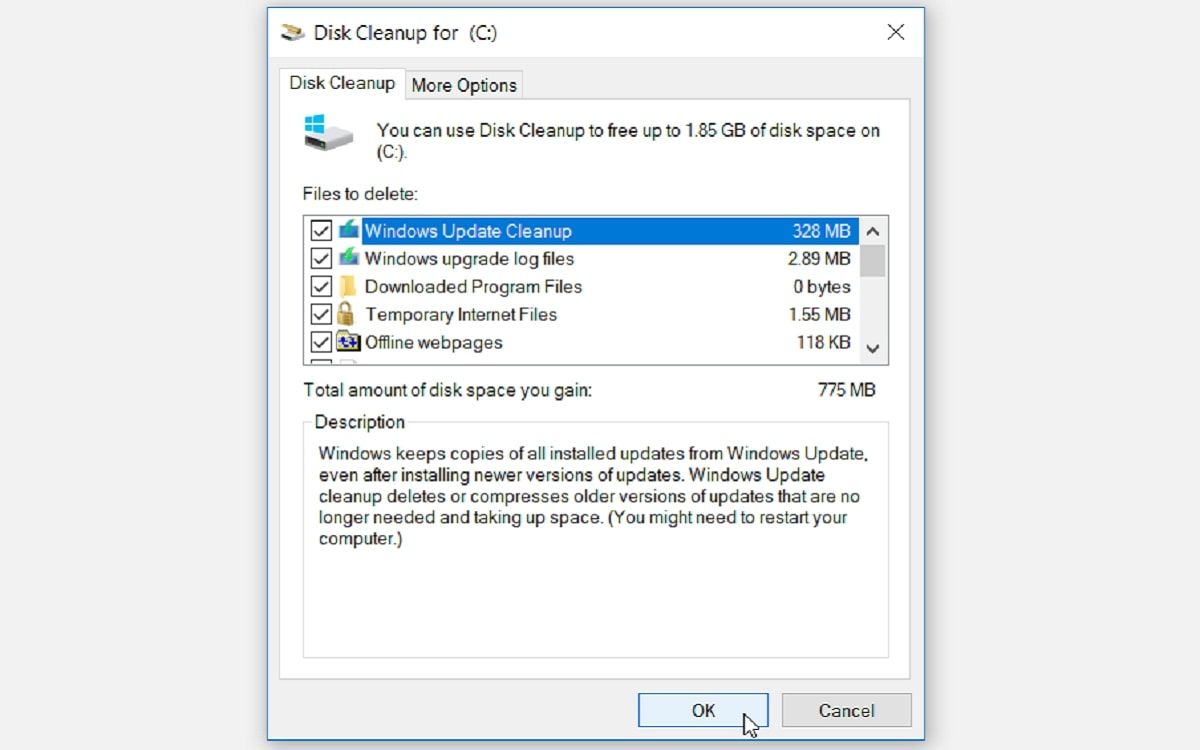
1. Search for Disk Cleanup in the Windows search box and open it. (See Image 7)
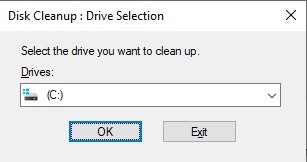
2. Select the drive you want to clean up from the drop-down list and click OK. (See Image 8)
3. Select the files you want to delete and click OK.
4. You may also click on ‘Clean up system files’ and then select the drive from where you want to remove the unnecessary files. (See Image 9)

5. If you want to remove data from a previously installed Windows, select the Previous Windows Installation (s) checkbox.
6. Next, click Delete files. Once the files are deleted, go back to This PC in File Explorer, and select the drive you cleaned up.
7. Click Refresh on the next prompt.
8. In the message that appears, select Delete files.
Lost your favorite photos after running Disk Cleanup? Read more to know how to Recover Deleted Photos after Running Disk Cleanup?
Method 4: Uninstall Apps you don’t need anymore
You may uninstall the applications and programs that you don’t use anymore to eliminate this error. To do so, follow the given steps:
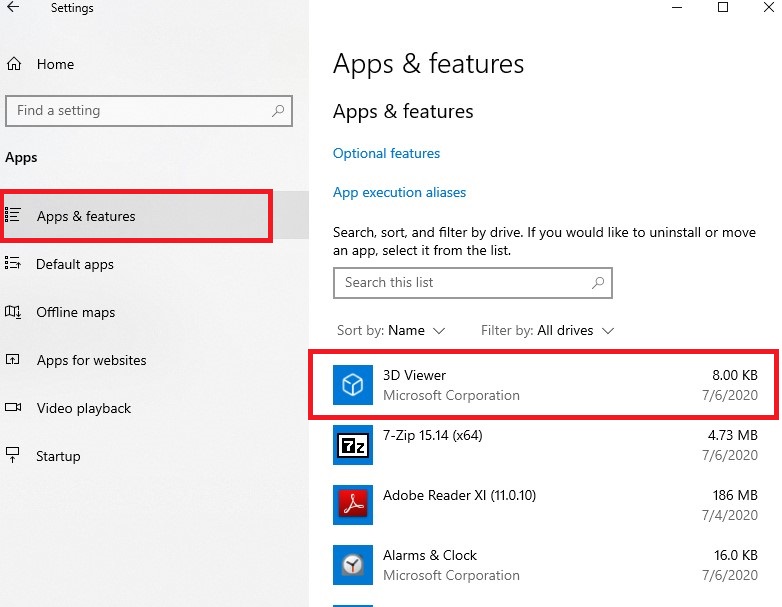
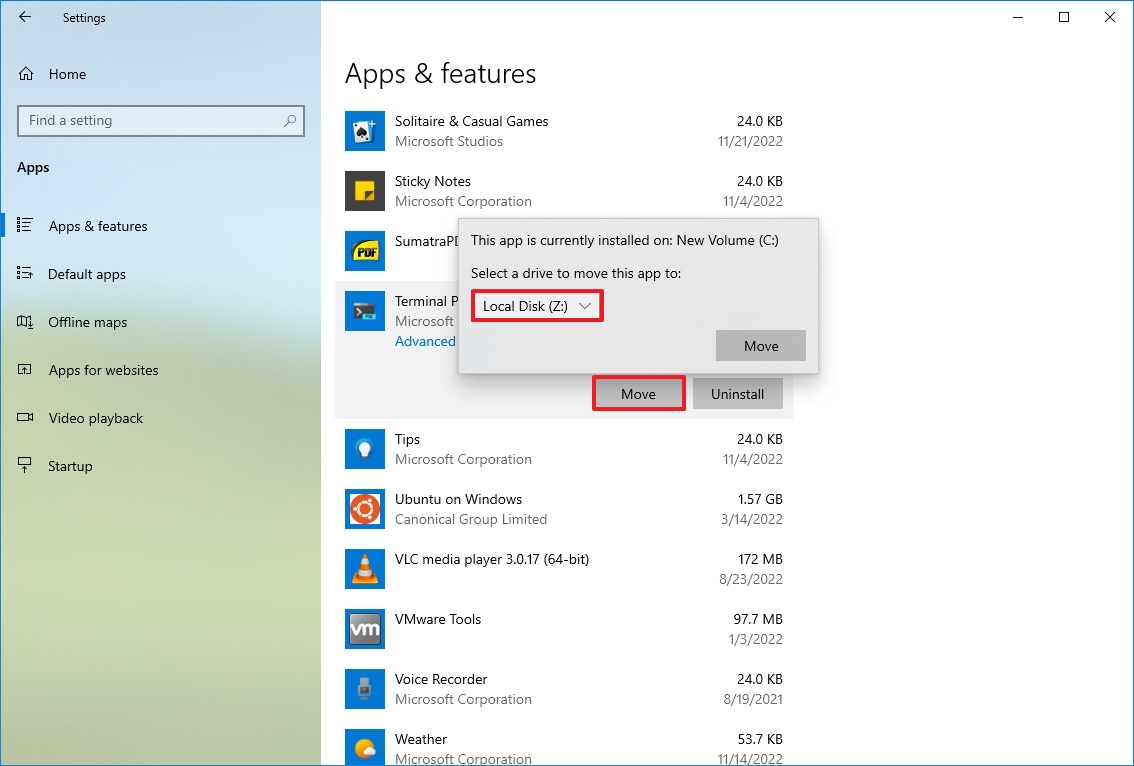
1. Open Settings app by pressing Windows + I, and go to Apps. (See Image 10)
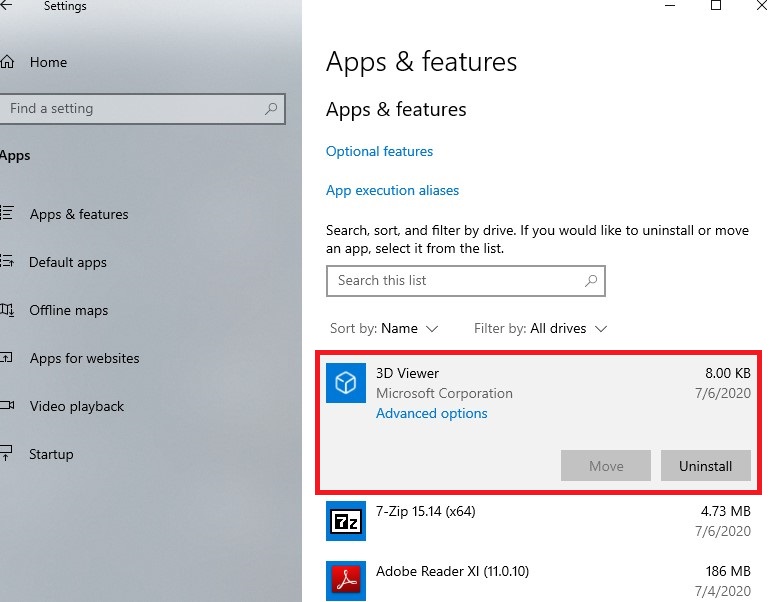
2. Open Apps & Features, search for specific apps or software to sort them by size to see which ones are causing problems and overloading your system. (See Image 11)
3. Select the problematic app and click Uninstall. (See Image 12)
Error ‘No more disk space! Delete windows?’ still showing up after uninstalling unused applications? You’re at potential risk of data loss! Protect the data by restoring it with the help of a data recovery tool.
Recover Data with Stellar Data Recovery
You may recover your data from an inaccessible or the ‘No more disk space! Delete Windows?’ error-affected PC with a powerful data recovery tool such as Stellar Data Recovery. It is an easy-to-use software that efficiently extracts lost or deleted files, folders, photos, videos, audios, and more from a Windows PC, laptop, or external storage media device. You just need to scan the drive or a specific location or folder for retrieving data. Stellar Data Recovery is a smart tool that recovers data from all common data loss scenarios such as lost and deleted files, corrupt hard drives, virus attacks, formatted partitions, and more. You can download the trial version of the software from here to see the results.
Conclusion
The ‘No more disk space delete Windows’ error may occur at any moment. Due to this error, you may not be able to access your system drives or external storage drives. To fix this error, you may try the methods above, such as Delete unnecessary files, Use Disk Cleanup, Use Storage Sense, etc. However, if you want to recover the data from the drives, you may use a data recovery tool such as Stellar Data Recovery. The software can efficiently retrieve lost/deleted documents, files, folders, photos, videos, etc. from any Windows device, Camera SD card, USB, and Windows compatible storage media.
Hope the article helps you to fix the error!
If you’re looking for solutions to other related errors, leave a comment below!


75%
of people found this article helpful
Если на компьютере осталось мало свободного пространства, вы можете потерять возможность устанавливать важные обновления Windows. Кроме того, может снизиться производительность компьютера. Вот несколько способов освободить пространство на диске, чтобы поддерживать компьютер в актуальном состоянии и обеспечить его оптимальную работу. Эти советы перечислены в определенном порядке — начните с первого, проверьте, помог ли он, и переходите к следующему.
Вы можете узнать общий объем свободного места на устройстве с Windows 11, запустив Проводник на панели задач и выбрав Этот компьютер слева. Доступное пространство на диске отображается в разделе Устройства и диски.
Примечание: Если вы выполните следующие действия и у вас по-прежнему будут возникать проблемы при обновлении Windows из-за нехватки места на диске, вам может помочь сброс настроек или переустановка Windows. Дополнительные сведения см. в статье Переустановка Windows.
Если вы не хотите использовать Контроль памяти, рекомендации по очистке помогут найти на устройстве временные и системные файлы и удалить их.
-
Нажмите кнопку «Пуск > Параметры > Система > Хранилище > Рекомендации по очистке».
-
Просмотрите все категории, в том числе Временные файлы, Большие или неиспользуемые файлы, Файлы, синхронизированные с облаком и Неиспользуемые приложения. Выберите элементы, которые нужно удалить. Система Windows предложит файлы для удаления и укажет объем места, которое будет освобождено при удалении этих файлов.
-
После выбора удаляемых элементов нажмите кнопку Очистить для каждого раздела.
Примечание: Если с момента перехода на Windows 10 прошло менее 10 дней, предыдущая версия Windows будет указана как системный файл, который можно удалить. Если вам нужно освободить место на диске, вы можете удалить ее, но помните, что вам нужно будет удалить папку Windows.old, содержащую файлы, которые дают возможность вернуться к предыдущей версии Windows. Если вы удалите предыдущую версию Windows, эту операцию невозможно отменить. (Вы не сможете вернуться к предыдущей версии Windows.)
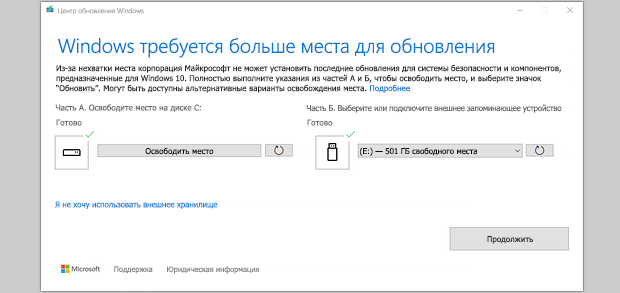
Windows 11 может сообщить, что для получения последнего обновления компонентов Windows 11 требуется больше места. Для завершения обновления можно использовать внешнее запоминающее устройство.
Дополнительные сведения см. в статье Освобождение места для обновления Windows.
Примечание: Если на устройстве нет стандартного USB-порта, может потребоваться использовать адаптер micro-USB.
Личные файлы, такие как видео, музыка, фотографии и документы, занимают много места на устройстве. Вот как узнать, какие файлы занимают больше всего места:
-
Выберите Проводник на панели задач и найдите файлы, которые нужно переместить.
-
В разделе Этот компьютер в левом меню выберите папку, чтобы увидеть, какие файлы сохранены в ней. Папки Видео, Музыка, Изображения и Загрузки обычно содержат самые большие файлы, сохраненные на устройстве.
-
Чтобы просмотреть размер файлов в папке, выберите Вид на панели задач, а затем щелкните Сведения. Щелкните правой кнопкой мыши в открытом пространстве (или выберите и удерживайте), а затем выберите Сортировать по размеру> , чтобы отобразить самые большие файлы в верхней части списка.
-
Если на устройстве есть файлы, которые вам больше не нужны, вы можете удалить их или переместить на внешнее запоминающее устройство, такое как USB-накопитель или SD-карта.
Примечание: Удаляя файлы, не забывайте очищать корзину, чтобы полностью удалить их с устройства и освободить место.
Чтобы переместить фотографии, музыку, видео или другие файлы, которые вы хотите сохранить, но используете не очень часто, вы можете сохранить их на внешнее запоминающее устройство, например USB-накопитель или SD-карту. Вы по-прежнему сможете использовать их, подключив этот носитель, но они не будут занимать место на вашем компьютере.
-
Подключите к компьютеру внешнее запоминающее устройство, например USB-накопитель или SD-карту.
-
Выберите Проводник на панели задач и перейдите к папке, содержащей файлы, которые требуется переместить.
-
Выберите файлы, а затем нажмите Вырезать на ленте. Перейдите в расположение подключенного внешнего запоминающего устройства и нажмите Вставить.
Сохранение новых файлов на другом диске поможет избежать проблем, связанных с нехваткой места на диске, чтобы вам не приходилось постоянно перемещать файлы на другой диск. Вместо того чтобы сохранять все новые файлы на диске по умолчанию, вы можете сохранить некоторые из них на другом диске, где больше свободного пространства.
-
Нажмите «Пуск > Параметры > Система > Хранилище > Дополнительные параметры хранилища > Место сохранения нового содержимого».
Открыть параметры хранилища -
Для каждого типа содержимого выберите диск из раскрывающегося меню. Если желаемый диск отсутствует в списке, убедитесь, что он подключен к вашему компьютеру.
Вы можете сэкономить место, включив функцию «Файлы из OneDrive по запросу», которая сохраняет на жестком диске небольшой файл-заполнитель вместо полноразмерного файла, хранящегося в вашей учетной записи OneDrive в облаке. Вы сможете получать доступ к своим файлам из OneDrive с компьютера, не занимая место на жестком диске за счет скачивания их полноразмерных версий. Дополнительные сведения см. в статье Экономия места на диске с помощью файлов OneDrive по запросу для Windows .
Иногда вирусы или другие вредоносные программы могут использовать значительное пространство на жестком диске, повреждая системные файлы. Если вы подозреваете, что ваш компьютер заражен вредоносными программами, используйте антивирусную программу, например Безопасность Windows, для запуска проверки и очистки вирусов. Если это не поможет, может потребоваться вернуть компьютер в исходное состояние.
Если вы следовали представленным здесь инструкциям, но вам все еще нужна помощь в освобождении места на устройстве, вы можете обратиться в службу поддержки Майкрософт и поговорить с ее представителем. Это также рекомендуется, если попытки освободить место на диске приводят к определенным ошибкам, с устранением которых вам необходима помощь.
Следующие вопросы связаны с недостатком места на диске и Центром обновления Windows. Дополнительные сведения о Центре обновления Windows.
Если на диске не хватает свободного места для установки обновления, появится всплывающее уведомление о том, что для установки обновления требуется дополнительное место на диске.
Если вы выберете пункт Устранить проблемы, вы получите уведомление о том, сколько места требуется дополнительно. Кроме того, вы будете уведомлены о том, что можно использовать внешнее запоминающее устройство, чтобы не высвобождать такой объем пространства на системном диске. Подробнее об освобождении места для установки обновлений Windows.
Общий объем свободного места на диске, необходимый устройству для завершения обновления, может быть разным. Как правило, для обновления компонентов требуется не менее 6-11 ГБ свободного пространства, для исправлений — не менее 2-3 ГБ. Сведения о разнице между обновлением компонентов и исправлением.
Дисковое пространство необходимо для скачивания обновления и новых версий любых дополнительных компонентов и языков, установленных на данный момент, и для применения обновления. Дополнительное место временно требуется для поддержки удаления обновления (обычно в течение 10 дней). После завершения обновления это пространство можно высвободить. Для этого нажмите кнопку «Пуск > Параметры > Система > Хранилище > Рекомендации по очистке». После выбора удаляемых элементов нажмите кнопку Очистить для этого раздела.
Открыть параметры хранилища
Обновление сжато для уменьшения размера загрузки.
Примечание: Для устройств с зарезервированным хранилищем для обновления сначала используется это зарезервированное хранилище, а затем другое дисковое пространство. Дополнительные сведения см. в статье Как работает зарезервированное хранилище в Windows.
Пространство, необходимое для завершения обновления компонентов, зависит от двух факторов: варианта обновления и размера дополнительного содержимого и других обновлений, которые применяются к вашему компьютеру при установке обновления компонентов.
Примечание: Для устройств с зарезервированным хранилищем для обновления сначала используется это зарезервированное хранилище, а затем другое дисковое пространство. Дополнительные сведения см. в статье Как работает зарезервированное хранилище в Windows.
Windows использует три разных варианта обновления компонентов в зависимости от объема свободного места на диске в настоящее время.
-
Для компьютеров с большим количеством свободного места на диске
Во время использования компьютера Windows автоматически пытается выполнить большую часть процесса обновления в фоновом режиме. Это значительно сокращает время, в течение которого ваш компьютер будет вне сети (или недоступный для использования) в процессе обновления, хотя для завершения обновления может временно использоваться больше места на диске. Подробнее о наших усилиях по сокращению времени вне сети в процессе обновления (в настоящее время только на английском языке). -
Для компьютеров с ограниченным свободным пространством, но достаточным для автоматического завершения обновления
Windows автоматически оптимизирует процесс, чтобы уменьшить объем свободного места на диске, необходимый для установки обновления. В результате время автономной установки увеличивается. -
Для компьютеров, на которых недостаточно места для автоматической установки обновления
Windows предложит освободить место на диске или использовать внешнее хранилище для временного расширения хранилища на компьютере. Если вы используете внешнее запоминающее устройство, Windows не потребуется много места на системном диске, так как система будет временно использовать внешнее устройство.
Для каждого из этих вариантов обновления общий объем необходимого свободного места на диске будет зависеть от дополнительного содержимого и других обновлений, которые применяются к компьютеру. Например:
-
Дополнительные возможности. Многие необязательные компоненты, доступные для Windows, устанавливаются системой предварительно или по требованию либо устанавливаются пользователем вручную. Чтобы узнать, какие компоненты установлены на компьютере, нажмите кнопку «Пуск > Параметры > Приложения > Дополнительные компоненты».
Открыть параметры «Необязательные компоненты»
Размер этих компонентов составляет от менее 1 МБ до почти 2 ГБ для портала Windows Mixed Reality. Чтобы уменьшить объем пространства, необходимого для установки обновления компонентов на компьютере, удалите необязательные компоненты, которые вы не используете. -
Установленные языки. Операционная система Windows переведена на многие языки. Хотя многие пользователи одновременно используют только один язык, некоторые переключаются между двумя и более языками. Чтобы узнать, какие языки установлены на компьютере, выберите Параметры запуска > > время & язык > язык & регионе .
Открыть языковые параметры
Во время каждого обновления все языковые ресурсы и любые связанные данные о вводе с клавиатуры, преобразовании текста в речь, преобразовании речи в текст и распознавании рукописного ввода необходимо обновить. Размер контента для каждого языка может составлять от 175 МБ до более 300 МБ. Вы можете уменьшить объем пространства, необходимого для установки обновления компонентов на компьютере, удалив языки, которые вы не используете. -
Обновления драйверов. Изготовители оборудования и другие партнеры по оборудованию иногда публикуют новые графические, сетевые, аудиодрайверы и другие драйверы вместе с новым обновлением операционной системы. Их размер может существенно различаться в зависимости от компьютера и от того, какие именно драйверы обновляются.
-
Исправления ОС. Во время обновления компонентов Windows пытается скачать и автоматически установить последние исправления, чтобы ваш компьютер был полностью обновлен. Вскоре после выпуска обновления компонентов размер исправления для этого обновления может составлять всего нескольких сотен мегабайт, однако по мере реализации дополнительных исправлений и обновлений системы безопасности размер исправления может увеличиться до 1 ГБ и более. Если на компьютере не хватает места на диске, вы можете скачать и установить исправление после завершения обновления компонентов.
Наконец, Центр обновления Windows временно отключает hiberfile.sys, pagefile.sys и другие системные файлы и использует пространство, которое обычно занимают эти файлы, для применения обновления компонентов. Все файлы, которые отключаются для установки обновления, будут автоматически включены после завершения обновления. Так как размер этих файлов зависит от того, как вы используете компьютер, и от объема оперативной памяти вашего компьютера, объем свободного места на диске для выполнения обновления может отличаться, даже если на двух разных компьютерах используется одинаковый образ операционной системы.
Сочетание варианта обновления и компонентов означает, что для завершения обновления может потребоваться различный объем свободного места на диске. Вот несколько примеров обновления компьютеров до Windows 10 версии 1803.
|
Оптимизировано для сокращения времени вне сети |
Оптимизировано для уменьшения занимаемого места на диске |
Оптимизировано для уменьшения занимаемого места на диске с помощью внешнего хранилища |
|
|---|---|---|---|
|
Минимальный объем необязательных компонентов, языков и обновлений |
20 ГБ |
5,5 ГБ и более |
4,5 ГБ и более |
|
Множество необязательных компонентов, языков и обновлений |
20 ГБ и более |
13,75 ГБ и более |
7 ГБ и более |
Вы можете узнать общий объем свободного места на устройстве с Windows 11, запустив Проводник на панели задач и выбрав Этот компьютер слева. Доступное пространство на диске отображается в разделе Устройства и диски.
Внешнее запоминающее устройство лучше использовать в следующих случаях.
-
При отсутствии доступа к Интернету.
-
Если необходимо сохранить файлы большого размера или большое количество файлов. В таких случаях отправка файлов занимает длительное время, а расходы на хранение файлов могут возрастать.
Для работы Windows 11 требуется процессор размером 64 ГБ.
При выборе оборудования для хранения данных, которое будет использоваться в вашем устройстве, обращайте внимание не только на размер хранилища. Часто скорость хранилища важнее его размера. Устройства с медленным хранилищем, например жесткие диски, часто значительно медленнее устройств SSD и eMMC.
Вам не нужно удалять все данные с жесткого диска для обновления устройства, но вам потребуется освободить достаточно места для завершения обновления.
Статьи по теме
-
Советы по повышению производительности компьютера с Windows
-
Справка по ошибкам активации Windows
Если на компьютере осталось мало свободного пространства, вы можете потерять возможность устанавливать важные обновления Windows. Кроме того, может снизиться производительность компьютера. Вот несколько способов освободить пространство на диске, чтобы поддерживать компьютер в актуальном состоянии и обеспечить его оптимальную работу. Эти советы перечислены в определенном порядке — начните с первого, проверьте, помог ли он, и переходите к следующему.
Вы можете узнать общий объем свободного места на устройстве с Windows 10, запустив Проводник на панели задач и выбрав Этот компьютер слева. Доступное пространство на диске отображается в разделе Устройства и диски.
Примечание: Если вы выполните следующие действия и у вас по-прежнему будут возникать проблемы при обновлении Windows из-за нехватки места на диске, вам может помочь сброс настроек или переустановка Windows. Дополнительные сведения см. в статье Переустановка Windows.
Если в вашей системе отсутствует контроль памяти, можно использовать средство очистки диска для удаления временных файлов и системных файлов с устройства.
-
Введите очистка диска в поле поиска на панели задач, а затем в списке результатов выберите «Очистка диска».
-
Выберите диск, для которого нужно очистить файлы, а затем нажмите кнопку ОК.
-
Установите флажок напротив типа файлов, которые требуется удалить. (Чтобы просмотреть описание того или иного типа файлов, выберите имя.) По умолчанию установлены флажки Загруженные файлы программ, Временные файлы Интернета и Эскизы. Если вы не хотите удалять эти файлы, снимите эти флажки.
-
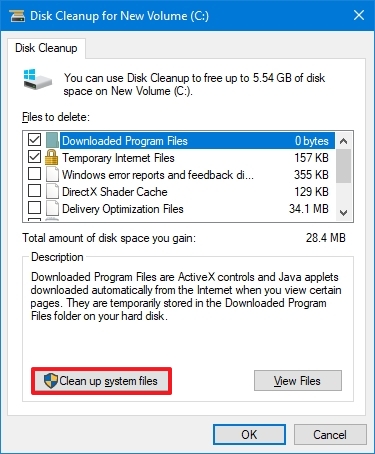
Чтобы освободить еще больше места, выберите Очистить системные файлы, выберите диск и нажмите кнопку ОК. Когда система выполняет вычисления, выберите тип системных файлов, которые требуется удалить. Программе очистки диска потребуется некоторое время, чтобы вычислить объем дискового пространства, которое может быть освобождено.
Примечание: Если с момента перехода на Windows 10 прошло менее 10 дней, предыдущая версия Windows будет указана как системный файл, который можно удалить. Если вам нужно освободить место на диске, вы можете удалить ее, но помните, что вам нужно будет удалить папку Windows.old, содержащую файлы, которые дают возможность вернуться к предыдущей версии Windows. Если вы удалите предыдущую версию Windows, эту операцию невозможно отменить. (Вы не сможете вернуться к предыдущей версии Windows.)
-
Выбрав типы файлов, которые требуется удалить, нажмите кнопку ОК, а затем выберите Удалить файлы в окне подтверждения, чтобы начать очистку.
Важно:
-
Вы также можете сжать диск ОС (диск, на котором установлена Windows), чтобы получить дополнительное место для установки важных обновлений. Это действие не удаляет содержимое диска, и у вас не должны возникать проблемы с открытием и сохранением файлов на сжатом диске.
-
Если вы хотите сжать диск ОС, выберите проводник на панели задач и в области слева выберите Этот компьютер. Щелкните правой кнопкой мыши или коснитесь и удерживайте диск ОС (обычно диск C), а затем выберите Свойства, а затем на вкладке Общие выберите Сжать этот диск, чтобы сэкономить место на диске. Выберите Применить > ОК. После установки обновления можно вручную распаковать диск ОС в любое время, сняв флажок Сжимать этот диск для экономии места на диске , а затем выбрав Применить > ОК.
Windows 10 может сообщить, что для получения последнего обновления компонентов Windows 10 требуется больше места. Для завершения обновления можно использовать внешнее запоминающее устройство.
Дополнительные сведения см. в статье Освобождение места для обновления Windows.
Примечание: Если на устройстве нет стандартного USB-порта, может потребоваться использовать адаптер micro-USB.
Личные файлы, такие как видео, музыка, фотографии и документы, занимают много места на устройстве. Вот как узнать, какие файлы занимают больше всего места:
-
Выберите Проводник на панели задач и найдите файлы, которые нужно переместить.
-
В разделе Этот компьютер в левом меню выберите папку, чтобы увидеть, какие файлы сохранены в ней. Папки Видео, Музыка, Изображения и Загрузки обычно содержат самые большие файлы, сохраненные на устройстве.
-
Чтобы просмотреть размер файлов в папке, нажмите вкладку Просмотреть, затем нажмите Сведения. Щелкните правой кнопкой мыши на пустом пространстве и выберите Сортировать > Размер, чтобы отобразить самые большие файлы в верхней части списка.
-
Если на устройстве есть файлы, которые вам больше не нужны, вы можете удалить их или переместить на внешнее запоминающее устройство, такое как USB-накопитель или SD-карта.
Примечание: Удаляя файлы, не забывайте очищать корзину, чтобы полностью удалить их с устройства и освободить место.
Чтобы переместить фотографии, музыку, видео или другие файлы, которые вы хотите сохранить, но используете не очень часто, вы можете сохранить их на внешнее запоминающее устройство, например USB-накопитель или SD-карту. Вы по-прежнему сможете использовать их, подключив этот носитель, но они не будут занимать место на вашем компьютере.
-
Подключите к компьютеру внешнее запоминающее устройство, например USB-накопитель или SD-карту.
-
Выберите Проводник на панели задач и перейдите к папке, содержащей файлы, которые требуется переместить.
-
Выберите файлы, перейдите на вкладку Главная , а затем выберите Переместить в и выберите Выбрать расположение.
-
Выберите внешнее запоминающее устройство в списке расположений, а затем нажмите Переместить.
Сохранение новых файлов на другом диске поможет избежать проблем, связанных с нехваткой места на диске, чтобы вам не приходилось постоянно перемещать файлы на другой диск. Вместо того чтобы сохранять все новые файлы на диске по умолчанию, вы можете сохранить некоторые из них на другом диске, где больше свободного пространства.
-
Нажмите кнопку Пуск и выберите Параметры > Система > Хранилище .
Открыть параметры хранилища -
Прокрутите вниз и в разделе Другие параметры хранилища выберите параметр Изменить место сохранения нового содержимого.
-
Для каждого типа содержимого выберите диск из раскрывающегося меню. Если желаемый диск отсутствует в списке, убедитесь, что он подключен к вашему компьютеру.
Примечание: Для использования функции «Файлы из OneDrive по запросу» необходимы Windows 10 версии 1709 или более поздней и клиент OneDrive версии 17.3.7064.1005 или более поздней. Чтобы узнать, какая у вас версия Windows, нажмите кнопку Пуск и выберите Параметры > Система > О системе . Чтобы узнать, какая версия клиента OneDrive установлена, см. статью Какое приложение OneDrive? и перейдите к разделу о том, какое приложение у вас установлено.
Открыть сведения о параметрах
Вы можете сэкономить место, включив функцию «Файлы из OneDrive по запросу», которая сохраняет на жестком диске небольшой файл-заполнитель вместо полноразмерного файла, хранящегося в вашей учетной записи OneDrive в облаке. Вы сможете получать доступ к своим файлам из OneDrive с компьютера, не занимая место на жестком диске за счет скачивания их полноразмерных версий. Дополнительные сведения см. в статье Экономия места на диске с помощью файлов OneDrive по запросу для Windows .
Иногда вирусы или другие вредоносные программы могут использовать значительное пространство на жестком диске, повреждая системные файлы. Если вы подозреваете, что ваш компьютер заражен вредоносными программами, используйте антивирусную программу, например Безопасность Windows, для запуска проверки и очистки вирусов. Если это не поможет, может потребоваться вернуть компьютер в исходное состояние.
Если вы следовали представленным здесь инструкциям, но вам все еще нужна помощь в освобождении места на устройстве, вы можете обратиться в службу поддержки Майкрософт и поговорить с ее представителем. Это также рекомендуется, если попытки освободить место на диске приводят к определенным ошибкам, с устранением которых вам необходима помощь.
Следующие вопросы связаны с недостатком места на диске и Центром обновления Windows. Дополнительные сведения о Центре обновления Windows.
Если на диске не хватает свободного места для установки обновления, появится всплывающее уведомление о том, что для установки обновления требуется дополнительное место на диске.
Если вы выберете пункт Устранить проблемы, вы получите уведомление о том, сколько места требуется дополнительно. Кроме того, вы будете уведомлены о том, что можно использовать внешнее запоминающее устройство, чтобы не высвобождать такой объем пространства на системном диске. Подробнее об освобождении места для установки обновлений Windows.
Общий объем свободного места на диске, необходимый устройству для завершения обновления, может быть разным. Как правило, для обновления компонентов требуется не менее 6-11 ГБ свободного пространства, для исправлений — не менее 2-3 ГБ. Сведения о разнице между обновлением компонентов и исправлением.
Дисковое пространство необходимо для скачивания обновления и новых версий любых дополнительных компонентов и языков, установленных на данный момент, и для применения обновления. Дополнительное место временно требуется для поддержки удаления обновления (обычно в течение 10 дней). После завершения обновления это пространство можно высвободить. Для этого выберите Запустить > параметры > системное хранилище > > настроить контроль хранилища или запустите его сейчас. Прокрутите вниз и в разделе Освободить место выберите Очистить.
Открыть параметры хранилища
Обновление сжато для уменьшения размера загрузки.
Примечание: Для устройств с зарезервированным хранилищем для обновления сначала используется это зарезервированное хранилище, а затем другое дисковое пространство. Дополнительные сведения см. в статье Как работает зарезервированное хранилище в Windows.
Пространство, необходимое для завершения обновления компонентов, зависит от двух факторов: варианта обновления и размера дополнительного содержимого и других обновлений, которые применяются к вашему компьютеру при установке обновления компонентов.
Примечание: Для устройств с зарезервированным хранилищем для обновления сначала используется это зарезервированное хранилище, а затем другое дисковое пространство. Дополнительные сведения см. в статье Как работает зарезервированное хранилище в Windows.
Windows использует три разных варианта обновления компонентов в зависимости от объема свободного места на диске в настоящее время.
-
Для компьютеров с большим количеством свободного места на диске
Во время использования компьютера Windows автоматически пытается выполнить большую часть процесса обновления в фоновом режиме. Это значительно сокращает время, в течение которого ваш компьютер будет вне сети (или недоступный для использования) в процессе обновления, хотя для завершения обновления может временно использоваться больше места на диске. Подробнее о наших усилиях по сокращению времени вне сети в процессе обновления (в настоящее время только на английском языке). -
Для компьютеров с ограниченным свободным пространством, но достаточным для автоматического завершения обновления
Windows автоматически оптимизирует процесс, чтобы уменьшить объем свободного места на диске, необходимый для установки обновления. В результате время автономной установки увеличивается. -
Для компьютеров, на которых недостаточно места для автоматической установки обновления
Windows предложит освободить место на диске или использовать внешнее хранилище для временного расширения хранилища на компьютере. Если вы используете внешнее запоминающее устройство, Windows не потребуется много места на системном диске, так как система будет временно использовать внешнее устройство.
Для каждого из этих вариантов обновления общий объем необходимого свободного места на диске будет зависеть от дополнительного содержимого и других обновлений, которые применяются к компьютеру. Например:
-
Дополнительные возможности. Многие необязательные компоненты, доступные для Windows, устанавливаются системой предварительно или по требованию либо устанавливаются пользователем вручную. Вы можете узнать, какие из них установлены на компьютере, перейдя в «Параметры > Приложения > Приложения и компоненты > Необязательные компоненты».
Открыть параметры «Необязательные компоненты»
Размер этих компонентов составляет от менее 1 МБ до почти 2 ГБ для портала Windows Mixed Reality. Чтобы уменьшить объем пространства, необходимого для установки обновления компонентов на компьютере, удалите необязательные компоненты, которые вы не используете. -
Установленные языки. Операционная система Windows переведена на многие языки. Хотя многие пользователи одновременно используют только один язык, некоторые переключаются между двумя и более языками. Чтобы узнать, какие языки установлены на компьютере, нажмите кнопку «Пуск > Параметры > Время и язык > Язык» .
Открыть языковые параметры
Во время каждого обновления все языковые ресурсы и любые связанные данные о вводе с клавиатуры, преобразовании текста в речь, преобразовании речи в текст и распознавании рукописного ввода необходимо обновить. Размер контента для каждого языка может составлять от 175 МБ до более 300 МБ. Вы можете уменьшить объем пространства, необходимого для установки обновления компонентов на компьютере, удалив языки, которые вы не используете. -
Обновления драйверов. Изготовители оборудования и другие партнеры по оборудованию иногда публикуют новые графические, сетевые, аудиодрайверы и другие драйверы вместе с новым обновлением операционной системы. Их размер может существенно различаться в зависимости от компьютера и от того, какие именно драйверы обновляются.
-
Исправления ОС. Во время обновления компонентов Windows пытается скачать и автоматически установить последние исправления, чтобы ваш компьютер был полностью обновлен. Вскоре после выпуска обновления компонентов размер исправления для этого обновления может составлять всего нескольких сотен мегабайт, однако по мере реализации дополнительных исправлений и обновлений системы безопасности размер исправления может увеличиться до 1 ГБ и более. Если на компьютере не хватает места на диске, вы можете скачать и установить исправление после завершения обновления компонентов.
Наконец, Центр обновления Windows временно отключает hiberfile.sys, pagefile.sys и другие системные файлы и использует пространство, которое обычно занимают эти файлы, для применения обновления компонентов. Все файлы, которые отключаются для установки обновления, будут автоматически включены после завершения обновления. Так как размер этих файлов зависит от того, как вы используете компьютер, и от объема оперативной памяти вашего компьютера, объем свободного места на диске для выполнения обновления может отличаться, даже если на двух разных компьютерах используется одинаковый образ операционной системы.
Сочетание варианта обновления и компонентов означает, что для завершения обновления может потребоваться различный объем свободного места на диске. Вот несколько примеров обновления компьютеров до Windows версии 1803.
|
Оптимизировано для сокращения времени вне сети |
Оптимизировано для уменьшения занимаемого места на диске |
Оптимизировано для уменьшения занимаемого места на диске с помощью внешнего хранилища |
|
|---|---|---|---|
|
Минимальный объем необязательных компонентов, языков и обновлений |
20 ГБ |
5,5 ГБ и более |
4,5 ГБ и более |
|
Множество необязательных компонентов, языков и обновлений |
20 ГБ и более |
13,75 ГБ и более |
7 ГБ и более |
Вы можете узнать общий объем свободного места на устройстве с Windows 10, запустив Проводник на панели задач и выбрав Этот компьютер слева. Доступное пространство для каждого диска будет отображаться в разделе Устройства и диски.
Внешнее запоминающее устройство лучше использовать в следующих случаях.
-
При отсутствии доступа к Интернету.
-
Если необходимо сохранить файлы большого размера или большое количество файлов. В таких случаях отправка файлов занимает длительное время, а расходы на хранение файлов могут возрастать.
Центр обновления Windows автоматически предоставляет обновления соответствующим устройствам. Чтобы убедиться, что устройство обновлено, нажмите кнопку «Пуск > Параметры > Обновление и безопасность > Центр обновления Windows» , а затем нажмите Проверить наличие обновлений.
Проверить наличие обновлений
Подробнее о Центре обновления Windows
Для работы Windows 11 требуется процессор размером 64 ГБ.
При выборе оборудования для хранения данных, которое будет использоваться в вашем устройстве, обращайте внимание не только на размер хранилища. Часто скорость хранилища важнее его размера. Устройства с медленным хранилищем, например жесткие диски, часто значительно медленнее устройств SSD и eMMC.
Вам не нужно удалять все данные с жесткого диска для обновления устройства, но вам потребуется освободить достаточно места для завершения обновления.
Статьи по теме
-
Советы по повышению производительности компьютера с Windows
-
Справка по ошибкам активации Windows
Нужна дополнительная помощь?
Windows 10 updates offer the latest features and security improvements for your operating system. For this reason, you may want to update your PC regularly.
But before the installation process starts, Windows checks to ensure there’s enough storage space on your internal drive. If there isn’t enough disk space, you’ll see error messages like «Windows needs more space» or «There is not enough space on the disk.»
This shouldn’t stop you from updating your Windows 10 PC. To make things easy for you, we’ll show you how to tackle this problem.
How Much Disk Space Do You Need to Update Windows 10?
According to Microsoft, you need at least 32GB of free disk space to upgrade to the latest version of Windows 10—whether you’re using a 32- or 64-bit Windows OS. If you have less than that, you may experience the «Windows needs more space» error.
On some devices, such as Windows 10 tablets with only 16GB or 32GB of storage, you may save up more disk space by installing the Windows 10 Compact OS.
Otherwise, here are four ways to free up space on your hard drive and continue with the Windows update.
1. Clean Up Your Disk Drive
When there’s insufficient disk space for the Windows 10 update, you can create more space by cleaning up the drive containing the Windows 10 OS. For most people, that is the C: drive.
The Windows 10 Disk Cleanup tool can help you with this. It performs a quick scan on your drive and finds redundant files that you can remove to create more space.
In fact, using the Disk Cleanup tool is a good way to create enough disk space without affecting your important files.
Here’s how to clean up your disk drive using this tool:
- Type Disk Cleanup in the Start menu search bar and select the Best Match.
- Select the C: drive and then click OK on the Disk Cleanup: Drive Selection window.
- Click Clean up system files on the Disk Cleanup for Drive (C:) window.
- Select all the files you want to delete and click OK to continue.
To further create more disk space on the C: drive, you can manually delete some files you no longer need.
For example, you can start by removing a folder called Windows.old, which contains all the previous data in your earlier OS version. This is a folder that’s created automatically whenever you upgrade Windows 10. However, delete the folder only if you’re completely satisfied with your current Windows 10 version and have no intention of returning to the old OS.
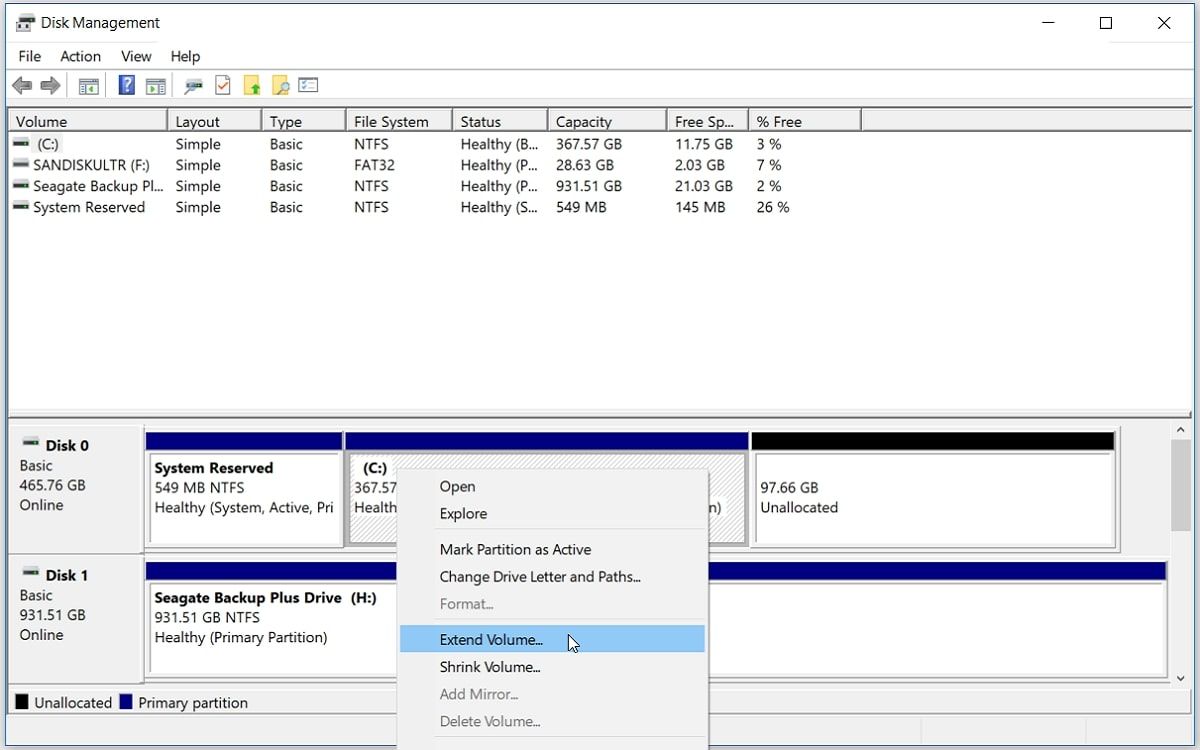
If you can’t free up enough disk space on your PC, then you might consider extending your drive. This should give you enough space for the Windows 10 update.
Of course, this fix only works if you have unallocated space on your drive.
Here’s how to extend your drive storage to tackle the «not enough disk space» error:
- Type disk part in the Start menu search bar and select the Best Match.
- When the Disk Management window appears, check whether there’s unallocated space on the C: drive or not. If you have some unallocated space, right-click the C: drive and select Extend Volume to add the unallocated space.
3. Create More Space By Using External Storage Devices
If you don’t have enough disk space on your PC, you can use an external storage device to complete the Windows 10 update. For this, you’ll need an external storage device with about 10GB of free space or more (depending on how much additional space you need).
To get started, navigate to Start > Settings > Update & Security > Windows Update > Check for Updates.
Windows will pop up the «Not enough space on disk» or «Windows needs more space» error message. On the Windows update pop-up window, select the Fix issues option. This will launch a tool that lets you update your PC using an external storage device.
But before using an external storage device for updating your PC, make sure you back up your important files.
From there, follow these steps:
- Connect an external storage device with enough free space to your computer.
- On the Windows update page, click the External Storage Device drop-down menu and select your external storage device. From there, click Next to continue.
- Follow the on-screen instructions to finish installing the update. Once the process is complete, you can safely remove your external storage device and restart your PC.
4. Find and Remove Large Unwanted Programs Using Third-Party Software
You might be experiencing low disk storage issues because of large files that are hidden somewhere on your PC. Windows offers several ways to delete unwanted software, but it may be hard for you to locate some programs manually.
The good news is that you can easily find and delete large programs by using third-party software.
There are many software programs you can use, but we recommend IObit Uninstaller in this article. It once had a poor reputation for bundling third-party software in the installation, but that is no longer an issue.
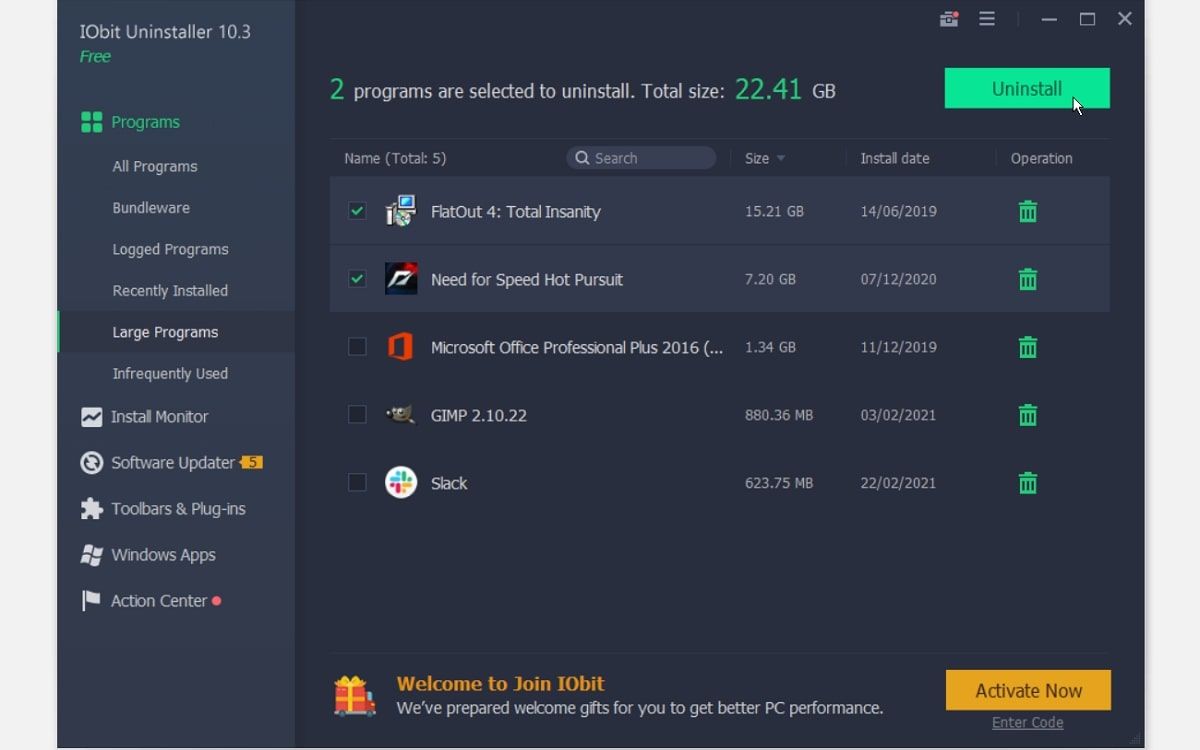
You can remove all your large unwanted programs with the free version of the software. Here’s how you can use the software to delete unwanted programs from your PC:
- Download and install the free version of IObit Uninstaller.
- Launch IObit Uninstaller and select Large Programs on the left-hand side pane. From there, all your large programs will show on the right-hand side pane
- Mark all the programs you want to delete and click the Uninstall button.
- Click Uninstall again in the pop-up window to finalize the process.
You know what’s great about using tools like IObit Uninstaller? Such programs remove large files and ensure there are no leftover files and Registry entries that would still consume space.
But if you don’t feel like deleting your large files, you can move them to an external storage device or cloud storage to free up some disk space.
Update Your Windows 10 PC Any Time
Updating your Windows 10 PC is something you should do regularly. This process protects your PC from system crashes and malware attacks.
When an update is required on your Windows 10 PC, your might often see a message that reads, «Your computer needs a required update.» But if you don’t have enough disk space, then you’ll likely encounter the «Windows needs more space» error when trying to update the device.
If you run into «storage» issues while updating your PC, try any of the solutions we’ve covered.
And if you want to avoid running into «disk storage» issues in the future, you may consider replacing your hard drive with a larger one. This is a long-term solution that’ll allow you to install Windows 10 updates without a hassle.
5 Ways to Fix Deleted Files But Disk Still Full
It seems that it’s no longer a new problem for users to meet this issue that even when they’ve already deleted files, the drive still shows occupied with no extra available free space. So how to fix the file deleted, but space not released in Windows 10 and get free space back on your device? Relax! Just follow the below tips and you’ll be able to fix the deleting files doesn’t free up space error and free up space on Windows disk, external hard drive, USB, SD, etc devices with ease.
| Workable Solutions | Step-by-step Troubleshooting |
|---|---|
| Fix 1. Run CHKDSK | Press the Windows key and type cmd. Right-click «Command Prompt» and…Full steps |
| Fix 2. Run CHKDSK Alternative | DOWNLOAD EaseUS CleanGenius for Free and install it. Open the software and…Full steps |
| Fix 3. Back Up Data | Run EaseUS Todo Backup and choose «File» on the main window…Full steps |
| Fix 4. Format the Partition | Right-click on the Windows icon and select «Disk Management». Right-click on the…Full steps |
| Fix 5. Wipe the Hard Drive | Select the HDD or SSD which you want to wipe. And right-click to choose «Wipe Data»…Full steps |
Available Disk Space Does Not Increase After Deleting Files
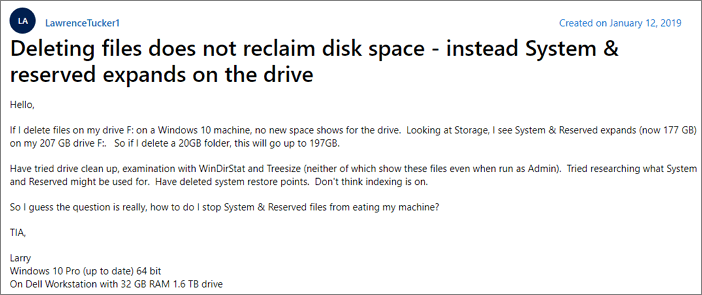
«Hello, If I delete files on my drive F: on a Windows 10 machine, no new space shows for the drive. Looking at Storage, I see System & Reserved expands (now 177 GB) on my 207 GB drive F. So if I delete a 20GB folder, this will go up to 197GB.
Have tried junk file clean up, examination with WinDirStat and Treesize (neither of which show these files even when run as Admin). Tried researching what System and Reserved might be used for. Have deleted system restore points. Don’t think indexing is on.
So I guess the question is really, how do I stop System & Reserved files from eating my machine.»
Available disk space does not increase after deleting files. When a file is deleted, the space used on the disk is not reclaimed until the file is truly erased. To fix the error without losing data you can follow these solutions.
Fix 1. Check and Fix Disk Error with CHKDSK
Free disk space does not increase after deleting files windows 10 error could happen if there are errors on your disk. Fix the disk error and let CHKDSK help.
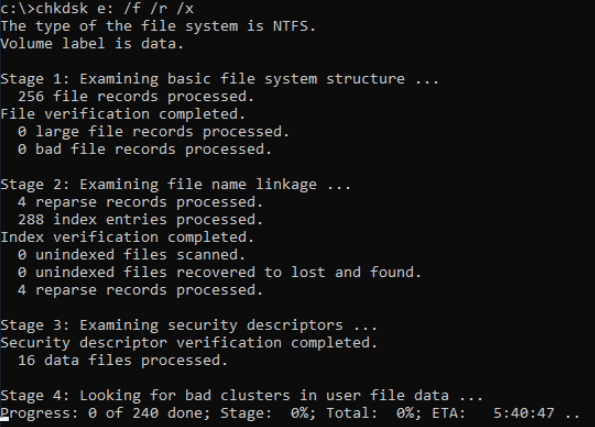
Step 1. Press the Windows key and type cmd.
Step 2. Right-click «Command Prompt» and choose «Run as administrator.»
Step 3. Enter the following command («E» is the drive letter of the partition you want to check.)
chkdsk E: /f /r /x
Fix 2. Run CHKDSK Alternative to Fix Space Not Increasing
If command line is not your ideal choice, you can apply this command-line alternative tool — EaseUS CleanGenius. Use this one-click tool to fix the file system error on your hard drive.
Step 1. Download EaseUS CleanGenius on your computer for free.
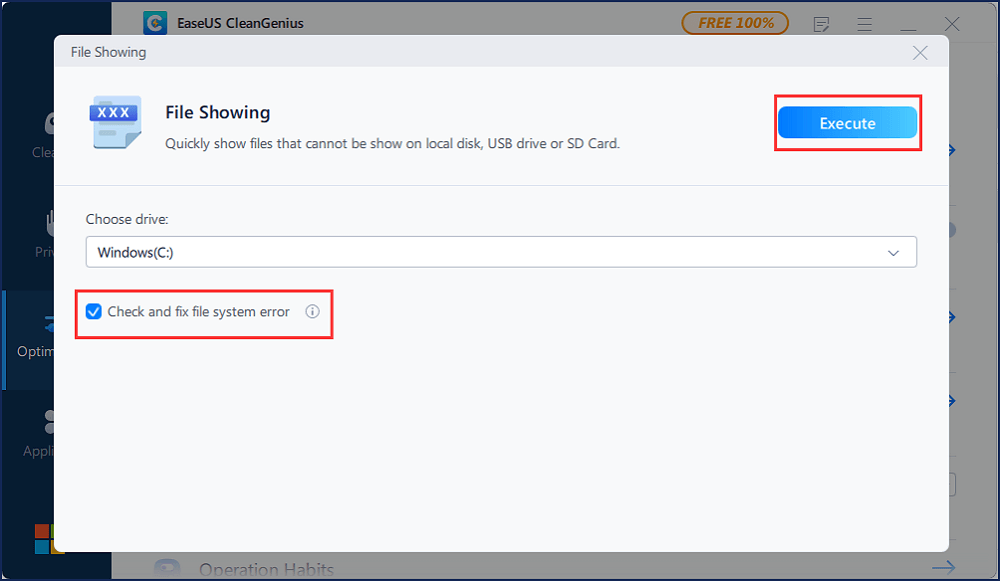
Step 2. Run the software. Click «Optimization» on the left panel, and then choose «File Showing» .
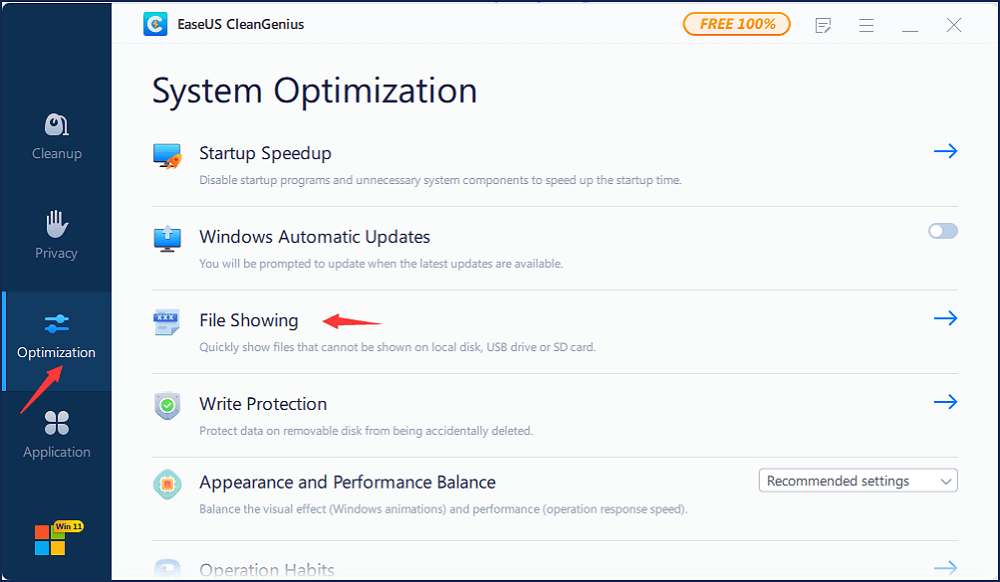
Step 3. Go to «Choose drive» and select the drive with a file system error. Check the «Check and fix file system error» option and click «Execute».
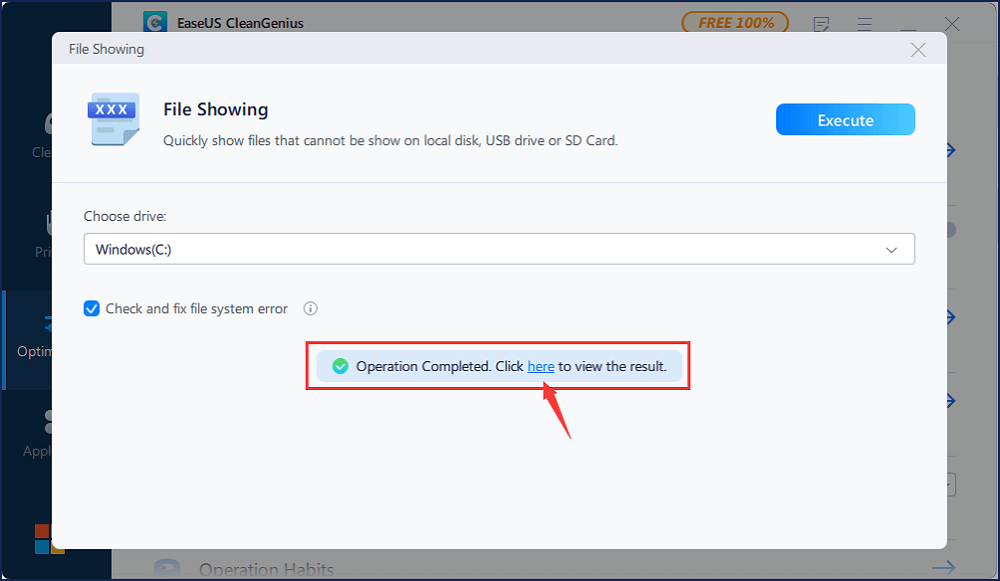
Step 4. Wait the EaseUS CleanGenius completes the repairing process. After that, click the «here» to view the result.
Fix 3. Transfer Data to External Device (Back Up Data)
In order to avoid unexpected data loss issues while freeing up space on your devices, back up important data or remove saved files to other spots. You can manually copy your disk or partition data to your external device or use third-party backup and recovery software. EaseUS Todo Backup can back up operating systems, personal files, and the whole partition or disk with easy steps. Follow these steps to back up files to an external device.
Step 1. Click «Select backup contents» to initiate a backup.

Step 2. There are four data backup categories, File, Disk, OS, and Mail, click File.

Step 3. Local and network files will be displayed on the left side. You may extend the directory to choose which files to back up.

Step 4. Select the location where you want to store the backup by following the on-screen instructions.

Click «Options» to encrypt the backup with a password in «Backup Options,» and to setup a backup schedule and choose to initiate a backup at a certain event in «Backup Scheme.» There are a variety of other customization options available for the backup process.

Step 5. You may save the backup to a local disk, EaseUS’ online service, or a NAS.

Step 6. EaseUS Todo Backup enables customers to back up data to a third-party cloud drive and its own cloud drive.
If you want to back up data to a third-party cloud drive, choose Local Drive, scroll down to add Cloud Device, add your account, and then log in.

You can also save backups to EaseUS’s cloud storage service. Sign up for an EaseUS Account and log in after clicking EaseUS Cloud.

Step 7. To begin backup, click «Backup Now» Once the backup process has been finished, it will be shown as a card on the panel’s left side. To further manage a backup job, right-click it.

Fix 4. Format the Partition to Free Up Space
After you have made a backup, you can try to format the drive with space not increasing error. Windows 10 offers users a built-in disk management tool to create, delete, extend, shrink, and format partitions. The easiest way to format the hard drive is by using Disk Management:
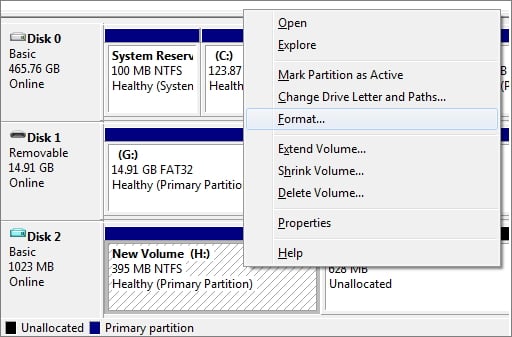
Step 1. Right-click on the Windows icon and select «Disk Management».
Step 2. Right-click on the target drive or partition and click on «Format».
Step 3. Select the file system and set the cluster size.
Step 4. Click «OK» to format the drive.
Fix 5. Wipe the Hard Drive If It’s Still Full After Deleting
If this error still exists, you can consider wiping this disk to fix «deleting files doesn’t free up space». EaseUS Partition Master can permanently erase data on the disk(s) or partition(s). What’s more, you can delete a partition, merge partitions, and format a partition with this software. Follow these steps to wipe your hard drive with ease.
We’ve set two options for you to wipe data. Choose the one you need.
Option 1. Wipe Partition
- Right-click the partition you want to erase data from, and choose «Wipe».
- In the new window, set the time for which you want to wipe your partition, then click «OK».
- Click the «Execute 1 Task(s)» button in the lower right corner, check the changes, then click «Apply».
Option 2. Wipe Disk
- Select the HDD/SSD. And right-click to choose «Wipe Disk».
- Set the number of times to wipe data. (You can set to 10 at most.) Then Click «OK».
- Click «Execute 1 Task(s)» and then click «Apply».
After data erasing, you can use EaseUS partition software to partition the hard drive and restore the backup to your drive.
Conclusion
When you delete files, use right-click and then select delete. When files are deleted they get moved to the recycle bin. Once you deleted them from the recycle bin space is cleared. If a file deleted, but space not released on Windows 10, try the five ways demonstrated in this tutorial.
Deleted Files But Hard Drive Still Full FAQs
It’s really frustrating when you deleted files from your hard drive but it still says no free space. You can fix them with these steps above. If you still have problems, you can read these frequently asked questions to get additional help.
Why is my hard drive still full after deleting files?
Available disk space does not increase after deleting files. When a file is deleted, the space used on the disk is not reclaimed until the file is truly erased. The trash (recycle bin on Windows) is actually a hidden folder located in each hard drive.
Are deleted files ever really gone?
When you delete a file from your computer, it doesn’t simply disappear from existence. Even if you immediately empty the Recycle Bin or Trash folder, all your deletion does is earmark the space that file takes up on your hard drive as vacant.
Is Disk Cleanup safe for SSD?
Yes and if you don’t use system restore often, turn that off too, especially if you own an Intel SSD, they recommend it be off for their SSDs. However that doesn’t mean that you should never use it.
(Image credit: Future)
On Windows 10, you can free up space on your computer in many different ways. Although nowadays, laptops and desktops include drives with multiple terabytes of storage, we always find a way to fill them up with documents, pictures, videos, apps, and games, causing the system to feel sluggish, problems saving files, and many other issues.
If your computer runs out of space, Windows 10 comes with tools if your computer runs low on space. For example, Storage Sense, OneDrive Files On-Demand, Compact OS, NTFS compression, and other features to delete unnecessary files, apps, and games can help reclaim space, improve performance, and resolve problems during updates.
This guide will walk you through the best ways to free up storage space on Windows 10 to store more files and install feature updates without issues.
1. Free up space clearing Recycle Bin on Windows 10
Windows 10 doesn’t erase files from the drive when you delete them. Instead, they are relocated to the Recycle Bin and marked for deletion. However, since the Recycle Bin can grow large over time, emptying its contents is the first thing you can do to free up space on your computer.
To empty the Recycle Bin to regain storage space on Windows 10, use these steps:
- Open Start.
- Search for Recycle Bin and click the top result to open the app.
- Quick tip: If the app does not appear in the result, you can open File Explorer (Windows key + E), type Recycle Bin, and press Enter in the address bar.
- Click the «Recycle Bin Tools» tab.
- Click the «Empty Recycle Bin» button.
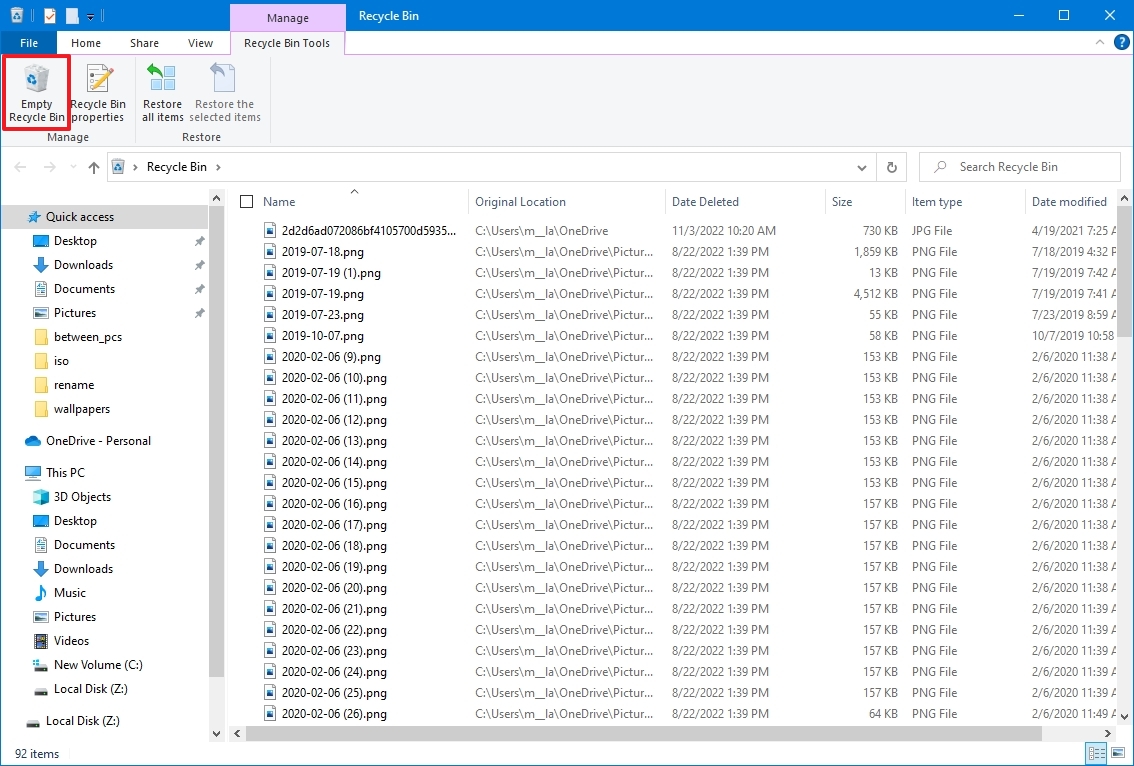
- Click the Yes button.
Once you complete the steps, the system will free up around 10% of the drive capacity (assuming the bin is full).
Change Recycle Bin settings
Windows 10 reserves 10% of the available space for deleted files. Once the threshold is reached, the system will automatically delete files from the oldest to the newest. You can always adjust how much space the system should use for the Recycle Bin.
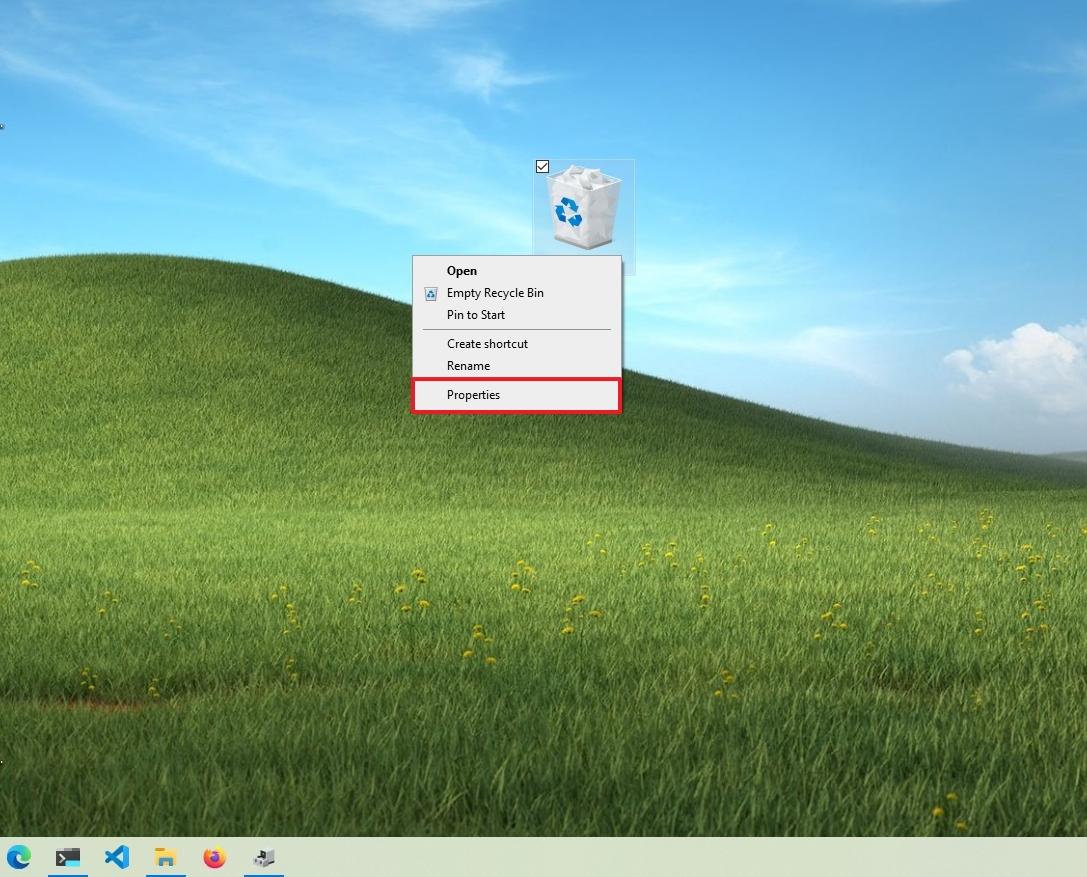
To reduce the space usage for the Recycle Bin, use these steps:
- Use the Windows + D keyboard shortcut to view the desktop.
- Right-click the Recycle Bin icon and select the Properties option.
- Select the Recycle Bin location you want to configure if you have multiple partitions. For example, Local Disk (C:) is the drive where Windows 10 is installed.
- Under the «Settings for selected location» section, select the Custom size option.
- In the «Maximum size (MB)» field, specify the maximum hard drive space in megabytes that Recycle Bin can use on the particular partition.
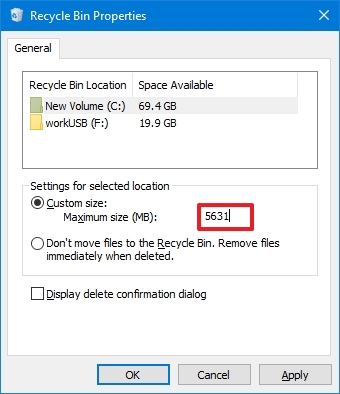
- (Optional) Check the «Don’t move files to the Recycle Bin. Remove files immediately when deleted» option if you want to delete the files from the drive skipping the Recycle Bin to minimize storage usage.
- Click the Apply button.
- Click the OK Button.
After you complete the steps, the Recycle Bin will be able to keep more or fewer files from a particular location, depending on your configuration.
2. Free up space removing junk files with Storage Sense on Windows 10
Storage Sense is a feature that allows the deletion of different types of junk files (including previous installation files after an upgrade and temporary files) to free up space on all the drives to make room to store other files and improve drive efficiency.
Enable Storage Sense
Although you can use Storage Sense manually, you can also enable the feature to run maintenance automatically.
To enable Storage Sense on Windows 10, use these steps:
- Open Settings.
- Click on System.
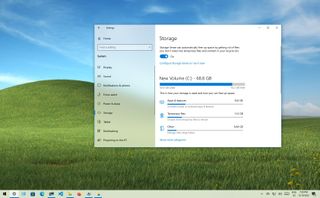
- Click on Storage.
- Under the «Storage» section, click the «Configure Storage Sense or run it now» option.
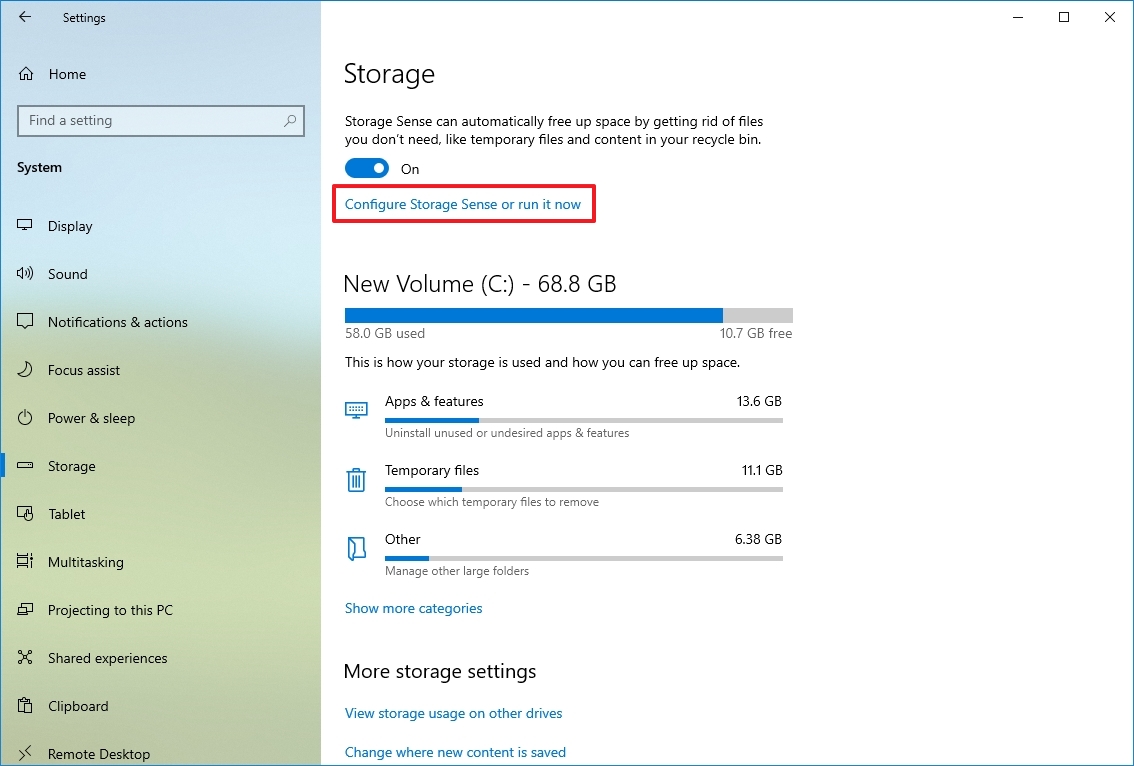
- Turn on the Storage Sense toggle switch.
- Use the «Run Storage Sense» drop-down menu and select the best option for your situation:
- Every day.
- Every week.
- Every month.
- During low free disk space (recommended).
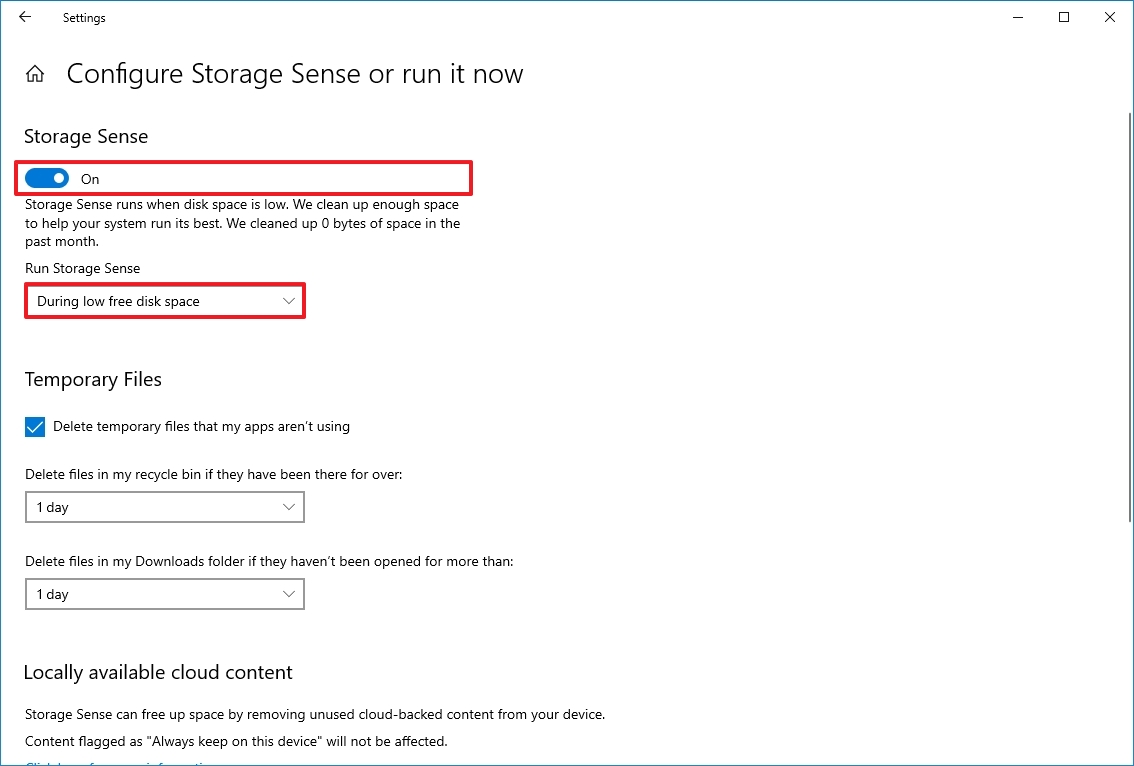
Once you complete the steps, Storage Sense will run automatically at your specified schedule to free up space and improve storage performance on Windows 10.
The option to enable the feature is also available through the «Storage» page. However, it only activates the default settings. Utilizing the Storage Sense settings page lets you configure how the feature should remove unnecessary content from your computer.
Delete unnecessary files with Storage Sense
To free up space using Storage Sense on Windows 10, use these steps:
- Open Settings.
- Click on System.
- Click on Storage.
- Under the «Storage» section, click the «Configure Storage Sense or run it now» option.
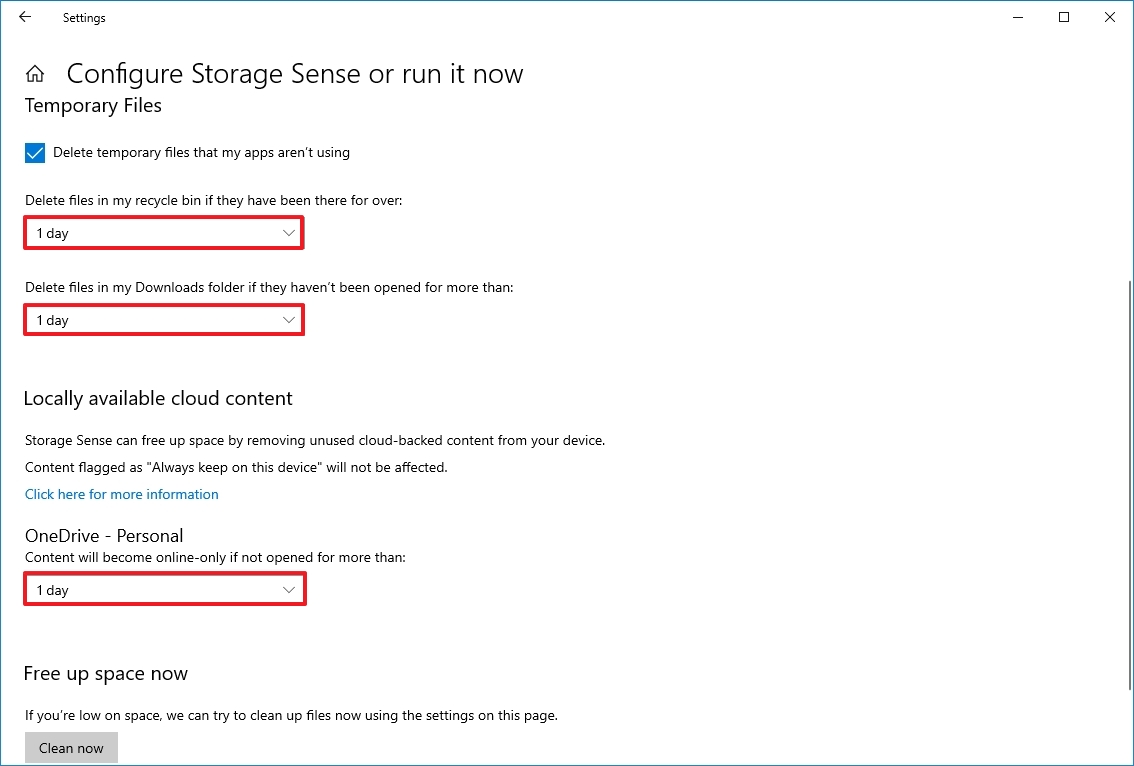
- Under the «Temporary Files» section, check the «Delete temporary files that my apps aren’t using» option.
- Use the Recycle Bin drop-down menu to specify how to clear already deleted files you do not need.
- Use the Downloads drop-down menu to specify how to clean up downloaded files.
- Quick tip: If you need to delete the most files, use the «1 day» option. The «Downloads» folder may contain valuable files you may have downloaded from the internet, which means that it is recommended to back up those files manually before running the feature.
- Under the «Locally available cloud content» section, use the drop-down menu to specify how long OneDrive content synced to the device becomes online-only.
- Quick note: This option is part of OneDrive Files On-Demand that allows you to access your documents, pictures, videos, and other files using File Explorer without needing to sync them to reduce the space usage. When the device is running low on space, you can use it to make files only available in the cloud. You will still see your files, but their content will only download when you need them.
- Under the «Free up space now» section, check the «Delete previous versions of Windows» option (if applicable).
- Click the Clean now button.
- Quick note: This option can free up close to 20GB of space, but the storage will vary from system to system.
Storage Sense will run and delete unnecessary files from the computer to reclaim more space after completing the steps.
Delete temporary files with Storage Sense
Storage Sense also deletes temporary system and app files that can help to reclaim several gigabytes of space on the computer.
To delete temporary files from the computer, use these steps:
- Open Settings.
- Click on System.
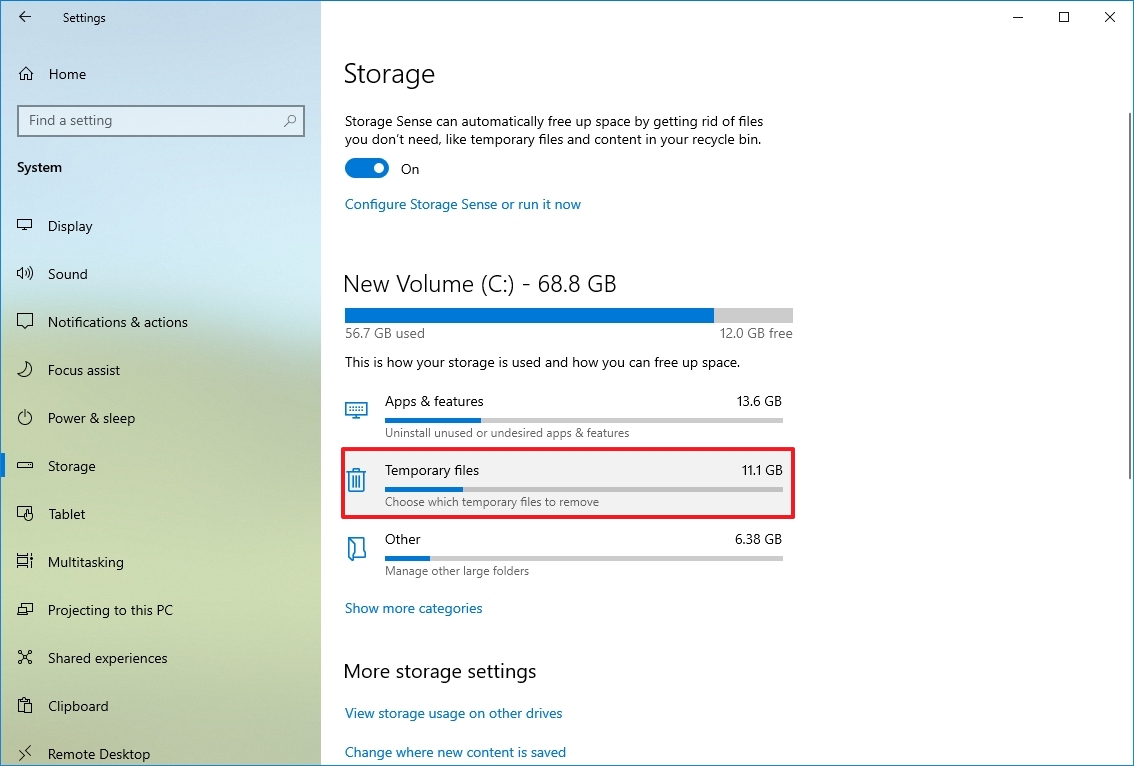
- Click on Storage.
- Under the «Local Disk (C:)» section, click the «Temporary files» item. (If the item is unavailable, click the «Show more categories» option.)
- Check all the items you want to remove to optimize the space. For example:
- Downloads.
- Windows Update Cleanup.
- Recycle Bin.
- Delivery Optimization Files.
- Thumbnails.
- Microsoft Defender Antivirus.
- Temporary Internet Files.
- Temporary files.
- Windows error reports and feedback diagnostics.
- DirectX Shader Cache.
- Previous Windows installation(s).
- Temporary Windows installation files.
- Quick tip: The available items may differ on your installation. If you want to select the «Downloads» item, before clearing these files, make sure to understand that this option will erase everything in that folder.
- Click the Remove files button.
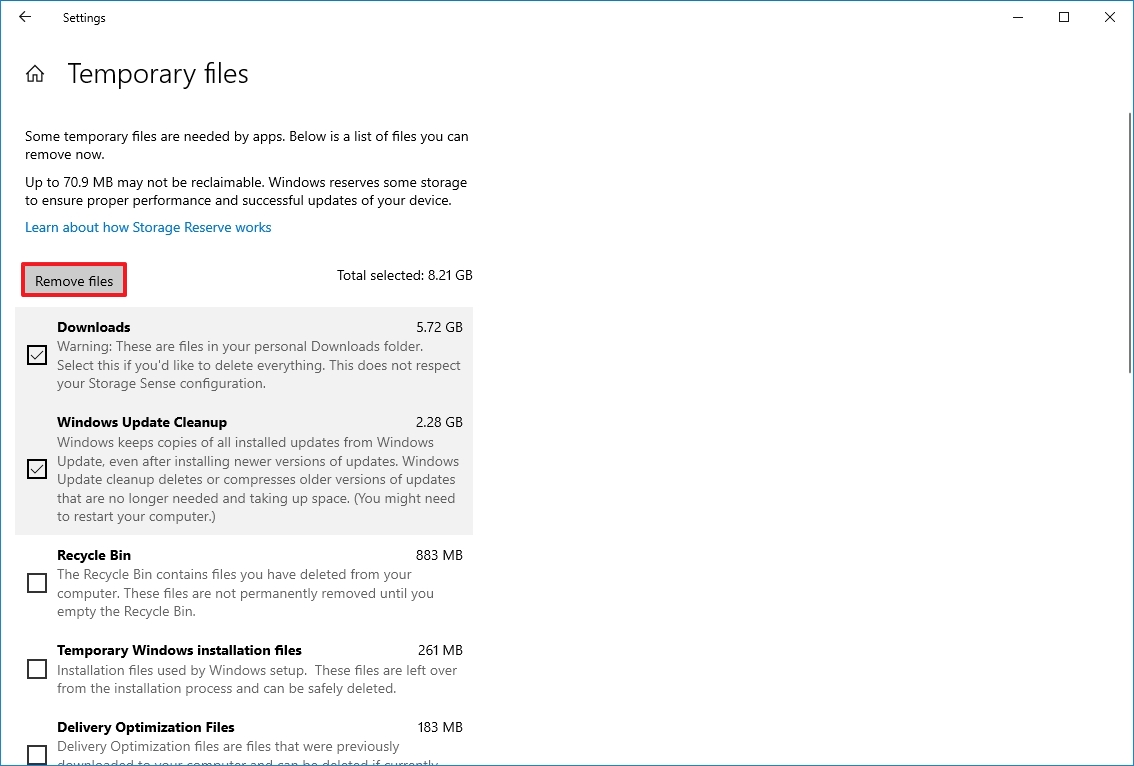
After you complete the steps, the selected files will be deleted permanently, freeing up space for more important files.
View storage usage
On Windows 10, Storage Sense is also a great tool to help you understand which files use the most space to determine the files you can clean up.
To view the storage usage on Windows 10, use these steps:
- Open Settings.
- Click on System.
- Click on Storage.
- Under the «Local Disk C:» section, click the «Show more categories» option.
- Confirm storage usage on Windows 10.
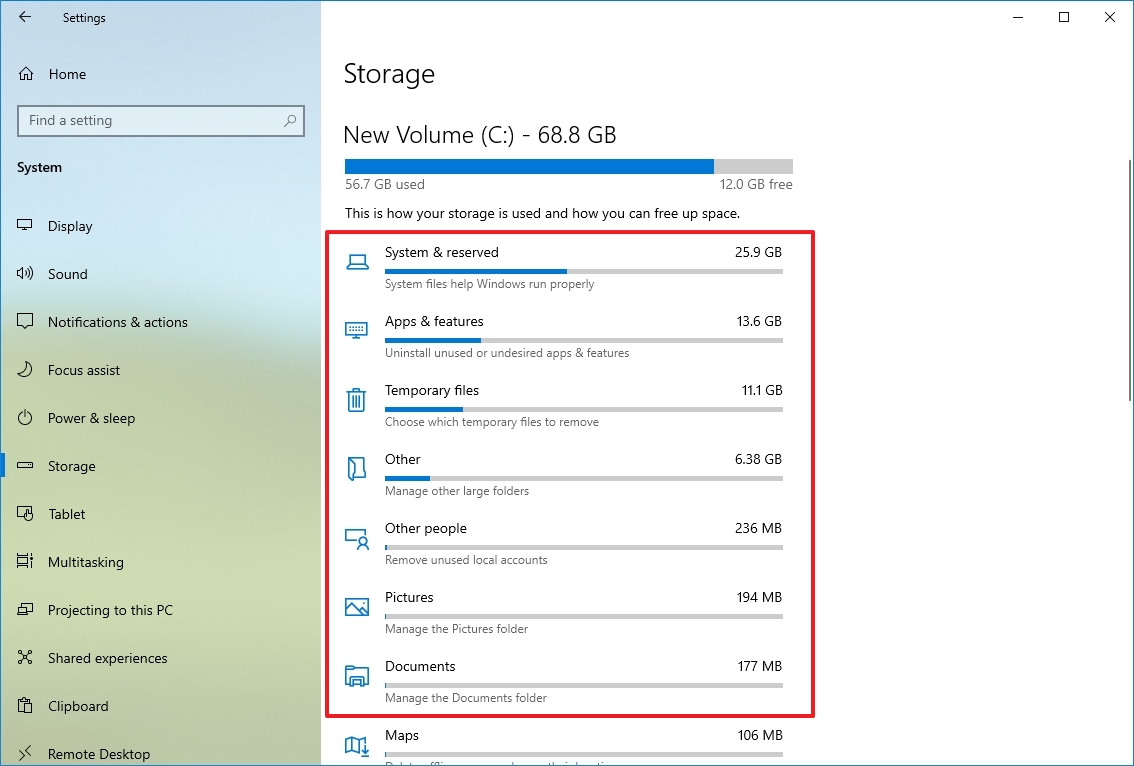
- Select each category to see even more details and actions you can take to free up space on Windows 10.
Once you complete the steps, you can determine the storage usage to focus on the locations to free up space. For example, inside the «System & reserved» category, you will see how much space the installation, virtual memory, hibernation files, and system restore are using and how much space the system is reserving for updates.
If you have multiple drives, under the «More storage settings» section, click the «View storage usage on other drives» option to open the page that lists all the drives on the device.
3. Free up space deleting temporary files using Disk Cleanup on Windows 10
You can still use the legacy Disk Cleanup tool to clear unnecessary files on Windows 10.
Remove temporary files with Disk Cleanup
To use Disk Cleanup to delete temporary files on Windows 10, use these steps:
- Open Start.
- Search for Disk Cleanup and select the top result to open the app.
- Use the «Drives» drop-down menu and select the (C:) drive (if applicable).
- Click the OK button.
- Click the «Clean up system files» button.
- Use the «Drives» drop-down menu and select the (C:) drive.
- Click the OK button.
- Check all the contents to delete.
- Windows Update Cleanup.
- Microsoft Defender Antivirus.
- Downloaded Program Files.
- Temporary Internet Files.
- Windows error reports and feedback diagnostics.
- DirectX Shader Cache.
- Delivery Optimization Files.
- Device driver packages.
- Language Resource Files.
- Previous Windows installation(s).
- Recycle Bin.
- Temporary files.
- Thumbnails.
- Click the OK button.
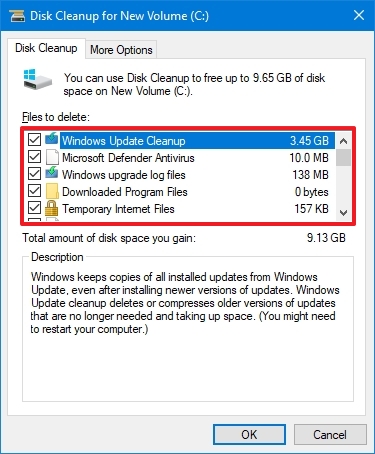
- Click the Delete Files button.
After you complete the steps, those unnecessary files will be deleted from the device, freeing up hard drive space.
Delete System Restore and Shadow Copies using Disk Cleanup
Using System Restore and the Shadow Copies features, you can delete older files to reclaim additional space on Windows 10.
To delete old system restore points on Windows 10, use these steps:
- Open Start.
- Search for Disk Cleanup and select the top result to open the app.
- Use the «Drives» drop-down menu and select the (C:) drive (if applicable).
- Click the OK button.
- Click the «Clean up system files» button.
- Click the More Options tab.
- Under the «System Restore and Shadow Copies» section, click the Clean up button.
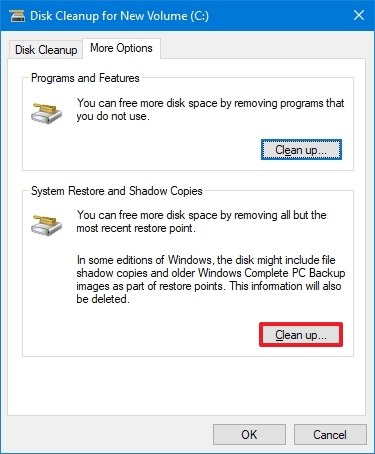
- Click the Delete button.
After completing the steps, you will reclaim additional space to store more important content.
4. Free up space using OneDrive files on-demand on Windows 10
You can also use the OneDrive Files On-Demand feature to manually make files available online to regain some space on your computer.
Enable OneDrive Files On-Demand
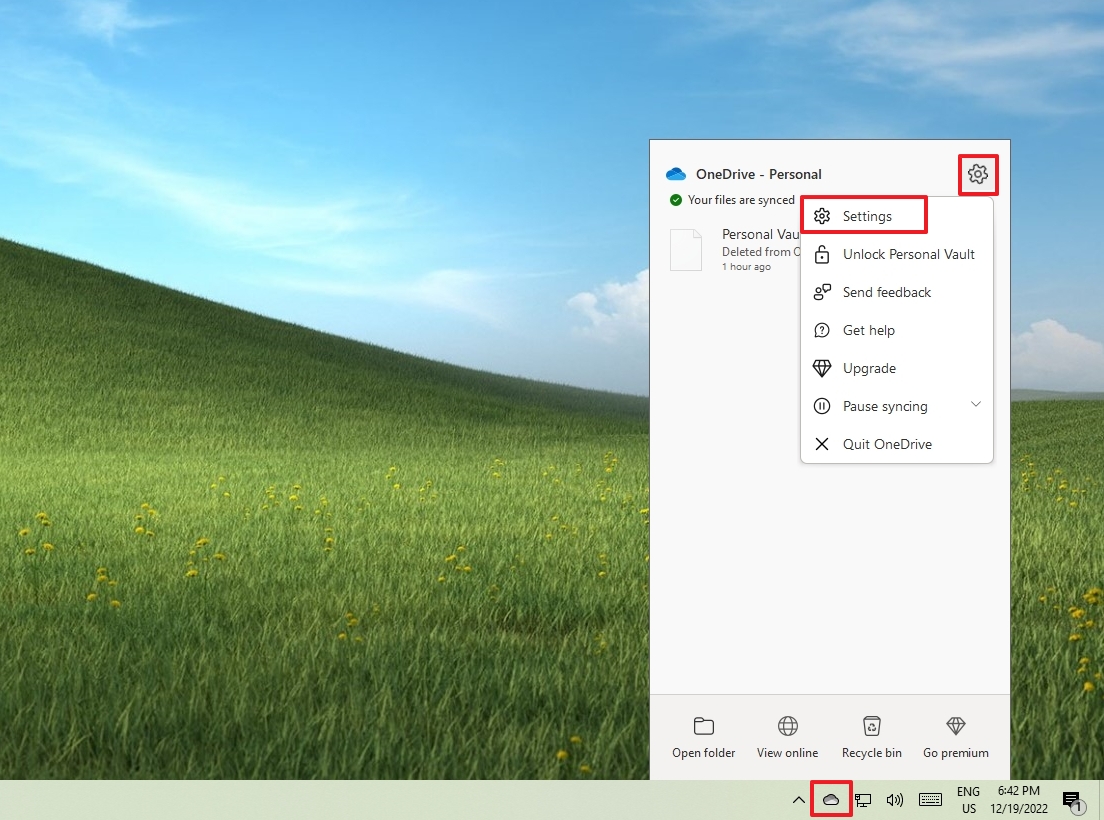
On Windows 10, the Files On-Demand feature should be already enabled in OneDrive, but if it is not, use these steps:
- Click the OneDrive icon in the bottom-right corner of the taskbar.
- Click the Help & settings (gear) button on the top-right.
- Click the Settings option.
- Click the Settings tab.
- Click on Sync and backup.
- Click the Advanced settings item.
- Under the «Files On-Demand» section, click the «Download files as you use them» button.
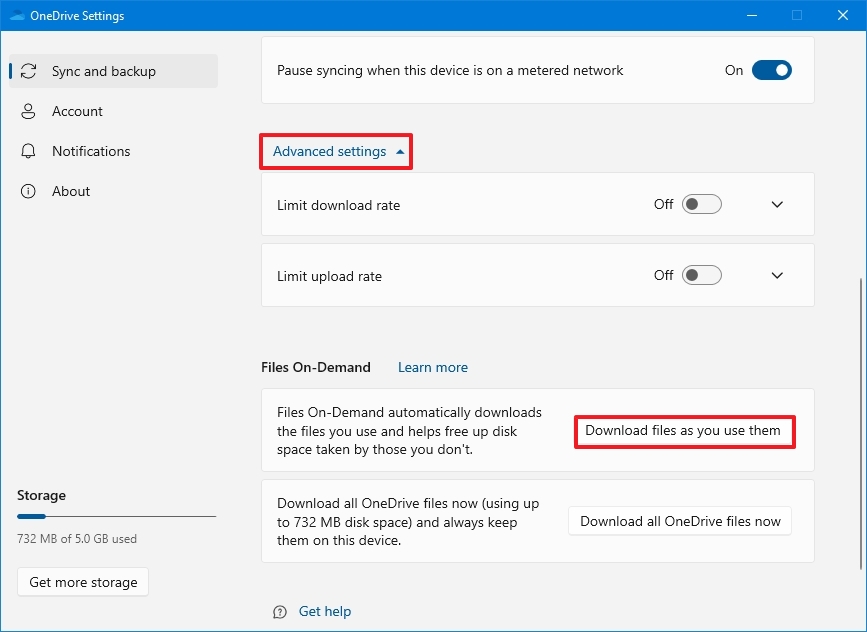
- Click the Continue button.
Once you complete the steps, you can move files to the OneDrive folder and make them available only online to free up space (see steps below).
Make files available online-only
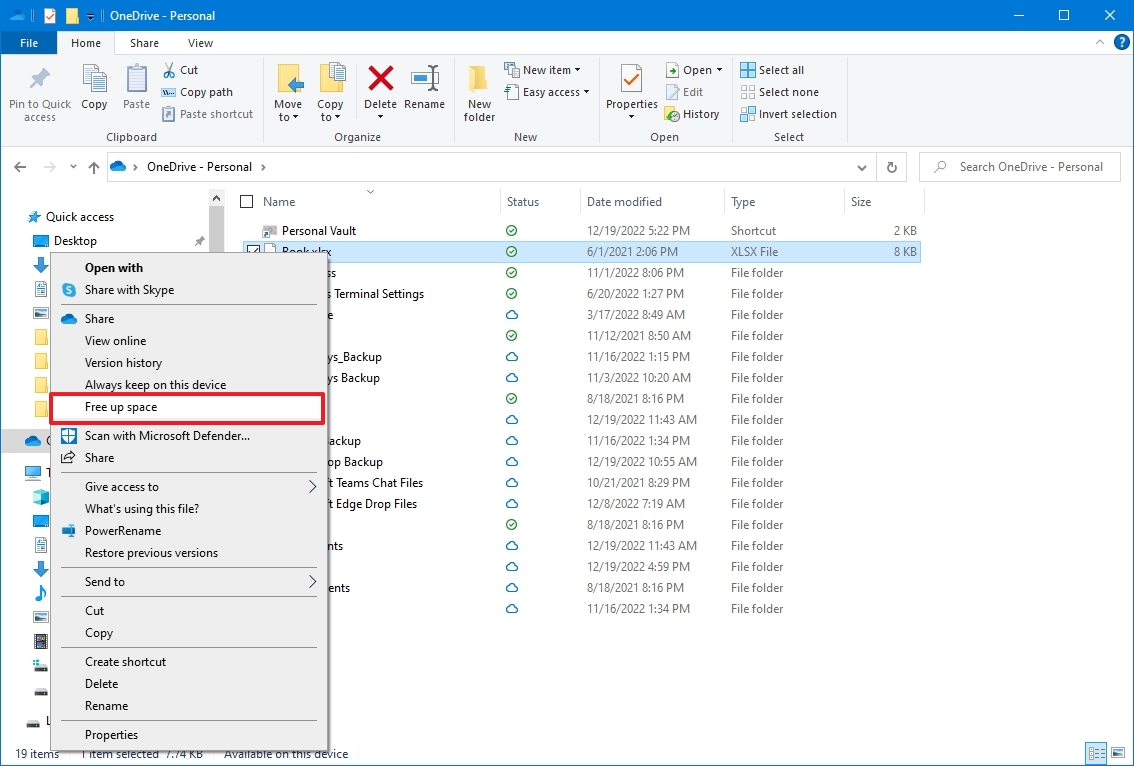
To make local files available online-only with OneDrive, use these steps:
- Open File Explorer.
- Select the OneDrive folder from the left pane.
- Select the files and folders taking up the most space.
- Quick tip: You can select all files using the «Ctrl + A» keyboard shortcut by selecting the first file, holding down the «Shift» key, selecting the last files, or holding down the «Ctrl» key and selecting each file individually.
- Right-click the selection and choose the «Free up space» option.
After you complete the steps, you will be able to access all of your content using File Explorer, but you will only be able to open them with an internet connection. In addition to making synced files available only with an internet connection, you can free up even more space by moving other files to the OneDrive folder and using the above steps to make them available on demand.
The free version of OneDrive allows you to store up to 5GB of data. However, you can always get a Microsoft 365 subscription to lift the limit to 1TB (opens in new tab). In addition to the 1TB of storage, the subscription also gives you access to all the Office apps and services like Microsoft Teams and Family Safety.
5. Free up space removing non-essential apps and games
You can also reclaim space by uninstalling apps you don’t need or rarely use. Games also take up a lot of space, which means that keeping your catalog to a minimum can significantly reduce space usage while improving gaming performance on Windows 10.
To uninstall apps and games on Windows 10, use these steps:
- Open Settings.
- Click on Apps.
- Click on Apps & features.
- Use the «Sort by» filter and select the Size view to quickly identify the apps and games wasting the most space.
- Select the item to remove.
- Click the Uninstall button.
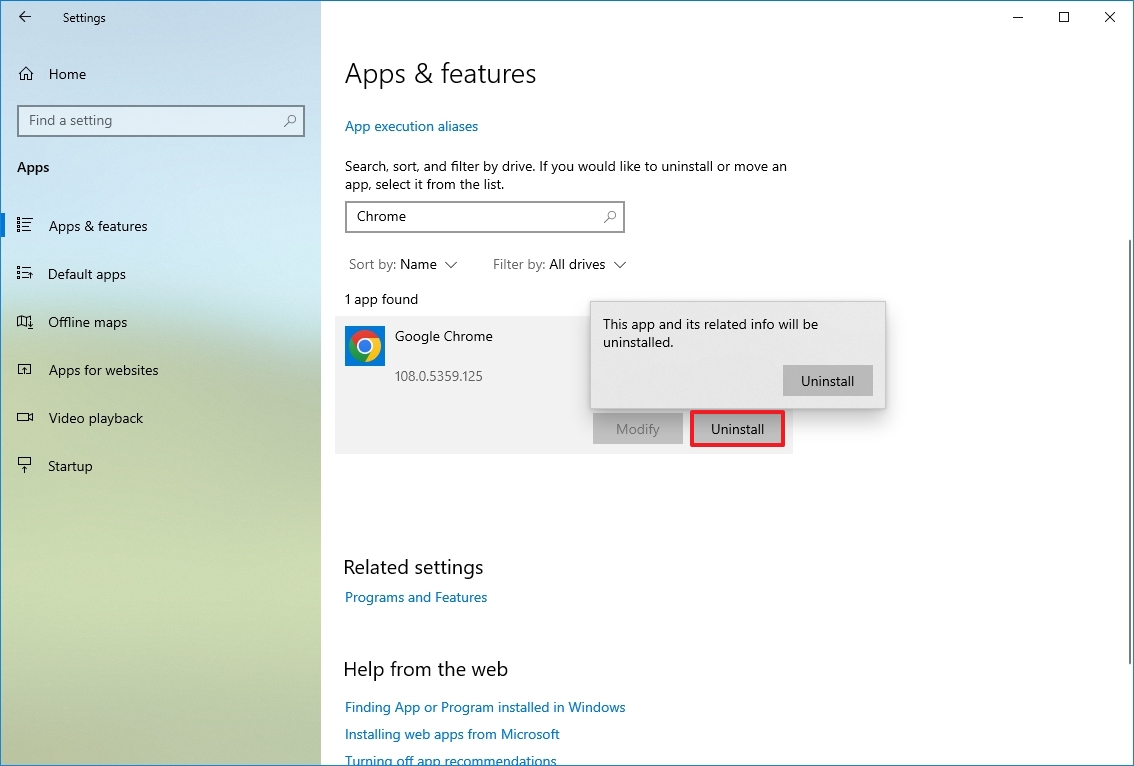
- Click the Uninstall button again.
- Continue with the on-screen directions (if applicable).
Once you complete the steps, repeat the instructions to remove additional apps and games from the computer.
If you previously enabled the Windows Subsystem for Linux (WSL), you may also have one or multiple distros installed on your computer. You can always uninstall them to free up space on Windows 10.
Delete unused languages
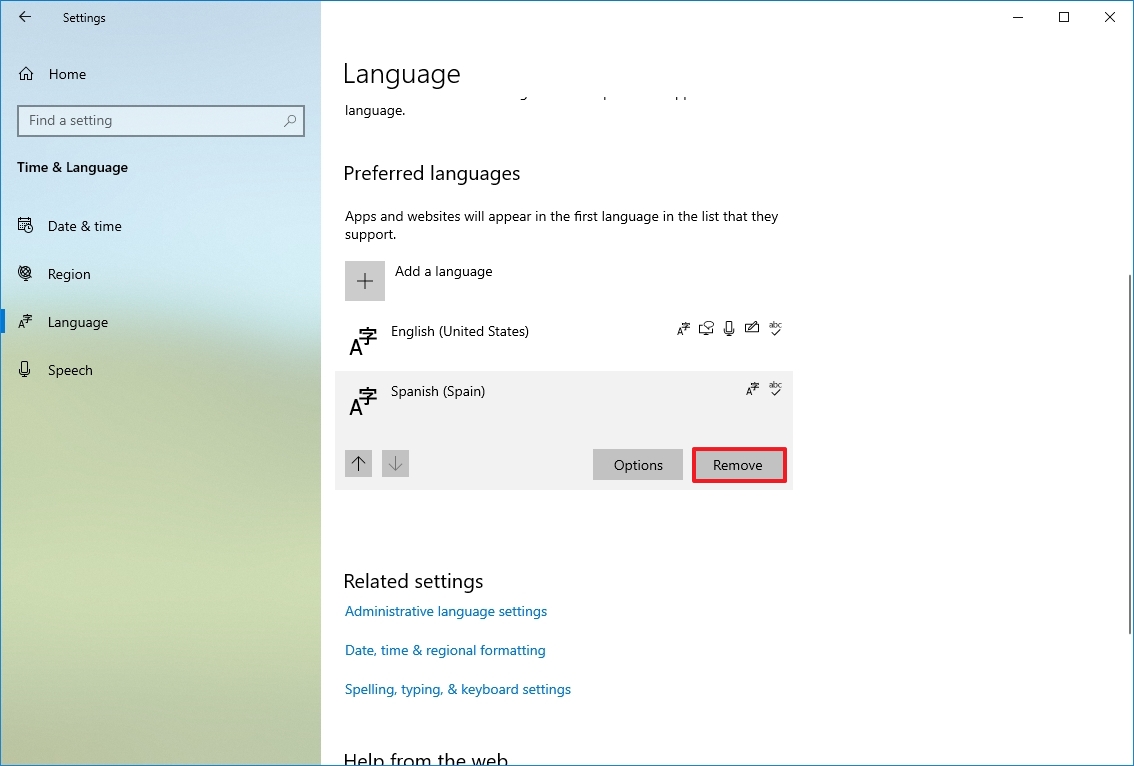
Secondary languages installed on Windows 10 can also use some available storage. If you rarely use the other languages, remove them to make more room for additional files.
To uninstall languages on Windows 10, use these steps:
- Open Settings.
- Click on Time & Language.
- Click on Language.
- Select the language to remove.
- Click the Remove button.
After you complete the steps, you may need to repeat the instructions to delete additional languages as necessary.
Delete maps
If you use the maps feature on Windows 10, you can remove the offline maps to clear up some additional space on the computer.
To delete existing maps from your computer, use these steps:
- Open Settings.
- Click on Apps.
- Click on Offline maps.
- Click the Delete all maps button.

- Click the Delete all button.
Once you complete the steps, the offline maps will be removed from your computer to reclaim additional storage space.
Uninstall optional features
Optional features (such as Windows Media Player, Windows Hello Face, Math Recognizer, Windows Fax and Scan, and others) also take up storage, and you can remove them to regain some extra space on Windows 10.
To remove optional features on Windows 10, use these steps:
- Open Settings.
- Click on Apps.
- Click on Apps & features.
- Under the «Apps & features» section, click the «Optional features» option.
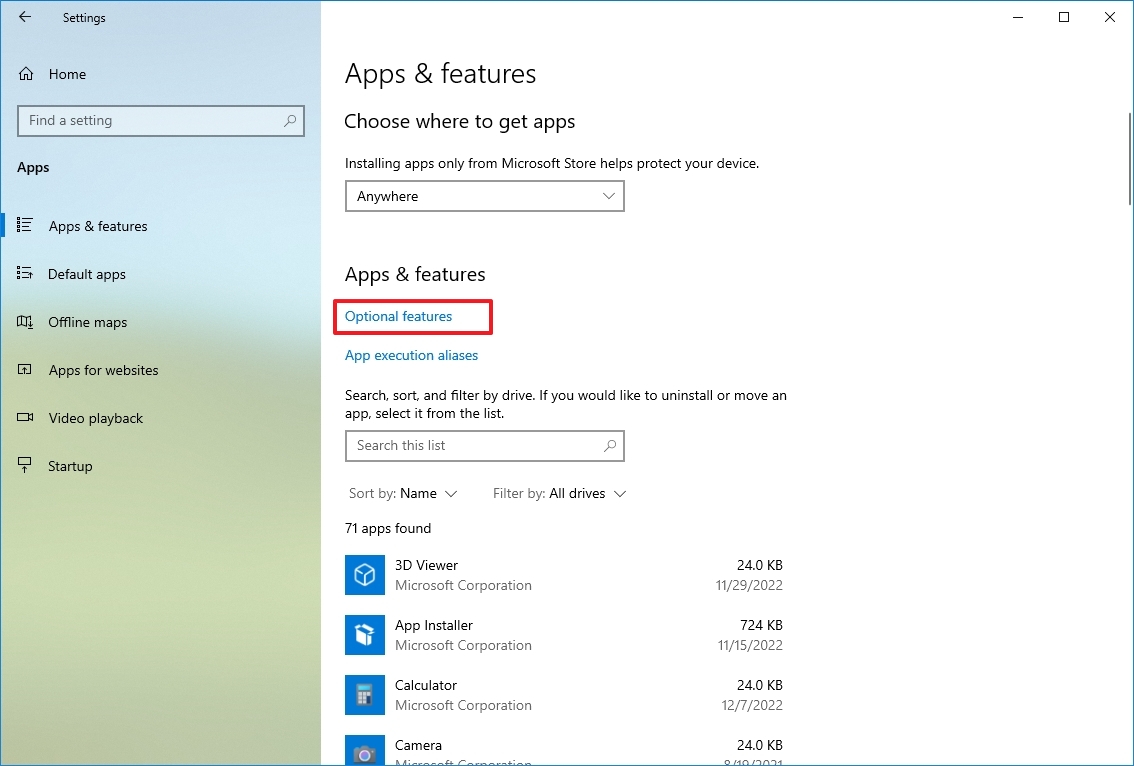
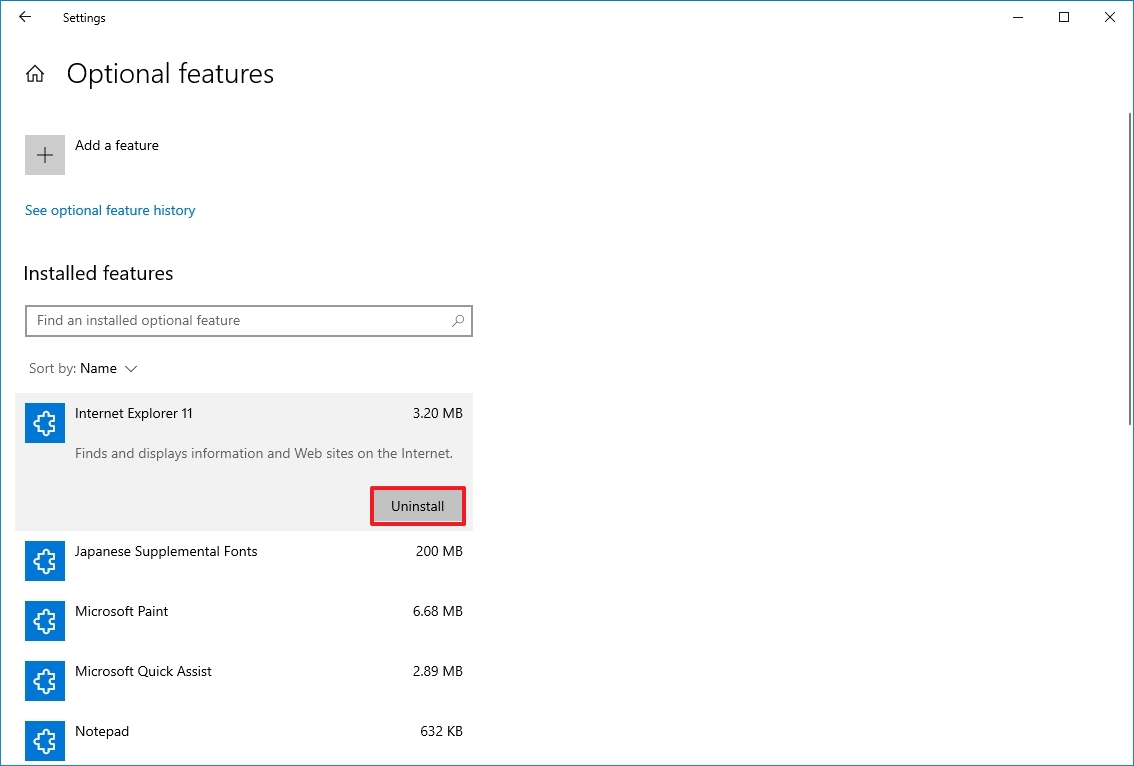
- Click the «Sort by» menu and select the Install Size option to determine the feature using the most space.
- Select the feature to remove.
- Click the Uninstall button.
After you complete the steps, you may need to repeat the instructions to remove other features you may no longer need.
6. Free up space transferring files to external drive
If you cannot clear enough space, you can connect an external drive to move files to the new location. You can even configure the system to make the external storage the default location to save files.
Relocate files to external drive
To transfer existing files to an external storage, connect the drive you will dedicate to the computer, and then use these steps:
- Open File Explorer.
- Browse to the folder with the content taking the most space.
- Select the items to move.
- Click the Move to button from the «Home» tab.
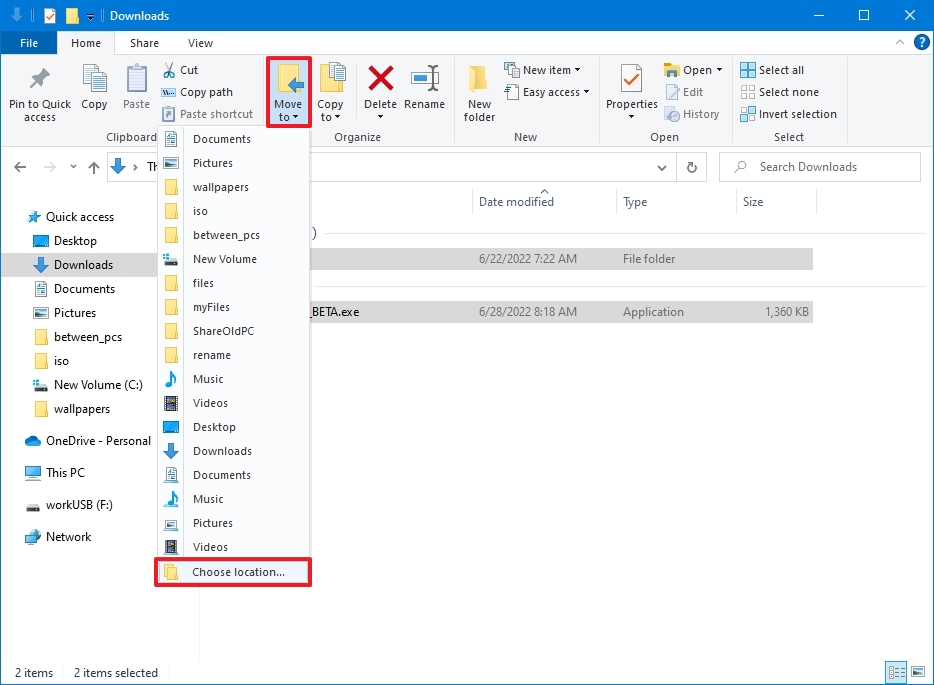
- Select the Choose location option.
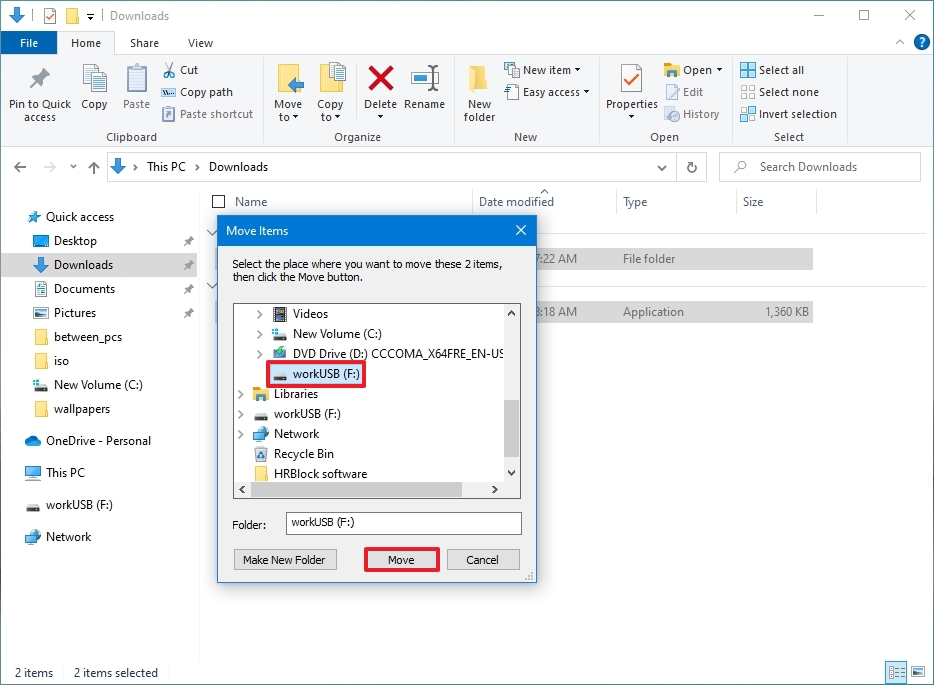
- Select the external storage as the new destination.
- Quick tip: If you want to keep files organized, you can use the available option to create a new folder to store the files in the new location.
- Click the Move button.
After completing the steps, you may need to repeat the instructions to move additional files and folders to a new location to reduce the storage usage in the drive running out of space.
Configure external drive as new save location
To allow the system to save files and install apps on an external drive automatically, use these steps:
- Open Settings.
- Click on System.
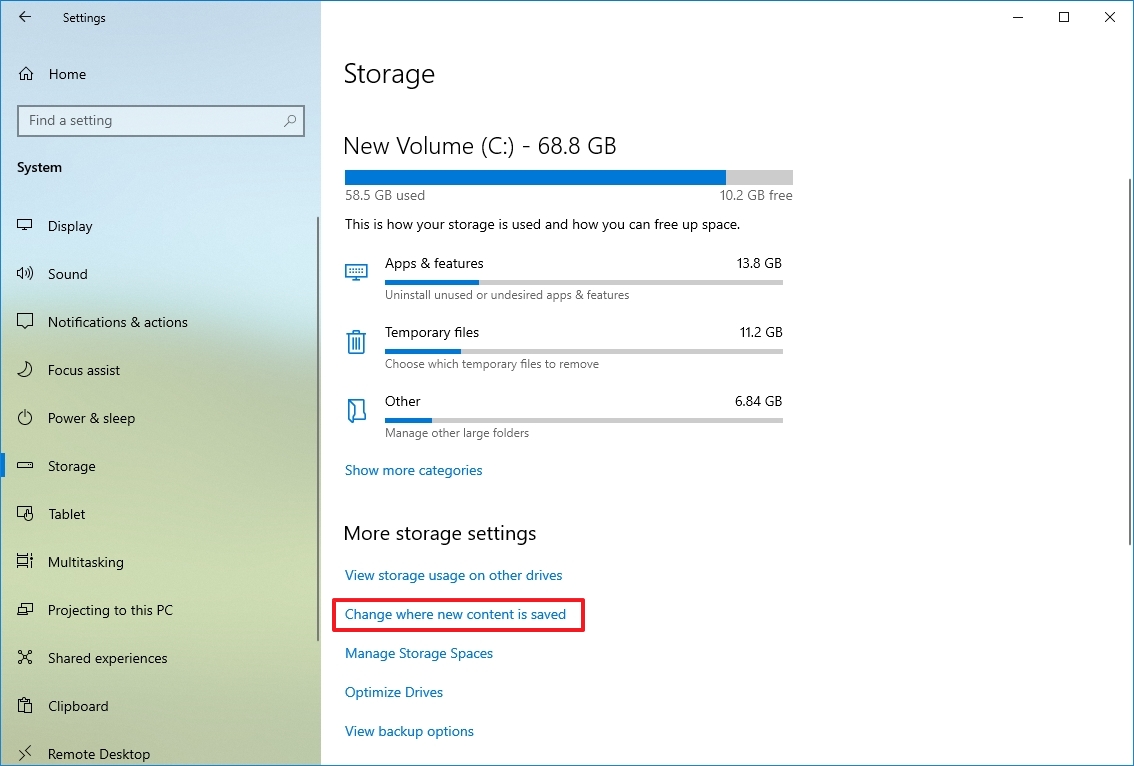
- Click on Storage.
- Under the «More storage settings» section, click the «Change where new content is saved» option.
- Use the drop-down menus and select the new location to save files automatically for each content type.
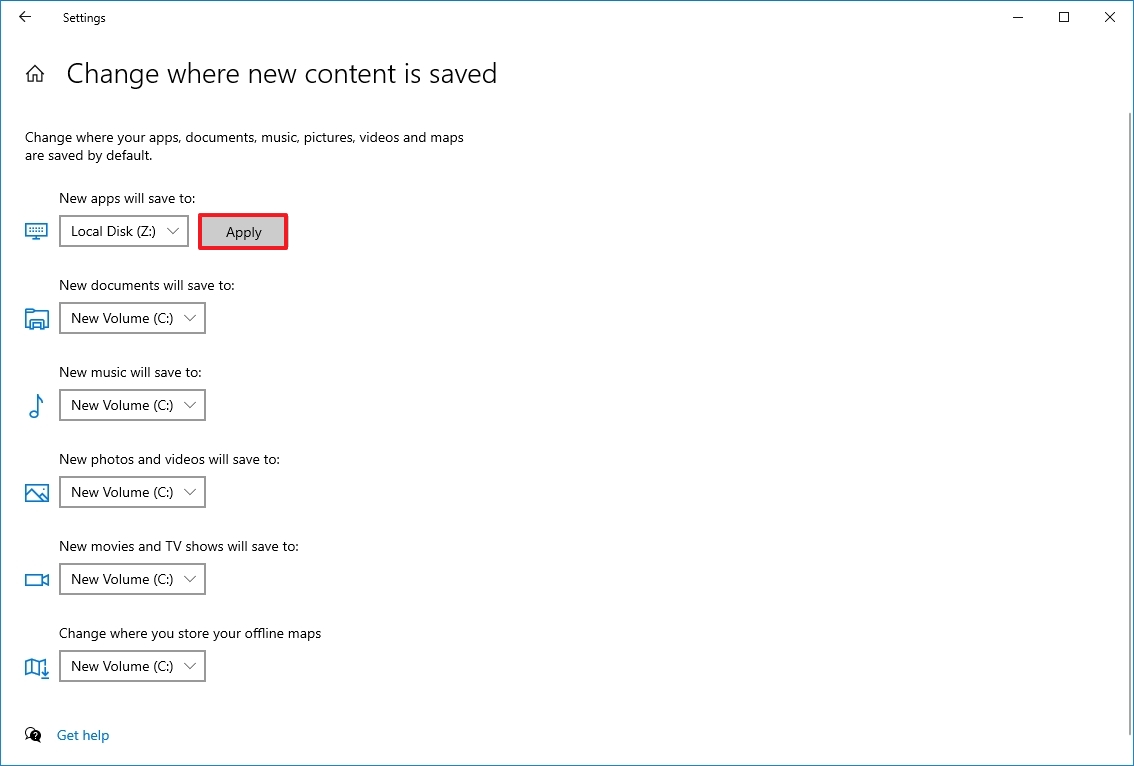
- Use the «New apps will be save to» drop-down menu to select the drive to install future apps by default.
- Click the Apply button for each setting.
Once you complete the steps, files, and apps from the Microsoft Store will save in the new location you specified.
Relocate apps and games to new drive
You can also move most apps and games from the Microsoft Store installed on the computer to an external drive, which can help reduce storage usage.
To transfer existing apps and games to another drive on Windows 10, connect the external storage to the computer, and then use these steps:
- Open Settings.
- Click on Apps.
- Click on Apps & features.
- Use the «Sort by» filter and select the Size view to quickly identify the apps and games using the most space.
- Select the item to relocate.
- Click the Move button. (If the option is not available, the transfer feature is not available for that particular item.)
- Use the drop-down menu to select the new location.
- Click the Move button again.
After you complete the steps, you may need to repeat the same instructions to move additional apps or games to the new location.
The external drive must always be connected to the device when using this feature. Otherwise, you won’t be able to launch the apps or play those games you moved to the new storage.
7. Free up space using NTFS compression
Windows 10 also includes a compression feature part of the NT File System (NTFS) to reduce the storage usage of current files maintaining normal access without the need to zip any content. The feature can compress files, folders, or the entire drive.
Important: Data compression can negatively impact system performance as it has to compress and decompress data on the fly. You should use this option only if you do not have another option and have capable hardware.
Enable folder compression
To enable Windows 10 NTFS compression for a folder, use these steps:
- Open File Explorer.
- Browse to the folder to compress.
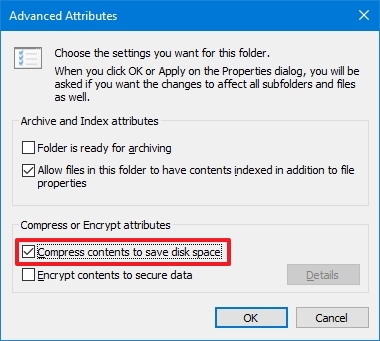
- Right-click the folder and select the Properties option.
- Click the Advanced button.
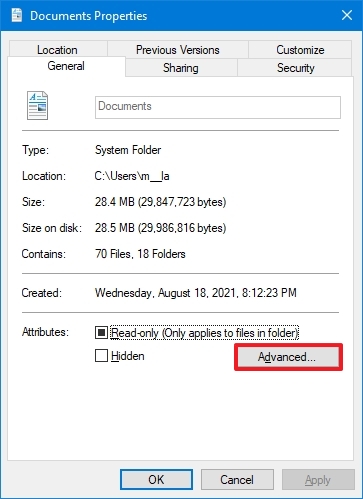
- Under the «Compress or Encrypt attributes» section, check the «Compress contents to save disk space» option.
- Click the OK button.
- Click the Apply button.
- Select the «Apply changes to this folder, subfolders and files» option.
- Quick note: If the folder already contains files, the initial compression can take time.
- Click the OK button.
- Click the OK button again.
After you complete the steps, the file compression feature will enable reducing the size of existing and future files. (The above steps focus on folders, but the same instructions apply to compress files individually.)
If you no longer want to use file compression, you can revert the changes using the same instructions, but in step 5, make sure to clear the Compress contents to save disk space option.
Enable drive compression
To enable NTFS compression for the entire drive, use these steps:
- Open File Explorer.
- Click on This PC from the left pane.
- Under the «Devices and drives» section, right-click the drive to compress and select the Properties option.
- Check the «Compress this drive to save disk space» option.
- Quick tip: Since compressing the installation drive can negatively affect performance, try using this feature only on a secondary drive or partition.
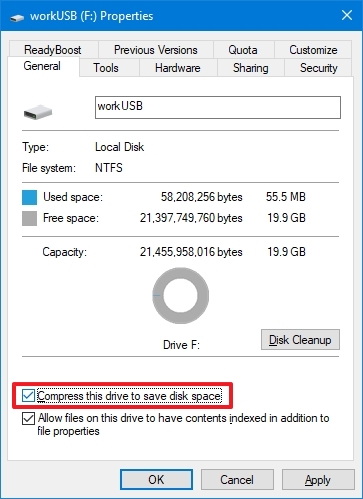
- Click the Apply button.
- Select the «Apply changes to drive (drive letter), subfolders, and files» option.
- Click the OK button.
- Click the OK button again.
Once you complete the steps, Windows 10 will compress the drive and any content already on the storage without reformatting.
When the feature is no longer needed, you can use the same instructions to disable compression, but in step 4, make sure to clear the «Compress this drive to save disk space» option.
8. Free up space disabling Hibernation on Windows 10
On Windows 10, Hibernation is a nifty feature that saves the data in memory onto the system drive before shutting down to preserve the current session upon resuming. Then you can pick up where you left off when the device returns online.
Although it is a convenient feature, it requires gigabytes of space to save the memory information into the hiberfil.sys file. If the device is running out of room, disabling Hibernation can help free up space for more critical files.
To disable Hibernation on Windows 10 to free up space, use these steps:
- Open Start.
- Search for Command Prompt, right-click the top result, and select the Run as administrator option.
- Type the following command to disable Hibernation on Windows 10 and press Enter: powercfg /hibernate off
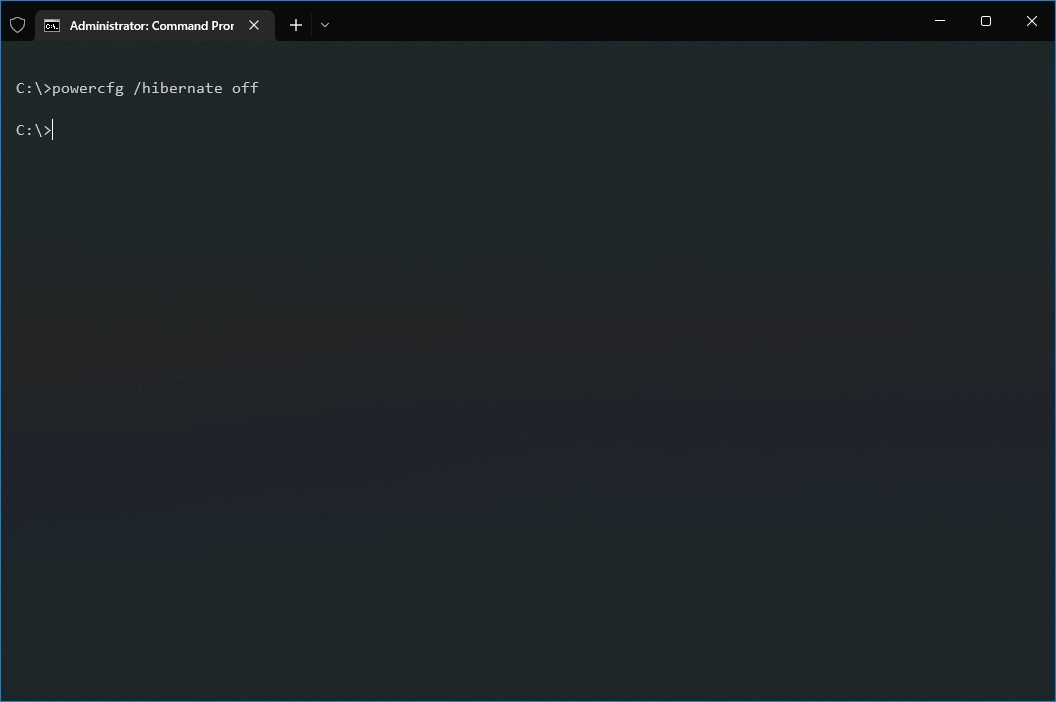
Once you complete the steps, Hibernation will no longer be available, but you will have more space for other files.
In the future, you can always re-enable the feature with the same instructions, but on step 3, make sure to use the powercfg /hibernate on command.
9. Free up space compressing installation footprint of Windows 10
Compact OS is a tool that compresses the footprint of Windows 10 and apps. The feature is meant for devices with limited storage, but you can use the tool to quickly reclaim a few gigabytes of space when you do not have an external hard drive.
Warning: This is a friendly reminder that modifying system files is risky and can cause irreversible damage to your installation if you do not do it correctly. Before proceeding, making a temporary full backup of your PC is recommended.
To shrink the size of the Windows 10 installation and apps with Compact OS, use these steps:
- Open Start.
- Search for Command Prompt, right-click the top result, and select the Run as administrator option.
- Type the following command to enable Compress OS and press Enter: compact.exe /compactOS:always
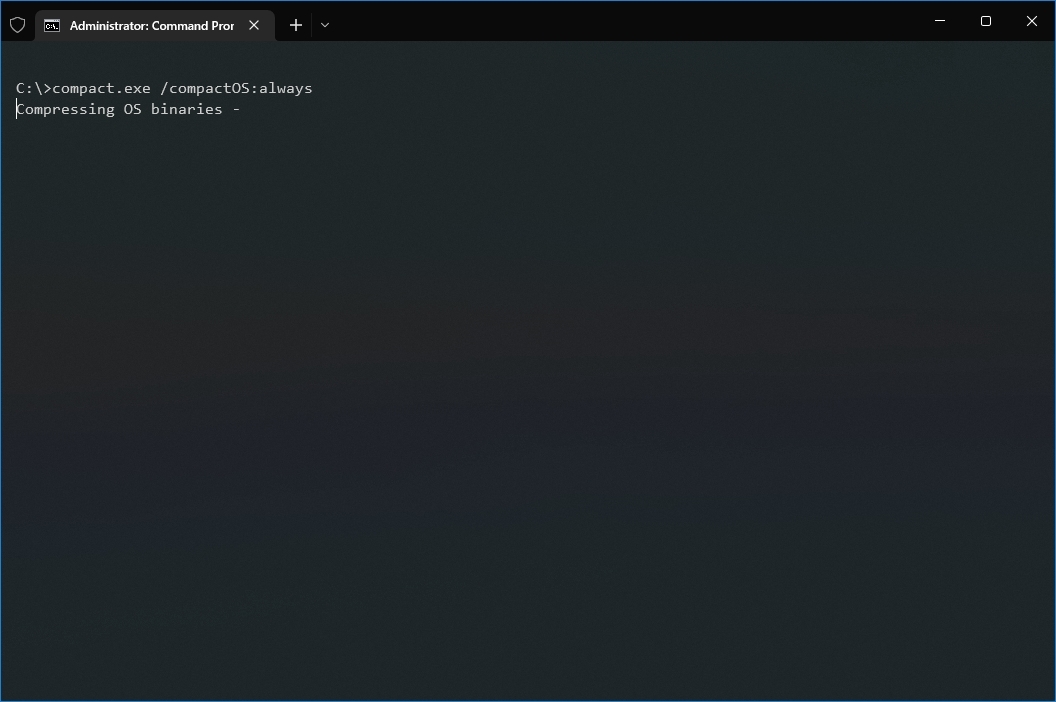
After you complete the steps, the process will reclaim around 2GB of storage, slightly improving performance.
When the feature is no longer needed, you can always revert the changes using the same instructions, but in step 3, make sure to use the compact.exe /compactOS:never command.
10. Free up space rebuilding search indexer on Windows 10
The Windows Search database can sometimes grow very large because of the amount of content that needs indexing or indexing issues, which can be why the system drive is running out of space. If this is the case, clearing and rebuilding the database and modifying the index items can significantly reduce storage usage on Windows 10.
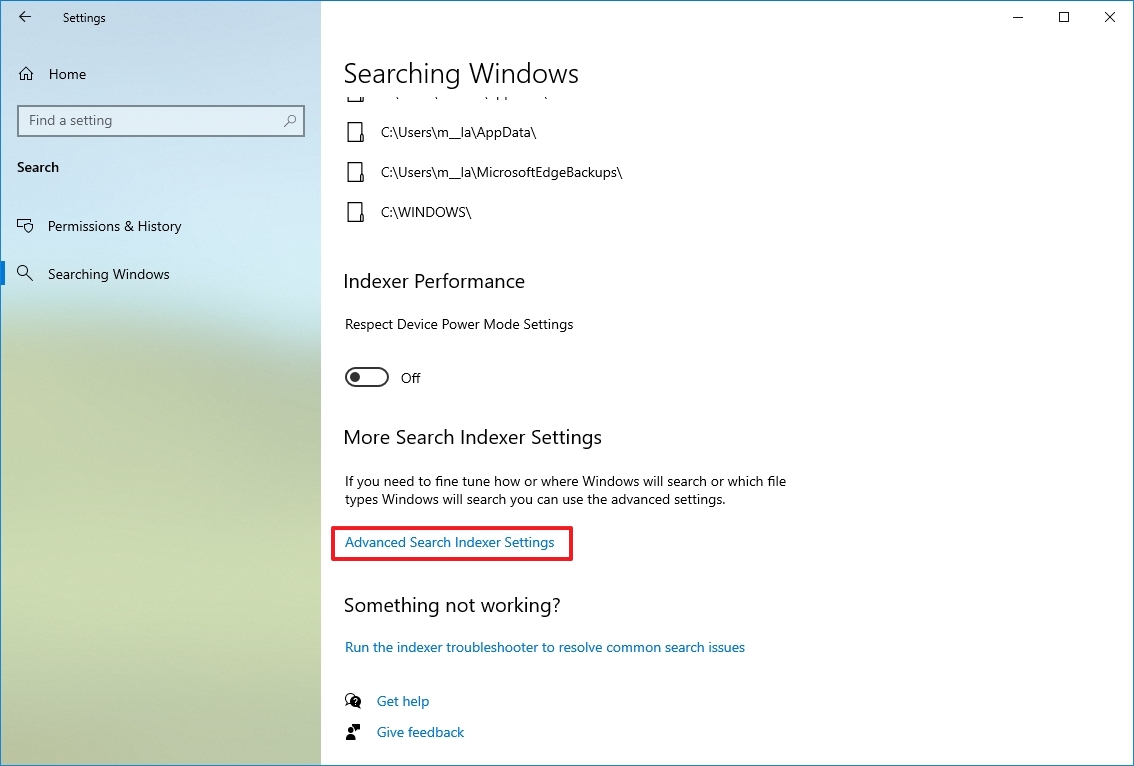
To rebuild the index of Windows 10 to free up space, use these steps:
- Open Settings.
- Click on Search.
- Click on Searching Windows.
- Under the «More Search Indexer Settings» section, click the «Advanced Search Indexer Settings» option.
- Click the Advanced button.
- Click the Index Settings tab.
- Under the «Troubleshooting» section, click the Rebuild button.
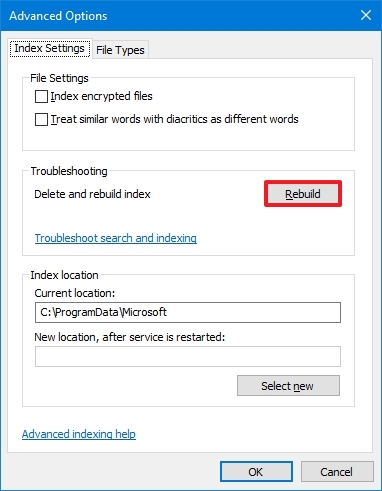
- Click the OK button.
Once you complete the steps, the system will clear and rebuild the Windows Search feature’s index database, which can significantly reclaim a lot of space.
The only caveat with this process is that during the rebuild, searches using the Taskbar, File Explorer, and across Windows 10 might be incomplete until files are re-indexed.
Configure indexer
You can also minimize the space by preventing Windows Search from indexing specific locations.
To remove indexing folder locations from Windows Search, use these steps:
- Open Settings.
- Click on Search.
- Click on Searching Windows.
- Under the «More Search Indexer Settings» section, click the «Advanced Search Indexer Settings» option.
- Click the Modify button.
- Click the Show all locations button.
- Clear the options for apps to exclude from the index database.
- Quick note: Generally speaking, you never want to index any kind of application.
- Expand the «C:» drive and clear the folder you do not wish to appear in search to reduce the database storage usage.
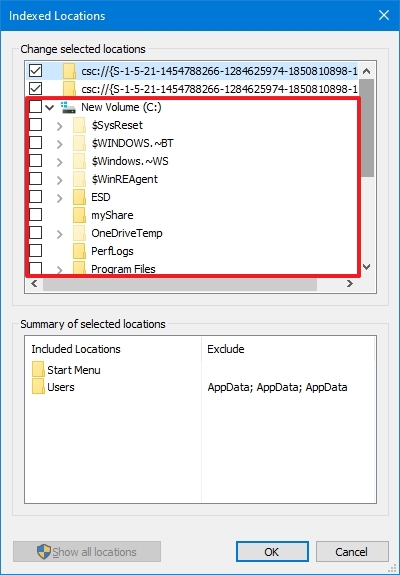
- Click the OK button.
- Click the Close button.
After completing the steps, Windows Search will update the database, hopefully reducing its footprint and making space for other files.
11. Free up space deleting users no longer sharing device
If you share the computer with others, it may be possible to free up space by deleting accounts that no one is using anymore.
To delete a user account and files on Windows 10, use these steps:
- Open Settings.
- Click on Accounts.
- Click on Family & other users.
- Select the account no longer in use.
- Click the Remove button.
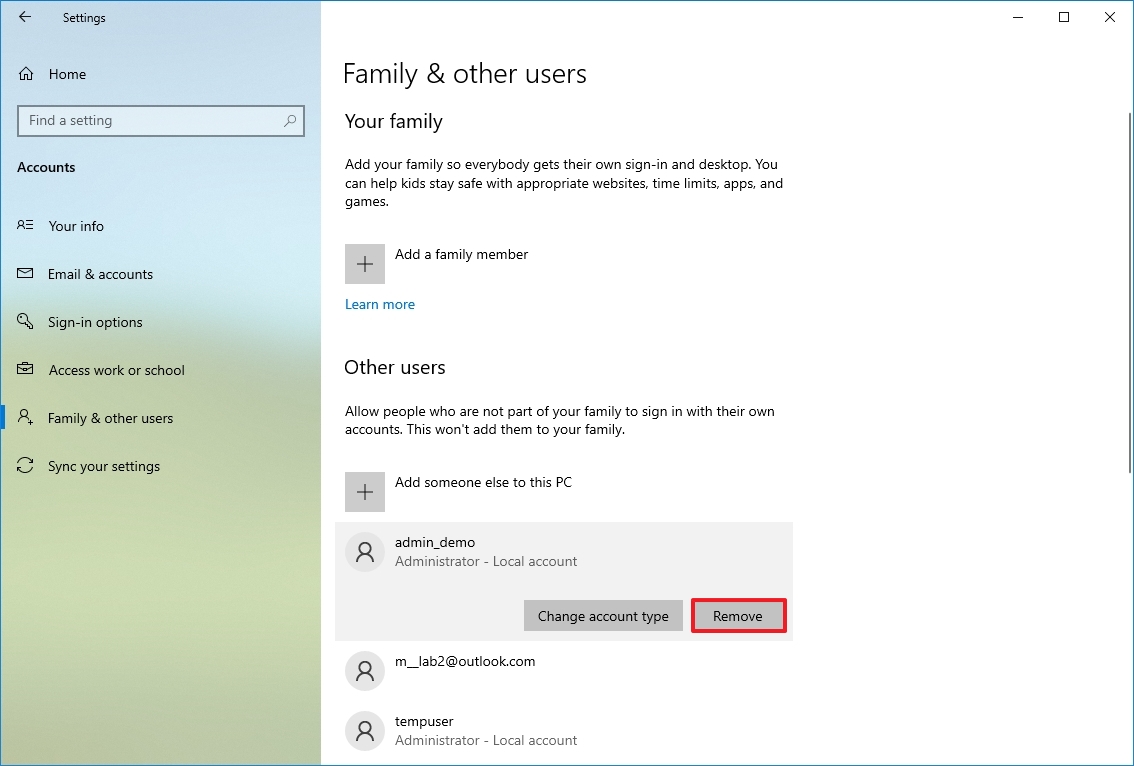
- Click the «Delete account and data» button.
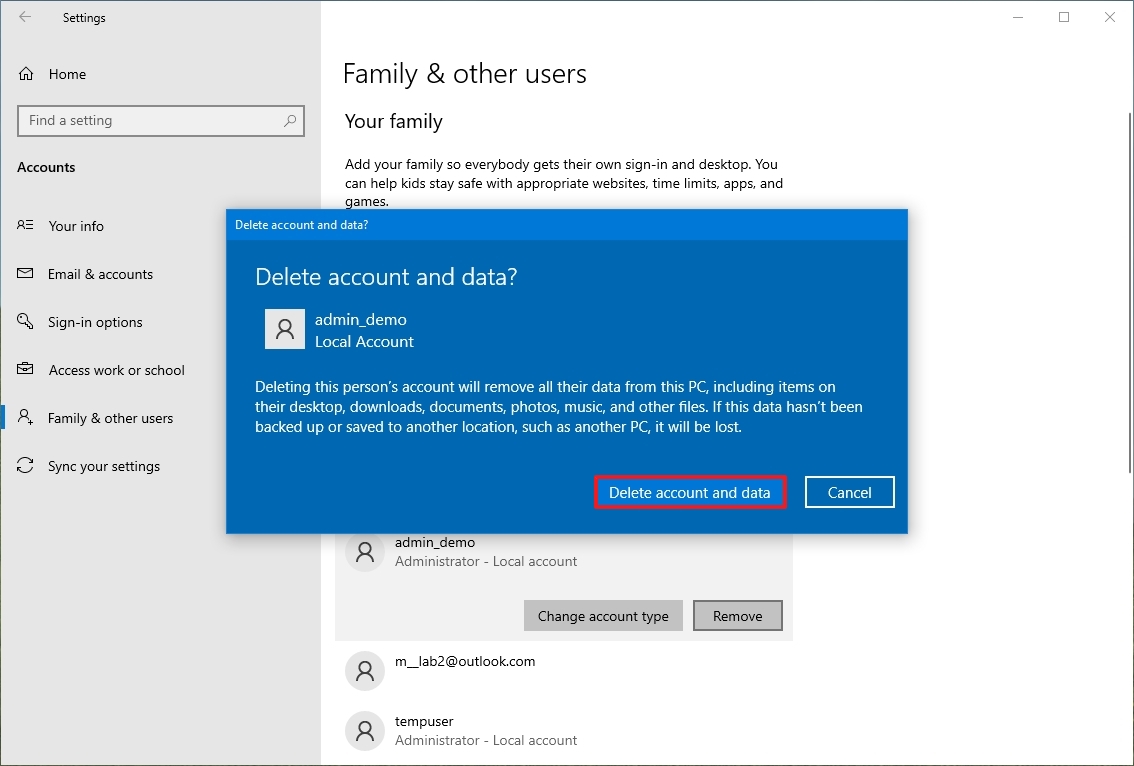
Once you complete the steps, the profile and data will be removed from the computer, regaining more space for other files. You may need to repeat the steps to delete other accounts on Windows 10.
12. Free up space disabling Reserved Storage on Windows 10
«Reserved Storage» on Windows 10 is a feature that sets apart several gigabytes of space for updates, system cache, and temporary files. When new updates are available, the system automatically cleans up the storage to minimize problems during other updates.
Although this is a great feature to minimize problems during updates and upgrades, it takes away space you could use to store more documents, pictures, and videos. If you understand the feature and prefer not to use it, you can disable it to free up space. The only caveat with this method is that once you disable the feature, the changes will apply during the next feature update of Windows.
Important: Only use these instructions if you understand the feature. Otherwise, it is not recommended to disable Reserved Storage as it may cause issues during updates.
To disable Reserved Storage on Windows 10, use these steps:
- Open Start.
- Search for PowerShell, right-click the top result, and select the Run as administrator option.
- Type the following command to confirm whether the feature is enabled and press Enter: Get-WindowsReservedStorageState
- Type the following command to disable the feature and press Enter: Set-WindowsReservedStorageState -State disabled
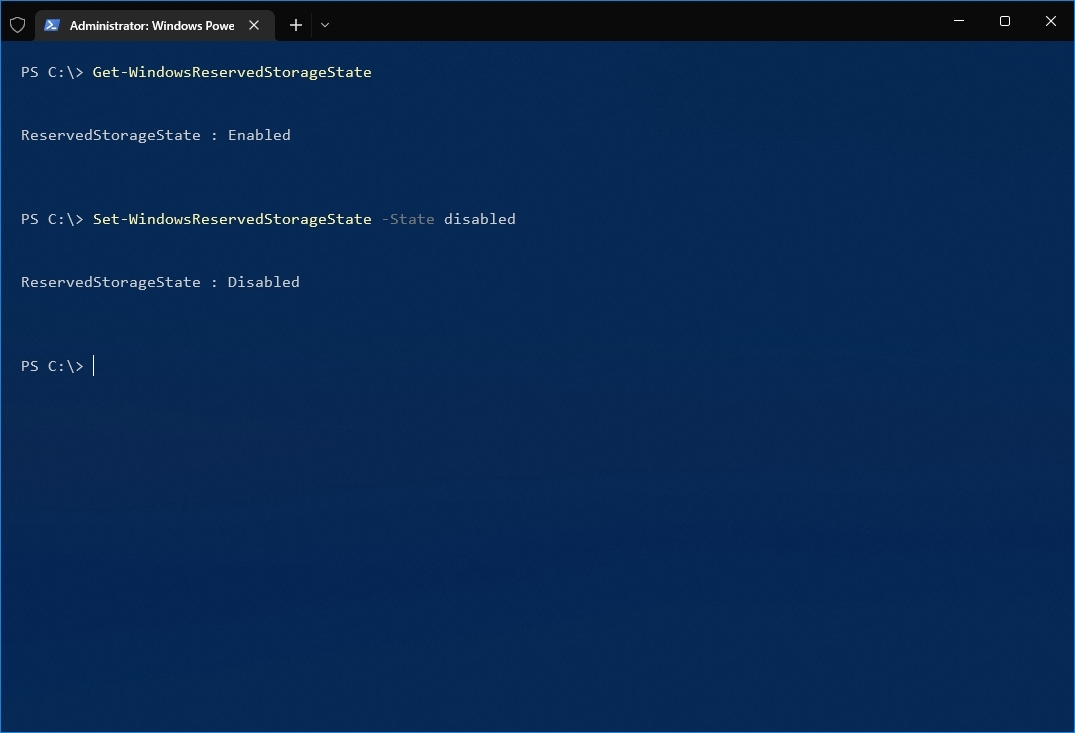
After completing the steps, the feature will turn off on Windows 10, allowing you to reclaim around 7GB of space after the next feature update of Windows 10.
In addition to all these different ways to free up drive space, sometimes malware can cause storage problems. If you notice strange behaviors and the hard drive is running low in space, a virus may be causing the problem. If this is the case, you can use these instructions to scan, detect, and remove any malware causing storage issues.
More resources
Why you can trust Windows Central
Our expert reviewers spend hours testing and comparing products and services so you can choose the best for you. Find out more about how we test.
For more helpful articles, coverage, and answers to common questions about Windows 10 and Windows 11, visit the following resources:
- Windows 11 on Windows Central — All you need to know
- Windows 10 on Windows Central — All you need to know

(opens in new tab)
Cutting-edge operating system
A refreshed design in Windows 11 enables you to do what you want effortlessly and safely, with biometric logins for encrypted authentication and advanced antivirus defenses.
Get the best of Windows Central in in your inbox, every day!
Mauro Huculak is technical writer for WindowsCentral.com. His primary focus is to write comprehensive how-tos to help users get the most out of Windows 10 and its many related technologies. He has an IT background with professional certifications from Microsoft, Cisco, and CompTIA, and he’s a recognized member of the Microsoft MVP community.
Содержание
- Free up drive space in Windows 10
- How to free up disk space in Windows 10 laptop/desktop
- Free up space with Windows 10 Disk Cleanup utility
- 8 useful methods to free up disk space in Windows 10
- ① Uninstall apps
- ② Move installed apps and games
- ③ Move files/folders
- ④ Reset Recycle Bin
- ⑤ Reset Paging File
- ⑥ Reset System Protection
- ⑦ Reset Hibernation Setting
- ⑧ Compress files
- Additional steps after freeing up disk space for Windows 10 computers
- 1. Save files to new location
- 2. Turn on Storage Sense
- 3. Expand C drive as large as possible
- In Summary
Free up drive space in Windows 10
If your PC is running low on free space, you might not be able to install important Windows updates, and your PC’s performance may be affected. Here are some ways to free up space so you can keep your PC up to date and running smoothly. These suggestions are listed in order, so start with the first one, see if that helps, and then continue to the next one if it doesn’t.
To check the total disk space left on your Windows 10 device, select File Explorer from the taskbar, and then select This PC on the left. The available space on your drive will appear under Devices and drives.
Note: If you follow the steps below and continue to have trouble updating Windows because of low disk space, resetting or reinstalling Windows might help. For more info, see Reinstall Windows 10.
If you used Disk Cleanup to free up space on your device and then see a Low Disk Space error, it’s possible that your Temp folder is quickly filling up with application (.appx) files that are used by Microsoft Store. For more info, see Low Disk Space error due to a full Temp folder.
Storage Sense can automatically free up drive space for you by getting rid of items that you don’t need, like temporary files and items in your Recycle Bin. For more info, see Manage drive space with Storage Sense.
If your system doesn’t have Storage sense, you can use the Disk Cleanup tool to delete temporary files and system files from your device.
In the search box on the taskbar, type disk cleanup, then select itfrom the results.
Select the check box next to the type of files you want to delete. (To view a description of each type of file, select the name.) By default, Downloaded Program Files, Temporary Internet Files, and Thumbnails are selected. Be sure to clear those check boxes if you don’t want to delete those files.
To free up even more space, select Clean up system files, and then select the type of system files you want to delete. Disk Cleanup will take a few moments to calculate the amount of space that can be freed up.
Note: If it’s been fewer than 10 days since you upgraded to Windows 10, your previous version of Windows will be listed as a system file you can delete. If you need to free up drive space, you can delete it, but keep in mind that you’ll be deleting your Windows.old folder, which contains files that give you the option to go back to your previous version of Windows. If you delete your previous version of Windows, this can’t be undone. (You won’t be able to go back to your previous version of Windows.)
After you’ve selected the types of files you want to delete, select OK, and then select Delete files in the confirmation window to start the cleanup.
There’s also an option in Disk Cleanup to Compress your OS drive. Selecting this option compresses the drive on which Windows is installed, helping you gain extra space to install important updates. This action does not delete the contents of this drive, and you shouldn’t experience problems opening and saving files from the compressed drive.
After you install the update, you can manually decompress the OS drive at any time. To do this, select File Explorer from the taskbar, and in the left pane, select This PC. Right-click or tap and hold the OS drive (usually disk C), and then select Properties on the shortcut menu. Clear the Compress this drive to save disk space check box, and then select Apply > OK.
Windows 10 may indicate that it needs more space to get the latest Windows 10 feature update. You can use an external storage device to help you complete the update.
Note: You may need to use a micro-USB adapter if your device doesn’t have a standard USB port.
Personal files such as videos, music, photos, and documents can take up a lot of space on your device. To see which files are using the most space:
Select File Explorer from the taskbar and find the files you want to move.
Under This PC in the menu on the left, select a folder to see what files are saved in it. The Videos, Music, Pictures, and Downloads folders usually contain the largest files that you’ve saved to your device.
To see the size of the files in a folder, select View > Details. Right-click in the open space and then select Sort by > Size to show the largest files at the top of the list.
If there are files you no longer need on your device, you can either delete them or move them to an external storage device like a USB drive or an SD card.
Note: If you delete any files, remember to empty the Recycle Bin to completely remove them from your device and free up space.
To move photos, music, videos, or other files that you want to keep but don’t use very often, consider saving them to an external storage device like a USB drive or an SD card. You’ll still be able to use them when the drive is connected, but they won’t take up space on your PC.
Connect an external storage device like a USB drive or SD card to your PC.
Select File Explorer from the taskbar and go to the folder that contains the files you want to move.
Select the files, select the Home tab, and then select Move to > Choose location.
Select the external storage device you connected in the location list, and then select Move.
Saving new files to another drive will help prevent low space problems on that drive in the future, so you won’t have to move your files to another drive repeatedly. Instead of saving all your new files to the default drive, you can save some of them to a different drive that has more free space.
Under More storage settings, select Change where new content is saved.
For each content type, select a drive from the drop-down menu. If the drive you want to use isn’t listed there, make sure it’s connected to your PC.
Note: OneDrive Files On-Demand requires Windows 10 version 1709 or later and OneDrive client version 17.3.7064.1005 or later. To see which version of Windows you’re running, select Start > Settings > System > About . To see which version of the OneDrive client you have installed, see Which version of OneDrive am I using?
Open About settings
You can save space by turning on OneDrive Files On-Demand, which stores a smaller placeholder file on your hard drive instead of the full-size file that’s stored in your OneDrive account in the cloud. You’ll be able to get to your OneDrive files from your PC without having to use up hard-drive space downloading full-size versions of them all. See Learn about OneDrive Files On-Demand for more info.
Sometimes a virus or other malware can consume significant hard-drive space by corrupting your system files. If you suspect your PC is infected with malware, use an antivirus program like Windows Defender to run a virus scan and cleanup. If this doesn’t fix the problem, you might need to reset your PC.
If you’ve followed the instructions here but still need help freeing up space on your device, you can contact Microsoft support to chat with a support agent. This is also recommended if your attempts to free up drive space trigger particular error codes that you need help resolving.
The following questions concern low disk space and Windows Update specifically. Learn more about Windows Update.
When there isn’t enough free space available to install an update, a pop-up notification will prompt you that additional space is required to install the update.
When you select Fix issues, you’ll be informed about how much additional space is needed. You’ll also be notified that you can use an external storage device so that you don’t need to free up quite as much space on your system drive. Learn how to free up space to install Windows updates.
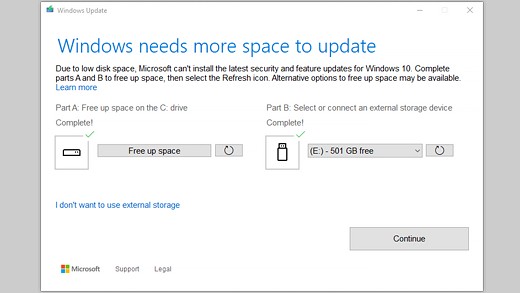
The total free disk space your device requires to complete an update varies. Typically, feature updates require 6 GB–11 GB or more of free space, while quality updates require 2 GB–3 GB or more. Learn about the difference between a feature update and a quality update.
You need disk space to download the update, download new versions of any optional features and languages that are currently installed, and to apply the update. Additional space is temporarily required to support removal of the update (typically for 10 days). This space can be reclaimed after the update is completed. To do this, Select Start > Settings > System > Storage > Free up space now.
Open Storage settings
The update is compressed to reduce download size.
Note: For devices with reserved storage, an update will first use the reserved storage space before using other disk space. For more info, see How reserved storage works in Windows 10.
The space required to complete a feature update depends on two factors: which update path is followed and the size of optional content and other updates that apply to your PC when the feature update is installed.
Note: For devices with reserved storage, an update will first use the reserved storage space before using other disk space. For more info, see How reserved storage works in Windows 10.
Windows follows three different feature update paths, depending on the amount of disk space currently available.
1. For PCs with plenty of free disk space
Windows automatically tries to complete more of the update process in the background while you use your PC. This significantly reduces the time your PC will be offline (or unusable) during the update, although it might temporarily use more disk space to complete the update. Learn more about our efforts to reduce offline time during updates (English only at this time).
2. For PCs with limited free space but still enough to complete the update automatically
Windows will automatically optimize for reducing the amount of free disk space required to install the update. This will result in a longer offline install time.
3. For PCs that don’t have enough space to automatically install the update
Windows will prompt you to free up disk space or use external storage to temporarily extend the storage on your PC. If you use an external storage device, Windows won’t need as much free space on the system drive as it temporarily uses your external storage.
Across each of these update paths, the total amount of free disk space required will vary, depending on the optional content installed and other updates that apply to your PC. For example:
Optional features. Many optional features available for Windows are pre-installed or acquired on demand by the system, or manually by you. You can see which ones are installed on your PC by going to Settings > Apps > Apps & features > Manage optional features.
Open Optional features settings
These features range in size from less than 1 MB to almost 2 GB for the Windows Mixed Reality portal. You can reduce the amount of space required to install a feature update on your PC by uninstalling optional features you aren’t using.
Languages installed. Windows is localized into many languages. Although many people only use one language at a time, some people switch between two or more languages. You can see which languages are installed on your PC by selecting Start > Settings > Time & Language > Language .
Open Language settings
During each update, all language resources and any associated typing, text-to-speech, speech-to-text, and handwriting recognition resources must be updated. The content for each language can range from about 175 MB to more than 300 MB. You can reduce the amount of space required to install a feature update on your PC by uninstalling languages you aren’t using.
Driver updates. OEMs and other hardware partners sometimes publish new graphics, networking, audio, and other drivers in conjunction with the new OS update. The size of these drivers can vary significantly, depending on your PC and on which drivers have been updated.
OS quality updates. During a feature update, Windows tries to download and automatically install the latest quality update so that your PC is fully up to date when you start using it. Shortly after the feature update is released, the quality update for that feature update could be as small as a few hundred MB, but as more quality and security changes are implemented, the quality update can increase in size to 1 GB or more.If your PC is short on disk space, you can download and install the quality update after the feature update is complete.
Finally, Windows Update will temporarily disable hiberfile.sys, pagefile.sys, and other system files in order to use the space these files typically consume to apply the feature update. Any files that are disabled to apply the update will be automatically re-enabled when the update is complete. Because these files vary in size depending on how you use your PC and the amount of RAM your PC has, even in cases where two different PCs have the exact same OS image, the amount of free disk space required to complete an update may vary.
The combination of update path and features means there’s a wide range of free disk space required to complete an update. Here are a few examples for PCs updating to Windows version 1803:
Optimized for reduced offline time
Optimized for minimal disk space
Optimized for minimal disk space with external storage
Minimal optional features, languages, and updates
How to free up disk space in Windows 10 laptop/desktop
by Andy, Updated on: March 1, 2021
This article introduces how to free up disk space in Windows 10 (32 & 64 bit) with Disk Cleanup tool and additional methods.
Content:
Many people feedback that system C drive becomes full after upgrading to Windows 10 or installing some Updates. This is because that system partition is filling up by many types of junk files continuously. It’s more likely to encounter this issue if you use SSD, because it is much smaller than traditional mechanical hard disk.
In this situation, you can remove the unnecessary and junk files to reclaim disk space. In this this article, I’ll show you how to free up disk space in Windows 10 laptop/desktop with native Disk Cleanup utility and additional methods.
Free up space with Windows 10 Disk Cleanup utility
There are many third party system optimization software that can help delete junk files, but to free up disk space in Windows 10, the built-in Disk Cleanup utility is well enough. From Windows XP to the latest Windows 10, I always use this utility to cleans up disk space. It is easy to use, runs fast, and is able to clean up most common types of unnecessary files. The most important aspect, it is safe.
How to free up disk space in Windows 10 with Disk Cleanup utility:
- Press Windows and R on the keyboard, input cleanmgr and press Enter.

- Select C: drive in the drop-down list and click OK.
- Click the check-boxes in front of the files that you want to remove. Read the associated description on bottom before clicking OK if you do not know what kind of files are included.
- Click Delete Files to confirm in the pop-up window. Disk Cleanup will begin cleaning up, the time depends on your computer performance and the amount of files.
- Repeat to Clean up system files.
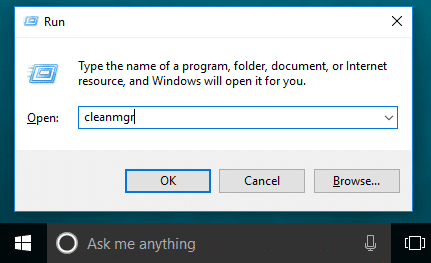
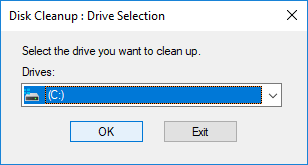
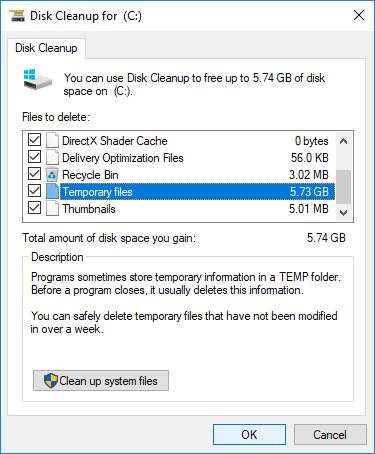
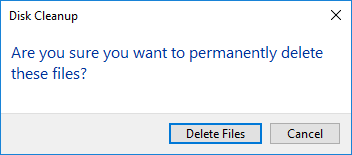
8 useful methods to free up disk space in Windows 10
If you never or have not clean up disk space for your computer for a long time, Disk Cleanup may help you regain several GBs of disk space. To get more, you may try the additional methods to free up disk space for Windows 10 laptop/desktop.
① Uninstall apps
You may uninstall some apps and games that you no longer use or that came preinstalled on your computer from the manufacturer.
Steps:
- Press Windows and X on keyboard, then Settings
- Scroll down in Apps & features
- Click the items that you want to remove and click Uninstall.
② Move installed apps and games
All programs are installed to system C: drive by default, the more programs you installed, the less free space left. In previous version, you have to uninstall and reinstall in another partition. Windows 10 has new feature to help you move them to other partition. This is a good method to free up disk space in C drive for Windows 10 computers.
Steps:
- Click Start >Settings > Apps > Apps & features
- Click an app or game.
- Click the Move button.
- Select the new location from the drop-down list.
- Click the Move button.
- Repeat the steps to move more items.
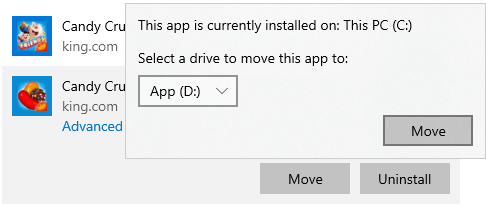
③ Move files/folders
Another option is moving specific files/folders to other volume, steps:
- Open Windows File Explorer.
- Select the the files/folders that you want to move.
- Click Home menu on the top >Move to >Choose location.
- Select the target location and click the Move button.
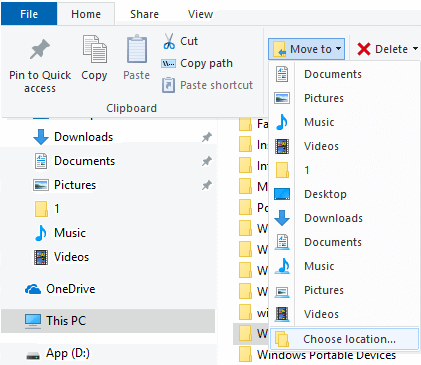
④ Reset Recycle Bin
All files that deleted by pressing DEL without SHIFT key will go to Recycle Bin. You can revert these files to original location manually if you deleted them by mistake. When system C drive is almost full, you may consider decreasing the disk space usage or change the location for Recycle Bin. This is another useful method to free up disk space in Windows 10 and previous versions.
Steps:
- Right click Recycle Bin in Desktop and click Properties.
- Select a drive for Recycle Bin.
- Select Customer size and enter an amount.
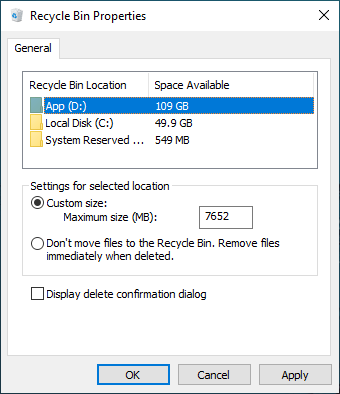
⑤ Reset Paging File
Paging file uses part of disk space as virtual RAM and it is located in C drive by default. You can decrease it or change it to other partition to release free space.
How to free up disk space in Windows 10 by resetting paging file:
- Press Windows and R on keyboard to start Run.
- Input sysdm.cpl ,3 and press Enter.
- Click Settings under Performance in Advanced tab.
- Click Change under Virtual Memory.
- Uncheck Automatically manage paging file size for all drives on the top.
- Select D: or other drive, enter amount of Initial size and Maximum size in Customer size radio box, and then click Set.
- Select C: drive and select No paging file radio box, then click Set.
- Click OK. (It may requires reboot to take affect)
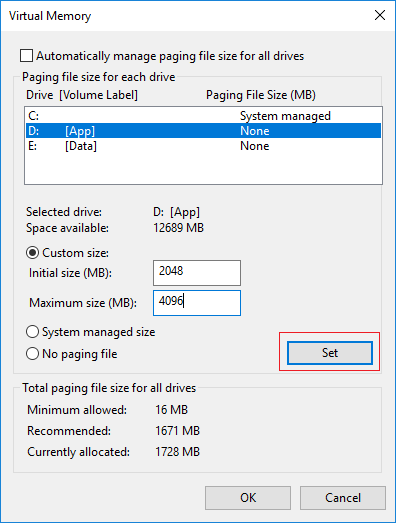
⑥ Reset System Protection
System Protection is another Windows built-in backup feature that is able to create system restore point. These restore points are created automatically by Windows when some operations are made to disk drive, and roll back the system to a recent state when you need. This feature reserves quite a big disk space for its functionality.
You can free up disk space by reducing disk space usage, steps:
- Press Windows and R key to launch Run, type sysdm.cpl ,4 and press Enter.
- Select C drive and then click Configure
- Sliding towards the left to decrease the Max Usage of disk space.
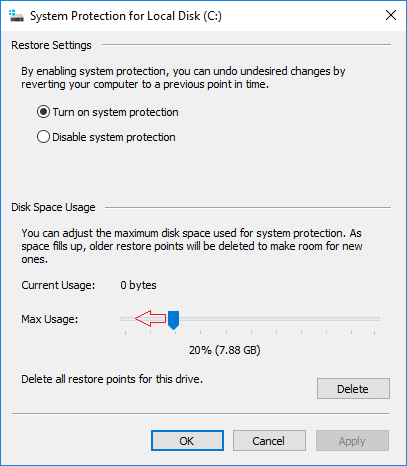
⑦ Reset Hibernation Setting
Hibernation is a feature that saves the content in memory to the hard drive allowing you to shut down your device completely without losing your current session. Hibernation is a useful feature but it requires several gigabytes of space to save the content to hiberfil.sys file in C drive.
You can free up disk space by deleting the hibernation files or reduce the size of hiberfil.sys, steps:
Search cmd on task bar on bottom left corner of the screen, right click Command Prompt and choose Run as administrator.
Input powercfg -h -size 50
The size will be changed from default 75% to the minimum 50%
if you receive error that «The system fireware does not support hibernation», then you cannot use these commands.
Input powercfg.exe -h off
Hibernate mode will be disabled and any associated saved data from previous hibernations will be deleted automatically.
Input powercfg.exe -h on
⑧ Compress files
Compact OS is a tool introduced with Windows 10 that allows you to compress the installation files and built-in desktop applications reducing the footprint and freeing up space.
This operation won’t affect computer performance, but it will modify system files. This operation is only suggested when disk space is extremely low and you have no other choice.
- Search for Command Prompt and run as administrator.
- Input the command: Compact.exe /CompactOS:always
You can revert the changes using the command: Compact.exe /CompactOS:never
Generally speaking, you’ll get several to over 10GB free space after completing the steps above. However, there is still an issue: new junk and some necessary files are continue to be saved in C drive. Therefore, free space will be eaten up again, you’d better complete following additional steps.
Additional steps after freeing up disk space for Windows 10 computers
1. Save files to new location
Windows 10 has new option to save new files of apps, documents, music, pictures, and videos to other place, steps:
- Press Windows and X on keyboard, then click Settings
- Click System>Storage.
- Click Change where new content is saved under More storage settings.
- Click the drop-down list to select new location and click Apply.
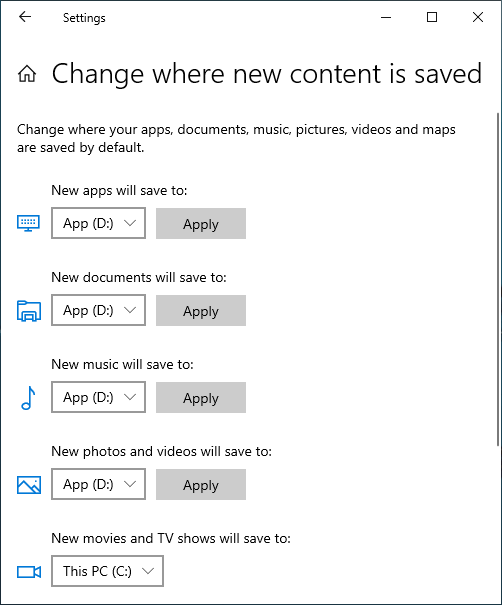
2. Turn on Storage Sense
Storage Sense is a relatively new feature in Windows 10 that users may enable to free up disk space automatically when the drive is running low on space.
Firstly, you need to enable this service:
- Press Windows and X on keyboard, then Settings
- Go to System >Storage
- Switch Off to On under Storage Sense on the right side.
Then click Change how we free up space automatically below it.
You have several options:
- Select from the list to free up disk space when this partition is running low or every day/week/month.
- Then you can select whether delete temporary files automatically.
- Select from the drop-down list to delete files in Recycle Bin and Downloads folder if they have been there for over 1/14/30/60 days.
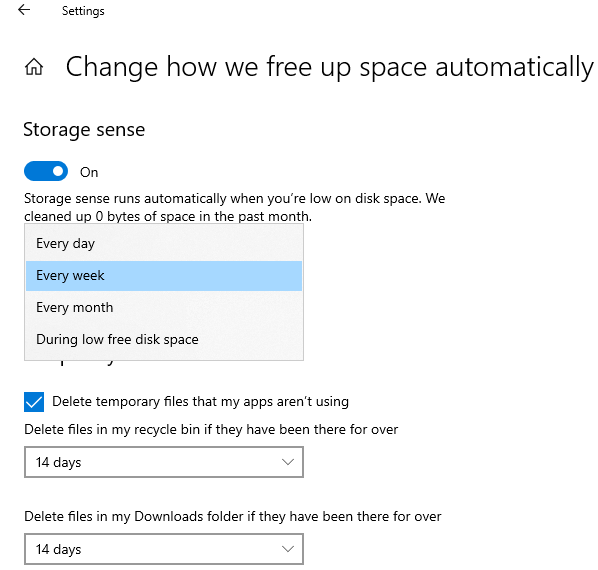
3. Expand C drive as large as possible
This step is very important to the computers that C drive are created small. Similar with a smart phone, if it is 16GB, you have to clean it up frequently, but if it is 256GB, you won’t encounter the low space issue for a long time.
With NIUBI Partition Editor, you can move free space to C drive from other partitions without losing data. Operating System, programs and associated setting, as well as anything else keep the same with before. It has free edition for Windows 10/8/7/Vista/XP home computer users. Besides reallocating free space, it helps you do many other disk partition management operations.
Download the free edition and follow the steps in the video to expand C drive.
In Summary
To free up disk space in Windows 10 laptop and desktop, first of all, delete the junk files with native disk cleanup utility. Then move programs and some files out of C drive, and then delete some restore point. Finally, expand C drive as large as possible with free space in other partitions.
This article introduces how to free up disk space in Windows 10 (32 & 64 bit) with Disk Cleanup tool and additional methods.
Content:
- Free up space with Windows 10 Disk Cleanup utility
- 8 useful methods to free up disk space in Windows 10
- 3 additional steps after freeing up disk space
Many people feedback that system C drive becomes full after upgrading to Windows 10 or installing some Updates. This is because that system partition is filling up by many types of junk files continuously. It’s more likely to encounter this issue if you use SSD, because it is much smaller than traditional mechanical hard disk.
In this situation, you can remove the unnecessary and junk files to reclaim disk space. In this this article, I’ll show you how to free up disk space in Windows 10 laptop/desktop with native Disk Cleanup utility and additional methods.
Free up space with Windows 10 Disk Cleanup utility
There are many third party system optimization software that can help delete junk files, but to free up disk space in Windows 10, the built-in Disk Cleanup utility is well enough. From Windows XP to the latest Windows 10, I always use this utility to cleans up disk space. It is easy to use, runs fast, and is able to clean up most common types of unnecessary files. The most important aspect, it is safe.
8 useful methods to free up disk space in Windows 10
If you never or have not clean up disk space for your computer for a long time, Disk Cleanup may help you regain several GBs of disk space. To get more, you may try the additional methods to free up disk space for Windows 10 laptop/desktop.
① Uninstall apps
You may uninstall some apps and games that you no longer use or that came preinstalled on your computer from the manufacturer.
Steps:
- Press Windows and X on keyboard, then Settings
- Scroll down in Apps & features
- Click the items that you want to remove and click Uninstall.
② Move installed apps and games
All programs are installed to system C: drive by default, the more programs you installed, the less free space left. In previous version, you have to uninstall and reinstall in another partition. Windows 10 has new feature to help you move them to other partition. This is a good method to free up disk space in C drive for Windows 10 computers.
Steps:
- Click Start > Settings > Apps > Apps & features
- Click an app or game.
- Click the Move button.
- Select the new location from the drop-down list.
- Click the Move button.
- Repeat the steps to move more items.
③ Move files/folders
Another option is moving specific files/folders to other volume, steps:
- Open Windows File Explorer.
- Select the the files/folders that you want to move.
- Click Home menu on the top > Move to > Choose location.
- Select the target location and click the Move button.
④ Reset Recycle Bin
All files that deleted by pressing DEL without SHIFT key will go to Recycle Bin. You can revert these files to original location manually if you deleted them by mistake. When system C drive is almost full, you may consider decreasing the disk space usage or change the location for Recycle Bin. This is another useful method to free up disk space in Windows 10 and previous versions.
Steps:
- Right click Recycle Bin in Desktop and click Properties.
- Select a drive for Recycle Bin.
- Select Customer size and enter an amount.
⑤ Reset Paging File
Paging file uses part of disk space as virtual RAM and it is located in C drive by default. You can decrease it or change it to other partition to release free space.
How to free up disk space in Windows 10 by resetting paging file:
- Press Windows and R on keyboard to start Run.
- Input sysdm.cpl ,3 and press Enter.
- Click Settings under Performance in Advanced tab.
- Click Change under Virtual Memory.
- Uncheck Automatically manage paging file size for all drives on the top.
- Select D: or other drive, enter amount of Initial size and Maximum size in Customer size radio box, and then click Set.
- Select C: drive and select No paging file radio box, then click Set.
- Click OK. (It may requires reboot to take affect)
⑥ Reset System Protection
System Protection is another Windows built-in backup feature that is able to create system restore point. These restore points are created automatically by Windows when some operations are made to disk drive, and roll back the system to a recent state when you need. This feature reserves quite a big disk space for its functionality.
You can free up disk space by reducing disk space usage, steps:
- Press Windows and R key to launch Run, type sysdm.cpl ,4 and press Enter.
- Select C drive and then click Configure
- Sliding towards the left to decrease the Max Usage of disk space.
⑦ Reset Hibernation Setting
Hibernation is a feature that saves the content in memory to the hard drive allowing you to shut down your device completely without losing your current session. Hibernation is a useful feature but it requires several gigabytes of space to save the content to hiberfil.sys file in C drive.
You can free up disk space by deleting the hibernation files or reduce the size of hiberfil.sys, steps:
Search cmd on task bar on bottom left corner of the screen, right click Command Prompt and choose Run as administrator.
To reduce hiberfil.sys file:
Input powercfg -h -size 50
The size will be changed from default 75% to the minimum 50%
if you receive error that «The system fireware does not support hibernation», then you cannot use these commands.
To delete hibernate:
Input powercfg.exe -h off
Hibernate mode will be disabled and any associated saved data from previous hibernations will be deleted automatically.
If you want to enable it:
Input powercfg.exe -h on
⑧ Compress files
Compact OS is a tool introduced with Windows 10 that allows you to compress the installation files and built-in desktop applications reducing the footprint and freeing up space.
This operation won’t affect computer performance, but it will modify system files. This operation is only suggested when disk space is extremely low and you have no other choice.
- Search for Command Prompt and run as administrator.
- Input the command: Compact.exe /CompactOS:always
You can revert the changes using the command: Compact.exe /CompactOS:never
Generally speaking, you’ll get several to over 10GB free space after completing the steps above. However, there is still an issue: new junk and some necessary files are continue to be saved in C drive. Therefore, free space will be eaten up again, you’d better complete following additional steps.
Additional steps after freeing up disk space for Windows 10 computers
1. Save files to new location
Windows 10 has new option to save new files of apps, documents, music, pictures, and videos to other place, steps:
- Press Windows and X on keyboard, then click Settings
- Click System> Storage.
- Click Change where new content is saved under More storage settings.
- Click the drop-down list to select new location and click Apply.
2. Turn on Storage Sense
Storage Sense is a relatively new feature in Windows 10 that users may enable to free up disk space automatically when the drive is running low on space.
Firstly, you need to enable this service:
- Press Windows and X on keyboard, then Settings
- Go to System > Storage
- Switch Off to On under Storage Sense on the right side.
Then click Change how we free up space automatically below it.
You have several options:
- Select from the list to free up disk space when this partition is running low or every day/week/month.
- Then you can select whether delete temporary files automatically.
- Select from the drop-down list to delete files in Recycle Bin and Downloads folder if they have been there for over 1/14/30/60 days.
3. Expand C drive as large as possible
This step is very important to the computers that C drive are created small. Similar with a smart phone, if it is 16GB, you have to clean it up frequently, but if it is 256GB, you won’t encounter the low space issue for a long time.
With NIUBI Partition Editor, you can move free space to C drive from other partitions without losing data. Operating System, programs and associated setting, as well as anything else keep the same with before. It has free edition for Windows 10/8/7/Vista/XP home computer users. Besides reallocating free space, it helps you do many other disk partition management operations.
Download the free edition and follow the steps in the video to expand C drive.
In Summary
To free up disk space in Windows 10 laptop and desktop, first of all, delete the junk files with native disk cleanup utility. Then move programs and some files out of C drive, and then delete some restore point. Finally, expand C drive as large as possible with free space in other partitions.
Receiving «There is not enough free space on partition (C:)» error? C drive keeps filling up? We show you some fixes to free up disk space as well as how to use free partition manager to upgrade hard drive in Windows 10.
What Is Taking up Space on My Hard Drive
In the daily usage of computer, you may find hard drive space disappearing and wonder «what is taking up space on my hard drive?» Indeed, it is hard to tell what is taking up disk space simply by looking at installed apps and saved files in Windows Explorer. Luckily, Windows helps you make it out.
Go to Settings -> System -> Storage, you will see all drives listed there. You can select a drive to see what’s taking up space.
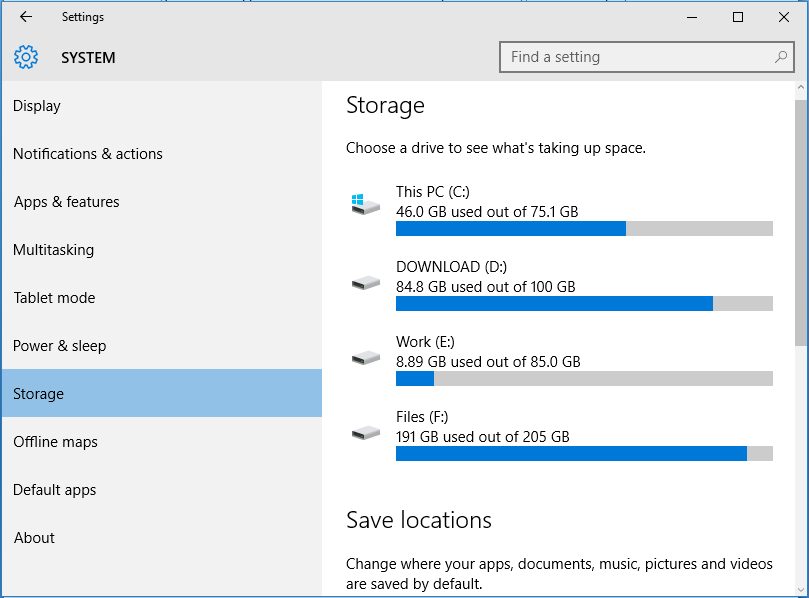
Besides, you can even click each item to go deeper. For instance, you will be able to see how much disk space an app/game takes.
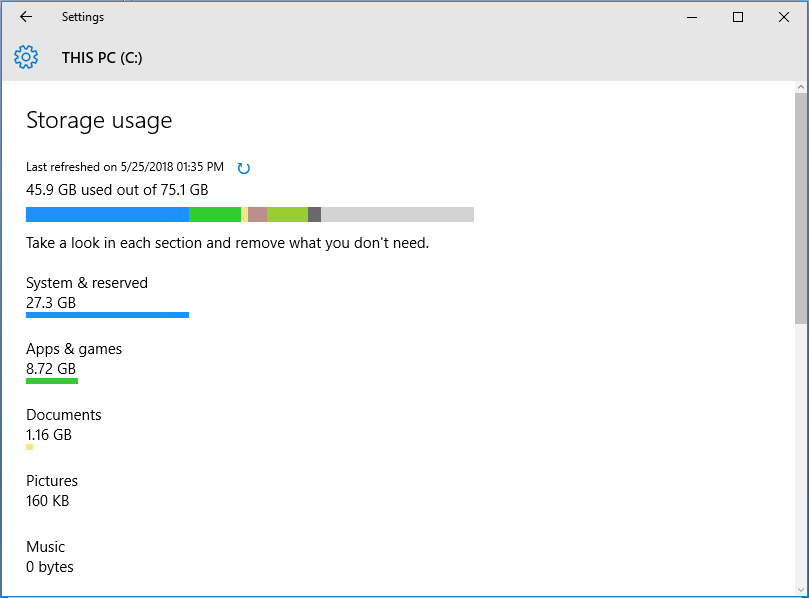
Right now, we show you how to clean hard drive in multiple solutions.
Fix #1: Delete Unnecessary Files
Here are two approaches for you to do this. The first one is to select and delete some files you no longer use manually. The second one is to make use of Storage Sense. Storage Sense was introduced in Windows 10 version 1703 to get rid of temporary files and stuff in your Recycle Bin. If you have Storage Sense turned on in Settings, Windows can automatically free disk space by removing files you don’t need.
If your Storage Sense is still OFF, you can now make it work.
Step 1. Go to Start menu -> Settings -> System -> Storage. Toggle the option for «Storage Sense» ON and click the option «Change how we free up space«.
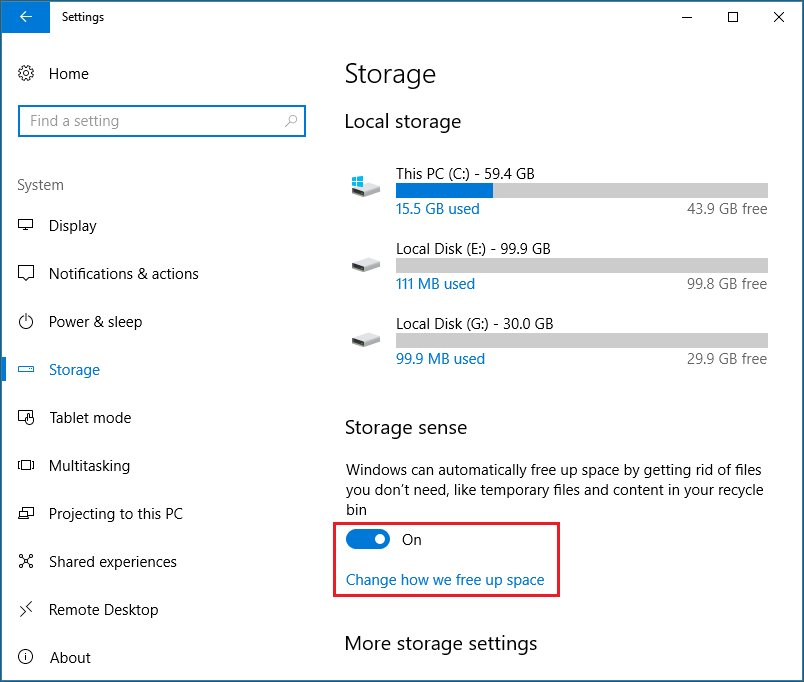
Step 2. In the next window, check what kind of temporary files to delete. You can also press «Clean now» to free up disk space Windows 10 now.
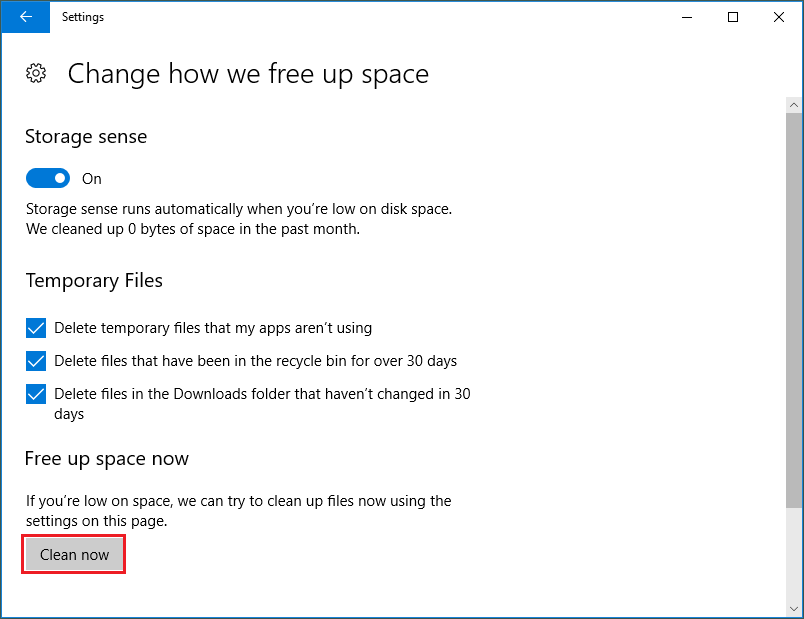
Fix #2: Uninstall Apps You No Longer Need
If you have some programs installed for problem-solving and now they are no longer needed, you can go ahead and uninstall them to free up disk space. To do this, right-click Windows Start menu and click «Programs and Features«. Then right click the program you no longer need and choose «Uninstall«. Repeat this process to remove the rest unnecessary apps.
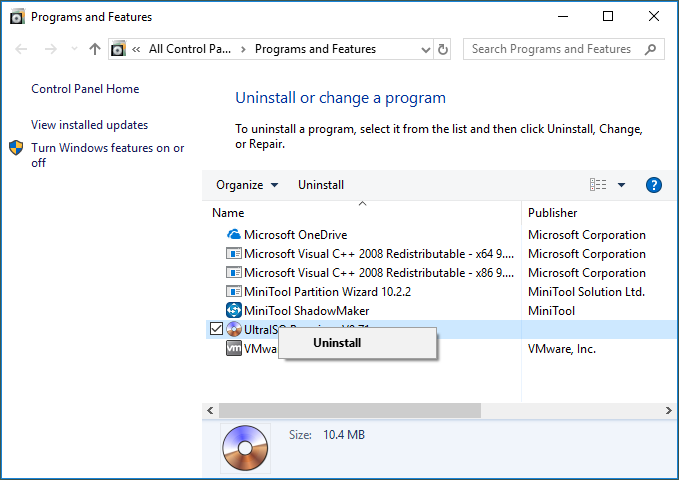
Fix #3: Run Disk Cleanup
Disk Cleanup is a built-in tool that deletes temporary and unimportant files. When your hard drive like C drive keeps filling up, you can go ahead and use Disk Cleanup to free disk space. Simple guide is shown below:
Step 1. Go to Explorer and navigate to «This PC«. Then right-click the drive you want to clean up and choose «Disk Cleanup» from the best match.
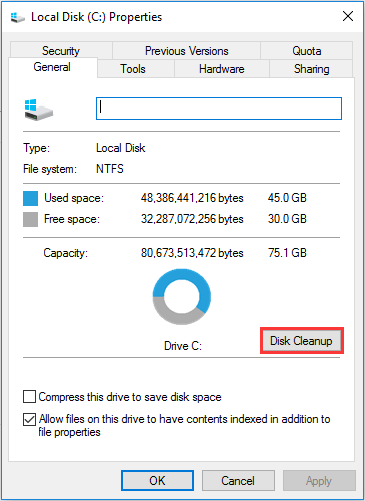
Step 2. After several minutes’ calculation, you will be given a new interface listing files in total that can be cleaned as well as the file size taken by each file type. At this time, check the ones you don’t want and click OK.
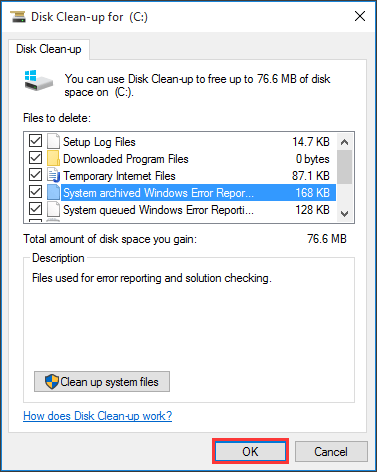
Tip: If you are freeing up disk space from the C drive, you can read Disk Cleanup Windows 10 to remove more system files such as the System Restore and Shadow Copies.
Fix #4: Disable Hibernation Mode
Hibernation in computing is to power down a computer while maintaining its state. If you have enabled Hibernation Mode in Windows, by changing the Folder Options to «Show hidden files, folders and drives» and unchecking «Hide protected operating system files (Recommended)«, you will find a file named «hiberfil.sys» located in the C drive, taking several gigabytes’ storage space.
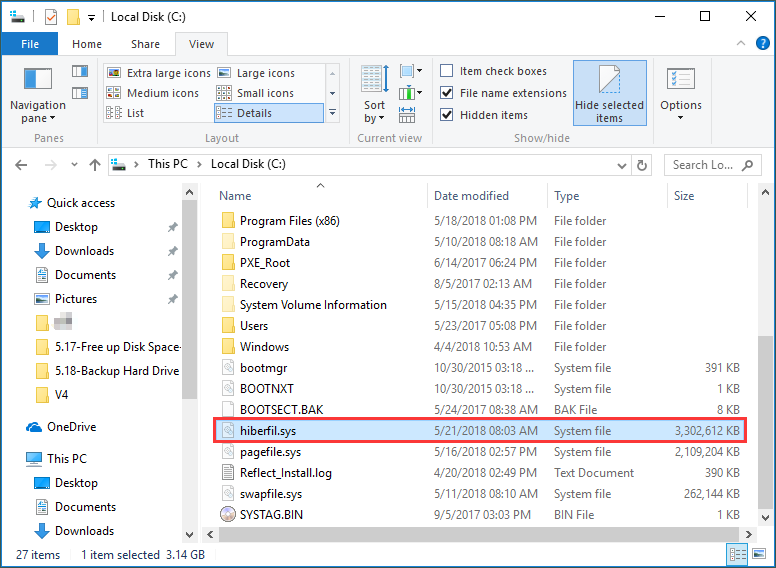
To free up disk space taken by this file, you can open CMD and run this command:
Powercfg /hibernate off

By doing this, the «hiberfil.sys» is deleted totally.
Fix #5: Enable Compact OS
Compact OS is introduced with Windows 10. It decreases the operating system’s size using the combination of compression and software tricks. It also reduces the footprint of Windows apps to free up disk space, making sense in Windows disk cleanup.
Enabling Compact OS is easy. However, since you are handling the operating system, it is significant to create a system image backup before you proceed.
Step 1. Search for Command Prompt and run it as Administrator.
Step 2. Type the following command to compress Windows 10 and applications and press Enter:
Compact.exe /CompactOS:always
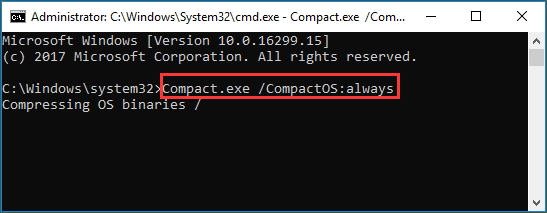
Step 3. This process will take around 20 minutes. When it finishes, you get 2GB around disk space.
Tip: At any time you want to revert, you can run the contrary command instead: Compact.exe /CompactOS:never
Fix #6: Reduce the Size of WinSxS Folder
If your C drive keeps filling up, you can go to C:Windows to find a folder named «WinSxS». By viewing its properties, you will see it takes quite a lot of disk space (image attached).
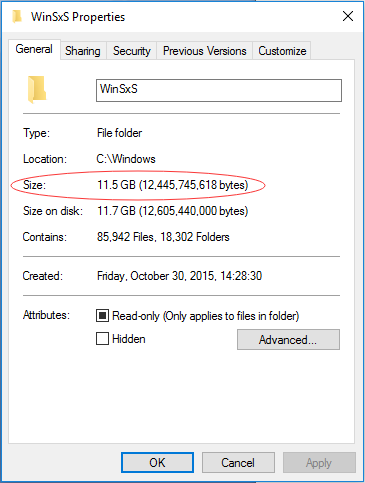
The WinSXS folder contains all Windows system components and continues to grow with the time Windows installed. It also builds up unnecessary files like old versions of system components over time.
Now you may ask:
«Can we remove WinSxS folder for Windows disk cleanup?»
Note that you should not delete the entire WinSxS folder or delete some files from it, as this might severely damage your system, making your PC impossible to restart or update. However, you can do the followings to remove the unnecessary files.
Step 1. Go to Control Panel.
Step 2. Set to view by Category and select «System and Security«.
Step 3. Select «Schedule tasks» under Administrative Tools.

Step 4. In the left panel, select Task Scheduler Library -> Microsoft -> Windows -> Servicing.
Step 5. In the middle panel, right-click «StartComponentCleanup» and choose «Run«.
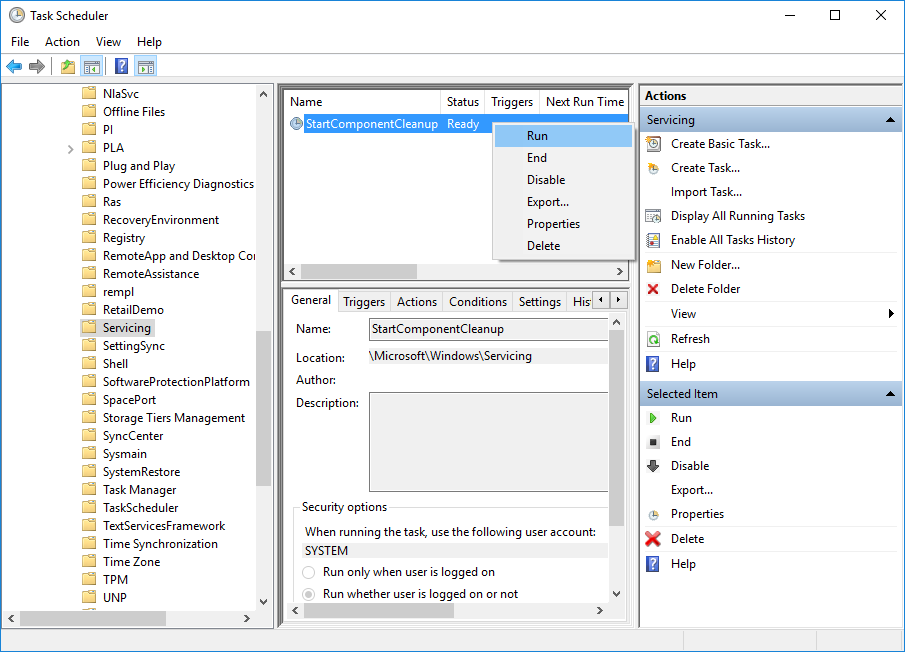
After the above trying, if your hard drive space keeps disappearing, you may consider the rest workarounds.
Fix #7: Turn on OneDrive Files On-Demand
If your PC is running Windows 10 Fall Creators Update and higher version, you can free up disk space by turning on OneDrive Files On-Demand. With this feature enabled, you’ll be able to get to your OneDrive files from your PC without having to download them all, thus, freeing up a lot of disk space.
Step 1. Click the OneDrive icon on the taskbar and log into your account.
Step 2. Right click the OneDrive icon and choose «Settings«.
Step 3. Navigate to «Settings» tab and make sure the option «Save space and download files as you use them» is CHECKED.

Step 4. Open your OneDrive folder, select all the files and folders, bring up the context menu and choose «Clear space«. In this way, all files are kept in the cloud, freeing up disk space Windows.
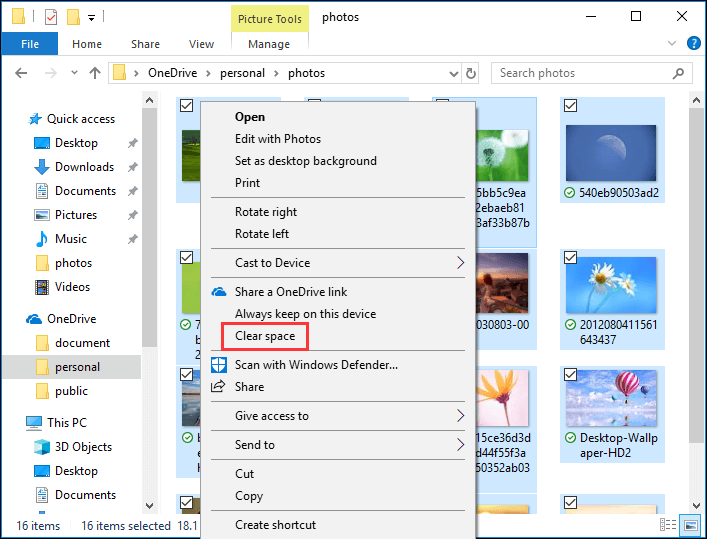
Tip: To free up more space, you can move some personal files from the default folders to your OneDrive folder and then repeat the above process. However, also note that by doing this, you are only able to access these files when there is network connection.
Fix #8: Move Files to another Location
If you have numbers of pictures, audios, videos and other large files saved on the drive, consider moving them to another location such as an external hard drive to free disk space.
Step 1. Open File Explorer, enter each partition and pick up the ones you want to move.
Step 2. After that, go to the Home tab on the ribbon, select Move to and then Choose location.
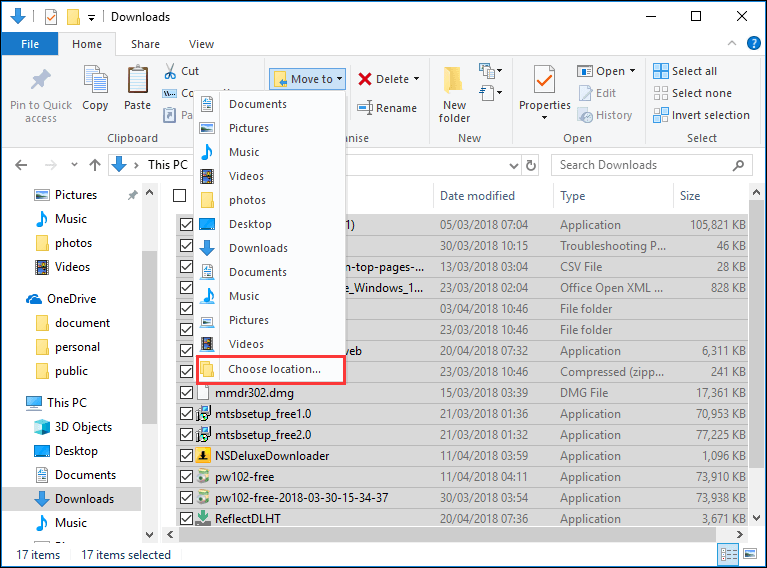
Step 3. Select your external hard drive from the location list and then select Move.
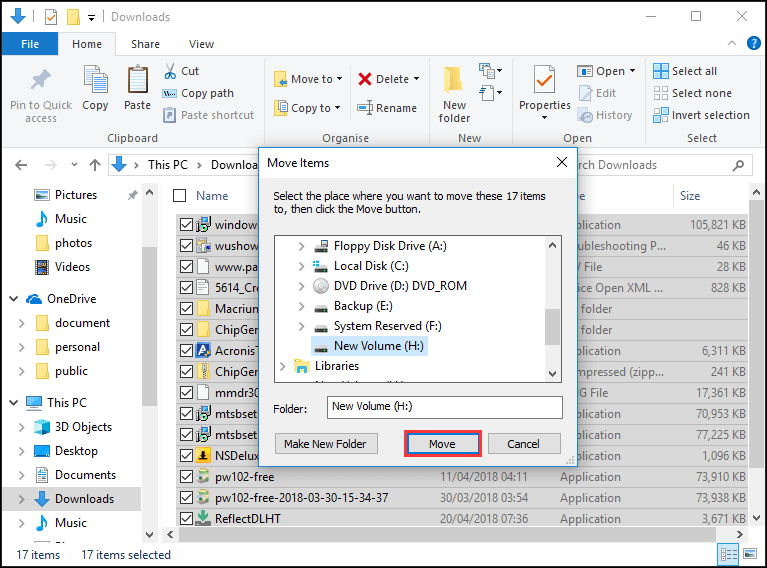
Fix #9: Save New Files to another Location
Instead of saving all your new files to the same location, save some of them to a different drive to free up disk space.
Step 1. Open the Start menu and select Settings -> System -> Storage.
Step 2. Under More storage settings, select «Change where new content is saved«.
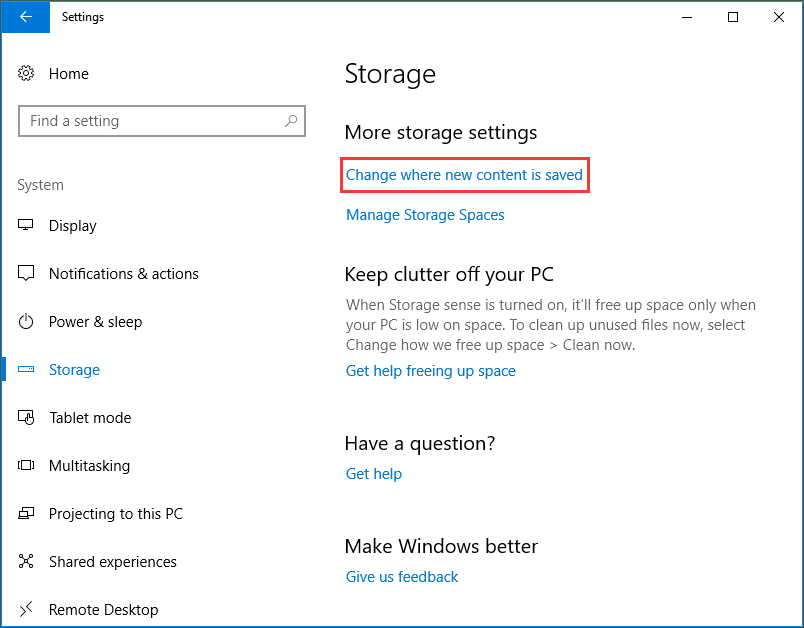
Step 3. For each content type, select a drive to save new files from the drop-down menu.
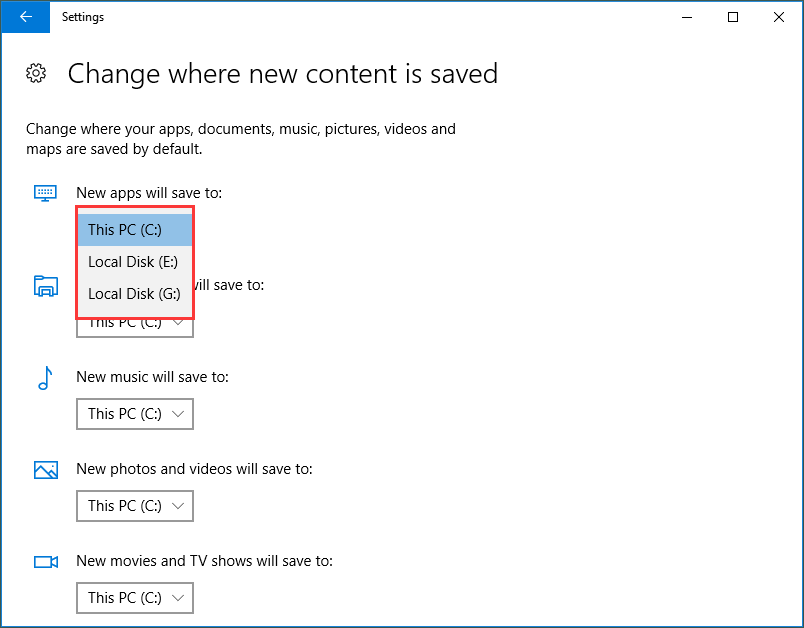
Reading here, we hope you have resolved Windows disk cleanup. But if partition bar gets red from time to time, you still have the last choice…
Fix #10: Get a Larger Hard Drive
Hard drive upgrade is the most effective way to remove «low disk space warning». If you have the budget to purchase a larger hard drive, you can choose any of the following methods. And luckily, MiniTool Partition Wizard can help you all.
Before you start, download and install this free partition manager on computer.
Free Download
Option A: Clone Disk
This way will copy the source disk entirely to the larger one, enabling you to extend each partition size at the same time
Step 1. Select the disk to be copied and choose «Copy Disk» from the action panel.
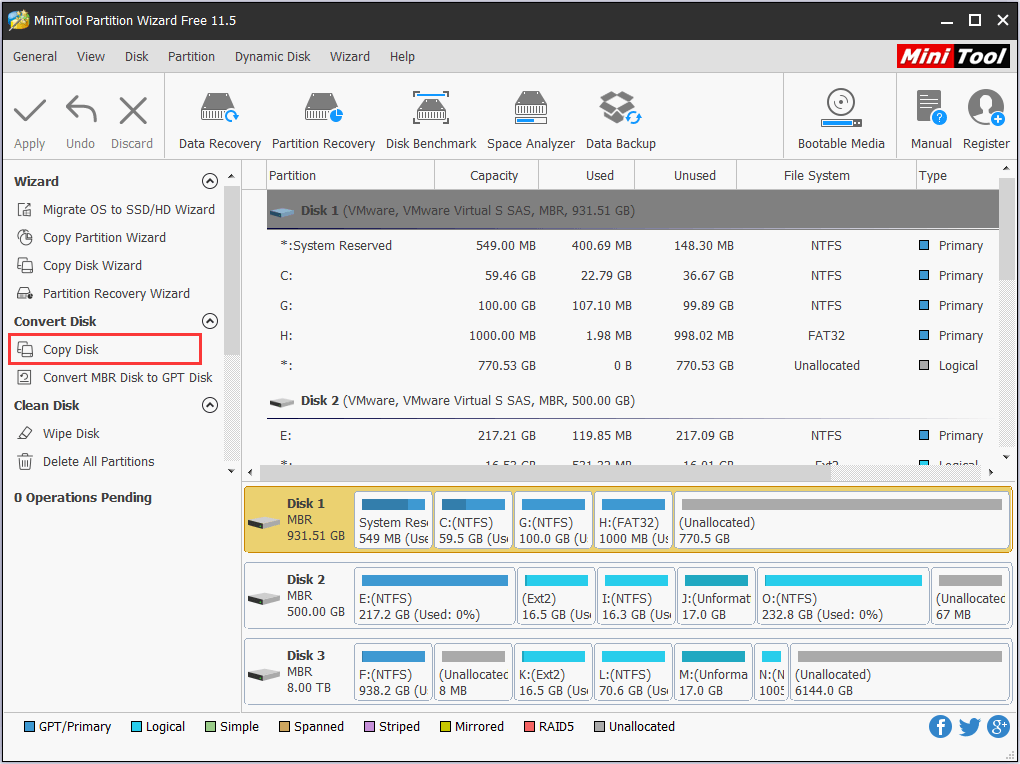
Step 2. On the next interface, select the larger drive as the target disk. Note that all data on the target disk will be cleaned. Click «Next» to continue.
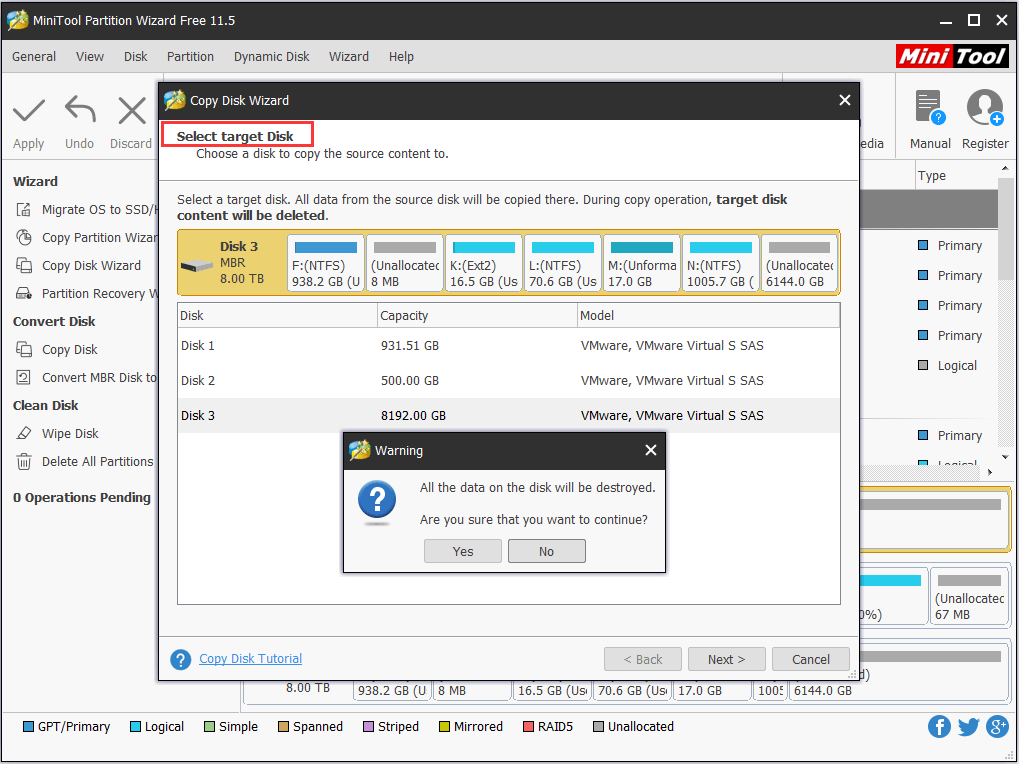
Step 3. Choose the copy options depending on the basis of your preference. It is worth mentioning that no matter you choose «Fit partitions to entire disk» or «Copy Partitions without resize«, you can resize each partition by dragging the slider on the lower part.
Note: «Use GUID Partition Table» is a paid feature that helps to clone MBR disk to GPT disk. However, it is available in the Pro and more advanced editions. If you have such requirement, go to the Online Store.
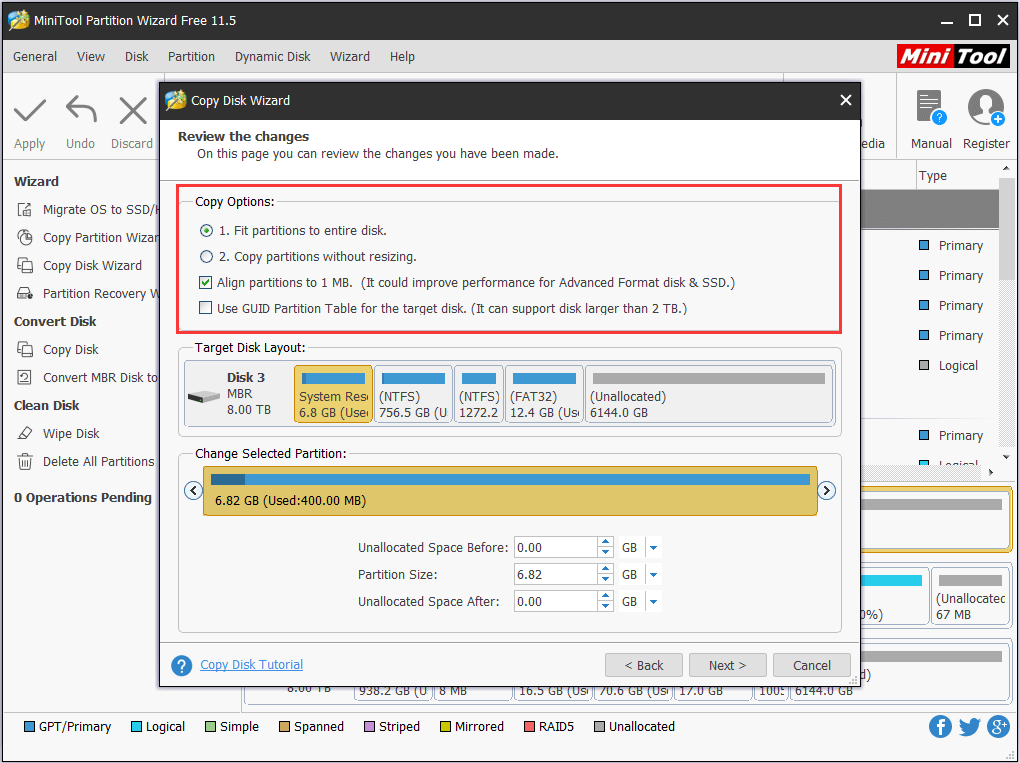
Step 4. Here you will be told how to boot from the destination disk. Please keep this information in mind and click «Finish«.

Step 5. Finally, click «Apply» to save the changes.
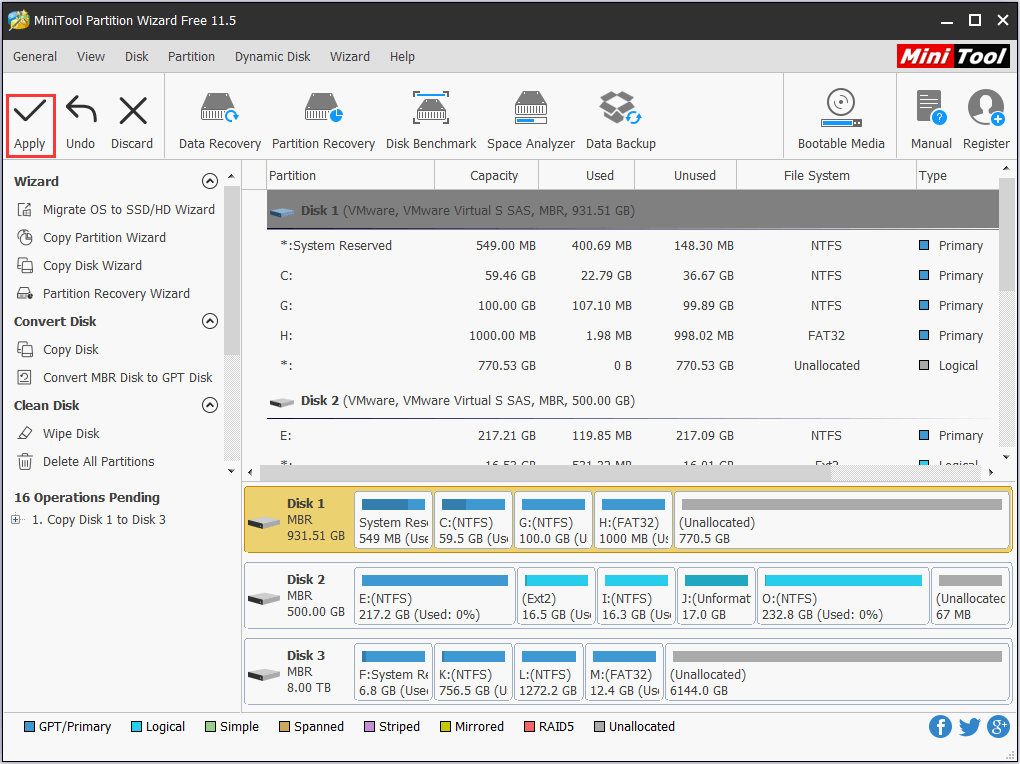
Step 6. Remove the original system disk and boot from the larger hard drive.
Option B: Migrate OS Only
If you only want to move the operating system to a second drive, you can choose «Migrate OS to SSD/HD«. This feature is able to clone the OS related partitions like System Reserved Partition, EFI System Partition, System Partition and Recovery Partition.
Step 1. Connect the hard drive to your PC and then run MiniTool Partition Wizard to get the main interface. Select «Migrate OS to SSD/HD» from the toolbar.
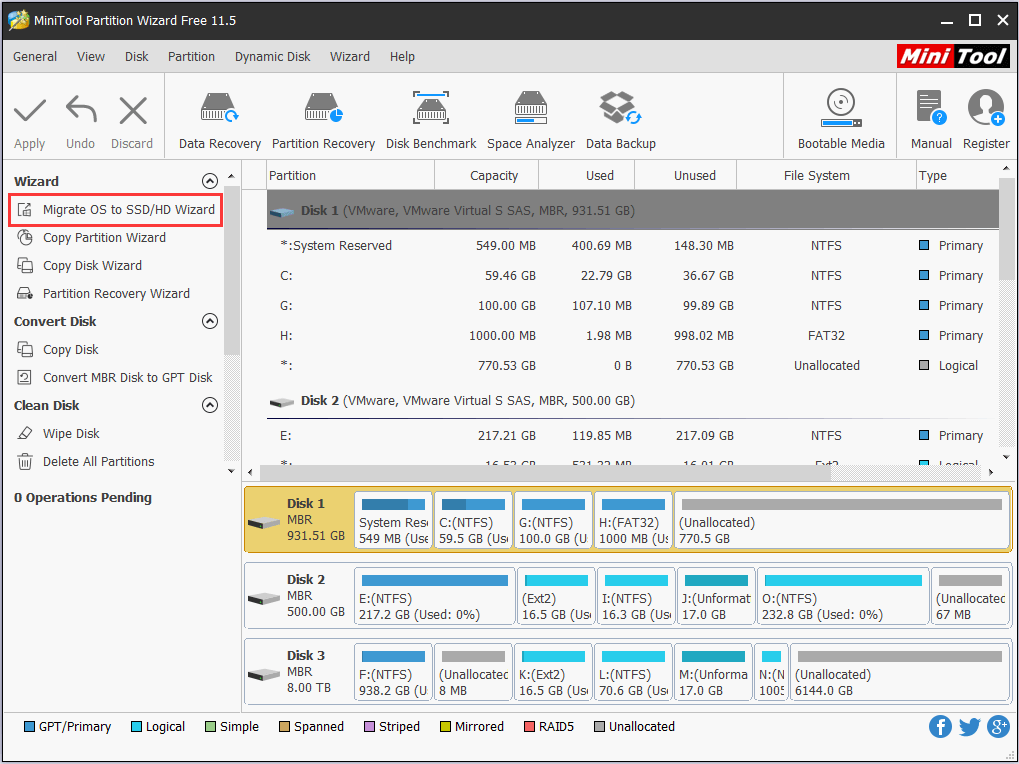
Step 2. In the pop-up window, choose option B, i.e. «I would like to move my operating system to another hard disk.«
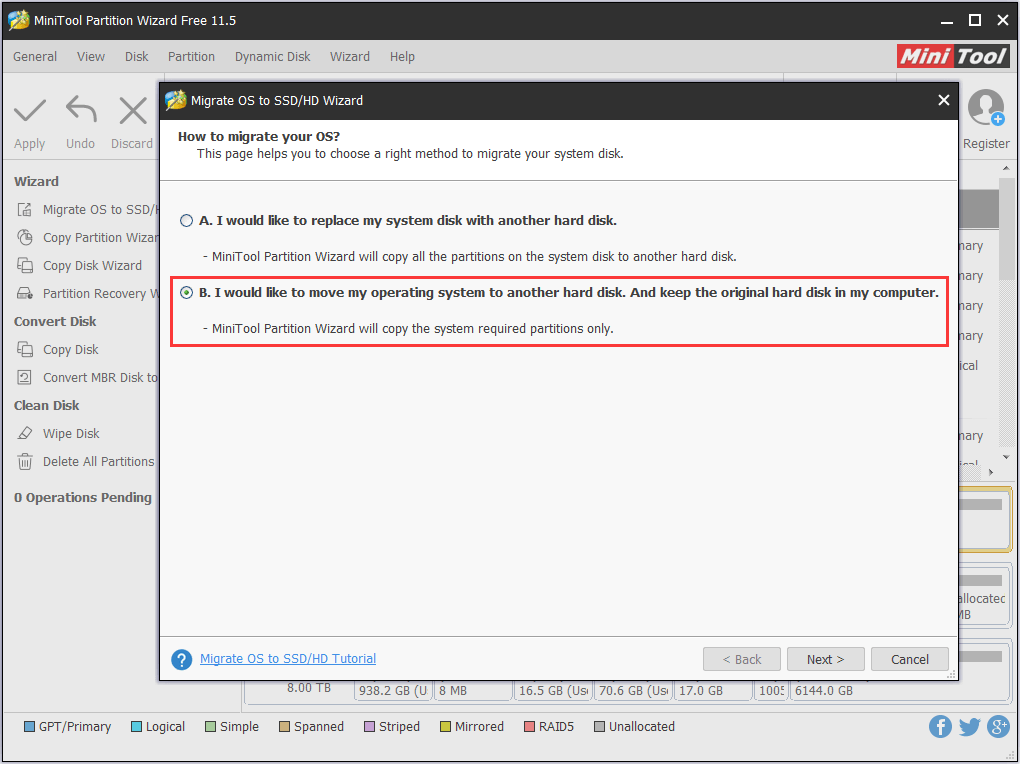
Step 3. Select the target disk. All data on the target disk will be removed.
Step 4. Select the copy options and adjust the partition size.
Step 5. Read the Note carefully and click «Apply» to finish.
Step 6. When the OS is migrated, boot your PC from the larger drive and delete the operating system from the original hard drive.
For the details, please read How Can You Migrate Windows 10 to SSD without Reinstalling OS.
Option C: Copy Some Partitions
You can also choose to move some data partitions to another hard drive, which will free up disk space to the largest extent.
Step 1. Select the partition you want to copy and choose «Copy Partition» from the left action panel.
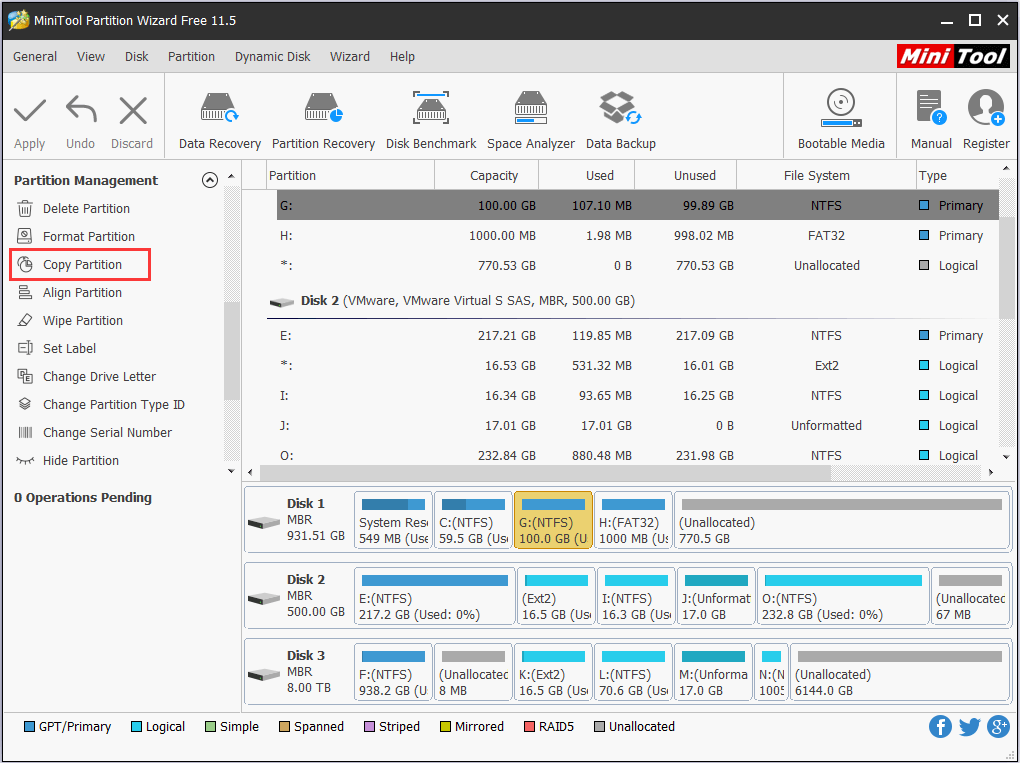
Step 2. Select a location to create the copy of the target partition. Please note that only unallocated space can be selected. Click «Next» to go on.
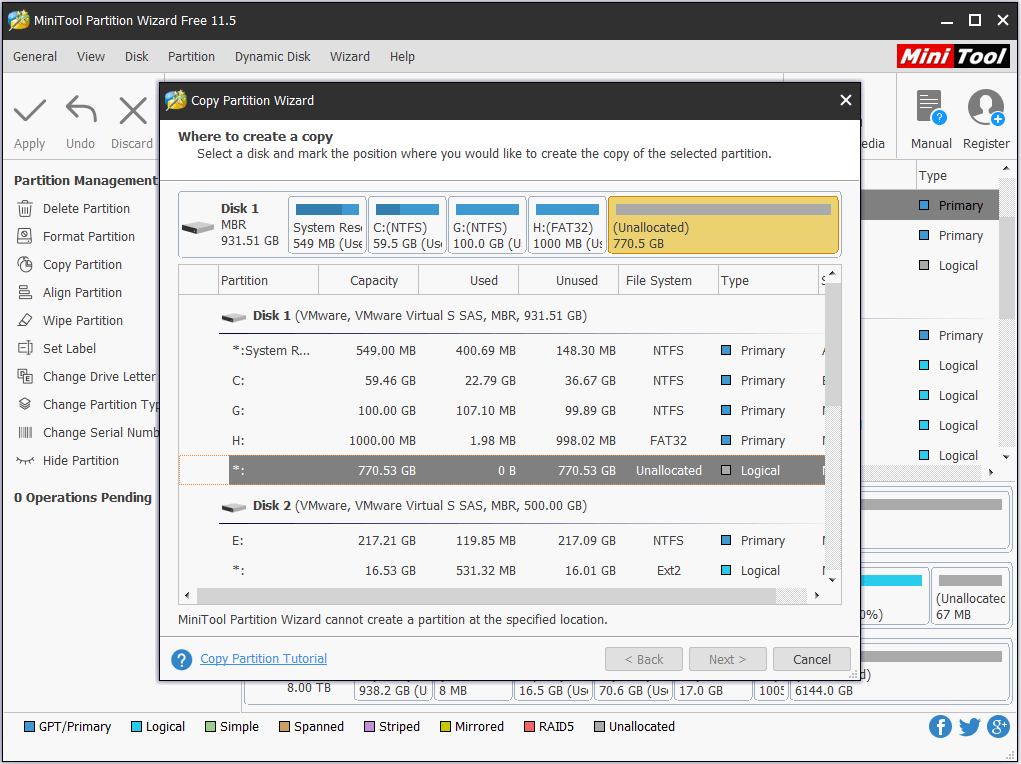
Step 3. Determine the partition size and location. To resize partition, drag the slider bar to shrink or extend. To move the location, drag the partition leftwards or rightwards. Then click «Finish«.
Step 4. Click «Apply» to start the copy.
Tip: Now you can delete the partitions that have been copied from the original disk and then make full use of the unallocated space to extend the rest partitions.
«How to clear disk space? These 10 solutions help you carry out Windows disk cleanup easily and effectively.»Click to Tweet
Now, It’s Your Turn
In this post, we show you 10 ways to free up disk space, and hope you never go to the last costly one. If you have come across other workarounds, please list the troubleshooting steps in the comment section below. If you have any questions towards using MiniTool software, you can contact us by sending an email to [email protected].