Содержание
- Способ 1: Проверка состояния службы аудио
- Способ 2: Проверка состояния устройства
- Способ 3: Обновление или откат драйвера
- Способ 4: Средство устранения неполадок
- Вопросы и ответы
Способ 1: Проверка состояния службы аудио
Если на компьютере имеется несколько устройств аудиовывода, вы можете переключаться между ними в разделе «Система» → «Звук» → «Вывод» приложения «Параметры». Однако может случиться, что в выпадающем списке вместо аудиоустройств будет указан статус «Устройства вывода не найдены». Если при этом на компьютере не работает звук, первым делом проверьте состояние аудиослужбы.
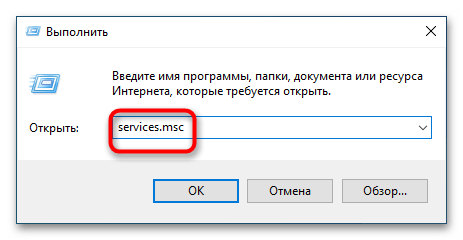
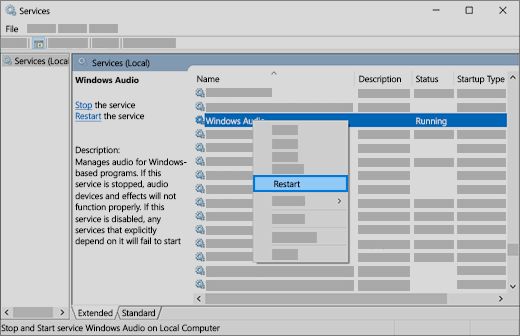
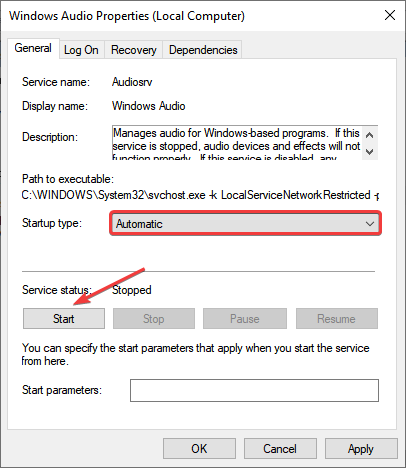
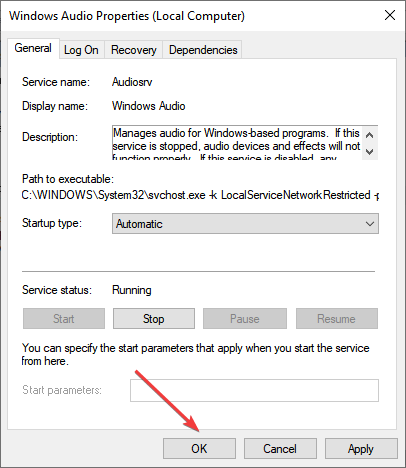
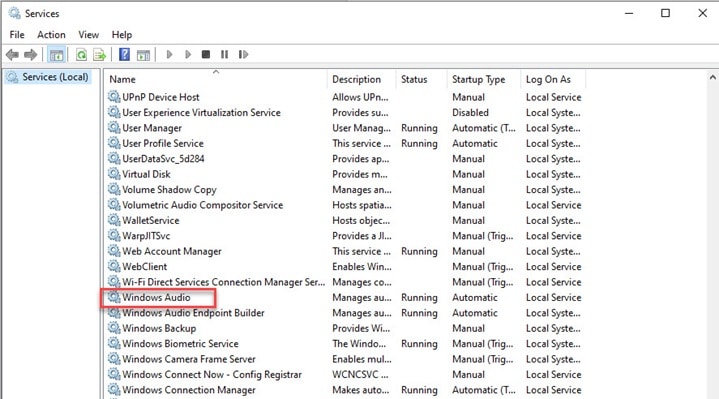
- Запустите оснастку управления службами. Сочетанием клавиш Win + R откройте окошко быстрого выполнения команд, введите в него команду
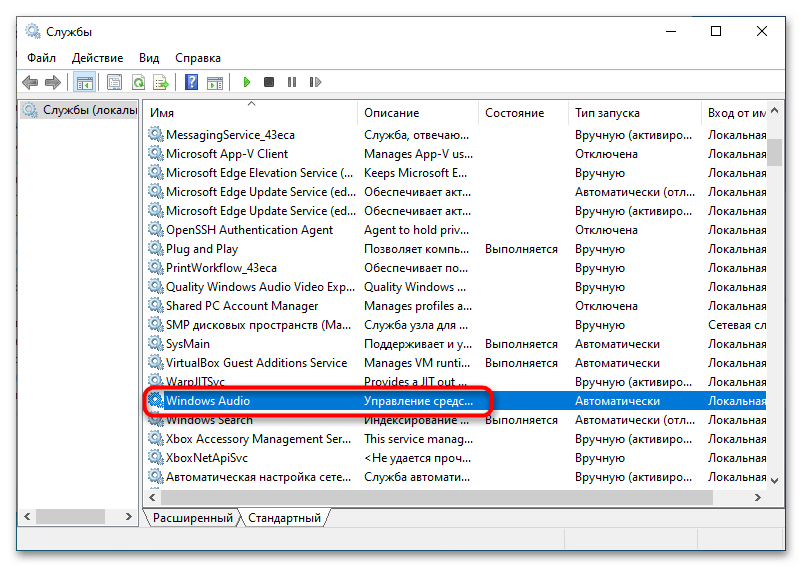
services.mscи нажмите клавишу ввода. - Найдите в списке службу «Windows Audio» и вызовите ее свойства двойным по ней кликом.
- Тип запуска службы должен быть выставлен «Автоматически», а сама она — выполняться. В противном случае измените тип запуска службы и запустите ее.
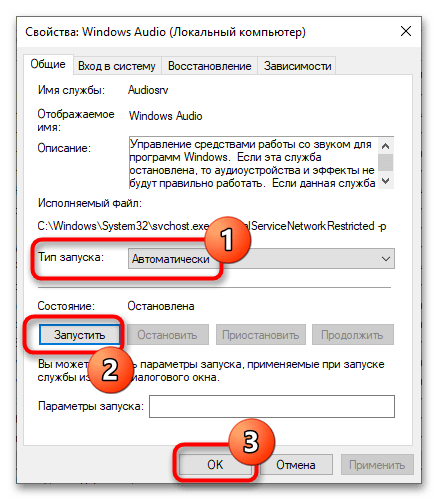
После этого выбор аудиоустройств должен стать доступным.
Способ 2: Проверка состояния устройства
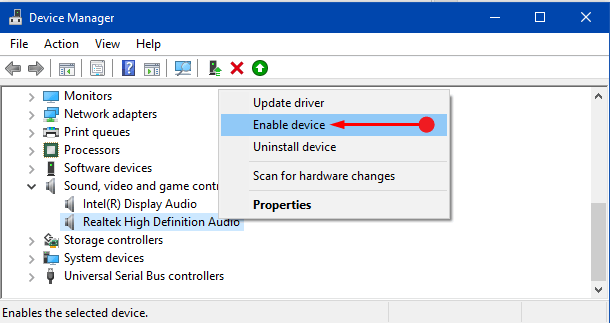
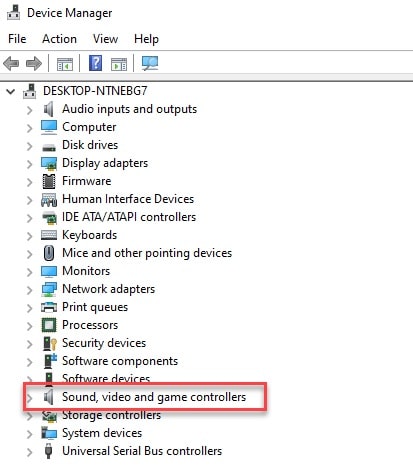
Убедитесь, что устройство вывода звука доступно в «Диспетчере устройств» и проверьте его состояние. Возможно, оно по какой-то причине отключено или имеются проблемы с его драйвером.
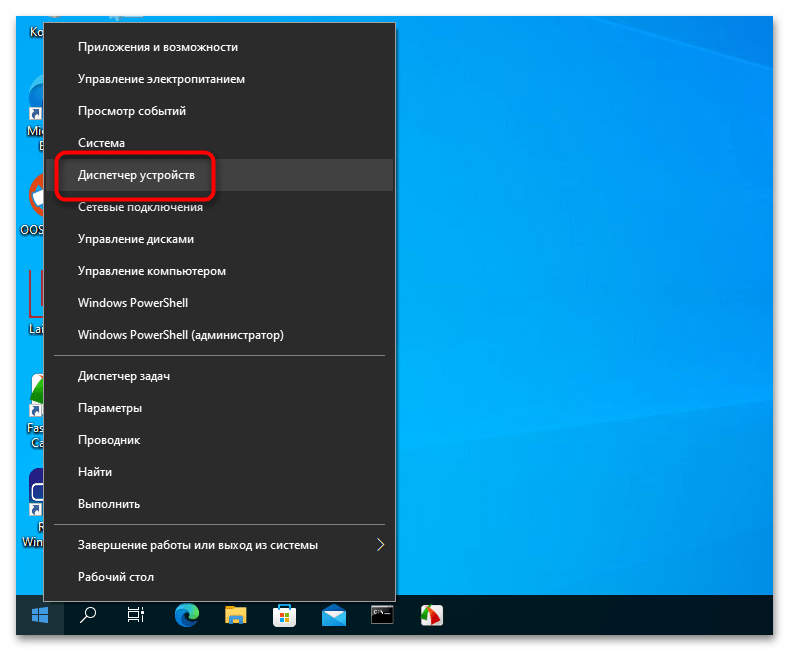
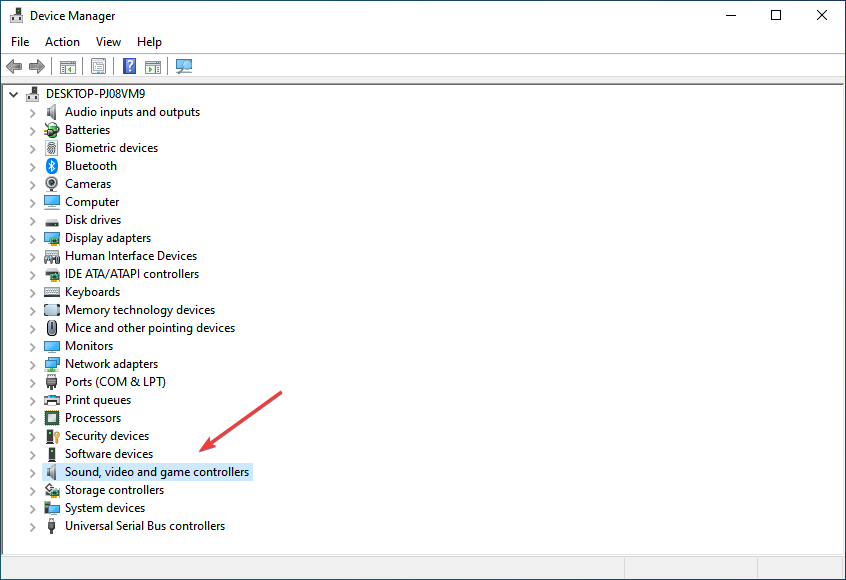
- Откройте оснастку «Диспетчер устройств» из контекстного меню кнопки «Пуск».
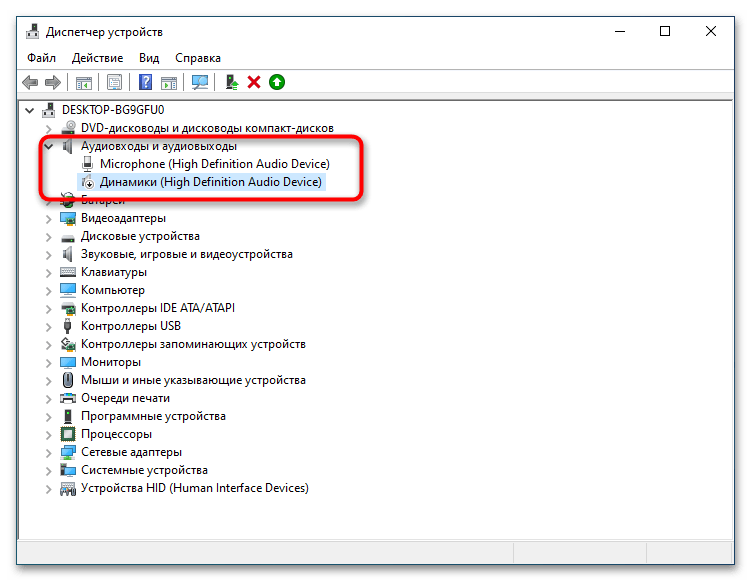
- Разверните пункт «Аудиовходы и аудиовыходы», найдите устройства вывода (динамики, наушники) и откройте их свойства двойным кликом.
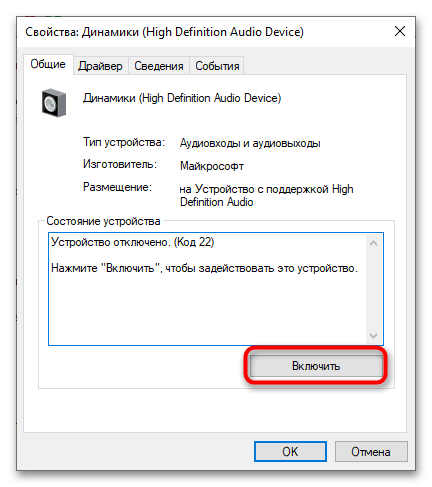
- Состояние устройства должно быть «Включено». В противном случае обратите внимание на код состояния, он укажет вам на характер проблемы. Например, код 45 указывает на сбой подключения устройства, а код 22 — на его отключение пользователем или программой. Включите устройство, если оно отключено, в остальных случаях решение принимается в соответствии с кодом проблемы.
Подробнее: Ошибка с кодом 45 «Сейчас это устройство не подключено»
Способ 3: Обновление или откат драйвера
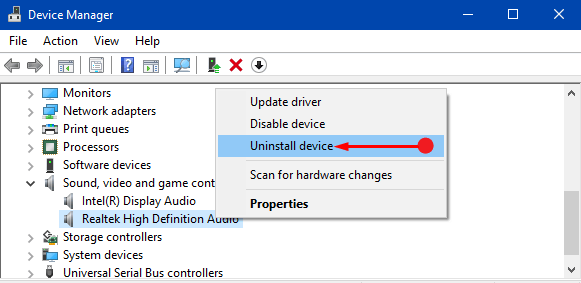
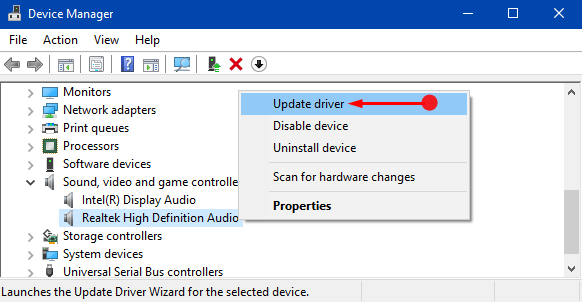
Если проблема возникла после критического сбоя, установки нового оборудования, обновления системы и аудиодрайвера, следует проверить работу драйвера устройства.
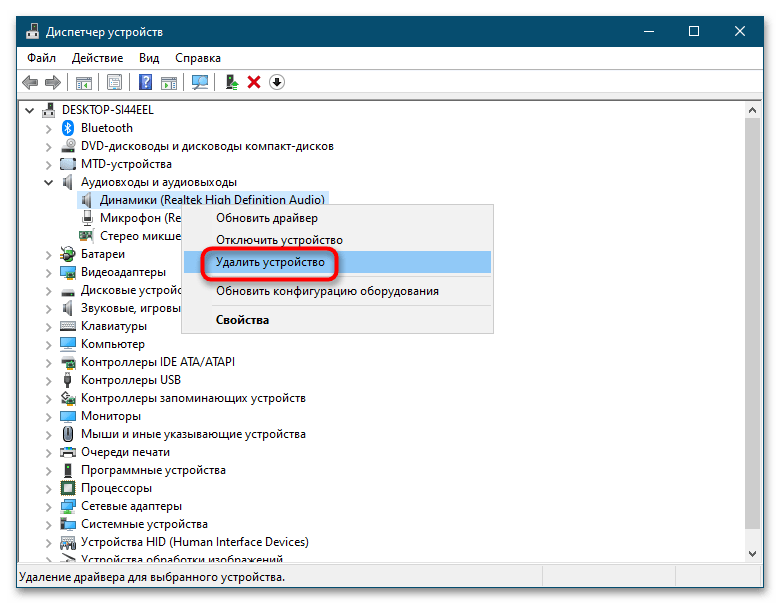
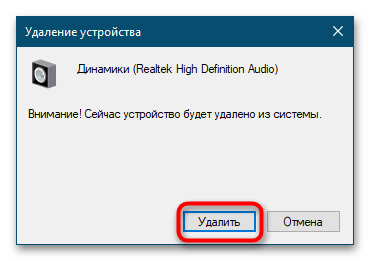
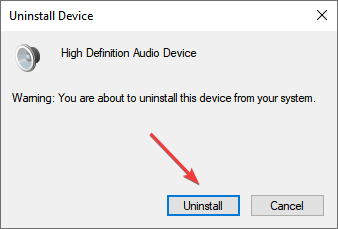
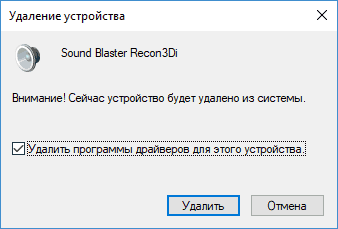
- Запустите «Диспетчер устройств» как было показано выше, разверните «Аудиовходы и аудиовыходы», кликните по проблемному компоненту правой кнопкой мыши и выберите «Удалить устройство».
- Подтвердите удаление устройства, перезагрузите компьютер и проверьте его доступность в приложении «Параметры».
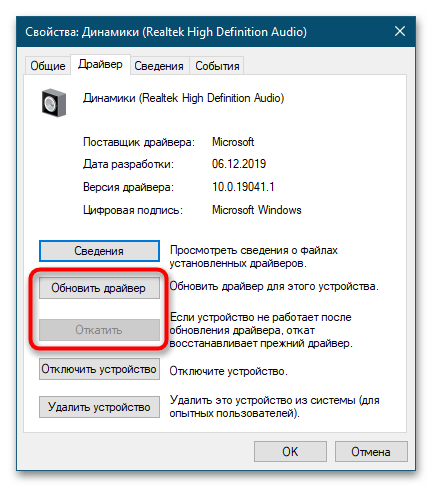
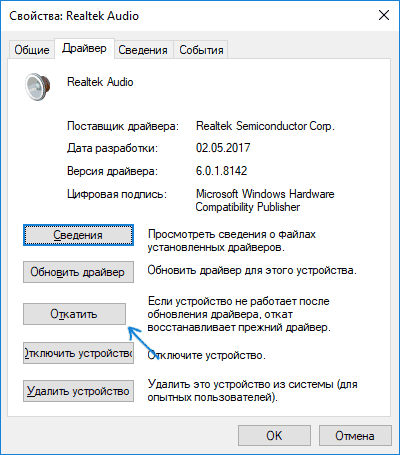
- Если это не поможет, откройте свойства устройства двойным по нему кликом, переключитесь на вкладку «Драйвер» и выполните либо обновление драйвера, либо его откат, если проблема возникла после обновления драйвера или системы.
Подробнее: Обновление драйверов в Windows 10
Если аудиоустройство отсутствует в «Диспетчере устройств», это может указывать на выход его из строя, в то время как наличие отмеченного желтым значком некоего неопознанного устройства – на отсутствие в системе его драйвера. В последнем случае вам нужно будет найти и установить для него соответствующий драйвер самостоятельно или воспользовавшись специальным программным обеспечением.
Подробнее:
Узнаем, какие драйверы нужно установить на компьютер
Программы для поиска и обновления драйверов
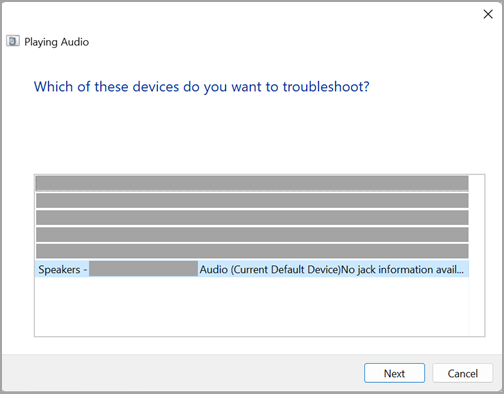
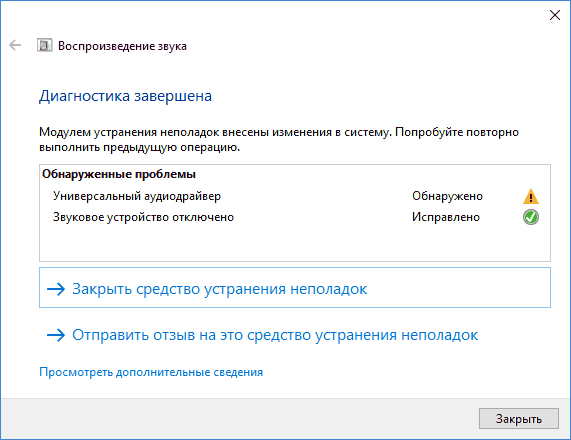
Способ 4: Средство устранения неполадок
Также вы можете воспользоваться встроенным в Windows 10 инструментом «Средство устранения неполадок» — возможно, ему удастся найти причину проблемы.
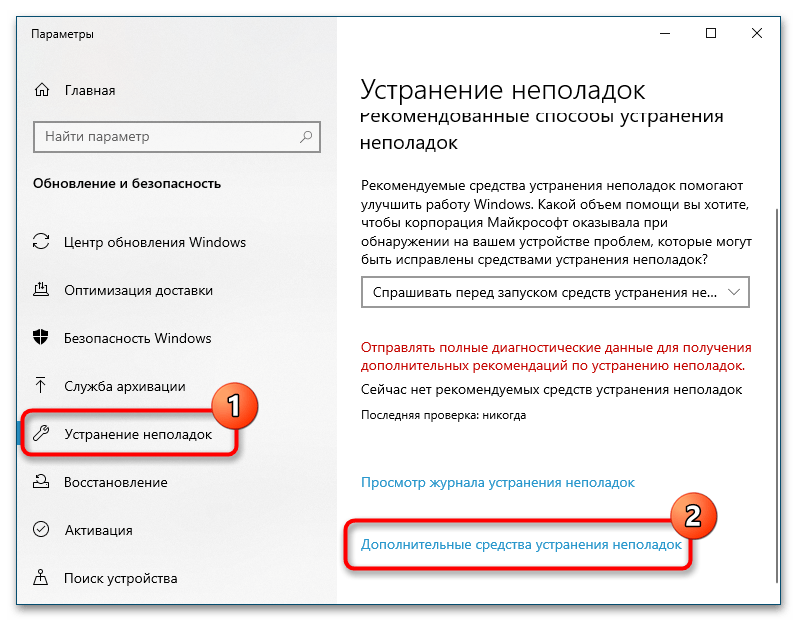
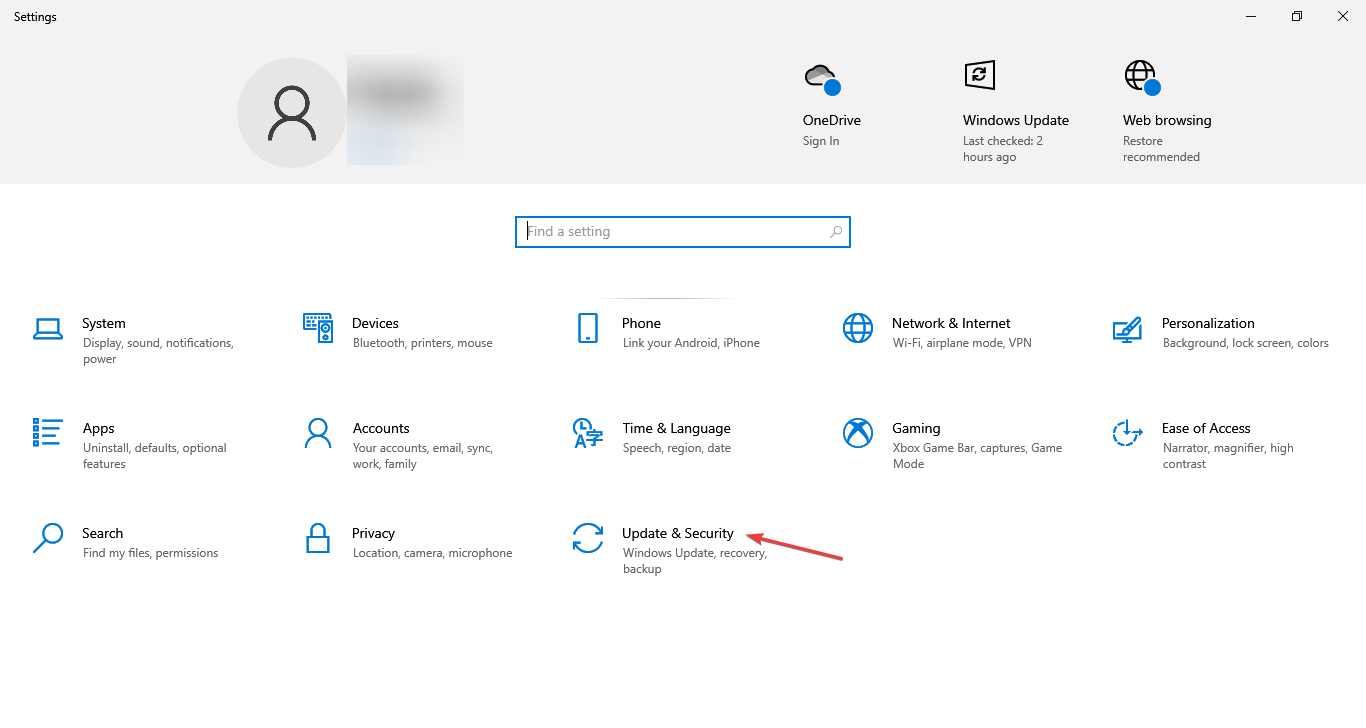
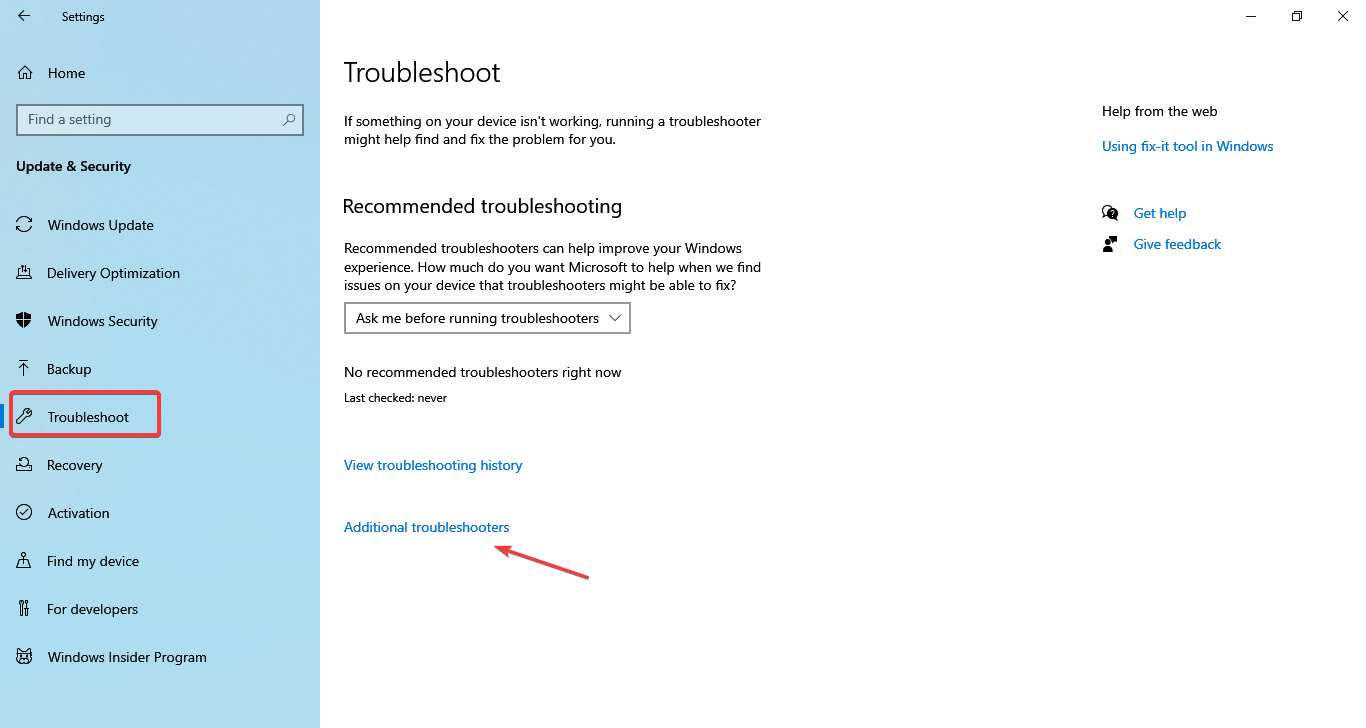
- Открыв приложение «Параметры», перейдите в раздел «Обновление и безопасность» → «Устранение неполадок» и нажмите справа ссылку «Дополнительные средства устранения неполадок».
- Выберите и запустите инструмент для варианта «Воспроизведение звука».

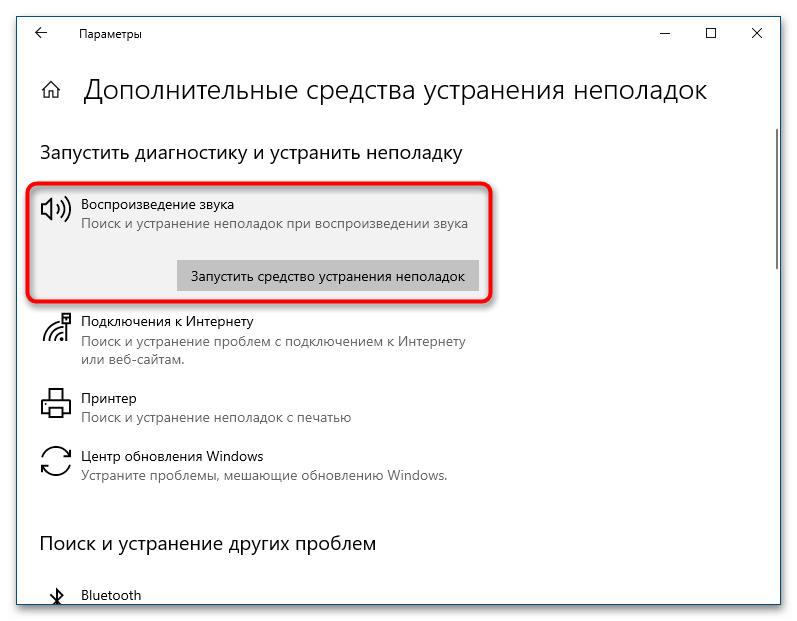
Открывшееся средство выполнит проверку на предмет типичных неполадок и предложит соответствующее решение, если таковое будет найдено.
Еще статьи по данной теме:
Помогла ли Вам статья?
If you’re having sound or audio problems, the following suggestions might help. The tips are listed in order, so start with the first one, see if that helps, and then continue to the next one if it doesn’t.
Before you begin
Start by running the automated audio troubleshooter in the Get Help app. Get Help automatically runs diagnostics and takes the correct steps to fix most audio issues.
Open Get Help
If the Get Help app is unable to resolve your sound or audio issue, try the possible solutions listed:
If multiple audio output devices are available, check that you have the appropriate one selected. Here’s how:
-
Select the Speakers icon on the taskbar.
Note: If you don’t see Speakers displayed, it may be in the overflow area. Select Show hidden icons to check there.
-
Next, select the arrow to open a list of audio devices connected to your computer.
-
Check that your audio is playing to the audio device you prefer, such as a speaker or headphones.
If this doesn’t help, continue to the next tip.
The audio troubleshooter might be able to fix audio problems automatically.
To run the troubleshooter:
-
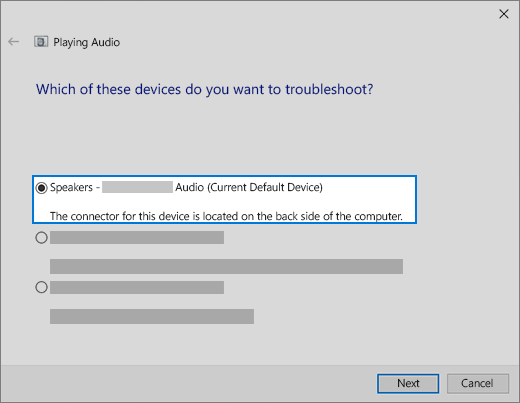
Go to Search in the taskbar, type audio troubleshooter, and select Find and fix problems with playing sound from the results to launch the troubleshooter.
-
Select Next, and then select the device you want to troubleshoot and then continue through the troubleshooter.

You can also launch the troubleshooter from audio Settings:
-
Select Start > Settings > System > Sound > Troubleshoot common sound problems and select Output devices or Input devices.
If running the troubleshooter doesn’t help, continue to the next tip.
To check for updates:
-
Do one of the following:
-
If the status says, «You’re up to date,» go to the next tip.
-
If the status says, «Updates are available,» select Install now.
-
-
Select the updates you want to install, then select Install.
-
Restart your PC and check if your sound is working properly.
If that didn’t solve your problem, continue to the next tip.
Try these steps:
-
Check your speaker and headphone connections for loose cords or cables. Make sure all cords and cables are plugged in.
-
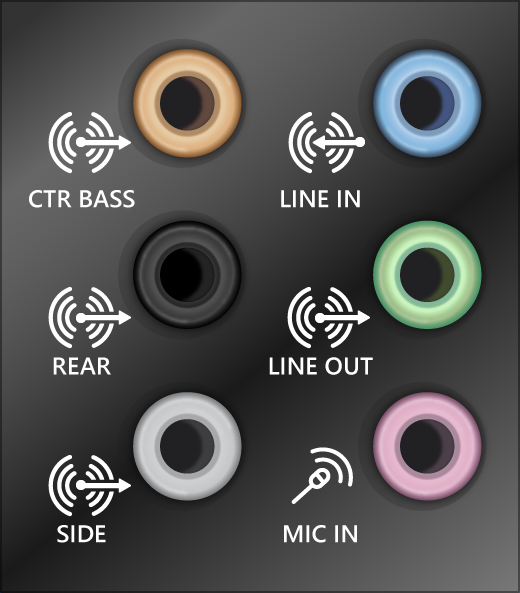
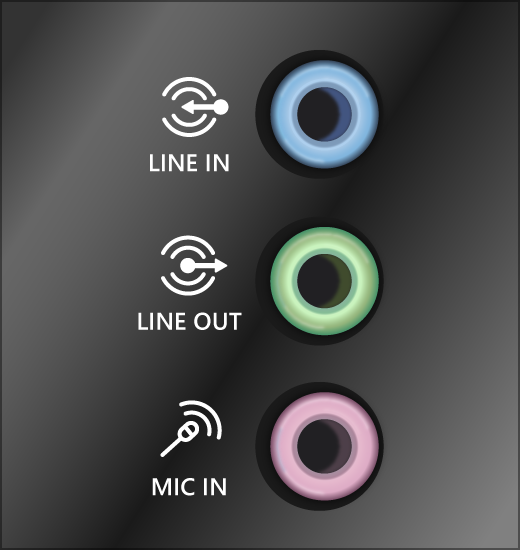
If you have multiple 5mm jacks to plug into, especially on a surround sound system, make sure all cords and cables are plugged into the correct jack.
-
If it’s not clear which jack goes with which cord, consult your hardware manufacturer, or try the most obvious outputs one at a time and see if they work.
Note: Some systems use a green jack for output and a pink jack for mic input and others will be labeled «headphone» or «microphone.»
-
-
Make sure the power is turned on.
-
Make sure the mute setting is not turned on and try turning up all the volume controls.
Note: Some speakers and apps have their own volume controls. Be sure to check them all.
-
Try connecting your speaker and headphones to a different USB port.
-
It’s possible that your speakers won’t work when your headphones are plugged in. Unplug your headphones and see if that helps.
If you’re still having audio problems, see the next sections for additional troubleshooting.
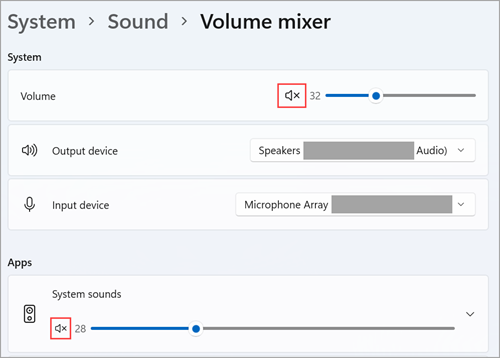
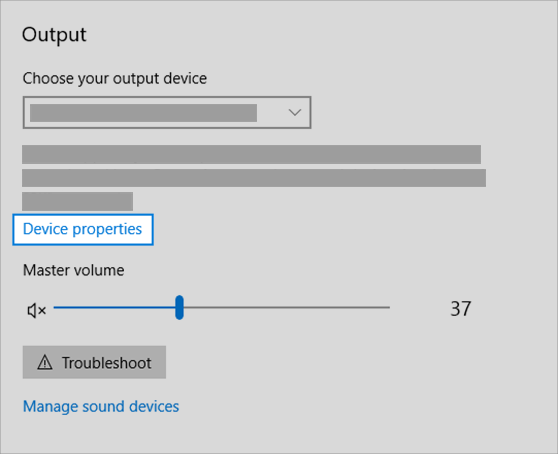
Check to make sure your audio devices aren’t muted and haven’t been disabled.
-
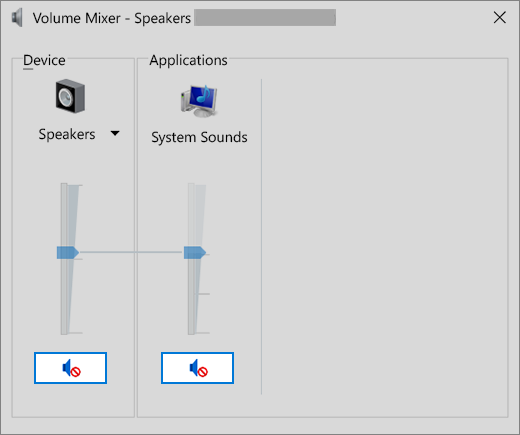
Select and hold (or right-click) the Speakers icon on the taskbar, and then select Open Volume mixer.
Note: If you don’t see Speakers displayed, it may be in the overflow area. Select Show hidden icons to check there.
-
You’ll see a set of volume controls for your devices. Make sure none of them are muted. If any of them are muted, you’ll see an «x» next to the volume control . To unmute do one of the following:
-
Select the volume control and adjust to the desired volume level.
-
Select the Unmute speakers icon .
-
-
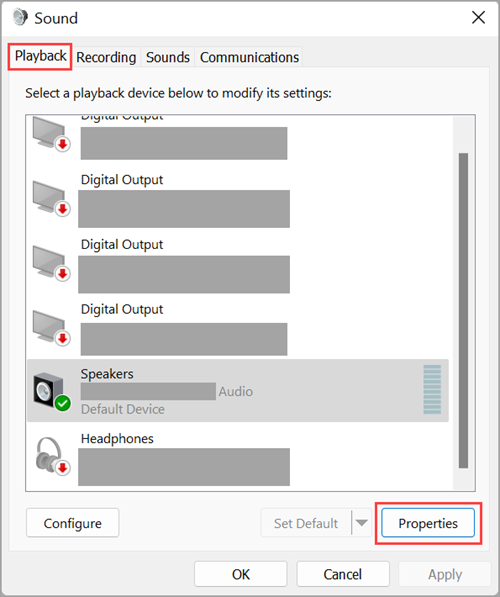
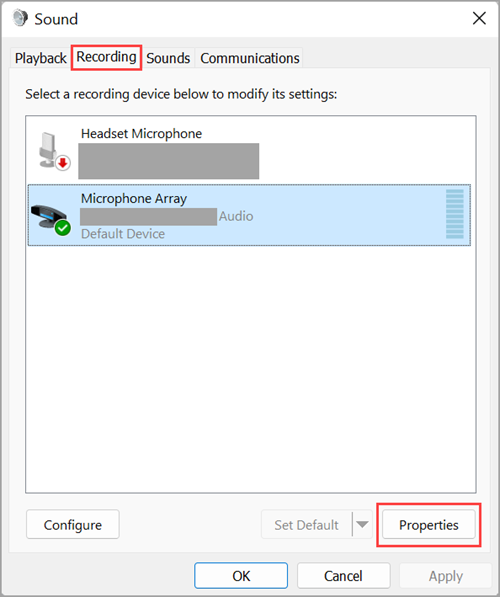
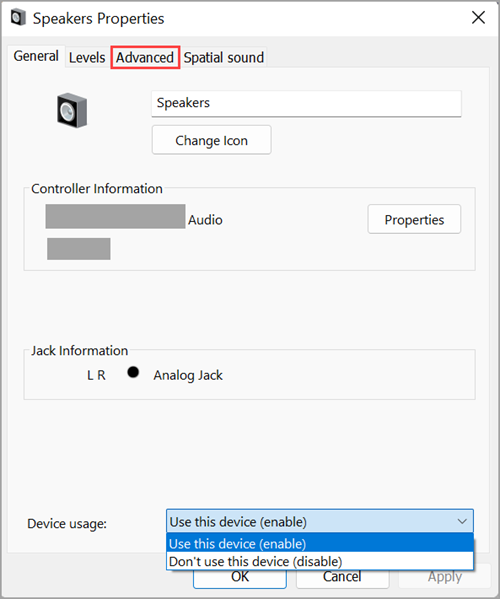
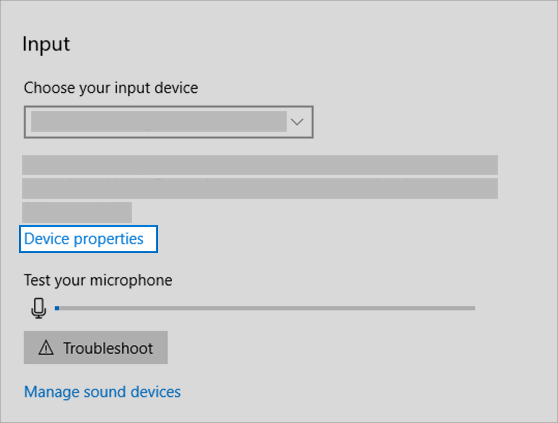
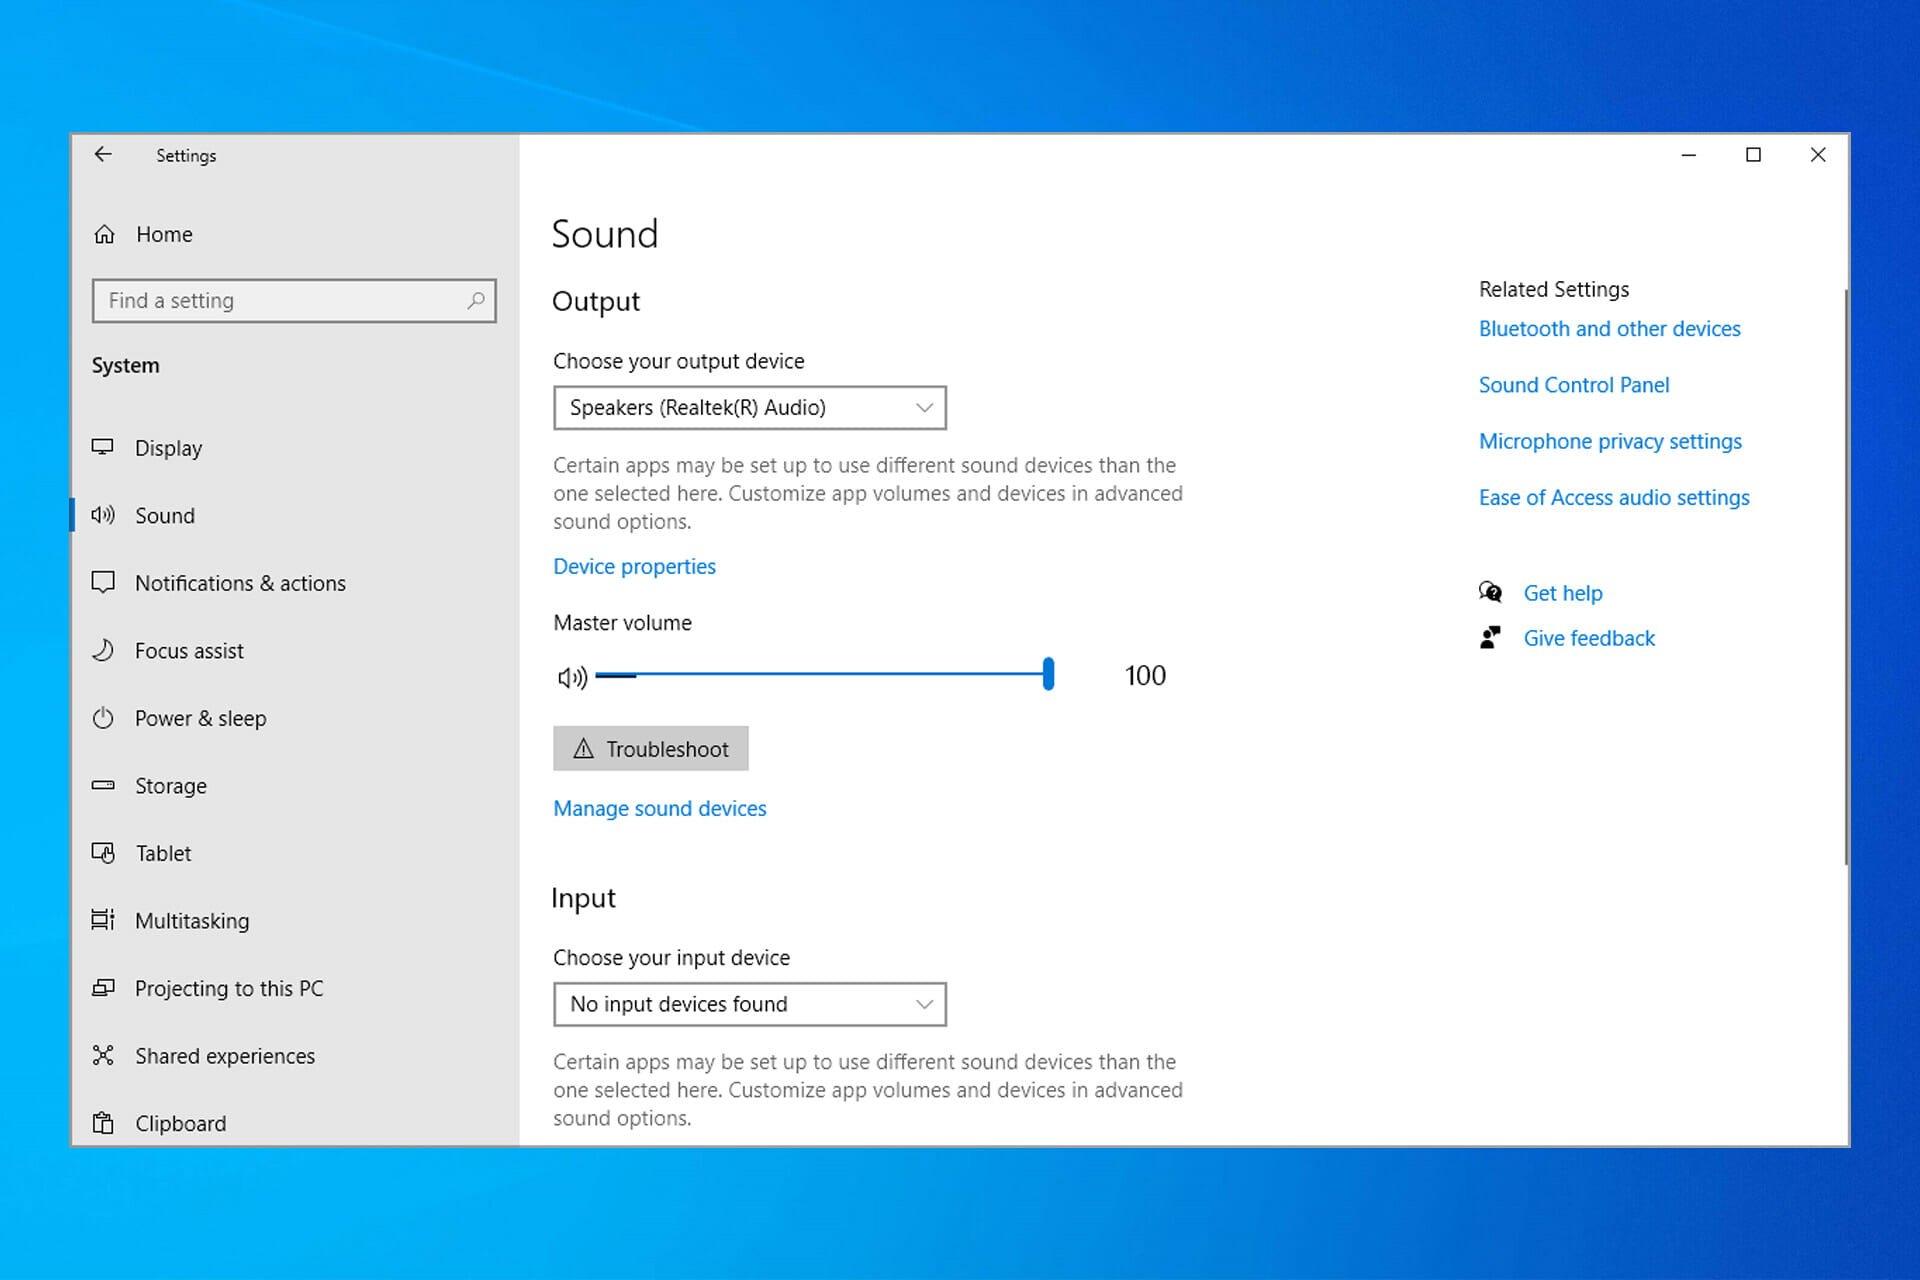
Check your device properties to make sure that your devices have not been disabled by mistake. Select Start > Settings > System > Sound .
-
Under Advanced, select More sound settings and select either the Playback (output) or Recording (input) tab.
-
Select your device and then select Properties.
-
Next to Device usage, check that Use this device (enable) is selected from the list for the output and input devices.
If that didn’t solve your problem, continue to the next tip.
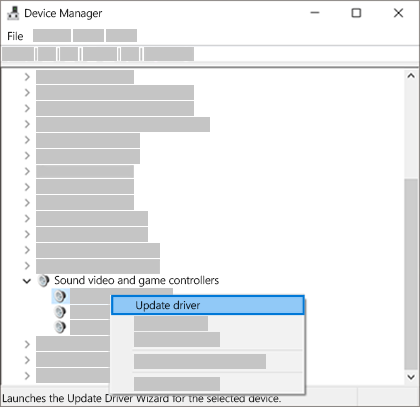
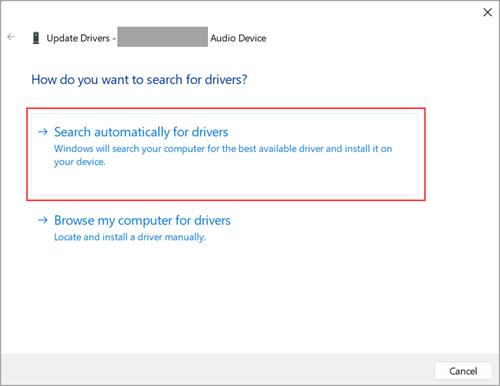
Hardware problems can be caused by outdated or malfunctioning drivers. Make sure your audio driver is up to date and update it if needed. If that doesn’t work, try uninstalling the audio driver (it will reinstall automatically). If that doesn’t work, try using the generic audio driver that comes with Windows. If you’re having audio issues after installing updates, try rolling back your audio driver.
To update your audio driver automatically:
-
In the search box on the taskbar, type device manager, then select it from the results.
-
Select the arrow next to Sound, video and game controllers to expand it.
-
Select and hold (or right-click) the listing for your sound card or audio device, such as headphones or speakers, select Update driver, then select Search automatically for drivers. Follow the instructions to complete the update.
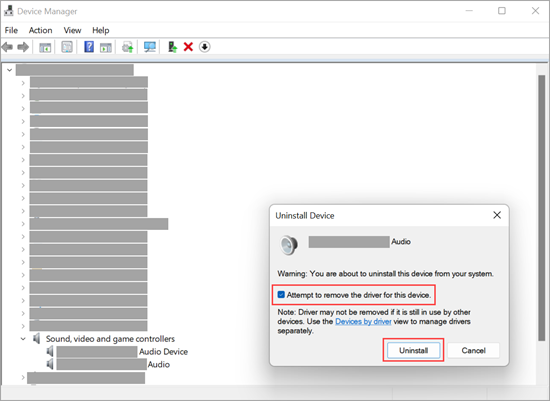
If Windows doesn’t find a new driver, look for one on the device manufacturer’s website and follow those instructions. If that doesn’t work, try uninstalling your audio driver.
To uninstall your audio driver:
-
In the search box on the taskbar, type device manager, then select it from the results.
-
Select the arrow next to Sound, video and game controllers to expand it.
-
Select and hold (or right-click) the listing for your sound card or audio device, select Uninstall device, select the Attempt to remove the driver for this device check box, and then select Uninstall.
-
Restart your PC.
Note: Be sure to save your documents and any other current work before you restart.
-
This restart will automatically prompt your PC to reinstall your audio driver.
-
To restart, select Start > Power > Restart .
-
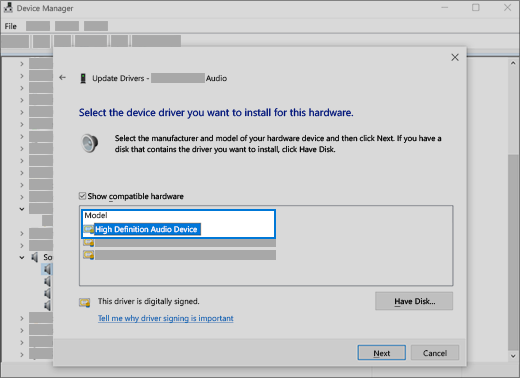
If those options didn’t work, try using the generic audio driver that comes with Windows.
To use the generic audio driver that comes with Windows:
-
In the search box on the taskbar, type device manager, then select it from the results.
-
Select the arrow next to Sound, video and game controllers to expand it.
-
Select and hold (or right-click) the listing for your sound card or audio device, then select Update driver > Browse my computer for drivers > Let me pick from a list of available drivers on my computer.
-
Select the audio device whose driver you want to update, select Next, and then follow the instructions to install it.
If these steps didn’t solve your audio issue, visit your device manufacturer’s website and install the most recent audio/sound drivers for your device. The following is an example of a driver download page for a sound device manufacturer.
If you have audio issues after installing updates
If your audio was working before you ran Windows Update and now isn’t working, try rolling back your audio driver.
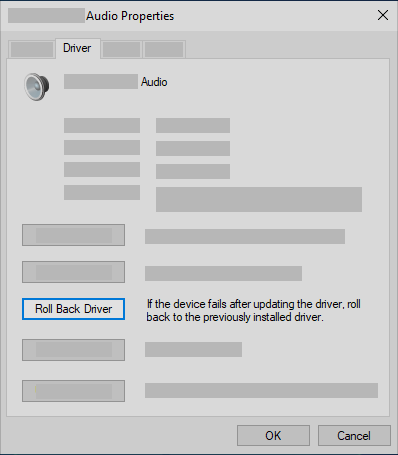
To roll back your audio driver:
-
In the search box on the taskbar, type device manager, then select it from the results.
-
Select the arrow next to Sound, video and game controllers to expand it.
-
Select and hold (or right-click) the listing for your sound card or audio device, then select Properties.
-
Select the Driver tab, then select Roll Back Driver.
-
Read and follow the instructions and then select Yes if you want to roll back your audio driver.
If rolling back your audio driver didn’t work or wasn’t an option, you can try to restore your PC from a system restore point.
Restore your PC from a system restore point:
When Microsoft installs updates on your system, we create a system restore point in case problems arise. Try restoring from that point and see if that fixes your sound problems. For more info, see «Restore from a system restore point» in Recovery options in Windows.
If you’re connecting to an audio device—such as headphones or speakers—using USB or HDMI, you might need to set that device as the default audio device. If you’re using an external monitor that doesn’t have built-in speakers, make sure that the monitor isn’t already selected as your default output device. if it is, you won’t have any audio. You can check that when you set your default output audio device. Here’s how:
-
In the search box on the taskbar, type control panel, then select it from the results.
-
Select Hardware and Sound from the Control Panel, and then select Sound.
-
On the Playback tab, select and hold (or right-click) the listing for your audio device, select Set as Default Device, and then select OK.
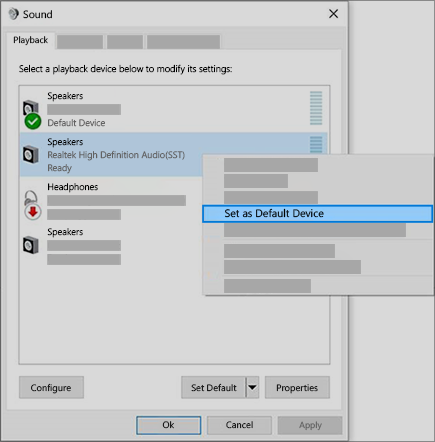
If setting your audio device as the default device doesn’t help, continue to the next tip for additional troubleshooting.
Sometimes having audio enhancements on can result in audio issues. Disabling them may resolve your issue.
-
In the search box on the taskbar, type control panel, then select it from the results.
-
Select Hardware and Sound from the Control Panel, and then select Sound.
-
On the Playback tab, select and hold (or right-click) the Default Device, and then select Properties.
-
Select the Advanced tab and uncheck either the Enable audio enhancements or the Enable sound effects check box (depending on which option you see), select Apply, and try to play your audio device.
-
If that doesn’t work, on the Playback tab, select and hold (or right-click) another default device (if you have one), and select Properties. Uncheck either the Enable audio enhancements or the Enable sound effects check box (depending on which option you see), select Apply, and try to play audio again. Do this for each default device.
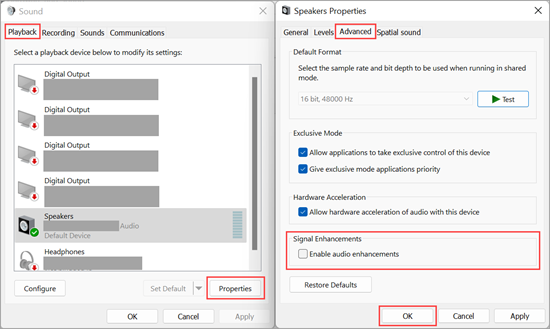
If turning off audio enhancements doesn’t help, see the next sections for additional troubleshooting.
-
In the search box on the taskbar, type services, then select it from the results.
-
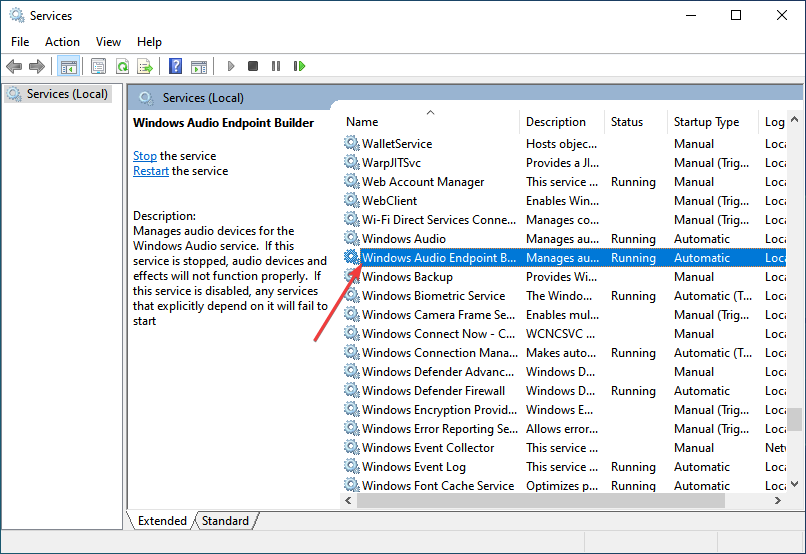
Select each of the following services, select and hold (or right-click), select Restart, and then select Yes:
-
Windows Audio
-
Windows Audio Endpoint Builder
-
Remote Procedure Call (RPC)
-
If restarting these services doesn’t resolve your issue, see the next sections for more troubleshooting.
-
In the search box on the taskbar, type control panel, and then select it from the results.
-
Select Hardware and Sound from the Control Panel, and then select Sound.
-
On the Playback tab, select and hold (or right-click) Default Device, and then select Properties.
-
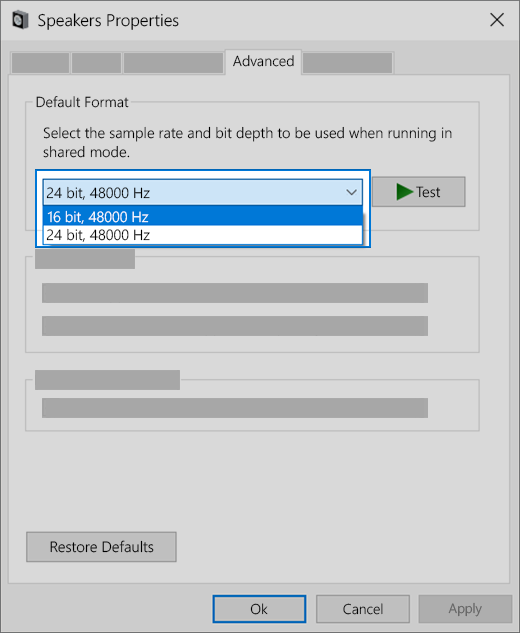
On the Advanced tab, under Default Format, change the setting, select OK, and then test your audio device. If that doesn’t work, try changing the setting again.
If trying different audio formats doesn’t help, see the next sections for additional troubleshooting.
Many updates require you to restart your device.
To check and see if you have installed updates pending and need to restart:
-
Save your work and close all open applications.
-
Select Start > Power . If you have installed updates pending, you’ll see options to Update and restart and Update and shut down.
-
Select one of those restart options to apply the updates.
Need help with Windows Update? See Troubleshoot problems updating Windows.
If restarting doesn’t help, see the next section for additional troubleshooting.
Some audio problems might be caused by an issue with the audio system’s IDT High Definition Audio CODEC. This can be fixed with a manual driver update which allows you to choose the sound driver you want to use.
Note: Not all systems will have an IDT High Definition Audio CODEC.
To check and see if you have one, and to manually update the driver:
-
In the search box on the taskbar, type device manager, then select it from the results.
-
Select the arrow next to Sound, video and game controllers to expand it.
-
Look for IDT High Definition Audio CODEC. If it’s listed, select and hold (or right-click) it and select Update driver, then select Browse my computer for drivers > Let me pick from a list of available drivers on my computer.
-
You’ll see a list of pre-installed drivers. Select High Definition Audio Device, and then select Next.
-
Select Start > Settings > Privacy & security.
-
Under App permissions, select Microphone.
-
Make sure that the Microphone access and Let apps access your microphone toggles are turned On.
-
If you’re having this issue with a specific app, scroll down under Let apps access your microphone and make sure that the toggle next to that specific app is turned On as well.
If multiple audio output devices are available, check that you have the appropriate one selected. Here’s how:
-
Select the Speakers icon on the taskbar.
Note: If you don’t see Speakers displayed, it may be in the overflow area. Select Show hidden icons to check there.
-
Next, select the arrow to open a list of audio devices connected to your computer.
-
Check that your audio is playing to the audio device you prefer, such as a speaker or headphones.
If this doesn’t help, continue to the next tip.
The audio troubleshooter might be able to fix audio problems automatically.
To run the troubleshooter:
-
In the search box on the taskbar, type audio troubleshooter, select Find and fix problems with playing sound from the results, then select Next.
-
Select the device you want to troubleshoot and then continue through the troubleshooter.
You can also launch the troubleshooter from audio Settings. Select Start > Settings > System > Sound > Troubleshoot.
If running the troubleshooter doesn’t help, continue to the next tip.
To check for updates:
-
Select Start > Settings > Update & Security > Windows Update > Check for updates.
Open Windows Update
-
Do one of the following:
-
If the status says, «You’re up to date,» go to the next tip.
-
If the status says, «Updates are available,» select Install now.
-
-
Select the updates you want to install, then select Install.
-
Restart your PC and see if your sound is working properly.
If that didn’t solve your problem, continue to the next tip.
Try these steps:
-
Check your speaker and headphone connections for loose cords or cables. Make sure all cords and cables are plugged in.
-
If you have multiple 5mm jacks to plug into, especially on a surround sound system, make sure all cords and cables are plugged into the correct jack.
-
If it’s not clear which jack goes with which cord, consult your hardware manufacturer, or try the most obvious outputs one at a time and see if they work.
Note: Some systems use a green jack for output and a pink jack for mic input and others will be labeled «headphone» or «microphone.»
-
-
Make sure the power is turned on.
-
Make sure the mute setting is not turned on and try turning up all the volume controls.
Note: Some speakers and apps have their own volume controls. Be sure to check them all.
-
Try connecting your speaker and headphones to a different USB port.
-
It’s possible that your speakers won’t work when your headphones are plugged in. Unplug your headphones and see if that helps.
If you’re still having audio problems, see the next sections for additional troubleshooting.
Check to make sure your audio devices aren’t muted and haven’t been disabled.
-
Select and hold (or right-click) the Speakers icon on the taskbar, and then select Open Volume mixer.
Note: If you don’t see Speakers displayed, it may be in the overflow area. Select Show hidden icons to check there.
-
You’ll see a set of volume controls for your devices. Make sure none of them are muted. If any of them are muted, you’ll see a red circle with a line through it next to the volume control. In that case, select the volume control to unmute.
-
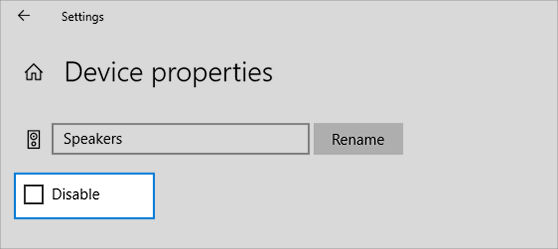
Check your device properties to make sure that your devices have not been disabled by mistake. Select Start > Settings > System > Sound .
-
Select your audio device, and then select Device properties. Be sure to selectDevice properties for both the output and input devices.
-
Make sure the Disable check box is cleared for the output and input devices.
If that didn’t solve your problem, continue to the next tip.
Hardware problems can be caused by outdated or malfunctioning drivers. Make sure your audio driver is up to date and update it if needed. If that doesn’t work, try uninstalling the audio driver (it will reinstall automatically). If that doesn’t work, try using the generic audio driver that comes with Windows. If you’re having audio issues after installing updates, try rolling back your audio driver.
To update your audio driver automatically:
-
In the search box on the taskbar, type device manager, then select it from the results.
-
Select the arrow next to Sound, video and game controllers to expand it.
-
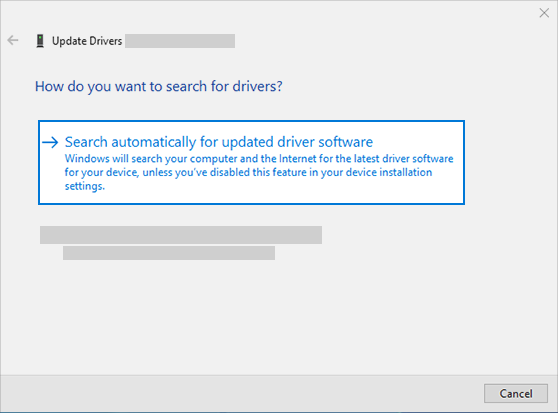
Select and hold (or right-click) the listing for your sound card or audio device, such as headphones or speakers, select Update driver, then select Search automatically for updated driver software. Follow the instructions to complete the update.
If Windows doesn’t find a new driver, look for one on the device manufacturer’s website and follow those instructions. If that doesn’t work, try uninstalling your audio driver.
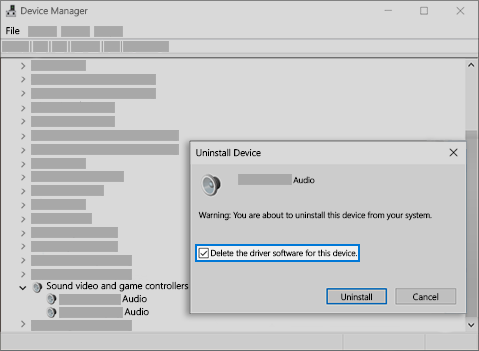
To uninstall your audio driver:
-
In the search box on the taskbar, type device manager, then select it from the results.
-
Select the arrow next to Sound, video and game controllers to expand it.
-
Right-click the listing for your sound card or audio device, select Uninstall device,select the Delete the driver software for this device check box, and then select Uninstall.
-
Restart your PC.
-
Note: Be sure to save documents and any other current work before you restart.
-
This restart will automatically prompt your PC to reinstall your audio driver.
-
To restart, select Start > Power > Restart .
-
If those options didn’t work, try using the generic audio driver that comes with Windows.
To use the generic audio driver that comes with Windows:
-
In the search box on the taskbar, type device manager, then select it from the results.
-
Select the arrow next to Sound, video and game controllers to expand it.
-
Select and hold (or right-click) the listing for your sound card or audio device, then select Update driver > Browse my computer for drivers > Let me pick from a list of device drivers on my computer.
-
Select the audio device whose driver you want to update, select Next, and then follow the instructions to install it.
If these steps didn’t solve your audio issue, visit your device manufacturer’s website, and install the most recent audio or sound drivers for your device. The following is an example of a driver download page for a sound device manufacturer.
If you have audio issues after installing updates
If your audio was working before you ran Windows Update and now isn’t working, try rolling back your audio driver.
To roll back your audio driver:
-
In the search box on the taskbar, type device manager, then select it from the results.
-
Select the arrow next to Sound, video and game controllers to expand it.
-
Select and hold (or right-click) the listing for your sound card or audio device, then select Properties.
-
Select the Driver tab, then select Roll Back Driver.
-
Read and follow the instructions and then selectYes if you want to roll back your audio driver.
If rolling back your audio driver didn’t work or wasn’t an option, you can try to restore your PC from a system restore point.
Restore your PC from a system restore point:
When Microsoft installs updates on your system, we create a system restore point in case problems arise. Try restoring from that point and see if that fixes your sound problems. For more info, see «Restore from a system restore point» in Recovery options in Windows.
If you’re connecting to an audio device—such as headphones or speakers—using USB or HDMI, you might need to set that device as the default audio device. If you’re using an external monitor that doesn’t have built-in speakers, make sure that the monitor isn’t already selected as your default output device. If it is, you won’t have any audio. You can check that when you set your default output audio device. Here’s how:
-
In the search box on the taskbar, type control panel, then select it from the results.
-
Select Hardware and Sound from the Control Panel, and then select Sound.
-
On the Playback tab, select and hold (or right-click) the listing for your audio device, select Set as Default Device, and then select OK.
If setting your audio device as the default device doesn’t help, continue to the next tip for additional troubleshooting.
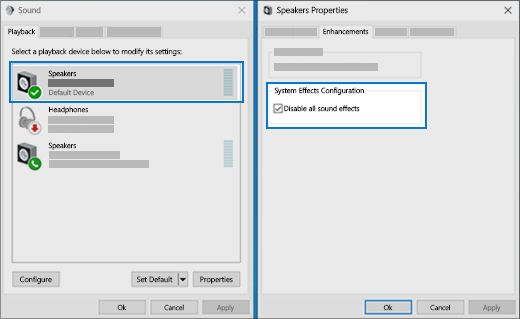
Sometimes having audio enhancements on can result in audio issues. Disabling them may resolve your issue.
-
In the search box on the taskbar, type control panel, then select it from the results.
-
Select Hardware and Sound from the Control Panel, and then select Sound.
-
On the Playback tab, select and hold (or right-click) the Default Device, and then select Properties.
-
On the Enhancements tab, select either the Disable all enhancements or the Disable all sound effects check box (depending on which option you see), select OK, and try to play your audio device.
-
If that doesn’t work, on the Playback tab, select and hold (or right-click) another default device (if you have one), then select Properties. On the Enhancements tab select either the Disable all enhancements or the Disable all sound effects check box (depending on which option you see), select OK, and try to play audio again. Do this for each default device.
If turning off audio enhancements doesn’t help, see the next sections for additional troubleshooting.
-
In the search box on the taskbar, type services, then select it from the results.
-
Select each of the following services, right-click, and then select Restart:
-
Windows Audio
-
Windows Audio Endpoint Builder
-
Remote Procedure Call (RPC)
-
If restarting these services doesn’t resolve your issue, see the next sections for more troubleshooting.
-
In the search box on the taskbar, type control panel, and then select it from the results.
-
Select Hardware and Sound from the Control Panel, and then select Sound.
-
On the Playback tab, select and hold (or right-click) Default Device, and then select Properties.
-
On the Advanced tab, under Default Format, change the setting, select OK, and then test your audio device. If that doesn’t work, try changing the setting again.
If trying different audio formats doesn’t help, see the next sections for additional troubleshooting.
Many updates require you to restart your device.
To check and see if you have installed updates pending and need to restart
-
Save your work and close all open applications.
-
Select Start > Power . If you have installed updates pending, you’ll see options to Update and restart and Update and shut down.
-
Select one of those restart options to apply the updates.
Need help with Windows Update? See Troubleshoot problems updating Windows.
If restarting doesn’t help, see the next section for additional troubleshooting.
Some audio problems might be caused by an issue with the audio system’s IDT High Definition Audio CODEC. This can be fixed with a manual driver update which allows you to choose the sound driver you want to use.
Note: Not all systems will have an IDT High Definition Audio CODEC.
To check and see if you have one, and to manually update the driver:
-
In the search box on the taskbar, type device manager, then select it from the results.
-
Select the arrow next to Sound, video and game controllers to expand it.
-
Look for IDT High Definition Audio CODEC. If it’s listed, select and hold (or right-click) it and select Update driver, then select Browse my computer for drivers > Let me pick from a list of device drivers on my computer.
-
You’ll see a list of pre-installed drivers. Select High Definition Audio Device, and then select Next.
-
Select Start > Settings > Privacy , and then select Microphone from the left menu.
-
Under Allow access to the microphone on this device, select Change. Make sure the toggle is turned On.
-
If you’re having this issue with a specific app, scroll down to Choose which Microsoft Store apps can access your microphone and make sure that the toggle next to that app is turned On as well.
Need more help?
Check expert recommended solutions that worked for all
by Matthew Adams
Matthew is a freelancer who has produced a variety of articles on various topics related to technology. His main focus is the Windows OS and all the things… read more
Updated on September 26, 2022
Reviewed by
Vlad Turiceanu

Passionate about technology, Windows, and everything that has a power button, he spent most of his time developing new skills and learning more about the tech world. Coming… read more
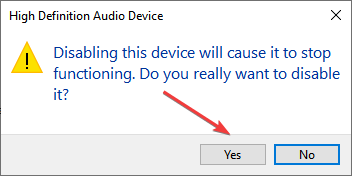
- If Windows can’t find an audio device, you won’t hear any sound on the PC.
- It’s usually corrupt or outdated drivers, problems with the connections, or third-party conflicts behind the error.
- To fix things, you can run the dedicated troubleshooter or update the drivers, amongst other methods.
XINSTALL BY CLICKING THE DOWNLOAD FILE
This software will repair common computer errors, protect you from file loss, malware, hardware failure and optimize your PC for maximum performance. Fix PC issues and remove viruses now in 3 easy steps:
- Download Restoro PC Repair Tool that comes with Patented Technologies (patent available here).
- Click Start Scan to find Windows issues that could be causing PC problems.
- Click Repair All to fix issues affecting your computer’s security and performance
- Restoro has been downloaded by 0 readers this month.
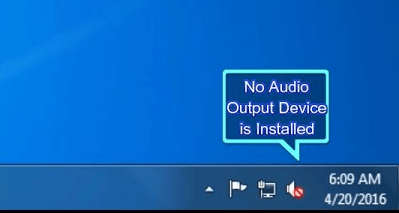
The No audio output device is installed error occurs when Windows can’t find the audio device. You can see this notification above the system tray when hovering the cursor over the sound icon.
Consequently, no sound plays when Windows can’t find audio device hardware. Unfortunately, the issue often arises after system upgrades.
There are, however, a few potential resolutions for the Windows can’t find audio device problem, and we’ll discuss them here.
Why is my audio device not detected in Windows 10?
One of the most common reasons behind the We can’t find an audio device error in Windows 10 is improper connections, be it wired or wireless.
For wired audio devices, check that it is plugged in properly to the PC and that the cable or the port is not damaged. For wireless ones, check for issues with Bluetooth, run the dedicated troubleshooter, and other relevant ones.
Also, drivers have often been found to lead situations where your computer doesn’t recognize the audio device. In addition to that, the third-party apps installed on the computer may create conflicts.
Why am I getting We can’t find an audio device 0xc00d36 error message?
These types of errors are somewhat common, and many reported Music/Video error 0xc00d36c4. If this issue occurs, check your audio drivers, and update them if needed.
Another common reason is running unsupported video formats, which can be fixed by installing the required codecs.
Apart from that, there are many problems with sound, but you can always fix issues with audio devices in Windows.
How do I fix No audio output device is installed error?
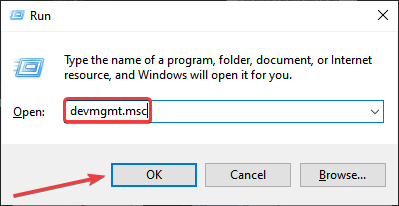
1. Reinstall the sound card’s driver
- Press Windows + R to open Run, enter devmgmt.msc in the text field, and click OK.

- Double-click Sound, video and game controllers.

- Right-click the audio adapter and select Uninstall device.
- Click the Uninstall button in the confirmation prompt.

- After removing the device, restart the computer, and Windows will automatically locate and install the best available drivers.

Alternatively, you can replace corrupted audio adapter drivers with a dedicated third-party tool like DriverFix.
To do so, click the button below, go to the official website and download the tool.
Install it and open the software’s window. DriverFix will automatically scan for and detect a corrupted or outdated sound card driver.
Some PC issues are hard to tackle, especially when it comes to corrupted repositories or missing Windows files. If you are having troubles fixing an error, your system may be partially broken.
We recommend installing Restoro, a tool that will scan your machine and identify what the fault is.
Click here to download and start repairing.
DriverFix will recommend compatible updates not just for your audio driver but for any outdated software it will find so that you can choose the preferred ones.

DriverFix
Use this fast and reliable method of detecting and updating all your device drivers and restore your audio options in Windows 10.
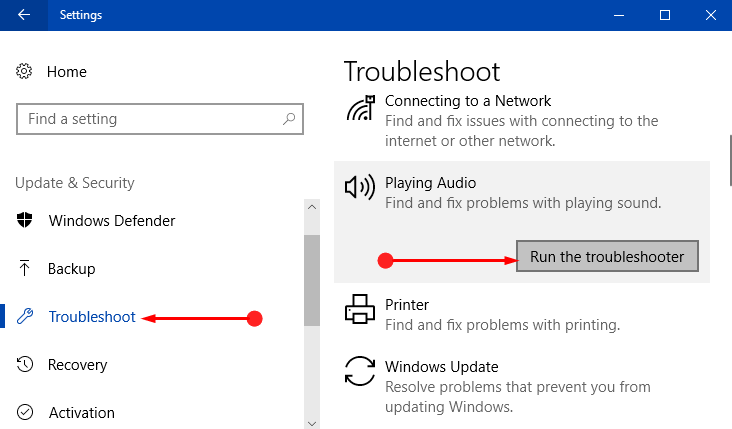
2. Run the Playing Audio troubleshooter
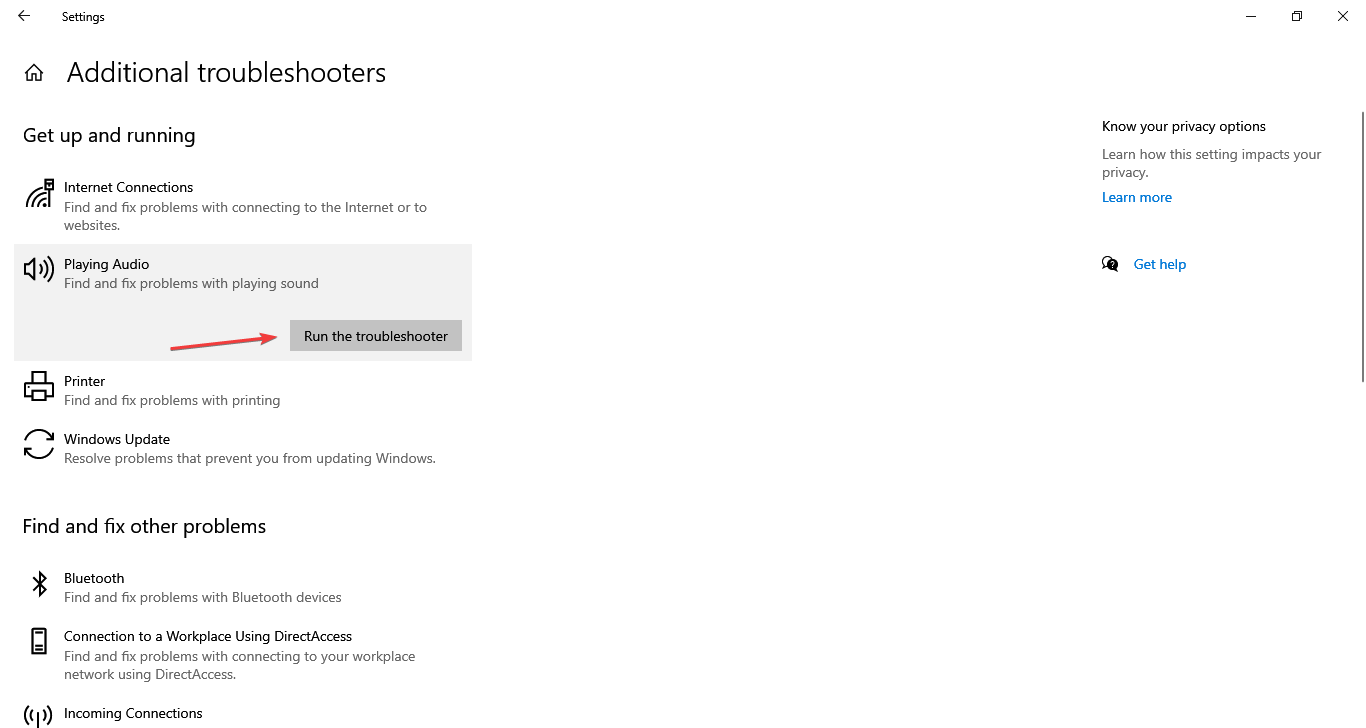
- Press Windows + I to open Settings, and select Update & Security from the left.

- Next, select Troubleshoot from the navigation pane, and click on Additional troubleshooters on the right.
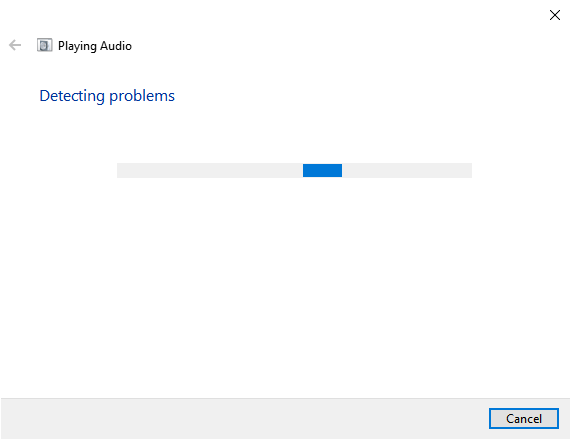
- Select Playing Audio and click the Run the troubleshooter button under it.
- Now, follow the on-screen instructions, and choose the appropriate response when prompted to complete the process.

The built-in troubleshooter is an effective way of dealing with things when Windows can’t find the audio device and should eliminate the issue. Though it only works for problems reported to Microsoft and a patch introduced for it.
3. Re-enable the sound adapter
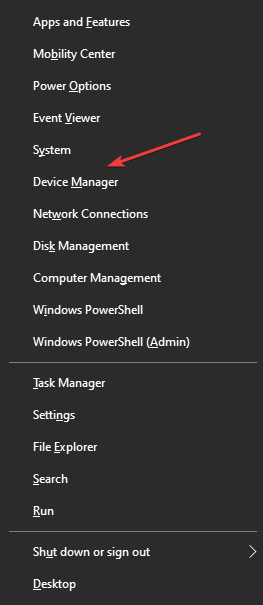
- Press the Windows + X and choose Device Manager.

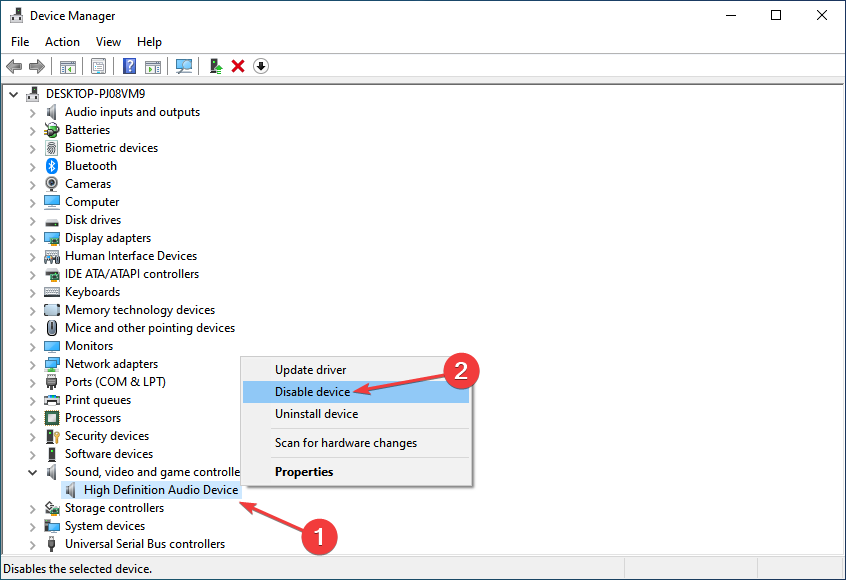
- Double-click Sound, video and game controllers to expand that category.
- Then right-click the audio adapter listed there and select Disable device.
- Click Yes in the confirmation prompt.

- To re-enable it, right-click the audio adapter and select Enable device.

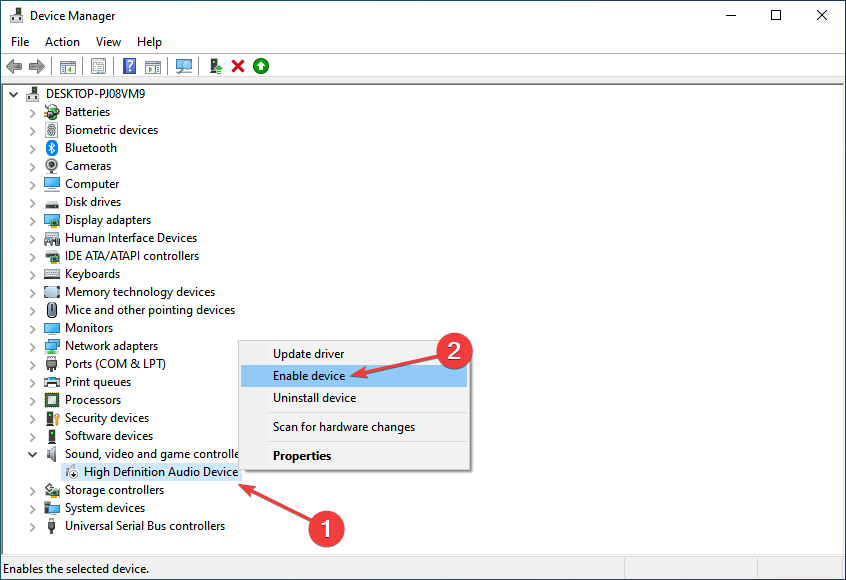
If it’s a minor bug or trivial issues with the audio device, simply reinstalling it should fix things if you come across I couldn’t find your audio device. Then, make sure it’s connected and try again.
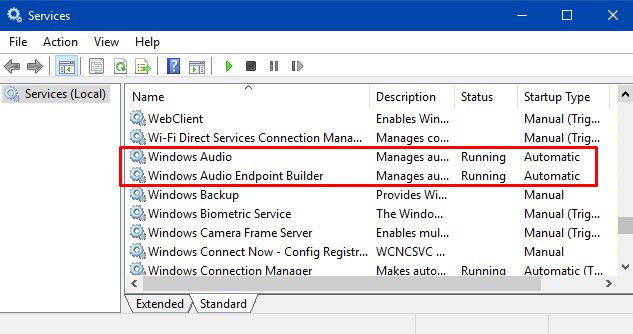
4. Check the Windows Audio Services are Enabled
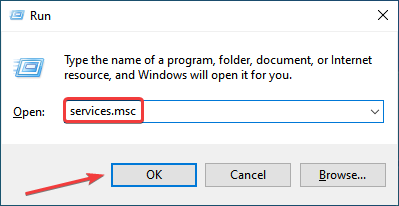
- Press Windows + R, type services.msc in the text field, and click OK or hit Enter.
- Locate and double-click on Windows Audio to open its Properties.

- Select Automatic from the Startup type drop-down menu, and click on Start if the service is not running.

- Click OK to save the changes and close the window.
- Then double-click Windows Endpoint Audio Builder.
- Again, select Automatic from the Startup type drop-down menu, and click the Start button.
- Finally, click on OK to save the changes.
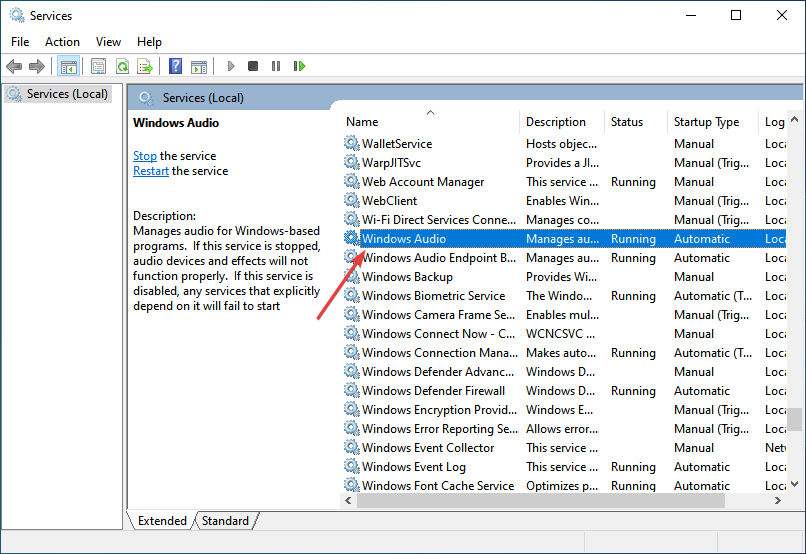
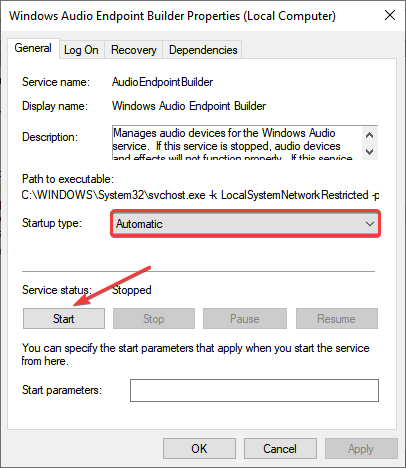
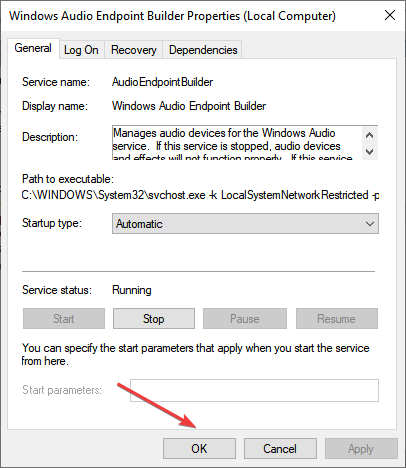
Keep in mind that Windows Audio and Windows Audio Endpoint Builder are two services that need to be enabled for audio devices. And if the two are not running, you may encounter a bunch of issues, including We can’t find an audio device: 0x8889000f.
- Audio device is disabled on Windows 10/11 PC [BEST FIXES]
- FIX: No speaker or headphones are plugged in [Full Guide]
- How to fix problems with Bose headphones on Windows 10/11
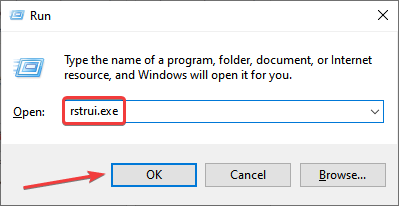
5. Perform a system restore
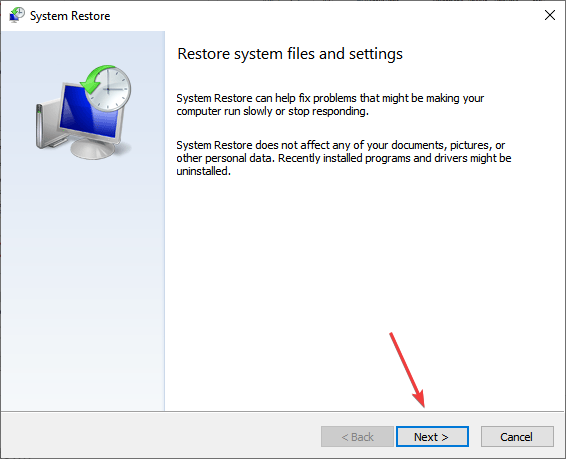
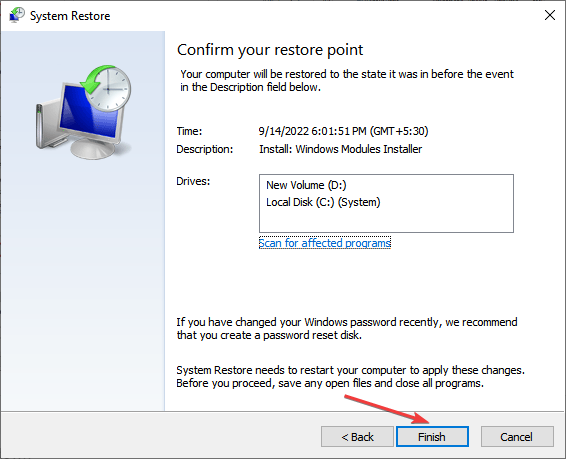
- Press Windows + R to open Run, type rstrui.exe in the text field, and click OK.
- Press the Next button to open the list of restore points.

- Select a restore point from the list, and click on Next.
- Finally, click Finish to start the restore process.
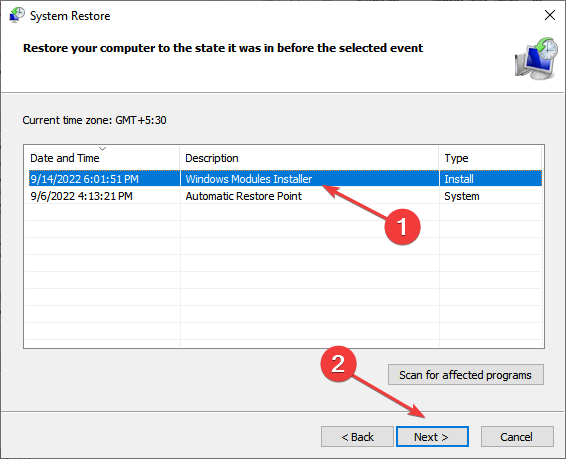
System Restore is an effective tool to fix many issues with Windows. It simply reverts the system to a state where the error didn’t exist by modifying the configured settings and installed apps, though it doesn’t affect the files stored on the PC.
Choosing a restore point created before you first encountered the Windows can’t find audio device error is critical. And that’s why it’s recommended that you manually create restore points every once in a while to be able to revert things to normal in case of issues.
6. Factory reset Windows
If nothing else worked, you are left with no option but to factory reset Windows. And we recommend you clear everything from the PC when given the option since there’s a higher possibility of the error being eliminated in this case.
You may create a backup for the files using reliable cloud storage services to recover things after the reset, but that’s a personal preference.
Once the reset process is complete, things should be up and running, with Windows can’t find audio device error fixed.
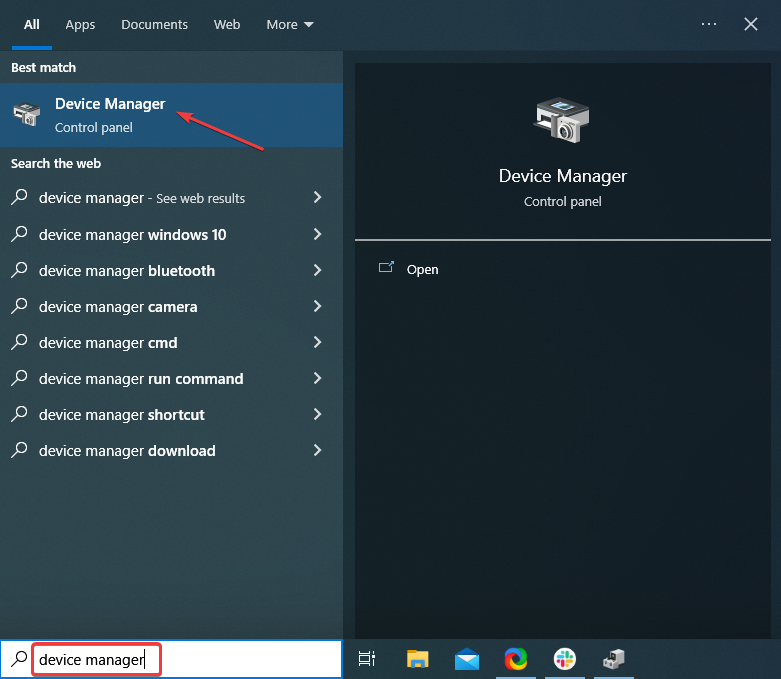
How do I reinstall an audio device in Windows 10?
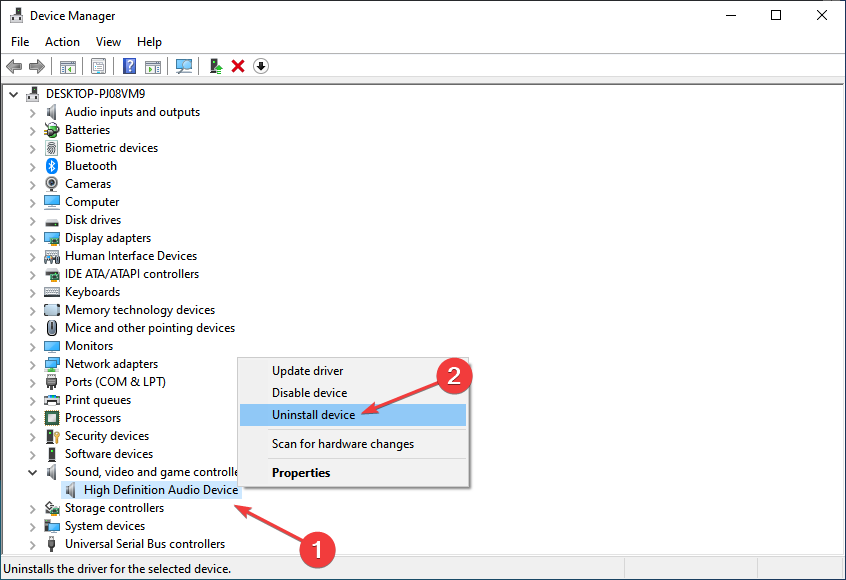
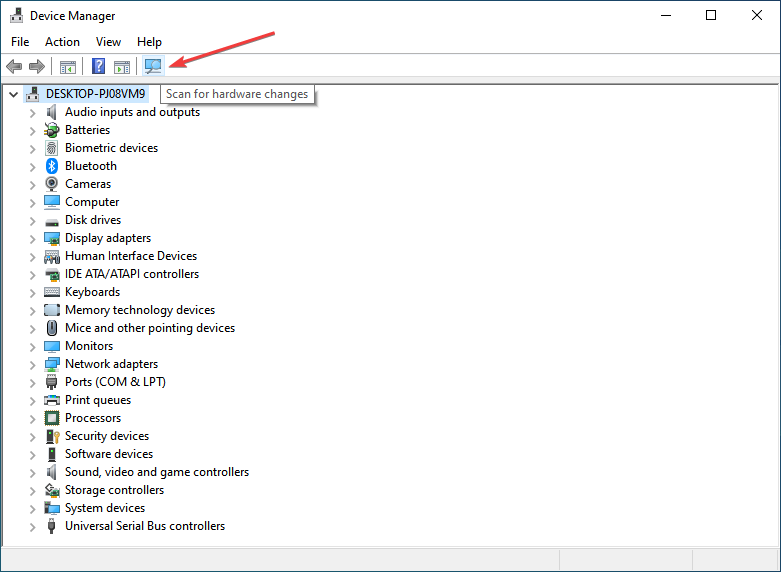
- Type Device Manager in the Search menu and click on the relevant search result.

- Locate the audio device you want to reinstall, right-click on it, and then select Uninstall device.
- Now, click Uninstall in the confirmation prompt.
- Once done, click on the Scan for hardware changes icon to reinstall the device and the relevant driver.


That’s it! These are some resolutions that should fix the No audio output error when Windows can’t find audio device hardware.
If the above solutions don’t work, you may need to install an effective and reliable sound card.
We hope that this article was helpful. Please tell us what solutions worked for you using the comments section.
![]()
Newsletter
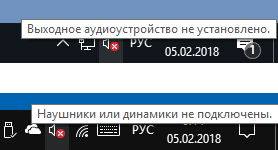
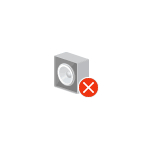 Среди прочих проблем со звуком в Windows 10, 8 и Windows 7 можно столкнуться с красным крестиком на значке динамика в области уведомлений и сообщением «Выходное аудио устройство не установлено» или «Наушники или динамики не подключены», при этом, чтобы устранить эту проблему иногда приходится помучиться.
В этой инструкции подробно о наиболее часто встречающихся причинах ошибок «Выходное аудио устройство не установлено» и «Наушники или динамики не подключены» в Windows и о том, как исправить ситуацию и вернуть нормальное воспроизведение звука. Если проблема возникла после обновления Windows 10 до новой версии, рекомендую сначала попробовать методы из инструкции Не работает звук Windows 10, а затем вернуться к текущему руководству.
Проверка подключения выходных аудио устройств
В первую очередь при появлении рассматриваемой ошибки стоит проверить фактическое подключение динамиков или наушников, даже если вы уверены, что они подключены и подключены правильно.
Сначала убедитесь, что они действительно подключены (так как бывает, что кто-то или что-то случайно выдергивает кабель, а вы об этом не знаете), далее учитывайте следующие моменты
- Если вы впервые подключили наушники или динамики к передней панели ПК, попробуйте подключить к выходу звуковой карты на задней панели — проблема может заключаться в том, что разъемы на передней панели не подключены к материнской плате (см. Как подключить разъемы передней панели ПК к материнской плате).
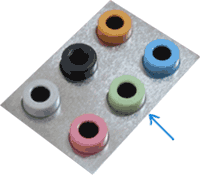
- Проверьте, что устройство воспроизведения подключено к нужному разъему (обычно — зеленого цвета, если все разъемы одного цвета, то выход для наушников/стандартрых динамиков обычно бывает выделен, например, обведён).

- Поврежденные провода, штекер на наушниках или колонках, поврежденный разъем (в том числе в результате разрядов статического электричества) могут быть причиной проблемы. Если есть подозрения на это — попробуйте подключить любые другие наушники, в том числе от вашего телефона.
Проверка аудиовходов и аудиовыходов в диспетчере устройств
Возможно, этот пункт можно было поставить и первым в теме про «Выходное аудио устройство не установлено»
- Нажмите клавиши Win+R, введите devmgmt.msc в окно «Выполнить» и нажмите Enter — это откроет диспетчер устройств в Windows 10, 8 и Windows
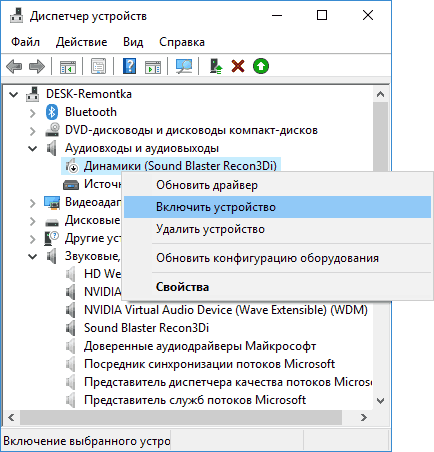
- Обычно при появлении проблем со звуком, пользователь смотрит на раздел «Звуковые, игровые и видеоустройства» и ищет там наличие своей звуковой карты — High Definition Audio, Realtek HD, Realtek Audio и др. Однако, в контексте проблемы «Выходное аудио устройство не установлено» более важным является раздел «Аудиовходы и аудиовыходы». Проверьте, есть ли этот раздел в наличии и присутствуют ли там выходы на динамики и не отключены ли они (для отключенных устройство отображается стрелочка «вниз»).
- При наличии отключенных устройств — нажмите правой кнопкой мыши по такому устройству и выберите пункт «Включить устройство».

- Если в списке в диспетчере устройств есть какие-либо неизвестные устройства или устройства с ошибками (отмечены желтым значком) — попробуйте удалить их (правый клик — удалить), а затем в меню диспетчера устройств выбрать «Действие» — «Обновить конфигурацию оборудования».
Драйверы звуковой карты
Следующий шаг, который следует попробовать — убедиться, что установлены необходимые драйверы звуковой карты и они работают, при этом начинающему пользователю следует учитывать такие моменты:
- Если в диспетчере устройств в разделе «Звуковые, игровые и видеоустройства» вы видите только пункты наподобие NVIDIA High Definition Audio, AMD HD Audio, Аудио Intel для дисплеев — по всей видимости, звуковая карта или отключена в БИОС (на некоторых материнских платах и ноутбуках это возможно) или на нее не установлены необходимые драйверы, а то, что вы видите — это устройства для вывода звука по HDMI или Display Port, т.е. работающие с выходами видеокарты.
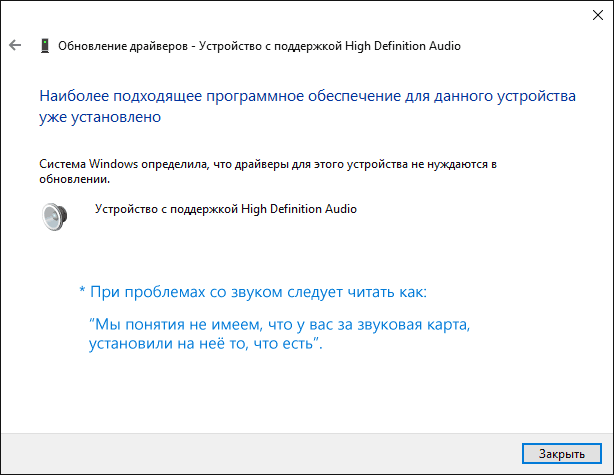
- Если вы нажали правой кнопкой мыши по звуковой карте в диспетчере устройств, выбрали «Обновить драйвер» и после автоматического поиска обновленных драйверов вам сообщили, что «Наиболее подходящие драйверы для данного устройства уже установлены» — это не дает полезных сведений о том, что установлены правильные драйверы: просто в центре обновлений Windows не нашлось других подходящих.
- Стандартные драйверы аудио Realtek и прочие могут успешно устанавливаться из различных драйвер-паков, но не всегда адекватно работают — следует использовать драйверы производителя конкретного оборудования (ноутбука или материнской платы).
В общем случае, если звуковая карта отображается в диспетчере устройств, самые верные шаги по установке правильного драйвера на нее будут выглядеть следующим образом:
- Зайдите на официальную страницу вашей материнской платы (как узнать модель материнской платы) или вашей модели ноутбука и в разделе «поддержка» найдите и загрузите имеющиеся драйверы для звука, обычно отмечены как Audio, могут — Realtek, Sound и т.п. Если, к примеру, у вас установлена Windows 10, а на оф. сайте драйверы только для Windows 7 или 8, смело скачивайте их.
- Зайдите в диспетчер устройств и удалите в разделе «Звуковые, игровые и видеоустройства» вашу звуковую карту (правый клик — удалить — установить отметку «Удалить программы драйверов для этого устройства», если таковая появится).
- После удаления запустите установку драйвера, который был скачан на первом шаге.
По завершении установки, проверьте, была ли решена проблема.
Дополнительный, иногда срабатывающий метод (при условии, что «только вчера» всё работало) — заглянуть в свойства звуковой карты на вкладку «Драйвер» и, если там активна кнопка «Откатить», нажать её (иногда Windows может автоматически обновить драйверы не на те, что нужно).
Примечание: если в диспетчере устройств нет ни звуковой карты, ни неизвестных устройств, есть вероятность, что звуковая карта отключена в БИОС компьютера или ноутбука. Поищите в БИОС (UEFI) в разделах Advanced/Peripherals/Onboard Devices что-то связанное с Onboard Audio и убедитесь, что оно включено (Enabled).
Настройка устройств воспроизведения
Настройка устройств воспроизведения также может помочь, особенно часто, если у вас к компьютеру монитор (или ТВ) подключены по HDMI или Display Port, особенно, если через какой-либо адаптер.
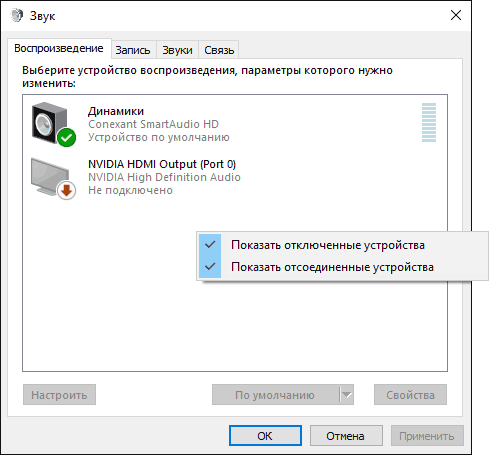
Обновление: В Windows 10 версии 1903, 1809 и 1803 для того, чтобы открыть устройства записи и воспроизведения (первый шаг в инструкции ниже), зайдите в Панель управления (можно открыть через поиск на панели задач) в поле просмотр установите «Значки» и откройте пункт «Звук». Второй способ — правый клик по значку динамика — «Открыть параметры звука», а затем пункт «Панель управления звуком» в правом верхнем углу (или внизу списка настроек при изменении ширины окна) параметров звука.
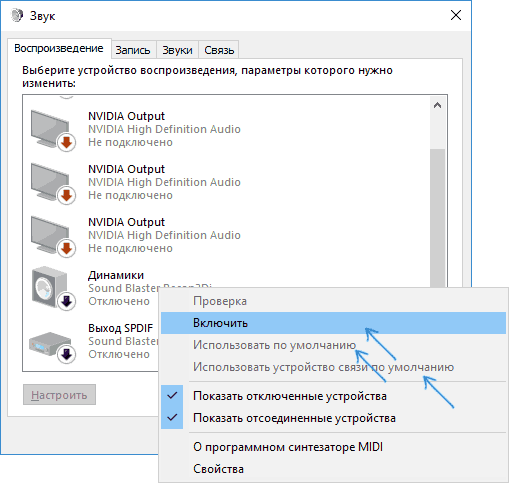
- Нажмите правой кнопкой мыши по значку динамика в области уведомлений Windows и откройте пункт «Устройства воспроизведения».
- В списке устройств воспроизведения нажмите правой кнопкой мыши и отметьте пункты «Показать отключенные устройства» и «Показать отсоединенные устройства».
- Убедитесь, что в качестве устройства вывода аудио по умолчанию выбраны нужные динамики (не HDMI выход и т.п.). При необходимости изменить устройство по умолчанию — нажмите по нему и выберите «Использовать по умолчанию» (также разумно включить «Использовать устройство связи по умолчанию»).

- Если необходимое устройство отключено, нажмите по нему правой кнопкой мыши и выберите пункт контекстного меню «Включить».
Дополнительные способы исправить проблему «Выходное аудио устройство не установлено»
В завершение — несколько дополнительных, иногда срабатывающих, методов исправить ситуацию со звуком, если предыдущие способы не помогли.
- Если в диспетчере устройств в «Аудиовыходах» отображаются выходные аудиоустройства, попробуйте их удалить, а затем в меню выбрать Действие — Обновить конфигурацию оборудования.
- Если у вас звуковая карта Realtek, загляните в раздел «Динамики» приложения Realtek HD. Включите правильную конфигурацию (например, стерео), а в «дополнительные настройки устройства» установите отметку на «Отключить определение гнезд передней панели» (даже если проблемы возникают при подключении к задней панели).
- Если у вас какая-то особенная звуковая карта с собственным ПО для управления, проверьте, нет ли в этом ПО каких-то параметров, которые могут вызывать проблему.

- Если у вас более одной звуковой карты, попробуйте отключить в диспетчере устройств неиспользуемую
- Если проблема появилась после обновления Windows 10, а варианты решения с драйверами не помогли, попробуйте выполнить восстановление целостности системных файлов с помощью dism.exe /Online /Cleanup-image /RestoreHealth (см. Как проверить целостность системных файлов Windows 10).
- Попробуйте использовать точки восстановления системы, если ранее звук работал исправно.
Примечание: в инструкции не описывается метод автоматического устранение неполадок Windows со звуком, поскольку, вероятнее всего вы и так его попробовали (если нет — попробуйте, оно может сработать).
Устранение неполадок автоматически запускается по двойному нажатию на значке динамика, перечёркнутому красным крестиком, также можно запустить его и вручную, см., например, устранение неполадок Windows 10.
When you encounter No Audio Output Device is Installed Windows 10 error, no sound is emitted by your PC whether it is from HP, Lenovo, Dell or another Brand. As you hover the mouse over the speaker icon the error message pops up. This issue occurs when your system carries a corrupted sound driver, or the OS fails to recognize your PC’s audio device. In addition to this error message, the Windows 10 sound icon on the taskbar also displays a red cross mark. Follow our another sound-related article to Fix Beep Sound While Installing Updates in Windows 10.
So, in this guide, we present you a decent range of foolproof solutions to fix the error No Audio Output Device is Installed in Windows 10.
Well, a number of Windows 10 users are frequently complaining about this recurring sound problem. But before you delve into the solutions, let us know the root cause(s) of No Audio Output Device is Installed Windows 10. Below are the few common causes of the error.
1. Infected or corrupted sound driver.
2. The sound driver is disabled by the OS.
3. The sound drivers are outdated.
4. Windows 10 Infected Registry database.
These are the common reasons for the error. So, let us walk ahead towards the solutions and try to fix the issue.
Solution 1 – Run Playing Audio Troubleshooter
The first attempt you should take towards fixing No Audio Output Device is Installed in Windows 10 is to simply troubleshoot Playing Audio. When you do so, Windows will automatically try to dig out the errors. In case, it finds any issues, it will try to repair them instantly. To do so, follow the below series of steps.
Step 1 – To get rid of No Audio Output Device is Installed in Windows 10, first, open Settings application. Jointly press Win&I keys to open the same.
Step 2 – Click Update & security tab on the home page of Settings application.
Step 3 – Click Troubleshoot on the left sidebar of the following page. Shift to the right pane and click Playing Audio option.
Step 4 – Run the troubleshooter button will come into view, click it. Let the detection of problems begin. Follow the guidelines on the dialog and complete the troubleshooting process. In the end, the dialog will display the audio issues and their repair status.
You may like to read Download Audio Troubleshooter for Windows 10 Pro, Home and Run.
Now, if troubleshooting Audio didn’t help you, try out the next solution.
Solution 2 – Check Windows Audio Services
If the audio service is not running Windows 10, you are likely to receive such error notes. To check them, do the below steps.
Learn more 5 Ways to Manage Services in Windows 10.
Step 1 – On Cortana search, type services and click the same that appears on the top.
Step 2 – In the Services window, search for two services namely Windows Audio Endpoint Builder and Windows Audio. When you see them ensure that they are running and both are set to Automatic.
Note – You must also check for other Audio services because the names may differ depending upon your hardware.
See our Guide to Start, Stop, Configure Windows Services in Windows 10.
If Windows Audio services are performing perfectly but still you are getting No Audio Output Device is Installed in Windows 10 note, then proceed to the next solution.
Solution 3 – Re-enable Audio Driver
Step 1 – Open Power user menu by pressing Win&X keys in one go. As an alternative, you can also open WinX menu Windows 10 by right-clicking Start icon.
For reference, you can Use Win+X Menu Editor v3.0 in Windows 10.
Step 2 – Locate and click Device Manager from the menu that appears on your PC screen.
Step 3 – Search and expand the category namely Sound, video and game controllers by clicking its arrow. Conduct a right-click on your Audio driver and click Enable.
Note – If the Audio driver is already enabled, skip to the next solution. But if you don’t find this specific Sound, video and game controllers category, then follow the below guidelines.
Step 1 – Stay into the Device Manager and click Action on the menu tab. This will bring down a menu, click the option with a name Add Legacy hardware.
Note – Well, many users can only see Help in the Action tab. To see all the options, click somewhere on a vacant space on Device Manager without selecting any category. This will refresh everything and will display all the tabs and options on the menu bar.
Step 2 – Add Hardware dialog will come into view, click Next.
Step 3 – Moving on, the dialog will show up two options in the next screen. Click the first option that reads as Search for and install hardware automatically (Recommended).
Step 4 – Well, if the dialog displays that it can’t find any new hardware, click Next.
Step 5 – This will show a list of hardware types. So, in the list search for Sound, video and game controllers. When you see the specific hardware, select it and click Next.
Step 6 – Finally, select the model and manufacturer details of your sound card and moreover, click Next to finish the process.
Solution 4 – Uninstall and Reinstall Audio Driver
Step 1 – Open Device Manager and click the arrow that appears on the left sidebar of Sound, video and game controllers.
See Windows 10 – How to Find Device Manager and Use its Functions.
Step 2 – Perform a right-click on your audio driver. From the menu that pops-up click Uninstall device. Restart your PC and upon restart, the OS will by itself install audio driver Windows 10. Well, in this way, it installs the latest driver which will resolve the issue.
Solution 5 – Update Audio Driver
Step 1 – To try this workaround, first, open Device Manager. Look for Sound, video and game controllers and click its arrow on the left sidebar to expand it.
Step 2 – Conduct a right-click on the sound driver and click Update driver option.
Step 3 – Two update options will come up. Choose Search automatically for updated driver software, the first one. You may ask to restart the PC.
Solution 6 – Repair Registry Database
When some malware or virus begins infecting your PC, its main aim is to corrupt your Windows Registry Database. However, there is a possibility that if your Registry is infected, you are likely to receive some kind of driver issues including sound drivers.
So, the best solution is to repair Registry Database of your PC as soon as possible. Many third party tools are available in the market that can completely eradicate Registry issues. Hence, use a Registry Cleaner and follow their instructions to repair the same.
Learn How to Use Black Bird Registry Cleaner on Windows.
Solution 7 – Use sfc /scannow
Step 1 – Type the command cmd on the Cortana search. When Cortana’s Best match shows Command Prompt, do a right-click on it. From the pop-up menu on Cortana, perform a click on Run as administrator.
Find more ways to Launch Elevated Command Prompt on Windows 10.
Step 2 – You may see a UAC prompt, so, click Yes to proceed.
Step 3 – Copy and paste the following command line and to execute it press Enter.
sfc /scannow
Step 4 – This will immediately start the scanning process. It will trace out if there exist any issues with registry or drivers.
Learn more about SFC /Scannow, DISM.Exe, CHKDSK Windows 10.
Conclusion
Hopefully, following the above solutions will resolve your issue of continuously receiving No Audio Output Device is Installed in Windows 10 message. Well, some users may settle the issue with one solution whereas some may need more workarounds. Hence, give a shot to the solutions and let us know which solution worked for your PC.
Repair any Windows problems such as Blue/Black Screen, DLL, Exe, application, Regisrty error and quickly recover system from issues using Reimage.
You are here: Home / Hardware / Sound Card Not Detected In Windows 10 – How To Fix?
Your Computer uses sound cards to connect the sound devices like speakers, recorders, or mixers and nowadays you also have the privilege to connect wirelessly.
The Bluetooth options are blessed with instant connections to your device as well. But often when you update your Windows, you may encounter with some sort of changes and errors.
One of the common problems is sound card not detected in windows 10. When this happens, you are unable to use certain apps, play your favorite videos or hear from the speakers.
We have shown a VIDEO walk through at the end of the post for easy solution.
Contents
- 1 What To Do When Sound Card Not Detected In Windows 10?
- 1.1 Solution 1: Re-Enabling Sound Adapter
- 1.2 Solution 2: Reverting Back Windows
- 1.3 Solution 3: Checking Windows Sound System
- 1.4 Solution 4: Troubleshooting The Playing Audio
- 1.5 Solution 5: Uninstalling And Reinstalling The Sound Drivers
- 1.6 Solution 6: Factory Reset Windows
- 1.7 Wrapping Up
If you get annoyed with the can’t find audio device in Windows 10 problem, you may try reinstalling your sound drivers.
It is advised to check the volume mixer from your sound settings to ensure that the Windows sound is not muted by chance!
Here, I am providing some solutions to rectify the sound error but if these do not provide any help, you will have to replace your sound card drivers.
Solution 1: Re-Enabling Sound Adapter
You can choose to re-enable the audio adapter to solve the problem when can’t find audio device in windows 10. Here I am providing you the steps for reenabling the sound adapter:
Step 1: First of all, go to the Device Manager and then double-click on Sound, Video And Game Controllers for expanding the category.
Step 2: Now, find the Audio Adapter from the list and right-click on it. Now choose to Disable the device.
Step 3: Now, you will have to proceed for re-enabling it by right-click on the audio adapter. After that choose to Enable it.
Step 4: After you have accomplished the task, press Windows Key and R to launch Run. In the dialog box provided, type services.msc followed by hitting the OK button.
Step 5: Now click twice on the Windows Audio and choose the Automatic option in case you find that the service is disabled.
Step 6: Now hit the Start option and then select the Apply option. Now, get out of the window and then open the properties by double-clicking on Windows Endpoint Audio Builder.
Step 7: Next, after selecting the Automatic Startup Type option and hit the Start option. Now, select the Apply option and press OK. Now, check whether it has done any improvement.
Solution 2: Reverting Back Windows
You can roll back your Windows for restoring a point and resolve the no sound device detected problem. Follow the below mentioned process to accomplish the task.
Step 1: Open Run dialogue box and enter rstrui in the dialog box. This will open the System restore.
Step 2: Then hit Next for opening the restore points and you will have to choose the option to open more such points. Now the expanded list will get displayed in front of you.
Step 3: Now you will have to select a certain date of restore point that will enable the Windows to roll back.
Now for providing the confirmation for restoring point by hitting Next followed by the Finish option.
Solution 3: Checking Windows Sound System
Before moving to any other solution, check whether you have accidentally muted the Windows 10 volume from the sound settings. To commence the procedure you will have to follow the given steps:
Step 1: First of all, go to the Settings option and click it to display the options.
Step 2: Now, go to the System option and click on it. Now from the given options, choose Sound Settings.
Now check whether the volume is muted somehow.
You can also go to the task bar and select the volume icon and right click on it to open the open volume Mixer.
Now scrutinize if the volume knobs are normal and raised high as shown in the diagram below:

In case you find there is no problem with the sound settings move forward to our next provided solutions.
Solution 4: Troubleshooting The Playing Audio
This is a simple troubleshooting step that you may try to resolve the PC not detecting audio device error. Follow the steps given below:
Step 1: Hold Windows Key and press Q hotkey. Then enter troubleshoot in the search box and this will enable you to open the Settings App.
Step 2: Now, choose the Audio playing and click Run The Troubleshooter.
If the window suggests some resolutions, follow the onscreen instructions, and go for the remedies suggested. Check whether this has helped in any improvement.
Solution 5: Uninstalling And Reinstalling The Sound Drivers
Whenever you can’t find audio device in Windows 10, always check whether the sound drivers are corrupted, and you need an update. For quickly updating your sound drivers, follow the steps mentioned below:
Step 1: Open Run and type devmgmt.msc in the given box. Then hit OK to go to the Device Manager. Now in the Device Manager, select Sound, Video, And Game Controllers.
Step 2: Now as soon as you find the Audio Device, right click on it and then select the Uninstall option. Then choose – Delete The Driver Software For This Device.
Step 3: After that again the Uninstall option and wait for some time till the process gets completed.
Again, go for reinstallation of the sound adapter by clicking Action and then select the option Scan For Hardware Changes. Now close the window and check whether this has helped you anyway.
Solution 6: Factory Reset Windows
When you choose to reset factory windows, it helps you to reinstall your windows 10 and then retain all your important files. This is one of the effective resolutions when Windows is unable to find the audio device hardware.
Step 1: Hold Windows Key and press Q hotkey and then r in the search box and enter reset. Now choose to reset your PC.
Step 2: Now go to the Get Started option and then choose to hit the Keep my Files option.
Step 3: Next choose Reset. Check whether this factory resetting has helped you anyway to fix sound card not detected in windows 10 error.
Wrapping Up
So, I hope by now, you can find out a suitable solution if got annoyed when the sound card not detected in windows 10.
If you still have queries related to this issue or any other folder, please communicate with us in the comments section provided below.
Feel free to shoot us a mail with your ideas or suggestions. We always look forward to hearing back from you.
Содержание
- 1 Не работает звук Windows 10 после обновления до новой версии
- 2 Пропал звук в Windows 10 после обновления или установки системы
- 3 Звук или микрофон перестал работать на ноутбуке Asus (может подойти и для других)
- 4 Устройства воспроизведения и их дополнительные параметры
- 5 Звук стал тихим, хрипит или автоматически снижается громкость
- 6 В заключение
- 7 Проверка подключения штекера звуковой системы
- 8 Проверка настроек звукового микшера
- 9 Диагностика с помощью приложения “Устранение неполадок со звуком”
- 10 Решение проблем с драйвером звукового устройства
- 11 Когда звук пропал после обновления Windows 10
- 12 Запуск проверки системы на вирусы
- 13 Решение проблем со службой Windows Audio
- 14 Сбой работы реестра
- 15 Восстановление системы
- 16 Аппаратная неисправность
- 17 Самый легкий метод решения задачи, когда звук пропал в Windows 10
- 18 Пропал звук в устройствах воспроизведения после установки обновлений
- 19 Чистая установка драйверов на звуковую карту
- 20 Исправляем параметры устройств воспроизведения в Windows 10
- 21 Подводим итог
- 22 Видео по теме
 Многие пользователи, обновившиеся до Windows 10 или же после чистой установки ОС столкнулись с самыми разными проблемами работы звука в системе — у кого-то просто пропал звук на ноутбуке или компьютере, у других — перестал работать звук через выход на наушники на передней панели ПК, еще одна распространенная ситуация — звук сам по себе делается тише со временем.
В этой инструкции по шагам описаны возможные способы исправить наиболее распространенные проблемы, когда воспроизведение аудио работает неправильно или просто пропал звук в Windows 10 после обновления или установки, а также просто в процессе работы без видимых причин. См. также: что делать, если звук Windows 10 хрипит, шипит, трещит или очень тихий, Нет звука по HDMI, Служба аудио не запущена.
Не работает звук Windows 10 после обновления до новой версии
Если у вас пропал звук после установки новой версии Windows 10 (например, обновления до 1809 October 2018 Update), для начала попробуйте следующие два метода исправления ситуации.
- Зайдите в диспетчер устройств (можно через меню, которое открывается по правому клику на кнопке Пуск).
- Раскройте раздел «Системные устройства» и посмотрите, есть ли там устройства с буквами SST (Smart Sound Technology) в названии. Если есть, нажмите по такому устройству правой кнопкой мыши и выберите «Обновить драйвер».
- Далее выберите «Выполнить поиск драйверов на этом компьютере» — «Выбрать драйвер из списка доступных драйверов на компьютере».
- Если в списке есть другие совместимые драйверы, например, «Устройство с поддержкой High Definition Audio», выберите его, нажмите «Далее» и установите.
- Учитывайте, что в списке системных устройств может быть более одного устройства SST, выполните шаги для всех.
И ещё один способ, более сложный, но также способный помочь в ситуации.
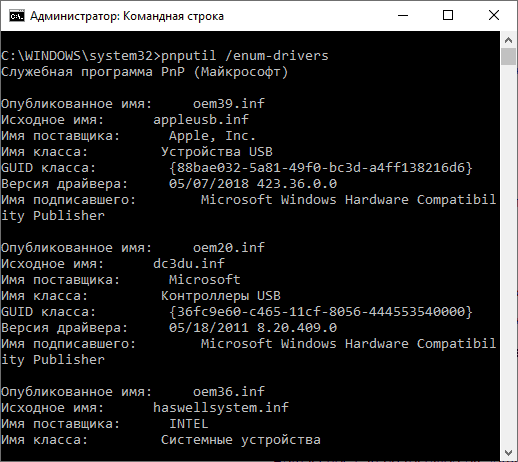
- Запустите командную строку от имени администратора (можно использовать поиск на панели задач). И в командной строке введите команду
- pnputil /enum-drivers
- В списке, который выдаст команда, найдите (при наличии) пункт, для которого исходное имя — intcaudiobus.inf и запомните его опубликованное имя (oemNNN.inf).

- Введите команду pnputil /delete-driver oemNNN.inf /uninstall для удаления этого драйвера.
- Зайдите в диспетчер устройств и в меню выберите Действие — Обновить конфигурацию оборудования.
Прежде чем приступать к шагам, описываемым далее, попробуйте запустить автоматическое исправление проблем со звуком Windows 10, кликнув правой кнопкой мыши по значку динамика и выбрав пункт «Устранение неполадок со звуком». Не факт, что сработает, но, если не пробовали — стоит попробовать. Дополнительно: Не работает звук по HDMI в Windows — как исправить, Ошибки «Выходное аудио устройство не установлено» и «Наушники или динамики не подключены».
Примечание: если звук пропал после простой установки обновлений в Windows 10, то попробуйте зайти в диспетчер устройств (через правый клик по пуску), выбрать в звуковых устройствах вашу звуковую плату, кликнуть по ней правой кнопкой мыши, а затем — на вкладке «Драйвер» нажать «Откатить». В дальнейшем вы можете отключить автоматическое обновление драйверов для звуковой платы, чтобы проблема не возникала.
Пропал звук в Windows 10 после обновления или установки системы
Самый распространенный вариант проблемы — на компьютере или ноутбук просто пропадает звук. При этом, как правило (сначала рассмотрим этот вариант), значок динамика на панели задач в порядке, в диспетчере устройств Windows 10 для звуковой платы написано «Устройство работает нормально», а драйвер не нуждается в обновлении.
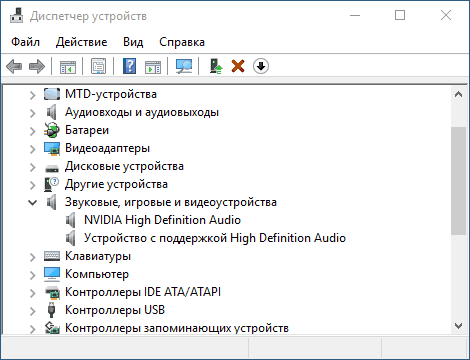
Правда, в то же самое время обычно (но не всегда) в данном случае звуковая плата в диспетчере устройств называется «Устройство с поддержкой High Definition Audio» (а это верный признак отсутствия установленных драйверов на нее). Обычно это случается для звуковых чипов Conexant SmartAudio HD, Realtek, VIA HD Audio, ноутбуков Sony и Asus.
Устанавливаем драйвера на звук в Windows 10
Что делать в этой ситуации, чтобы исправить проблему? Почти всегда работающий способ состоит из следующих простых шагов:
- Ввести в поисковике Модель_вашего_ноутбука support, или Модель_вашей_материнской_платы support. Не рекомендую при возникновении проблем, о которых идет речь в этой инструкции, начинать поиск драйверов, например, с сайта Realtek, прежде всего посмотрите на сайте производителя не чипа, но всего устройства.
- В разделе поддержки найти драйверы аудио для загрузки. Если они будут для Windows 7 или 8, а не для Windows 10 — это нормально. Главное, чтобы не отличалась разрядность (x64 или x86 должно соответствовать разрядности системы, установленной в настоящий момент, см. Как узнать разрядность Windows 10)
- Установить эти драйверы.
Казалось бы, просто, но многие пишут о том, что уже так делали, но ничего не происходит и не меняется. Как правило, это происходит из-за того, что несмотря на то, что установщик драйверов проводит вас по всем шагам, фактически драйвер на устройство не устанавливается (легко проверить, посмотрев свойства драйвера в диспетчере устройств). Причем, установщики некоторых производителей не сообщают об ошибке.
Есть следующие способы решения этой проблемы:
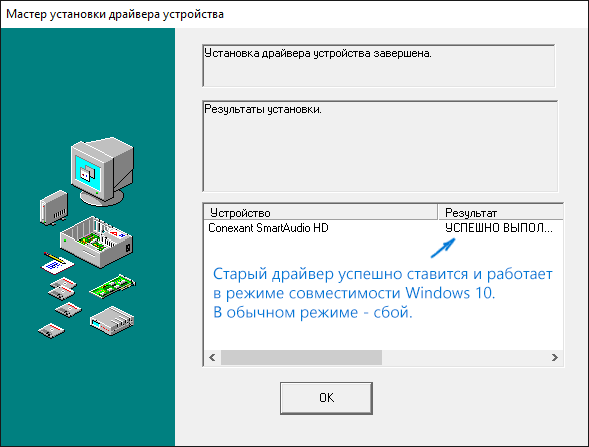
- Запуск установщика в режиме совместимости с предыдущей версией Windows. Помогает чаще всего. Например, для установки Conexant SmartAudio и Via HD Audio на ноутбуках обычно срабатывает этот вариант (режим совместимости с Windows 7). См. Режим совместимости программ Windows 10.

- Предварительно удалить звуковую плату (из раздела «Звуковые, игровые и видеоустройства») и все устройства из раздела «аудиовходы и аудиовыходы» через диспетчер устройств (правый клик по устройству — удалить), по возможности (если есть такая отметка), вместе с драйверами. И сразу после удаления запустить установщик (в том числе и через режим совместимости). Если драйвер все так же не установится, то в диспетчере устройств выбрать «Действие» — «Обновить конфигурацию оборудования». Часто срабатывает на Realtek, но не всегда.

- Если после этого установился старый драйвер, то кликнуть правой кнопкой мыши по звуковой плате, выбрать «Обновить драйвер» — «Выполнить поиск драйверов на этом компьютере» и посмотреть, появились ли в списке уже установленных драйверов новые (кроме Устройство с поддержкой High Definition Audio) совместимые драйвера для вашей звуковой платы. А если знаете ее название, то можно посмотреть и среди несовместимых.


Даже если вы не смогли найти официальных драйверов, все равно попробуйте вариант с удалением звуковой платы в диспетчере устройств с последующим обновлением конфигурации оборудования (пункт 2 выше).
Звук или микрофон перестал работать на ноутбуке Asus (может подойти и для других)
Отдельно отмечу способ решения для ноутбуков Asus со звуковым чипом Via Audio, именно на них чаще всего возникают проблемы с воспроизведением, а также подключением микрофона в Windows 10. Путь решения:
- Зайти в диспетчер устройств (через правый клик по пуску), открыть пункт «Аудиовходы и аудиовыходы»
- Через правый клик по каждому пункту в разделе, удалить его, если есть предложение удалить и драйвер, сделайте это тоже.
- Зайдите в раздел «Звуковые, игровые и видеоустройства», удалите их тем же образом (кроме HDMI-устройств).
- Загрузите драйвер Via Audio от Asus, с официального сайта под вашу модель, для Windows 8.1 или 7.
- Запустите установщик драйвера в режиме совместимости с Windows 8.1 или 7, желательно от имени Администратора.
Отмечу, почему я указываю на более старую версию драйвера: замечено, что работоспособным в большинстве случаев оказывается VIA 6.0.11.200, а не более новые драйвера.
Устройства воспроизведения и их дополнительные параметры
Некоторые начинающие пользователи забывают проверить параметры устройств воспроизведения звука в Windows 10, а это лучше сделать. Как именно:
- Кликните правой кнопкой мыши по значку динамика в области уведомлений справа внизу, выберите пункт контекстного меню «Устройства воспроизведения». В Windows 10 1903 путь будет иным: правый клик по значку динамика — Открыть параметры звука — Панель управления звуком в разделе «Сопутствующие параметры», а в Windows 10 1809 и 1803: правый клик по значку динамика — «Звуки», а затем вкладка «Воспроизведение».
- Убедитесь, что установлено правильное устройство воспроизведения по умолчанию. Если нет, кликните по нужному правой кнопкой мыши и выберите пункт «Использовать по умолчанию».

- Если динамики или наушники, как и требуется, являются устройством по умолчанию, кликните по ним правой кнопкой мыши и выберите пункт «Свойства», а затем перейдите на вкладку «Дополнительные возможности».
- Отметьте пункт «Отключить все эффекты».
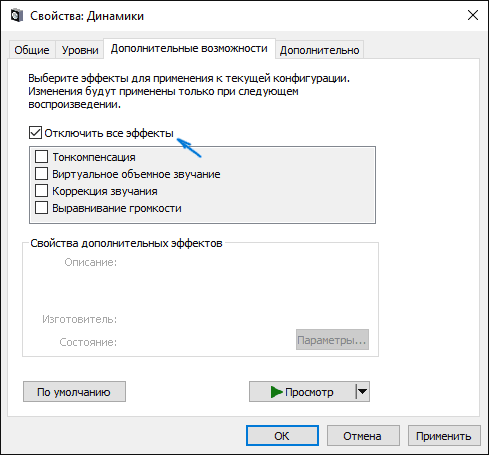
После выполнения указанных настроек, проверьте, заработал ли звук.
Звук стал тихим, хрипит или автоматически снижается громкость
Если несмотря на то, что звук воспроизводится, с ним есть какие-то проблемы: он хрипит, слишком тихий (причем громкость может меняться сама), попробуйте следующие варианты решения проблемы.
- Зайдите в устройства воспроизведения, кликнув правой кнопкой мыши по значку динамика.
- Кликните правой кнопкой мыши по устройству, со звуком с которого возникает проблема, выберите «Свойства».
- На вкладке «Дополнительные возможности» отметьте «Отключить все эффекты». Примените настройки. Вы вернетесь к списку устройств воспроизведения.
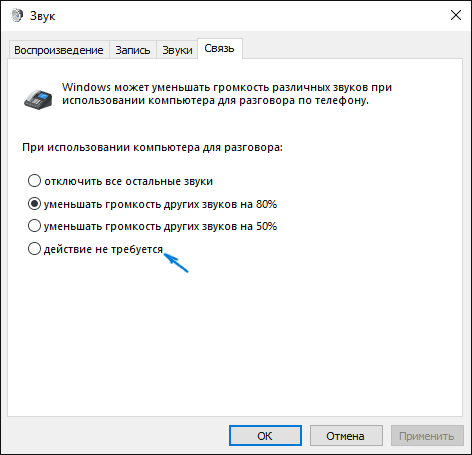
- Откройте вкладку «Связь» и уберите уменьшение громкости или отключение звука при связи, установите «Действие не требуется».

Примените сделанные настройки и проверьте, была ли решена проблема. Если нет, есть еще один вариант: попробуйте через диспетчер устройств выбрать вашу звуковую плату — свойства — обновить драйвер и установить не «родной» драйвер звуковой платы (показать список установленных драйверов), а один из совместимых, которые Windows 10 может предложить сама. В данной ситуации иногда случается, что на «не родных» драйверах проблема не проявляется.
Дополнительно: проверьте, включена ли служба Windows Audio (нажмите Win+R, введите services.msc и найдите службу, убедитесь, что служба выполняется и тип запуска для нее установлен в «Автоматически».
В заключение
Если ничто из описанного так и не помогло, рекомендую также попробовать использовать какой-нибудь популярный драйвер-пак, а предварительно проверить, а работоспособны ли сами устройства — наушники, колонки, микрофон: случается и так, что проблема со звуком не в Windows 10, а в них самих.
Часто пользователи операционной системы Windows 10 сталкиваются с проблемой исчезновение звука без видимых на то причин. И какой бы ни была причина отключения звука, сам факт этого довольно неприятен. В этой статье мы рассмотрим способы устранения данной проблемы. И первое, что нам необходимо будет сделать, это выявить саму причину пропадания звука на компьютере. Поэтапно мы рассмотрим почему пропал звук в Windows, постепенно переходя от простых способов решения к более сложным.
Возможные причины исчезновения звука в Windows 10:
- Отключение звуковой системы от компьютера;
- Программное отключение звука;
- Нарушение работы драйвера звуковой карты;
- Последствия обновление Windows 10;
- Конфликт программного обеспечения звуковой карты и стороннего приложения;
- Сбои в работе реестра или системных служб;
- Аппаратные проблемы;
Проверка подключения штекера звуковой системы
Первая причина при своей простоте у неопытного пользователя может отнять довольно много времени на поиски и устранение неисправности. Бывает так, что, случайно задев провод, идущий от звукового устройства к системному блоку, он просто отсоединяется от гнезда. Сам компьютер же при отключении штекера, никаким образом не сообщает об этом, лишь из динамиков слышится, легкое характерное гудение. Естественно для устранения данной проблемы достаточно штекер звуковой системы, подключить в соответствующий разъем. Как правило, у компьютеров этот разъем зеленого цвета либо как на ноутбуках обозначается изображением наушников. Если в ПК есть интегрированный в материнку звуковой адаптер и внешняя звуковой карта, то нужно попробовать подключить штекер по очереди в оба гнезда. Это даст дополнительную информацию по корневой причине отсутствия звука.
Также нужно проверить состояние кабелей, подключаемых внешних колонок или наушников. Если есть возможность, то проверьте их на другом ПК или любом другом устройстве воспроизведения звука с аналогичным штекером (обычно это mini-jack 3,5 мм).
Проверка настроек звукового микшера
Бывает и так, что звук в Windows 10 отключен программно в микшере звукового устройства, либо в Панели управления во вкладке Звук.
Первое лечится нажатием на значок с изображением динамика в системном трее и сдвигом ползунка регулировки звука вправо.

Или по правому клику открыть микшер громкости и сдвинуть ползунки вверх:


Если не помогло, то для проверки выбранного по умолчанию устройства воспроизведения, необходимо перейти в Панель управления и выбрать Звук.


В появившемся диалоговом окне необходимо проверить статус звуковых устройств и какое из них используется в системе по умолчанию. По правой кнопке мыши можно включить устройство и сделать его используемым по умолчанию. Там же после включения можно запустить проверку звука.

Диагностика с помощью приложения “Устранение неполадок со звуком”
При нажатии правой кнопкой мыши на значок динамика в трее можно активировать встроенное приложение диагностики неполадок со звуком. Оно малоэффективно, но в некоторых простейших ситуациях помогает.

Альтернативный вариант запуска: Пуск -> Параметры -> Обновление и безопасность -> Устранение неполадок -> Воспроизведение звука.
После запуска приложения выберите нужное звуковое устройство и нажмите «Далее».


В некоторых простых случаях эта диагностика устраняет проблему автоматически.

Иногда средство диагностики рекомендует отключить все звуковые эффекты и улучшения для повышения качества звука, как на примере ниже.


Попробуйте сделать это и проверить наличие звука и его качество.
Если же на этом этапе всё в порядке:
- громкость стояла на максимуме;
- устройство воспроизведения по умолчанию было включено;
- встроенное средство диагностики не решило проблему;
то переходим к следующему шагу.
Решение проблем с драйвером звукового устройства
Проблемы с драйвером звукового устройства могут возникнуть после обновления Windows 10 или же при его конфликте с драйвером другого устройства. Для устранения неисправности с драйвером необходимо выполнить следующие действия.
Откат драйвера
- Через меню «Пуск» перейти в «Панель управления».
- Далее выбрать и запустить «Диспетчер устройств».

- Найти в появившемся окне звуковое устройство и кликнуть на нём правой кнопкой мыши, в открывшемся меню нажать свойства и во вкладке «Драйвер», нажать кнопку откатить.


Указать причину:

Результат отката:
Поиск драйвера звукового устройства по ИД и переустановка
Бывает так, что откатить данным способом драйвер не получается. В таком случае необходимо переустановить звуковой драйвер вручную. Отлично если есть диск с драйверами, который шел в комплекте с ноутбуком или компьютером. Если такого диска нет или он утерян, то драйвер придётся искать самостоятельно. Для этого есть несколько способов. Можно зайти на сайт производителя ПК или ноута и скачать драйвер оттуда. Если у вас не брендовый компьютер, то можно поискать на сайте компании, выпустившей чипсет материнской платы или звукового дискретного адаптера. Ниже рассмотрим вариант поиска вручную по так называемому идентификатору оборудования (ИД), который уникален для каждого устройства. Такой способ иногда бывает полезен и применим.
- В «Диспетчере устройств» выбрать свою звуковое устройство, нажать на него правой кнопкой мыши и перейти в свойства;
- В диалоговом окне выберите «Сведения»;
- Теперь в списке «Свойство» необходимо выбрать значение «ИД оборудования»;
- После этого скопируйте это значение и как есть вставьте в окно поисковика. По данному «ИД» поисковая система обычно в первой же строке находит драйвер устройства, который нужно скачать. Перед скачиванием обязательно правильно выбрать версию драйвера, соответствующую разрядности вашей операционной системы.
ЧИТАЙТЕ ТАКЖЕ:Kак установить Windows 10 с флешки: пошаговая инструкция
Существуют 32 и 64-битная ОС, узнать версию можно, выполнив следующие действия:
- В меню Пуск выбрать «Параметры»;
- Перейти в раздел «Система», а затем на вкладку установленной версии Windows «О программе». В появившемся окне в строке «Тип системы» и будет указана разрядность Windows 10;
- Затем необходимо полностью удалить из системы старый драйвер для этого всё в том же «Диспетчере устройств», выберите нужное устройство и с помощью правой кнопки мыши перейдите к его удалению.
Читайте в нашей статье подробно про варианты и способы обновления драйверов в Windows 10.
Когда звук пропал после обновления Windows 10
Много проблем со звуком всплыло у пользователей после обновления 1809 для Windows 10 в октябре 2018 года. Чаще всего у пользователей возникала ошибка: «Выходное аудио устройство не установлено».
По информации от Microsoft это случилось из-за того, что во время обновления ошибочно на звуковые устройства устанавливался драйвер Intel. Об этом можно прочитать, например, здесь — https://blogs.msdn.microsoft.com/matthew_van_eerde/2018/10/12/if-windows-update-sent-you-intel-audio-controller-version-9-21-0-3755-by-mistake-uninstall-it/
Чтобы вручную устранить проблему поддержка производителя рекомендует выполнить следующие шаги:
- Зайти с административными правами в Диспетчер устройств (см. выше);
- В разделе “Звуковые, игровые и видеоустройства” найдите звуковой драйвер Intel (может отображать как Intel SST Audio Controller, или Intel Smart Sound Technology driver), или аудиодрайвер с желтым восклицательным знаком.
- Щелкните по нему правой кнопкой мыши и выберите «Удалить устройство». В окне всплывающего подтверждения нужно обязательно поставит флажок для полного удаления файлов драйвера:
- Перегрузите компьютер.
После перезагрузки звук скорей всего восстановится, так как драйверы вашего звукового устройства (например, RealTek) автоматически установятся в системе. Если проблема осталась, то нужно посмотреть статус звуковых устройств в Диспетчере устройств. Возможно придется, как было описано в предыдущем разделе, установить драйвер вручную. Также возможен вариант с обновлением драйвера через Интернет.
Кстати, для устранения проблем со звуком в релизе 1809 был выпущен патч KB4468550.
Поэтому можно воспользоваться им для автоматического устранения проблемы. Вообще в обновлении 1809 оказалась так много багов, что в результате оно было отозвано. Главным багом было конечно то, что при установке этой версии автоматически удалялись пользовательские файлы.
Позже в 1809 эту ошибку со звуком исправили и теоретически сейчас этих проблем быть не должно.
Запуск проверки системы на вирусы
В некоторых ситуациях звук пропадает из-за отключения системных служб, связанных с его работой. Есть ряд факторов, способствующих этому, одна из наиболее распространённых причин — это вирусы, действующие в вашей операционной системе.
Для устранения данной проблемы понадобится антивирус, который необходимо скачать из Интернета или установить имеющийся с диска.
Возможные варианты бесплатного антивирусного ПО:
|
Название антивирусного ПО |
Домашняя страница |
| Avast Free Antivirus | https://www.avast.ru/free-antivirus-download |
| Kaspersky Free | https://www.kaspersky.ru/free-antivirus |
| AVG AntiVirus Free | https://www.avg.com/ru-ru/free-antivirus-download |
| Avira Free Security Suite | https://www.avira.com/ru/free-security-suite |
| Bitdefender Antivirus Free Edition | https://www.bitdefender.com/solutions/free.html |
| Comodo Free Internet Security | https://www.comodo.com/home/internet-security/free-internet-security.php |
| Panda Free Antivirus | https://www.pandasecurity.com/russia/homeusers/solutions/free-antivirus/ |
| 360 Total Security | https://www.360totalsecurity.com/ru/ |
| Sophos Home | https://home.sophos.com/en-us.aspx |
Далее выполните следующие действия:
- Инсталлируйте в систему с правами администратора антивирусное программное обеспечение;
- Просканируйте систему на наличие вирусов и вредоносного ПО, если таковые найдутся, то удалите их;
- После этого перезагрузите систему и на всякий случай повторно просканируйте — некоторые вирусы могли сохраниться.
Также можно воспользоваться и встроенным в десятку антивирусом — Защитником Windows (Defender).
Нужно только предварительно обновить через Интернет антивирусные базы:
После этого уже можно запускать полное сканирование компьютера.
Решение проблем со службой Windows Audio
После того как вы убедились в отсутствие вирусов на ПК, зайдите в меню Пуск с помощью поиска и найдите приложение «Службы». Перед вами появится список служб, установленных в системе. Необходимо выбрать службу «Windows Audio» и перезапустить ее.
ЧИТАЙТЕ ТАКЖЕ:Обзор лучших бесплатных программ для отключения слежки в Windows 10
Также надо убедиться, что у службы стоит автоматический тип запуска.
Управление службой Window Audio с помощью команд
Для продвинутых пользователей службу Windows Audio можно перезапустить командами в cmd (командной строке):
net stop audiosrv
net start audiosrv
Узнать текущий статус службы из командной строки можно с помощью команды:
sc query audiosrv
Также службу можно запустить этой командой :
sc start audiosrv
И поменять тип запуска:
sc config Audiosrv start= auto
Для самых продвинутых пользователей, а тем более системных администраторов, лучший способ управления службами, это использование PowerShell.
Узнать статус службы Windows Audio в Powershell:
get-service Audiosrv
Получение всех свойств службы в Powershell:
get-service audiosrv | select *
Запуск службы службы audiosrv в Powershell:
start-service audiosrv
Установка режима автоматического запуска:
set-service audiosrv -startupType Automatic
Если после этого звук в системе все равно отсутствует, то возможно нарушены настройки реестра.
Сбой работы реестра
Бывает и так, что работа звука в Windows 10 нарушается из-за внесённых изменений в реестр. Данные изменения, как правило, вносятся различными утилитами для настройки и оптимизации операционной системы. И для устранения проблемы необходимо выполнить следующие действия:
- Запустите встроенный редактор реестра. Для этого напишите «regedit» и нажмите Enter.
- В редакторе перейдите в раздел: HKEY_LOCAL_MACHINESYSTEMCurrentControlSetControlClass{4d36e96c-e325-11ce-bfc1-08002be10318};
- Найдите параметр «UpperFilters», откройте его и проверьте значение. Если кроме «ksthunk», присутствуют и другие, то удалите их.
Восстановление системы
Если ничего из вышеизложенного не помогло, то есть один простой, но в тоже время эффективный способ решения данной проблемы. Это встроенная в Windows функция «Восстановление системы».
Единственный минус данного способа является то что при восстановлении будут удалены все приложения и драйвера установленные после выбранной даты точки восстановления. Для активации режима восстановления необходимо выполнить следующие действия:
- В меню Пуск откройте окно Выполнить и введите команду «systempropertiesprotection»;
- В появившемся окне «Свойства системы» выберите вкладку «Защита системы» и нажмите кнопку — «Восстановить…»;
- Вспомните, какого числа последний раз звук нормально работал, и выберите наиболее близкую к этой дате точку восстановления;
- Система покажет, какие приложения и драйвера будут затронуты в ходе восстановления. Если среди этого нет ничего жизненно важного, то подтвердите запуск восстановления нажатием кнопки «Готово»;
Когда компьютер перезагрузится, все драйверы и программы станут такими, какими были на дату восстановления. Личные данные такие, как документы, музыка, фото и видео — система восстановления не затрагивает.
Если точек восстановления нет или функция совсем была отключена, то скорей всего придется переустановить Windows 10. Иногда это оказывается самым быстрым способом, так как не тратится время на диагностику неисправности. Нужно только не забыть сохранить всю ценную личную информацию из своего профиля на внешний носитель, чтобы случайно все не потерять, отформатировав жесткий диск.
Аппаратная неисправность
Если ничего из вышеизложенного не помогло в решении проблемы, то скорее всего в компьютере, в материнской или звуковой плате присутствует аппаратное или механическое повреждение. Как вариант, если используется не встроенная в материнскую плату звуковая карта, достаточно будет вытащить ее из гнезда и почистить резиновым ластиком контакты или потереть спиртом, а затем вставить обратно.
Если недавно были изменения в настройках BIOS компьютера, то нужно попробовать откатить настройки обратно. Также нужно изучить документацию производителя, которая шла в комплекте с ПК, ноутбуком или материнской платой, звуковой картой. Если она утеряны, то нужно искать ее на сайте производителя. Там же можно поискать новые версии драйверов и прошивок (firmware), почитать FAQ или написать вопрос в поддержку. Не лишним будет поискать о вашей проблеме в Интернете, на профильных форумах.
Если после всех вышеперечисленных способов звук на ПК так и не появился, то, скорее всего, придётся обратиться в сервисный центр (может быть по гарантии) и проверить материнскую плату на работоспособность встроенного аудио чипа, возможно, повреждён именно он. То же самое относится и к внешним звуковым платам.
Из всего вышеперечисленного становится ясно, что лечение пропажи звука в Windows 10, не такой сложный и трудоемкий процесс, каким может показаться на первый взгляд. Необходимо лишь в точности следовать инструкции.
Благодаря бесплатному обновлению до Windows 10, миллионы пользователей ПК заменили свою старую операционную систему. Такой тип обновления дал многим пользователям оценить все преимущества новой Windows 10. Но как показывает история, все новые операционные системы Windows не лишены проблем. После обновления или полной установки Windows 10, у многих пользователей на компьютере перестал работать звук. В этом материале мы подробно опишем, какие проблемы со звуком могут быть в Windows 10, а также опишем способы решения этих проблем.
Самый легкий метод решения задачи, когда звук пропал в Windows 10
Windows 10 умеет автоматически исправлять проблемы со звуком, когда он перестал работать. Решить эту проблему можно с помощью мастера диагностики и устранения неполадок. Этот мастер представляет собой проверочную утилиту для поиска неисправностей. Запустить этот мастер можно при помощи клика правой кнопки мыши на стандартном значке регулятора громкости звука, который находится на панели задач в области уведомлений.

Теперь в появившемся контекстном меню необходимо выбрать пункт «Обнаружить неполадки со звуком», который и запустит этот мастер. После запуска мастер сразу запустит диагностику, которая должна выявить и исправить проблему со звуком.
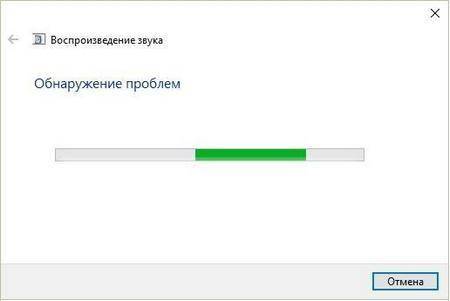
В нашем случае проверочный мастер обнаружил проблему с отключенной звуковой картой, и нам удалось исправить проблему.
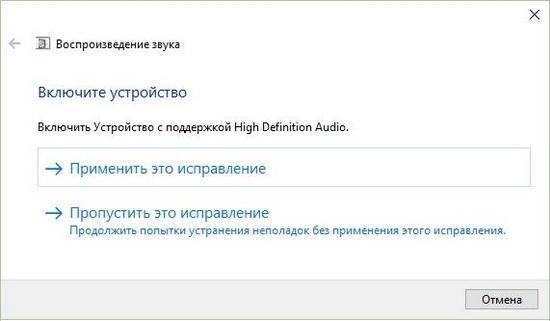
Этот мастер часто выручает пользователей, когда нет звука в ПК.
Пропал звук в устройствах воспроизведения после установки обновлений
Очень часто у пользователей с ОС Windows 10 встречается проблема, когда мультимедийные колонки и наушники не воспроизводят звук после установки обновлений. В этой ситуации странным является то, что звук не подается на мултимедийные колонки и наушники, а операционная система все равно не видит неполадок. Например, если в ОС удалось обнаружить, что на ПК отсутствует звук, то на панели задач в области уведомлений можно увидеть соответствующий значок, который оповещает, что звука нет.

В этой же ситуации со значком все в порядке. Если мы перейдем в диспетчер устройств, то мы обнаружим, что звуковая карта имеет название «Устройство с поддержкой High Definition Audio».
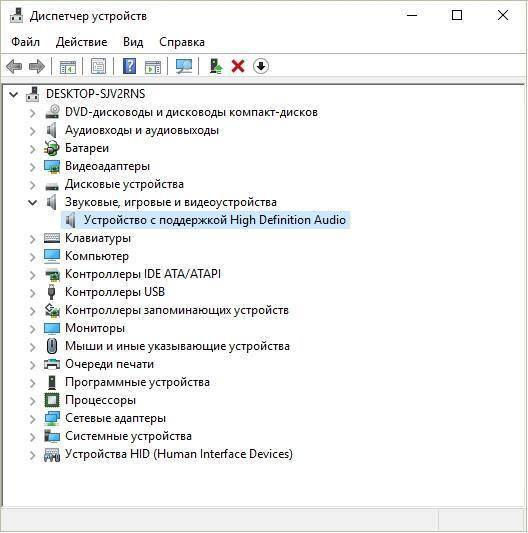
Если драйвер звуковой карты установлен нормально, то в ее названии в диспетчере устройств вы обязательно найдете приставку, указывающую на поставщика звукового процессора. Например, звуковые карты от компании Realtek имеют названия в диспетчере задач «Realtek High Definition Audio». В нашем же случае такой приставки нет. Обычно такая ситуация возникает из-за скаченных драйверов в месте с обновлениями Windows 10, которые система неправильно установила или звуковая карта их не поддерживает.
Решить эту проблему поможет установка драйверов из официальных источников.
В следующей главе мы рассмотрим примеры установки драйверов на ноутбук и стационарный компьютер. Надеемся, эта глава ответит нашим читателям, почему после обновления Windows 10 не работает звук.
Чистая установка драйверов на звуковую карту
Windows 10 не всегда может найти драйвера автоматически для новых звуковых карт ноутбуков и стационарных компьютеров. Также десятка может неправильно установить скачанные ей драйвера из Windows Update. Поэтому в этом примере мы покажем, как установить новые драйвера для стационарного компьютера и ноутбука с нуля.
Для примера со стационарным компьютером мы будем использовать ПК, который основан на материнской плате MSI A88X-G43. В этой материнской плате установлена звуковая карта, которая базируется на чипе Realtek ALC892. Скачать сам драйвер для этого чипа можно на официальном сайте производителя материнской платы www.msi.com. В нашем случае драйвер представляет 64-битную версию для Windows 10 64 bit. После загрузки инсталлятора драйвера запустим его.

Установка драйвера от компании Realtek очень простая и сводится к нескольким нажатиям кнопки .
После установки инсталлятор предложит перезагрузить компьютер, что мы и сделаем.
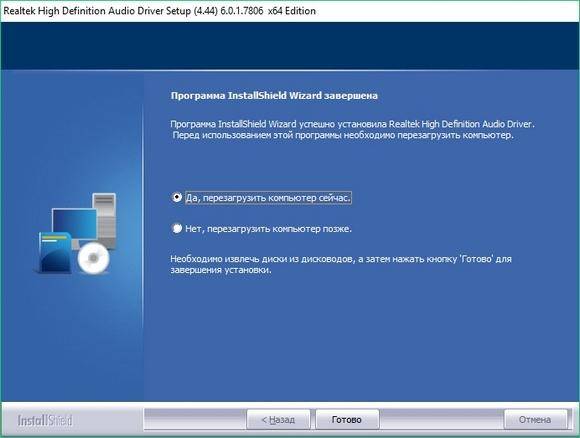
Перезагрузив ПК, в панели уведомлений появится значок.
![]()
С помощью этого значка можно попасть в «Диспетчер Realtek HD», где можно произвести тонкую настройку звуковой карты.
Установка драйвера на ноутбук практически идентична с первым примером. Для примера будем использовать ноутбук Acer Aspire V3-372. Этот ноутбук также оснащен звуковым чипом от Realtek. Скачать драйвер для этого ноутбука можно на странице www.acer.com/ac/ru/RU/content/drivers. После загрузки также запустим его, как в первом примере.
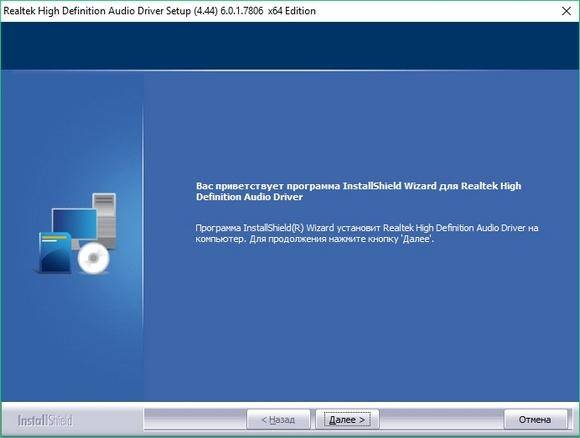
Запустив инсталлятор, перед нами появится то же окно, как в первом примере. Процесс установки драйвера ноутбука в нашем случае идентичен со стационарным компьютером. Если звук перестал работать на чипах, не рассмотренных в этой главе, то принцип установки на них драйвера максимально схож с рассмотренными примерами.
Еще для стационарного ПК и ноутбука могут помочь такие способы решения задачи, когда пропал звук:
- Если на вашем ПК пропал звук по вине драйвера, то нередко решить эту проблему можно полной переустановкой драйвера.
- При поиске драйвера для старого ПК пользователь часто встречается с ситуацией, когда его нет для Windows 10. Многие производители часто забрасывают старые ПК и не обновляют для них драйвера, поэтому их нет для новых ОС. В этой ситуации могут помочь драйвера, предназначенные для Windows 7 и 8. Единственное, на что следует обратить внимание в этом случае — это разрядность ОС, для которой этот драйвер предназначен.
- Если вы загрузили или отыскали на диске очень старый драйвер, то его не удастся установить, так как у него нет поддержки Windows 10. В этой ситуации может помочь запуск установщика драйвера в режиме совместимости ОС, для которой он предназначен.
Исправляем параметры устройств воспроизведения в Windows 10
В Windows 10 существует множество опций, которые улучшают звуковые показатели. Но если ваш ПК уже достаточно старый, то на нем может пропасть звук, как раз из-за этих улучшений. Чтобы исправить проблему, когда звук пропадает, эти улучшения необходимо отключить. Для этого перейдем в оснастку «Звук», которая находится на панели управления. Быстро открыть эту оснастку можно с помощью программы «Выполнить», набрав в ней команду mmsys.cpl
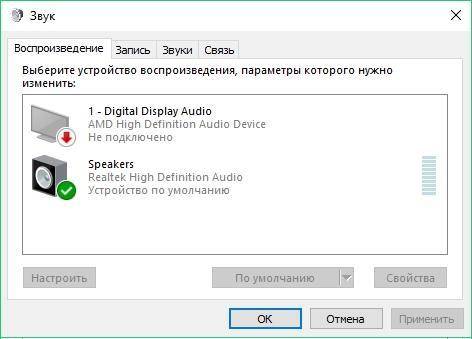
В открывшемся окне найдем устройство воспроизведения звука по умолчанию и кликнем по нему правой кнопкой мыши. В появившемся контекстном меню перейдем к свойствам этого устройства. Устройством воспроизведения могут быть как колонки, так и наушники. В открывшихся свойствах устройства откроем вкладку «Улучшения».
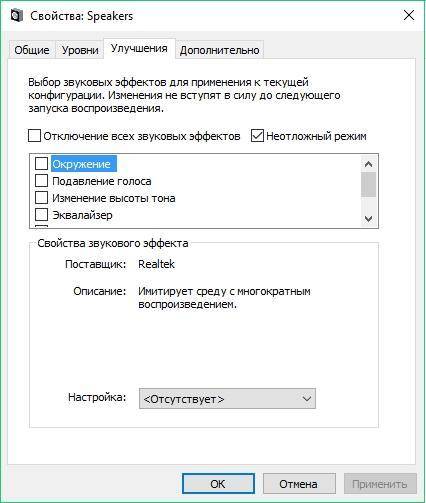
На этой вкладке нас интересует чекбокс с именем «Отключение всех звуковых эффектов». Нам нужно включить этот чекбокс и нажать кнопку , чтобы сохранить настройки. Выполнив эти настройки, проверьте колонки и динамики на наличие звука.
Еще в Windows 10 пользователи могут наблюдать хриплый звук в наушниках или автоматическое снижение уровня громкости. Это также связано с опциями, которые в этом случае должны улучшать качество связи при разговоре через ПК. Отключить эти настройки можно через ту же надстройку в панели управления «Звук». Поэтому откроем эту надстройку панели управления и перейдем во вкладку «Связь».
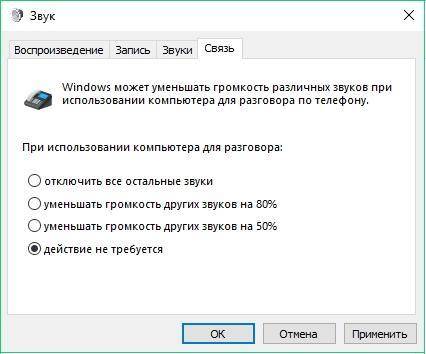
На этой вкладке нужно выбрать радиокнопку «Действие не требуется» и подтвердить сохранение этой настройки кнопкой . После выполнения этих настроек качество воспроизведения должно улучшиться.
Подводим итог
В этом материале мы постарались изложить все способы решения проблем, когда звук перестал работать в Windows 10. Кроме программных проблем с воспроизведением звука, пользователь может еще столкнуться с неисправными наушниками и мультимедийными колонками. Проверить эту неисправность достаточно просто, взяв рабочие колонки или наушники с другого ПК.
Также неправильное подключение наушников и колонок к передней и задней панели может быть следствием того, когда звук перестал работать. Еще довольно часто встречаются случаи, когда звук перестал работать при подключении к передней панели. Обычно это связано с неправильным подключением передней панели к материнской плате или неправильной распайкой передней панели. Надеемся, эта статья позволит вам решить проблему, когда нет звука в Windows 10, и вы сможете нормально послушать любимую композицию или посмотреть новый фильм.
Видео по теме
Хорошая рекламаИспользуемые источники:
- https://remontka.pro/no-sound-windows-10/
- https://sysadmintips.ru/propal-zvuk-na-kompjutere-windows-10.html
- https://ustanovkaos.ru/reshenie-problem/net-zvuka-na-kompyutere-windows-10.html
NOTE: Users facing this audio loss issue after Windows Update on 11 October 2018, should check this fix instead.
If suddenly you discovered that your system has no audio, this is one of the most common issue faced by users. The audio may be lost after some Windows Update, feature upgrade or due to use third-party software, which broke audio integrity.
When audio is not available on your system, sound icon in taskbar has a red cross on it. Hovering the cursor over this icon displays ‘No Audio Output Device is installed‘ statement. You can clearly realize this in below shown screenshot.
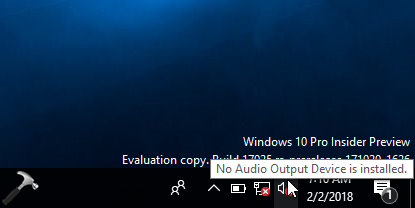
Users facing this problem may try below mentioned suggestions to fix.
FIX: ‘No Audio Output Device Is Installed’ For Windows 10/8/7
FIX 1 – General Suggestions
1. First thing you should try after getting into this problem is – reboot the device.
2. If rebooting doesn’t helps, right click sound icon and select Troubleshoot sound problems. Run the Audio troubleshooter and see if it helps.
3. Try additional suggestions mentioned here to troubleshoot the issue.
4. Try to update sound drivers, if sound device(s) available in Device Manager. If you can’t locate sound device(s) in Device Manager, follow FIX 2.
FIX 2 – Add Legacy Hardware/Sound Driver
1. Open Device Manager by running devmgmt.msc command.
2. In the Device Manager window, click Action > Add legacy hardware.
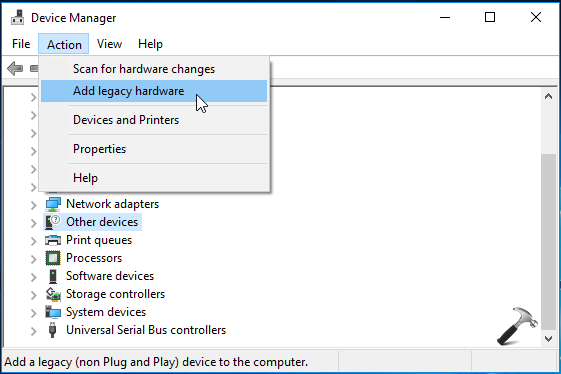
3. Then in Welcome to the Add Hardware Wizard screen, click Next.
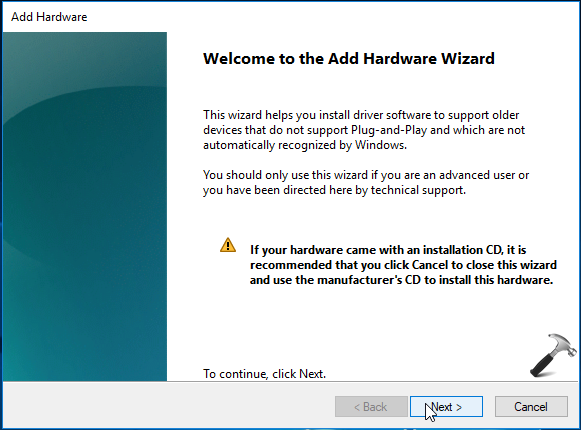
4. Moving on, select Install the hardware that I manually select from a list (Advanced) option. Click Next.
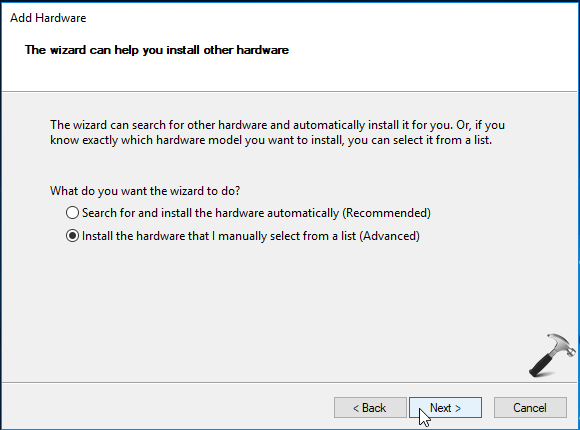
5. Now in the list, scroll down and select Sound, video and game controllers. Click Next.
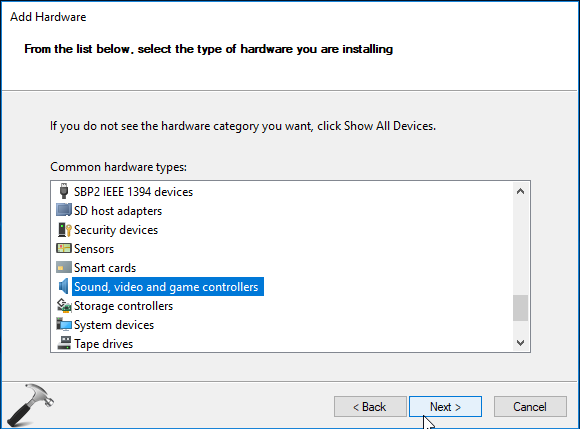
6. Then select the sound device driver from your device manufacturer. Click Next.
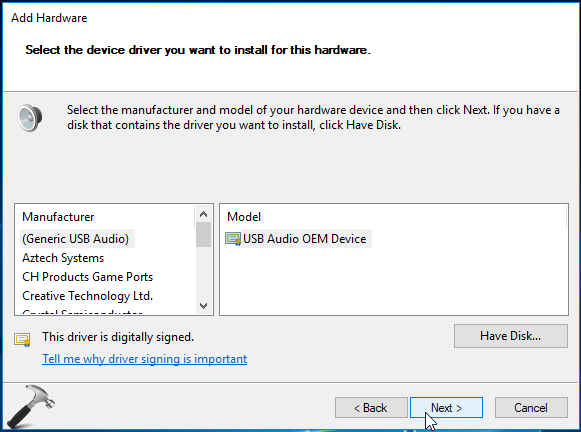
7. Finally, click Next to begin installation of selected device.
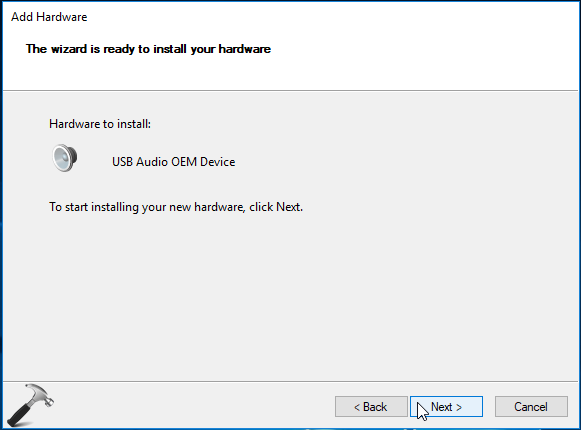
Once this installation is completed, go back to Device Manager. Under Sound, video and game controllers, right click your installed device and select Enable.
Reboot the machine and after restart, sound should be back on your device.
See following video to illustrate this fix:
Hope this helps!
READ THESE ARTICLES NEXT
- Fix: Audio services not responding in Windows 11/10
- Fix: Audio not working after Windows 11 upgrade
- Adjust Left Right Audio Balance in Windows 11
- How to Change the Startup Sound for Windows 11
- Enable or Disable Startup Sound in Windows 11
- How to Change Default Sound Input Device in Windows 11
- Fix: Audio enhancements tab missing in Windows 11/10/8.1
- Enable Shutdown Sound In Windows 10
- How To Disable Audio Enhancements In Windows 10
- [FIX] Audio Lost After Windows 10 October 2018 Update

Кажется, самой большой угрозой для стабильности наших ПК являются обновления ОС Windows 10, причем последняя проблема заключается в том, что у пользователей ПК пропадает звук с компьютера.
Обычно это сопровождается ошибкой «No Audio Output Device is Installed» (отсутствуют аудио устройства).
Проблема заключается в неправильном аудио драйвере, который устанавливается автоматически при обновлении системы. Подобные проблемы проявляются у небольшого количества пользователей. К счастью, решение относительно простое.
- Откройте Диспетчер устройств (откройте меню Пуск, введите Диспетчер устройств и нажмите Enter) и выберите Системные устройства.
- Найдите драйвер Intel Smart Sound Technology driver (SST).
- Щелкните правой кнопкой мыши и выберите Обновить драйвер в контекстном меню.
- Выберите поиск драйверов на моем компьютере, а затем выберите из списка доступных драйверов на моем компьютере High Definition Audio.
- Нажимать Далее.
- Intel Smart Sound Technology (SST) драйвер исчезнет, и звук появится.
Кто-нибудь из наших читателей с Windows 10 пострадал?