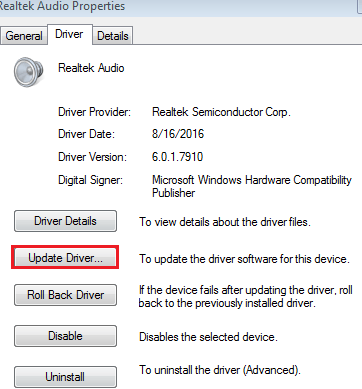
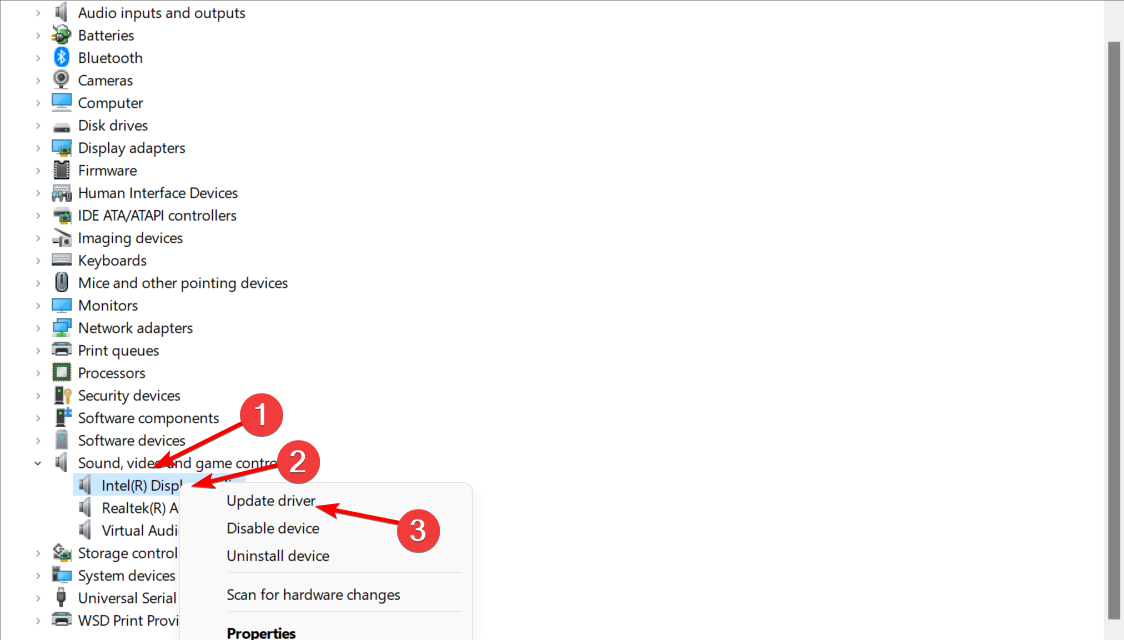
Способ 1: Удалите аудиодрайвер
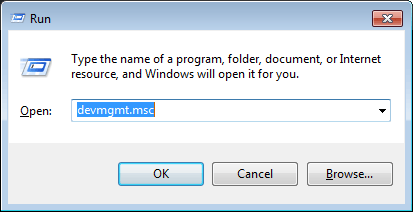
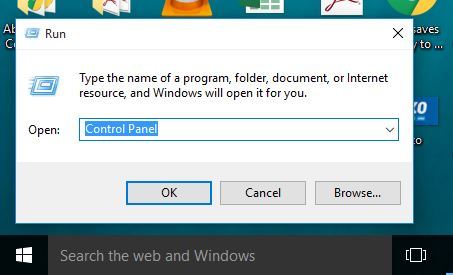
a, перейдите в диспетчер устройств, нажав Win + R вместе, чтобы открыть диалоговое окно «Выполнить», введите devmgmt.msc .
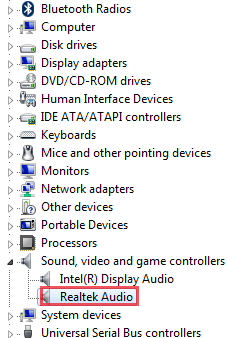
б, Найдите свое аудиоустройство в списке,
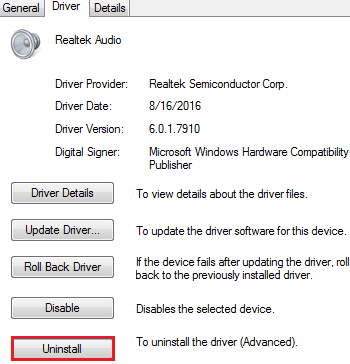
c, щелкните правой кнопкой мыши звуковую карту, выберите Свойства а затем вы увидите всплывающие окна, как показано ниже. Перейдите к Водитель вкладку, щелкните Удалить.
 г, перезагрузите компьютер к после завершение процесса. Он снова переустановит драйвер и проверит, решает ли он проблему.
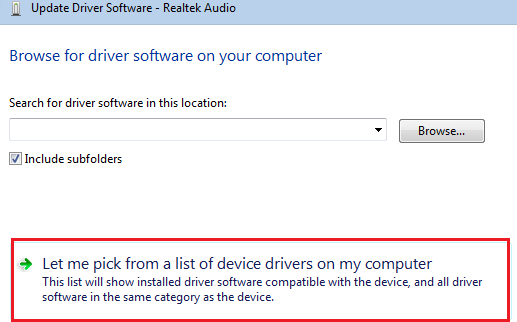
Если нет, попробуйте M этод 2: Обновить драйвер…
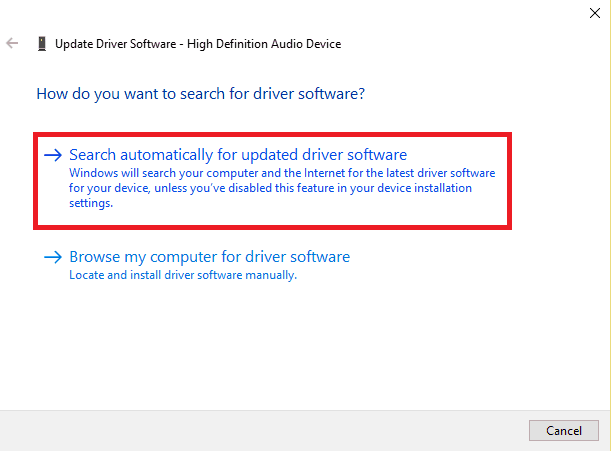
а. На этот раз нажмите «Обновить драйвер…», затем выберите « Найдите на моем компьютере драйверы ‘.

б, выберите « Разрешите мне выбрать из списка драйверов устройств на моем компьютере ‘.
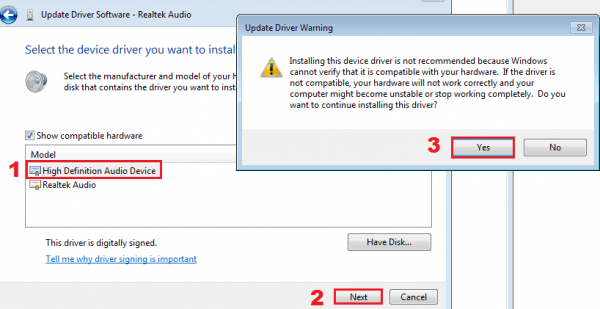
c, действуйте и следуйте инструкциям ниже
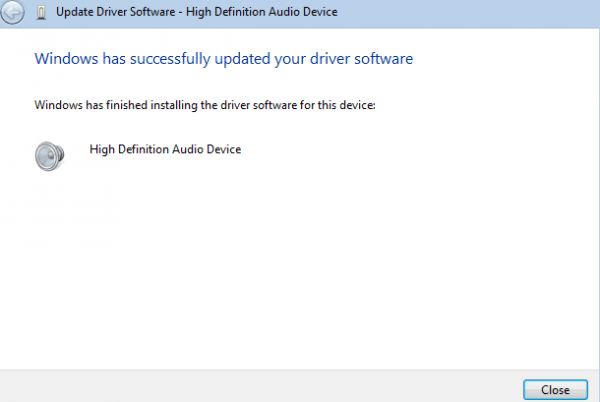
г, Подождите несколько минут, он должен успешно обновить программное обеспечение драйвера.
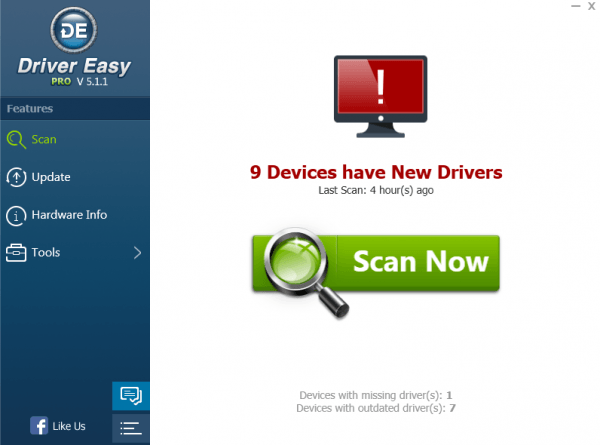
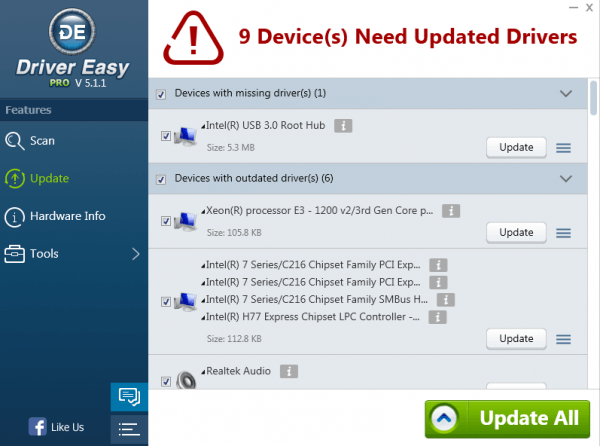
гВыполнение всех этих шагов каждый раз при обновлении драйвера — определенно головная боль. Хотите, чтобы ваши драйверы обновлялись бесплатно и автоматически? Пытаться DriverEasy Профессиональный диспетчер устройств, он обновляет все ваши драйверы быстрее, с меньшим количеством щелчков мыши и менее сложным.
Explore tested solutions brought to you by our team of experts
by Milan Stanojevic
Milan has been enthusiastic about technology ever since his childhood days, and this led him to take interest in all PC-related technologies. He’s a PC enthusiast and he… read more
Updated on November 17, 2022
Reviewed by
Alex Serban

After moving away from the corporate work-style, Alex has found rewards in a lifestyle of constant analysis, team coordination and pestering his colleagues. Holding an MCSA Windows Server… read more
- If your device says no speaker or headphones are connected, it might be down to your audio drivers.
- The first thing you need to do is re-enable the sound card and update the audio drivers.
- Make sure it’s not a hardware problem by testing the peripherals on another device.
XINSTALL BY CLICKING THE DOWNLOAD FILE
This software will keep your drivers up and running, thus keeping you safe from common computer errors and hardware failure. Check all your drivers now in 3 easy steps:
- Download DriverFix (verified download file).
- Click Start Scan to find all problematic drivers.
- Click Update Drivers to get new versions and avoid system malfunctionings.
- DriverFix has been downloaded by 0 readers this month.
There is a common problem circulating on the web about Windows 10 not recognizing audio devices plugged into the machine. This is accompanied by no speakers or headphones plugged in error despite connecting the devices.
While some users complain that this issue started after upgrading their PCs, other factors can still be responsible. Irrespective of the causes, this guide will show you the surefire fixes to get back sound on your PC.
Why is my PC not detecting my speakers?
The issue of no speakers or headphones are plugged into Windows 10 after the update issue can be caused by various factors. Below are some of these causes:
- Outdated audio drivers: The first thing to look at when facing the no speakers or headphones plugged in Windows 10 issue on an HP or Dell computer is your audio drivers. If they are outdated, you need to update the drivers to restore normalcy.
- Faulty update: If you started noticing this issue after updating your PC, the problem might be with the update. You need to remove this update to solve this problem.
- Wrong sound settings: Sometimes, selecting the faulty playback device is why you are getting this error. You need to change the playback device to your speaker or headphone to make them work in this case.
- Outdated BIOS: Many users have found their BIOS to be the cause of the headphone not plugged in Windows 10 issue. The quick way to fix this is to update your system BIOS from the manufacturer’s website.
How do I fix No speakers or headphones are plugged in error?
Before delving into the detailed fixes in this section, we recommend going to your PC manufacturer’s website to update your BIOS. This has worked for many users and can save you a lot of stress.
Also, if you use a PC with more than one audio port, change the line positions to your speaker by trial. There is no need to follow the color code, as some updates might have tampered with it. If these do not work, you can now proceed to the fix below:
1. Update the audio driver
1.1 Manually update your drivers
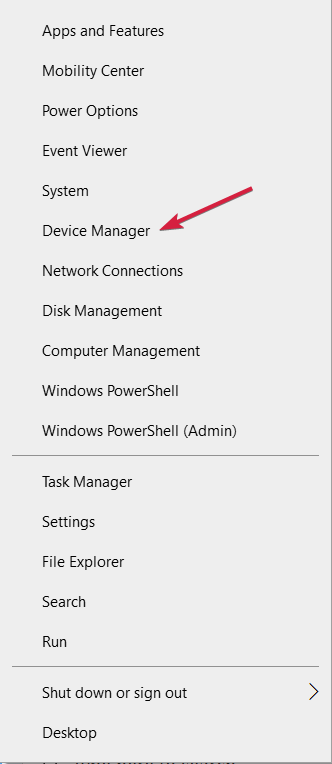
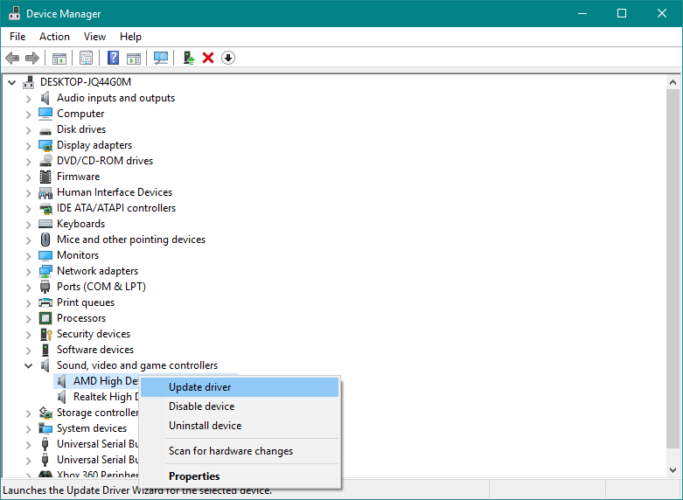
1. Right-click the Start button and select Device Manager.
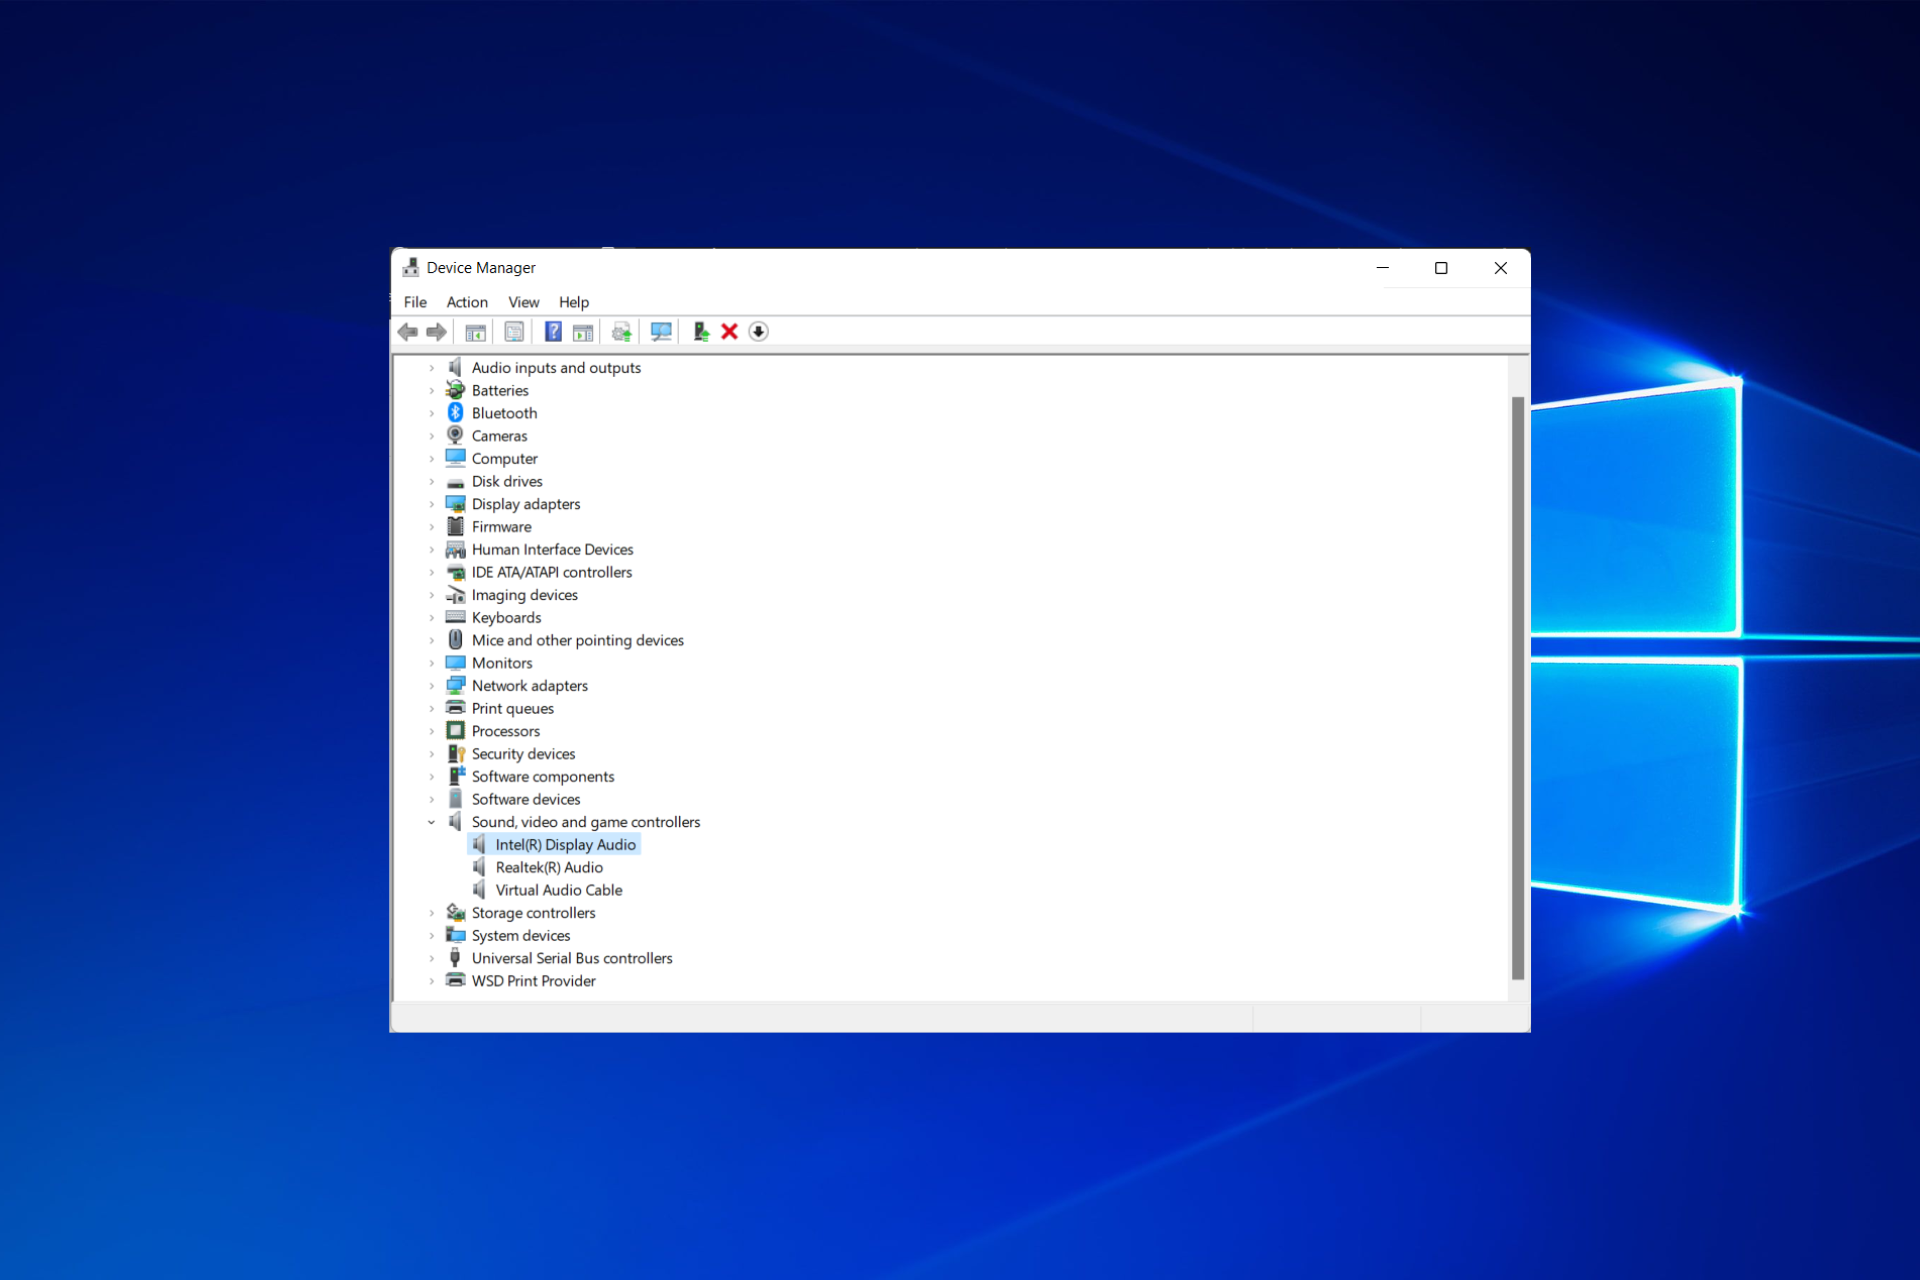
2. Expand the Sound, video and game controllers section.
3. Right-click the audio driver and select Update driver.
4. If you have multiple drivers, do the same for all of them.
5. Choose Search automatically for drivers then restart your computer once the process is done.
If you’re encountering the No Speaker or Headphones are plugged in issue, the first recommended fix is to update your drivers. Aside using the built-in driver updater, you can also go to the manufacturer’s website to download and install the latest driver.
This has proved effective in solving the no speakers or headphones are plugged in issue for some users.
1.2. Update drivers automatically
Downloading and updating drivers manually can permanently damage your system by installing the wrong versions. To prevent that, we strongly suggest doing it automatically by using a third-party program.
We have to mention that this tool will also prevent any damage to your PC by downloading and installing the wrong driver versions. After several tests, our team concluded that this is the best-automatized solution.
It will show you what drivers are outdated and let you choose manually which one to update and which to leave in the current state.
There is no need for other tools because you can rest assured when updating drivers automatically with DriverFix.

DriverFix
A trustworthy solution that can maintain your PC in an optimized state by locating the latest updates for your drivers.
2. Rollback driver
- Press the Windows key + X and select Device Manager.

- Click the arrow next to the Sound, video and game controllers option to expand it and double-click the driver there.

- Click the Driver tab at the top, followed by the Roll Back Driver button.

If you started noticing the no speakers or headphones are plugged in issue after installing a driver update; you need to roll back your driver. Remember to restart your PC after doing so.
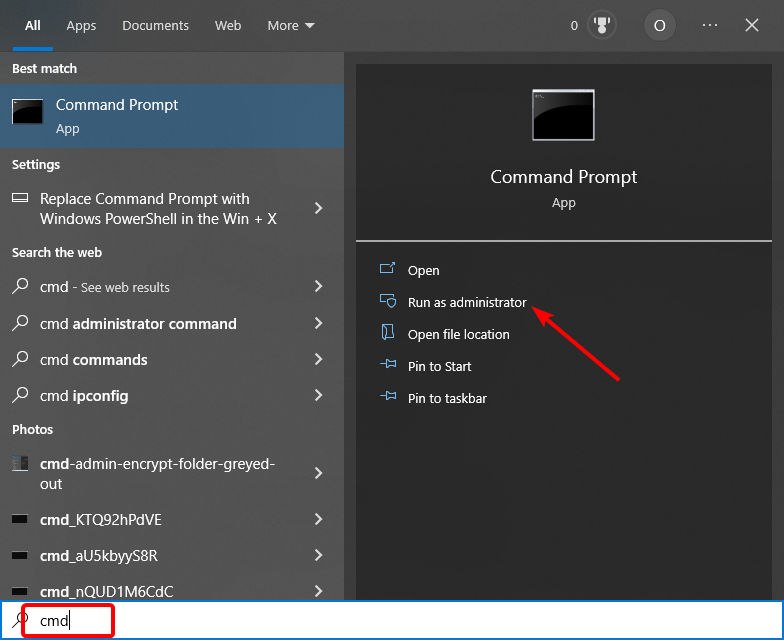
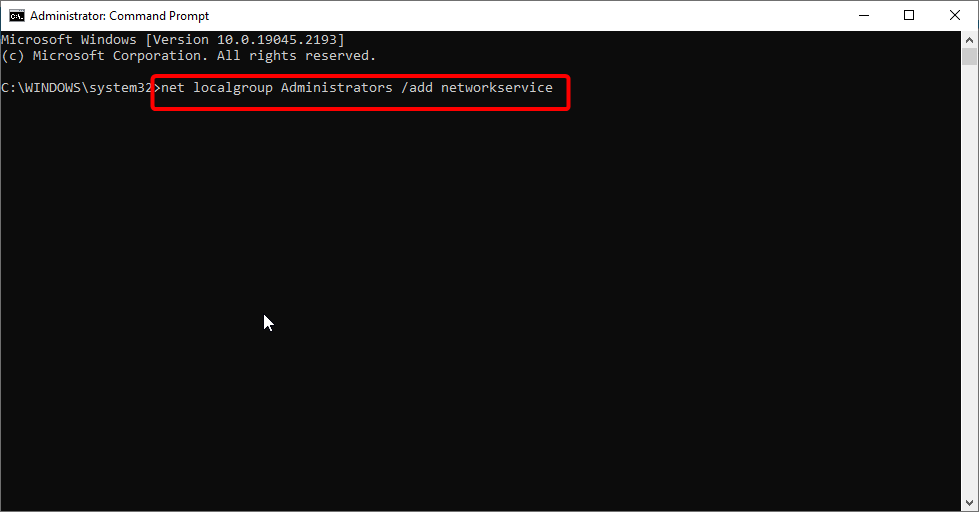
3. Use Command Prompt
- Press the Windows key, type cmd, and select Run as administrator under Command Prompt.

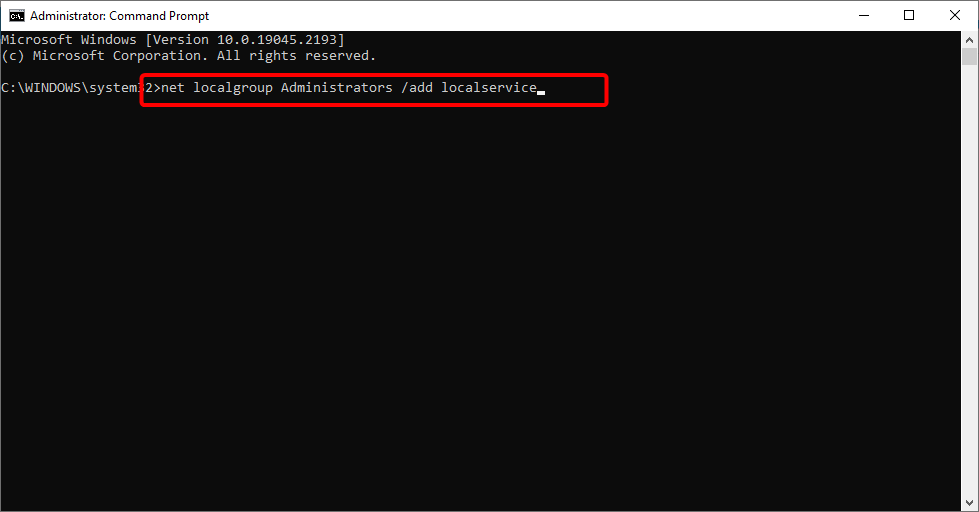
- Type the commands below and hit Enter after each:
net localgroup Administrators /add networkservice
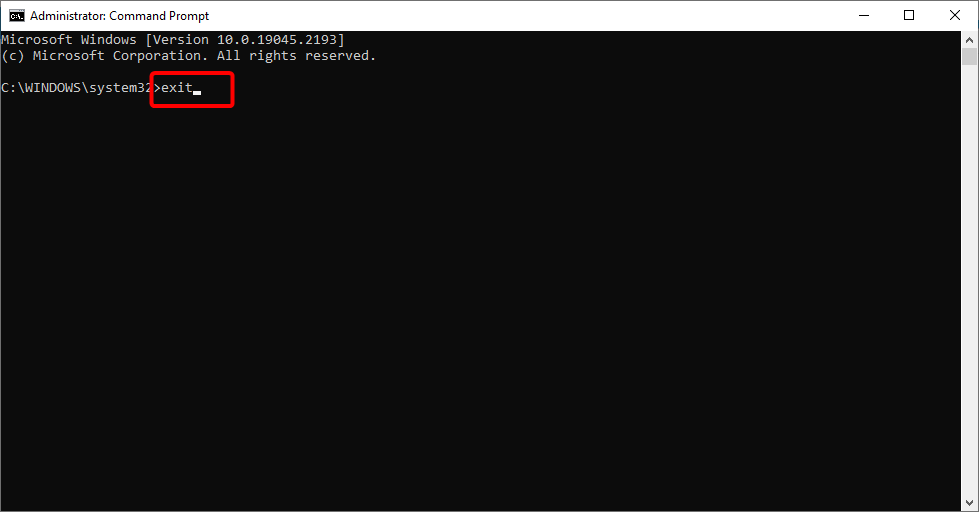
net localgroup Administrators /add localservice exit - Finally, restart your PC.
Another cause of the no speakers or headphones are plugged in issue is your PC settings. The commands below will help set the needed settings and fix the audio problem.
- Chroma Connect not Working: Enable it With These 4 Methods
- Fix: Brother Printer Scanner Not Working/Connecting to PC
- Windows Fax and Scan Could not Complete Scan: 4 Fixes to use
- Quick Fix: Logitech Keyboard Stopped Working
- Cricut not Printing to Printer: 3 Ways to get it Working
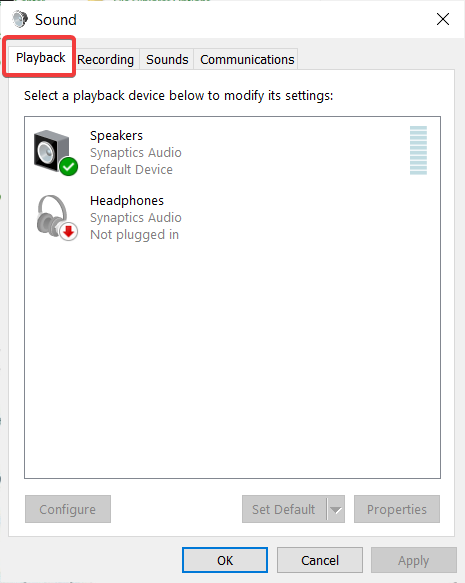
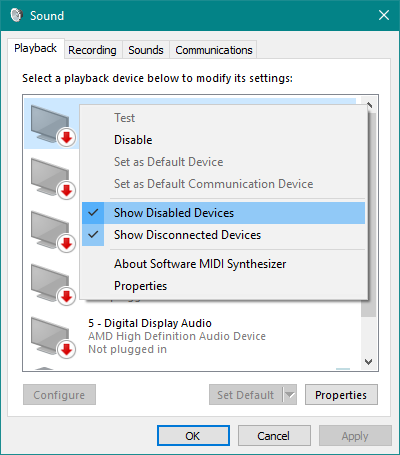
4. Change the default playback device
- Right-click the sound icon in the Taskbar and select the System Sound Events option.

- Click on the Playback tab.
- Right-click anywhere there and choose Show Disabled Devices.

- Now, right-click your speaker or headphone and select Enable, followed by Set as Default device.
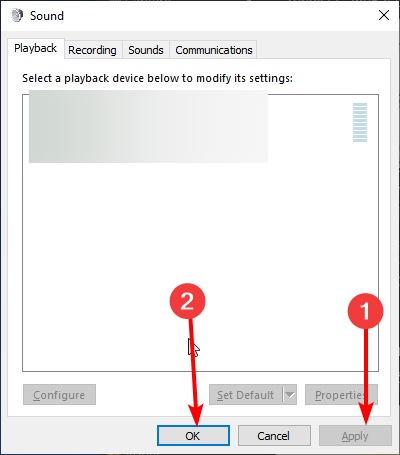
- Finally, click the Apply button, OK, and restart your PC.
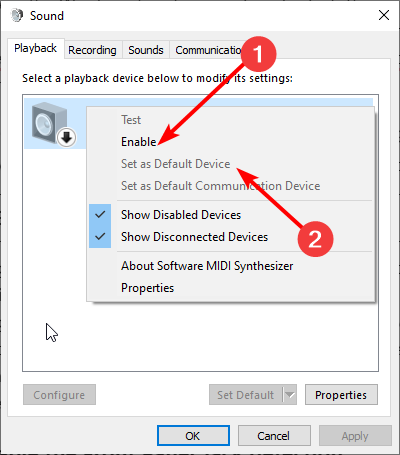
At times, you are simply getting the no speakers or headphones plugged in error because the device is disabled. Enabling and setting it as the default audio device should remedy this.
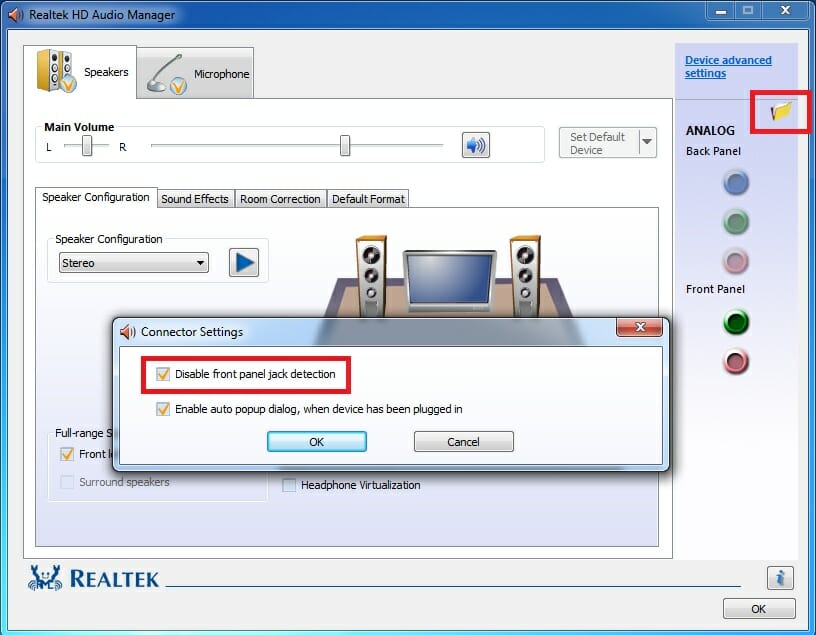
5. Disable the Front Panel Jack detection
- Go to Search, type realtek hd audio manager, and open Realtek Audio HD Manager. You will need to download the Audio Manager if you don’t have it.
- Then go to the Speakers tab, and click the folder under Device Advanced settings.
- Select Disable front panel jack detection.

- Restart your computer.
If your Realtek HD Audio Manager isn’t opening in Windows 10, look at this article dedicated to fixing Realtek issues and learn what to do.
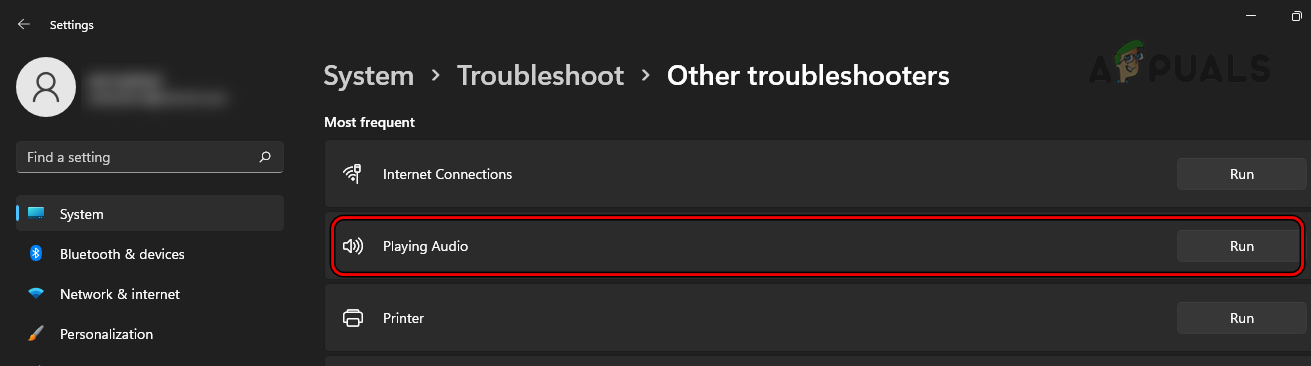
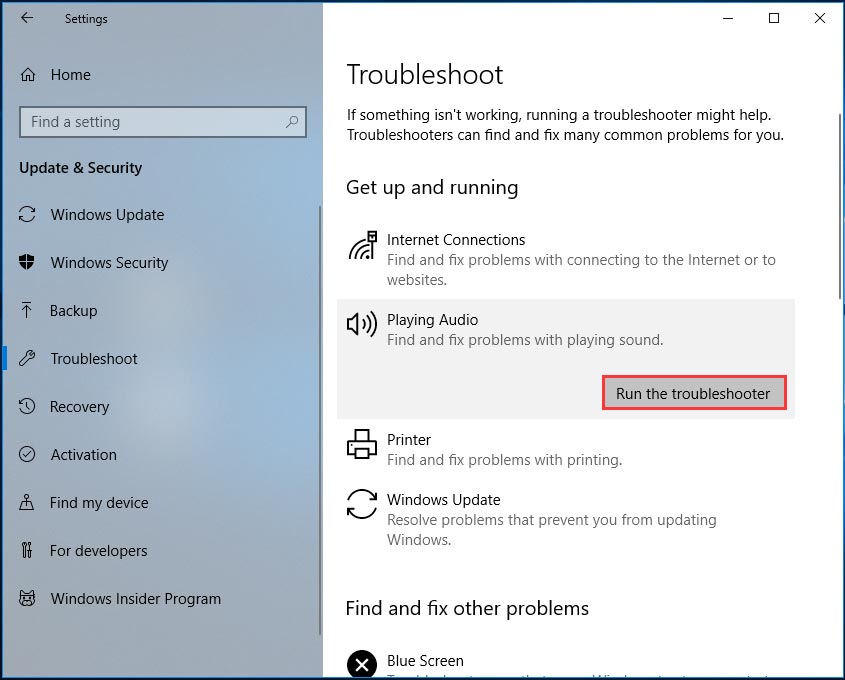
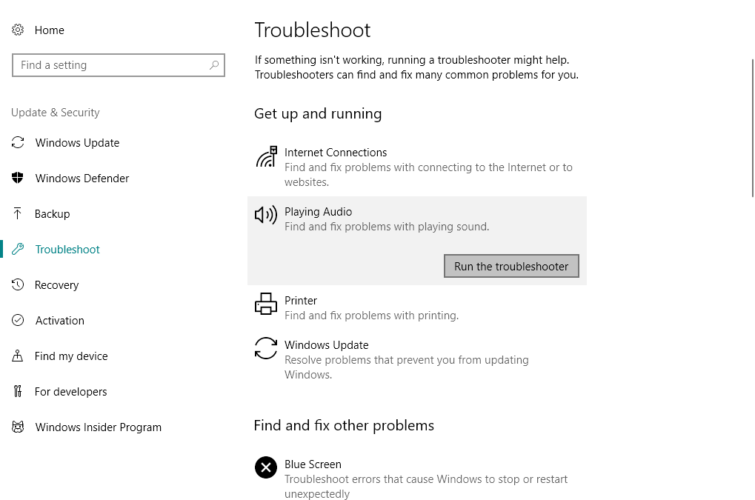
6. Run Sound Troubleshooter
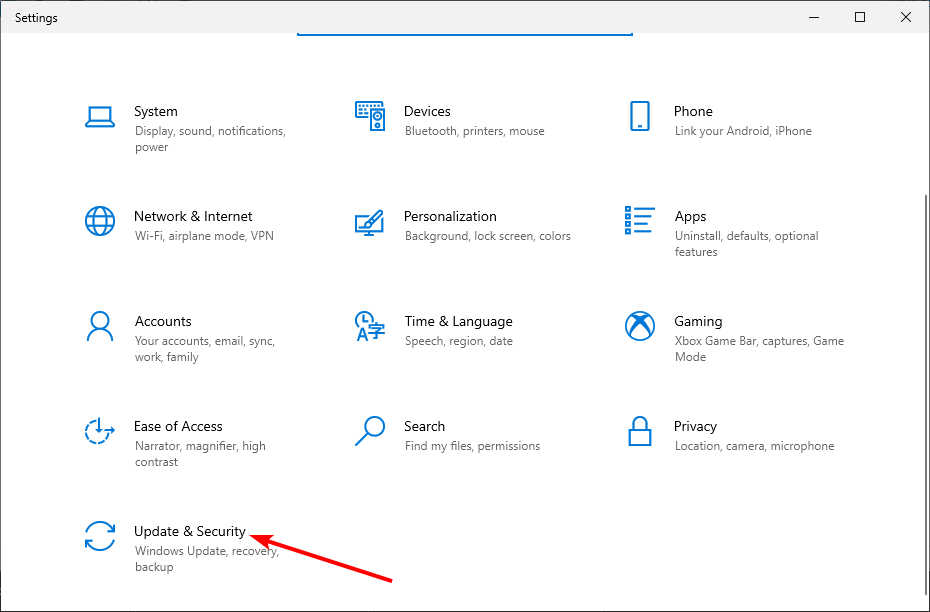
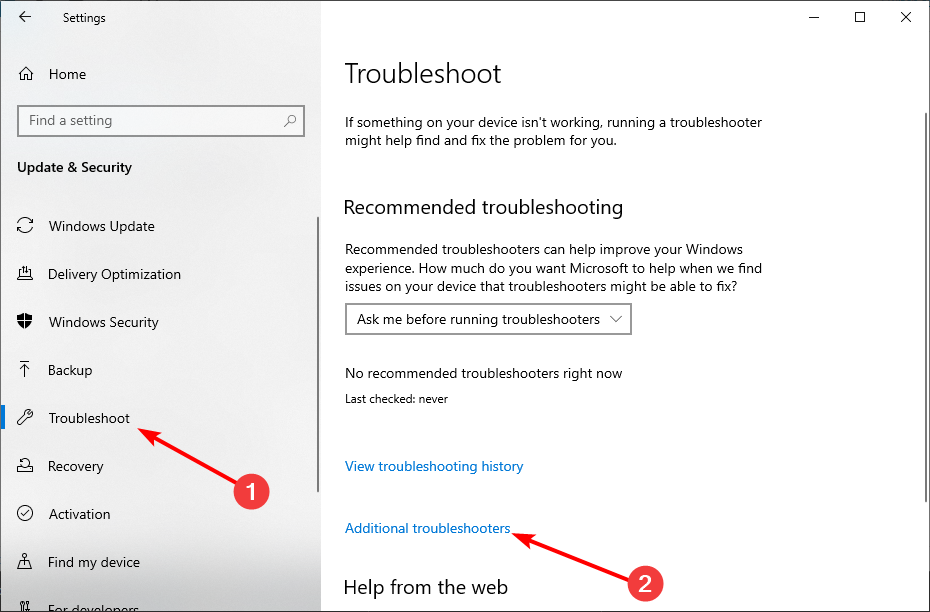
- Press the Windows key + I to open the Settings app and select Update & Security.

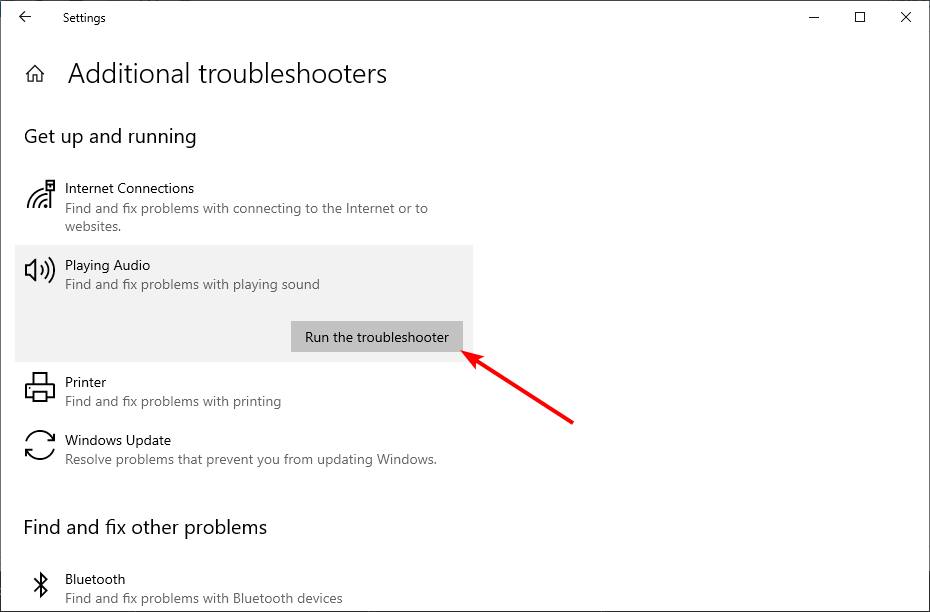
- Then click on Troubleshoot followed by Additional troubleshooters.
- Click Playing Audio, and select Run the troubleshooter.
- Follow further on-screen instructions and restart your computer.
Sometimes, it will be hard to trace the cause of the no speakers or headphones plugged in the issue. Running the troubleshooter will help diagnose it and recommend possible solutions.
7. Delete Windows updates
- Open Settings and click on Updates & Security.
- Select the View update history.
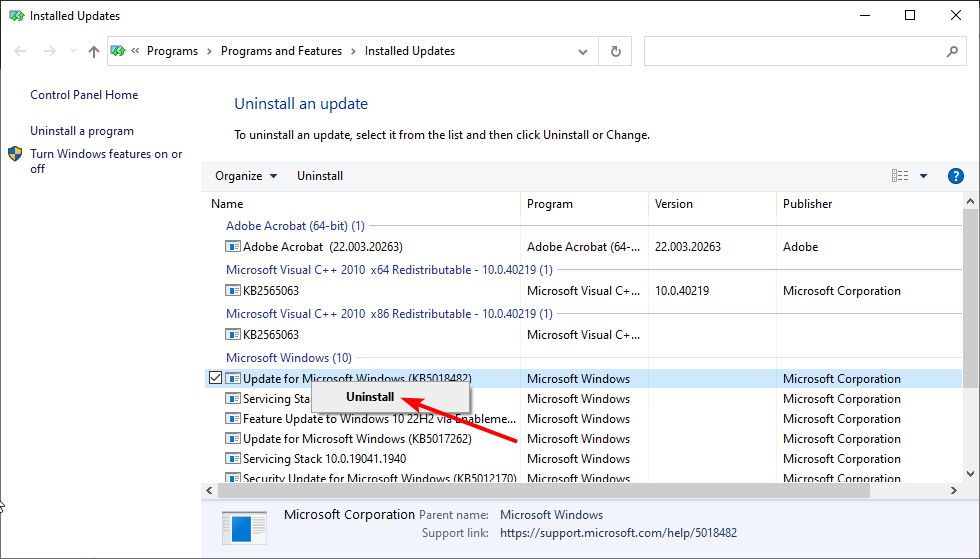
- Click on Uninstall updates.
- Find the troublesome update (usually the latest installed update on your computer), right-click it, and choose Uninstall.

- Reboot your computer.
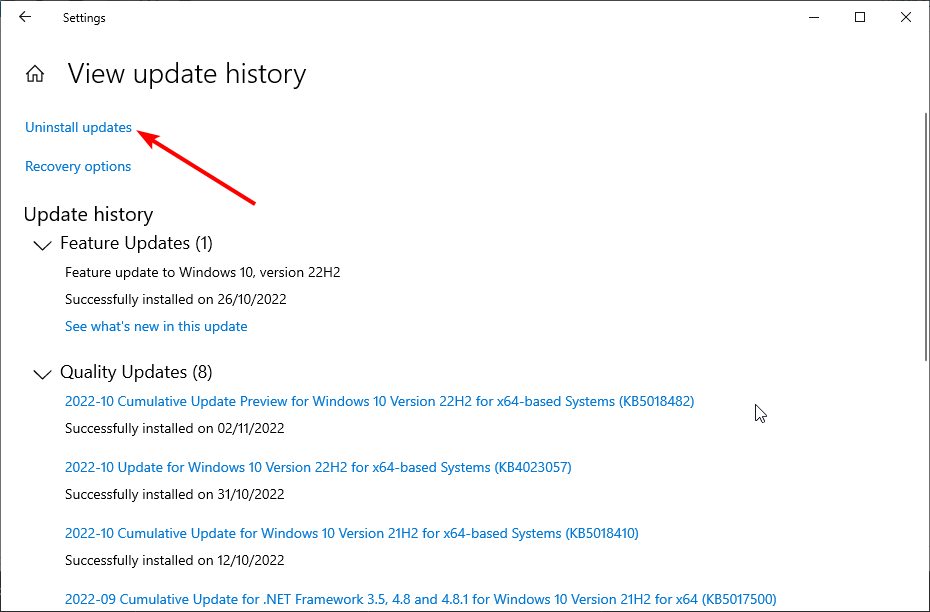
If you keep getting the audio peripheral doesn’t appear to be plugged in error, it might be the last installed Windows update messing with your PC. Therefore, you must remove and wait for newer patches to fix this issue.
That’s about it; we hope at least one of these solutions helped you resolve the annoying No speaker or headphones are plugged in problem in Windows 10.
If your headphones are causing sound problems and you are experiencing no sound, check out our article to solve the problem.
If you have any comments, questions, or suggestions, feel free to let us know in the comments below.
Still having issues? Fix them with this tool:
SPONSORED
If the advices above haven’t solved your issue, your PC may experience deeper Windows problems. We recommend downloading this PC Repair tool (rated Great on TrustPilot.com) to easily address them. After installation, simply click the Start Scan button and then press on Repair All.
![]()
Newsletter
No speakers or headphones problem might occur in Windows mainly due to bad sound driver or corrupt system files. The drivers’ issues range from an incompatible driver (after an update) to a corrupt sound driver. The issue arises (mainly after an OS or driver update) when there is no sound output from your system and when you check on the volume icon in the system tray which sometimes shows a red cross, you are shown no speakers or headphones message. The issue is not limited to a particular brand of sound cards or PCs.
There may be many reasons for which your system’s speakers or headphones might not work but the following can be easily considered as the main factors to cause the sound issue:
- Outdated, Incompatible, Corrupt Sound Driver: The system may show no speakers or headphones if its sound driver is not compatible after the last update with your system, is outdated, or corrupt and as a result, the OS fails to load its sound driver.
- Outdated PC’s OS: If your system’s OS is not updated to its latest build, then it may become incompatible with the sound driver and thus may fail to load the sound driver, resulting in the issue under discussion.
- Conflicting Applications: The audio problem may arise if another application on your PC is interfering with the execution of the sound driver and thus cause the error at hand.
- Outdated System BIOS: If your PC’s BIOS is outdated, then that may stop the sound devices from working as the system devices fail to properly communicate with each other, resulting in the audio problem.
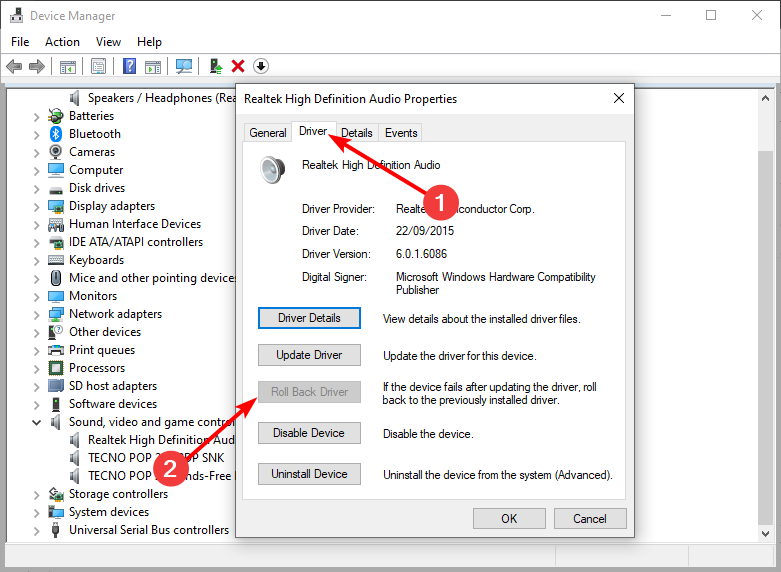
1. Roll Back the Sound Driver in the Device Manager
If the updated system’s sound driver is not compatible with your PC, then that could result in the issue at hand as the OS may fail to load the incompatible driver. In such a case, rolling back the system’s sound driver may clear the audio issue. Before moving on, check if trying another cable for the speakers (if the issue is occurring on the external speakers) clears the error. Also, check if your system’s audio works fine when booted through another OS USB like a live Ubuntu USB (if possible).
- Right-click Windows Start Menu Icon and Click Device Manager.

Open Device Manager Through the Quick Access Menu - Now expand the Sound, Video, and Game Controllers tab and double-click on your sound device like Realtek High Definition Audio.

Open Properties of the Sound Device in the Device Manager - Then head to its Driver tab and click on Roll Back Driver.

Roll Back the System’s Sound Driver - Now confirm to roll back the system’s sound driver and once done, restart your PC.
- Upon restart, check if the speakers or headphones are working normally. If so, then you may disable further updating of the driver, till the issue resolves.
- If that did not work, open Device Manager and expand the System Devices tab.
- Now check if rolling back the drivers (for those devices for which it is possible) of all the sound-related devices (like Intel SST) clears the issue.

Roll Back the Driver of the Sound-Related Devices in the System Devices Tab of the Device Manager


2. Update the PC’s Windows to the Latest Build
The system may show no speakers or headphones issue if the PC’s OS is outdated as it can make the OS incompatible with other essential modules (like the sound driver) and as a result, the OS fails to load the driver. Here, updating the PC’s Windows to the latest build may solve the sound problem.
- Click Windows Start Menu Icon, search for Check for Updates, and open the System Setting of Check for Updates.

Open Check for Updates on Windows - Now, in the right half of the window shown, click on Check for Updates, and if updates are available, download and install the updates.

Check for Windows Updates and Open Advanced Options - Once installed, restart your PC, and upon restart, open Windows Update in the PC’s Settings.
- Then open Advanced Options and select Optional Updates.

Open Optional Updates in the Windows Update - Now install all the optional updates as well and once done, restart your PC.
- Upon restart, check if the speakers or headphones are working fine.


3. Try the Windows Built-in Troubleshooter
A temporary glitch in the OS’s modules could result in the non-working of speakers or headphones and cause the issue at hand. In such a case, trying the Windows Built-in troubleshooter may solve the problem.
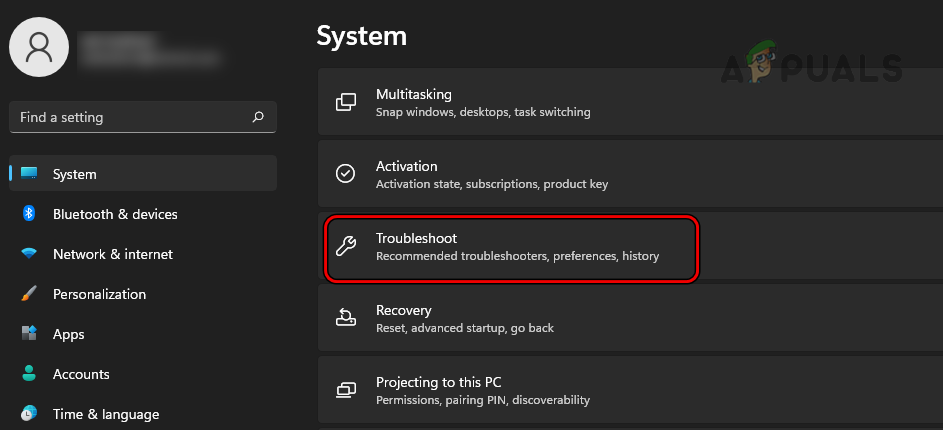
- Right-click Windows Start Menu Icon and select Settings.

Open Windows Settings Through the Quick Access Menu - Now, in the right pane of the System tab, select Troubleshoot and open Other Troubleshooters.

Open Troubleshoot in the Windows Settings - Then locate the Playing Audio troubleshooter and click on Run.

Open Other Troubleshooters in the Windows Settings - Now follow the prompts on the screen to complete the troubleshoot process and then apply the changes recommended by the troubleshooter.

Run the Playing Audio Troubleshooter in the Windows Settings - Then check if the system’s audio is working fine.


4. Set the Speakers or Headphones as the Default Output Device
If the speakers or headphones are not set as the default output device on your system, then the system might try to route the audio signal to the default output device (that is not present), thus causing the issue. In this scenario, setting the speakers or headphones as the default output device of the system may solve the problem.
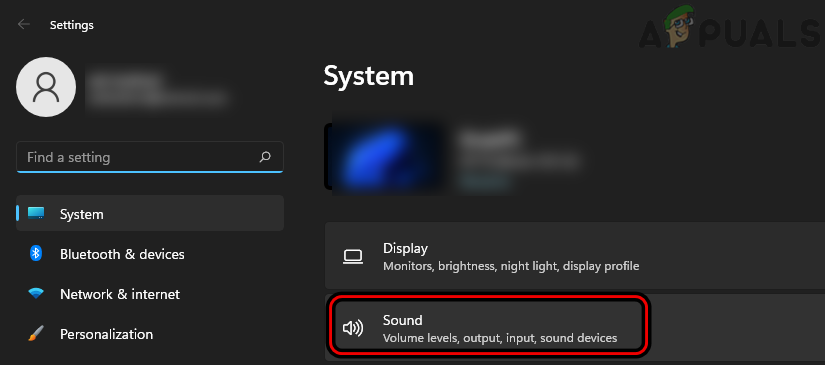
- Right-click Windows Start Menu Icon and open Settings.
- Now, in the right pane of the System tab, open Sound and scroll down till the end.

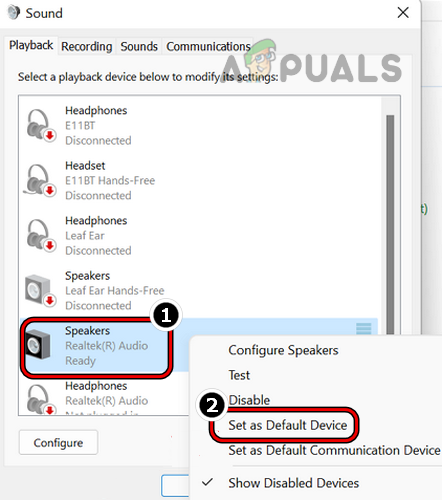
Open Sound in the System Tab of Windows Settings - Then open More Sound Settings and in the Sound Control Panel window, head to its Playback tab.

Open More Sound Settings in the Windows Settings - Now right-click on your speakers or headphones and select Set as Default Device.

Set the Speakers as the Default Device - Then apply the changes made and restart your system.
- Upon restart, check if the speakers or headphones are working fine.

5. Disable the Front Jack Detection in the OEM’s Utility (If Applicable)
If an OEM utility like Realtek HD Audio Manager is overriding Windows’ capability to detect a headphone or speaker to the system, then that could result in the no speakers or headphones issue at hand. In this case, disabling the Front Jack Detection in the OEM utility may clear the problem. For elucidation, we will discuss the process of disabling the Front Jack Detection in the Realtek HD Audio Manager.
- Launch the Realtek HD Audio Manager and head to its Speakers tab.
- Now, in the Speaker Configuration tab, click on the folder icon (under the Device Advanced Settings).
- Then, in the Connector Settings dialogue box, checkmark Disable Front Jack Detection and click on OK.

Disable Front Panel Jack Detection in the Realtek HD Audio Manager - Now restart your PC and upon restart, check if the speakers or headphones issue is cleared.

If the issue persists, check if inserting the speakers or headphones into another port or jack resolves the issue. If the system has only one jack, check if re-plugging the audio device (make sure the connector is properly seated, you may wiggle the connector a bit) clears the error.
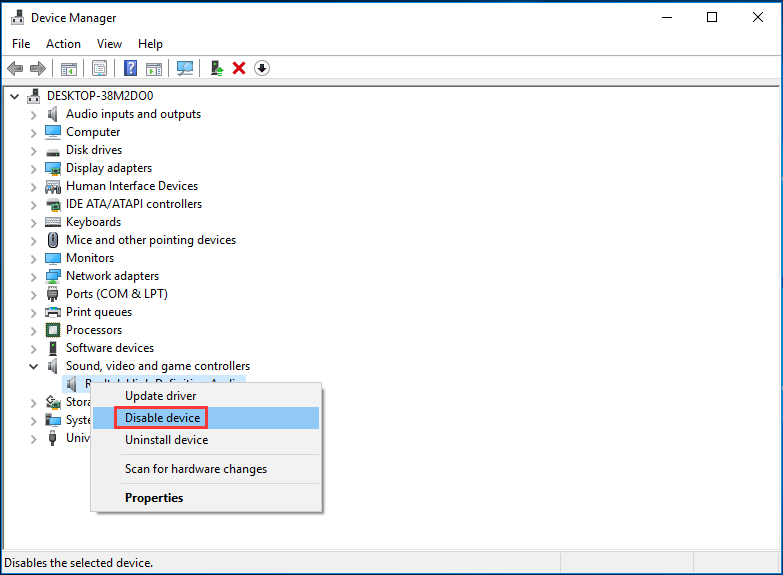
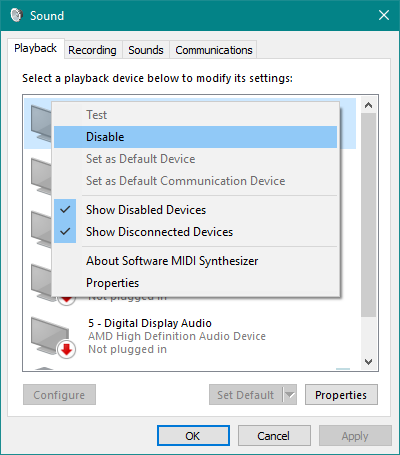
6. Disable and Enable the System’s Audio Device
A temporary glitch in the system’s modules could stop the audio device from working and cause the issue at hand. Here, disabling and enabling the system’s audio device may solve the problem.
- Right-click Windows Start Menu Icon and open Settings.
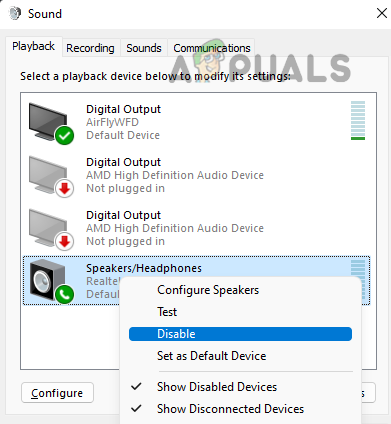
- Now, in the left pane, head to the System tab, and then, in the right pane, open Sound.
- Then, scroll down to the bottom and click on More Sound Settings.
- Now, in the Playback tab of the Sound control panel, right-click on the speakers or headphones and select Disable.

Disable the Speakers or Headphones in the Sound Control Panel - Then restart your PC and upon restart, enable the speakers or headphones in the Sound Control Panel and check if the issue is resolved.
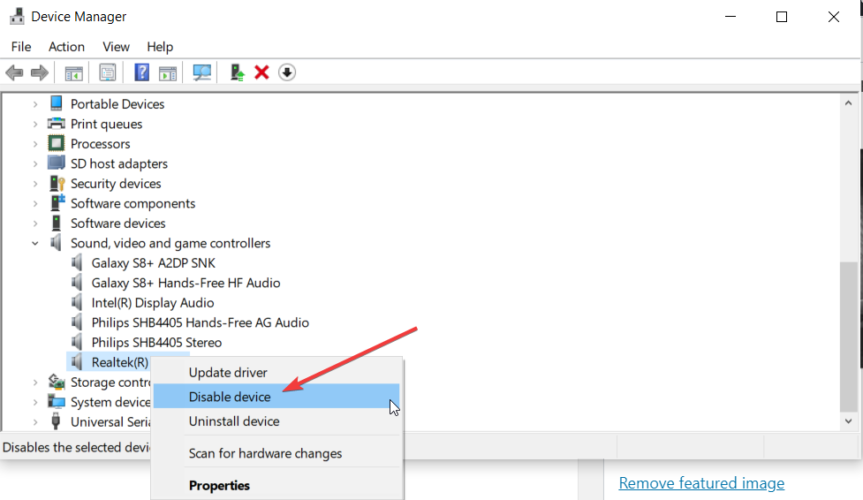
- If that did not work, right-click Windows and open Device Manager.
- Now expand the Sound, Video, and Game Controllers tab and right-click on your sound device.
- Then select Disable Device and restart your PC.

Disable the Sound Device in the Device Manager - Upon restart, enable the sound device in the system’s device manager and click on the Scan for Changes button.

Enable the System’s Sound Card in the Device Manager and Click on Scan for Hardware Changes - Afterward, check if the system’s sound has started to work fine.
- If not, check if disabling all devices (like HDMI) except the speakers or headphones in the Playback tab of the system’s Sound Control Panel resolves the issue.
- If that did not work, boot your system into the BIOS and head to the Advanced tab.
- Now open Onboard Devices Configurations and disable the audio device like Realtek HD Audio Controller.

Open Onboard Devices Configuration in the System’s BIOS - Then save your changes and boot your PC into Windows.

Disable HD Audio Controller in the System’s BIOS - Afterward, boot your PC into BIOS and enable the audio device.
- Now boot your PC into Windows and check if its audio issue is cleared.


7. Update the System’s Drivers to the Latest Builds
You may also encounter the sound issue under discussion if the system’s drivers are outdated as the sound driver becomes incompatible with the OS and fails to load with the OS. In this context, updating the system’s drivers (especially, the sound driver) to the latest build may solve the problem.
- Right-click on Windows Start Menu Icon and select Device Manager.
- Now expand the Sound, Video, and Game Controllers tab and right-click on your sound device.

Update the Driver of the Sound Device in the Device Manager - Then select Update Driver and select Search Automatically for Drivers.

Search Automatically for Drivers of the Sound Device - If a sound driver update is available, let it install.
- Now repeat the same to update all the other drivers as well (especially, sound-related devices in the System Devices tab).
- Once the system drivers are updated, restart your PC and upon restart, check if no speakers or headphones issue is resolved.
- If not, launch a web browser and head to the OEM website (like Dell or Nvidia).
- Now download the sound driver as per your system specs and then install it as an administrator.
- Once done, restart your system and upon restart, check if the speakers or headphones problem is solved.
- If the issue persists and your OEM (PC or sound device) has a driver management utility (like Dell Support Assistant), check if updating the system drivers through that utility resolves the issue.
- If that did not work, then open Device Manager and expand the Sound, Video, and Game Controllers tab.
- Now right-click on the sound device and select Update Driver.
- Then click on Browse My Computer for Drivers and select Let Me Pick from a List of Available Drivers on My Computer.

Open Browse My Computer for Drivers for the Sound Device - Now select another driver (except the current driver) e.g., High Definition Audio Device and click Next.

Open Let Me Pick from a List of Available Drivers on My Computer for the Sound Device - Then wait till the process completes and afterward, restart your PC.

Try Another Driver for the Sound Device - Upon restart, check if the sound issue is resolved.
- If not, then repeat the above steps but with a different driver at step 14 and keep repeating (do not forget to restart your system after each try), till the issue is resolved or no other driver is left to try.
- If the issue persists, then repeat steps 11 to 17 but for the sound-related devices in the System Devices tab of the Device Manager and check if any of the drivers for those devices resolves the issue.


8. Perform the Clean Boot of the System and Uninstall Conflicting Applications
The sound problem under discussion may arise if another application on the system is interfering with the system’s sound driver and not letting it execute. In this scenario, performing a clean boot of the system and uninstalling the conflicting application may solve the problem.
- Perform a clean boot of the system but make sure the sound-related services are not disabled during the process.

Clean Boot the Windows 10 PC - Then check if the system’s audio issue is resolved.
- If so, then one by one enable all the services/processes that were disabled earlier to find out the problematic application.
- Once the problematic application is found, you may keep it disabled at the system boot (if essential), otherwise may uninstall it.

The Realtek Audio Manager is a reported utility to cause the problem and if you have installed it (or a similar utility), then check if uninstalling it resolves the issue. For illustration, we will discuss the process of uninstalling the Realtek Audio Manager.
- Right-click Windows and open Apps & Features.

Open Apps & Features - Now locate the Realtek Audio Manager and expand its options.

Uninstall the Realtek Audio Manager - Then click on Uninstall and afterward, confirm to uninstall Realtek Audio Manager.
- Now follow the prompts on the screen to complete the uninstallation of the Realtek Audio Manager and once done, restart your system.
- Upon restart, check if the speakers or headphones are operating normally.


9. Enable the System Services Through the Command Prompt
If the services essential for the operation of the audio device are not enabled, then that could result in the problem at hand. In this case, enabling the system services through the Command Prompt may solve the problem.
- Click Windows Start Menu Icon, search for Command Prompt, right-click on the result of the Command Prompt, and in the sub-menu, select Run as Administrator.

Open Command Prompt as Administrator - Now enter the following and hit the Enter key:
net localgroup Administrators /add networkservice
- Then enter the following and hit the Enter key:
net localgroup Administrators /add localservice

Enable the Sound Related Services Through the Command Prompt - Now close the Command Prompt window and restart your PC.
- Upon restart, check if the system’s sound issue is resolved.


10. Update the PC’s BIOS to the Latest Build
You may encounter the speakers or headphones issue if the PC’s BIOS is outdated as it can make the different system devices incompatible with each other. In this context, updating the PC’s BIOS to the latest build may clear the audio issue.
Warning:
Advance at your own risk and with extreme caution as editing the PC’s BIOS settings or updating the BIOS is a skilled job. If not done properly or something goes wrong (like a sudden power failure during the BIOS update process), you may brick your system and the data may be lost.
- Update the PC’s BIOS as per the manufacturer:
- Dell
- HP
- Gateway
- Lenovo
- MSI
- Once the PC’s BIOS is updated, check if the speakers or headphones are functioning properly.
11. Reinstall the Sound Driver
The no speaker or headphones issue might emerge if the system’s sound driver is corrupt and has become incompatible with the OS. In this case, reinstalling the system’s sound driver may solve the problem.
- Firstly, download the latest sound driver from the OEM website (like Dell).
- Now, right-click Windows and open Device Manager.
- Then expand the Sound, Video, and Game Controllers tab and right-click on your audio device.

Uninstall the Audio Device from the Device Manager - Now select Uninstall Device and checkmark Attempt to Remove the Driver of This Device.

Checkmark Attempt to Remove the Driver of This Device and Click on Uninstall - Then click on Uninstall and once uninstalled, restart your PC.
- Upon restart, if the PC’s windows try to install a generic sound driver, let it install and then check if the sound issue is resolved.
- If not, launch the downloaded sound driver as an administrator and follow the prompts on your screen to install the driver.
- Once installed, restart your PC, and upon restart, check if the system’s speakers or headphones are working fine.
- If that did not work, check if reinstalling the 64-bit version of the sound driver resolves the issue.
- If the issue persists, check if reinstalling the sound driver in the compatibility mode solves the problem.


12. Edit the System’s Registry to Allow the User Full Control Over the Audio Service
If none of the above worked for you, then editing the system’s registry to allow the user full control over the audio service (especially, on a domain-joined computer) may solve the problem. Before proceeding, do not forget to backup your system’s registry (just in case…).
Warning:
Proceed at your own risk and with utmost care as editing your system’s registry is a skillful job. If not done properly, you may cause undying damage to the system, OS, and, data.
- Click Windows Start Menu Icon, search for Registry Editor, right-click on the result of the Registry Editor, and select Run as Administrator.

Open Registry Editor as Administrator - Then navigate to the following path:
ComputerHKEY_LOCAL_MACHINESOFTWAREMicrosoftWindowsCurrentVersionMMDevices
- Now, in the left pane, right-click on the MMDevices and select Permissions.

Open Permissions of the MMDevices Registry Key - Then, in the Group or User Names, select Audiosrv, and in the Permissions of Audiosrv box, checkmark the Full Control box.

Allow the Users Full Control Over the Audiosrv - Now click on Apply/OK and restart your PC.
- Upon restart, check if the system’s audio is operating normally.


13. Remove the Conflicting Windows Update
If the PC’s latest Windows Update is conflicting with your system’s sound hardware, then that could also result in the audio issue under discussion. Here, removing the conflicting Windows update may solve the problem.
- Right-click Windows and open Settings.
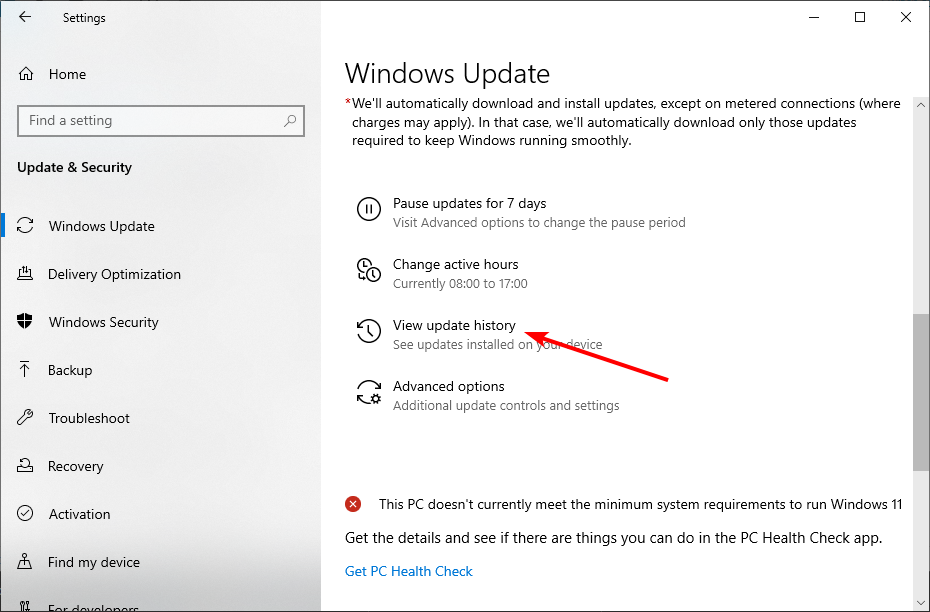
- Now, in the left pane, head to the Windows Update tab, and the right pane, open Update History.

Open Update History in the Windows Update Tab - Then scroll down to the bottom and under Related Settings, open Uninstall Updates.

Open Uninstall Updates in the Windows Settings - Now select the latest Windows Update (you can find it through the Installed On column) and click on Uninstall.

Uninstall the Conflicting Windows Update - Then follow the prompts on the screen to uninstall the latest Windows update and afterward, restart your PC.
- Upon restart, check if the system’s audio is working fine. If so, then may defer the problematic update.


14. Perform an In-Place Upgrade of the System
The speakers or headphones issue might also occur if the system’s Windows is corrupt and due to this corruption, the OS fails to load the sound driver. Here, performing an In-place upgrade of the system may solve the problem.
Before proceeding, do not forget to back up the system and create a restore point. Also, ensure the system drive has enough free space to complete the installation (for 64-bit: 32 GB and 32-bit: 20GB). If the system gets interrupted during the upgrade process, then you may remove any 3rd party security application (at your own risk) and disable the BIOS’s Secure Boot.
- Launch a browser and steer to the Windows 10 ISO download page or Windows 11 ISO download page (if the PC’s hardware is compatible).

Click Download Now under Create Windows 11 Installation Media - Then scroll down and in the create Windows Installation Media (ISO) section, click on the Download Tool Now.
- Once downloaded, launch its setup file as administrator and follow the prompts on your screen to complete the process. Make sure to select the option of Keep Windows Settings, Personal Files, and Apps.

Keep Windows Settings, Personal Files, and Apps - Once done, reboot your system and upon reboot, hopefully, the speakers or headphones would be working fine.


If the issue persists, then check if performing a system restore resolves the audio issue. If that did not work or is not an option, then you may reset your PC to the factory defaults or perform a clean installation of Windows on your system to clear the sound problem. If that did not work, then the sound card might be faulty and you may need a new sound card.
-
MiniTool
-
MiniTool News Center
- Here’s How to Fix No Speakers or Headphones Are Plugged in Error
By Vera | Follow |
Last Updated September 23, 2021
![]()
How do you fix no speakers or headphones are plugged in Windows 10? If you are bothered by this error, you may ask this question. It is easy to fix as long as you follow these solutions mentioned in this post by MiniTool Solution. Now, let’s see them.
No Speakers or Headphones Are Plugged in Windows 10
If you want to hear music, videos, and other sounds on your computer, you need a device that can be used to output audio. It can be speakers, headphones, or earbuds. However, you often encounter an issue – Windows 10 not recognizing your audio device.
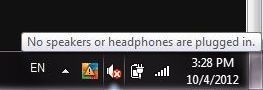
From the computer taskbar, you can see a volume icon and there is a red X symbol next to it. This means your device is not working. That is, you cannot hear any audio output from your machine. When putting your mouse cursor on the icon, it says “No speakers or headphones are plugged in”.
The reasons for this error may be faulty speakers or headphones, disabled audio card, outdated audio driver, etc. This issue cannot be solved by a reboot or unplugging and plugging the device. But you can try these methods below to easily get rid of the issue.
Tip: Here is a related article you may be interested in — 5 Tips to Fix Computer Speakers Not Working Windows 10.
No Speakers or Headphones Are Plugged in Windows 10 Fix
Use Your Audio Device in Another Computer
The first thing you should do is to check if your speakers or headphones are faulty. You can plug your device to the audio jack of another computer or even a smartphone or use a different jack on your machine.
If the audio device works well, the issue is not related to the device and you need to try the following ways to fix the Windows 10 speakers not plugged in issue. If the audio device cannot work anywhere else, it is faulty and you should purchase one.
Run the Sound Troubleshooter
Windows 10 comes with many useful troubleshooters and one is used to solve audio and sound problems. Although it is not guaranteed that this method is useful to fix the issue, you can also have a try.
Step 1: Press Win + I keys to open Windows Settings and click Update & Security.
Step 2: Under the Troubleshoot page, click Run the troubleshooter under the Playing Audio section.
Step 3: Follow the wizards on the screen to finish the fix.
Re-enable Your Sound Card
To remove Windows 10 no speakers or headphones are plugged in, you can disable and then re-enable your sound card.
Step 1: Right-click the Start button and choose Device Manager.
Step 2: Expand Sound, video, and game controllers and right-click your sound card to choose Disable device.
Step 3: Wait a few seconds and enable your sound card.
Step 4: Restart the PC and see if the speakers or headphones not plugged in Windows 10 issue is solved.
Update the Sound Card Driver
If no speakers or headphones are plugged in after trying the above ways, update the sound card driver in Device Manager by following these steps below.
Step 1: Right-click your sound card in Device Manager and choose Update driver.
Step 2: Let Windows search for updated driver software. If it finds one, it will download and install it on your computer.
Alternatively, you can download a sound driver from the manufacturer’s website and install it on your PC.
Disable HDMI Sound
If you are using an HDMI cable to distribute audio, disable the HDMI sound so that you can use headphones or speakers.
Step 1: Right-click the volume icon from the taskbar and choose Sound.
Step 2: Go to the Playback tab, right-click the audio device you are using and choose Disable.
Disable Front Panel Jack Detection
If you are using a Realtek sound card, you can disable front panel jack detection in its manager. This is helpful to fix the unplugged speakers or headphones error.
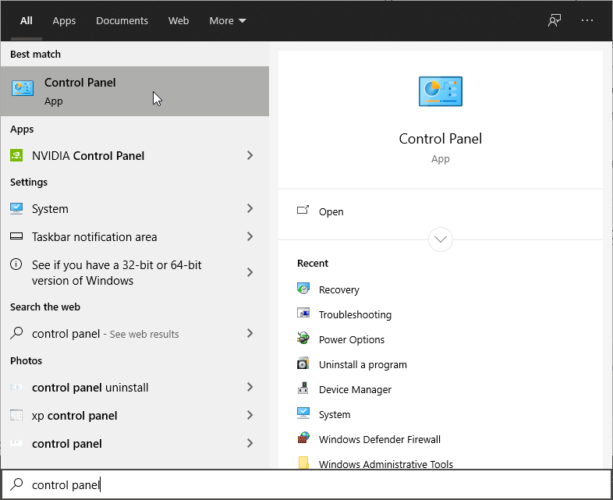
Step 1: Open Control Panel and go to Hardware and Sound > Realtek HD Audio Manager.
Step 2: Go to Connector settings and turn off the option – Disable front panel jack detection.
Tip: If your laptop cannot recognize your headphones, you can get solutions from this post — Is Your Laptop Not Recognizing Headphones? Full Fixes for You!
Final Words
No speakers or headphones are plugged in? If your Windows 10 PC is having this error, now you can try these solutions and easily get rid of the audio device unplugged in issue.
About The Author

Position: Columnist
Vera is an editor of the MiniTool Team since 2016 who has more than 5 years’ writing experiences in the field of technical articles. Her articles mainly focus on disk & partition management, PC data recovery, video conversion, as well as PC backup & restore, helping users to solve some errors and issues when using their computers. In her spare times, she likes shopping, playing games and reading some articles.
Содержание
- Headphones not working / detected in Windows 10 [Easy Fix]
- How do I fix headphones if not recognized in Windows 10 ?
- 1. Update audio/sound driver
- DriverFix
- 2. Disable front panel jack detection
- No speaker or headphones are plugged in [FULL GUIDE]
- How can I fix problems with speakers and headphones in Windows 10?
- 1. Update the Audio driver
- Update drivers automatically
- DriverFix
- 2. Re-enable your sound card
- 3. Re-enable disconnected devices
- 4. Disable the HDMI sound
- 5. Disable the Front Panel Jack detection
- Run a System Scan to discover potential errors
- 6. Run Sound Troubleshooter
- 7. Restart the Windows Audio service
- 8. Perform an SFC scan
- 9. Delete Windows updates
- 10. Perform a System Restore
- 11. Try your headphones/speaker on another computer
- 12. No sound in specific apps
Headphones not working / detected in Windows 10 [Easy Fix]

- Sometimes, Windows 10 won’t recognize the headphones so check if they are connected properly.
- Headphones might not be detected in Windows 10 because of a problematic driver.
- A simple solution is to update the audio driver by using a dedicated software.
- Disabling the front panel jack detection can also solve this problem so try this fix.
Have you ever connected your headphones ready to tune to your favorite jam, or privately watch a movie, then you got the message Windows 10 won’t recognize headphones?
It can be frustrating and annoying. However, there are various solutions to resolving the issue and get you back on track.
How do I fix headphones if not recognized in Windows 10 ?
1. Update audio/sound driver
1.1. Update your audio/sound driver manually
- Type control in Windows search and click on Control Panel from the results.

- Click on Sound.
- Go to the Playback tab.
- Select your headphones and click on Properties.
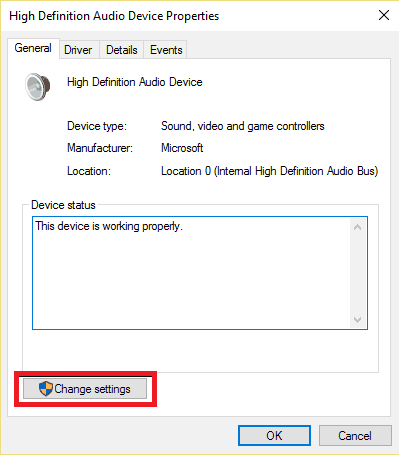
- Go to Controller Information then click on Properties button
- Click Change Settings (this may require administrator permission).
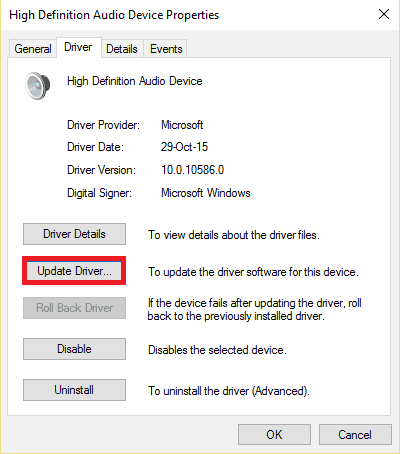
- Go to Driver tab.
- Select Update Driver.
- Let the update download automatically.
- Once this is complete, plug in your headphones to check whether they’ll work.
1.2. Update audio/sound driver using a utility tool
Downloading drivers manually is a process that carries the risk of getting the wrong driver installed, which may lead to serious malfunctions.
The safer and easier way to update drivers on a Windows computer is by using an automatic tool such as the one recommended below.
This tool can get the job done in just a few seconds and clicks because it will repair and update your drivers automatically.
DriverFix
2. Disable front panel jack detection
- Press the Windows key + R to start the Run application.
- Type Control Panel then press enter to open it
- Select Sound.
- Find Realtek HD Audio Manager then click on it
- Go to Connector settings.
- Click Disable front panel jack detection to check the box.
This is one of the simplest ways to resolve the Windows 10 won’t recognize headphones issue.
If you have the Realtek software installed on your computer or laptop, follow the steps above to disable the headphone’s jack detection.
Try on your headphones again to see whether this solution works for you.
No speaker or headphones are plugged in [FULL GUIDE]
- For some users, Windows 10 is not recognizing audio devices plugged in the PC, especially after a Windows 10 update.
- There are many causes for this problem but most of them are pretty easy to fix by using our guide.
- For the most comprehensive collection of articles on Windows, check our Windows 10 page.
- Visit our Tech Troubleshooting Hub for plenty of solutions to any other PC problems.

- Download Restoro PC Repair Tool that comes with Patented Technologies (patent available here).
- Click Start Scan to find Windows issues that could be causing PC problems.
- Click Repair All to fix issues affecting your computer’s security and performance
- Restoro has been downloaded by 0 readers this month.
There is a common problem circulating on the web about Windows 10 not recognizing audio devices plugged in the machine.
There are many things that can cause this problem depending on your system. However, most of them are fairly easy to fix.
We will go through the most common root-causes of the problem and figure out a working solution for these types of issues.
The majority of people complain that after they upgraded their OS to Windows 10 they lost all sound, their devices not being recognized anymore.
There are more than a few people that are still looking for a working solution, not being able to resolve the issue by restarting the computer or plugging the devices in and out.
Along with the No Speaker or Headphones are plugged in problem, you might also encounter some more sound-preventing issues like:
- No speakers or headphones are plugged in Windows 10 – A common issue in Windows 10.
- The speaker headset or headphone is unplugged Windows 10 – A variation of the first issue in Windows 10.
- Audio device not plugged in Windows 10 – The solutions from this article will also solve this issue.
- Headphones not plugged in Windows 10 – Occurs when you’re not able to connect your headphones to a computer running Windows 10.
How can I fix problems with speakers and headphones in Windows 10?
- Update the Audio driver
- Re-enable your sound card
- Re-enable disconnected devices
- Disable the HDMI sound
- Disable Front Panel Jack detection
- Run Sound Troubleshooter
- Restart Windows Audio service
- Perform an SFC scan
- Delete Windows updates
- Perform a System Restore
- Try your headphones/speaker on another computer
- No sound in specific apps
1. Update the Audio driver
- Right-click the Start button and select Device Manager
- Find your audio device, right-click it, and select Update driver.
- If there are any updates, the installation wizard will install them automatically.
- Restart your computer
Update drivers automatically
 Downloading and updating drivers manually can permanently damage your system by installing the wrong versions. In order to prevent that, we strongly suggest to do it automatically by using DriverFix.
We have to mention that this tool will also prevent any damage on your PC by downloading and installing the wrong driver versions.
After several tests, our team concluded that this is the best-automatized solution. Below you can find a quick guide on how to do it using DriverFix.
-
- Download and install DriverFix.
- Running it will start scanning your PC for outdated drivers automatically. The tool will confront the driver versions against its cloud database of over 18 million drivers and recommend proper updates.
- In the end, you will get a report on all problem drivers found on your PC.
- Look at the list and check the boxes to the left of the drivers you want to install. You can also check the Select All box from the top and install all of them.


DriverFix
2. Re-enable your sound card
- Go to Search, type devicemngr, and open Device Manger
- Expand Sound, video and game controllers
- Right-click your sound card, and go to Disable
- Restart your computer
- Go back to Device Manager, and Enable your sound card once again
- If you can hear the sound, you problem is resolved
Note: If you’re having any sound card issues, solve them quickly with the useful solutions from this expert guide.
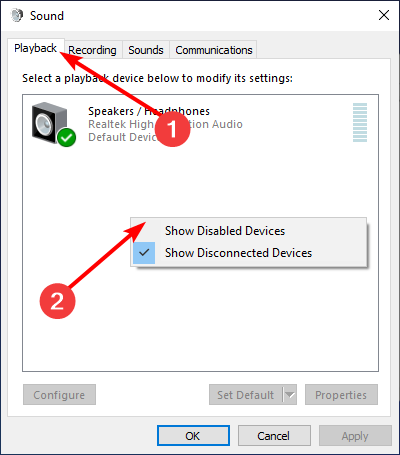
3. Re-enable disconnected devices
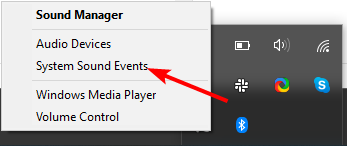
- Right-click the sound icon in the Taskbar
- Click on Playback Devices
- Right-click anywhere under the Sound window and choose Show Disabled Devices
- If you device is disabled, simply right-click it and select Enable
- Restart your computer
4. Disable the HDMI sound
- Right-click the sound icon in the taskbar
- Click Playback Devices
- Right-click the High Definition Audio Device you’re currently using, and select Disable
- Restart your computer
Note: If your HDMI isn’t showing up in playback devices, take a look at this guide and solve the problem easily.
5. Disable the Front Panel Jack detection

- Go to Search, type realtek hd audio manager, and open Realtek Audio HD Manager
- Go to the Speakers tab, and click the folder under Device Advanced settings
- Select Disablefrontpaneljackdetection
- Restart your computer
Run a System Scan to discover potential errors


6. Run Sound Troubleshooter
- Go to the Settings app.
- Click on the Update & Security, then click on Troubleshoot.
- Click Playing Audio, and select Run the troubleshooter.
- Follow further on-screen instructions.
- Restart your computer.
Note: If you’re having trouble opening the Setting app, take a look at this comprehensive article to solve the issue.
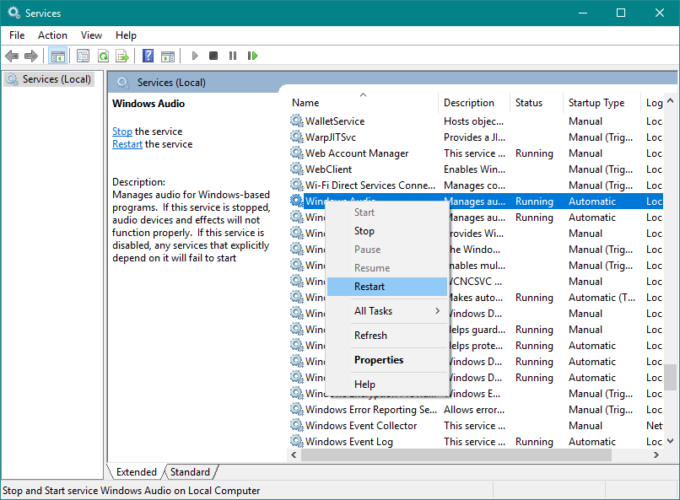
7. Restart the Windows Audio service
- Go to Search, type services.msc , and open Services.
- Find the Windows Audio service.
- If this service is not enabled, right-click it, and select Start. If it’s enabled, right-click it and select Restart.
- Wait for the process to finish and restart your computer.
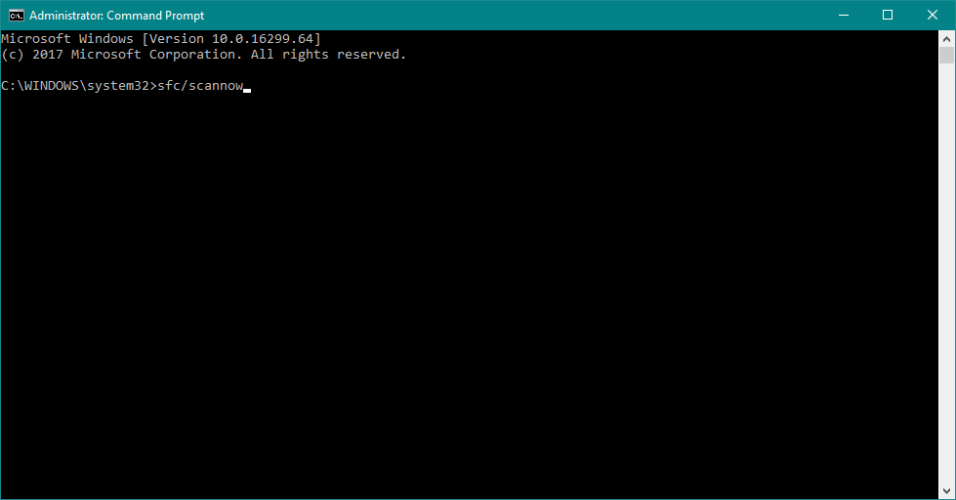
8. Perform an SFC scan
- Type cmd in Search, right-click Command Prompt and select Run As Administrator
- Enter the following command, and press Enter: sfc/scannow
- Wait for the process to finish
- Restart your computer
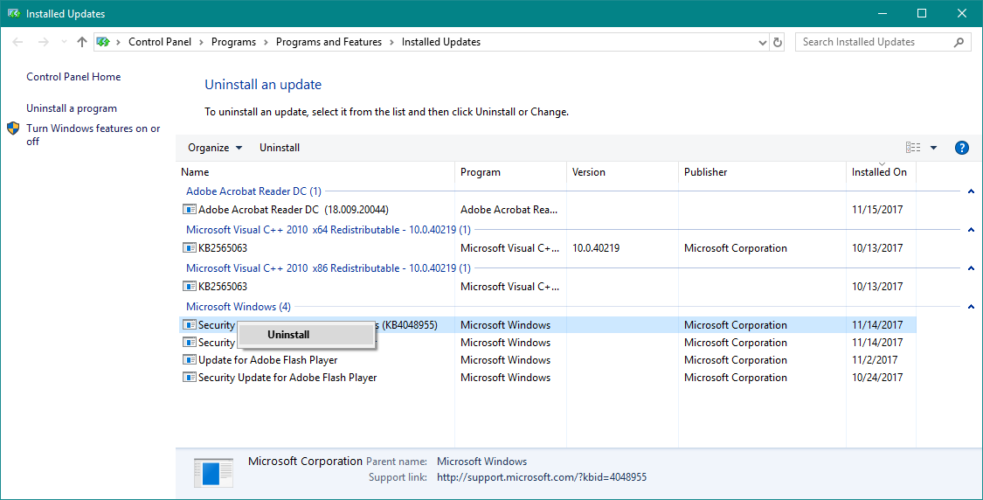
9. Delete Windows updates
- Open Settings, click on Updates & Security , and then on Windows Update
- Go to Update history and click on Uninstall updates
- Find the troublesome update, (it’s usually the latest installed update on your computer) right-click it, and go to Uninstall
- Reboot your computer
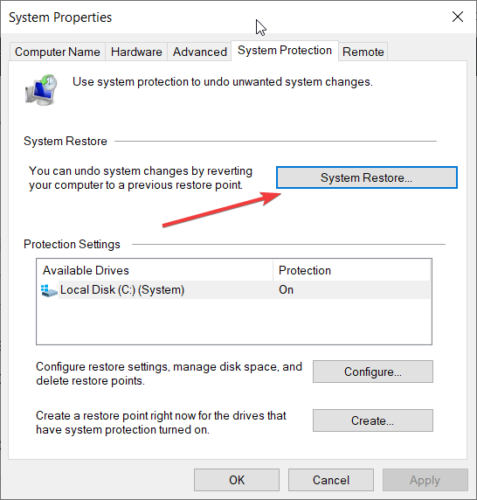
10. Perform a System Restore
- Open Control Panel
- Go to System and Security >System.
- Under the Control Panel Home menu, click System protection.
- Click System Restore.
- Choose a Restore point.
- Follow further on-screen instructions.
- Once you initiate the process, your computer will restart, and System Restore will get it to the selected previous state.
Note: If you can’t open Control Panel on Windows 10, take a look at this step-by-step guide to find a solution.
If you’re interested in more info on how to create a restore point and how would that help you, check out this simple article to find out everything you need to know.
11. Try your headphones/speaker on another computer
 And finally, if none of the solutions listed above worked, try your headphones or speakers on another computer. If you keep receiving the same error, you most likely have a hardware problem.
So, it’s time to get new speakers/headphones!
12. No sound in specific apps
 If the issue presents itself only in some applications make sure the volume is not set to minimal or disabled from the application option menu or the Windows 10 sounds menu.
Windows 10 has specific sound volume for each of the applications opened on your machine, and to access those you need to tap or left-click the speaker icon on the right side of the taskbar and tap or click the mixer option on the bottom of the window.
That’s about it, we hope at least one of these solutions helped you resolve the annoying No speaker or headphones are plugged in problem in Windows 10.
For any other sound problems in Windows 10, check out this excellent guide to fix it.
If you have any comments, questions, or suggestions, feel free to let us know in the comments down below.
Wondering how to Fix no Audio Output Device is Installed? Don’t bother because you’ve landed on the right page. Here we will discuss the best ways to resolve no audio devices installed.
When you see a Red Cross sign next to the audio icon in the system tray, you know you cannot listen to any sound on your computer. And imaging life without music, & melodies isn’t a pleasant sight.
With that being said, if you have run into an error that says, No Audio Output Device is installed. We are here to help. This troubleshooting guide will explain the best ways to fix no audio output device installed in Windows 10.
Read Also: How To Fix USB Ports Not Working Issue in Windows PC
Reasons For No Audio Devices Are Installed Windows 10, error
Pinpointing one specific reason for the audio output device not working isn’t easy. However, after researching why people face this problem, we were able to sort out some common causes. Here’s the list of them:
- Corrupt Windows Update.
- Missing, outdated, or corrupt audio drivers.
- Disabled playback device.
- An unpaired wireless device with a PC.
- Playback device connected to the incorrect port.
Now that we know what can lead to no audio device error, let’s learn how to fix it in Windows 10.

Ways to Fix “No audio Output Device is installed” Error
Fix 1. Restart the system
Many times when you change hardware configurations, the audio device might stop working. To avoid this, never attach any device while the PC is booting up. However, if you did connect a peripheral when the Windows wasn’t fully loaded, simply restart the device. This should help fix no audio devices are installed.
Fix 2. Run Audio Troubleshooter
To resolve various problems, Windows 10 offers an in-built troubleshooter. Using it, you can get rid of audio-related issues. To use it, follow the steps below:
1. Right-click the volume icon in the system tray
2. Select Troubleshoot sound problems from the context menu

3. Wait for the troubleshooter to detect the problem with the audio device.

4. If you have multiple devices, select the audio device you want to troubleshoot > Next

Note: Ensure the device to be tested is correctly plugged in.
5. If any problems are detected, they will be fixed. Also, the troubleshooter will give tips to improve the system’s sound.
6. Once all the suggested changes are made, test the audio. It should work, and you should no longer face the, no audio output device is installed, error.
Fix 3. Update outdated audio drivers
To avoid facing common Windows errors, keep drivers updated. This enables the system to work properly and support third-party devices. Usually, Windows 10 has no audio output device installed, which is caused by defective or obsolete drivers.
Note:- You can update drivers both manually and automatically. The former is time-consuming and risky while the latter is easy, effective, and trustworthy.
To manually update the driver, you will need to visit the manufacturer’s website and download the correct driver compatible with your operating system and the device you are using. If you are a beginner or don’t like looking for the right driver yourself, we have an easy way. Try using Advanced Driver Updater, a popular driver updater with a huge database of drivers. Using it in no time, you can scan the system for outdated drivers and get the latest and most compatible driver installed.
Related: Advanced Driver Updater Review
Recommended – Automatically Update Drivers
To automatically update the driver, follow the steps below:
1. Download and install Advanced Driver Updater
2. Launch the driver updating tool.
3. Click Start Scan Now to scan the system for outdated drivers

4. Wait for the scan to complete.

5. Once you have the scan result, click Update driver next to Audio driver and update it and also update all outdated driver at once..

Note : Using the Pro version of Advanced Driver Updater by clicking Update All, you can update all outdated drivers at once. However, if you are using the trial version, you will have to update each driver individually. Furthermore, the paid version of the product comes with a 60-day money-back guarantee and trained technical support.
6. After updating the driver restart the system to apply changes, the audio should now be working.
Fix 4. Disconnect and reconnect the external output device
Are you using an external audio output device? Try detaching it from the system restart the PC and reconnect it. This should help fix no audio output device installed in Windows 10.
If this doesn’t help, move to the next step.
Fix 5. Update Windows
Updating Windows can sometimes destroy the audio device, but it can also fix it. As a result, we recommend upgrading Windows to see if it resolves the issue of no audio output device installed. To do so, take these steps:
1. Press Windows + I to open Settings
2. Click Update & Security > Windows Update > Check for updates
3. Let Windows look for available updates, if available you will get Download & install option, click on it to update Windows.
In addition to the above steps, to install driver updates click the View optional updates option, if you see it. See if you can find any update related to the audio device and download and install it.

Note : You need an active internet connection to update Windows.
Fix 6. Use add legacy hardware option
The error No audio output device is installed Windows 10 can be fixed via Device Manager. To do so, follow the steps below:
1. Press Windows + R to open the Run window
2. Type devmgmt.msc > ok and open Device Manager
3. Look for the Sound, video, and game controllers section and double-click it
4. Thereafter, click Action from the top bar and select Add legacy hardware. As shown in the screenshot below:

5. This will open Add Hardware Wizard, click Next

6. Select Search for and install hardware automatically > Next.

7. Click Next if you know the hardware model, you want to install.

8. In the consecutive window scroll down and find Sound, video, and game controllers > Next.

9. Choose the manufacturer, model number of the device > Next > Finish

10. Go back to Device Manager, right-click your audio device > Enable.
Now check if the audio should be working, if not uninstall the audio driver and restart the system to fix no audio devices are installed. To learn how to do that, move on to the next step.
Must Read : Windows 11 Keeps Crashing? How To Fix It?
Fix 7. Uninstall the audio driver
Sometimes, even after updating to the latest driver using Add legacy hardware the issue with no audio output device is installed Windows 10 persists. In such a case uninstalling the driver is recommended. To do so, follow the steps below:
1. Press Windows + R to open the Run window
2. Type devmgmt.msc > Ok to open Device Manager
3. Look for Sound, video, and gamer controller
4. Double click to expand it
5. Right-click the audio device you are using > Uninstall Device

6. You will now see a warning message click Uninstall to remove the audio device.

7. Similarly, double click Audio inputs and outputs > select the device you are using > right-click > Uninstall device > confirm the action
8. Restart the system to apply changes. The audio problem should now be fixed.
Fix 8. Check hardware issues
Often, when facing no audio output device is installed on Windows 10, we forget to check for the proper cable connection.
Therefore, if nothing has worked so far please check if all the wires are properly connected. Also if it is a wireless device it should be attached.
Fix 9. Re-enable Sound Card
Another way to fix no audio issue on Windows 10 is to disable and re-enable the sound card.
1. Open Device Manager.
2. Expand Sound, video and game controllers > right-click audio device > Disable device.

3. Wait for a few seconds and then enable the Sound card.
4. Reboot the PC, and see if this fixes the issue or not.
Fix 10. Disable HDMI Sound
If you use an HDMI cable for audio try disabling it and use the headphones or speakers.
1. Right-click the Volume icon present in the system tray > select Sounds.

2. Click the Playback tab > right-click the audio device you are using > Disable.

Fix 11. Replace defective sound card
If none of the above solutions work, there are chances that the sound card is defective. We suggest you get it checked and fix no audio output device installed in Windows 10.
Additional Tip for Realtek Sound Card Users
If the sound card you are using is from Realtek, to fix the issues, try disabling front panel jack detection. This helps fix unplugged headphones and speaker errors.
1. Launch Control Panel > go to Hardware and Sound > Realtek HD Audio Manager.
2. Click Connector settings and uncheck the box next to Disable front panel jack detection. 
Frequently Asked Questions
1. Why does my computer say no audio output device installed?
The primary reason for “no audio output device is installed in Windows 10” is corrupt, missing, or outdated drivers. The best way to fix this error is to update sound drivers. You can do it manually, but it will be time-consuming and need technical skills. However, if you want to save yourself from going through this daunting task can use Advanced Driver Updater.
2. How do I reinstall the audio output device?
To reinstall the audio output device follow these steps:
1. Press Windows + R and open the Run window.
2. Type devmgmt.msc > press Enter key.
3. Scroll down and look for Sound, video and game controllers.
4. Double click on the category > right-click on the audio device > Update driver.
5. Choose Search automatically for updated driver software and check for an available update.
6. Wait for it to install and restart your PC.
3. How do you fix no speakers or headphones are plugged in Windows 10?
To fix no speaker or headphones are plugged in Windows 10, error, follow these steps:
The first thing you should do to fix the issue is to check the headphones and speakers. If they are faulty you know what to do. To check the audio device, connect it with another computer and see if they work. If they are working fine, try the following fixes.
1. Restart PC
2. Run the built-in Windows Audio Troubleshooter.
3. Re-enable the sound card.
4. Update the Sound card driver.
5. Disconnect and re-connect the external output device.
6. Disable HDMI.
7. Update Windows.
8. Use Add legacy hardware option.
9. Disable & re-enable the audio device.
10. Uninstall and re-install the Audio device.
11. Disable front jack detection (Realtek Sound Card)
4. Why my PC Cannot detect speakers?
If you are unable to see speakers in the device list, there’s a possibility that it is disabled. To fix this, right-click on the blank area > select Show disable devices.

Next, right-click the speaker > Enable.

If this doesn’t help try updating the sound driver.
5. How do I get Windows 10 to recognize my speakers?
1. Right-click the sound icon in the system tray
2. Select Sounds.
3. Click the Playback tab > select the speaker you want to use > click Set Default > Apply > Ok.

6. How do I install system speaker drivers?
The easiest way to install the latest driver for the system speaker is to use Advanced Driver Updater.
Conclusion
We hope using the steps explained above you were able to fix no sound issues, and we were able to answer how to fix no audio output device is installed in Windows 10. In case you have any questions, regarding Advanced Driver Updater do contact our support team at support@systweak.com