I am creating a package installer which has nodejs, redis, and socket.io as prerequisites. The problem is that I don’t want the developers to install the prerequisites own their own.
I figured out a way of doing that using on mac and ubuntu by including brew install node for mac
and sudo apt-get install nodejs, sudo apt-get install npm
I am now looking for a way to install nodejs on window using a command or two.
Any Idea? Please.
asked Aug 10, 2017 at 0:15
![]()
5
You can install using this msiexec, select the version that’s most suitable for you in the link
msiexec.exe /a https://nodejs.org/dist/v8.3.0/node-v8.3.0-x64.msi /quiet
answered Aug 10, 2017 at 4:15
![]()
Kalana DemelKalana Demel
3,1803 gold badges21 silver badges33 bronze badges
1
Nodejs Alternative For Windows
Using Chocolatey:
cinst nodejs
or for full install with npm
cinst nodejs.install
Using Scoop:
scoop install nodejs
answered Jun 6, 2019 at 12:05
![]()
1
You could use:
cinst nodejs.install
This is great install with npm.
answered Jan 15, 2020 at 9:50
![]()
Install nodejs version 8.10.0 on window
-
download the installer from the url given below
- https://nodejs.org/download/release/v8.10.0/
- download .mis file from this page
- you can download all versions form this url just by changing version number in the end of url
2.Install Angular 6 on window
- Open command line as administrator
-
run below command in command line
npm install -g @angular/cli@6
answered Jun 6, 2019 at 8:39
![]()
I was running in the ServerCore windows container on Gitlab so the msiexec.exe did not work for me. However found another answer that did work over here from user Witcher: Docker + Node.js + Windows
The commands in the container that ended up working in my gitlab yml file before_script were:
Invoke-WebRequest 'https://nodejs.org/dist/v18.12.0/node-v18.12.0-win-x64.zip' OutFile 'C:/nodejs.zip'
Expand-Archive C:nodejs.zip -DestinationPath C:
Rename-Item "C:\node-v18.12.0-win-x64" C:nodejs
$Env:Path += ";C:nodejs"
This is downloading the Zip file from Nodejs’s site to the root of C, expanding the archive, and setting the nodejs path to the environment path variable so the «npm» command is recognized.
answered Oct 27, 2022 at 20:51
![]()
KhowardKhoward
1711 silver badge4 bronze badges
-
Главная
-
Инструкции
-
Node.js
-
Как установить Node.js на Windows: пошаговая инструкция
На JavaScript выполняется большая часть интерактивных элементов на сайтах и в мобильных приложениях. JavaScript отлично работает с HTML/CSS и интегрирован основные браузеры на рынке. Чистый JavaScript используется в вебе, а для общего применения JavaScript разработчики используют различные среды выполнения, например, Node.js.
Node.js — это среда выполнения кода JavaScript. Она позволяет использовать JavaScript как язык программирования общего назначения: создавать на нем серверную часть и писать полноценные десктопные приложения.
Основа Node.js — движок V8. Этот движок был разработан Google и используется в браузере Google Chrome. Он компилирует код JavaScript в машинный код, который понимает процессор. Однако, чтобы сделать из JavaScript язык общего назначения, одного движка недостаточно. Так, например, для создания серверной части нужно, чтобы язык умел работать с файлами, сетью и т.п. Для решения этой проблемы разработчики добавили к V8 дополнительные возможности, с помощью своего кода и сторонних библиотек. В итоге у них получился инструмент, который превращает JavaScript в язык общего назначения.
Node.js стала популярна среди разработчиков благодаря возможности создавать серверную и клиентскую часть на одном языке, скорости работы и NPM. В этом материале мы расскажем, как правильно установить Node.js на Windows 10.
Удаление старых версий
Перед установкой необходимо удалить старые версии среды выполнения, если они были ранее установлены. Наличие предыдущих версий может привести к возникновению конфликтов.
Проверим систему на наличие версий Node.js. Для этого в cmd (чтобы ее запустить, нажмите Win+R, введите cmd и нажмите Enter) выполняем команду nvm list:
C:UsersTimeweb>nvm list
    18.9.0
    18.8.0
    16.17.0
Как видим, у нас установлено несколько версий. Удалим их:
- Выполняем команду
npm cache clean --force. - В «Установка и удаление программ» удаляем Node.js.
- Перезагружаем компьютер.
- Удаляем следующие каталоги. Некоторые из них могут существовать, а некоторые, наоборот, отсутствовать:
- C:Program Files (x86)Nodejs
- C:Program FilesNodejs
- C:Users{User}AppDataRoamingnpm
- C:Users{User}AppDataRoamingnpm-cache
- C:Users{User}.npmrc
- C:Users{User}AppDataLocalTempnpm-*
- Возвращаемся в командную строку и выполняем
nvm uninstallк каждой версии, полученной с помощьюnvm list:
C:UsersTimeweb>nvm uninstall 18.9.0
Uninstalling node v18.9.0... doneC:UsersTimeweb>nvm uninstall 18.8.0
Uninstalling node v18.9.0... done
C:UsersTimeweb>nvm uninstall 16.17.0
Uninstalling node v18.9.0... done
Дополнительно проверим, что версии удалены:
C:UsersTimeweb>nvm list
No installations recognized.C:UsersTimeweb>where node
ИНФОРМАЦИЯ: не удается найти файлы по заданным шаблонам.
C:UsersTimeweb>where npm
ИНФОРМАЦИЯ: не удается найти файлы по заданным шаблонам.
С помощью nvm-windows
Node Version Manager или сокращенно NVM — это диспетчер версий Node.js. Возможно, во время работы вам придется использовать различные версии Node и переключаться между ними. Версии часто меняются, поэтому при работе рекомендуется использовать диспетчер версий.
NVM — самый распространенный диспетчер версий, но, к сожалению, в Windows он не доступен, и вместо него используется адаптированный вариант nvm-windows.
- Зайдите в репозиторий nvm-windows на github.
- Загрузите установщик
nvm-setup.exeпоследней версии диспетчера. - После загрузки осуществите установку.
- По окончании работы установщика откройте PowerShell от имени администратора и проверьте работоспособность NVM:
PS C:Windowssystem32 > nvm list
No installations recognized.
Теперь нужно выбрать версию Node.js, которую вы будете устанавливать на свой компьютер. Команда nvm list available покажет частичный список доступных для загрузки версий:

Если для вашего проекта не требуется определенная версия, то рекомендуется выбрать последний LTS-выпуск. Риск возникновения проблем при работе с такой версией минимален. Если же вы хотите протестировать нововведения и улучшенные возможности, то вы можете загрузить последнюю версию. При этом не стоит забывать, что риск возникновения проблем с новейшей версией выше.
Установим последний LTS. Возьмем номер версии из результата nvm list available и установим его с помощью nvm install:
PS C:Windowssystem32> nvm install 16.17.0
Downloading node.js version 16.17.0 (64-bit)...
Extracting...
Complete
Creating C:UsersTimewebAppDataRoamingnvmtempDownloading npm version 8.15.0… Complete
Installing npm v8.15.0…
Installation complete. If you want to use this version, type
nvm use 16.17.0
Установка завершена. В ряде случаев при установке nvm-windows может возникнуть проблема: nvm не загрузит диспетчер пакетов NPM. В этом случае рекомендуем воспользоваться следующим способом установки.
Как установить node.js с помощью официального установщика
- Зайдите на официальный сайт nodejs.org в раздел «Загрузка».
- Выберите и загрузите нужную версию.
- По завершению загрузки откройте файл, после чего начнется установка.
- Следуйте инструкциям установщика.
Установка node.js в WSL2
Если вы хотите использовать Node.js вместе с Docker, планируете работать с командной строке Bash или просто любите Linux, то имеет смысл задуматься об установке среды выполнения в WSL2.
WSL (Windows Subsystem for Linux) — это программная прослойка для запуска приложений, созданных под Linux-системы, на ОС Windows. Возможно, вам уже приходилось работать в WSL с приложениями, у которых нет Windows-версий. Ранее мы уже рассматривали установку Node.js на Ubuntu 20.04. Поэтому в этом разделе будет размещена инструкция по установке WSL 2 — об установке Node.js на Ubuntu читайте в статье «Как установить Node.js в Ubuntu 20.04».
Алгоритм установки WSL2 в Windows 10 зависит от версии операционной системы. Чтобы её узнать, нажмите Win+R и введите winver. После этого откроется такое окно:
Алгоритм для версий старше 2004
В PowerShell от имени администратора выполняем следующие команды:
wsl --install
wsl --set-version Ubuntu 2
Для проверки результата воспользуемся командой wsl.exe -l -v:
PS C:WINDOWSsystem32> wsl.exe -l -v
  NAME      STATE           VERSION
* Ubuntu    Stopped         2
Алгоритм для версий младше 2004 (как минимум потребуется ОС версии 1903)
В PowerShell (от имени администратора) активируем подсистему Windows для Linux.
dism.exe /online /enable-feature /featurename:Microsoft-Windows-Subsystem-Linux /all /norestartЗатем активируем функцию виртуальной машины:
dism.exe /online /enable-feature /featurename: VirtualMachinePlatform /all /norestart После выполнения этих действий нужно перезагрузить компьютер.
Когда компьютера запустится, скачиваем и устанавливаем пакет обновлений ядра Linux. Загрузить его можно по здесь.
В PowerShell выберем 2 версию WSL в качестве основной:
wsl --set-default-version 2Теперь скачаем какую-нибудь операционную систему на Linux. Сделать это можно прямо магазине приложений Microsoft Store:
По окончании установки вы сможете зайти в консоль установленной системы через меню поиска:
Заключение
Node.js — это популярная среда разработки, которая используется множеством крупных компаний: PayPal, Yahoo, Ebay, General Electric, Microsoft и Uber. В рамках этого материала мы рассмотрели способы как установить Node.js на Windows 10.
Introduction
Node.js is a run-time environment which includes everything you need to execute a program written in JavaScript. It’s used for running scripts on the server to render content before it is delivered to a web browser.
NPM stands for Node Package Manager, which is an application and repository for developing and sharing JavaScript code.
This guide will help you install and update Node.js and NPM on a Windows system and other useful Node.js commands.
Prerequisites
- A user account with administrator privileges (or the ability to download and install software)
- Access to the Windows command line (search > cmd > right-click > run as administrator) OR Windows PowerShell (Search > Powershell > right-click > run as administrator)
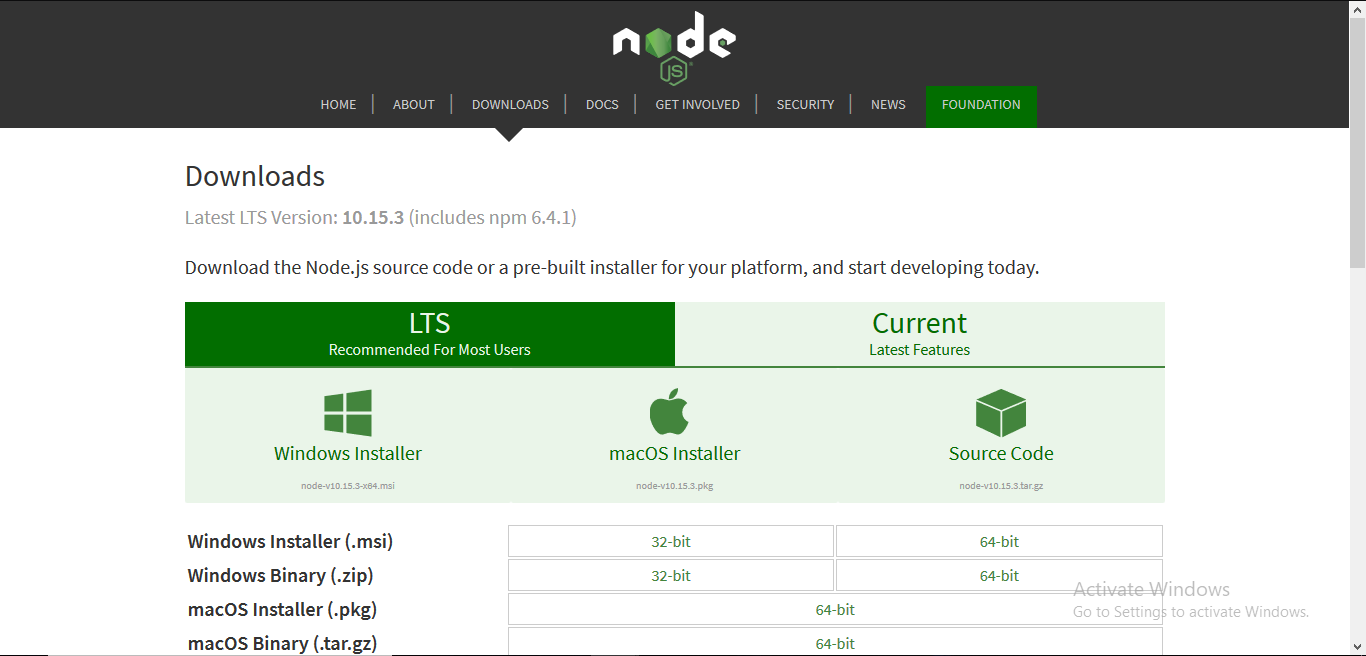
Step 1: Download Node.js Installer
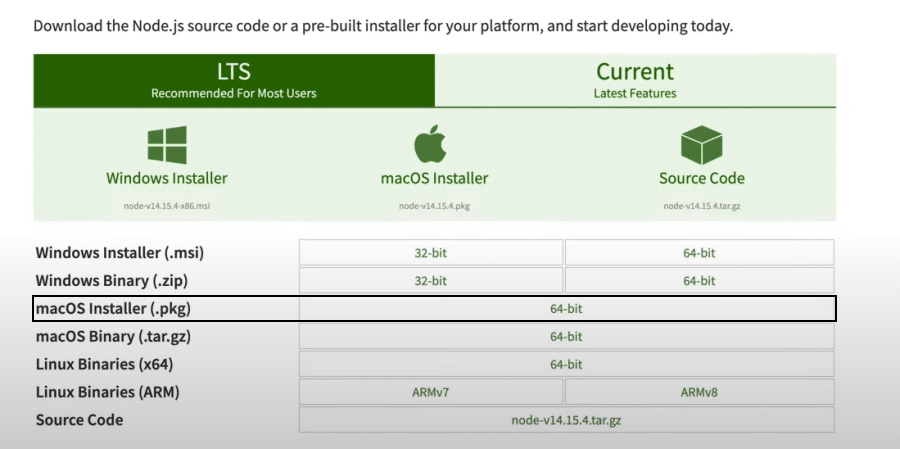
In a web browser, navigate to https://nodejs.org/en/download/. Click the Windows Installer button to download the latest default version. At the time this article was written, version 10.16.0-x64 was the latest version. The Node.js installer includes the NPM package manager.
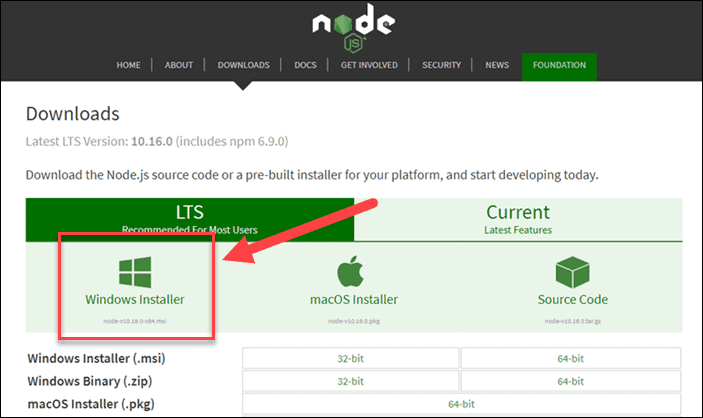
Note: There are other versions available. If you have an older system, you may need the 32-bit version. You can also use the top link to switch from the stable LTS version to the current version. If you are new to Node.js or don’t need a specific version, choose LTS.
Step 2: Install Node.js and NPM from Browser
1. Once the installer finishes downloading, launch it. Open the downloads link in your browser and click the file. Or, browse to the location where you have saved the file and double-click it to launch.
2. The system will ask if you want to run the software – click Run.
3. You will be welcomed to the Node.js Setup Wizard – click Next.
4. On the next screen, review the license agreement. Click Next if you agree to the terms and install the software.
5. The installer will prompt you for the installation location. Leave the default location, unless you have a specific need to install it somewhere else – then click Next.
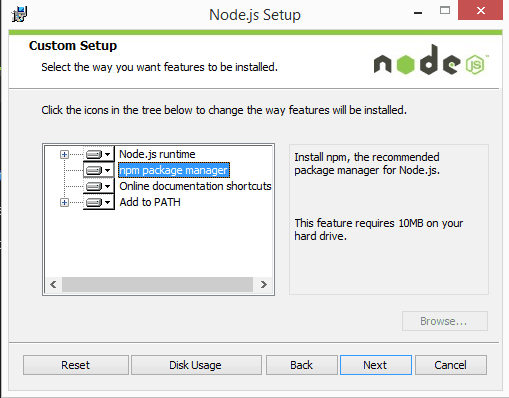
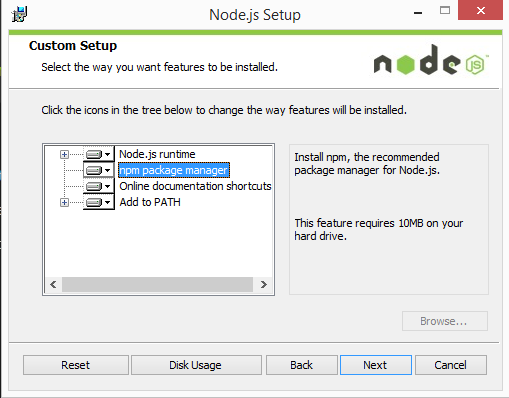
6. The wizard will let you select components to include or remove from the installation. Again, unless you have a specific need, accept the defaults by clicking Next.
7. Finally, click the Install button to run the installer. When it finishes, click Finish.
Step 3: Verify Installation
Open a command prompt (or PowerShell), and enter the following:
node -vThe system should display the Node.js version installed on your system. You can do the same for NPM:
npm -v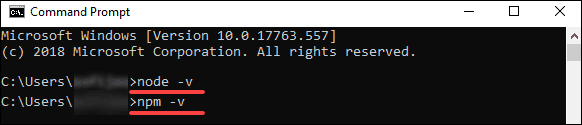
How to Update Node.js and NPM on Windows
The easiest way to update Node.js and NPM is to download the latest version of the software. On the Node.js download page, right below the Windows Installer link, it will display the latest version. You can compare this to the version you have installed.
To upgrade, download the installer and run it. The setup wizard will overwrite the old version, and replace it with the new version.
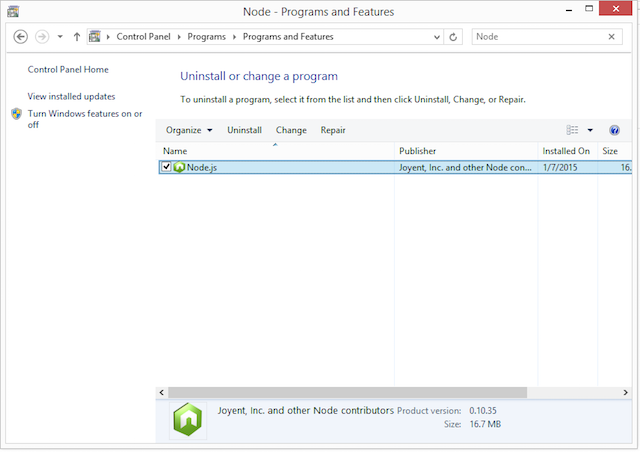
How to Uninstall Node.js and NPM on Windows
You can uninstall Node.js from the Control Panel in Windows.
To do so:
- Click the Start button > Settings (gear icon) > Apps.
- Scroll down to find Node.js and click to highlight.
- Select Uninstall. This launches a wizard to uninstall the software.
Basic Node.js Usage
Node.js is a framework, which means that it doesn’t work as a normal application. Instead, it interprets commands that you write. To test your new Node.js installation, create a Hello World script.
1. Start by launching a text editor of your choice.
2. Next, copy and paste the following into the text editor you’ve just opened:
var http = require('http');
 http.createServer(function (req, res) {
   res.writeHead(200, {'Content-Type': 'text/html'});
   res.end('Hello World!');
 }).listen(8080);
3. Save the file, then exit. Open the PowerShell, and enter the following:
node users<your_username>myprogram.jsIt will look like nothing has happened. In reality, your script is running in the background. You may see a Windows Defender notice about allowing traffic – for now, click Allow.
4. Next, open a web browser, and enter the following into the address bar:
http://localhost:8080In the very upper-left corner, you should see the text Hello World!
Right now, your computer is acting like a server. Any other computer that tries to access your system on port 8080 will see the Hello World notice.
To turn off the program, switch back to PowerShell and press Ctrl+C. The system will switch back to a command prompt. You can close this window whenever you are ready.
Conclusion
You should now be able to install both the Node.js framework, and the NPM package manager. You’ve also written your first node.js JavaScript program!
The NPM framework gives access to many different JavaScript solutions, which can be found at npmjs.com.
If you’re looking to take your JavaScript coding to another level, Treehouse offers unlimited courses in JavaScript (and many other subjects) starting at $25/month. Try our program out with a free seven-day trial today.
JavaScript is quickly becoming the go-to language for web developers. Front-end web developers use JavaScript to add user interface enhancements, add interactivity, and talk to back-end web services using AJAX. Web developers who work on the server-side are also flocking to JavaScript because of the efficiencies and speed offered by JavaScript’s event-driven, non-blocking nature.
In fact, concentrating on JavaScript as your language of choice offers the opportunity to master a single language while still being able to develop “full-stack” web applications.
In a previous article, I wrote about how to install Node.js® and, it’s companion, NPM on a Mac. Fortunately, for Windows users, the Node.js® installation process is a lot easier than how I recommend installing Node.js® on a Mac.
What is the Difference Between Node & NPM?
The key to this server-side JavaScript revolution is Node.js® — a version of Chrome’s V8 JavaScript runtime engine — which makes it possible to run JavaScript on the server-side.
Node.js is also used for developing desktop applications and for deploying tools that make developing web sites simpler. For example, by installing Node.js® on your desktop machine, you can quickly convert CoffeeScript to JavaScript, SASS to CSS, and shrink the size of your HTML, JavaScript and graphic files. Using NPM — a tool that makes installing and managing Node modules — it’s quite easy to add many useful tools to your web development toolkit.
When to use Node
Node isn’t a program that you simply launch like Word or Photoshop: you won’t find it pinned to the taskbar or in your list of Apps. To use Node you must type command-line instructions, so you need to be comfortable with (or at least know how to start) a command-line tool like the Windows Command Prompt, PowerShell, Cygwin, or the Git shell (which is installed along with Github for Windows).
Are you ready to start learning?
Learning with Treehouse for only 30 minutes a day can teach you the skills needed to land the job that you’ve been dreaming about.
Start a Free Trial

Installation Steps
Installing Node and NPM is pretty straightforward using the installer package available from the Node.js® web site.
- Download the Windows installer from the Nodes.js® web site.
- Run the installer (the .msi file you downloaded in the previous step.)
- Follow the prompts in the installer (Accept the license agreement, click the NEXT button a bunch of times and accept the default installation settings).

- Restart your computer. You won’t be able to run Node.js® until you restart your computer.
Checking if Node & NPM are Installed
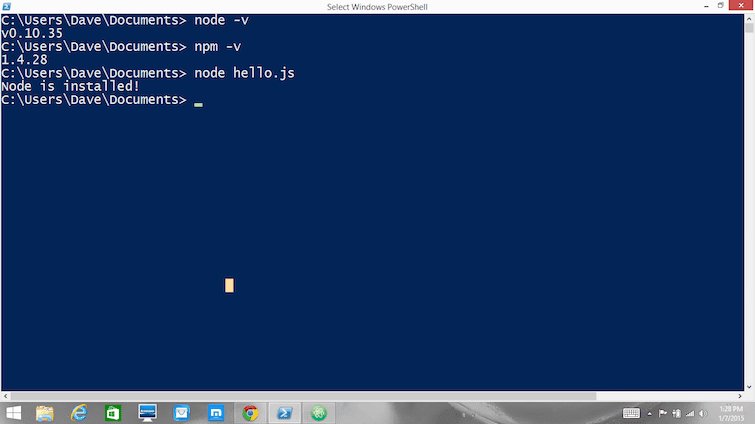
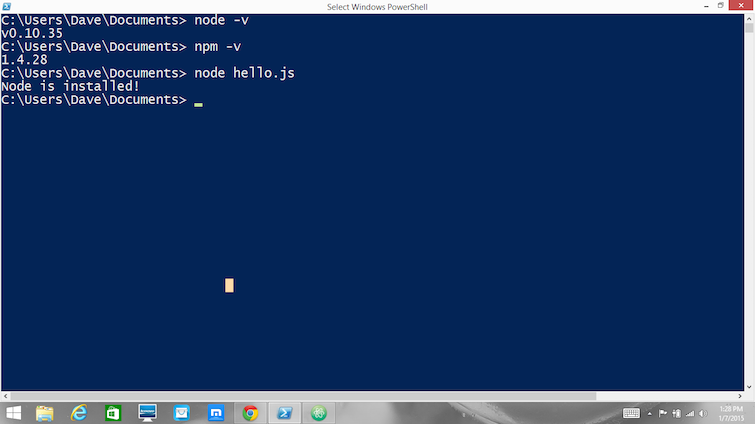
Make sure you have Node and NPM installed by running simple commands to see what version of each is installed and to run a simple test program:
- Test Node. To see if Node is installed, open the Windows Command Prompt, Powershell or a similar command line tool, and type
node -v. This should print a version number, so you’ll see something like thisv0.10.35. - Test NPM. To see if NPM is installed, type
npm -vin Terminal. This should print NPM’s version number so you’ll see something like this1.4.28 - Create a test file and run it. A simple way to test that node.js works is to create a JavaScript file: name it
hello.js, and just add the codeconsole.log('Node is installed!');. To run the code simply open your command line program, navigate to the folder where you save the file and typenode hello.js. This will start Node and run the code in thehello.jsfile. You should see the outputNode is installed!.
Check and Update Your Node and NPM Versions
New versions of Node and NPM come out frequently. To install the updates, just download the installer from the Nodejs.org site and run it again. The new version of Node and NPM will replace the older versions.
How to Uninstall Node and NPM
You uninstall Node.js and NPM the same as you would most Windows software:
- Open the Windows Control Panel
- Choose the “Programs and Features” option
- Click the “Uninstall a program” option
- Select Node.js, and click the Uninstall link.
With Node.js and NPM installed you’ll soon be able to take advantage of the huge world of NPM modules that can help with a wide variety of tasks both on the web server and on your desktop (or laptop) machine. The NPM site lists all of the official Node packages making it easy to make the choice. Have fun!
Learn with Treehouse
Learning with Treehouse starts at only $25 per month. If you think you’re ready to start exploring if tech is right for you, sign up for your free seven day trial.
What sets Treehouse apart is their dedication to helping you find your perfect job or develop your own business. – SwitchUp.org
Follow us on Twitter, Instagram, and Facebook for our favorite tips, and to share how your learning is going. We’ll see you there!
If you liked reading this article, you should also look at these two:
- 7 Awesome Things You Can Build With Node.js
- The Best Places to Look for Your First Tech Job
- 5 Treehouse Students Who Found Tech Jobs in Less than a Year
Node.js came as a blessing for JavaScript developers worldwide struggling with swapping among multiple languages and frameworks to amplify their code into a sustainable development environment.
With Node.js, you can finally build web applications with two-way connections where both the server-side and client-side can thoroughly communicate in real-time and exchange data. Indeed, Node.js has been revolutionary for developers who wanted to push real-time web applications over WebSocket.
If you’re aiming forward to enhancing your web development skills to the next level and becoming a full-stack JavaScript developer, Node.js indeed prepares the path towards that enthusiastic buzzword!
In this article, we’ll demonstrate a step-by-step guideline for installing Node.js on your computer and commencing with your web development journey.
What Is Node.js?
![]()
The first thing you should know is that Node.js is not a programming language!
You may already be aware of this fact, but it bears repeating for new developers in the field who may mistake Node.js for a unique programming language. It’s not!
Node.js is an open-source runtime environment for the JavaScript language that reshapes JavaScript’s characteristics and upgrades its functionality. As a result, you can use JavaScript for frontend and backend development, enabling full-stack development solely using JavaScript.
Initially, Node.js was designed to serve real-time performance, pushed-back architectures. But since then, Node.js has grown into a vital element for server-side programming for event-driven, non-blocking servers. Most conventional websites and API services today depend on Node.js.
Before Node.js, if you wanted to store any data on the database or connect your program to the database, you needed support from a server-side language. That’s because JavaScript couldn’t regulate the backend process. Consequently, you had to learn server-side languages like PHP, Python, Ruby, or C# — or seek a backend developer’s help.
The Node.js environment empowers JavaScript to directly employ the database and function properly as a backend language. As a result, you can ultimately build and run a program using only JavaScript with Node.js.
Node.js uses the V8 JavaScript runtime engine as its root power, and it employs a non-blocking I/O architecture that’s event-driven. All these together construct Node.js and help drive products towards robust performance.
Who Uses Node.js?
According to W3Techs, to date, 1.4% of all websites use Node.js — that’s more than 22 million websites. These numbers give you a general idea of the amount of Node.js users. On top of that, Node.js has been downloaded more than 1.3 billion times! As you can see, the stats speak strongly to Node.js’ market scale.
From your friends in IT to the industry tycoons, all are enjoying leveraging Node.js. That’s because Node.js amplifies the performance of developers and increases the speed of the development process. One of the most intelligent trends nowadays is using JavaScript everywhere, which has brought Node.js into the arena.
Top companies that use Node.js include:
- NASA
- Netflix
- PayPal
- Trello
- eBay
- Walmart
- Mozilla
- Medium
If you study these companies, you may notice that they run their businesses on different services or products. But they all have a critical factor in common: they rely on Node.js. Indeed, using Node.js can solve most of your development issues, never mind what industry you’re in.
Advantages of Using Node.js
Choosing the right programming platform for your tech stack is as important as the labor you want to invest in. Multiple factors should be considered when you look for the advantages of using a particular platform. Things like the learning curve, development speed, community, and scale can alter the overall balance of benefits.
Here are the main advantages of using Node.js:
- Simple syntax
- Easy learning curve
- Ability to scale quickly
- Open source and flexible
- Cross-platform development
- Single-language full-stack development
- Real-time communication
- Vast and active community
Node.js Prerequisites
Before installing Node.js, you need to ensure that you’ve gathered all the necessary bits of knowledge and downloaded all required installation files and elements.
Firstly, it would help if you had a basic understanding of JavaScript and its syntax — this will make picking up Node.js easier for you.
Secondly, a basic understanding of an object-oriented programming (OOP) language will help you work on server-side coding.
Lastly, rather than rushing into deep learning, take it one step at a time. Always remember that you’re not a day late or a dollar short as long as you’re progressing.
System Requirements
Node.js doesn’t require a fancy hardware setup to run; most computers of this era should handle Node.js efficiently. Even the most miniature computers like BeagleBone or Arduino YÚN can run Node.js.
Nevertheless, much still depends on what other memory hog software you’ve got running on the same system. But in most cases, you shouldn’t be worried unless your computer is from the Mesozoic Era!
LTS Version vs Current Version
Node.js offers two different versions for you to download: the LTS version and the Current version.
The first one is Long-Term Support (LTS), which indicates the version that has been in the market for a while and comes with all mandatory support. Consequently, you can access a bunch of information and community for additional help with this version.
This LTS version is recommended to most users because of its sustainability and 18-month-long support cycle. As it’s a stable version, using it to produce backends can help you achieve a robust outcome.
The Current version indicates the latest released version of Node with the most recently added and updated features. But this version has less support behind it (around eight months) and possible bug exposure. Therefore, experts suggest using this version only for frontend development.
Considering all these factors, if you’re a regular user who loves to live hassle-free, go for the LTS version. On the other hand, if you’re an advanced user who loves the adventure of experiencing new technology, you can choose to install the Current version.
How to Install Node.js and npm
Every operating system has a distinct method of installing Node.js. The core setup file differs for each OS to OS. However, the Node.js creators have taken care to provide you with the files needed for each system.
In the next portion of the article, we’ll discuss installing Node.js on Windows, macOS, and Linux operating systems.
How to Install Node.js on Windows
Follow this step-by-step guide to install Node.js on Windows.
1. Download Windows Installer
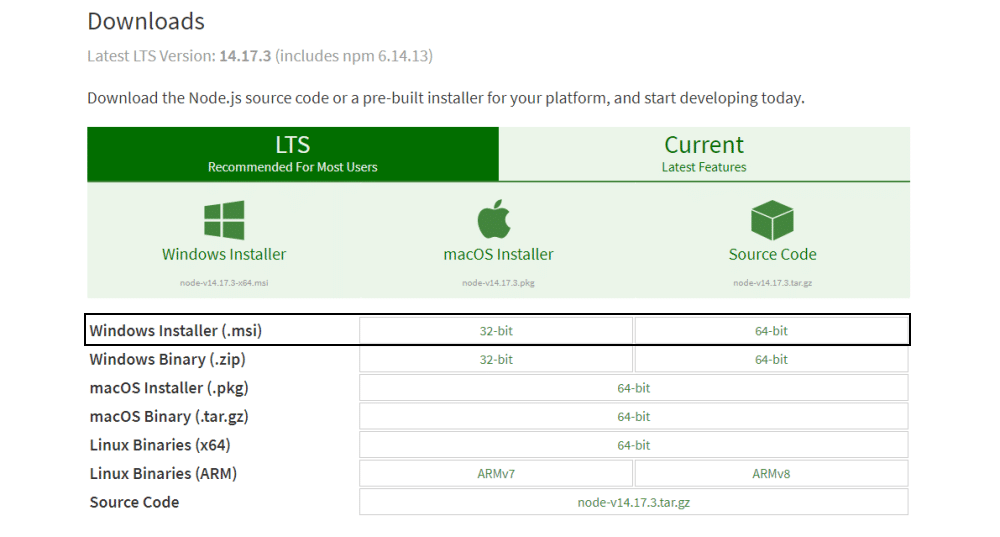
First, you need to download the Windows Installer (.msi) file from the official Node.js website. This MSI installer database carries a collection of installer files essential to install, update, or modify the existing Node.js version.
Notably, the installer also carries the Node.js package manager (npm) within it. It means you don’t need to install the npm separately.
When downloading, select the correct version as per your operating system. For example, if you’re using a 64-bit operating system, download the 64-bit version, and if you’re using the 32-bit version, download the 32-bit version:
2. Begin the Installation Process
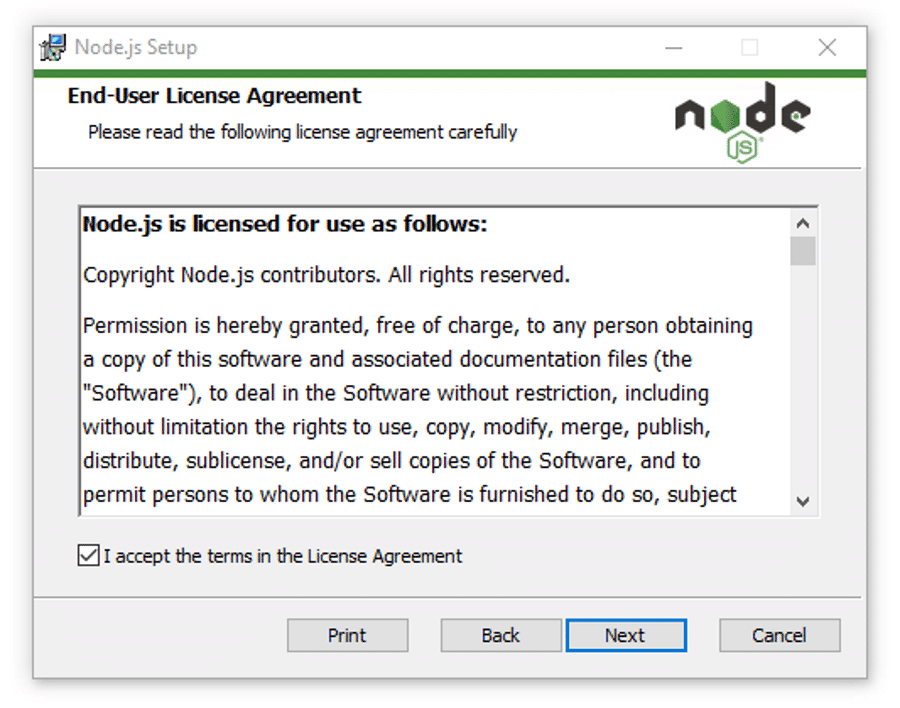
Once you open and run the .msi file, the installation process begins. But you have to set a few parameters before running the installation process.
Double-click on the installer file and run it. The installer will ask you to accept the Node.js license agreement. To move forward, check the “I accept” box and click Next:
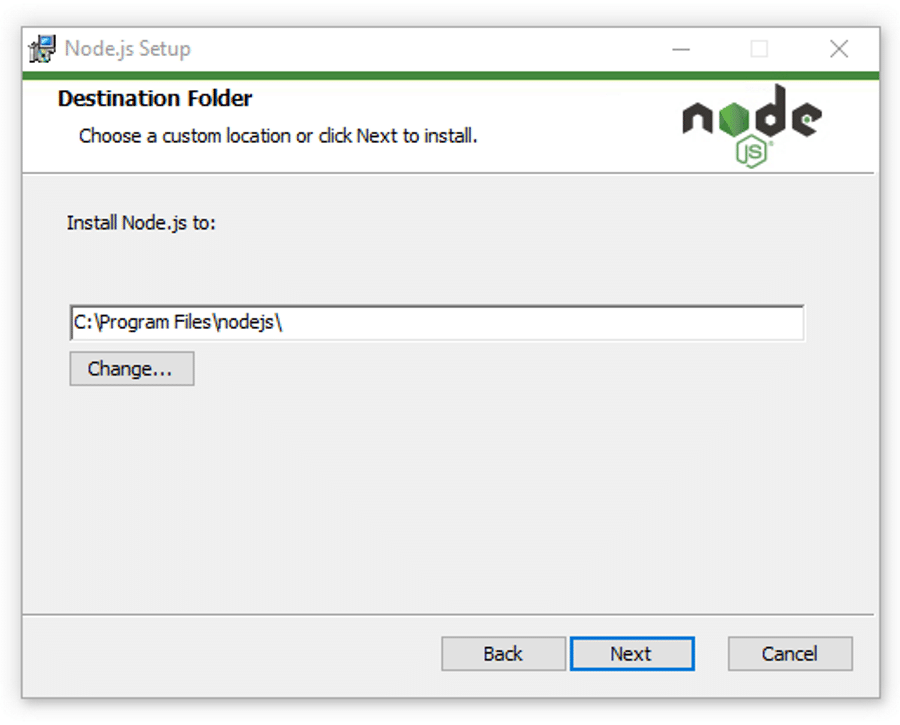
Then, select the destination where you want to install Node.js. If you don’t want to change the directory, go with the Windows default location and click the Next button again.
The next screen will show you custom setup options. If you want a standard installation with the Node.js default features, click the Next button. Otherwise, you can select your specific elements from the icons in the tree before clicking Next:
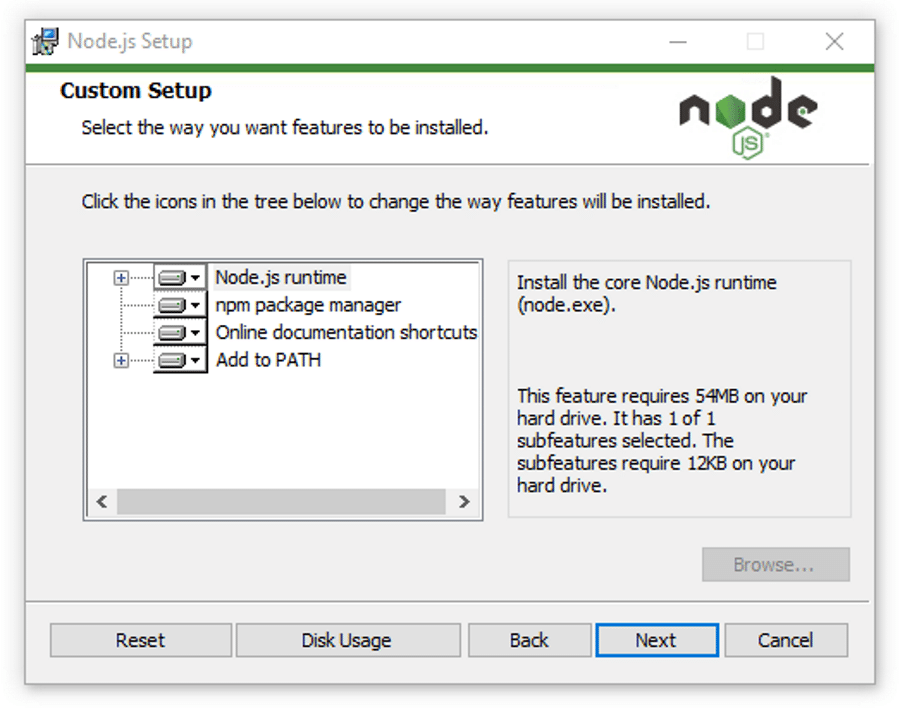
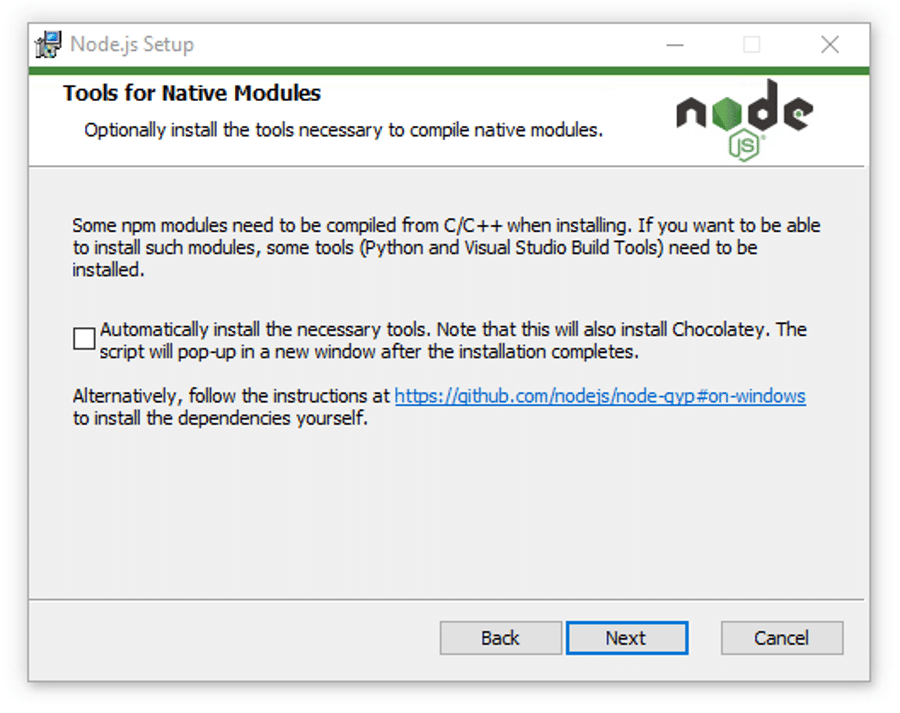
Node.js offers you options to install tools for native modules. If you’re interested in these, click the checkbox to mark your preferences, or click Next to move forward with the default:
3. Run Node.js Installation on Windows
Lastly — and this is the easiest part of all — click the Install button to begin the installation process:
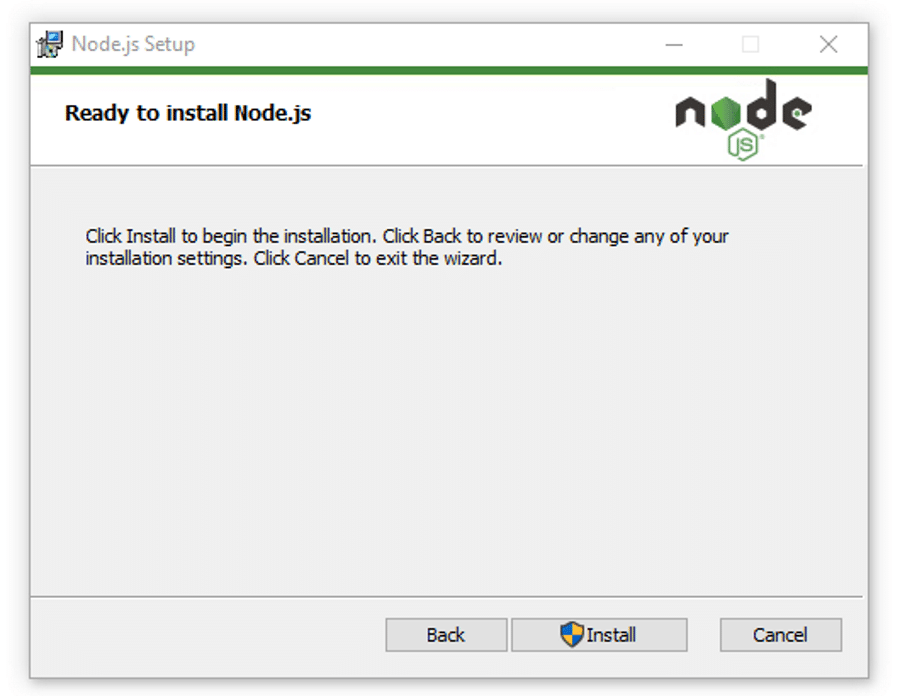
The system will complete the installation within a few seconds or minutes and show you a success message. Click on the Finish button to close the Node.js installer.

4. Verify Node.js Installation
So the installation process is completed. Now, you have to check whether Node.js is successfully installed or not.
To verify the installation and confirm whether the correct version was installed, open your PC’s command prompt and enter the following command:
Node --versionAnd to check the npm version, run this command:
npm --version
If the Node.js version and npm are correctly installed, you’ll see the version name in the CMD prompt.
How To Install Node.js on macOS
Follow these step-by-step guidelines to install Node.js on macOS.
1. Download macOS Installer
Installing Node.js on macOS follows almost the same procedure as Windows. All you have to do is to download the installation file for Mac. Then, as soon as you start it up, the installer will walk you through the rest.
Firstly, download the macOS installer (.pkg) file from the Node.js website. There’s only a 64-bit version, so you don’t have to worry about which to download.
2. Begin Node.js Installation on macOS
Check your Download folder for the installer file and click on it to start the installation process.
The Node.js installer carries the Node.js core file, and, consequently, the installation process installs both Node.js and npm from the installer file. Therefore, you don’t need to install npm separately.
Then, click Continue to move forward with the installation.

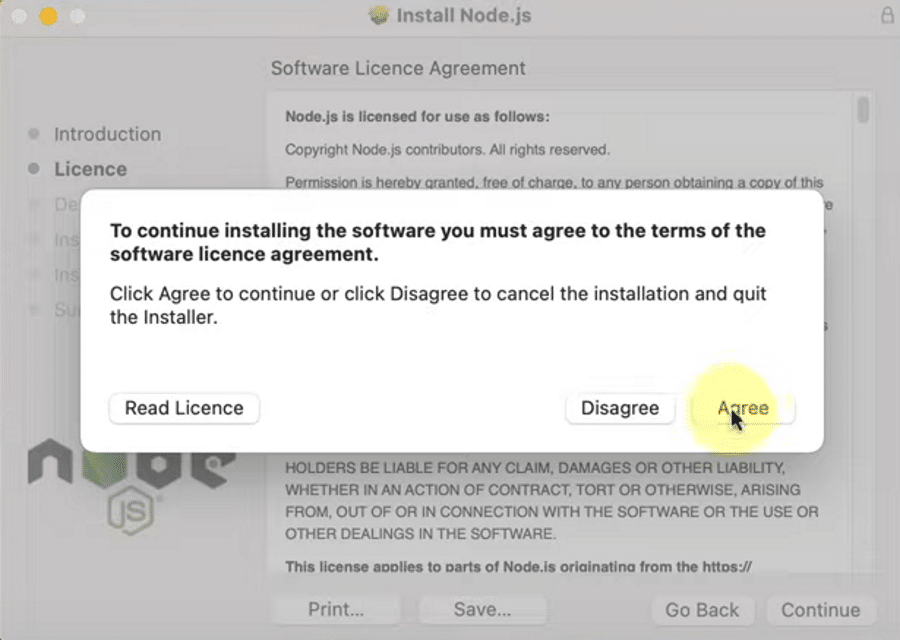
You must agree to the terms of usage to install Node.js. Read through it before clicking the Agree button to continue if you’d like to explore the license agreement.
At this screen, you need to select the installation location. Usually, the OS determines a default installation location. If you have other requirements, you can change the location. Otherwise, keep the default location.
3. Run Node.js Installation on macOS
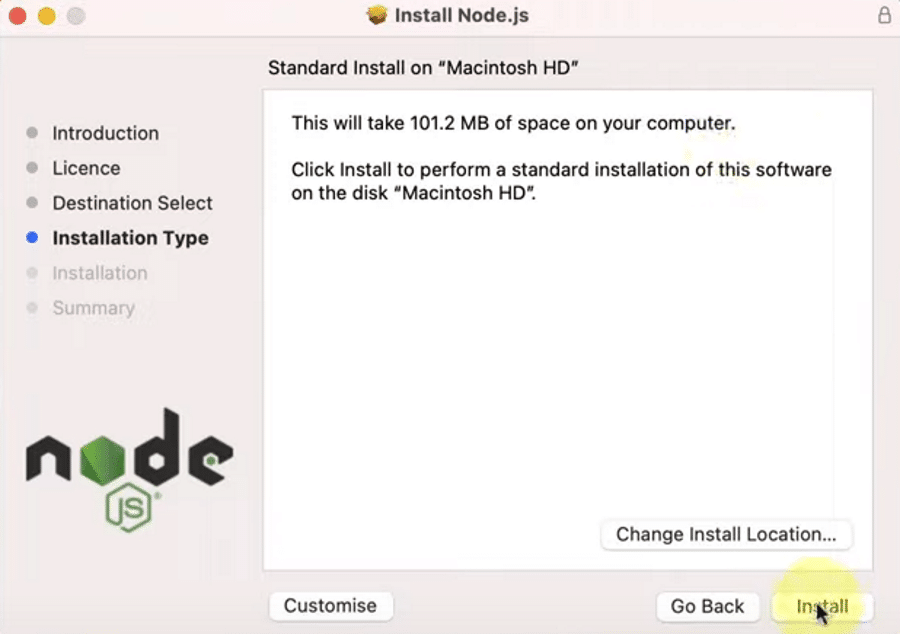
Until now, you’ve set all the preferences that are needed to install Node.js on macOS fully. Now click on the Install button to finish things up.
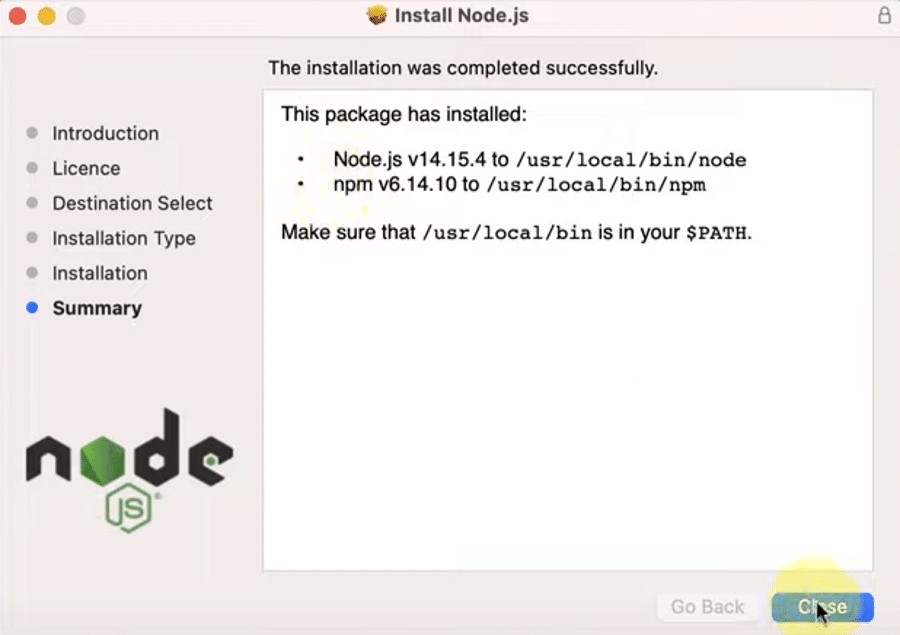
After a successful installation process, the system will show you a confirmation message. As npm is integrated within the Node.js installer, the notification should indicate proof of npm installation too.
Finally, click on the Close button to close the dialogue box.
4. Verify Node.js Installation on macOS
You’ve now successfully installed Node.js on your macOS. However, you should check to confirm that the installation process was successful and whether the Node.js and npm versions are working properly on your macOS.
To check the Node.js version, you need to open your macOS terminal, click the Command + Space keys, or search the terminal from the search bar.
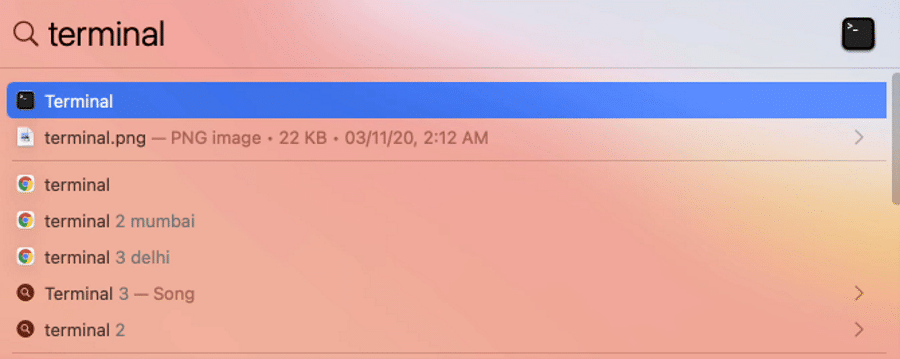
To check the Node.js version, type:
Node --versionAnd to check the npm version, run this command:
npm --version
If the Node.js and npm versions are visible, both of them are correctly installed and working fine. If not, you may need to recheck to find the error or try the installation process again.
How To Install Node.js on Linux
The Linux operating system works a bit differently than the other traditional operating systems. That’s because Linux is open-source, offering you more freedom, customization, and advanced functionalities.
If you’re casual with commands, you should feel comfortable with Linux. Here, we are about to discuss the easiest method of installing Node.js on the Linux operating system.
1. Choose the Node.js Version for Your Linux Distribution
The Linux operating system has hundreds of different distributions because of the diversity it provides. And users love to customize and harness different versions’ specific functionalities using distinct distributions.
Firstly, find the installation instruction for your specific distribution from Node.js’s Binary Distributions page. For this guide, we’ll be using Ubuntu for illustration purposes.
2. Install the Curl Command-Line Tool
Before going for Node.js installation, ensure that you have the curl command-line utility installed on your system. If not, then paste this command on your terminal to install curl:
sudo apt install curlIt may ask for your system password to verify the permission of the installation. Once you input the password, the system should begin the curl installation.

3. Start Node.js Installation
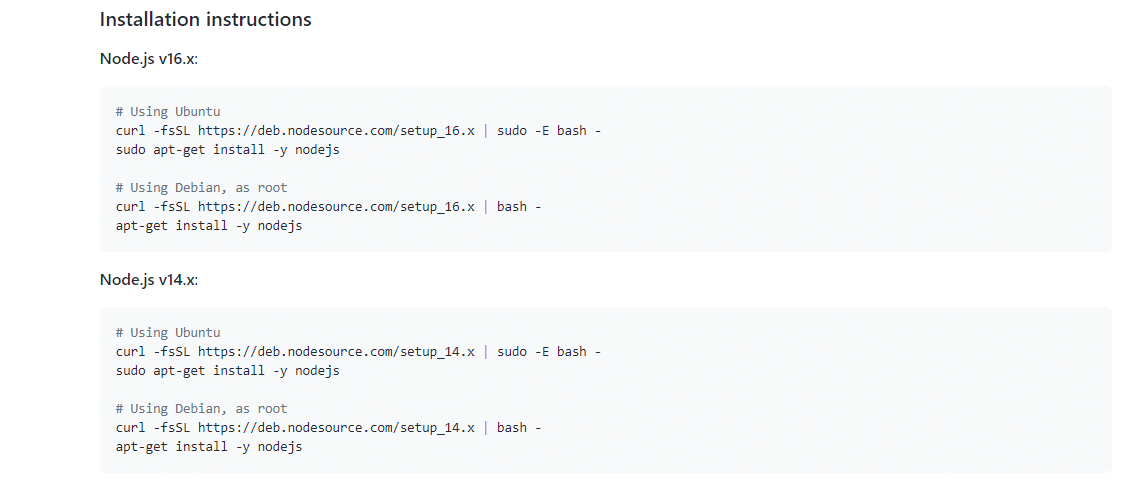
You need to copy and paste the Node.js installation command into your terminal (in our case, we can grab it from the Ubuntu distribution page) so that the system can begin the Node.js installation.
For instance, here, we’ll be installing Node.js v14.x. These are the installation commands for Ubuntu:
curl -fsSL https://deb.nodesource.com/setup_14.x | sudo -E bash -sudo apt-get install -y nodejsAs you already have the curl command line installed on your terminal, you’ll need to copy and paste the first command (the curl command) on your terminal and run it.

The curl command begins the Node.js installation process, updates your system, and downloads all Node.js libraries required to install Node.js on your Linux OS.
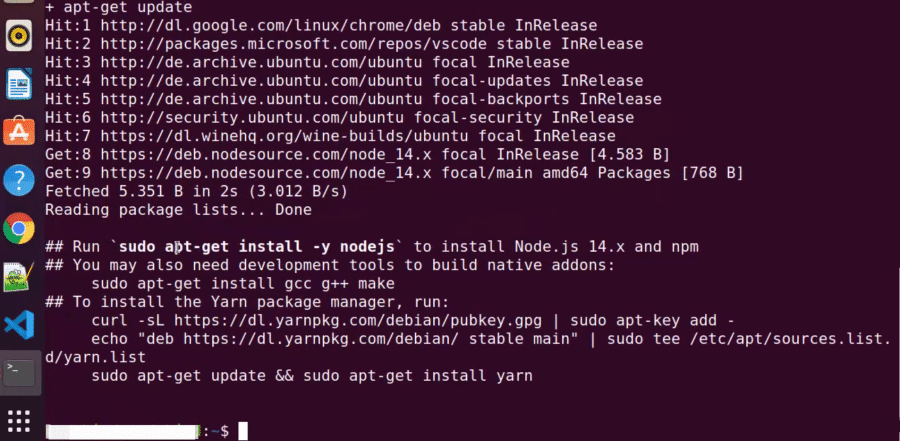
Now, all the libraries and resources of Node.js have been downloaded to your PC. With one final command, we can finish installing Node.js and npm on your computer.
Copy and paste the second line of command from the installation instructions above into your Linux terminal:
sudo apt-get install -y nodejs
If you’ve done everything correctly, Node.js will install correctly on your Linux distribution. Now input the Clear command to clear the terminal.
4. Verify Node.js Installation on Linux Ubuntu distribution
As you’ve installed Node.js, you can verify to check whether the installation is successful or not. To confirm the installation, you need to run two simple Linux commands on your Linux terminal.
To check the Node.js version, type:
Node --versionAnd to check the npm version, type:
npm --version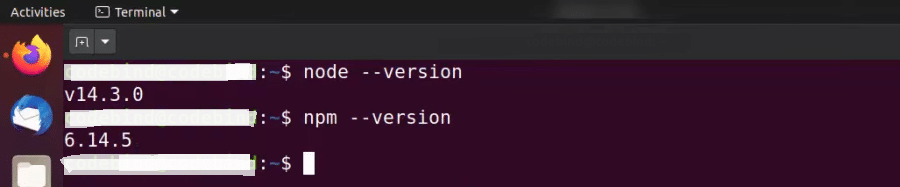
If the Node.js version and npm are installed correctly, you’ll see the Node.js and npm version names visible on the Linux terminal. It indicates that you have successfully installed Node.js and npm on your Linux distribution.
Check and Update npm Version
As we’ve mentioned, npm is the Node.js package manager. It manages the dependencies for packages. Without npm, you would have to unpack all your Node.js packages manually every time you want to upload a framework. But npm relieves you of this responsibility and takes care of it automatically.
Regularly updating npm also updates your local packages and improves the code used in your projects. However, as npm automatically installs with the Node.js version you choose, it often misses the latest npm release. In such cases, you can check your npm version and update it manually in a simple process.
The processes to check and update your npm version are very similar between Windows, macOS, and Linux — you’ll be running the same command on each.
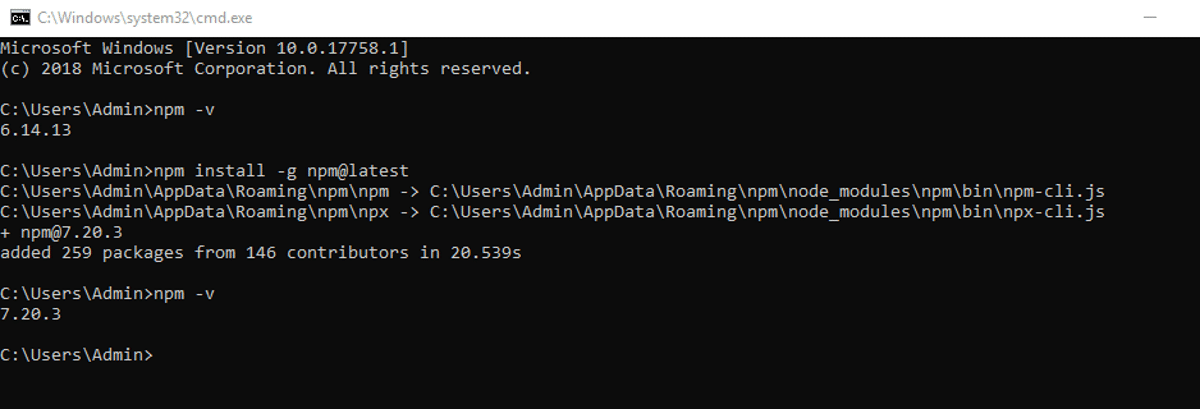
Update npm in Windows
To check the npm version, run the following command:
npm -v…or:
npm --versionAnd to update the npm version, run this command:
npm install -g [email protected]After running this command on your CMD prompt on Windows, the system will update your npm version and install the additional packages in a few seconds. In the end, you can recheck the version to confirm the update of the npm version.
Update npm on macOS
To check the npm version on macOS, open your terminal and run the following command:
npm -v…or:
npm --version
To update the npm version, run this command in your macOS terminal:
npm install -g [email protected]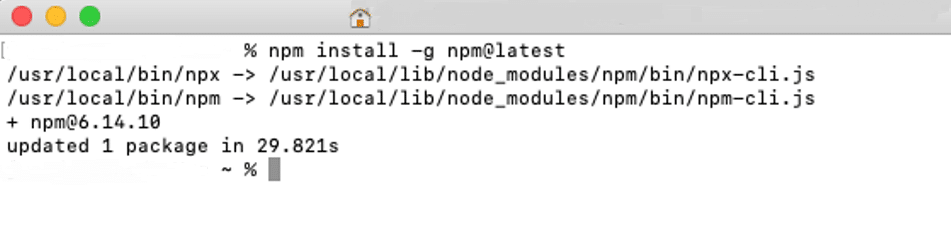
Update npm in Linux
To update your npm version on Linux, type these commands into your terminal:
sudo npm install -g n…and then:
sudo n latest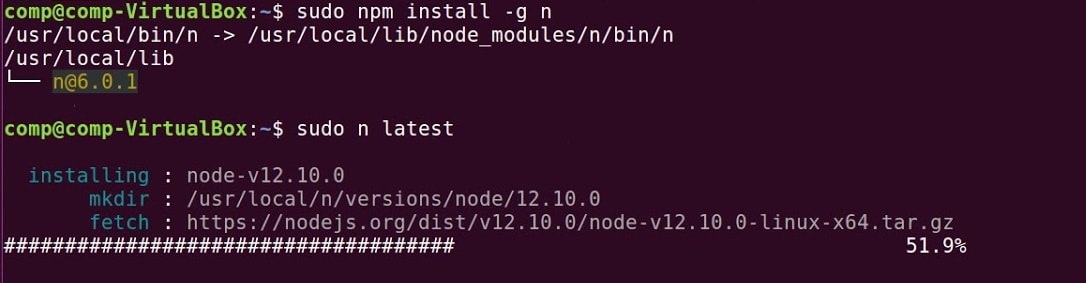
With Node.js, you can take your web dev skills to the next level 📈… so what are you waiting for? Get started with this guide 👇Click to Tweet
Summary
Node.js has become a popular programming environment quickly because of its usefulness in both frontend and backend. Thousands of active users have created a vast community that helps keep new developers and their questions from slipping through the cracks.
In essence, it’s easy to start with Node.js because of its simplicity, and its capabilities for creating advanced applications are extraordinary. It can also help turn you into a full-stack developer in a short time. These features make Node.js an inevitable choice for next-generation programming.
Have we missed any helpful tips about installing Node.js on Windows, macOS, or Linux? Let us know in the comments section!
Get all your applications, databases and WordPress sites online and under one roof. Our feature-packed, high-performance cloud platform includes:
- Easy setup and management in the MyKinsta dashboard
- 24/7 expert support
- The best Google Cloud Platform hardware and network, powered by Kubernetes for maximum scalability
- An enterprise-level Cloudflare integration for speed and security
- Global audience reach with up to 35 data centers and 275+ PoPs worldwide
Test it yourself with $20 off your first month of Application Hosting or Database Hosting. Explore our plans or talk to sales to find your best fit.
As with any programming language, platform, or tool that doesn’t come bundled with Windows, getting up and running with Node.js takes some initial setup before you can start hacking away. In my experience, though Node.js has a far better installation experience on Windows than virtually any other language, platform, or tool that I’ve tried to use — just run the installer, and you’re good to go.
In this quick tutorial, we’ll take a look at how to get Node.js installed on Windows. Once we’ve completed the entirety of the tutorial, you’ll be ready to take the next step with Node.js.
This guide covers installing Node.js on the following versions of Windows: Windows 7, Windows 8, Windows 8.1, and Windows 10. These are the versions that are consistently tested and supported by the Node.js build process at the time of writing.
Step 0: The Quick Guide (TL;DR) to Get Node.js Installed on Windows
Here’s the abbreviated guide, highlighting the major steps:
- Open the official page for Node.js downloads and download Node.js for Windows by clicking the «Windows Installer» option
- Run the downloaded Node.js
.msiInstaller — including accepting the license, selecting the destination, and authenticating for the install.- This requires Administrator privileges, and you may need to authenticate
- To ensure Node.js has been installed, run
node -vin your terminal — you should get something likev6.9.5 - Update your version of npm with
npm install npm --global- This requires Administrator privileges, and you may need to authenticate
- Congratulations — you’ve now got Node.js installed, and are ready to start building!
Step 1: Download the Node.js .msi Installer
As the first step to installing Node.js on Windows, you’ll need to download the installer. You’ll be able to grab the installer from the official downloads page for Node.js.
You’ll be able to download the Windows Node.js installer by clicking the Windows Installer option at the top of the page — when you click this, you’ll get an MSI installer download. Make sure to save it somewhere that you’ll be able to find it!
Step 2: Run the Node.js Installer
You’ve got the Windows Installer — great! Now, you need to install it on your PC. The installer is a pretty typical Wizard interface for installing software on Windows — there are a few steps to it, but you can have it done in under a minute. You can get through it by following the guide below:
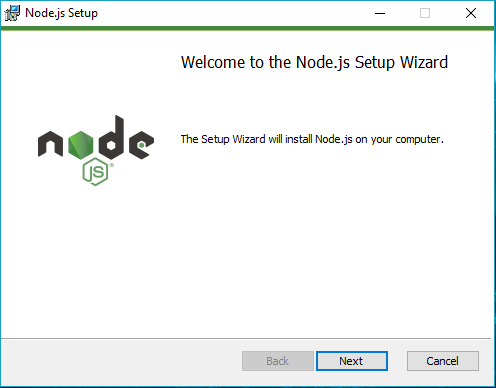
- Welcome to the Node.js Setup Wizard
- Select
Next
- Select
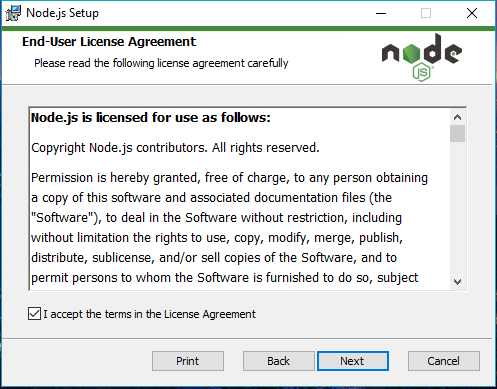
- End-User License Agreement (EULA)
- Check
I accept the terms in the License Agreement - Select
Next
- Check
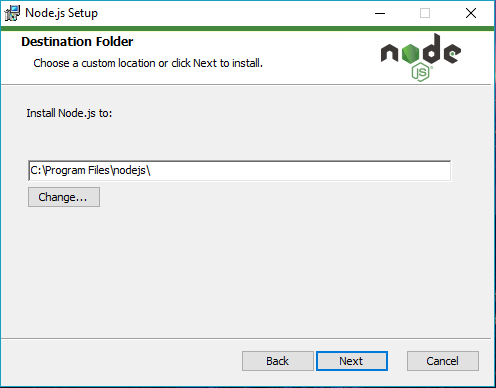
- Destination Folder
- Select
Next
- Select
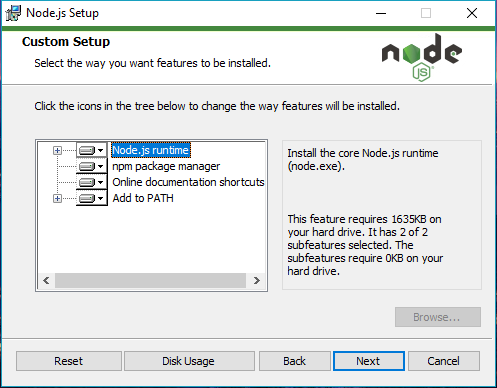
- Custom Setup
- Select
Next
- Select
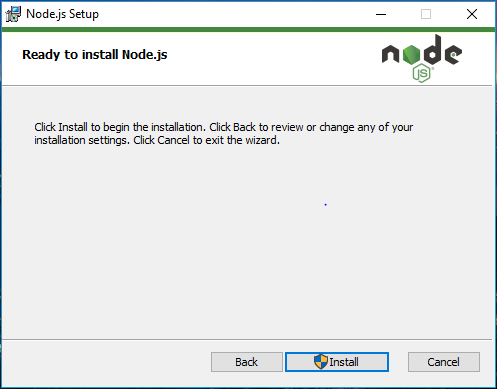
- Ready to install Node.js
- Select
Install - Note: This step requires Administrator privlidges.
- If prompted, authenticate as an Administrator
- Select
- Installing Node.js
- Let the installer run to completion
- Completed the Node.js Setup Wizard
- Click
Finish
- Click
Step 3: Verify that Node.js was Properly installed
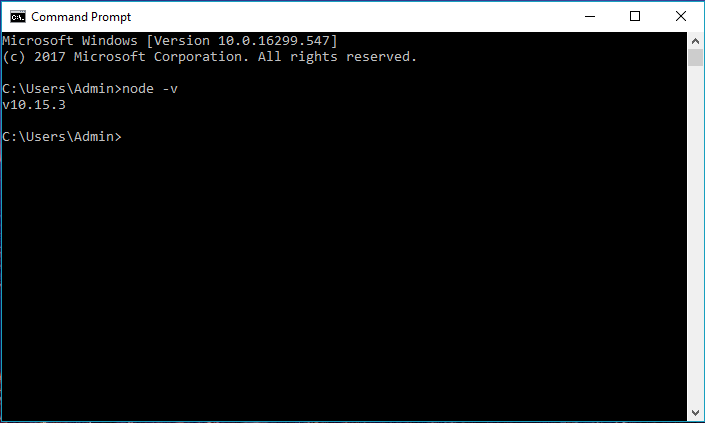
To double check that Node.js was installed fully on your PC, you can test the following command in your Command Prompt (regardless of if you’re using cmd.exe, Powershell, or any other command prompt):
$ node -v
If Node.js was installed fully, the command prompt will print something similar to (but probably not exactly) this:
$ node -v // The command we ran - prints out the version of Node.js that's currently installed
v6.9.5 // The printed version of Node.js that's currently installed - v6.9.5 was the most current LTS release at the time of writing.
Step 4: Update the Local npm Version
As the final step in getting Node.js installed, we’ll update your version of npm — the package manager that comes bundled with Node.js.
Node.js always ships with a specific version of npm — Node.js doesn’t (and shouldn’t!) automatically update npm. The release cycle of the npm CLI client isn’t in sync with the Node.js releases. Because of this, there’s almost certainly going to be a newer version of npm available than the one that is installed as a default in any given Node release.
To quickly and easily update npm, you can run the following command:
npm install npm --global // Update the `npm` CLI client
Now you’ve got Node.js on Windows machine. It’s time to start exploring!
Luckily, we’ve got your back. We’ve written a bunch of articles to help you get started with Node.js! If you’re interested in exploring ES6, you should check out our article on some of the most exciting ES6 features in Node.js. If you’re interested in ways to collaborate with your team a bit better, you should check out our tutorial on using ESLint in projects to improve team collaboration through code standards. Maybe you’d just like to start deploying the applications you’re about to build? In that case, take a peek at our guide on how to deploy Node.js apps on Linux with systemd!
That said, if you want to keep in touch with Node.js and the surrounding ecosystem, you should go follow @NodeSource on Twitter! We’ll keep you updated with important news from the Node.js project, and share the best Node.js tutorials, guides, and tools that the community has to offer.
What’s Node.js® and NPM?
Node.js® is a JavaScript-based environment which you can use to create web-servers and networked applications. You can also use it to perform helpful tasks on your computer such as concatenating and minifying JavaScript files and compiling Sass files into CSS.
NPM is a “package manager” that makes installing Node “packages” fast and easy. A package is just a code library that extends Node by adding useful features. For example, the “request” package simplifies the process of making HTTP requests so you can easily get web resources from other sites.
NPM is installed when you install Node.js®
Prerequisites
- You should have some familiarity with an application that lets you issue command line instructions. For example, the Windows Command Prompt, PowerShell, Cygwin, or the Git shell (which you get when you install Github for Windows).
Installation Overview
Installing Node.js® and NPM is pretty straightforward using the installer package available from the Node.js web site.
Installation Steps
- Download the Windows installer from Nodejs.org.
- Run the installer (the .msi file you downloaded in the previous step.)
- Follow the prompts in the installer (Accept the license agreement, click the NEXT button a bunch of times and accept the default installation settings).
- Restart your computer. You won’t be able to run Node.js until you restart your computer.
Test it!
Make sure you have Node and NPM installed by running simple commands to see what version of each is installed:
- Test Node. To see if Node is installed, open the Windows Command Prompt, Powershell or a similar command line tool, and type
node -v. This should print the version number so you’ll see something like thisv0.10.35. - Test NPM. To see if NPM is installed, type
npm -vin Terminal. This should print the version number so you’ll see something like this1.4.28 - Create a test file and run it. A simple way to test that node.js works is to create a simple JavaScript file: name it hello.js, and just add the code
console.log('Node is installed!');. To run the code simply open your command line program, navigate to the folder where you save the file and typenode hello.js. This will start Node.js and run the code in thehello.jsfile. You should see the outputNode is installed!.
How to Update Node and NPM
New versions of Node and NPM come out frequently. To install the updates, just download the installer from the Nodejs.org site and run it again. The new version of Node.js and NPM will replace the older versions.
How to Uninstall Node and NPM
You uninstall Node.js and NPM the same as you would most all Windows software:
- Open the Windows Control Panel
- Choose the Programs and Features option
- Click the “Uninstall a program”
- Select Node.js, and click the Uninstall link.
Setting up the Node Development Environment
The Node can be installed in multiple ways on a computer. The approach used by you depends on the existing development environment in the system. There are different package installer for different environments. You can install Node by grabbing a copy of the source code and compiling the application. Another way of installing Node is by cloning the GIT repository in all the three environments and then installing it on the system.
Installing Node On Windows (WINDOWS 10):
You have to follow the following steps to install the Node.js on your Windows :
Step-1: Downloading the Node.js ‘.msi’ installer.
The first step to install Node.js on windows is to download the installer. Visit the official Node.js website i.e) https://nodejs.org/en/download/ and download the .msi file according to your system environment (32-bit & 64-bit). An MSI installer will be downloaded on your system.
Step-2: Running the Node.js installer.
Now you need to install the node.js installer on your PC. You need to follow the following steps for the Node.js to be installed:-
- Double click on the .msi installer.
The Node.js Setup wizard will open.
- Welcome To Node.js Setup Wizard.
Select “Next”
- After clicking “Next”, End-User License Agreement (EULA) will open.
Check “I accept the terms in the License Agreement”
Select “Next”
- Destination Folder
Set the Destination Folder where you want to install Node.js & Select “Next”
- Custom Setup
Select “Next”
- Ready to Install Node.js.
Select “Install”
- Installing Node.js.
Do not close or cancel the installer until the install is complete
- Complete the Node.js Setup Wizard.
Click “Finish”
NOTE :
A prompt saying – “This step requires administrative privileges” will appear.
Authenticate the prompt as an “Administrator”

Step 3: Verify that Node.js was properly installed or not.
To check that node.js was completely installed on your system or not, you can run the following command in your command prompt or Windows Powershell and test it:-
C:UsersAdmin> node -v
If node.js was completely installed on your system, the command prompt will print the version of the node.js installed.
Step 4: Updating the Local npm version.
The final step in node.js installed is the updation of your local npm version(if required) – the package manager that comes bundled with Node.js.
You can run the following command, to quickly update the npm
npm install npm –global // Updates the ‘CLI’ client
NOTE :
- You do not need to do anything to the system variables as the windows installer takes care of the system variables itself while installing through the .msi installer
- If you use any other format for installing node.js on your PC, you should put the system variable path for node.js as follows:
PATH : C:Users[username]AppDataRoamingnpm
C:Program Filesnodejs (Path to the nodejs folder)