The process manager + task scheduler approach I posted a year ago works well with some one-off service installations. But recently I started to design system in a micro-service fashion, with many small services talking to each other via IPC. So manually configuring each service has become unbearable.
Towards the goal of installing services without manual configuration, I created serman, a command line tool (install with npm i -g serman) to install an executable as a service. All you need to write (and only write once) is a simple service configuration file along with your executable. Run
serman install <path_to_config_file>
will install the service. stdout and stderr are all logged. For more info, take a look at the project website.
A working configuration file is very simple, as demonstrated below. But it also has many useful features such as <env> and <persistent_env> below.
<service>
  <id>hello</id>
  <name>hello</name>
  <description>This service runs the hello application</description>

  <executable>node.exe</executable>

  <!--
       {{dir}} will be expanded to the containing directory of your
       config file, which is normally where your executable locates
   -->
  <arguments>"{{dir}}hello.js"</arguments>

  <logmode>rotate</logmode>

  <!-- OPTIONAL FEATURE:
       NODE_ENV=production will be an environment variable
       available to your application, but not visible outside
       of your application
   -->
  <env name="NODE_ENV" value="production"/>

  <!-- OPTIONAL FEATURE:
       FOO_SERVICE_PORT=8989 will be persisted as an environment
       variable machine-wide.
   -->
  <persistent_env name="FOO_SERVICE_PORT" value="8989" />
</service>
![]()
It wasn’t my intention when I started the first article but this has become a series of how to run node applications in production with IIS on Windows. These are the previous articles on the topic:
- Hosting a Node.js application on Windows with IIS as reverse proxy
- Using HTTP platform handler to host a node.js application via IIS
In the last article a node web application was deployed on a Windows server. With the help of the HTTP platform handler, IIS manages the node process for us. When it receives a request it will start the node process and pass the web request for node to handle it.
In some cases however we don’t want to expose the node.js web application via IIS. I have built an internal API in the past which should not be accessible from the outside for security reasons. The internal API is only consumed by other applications running on the same server. In this case, we can’t rely on IIS to manage the node process for us as IIS would expose the web application to the internet.
We need an alternative to keep the node process running to make the internal API available on the server via localhost. PM2 can manage the node process and keep it up and running. Unfortunately I did not find a reliable way to start PM2 whenever the Windows Server restarts. Every time the server restarted, the internal API was down and had to be manually started.
Luckily there is a NPM package node-windows which can install a node application as a Windows service. This service can be automatically started when the server restarts.
This is the Hello World sample from the Express website, we will install it as a Windows service:
const express = require('express')
const app = express()
const port = 3000

app.get('/', (req, res) => res.send('Hello World!'))

app.listen(port, () => console.log(`Example app listening at http://localhost:${port}`))
The node-windows NPM package can do this for us. Run the following commands
npm install -g node-windows
npm link node-windows
Once the package is installed it can be used to install the application as a service with the following node script:
var Service = require('node-windows').Service;

// Create a new service object
var svc = new Service({
  name:'Node application as Windows Service',
  description: 'Node application as Windows Service',
  script: 'C:\temp\test.js'
});

// Listen for the "install" event, which indicates the
// process is available as a service.
svc.on('install',function(){
  svc.start();
});

svc.install();
Just run the script as any other node script:
node install-windows-service.js
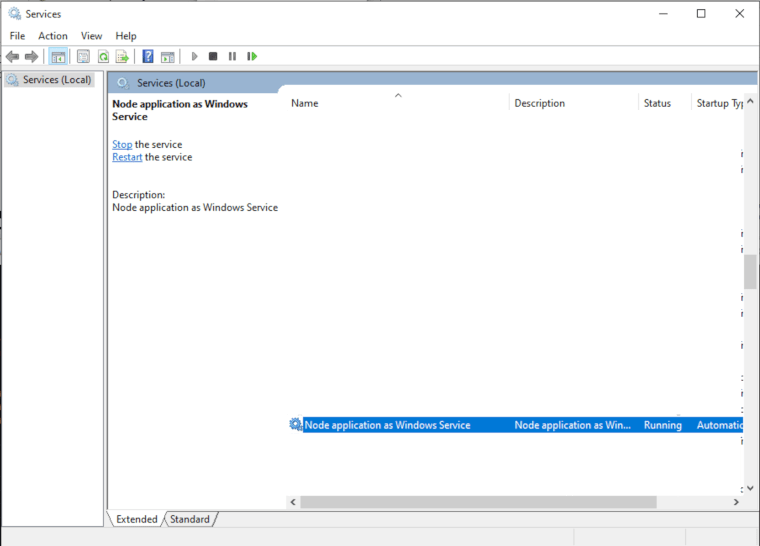
If User Account Control (UAC) is enabled on Windows you will have to give permission a few times to complete the installation. Once this script has finished the service is installed and the application is running. You can find the service in the Services dialog. It will have the name that you have passed to the Service class in the node script.
If the service ever needs to be uninstalled, the Service class also has an uninstall method:
var Service = require('node-windows').Service;

// Create a new service object
var svc = new Service({
  name:'Node application as Windows Service',
  description: 'Node application as Windows Service',
  script: 'C:\temp\test.js'
});

// Listen for the "uninstall" event so we know when it's done.
svc.on('uninstall',function(){
  console.log('Uninstall complete.');
  console.log('The service exists: ',svc.exists);
});

// Uninstall the service.
svc.uninstall();
This can also be run as any other node script:
node uninstall-windows.service.js
Because the Windows service is set to start automatic, it will start every time the server is restarted. Exactly as expected. Happy deploying!
This is a cross post from my own blog.
Windows Services
node-windows has a utility to run Node.js scripts as Windows services. Please note that like all
Windows services, creating one requires administrative privileges. To create a service with
node-windows, prepare a script like:
var Service = require('node-windows').Service;

// Create a new service object
var svc = new Service({
  name:'Hello World',
  description: 'The nodejs.org example web server.',
  script: 'C:\path\to\helloworld.js')
});

// Listen for the "install" event, which indicates the
// process is available as a service.
svc.on('install',function(){
  svc.start();
});

svc.install();
The code above creates a new Service object, providing a pretty name and description.
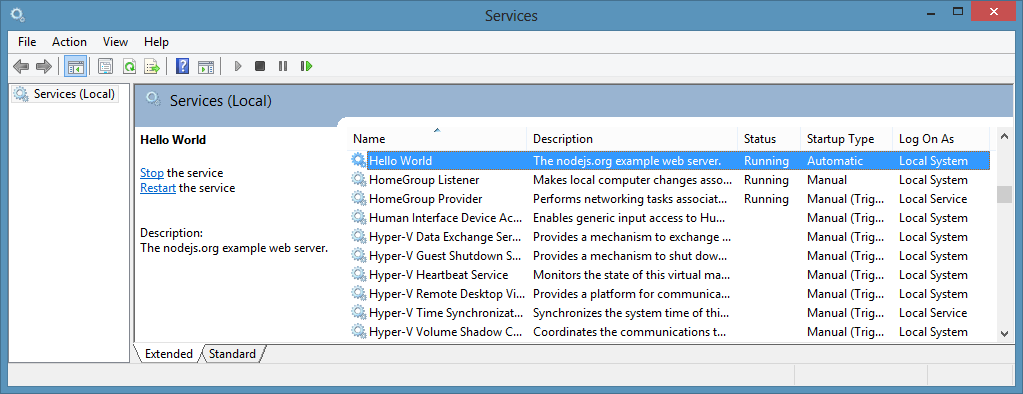
The script attribute identifies the Node.js script that should run as a service. Upon running
this, the script will be visible from the Windows Services utility.

The Service object emits the following events:
- install — Fired when the script is installed as a service.
- alreadyinstalled — Fired if the script is already known to be a service.
- invalidinstallation — Fired if an installation is detected but missing required files.
- uninstall — Fired when an uninstallation is complete.
- start — Fired when the new service is started.
- stop — Fired when the service is stopped.
- error — Fired in some instances when an error occurs.
In the example above, the script listens for the install event. Since this event
is fired when a service installation is complete, it is safe to start the service.
Services created by node-windows are similar to most other services running on Windows.
They can be started/stopped from the windows service utility, via NET START or NET STOP commands,
or even managed using the sc
utility.
Environment Variables
Sometimes you may want to provide a service with static data, passed in on creation of the service. You can do this by setting environment variables in the service config, as shown below:
var svc = new Service({
  name:'Hello World',
  description: 'The nodejs.org example web server.',
  script: 'C:\path\to\helloworld.js',
  env: {
    name: "HOME",
    value: process.env["USERPROFILE"] // service is now able to access the user who created its' home directory
  }
});
You can also supply an array to set multiple environment variables:
var svc = new Service({
  name:'Hello World',
  description: 'The nodejs.org example web server.',
  script: 'C:\path\to\helloworld.js',
  env: [{
    name: "HOME",
    value: process.env["USERPROFILE"] // service is now able to access the user who created its' home directory
  },
  {
    name: "TEMP",
    value: path.join(process.env["USERPROFILE"],"/temp") // use a temp directory in user's home directory
  }]
});
User Account Attributes
If you need to specify a specific user or particular credentials to manage a service, the following
attributes may be helpful.
The user attribute is an object with three keys: domain,account, and password.
This can be used to identify which user the service library should use to perform system commands.
By default, the domain is set to the local computer name, but it can be overridden with an Active Directory
or LDAP domain. For example:
app.js
var Service = require('node-windows').Service;

// Create a new service object
var svc = new Service({
  name:'Hello World',
  script: require('path').join(__dirname,'helloworld.js')
});

svc.user.domain = 'mydomain.local';
svc.user.account = 'username';
svc.user.password = 'password';
...
Both the account and password must be explicitly defined if you want the service module to
run commands as a specific user. By default, it will run using the user account that launched
the process (i.e. who launched node app.js).
The other attribute is sudo. This attribute has a single property called password. By supplying
this, the service module will attempt to run commands using the user account that launched the
process and the password for that account. This should only be used for accounts with administrative
privileges.
app.js
var Service = require(‘node-windows’).Service;
// Create a new service object
var svc = new Service({
  name:'Hello World',
  script: require('path').join(__dirname,'helloworld.js')
});

svc.sudo.password = 'password';
...
Cleaning Up: Uninstall a Service
Uninstalling a previously created service is syntactically similar to installation.
var Service = require('node-windows').Service;

// Create a new service object
var svc = new Service({
  name:'Hello World',
  script: require('path').join(__dirname,'helloworld.js')
});

// Listen for the "uninstall" event so we know when it's done.
svc.on('uninstall',function(){
  console.log('Uninstall complete.');
  console.log('The service exists: ',svc.exists);
});

// Uninstall the service.
svc.uninstall();
The uninstall process only removes process-specific files. It does NOT delete your Node.js script!
What Makes node-windows Services Unique?
Lots of things!
Long Running Processes & Monitoring:
The built-in service recovery for Windows services is fairly limited and cannot easily be configured
from code. Therefore, node-windows creates a wrapper around the Node.js script. This wrapper
is responsible for restarting a failed service in an intelligent and configurable manner. For example,
if your script crashes due to an unknown error, node-windows will attempt to restart it. By default,
this occurs every second. However; if the script has a fatal flaw that makes it crash repeatedly,
it adds unnecessary overhead to the system. node-windows handles this by increasing the time interval
between restarts and capping the maximum number of restarts.
Smarter Restarts That Won’t Pummel Your Server:
Using the default settings, node-windows adds 25% to the wait interval each time it needs to restart
the script. With the default setting (1 second), the first restart attempt occurs after one second.
The second occurs after 1.25 seconds. The third after 1.56 seconds (1.25 increased by 25%) and so on.
Both the initial wait time and the growth rate are configuration options that can be passed to a new
Service. For example:
var svc = new Service({
  name:'Hello World',
  description: 'The nodejs.org example web server.',
  script: 'C:\path\to\helloworld.js'),
  wait: 2,
  grow: .5
});
In this example, the wait period will start at 2 seconds and increase by 50%. So, the second attempt
would be 3 seconds later while the fourth would be 4.5 seconds later.
Don’t DOS Yourself!
Repetitive recycling could potentially go on forever with a bad script. To handle these situations, node-windows
supports two kinds of caps. Using maxRetries will cap the maximum number of restart attempts. By
default, this is unlimited. Setting it to 3 would tell the process to no longer restart a process
after it has failed 3 times. Another option is maxRestarts, which caps the number of restarts attempted
within 60 seconds. For example, if this is set to 3 (the default) and the process crashes/restarts repeatedly,
node-windows will cease restart attempts after the 3rd cycle in a 60 second window. Both of these
configuration options can be set, just like wait or grow.
Finally, an attribute called abortOnError can be set to true if you want your script to not restart
at all when it exits with an error.
How Services Are Made
node-windows uses the winsw utility to create a unique .exe
for each Node.js script deployed as a service. A directory called daemon is created and populated
with myappname.exe and myappname.xml. The XML file is a configuration for the executable. Additionally,
winsw will create some logs for itself in this directory (which are viewable in the Event log).
The myappname.exe file launches the node-windows wrapper, which is responsible for monitoring and managing
the script. Since this file is a part of node-windows, moving the node-windows directory could result in
the .exe file not being able to find the Node.js script. However; this should not be a problem if
node-windows is installed globally, per the recommended installation instructions.
All of these daemon-specific files are created in a subdirectory called daemon, which is created in the
same directory where the Node.js script is saved. Uninstalling a service will remove these files.
Event Logging
Services created with node-windows have two event logs that can be viewed through the Windows Event Viewer.
A log source named myappname.exe provides basic logging for the executable file. It can be used to see
when the entire service starts/stops or has errors. A second log, named after your service name (i.e. My App Name),
is used by the node-windows monitor. It is possible to write to this log from the Node.js script using
the node-windows Event Logging.
Event Logging
New as of v0.1.0 is a non-C++ based event logging utility. This utility can write to the event log,
making your logs visible from the Event Viewer.
To create a logger:
var EventLogger = require('node-windows').EventLogger;

var log = new EventLogger('Hello World');

log.info('Basic information.');
log.warn('Watch out!');
log.error('Something went wrong.');
Looks similar to:
Some lesser-used options are also available through node-windows event logging.
log.auditSuccess('AUser Login Success');
log.auditFailure('AUser Login Failure');
Each log type (info, warn, error, auditSuccess, and auditFailure) method optionally accepts two additional
arguments, including a code and callback. By default, the event code is 1000 if not otherwise specified.
To provide a custom event code with a log message and write that message to the console, the following code could
be used:
log.info('Something different happened!', 1002, function(){
  console.log('Something different happened!');
});
By default, event logs are all part of the APPLICATION scope. However; it is also possible to use the SYSTEM log.
To do this, a configuration object must be passed to the new log:
var EventLogger = require('node-windows').EventLogger;
var log = new EventLogger({
  source: 'My Event Log',
  eventLog: 'SYSTEM'
});
Licenses
winsw and sudowin are the copyrights of their respective owners. winsw
is distributed under an MIT license. sudowin is distributed under a BSD license.
All other scripts are Copyright (c) Corey Butler under an MIT license.
(The MIT License)
Copyright (c) 2013 Corey Butler
Permission is hereby granted, free of charge, to any person obtaining
a copy of this software and associated documentation files (the
‘Software’), to deal in the Software without restriction, including
without limitation the rights to use, copy, modify, merge, publish,
distribute, sublicense, and/or sell copies of the Software, and to
permit persons to whom the Software is furnished to do so, subject to
the following conditions:
The above copyright notice and this permission notice shall be
included in all copies or substantial portions of the Software.
THE SOFTWARE IS PROVIDED ‘AS IS’, WITHOUT WARRANTY OF ANY KIND,
EXPRESS OR IMPLIED, INCLUDING BUT NOT LIMITED TO THE WARRANTIES OF
MERCHANTABILITY, FITNESS FOR A PARTICULAR PURPOSE AND NONINFRINGEMENT.
IN NO EVENT SHALL THE AUTHORS OR COPYRIGHT HOLDERS BE LIABLE FOR ANY
CLAIM, DAMAGES OR OTHER LIABILITY, WHETHER IN AN ACTION OF CONTRACT,
TORT OR OTHERWISE, ARISING FROM, OUT OF OR IN CONNECTION WITH THE
SOFTWARE OR THE USE OR OTHER DEALINGS IN THE SOFTWARE.
Why Run a Nodejs Application as a Service
The Windows Services is a core component of the Microsoft Windows Operating System. It enables the creation and management of long-running processes. Furthermore, unlike regular software which an end user launches and only runs when the user is online, Windows Services starts without any user intervention and continues running long after the user logs off. The services run in the background and usually kicks in when the machine boots.
However, the built-in service recovery for Windows services is fairly limited and cannot easily be configured from code. This is where node-windows service has its advantage.
The node-windows creates a wrapper around the Node.js script. This wrapper is responsible for restarting a failed service in an intelligent and configurable manner.
For example, if your script crashes due to an unknown error, node-windows will attempt to restart it. By default, this occurs every second. However, if the script has a fatal flaw that makes it crash repeatedly, it adds unnecessary overhead to the system. node-windows handles this by increasing the time interval between restarts and capping the maximum number of restarts.
Flexibility in the Configuration of Services
Press the Windows+R keys to open the Run dialog, type services.msc, press Enter, and the Services window will open.
- View the list of installed services along with Service Name, descriptions and configuration.
- Start, Stop, Pause or Restart services.
- Specify service parameters when applicable.
- Automatic: The service starts at system login.
- Automatic (Delayed): The service starts a short while after the system has finished starting up. This option was introduced in Windows Vista in an attempt to reduce the boot-to-desktop time. However, not all services support delayed start.
- Manual: The service starts only when explicitly summoned.
- Disabled: The service is disabled. It will not run.
- Change the user account context in which the service operates.
- Configure recovery actions that should be taken if a service fails.
- Inspect service dependencies, discovering which services or device drivers depend on a given service or upon which services or device drivers a given service depends.
Obviously, these services make work efficient and convenient, which is why a service for the Node.js application is required.
Configuring an application as a service has many advantages. The Node.js application starts on boot and continuously runs for as long as your system is ON. For running the Node.js application as a service, you require an additional package. The package will perform the actual job of starting and re-starting your app.
One such package is the ‘Node-windows’ npm. This package, helps you run the Node.js application as a service.
The node-windows npm module
The node-windows module has a utility to run Node.js scripts as Windows services. Install node-windows with npm. The recommended way is by using the global flag (-g), the reason being, when you use the global flag (-g) you do not need to install node-windows for each new project in the system you are using.
npm install -g node-windows
It is certainly possible to use node-windows without the global flag as well.
npm install node-windows
Please note that like all Windows services, creating this requires administrative privileges. To create a service with node-windows, prepare a script like
     var Service = require('node-windows').Service;
     // Create a new service object
     var svc = new Service({
          name:'Hello World',
          description: 'The nodejs.org example web server.',
          script: 'C:\path\to\helloworld.js'
     });

     // Listen for the "install" event, which indicates the
     // process is available as a service.

     svc.on('install',function(){
                svc.start();
     });

     svc.install();
The above code is to create a new Service object, provide a pretty name and description as well. The script attribute identifies the Node.js script which should run as a service (In this case helloworld.js). After running, the script will be visible from the Windows Services utility as shown below.
Follow the above steps to configure and run the Nodejs Application as a service on windows using node-windows. For more information on NodeJs and MEAN, please follow this blog for more such topics.

Post Views: 22,638

In a development environment, it’s very easy to run your server using a simple command but in a production environment, your Node application needs to be up and running at all times.
To run a Node application as a Windows service, you need to leverage another third-party tool. The best and the easiest one to configure in this case would be NSSM.
What does NSSM offer?
Once you install and configure NSSM for your Node.js application, you can be assured that your server will run forever as a background service.
Here are the most salient features of NSSM:
- NSSM is a free and open source software
- It converts executables into Windows services
- NSSM can manage the CPU affinity and process priority of the managed application
- It acts as a Load balancer for your services
- NSSM monitors the services at all times. Whenever there’s a failure or machine reboots, it will automatically start the services
How to run Node server as a Service using NSSM
Here are step-by-step instructions with screenshots on how to install and use NSSM to ensure the availability of your Node application server at all times:
Step-1: Download NSSM
You can download the latest package of NSSM from HERE.
If you’re running Windows 10, you should download the latest pre-release build to avoid any problems.

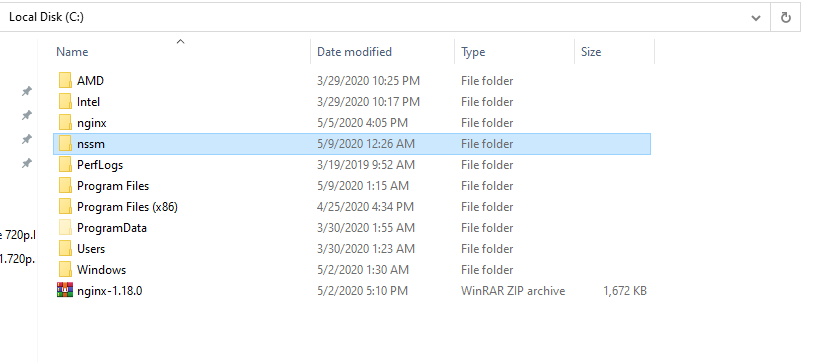
Step-2: Renaming and placing the NSSM folder in C: drive
It’s not a compulsory step but it’s better to rename the folder to a simple name and place it in the C: drive for better accessibility.
For this exercise we are going to name the folder “nssm” and move it to the main C: drive.
Step-3: Creating a Service for your Nodejs Application
The next step is to create a Windows service using NSSM for your Node application. Follow the procedure step-by-step and make sure to get the locations of the folders right.
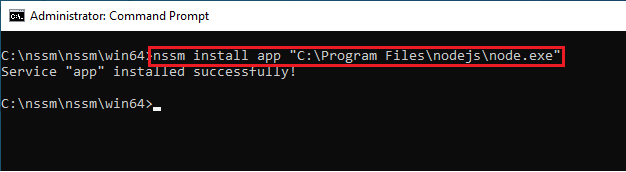
- Open the command prompt and make sure to run as Administrator.
- Traverse to the path where nssm.exe is located. If you followed the previous step it should be located in C:nssmnssmwin64 (If your Windows is 4-bit).

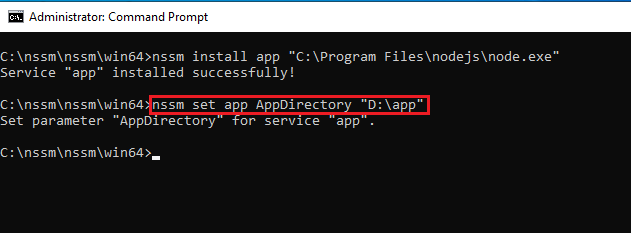
- Assuming you have Nodejs installed in the default folder (C:Program Filesnodejs), you need to enter the following command in the command prompt: (app is the service name that you want to assign for your Node application)

- Now we need to set the App Directory for the Nodejs app that you need to run as service. Assuming the App is located at: D:app Enter this command:

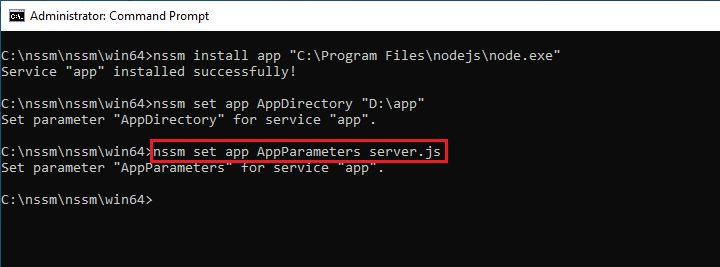
- Once that’s done, you need to set the App parameters to the server.js file that needs to run every time. Here’s the command to do that:

- Now finally, you can initiate the new service with the command:


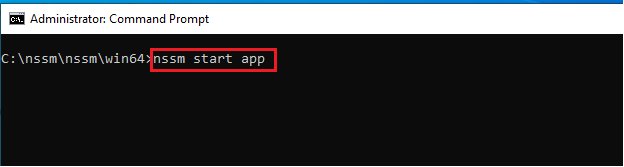
And that is it! Your Nodejs app will now run as a background Windows service. If anything fails or your machine boots up, the application will launch automatically, ensuring maximum availability for your Node application.
Additional Resources
- How to run any Application as a Windows Service (Step-by-step)


In a recent project we are using websockets to respond in Apex to certain database events.
The websocket server is based upon node.js. One of the tasks was to setup this server as an service under a normal Windows Server 2003 (yes I know it is old) infrastructure. This post describes the steps how to setup such a service and also includes some monitoring information.
The prerequisties are that you already need to have node installed on your machine.
To start the websocket server we would usually call
node synwsserver.js
This starts the server. All the output (console.log) will be written to the terminal.
But we don’t want to run it manually each time. Instead we would like to setup it as a windows service. So here is how to achieve that. The same logic can be applied for any node module, not just for websockets.
1) Load node-windows
The node package that I used is node-windows. It is very lightweight and did not have dependencies to node-gyp which often gives trouble.
The command to install it is:
npm install node-windows
The author recommends to install it using the global flag -g. You might want to consider it. I did not encounter issues without the global flag.
2) Install the service
In the node “shell” run the following commands.
The script name is the same script that would be called directly from node.
File: installServiceApexWS.js
var Service = require('node-windows').Service;

// Create a new service object
var svc = new Service({
  name:'syn-apex-websocket',
  description: 'The websocket server for the APEX project.',
  script: 'D:\tomcat\nodejs\synwsserver.js'
});

// Listen for the 'install' event, which indicates the
// process is available as a service.
svc.on('install',function(){
  svc.start();
});

// install the service
svc.install();
The name and the description can then be seen in the windows service tool.
Result

And we are able to start and stop the service.
Problem solved!
Ok there is a tiny bit more. We want to be able to uninstall it as well. And we need to think about the messages that were previously written to the console.
Run in Batch
The sequence of javascript commands can also be put into a .BAT file. I choose to separate the batch call from the js code, so there are two files now.
File: installServiceApexWS.bat
echo "Installing service..."
start "install service - Syntegris APEX websocket server" node installServiceApexWS.js
echo "Service installiert."
exit;
3) Uninstall the service
The logic to deinstall the service is very similar to installing it.
File: uninstallServiceApexWS.js
var Service = require('node-windows').Service;

// Create a new service object
var svc = new Service({
  name:'syn-apex-websocket',
  description: 'The websocket server for the APEX project.',
  script: 'D:\tomcat\nodejs\synwsserver.js'
});

// Listen for the 'uninstall' event so we know when it is done.
svc.on('uninstall',function(){
  console.log('Uninstall complete.');
  console.log('The service exists: ',svc.exists);

});

// Uninstall the service.
svc.uninstall();
File: uninstallServiceApexWS.bat
echo "Uninstalling service..."
start "uninstall service - Syntegris APEX websocket server"  node uninstallServiceApexWS.js
echo "Service deinstalliert."
exit;
4) Add event logging
Node-windows comes with same basic windows event logging. That means certain type of actions can be written into the default windows eventlog.
An example
/*
  add logging for Windows events
*/
var EventLogger = require('node-windows').EventLogger;
var log = new EventLogger('syn-apex-websocket');

...

/* Start listening on the configured port and write to standard output*/
server.listen(config.port, function() {
    console.log((new Date()) + ' Server is listening on port ' + config.port);
    log.info('Server is listening on port ' + config.port);

});
An this is how the result looks like in the Event Viewer (search for Event on your Windows Server) to find the tool.

Instructor: [00:00] One of the easiest ways to install a node application as a window service is to use an application called NSSM. NSSM stands for the Non-Sucking Service Manager, and you can download it from this URL.
[00:12] After installing NSSM, if you open a command prompt with administration access and navigate to the directory, entering NSSM on its own will give you a list of commands. What we want to use is NSSM install.
[00:28] We’re also going to give it a name. I recommend you prefix all your services with a common set of initials, making them easier to find in the task manager. We’ll call ours MBS. This will then display the NSSM GUI.
[00:41] Within the NSSM GUI, the first thing we want to do is find the path to our node.exe. This is what we’re going to use to start our node service.
[00:56] The next thing we need is a startup directory. This is the directory that our app lives in. Finally, we need to give the arguments we would give to the command line. In our case, we would use start, as in node-start.
[01:13] The service name is what we gave it when we launched this GUI, and that’s fine. The details, we will keep the display name the same. The description should be something meaningful who would understand what the service does.
[01:30] Startup type, will either be automatic, so when the service reboots the service restarts, which is what you would normally want.
[01:36] Automatic delayed start, that will be if you want the service to not start initially and give a chance for something else to start. Manual and disabled are if you don’t want this to be an automatic starting service. Log on.
[01:50] This is a test box. We’re going to use a local system account. In production, you should use a user account that has sufficient access to run the service.
[01:59] Dependencies, this allows you to define other services that this service may rely on. For instance, you may want to specify MongoDB starts first before this service starts. Let’s install the service. We get a prompt back from NSSM saying successfully installed.
[02:15] Looking under our services within task manager, we see our new service mbtest, which is currently stopped. I open the services up, find the disservice, I can now start it. My service is now successfully started. If the server is restarted, this service will start automatically.
[02:34] One thing you need to do is you should be remotely monitoring your window services to make sure that this is running successfully.