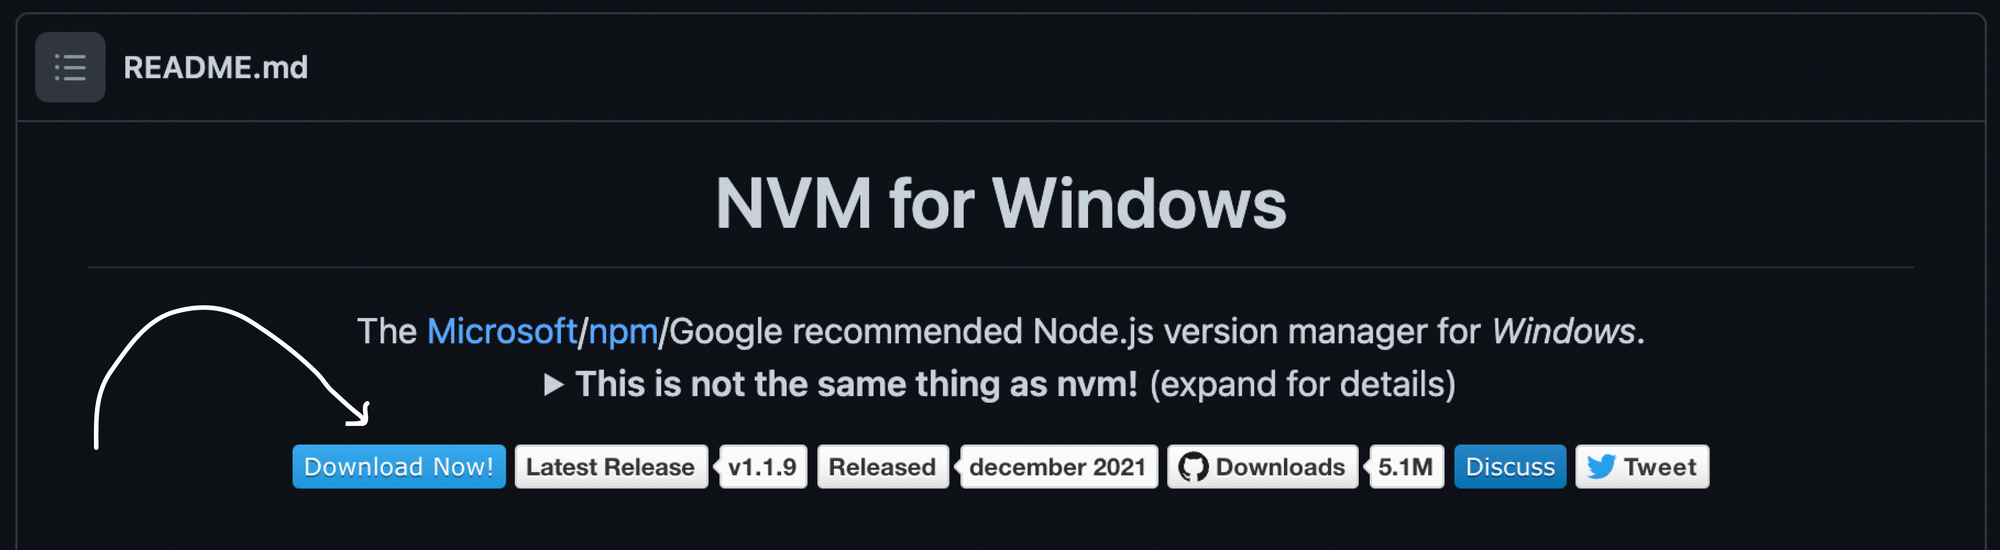
NVM for Windows
The Microsoft/npm/Google recommended Node.js version manager for Windows.
This is not the same thing as nvm! (expand for details)
The original nvm is a completely separate project for Mac/Linux only. This project uses an entirely different philosophy and is not just a clone of nvm. Details are listed in Why another version manager? and what’s the big difference?.

Sponsors
Seeking Feedback:
We’re working on Runtime (rt), the successor to NVM For Windows. Please contribute by taking a minute to complete this form. Thank you!
Overview
Manage multiple installations of node.js on a Windows computer.
tl;dr Similar (not identical) to nvm, but for Windows. Has an installer. Download Now!
This has always been a node version manager, not an io.js manager, so there is no back-support for io.js. Node 4+ is supported. Remember when running nvm install or nvm use, Windows usually requires administrative rights (to create symlinks).

There are situations where the ability to switch between different versions of Node.js can be very useful. For example, if you want to test a module you’re developing with the latest bleeding edge version without uninstalling the stable version of node, this utility can help.

Installation & Upgrades
⭐ ⭐ Uninstall any pre-existing Node installations!! ⭐ ⭐
Uninstall any existing versions of Node.js before installing NVM for Windows (otherwise you’ll have conflicting versions). Delete any existing Node.js installation directories (e.g., %ProgramFiles%nodejs) that might remain. NVM’s generated symlink will not overwrite an existing (even empty) installation directory.
👀 Backup any global npmrc config 👀
(e.g. %AppData%npmetcnpmrc)
Alternatively, copy the settings to the user config %UserProfile%.npmrc. Delete the existing npm install location (e.g. %AppData%npm) to prevent global module conflicts.
Install nvm-windows
Use the latest installer (comes with an uninstaller). Alternatively, follow the manual installation guide.
If NVM4W doesn’t appear to work immediately after installation, restart the terminal/powershell (not the whole computer).

Reinstall any global utilities
After install, reinstalling global utilities (e.g. yarn) will have to be done for each installed version of node:
nvm use 14.0.0
npm install -g yarn
nvm use 12.0.1
npm install -g yarn
Upgrading nvm-windows
💡 As of v1.1.8, there is an upgrade utility that will automate the upgrade process.
To upgrade nvm-windows, run the new installer. It will safely overwrite the files it needs to update without touching your node.js installations. Make sure you use the same installation and symlink folder. If you originally installed to the default locations, you just need to click «next» on each window until it finishes.
Usage
nvm-windows runs in an Admin shell. You’ll need to start powershell or Command Prompt as Administrator to use nvm-windows
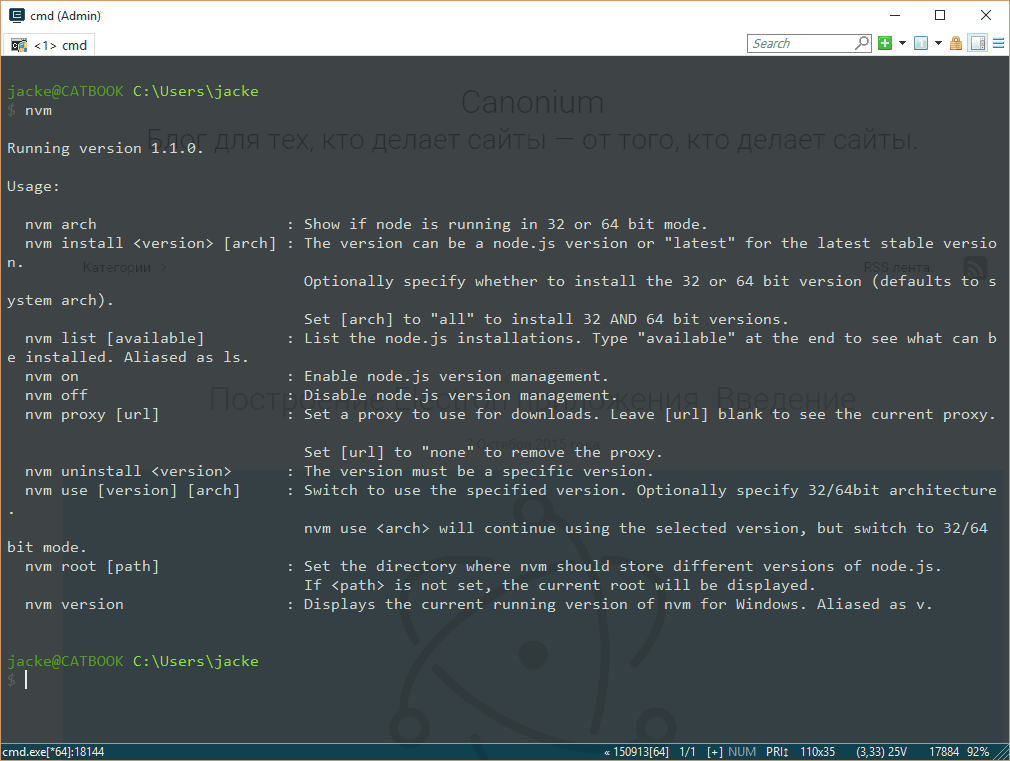
NVM for Windows is a command line tool. Simply type nvm in the console for help. The basic commands are:
nvm arch [32|64]: Show if node is running in 32 or 64 bit mode. Specify 32 or 64 to override the default architecture.nvm check: Check the NVM4W process for known problems.nvm current: Display active version.nvm install <version> [arch]: The version can be a specific version, «latest» for the latest current version, or «lts» for the most recent LTS version. Optionally specify whether to install the 32 or 64 bit version (defaults to system arch). Set [arch] to «all» to install 32 AND 64 bit versions. Add--insecureto the end of this command to bypass SSL validation of the remote download server.nvm list [available]: List the node.js installations. Typeavailableat the end to show a list of versions available for download.nvm on: Enable node.js version management.nvm off: Disable node.js version management (does not uninstall anything).nvm proxy [url]: Set a proxy to use for downloads. Leave[url]blank to see the current proxy. Set[url]to «none» to remove the proxy.nvm uninstall <version>: Uninstall a specific version.nvm use <version> [arch]: Switch to use the specified version. Optionally uselatest,lts, ornewest.newestis the latest installed version. Optionally specify 32/64bit architecture.nvm use <arch>will continue using the selected version, but switch to 32/64 bit mode. For information about usingusein a specific directory (or using.nvmrc), please refer to issue #16.nvm root <path>: Set the directory where nvm should store different versions of node.js. If<path>is not set, the current root will be displayed.nvm version: Displays the current running version of NVM for Windows.nvm node_mirror <node_mirror_url>: Set the node mirror.People in China can use https://npmmirror.com/mirrors/node/nvm npm_mirror <npm_mirror_url>: Set the npm mirror.People in China can use https://npmmirror.com/mirrors/npm/
⚠️ Gotcha!
Please note that any global npm modules you may have installed are not shared between the various versions of node.js you have installed. Additionally, some npm modules may not be supported in the version of node you’re using, so be aware of your environment as you work.
📛 Antivirus
Users have reported some problems using antivirus, specifically McAfee. It appears the antivirus software is manipulating access to the VBScript engine. See issue #133 for details and resolution.
v1.1.8 is not code signed, but all other versions are signed by Ecor Ventures LLC/Author.io. This should help prevent false positives with most antivirus software.
v1.1.8+ was not code signed due to an expired certificate (see the release notes for reasons). v1.1.9 is code signed thanks to ajyong, who sponsored the new certificate.
Using Yarn
tldr; npm i -g yarn
See the wiki for details.
Build from source
- Install go from http://golang.org
- Download source / Git Clone the repo
- Change GOARCH to amd64 in build.bat if you feel like building a 64-bit executable
- Fire up a Windows command prompt and change directory to project dir
- Execute
go get github.com/blang/semver - Execute
go get github.com/olekukonko/tablewriter - Execute
build.bat - Check the
distdirectory for generated setup program.
💡 Why another version manager?
There are several version managers for node.js. Tools like nvm and n
only run on Mac OSX and Linux. Windows users are left in the cold? No. nvmw and nodist
are both designed for Windows. So, why another version manager for Windows?
The architecture of most node version managers for Windows rely on .bat files, which do some clever tricks to set or mimic environment variables. Some of them use node itself (once it’s downloaded), which is admirable, but prone to problems. Right around node 0.10.30, the installation structure changed a little, causing some of these to just stop working with anything new.
Additionally, some users struggle to install these modules since it requires a little more knowledge of node’s installation structure. I believe if it were easier for people to switch between versions, people might take the time to test their code on back and future versions… which is just good practice.
💡 What’s the big difference?
First and foremost, this version of nvm has no dependency on node. It’s written in Go, which is a much more structured approach than hacking around a limited .bat file. It does not rely on having an existing node installation. Go offers the ability to create a Mac/Linux version on the same code base. In fact, this is already underway.
The control mechanism is also quite different. There are two general ways to support multiple node installations with hot switching capabilities. The first is to modify the system PATH any time you switch versions, or bypass it by using a .bat file to mimic the node executable and redirect accordingly. This always seemed a little hackish to me, and there are some quirks as a result of this implementation.
The second option is to use a symlink. This concept requires putting the symlink in the system PATH, then updating its target to the node installation directory you want to use. This is a straightforward approach, and seems to be what people recommend…. until they realize just how much of a pain symlinks are on Windows. This is why it hasn’t happened before.
In order to create/modify a symlink, you must be running as an admin, and you must get around Windows UAC (that annoying prompt). Luckily, this is a challenge I already solved with some helper scripts in node-windows. As a result, NVM for Windows maintains a single symlink that is put in the system PATH during installation only. Switching to different versions of node is a matter of switching the symlink target. As a result, this utility does not require you to run nvm use x.x.x every time you open a console window. When you do run nvm use x.x.x, the active version of node is automatically updated across all open console windows. It also persists between system reboots, so you only need to use nvm when you want to make a change.
NVM for Windows comes with an installer, courtesy of a byproduct of my work on Fenix Web Server.
Overall, this project brings together some ideas, a few battle-hardened pieces of other modules, and support for newer versions of node.
NVM for Windows recognizes the «latest» versions using a list provided by the Node project. Version 1.1.1+ use this list. Before this list existed, I was scraping releases and serving it as a standalone data feed. This list was used in versions 1.1.0 and prior, but is now deprecated.
Motivation
I needed it, plain and simple. Additionally, it’s apparent that support for multiple versions is not coming to node core. It was also an excuse to play with Go.
Why Go? Why not Node?
I chose Go because it is cross-platform, felt like less overhead than Java, has been around longer than most people think. Plus, I wanted to experiment with it. I’ve been asked why I didn’t write it with Node. Trying to write a tool with the tool you’re trying to install doesn’t make sense to me. As a result, my project requirements for this were simple… something that’s not Node. Node will continue to evolve and change. If you need a reminder of that, remember io.js, Ayo, all the breaking changes between 4.x.x and 6.x.x, and the shift to ES Modules in 12+. Change is inevitable in the world of software. JavaScript is extremely dynamic.
🙏 Thanks
Thanks to everyone who has submitted issues on and off Github, made suggestions, and generally helped make this a better project. Special thanks to
- @vkbansal, who provided significant early feedback throughout the early releases.
- @rainabba and @sullivanpt for getting Node v4 support integrated.
- @s-h-a-d-o-w who resolved the longstanding space escaping issue in path names (#355).
- ajyong who sponsored the code signing certificate in late 2021.
In this article, I’ll explain how you can install NVM, or Node Version Manager, on Windows, Linux, and Mac.
What is NVM?
Node Version Manager (NVM), as the name implies, is a tool for managing Node versions on your device.
Different projects on your device may be using different versions of Node. Using only one version (the one installed by npm) for these different projects may not give you accurate execution results.
For example, if you use a Node version of 10.0.0 for a project that uses 12.0.0, you may get some errors. And if you update the Node version to 12.0.0 with npm, and you use it for a project that uses 10.0.0, you may not get the expected experience.
In fact, you would most likely get a warning that says:
This project requires Node version X
Instead of using npm to install and uninstall Node versions for your different projects, you can use nvm, which helps you effectively manage your node versions for each project.
NVM allows you to install different versions of Node, and switch between these versions depending on the project that you’re working on via the command line.
In the next sections, I’ll show you how to install NVM on your Windows, Linux, or Mac device.
Before proceeding, I also recommend that you uninstall Node.js if you have it installed already so that you do not have any conflicts with Node.js and nvm.
How to Install NVM on Windows
NVM is mostly supported on Linux and Mac. It doesn’t have support for Windows. But there’s a similar tool created by coreybutler to provide an nvm experience in Windows called nvm-windows.
nvm-windows provides a management utility for managing Node.js versions in Windows. Here’s how to install it:
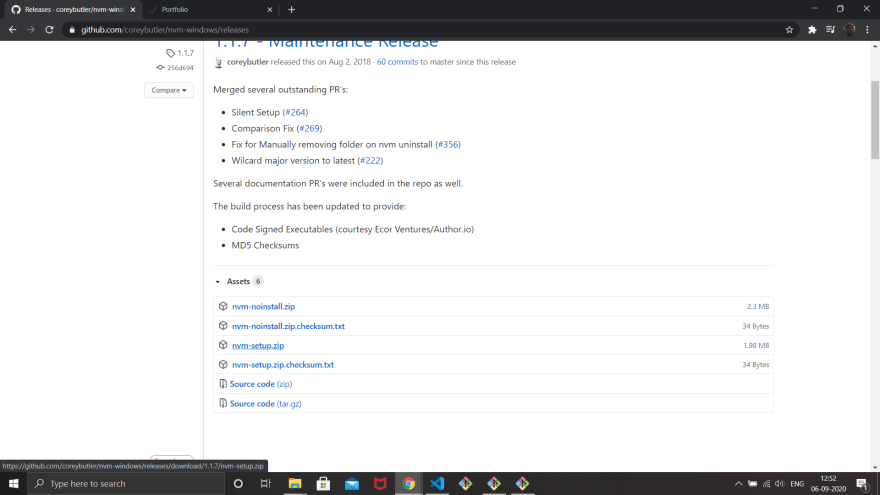
1. Click on «Download Now»
In the nvm-windows repository Readme, click on «Download Now!»:
This will open a page showing different NVM releases.
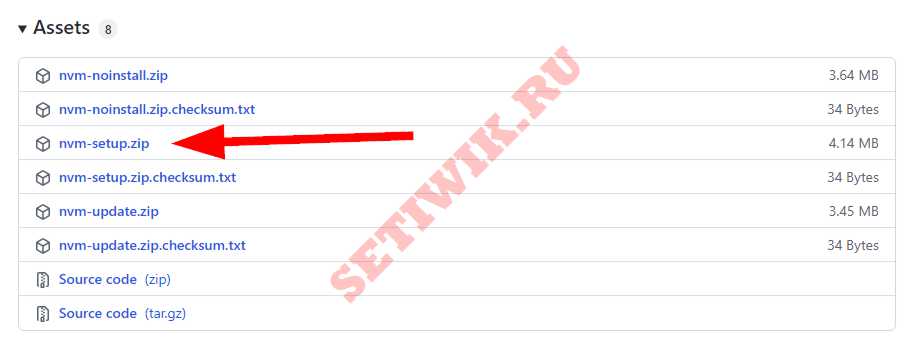
2. Install the .exe file of the latest release
In the latest release (which as of the time of writing this is 1.1.9), you’ll find different assets. Click on the nvm-setup.exe asset which is the installation file for the tool:

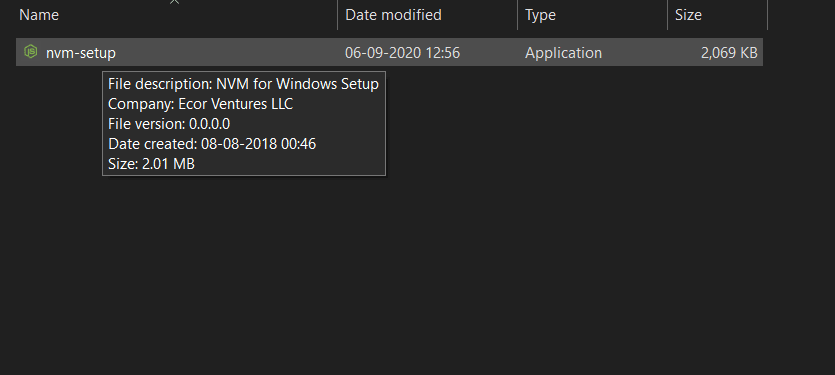
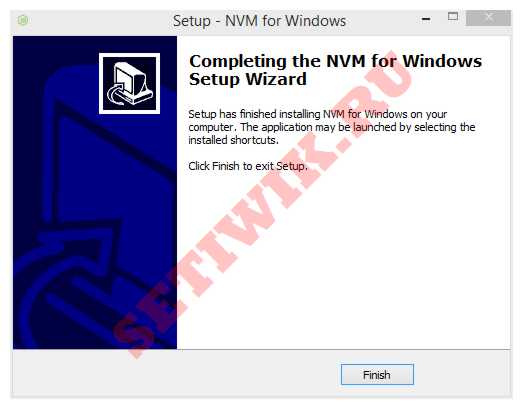
3. Complete the Installation Wizard
Open the file that you have downloaded, and complete the installation wizard.
When done, you can confirm that nvm has been installed by running:
nvm -v
If nvm was installed correctly, this command will show you the nvm version installed.
How to Install NVM on Linux and Mac
Since Linux and Mac have some similarities (they are both UNIX-based OSes), you can install nvm on them in similar ways.
1. Run the nvm installer
In your terminal, run the nvm installer like this:
curl -o- https://raw.githubusercontent.com/nvm-sh/nvm/v0.39.1/install.sh | bash

# or

wget -qO- https://raw.githubusercontent.com/nvm-sh/nvm/v0.39.1/install.sh | bash
You can use curl or bash depending on the command available on your device.
These commands will clone the nvm repository to a ~/.nvm directory on your device.
2. Update your profile configuration
The installation process from step 1 should also automatically add the nvm configuration to your profile. If you’re using zsh, that would be ~/.zshrc. If you’re using bash, that would be ~/.bash_profile…or some other profile.
If it doesn’t automatically add nvm configuration, you can add it yourself to your profile file:
export NVM_DIR="$([ -z "${XDG_CONFIG_HOME-}" ] && printf %s "${HOME}/.nvm" || printf %s "${XDG_CONFIG_HOME}/nvm")"
[ -s "$NVM_DIR/nvm.sh" ] && . "$NVM_DIR/nvm.sh"
This command above loads nvm for use.
3. Reload the shell configuration
With your profile configuration updated, now you will reload the configuration for your terminal to use:
source ~/.bashrc
With this command executed, nvm is ready for you to use. You can confirm that nvm is installed correctly by running:
nvm -v
This should show the version of nvm installed.
Wrapping up
With nvm installed, you can now install, uninstall, and switch between different Node versions in your Windows, Linux, or Mac device.
You can install Node versions like this:
nvm install latest
This command will install the last version of Node:
nvm install vX.Y.Z
This will install the X.Y.Z Node version.
You can also make a version your default by running:
nvm alias default vX.Y.Z
And if you want to use a specific version at any point, you can run the following in your terminal:
nvm use vA.B.C
NVM makes it easier to manage multiple versions of Node.js across different projects that require different versions.
Learn to code for free. freeCodeCamp’s open source curriculum has helped more than 40,000 people get jobs as developers. Get started

![]()
Introduction
I had recently purchased a Windows 10 laptop and I wanted to install Node.js. I usually prefer to use a Node Version Manager to install Node.js.
The reason I choose to do that is because I usually have to work with multiple applications that need require different Node.js versions, and using a node version manager (NVM) it is very easy to switch versions.
This article is more of a user guide for folks who are interested to install a Node Version Manager for Windows 10 Operating System.
A Quick Look at the Key Terminologies
I wanted to mention the following terminologies for absolute beginners. So, feel free, to skip this section, if you are already familiar.
-
nvm — Node Version Manager. It is a tool that allows you to download and install Node.js. It allows you to pick and choose the Node.js version that you wish to use.
-
Node.js — It is a platform for running JavaScript applications.
-
npm — Node Package Manager. It is a tool that allows you to install JavaScript packages. npm comes along with Node.js. So, if you have installed Node.js, you’ll have npm installed as well.
Installing NVM for Windows 10
Go to the nvm-windows Git Repository
-
Using your browser navigate to the Git repository for nvm-windows located over here.
-
Click on the ‘nvm-setup.zip’ link from the ‘assets’ table as shown in the image below.
Locate the Zip File & Extract
- The Zip file should have been downloaded to your Downloads folder (or where ever you have configured your downloads to be saved).

- Unzip/Extract the contents to the same folder.


- You should have the file nvm-setup.exe extracted in the same folder.
Install NVM
-
Double-Click on the executable file to launch the installer.
-
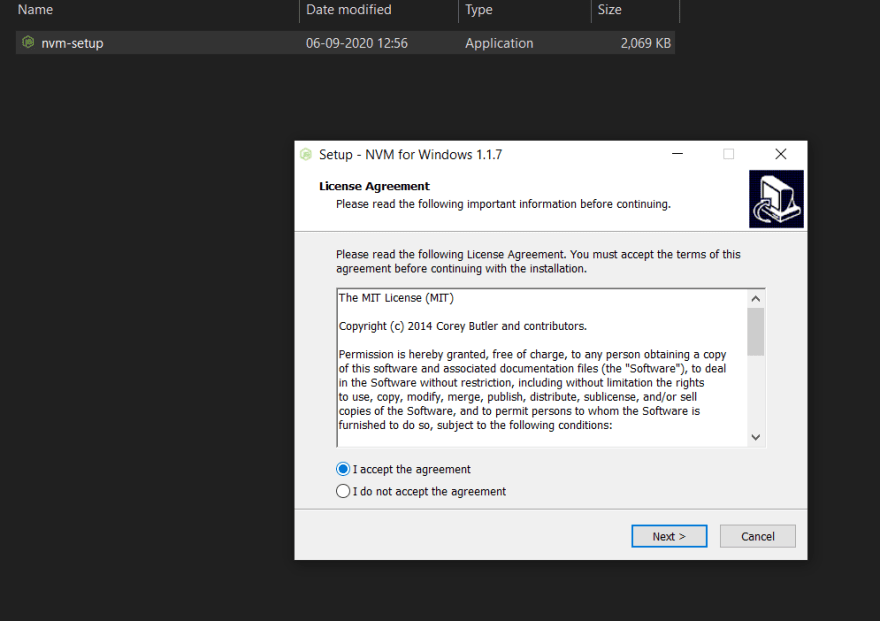
Choose ‘I accept the agreement’ option.
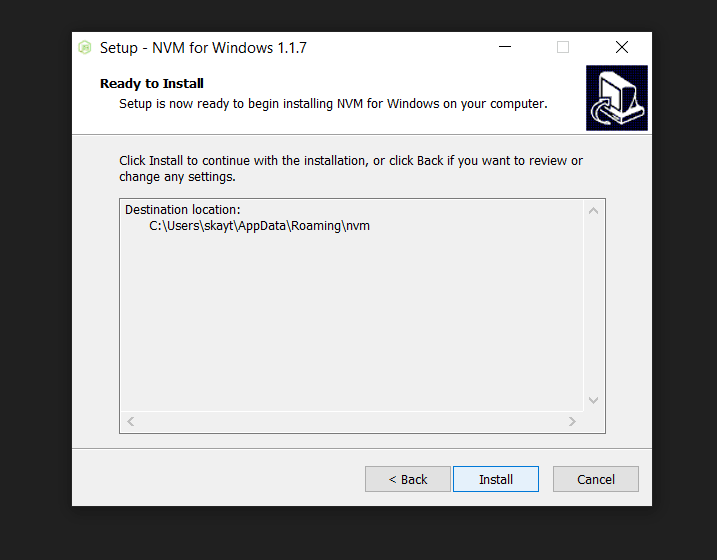
- Select destination to install.

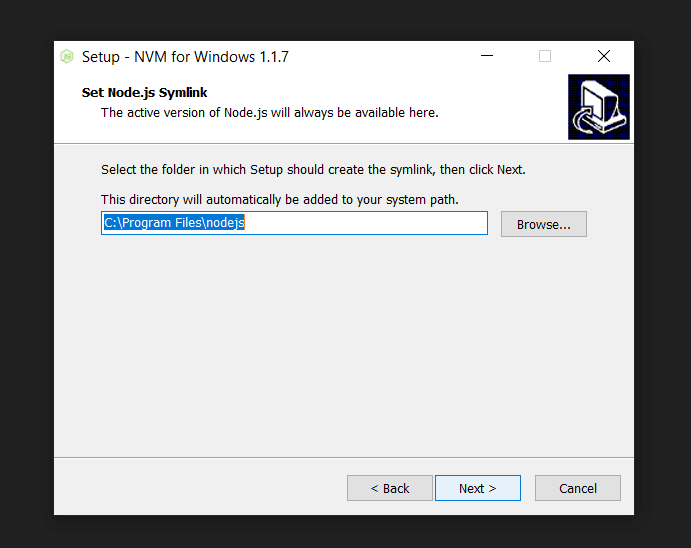
- Select Symlink for Node.js.
- Click on Install & once it completes, click on the ‘Finish’ button.

Confirm that the ‘NVM’ successfully installed
-
Open your command line terminal
-
Type the below command to verify if your nvm installation was successful.
$ nvm --version
Enter fullscreen mode
Exit fullscreen mode

Install npm
- You can now install ‘npm’ using the following command.
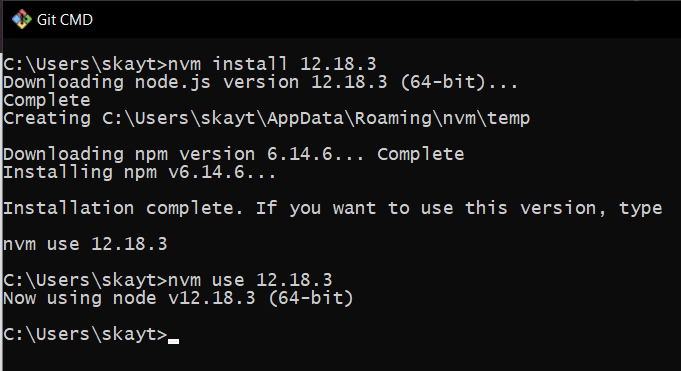
  $ nvm install latest
  //installs the latest version of npm

  $ nvm install <<version number>>
  //e.g. nvm install 12.6.8 to install a specific npm version
Enter fullscreen mode
Exit fullscreen mode
- Let us install the latest version of npm. (As of Sep 2020)

Specify the version of npm that you choose to use
- Using the below command to specify the version of npm that you wish to use. In our case, since we have only one version installed. Let’s go with that.
$ nvm use 14.9.0
Enter fullscreen mode
Exit fullscreen mode

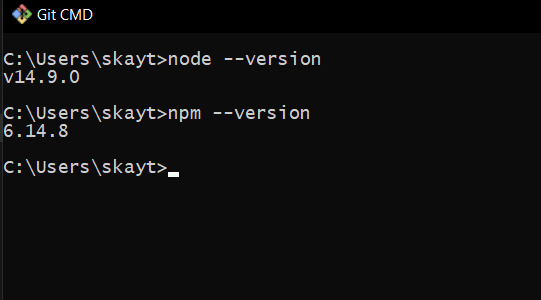
Check npm & nodejs versions
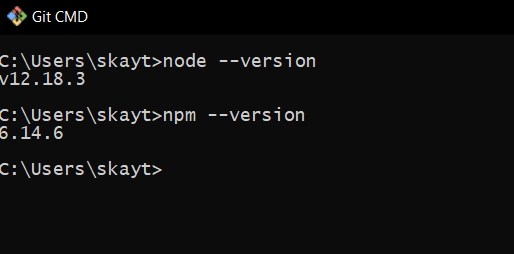
- You can confirm the nodejs and npm versions through the commands below.
//Check Node.js version
$ node --version

//Check npm version
$ npm --version
Enter fullscreen mode
Exit fullscreen mode
Install Another npm Version
- Repeat the above steps

- Install Completed & Select the version using the ‘nvm use’ command

- Confirm that the environment now points to the new Node.js and npm versions
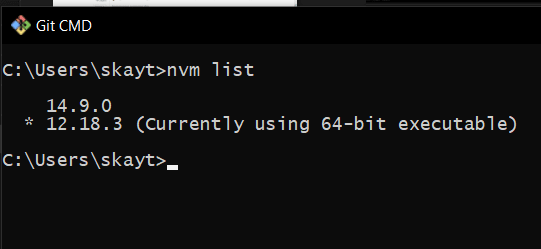
List all Versions
- You can use the nvm list command to list all the npm and Node.js versions installed.
$ nvm list
Enter fullscreen mode
Exit fullscreen mode
Conclusion
I hope the detailed user-guide helped you setup the Node Version Manager (nvm) in your Windows 10 machine. Thank you for reading the article and do share it if you found it useful.
Cover Photo by Christina @ wocintechchat.com on Unsplash
You may also like:
- IIFE — Immediately Invoked Function Expressions
- ES6 — Spread Operator
- A Basic Introduction to Webpack
- ES6 => Arrow Functions
- ES6 — Understanding Destructuring
- Why do you want to work for us?
- Understanding Closures
- What is ‘this’ in JavaScript
- Docker Fundamentals
Вопрос экономии времени и удобства окружения разработчика — штука сложная. Работая с Node.js, иногда приходится тестировать своё приложение не только в той версии, которую используете вы, но и в тех, что были выпущены до неё или даже после. В большинстве своём, это касается пакетов (библиотек), которые распространяются через npm. Разумеется, вы можете использовать для этих целей Travis CI, но этот инструмент создан не для этого.
Наиболее простым способом устанавливать и переключать версии Node.js на Linux является использование утилиты nvm. Для разработчиков, которые «сидят» на Windows, существует порт этой утилиты, хотя и менее продвинутый. Разбираемся в управлении версиями Node.js через консоль в Windows.
nvm (Node Version Manager) — это довольно простой скрипт, который позволяет устанавливать, переключать и удалять версии Node.js на лету. Проще говоря, nvm даёт вам возможность держать на одной машине любое количество версий Node.js. При установке новой версии для неё создаётся отдельная директория, например, 5.0.0 или 4.2.2. При переключении версий скрипт подменяет путь до Node.js в PATH.
При этом нужно помнить, что глобальные пакеты для каждой версии свои и никак не пересекаются. Это значит, что если вы глобально установили пакет, используя Node.js версии 4.2.2 и переключились на версию 5.1.0, то этот же пакет вам придётся устанавливать повторно уже для этой версии.
Установка nvm
Напомню, что речь сейчас идёт про Windows, и установить nvm здесь так же «сложно», как и любую другую программу или игру. Для этого вам придётся перейти в репозиторий nvm-windows и загрузить установочный пакет. Далее процедура полностью стандартна, как и для любого другого установочного файла в Windows: выбираете директорию установки и несколько раз кликаете на «Далее».
Установка Node.js
Теперь, когда у вас установлен nvm, пришло время добавить новую версию Node.js. Для этого потребуется прочитать справку, которую можно вызвать, используя команду nvm.
Сначала посмотрим на список доступных для установки версий Node.js, который можно открыть командой $ nvm list available. В этом списке доступны как стабильные, так и нестабильные релизы.
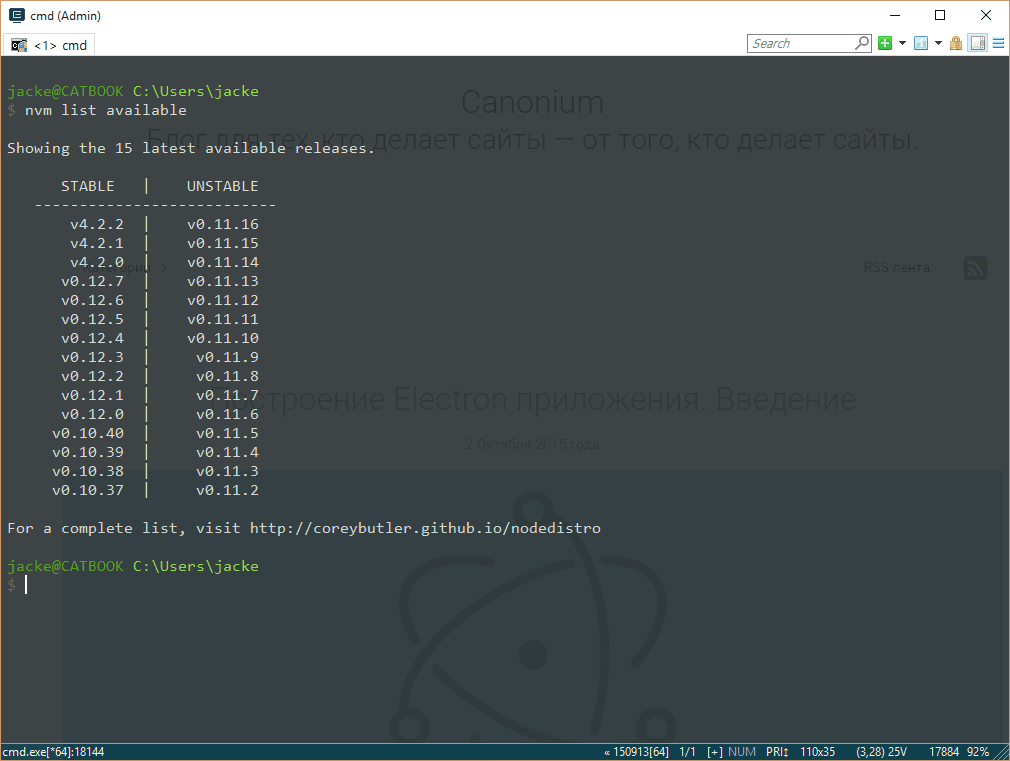
Обратите внимание, что здесь не хватает 5-ой версии Node.js. Дело в том, что создатель nvm для Windows ещё не подготовил новый релиз, добавляющий 5-ую версию Node.js в этот список.
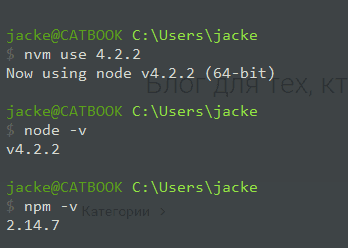
Итак, установим последнюю версию Node.js четвертой ветки. Для этого, к сожалению, потребуется полностью прописать версию Node.js, хотя в версии под Linux и OSX можно просто указывать мажорную цифру (4 или 5).
$ nvm install 4.2.2
Тоже самое можно проделать с пятой веткой:
$ nvm install 5.1.0
Помимо версии, при установке есть возможность указать разрядность, например, для установки Node.js 5.1.0 32-битной разрядности следует выполнить
$ nvm install 5.1.0 32
Переключение версий
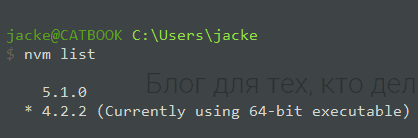
Посмотрим на список уже установленных версий Node.js на вашей машине, выполнив в консоли команду $ nvm list:

Для того, чтобы начать использовать Node.js версии 4.2.2, нужно прописать в консоли $ nvm use 4.2.2. После этого из консоли станет доступна именно эта версия Node.js и поставляемая вместе с ней версия npm:
Соответственно, чтобы переключиться на Node.js версии 5.1.0, нужно выполнить команду:
$ nvm use 5.1.0
Теперь, когда вы выполняете команду $ nvm list, в выводе будет присутствовать указатель текущей версии:
Создание синонимов
Я вынужден был создать этот заголовок в виду того, что «настоящий» nvm позволяет назначать установленным версиям Node.js синонимы. К сожалению, пока что nvm для Windows не умеет этого.
Немного про глобальные пакеты
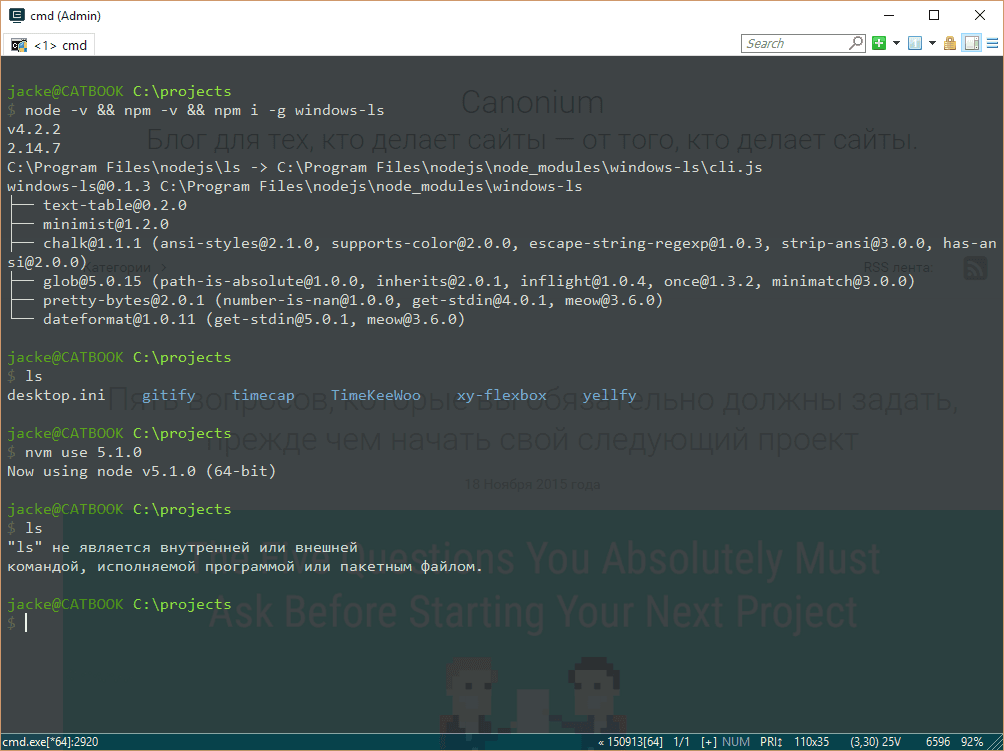
Как я уже говорил в начале, nvm разделяет версии Node.js по директориям, и, из-за этого, устанавливаемые глобально пакеты доступны лишь в той версии, в которой они были установлены.
Для примера я установлю свой же пакет windows-ls в версии 4.2.2 и попытаюсь использовать его в версии 5.1.0. В итоге я получаю ошибку, говорящую о том, что такого пакета нет.
Итоги
Все мы знаем, что Windows — это не та платформа, на которую ориентированы разработчики инструментов, которые нужны веб-разработчикам. Примеров, отображающих эту ситуацию довольно много и для каждого они свои, поэтому приводить я их здесь не буду. Рассмотренная в этой статье утилита делает жизнь разработчикам на Windows чуточку лучше, позволяя сконцентрироваться на работе, а не загрузке, установке и удалении различных версий Node.js.
Наш прошлый перевод про новые функции 15-й версии Node.js был очень хорошо принят читателями «Хабра», поэтому сегодня мы решили продолжить тему и рассказать, как настроить NVM с версией Node.js 15 и NPM 7.
Версия Node.js 15 была выпущена 20 октября 2020 года. Она поставляется с npm 7 и множеством новых функций. Вы уже успели опробовать новую версию?
Но подождите минутку! Node.js 15 и npm 7 содержат критические изменения. Не повредит ли тогда обновление существующим проектам?
Теоретически может повредить!

К счастью, у нас есть NVM (Node Version Manager), который избавит нас от этой опасности. Давайте детально рассмотрим данный инструмент, чтобы без проблем обновить версии node.js и npm.
Установка NVM
nvm управляет версиями node.js и npm. Он устанавливается для конкретного пользователя и может быть вызван отдельно для каждой оболочки. nvm работает с любой POSIX-совместимой оболочкой (sh, dash, ksh, zsh, bash), в том числе на платформах: unix, macOS и windows WSL.
nvm можно установить с помощью команд curl или wget:
$ curl -o- https://raw.githubusercontent.com/nvm-sh/nvm/v0.37.2/install.sh | bash
$ wget -qO- https://raw.githubusercontent.com/nvm-sh/nvm/v0.37.2/install.sh | bash
Скрипт install.sh клонирует репозиторий nvm в ~/.nvm и пытается добавить исходные строки из приведенного ниже фрагмента в нужный файл профиля (~/.bash_profile, ~/.zshrc, ~/.profile или ~/.bashrc).
export NVM_DIR="$([ -z "${XDG_CONFIG_HOME-}" ] && printf %s "${HOME}/.nvm" || printf %s "${XDG_CONFIG_HOME}/nvm")"
[ -s "$NVM_DIR/nvm.sh" ] && . "$NVM_DIR/nvm.sh" # This loads nvm
В ~/.bash_profile мы видим, что строки добавлены:
export NVM_DIR="/Users/fuje/.nvm"
[ -s "$NVM_DIR/nvm.sh" ] && . "$NVM_DIR/nvm.sh"  # This loads nvm
[ -s "$NVM_DIR/bash_completion" ] && . "$NVM_DIR/bash_completion"  # This loads nvm bash_completion
Использование NVM
Итак, мы установили nvm. Теперь используем данную команду для установки последней версии node.js:
$ nvm install node
Downloading and installing node v15.4.0...
Downloading https://nodejs.org/dist/v15.4.0/node-v15.4.0-darwin-x64.tar.xz...
######################################################################## 100.0%
Computing checksum with shasum -a 256
Checksums matched!
Now using node v15.4.0 (npm v7.0.15)
В выходных данных из примера выше указано, что npm 7.0.15 используется вместе с node.js 15.4.0. Проверим:
$ node -v
v15.4.0
$ npm -v
7.0.15
Также мы можем указать нужную версию для установки. Семантический формат версии определяется SemVer:
$ nvm install 10.14.0
Downloading and installing node v10.14.0...
Downloading https://nodejs.org/dist/v10.14.0/node-v10.14.0-darwin-x64.tar.xz...
######################################################################## 100.0%
Computing checksum with shasum -a 256
Checksums matched!
Now using node v10.14.0 (npm v6.4.1)
Если указанная версия уже была установлена, она не переустанавливается:
$ nvm install 10.14.0
v10.14.0 is already installed.
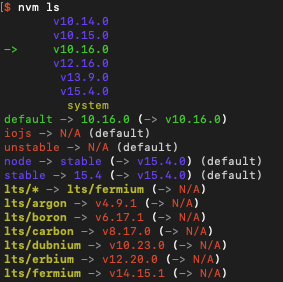
Now using node v10.14.0 (npm v6.4.1)Мы можем вывести на экран все установленные версии:
$ nvm ls
->     v10.14.0
       v10.15.0
       v10.16.0
       v12.16.0
        v13.9.0
        v15.4.0
         system
default -> 12.16.0 (-> v12.16.0)
node -> stable (-> v15.4.0) (default)
stable -> 15.4 (-> v15.4.0) (default)
iojs -> N/A (default)
unstable -> N/A (default)
lts/* -> lts/fermium (-> N/A)
lts/argon -> v4.9.1 (-> N/A)
lts/boron -> v6.17.1 (-> N/A)
lts/carbon -> v8.17.0 (-> N/A)
lts/dubnium -> v10.23.0 (-> N/A)
lts/erbium -> v12.20.0 (-> N/A)
lts/fermium -> v14.15.1 (-> N/A)
В приведенных выше примерах вывода символ -> указывает, что текущая версия node.js — 10.14.0. Стрелка также представляет значения для default (12.16.0), node (15.4.0) и stable (15.4.0).
nvm use заменяет текущую версию:
$ nvm use 12.16.0
Now using node v12.16.0 (npm v6.14.8)
$ nvm use 10.16.0
Now using node v10.16.0 (npm v6.14.5)
$ nvm use 13.9.0
Now using node v13.9.0 (npm v6.13.7)
$ nvm use default
Now using node v12.16.0 (npm v6.14.8)
$ nvm use node
Now using node v15.4.0 (npm v7.0.15)
$ nvm use stable
Now using node v15.4.0 (npm v7.0.15)
Возможно, вы спросите, как так получилось, что v10.16.0 использует более позднюю версию npm, чем v13.9.0. Эту задачу можно решить с помощью следующих команд:
$ nvm use 10.16.0
$ npm install -g npm@6.14.5
Данная команда позволяет получить последнюю поддерживаемую версию npm для текущей версии Node.js:
$ nvm install-latest-npmnvm use устанавливает нужную версию только для текущей оболочки. Если вы измените оболочку, только что обновленная версия node.js будет потеряна.
Как сделать определенную версию Node.js постоянной?
Версия по умолчанию — такая версия, которая распространяется на все оболочки.
Команда nvm alias позволяет установить версию по умолчанию.
$ nvm alias default 10.16.0Для удобства можно создать файл .nvmrc, который принимает формат SemVer, node или default. После этого nvm use, nvm install, nvm exec, nvm run и nvm which будут использовать версию, указанную в файле .nvmrc, если в командной строке не указана другая.
$ cat .nvmrc
15.4.0
$ nvm use
Found '/Users/fuje/.nvmrc' with version <15.4.0>
Now using node v15.4.0 (npm v7.0.15)
Мы можем проверить текущую версию с помощью следующей команды:
$ nvm current
v15.4.0
ls-remote выводит на экран все доступные версии, но будьте готовы к очень длинному списку.
$ nvm ls-remoteОбратим внимание, что название версии в сокращенной форме значительно сокращает весь список.
$ nvm ls-remote 15
        v15.0.0
        v15.0.1
        v15.1.0
        v15.2.0
        v15.2.1
        v15.3.0
->      v15.4.0
nvm which указывает путь к исполняемому файлу, где nvm был установлен. Мы установили такие версии node.js, как 10.14.0, 10.15.0 и 10.16.0. Вот результаты nvm which:
$ nvm which 10.14.0
/Users/fuje/.nvm/versions/node/v10.14.0/bin/node
$ nvm which 10.15.0
/Users/fuje/.nvm/versions/node/v10.15.0/bin/node
$ nvm which 10.16.0
/Users/fuje/.nvm/versions/node/v10.16.0/bin/node
$ nvm which 10.15
/Users/fuje/.nvm/versions/node/v10.15.0/bin/node
$ nvm which 10.12
N/A: version "v10.12" is not yet installed.
You need to run "nvm install 10.12" to install it before using it.
$ nvm which 10
/Users/fuje/.nvm/versions/node/v10.16.0/bin/node
Указанную версию Node.js можно использовать непосредственно для запуска приложений:
$ nvm run 10.15.0 app.js
Как вариант, данная команда запускает node app.js с переменной PATH, указывающей на версию 10.15.0.
$ nvm exec 10.15.0 node app.js
Если вам нужно больше nvm-команд, запустите команду help:
$ nvm --helpОбновление NVM
Мы можем использовать nvm для обновления node.js и npm. Но как обновить сам nvm?
Давайте попробуем!
Перед обновлением у нас установлен nvm 0.34.0.
Обновляем до версии 0.37.2.
$ curl -o- https://raw.githubusercontent.com/nvm-sh/nvm/v0.37.2/install.sh | bash
  % Total    % Received % Xferd  Average Speed   Time    Time     Time  Current
                                 Dload  Upload   Total   Spent    Left  Speed
100 13527  100 13527    0     0  23046      0 --:--:-- --:--:-- --:--:-- 23083
=> nvm is already installed in /Users/fuje/.nvm, trying to update using git
=> => Compressing and cleaning up git repository
=> nvm source string already in /Users/fuje/.bash_profile
=> bash_completion source string already in /Users/fuje/.bash_profile
=> Close and reopen your terminal to start using nvm or run the following to use it now:
export NVM_DIR="$HOME/.nvm"
[ -s "$NVM_DIR/nvm.sh" ] && . "$NVM_DIR/nvm.sh"  # This loads nvm
[ -s "$NVM_DIR/bash_completion" ] && . "$NVM_DIR/bash_completion"  # This loads nvm bash_completion
Как указано в выводе, нам нужно закрыть и снова открыть терминал, чтобы использовать новую версию:
$ nvm --version
0.37.2
По сравнению с версией 0.34.0, в версии 0.37.2 добавлена функция nvm set-colors для вывода на консоль.
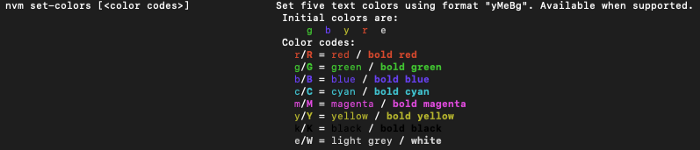
По умолчанию nvm ls показывает следующие цвета:
Установим новые цвета:
$ nvm set-colors cgYmWnvm ls отображает вывод с новыми цветами:

Заключение
nvm упрощает управление версиями node.js и npm. Теперь мы точно готовы перейти на node.js 15 и npm 7. Надеюсь, статья была полезной. Другие публикации автора можно найти здесь.
Опубликовано 14.03.2022
Содержание
- Установка NVM в Windows
- Как установить Node.js в Windows
- Настройка версии по умолчанию Node.js
- Удалить версию Node из Windows
- Заключение
NVM (Node Version Manager) — это утилита командной строки для установки Node.js в вашей системе Windows. Утилита позволяет устанавливать несколько Node.js версии и переключение между ними. Это полезно для системы в которой запущено приложение с несколькими Node.js, для которых требуются версии Node differnt-2.
Это руководство покажет вам как выполняется установка NVM в Windows и как управлять несколькими Node.js в Windows с использованием NVM.
Установка NVM в Windows
Coreybutler собрал установщик nvm для систем Windows. Перейдите по ссылке ниже, чтобы загрузить установщик NVM для системы Windows.
- https://github.com/coreybutler/nvm-windows/releases
Вам потребуется скачать файл nvm-setup.zip последней версии.
Извлеките загруженный файл архива в вашу систему.
Вы увидите файл node-setup.exe. Дважды щелкните node-setup.exe файл для начала установки Node в Windows.
Следуйте инструкциям мастера установки, чтобы завершить установку NVM в Windows.
Как установить Node.js в Windows
Поскольку вы уже установили NVM в своей системе. Теперь вы можете установить любую версию Node.js в системе Windows. Для установки последней версии используйте “latest”, а для установки последней стабильной версии используйте “lts” с командой nvm install.
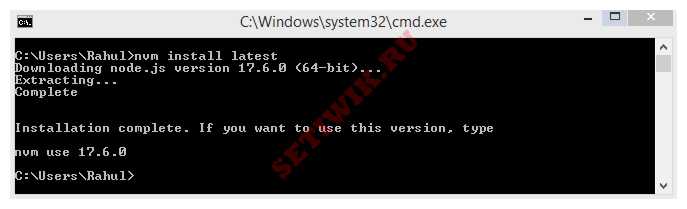
Используйте следующую команду для установки последней версии Node.js
nvm install latest
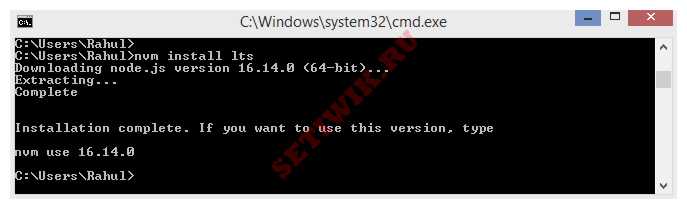
Чтобы установить последнюю стабильную версию, выполните следующую команду
nvm install lts
Вы также можете установить определенную версию, например 14.15.0.
nvm install 14.15.0
Вы можете следовать тем же командам для установки нескольких версий Node в одной системе.
Настройка версии по умолчанию Node.js
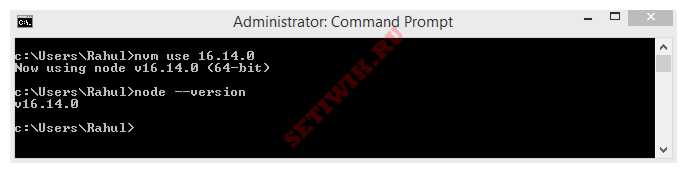
Вы можете изменить версию активного Node по умолчанию с помощью следующей команды. Например, чтобы установить Node 14.1.50 в качестве версии по умолчанию, введите команду:
nvm use 14.15.0
После активации новой версии введите:
node --version
Эта команда покажет текущий активный Node.js. См. Скриншот ниже:
Удалить версию Node из Windows
Вы можете удалить неиспользуемые старые версии Node.js из вашей системы. Делается это с помощью следующей команды.
nvm uninstall 14.15.0
Измените номер версии в соответствии с вашими требованиями. Приведенная выше команда удалит Node 14.15.0 из вашей системы.
Заключение
Это руководство показало вам как выполняется установка NVM в системе Windows. А также объяснит и покажет команды для установки конкретных версий Node.js в системе Windows.