Windows 11 теперь официально доступна в качестве бесплатного обновления для всех систем, отвечающих требованиям к оборудованию. Но уже прошло пятое октября, а вы все еще не получили официального обновления. Почему это так и что вы можете сделать, чтобы получить Windows 11 прямо сейчас? Вот все, что вам нужно знать.
Хотя Windows 11 была выпущена 5 октября, очень много людей ждали, затаив дыхание, но безрезультатно. Это связано с тем, что Microsoft хочет выпускать обновление поэтапно, подобно тому, как это делалось с функциями Windows в прошлом.
Помимо получения дополнительных доходов от OEM-производителей, таких как Dell и HP, которые лицензируют ОС Windows, поэтапный выпуск также гарантирует, что любые обнаруженные проблемы могут быть исправлены до того, как большинство пользователей получат обновление. Однако ждать осталось недолго. Microsoft ожидает, что все совместимые Windows 10 получат обновление Windows 11 к лету 22 года.
Как исправить обновление Windows 11, которое не отображается (7 методов)
Сказав это, вы можете оставить все каналы открытыми на случай, если обновление действительно будет выпущено на ваш компьютер. Поэтому, если вы обнаружите, что обновление Windows 11 не отображается, и вы не можете официально обновить свой компьютер, вот несколько вещей, которые вы должны проверить, чтобы обновление прошло.
Исправление № 01: проверьте, соответствует ли ваш компьютер системным требованиям.
Во-первых, проверьте, действительно ли ваш компьютер соответствует требованиям системные требования для запуска Windows 11. Microsoft не будет выпускать обновление, если не будут соблюдены технические характеристики оборудования. Хотя пользователи могут обойти это и установить Windows 11, даже если их системное оборудование не на должном уровне, обычно это не рекомендуется.
Исправление № 02: убедитесь, что Центр обновления Windows работает.
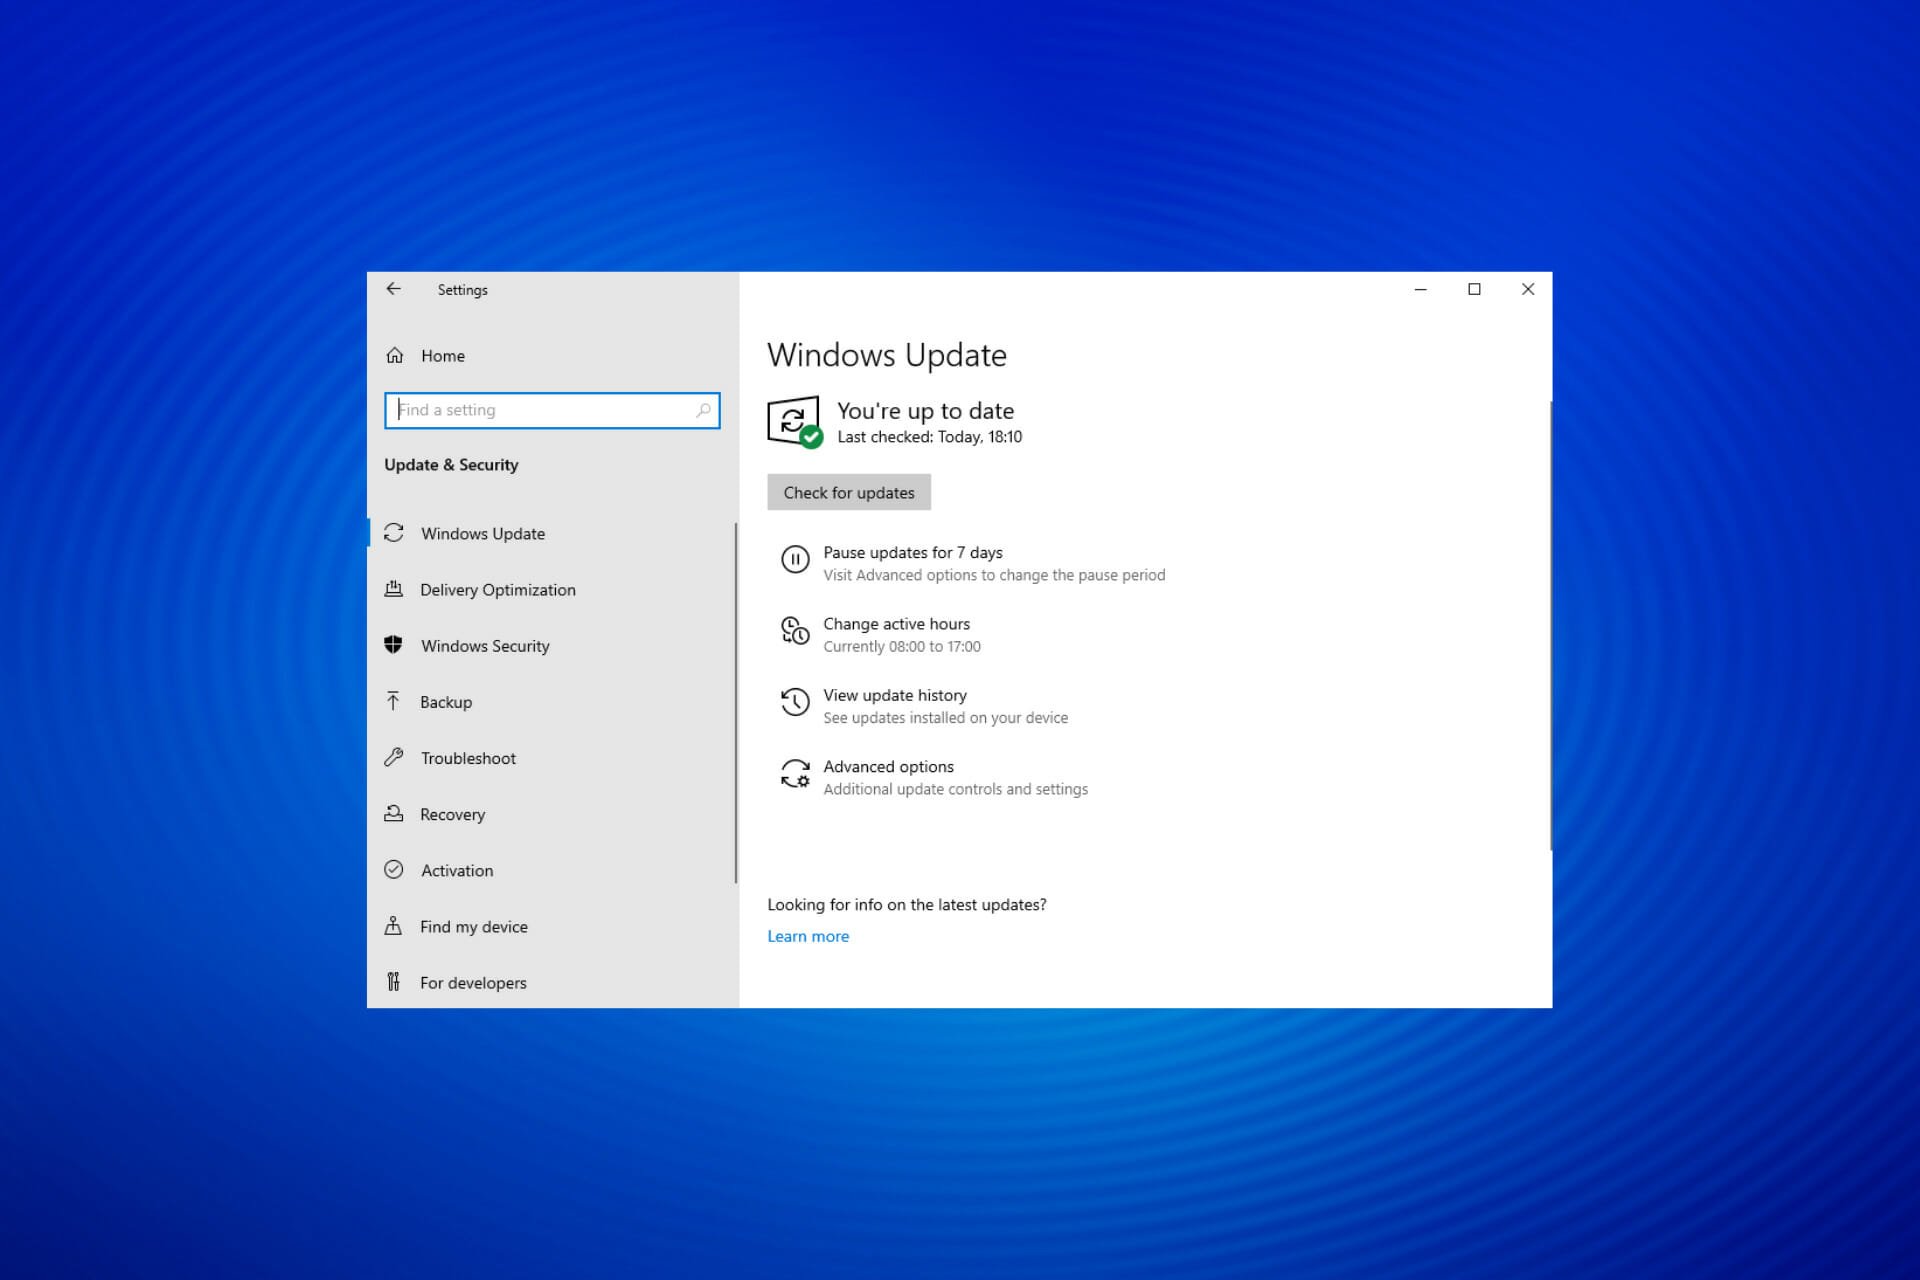
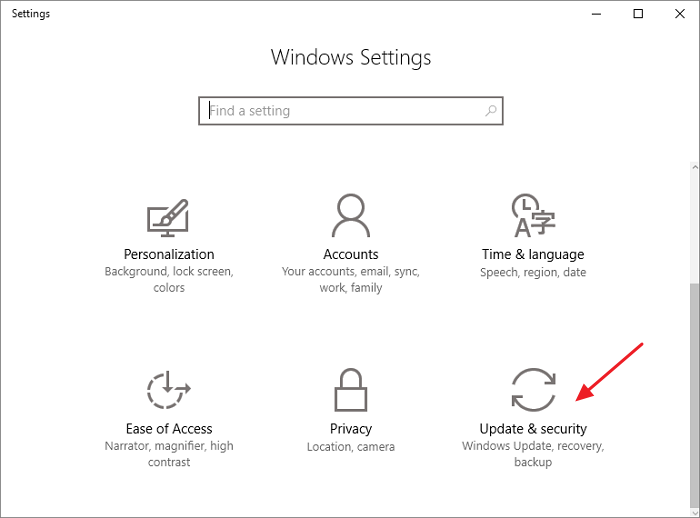
Также возможно, что вы, возможно, приостанавливали обновления Windows в прошлом и забыли об этом, или что функция была отключена приложением или ошибкой. Чтобы проверить, так ли это, нажмите Win + I, чтобы открыть Настройки. Кликните Обновление и безопасность.
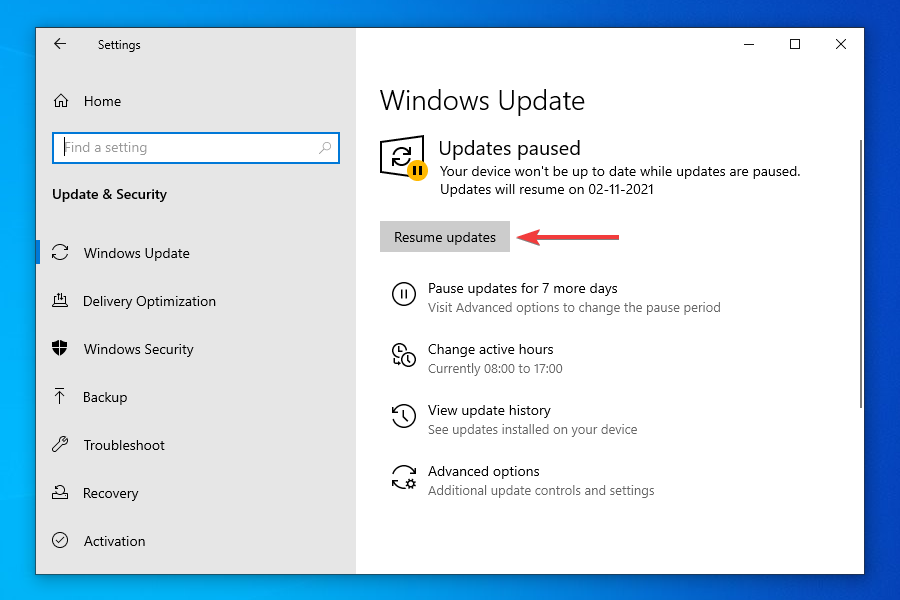
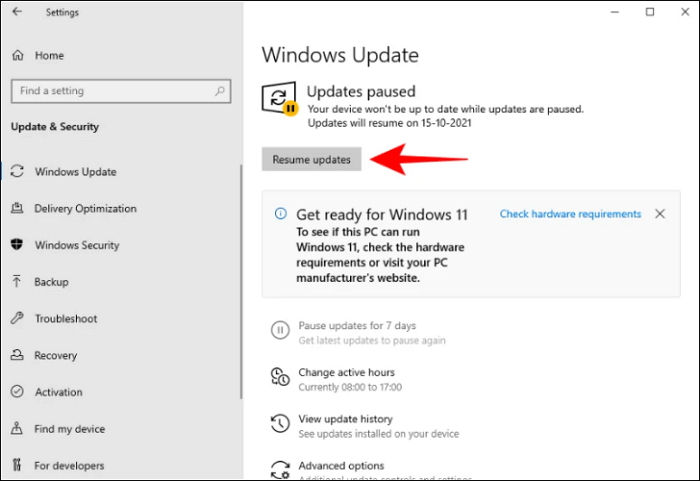
Если ваши обновления приостановлены, нажмите «Возобновить обновления».
Исправление № 03: перезагрузите компьютер.
Иногда поврежденные временные файлы могут помешать обновлению Windows, и самый быстрый способ исправить это — перезагрузить компьютер. Это простое и легкое решение, которое не требует времени на выполнение.
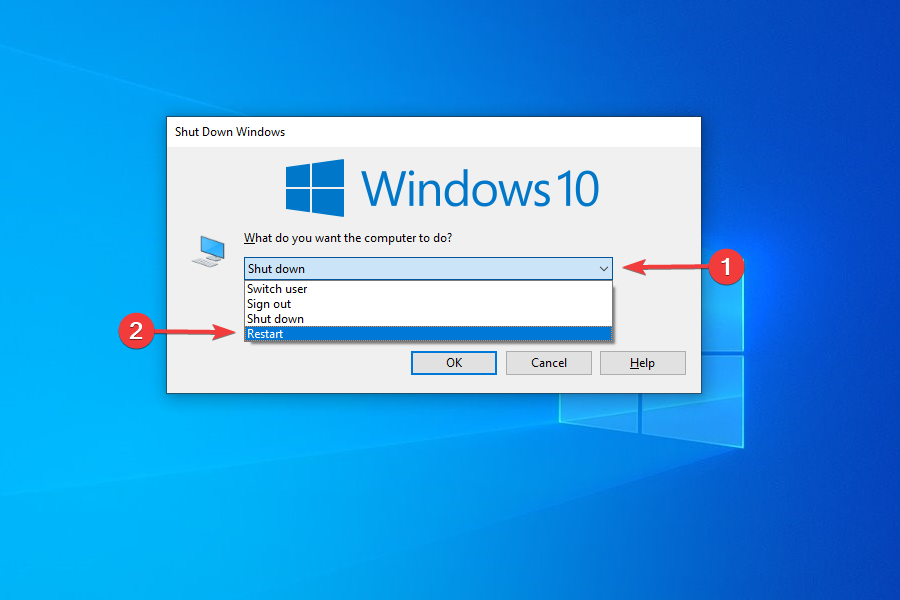
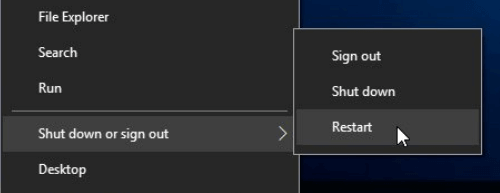
Поэтому обязательно перезагрузите компьютер и проверьте, доступны ли какие-либо обновления. Чтобы перезагрузить компьютер, нажмите клавиши Win + X, затем нажмите «Завершить работу или выйти», а затем «Перезагрузить».
Исправление № 04: устранение неполадок Центра обновления Windows
В Windows есть собственное встроенное средство устранения неполадок для диагностики проблем и предложения исправлений. Во многих случаях средство устранения неполадок Центра обновления Windows обнаружит, что препятствует установке обновлений, и порекомендует решения. Вот как это запустить:
Нажмите Win + I, чтобы открыть приложение «Настройки». Затем нажмите «Обновление и безопасность» внизу.
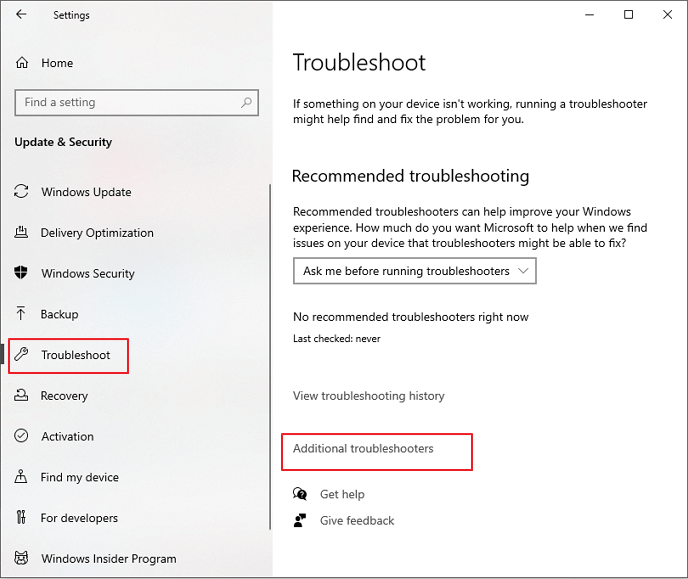
Нажмите «Устранение неполадок» слева.
Кликните Дополнительные средства устранения неполадок.
Кликните Центр обновления Windows.
Затем нажмите Запустить средство устранения неполадок.
Средство устранения неполадок начнет поиск проблем и предложит возможные исправления, если будут обнаружены какие-либо проблемы.
Исправление № 05: обновление с помощью Помощника по установке Windows 11.
Вышеупомянутые исправления гарантируют, что все доступные каналы будут открыты и восприимчивы к обновлениям Windows 11, когда они появятся. Но если вы хотите получить Windows 11 сейчас, эти несколько последних методов помогут вам получить ее.
Выпуск Windows 11 означает, что теперь вы можете найти официальный помощник по установке Windows 11 на сайте Microsoft. Установить Windows 11 с помощью этого помощника очень просто. Мы рассмотрели пошаговое руководство для этого — поэтому проверьте его ниже, чтобы точно знать, что делать.
Может быть интересно: Как использовать Помощник по установке Windows 11 для обновления с Windows 10
Исправление № 06: Запуск обновления на месте с помощью Windows 11 Media Creation Tool.
Если вы еще не получили обновление Windows 11, вы также можете выполнить обновление на месте самостоятельно с помощью установочного носителя Windows 11. Для этого вам понадобится пустая флешка (не менее 8 ГБ).
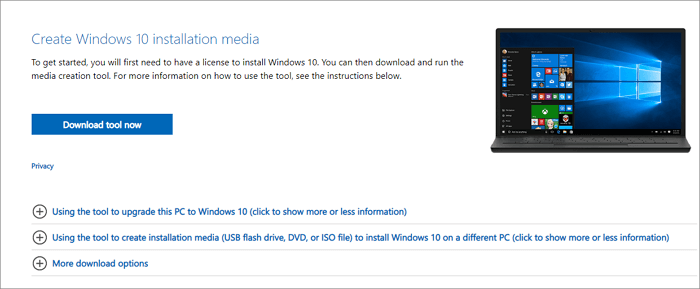
Скачать: Установочный носитель Windows 11
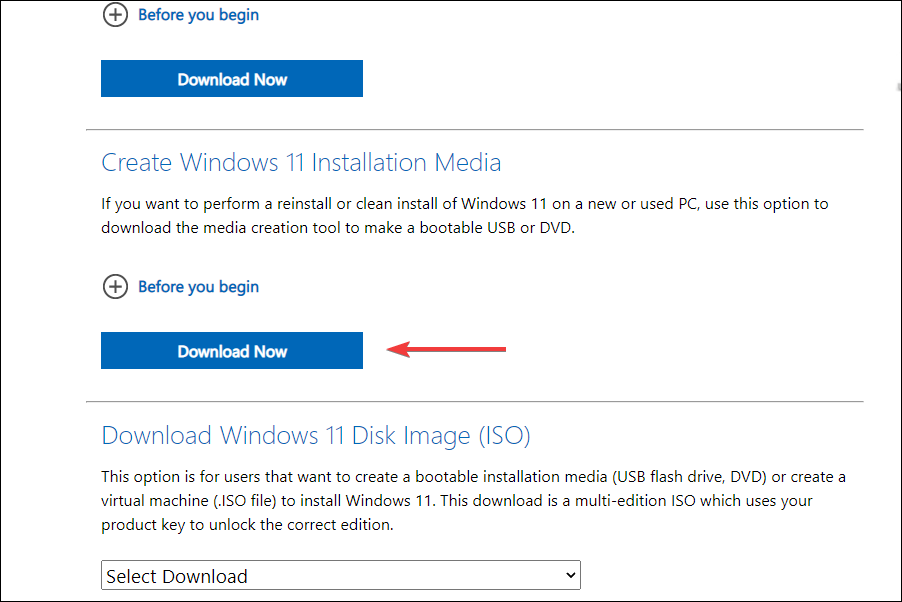
На странице, указанной выше, нажмите Загрузить сейчас в разделе «Создать установочный носитель Windows 11».
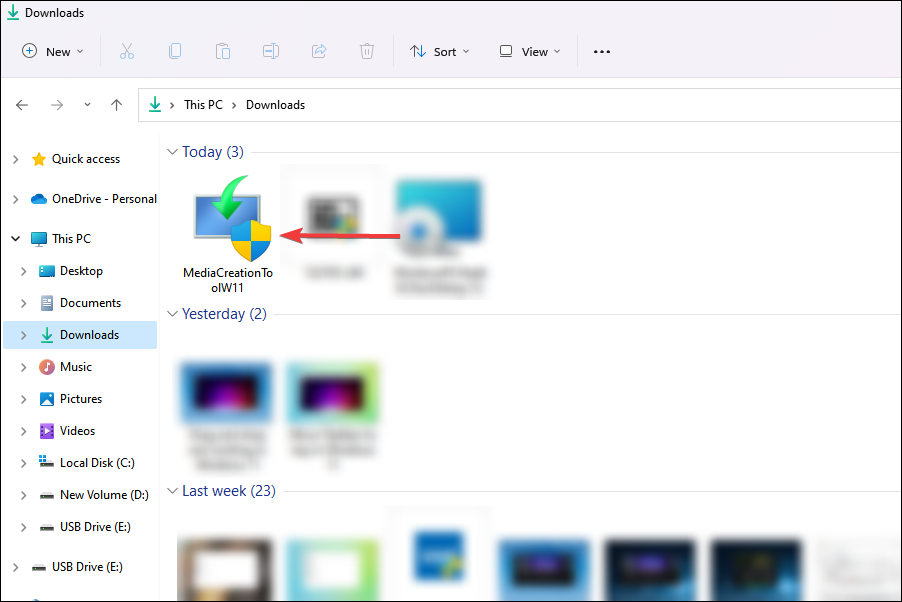
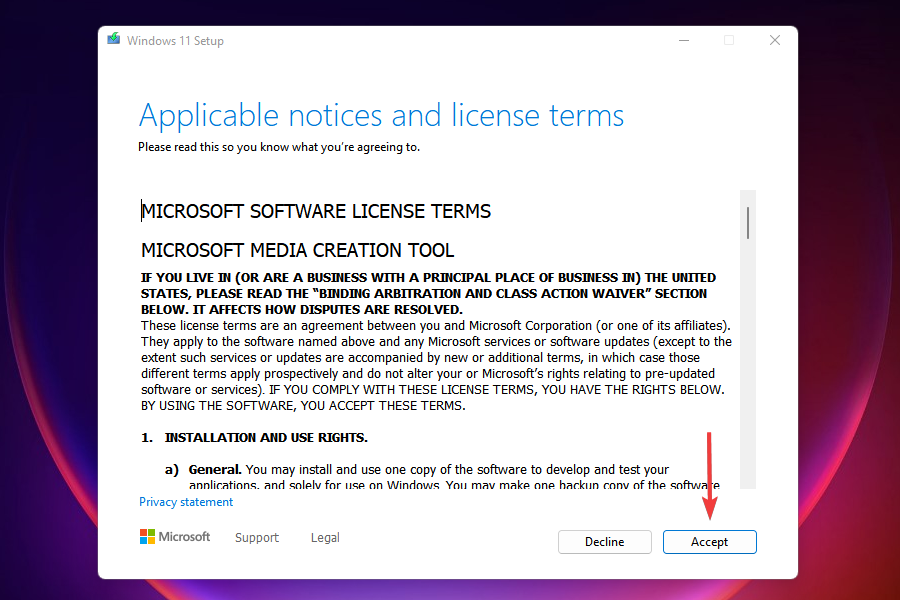
Подключите USB-накопитель и запустите загруженный инструмент создания мультимедиа. Кликните «Принять«.
Нажмите «Далее».
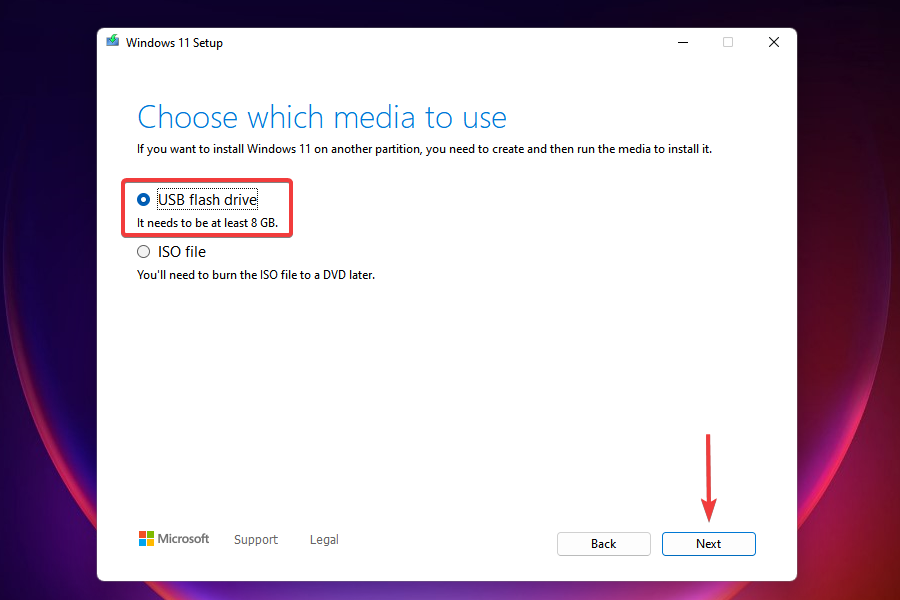
Выбрав параметр «Флэш-накопитель USB», нажмите «Далее».
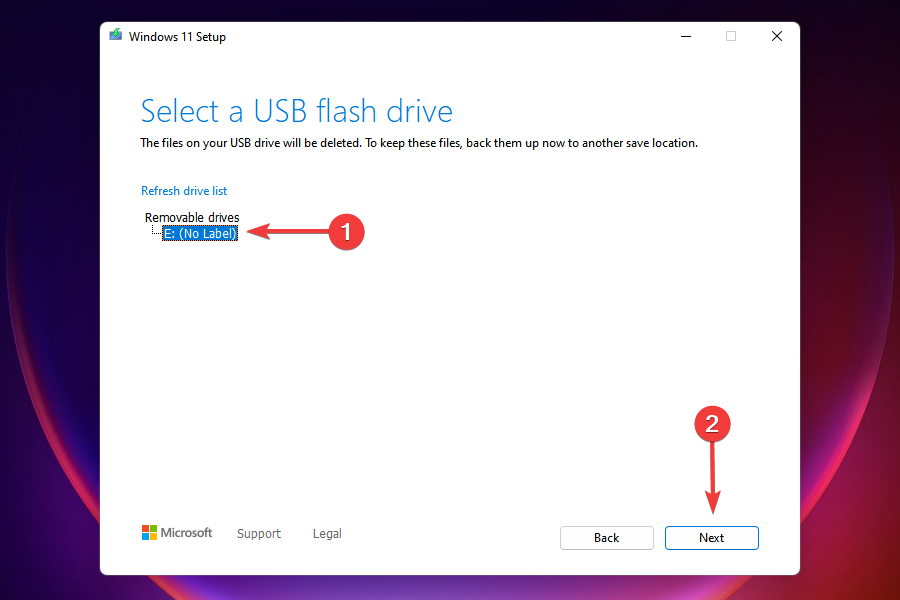
В списке «Съемные диски» выберите USB-накопитель и нажмите «Далее».
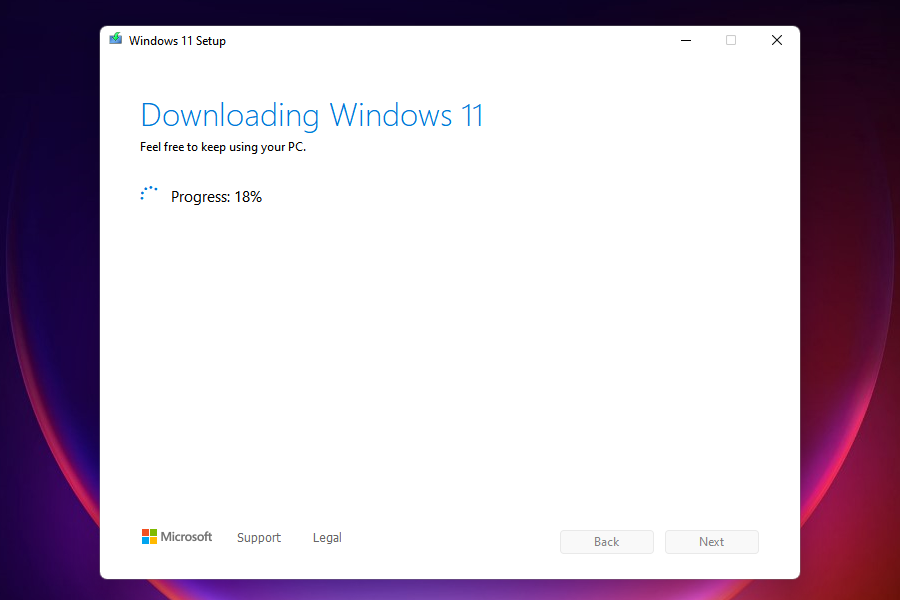
Для загрузки и установки обновления Windows 11 потребуется некоторое время.
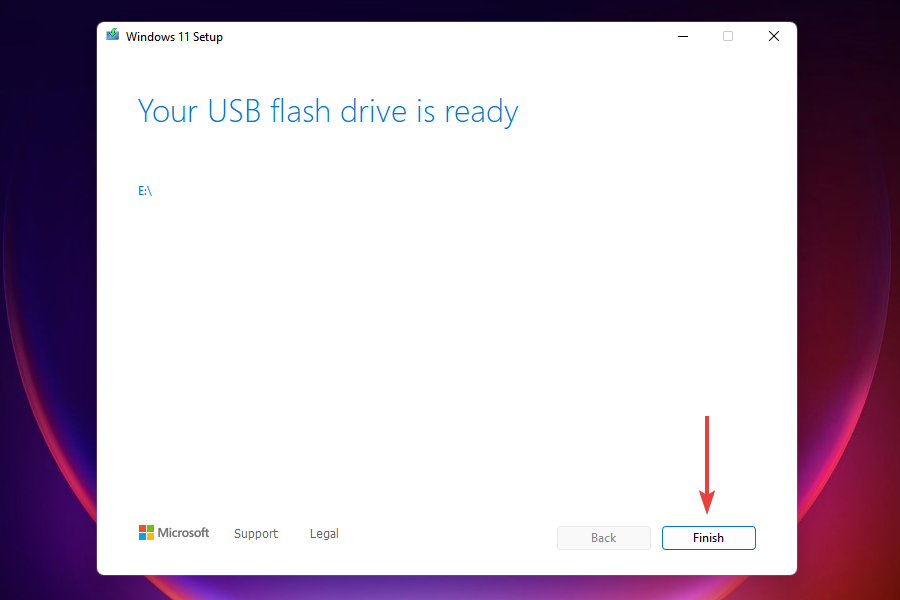
После завершения процесса ваше USB-устройство будет готово для обслуживания вас (или любого другого совместимого ПК, на котором оно используется) с Windows 11. Вы можете сделать это, загрузившись с USB-накопителя и выполнив инструкции на экране. Или вы можете зайти на свой USB-накопитель (через проводник) и запустить setup.exe.
Откроется окно установки Windows 11. Следуйте инструкциям на экране, чтобы выполнить обновление до Windows 11.
Исправление № 07: дождитесь, пока Microsoft выпустит обновление для Windows 11 на ваш компьютер.
Если обновление Windows 11 еще не доступно для вашего ПК и вы не хотите выполнять обновление вручную, единственное, что вы можете сделать, это подождать. Microsoft медленно внедряет обновление Windows 11 на все ПК, отвечающие системным требованиям. Ожидайте, что он будет доступен для вашего ПК к середине 2022 года.
Windows 11 не поддерживает мой компьютер или процессор?
Что ж, если приведенные выше исправления не работают, возможно, ваш компьютер не поддерживается Windows 11.
Загрузите приложение Windows 11 Health Check для проверки работоспособности ПК отсюда. Он автоматически начнет загрузку, но если этого не произойдет, нажмите кнопку «Загрузить» в левом верхнем углу.
Дважды кликните загруженный файл, чтобы запустить приложение PC Health Check на вашем компьютере.
Нажмите кнопку «Проверить сейчас».
Если ваш компьютер совместим с Windows 11, вы увидите этот экран:
Если ваш компьютер соответствует требованиям, снова воспользуйтесь Помощником по установке Windows 11. Это должно работать.
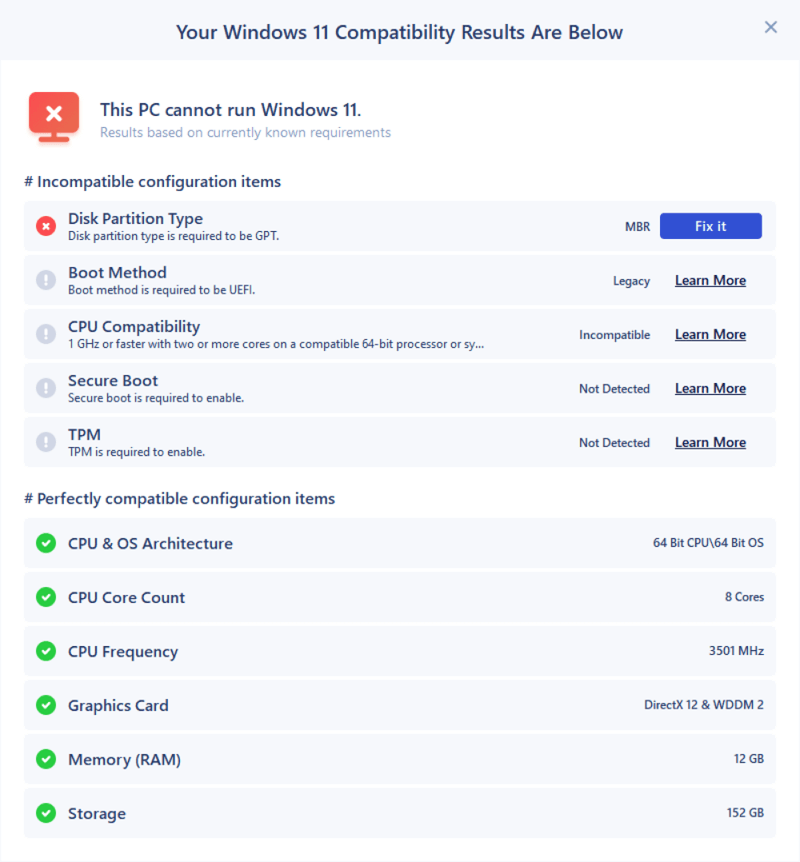
Однако, если ваш компьютер НЕ совместим с Windows 11, вы получите следующий экран:
В этом случае см. Исправление для установки Windows 11 на неподдерживаемом ПК прямо ниже.
Как установить Windows 11 на неподдерживаемый компьютер
Как ни странно, да. И довольно легко. Проверьте ссылку ниже.
Простой способ установить Windows 11 на неподдерживаемое оборудование — отключить проверку TPM и безопасной загрузки.
Вы можете сделать это, открыв редактор реестра и перейдя по этому адресу:
HKEY_LOCAL_MACHINE SYSTEM Setup MoSetup
Здесь создайте новое значение DWORD (32-разрядное) с именем AllowUpgradesWithUnsupportedTPMOrCPU. Теперь дважды кликните новое значение, чтобы отредактировать его, и замените данные значения с 0 на 1, а затем нажмите кнопку ОК, чтобы сохранить его.
Теперь установите Windows 11 с помощью Помощника по установке Windows 11. Кроме того, вы также можете использовать ISO- файл Windows 11.
Приведенный выше метод действительно лучший, так как даже сама Microsoft предложенный Это. Однако, если вы боитесь редактировать файл реестра, вы настраиваете ISO-файл Windows 11, чтобы он не проверял требования безопасной загрузки и TPM, и сразу же устанавливаете обновление Windows 11.
Все, что вам нужно сделать, это установить Windows 11 с помощью ISO-файла, предоставленного Microsoft, но сначала удалить appraiserres.dll внутри него.
Мы надеемся, что с помощью этого руководства вы смогли установить на свой компьютер Windows следующего поколения.
This issue prevents the installation of the new OS
by Kazim Ali Alvi
Kazim has always been fond of technology, be it scrolling through the settings on his iPhone, Android device, or Windows. And at times, unscrewing the device to take… read more
Published on November 28, 2022
Reviewed by
Vlad Turiceanu

Passionate about technology, Windows, and everything that has a power button, he spent most of his time developing new skills and learning more about the tech world. Coming… read more
- A lot of users have reported being the Windows 11 update not showing in Windows 10 on the Windows Update tool.
- If you using a PC that meets that minimum requirement, you should receive the update in a while since the roll-out is in a phased manner. However, there are ways to make the jump even sooner.
- Check for any issues with the Windows Update, namely, if they are paused, stuck, or the presence of conflicting programs.
- Also, learn how to install Windows 11 on unsupported PCs.
XINSTALL BY CLICKING THE DOWNLOAD FILE
- Download Restoro PC Repair Tool that comes with Patented Technologies (patent available here).
- Click Start Scan to find broken files that are causing the problems.
- Click Repair All to fix issues affecting your computer’s security and performance
- Restoro has been downloaded by 0 readers this month.
Windows 11 has been rolled out for users, though in a phased manner. PCs that are compatible should receive an update in the days to follow. However, many users have reported Windows 11 not showing up in Windows Update.
The Windows 11 update not showing up issue could be due to a bunch of reasons, some related to your computer’s compatibility while others to the phased rollout. Whatever the case, there are ways you can get your hands on the latest Windows iteration from Microsoft.
If you have been checking the Windows Update section time and again to upgrade but to no avail, read ahead to find out the various ways you can install Windows 11 on your computer.
Why don’t I see the Windows 11 update?
A large number of computers wouldn’t be able to upgrade to Windows 11 owing to the strict system requirements. And Microsoft has its reasoning for that.
Can my PC run Windows 11?
To check whether a computer can run Windows 11, Microsoft has released the PC Health Check app. Just download and install the app, run it, and you will find out whether or not your system is compatible.
If you get the message This PC meets Windows 11 requirements, your computer is compatible. Head over to the next section to find out ways to make the upgrade even if Windows 11 is not showing up in Windows Update.
For those of you who see This PC doesn’t currently meet the Windows 11 system requirements, you wouldn’t be receiving the upgrade via Windows Update. Head over to the end to find out how you can install Windows 11 on an unsupported PC.
What can I do if the Windows 11 update is not showing up?
- Why don’t I see the Windows 11 update?
- Can my PC run Windows 11?
- What can I do if the Windows 11 update is not showing up?
- 1. Resume Windows Update
- 2. Reboot the computer
- 3. Run the Windows Update troubleshooter
- 4. Repair Windows Update components
- 5. Restart the Windows 11 update
- 6. Disable or uninstall conflicting apps
- 7. Use the Installation Media
- Can I use the Windows 11 Installation Assistant to upgrade?
- What do I do if my PC doesn’t meet the system requirements for Windows 11?
1. Resume Windows Update
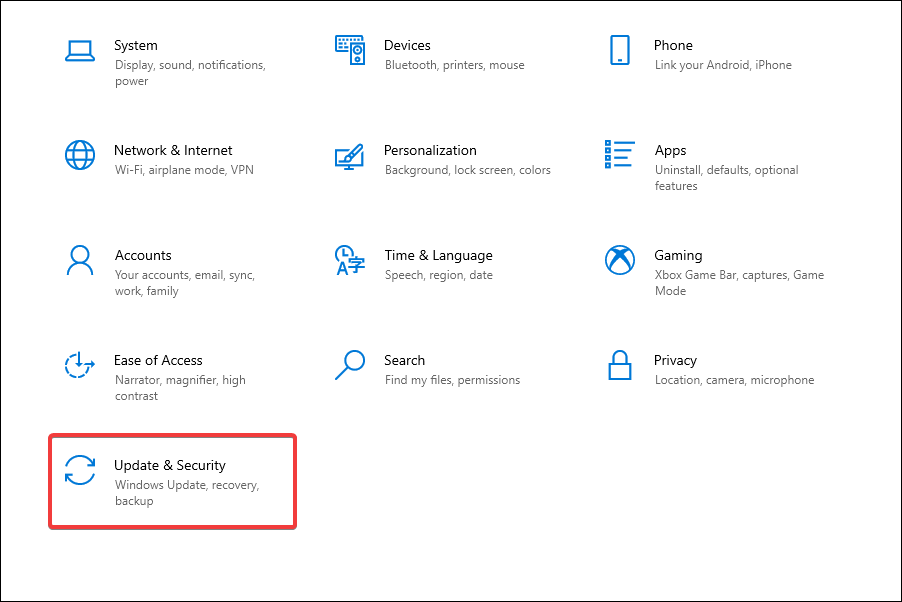
- Press Windows + I to launch the Settings app.
- Select Update & Security from the various options listed here.

- In the Windows Update tab that opens by default, check if there is a Resume Updates button on the right. If there’s one, click on it to start receiving updates.

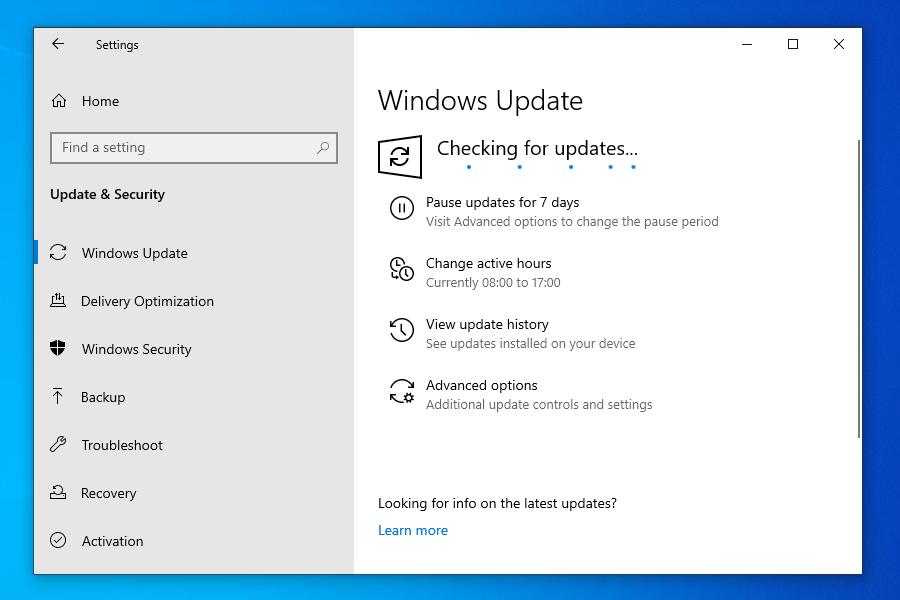
- Your system will now automatically start scanning for any available update including those for Windows 11.

If you have paused updates, you wouldn’t be receiving any, including the one for Windows 11. Even if you don’t remember doing it, there’s no harm in cross-checking before we proceed further.
After you enable updates, if an upgrade for Windows 11 is available, it would be shown in Windows Update, and subsequently, downloaded and installed on your computer.
2. Reboot the computer
- Navigate to the desktop and press Alt + F4 to launch the Shut Down Windows box.
- Click on the dropdown menu and select Restart from the list of options.
- Click on OK to restart the computer.
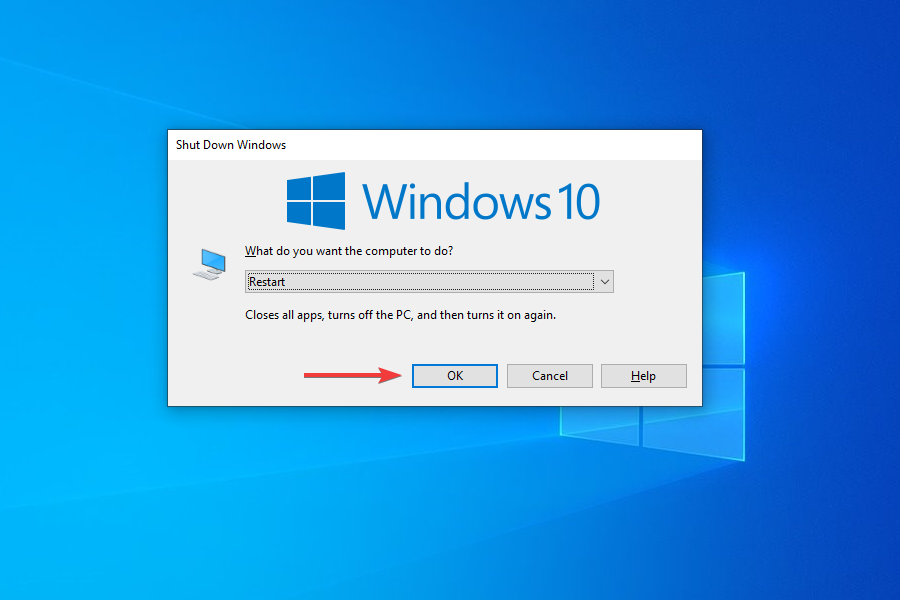
Before restarting, make sure to save any open files to avoid data loss. Rebooting the computer restarts the OS and fixes any trivial bugs that may be interfering with the Windows 11 update.
3. Run the Windows Update troubleshooter
- Press Windows + I to launch the Settings app.
- Select Update & Security from the list of options listed in the Settings.
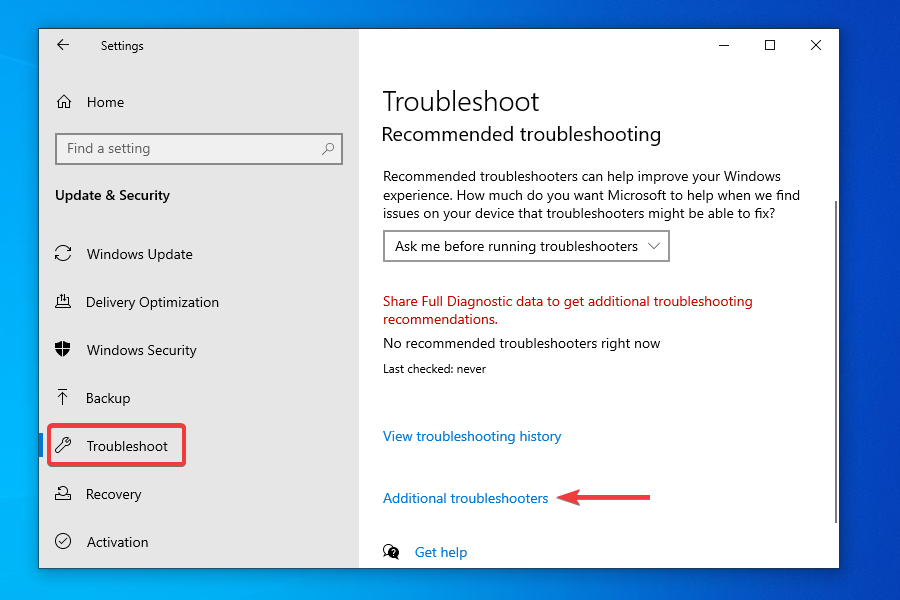
- Select Troubleshoot from the tabs listed in the navigation pane and click Additional troubleshooters on the right.
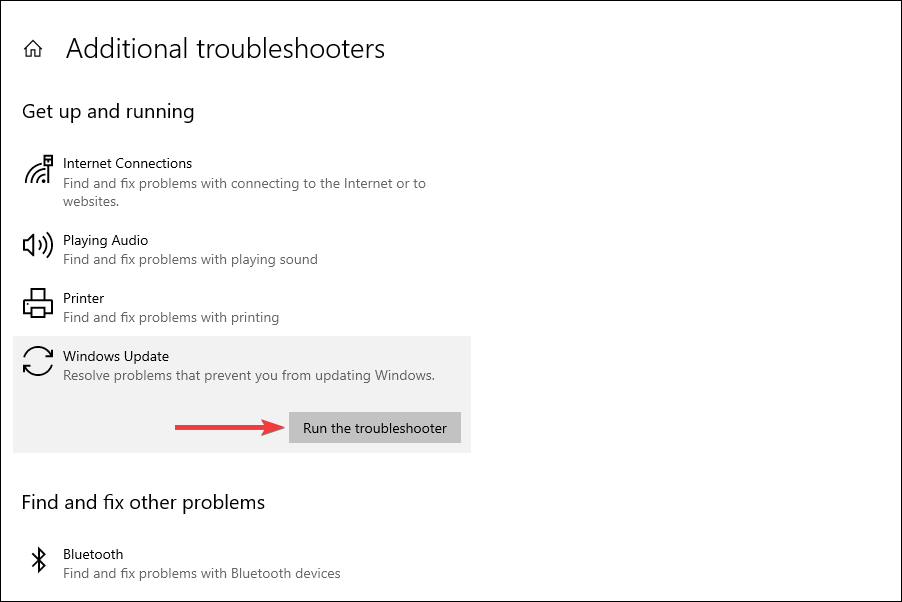
- Click on Windows Update.
- Click Run troubleshooter to diagnose and fix issues preventing your PC from receiving the update for Windows 11.
- The troubleshooter will now start running. Follow the instructions and choose the appropriate response, if and when prompted, to complete the process.

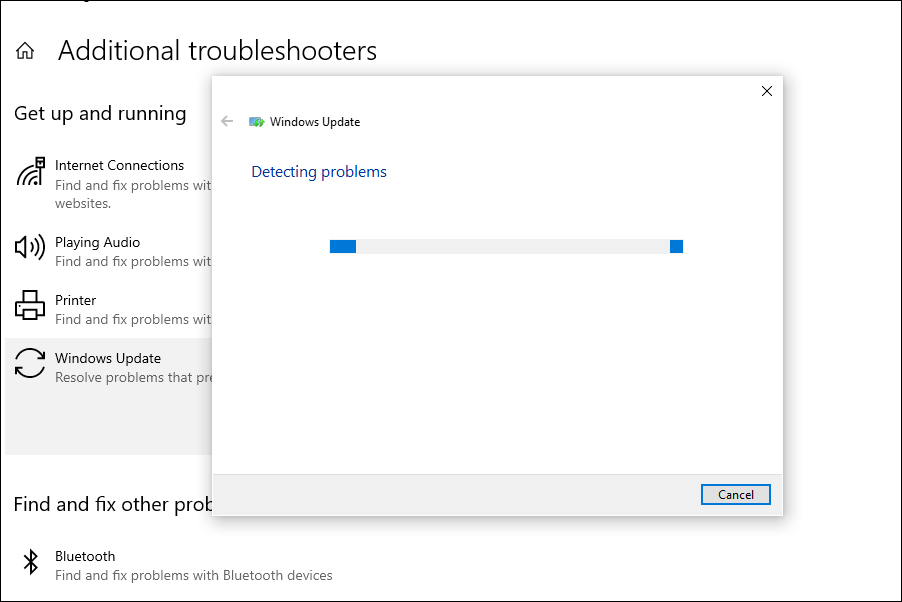
The built-in troubleshooters offered by Microsoft are excellent in identifying and fixing small bugs, misconfigured settings, and other issues. After the troubleshooter is done running, check if Windows 11 is now showing up in Windows Update.
4. Repair Windows Update components
Although you are required to repair or reset Windows Update components when encountering an error, it may also help you get the Windows 11 update in this case.
If they have become corrupt or have run into a bug that is leading to the Windows 11 not showing up in Windows update issue, repairing or resetting them should come in handy.
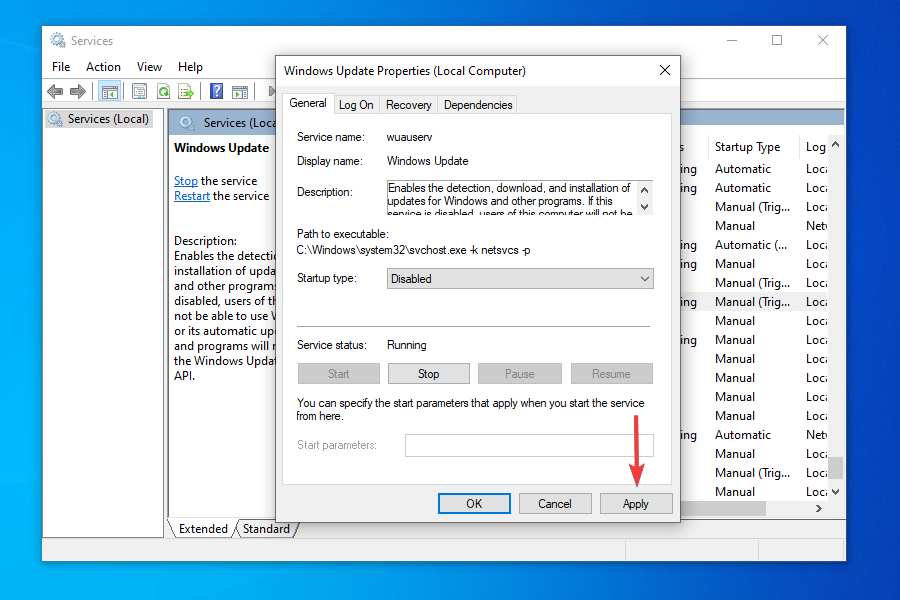
5. Restart the Windows 11 update
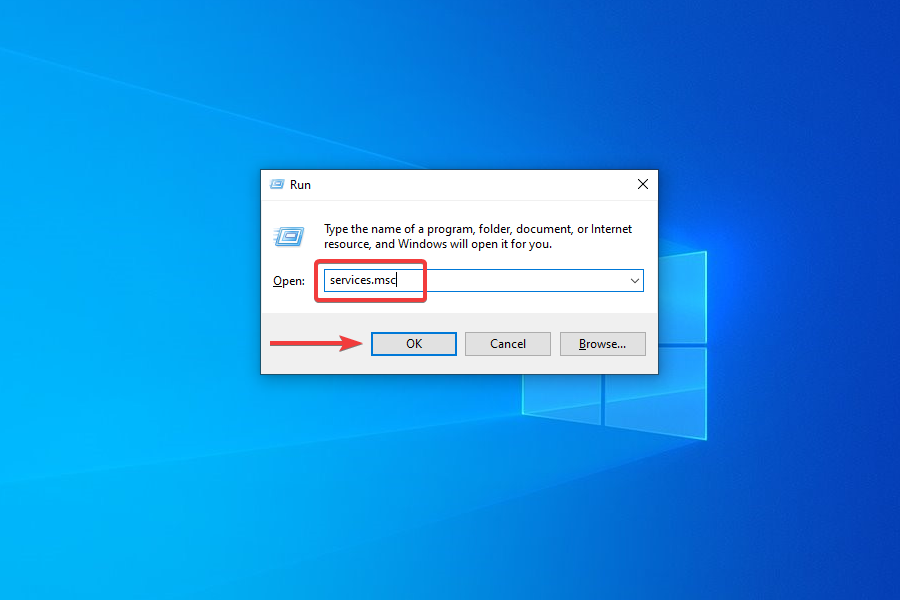
- Press Windows + R to launch the Run command.
- Type services.msc in the text field, and either click on OK or press Enter to launch the Services app.
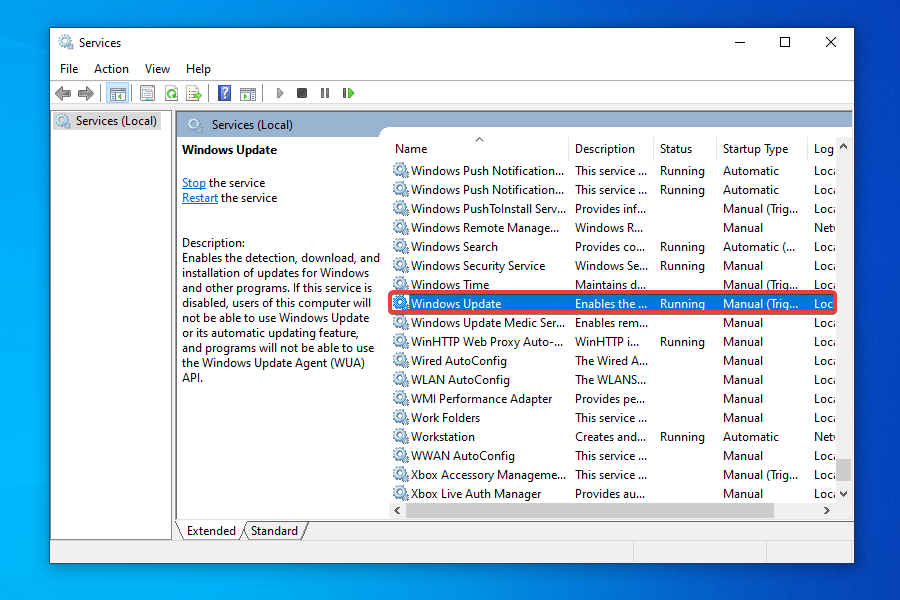
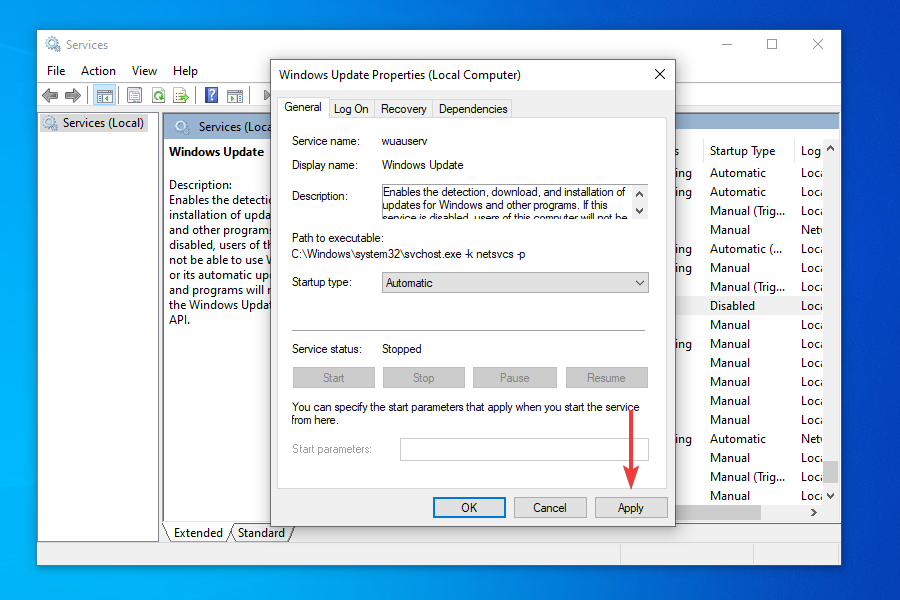
- Locate and double-click on the Windows Update service.
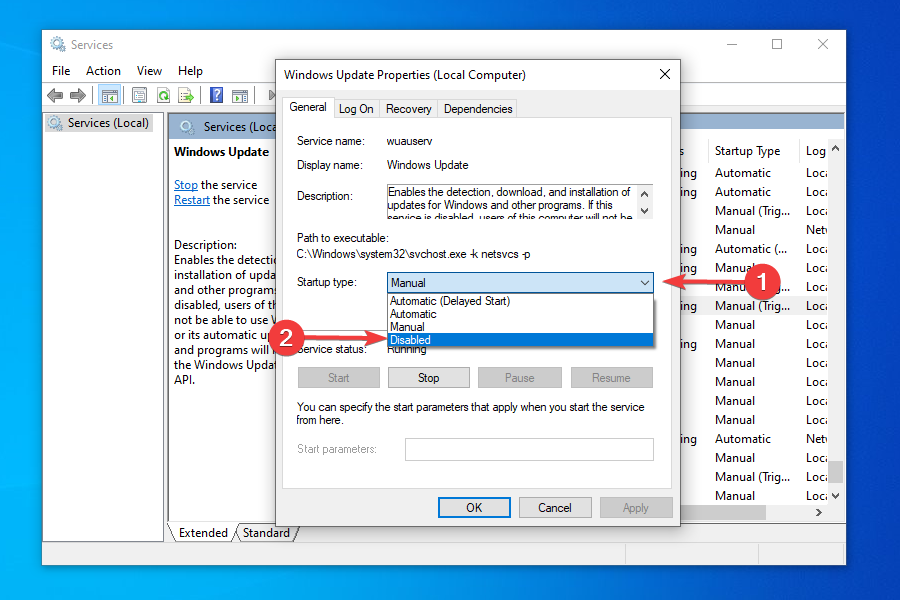
- Click on the Startup type dropdown menu and select Disabled from the list of options that appear.
- Click on Apply to save the changes.
- Next, click OK to close the properties window.
- Close the Services app.
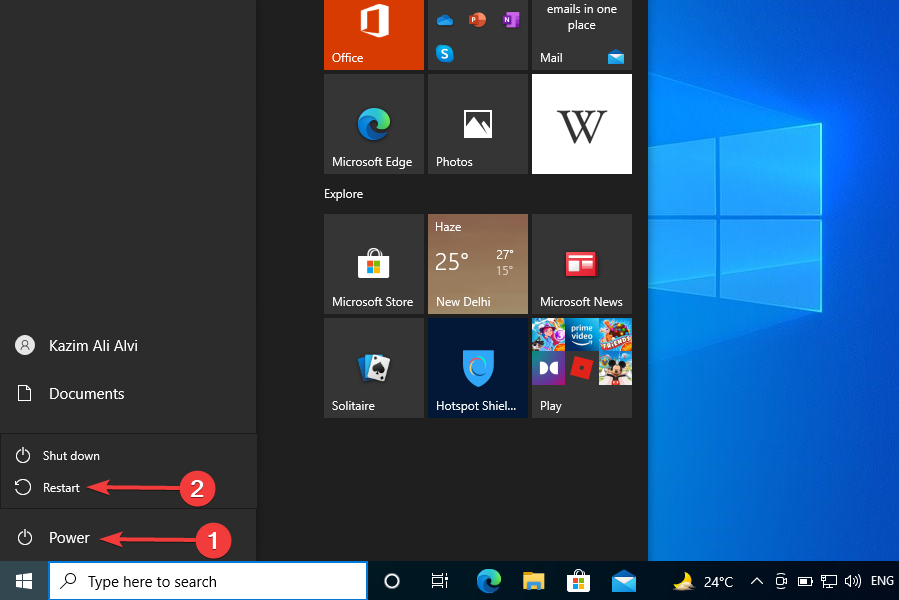
- Now, you need to reboot the computer. To do that, press the Windows key, click on the Power button, and select Restart from the menu that appears.

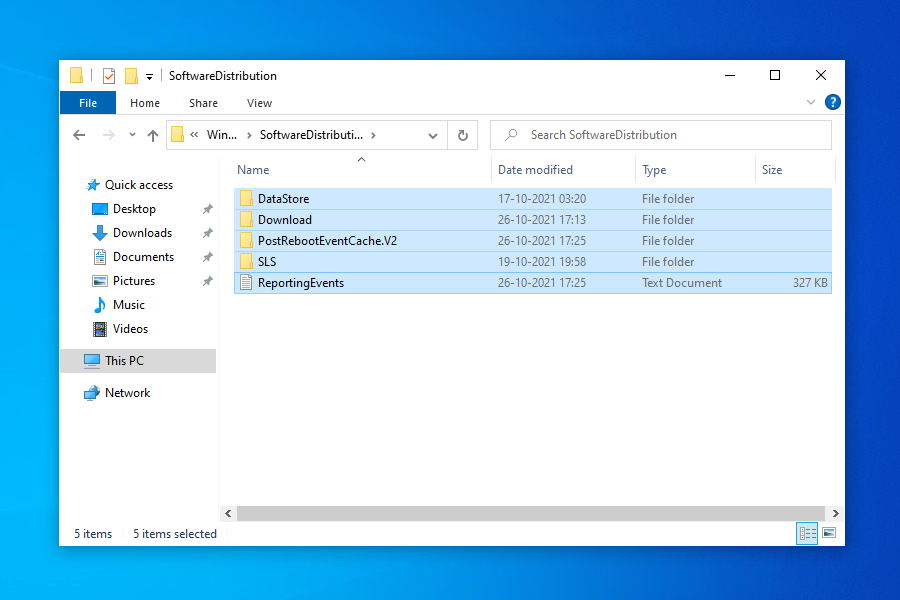
- Press Windows + E to launch the File Explorer, and navigate to the following path or paste it in the addressbar at the top and hit Enter.
C:WindowsSoftwareDistribution - Press Ctrl + A to select all the files saved here, and hit the Del key to delete them.
- Choose the appropriate response in case a confirmation box pops up.
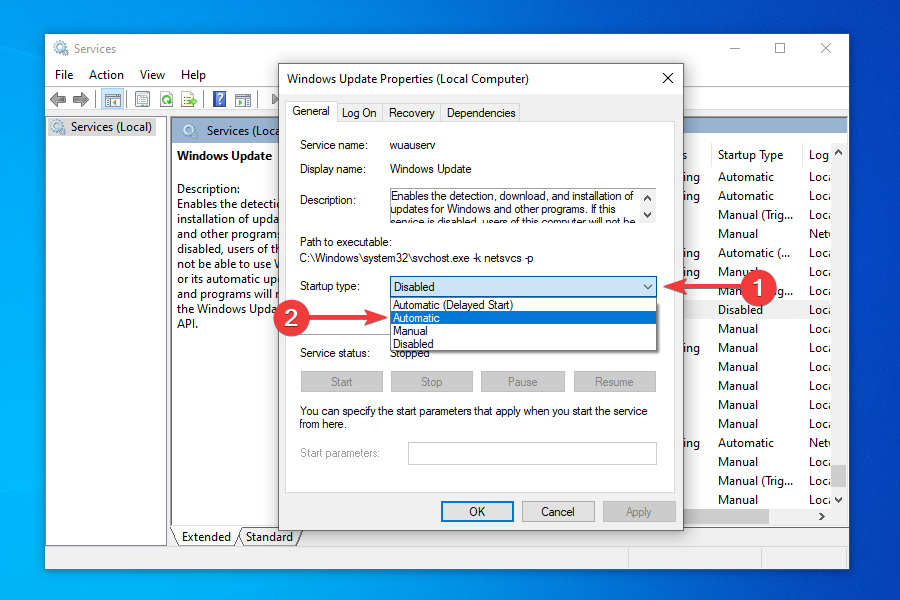
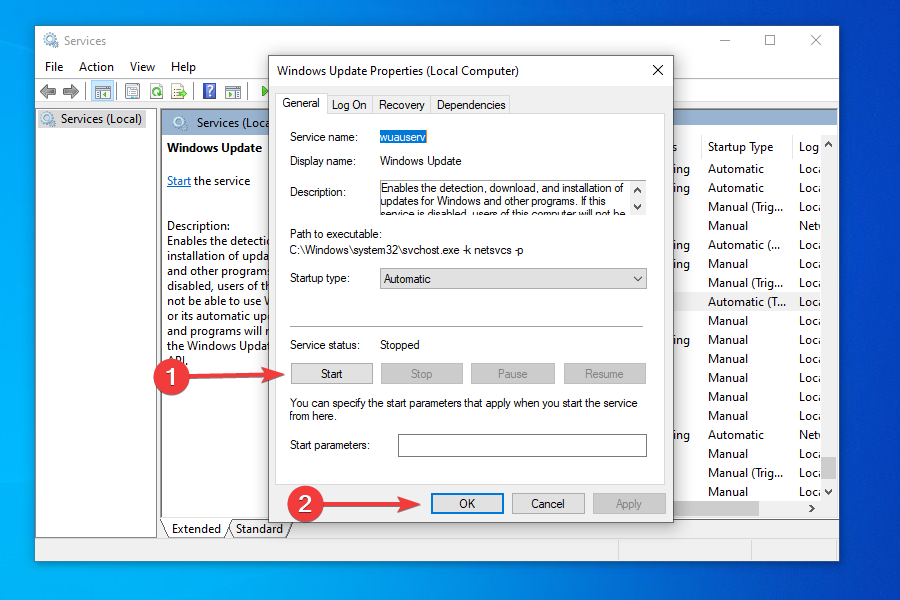
- Now, again launch the Services app as you did earlier, and double-click on the Windows Update service.
- Select Automatic from the Startup type dropdown menu this time.
- Click on Apply to save the changes.
- Click on Start under Service status to run the service, and then click on OK at the bottom.
- Go to the Windows Update section in Settings and check if you can now install Windows 11.

In some cases, the update for Windows 11 may seem stuck at 100% for hours without any progress. In such cases, following the steps mentioned here will get things up and running and allow you to upgrade.
6. Disable or uninstall conflicting apps
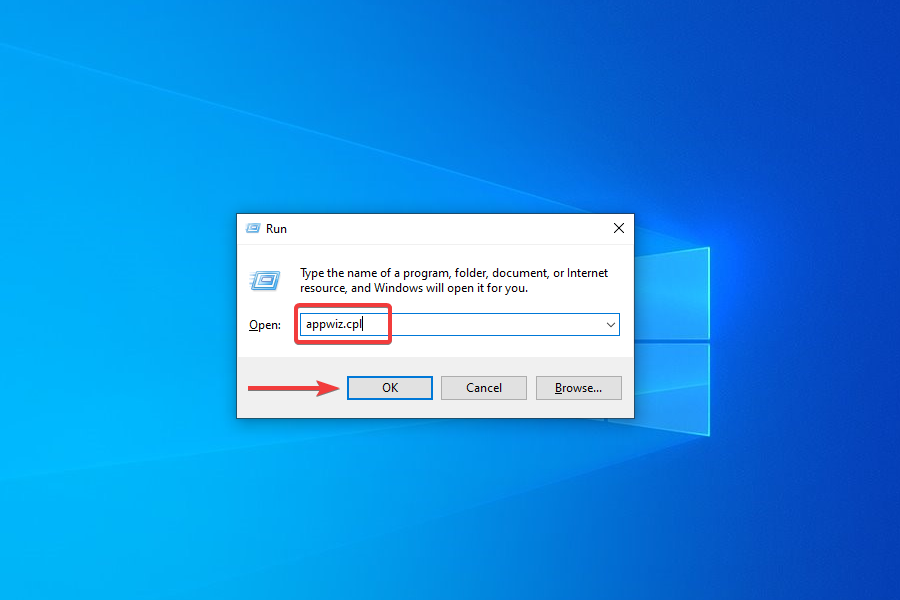
- Press Windows + R to launch the Run command.
- Enter appwiz.cpl in the text field and click on OK or hit Enter to launch the Programs and Features window.
- Locate and select the app you want to remove, and click on Uninstall at the top.
- Choose the appropriate response in case a confirmation box pops up.

To disable an app, you can go to its built-in Settings and turn on/off the required toggle or choose the appropriate response.
The method to disable each app is different and there should be an option for it somewhere in the app’s built-in Settings. Search the FAQ section on the official website for the program to find out the exact steps.
Some PC issues are hard to tackle, especially when it comes to corrupted repositories or missing Windows files. If you are having troubles fixing an error, your system may be partially broken.
We recommend installing Restoro, a tool that will scan your machine and identify what the fault is.
Click here to download and start repairing.
If disabling the app didn’t work or you couldn’t find the option for it, follow the steps above to uninstall the app.
Certain programs are known to block the Windows Updates, thus leading to the current issue.
You should look out for third-party firewalls and disable or uninstall them. Also, apps like Pi-hole or other similar ones, have been found to be the culprit, and uninstalling them fixed the problem.
Once you are done disabling or uninstalling the problematic apps, check if you are able to find and install Windows 11 from Windows Update.
7. Use the Installation Media

NOTE
For this method, you will require a USB flash drive with more than 8 GB of storage to create a bootable USB for installing Windows 11.
- Plug in the flash drive to your sytem.
- Go to the download page for Windows 11 and click on Download Now under Create Windows 11 Installation Media.
- Navigate to the location where the downloaded file is saved and double-click on it.
- Click Yes on the UAC prompt that appears.
- The setup will take a few moments to get things ready.
- Click on Accept to agree to the license terms.
- Now, you will find the recommended language and edition already selected. In case you want to make any changes, untick the checkbox for Use the recommended options for this PC and choose the appropriate settings. Finally, click on Next.
- Choose the USB flash drive option and click Next.
- Select the removable drive that you earlier plugged in from the list and click on Next.
- Wait for the setup to create a bootable USB drive. You can monitor the progress in this window.
- After the bootable flash drive is created, click on Finish to close the setup.

Once done, you can now easily install the OS from the bootable USB drive. Although the guide is for Windows 10, it would assist you when installing Windows 11 as well, since the process remains the same.
After the flash drive is booted, follow the on-screen instructions to complete the installation process.
A major advantage of this method is that you will always have a bootable USB at your disposal, which would make things a lot easier in case you have to reinstall Windows 11.
We’ve written extensively around the issue of people either not being able to complete the upgrade process to Windows 11 or not seeing the option, at all. Here are some resources we’re suggesting for you to check out:
- How to fix Windows 11 Windows Update errors
- How to fix Windows 11 errors after update from Windows 10
- How to make Windows 11 update after restart
- How to fix Windows Update troubleshooter in Windows 11
- How to fix a stuck Windows 11 download
- How to solve Windows 11 installation woes
Can I use the Windows 11 Installation Assistant to upgrade?
Yes, the Windows 11 Installation Assistant is another tool at your disposal to upgrade to the latest iteration. However, you cannot use it if the PC doesn’t meet the minimum system requirements, since the Installation Assistant wouldn’t run.
You can download and use the Windows 11 Installation Assistant with the help of our guide. Simply, go to the How to use the Windows 11 Installation Assistant? heading and follow the steps listed there.
What do I do if my PC doesn’t meet the system requirements for Windows 11?
As promised earlier, we would now list out the ways you can install Windows 11 on an unsupported PC. However, Microsoft has stated that such PCs may have compatibility issues and might not receive updates, including those for security. You will thus be exposing the system to a major risk.
Though if you have made up your mind, you can install Windows 11 after bypassing SecureBoot and TPM checks. This would require making some minor changes to the Registry.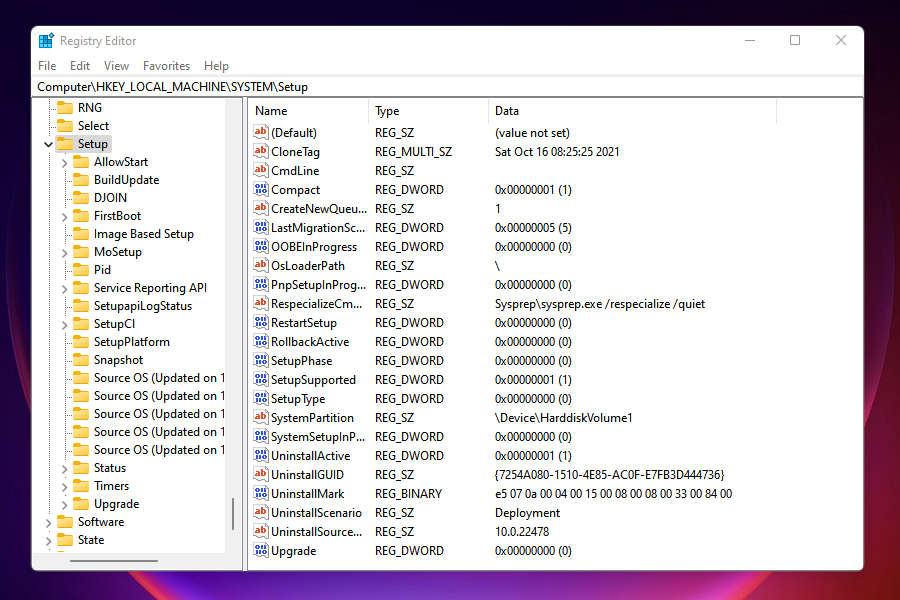
It’s also possible to install Windows 11 without TPM, another workaround users had been looking for due to the TPM 2.0 requirement.
If you are still unsure, learn how to install Windows 11 on a Virtual Machine, try it out and then make the upgrade. Nevertheless, if you have already made the jump, it’s easy to roll back from Windows 11 to Windows 10.
By the time you reach the end of this article, you know a bunch of ways to install the latest iteration from Microsoft on both supported and unsupported PCS. Also, the Windows 11 not showing up in Windows Update issue would be fixed.
Let’s know which method worked for you and your experience thus far with Windows 11.
![]()
Newsletter
-
MiniTool
-
MiniTool News Center
- [7 Fixes] Windows 11 Not Showing up in Windows Update
By Stella | Follow |
Last Updated December 16, 2022
![]()
Windows 11 not showing up in Windows Update is an annoying thing that prevents you from getting Windows 11, the new version of Windows. MiniTool Software collects some useful solutions and shows them in this post. If you don’t know the exact reason for this issue, you can try these solutions one by one until you find the suitable one.
UPDATE 10/5: Windows 11 has been officially released on October 5, 2021. But Microsoft doesn’t push Windows 11 to all users at the same time. If your computer doesn’t receive Windows 11 in Windows Update, it usually means that your device is not ready for Windows 11. But this doesn’t mean that you can’t get Windows 11 immediately.
You can go to the Microsoft’s Windows 11 software download page to select one tool to download and install Windows 11. There are three tools:
- Windows 11 Installation Assistant: install Windows 11 on a supported Windows 10 computer.
- Windows 11 Installation Media creation tool: create a Windows 11 installation medium for installation.
- Windows 11 Disk Image download tool: directly download Windows 11 ISO files for installation.
On a Windows 11 supported computer, you can directly install Windows 11 using the ISO file. Besides, you can also use the methods mentioned in this post if Windows 11 is not available in Windows Update.
Windows 11 Not Showing up in Windows Update
To upgrade to Windows 11 via Windows Update, you can go to Start > Settings > Update & security > Windows update to see whether the Windows 11 update is available.
However, some users reflect that Windows 11 not showing up in Windows Update even the Windows 11 compatibility checker says everything is OK for Windows 11. We believe that many users are troubled by this issue and want to know the causes & fixes.
Reasons for Windows 11 Update Not Showing up
If you can’t find the Windows 11 option in Windows Update, you should consider the following reasons:
- Some damaged temporary files may cause Windows 11 update not working on your device. So you can’t receive Windows 11 update successfully.
- There is something wrong with the Windows Update service.
- You are not in the proper Channel of the Windows Insider Program.
Fix 1: Check whether Windows Update Is Blocked
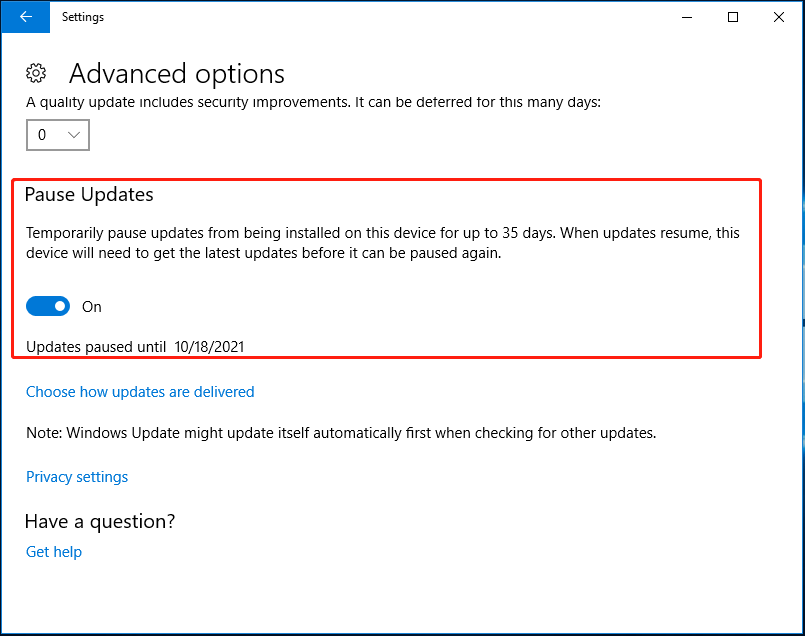
Perhaps, you have blocked Windows Update but you forgot it. If so, you will be unable to see Windows 11 in Windows Update.
In Windows Update, you can check whether Pause Updates is enabled. If yes, you need to turn it off and go back to check for updates.
Fix 2: Restart Your Computer
Restarting your computer can remove the damaged or corrupt temporary files that cause Windows 11 updates not working in Windows Update. This is the easiest method. But it is worth trying.
Fix 3: Turn on VPN
If you have an available VPN and it is not turned on when you want to upgrade to Windows 11, you can turn it on and try to check for updates again. Some users said they solved this issue this way. You can also have a try.
Fix 4: Run Windows Update Troubleshooter
Windows has built-in troubleshooters to troubleshoot different kinds of software & hardware issues on your device. Windows Update troubleshooter is one of them and it can fix some Windows Update issues including Windows Update not working, Windows Update not showing updates, Windows 11 update not working, and more.
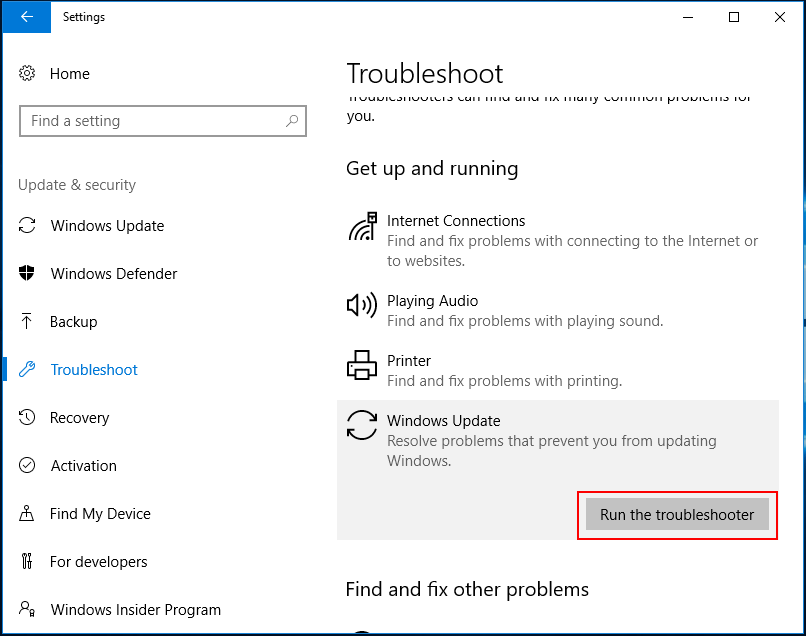
- Go to Start > Settings > Update & security > Troubleshoot.
- Click Windows Update under Get up and running.
- Click Run the troubleshooter to run Windows Update troubleshooter.
- Follow the on-screen wizards to finish the troubleshooting process.
Fix 5: Modify Registry Keys
If you still can’t find Windows 11 update in Windows Update after using the above two methods, you may need to change the related registry keys.
- Press Windows + R to open Run.
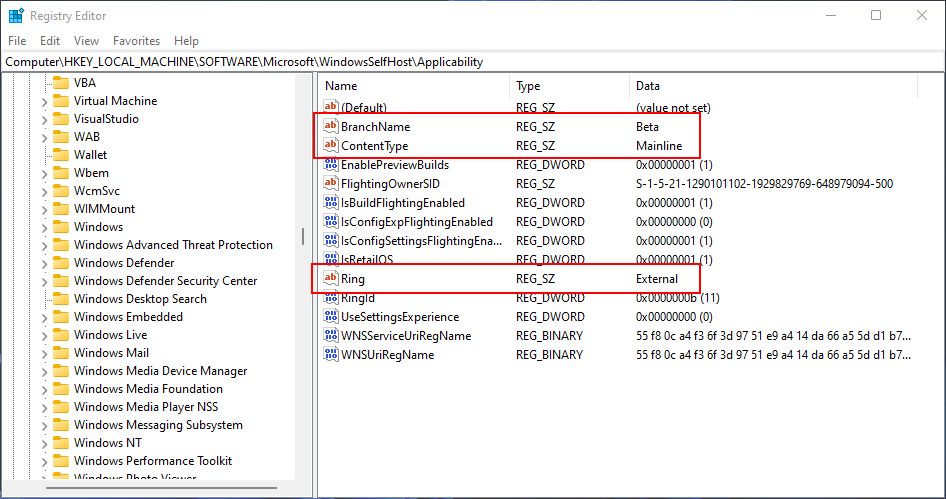
- Type regedit and press Enter to open Registry Editor.
- Go to ComputerHKEY_LOCAL_MACHINESOFTWAREMicrosoftWindowsSelfHostApplicability.
- Make sure the following three values are matched:
- BranchName (Type REG_SZ) = Beta
- ContentType (Type REG_SZ) = Mainline
- Ring (Type REG_SZ) = External
Fix 6: Change the Telemetry Settings
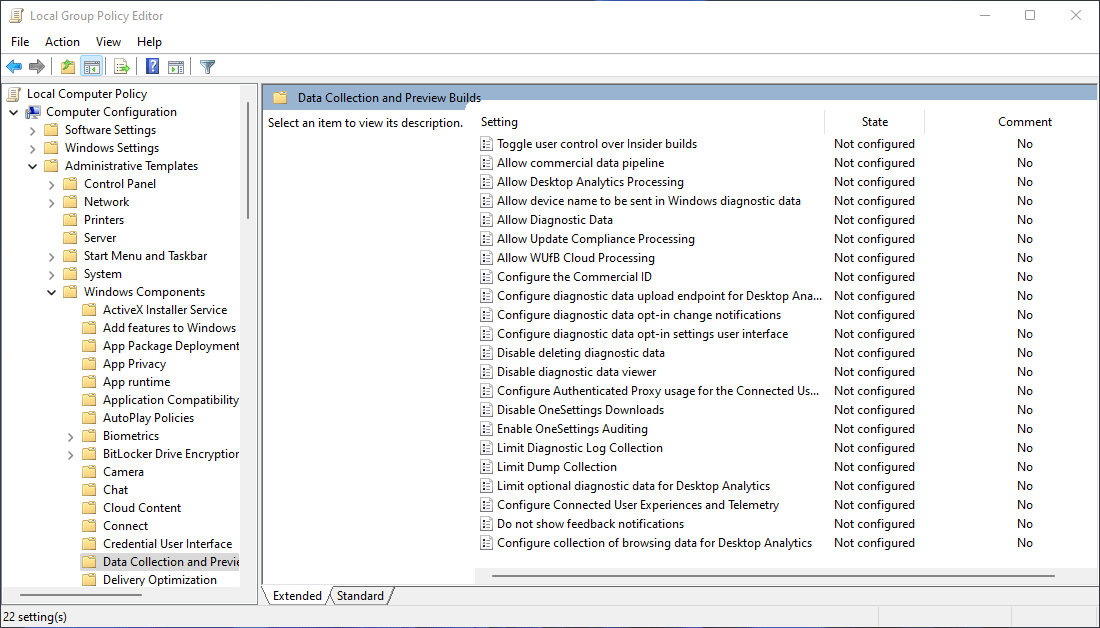
If the above method doesn’t help you, you can change the telemetry settings via Local Group Policy Editor. If you are run Windows 10 Pro, you can try this method. However, if you are using Windows 10 Home, Local Group Policy Editor is not available.
- Press Windows + R to open Run.
- Type gpedit.msc and press Enter to open Local Group Policy Editor.
- Go to Computer configuration > Administrative templates > Windows components > Datacollection and Preview Builds.
- Change everything to allow as much telemetry as possible.
Fix 7: Install Windows 11 Using Windows 11 ISO Files
Microsoft has released Windows 11 ISO files in the Microsoft Windows 11 software download page. If Windows Update doesn’t show Windows 11 update, you can download a proper Windows 11 ISO file and then:
Windows 11 Clean Install:
- Step 1: Download a proper version of the ISO file.
- Step 2: Burn it to a USB drive.
- Step 3: Install Windows 11 from the USB installation drive.
Windows 11 In-Place Upgrade
You can also perform a Windows 11 in-place upgrade using the Windows 11 ISO file.
Bottom Line
Those are the solutions you can try when Windows 11 is not showing up in Windows Update. We hope you can find a suitable method here. If you have other related issues, you can let us know in the comments.
About The Author

Position: Columnist
Stella has been working in MiniTool Software as an English Editor for more than 4 years. Her articles mainly cover the fields of data recovery including storage media data recovery and phone data recovery, YouTube videos download, partition management, and video conversions.
Друзья, приветствую вас на портале WiFiGid, на связи Ботан! В рамках нашего обновления статей под последнюю версию операционной системы предлагаю вашему вниманию подробную инструкцию, если не обновляется Windows 11. Вариантов проблемы очень много, попробую охватить все в доступном виде.
Текущая статья описывает неоднозначную проблему Windows. Решений может быть очень много, но самое страшное, что ни одно из них может не подойти именно вам. WiFiGid просит пользователей, нашедших конкретное уникальное решение под себя, написать об этом в комментариях – так вы поможете тысячам других пользователей сэкономить уйму времени. А WiFiGid будет бесконечно благодарен вам.
Содержание
- Первые действия
- Шаг 1 – Освободите место
- Шаг 2 – Откалываем и пробуем заново
- Шаг 3 – Отсоединение оборудования
- Шаг 4 – Установка драйверов
- Шаг 5 – Если появилась ошибка
- Шаг 6 – Запуск устранения неполадок
- Шаг 7 – Возобновление обновлений
- Шаг 8 – Антивирусы
- Шаг 9 – Синхронизация часов
- Шаг 10 – Остаточные файлы
- Видео по теме
- Задать вопрос автору статьи
Первые действия

Эти действия очевидны, но мало ли кто-то просто про них забыл. Если Windows 11 не обновляется, в первую очередь не забываем про эти шаги:
- У вашей Windows 11 есть лицензия. Очень надеюсь, что вы не устанавливали левые пиратские сборки. И хотя некоторые из них позволяют устанавливать обновления, встречались экземпляры без такой функции. А если вдруг вы используете какую-то странную сборку, то тут скорее всего поможет только чистая переустановка Windows 11 из официального образа.
- У вашего компьютера или ноутбука прямо сейчас есть интернет. Проверяем методом простого открытия браузера и гугления чего-нибудь бесполезного. В идеале отключаем всякие прокси и VPN – из-за них обновления тоже не скачиваются.
- Делаем перезагрузку. Перезагрузка спасает от многих болезней: от банальных сетевых конфликтов и запуска упавших служб, до чего-то странного. Еще как интересное замечание – ваша система может отказываться устанавливать обновления, потому что она еще не успела установить старые, и тут перезагрузка тоже поможет.
И как дополнение. Эта статья не об этом, но некоторые обновления (не часто) устанавливаются только с учетной записи администратора. Поэтому если у вас много учетных записей на компьютере, проверяем, чтобы в момент обновления вы зашли именно под пользователем, у которого сейчас есть права администратора.
Шаг 1 – Освободите место
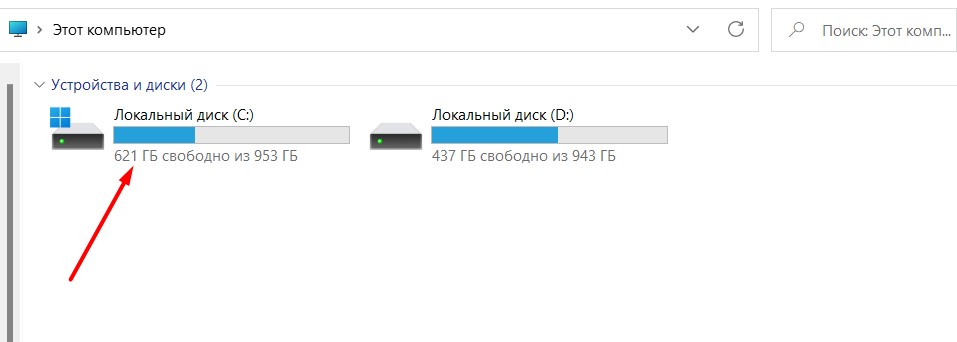
Тут все почти просто – для установки обновлений Windows 11 сама Microsoft рекомендует убедиться, что на вашем системном диске прямо сейчас свободно не менее 20 Гб. Если у вас меньше, очищаем. Обновления просто упираются в свободное место и не устанавливаются.
Проверить место просто, заходим в «Проводник» или «Этот компьютер» и смотрим на диск, где у вас установлена Windows:
Шаг 2 – Откалываем и пробуем заново
Способ немного странный, но иногда работает. Если что-то сейчас не обновляется – ляг, поспи и все пройдет. А если серьезно, предлагаю отложить эту операцию до следующего дня (если вы уже не пытаетесь обновиться целую неделю). Зачастую, при массовых ошибках могут выкатить какие-то микропатчи или подвезти дополнительные обновления, которые появятся там же в «Центре обновления».
Кстати, а как вы пытаетесь обновить свою систему? Надеюсь, что через «Центр обновления». Инструкция ниже по ручному обновлению специально для тех, кто что-то делает не так.
- Переходим в «Параметры – Центр обновления Windows» (в параметры проще всего можно попасть через сочетание клавиш + I).
- Нажимаем кнопку «Проверить наличие обновлений».
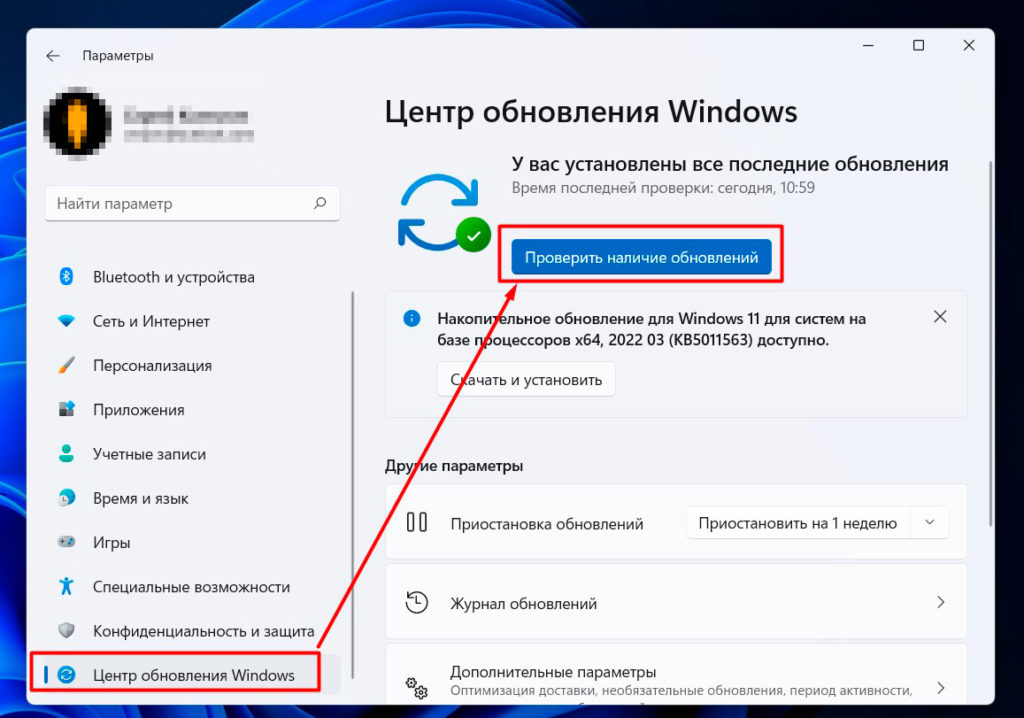
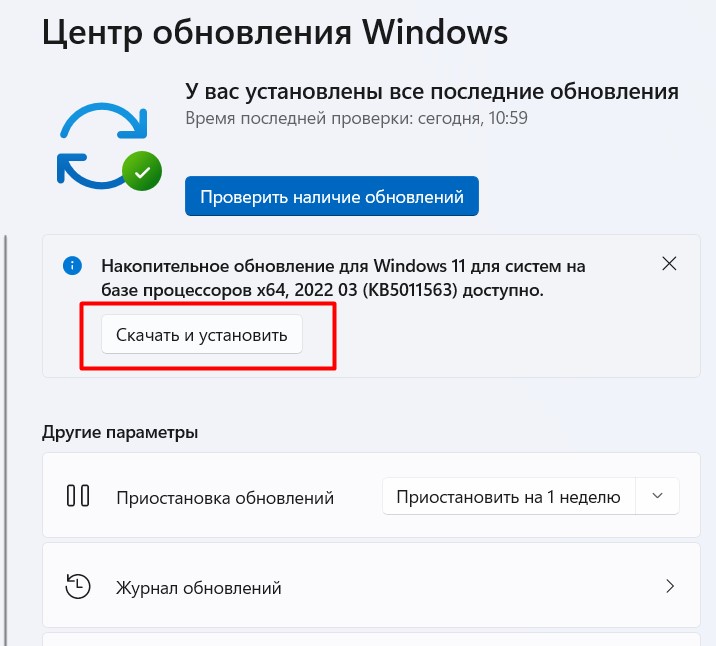
- Если какие-то обновления были найдены – нажимаем на кнопку «Скачать и установить».
Шаг 3 – Отсоединение оборудования
Если у вас к компьютеру прямо сейчас подключено что-то лишнее – флешки, жесткие диски, док-станции, чего вы обычно не используете – временно отключите их. Как один из возможных конфликтов – Windows 11 может для обновления использовать и другие диски, и представьте, что в этот момент ей захочется использовать флешку на 8 Гб, куда обновление просто не залезет. Случай не частый, но бывает. Рекомендую проверить все у себя.
Шаг 4 – Установка драйверов
Не все драйвера одинаково полезны, и не все сегодня может установить Windows. Это к тому, что если ваше обновления завязано на драйвера конкретного устройства, вполне стоит ждать конфуза. Решение – идем на официальный сайт производителя конкретного своего устройства и скачиваем официальные драйвера. А уже после их установки пробуем сделать обновление.
Как совет для проверки – зайдите в «Диспетчер устройств» и проверьте, чтобы там не было никаких неопознанных устройств или устройств с восклицательными или другими знаками. Если что-то такое появилось, нужно опознавать эти устройства и искать на них драйвера.
Шаг 5 – Если появилась ошибка
Обычно, ошибок нет и вылезает сообщение «Не удалось установить обновление», но, если вам вылезла конкретная ошибка обновления с кодом, считайте, что вам очень крупно повезло. Конечно, это не приятно, но по крайней мере ее можно опознать. Как выглядят коды ошибок? Например, вот так:
0x8007000E, 0x80242006, 0x80244018, 0x80D02002, 0x80246017
Ошибок очень много, перечислить здесь все невозможно. Главное решение – вписываем эту ошибку в любую поисковую систему (Google или Яндекс) и уже там начинаем искать решение. Возможно, даже попадете на какую-то конкретную страницу на нашем сайте.
Шаг 6 – Запуск устранения неполадок
Кому-то это тоже очень сильно помогает. В Windows 11 есть много «устранителей неполадок». Нас же интересует только тот, что отвечает за обновления. Запустим его:
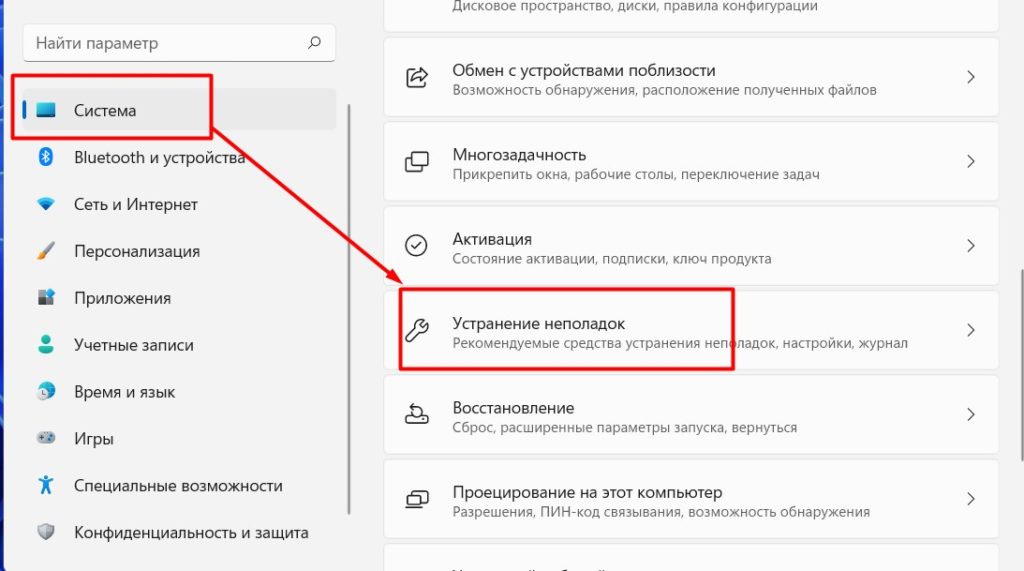
- Переходим в «Параметр – Система – Устранение неполадок» (как попасть в «Параметры», я уже писал, а вот для отображения пункта «Устранение неполадок» нужно пролистать чуть ниже, т.к. его не видно в первом экране).
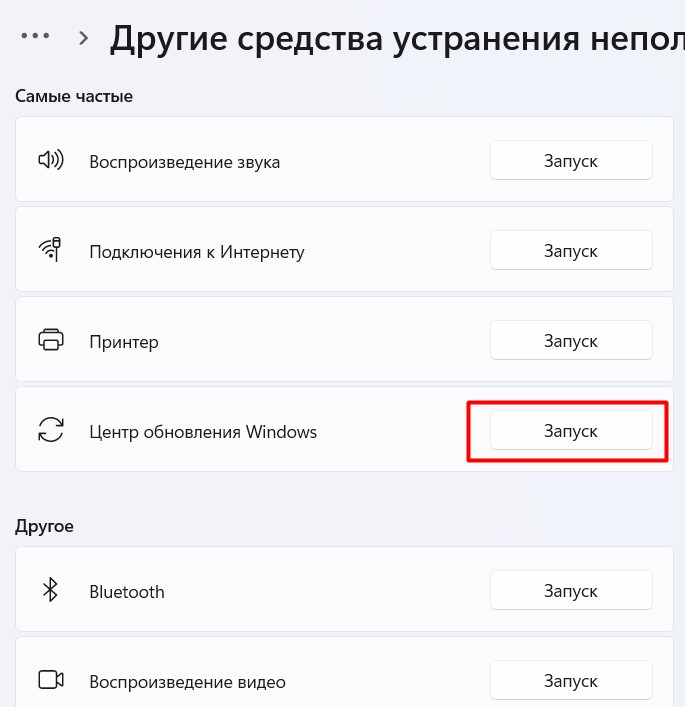
- «Другие средства устранения неполадок».
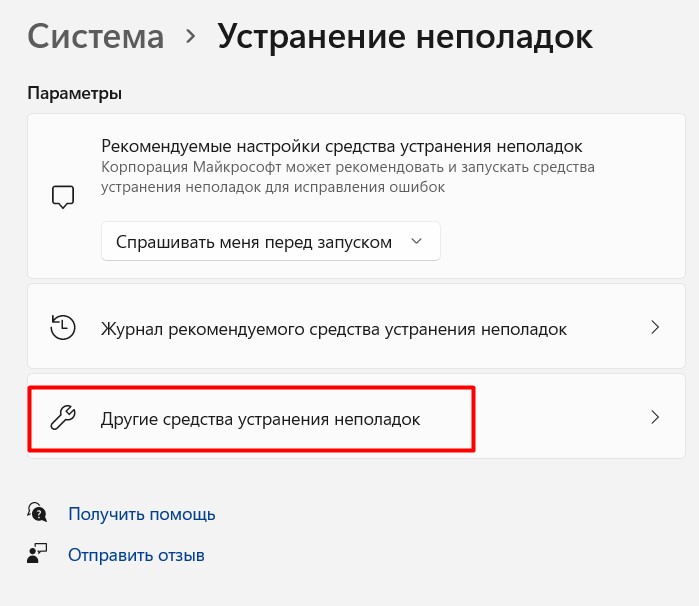
- Находим «Центр обновления Windows» и нажимаем на кнопку «Запуск».
Способ особенно актуален, если обновление надолго зависает во время установки или центр обновления вообще не работает.
Шаг 7 – Возобновление обновлений
Этот вариант я припрятал как можно ниже, потому что вряд ли у кого-то в здравом уме сначала придет мысль отключить обновления, а потом жаловаться, что они не работают. Но мало ли
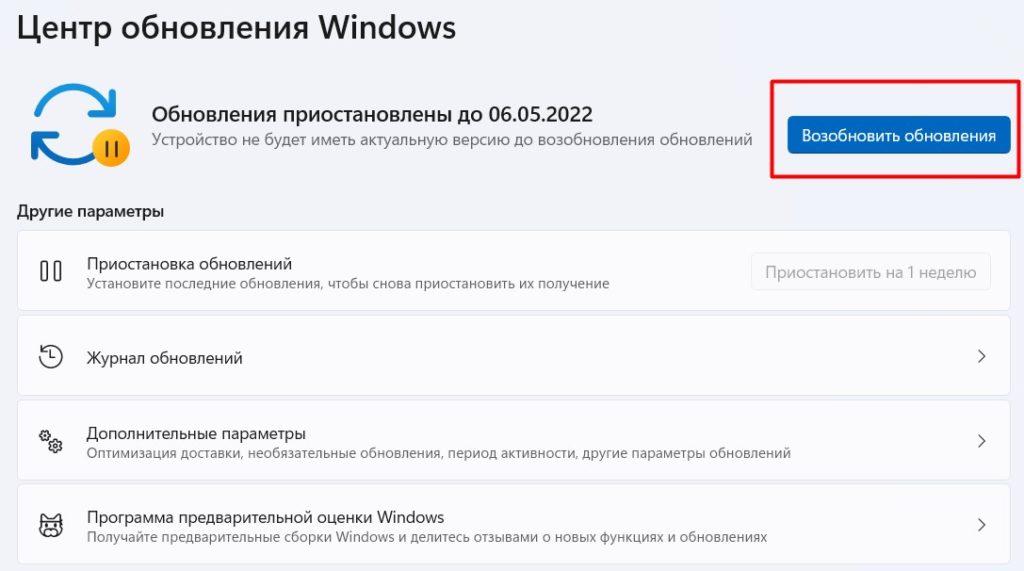
- Переходим в «Параметры – Центр обновления Windows».
- Нажимаем кнопку «Возобновить обновления».
Шаг 8 – Антивирусы
Очень не рекомендую отключать свои антивирусы (если используете), но в очень редких случаях (и Microsoft это подтверждает) антивирусы блокируют установку последних обновлений Windows 11. Так что, если что-то не идет, возможно, стоит попробовать УДАЛИТЬ свой антивирус (но после обновления обязательно установить обратно).
Шаг 9 – Синхронизация часов
Как бы это ни казалось забавным, но часы в вашей системе должны быть синхронизированы и показывать точное время. Если видите расхождение, быть может это и есть та самая проблема. В подобной статье про ошибку сертификатов безопасности в браузерах многие читатели выражали гнев и недоумение, но так работает SSL – он требует точное время. А трафик обновлений вполне себе может использовать те же самые SSL-сертификаты в другом виде. Просто проверьте время, мало ли.
Шаг 10 – Остаточные файлы
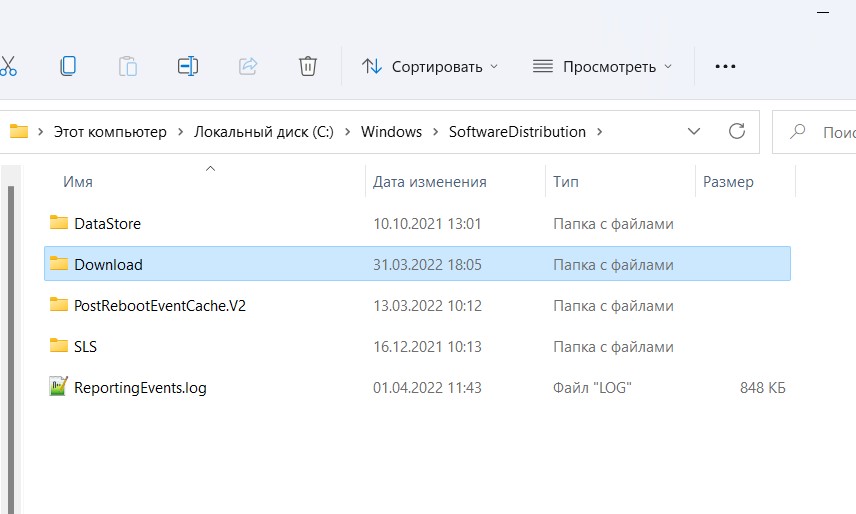
Сам лично не натыкался на такую проблему при обновлении, но раз многие говорят, значит бывает. Суть – остаточные файлы обновлений в какой-то конфликтной ситуации могут наглухо выбивать ошибки. Решение – удаляем их.
Эти файлы находятся по адресу:
C:WindowsSoftwareDistributionDownload
Просто целиком удаляем эту папку или чистим ее содержимое.
А некоторые и вовсе рекомендуют удалять папку SoftwareDistribution – возможно, стоит попробовать и это.
Еще как примечание, удаление папки SoftwareDistribution порой запрещается Windows. Для разблокировки – отключаем службу «Фоновая интеллектуальная служба передачи (BITS)».
Видео по теме
Некоторые советы из этих видео могут оказаться полезными именно в вашем случае:
We’ll walk you through how to fix Windows 11 not showing up in Windows update to get Microsoft’s latest OS. Here’s the overview of the solutions.
| Workable Solutions | Step-by-step Troubleshooting |
|---|---|
| 1. Check Your PC | Download EaseUS Windows 11 Upgrade Checker. Click the Check Now button to…Full steps |
| 2. Check Windows Update | Press Windows + S to open Settings and choose «Update & Security»…Full steps |
| 3. Restart Your PC | Click the «Start» icon. Go to «Shut down or sign out > Restart.»…Full steps |
| 4. Run Update Troubleshooter | Go to «Start > Settings > Update & security > Troubleshoot». Click on…Full steps |
| 5. Upgrade to Windows 11 | If you still fail to receive the notification after you have tried these solutions…Full steps |
Windows 11 rolled out to eligible devices earlier this month, as Microsoft launched its new operating system on Oct, 5. Everyone using Windows 10 can upgrade for free if they have a compatible computer, but a lot of people say that Windows 11 not showing up in Windows update. Here’s the case:
«I’ve done everything correctly. The Health Check app says everything is good, and I have updated to the latest Windows 10 insider build. For some reason Windows 11 won’t pop up, it just keeps saying I’m up to date. Any help?»
Usually, if your computer can meet the requirements, you can receive the Windows 11 update notification. If you find that the Windows 11 update isn’t showing and you can’t update your PC, here are a few things you must check to allow the update to come through.
Method 1. Check If Your PC Meets the Requirements
If Windows 11 update doesn’t show up in Windows 10, you should check your PC to see if it meets the requirements. EaseUS provides you with a free Windows 11 compatibility checker that can check your PC easily and quickly. Visit the download page and install the software, and run it to quickly know whether your computer is ready for Windows 11 or not.
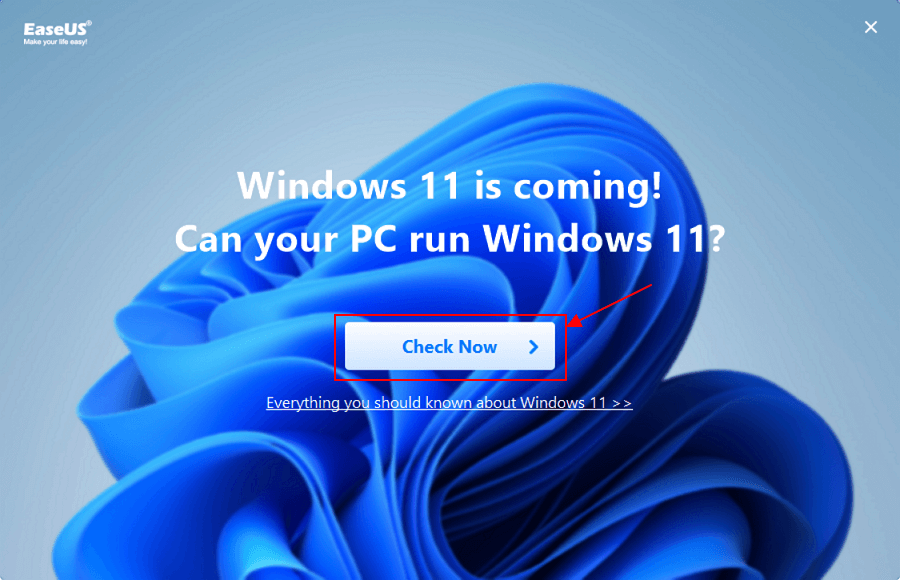
Step 1. Download EaseUS Windows 11 Upgrade Checker.
Step 2. Click the Check Now button to start.
Step 3. The Windows 11 compatibility result window will soon appear. All the incompatible and compatible configuration items will be listed.
Method 2. Ensure that Windows Update Is Working
If you have paused Windows updates in the past and forgot about it, or that the feature was disabled by an app or a bug. To check if your Windows update option is working well, follow the steps below.
Step 1. Press Windows + S to open Settings and choose «Update & Security».
If your Updates are paused, click on Resume updates.
Step 2. If your Updates are paused, click on «Resume updates».
Method 3. Restart Your PC to Fix Windows 11 Not Showing Up
This is the easiest method but worth trying. As you know, you can remove the damaged or corrupt temporary files that make Windows 11 updates not working on your PC. Therefore, make sure to give your PC a soft reboot and check to see if any updates are available.
- Click the «Start» icon.
- Go to «Shut down or sign out > Restart.»
Method 4. Run Windows Update Troubleshooter to Fix It
Windows has a built-in troubleshooter to diagnose problems and offer solutions. It can fix some Windows Update issues including Windows Update not working, Windows Update not showing updates, Windows update stuck, and more. Here’s how to run it:
Step 1. Go to «Start > Settings > Update & security > Troubleshoot».
Step 2. Click on «Additional troubleshooters».
Step 3. Click on «Windows Update > Run the troubleshooter».
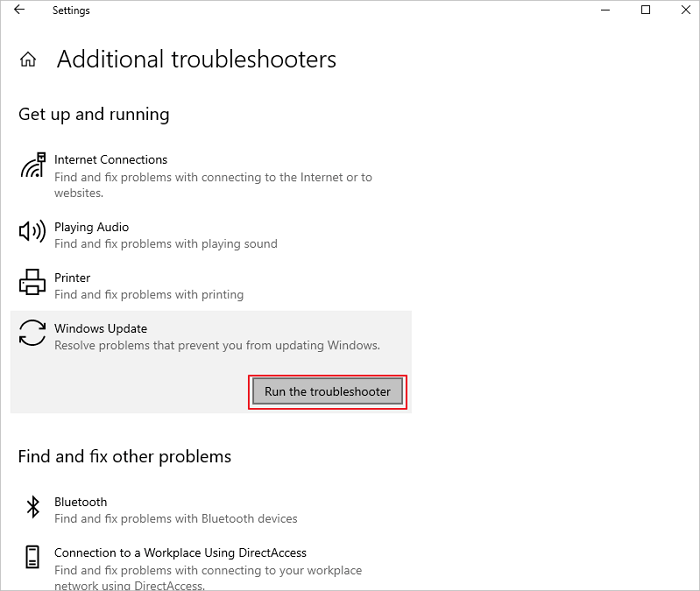
The troubleshooter will start looking for problems and will offer potential fixes if any issues are found.
Method 5. Upgrade to Windows 11 with Windows 11 Media Creation Tool
If you still fail to receive the notification after you have tried these solutions, you can upgrade to Windows 11 with Windows 11 media creation tool. You’ll need an empty USB flash drive (at least 8GB) for this purpose.
![]()
Additional Tips — How to Recover Data After Windows Update
Don’t worry even if you have lost data when you upgrade to Windows 11. EaseUS EaseUS Data Recovery Wizard can restore data from an SD card, SSD, USB flash drive, memory card, camcorder after updating, deleting, and formatting. Follow the steps below to get back your data.
Step 1. Select a location and start scanning
Launch EaseUS Data Recovery Wizard and choose the partition where you lost data. Then, click «Scan».

Step 2. Filter and preview files
Use the file format filter on the left or upper right corner to find the files you need. Then, you can click the «Preview» button or double-click a file to preview its content.

Step 3. Recover lost data or files
Click the checkbox next to the file and click «Recover» to restore the lost data to a secure place.

Conclusion
You can try any of the solutions to fix Windows 11 not showing up in Windows update. Let us know if you still have problems with Windows 11 update, and we’ll try our best to help you.

- Remove From My Forums
-
Question
-
Добрый день, кто сталкивался с тем, что при поиске обновлений не видны новые build, у меня сейчас установлен 10130, и новых версий не видно, хотя они уже есть, как можно исправить положение?
All replies
-
Если обновление не скачивается через Центр обновления Windows или возникает ошибка:
1. Проверьте, чтобы на системном разделе было достаточно свободного места — не менее
20Гб для x64, и не менее 16Гб для x86.
2. Удалите все стороннее антивирусное ПО.
3. Выполните очистку системного диска: Win+R —> cleanmgr —> выбрать системный диск —> OK —> нажать «Очистить системные файлы» (Clean up system files) —> повторно
выбрать системный диск —> поставить все галочки —> OK
4. Загрузите и запустите исправления:ссылка
5. Примените следующий твик реестра:
Код:

Windows Registry Editor Version 5.00[HKEY_CURRENT_USERSOFTWAREMicrosoftWindowsSelfhostApplicability]
"UXOptions"=dword:00000001
"ErrorState"=-
"LastHR"=-
"PilotInfoRing"=-
"BranchList"=-[-HKEY_LOCAL_MACHINESOFTWAREMicrosoftWindowsSelfHostApplicabilityRecoveredFrom]
[-HKEY_LOCAL_MACHINESOFTWAREMicrosoftWindowsSelfHostAU]
[HKEY_LOCAL_MACHINESOFTWAREMicrosoftWindowsSelfHostApplicability]
"BranchName"="TH1"
"Ring"="WIF"
"RingBackup"="WIS"
"ThresholdRiskLevel"="low"
"ThresholdOptedin"=dword:00000001
"ThresholdInternal"=-
"UserPreferredBranchName"="TH1"
Компьютерная помощь — /profile/staiki/
-
Сегодня поставил Enterprise insider preview сборка 10074.
Обновления были но не билды.
Пост выше помог. Сейчас обновляюсь до 10240
-
Запустил средство диагностики… Обнаруженные проблеммы:
service registration is missing or corrupt не исправлено
Помогите
