Windows 10 shows a limited amount of details whenever you start, restart, shutdown, login, or logout. These are known as Verbose Status Messages. We can enable Windows to show you all of these messages with registry files, a simple registry edit, or Group Policy Editor.
-=- Advertisement -=-
Startup messages include:
Shut down messages include:
Show Detailed Information During Startup, Shutdown, Login, and Logout — Registry Files
Download Enable Verbose Messages and extract the two files.
Double-click one of the two registry files:
Verbose Messages Show.reg
Verbose Messages Hide.reg (Default)
Click Yes when prompted by User Account Control.
Click Yes when prompted by Registry Editor.
Click OK when prompted by the Registry Editor.
This tweak is included as part of MajorGeeks Windows Tweaks.
Show Detailed Information During Startup, Shutdown, Login, and Logout — Edit the Registry
You can also edit the registry Yourself.
Open the registry editor and go to:
HKEY_LOCAL_MACHINESoftwareMicrosoftWindowsCurrentVersionPoliciesSystem
Right-click on the right window and click New > DWORD > (32-bit) Value
Enter VerboseStatus and press Enter.
Double-click VerboseStatus and change the Value data to 1.

Reboot.
Show Detailed Information During Startup, Shutdown, Login, and Logout — Group Policy Editor
Windows 10 Home users will need to enable Group Policy Editor.
Go to Computer Configuration Administrative Templates System.
Double-click Display highly detailed status messages.
Click on Enabled, and click OK.
comments powered by Disqus
In November and December 2019, Microsoft released a few new patches just like any other month to patch certain issues in Windows Server 2012. It has recently come to my attention that these patches seem to break Windows Server 2012 virtual machines! They appear to cause a reboot loop, which cannot be interrupted.
Since this was happening on a relatively large scale I didn’t know that the reboot loop was because of some faulty Windows patches. I figured I would just check the environment to see if anything infrastructure related was causing the issues. In a reboot loop this is highly unlikely, but hey, since this was happening on more than one virtual machine we just want to be sure right?
After some troubleshooting it seemed that, the reboot loop was a result of patching Windows Server 2012 virtual machines the incorrect way. Both the November 2019 Servicing Stack Update (SSU) KB4523208 and the December SSU KB4532920 for Windows Server 2012 seem to be causing the reboot loops according to some users on Twitter and Reddit. It seems that these two patches, as with most SSU patches, need to be installed exclusively (which Microsoft does mention in the installation procedure). This means they should be installed before any other patches get installed. When you install patches in the environment with WSUS or even unattended, the installation sequence will be ignored and the rollup patch gets installed before the SSU patch, which in this case makes the virtual server break. Some have said that patch KB890830 is also responsible for the reboot loop. When you are experiencing this issue, the servers keep getting stuck in the following screen:
Stage 2 of 4
Preparing to configure Windows
Do not turn off your computer
After which the virtual machine will just tell you:
Notifying services that Windows is shutting down.
And it will reboot. So how do we fix this? Well the resolution is quite simple but it depends on where you are in the process:
- If you haven’t installed the November or December SSU patch, you can proactively take care of the situation by following the installation guidelines for the patch. Which means, install these patches before the rollup patches. This way you should be fine.
- Did you already install the patch and are you experiencing the issue? Then you will have to boot into Safe Mode and reboot (twice sometimes). When the VM boots into Safe Mode the installation completes or fails and you can reboot and use the virtual machine as usual.
However, what do you do when you cannot boot into Safe Mode? If you are for example using EFI boot, booting into the Windows “Advanced Boot Options” menu is disabled. Some say it is disabled by default in Windows Server 2008 R2 and above to have faster boot times on the VM, even when using Legacy BIOS mode. I myself have not been able to proof this to be true though. I have done tests on Windows Server 2012, 2012 R2 and 2016 VM’s with Legacy BIOS enabled and every time I could hit F8 and boot into the Windows Advanced Boot Options menu.
So what do we need to do to get into the Windows Advanced Boot Options menu when we use UEFI Boot for our VM’s? Well we can get into the UEFI Boot Manager by pressing F2 when a VM boots. You will receive the UEFI Bios Manager screen such as below:

From there on you can do all sorts of things, but you can’t get the Windows Advanced Boot Options menu without doing some tricks. Below are three ways of entering the Windows Advanced Boot Options menu when using UEFI Boot:
- Connect the Windows 2012(R2) ISO.
- Start the VM hit F2 for the UEFI Boot Manager.
- Run the Virtual CDROM.
- Choose Use a Device -> UEFI Internal Shell (Unsupported Version).
- Press F8 on the selected GuestOS for advanced options.
- Press Save Mode (with options) and continue.
OR
- Start the VM and press F2 during boot.
- In the UEFI Boot Manager go to “Enter Setup” and select “Boot from a File”.
- Choose file with “NO VOLUME LABEL”. Press Enter twice.
- Go to “Microsoft” and press Enter.
- Press Enter on “Boot”.
- Go down to “bootmgfw.efi” and press Enter.
OR
- Start the VM and press F2 during boot.
- In UEFI Boot Manager go to UEFI Internal Shell (Unsupported Version).
- Let the shell load, do
map -r -b(-b to break after one screen). - Choose the fs0 mapping or blk0 mapping by entering
fs0: orblk0:. - Enter
dirorlsto view content of mapping/disk. - Go to the “UEFI” folder with
cd EFI. - Enter
dirorlsto view content of mapping/disk. Docd Bootto enter the Boot folder. - Execute bootx64.efi by just entering
bootx64.efi. - Press F8 on the selected GuestOS for advanced options.
- Press Save Mode (with options) and continue.


Windows Safe Mode Boot menu
If none of these work, it is probably because the option that shows the Windows Advanced Boot Options menu has been disabled in the Boot Configuration Data (BCD) configuration inside the GuestOS. You can check this by executing the following command from within the GuestOS and looking for the displaybootmenu option:

If you want to enable this menu you can do this by entering the following command:
|
bcdedit /set {bootmgr} displaybootmenu yes |


If you want to disable the boot menu again, you can disable the menu manually by executing the following command inside Windows. Some have this setting disabled by default for security reasons.
|
bcdedit /set {bootmgr} displaybootmenu no |
You can check if this had any effect by executing:
The displaytoolsmenu option should say “no”.
The following is a bonus! If you looked closely in the previous screenshots you can see that the UEFI Bios screenshots show a line called “Windows Boot Manager”. This option calls the Windows “Advanced Boot Options” menu from within the bios. This will work when you have the displaybootmenu option enabled. So calling this will save you time, because you don’t have to use one of the three procedures explained before to get to Windows Safe Mode. But what if you don’t have this line, like in the screenshot below? Well that is probably because your UEFI boot partition is corrupt or faulty.

It took me some time to figure this out, but don’t worry, I got you covered. There are ways to fix this, without doing a restore or destroying your virtual machine. Just follow the below steps and you will be fine:
- Either do this from within the GuestOS or from the Windows installation ISO.
- On a command line enter the following command:
bootrec /rebuildbcd- This will search for Windows installations not included in the BCD store and will try to add it. If this command returns:
Scanning all disks for Windows installations. Please wait, since this may take a while... Successfully scanned Windows installations. Total identified Windows installations: 0 The operation completed successfully.
Then continue to step 4. But if this command returns:Scanning all disks for Windows installations. Please wait, since this may take a while... Successfully scanned Windows installations. Total identified Windows installations: 1 [1] D:Windows Add installation to boot list? Yes/No/All: Y
Then end the procedure by executing step 3.
- Reboot the machine and you will see the Windows Boot Manager line in the bios.
- Since the bootrec command cannot find any Windows installation that haven’t been included in the bootrec configuration yet (obviously because we already have Windows installed), we will have to remove the current entry and reconfigure it. On a command line enter the following command:
bcdedit /export C:bcdexport- When you are using a Windows ISO to recreate the BCD configuration you will probably have to mount the recovery partition. This parition isn’t mounted by default. To do so just enter the following commands:
diskpartlist volumeselect volume Xassign letter=vlist volume(to check if the volume is mounted under a drive letter)
Then execute the command in the beginning of step 4 to export the BCD store as a file.
- When you are using a Windows ISO to recreate the BCD configuration you will probably have to mount the recovery partition. This parition isn’t mounted by default. To do so just enter the following commands:
- With the next step we will have to change the attributes on the BCD store file so that we edit it. Enter the following command:
attrib v:EFIMicrosoftBootbcd –h –r –s(If you can’t find the file on “C:boot”, just search for it withdir bcd /slike I did. The attrib command removes the hidden, read-only and system attributes from the BCD store. - Rename the old BCD store file so that it cannot be used anymore:
ren v:EFIMicrosoftBootbcd bcd.old - Now execute step 1 again. This time you should receive the correct output. The bootrec command should now have added the refreshed BCD store file.
- Once this is done you can reboot the virtual machine.
Fix Windows EFI Partition
And now it is back again! The Windows Boot Manager option is back in the UEFI Bios. So there you have it, three ways of entering Windows Safe Mode when using UEFI boot for your VM’s on VMware vSphere. I hope this blogpost can help people that are having issues with the November and December 2019 SSU patches.
Содержание
- «The VSS service is shutting down due to idle timeout» — event 8224 on Windows 10.
- Computer Shuts Down During Windows 10 Upgrade
- Replies (9)
- How does a windows service behaves on Windows shutdown?
- 1 Answer 1
- Default Shutdown Order of Windows Services
- 1 Answer 1
- Restart or Shut Down
- Restart the computer
- Shut down the computer
«The VSS service is shutting down due to idle timeout» — event 8224 on Windows 10.
Original Title: System volume information keeps increasing
This folder keeps increasing and gobbling up my C drive. I have System Restore set on the C drive alone with a maximum of 12 Gb, but it ignores this and sets itself to 100%. I have many files in this folder and a new one appears often (15+ in the last 90 min). Each time a new file appears, it coincides with «The VSS service is shutting down due to idle timeout» — event 8224 in Event Viewer. Any ideas how to stop it?.
![]()
Thanks for replying and sorry for delayed response.
SFC scan and DISM scan will detect if any of the system files are missing or corrupted and will replace the same to enhance and resolve the system issues on the PC.
Run SFC scan and DISM scan on the PC by following the steps below and check if the issue is resolved.
SFC scan is a utility in Windows that allows users to scan for corruptions in Windows system files and restore corrupted files. If a Windows Resource Protection (WRP) file is missing or is corrupted, Windows may not behave as expected. For example, some Windows functions may not work, or Windows may crash.
Windows corruption errors may prevent Windows updates and service packs from installing. For example, an update might not install if a system file is damaged. The DISM scan or System Update Readiness tool may help you to fix some Windows corruption errors.
Step 1: Open an Administrator command prompt window by
- Press Windows logo + X keys on the keyboard and select Command Prompt (Admin) option.
- Click on Yes and continue. Provide administrator password if prompted.
- Check if it says Administrator: Command Prompt at the top of the command prompt window.
Step 2: Type the following commands in the CMD Prompt:
Dism.exe /online /cleanup-image /scanhealth
Dism.exe /online /cleanup-image /restorehealth
sfc /scannow
Step 3: Close the command window and check if the issue is resolved.
Write to us with the status of the issue on the same post for further assistance. Your reply is most important for us to ensure we assist you accordingly.
Computer Shuts Down During Windows 10 Upgrade
17 people found this reply helpful
Was this reply helpful?
Sorry this didn’t help.
Great! Thanks for your feedback.
How satisfied are you with this reply?
Thanks for your feedback, it helps us improve the site.
How satisfied are you with this reply?
Thanks for your feedback.
3 people found this reply helpful
Was this reply helpful?
Sorry this didn’t help.
Great! Thanks for your feedback.
How satisfied are you with this reply?
Thanks for your feedback, it helps us improve the site.
How satisfied are you with this reply?
Thanks for your feedback.
4 people found this reply helpful
Was this reply helpful?
Sorry this didn’t help.
Great! Thanks for your feedback.
How satisfied are you with this reply?
Thanks for your feedback, it helps us improve the site.
How satisfied are you with this reply?
Thanks for your feedback.
Power down computer.
Wait 10 minutes.
Setup will automatically restore your previous Windows 10 build or previous version of Windows.
Launch command prompt with administrator privileges.
Press Windows key + X
Click Command Prompt (Admin)
Type the following command:
rundll32.exe pnpclean.dll,RunDLL_PnpClean /DRIVERS /MAXCLEAN
Hit Enter on your keyboard
Exit command prompt
- Disable (preferrably uninstall) your Antivirus utility before attempting the upgrade.
- Restart a few times and try again.
- Disable General USB Devices (example — Smart Card Reader).
- If you are using a SCSI hard disk, make sure you have drivers available for your storage device on a thumdrive and it is connected. During Windows 10 setup, click the Custom Advanced Option and use the Load Driver command to load the appropriate driver for the SCSI drive. If this does not work and setup still fails, consider switching to a IDE based hard disk.
- Do a clean boot and try again.
- If you are upgrading using the .ISO file, disconnect from the Internet during setup, if you are connected by LAN (Ethernet) or Wi-Fi, disable both and attempt setup again.
- If you are updating through Windows Update, when the download reaches 100% disconnect from the Internet LAN (Ethernet) or Wi-Fi and proceed with the installation.
- If that does not work, try using the .ISO file to upgrade if possible.
- If you are connected to a domain, switch to a local account
- If you have any external devices attached to the machine, disconnect them (example, gaming controllers, USB keys, external hard disk, printers, non-essential devices).
Click HERE to download official ISO media for Windows 10 from Microsoft.
How does a windows service behaves on Windows shutdown?
Is there a timeout for stopping Windows Services when Windows is shutting down? I know there is a registry key «WaitToKillServiceTimeout» but does this timeout effect on services, when Windows is shutting down or is there another timeout?
I want to find out, how long system during shutdown waits for services when it calls the OnStop method of a service.
Can a service prevent Windows from shutting down?

1 Answer 1
[WaitToKillServiceTimeout] Determines how long the system waits for services to stop after notifying the service that the system is shutting down.
Then yes, that’s value used to wait for services shutdown but also note that it’s shared for all services:
If all services stop before this value expires, the system shuts down.
For your question «Can a service prevent Windows from shutting down?» answer is «more or less». You can’t prevent Windows to shutdown (it may be really annoying for users if they can’t shutdown because a service decided they shouldn’t) but:
When the value of this entry expires, the system notifies the user that the service has not stopped. The user can either force the service task to stop or continue to wait. If the user waits, this value specifies the interval between repeated user notices that the service has not stopped.
Some services increase the value of this entry to provide more time for cleanup tasks.
In case your service is slow to shutdown you may increase such value (during installation) to give you more time. In theory using a very high value you’ll postpone shutdown for a very long time (but this behavior isn’t same as cancel it and don’t forget it’s shared for all services).
AFAIK a service can’t cancel shutdown but a GUI application can do it using ShutdownBlockReasonCreate() function.
Default Shutdown Order of Windows Services
While I could find articles on how the windows services start in an order that is based on service groups and within a service group based on tags, I am unable to get information on the default shutdown order of windows services.
If we do not specify a «PreshutdownOrder» to alter the shutdown sequence, can we assume that windows services would shutdown in an order that is reverse of the order in which they start? If no then why is it so and how is the shutdown order determined? If yes then can you please point me to relevant documentation preferably from Microsoft?
I am asking this question because I have an application whitelisting service (say A) on my machine that belongs to a service group and a few services (say B and C) that do not belong to any service group. For system security reasons, I want to ensure that whitelisting service A starts before other services start and shuts down after other services shut down.

1 Answer 1
After the preshutdown notifications have been completed, all control handlers that have called SetServiceStatus with the SERVICE_ACCEPT_SHUTDOWN control code receive the SERVICE_CONTROL_SHUTDOWN control code. They are notified in the order that they appear in the database of installed services.
I believe the upshot of that is that the order in which services are notified is unpredictable. Of course, the services do not necessary stop in the order in which they are notified; the system does not wait for each service to stop before notifying the next one.
Based on your description, in your scenario the best option would probably be for service A to continue running during the system shutdown. Any service that does not register for shutdown notification is simply left running until the system is actually powered down or restarted.
However, if it is essential that service A is notified that the system is shutting down (for example, it might need to close a database file cleanly) then it can return STOP_PENDING while it waits for all of the dependent services to stop.
Restart or Shut Down
You might have to restart the host computer and all of the stations in your MultiPoint Services system if instructed after you install hardware, software, and software updates. If you have added new hardware devices to a station, you might also want to associate the hardware devices to that station. For more information about how to associate stations, see the Switch Between Modes topic.
To turn off your MultiPoint Services system’s computer safely, the computer must perform a shutdown process that closes any open programs, shuts down Windows, and turns off your computer and its associated stations. Do not just unplug or press the Power button to turn off your computer. You should shut down your computer at the end of the day and when you must install new hardware enclosed in the computer case. If you add other hardware to the system, you may also need to shut down or restart the server.
Before you restart or shut down the computer that is running MultiPoint Services, all user sessions must have ended.
Restart the computer
End all user sessions. For more information about ending user sessions, see the End a User Session topic.
In MultiPoint Manager, click Home, and then click Restart the computer.
Shut down the computer
End all user sessions. For more information about ending user sessions, see the End a User Session topic.
In MultiPoint Manager, click the Home tab, and then click Shut down the computer.
How to Enable Verbose Logon Messages in Windows 10
It is possible to enable detailed information for Windows 10 logon, sign out, restart and shutdown events. The OS can display certain messages during its startup and shutdown. These are referred to as Verbose Status Messages and tell us the processes or steps that the Windows operating system is taking during startup, shutdown, logon, and logoff operations.
The messages you may see during the startup may include:
Starting Windows
Starting Group Policy Service
RPCSS is starting
Starting Windows Update Service
Applying your personal settings
Applying computer settings
Please wait for the User profile to load
Preparing your Desktop
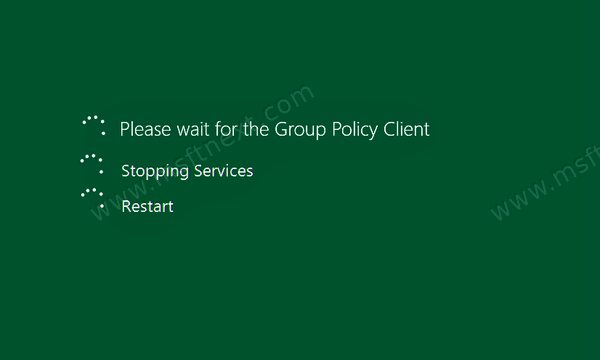
The shut down messages are as follows:
Shutting down <application name>
Stopping Group Policy Service
Stopping Windows Update
Please wait for Group Policy Service
Please wait for Windows Update Service
Notifying services that Windows is shutting down
Waiting for machine group policies to finish
Stopping Services
Shutting Down
Windows is preparing to shut down the computer.
The verbose logon messages option in Windows 10 can be enabled in Registry. Once you apply the tweak, the operating system will report what exactly is happening at the current moment while you are on the logon/logoff screen.
Showing verbose status messages is very helpful when you are troubleshooting slow startup, shutdown, logon, or logoff behavior.
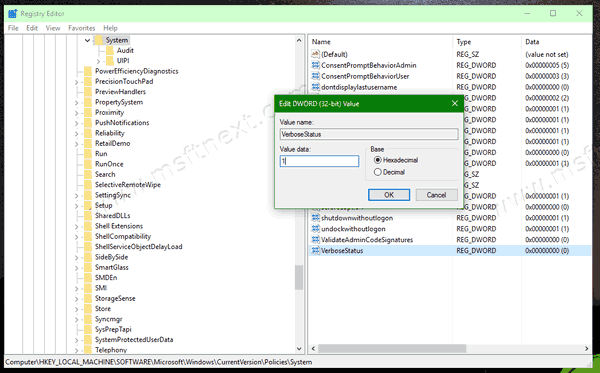
- Open the Registry Editor (Press Win+R and type
regedit). - Go to the following Registry path:
HKEY_LOCAL_MACHINESoftwareMicrosoftWindowsCurrentVersionPoliciesSystem. You can open this key directly. - If you don’t have such a key, then just create it.
- Create a new 32-bit DWORD value named VerboseStatus. Set its value data to 1. If you are running 64-bit Windows 10, you still need to create a 32-bit DWORD value.

Now, try to sign out from your user account or restart the operating system. You will see verbose logon messages.
If you are running Windows 10 Pro, Education, or Enterprise edition, then you can use Local Group Policy Editor app (gpedit.msc)
Enable Verbose Messages in Local Group Policy Editor
- Press Win+R, type
gpedit.mscin the Run box, and pressEnter. - Browse the left pane of the app to
Computer Configuration Administrative Templates System. - Double-click on the policy named Display highly detailed status messages, and set it to Enabled.

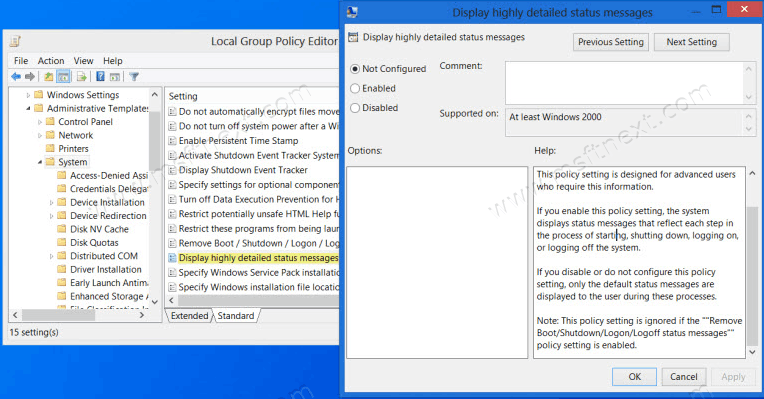
If you enable this policy setting, the system Displays status messages that reflect each step in the process of starting, shutting down, logging on, or logging off the system.
![]()
The MSFTNEXT project is a small team of authors who love to engage with the latest technology and gadgets. Being passionate Windows bloggers, we are happy to help others fix their system issues. View all posts by The MFTNEXT Team