A high temperature can be dangerous for your PC
by Kazim Ali Alvi
Kazim has always been fond of technology, be it scrolling through the settings on his iPhone, Android device, or Windows. And at times, unscrewing the device to take… read more
Updated on January 11, 2023
- A lot of users after upgrading to Windows 11 have reported overheating, an issue that can both damage the computer and affect its performance.
- The problem is primarily caused due to dust buildup, running multiple applications at once, or using an outdated version of Windows.
- Also, find out about third-party tools that will let you control the speed of the computer fan for optimal cooling.
XINSTALL BY CLICKING THE DOWNLOAD FILE
- Download Restoro PC Repair Tool that comes with Patented Technologies (patent available here).
- Click Start Scan to find Windows 11 issues that could be causing PC problems.
- Click Repair All to fix issues affecting your computer’s security and performance
- Restoro has been downloaded by 0 readers this month.
Windows 11, the recent OS upgrade from Microsoft, is also prone to errors as was the case with the previous ones. While most of them don’t pose much of a risk, the Windows 11 overheating problem can be a big turn off.
When your PC starts to overheat, it’s not only detrimental to the performance but may also damage the hardware components, likely to the ones that are fragile.
Hence, it becomes imperative to understand the various problems that cause the overheating problem in Windows 11, and their subsequent fixes.
Which issues cause Windows 11 overheating issues?
There are a bunch of problems that are responsible for overheating in a Windows 11 system. Some pertain to issues with the hardware or simply lack of maintenance, while others have to do with the software aspect. Let’s have a look at the issues:
- Lack of ventilation
- Dust build-up
- Issues with the hardware
- Running incompatible software
- Outdated version of Windows
- Using multiple high-end applications simultaneously
If you are able to identify the problem, head to the relevant fix. Or, simply execute them in the listed sequence for a quick troubleshooting experience.
How can I fix the Windows 11 heating issue?
- Which issues cause Windows 11 overheating issues?
- How can I fix the Windows 11 heating issue?
- 1. Restart the Windows 11 PC
- 2. Make sure the computer is properly positioned
- 3. Check the computer fan
- 4. Update Windows 11
- 5. Disable startup apps
- 6. Terminate apps and processes
- 7. Disable apps from running in the background
- 8. Change power plan settings
- 9. Update the graphics driver
- How can I manually control the computer fan to avoid overheating?
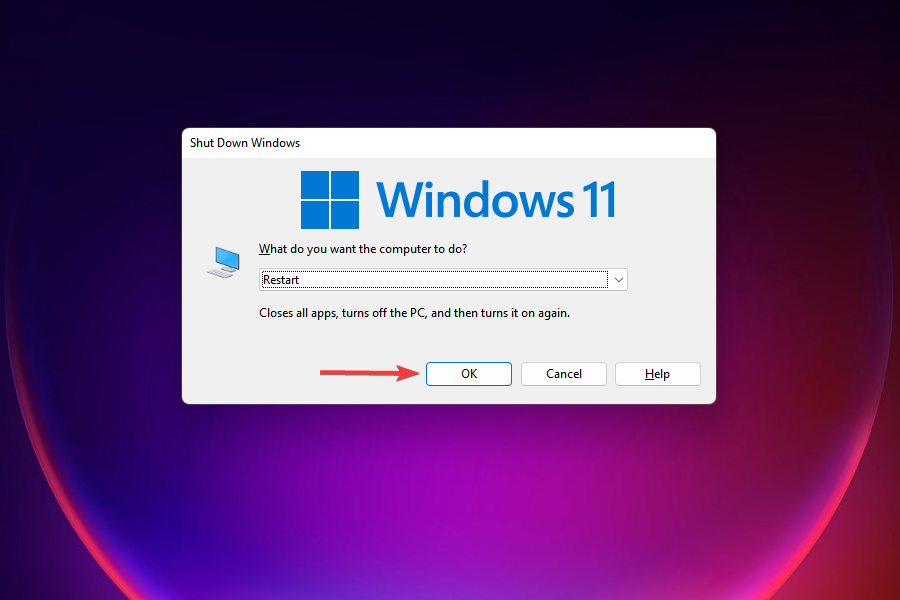
1. Restart the Windows 11 PC
- Navigate to the desktop and press Alt + F4 to launch the Shut Down Windows box.
- Click on the dropdown menu and select Restart from the list of options.

- Click on OK to restart the computer.
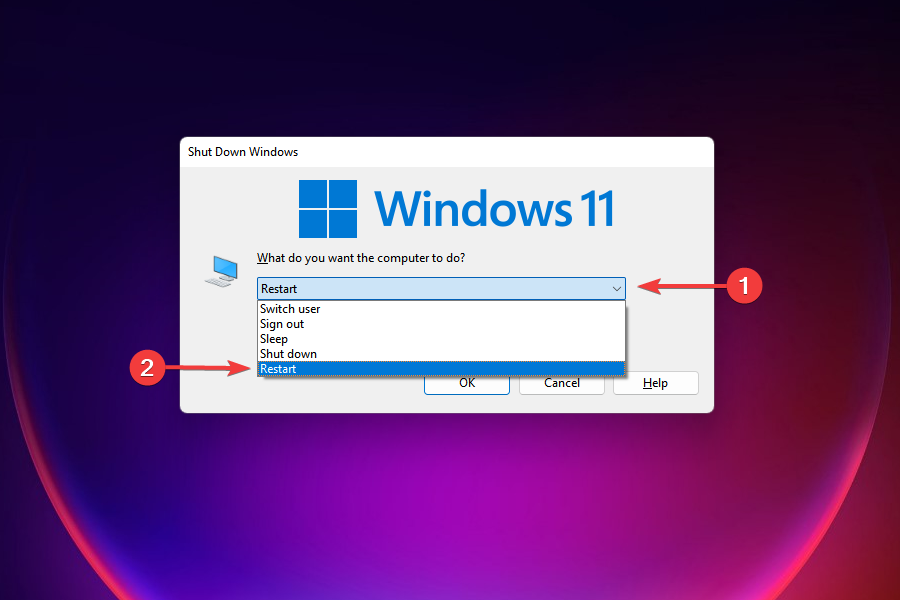
In many instances, it’s a particular process or program running in the background which is overloading the CPU and causing the system to overheat. A quick solution would be to restart the computer to eliminate any such process.
However, you must understand that rebooting Windows 11 is only a temporary fix that will help execute the others listed here. So, do go through the ones mentioned in the following sections for a permanent resolution.
2. Make sure the computer is properly positioned
An improperly positioned computer is also likely to cause the overheating problem in Windows 11. If the CPU is positioned such that the hot air from the fan cannot freely exit due to obstructions or lack of free space, the computer is bound to overheat.
In the case of a laptop, avoid resting it on beds or similar surfaces since the hot air is released from the bottom surface. Also, you can use cooling pads to keep the overheating in check and enhance the computer’s performance.
3. Check the computer fan
If the computer fan is functioning at reduced speeds or ceases to work altogether, the system will overheat. This could be due to dust build-up inside the fan, wires causing obstructions, or a faulty motor, in case the fan does not work.
Issues with the computer fan are easily fixable, but you must understand the various components and the connections. In case you are not acquainted with these, it’s best to get in touch with a professional to get things up and running.
After the laptop is cleaned and serviced, check if the overheating problem in Windows 11 is resolved.
4. Update Windows 11
- Press Windows + I to launch the Settings app.
- Select Windows Update from the list of tabs in the navigation pane on the left.

- Click on Windows Update on the right.
- Click on Check for updates to scan for any available newer versions.
- Download and install the updates that show up after the scan.
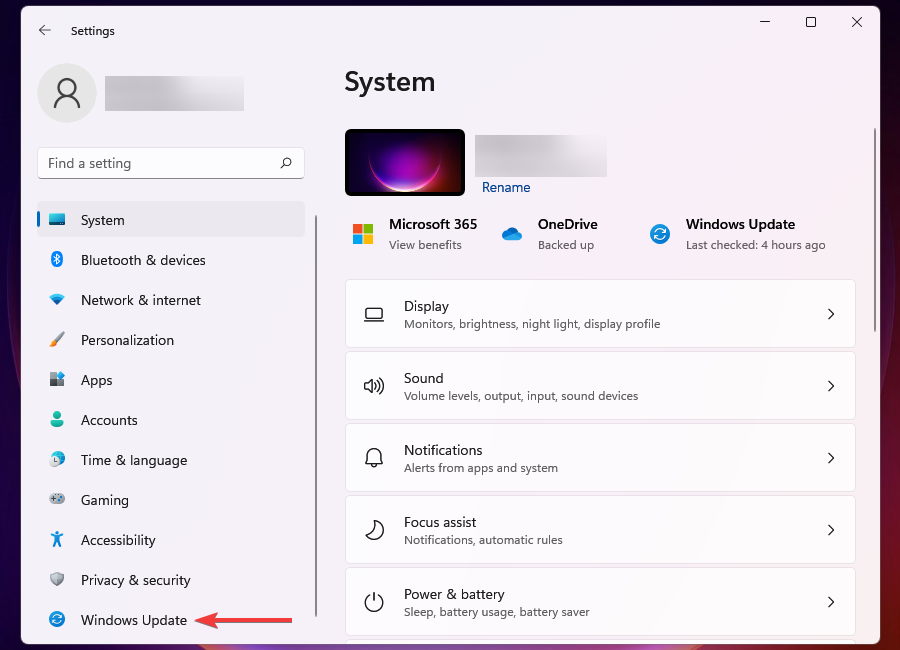
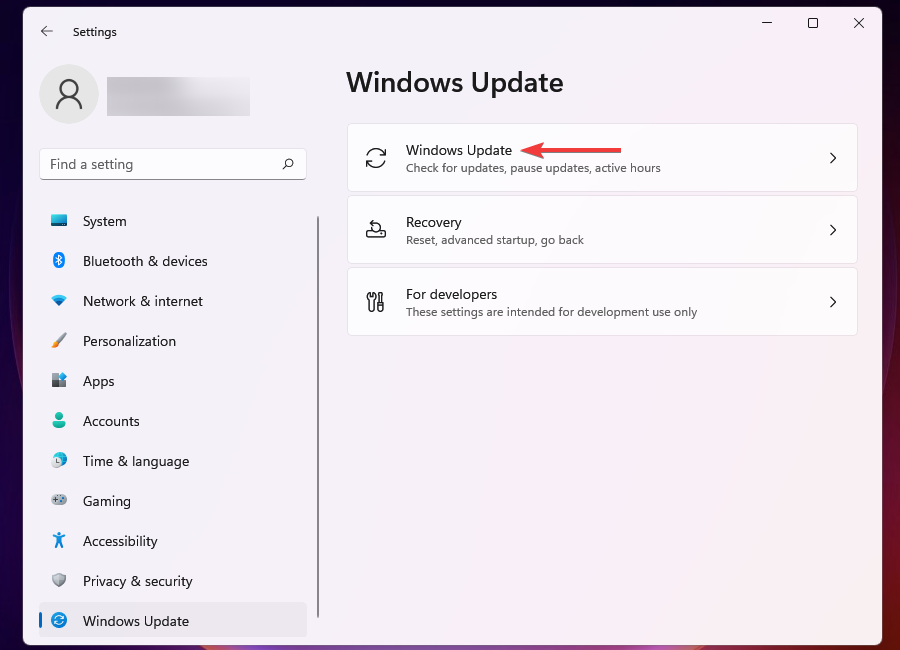

Running an older or outdated version of Windows 11 is also likely to cause overheating. With each update, new features, patches for bugs, and other enhancements in terms of performance are introduced.
Hence, it’s recommended that you keep the Windows 11 up-to-date to prevent the PC from overheating.
5. Disable startup apps
- Press Ctrl + Shift + Esc to launch Task Manager.
- Navigate to the Startup tab to view application that load when you boot Windows.
- Select the individual application to remove and click on Disable. Alternatively, you can right-click on it and select Disable from the context menu.
- Similarly remove the other apps as well.
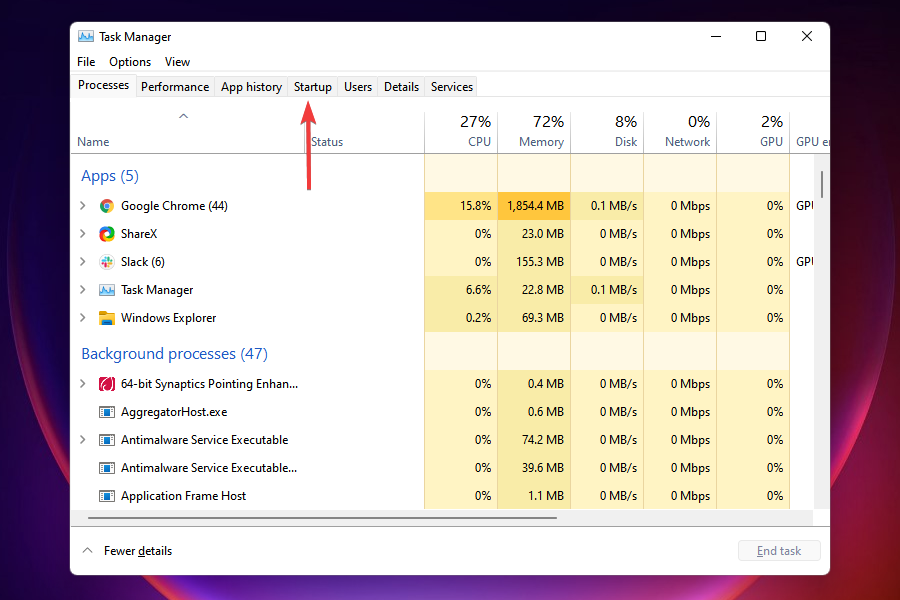
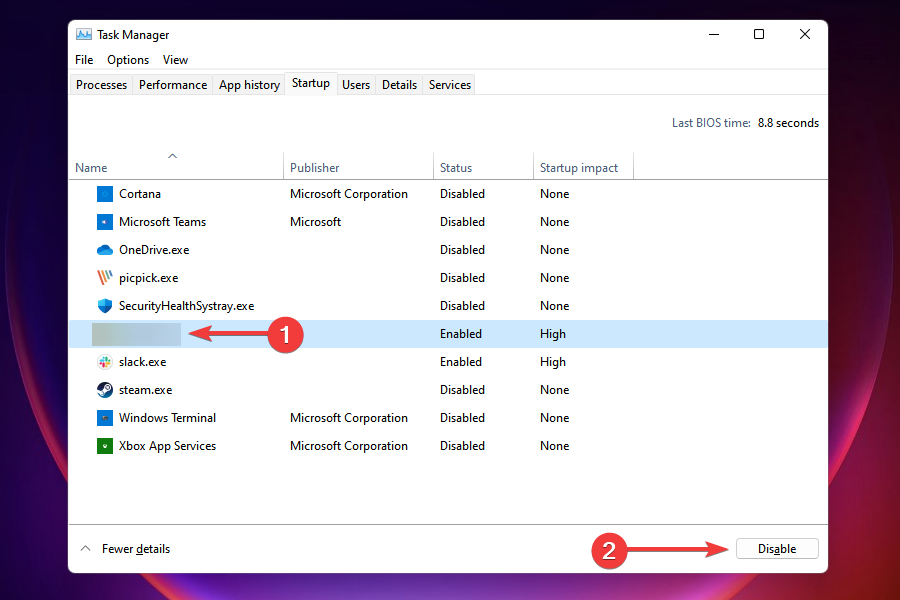
There are a bunch of apps on the PC that load when you turn it on. Apart from unnecessarily hogging the system resources and leading to overheating, these also increase the time taken by Windows to boot. A simple solution here is to disable these apps.
Do remember not to remove all of the apps that appear in the startup tab since some perform critical functions. After done with it, restart the computer and check if the overheating problem in Windows 11 is resolved.
Some PC issues are hard to tackle, especially when it comes to corrupted repositories or missing Windows files. If you are having troubles fixing an error, your system may be partially broken.
We recommend installing Restoro, a tool that will scan your machine and identify what the fault is.
Click here to download and start repairing.
In case you want to use any of the apps that you disabled from loading at startup, just manually launch them.
6. Terminate apps and processes
- Press Ctrl + Shift + Esc to launch Task Manager.
- in the Performance tab, scroll through the list of programs and identify the ones that are hogging the system resources.
- Select the one that you want to terminate and click on the End task button at the bottom.
- You can similalry disable the other apps and processes listed here, in case you don’t need them.
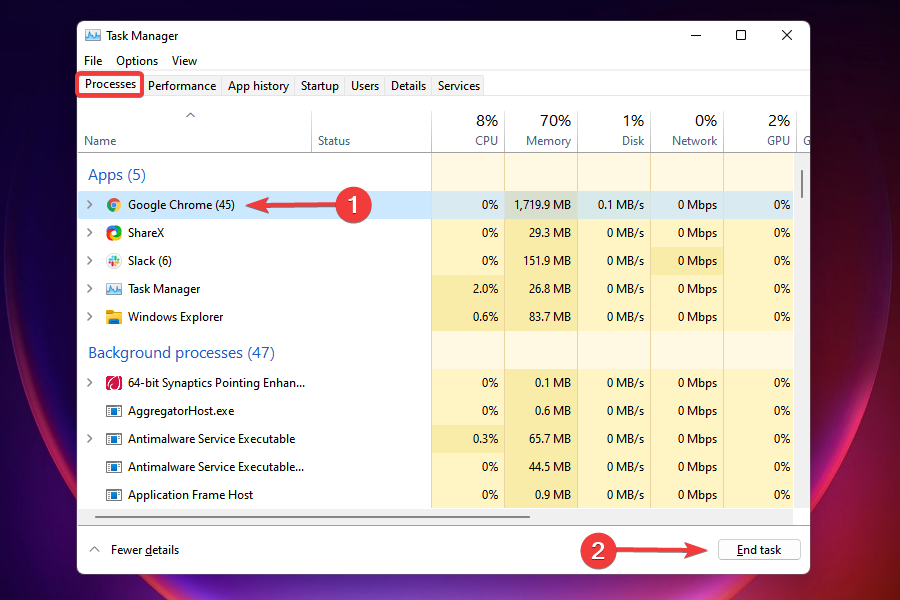
There are a bunch of non-critical apps and processes running in the background that hog the system resources. If you are facing issues with overheating in Windows 11, eliminating these tasks will come in handy and resolve the problem.
As was the case before, not all processes should be terminated. Some may consume considerable resources but are critical to the functioning of Windows.
Also, you might find a momentary spike in consumption of resources, for instance, while you update the Windows. And, these processes should be allowed to run.
- What to do when your laptop is overheating when charging
- WaasMedic Agent.exe High Disk Usage: How to Stop It?
- Looking for a lightweight Windows 11? Tiny11 is the answer
- How to Fix AnyDesk ID Not Showing in Windows 11?
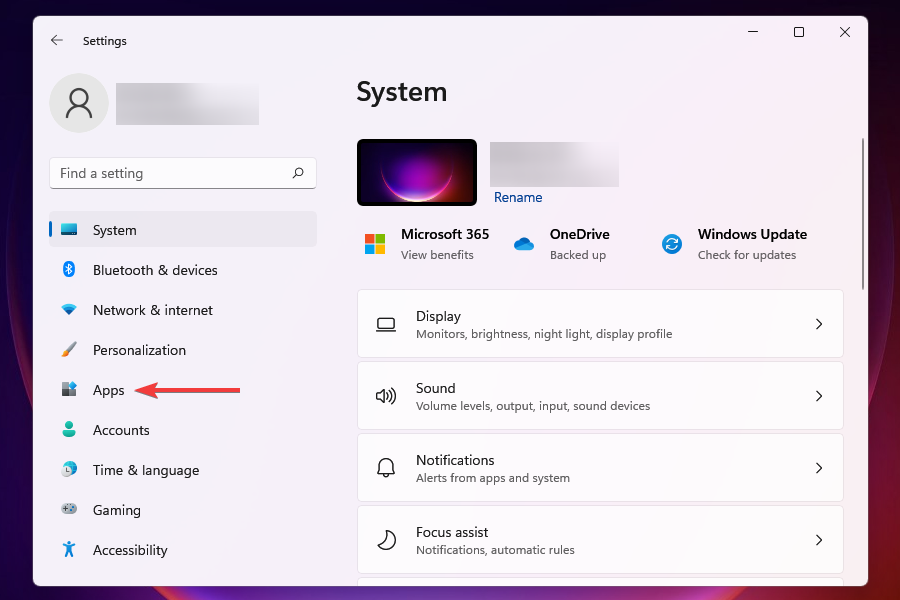
7. Disable apps from running in the background
- Press Windows + I to launch the Settings app.
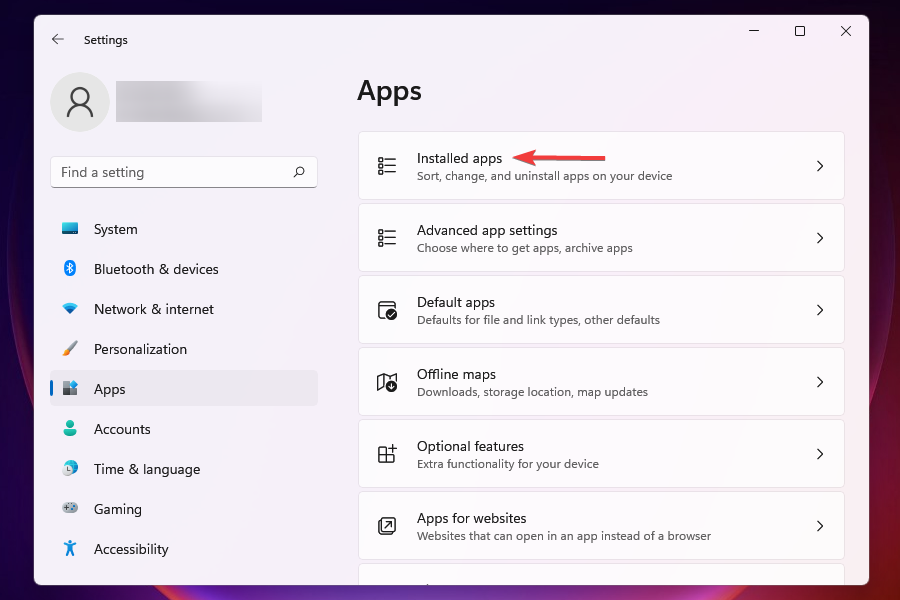
- Select the Apps tab from the navigation pane on the left.
- Next, click on Installed apps on the right.
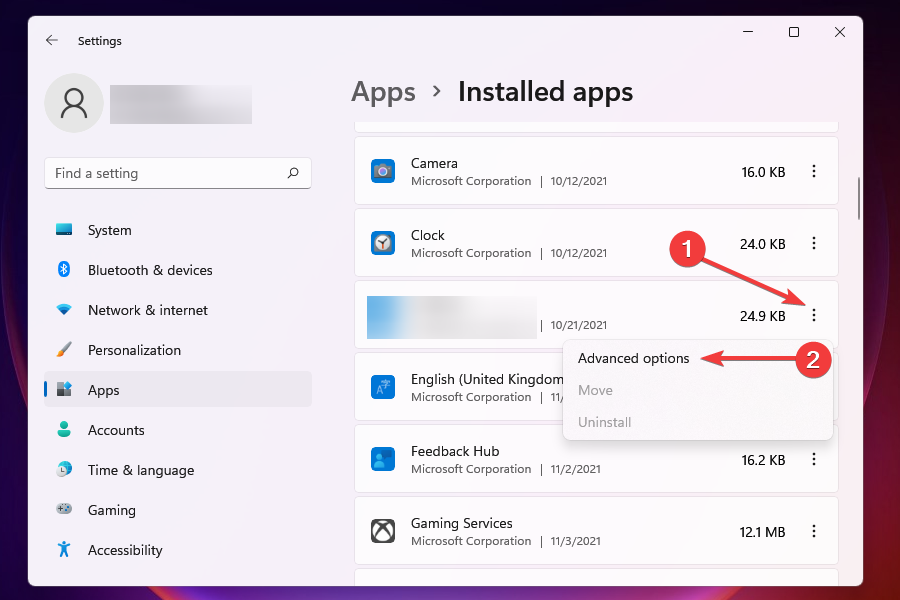
- Locate the app that you don’t want running in the background, click on the ellipsis next to it, and select Advanced options from the menu that appears.
- Now, scroll down to Background app permissions and click on the menu under it Let this app run in the background.
- Select Never from the list of options that appear.
- Similarly disable the other apps from running in the background.


When you change the background app permissions to Never, the app won’t run at all in the background, thereby clearing considerable resources and resolving the overheating problem in Windows 11.
It’s actually recommended that you disable most of the non-critical ones anyway, since these consume resources and lead to overheating. Nevertheless, you can always manually launch them, whenever required.
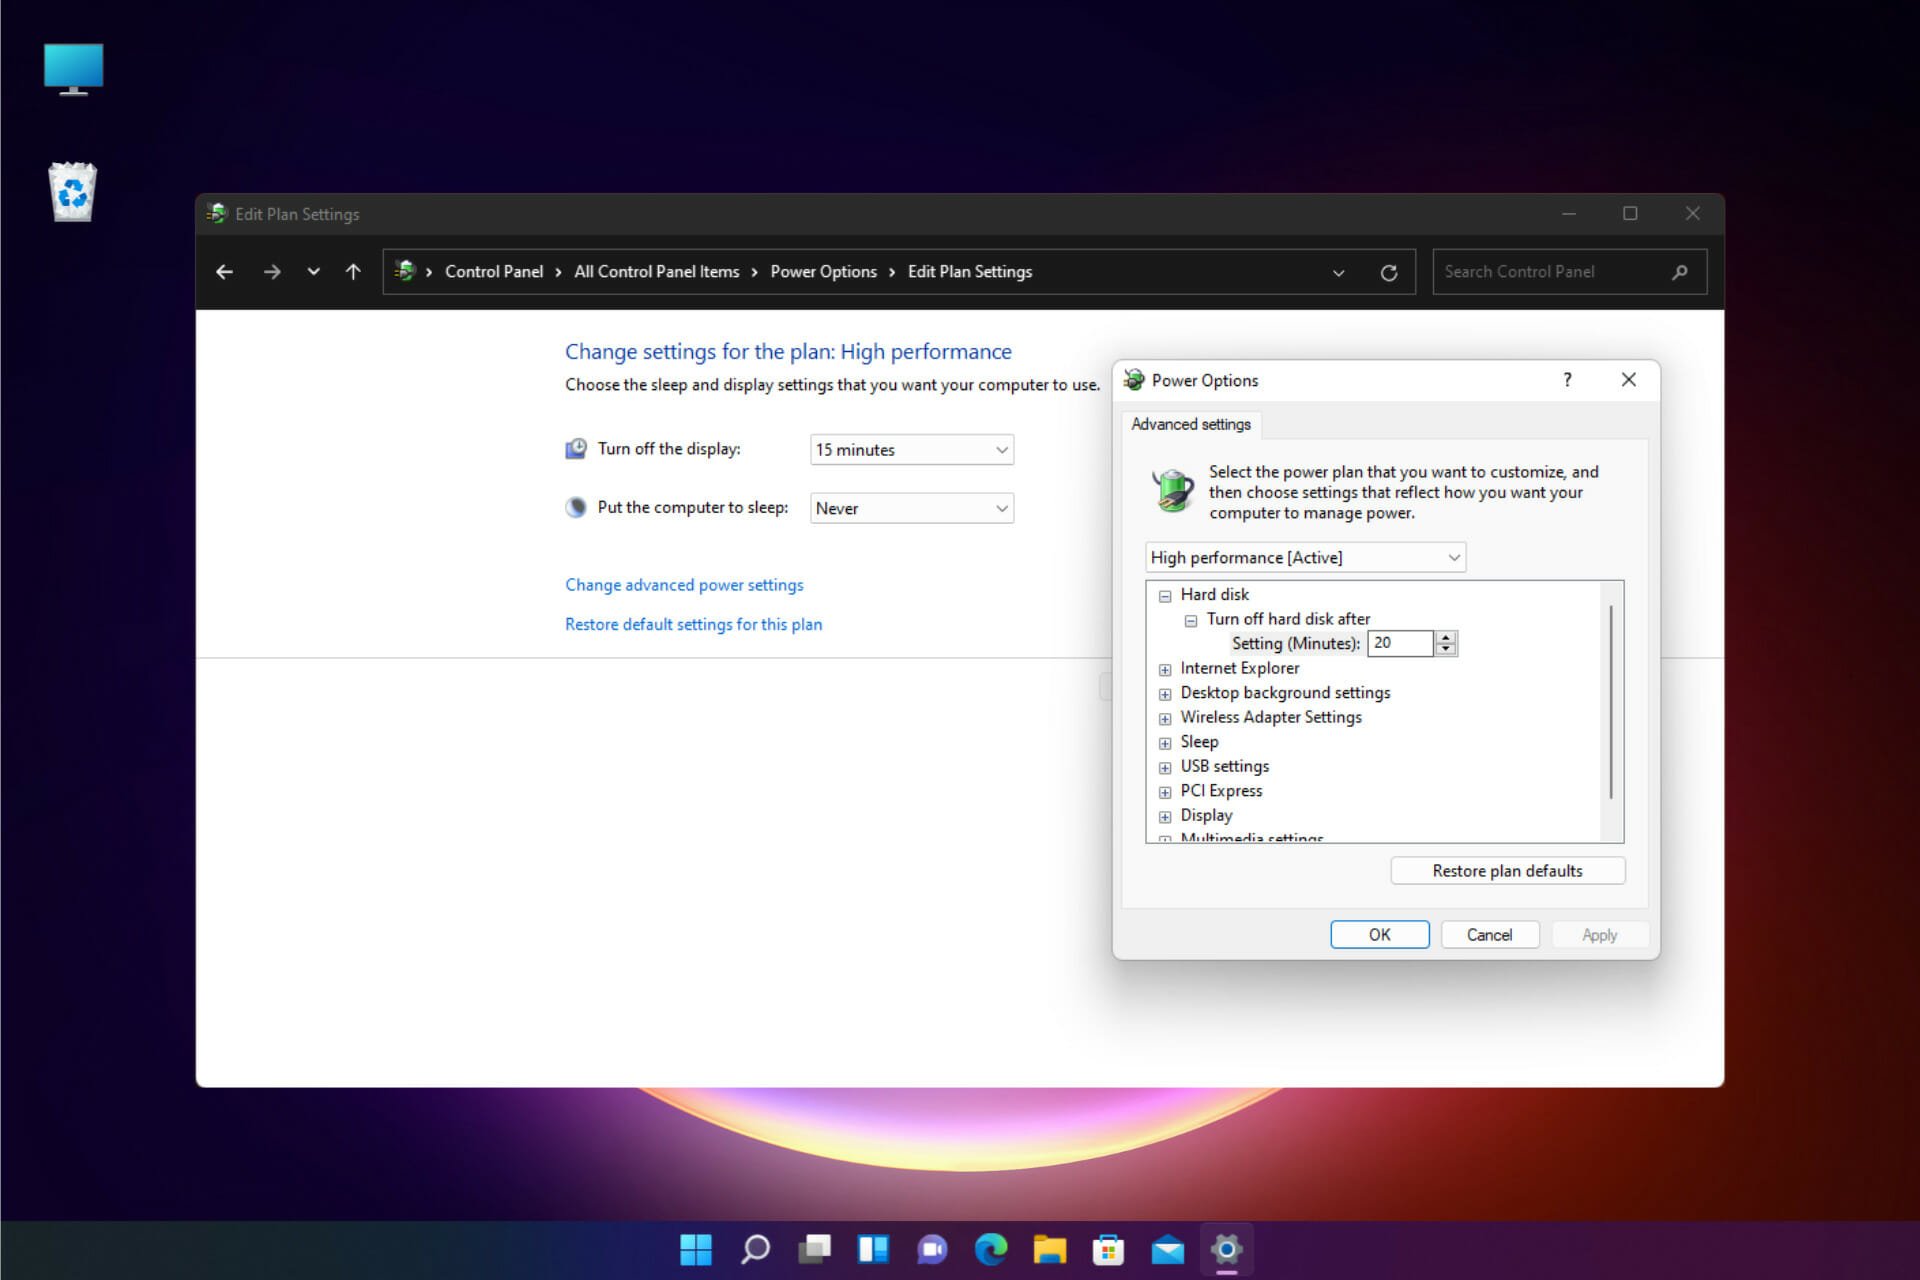
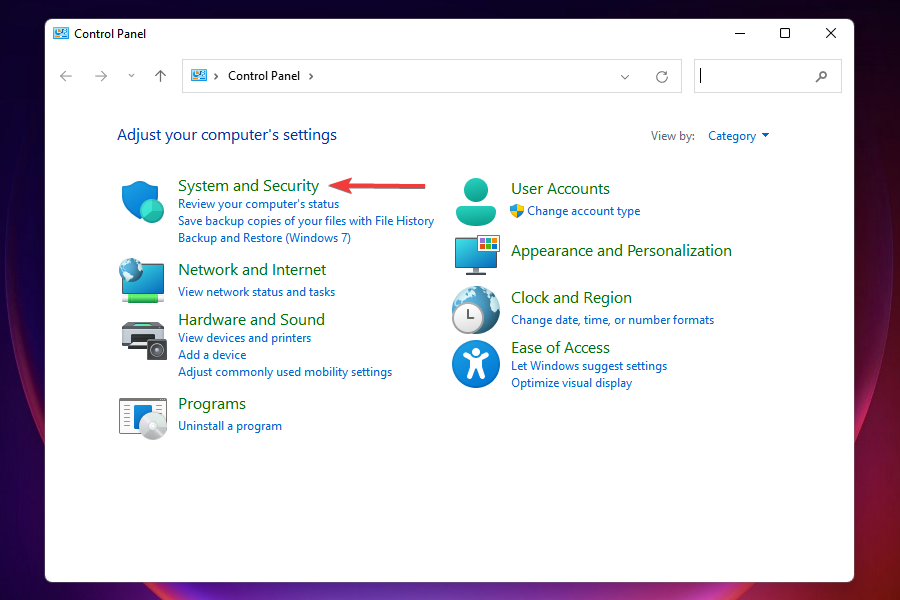
8. Change power plan settings
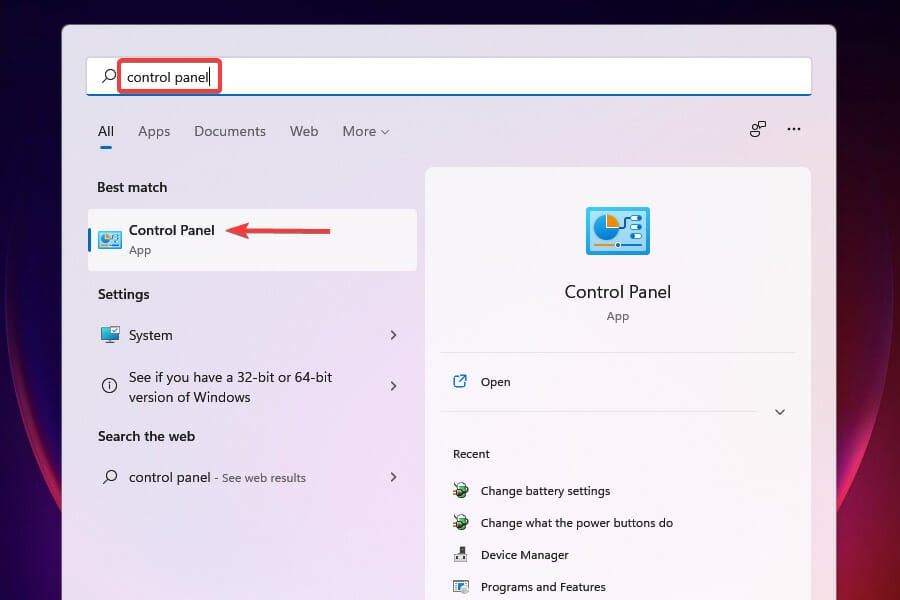
- Press Windows + S to launch the Search menu.
- Enter Control Panel in the text field at the top, and click on relevant search result that appears.
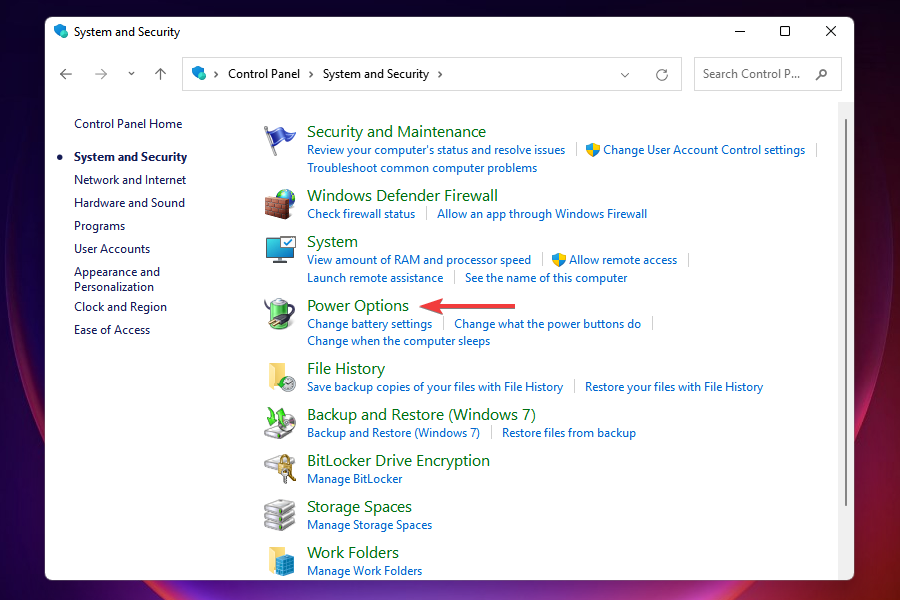
- Click on System and Security from the options that appear.
- Click on Power options.
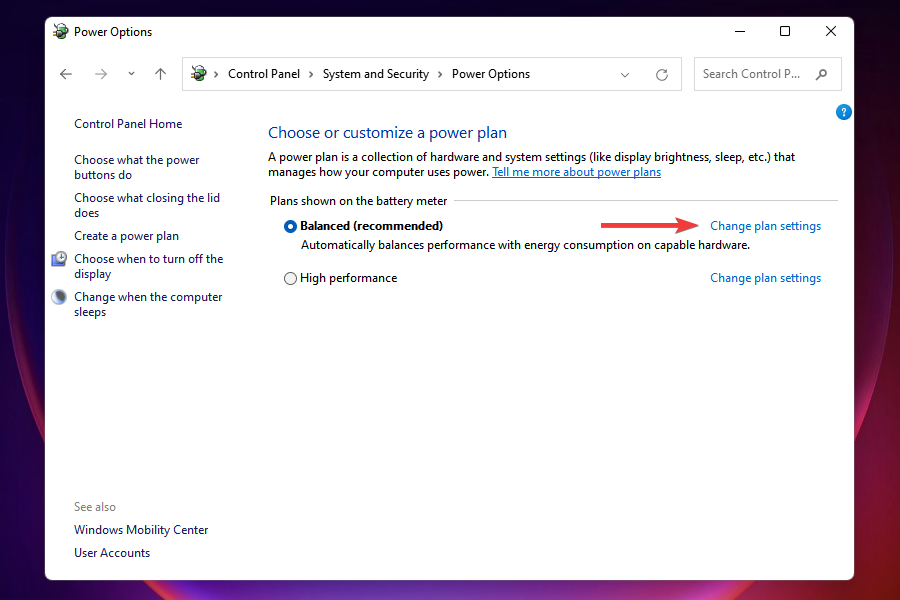
- Next, click on Change plan settings next to the current power plan.
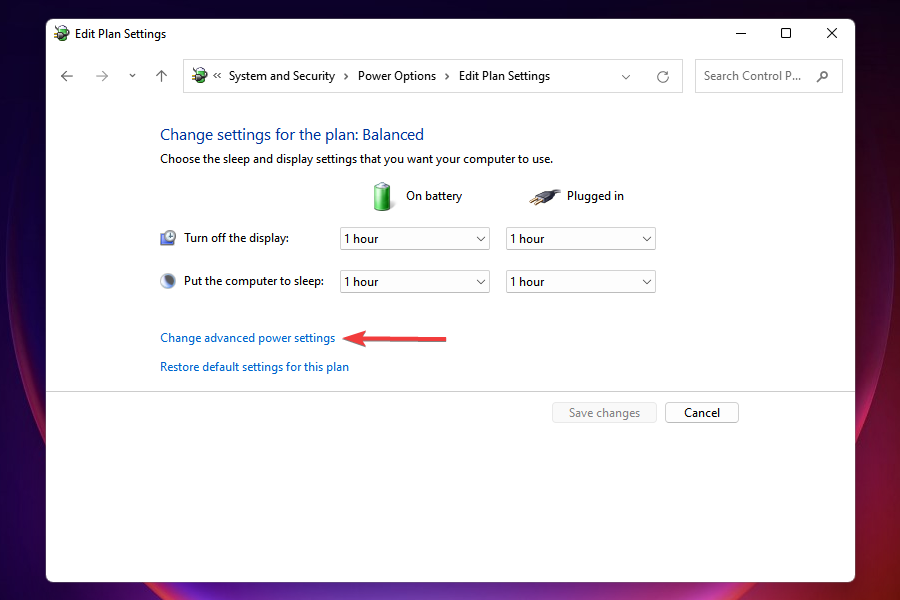
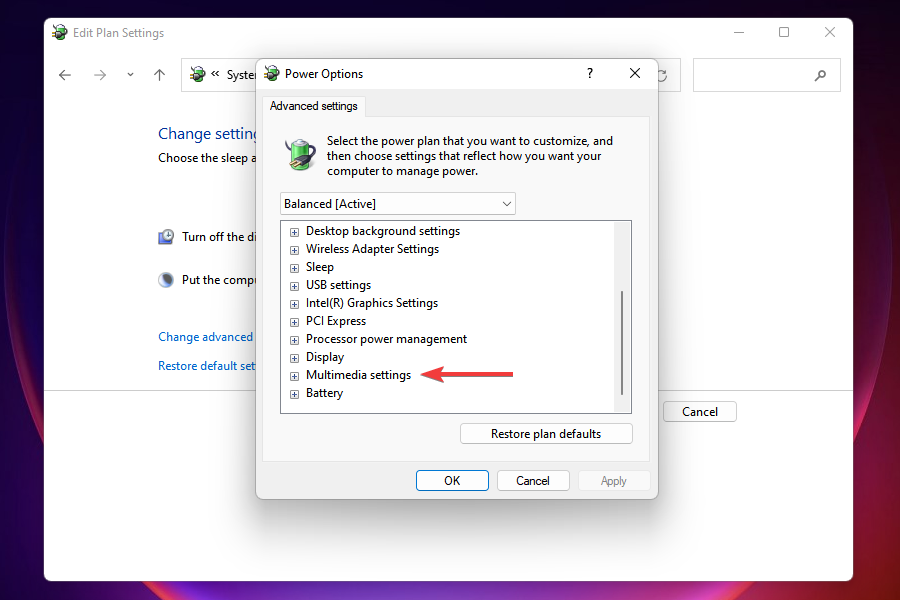
- Click on Change advanced power settings near the bottom.
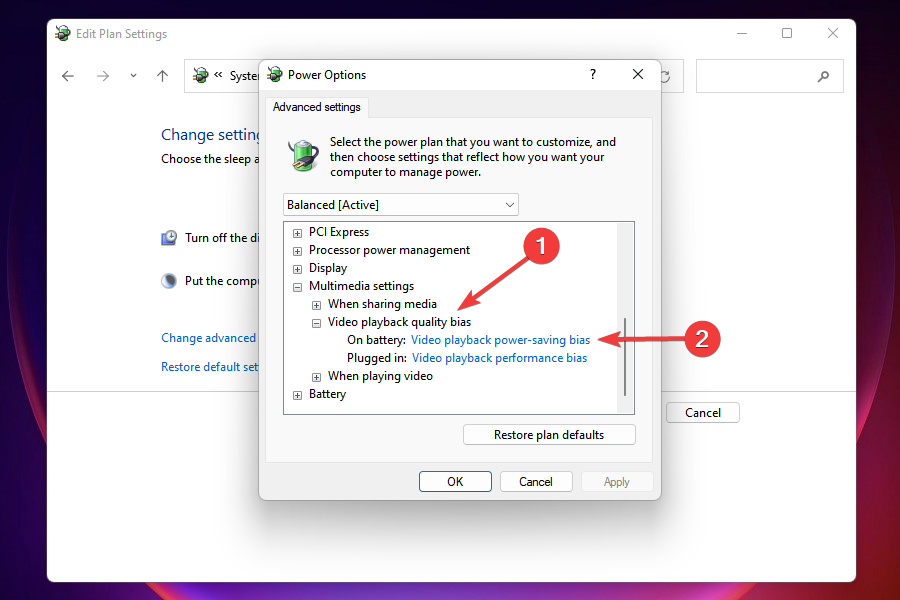
- In the Power Options window, scroll down and double-click on Multimedia settings.
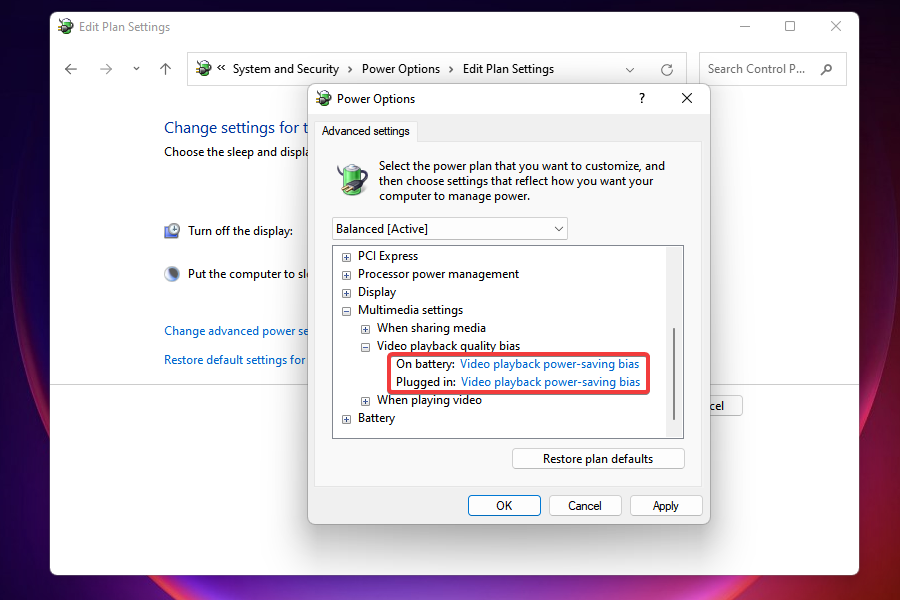
- Now double-click on Video playback quality bias, and then on the menu next to On battery.
- Select Video playback power-saving bias from the list of options that appear.
- Similarly, select the same setting for Plugged in as well.
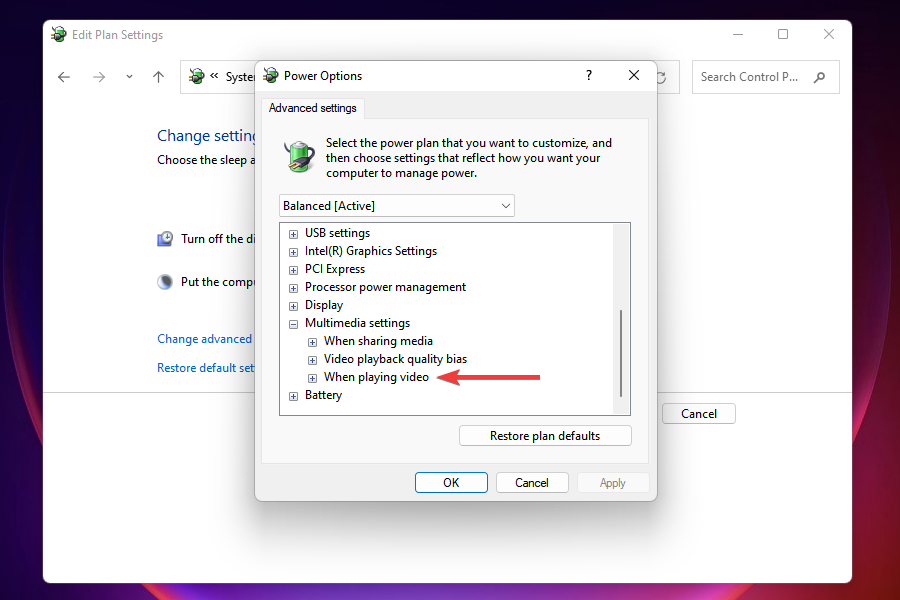
- Next, double-click on When playing video to expand and view the settings under it.
- Set both On battery and Plugged in as Optimize power savings, and click on OK to save the changes.

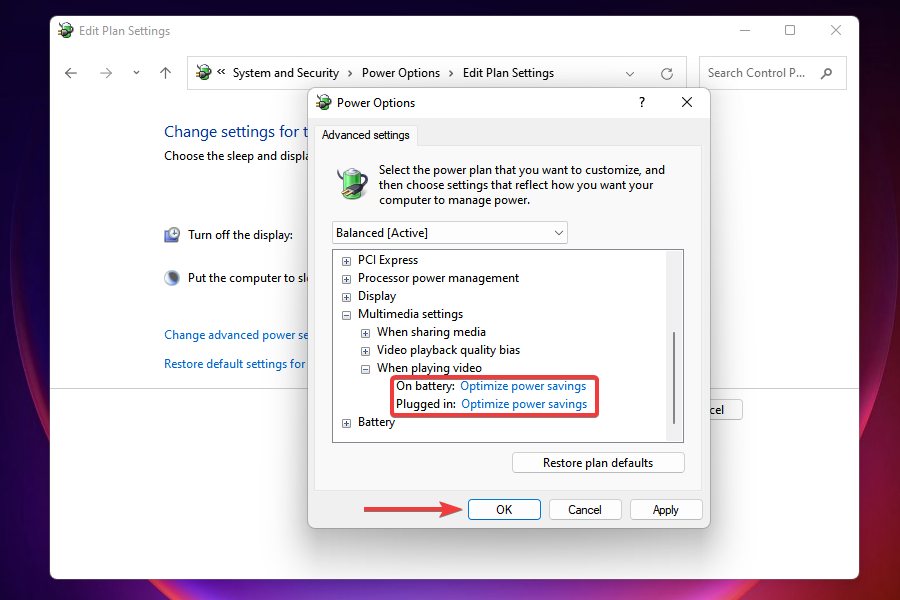
Another effective way of optimizing performance and eliminating overheating in Windows 11 is to modify the power plan settings. With these settings in place, Windows will optimize things such that your computer bears the minimum pressure, thereby eliminating the chances of overheating.
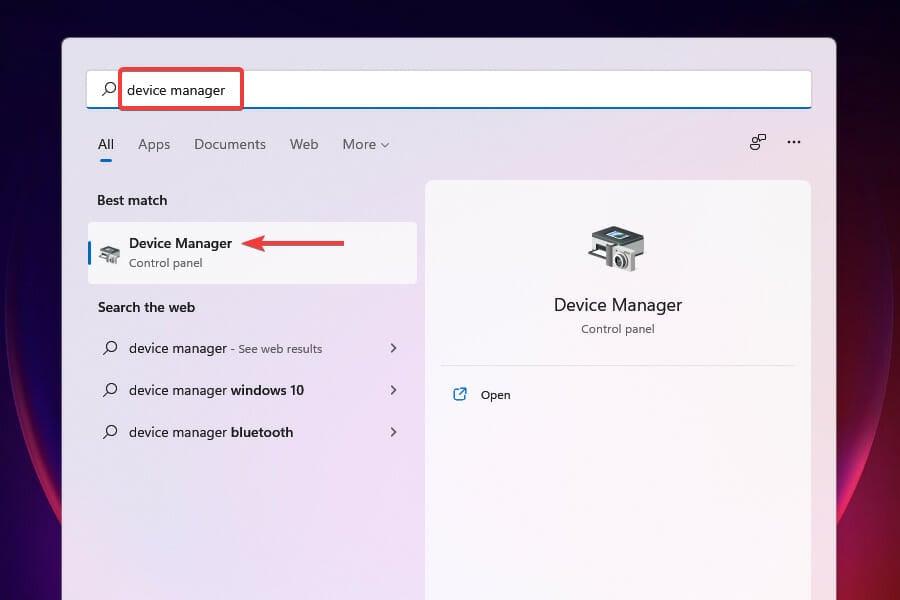
9. Update the graphics driver
- Press Windows + S to launch the Search menu.
- Enter Device Manager in the text field at the top and click on the relevant search result that appears.
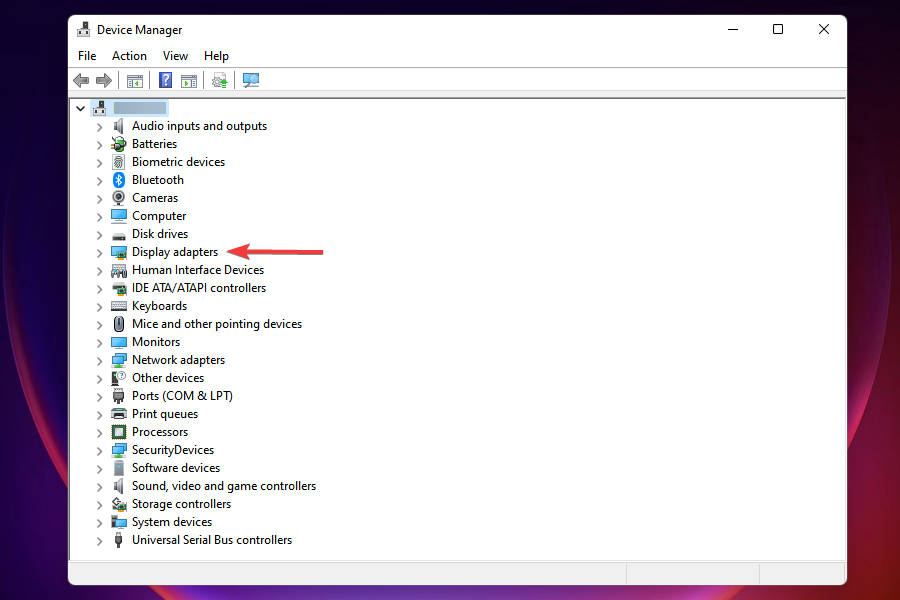
- Locate and double-click on the Display adapters entry.
- Right-click on the graphics adapter and select Update driver from the context menu.
- Next, select Search automatically for drivers in the Update Drivers window, to let Windows look for the best available driver on the system and install it.
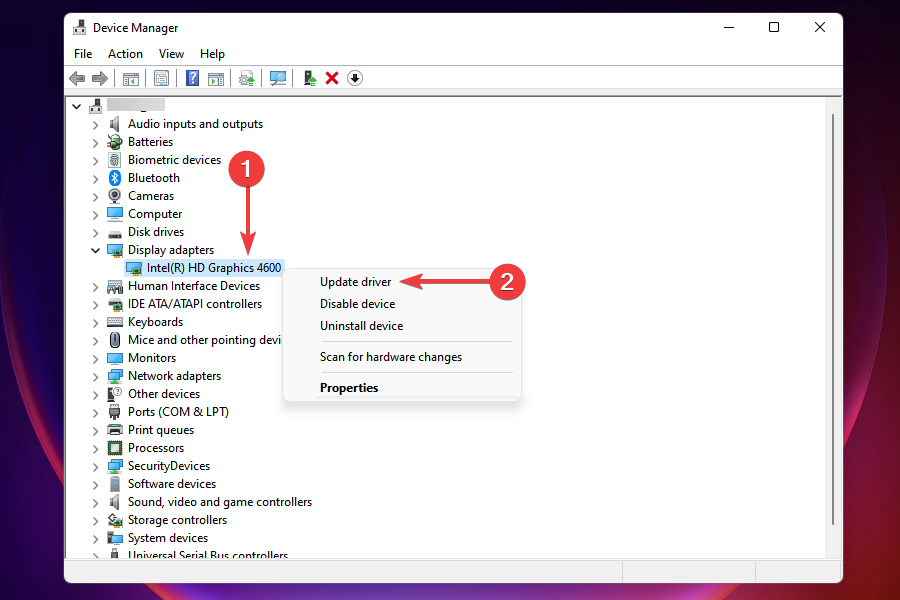
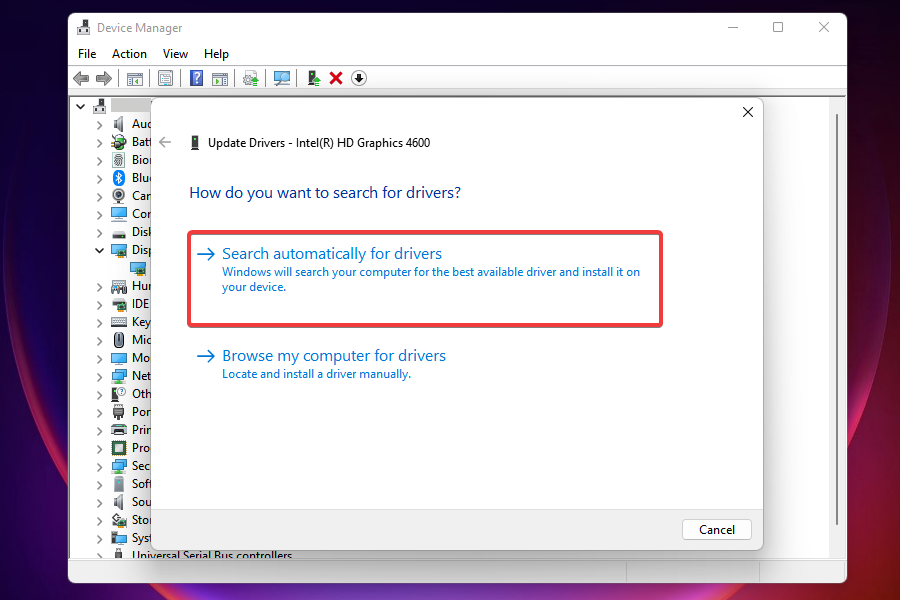
The graphics driver is one the most critical ones on the computer, and running an outdated version can cause a bunch of problems including overheating in Windows 11. To fix the problem, simply update the graphics driver.
When updating drivers via the Device Manager, you can only install the updates that have already been downloaded on the computer. In case you are unable to find a newer version, try updating the driver via other methods.
Also, we recommend using a dedicated tool such as DriverFix in that regard. After the driver is updated, the overheating problem in Windows 11 should be fixed.
- WaasMedic Agent.exe High Disk Usage: How to Stop It?
- Looking for a lightweight Windows 11? Tiny11 is the answer
- How to Fix AnyDesk ID Not Showing in Windows 11?
How can I manually control the computer fan to avoid overheating?
Although it’s not recommended, you can still manually control the computer fan and set it to run at the desired speed to avoid overheating. Most manufacturers generally offer software that helps you modify the fan speed and you should first look out for these.
In case your manufacturer doesn’t offer one, there are a bunch of third-party tools to control the fan speed. But before you start using any of those, a thorough understanding of the optimal speed and certain settings is a must.
Also, never set the fan speed too low such that the temperature begins to rise. If the inside temperature reaches more than 95° C, the chances of damage to internal components are high. Though your PC, in all likelihood, should shut down before reaching that temperature.
These are all the ways you can avoid overheating in a Windows 11 PC along with boosting the system’s performance. In case these don’t work, reset Windows to its factory settings.
Apart from that, you can also look for the best computer fan models available in the market, in case the current one ceases to function.
Let’s know which fix worked for you in the comments section below or whether replacing the fan solved the overheating issue in Windows 11.
![]()
Newsletter
A high temperature can be dangerous for your PC
by Kazim Ali Alvi
Kazim has always been fond of technology, be it scrolling through the settings on his iPhone, Android device, or Windows. And at times, unscrewing the device to take… read more
Updated on January 11, 2023
- A lot of users after upgrading to Windows 11 have reported overheating, an issue that can both damage the computer and affect its performance.
- The problem is primarily caused due to dust buildup, running multiple applications at once, or using an outdated version of Windows.
- Also, find out about third-party tools that will let you control the speed of the computer fan for optimal cooling.
XINSTALL BY CLICKING THE DOWNLOAD FILE
- Download Restoro PC Repair Tool that comes with Patented Technologies (patent available here).
- Click Start Scan to find Windows 11 issues that could be causing PC problems.
- Click Repair All to fix issues affecting your computer’s security and performance
- Restoro has been downloaded by 0 readers this month.
Windows 11, the recent OS upgrade from Microsoft, is also prone to errors as was the case with the previous ones. While most of them don’t pose much of a risk, the Windows 11 overheating problem can be a big turn off.
When your PC starts to overheat, it’s not only detrimental to the performance but may also damage the hardware components, likely to the ones that are fragile.
Hence, it becomes imperative to understand the various problems that cause the overheating problem in Windows 11, and their subsequent fixes.
Which issues cause Windows 11 overheating issues?
There are a bunch of problems that are responsible for overheating in a Windows 11 system. Some pertain to issues with the hardware or simply lack of maintenance, while others have to do with the software aspect. Let’s have a look at the issues:
- Lack of ventilation
- Dust build-up
- Issues with the hardware
- Running incompatible software
- Outdated version of Windows
- Using multiple high-end applications simultaneously
If you are able to identify the problem, head to the relevant fix. Or, simply execute them in the listed sequence for a quick troubleshooting experience.
How can I fix the Windows 11 heating issue?
- Which issues cause Windows 11 overheating issues?
- How can I fix the Windows 11 heating issue?
- 1. Restart the Windows 11 PC
- 2. Make sure the computer is properly positioned
- 3. Check the computer fan
- 4. Update Windows 11
- 5. Disable startup apps
- 6. Terminate apps and processes
- 7. Disable apps from running in the background
- 8. Change power plan settings
- 9. Update the graphics driver
- How can I manually control the computer fan to avoid overheating?
1. Restart the Windows 11 PC
- Navigate to the desktop and press Alt + F4 to launch the Shut Down Windows box.
- Click on the dropdown menu and select Restart from the list of options.
- Click on OK to restart the computer.
In many instances, it’s a particular process or program running in the background which is overloading the CPU and causing the system to overheat. A quick solution would be to restart the computer to eliminate any such process.
However, you must understand that rebooting Windows 11 is only a temporary fix that will help execute the others listed here. So, do go through the ones mentioned in the following sections for a permanent resolution.
2. Make sure the computer is properly positioned
An improperly positioned computer is also likely to cause the overheating problem in Windows 11. If the CPU is positioned such that the hot air from the fan cannot freely exit due to obstructions or lack of free space, the computer is bound to overheat.
In the case of a laptop, avoid resting it on beds or similar surfaces since the hot air is released from the bottom surface. Also, you can use cooling pads to keep the overheating in check and enhance the computer’s performance.
3. Check the computer fan
If the computer fan is functioning at reduced speeds or ceases to work altogether, the system will overheat. This could be due to dust build-up inside the fan, wires causing obstructions, or a faulty motor, in case the fan does not work.
Issues with the computer fan are easily fixable, but you must understand the various components and the connections. In case you are not acquainted with these, it’s best to get in touch with a professional to get things up and running.
After the laptop is cleaned and serviced, check if the overheating problem in Windows 11 is resolved.
4. Update Windows 11
- Press Windows + I to launch the Settings app.
- Select Windows Update from the list of tabs in the navigation pane on the left.
- Click on Windows Update on the right.
- Click on Check for updates to scan for any available newer versions.
- Download and install the updates that show up after the scan.
Running an older or outdated version of Windows 11 is also likely to cause overheating. With each update, new features, patches for bugs, and other enhancements in terms of performance are introduced.
Hence, it’s recommended that you keep the Windows 11 up-to-date to prevent the PC from overheating.
5. Disable startup apps
- Press Ctrl + Shift + Esc to launch Task Manager.
- Navigate to the Startup tab to view application that load when you boot Windows.
- Select the individual application to remove and click on Disable. Alternatively, you can right-click on it and select Disable from the context menu.
- Similarly remove the other apps as well.
There are a bunch of apps on the PC that load when you turn it on. Apart from unnecessarily hogging the system resources and leading to overheating, these also increase the time taken by Windows to boot. A simple solution here is to disable these apps.
Do remember not to remove all of the apps that appear in the startup tab since some perform critical functions. After done with it, restart the computer and check if the overheating problem in Windows 11 is resolved.
Some PC issues are hard to tackle, especially when it comes to corrupted repositories or missing Windows files. If you are having troubles fixing an error, your system may be partially broken.
We recommend installing Restoro, a tool that will scan your machine and identify what the fault is.
Click here to download and start repairing.
In case you want to use any of the apps that you disabled from loading at startup, just manually launch them.
6. Terminate apps and processes
- Press Ctrl + Shift + Esc to launch Task Manager.
- in the Performance tab, scroll through the list of programs and identify the ones that are hogging the system resources.
- Select the one that you want to terminate and click on the End task button at the bottom.
- You can similalry disable the other apps and processes listed here, in case you don’t need them.
There are a bunch of non-critical apps and processes running in the background that hog the system resources. If you are facing issues with overheating in Windows 11, eliminating these tasks will come in handy and resolve the problem.
As was the case before, not all processes should be terminated. Some may consume considerable resources but are critical to the functioning of Windows.
Also, you might find a momentary spike in consumption of resources, for instance, while you update the Windows. And, these processes should be allowed to run.
- What to do when your laptop is overheating when charging
- WaasMedic Agent.exe High Disk Usage: How to Stop It?
- Looking for a lightweight Windows 11? Tiny11 is the answer
- How to Fix AnyDesk ID Not Showing in Windows 11?
- 5 Ways to Fix The Remote Procedure Call Failed in Windows 11
7. Disable apps from running in the background
- Press Windows + I to launch the Settings app.
- Select the Apps tab from the navigation pane on the left.
- Next, click on Installed apps on the right.
- Locate the app that you don’t want running in the background, click on the ellipsis next to it, and select Advanced options from the menu that appears.
- Now, scroll down to Background app permissions and click on the menu under it Let this app run in the background.
- Select Never from the list of options that appear.
- Similarly disable the other apps from running in the background.
When you change the background app permissions to Never, the app won’t run at all in the background, thereby clearing considerable resources and resolving the overheating problem in Windows 11.
It’s actually recommended that you disable most of the non-critical ones anyway, since these consume resources and lead to overheating. Nevertheless, you can always manually launch them, whenever required.
8. Change power plan settings
- Press Windows + S to launch the Search menu.
- Enter Control Panel in the text field at the top, and click on relevant search result that appears.
- Click on System and Security from the options that appear.
- Click on Power options.
- Next, click on Change plan settings next to the current power plan.
- Click on Change advanced power settings near the bottom.
- In the Power Options window, scroll down and double-click on Multimedia settings.
- Now double-click on Video playback quality bias, and then on the menu next to On battery.
- Select Video playback power-saving bias from the list of options that appear.
- Similarly, select the same setting for Plugged in as well.
- Next, double-click on When playing video to expand and view the settings under it.
- Set both On battery and Plugged in as Optimize power savings, and click on OK to save the changes.
Another effective way of optimizing performance and eliminating overheating in Windows 11 is to modify the power plan settings. With these settings in place, Windows will optimize things such that your computer bears the minimum pressure, thereby eliminating the chances of overheating.
9. Update the graphics driver
- Press Windows + S to launch the Search menu.
- Enter Device Manager in the text field at the top and click on the relevant search result that appears.
- Locate and double-click on the Display adapters entry.
- Right-click on the graphics adapter and select Update driver from the context menu.
- Next, select Search automatically for drivers in the Update Drivers window, to let Windows look for the best available driver on the system and install it.
The graphics driver is one the most critical ones on the computer, and running an outdated version can cause a bunch of problems including overheating in Windows 11. To fix the problem, simply update the graphics driver.
When updating drivers via the Device Manager, you can only install the updates that have already been downloaded on the computer. In case you are unable to find a newer version, try updating the driver via other methods.
Also, we recommend using a dedicated tool such as DriverFix in that regard. After the driver is updated, the overheating problem in Windows 11 should be fixed.
- WaasMedic Agent.exe High Disk Usage: How to Stop It?
- Looking for a lightweight Windows 11? Tiny11 is the answer
- How to Fix AnyDesk ID Not Showing in Windows 11?
- 5 Ways to Fix The Remote Procedure Call Failed in Windows 11
How can I manually control the computer fan to avoid overheating?
Although it’s not recommended, you can still manually control the computer fan and set it to run at the desired speed to avoid overheating. Most manufacturers generally offer software that helps you modify the fan speed and you should first look out for these.
In case your manufacturer doesn’t offer one, there are a bunch of third-party tools to control the fan speed. But before you start using any of those, a thorough understanding of the optimal speed and certain settings is a must.
Also, never set the fan speed too low such that the temperature begins to rise. If the inside temperature reaches more than 95° C, the chances of damage to internal components are high. Though your PC, in all likelihood, should shut down before reaching that temperature.
These are all the ways you can avoid overheating in a Windows 11 PC along with boosting the system’s performance. In case these don’t work, reset Windows to its factory settings.
Apart from that, you can also look for the best computer fan models available in the market, in case the current one ceases to function.
Let’s know which fix worked for you in the comments section below or whether replacing the fan solved the overheating issue in Windows 11.
![]()
Newsletter
Windows 11, недавнее обновление ОС от Microsoft, также подвержено ошибкам, как и предыдущие. Хотя большинство из них не представляют большого риска, проблема перегрева Windows 11 может стать серьезным препятствием.
Когда ваш компьютер начинает перегреваться, это не только отрицательно сказывается на производительности, но также может привести к повреждению аппаратных компонентов, особенно хрупких.
Следовательно, становится обязательным понимать различные проблемы, вызывающие проблему перегрева в Windows 11, и их последующие исправления.
Какие проблемы вызывают проблемы с перегревом Windows 11?
Существует множество проблем, которые вызывают перегрев в системе Windows 11. Некоторые из них связаны с проблемами с оборудованием или просто с отсутствием обслуживания, в то время как другие связаны с аспектом программного обеспечения. Давайте рассмотрим вопросы:
- Отсутствие вентиляции
- Скопление пыли
- Проблемы с оборудованием
- Запуск несовместимого программного обеспечения
- Устаревшая версия Windows
- Одновременное использование нескольких высококачественных приложений
Если вы можете определить проблему, перейдите к соответствующему исправлению. Или просто выполните их в указанной последовательности для быстрого устранения неполадок.
Как я могу решить проблему с нагревом Windows 11?
1. Перезагрузите ПК с Windows 11.
- Перейдите на рабочий стол и нажмите Alt + F4, чтобы открыть окно «Завершение работы Windows».
- Щелкните раскрывающееся меню и выберите «Перезагрузить» в списке параметров.

- Нажмите OK, чтобы перезагрузить компьютер.


Во многих случаях это определенный процесс или программа, работающая в фоновом режиме, которая перегружает ЦП и вызывает перегрев системы. Быстрым решением будет перезагрузить компьютер, чтобы устранить любой такой процесс.
Однако вы должны понимать, что перезагрузка Windows 11 — это лишь временное исправление, которое поможет выполнить другие перечисленные здесь. Итак, просмотрите те, которые упомянуты в следующих разделах, для постоянного решения.
2. Убедитесь, что компьютер правильно расположен
Неправильное расположение компьютера также может вызвать проблему перегрева в Windows 11. Если процессор расположен так, что горячий воздух от вентилятора не может свободно выходить из-за препятствий или нехватки свободного места, компьютер обязательно перегреется.
В случае ноутбука не кладите его на кровати или подобные поверхности, так как горячий воздух выходит из-под нижней поверхности. Кроме того, вы можете использовать охлаждающие подставки, чтобы контролировать перегрев и повышать производительность компьютера.
3. Проверьте вентилятор компьютера.
Если вентилятор компьютера работает на пониженных оборотах или вообще перестает работать, система будет перегреваться. Это может быть связано с скоплением пыли внутри вентилятора, мешающими проводами или неисправным двигателем, если вентилятор не работает.
Проблемы с компьютерным вентилятором легко исправить, но вы должны понимать различные компоненты и соединения. Если вы не знакомы с ними, лучше всего связаться с профессионалом, чтобы все наладилось.
После чистки и обслуживания ноутбука проверьте, решена ли проблема перегрева в Windows 11.
4. Обновите Windows 11
- Нажмите Windows + I, чтобы запустить приложение «Настройки».
- Выберите Центр обновления Windows из списка вкладок на панели навигации слева.

- Нажмите на Центр обновления Windows справа.
- Нажмите «Проверить наличие обновлений», чтобы найти доступные более новые версии.
- Загрузите и установите обновления, которые появятся после сканирования.


Использование более старой или устаревшей версии Windows 11 также может привести к перегреву. С каждым обновлением вводятся новые функции, исправления ошибок и другие улучшения с точки зрения производительности.
Следовательно, рекомендуется постоянно обновлять Windows 11, чтобы предотвратить перегрев ПК.
5. Отключите автозагрузку приложений
- Нажмите Ctrl + Shift + Esc, чтобы запустить диспетчер задач.
- Перейдите на вкладку «Автозагрузка», чтобы просмотреть приложения, которые загружаются при загрузке Windows.
- Выберите отдельное приложение для удаления и нажмите «Отключить». Кроме того, вы можете щелкнуть по нему правой кнопкой мыши и выбрать «Отключить» в контекстном меню.
- Аналогичным образом удалите и другие приложения.


На ПК есть куча приложений, которые загружаются при включении. Помимо излишнего использования системных ресурсов и ведущего к перегреву, они также увеличивают время загрузки Windows. Простое решение здесь — отключить эти приложения.
Не забудьте удалить все приложения, которые отображаются на вкладке «Автозагрузка», поскольку некоторые из них выполняют важные функции. После этого перезагрузите компьютер и проверьте, решена ли проблема перегрева в Windows 11.
Если вы хотите использовать какие-либо приложения, которые вы отключили от загрузки при запуске, просто запустите их вручную.
6. Завершите приложения и процессы
- Нажмите Ctrl + Shift + Esc, чтобы запустить диспетчер задач.
- на вкладке «Производительность» прокрутите список программ и определите те, которые загружают системные ресурсы.
- Выберите тот, который вы хотите завершить, и нажмите кнопку «Завершить задачу» внизу.
- Вы можете аналогичным образом отключить другие приложения и процессы, перечисленные здесь, если они вам не нужны.

В фоновом режиме работает множество некритических приложений и процессов, которые потребляют системные ресурсы. Если вы столкнулись с проблемами перегрева в Windows 11, устранение этих задач пригодится и решит проблему.
Как и раньше, не все процессы следует завершать. Некоторые из них могут потреблять значительные ресурсы, но имеют решающее значение для функционирования Windows.
Кроме того, вы можете обнаружить кратковременный всплеск потребления ресурсов, например, при обновлении файла Windows. И эти процессы должны быть разрешены для запуска.
7. Отключите приложения от работы в фоновом режиме
- Нажмите Windows + I, чтобы запустить приложение «Настройки».
- Выберите вкладку «Приложения» на панели навигации слева.
- Затем нажмите «Установленные приложения» справа.
- Найдите приложение, которое вы не хотите запускать в фоновом режиме, щелкните многоточие рядом с ним и выберите «Дополнительные параметры» в появившемся меню.
- Теперь прокрутите вниз до «Разрешения фонового приложения» и щелкните меню под ним «Разрешить этому приложению работать в фоновом режиме».
- Выберите Никогда из появившегося списка вариантов.
- Аналогичным образом отключите работу других приложений в фоновом режиме.


Когда вы меняете разрешения фонового приложения на «Никогда», приложение вообще не будет работать в фоновом режиме, тем самым освобождая значительные ресурсы и решая проблему перегрева в Windows 11.
На самом деле рекомендуется в любом случае отключить большинство некритических, поскольку они потребляют ресурсы и приводят к перегреву. Тем не менее, вы всегда можете запустить их вручную, когда это потребуется.
8. Измените настройки плана питания
- Нажмите Windows + S, чтобы открыть меню поиска.
- Введите Панель управления в текстовое поле вверху и нажмите на соответствующий результат поиска.
- Нажмите «Система и безопасность» в появившихся параметрах.
- Нажмите «Параметры питания».
- Затем нажмите «Изменить параметры плана» рядом с текущим планом питания.
- Нажмите «Изменить дополнительные параметры питания» внизу.
- В окне «Электропитание» прокрутите вниз и дважды щелкните «Настройки мультимедиа».
- Теперь дважды щелкните по пункту «Смещение качества воспроизведения видео», а затем в меню рядом с пунктом «От батареи».
- Выберите «Смещение энергосбережения при воспроизведении видео» в появившемся списке параметров.
- Точно так же выберите ту же настройку для «Подключено».
- Затем дважды щелкните При воспроизведении видео, чтобы развернуть и просмотреть настройки под ним.
- Установите «От батареи» и «От сети» как «Оптимизировать энергосбережение» и нажмите «ОК», чтобы сохранить изменения.


Еще одним эффективным способом оптимизации производительности и устранения перегрева в Windows 11 является изменение параметров плана электропитания. С этими настройками Windows оптимизирует все так, чтобы ваш компьютер выдерживал минимальное давление, тем самым исключая вероятность перегрева.
9. Обновите графический драйвер
- Нажмите Windows + S, чтобы открыть меню поиска.
- Введите «Диспетчер устройств» в текстовое поле вверху и щелкните соответствующий результат поиска.
- Найдите и дважды щелкните запись Адаптеры дисплея.
- Щелкните правой кнопкой мыши графический адаптер и выберите «Обновить драйвер» в контекстном меню.
- Затем выберите «Автоматический поиск драйверов» в окне «Обновить драйверы», чтобы позволить Windows найти лучший из доступных драйверов в системе и установить его.


Графический драйвер является одним из самых важных на компьютере, и использование устаревшей версии может вызвать множество проблем, включая перегрев в Windows 11. Чтобы решить эту проблему, просто обновите графический драйвер.
При обновлении драйверов через Диспетчер устройств можно установить только те обновления, которые уже были загружены на компьютер. Если вы не можете найти более новую версию, попробуйте обновить драйвер другими способами.
Как я могу вручную управлять вентилятором компьютера, чтобы избежать перегрева?
Хотя это и не рекомендуется, вы все же можете вручную управлять вентилятором компьютера и настроить его на нужную скорость, чтобы избежать перегрева. Большинство производителей обычно предлагают программное обеспечение, которое помогает вам изменять скорость вращения вентилятора, и вам следует в первую очередь обратить на это внимание.
Если ваш производитель не предлагает его, существует множество сторонних инструментов для управления скоростью вращения вентилятора. Но прежде чем вы начнете использовать любой из них, необходимо тщательно изучить оптимальную скорость и определенные настройки.
Кроме того, никогда не устанавливайте слишком низкую скорость вращения вентилятора, чтобы температура не начала расти. Если внутренняя температура превышает 95°C, высока вероятность повреждения внутренних компонентов. Хотя ваш компьютер, по всей вероятности, должен выключиться до достижения этой температуры.
Это все способы избежать перегрева ПК с Windows 11, а также повысить производительность системы. Если они не работают, сбросьте Windows до заводских настроек.
Сообщите, какое исправление сработало для вас, в разделе комментариев ниже или решила ли замена вентилятора проблему перегрева в Windows 11.
Обновление KB5010414 оказалось проблемным
Несколько дней назад Microsoft выпустила обновление KB5010414 (Windows 11 Build 22000.526) для Windows 11 в каналах Beta и Release Preview. Оно содержит в себя ряд исправлений и улучшений, но, как оказалось, установка обновления привносит в систему новые проблемы.

Как пишет источник, после установки KB5010414 перестает работать принтер. После удаления обновления принтер восстанавливает работоспособность, так что проблема тут именно в KB5010414. Второй баг, который связывают с Windows 11 Build 22000.526 – повышенная загрузка центрального процессора, из-за чего тот начинает греться больше обычного.
На данный момент Microsoft не подтвердила эти баги, однако пользователям-участникам программы Windows Insider рекомендовано воздержаться от перехода на Windows 11 Build 22000.526.
12 февраля 2022 в 17:35
| Теги: Microsoft, Windows
| Источник: MyDrivers