This page’s content is sourced from the JSHint project repository. If you spot an error, please open an issue or (better yet) make a pull request!
JSHint runs in a number of different environments; installation is different
for each.
Browser-like environments
A standalone files is built for browser-like environments with every release.
You’ll find it in the dist directory of the download. Download the latest
release here.
Rhino
A standalone files is built for Mozilla’s Rhino JavaScript
engine with every release. You’ll find it in
the dist directory of the download. Download the latest release
here.
Node.js
![]()
Each release of JSHint is published to npm, the package
manager for the Node.js platform.
You may install it globally using the following command:
npm install -g jshintAfter this, you can use the jshint command-line interface.
It is common to install JSHint as a development dependency within an existing
Node.js project:
npm install --save-dev jshintPlugins for text editors and IDEs
VIM
- jshint.vim, VIM plugin and command line
tool for running JSHint. - jshint2.vim, modern VIM plugin with
extra features for running JSHint. - Syntastic,
supports JSHint both older/newer than 1.1.0.
Emacs
- jshint-mode, JSHint mode for GNU
Emacs. - Flycheck, on-the-fly syntax checking
extension for GNU Emacs, built-in JSHint support. - web-mode, an autonomous major-mode for editing web templates
supports JSHint.
Sublime Text
- Sublime-JSHint Gutter, JSHint
plugin for graphically displaying lint results in ST2 and ST3. - sublime-jshint, JSHint build package
for ST2. - Sublime Linter, inline lint
highlighting for ST2.
Atom
- linter-jshint, JSHint plugin for Atom’s Linter.
- JSHint for Atom, JSHint package for Atom.
TextMate
- JSHint Bundle for TextMate 2
- JSHint TextMate Bundle.
- JSLintMate (supports both JSHint and
JSLint). - JSHint-external TextMate Bundle
Visual Studio
- SharpLinter (supports both JSLint and
JSHint). - JSLint for Visual Studio (supports both
JSLint and JSHint). - Web Essentials (Runs JSHint automatically).
Visual Studio Code
- VS Code JSHint extension, integrates JSHint into VS Code.
Brackets
- Brackets JSHint plugin
- Brackets Interactive Linter
Other
- ShiftEdit IDE has built-in support for JSHint.
- Komodo 7 now ships
with built-in support for JSHint. - JSHint integration for the Eclipse IDE
- JSHint integration for the NetBeans IDE
- JetBrains IDE family supports realtime
code inspection with both JSHint and JSLint out of the box. - JSLint plugin for Notepad++ now
supports JSHint. - JSHint plugin for Gedit.
Other cool stuff
- JSHintr is a web tool that allows you to
set your own code standards, easily review a file against these standards, and
share the output with other developers. - FixMyJS is a tool that automatically fixes
mistakes—such as missing semicolon, multiple definitions, etc.—reported by
JSHint. - A ruby gem for JSHint.
- Another ruby gem but without Java
dependency. - pre-commit checks your code for errors
before you commit it. - Dedicated Ant task to easily
automate JSHint in Ant Maven. - QHint — JSHint in QUnit. Check for errors in
your code from within your unit tests. Lint errors result in failed tests. - Grunt, a task-based command line build tool for JavaScript
projects, supports JSHint out of the box. - overcommit is an extensible Git hook
manager with built-in JSHint linting, distributed as a Ruby gem. Read
more
about it. - jshint-mojo, a plugin for Maven.
- JSXHint, a wrapper around JSHint to allow
linting of files containing JSX syntax.

При написании JavaScript кода, новички неизбежно допускают ошибки и это нормально. Плагин JSHint как раз позволяет вовремя увидеть все допускаемые ошибки, когда вы пишите свой код в редакторе. На этом уроке мы рассмотрим как установить и настроить данный плагин для редактора VS Code.
Установка JSHint для VS Code
Для работы плагина JSHint, у вас уже должна быть установлена среда Node.js.
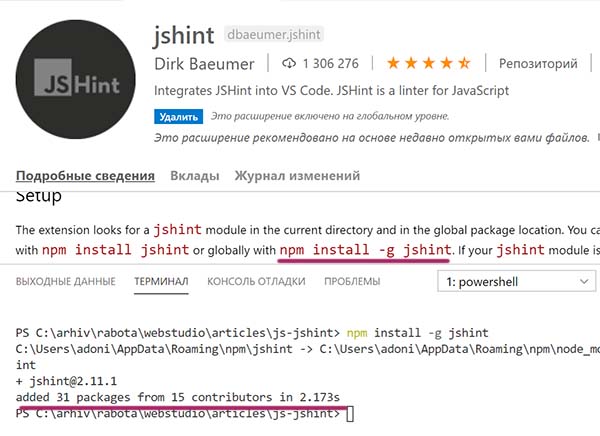
Шаг 1) Включите плагин JSHint во вкладке «Расширения»
Шаг 2) Установите npm пакет
NPM это менеджер пакетов, входящий в состав Node.js. В веб-разработке уже существует много готовых решений: компиляторы, плагины и еще много всего полезного. С помощью пакетного менеджера можно быстро все эти полезности устанавливать и что немаловажно, находится они будут в одном месте на вашем компьютере.
Для установки плагина глобально, откройте вкладку «Терминал», введите команду npm install -g jshint и нажмите клавишу «ENTER». Вместо слова install, можно прописать сокращенное название«i».
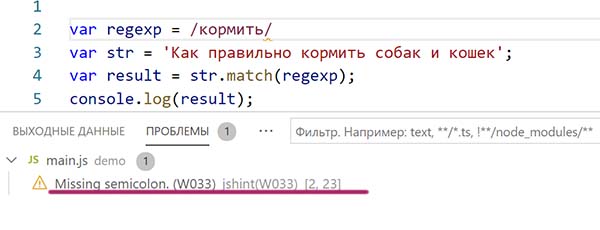
Теперь проверим, как это все работает. Сделаем намеренно ошибки в коде. Например пропустим точку с запятой на конце. Плагин сразу подчеркивает проблемное место волнистой линией, а во вкладке терминала «Проблемы», сразу выводится сообщение. JSHint подсказывает, что на второй строчке нет точки с запятой.
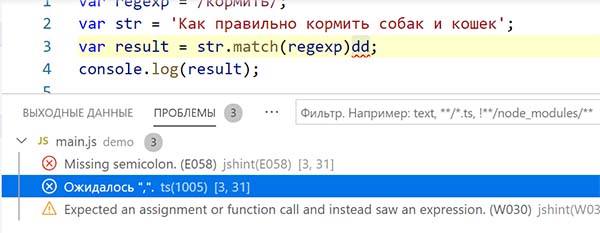
Предупреждения обозначаются желтым треугольником, а критические ошибки — красным кружком с крестиком. Наличие критических ошибок в коде, делает его совершенно не рабочим. Именно на такие ошибки нужно всегда в первую очередь обращать внимание.
Плагин JSHint очень полезный и удобный инструмент, который подскажет, где у вас проблема. Но есть одна особенность. О ней мы сейчас и поговорим. Дело в том, что после установки, плагин работает по стандартным настройкам. Зачастую «заводские» настройки ориентируются на старые форматы кода. Нас это совсем не устраивает, поэтому необходимо откорректировать настройки JSHint.
Настройка JSHint для VS Code
Создайте внутри проекта системный файл .jshintrc и пропишите внутри файла свои оптимальные настройки. Системные файлы могут не показываться, чтобы увидеть их, необходимо настроить показ скрытых файлов. Файл с настройками, находящийся внутри проекта будет влиять только на этот проект. Чтобы не копировать файл .jshintrc из проекта в проект, поместите его в общую папку с проектами.
Пример файла .jshintrc
При помощи этих опций можно задавать стилистику кода и задавать определенные условия по работе плагина.
{

    "camelcase" : true, // Названия переменных в camelCase стиле


    "undef" : true, // Все не глобальные переменные должны быть объявлены до их использования.


    "quotmark" : true, // Согласованность стиля кавычек


    "maxlen" : 120, // Максимальная длина строки


    "trailing" : true, // Запрещены пробелы на концах.


    "curly" : true, // Фигурные кавычки обязательны для каждого нового блока или области.


    "strict" : true, // Обязательно строгое использование.


    "browser" : true, // Стандартный браузер `window`, `document`.


    "devel" : true, // Разрешена панель разработчика `console.log();`.


    "jquery" : true, // Опция определяет глобальные переменные, предоставляемые библиотекой jQuery.


    "esversion" : 8, // Включить функции, представленные в ECMAScript 8.


    "node" : true // Определяет доступные глобальные переменные.


}
В этом уроке мы научились работать с одним из самых полезных инструментов для Front-End разработчика. JSHint будет в автоматическом режиме указывать на недочеты и ошибки в нашем коде. Теперь никакие синтаксические ошибки, опечатки и прочие мелочи не испортят ваш код!
-

Создано 03.07.2020 10:05:12
-
Михаил Русаков

Копирование материалов разрешается только с указанием автора (Михаил Русаков) и индексируемой прямой ссылкой на сайт (http://myrusakov.ru)!
Добавляйтесь ко мне в друзья ВКонтакте: http://vk.com/myrusakov.
Если Вы хотите дать оценку мне и моей работе, то напишите её в моей группе: http://vk.com/rusakovmy.
Если Вы не хотите пропустить новые материалы на сайте,
то Вы можете подписаться на обновления: Подписаться на обновления
Если у Вас остались какие-либо вопросы, либо у Вас есть желание высказаться по поводу этой статьи, то Вы можете оставить свой комментарий внизу страницы.
Если Вам понравился сайт, то разместите ссылку на него (у себя на сайте, на форуме, в контакте):
-
Кнопка:
Она выглядит вот так:
-
Текстовая ссылка:
Она выглядит вот так: Как создать свой сайт
- BB-код ссылки для форумов (например, можете поставить её в подписи):

Permalink
Cannot retrieve contributors at this time
Download and install
JSHint runs in a number of different environments; installation is different
for each.
Browser-like environments
A standalone files is built for browser-like environments with every release.
You’ll find it in the dist directory of the download. Download the latest
release here.
Rhino
A standalone files is built for Mozilla’s Rhino JavaScript
engine with every release. You’ll find it in
the dist directory of the download. Download the latest release
here.
Node.js
Each release of JSHint is published to npm, the package
manager for the Node.js platform.
You may install it globally using the following command:
After this, you can use the jshint command-line interface.
It is common to install JSHint as a development dependency within an existing
Node.js project:
npm install --save-dev jshint
Plugins for text editors and IDEs
VIM
- jshint.vim, VIM plugin and command line
tool for running JSHint. - jshint2.vim, modern VIM plugin with
extra features for running JSHint. - Syntastic,
supports JSHint both older/newer than 1.1.0.
Emacs
- jshint-mode, JSHint mode for GNU
Emacs. - Flycheck, on-the-fly syntax checking
extension for GNU Emacs, built-in JSHint support. - web-mode, an autonomous major-mode for editing web templates
supports JSHint.
Sublime Text
- Sublime-JSHint Gutter, JSHint
plugin for graphically displaying lint results in ST2 and ST3. - sublime-jshint, JSHint build package
for ST2. - Sublime Linter, inline lint
highlighting for ST2.
Atom
- linter-jshint, JSHint plugin for Atom’s Linter.
- JSHint for Atom, JSHint package for Atom.
TextMate
- JSHint Bundle for TextMate 2
- JSHint TextMate Bundle.
- JSLintMate (supports both JSHint and
JSLint). - JSHint-external TextMate Bundle
Visual Studio
- SharpLinter (supports both JSLint and
JSHint). - JSLint for Visual Studio (supports both
JSLint and JSHint). - Web Essentials (Runs JSHint automatically).
Visual Studio Code
- VS Code JSHint extension, integrates JSHint into VS Code.
Brackets
- Brackets JSHint plugin
- Brackets Interactive Linter
Other
- ShiftEdit IDE has built-in support for JSHint.
- Komodo 7 now ships
with built-in support for JSHint. - JSHint integration for the Eclipse IDE
- JSHint integration for the NetBeans IDE
- JetBrains IDE family supports realtime
code inspection with both JSHint and JSLint out of the box. - JSLint plugin for Notepad++ now
supports JSHint. - JSHint plugin for Gedit.
Other cool stuff
- JSHintr is a web tool that allows you to
set your own code standards, easily review a file against these standards, and
share the output with other developers. - FixMyJS is a tool that automatically fixes
mistakes—such as missing semicolon, multiple definitions, etc.—reported by
JSHint. - A ruby gem for JSHint.
- Another ruby gem but without Java
dependency. - pre-commit checks your code for errors
before you commit it. - Dedicated Ant task to easily
automate JSHint in Ant Maven. - QHint — JSHint in QUnit. Check for errors in
your code from within your unit tests. Lint errors result in failed tests. - Grunt, a task-based command line build tool for JavaScript
projects, supports JSHint out of the box. - overcommit is an extensible Git hook
manager with built-in JSHint linting, distributed as a Ruby gem. Read
more
about it. - jshint-mojo, a plugin for Maven.
- JSXHint, a wrapper around JSHint to allow
linting of files containing JSX syntax.
 Команда «npm install» в менеджере
пакетов npm
чаще всего употребляется
для локальной
установки зависимостей некоторого модуля, совершаемой в его подкаталоге
«/node_modules».
Однако возможен и запуск этой команды
с ключом «-g»
(от слóва «global»). Он обеспечивает установку указанного ей пакета в некоторое глобальное (то есть общее для всей системы) место. Кроме того, в PATH (для последующего запуска из любого желаемого каталога) оказывается прописанною та команда, которая была указана
в свойстве ««bin»»
в файле package.json у установленного пакета.
Таким общим местом, согласно документации, под Windows служит подкаталог
«/node_modules»
в каталоге установки Node. В остальных же системах таким общим местом чаще всего оказывается каталог
«/usr/local/lib/node_modules»
(тогда как Node там устанавливается в каталог
«/usr/local/bin»).
Обыкновенно этот подход употребляется для глобальной установки различных утилит, предназначенных для запуска из командной строки. Вот некоторые примеры:
- Команда «npm install jshint -g» обеспечивает появление в PATH команды «jshint», служащей для запуска JSHint.
- Команда «npm install browserify -g» обеспечивает появление в PATH команды «browserify», служащей для запуска Browserify.
- Команда «npm install less -g» обеспечивает появление в PATH команды «lessc», служащей для запуска Less.js.
 Однако на CLI (на командной строке) свет клином не сошёлся — и читателям Хабрахабра должно уж вполне быть известно, что приложение на языке JavaScript, употребляющее API Node.js, можно снабдить и GUI (графическим интерфейсом пользователя), сочинённым на языках HTML и CSS. Для этого придётся и запускать такое приложение вместо Node на том движке, который до прошлого года назывался
node-webkit,
а в нынешнем (2015) году оказался 14 января переименованным
в nw.js.
Ваши
GUI-приложения
также могут глобально быть установлены в системе
из npm-пакета
при помощи npm. Давайте поговорим об этом.
Первый шаг ваш понятен: непременно понадобится засунуть
в npm-пакет
исходный код самогó вашего
GUI-приложения,
и засунете.
Однако для запуска этого кода потребуется также
движок nw.js, а вот его-то
помещать в тот же пакет не слишком разумно.
Во-первых,
объём движка (под Windows составляющий более 80 мегабайтов, например) создаёт угрозу чрезмерной нагрузки на репозиторий
npm-пакетов,
если засовывать движок в каждый такой пакет.
Во-вторых,
в зависимости от системы (Windows, Linux, Mac OS X) или от её разрядности
(32-разрядная
или
64-разрядная)
движок должен быть другим — если же засовывать
в npm-пакет
все шесть возможных версий движка, то тогда не только репозиторий, но и конечный пользователь вздрогнет от суммарного объёма, достигающего без мáлого половины гигабайта.
Для преодоления этой проблемы разработчиками был создан
npm-пакет nw,
который
GUI-приложение
может указать в числе своих зависимостей (в разделе
««dependencies»»
в файле
package.json) —
и когда этот пакет будет установлен, то запустится определённый в его собственном файле package.json скрипт
postinstall,
который автоматически скачает из Интернета именно ту
версию nw.js,
которая сгодится для конкретной конечной операционной системы.
Следует заметить ещё, что пакет nw определяет (в свойстве
««bin»»
в файле
package.json)
ещё и команду «nw»; следовательно,
GUI-приложение
может указать эту команду в качестве собственного
скрипта «start»,
после чего запустить
GUI-приложение
можно будет, подав команду
«npm start»
в его каталоге.
Но сразу видно, что это не самый удобный способ запуска
GUI-приложения.
Куда удобнее было бы обеспечить возможность его запуска командою, состоящею из одного слóва (названия приложения) вместо двух, и притом из любого каталога. Выше ужé было сказано, что этой цели приложение может достигнуть, если в его файле package.json значением поля
««bin»»
будет некоторый скрипт — тогда npm во время глобальной установки автоматически поместит этот скрипт в PATH и придаст ему желаемое название. Ну а пакет nw экспортирует метод
«.findpath()»,
которым скрипт может воспользоваться, выясняя конкретное местонахождение скачанного
движка nw.js
(для последующего запуска движка).
Для примера укажу, что в составе моего браузера гипертекстового векторного Фидонета открытый исходный код такого скрипта выглядит
вот как:
#!/usr/bin/env node

require('child_process').spawn(
   require('nw').findpath(),
   ['.'].concat( process.argv.slice(2) ),
   {
      cwd: __dirname,
      detached: true,
      stdio: 'ignore'
   }
).unref();
Нетрудно видеть, что в нём нет ровным счётом ничего специфически фидонетовского. Следовательно, этот же пример все вы можете без малейших изменений использовать в собственных
GUI-приложениях,
если предполагаете глобальную установку их
из npm-пакета.
Непременно обратите внимание на следующие фрагменты этого примера:
- «detached: true» и «.unref()»: движок nw.js запускается в качестве отдельного процесса, а стартовая команда завершает свою работу тотчас же (не ждёт его);
- «cwd: __dirname»: движок nw.js начинает работу в том каталоге, куда npm глобально установил стартовую команду (исходя из предположения о том, что и всё GUI-приложение лежит там же; но если этот код вы положили не рядом с файлом package.json, как сделал я, а в некотором подкаталоге, то добавьте в этой строке выход из подкаталога в родительский каталог);
- «[‘.’].concat( process.argv.slice(2) )»: движку nw.js в командной строке сперва передаётся точка (указание взять запускаемое приложение из текущего каталога), а затем — все параметры командной строки стартовой команды;
- «#!/usr/bin/env node»: под Windows эта строка может показаться не нужною, однако это впечатление иллюзорно (на самом деле npm полагается на наличие этой строки).
Рассмотренный выше подход может также быть применён и к установке приложений,
вместо nw.js
использующих более ранний движок
node-webkit.
Для этой цели вместо
npm-пакета nw
следует использовать более ранний (и притом неофициальный)
npm-пакет — nodewebkit.
To update or switch versions, run npm install -g jshint@latest (or @v2,
etc).
Files
These are the files / directories that are created and/or modified with this
install:
~/.config/envman/PATH.env
~/.local/opt/node
~/.jshintrc.defaults.json5
~/.jshintrc.webi.json5
Cheat Sheet
JSHint is a community-driven tool that detects errors and potential problems
in JavaScript code. The project aims to help JavaScript developers write
complex programs without worrying about typos and language gotchas. —
jshint.com/about/
jshint works best when it’s integrated with your editor — such as vim (with
vim-ale) or VS Code. However, you can also use it
from the CLI.
Here we’ll cover how to:
- set defaults
- pick the best settings
- check all files in a project
- ignore certain file patterns
- apply overrides for specific files
Check out the official docs at https://jshint.com/docs/cli/ for
more info.
How to set JSHint’s defaults
JSHint is meant to be configure per-project.
You should put a .jshintrc in the root of the repository of each of your
projects.
You can copy our recommended settings into your project directory by running
this command:
# convert from JSON5 (with comments) to JSON and copy into current directory
sed -e 's://.*::g'
    ~/.jshintrc.webi.json5
    > .jshintrc
The .jshintrc will be read by code tools such as vim-ale and
VS Code
What are the best settings?
The primary value of tools like JSHint is that they allow you to restrict what
you use in the language from «everything that could every be useful» down to
just «safe features that don’t cause bugs».
Given that, JSHint is perhaps a little too «flexible» — whereas its primary
competitor (JSLint) is perhaps a little too inflexible — but if you follow that
general methodology, you’ll do well.
These are the settings we think strike the right balance for Software
Engineering (as opposed to just Code Monkey-ing around):
// ~/.jshintrc.webi.json5
// Recommended config from https://webinstall.dev/jshint
//
// To copy this file into your project without comments, run this:
//     sed -e 's://.*::g' ~/.jshintrc.webi.json5 > .jshintrc

{
  browser: true,
  node: true,
  esversion: 11,
  curly: true,
  sub: true,

  // More strict
  bitwise: true,
  eqeqeq: true,
  forin: true,
  freeze: true,
  immed: true,
  latedef: 'nofunc',
  nonbsp: true,
  nonew: true,
  plusplus: true,
  undef: true,
  unused: 'vars',
  strict: true,
  maxdepth: 4,
  maxstatements: 100,
  maxcomplexity: 20,
}
That file is installed to ~/.jshintrc.webi.json5, and should look pretty
similar to the above, assuming that we’ve kept it in sync with this README.
The list of JSHint’s default options can be found here:
https://github.com/jshint/jshint/blob/master/examples/.jshintrc
How to check project files with jshint
Give jshint a list of files and/or directories to check .js files:
jshint ./
How to make jshint ignore certain files
Create a .jshintignore to tell JSHint which files to ignore every time
echo "dist/" >> .jshintignore
How to apply different settings to different files
You can use the overrides directive to specify different rules to apply to
certain file patterns and directories.
{
  esversion: 11,
  overrides: {
    './browser/*.js': {
      esversion: 7,
    },
  },
}
NPM is a Node.js package manager that comes bundled with the installation of Node.js. It keeps track of all dependencies for your Node.js projects and gives you full control over managing them.
NPM makes is easy to reuse thousands of existing open source packages that solve a multitude of common problems, as well as share your own code with the community through the NPM registry.
Since JavaScript is now being used both for client and server-side code, there are lots of different packages: some for server side, some that are in fact command line programs and some that are made for front-end development. All those packages are listed on the official NPM website and in the NPM registry, the database of all available the open source packages.
This tutorial is an introduction to what you can do with NPM and a reference to its most frequently used commands.
Initializing a project
When you start a new project utilizing Node.js, you need to create a package.json file. It is a manifest file which tracks your dependencies, provides some metadata for your project and can optionally define some project-specific tasks to perform from command line.
If you have Node.js installed, npm command will be available. To check if it is installed just run:
npm -v
You can create a package.json file manually or bootstrap it interactively from the command line. The process will guide you through some common questions about the project, let you preview the file and then generate it.
$ mkdir ~/myproject
$ cd ~/myproject
$ npm init
name: (a) myapp
version: (1.0.0)
description: A very cool app
entry point: (index.js)
test command:
git repository:
keywords:
author: mrfoo@acme.com
license: (ISC)
About to write to /home/mrfoo/myproject/package.json:

{
  "name": "myapp",
  "version": "1.0.0",
  "description": "A very cool app",
  "main": "index.js",
  "scripts": {
    "test": "echo "Error: no test specified" && exit 1"
  },
  "author": "Mr Foo <mrfoo@acme.com>",
  "license": "ISC"
}

Is this ok? (yes)
Note: mark the application as private if you don’t plan to put it in an actual repository by adding the “private” property to package.json:
The official documentation provides a good overview of all the available properties in package.json. We will touch upon the most useful ones.
You can also check out an interactive example of a full package.json.
Installing dependencies
You can find over 100,000 projects available on the official NPM website where they are ranked by different criteria. A common thing to do is check if a package is actively maintained.
You can also search for packages from the command line:
npm search <search term>
You can visit the homepage of the package in your default browser by running:
npm home <package name>
Local installation
Now that you have a package.json, you can add a dependencies section and list everything you need:
"dependencies": {
  "express": "*",
  "grunt": "*",
  "bower": "*"
}
To install all packages listed in package.json and their dependencies, navigate to your project directory and run the install command which will create a node_modules directory and download all packages there:
npm install
You can also install new packages and record them from the terminal by running:
npm install --save <package name>
Some other useful options:
- Uninstall package and remove it from
package.json:npm uninstall --save <packagename> - Install directly from the git repository:
npm install git://github.com/mrfoo/mypackage.git - Install a specific version of the package:
npm install somepackage@1.1.0ornpm install somepackage@latest
It’s important to note that the above method will install packages locally, meaning they will be stored and be usable only inside your project. This is good as it lets each project define its modules, their specific version and download them separately.
Global instalation
Another way to install a package is by doing a global installation. It is commonly used for packages that provide command line functionality, such as grunt,bower and yo.
For example, to install JSHint globally, run the install command with -g flag and root privilege:
sudo npm install -g jshint
JShint should now be installed as a global package on the computer and can be ran from anywhere on a JavaScript file to lint it in a terminal.
jshint hello.js
It’s not advised to install every package globally. That method is reserved mostly for command line utilities.
Managing dependencies
NPM lets you manage your project dependencies and the versions you need. Open source projects often move fast, and versions change frequently. You can control which kind of updates your project accepts in the package.json file.
NPM uses semantic versioning, a standard to communicate what kind of changes are implemented in the release as it affects code stability.
A release number typically contains three elements:
- Major release which breaks backwards compatibility, e.g. 2.0.0
- Minor release with new features that don’t break existing features, e.g. 1.1.0
- Patch release with bug fixes and other minor changes, e.g. 1.0.1
Defining package versions
Let’s say you start developing with certain versions of the packages. You can update them and still preserve compatibility by specifying the range of accepted updates.
"dependencies": {
  "package1": "1.0.0",         // accepts only 1.0.0 version
  "package2": "1.0.x",         // any patch release in version 1.0
  "package3": "*",             // latest version, not recommended
  "package4": ">=1.0.0",       // any changes after 1.0.0
  "package5": "<1.9.0",        // anything less than 1.9.0
  "package6": "~1.8.0",        // shorthand for >= 1.8.0 < 1.9.0
  "package7": "^1.1.0",        // shorthand for >=1.1.0 < 2.0.0
  "package8": "latest",        // tag name for latest version
  "package9": "",              // same as * i.e. latest version
  "packageX": "<1.0.0 || >=2.3.1 <2.4.5 || >=2.5.2 <3.0.0"
}
For a more granular approach consult the NPM semantic version documentation.
Be sure to follow best-practices and patch versions of the packages so your code won’t break.
Note: If you are not sure which version to use, just put "*" and run npm update --save. It will install the modules and change the asterisks to installed version number with ^ allowing for minor and patch updates.
Upgrading packages
To see all locally installed packages use ls command and add -l flag for short description and --depth=0 for brevity and scope (add -g flag if you wish to see global packages):
npm ls -l --depth=0
To check out which packages can be updated locally and globally, run respectively:
npm outdated
npm outdated -g --depth=0
To upgrade to the highest acceptable version locally just run (to update globally just add -g flag and run as root):
npm update
If you removed a package in package.json just run the prune command to delete it from node_modules directory too.
npm prune
To upgrade NPM itself you need to install it as a global module again.
sudo npm install -g npm@latest
You can even update Node.js with NPM itself by installing a special module n and running it with either or stable as argument.
sudo npm install n -g
sudo n stable
You can run just npm to get a list of all available commands and help, or consult the official website for documentation.
Setting up NPM scripts
NPM has a built-in run-script command (or npm run for short). It works similarly to an alias in an operating system.
You define alias name as a property in scripts object which will execute the property’s value as a command in the operating system’s default shell.
You define you custom scripts in package.json like this (assuming you have the necessary dependencies listed and installed):
"scripts": {
    "lint": "jshint **.js",
    "test": "mocha test/"
  }
So if we run npm run lint in the terminal now, it will be the same as we executed jshint **.js in the terminal. This makes scripts property very flexible for programming, chaining commands, calling other modules, using system commands or anything just as you would do in a regular shell script.
There are some shortcuts available in NPM: npm test, npm start, npm stop and npm restart.
If we run npm test it’s the same as if we ran in default system shell npm run-script test, or npm run test, i.e. mocha test/.
Start scripts are usually defined so that they start main app.js file in Node.js "start": "node app.js".
When we run npm run lint (or any other custom scipt) NPM also runs the command with pre- and post- hooks like this: npm run prelint, npm run postlint. This gives us a chance to programmatically control what happens before the command and after.
You can even eliminate the need of build tools like Grunt or Gulp by configuring the scripts. You can check out an article on how to use NPM as a build tool here.
Development only dependencies
You can add a property for separately listing dependencies which are only used for development:
devDependencies : {
  "packageX": "*"
}
devDependencies are meant to be used during development of a package, like unit testing, linting, minification and similar. In most cases if you are an end-user of a package, you just need dependencies.
By default when you run npm install from a project directory it installs both dependencies as well as devDependencies (as it assumes you are in source directory so you must be the developer).
If you add --production flag it will install only dependencies.
npm install --production
If you install from the public registry with npm install <package> it will install only dependencies (becasue you are just a user of the package).
To install a package from the terminal and save it in package.json under devDependencies, add --save-dev flag.
npm install --save-dev <package>
Stackoverflow provides a good clarification on a difference between dependencies and devDependencies.
Publishing Node.js packages
Because every package is just a directory with package.json file and some other files, you can package your project, share it with the community and collaborate.
First you need to register yourself within NPM registry from the terminal and provide username, password and email address.
npm adduser
Now that you have an account you go to root of your to-be-published project and do:
npm publish
Summary
NPM makes it easy to install, manage and publish your packages. You start a new project by creating a package.json file, listing all the dependencies and installing them. For command line tools install packages globally.
While you work periodicaly check for updates, add new dependencies and write custom scripts. You can also segregate your dependencies into devDependencies and dependencies making a distinction between production and development environment.
After finishing you can publish your project in the NPM registry for others to use.
For more information consult:
- The official NPM documentation
- Properties specification for a
package.json - Interactive
package.json - Semantic versioner for NPM
- Most depended-upon packages

TOC
- Node
- Install NPM and NPM Global Libraries
- Install Node
- Node Hints
- NPM Install notes
- Pith Teaching
- Hello World
- Setting up the Port
- Cannot find module XXX
- Using Express
- Fav-Icon Missing — 404
- Hello Express
- Node Parameters
- Working with Post
- Using a Directory with app.use
- Express Generated Applications
- Stylus
- Test with Jasmine-Node
- Require
- Nodemon Watches for Changes
- Debug Node in Eclipse
- UpStart
- More on Upstart
- EADDRINUSE and UpStart
- Creating Directories and Copying Files
- Folder Manipulation
- JSHint and Node
- Karma and CHROME_BIN
- Symbolic Links to node_modules
- Debug
- MERN
- NodeJS on Azure
- SimpleDb
- Cloud 9
Node
Node.Js is a JavaScript engine and compiler. It ships with a set of accompanying libraries and plays host to very large set of third party libraries.
You can create general purpose JavaScript programs with Node, but it is
especially designed to help you build networked applications that link a
distributed architecture.
The NodeJs repository is here.
Install NPM and NPM Global Libraries
Most of the actions described here are performed automatically by the UbuntuSetup script. If you have run it, then you can skip this section unless you want to learn more about configuring global NPM libraries.
When using NodeJs, most developers will want to install express, nodemon and some other libraries globally.
Here is an outline of some of the steps performed If on Linux, first do this so that you don’t have to use sudo:
mkdir ~/npm
npm config set prefix ~/npm
Then add this to the bottom of your .bashrc and restart or source bash:
export PATH="$PATH:$HOME/npm/bin"
You can now install express, karma, etc globally without using sudo:
npm install -g karma-cli
npm install -g grunt-cli
npm install -g jasmine-node
npm install -g express-generator
npm install -g nodemon
npm install -g mocha
If on Windows, you can issue the above commands without worrying about
sudo.
Install Node
This sections details some of what is done by the UbuntuSetup script described above. Usually, I just run UbuntuSetup and it performs the steps outlined here. However, if you want to get some insights into how to install node, you can read this section, or not.
Go to the NodeInstall directory in JsObjects:
cd ~/Git/JsObjects/Utilities/NodeInstall/
There are two scripts there that you should run.
- NodeInstall.sh
- InstallNodePackages.sh
Run them one at a time, like this:
./NodeInstall.sh
./InstallNodePackages.sh
The first install node and npm. The second presents you with a menu. Install only the essentials.
If this is still too much abstraction for you, then simply open the scripts and see what they do. They are in plain text.
Node Hints
Here are some ideas for basic sanity checks.
Check if node installed:
$ node --version
v6.9.0
If you get an error instead of a version number, then it is very likely that node needs to be installed.
$ npm --version
3.10.8
Again, if you get no version number, then install node:
cd ~/Git/JsObjects/Utilities/NodeInstall
./NodeInstall.sh
Check if you have node utilities:
$ ls ~/npm/bin
bower             express        karma    npm
create-react-app  grunt          _mocha   npm-check-updates
css-beautify      html-beautify  mocha    npx
elf-express       jade           ncu      prettier
eslint            js-beautify    nodemon  pug
Here we can see that a few essential utilities are installed into ~/npm/bin. If you don’t see this, then run the InstallNodeUtilities script as described above.
NPM Install notes
The command, npm install processes the libraries that are specified in the dependencies and devdependencies sections of package.json. It puts the compiled output in a folder called node_modules.
Recall that package.json lists the dependencies, the libraries, that our code uses. When we run npm install, libraries/packages are downloaded from the NPM servers and placed in a directory called node_modules. This is a subdirectory of our current project.
NOTE: A NPM package is a library created by yourself, your team, or a third party. NodeJs comes with a few basic libraries pre-installed, but their philosophy is to keep the install very light by default. Therefore, when you want to use a library your generally specify the library name in package.json and then the library is downloaded from the NPM repository.
One of the key packages that we use is called express. If it is not already listed in your package.json file, you can install it by typing npm install express. If your program tries to load express and it is not present, you will see an error. The error is trying to tell you that the express package has not been installed into node_modules. The solution, as you probably now all understand, is to first make sure it is listed in the dependencies section of package.json and to then run npm install. That command downloads express into the node_modules directory.
NOTE: Sadly, I have found that failing to run npm install is one of the most common errors that node developers encounter. All node developers forget to run npm install, but experienced developers just sigh and fix the error, while newbies can cycle around the error for hours, or even days. Remember, if you get an error and can’t solve it, block copy it or take a screen shot and post it in the discussion area.
Here are links to express info:
https://www.npmjs.com/package/express
http://expressjs.com/
At the risk of being redundant, let me add some notes to help you better understand this issue. If we type npm install express, then we are saying that we don’t want to process all the packages listed in package.json. Instead, we want to install only the express package. If we type npm install —save express, then we asking to install express and to save a reference to that package in package.json. (The —save option is now the default.) That means that next time we type npm install or the shortcut npm i, npm will read package.json, see the reference to express, and install it. By default, when we ran express, elf-express or CreateExpressProject, express was added to package.json.
Some packages are installed globally. In particular, they are put in ~/npm/bin. If JsObjects is properly installed, then that directory is on your PATH. On Pristine Lubuntu, I had already installed two global packages called bower and nodemon globally. But on Cloud9, they were not installed, and you had to do that yourself. You did it like this:
- npm install -g bower nodemon
Note the -g flag. That means install the package globally. In particular, this command installs both bower and nodemon into ~/npm/bin or some similar location. The actual location will differ some on Cloud9 for reasons I don’t want to go into here.
Pith Teaching
You can’t run a project that depends on certain packages unless those packages are installed. We run npm install to install server side packages for a project, and we often run bower install to install client side packages for a project. NPM packages usually end up in a folder called node_modules, and bower packages usually end up in either a directory called bower_components, or in one called public/components.
The list of packages to be installed on the server side are kept in package.json. The list of packages to be installed on the client side are frequently kept in a file called bower.json.
There are various variations that can be run on these scenarios, but what is laid out in the above two paragraphs is what happens most frequently in most projects, or at least in most projects that I create.
Hello World
Below you will find some sample node programs. Here are the steps
for using them.
- Create a directory to host your project. (mkdir MyFirstNodeServer)
You might for instance, create the directory in a Git repository. - Navigate into that directory (cd MyFirstNodeServer)
- Create a file called server.js and use a text editor to place
one of the sample programs shown below inside your file. - Then run your program by typing node server.js.
For instance, you might type something like this:
C:GitProg282-Calvert>mkdir MyFirstNodeServer
C:GitProg282-Calvert>cd MyFirstNodeServer
Now create server.js as described below. Then run the server:
C:GitProg282-CalvertMyFirstNodeServer>node server.js
Once the server starts, go to your browser, and type the following:
http://localhost:30025
Here is the first, hello world style, node program that you can
place in the server.js file:
var http = require('http');

http.createServer(function (request, response) {
  response.writeHead(200, {'Content-Type': 'text/plain'});
  response.end('It works!n');
}).listen(30025);

console.log('Server running at http://127.0.0.1:30025/');
Here is another hello world type of program. Again, place it in
a file called server.js. You might for instance, create a directory
called MySecondNodeServer, and put this second server.js file
in that directory:
var http = require('http');

http.createServer(function (request, response) {
  response.writeHead(200, {'Content-Type': 'text/html'});
  response.end('<p>It works</p>');
}).listen(30025);

console.log('Server running at http://127.0.0.1:30025/');
And here is one more:
var http = require('http');
var fs = require('fs');

http.createServer(function (request, response) {
    var html = fs.readFileSync('index.html');
    response.writeHead(200, {'Content-Type': 'text/html'});
    response.write(html);
    response.end();
}).listen(30025);

console.log('Server running at http://127.0.0.1:30025/');
Notice that this last program depends on the presence of a file called
index.html, where index.html can be any valid HTML file.
Setting up the Port
Here is how to get the server to specify the port:
var port = process.env.PORT || 30025;
By default, we use port 30025 in my Bellevue College classes.
Cannot find module XXX
Here is the error:

Count down five lines from the line that reads «Cannot find module ‘nano'». That line looks something like this:
at Object <anonymous> (/home/bcusewr/Git/isit320_Sinanai-2016/Week05-DataMaster/routes/Couch.js:12:27
This means that in Couch.js, at line 12, character 27, there is a problem finding the module nano. I can’t be certain, but I imagine in your copy of Couch.js, at line 12, you would find this code:
var nano = require('nano')(servers[serverIndex]);
The program wants to load the nano package and retrieve and object from it. It is failing to do so. The reason, as others have pointed out, is probably because either:
You have not run npm install in order to install the package based on the code in package.json.
Or package.json does not contain instructions to insall nano.
If you have run npm install and the problem persists, then the it is likely that the second item above is the problem. In that case, run npm install nano —save. This will both install the package, and update package.json so that in the future, you can install nano by simply typing npm install.
Using Express
You can find the HelloExpress program on JsObjects:
Hello Express
To get started, create a directory called HelloExpress and then switch into
that directory:
mkdir HelloExpress
cd HelloExpress
The next step will be to install the express library on which this project
relies. You can do this one of two ways. Both involve issuing commands at
the shell (command) prompt. You should issue the command in the same
directory where you place your project. The simplest command looks like this:
npm install express
When you are done, you should have a folder called node_modules with the
contents of the express library in it. You can also choose to download a
global copy of express that you can use in multiple projects:
npm install -g express
npm link express
After issuing these last two commands, you are set to use Express with your
current project. If you create another project that uses express, you can give
it access to the Express library by again issuing this command:
npm link express
This will link in express using the global copy downloaded earlier. This
technique saves disk space, as it means you need only one copy of Express on
your system.
Fav-Icon Missing — 404
Sometimes, on startup, you get an error about your favorite icon missing. Put a 32 X 32 image file called called favicon.png in your public directory. Open app.js. Around line 17 you will find this code:
// uncomment after placing your favicon in /public
//app.use(favicon(path.join(__dirname, 'public', 'favicon.ico')));
Uncomment the second line and change favicon.ico to favicon.png.
// uncomment after placing your favicon in /public
app.use(favicon(path.join(__dirname, 'public', 'favicon.png')));
You can use any image editor to create or edit the PNG file. On Linux, the tool of choice is called gimp, but simpler tools will probably a do simple job like this just as well.
Hello Express
Here is the server for the HelloExpress program:
var express = require('express');
var app = express();
var fs = require('fs');

var port = process.env.PORT || 30025;

app.get('/', function(req, res) {
    var html = fs.readFileSync(__dirname + '/Public/index.html');
    res.writeHeader(200, {"Content-Type": "text/html"});
    res.write(html);
    res.end();
});

app.use("/", express.static(__dirname + '/Public'));
app.listen(port);
console.log('Listening on port :' + port);
This code has a method called app.get. It defines a default route that will
be called when the user browses to Port 30025:
http://localhost:30025
The app.get method shown here reads in a file called index.html, then
publishes it on the Node web server. When reading in the file, it uses a
library called fs (FileSystem) and a method called readFileSync.
NOTE: You can learn more about fs, readFileSync and the asynchronous method readFile in JsonBasics.
To make this program work, create a directory called Public. In it, put a
very simple HTML file such as this one:
<!DOCTYPE html>
<html>
<head>
  <meta charset="utf-8">
  <meta name="generator" content="pandoc">
  <title>Express Hello</title>

</head>
<body>
<h1>Hello Experss</h1>
<p>A simple Node Express program</p>
</body>
</html>
The file shown above is the one that will be read in by the node
readFileSync method, and then served up by the node web server.
Now start the node webserver by running this command:
node server.js
Here is another NODE example that uses express:
var express = require('express');
var app = express();
var fs = require('fs');

var port = process.env.PORT || 30025;

app.get('/', function(req, res) {
    console.log("root request sent");
    var html = fs.readFileSync(__dirname + '/public/index.html');
    res.writeHeader(200, {"Content-Type": "text/html"});
    res.write(html);
    res.end();
});

app.get('/dirname', function(req, result) {
    result.send({'result': __dirname});
});

app.get('/port', function(request, result) {
    result.send({'result': port});
});

app.use(express.static(__dirname + '/public'));

app.listen(port);
console.log('Express server started on port %s', port);
The first three lines are like import or include statements in other languages
such as Java, C# or C++:
var express = require('express');
var app = express();
var fs = require('fs');
The first line asks that we load in a library called Express. The second line
creates an instance of the express object. The third line brings a library called
fs (filesystem) that is built into node.
The next line establishs the port that your project will run on:
var port = process.env.PORT || 30025;
The words process.env.PORT refers to the environment variable called PORT. On
many machines this will not be set, so our code specifies the value for PORT if
PORT is not assigned. If you need help with environment variables, see this
page:
- Windows FAQ
The next lines of code defines the action that our program will take if the
user goes to the root of our site. For instance, if we are running on localhost,
then the following method is called when the user goes to http://localhost:30025:
app.get('/', function(req, res) {
    console.log("root request sent");
    var html = fs.readFileSync('public/index.html');
    res.writeHeader(200, {"Content-Type": "text/html"});
    res.write(html);
    res.end();
});
This code logs a debug message to the console. Then it reads in an HTML file
from the file system and packages it up using the HTTP protocol. It then
sends it to the user. In a typical scenario, the user invoked this method by
typing a URL in the address bar of a browser. Therefore the HTTP
packet is delivered to a browser and rendered there so the user can read it.
The following two lines of code mirror back the current directory and PORT on
which the node server is running:
app.get('/dirname', function(req, result) {
    result.send({'result': __dirname});
});

app.get('/port', function(request, result) {
    result.send({'result': port});
});
These commands are invoked when the user types one of the following URLS
http://localhost:30025/dirname
http://localhost:30025/port
The express library matches up the route designated by the URLs to the app.get
or app.post method that corresponds to it. For instance, the following URL
designates a route called dirname:
http://localhost:30025/dirname
This method is called when Express detects that the user designated the dirname
route:
app.get('/dirname', function(req, result) { etc... })
Express knows how to handle by HTTP get verbs and HTTP post verbs:
app.post('/dirname', function(req, result) { etc... })
For now, you can Read more here:
- http://expressjs.com/api.html#app.VERB
Node Parameters
There are three main ways to get parameters:
- request.query
- Use with get
- request.body
- Use with post
- request.params
- For getting url params: route.get(‘/foo:id’)
- request.params.id
Suppose you write the following, where a REST parameter is passed as the second parameter to getJSON:
$.getJSON('/walker', {folder: 'Assignments'}, function(data) { ... })
Then on the server end you could write the following to display the value passed from the client:
console.log('request.query', request.query);
This would produce the following output in the console:
request.params { folder: 'Assignments' }
Consider this useful example for loading Jade/Pug files:
router.get('/:id', function(request, response) {
    'use strict';
    console.log('Requested: ', request.params.id);
    response.render(request.params.id, {
        title: request.params.id
    });
});
This should be last route in the file. It says, in effect: if none of the other routes in this file have matched the request, then assume this is a request to render a jade/pug file. For instance, if the user asks for /foo, then the code will attempt to render as HTML the file in the views directory called foo.jade or foo.pug, as the case may be.
Working with Post
We used to use a tool called bodyParser when working with post. But
now we should use connect:
npm install connect --save
And in your code:
var connect = require( "connect" );

app.use(connect.urlencoded());
app.use(connect.json());
And then use it:
app.post('/add', function(request, response) {
    console.log('add called');
    console.log(request.body);
    var operandA = parseInt(request.body.operandA);
    var operandB = parseInt(request.body.operandB);
    var result = addingMachine.myObject.add(operandA, operandB);
    response.send({ "result": result });
});
Example code is found here:
- NodeRoutes01
- NodeRoutes02
Good job troubleshooting.
There is some background here that I have not covered sufficiently in class. See the routes methods section on this page:
https://expressjs.com/en/guide/routing.html (Links to an external site.)
In the (slightly updated) NodesRoutes02 (Links to an external site.) program notice that I have two Add methods:
// With a get, the parameters are passed in request.query
router.get('/add', function(request, response) {
    'use strict';
    console.log('add get called');
    console.log(request.query);
    var operandA = parseInt(request.query.operandA);
    var operandB = parseInt(request.query.operandB);
    var result = addingMachine.myObject.add(operandA, operandB);
    response.send({
        "result": result
    });
});

/* To handle a post, we have to add express.bodyParser, shown above
   Now our parameters come in on request.body */
router.post('/add', function(request, response) {
    'use strict';
    console.log('add post called');
    console.log(request.body);
    var operandA = parseInt(request.body.operandA);
    var operandB = parseInt(request.body.operandB);
    var result = addingMachine.myObject.add(operandA, operandB);
    response.send({
        "result": result
    });
});
One is a POST and one is a GET. Here is the client side code that calls them:
var add = function() {
    var operandA = $("#operandA").val();
    var operandB = $("#operandB").val();

    $.ajax({
        url: "/add",
        type: "GET",
        data: {
            "operandA": operandA,
            "operandB": operandB
        },
        dataType: "json",
        success: function(data) {
            $("#addResult").html(operandA + " + " + operandB + " = " + data.result);
        },
        error: function(jqXHR, textStatus, errorThrown) {
            console.log(jqXHR.responseText);
            console.log(textStatus);
            console.log(errorThrown);
        }
    });
};

var addPost = function() {
    var operandA = $("#operandAPost").val();
    var operandB = $("#operandBPost").val();

    $.ajax({
        url: "/add",
        type: "POST",
        data: {
            "operandA": operandA,
            "operandB": operandB
        },
        dataType: "json",
        success: function(data) {
            $("#addResultPost").html(operandA + " + " + operandB + " = " + data.result);
        },
        error: function(jqXHR, textStatus, errorThrown) {
            console.log(jqXHR.responseText);
            console.log(textStatus);
            console.log(errorThrown);
        }
    });
};
Notice that one does a get and one does a post.
url: "/add",
 type: "GET",
---------
url: "/add",
type: "POST"
And notice that the server side code differs:
--- The GET example ---------------------------
console.log(request.query);
var operandA = parseInt(request.query.operandA);
var operandB = parseInt(request.query.operandB);
--- The POST example --------------------------
console.log(request.body);
var operandA = parseInt(request.body.operandA);
var operandB = parseInt(request.body.operandB);
The get uses request.query and the post uses request.body. I was trying to explain all this earlier, but I was not giving the subject sufficient weight. The get methods sends the query as part of the URL, the POST methods sends the data a little differently, as a port of the HTTP request body. The practical difference is that we can send much more data back and forth with a post than with a get.
The $.getJSON and $.ajax do the same thing. In fact, $.getJSON calls $.ajax to do the actual work. After a bit, it is simpler to call $.ajax directly, but at first it is easier to call $.getJSON.
Using a Directory with app.use
There is one more very important line is the code sample shown in the previous
section:
app.use(express.static(__dirname + '/public'));
As you recall, our default route for this node script loads a file called
index.html that is stored in a folder called public:
var html = fs.readFileSync(__dirname + '/public/index.html');
The app.use command shown above ensures that Express knows to look in the
public directory for your files. If you don’t employ app.use to make directories
known to express, then your program may not be able to locate your files.
Inside of index.html, you may want to reference JavaScript and CSS files. If
you place them in the public directory, then you should reference them like
this:
<script src="/public/jquery.js"></script>
Finally, let’s think for a moment about how to load index.html in our default
handler. In many cases the following code will work, using a relative path
to find the public directory:
var html = fs.readFileSync('public/index.html');
However, the following code is preferred:
var html = fs.readFileSync(__dirname + '/public/index.html');
This code references the path to the directory where your node program
was launched, and then adds public/index.html to it. For instance, if your
server.js file were in a directory called src then the following path
would be used by readFileSync:
C:\users\sally\src\public\index.html
If your program were in subdirectory of your home directory on Linux, then the
path used by readFileSync might look like this:
/home/sally/src/public/index.html
Express Generated Applications
Once you have some of the core concepts behind Express under your belt,
it is time to move on to full Express application. To get started, be
sure you have both Express and a template library called Pug installed:
npm install -g express
npm install -g pug-cli
Make sure the express application is on your path. It is usually found
in AppData/Roaming. For instance, the Express executable is found here
on my system:
C:UsersCharlieAppDataRoamingnpmnode_modules.bin
On some systems it is here:
C:UsersCharlieAppDataRoamingnpm
In either case, you are looking for a program called express and
express.cmd. Make sure they are on your path.
It may also be available here in your generated applications:
node_modules.bin
Now let Express generate the framework for your application. For instance,
the following command generates an application called MyApp01:
express MyApp01
This command creates a directory called MyApp01. Inside it you will find
one main file and three subdirectories:
MyApp01
MyApp01/app.js   // We usually call this file server.js
MyApp01/public
MyApp01/routes
MyApp01/views
Alternatively, you can do something like this, which provides a library
called stylus for use with CSS files:
express -c stylus MyApp02
You can read about stylus in more depth later in this document.
By default, Express applications run on port 3000. Since we typically
run our applications on port 30025, the first thing you might do is
open app.js and modify the line that specifies the default port:
app.set('port', process.env.PORT || 30025);
Stylus
Stylus is a library that allows you to create CSS pages using a technique
that is a bit reminicescent of a template library or of markdown. In
other words, it provides an alternative syntax for composing CSS pages,
as well as a syntax for working with variables and parameters while
composing CSS pages.
The Stylus Home Page
When you add stylus to a node express page, the following line of code
should be present in your main express file:
app.use(require('stylus').middleware(__dirname + '/public'));
Here is a Simple Style Page
border-stuff()
    border solid thin black

body
    background-color #00AA00
    padding: 50px
    font: 14px "Lucida Grande", Helvetica, Arial, sans-serif

a
    color: #004400

nav
    background-color #00CC00
    border-stuff(0)
    padding 25px
    ul
        list-style none
        li
            display inline
            border-stuff(0)
            margin 10px
            padding 5px
            background-color #00FF00
Test with Jasmine-Node
First install jasmine-node:
sudo npm install -g jasmine-node
You will also want to install request locally with one of the following:
npm install request
npm install request --save-dev
The second option saves your command into package.json, if package.json
already exists.
Create a simple route you want to test:
app.get('/hello', function(request, response) { 'use strict';
    response.send('Hi there.');
});
Define a basic Jasmine-Node test by saving the following
as Tests/SimpleSpec.js:
var request = require('request');

describe("A suite", function() {
    it("should respond with hello world", function(done) {
        request("http://localhost:30025/hello", function(error, response, body) {
            expect(body).toEqual("Hi there.");
            done();
        });
    });
});
Now start your server running in one shell:
node Server.js
Then open a second shell and run your tests:
jasmine-node Tests/
Voila! You are done.
Require
Let’s look at this line of code:
var express = require('express')
It says that you want to load a copy of a file from the Express package and retrieve an object from it.
In package.json we ask npm to install the express library into node modules:
"dependencies": {
  "body-parser": "~1.12.0",
  "cookie-parser": "~1.3.4",
  "debug": "~2.1.1",
  "express": "~4.12.2",
  "jade": "~1.9.2",
  "morgan": "~1.5.1",
  "serve-favicon": "~2.2.0"
}
Because that line is found in package.json, the following directory is created in node_modules:
Week04-AngularMongoStatenode_modulesexpress
In that folder is a directory called lib and there is found a file called express.js. It is that file that is loaded when we call require and pass in express. Since we need the express library in a nodejs express project, it is important that we don’t change that line.
Nodemon Watches for Changes
Install nodemon:
npm install -g nodemon
Now use it to start your application:
nodemon server.js
Now you won’t have to restart your application each time you change
the source.
Debug Node in Eclipse
Here is how to debug outside of Eclipse:
- http://nodejs.org/api/debugger.html
Though it is not necessary for debugging, this is a good time to check that
you have JsHint installed. If you don’t have it installed, or if you are at all
unclear how to install new software into Eclipse, then please see this link:
- Android Eclipse
Just to review, here is the URL for JsHint:
- http://github.eclipsesource.com/jshint-eclipse/updates/
After you choose Help | Install New Software and click the add button, you fill
in the dialog like this:

Let’s now start talking about debugging inside Eclipse. To get started, try this link:
- Debug JavaScript from StackOverflow

Next you need to install Node Eclipse. Again Choose Help | Install Software
and try this search (I have not done this in a long time, and need to research how it works now):
- Node and Eclipse
Start the program like this:
node --debug-brk server01.js
Regardless of the port that you told your program to run on, the debugger
runs on port 5858:
G:\Git\OpenId03>node --debug-brk server01.js
debugger listening on port 5858
When starting the server in the browser, however, you should still use the
port you assigned:
http://localhost:30025
In Eclipse set up a Debug run configuration. First bring up the Debug Run
Configuration dialog:

Then set up the configuration for the V8 engine on port 5858:

I am not able to set breakpoints using the tools. Instead, I have to go into
the code and manually type the word debugger; on the line where I want the
debugger to break. Then I do the following:
- type node —debug-brk server01.js at the command line
- start the debugger in Eclipse, press F8 once to get passed the first breakpoint.
- launch my program in in the browser: http://localhost:30025
The program will then stop at my breakpoint:

You can step through the debugger with the following keys:
- F5 (Step into)
- F6 (Step over)
- F8 (Continue — run)

UpStart
UpStart is a Linux utility that ships with recent Ubuntu releases.
It can be used to ensure that your node servers or other program
stay in memory even after you have closed your shell. It will even
restart the programs automatically if the OS is rebooted.
Note that this project includes a file called ExpressSend.config.
You can use this file to ensure that your application is launched
when your OS boots, and that it will stay running, even if it
temporarily crashes.
In JsObjects, there is a program called ExpressSend:
- ExpressSend
If you open ExpressSend.config in an editor, you will see a few
portions of the line that begins with the word exec that you might
want to edit to convert them for use in your own programs. For
instance, seee the line that begins like this:
exec /usr/bin/nodejs /home/charlie/ExpressSend/server.js
If your version of the server is located elsewhere, then change the
line as necessary. For instance:
exec /usr/bin/nodejs /home/belinda/bin/server.js
Note that I replaced charlie/ExpressSend with belinda/bin. You
should edit your version of ExpressSend.config to reflect that paths
and file names on your system.
You can create a symbolic link to a deeply nested directory like this:
ln -s /home/ubuntu/Git/Prog282-Hints/CanvasGrid03 CanvasGrid
If you give that command in your home directory, then you will end
up with a directory that looks like this:
/home/ubuntu/CanvasGrid
The point, of course, is that this new directory is an alias, soft
link to the CanvasGrid03 directory.
Place ExpressSend.config in the /etc/init directory:
/etc/init/ExpressSend.config
The command to copy it to appropriate directory would be:
sudo cp ExpressSend.config /etc/init/.
Once the file is in the /etc/init directory, you can start your
program by typing the following:
sudo start ExpressSend
You can stop it with following command:
sudo stop ExpressSend
When you reboot the system, your program will start automatically.
Error messages and other output from your program are recorded in
the following location:
/var/log/node.log
If you examine the script, you can see that this file name is configurable.
You should create one script of this type for each program that you
want to launch.
In your node program, you may need to alter paths to your files so
that they include the __dirname variable:
var html = fs.readFileSync(__dirname + '/Public/index.html');
The following might also work, though I need to test it more:
var html = fs.readFileSync('./Public/index.html');
For now, I recommend the first option. This is necessary because your
program is no longer being launched from the directory in which you
created it, but instead, is start from the /etc/init directory. There
fore you need to use __dirname, which resolves to the complete path
to your file. For instance:
/home/charlie/git/MyProgram/Public/index.html
The __dirname variable, which is built into Node, gives you
the /home/charlie/git/MyProgram part of the path. Of course, on your
system that bit of the path will probably be different. Here is more
information on dirname:
- __dirname
More on Upstart
We specify where the log file will be written in this part of our upstart
scripts:
exec /usr/bin/nodejs /home/ubuntu/ExpressSend/server.js >> /var/log/node.log 2>&1
This command has three parts that we need to get write:
- exec — This command executes a process or program.
- /usr/bin/nodejs — This parameter points at our nodejs program. This is the program to be executed
- /home/ubuntu/ExpressSend/server.js — This is the path to the script that nodejs will run.
Then we redirect the output from the program to a text file called node.log that is located in the /var/log directory:
>> /var/log/node.log 2>&1
To see the content of that file, run this command:
cat /var/log/node.log
That is the most important command when it comes to debugging our UpStart scripts.
Let’s talk for a minute more about this strange command:
>> /var/log/node.log 2>&1
The > character redirects the output from one command to some other place,
usually a file. So this command sends the output of the echo command to a
file called foo.txt:
echo foo > foo.txt
After the command is run, foo.txt contains the string foo.
This command appends the output of the echo command to foo.txt:
echo bar >> foo.txt
Now foo.txt contains both foo and bar. The > operator will overwrite
foo.txt, and the >> operator will append data to it.
All this is called redirection, which is different from piping, which is
done with the | symbol.
This part of the command is more complicated:
2>&1
There are actually two streams of output that can occur when we launch a
program. One is the standard output stream, and that is what we are redirecting
above. The other is stderr, which is an error stream. By error stream, I mean
that it is a stream that contains the output produced by errors in our program.
The bizarre looking 2>&1 command redirects stderr to the same place as
stdout. This means that both the normal text, and the error text, is being
redirected to the same place. In our case, they are both being redirected to
node.log. When we read (cat) /var/log/node.log, we are therefore seeing
all the standard output, and all the error output, from our program.
EADDRINUSE and UpStart
The EADDRINUSE error is introduced above. Attemps to fix the error might be complicated if you are on a Linux box and using Upstart. UpStart keeps your program running even after you close the command prompt. This means you can’t stop the program by just typing Ctrl-C.
When using UpStart, remember to stop any running programs, such as our
ExpressSend sample, like this:
sudo stop ExpressSend
You might think that you can tell if a program is running on a port
by going to browser and seeing if anything comes up when you type in
the address and port of your server:
http://192.168.0.1:30025
That should help you tell if something is running on that port, but
it might not if you tried to launch something on that port, but it
failed during the launch. In particular, sometimes an attempt to
start a node program with UpStart will fail:
sudo start ExpressSend
You have to check /var/log/node.log to see if there are errors. But
the port can be munged up even if the program did not start
correctly. To fix the problem, just tell the program to stop running. If
necessary, remove the script from /etc/init. This can be important
because Linux will try to rerun the script when your server restarts:
sudo rm /etc/init/ExpressSend.config
Like all powerful tools, UpStart can be a double edged sword. It gives
you control over your system, but the power it grants you can also be
source of trouble.
Creating Directories and Copying Files
See the Library in the following project for an example of how to copy
files and make directories:
JsObjects/JavaScript/Syntax/MakeDirectory.
To create a directory:
var mkdirp = require('mkdirp');

var createDirectory = function(directory) {
    mkdirp(directory, function(err) {
        if (err) {
            console.log(err);
        } else {
            console.log("Created directory");
        }
    });
};
For mkdirp: npm install mkdirp
And to copy a file:
var copyFile = function(source, target) {

    var rd = fs.createReadStream(source);
    rd.on("error", function(err) {
        done(err);
    });
    var wr = fs.createWriteStream(target);
    wr.on("error", function(err) {
        done(err);
    });
    wr.on("close", function(ex) {
        done('Success: ' + ex);
    });
    rd.pipe(wr);

    function done(msg) {
        console.log(msg);
    }
};
Folder Manipulation
A library with a routine for ensuring a directory exists and for
recursively removing directories.
var mkdirp = require('mkdirp');
var fs = require('fs');
var path = require("path");

var SimpleDir = (function() {

    function SimpleDir() {
    }

    var makeDir = function(folder) {
        mkdirp(folder);
    }

    // Test if a directory exists, if it does not exist create it
    SimpleDir.prototype.ensureDir = function(folder) {
        fs.exists(folder, existsFunc);
    }

    // Synchronous version of directory exists
    SimpleDir.prototype.ensureDirSync = function(folder) {
        currentFolder = folder;
        if (fs.existsSync(folder)) {
            return fs.statSync(folder);
        } else {
            makeDir(folder);
            return 'successfully created directory';
        }
    };

    // Remove directories recursively
    // Credit to tkihira: https://gist.github.com/tkihira/2367067
    SimpleDir.prototype.rmdirSync = function(dir) {
        var list = fs.readdirSync(dir);
        for(var i = 0; i < list.length; i++) {
            var filename = path.join(dir, list[i]);
            var stat = fs.statSync(filename);

            if(filename == "." || filename == "..") {
                // pass these files
            } else if(stat.isDirectory()) {
                // rmdir recursively
                this.rmdirSync(filename);
            } else {
                // rm filename
                fs.unlinkSync(filename);
            }
        }
        fs.rmdirSync(dir);
    };

    return SimpleDir;
})();

exports.dirs = new SimpleDir();
You might use it in node like this:
var dirLib = require('./Library/SimpleDir');

var folder = 'foo/bar/bam';

dirLib.dirs.ensureDirSync(folder);
dirLib.dirs.rmdirSync('foo');
JSHint and Node
You can run JSHint from node. First install JSHint:
npm install -g jshint
Now try running JSHint by typing the command jshint at the command line.
If you see an error about the path, then set the following environment variable:
set HOME=%HOMEPATH%
It is a bug in JsHint that makes us do this. On Linux and the Mac you probably
won’t need to set the environment variable.
And finally try running jshint against one of your files:
jshint index.js
- See also Node and env
Karma and CHROME_BIN
Here’s a tip:
echo 'export CHROME_BIN="/usr/bin/chromium-browser"' >> ~/.bashrc && source ~/.bashrc
Just remember that you put the call in .bashrc in case there is some reason why you don’t want that behavior later on. In other words, you have now set CHROME_BIN for all bash sessions you create until you remove that line. Frankly, that seems like a totally reasonable thing to do, but just remember that you did it, in case there is some reason you want different behavior later on. Also, we don’t want to put too much in our .bashrc file or they will become too complex, and take too long to execute. This one line alone won’t cause problems, of course.
I believe I had referenced this bash file:
- RunKarma
It is a script, and needs to be run as such:
sh RunKarma.sh
or
chmod +x RunKarma.sh // Done once
./RunKarma.sh        // Any time you want to run the script once it has the executable flag set by the chmod call.
Then when it runs, it starts a new shell, then sets the environment variable $CHROME_BIN in the new shell to /usr/bin/chromium-browser, and then executes the line karma start. The point, I assume, is that Karma needs to know where chromium is located, and it checks the $CHROME_BIN environment variable as at least one way of finding it.
If you put the line: export CHROME_BIN=/usr/bin/chromium-browser at the end of your .bashrc file, then each time you start a new bash shell, that environment variable will be set.
The line source ~/.bashrc is a way to have the .bashrc file executed without having to start a new shell. It executes the line inside the present shell, and it can change the current shell, and particularly the environment variables for the current shell.
http://superuser.com/questions/46139/what-does-source-do
The point here is this. If you run source .bashrc, or if you start a new shell the normal way, then the current shell, the one you are in, is affected. It is a way of making sure that your current shell, the one at whose command line you are currently working, has executed all the commands in .bashrc. But if you run a script with the dot (.) command, then a new shell is launched, the script is run, and when it is finished you are returned to the original shell and changes the script made to the environment are forgotten. Consider running our command:
./RunKarma.sh
It creates a new shell, sets the environment variable CHROME_BIN for that shell to /usr/bin/chromium-browser. The script then starts Karma. When you hit Control-C to end the run, then you are returned to original shell, and the CHROME_BIN environment variable is returned to the state it was in before you ran the command. Since it is unlikely that anything else but Karma cares about that environment variable, then that is a reasonable solution. You could probably put ./RunKarma in your bin directory, so that you did not have to put it inside of each project…. (Yes, I tried that, and it seems to work).
Remember that you can check the current value of CHROME_BIN by typing:
echo $CHROME_BIN
On Windows it would be:
echo %CHROME_BIN%
Symbolic Links to node_modules
There is a way to save space on your hard drive if you have a large number of very similar node_modules and bower components folders on your system. It involves creating one copy of these folders, and then linking to them from your projects.
Go into one of the projects that uses most of the packages that we have been using in this course. For instance, go into any of the projects from Week07. Run npm install and bower install.
If you do not have a temp directory in your home drive, create one:
mkdir ~/temp
Now copy or move your folders into this temp directory. Here is the copy command:
cp -r node_modules ~/temp/.
cp -r public/components ~/temp/.
Or you can just move them there, which will free up space in your current project folder:
mv node_modules ~/temp/.
mv public/components ~/temp/.
Now go into another project. If there already are any existing packages, remove them to free up space:
rm -r node_modules
rm -r public/components
Now create symbolic links to the directories in your temp folder:
ln -s ~/temp/node_modules .
ln -s ~/temp/components public/.
As far as your project is concerned, the node_modules and components folders are now part of your project. They are actually in the temp directory, but the symbolic link makes them appear to be at two places at once:
- In your current project
- In the temp directory
I do this a lot, and it works very well. Once you start to understand what symbolic links are, you will find many uses for them. For instance, in your ~/bin directory you can create symbolic links to scripts in JsObjects. Then, when you do git pull to get the latest versions of my scripts, they will automagically appear in your ~/bin directory. This is because they only appear to be in your ~/bin directory, they are really in JsObjects. There is a tiny symbolic link in the ~/bin directory that points to the real copy of the file. Symbolic links don’t make copies of your files, they just point at the other location. Thus you can have many symbolic links to your ~/temp/node_modules folder while actually taking up only a small amount space on your drive.
Finally, you might want to make the code that creates the symbolic link a script, and put it in your ~/bin/directory:
#! /bin/bash

ln -s ~/temp/node_modules .
ln -s ~/temp/components public/.
Save it as ~/bin/nm-links. Make it executable
chmod +x ~/bin/nm-links.sh
Now, you can create links to these folders at any time but running the nm-links script from the root of your project. (If the folders already exist, then the script will fail.)
Debug
When running your code, make sure the debug window is open. Consider the image shown below.

Notice the following:
- We are running Chrome/Chromium, not FireFox
- The Chrome Developer Tools are open (F12)
- We are turned to the Sources page
- The red circle with the white X at the top right of the Chrome Developer Tools means there is an error
- The blue >_ symbol to the right of the red circle is toggled on (it is blue). When toggled on, this option displays the console at the bottom of the dev tools.
- The console shows our error, which states that «url» is part of an object that is not defined. We can see that the error is on line 33 of control.js
- The code in the display shows the actual line causing the problem. It is underlined with a red squiggly. Looking at the left of the display we can confirm that it is on line 33.
Turning to our editor, and moving to line 33, we can see the complete line of code causing the error:
appendUrl('#tweetList', index, tweet.text, tweet.entities.urls[0].url);
From the error messages in the dev tools, we now know that urls[0] is undefined. This is almost certainly because this particular tweet has no urls associated with it. As you know from previous lessons, the fix for this problem is to write something like this:
if (tweet.entities.urls.length > 0) { ... }
But my point here is not to provide the fix. It is to emphasize how crucially important it is that you use the debugger. I have come around to help many of you during or after class. As you know, the first thing I do is almost always to turn the debugger on. Without it the task of finding an error becomes much more difficult. We can walk from here to Tacoma rather than driving, but it is more difficult. We can fix problems in our code without the dev tools, but it is indeed much more difficult.
MERN
I’m not partial to this particular acronym, but if there is one that captures what we do, it is called the MERN stack: MongoDB, Express, React and Node. Not to be confused with the MEAN stack.
- MERN
- MEAN
- MEAN and MERN on MongoDB
I never really set out to be a LAMP, MEAN or MERN developer. I just found the technologies I like the most that I think students need to learn to get jobs. Right now, I think that is Node with Express, React, and MongoDB. I could happily replace MongoDB with CouchDB, but Mongo is so useful in the job market.
Ten years ago it was possible to pick a «best» tool for certain tasks. Now, the best we can do is say that a particular tool is very popular, or very much in demand. Many products are both powerful and well crafted.
I pick the tools we use very carefully. I don’t know how to say this properly, but have faith in me. I am showing you the right products.
NodeJS on Azure
- Azure and Node JS
I’m not quite sure what this command does:
npm install azure node-uuid DSInit /sqlInstance:.
SimpleDb
https://github.com/rjrodger/simpledb
Cloud 9
Cloud 9 is an online IDE. You can find it here:
- Amazon Cloud 9
- Find c9.io Website
On your account page, you can link to your GitHub account.
Installing NPM modules:
https://docs.c9.io/installing_npm_modules.html