Установив на свой ПК новые графические драйверы от Нвидиа, мы можем столкнуться с всплывающим на рабочем столе сообщением. Оно звучит как «Не найдена Панель управления Nvidia», появляется в Windows 10, и не все знают, как убрать уведомление. Фактором дисфункции часто выступает некорректная работа новых драйверов DCH для графических систем, из-за чего Панель управления может работать некорректно. Ниже рассмотрим сущность данной проблемы, а также опишем способы, позволяющие скрыть его на вашем ПК.
- Что значит «Не найдена Панель управления NVIDIA» в Виндовс 10?
- Отключение службы «NVIDIA Display Container LS», чтобы убрать уведомление
- Установка Панели Управления из Microsoft Store
- Каким образом скачать драйвера Game Ready, если не найдено управление NVIDIA
- Перезапуск всех служб видеокарты, чтобы скрыть уведомление
- Запуск Панели управления видеокартой вручную
- Возврат управления Нвидиа на экран в Windows 10
Что значит «Не найдена Панель управления NVIDIA» в Виндовс 10?
Обычно проблема возникает после обновления (установки) графических драйверов в системе. Справа внизу рабочего стола с регулярной частотой появляется сообщение «Не найдена Панель управления NVIDIA».
Компания «Nvidia» пока воздерживается от официальных комментариев по сути рассматриваемой проблемы. Существует гипотеза, что дисфункция связана с не корректной работой модерных драйверов DCH (Declarative Componentized Hardware) для графических карт «Nvidia». Такие драйвера разрабатываются в соответствии со спецификациями «Microsoft», и после их установки Панель Управления видеокарты может пропасть.
В соответствии с заявлениями разработчиков после установки драйверов Нвидиа Панель управления должна автоматически подтягиваться из Виндовс Store. Но как это обычно бывает, указанного «подтягивания» не происходит, потому будет необходимо самостоятельно установить её из Microsoft Store.
Итак, каким же образом можно убрать уведомление о том, что не найдена Панель управления видеокарты NVIDIA в операционной системе Windows 10? Читайте далее.
Читайте также: Панель управления NVIDIA: Доступ запрещен – что предпринять.
Отключение службы «NVIDIA Display Container LS», чтобы убрать уведомление
Наиболее простым способом убрать уведомление в ОС Виндовс 10 является отключение службы «NVIDIA Display Container LS», ответственной за демонстрацию указанного сообщения.
Осуществите следующее:
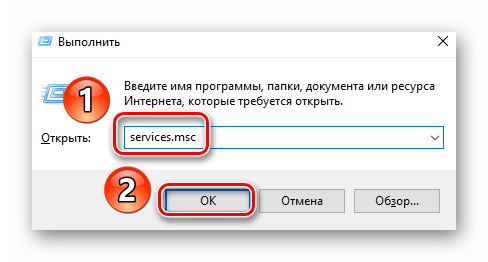
- Нажмите на клавиши Win+R;
- В возникшем окошке «Выполнить» введите services.msc и нажмите на клавишу Энтер;
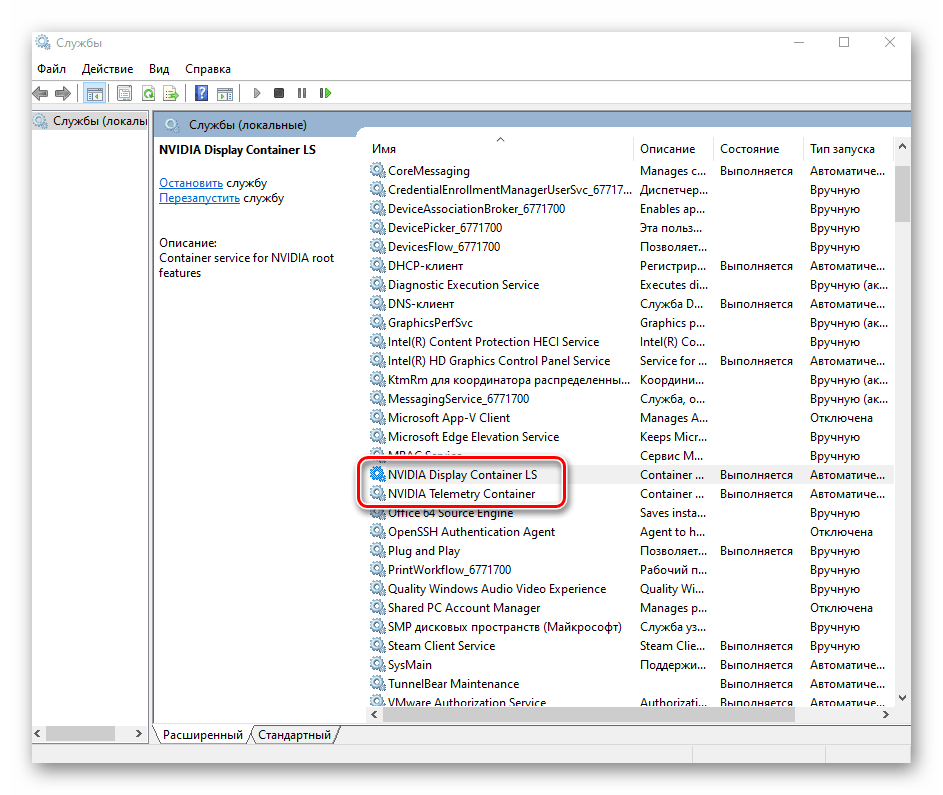
- Откроется окно служб. Найдите там ответственную службу «Nvidia Display Container LS» и дважды кликните по ней;
В перечне служб найдите указанную нами службу - Откроется окно данной службы. Установите значение опции «Тип запуска» на «Отключена», а потом внизу нажмите на «Применить»;
Установите тип запуска службы «Отключена» - Перезагрузите ваш PC для вступления изменений в силу
Установка Панели Управления из Microsoft Store
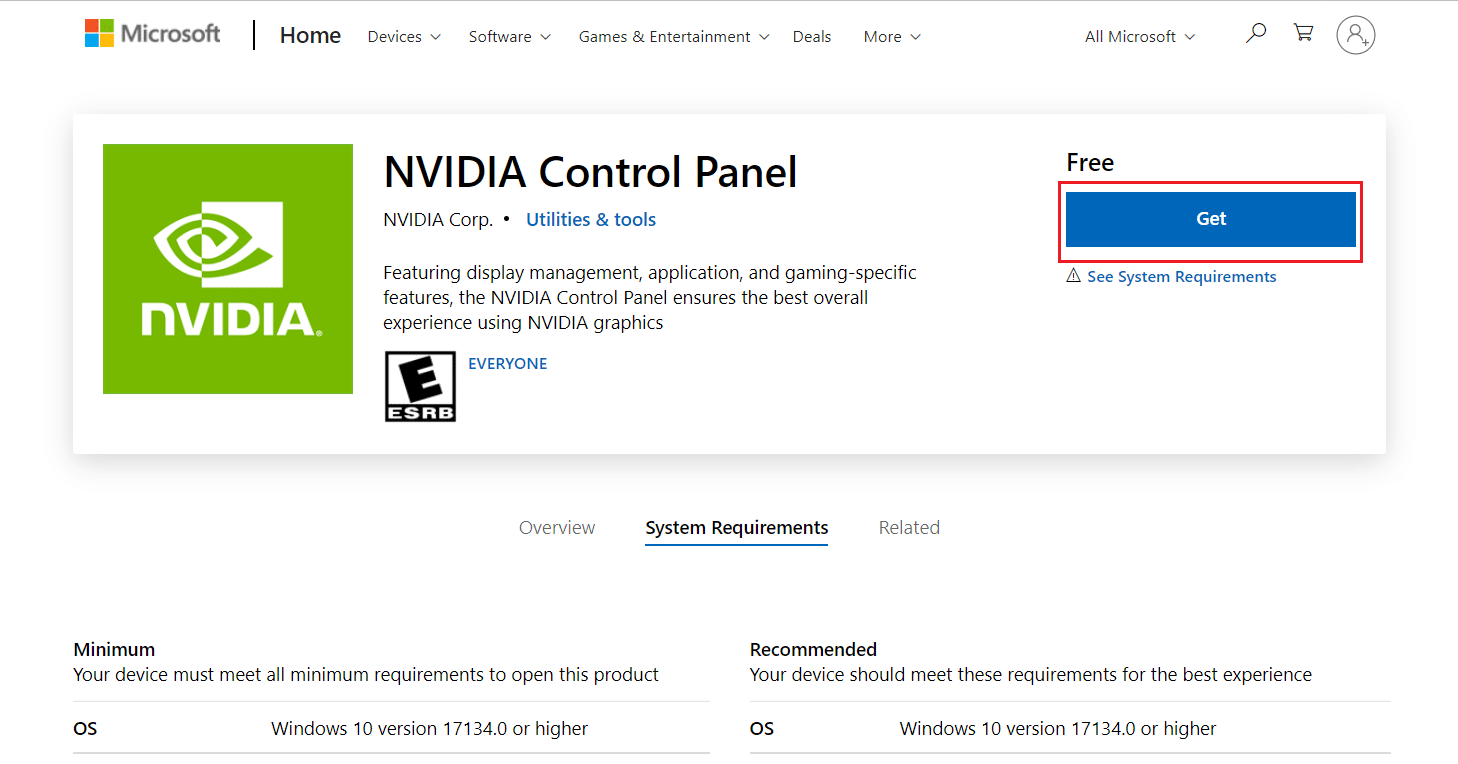
В ряде случаев избавиться от сообщения «Не найдена Панель управления NVIDIA» может помочь установка Панели Нвидиа из магазина Майкрософт. Понадобится перейти на microsoft.com, и нажать там на «Получить».
Эффективность данного способа обычно не высока, но обязательна для «джентельменского» набора советов по решению возникшей проблемы.
Каким образом скачать драйвера Game Ready, если не найдено управление NVIDIA
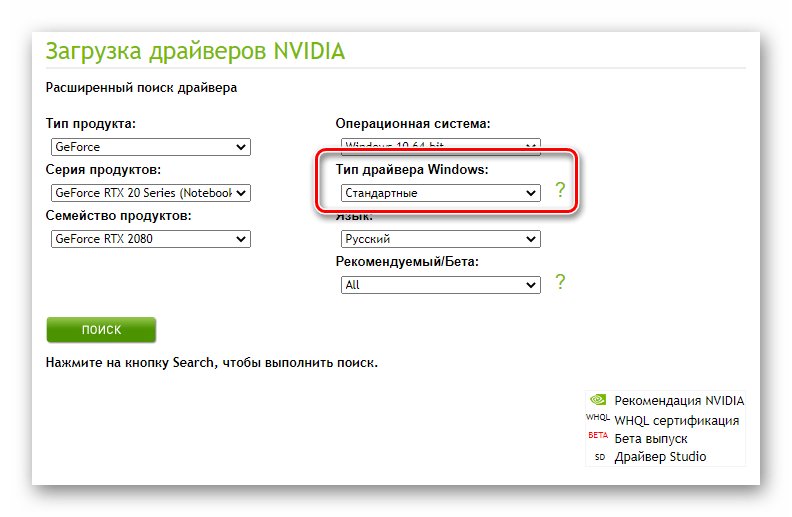
Решить рассматриваемую проблему может помочь загрузка драйверов Game Ready с сайта Нвидиа. Используйте расширенную форму поиска драйверов с помощью специализированной формы на сайте nvidia.com. Укажите в форме поиска на сайте вашу видеокарту, скачайте драйвера «Game Ready» и установите их на ваш ПК. Обычно там содержится и Панель Управления Нвидиа. После её установки уведомление должно быть убрано.
Перезапуск всех служб видеокарты, чтобы скрыть уведомление
Если ни один из перечисленных выше способов не помог исправить ошибку с Панелью управления, рекомендуем перезапустить службы Нвидиа в ОС Windows 10.
Выполните следующее:
- Нажмите на клавиши Win+R;
- В возникшем окошке «Выполнить» введите services.msc и нажмите на клавишу Энтер. Откроется окно служб;
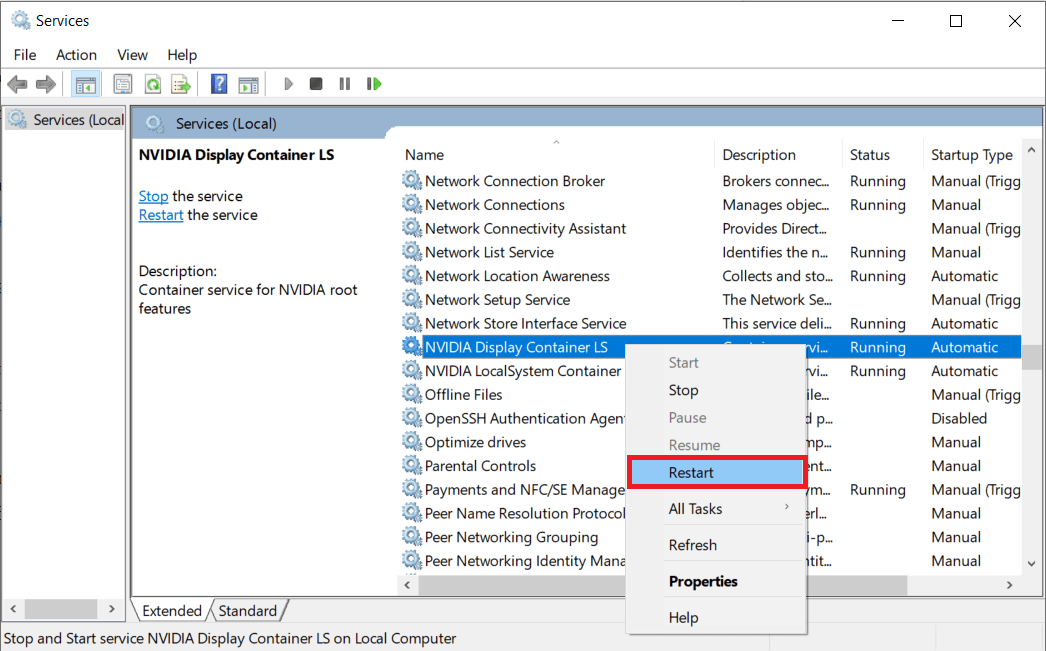
- Найдите в перечне службы от Nvidia, и, кликнув на каждую, нажмите вверху слева на «Перезапустить»;
Перезапустите работающие на PC службы Нвидиа - Выполните перезапуск каждой службы Nvidia.
Если во время перезапуска система выдаст вам ошибку 14109, тогда перейдите в Диспетчер устройств, и обновите драйвер вашей карты Нвидиа. Затем перезагрузите ваш PC.
Запуск Панели управления видеокартой вручную
Вы можете попытаться запустить Панель управления вручную.
Выполните следующее:
- Откройте папку «Мой компьютер»;
- Перейдите на диск С и найдите там папку Program Files;
- В папке Program Files вы найдете NVIDIA Corporations (если её там нет, ищите её в папке Program Files x86);
- Войдя в данную папку, откройте папку «Control Panel Client»;
- В данной папке найдите файл nvcplui. Кликните на нём правой клавишей мыши, и выберите «Запуск от имени администратора».
Возврат управления Нвидиа на экран в Windows 10
В ряде случаев (особенно после обновления) Панель управления может быть скрыта.
Для её возврата выполните следующее:
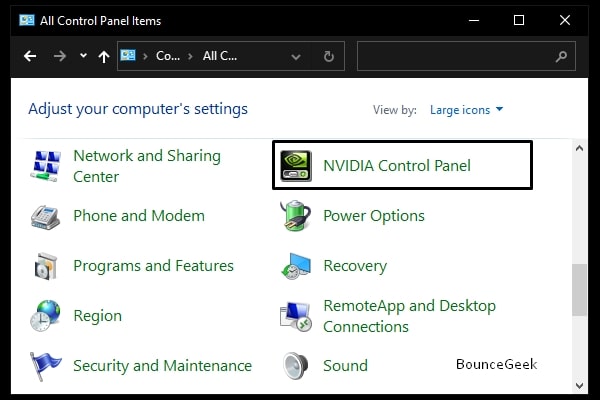
- Запустите Панель управления ОС Виндовс;
- Справа сверху в опции «Просмотр» выберите «Крупные значки»;
Выберите «Крупные значки» - Дважды кликните на «Панель управления Нвидиа»;
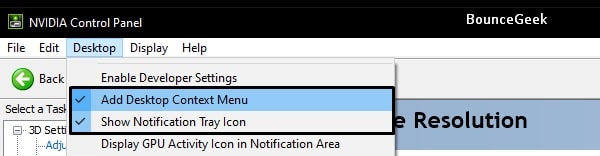
Нажмите на «Панель управления Нвидиа» - Найдите меню «Рабочий стол» или «Вид» и кликните на нём;
- В раскрывающемся списке выберите пункт «Добавить контекстное меню рабочего стола» установив рядом галочку;
Установите соответствующую галочку - Перейдите на рабочий стол вашего PC и посмотрите, появляется ли панель видеокарты в контекстном меню рабочего стола.
Это полезно знать: Панель управления Нвидиа не открывается — как исправить.
Видео инструкция
В ниже приведённом видео описан способ убрать уведомление, которое звучит как «Не найдена Панель управления NVIDIA» в операционной системе Windows 10 с официального сайта nvidia.com.
Будь то заядлый геймер или обычный пользователь компьютера, видеокарта NVIDIA всегда занимает особое место. Это приложение для графического процессора было разработано и запущено корпорацией NVIDIA, ведущим мировым производителем технологических продуктов. Как правило, графический процессор NVIDIA добавляется в вашу систему для обеспечения высокой производительности и мощной графики. Здесь приложение панели управления NVIDIA позволяет вам контролировать и получать доступ к настройкам, свойствам и работе видеокарты. Но что происходит, когда вы не можете открыть или даже найти приложение панели управления NVIDIA ни с того ни с сего? Это заставляет вас волноваться. Засучите рукава всем, кто борется с этой проблемой! Эта статья поможет вам решить проблему отсутствия панели управления NVIDIA в Windows 10. Итак, продолжайте читать, чтобы исправить проблему с отсутствующими настройками дисплея панели управления NVIDIA.
Могут быть перечислены различные причины отсутствия приложения панели управления NVIDIA в Windows 10. Но обратите внимание, что эти причины не являются прямой причиной проблемы, что означает, что только возможные результаты или сценарии, которые привели к этой проблеме, скомпилированы вместе.
- Наличие устаревшего, поврежденного или несовместимого драйвера вызывает ошибки в вашей видеокарте.
- Недавнее обновление Windows 10 может быть несовместимо с драйвером NVIDIA. Таким образом, вам нужно откатить его на более раннюю версию.
- Когда файлы повреждаются в приложении панели управления NVIDIA, оно повреждается.
- Другие распространенные ошибки и ошибки могут вызвать проблемы с этой конкретной проблемой.
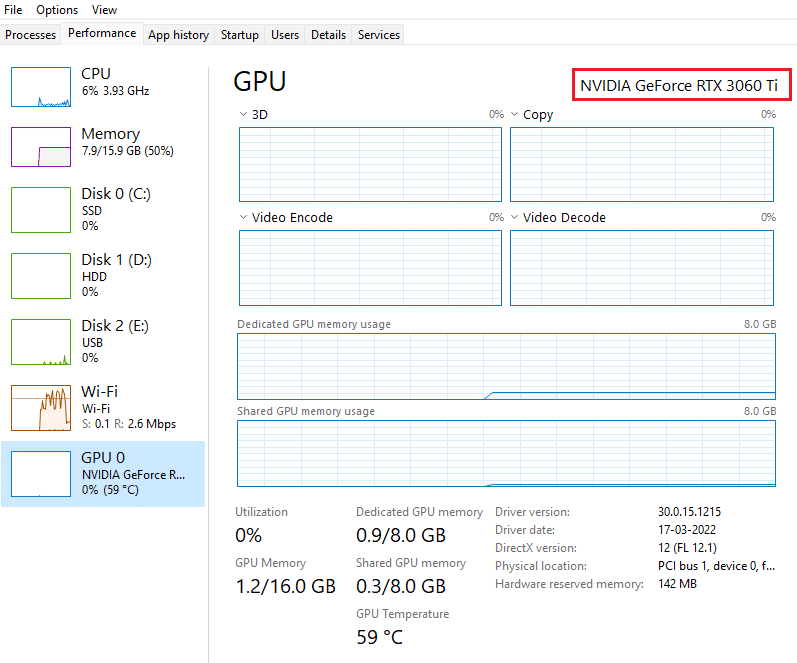
Прежде чем продолжить, убедитесь, что на вашем ПК установлен чип NVIDIA. Выполните приведенные ниже шаги, чтобы проверить наличие приложения панели управления NVIDIA для Windows 10 через службу диспетчера задач.
1. Нажмите кнопку Клавиши Ctrl + Shift + Esc вместе, чтобы открыть диспетчер задач.
2. В окне «Диспетчер задач» перейдите на вкладку «Производительность» и выберите «ГП 0» или «ГП 1» на левой панели.
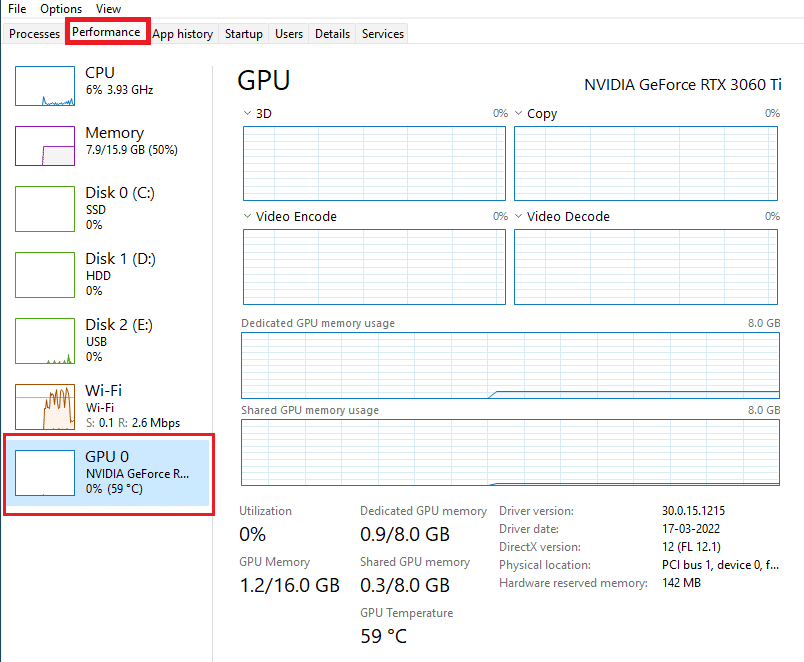
3. На правой панели графического процессора см. название модели видеокарты в правом верхнем углу страницы. Если он начинается с NVIDIA, то панель управления NVIDIA должна быть доступна на вашем компьютере.
После проверки, если драйвер NVIDIA радует вас своим присутствием и отсутствует только панель управления NVIDIA, вы можете использовать методы устранения неполадок, указанные ниже, чтобы решить эту проблему.
Способ 1: откатить Центр обновления Windows
Взгляд на обновление вашей операционной системы Windows 10 — это ценное усилие. Но иногда возможно, что ваш графический драйвер может быть несовместим с последним выпуском или обновленной версией Windows. Таким образом, отмените последнее обновление Windows из вашей системы, чтобы решить проблему отсутствия Windows 10 на панели управления NVIDIA.
1. Нажмите клавиши Windows + I, чтобы запустить настройки.
2. Выберите Обновление и безопасность.
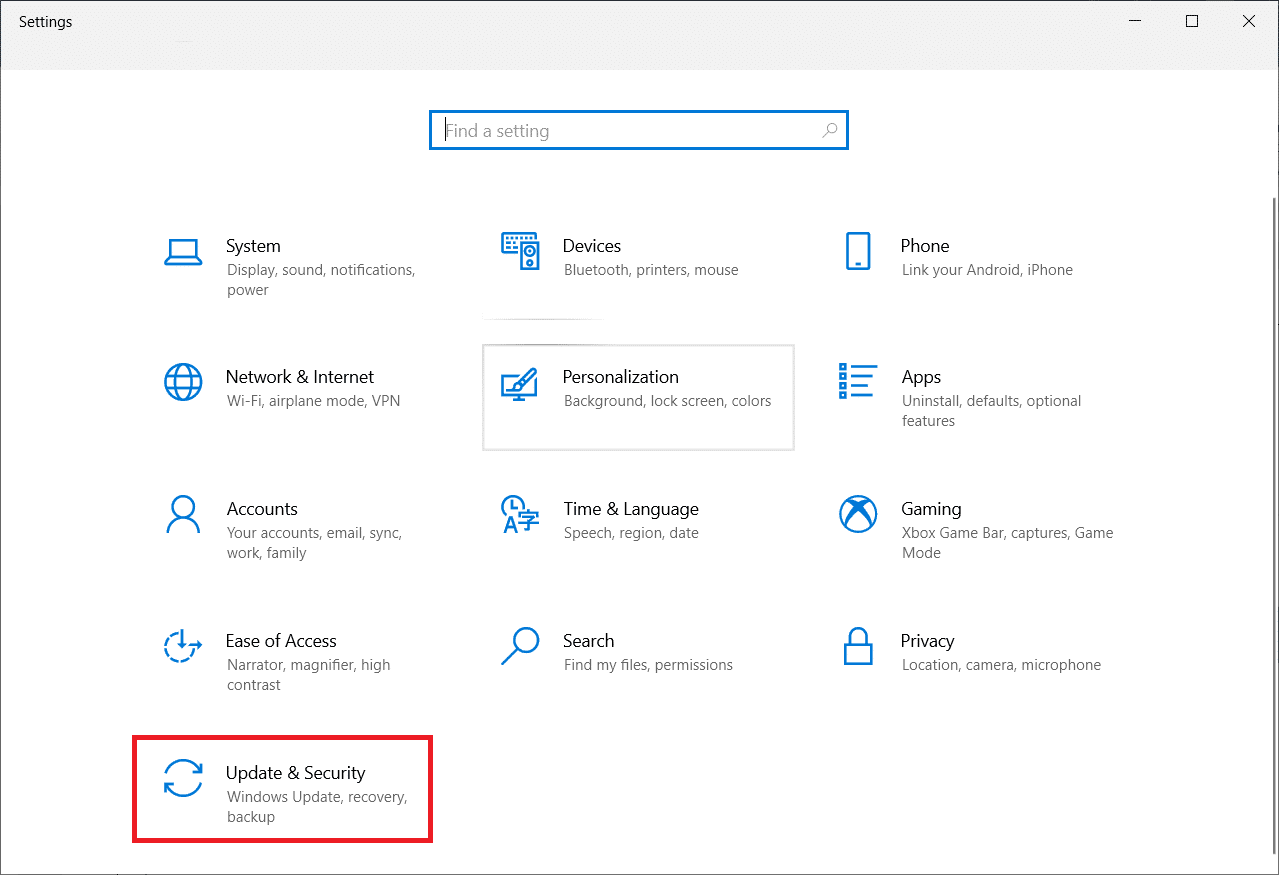
3. Выберите Восстановление на левой панели.
4. Нажмите кнопку «Начать».
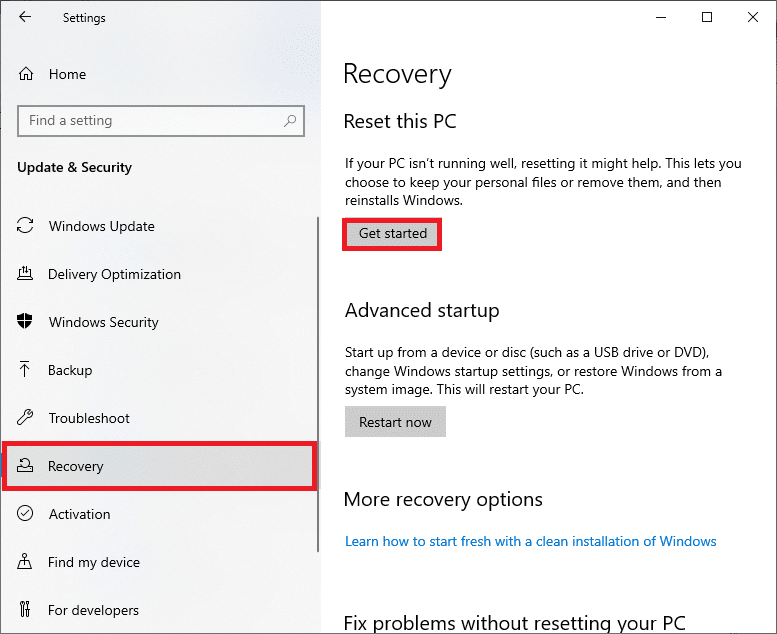
5. Следуйте инструкциям на экране, и ваша Windows вернется к предыдущей версии.
Способ 2: показать панель управления NVIDIA
Иногда по незнанию, если вы скрываете панель управления NVIDIA, она пропадает. В редких случаях также возможно, что ваша Windows 10 или стороннее приложение скрывают значок. Таким образом, может показаться, что он отсутствует. Выполните шаги, указанные ниже, и отобразите панель управления NVIDIA.
1. Нажмите клавишу Windows, введите панель управления и нажмите «Открыть».
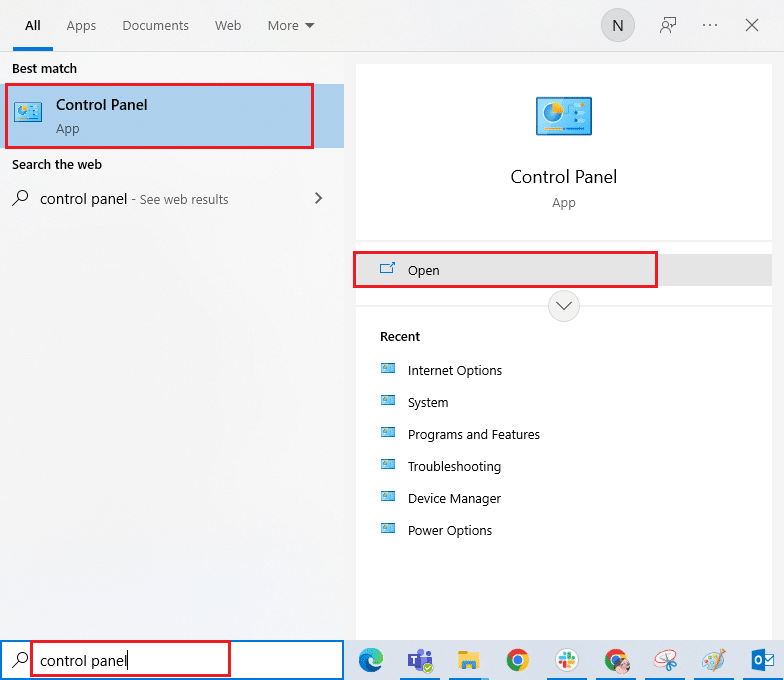
2. Здесь установите «Просмотр крупными значками», затем выберите «Панель управления NVIDIA» из списка элементов.
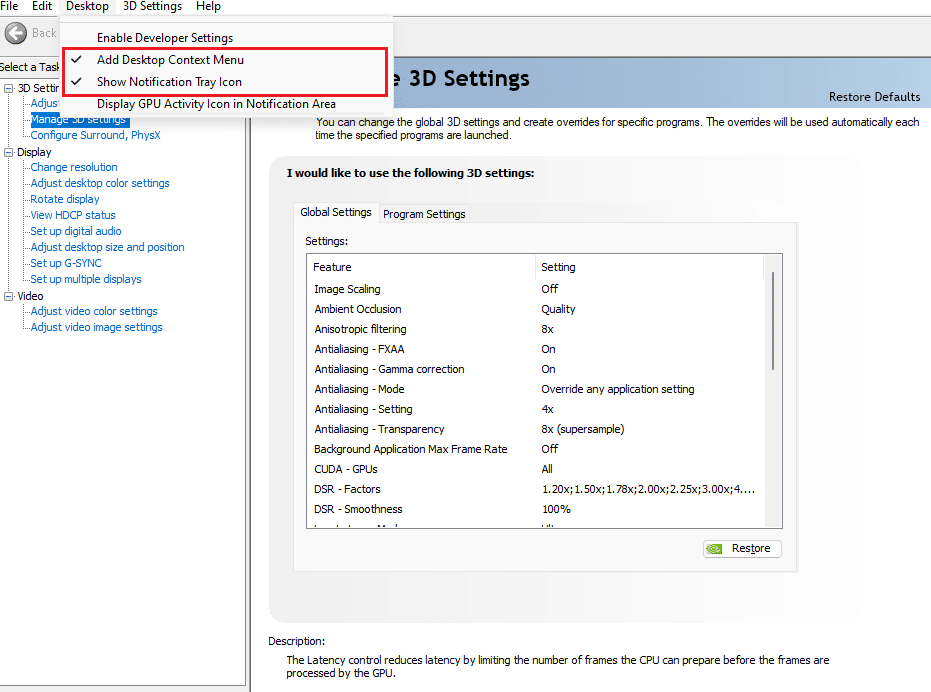
3. Выберите меню «Рабочий стол» вверху.

4. В меню «Рабочий стол» убедитесь, что параметры «Добавить контекстное меню рабочего стола» и «Показать значок панели уведомлений» включены. Если нет, отметьте его.
5. Наконец, закройте приложение панели управления NVIDIA и попробуйте открыть его с рабочего стола или панели задач.
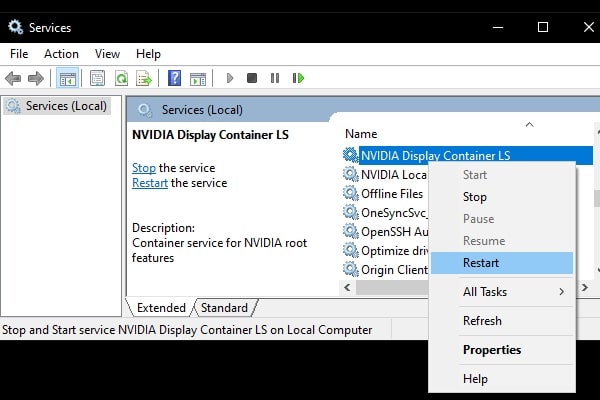
Способ 3: перезапустите службы NVIDIA
Различные службы постоянно работают в фоновом режиме, чтобы обеспечить бесперебойную работу других приложений. Поэтому перезапустите все службы, связанные с NIVIDIA, чтобы панель управления снова появилась. Вот как это сделать и решить проблему с отсутствующими настройками дисплея панели управления NVIDIA.
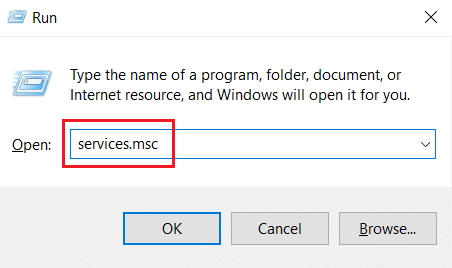
1. Нажмите одновременно клавиши Windows + R, чтобы открыть диалоговое окно «Выполнить».
2. Введите services.msc и нажмите клавишу Enter, чтобы открыть окно «Службы».
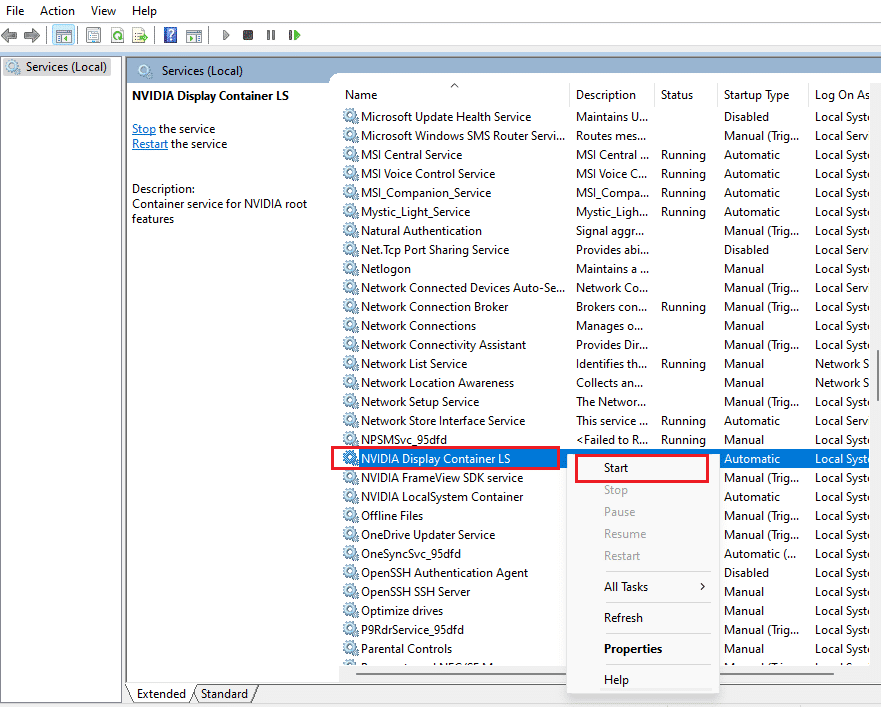
3. В окне «Службы» найдите службы, имена которых начинаются с имени NVIDIA. Щелкните правой кнопкой мыши каждую такую службу и выберите «Перезапустить» в контекстном меню.
4. Если служба не запущена, щелкните ее правой кнопкой мыши еще раз и нажмите «Пуск».
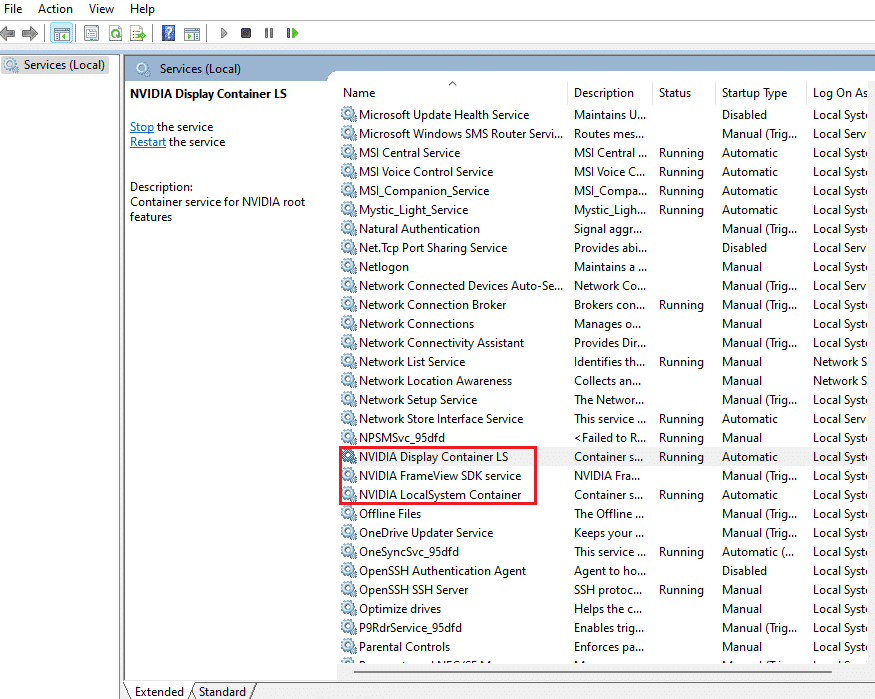
5. Повторите шаги 3 и 4 для перезапуска следующих служб:
- Контейнер локальной системы NVIDIA
- Контейнер сетевых сервисов NVIDIA
- Контейнер телеметрии NVIDIA
Проверьте, возвращает ли этот метод приложение панели управления NVIDIA. Если нет, не теряйте надежды. Попробуйте следующее решение, чтобы исправить проблему с отсутствием панели управления NVIDIA в Windows 10.
Способ 4: обновить графический драйвер NVIDIA
Графический драйвер является неотъемлемой частью любой онлайн-игры или самого компьютера. Производители графических процессоров часто выпускают обновления и функции. Кроме того, чтобы избежать каких-либо технических проблем, таких как мерцание экрана, неправильная работа дисплея, включение/выключение экрана и т. д., необходимо обновить графический драйвер, поскольку он отвечает за эффективность и производительность компьютера. Итак, обновите графический драйвер и посмотрите, сработает ли это обновление. Прочтите наше руководство по 4 способам обновления графических драйверов в Windows 10.
Способ 5: вручную открыть панель управления NVIDIA
Вы можете принудительно отобразить панель управления NVIDIA, запустив ее вручную. Для этого выполните шаги, указанные ниже.
1. Нажмите одновременно клавиши Windows + E, чтобы запустить Проводник.

2. Перейдите к следующему пути расположения.
C:Program FilesNVIDIA Corporation
Примечание. Расположение может различаться в зависимости от вашей установки.
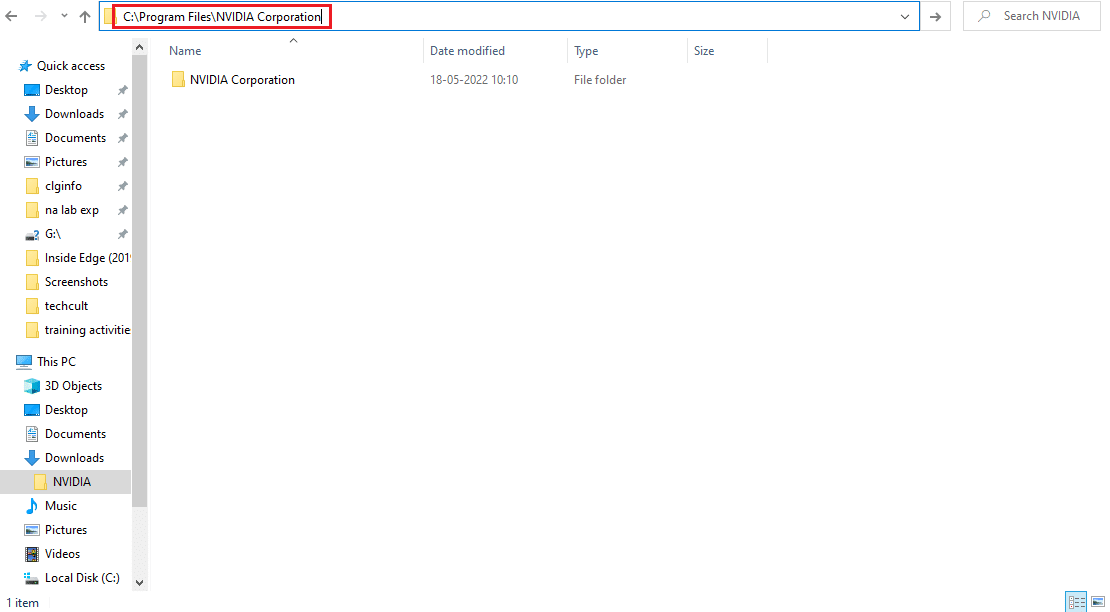
3. Дважды щелкните и откройте папку «Клиент панели управления». Найдите и щелкните правой кнопкой мыши файл nvcplui.exe. Затем выберите «Запуск от имени администратора» в контекстном меню.
Проверьте, обнаружена ли снова панель управления NVIDIA, отсутствующая в Windows 10.
Способ 6: не разгонять GPU
Разгон графического процессора снимает ограничение видеокарты и позволяет ей работать выше своего безопасного предела. Таким образом, этот процесс может иногда вызывать ошибку. Поэтому необходимо не переходить предел. Это связано с тем, что дальнейшее ограничение может остановить работу вашей видеокарты. И этот разогнанный графический процессор может быть причиной отсутствия Панели управления NVIDIA. Хотя прямая причина не найдена, многие пользователи сообщили, что снижение разгона графического процессора позволило снова увидеть панель управления NVIDIA.
Способ 7: изменить настройки совместимости
Если ошибка часто повторяется даже после ее устранения, служба поддержки NVIDIA предоставила нам постоянное решение. Следуйте приведенным ниже инструкциям, чтобы изменить настройки совместимости и устранить проблему с отсутствующими настройками дисплея панели управления NVIDIA.
1. Нажмите одновременно клавиши Windows + E, чтобы открыть Проводник.
2. Перейдите к следующему местоположению.
C:Program FilesNVIDIA CorporationDisplay.NvContainer

3. В папке Display.NvContainer найдите файл Display.NvContainer. Щелкните его правой кнопкой мыши и выберите «Копировать» в контекстном меню.
4. Нажмите одновременно клавиши Windows + R, чтобы открыть диалоговое окно «Выполнить».

5. Введите shell:startup и нажмите клавишу Enter, чтобы запустить папку «Автозагрузка».
6. В папке одновременно нажмите клавиши Ctrl + V, чтобы вставить скопированную папку.
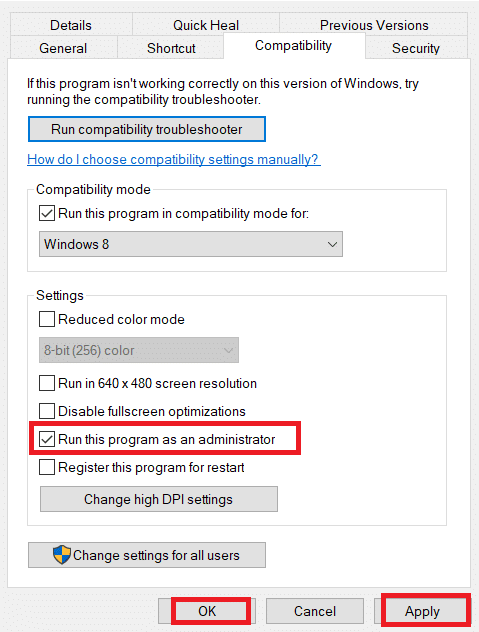
7. Затем щелкните правой кнопкой мыши скопированную папку Display.NvContainer и выберите «Свойства» в контекстном меню.
8. В окне «Свойства» перейдите на вкладку «Совместимость». Теперь установите флажок «Запустить эту программу от имени администратора» в разделе «Настройки». Выберите «Применить», а затем нажмите «ОК», чтобы сохранить внесенные изменения.
Проверьте, исправлены ли настройки отображения панели управления NVIDIA, отсутствующие в вашей Windows 10.
Способ 8: переустановите графический драйвер NVIDIA
Ни одно из вышеперечисленных решений не сработало? Не волнуйся. У вас есть последний метод, который нужно отработать. Это попытка переустановить приложение панели управления NVIDIA. Вот как удалить и переустановить приложение.
1. Нажмите клавишу Windows, введите диспетчер устройств и нажмите «Открыть».
2. Дважды щелкните Видеоадаптеры, чтобы развернуть драйвер.
3. Здесь щелкните правой кнопкой мыши графический драйвер или адаптер NVIDIA и выберите Удалить устройство в контекстном меню.

4. Следуйте инструкциям на экране, чтобы удалить драйвер и перезагрузить компьютер.
5. Перейдите на страницу загрузки драйверов NVIDIA, заполните сведения о модели адаптера NVIDIA и выберите «Поиск».
6. На новой странице нажмите Загрузить, чтобы загрузить мастер установки.
7. После загрузки запустите установочный файл и установите драйвер в вашей системе.
8. Наконец, перезагрузите компьютер и посмотрите, сможете ли вы найти панель управления NVIDIA на рабочем столе или в области уведомлений.
Совет для профессионалов: как установить приложение панели управления NVIDIA
Чтобы установить приложение NVIDIA Control из Microsoft Store, выполните следующие действия:
1. Перейдите на страницу панели управления NVIDIA в магазине Microsoft.
Примечание. Убедитесь, что все системные требования соблюдены.
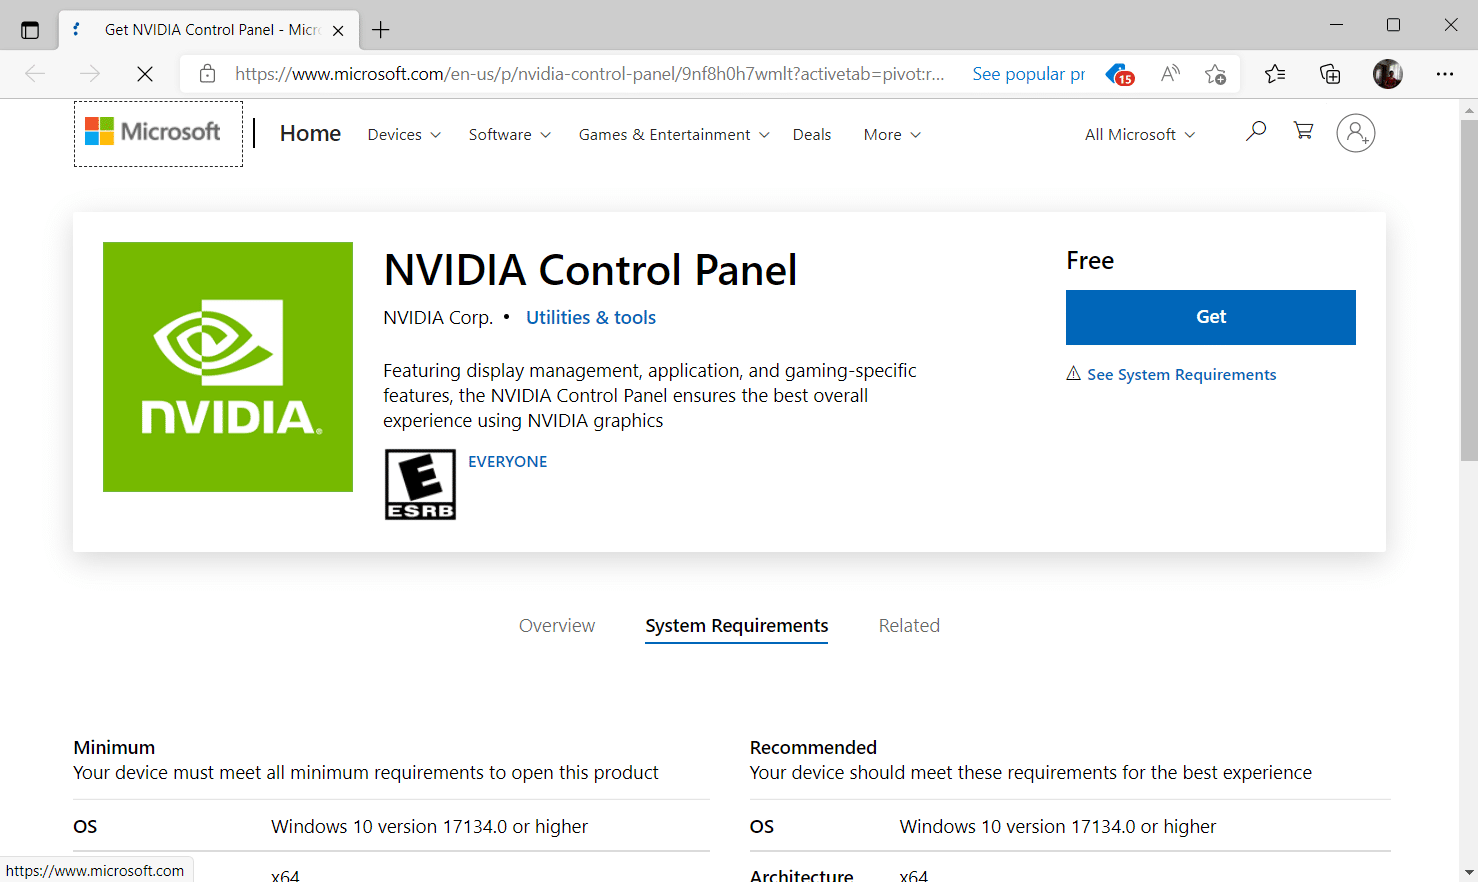
2. Нажмите кнопку «Получить», чтобы установить приложение.
Проверьте, существует ли проблема отсутствия Windows 10 в панели управления NVIDIA.
***
Мы надеемся, что это руководство было полезным, и вы смогли исправить отсутствующую панель управления NVIDIA в Windows 10. Сообщите нам, какой метод сработал лучше всего. Пожалуйста, не стесняйтесь обращаться к нам с любыми вопросами или предложениями через раздел комментариев, указанный ниже. Кроме того, дайте нам знать, что вы хотите узнать дальше.
Содержание
- Способ 1: Проверка служб
- Способ 2: Переустановка драйверов
- Способ 3: Проверка на вирусы
- Способ 4: Магазин Виндовс
- Вопросы и ответы

Для корректной работы видеокарты необходимо не только установить драйвера, но и произвести соответствующие настройки. Делается это зачастую в специальных панелях управления, однако случается и так, что последние пропадают из системы. В данной статье мы расскажем о том, что делать при исчезновении элемента «Панель управления NVIDIA» с компьютера или ноутбука, работающего под управлением Windows 10.
Рассматриваемая проблема в подавляющем большинстве случаев возникает по двум причинам – из-за ошибок в работе программного обеспечения NVIDIA или же в результате системного сбоя.
Способ 1: Проверка служб
Для корректной работы всех компонентов NVIDIA, и панели управления в том числе, необходимы специальные службы. Они должны быть активными, однако из-за системных ошибок иногда отключаются. Для их повторного включения необходимо сделать следующее:
- Используйте комбинацию клавиш «Windows» + «R». Появится окно оснастки «Выполнить». В него введите сочетание
services.msc, после чего нажмите «Enter» на клавиатуре или кнопку «OK» в этом же окне.

Читайте также: Запуск оснастки «Службы» в ОС Windows 10
- В открывшемся окне найдите все строки в графе «Имя», которые начинаются со слова «NVIDIA». У вас может быть от одного до четырех пунктов в списке в зависимости от версии установленного драйвера и дополнительных компонентов NVIDIA. Кликните на первом из пунктов два раза левой кнопкой мышки.
- На следующем этапе следует обратить внимание на состояние службы. Если в нижней части напротив строки стоит значение «Остановлена», нажмите кнопку «Запустить» немного ниже, а затем «OK» для применения изменений.
- Далее выполните аналогичные действия с другими службами NVIDIA. По завершении всех операций обязательно перезагрузите компьютер/ноутбук и проверьте, решилась ли проблема.

Способ 2: Переустановка драйверов
По умолчанию доступ к «Панели управления NVIDIA» появляется после установки соответствующих драйверов. Если по каким-то причинам данная панель пропала, стоит попробовать удалить ПО, а затем повторно его инсталлировать. О том, как это правильно сделать, мы писали ранее в отдельном руководстве. Главное, при загрузке новых драйверов выбирайте стандартное ПО, а не DCH.
Подробнее: Переустановка драйверов видеокарт NVIDIA
Способ 3: Проверка на вирусы
Вредоносное программное обеспечение способно вызвать множество ошибок и проблем, в том числе и отключать «Панель управления NVIDIA». Именно поэтому стоит в подобных ситуациях проверить систему на наличие вирусов, тем более, что для этого совсем не обязательно инсталлировать полноценные антивирусы, так как существуют портативные аналоги, которые хорошо справляются с поставленными задачами. О таких решениях мы рассказывали в одном из опубликованных ранее руководств, с которым вы можете ознакомиться по ссылке ниже.
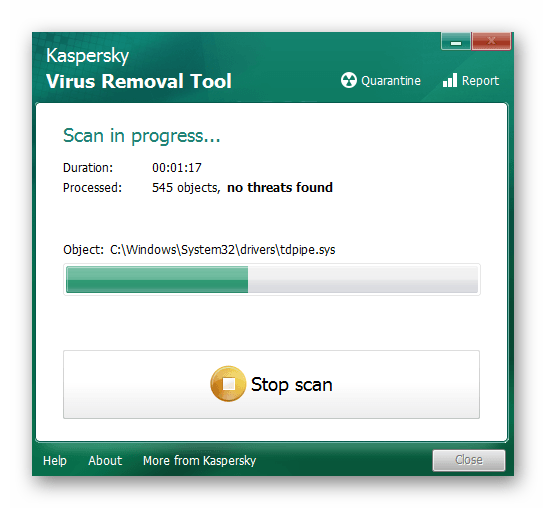
Подробнее: Проверка системы на наличие вредоносного ПО без антивируса
Способ 4: Магазин Виндовс
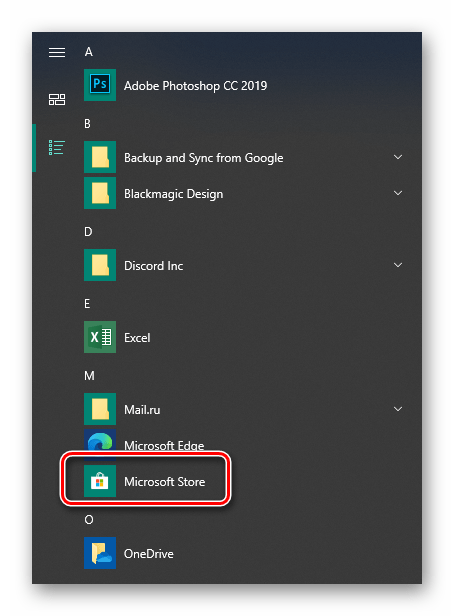
Данный способ можно отнести к решениям, к которым стоит прибегнуть в самых крайних ситуациях. Если ни один из вышеперечисленных методов не сработал, попробуйте запустить «Панель управления NVIDIA» непосредственно из встроенного приложения «Microsoft Store», откуда ее тоже можно установить. Для этого сделайте следующее:
- Нажмите кнопку «Пуск» и выберите в появившемся меню из списка приложений программу «Microsoft Store».
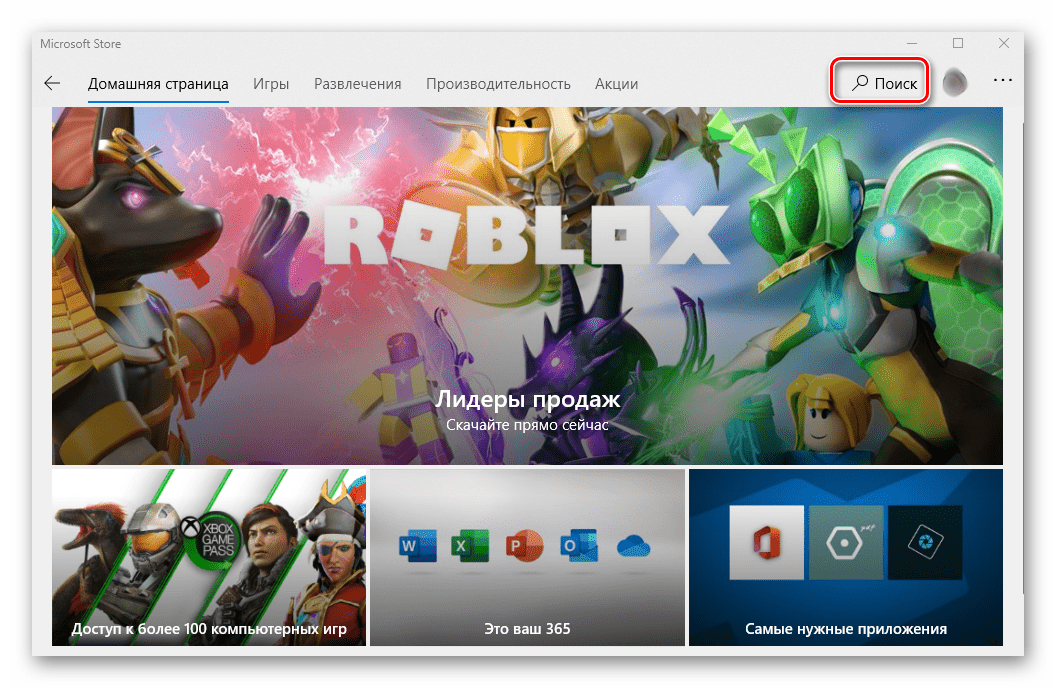
- Далее кликните по иконке поиска в правом верхнем углу и введите в появившуюся строку запрос
nvidia, после чего используйте «Enter» на клавиатуре. - На самом первом месте среди всех результатов поиска вы увидите нужное приложение. Кликните по нему один раз ЛКМ.
- Если в дальнейшем данное приложение не понадобится, вы всегда сможете его удалить.


В следующем окне нажмите кнопку «Получить». В результате программа автоматически начнет загружаться на компьютер. По завершении операции вместо данной надписи появится кнопка «Открыть» — нажмите ее для запуска «Панели управления NVIDIA».

Таким образом, вы узнали об основных методах возвращения «Панели управления NVIDIA» в ОС Windows 10. В качестве заключения хотелось бы напомнить, что в некоторых ситуациях данный элемент может не пропасть, а попросту перестать открываться. Решение этой проблемы мы описывали в отдельном руководстве.
Подробнее: Неполадки в работе Панели управления Nvidia
Еще статьи по данной теме:
Помогла ли Вам статья?
Людям, которые работают с приложениями, интенсивно использующими графику, такими как игры или любое программное обеспечение для рендеринга видео, постоянно нужно контролировать использование своей видеокарты. Некоторым геймерам постоянно приходится переключать свои настройки качества графики, чтобы увеличить их FPS (число кадров в секунду). Некоторым необходимо настроить размер, ориентацию, масштабирование и т. Д. Своих дисплеев, чтобы они работали лучше или использовали компьютер более эффективно. Вот тут и появляется Панель управления NVIDIA . Прежде всего, это программное обеспечение работает на компьютерах только с подключенной графической картой NVIDIA. Таким образом, если вы используете любую другую видеокарту, это не будет работать для вас. Но что, если вы обнаружите, что на вашем компьютере с Windows не открывается панель управления NVIDIA?

Содержание
- Панель управления NVIDIA не открывается
- Перезапустите процесс для Панели управления NVIDIA
- Перезапустите сервис для драйвера дисплея NVIDIA
- Обновите драйверы дисплея NVIDIA
Панель управления NVIDIA не открывается
Если NVIDIA Control Panel не открывается, не отвечает или не работает на вашем компьютере с Windows 10, вот несколько вещей, которые могут решить эту проблему для вас:
- Перезапустите процесс панели управления NVIDIA
- Перезапустите службу драйвера дисплея NVIDIA
- Обновите драйверы дисплея NVIDIA.
Давайте рассмотрим это подробно.
Перезапустите процесс для Панели управления NVIDIA

Чтобы перезапустить процесс для панели управления NVIDIA из диспетчера задач, нажмите комбинации клавиш CTRL + Shift + Esc на клавиатуре.
Найдите процесс под названием Приложение панели управления NVIDIA .
Разверните его и нажмите правой кнопкой мыши на подпроцесс Панель управления NVIDIA . Нажмите Завершить задачу.
Теперь попробуйте открыть панель управления NVIDIA из меню «Пуск» и проверьте, устраняет ли это проблему или нет.
Перезапустите сервис для драйвера дисплея NVIDIA

Вам придется открыть диспетчер служб Windows. Начните с нажатия комбинации клавиш WINKEY + R , чтобы запустить утилиту Выполнить . Затем введите services.msc и нажмите Enter . Теперь откроется окно «Службы» и будет заполнен список служб.
Теперь обратите внимание на сервисы, называемые NVIDIA Display Container LS . Дважды нажмите на него, чтобы открыть окно свойств.
Убедитесь, что служба запущена. Если нет, запустите его. Если он уже запущен, остановите его, а затем снова запустите. Также убедитесь, что тип запуска Автоматический .
Сделайте то же самое для службы NVIDIA LocalSystem Container .
Проверьте, решает ли это вашу проблему.
Обновите драйверы дисплея NVIDIA
Одной из основных задач, которую вы должны сделать, является обновление драйверов дисплея NVIDIA.
Для этого вам просто нужно зайти на их последний веб-сайт загрузки драйверов дисплея, чтобы скачать драйвер NVIDIA.
Из выпадающего меню вам нужно выбрать точную модель вашей видеокарты. Затем, нажав кнопку Поиск , вы увидите последнюю версию драйвера для вашей видеокарты. Примите условия использования, а затем загрузите драйвер. Наконец, запустите загруженный файл, чтобы установить последние версии драйверов.
Перезагрузите компьютер, чтобы изменения вступили в силу.
Панель управления NVIDIA должна работать нормально!
Связанное чтение : доступ к панели управления NVIDIA запрещен.

Be it for an avid gamer or a normal computer user, the NVIDIA graphics card always holds a special place. This GPU application was developed and launched by NVIDIA corporation, a leading tech product manufacturer in the world. Generally, an NVIDIA GPU is added to your system to experience high performance and powerful graphics. Here, NVIDIA Control Panel app enables you to control and access the settings, properties, and functioning of the graphics card. But what happens when you are unable to open or even find the NVIDIA control panel app out of the blue? It leaves you worried. Roll up the sleeves everybody who is struggling with this issue! This article will guide you to fix the NVIDIA control panel missing Windows 10 problem. So, continue reading to fix NVIDIA control panel display settings missing issue.

Contents
- How to Fix NVIDIA Control Panel Missing in Windows 10
- Method 1: Roll Back Windows Update
- Method 2: Unhide NVIDIA Control Panel
- Method 3: Restart NVIDIA Services
- Method 4: Update NVIDIA Graphics Driver
- Method 5: Manually Open NVIDIA Control Panel
- Method 6: Do Not Overclock GPU
- Method 7: Modify Compatibility Settings
- Method 8: Reinstall NVIDIA Graphics Driver
- Pro Tip: How to Install NVIDIA Control Panel App
Various reasons can be listed for missing NVIDIA Control Panel app in Windows 10. But note these reasons are not the direct cause of the issue which means only the possible outcomes or scenarios that led to this issue are compiled together.
- Presence of outdated, corrupted, or incompatible driver cause errors in your graphics card.
- The recent Windows 10 update might not be compatible with the NVIDIA Driver. Thus, you need to roll it back to the earlier version.
- When the files get damaged in the NVIDIA Control Panel application, it gets corrupt.
- Other common bugs and errors may cause trouble with this particular issue.
Before proceeding further, ensure to check if you have an NVIDIA chip installed on your PC. Implement the steps given below to check the presence of the NVIDIA Control Panel Windows 10 app via task manager service.
1. Press the Ctrl + Shift + Esc keys together to open Task Manager.
2. On the Task Manager window, switch to the Performance tab and select GPU 0 or GPU 1 on the left pane.

3. On the right pane of GPU, see the graphics card model name present at the top right corner of the page. If it starts with NVIDIA, then the NVIDIA Control Panel should be available on your computer.

After the check, if the NVIDIA driver graces you with its presence and only the NVIDIA Control Panel is missing then you can follow the troubleshooting methods mentioned below to fix this issue.
Method 1: Roll Back Windows Update
The eye to updating your Windows 10 operating system is an appreciative effort. But sometimes it is possible that your graphics driver might not be compatible with the latest release or upgraded version of Windows. Thus, revert your latest windows update from your system to resolve the NVIDIA control panel missing Windows 10 issue.
1. Press the Windows + I keys to launch Settings.
2. Select Update & Security.

3. Select Recovery from the left pane.
4. Click on Get started button.

5. Follow the on-screen instruction and your Windows will roll back to the previous version.
Method 2: Unhide NVIDIA Control Panel
Unknowingly sometimes if you hide the NVIDIA Control Panel, it goes missing. Rarely, it is also possible that your Windows 10 or a third-party application hide the icon. Thus, it might look like it’s missing. Perform the steps given below and unhide the NVIDIA Control Panel.
1. Press Windows key, type control panel and click on Open.

2. Here, set View by as Large icons, then select NVIDIA Control Panel from the list of items.
3. Select the Desktop menu present at the top.

4. Under the Desktop menu, ensure Add Desktop Context Menu and Show Notification Tray Icon options are enabled. If not, check to mark it.
![]()
5. Finally, close the NVIDIA Control Panel application and try opening it via Desktop or system tray.
Also Read: Fix NVIDIA Control Panel Not Opening
Method 3: Restart NVIDIA Services
Various services are running constantly in the background to make other apps run smoothly. Therefore, restart all the NIVIDIA-related services to make its control panel appear again. Here is how to do it and resolve the NVIDIA control panel display settings missing issue.
1. Press the Windows + R keys together to launch the Run dialog box.

2. Type services.msc and press Enter key to open the Services window.

3. On the Services windows, locate services that start with the name NVIDIA. Right-click each such service and select Restart from the context menu.

4. If the service is not running, then right-click it once again and click on Start.

5. Repeat steps 3 and 4 for restarting the following services as well:
- NVIDIA LocalSystem Container
- NVIDIA NetworkService Container
- NVIDIA Telemetry Container

Check if this method brings back the NVIDIA Control Panel app. If not, don’t lose hope yet. Try the next solution to rectify the NVIDIA control panel missing Windows 10 problem.
Method 4: Update NVIDIA Graphics Driver
The graphic driver is an essential feature of any online game or computer itself. The GPU manufacturers often release updates and features. Also, to avoid any kind of technical problems like flickering screen, improper display working, screen on/off, and so forth, it is necessary to update the graphic driver as they are responsible for the efficiency and performance of the computer. So, update the graphic driver and see if this update works out. Read our guide on 4 ways to update graphic drivers in Windows 10.

Also Read: How to Disable or Uninstall NVIDIA GeForce Experience
Method 5: Manually Open NVIDIA Control Panel
You can force the NVIDIA Control Panel to appear by launching it manually. To do so, follow the steps given below.
1. Press the Windows + E keys simultaneously to launch File Explorer.

2. Navigate to the following location path.
C:Program FilesNVIDIA Corporation
Note: The location may vary as per your installation.

3. Double-click and open the Control Panel Client folder. Locate and right-click the nvcplui.exe file. Then, select Run as administrator from the context menu.
Check if the NVIDIA Control Panel missing Windows 10 is found again.
Method 6: Do Not Overclock GPU
Overclocking GPU removes the limitation of the graphics card and enables it to carry out above its safety limit. Thus, this process may cause an error sometimes. Therefore, it is necessary not to cross the limit. This is because going forward the limitation might stop the functioning of your graphics card. And this overclocked GPU could be the reason behind the missing NVIDIA Control Panel. Though the direct cause is not found, many users disclosed that reducing GPU overclock enabled the NVIDIA Control Panel to be visible again.
Also Read: What is NVIDIA Virtual Audio Device Wave Extensible?
Method 7: Modify Compatibility Settings
If the error repeats often even after rectifying it, then NVIDIA Support provided us with a permanent solution. Follow the steps given below to modify compatibility settings and fix NVIDIA control panel display settings missing issue.
1. Press the Windows + E keys together to open File Explorer.

2. Navigate to the following location.
C:Program FilesNVIDIA CorporationDisplay.NvContainer

3. On the Display.NvContainer folder, locate the file Display.NvContainer. Right-click on it and select Copy from the context menu.
4. Press Windows + R keys together to launch the Run dialog box.

5. Type shell:startup and hit Enter key to launch the Startup folder.

6. On the folder, press Ctrl + V keys simultaneously to paste the copied folder.
7. Then, right-click the copied Display.NvContainer folder and select Properties from the context menu.
8. On the Properties window, go to the Compatibility tab. Now, check the Run this program as administrator box under the Settings section. Select Apply and then click OK to save the changes made.

Check if the NVIDIA control panel display settings missing in your Windows 10 are fixed.
Method 8: Reinstall NVIDIA Graphics Driver
None of the above solutions worked out? Do not worry. You have one final method to work out. It is to try and reinstall the NVIDIA Control Panel application. Here is how to uninstall and reinstall the application.
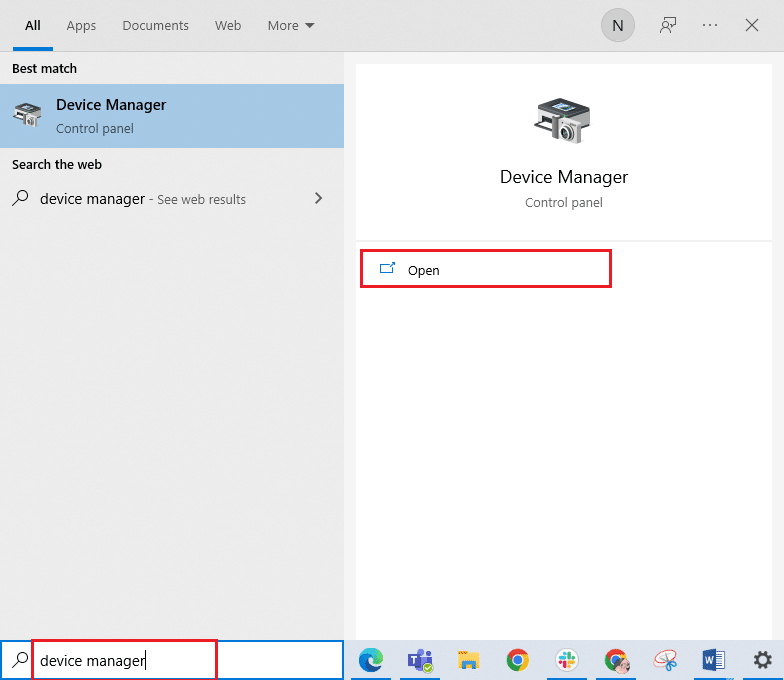
1. Hit the Windows key, type device manager, and click on Open.

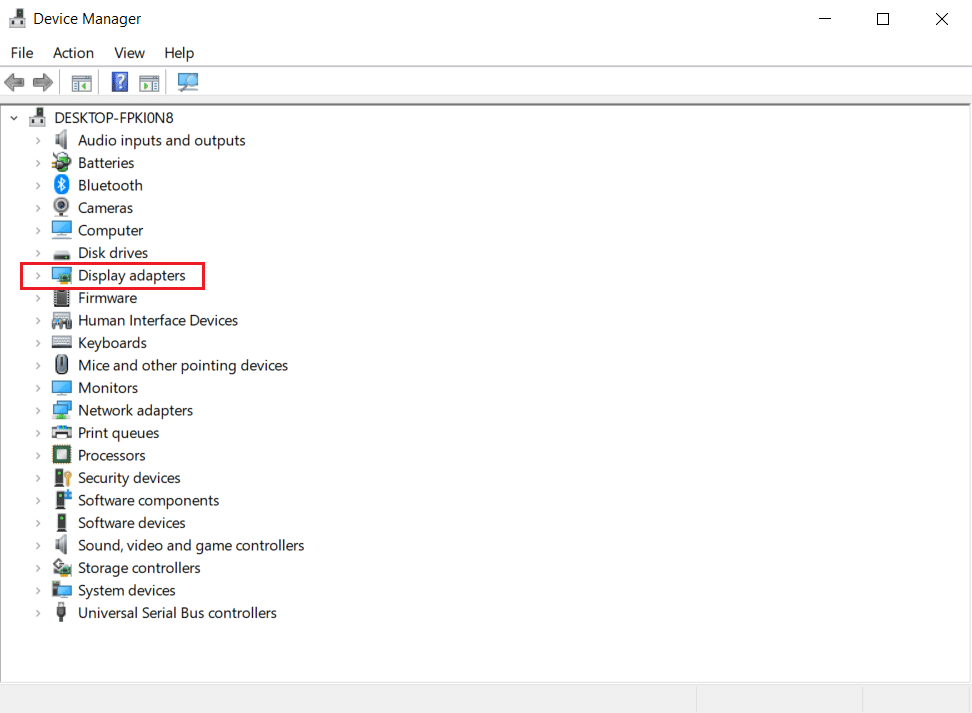
2. Double-click on Display adapters to expand the driver.

3. Here, right-click the NVIDIA graphics driver or adapter and select Uninstall device in the context menu.

4. Follow the on-screen instructions to uninstall the driver and restart the PC.
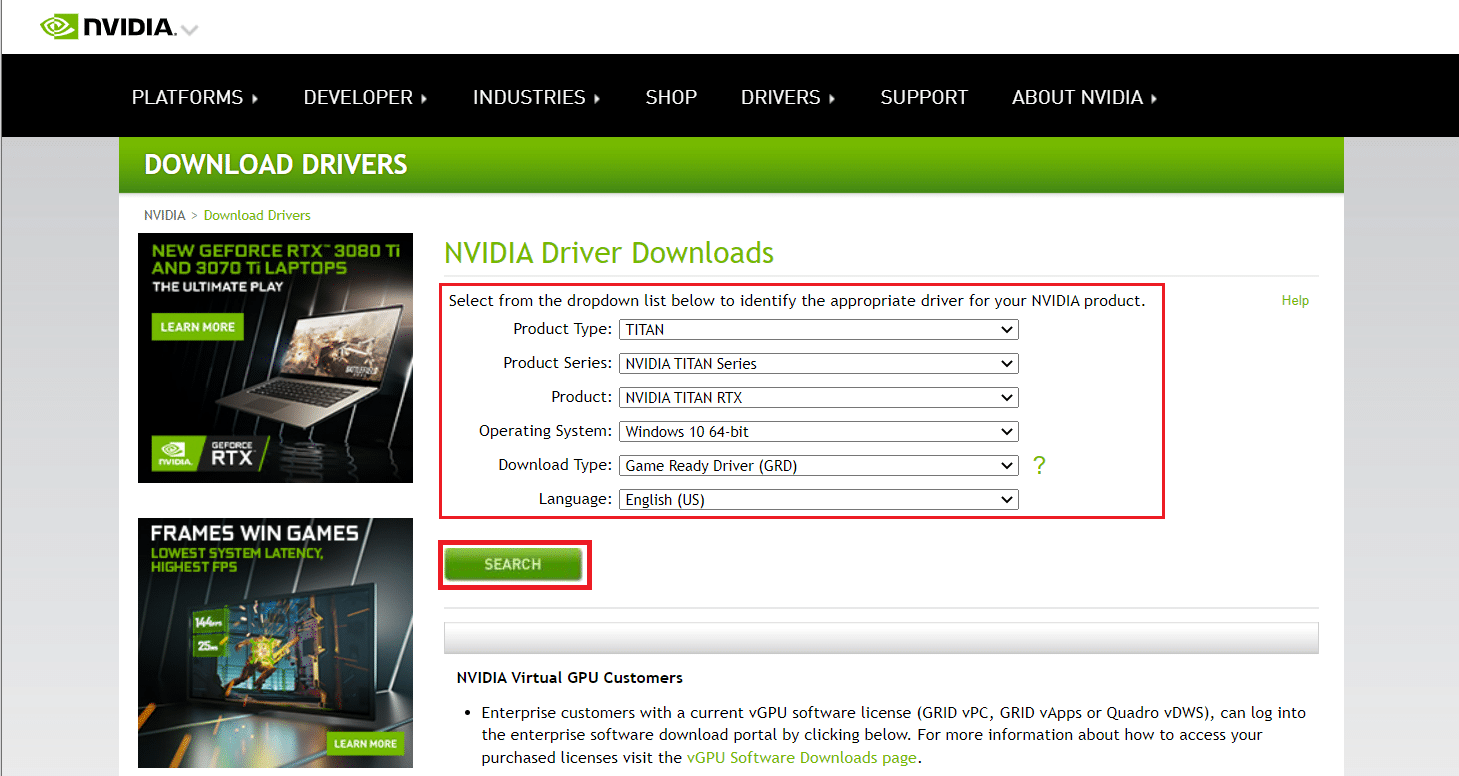
5. Go to the NVIDIA drivers download page and fill up the NVIDIA adapter model details and select Search.

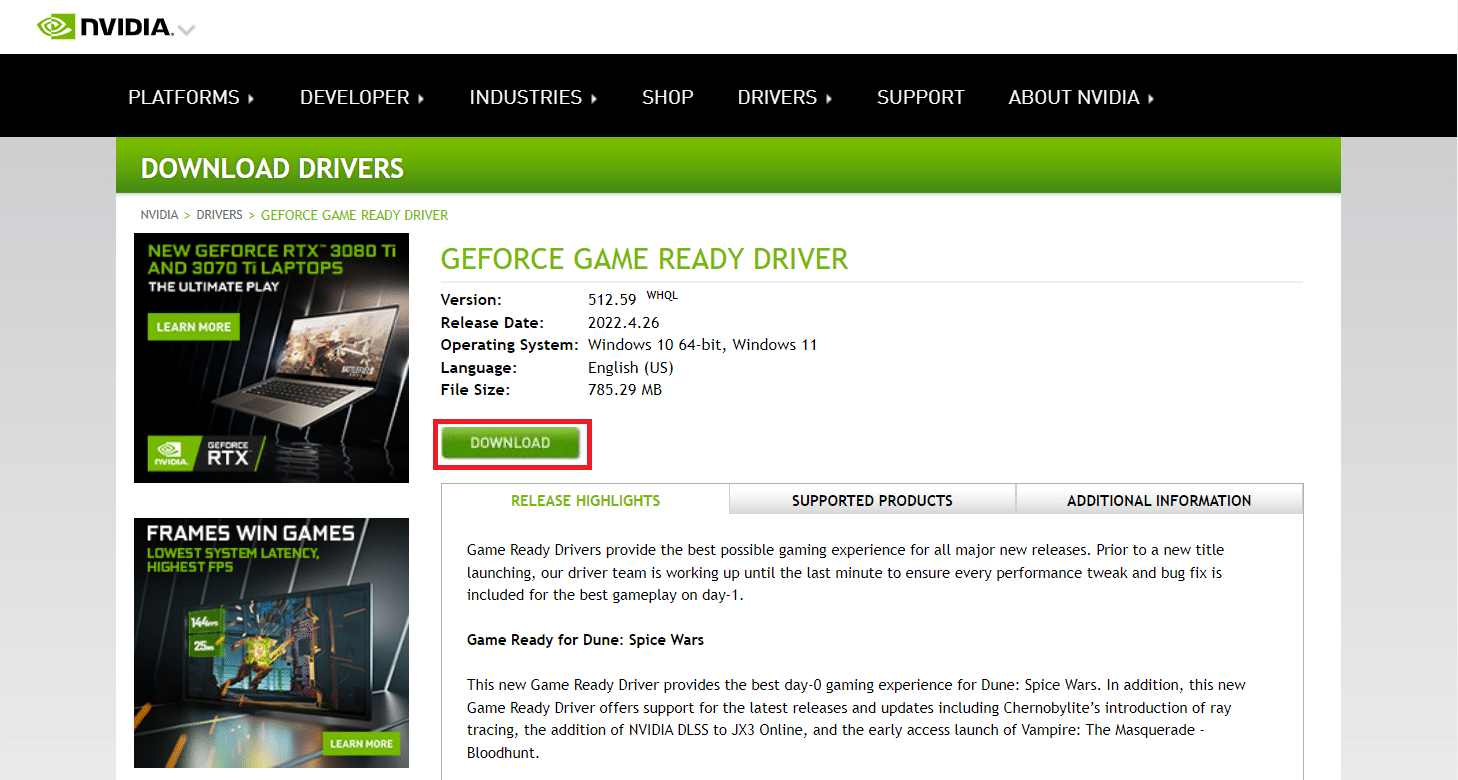
6. On the new page, click Download to download the installation wizard.

7. Once downloaded, run the setup file and install the driver on your system.
8. Finally, reboot your PC and see if you can find NVIDIA Control Panel on the desktop or system tray.
Also Read: How to Disable or Uninstall NVIDIA GeForce Experience
Pro Tip: How to Install NVIDIA Control Panel App
To install NVIDIA Control App from Microsoft Store, implement the steps given below:
1. Go to the NVIDIA Control Panel Microsoft store page.
Note: Ensure all the system requirements are met.

2. Select the Get button to install the application.

Check if the NVIDIA control panel missing Windows 10 issue still exists.
Recommended:
- How to Tell If Your Phone is Tapped
- Fix NVIDIA Container High CPU Usage on Windows 10
- How to Fix WOW Error #134 Fatal Condition
- Fix steam_api64.dll Missing on Windows 10
We hope this guide was helpful and you were able to fix NVIDIA control panel missing in Windows 10. Let us know which method worked the best. Please feel free to reach out to us for any queries or suggestions via the comment section given below. Also, let us know what you want to learn next.
After the recent Windows 10 update, many NVIDIA Graphics Card users have reported that their NVIDIA control panel missing. NVIDIA control panel is quite useful because with it you can change your display settings. Also, can manage 3D settings, and can configure Surround, PhysX. Yes, it is quite annoying, when NVIDIA Control Panel not showing in the context menu, start menu, or even not appears on the Desktop.
What Causes this issue in Windows 10?
Unfortunately, there isn’t any single cause behind this error. So here are the most common causes of the NVIDIA Control Panel not showing on Windows 10.
Graphics Card Driver – Outdated, Corrupted, or Incompatible Graphics card driver can cause such issues. Re-Installation of a compatible driver can be a reliable solution.
Windows Update – If you don’t check for NVIDIA Graphics Card driver update through NVIDIA GeForce experience. Then, maybe you are using an outdated graphics card driver. And, if you have updated Windows 10 recently, then the driver might not be compatible with your new Windows 10 version.
Incorrect or missing registry entries – In Windows, Registry stores low-level settings of the OS and for applications that opt to use the registry. NVIDIA Control Panel also opt to use registry settings. So, If any related registry entries are missing, then it can cause the Control Panel missing issue.
Other Causes – It might be possible that due to some third-party software interference, the NVIDIA control panel got corrupted or hidden.
Well, whatever is the cause, this issue can be resolved. Because I had experienced the same issue. So, if you can’t find the NVIDIA control panel on your PC, then give the following solutions try.
You don’t have to try all solutions, just try until you find the solution that works for you. From basic to advanced, I have added all solutions to fix the missing NVIDIA Control Panel issue. Don’t hesitate in trying the advanced or complex solution if basic doesn’t seem to work.
NVIDIA Control Panel Missing Solutions
Unhide NVIDIA Control Panel
If the NVIDIA Control Panel is installed on your Windows PC. But it’s not showing on the desktop context menu and notification tray. Then, there is a slight possibility that it might get hidden. This usually happens mostly after the NVIDIA Graphics Card Driver update. Let’s see, how you can get back the NVIDIA Control Panel, by following these steps.
1. Click on the start menu, and search for Control Panel. Launch the Application from the search results by clicking on Open.
2. Now, to easily access NVIDIA Control Panel, change the Control Panel view. So, In the control panel, under view by, select “Large icons”.
![]()
3. Scroll down a little, and look for “NVIDIA Control Panel”, and click on it to open.
Note: Is NVIDIA Control Panel is not showing in Control Panel. Don’t worry, check out the next solution.
4. Once, NVIDIA Control Panel opens up, click on the Desktop menu, and enable these two options.
- Add Desktop Context Menu
- Show Notification Tray Icon
That’s it, Close the NVIDIA Control Panel. Now, you can access the NVIDIA Control Panel by right-clicking anywhere on the desktop or using the system tray.

Open NVIDIA Control Panel manually
In my PC, NVIDIA Control Panel is not showing after setting up a view to Large Icons. But, On the laptop, it is showing. Ok, so if you’re facing the same issue, then no need to worry. Still, you can open the NVIDIA Control Panel and enable the context menu and notification tray options. (For the context, I am using NVIDIA GeForce GTX 1060 6GB Graphics Card, and Windows 10 Pro version in my PC.)
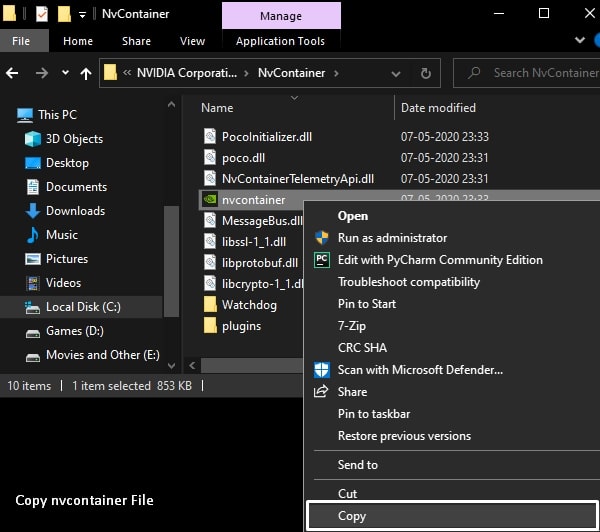
1. Do open the following directory in File Explorer.
C:Program FilesNVIDIA CorporationNvContainer
Note: If you can’t find the NVIDIA Corporation folder in Program Files, then look for the same inside Program Files (x86) Folder.
2. Now, In the NvContainer folder, you will see nvcontainer executable file. Right-click on it and then click on “Run as Administrator”.

3. You”ll now see the “NVIDIA Settings” icon in the notification/system tray.
4. Right-Click on it, and then click on “NVIDIA Control Panel”.

That’s it, once NVIDIA Control Panel gets open, enable those two options from the desktop menu. (Check 4th step of the above solution.)
Alternative Method to access NvContainer Folder
If you’re not able to find out the NVIDIA Corporation folder inside Program Files and Program Files (x86). Then, you can take the help of the Task Manager.
1. Press Ctrl + Shift + Esc Keyboard shortcut to open Task Manager. (Or, you can right-click on the start menu, and from the WinX menu you can do open task manager.)
2. In Task Manager, under the processes tab, look for NVIDIA Container. (There might be multiple processes, it’s normal.)
3. Right-Click on NVIDIA Container and then click on File Location.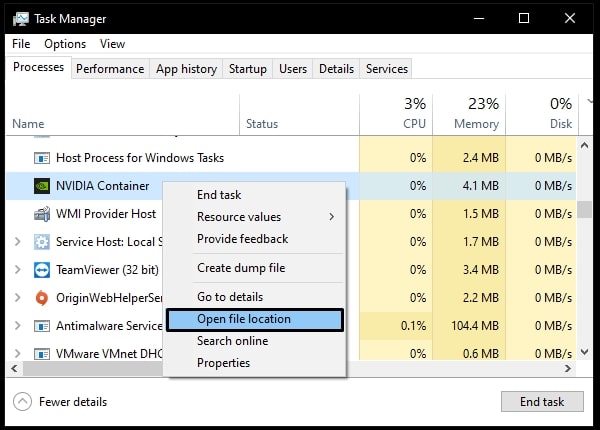
This option will open the NvContainer folder. And, from there you can execute the nvcontainer file, and then from NVIDIA settings, you can easily open the NVIDIA Control Panel.
For Old Laptop Users
If NVIDIA Control Panel missing issue occurs on your old laptop. Then, chances are you’re using an old NVIDIA driver. In that case, you have to access the Control Panel Client folder to open the NVIDIA Control Panel.
1. Do open the following Directory.
C:Program FilesNVIDIA CorporationControl Panel Client
2. Inside the Control Panel Client folder you will see the nvcplui file, right-click on it. And click on “Run as administrator”. NVIDIA Control Panel will get open.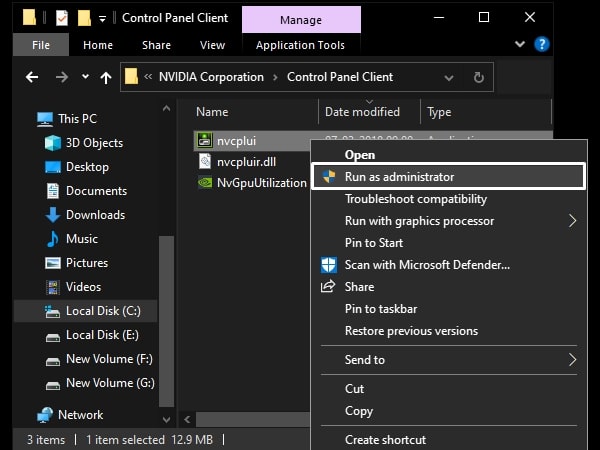
You can now pin it to the taskbar. Or, you can create a shortcut of it.
Restart NVIDIA Services
To keep Apps and Features running in Windows, a huge number of services keep running in the background. And, each Windows program comes with a batch of services. Which launch automatically when you run that program. So, it might be possible that NVIDIA Control Panel related services have become unresponsive or disabled. Well, in both cases, you have to restart all NVIDIA services in order for the Control Panel to re-appear.
1. Press Windows + R keyboard shortcut, Run window will get open.
2. Type services.msc in it and press the enter key.
3. Services Window will get open, now, you have to restart the following NVIDIA services. (It might be possible that only the first two appear in the services window. Which is ok.)
NVIDIA Display Container LS
NVIDIA LocalSystem Container
NVIDIA NetworkService Container
NVIDIA Telemetry Container
4. Right-Click on the service and then choose the restart option. Do the same with all four services.
After restarting all four services, see if you can see the NVIDIA Control Panel in your system tray or in the context menu. If not, then you might need to update Graphics Driver.
Install Nvidia Control Panel App from Microsoft Store
It might possible that NVIDIA Control Panel App got corrupted. In that case, uninstalling it from Windows 10 Settings. And, installing it again from Microsoft Store, can solve the NVIDIA Control Panel not showing the issue.
1. Press Windows + I keyboard shortcut to open Windows 10 Settings App.
2. Click on Apps. Now, In Apps & Features window look for NVIDIA Control Panel.
Click on the App, and then click on uninstall.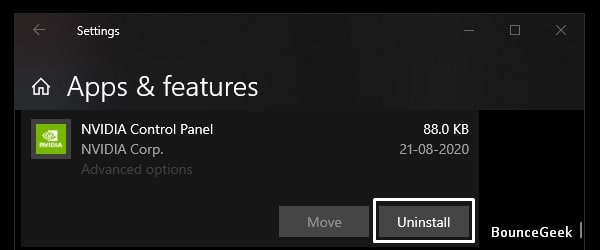
3. Now, open Microsoft Store App, and search for NVIDIA Control Panel.
Open the App page from search results and then Install it on your Windows 10 PC. That’s it, you can now add App in the context menu and system tray from the Desktop Menu.
Get NVIDIA Control Panel Microsoft Store
Add NVIDIA Control Panel in Startup Folder
This solution is suggested by the NVIDIA Support team. If the control panel is missing from the system tray after restarting Windows. Then, this solution might be useful for you. Basically, in this solution, we will add the NvContainer file in the startup folder. So that, it will automatically appear in the system tray whenever you restart Windows next time.
1. First, open the following directory and copy the nvcontainer file.
C:Program FilesNVIDIA CorporationNvContainer
For Old Laptop Users – If you’re using an old Windows 10 laptop, then you have to copy NVDisplay.Container file from the following directory.
C:Program Files (x86)NVIDIA CorporationDisplay.NvContainer
2. Now, Press Windows + R keyboard shortcut.
Type shell:startup in the Run window and press the enter key.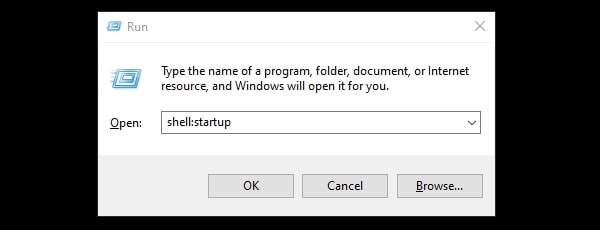
3. Startup folder will get open, paste the copied NvContainer file in it. (And, if you’re using an old laptop or old NVIDIA driver, then you have to paste NVDisplay.Container file in it.)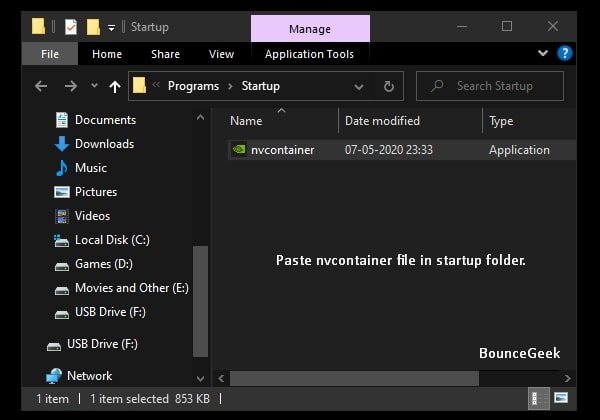
4. Now, From the startup folder, right-click on the NvContainer file and then click on properties.
In the Properties window, click on compatibility, and enable the “Run this program as an administrator” option. Click on Apply then click on ok.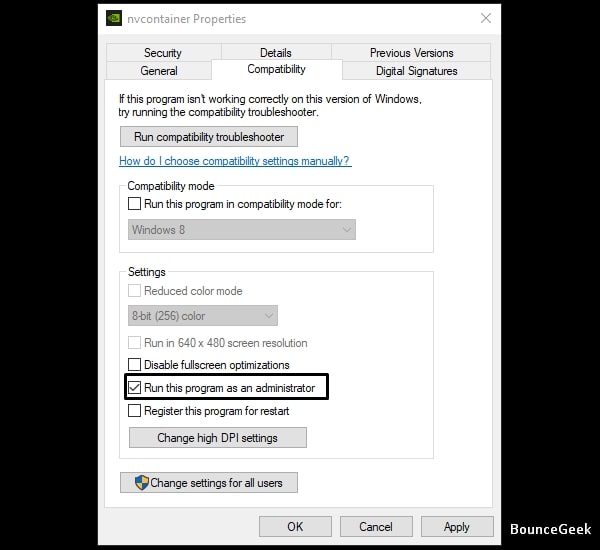
That’s it, now, restart your Windows, and hopefully issue got resolved now.
Install Latest NVIDIA Graphics Driver.
It could be possible that you’re using an outdated NVIDIA Driver. And, for NVIDIA Control Panel to work, Graphics Driver needs to up-to-date. Personally, as I mentioned, on my PC, I am using NVIDIA GeForce GTX 1060 Graphics Card. So, to update its graphics driver, I use NVIDIA GeForce Experience software. (Don’t use third-party driver updater software.)
Manually Download and Update NVIDIA Drivers.
1. By going to the official website of NVIDIA Drivers, you can download the latest driver. You have to select your graphics card details and windows version, in order to download the driver file.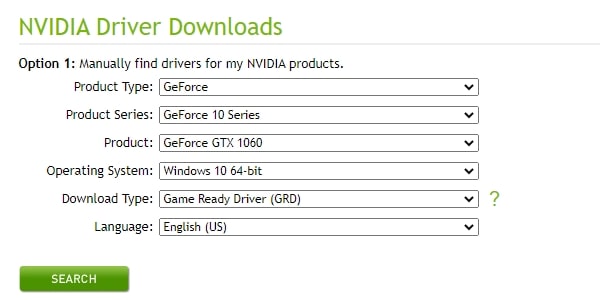
2. Once, you select all the details, you will get the graphics card driver download option. Download and install it on your PC.

Find out Graphics Card Info.
If you don’t know which graphics card you’re using in your Windows PC or laptop. Then, to find out you can either use CPU-Z software. Or, you can use the following method.
1. Open Run (Press Windows + R Key) Window, and type dxdiag in it.
2. DirectX Diagnostic Tool will get open with your system information.
3. Click on the Display tab, and under device details, you can find out your Graphics Card Information.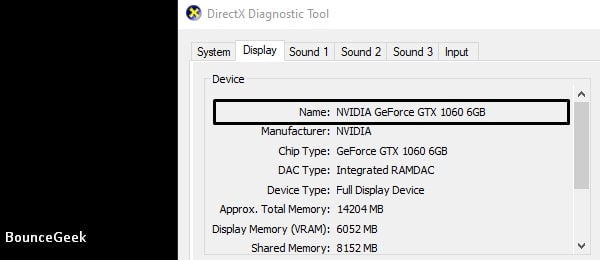
Once, you got all the required information, go to the NVIDIA Driver Download site. Enter all information and download the driver file.
Update Driver using Device Manager.
Important: Most of the time, the Device Manager doesn’t seem to work. That’s why I suggest you download and install the driver manually using the above-mentioned method.
1. Right-Click on the start button and then click on Device Manager.
2. In Device Manager, extend Display Adaptors.
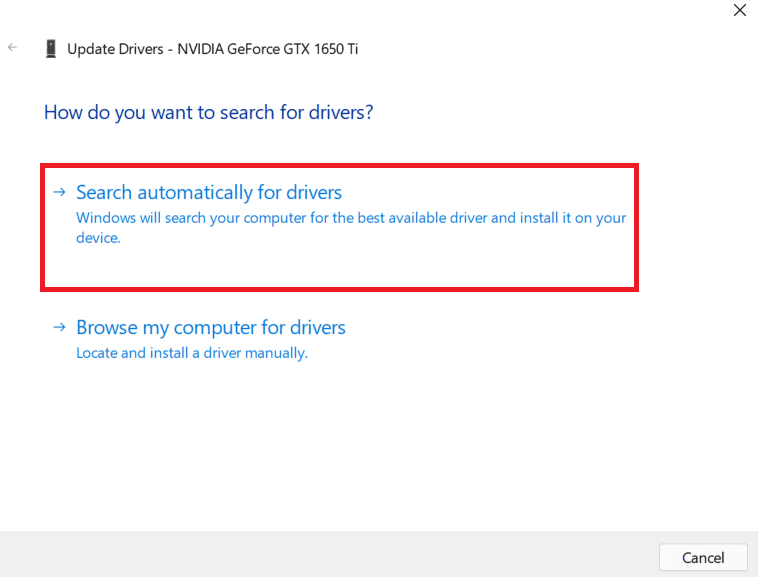
And, you will see your Graphics Card. Right-Click on it, and then click on update driver.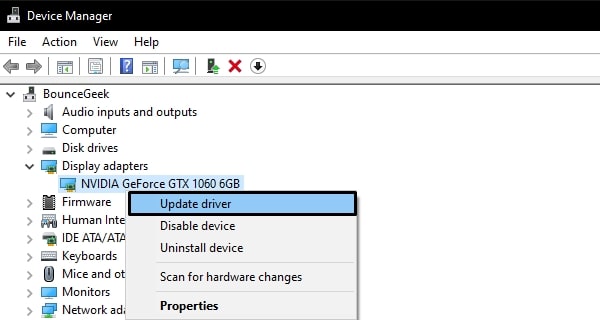
3. After that, click on “Search Automatically for Drivers“.
That’s it, Windows will now check driver update and will install if found any.
So, these were the solutions to fix the “NVIDIA Control Panel is missing” issue. If you face any trouble while trying out any solution, feel free to comment. And, If after getting the NVIDIA Control Panel, if it’s showing the “NVIDIA Display settings are not available” error, then you can read my article on it.
Article Contents
- 1 NVIDIA Control Panel Missing Solutions
- 1.1 Unhide NVIDIA Control Panel
- 1.2 Open NVIDIA Control Panel manually
- 1.3 Restart NVIDIA Services
- 1.4 Install Nvidia Control Panel App from Microsoft Store
- 1.5 Add NVIDIA Control Panel in Startup Folder
- 1.6 Install Latest NVIDIA Graphics Driver.
Recently I installed a new copy of Windows 10 on my laptop and everything seemed quite normal until I saw that the Nvidia control panel was missing from my computer.
Now, clearly, this is a problem as I can’t use my dedicated GPU to the fullest. So I tried to fix the Nvidia Control Panel missing on my laptop.
In this article, I am going to show you how to fix Nvidia Control Panel missing in Windows 10 using some simple methods.

Possible Cause for the Error
In my case, the cause for the missing Nvidia Control Panel was the installation of new Windows. However, there can be other reasons too for this problem:
Problematic Drivers: In this case, there might be something wrong with the Nvidia Display Drivers. There might be some outdated, corrupted, or faulty driver that might be causing the issue for you.
New Windows Update: Sometimes when you update your Windows to a newer version, the drivers might not be compatible with it and that can also cause this issue. You can roll back to the older update and that might solve the issue for you.
Missing Windows Registry: The Windows 10 Registry is very important and handles a lot of operations, anything wrong with the registry can also cause this error.
Corrupt Nvidia Panel: Yup, this could also be one of the reasons why the Nvidia Control Panel is missing. This happens if some files are deleted or damaged.

Also, Read: How to Customize the Right-click Menu on Windows 10
By Restarting Nvidia Services
Step 1: Go to the Windows Search bar, type “Services”, and hit enter.

Step 2: In the Services window, navigate down and search for all the services that have NVIDIA in them.
Step 3: Select them one by one and click on the ‘Restart button from the left window. If the service is not working, then click on ‘Start’.

Now you might get an error message Error 14109 reading Windows cannot start Nvidia Display Container Service, for that follow the steps below:
Step 1: Go to the Windows Search bar, type “Device Manager” and hit enter.

Step 2: Double click on ‘Display adapters’ to expand it.
Step 3: Select the Nvidia Display adapter, right-click on it and click on ‘Uninstall device’.

Complete the process and restart your computer.
See if this method helps, if not jump to the next one.
By Installing the Nvidia Control Panel App from Microsoft Store
Step 1: Go to the Windows Start button, click on it.
Step 2: Click on the Settings icon to open the Settings app.

Step 3: From the menu on the left side, click on ‘Apps & Features’, search for “Nvidia” in the search box.

Step 4: If the Nvidia Control Panel is missing, then click on the link below to download it from the Official Microsoft Store.
By Unhiding the Nvidia Control Panel
You can also try this method to fix if Nvidia Control Panel is missing in Windows 10. Here is how you can unhide it:
Step 1: Go to the Windows search bar, type “Control Panel” and hit enter.

Step 2: Change the ‘View by:’ option to Large icons.

Step 3: From the options, click on ‘NVIDIA Control Panel’.

Step 4: Once the menu is open, navigate to ‘Desktop’, and check on ‘Add Desktop Context Menu’ and ‘Show Notification Tray Icon’

That’s it and now you can try to open the Nvidia Control Panel from the system tray or by right-clicking on your desktop.
By Opening the Nvidia Control Panel Manually
Step 1: Go to the following path: C:Program Files(x86)Display.Nvcontainer. If you do not have Program File(x86) folder, go to the Program Files folder and search for Display.Nvcontainer folder.
Step 2: Go to the folder, you will see a file named “Display.NvContainer”, copy that file by right-clicking.
Step 3: Now go to the Windows Search bar, type “Run” and hit enter
Step 4: In the run window, type “shell:startup” and hit enter. This will open the startup folder.

Step 5: Once you have the access to the startup folder, paste the copied file in the folder.
Step 6: Now right-click on the pasted file and click on ‘Properties’.
Step 7: Navigate to the ‘Compatibility’ tab and check the ‘Run this program as administrator’ option.

Click on OK to apply the settings and restart your computer. This shall fix the Nvidia Control Panel Missing problem.
By Updating the Drivers
Step 1: Go to the Windows Search bar, type “Device Manager” and hit enter.
Step 2: Double click on ‘Display adapters’ to expand it.
Step 3: Select the Nvidia Display adapter, right-click on it and click on ‘Update Driver’.
Step 4: From the next menu, select ‘Search automatically for updated driver software’. This will find the best driver and install it. If there isn’t any, you will be informed about that too.

By Reinstalling the Nvidia Drivers
If none of the above methods seem to be working for you, this is the final thing that you can try and that is reinstalling the drivers again to fix Nvidia Control Panel missing problem.
First of all, uninstall any of the previous Nvidia drivers you have, to do that:
Step 1: Go to the Windows Search bar, type “Device Manager” and hit enter.
Step 2: Double click on ‘Display adapters’ to expand it.
Step 3: Select the Nvidia Display adapter, right-click on it and click on ‘Uninstall device’.

Complete the process
Now on to the next steps:
Step 1: Now open your browser and go to the Nvidia Drivers download page.
Step 2: You can download the automatic installer or you can also manually download the drivers by entering the relevant details.

Step 3: After downloading the drivers, install them and restart your computer.
This will fix the issue for you.
Conclusion
So that was all about how to fix if Nvidia Control Panel missing in Windows 10. We hope that you could have resolved the issue, where your laptop’s/desktop’s Nvidia control panel is missing.
In case you didn’t understand any step, or you can any other query regarding this article, then feel free to comment down below, we will be more than happy to assist you.
Also, Read: Download Android USB Drivers for Major Manufacturers