
Видеокарта – составная часть цифрового устройства, которая обрабатывает и передает информацию на экран. Оборудование представляет собой сложное устройство, требующее совместимости с компьютером. Возникшие сбои в процессе работы делают недоступным дальнейшее использование устройства. Иногда пользователи в Windows 10 сталкиваются с ошибкой видеокарты Nvidia код 43. Узнаем, почему она появляется и как ее устранить.
Причина ошибки с кодом 43
В основном, проблема данного характера встречается с видеокартами старого образца. Неполадка появляется по причине сбоя в работе драйверов или аппаратной проблемы. Адаптер во всех этих случаях будет работать некорректно или полностью отключится.

Ошибка с кодом может быть вызвана и другими причинами:
- проблемами с драйверами и другими программными обеспечениями;
- перегревом видеокарты;
- несовместимостью с ОЗУ;
- недостатком электропитания на USB-порте;
- ошибкой в параметрах реестра;
- установкой несоответствующего или несертифицированного драйвера.
В Диспетчере устройств неисправное оборудование помечается желтым значком с восклицательным знаком. Не рекомендуется приобретать оборудование у непроверенных источников. Перед тем, как приступать к решению проблемы, стоит попробовать перезагрузить компьютер. Возможно, когда система перезапустится, устройство перезагрузится и начнет нормально работать.
Устранение проблемы
В зависимости от источника проблемы пользователь может выбрать способ, который поможет устранить ошибку 43 в «десятке». Рассмотрим основные методы исправления неполадки.
Переустановка драйвера
Драйвер – посредник между ПО и операционной системой. Некорректная работа драйвера может привести к нарушению работы оборудования.
Если на ПК установлена несоответствующая версия микропрограммы, ее следует обновить, следуя инструкции:
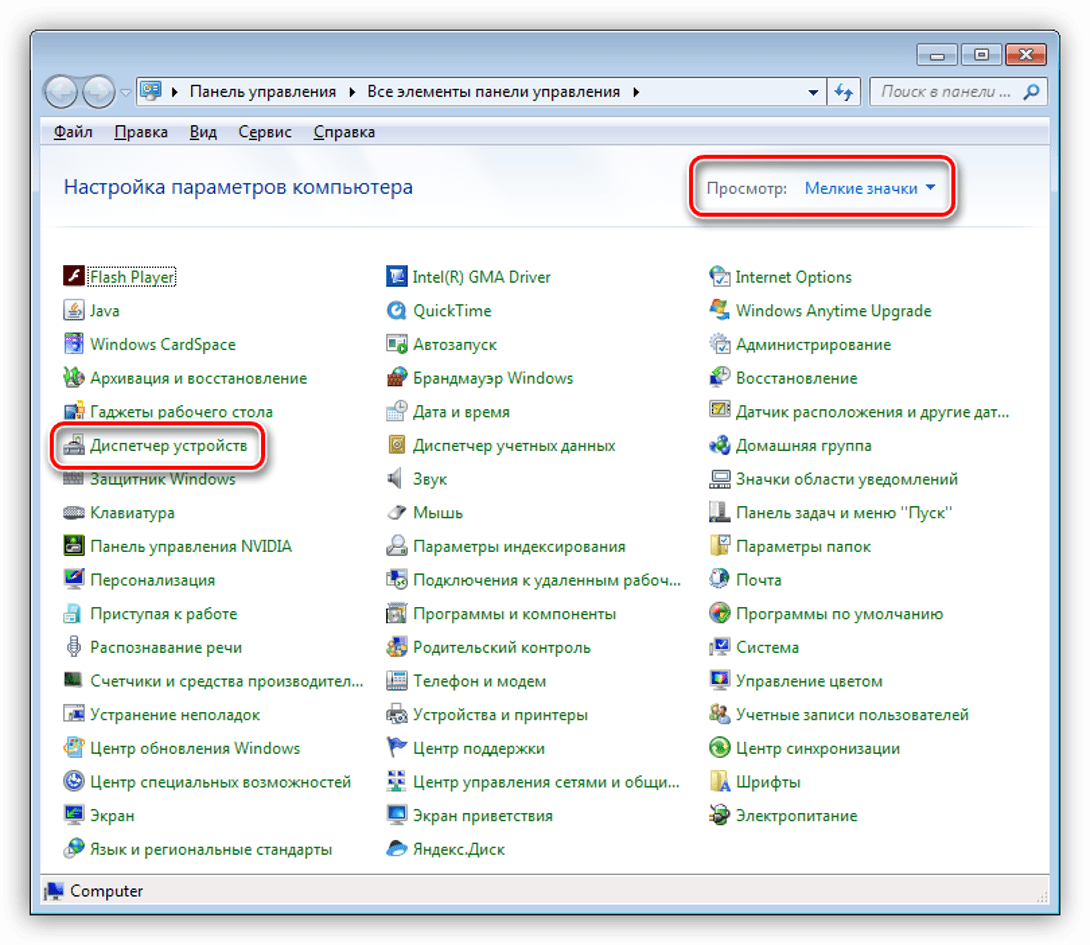
- Зайти в Панель управления.
- Найти и нажать Диспетчер устройств.
- Установить просмотр на «Мелкие значки».
- В списке найти пункт «Видеоадаптеры», нажать на него один раз.
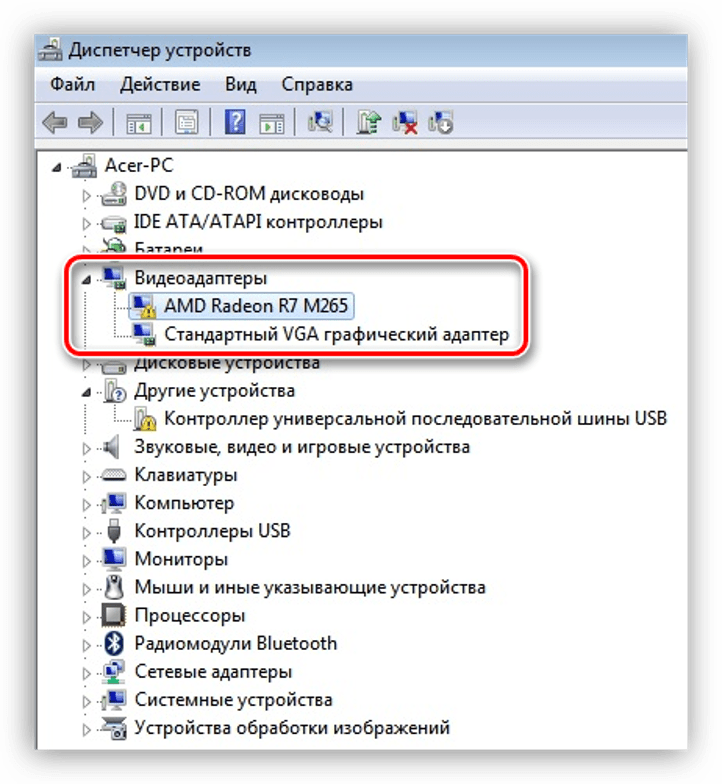
- В раскрывшейся ветке нажать дважды на адаптер.
- Перейти в «Свойства».
- Кликнуть по вкладке «Драйверы».
- Нажать кнопку «Обновить».

- Выбрать из списка автоматический поиск.

В результате программа выдаст вариант для установки драйвера. Пользователю останется перезагрузить устройство. Если ПО выдаст сообщение о том, что драйвер уже установлен, перейти к следующему методу.
Поврежденные драйверы также могут стать причиной появления ошибки 43. Исправить ситуацию поможет удаление поврежденных ПО, установка новых драйверов. Для этого используются специальные утилиты.
CCleaner
Еще один доступный вариант для устранения ошибки 43 в Виндовс 10. Мощный инструмент способен очистить ПК от ненужного мусора, ускорить работу ОС. Для работы с утилитой нужно выполнить следующее:
- Зайти на официальный сайт производителя.
- Скачать файл установщика.
- Инсталлировать программу на ПК.
- Открыть софт.

- В левой части меню перейти в раздел «Реестр».

- Нажать на кнопку «Поиск проблем».
- Дождаться завершения процесса.
- Кликнуть «Исправить отмеченное».

После выполнения всех действий описываемая ошибка должна исчезнуть.
Нехватка оперативной памяти
Одной из распространенных причин появления неполадки может стать конфликт между адаптером и оперативной памятью. Решается проблема следующим образом:
- Нажать клавиши: «Win + R».
- В окне вписать команду: «msconfig». Нажать клавишу ввода.

- Появится окно «Конфигурация системы».
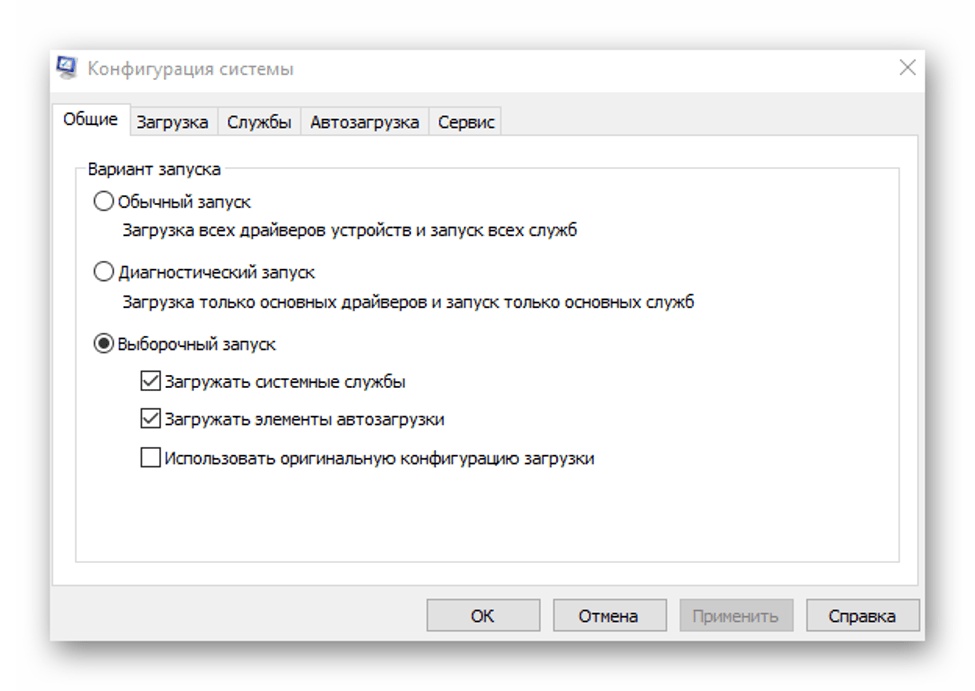
- Перейти во вкладку «Загрузка».
- Нажать на кнопку «Дополнительные параметры».

- Поставить маркер рядом со строкой «Максимум памяти».
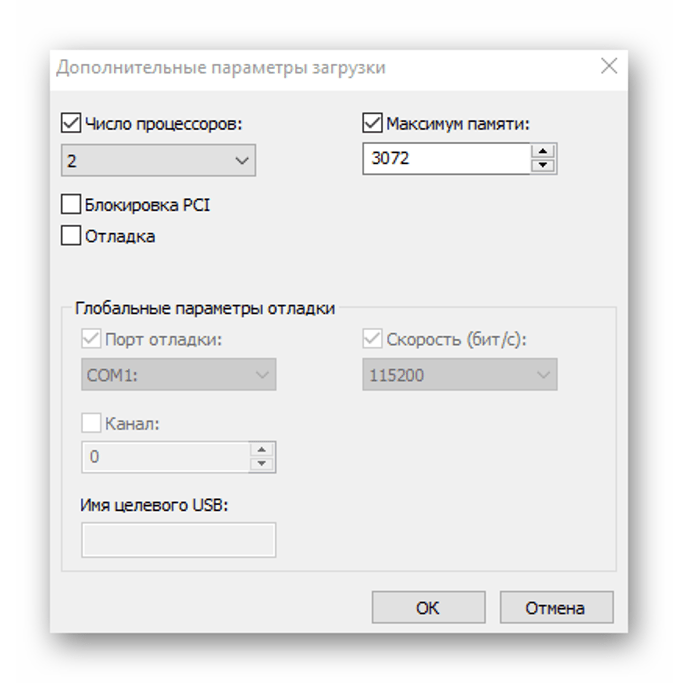
- Сохранить настройки.
Если источником проблемы стала переполненная память компьютера, то после выполнения всех пунктов ошибка исчезнет.
Смена аккаунта Microsoft
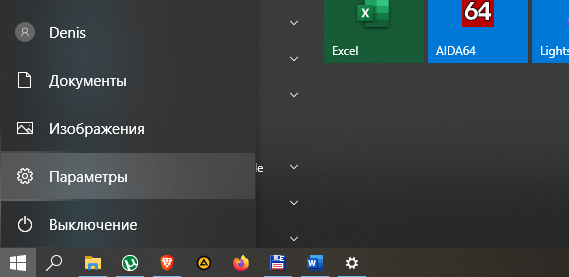
Если цифровое устройство не видит видеокарту, может помочь смена учетной записи «Майкрософт». Для этого потребуется:
- Открыть «Пуск».
- Нажать на значок шестеренки и войти в «Параметры».
- Нажать на раздел «Учетные записи».
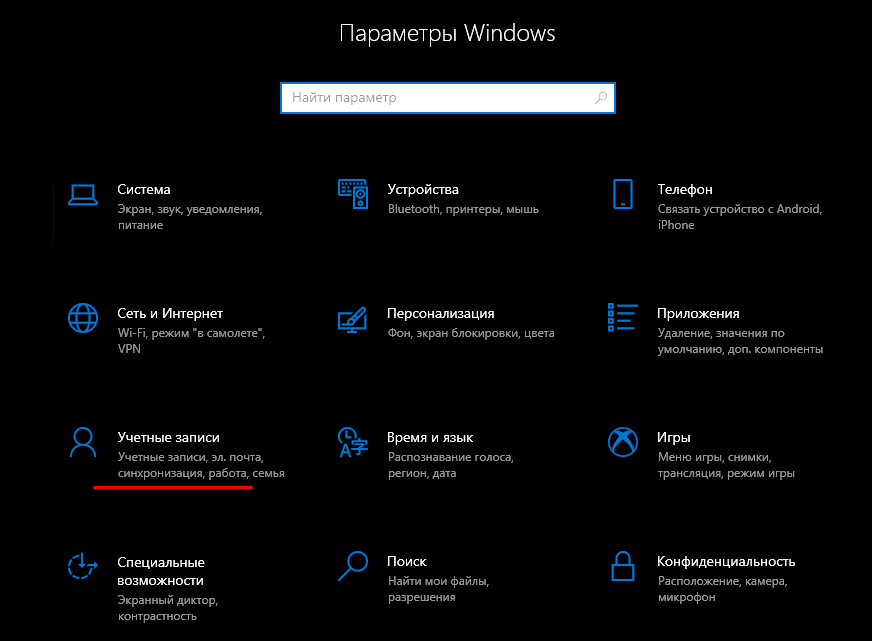
- Для смены учетки нажать на «Войти вместо этого с локальной учетной записью».

- Ввести данные для входа.
- Подтвердить действие.

- Повторить шаг 5.
- Нажать на «Войти вместо этого с учетной записью Майкрософт».
- Подтвердить действие.
- Перезагрузить ПК.
Исправление ошибки системными методами зачастую помогает в решении проблемы.
Ошибка с кодом 43 видеокарты Nvidia в Виндовс 10 нередко появляется по причине некорректной работы драйверов. Поэтому пользователю, в первую очередь, необходимо проверить их целостность. Если произошло повторное появление неполадки, стоит воспользоваться другими способами. Любую проблему в операционке легче предотвратить, чем устранять. Поэтому загружать ПО лучше с проверенных источников. Также рекомендуется регулярно чистить ПК и оптимизировать его компоненты.
Содержание
- Fix: NVIDIA Code 43 (Windows has stopped this device because it has reported problems)
- 1. Run a Batch File To Resolve Error Code 43
- 2. Uninstall VIRTU MVP Application
- 3. Reinstall NVIDIA Drivers
- 3.1 Uninstall Graphics Driver
- 3.2 Install Graphics Driver
- 4. Check legitimateness Of Nvidia Card
- 5. Disable Automatically Updating Drivers From Windows
- 6. Update BIOS
- 7. Run SFC and DISM Commands
- 8. Revert System to Previous Restore Point
- Fighting error 43 – Nvidia GPU in a virtual machine
- The tested system setup
- Fixing error 43
- Set KVM hidden via Libvirt xml
- Set KVM hidden for direct QEMU usage
- Using QEMU command arguments in the libvirt XML definition
- Sources
- Post updates
- 23 comments on “Fighting error 43 – Nvidia GPU in a virtual machine”
- MICHAEL MAST
- Graeme
- Mathias Hueber
- Frank
- Enyce
- Bikram
- Tosto
- ledjoud
- utilit
- eSavior
Fix: NVIDIA Code 43 (Windows has stopped this device because it has reported problems)
If you are encountering Nvidia Error Code 43, there are two possible reasons for this error. Perhaps it might be the hardware problem of your graphics card, or it can be the software issue that causes Error Code 43. High temperature, having VIRTU MVP Application, improper connected PCI-E 6 pin cable, and corrupted drivers seem to be the main contributors to this issue.
 Fix- NVIDIA Code 43 (Windows has stopped this device because it has reported problems)
We had research on this and discovered the error could be caused due to several reasons, including those mentioned below:-
- Lucid VIRTU MVP Software- Lucid VIRTU MVP is software that offers computer visuals with a faster response time but as per the Nvidia reports, using Lucid VIRTU MVP can bring many errors, including this one.
- Hardware Issue – The error could appear due to the hardware issues such as a wrong inserted graphics card and its cables. So before moving out, make sure to check that the graphics card and cables are correctly connected. You can also check the minimum watt of your power supply and how much your graphics card takes from it.
- Outdated Motherboard Bios- Having outdated bios can be one of the main reasons as it can cause errors.
- Outdated and Wrong Installed Drivers- If you have installed your graphics driver incorrectly, you may encounter this error. Please ensure the drivers you have are not obsolete or missing, as it can trigger error code 43.
- Defective System Files- If your Windows has corrupted files that cause error code 43, you must run some system commands to repair them.
1. Run a Batch File To Resolve Error Code 43
We have found an effective method that worked for almost every user encountering Error Code 43. Below we attached a batch file created explicitly for fixing error code 43 against Nvidia eGPU running on a mPCIe, EC, M.2, LUA interface, or desktop PCIe slot. Below are the steps to run a batch file.
- Download the batch file from Here
- Once the downloading is finished
- Right-click on it and select Extract to nvidia-error43-fixer_113
Note: You can use WinRar to extract the folder
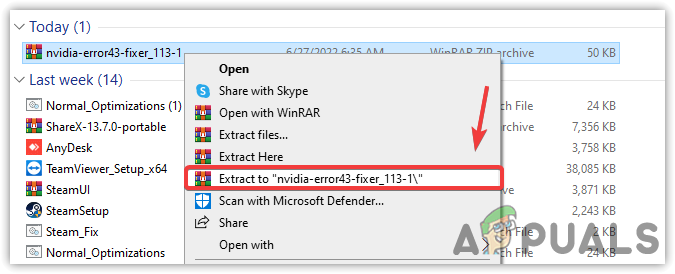 Extracting Zip Folder
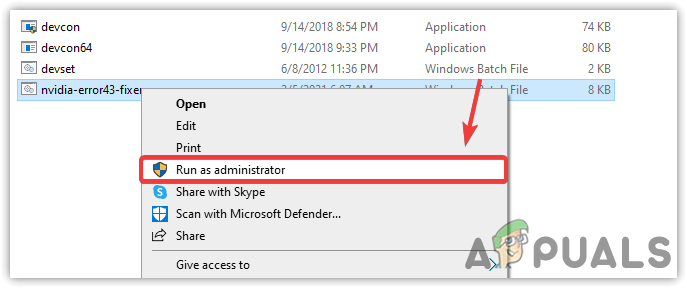 Run This File As Administrator
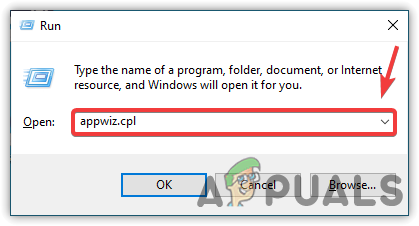
2. Uninstall VIRTU MVP Application
VIRTU MVP Application allows users to optimize their computers for the best gaming experience. The application offers faster response time, video processing, and smoother media playback. However, Nvidia does not support the VIRTU MVP Application, which can be why you are getting Error Code 43.
To uninstall the VIRTUP MVP application, press the Windows + R keys at the same time
- Type appwiz.cpl and press Enter
 Inserting Command
 Inserting Command
3. Reinstall NVIDIA Drivers
As it turns out, a corrupted graphics driver can be the sole reason for this issue. Having corrupted drivers decreases GPU performance and brings many errors such as this one. So first, we need to remove the graphics driver properly. Many users use the device manager to remove their drivers. Still, some files cannot be removed properly and are being left behind, which can cause errors because when we remove drivers, we want to delete them permanently. Apparently, From the device manager, it does not happen, and when we install new drivers, they conflict with each other, which is terrible and can cause problems. To remove drivers properly, we use DDU (Display Driver Uninstaller), allowing us to remove drivers without any files left behind.
3.1 Uninstall Graphics Driver
- To uninstall Graphics Driver completely, Download Display Driver Uninstaller
- Once done, now boot your Windows in safe mode, as recommended by DDU. For that click the Start-Menu and click the Power button then select Restart While holding the shift key on the keyboard Restart Computer to Open Windows in Safe Mode
- You will be redirected to the Windows options screen, where you will navigate to the Troubleshoot>Advanced option>Startup Settings
- Then, click Restart from the bottom right and wait for the Windows to boot up in the safe mode Restarting Computer
- Then, go to the downloads directory, right-click the zip folder and click Extract to [Guru3D.com] Note: You can use WinRar for this process to extract the zip folders.
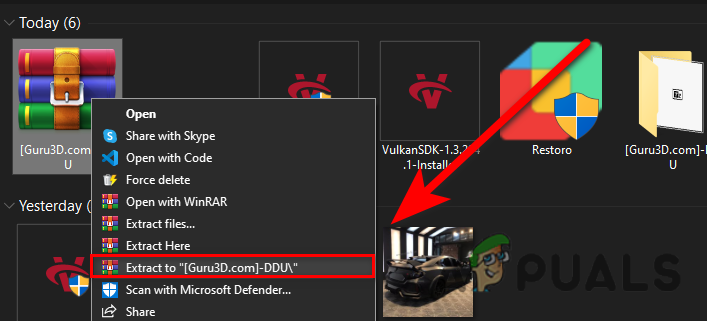 Extracting DDU Zip Folder
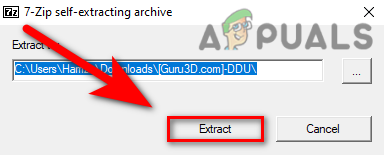 Extracting DDU Application
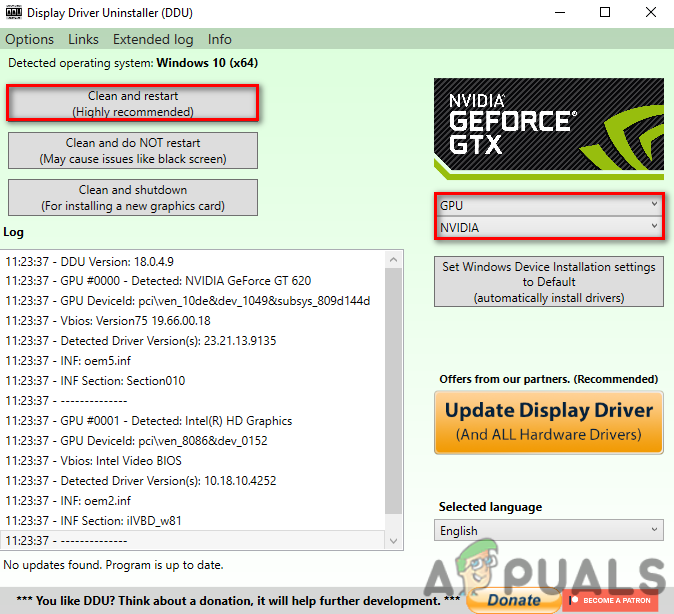 Selecting Graphics Card Driver For the Uninstallation Process
3.2 Install Graphics Driver
We have mentioned the almost similar steps for installing the graphics driver, if you have AMD or INTEL graphics card, you either follow the below steps:-
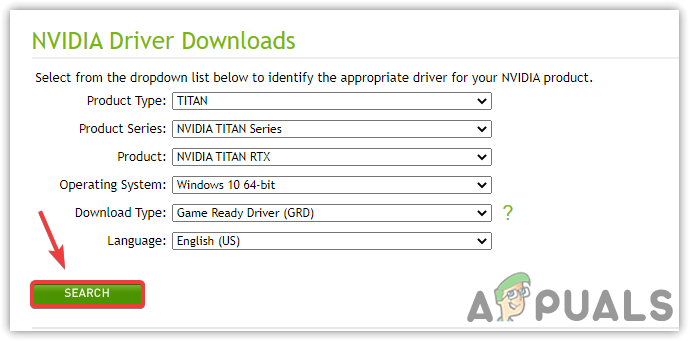
- To install the latest Graphics driver, go to the respective GPU manufacturer’s website
- Choose the Graphics Card according to its specification and click on the Search button
 Searching For Latest Graphics Drivers
 - Click Download to start the downloading process of the drivers Downloading Graphics Driver
- Once done, launch the installer and follow the on-screen instructions to install the drivers
- After the drivers’ installation, restart your computer for the changes to take effect
- Then, navigate to the device manager to check if the error is fixed.
 Searching For Latest Graphics Drivers
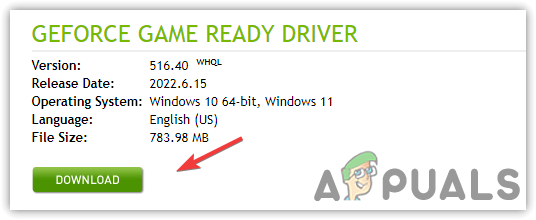 Downloading Graphics Driver
4. Check legitimateness Of Nvidia Card
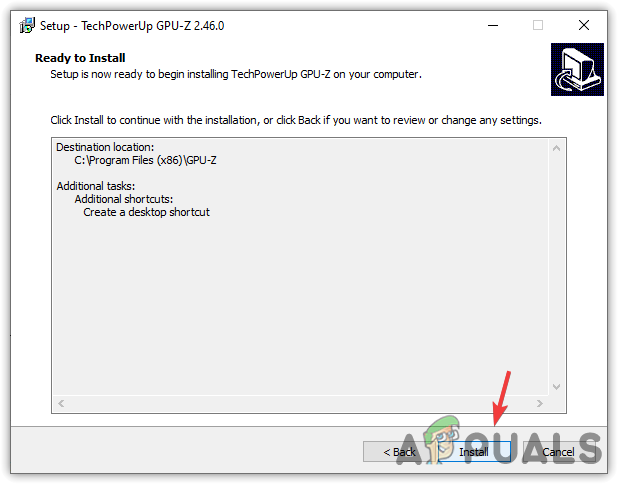
If the issue is still there, you may need to check the legitimacy of your Nvidia Card, if your card is fake, this error could arise until you change the graphics card. In this case, you need to ensure that your card is legit. For that, you have to install GPU-Z, an application that provides vital graphics card information. If your graphics card is fake, you will get a yellow warning with the [FAKE] before the model name of your graphics card.
- To check the legitimateness of the graphics card, Download GPU-Z
- After the downloading open the installer and follow the instruction to install it Installing GPU-Z
- Once done, launch the application and check your graphics card is legit.
 Installing GPU-Z
5. Disable Automatically Updating Drivers From Windows
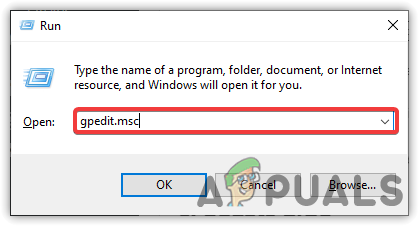
Another solution for this error is to disable automatic updates from windows as it can cause a conflict of drivers, which occurs when windows think it is the latest driver and install the outdated one. The driver you have already installed can conflict with a driver that windows installed. It is called driver conflict that can cause Error Code 43. To avoid this, you have to disable automatic driver updates from the Local Group Policy Editor.
Below are the steps that will help you to disable automatic updates:-
- Press the Windows + R keys simultaneously to open a Run dialogue box
- Type gpedit.msc and hit Enter to open Local Group Policy Editor
 Launching Local Group Policy Editor
 Open Driver Setting
A short Window will appear, click Enabled then click Apply
 Preventing Drivers From installing With Windows Updates
6. Update BIOS
If the issue is still there, try updating bios as it can aid in fixing the problem. If your bios is outdated, try to update it from the manufacturer’s website and follow all the instructions they mentioned.
7. Run SFC and DISM Commands
Corrupted or missing system files are also included in causing Error Code 43. The easy way to repair corrupted files is by running commands to restore Windows images and files. These commands contain the DLL package and the files that will replace with the corrupted or missing ones.
- To run SFC and DISM commands, click Start Menu and type Command Prompt
- Right-click on the command prompt and choose Run As Administrator
 Running Command Prompt As Administrator
Once the terminal is launched, insert the following commands one by one and hit Enter
 Repairing Corrupted Files
8. Revert System to Previous Restore Point
If none of the methods has worked, we recommend you restore Windows to a working condition. It requires a restore point created before you encounter the error message.
- To utilize a restore point, click Start Menu and type rstrui, and press enter to launch the restore settings Launching System Restore Settings
- Click Next and select a restore point then click Next
 Launching System Restore Settings
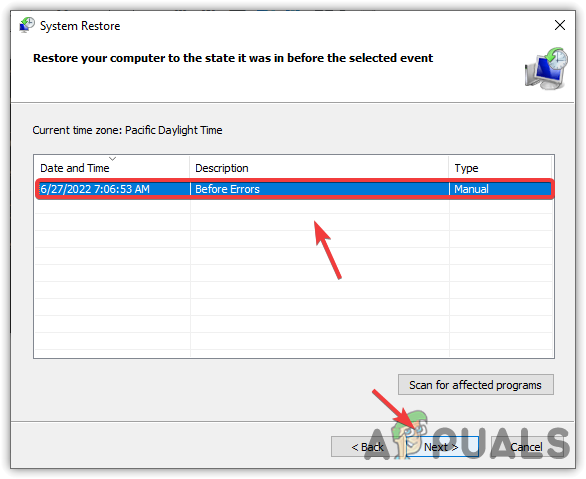 Selecting Restore Point
 Click Finish To Proceed
Above, we have compiled all the solutions that have the potential to fix Error Code 43. If none of the methods worked, we recommend you take your laptop or computer to a repair shop as the problem might come from the hardware.
Источник
Fighting error 43 – Nvidia GPU in a virtual machine
The infamous error 43 is triggered by the Nvidia Windows driver, in case it recognizes the GPU is used inside a virtual machine with GPU passthrough. This means the driver won’t load correctly during the system startup leaving you with cumbersome 800 by 600 display resolution.
Update: With Nvidia driver v465 (or later) Nvidia officially supports the use of consumer GPUs in virtual environments. Thus, edits recommended in this article are no longer required. Thank you!
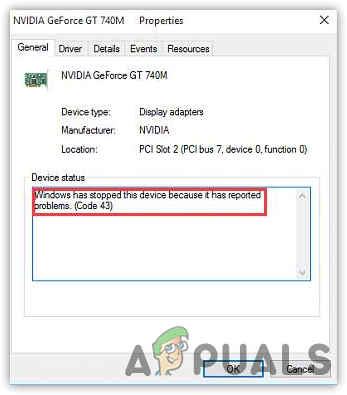
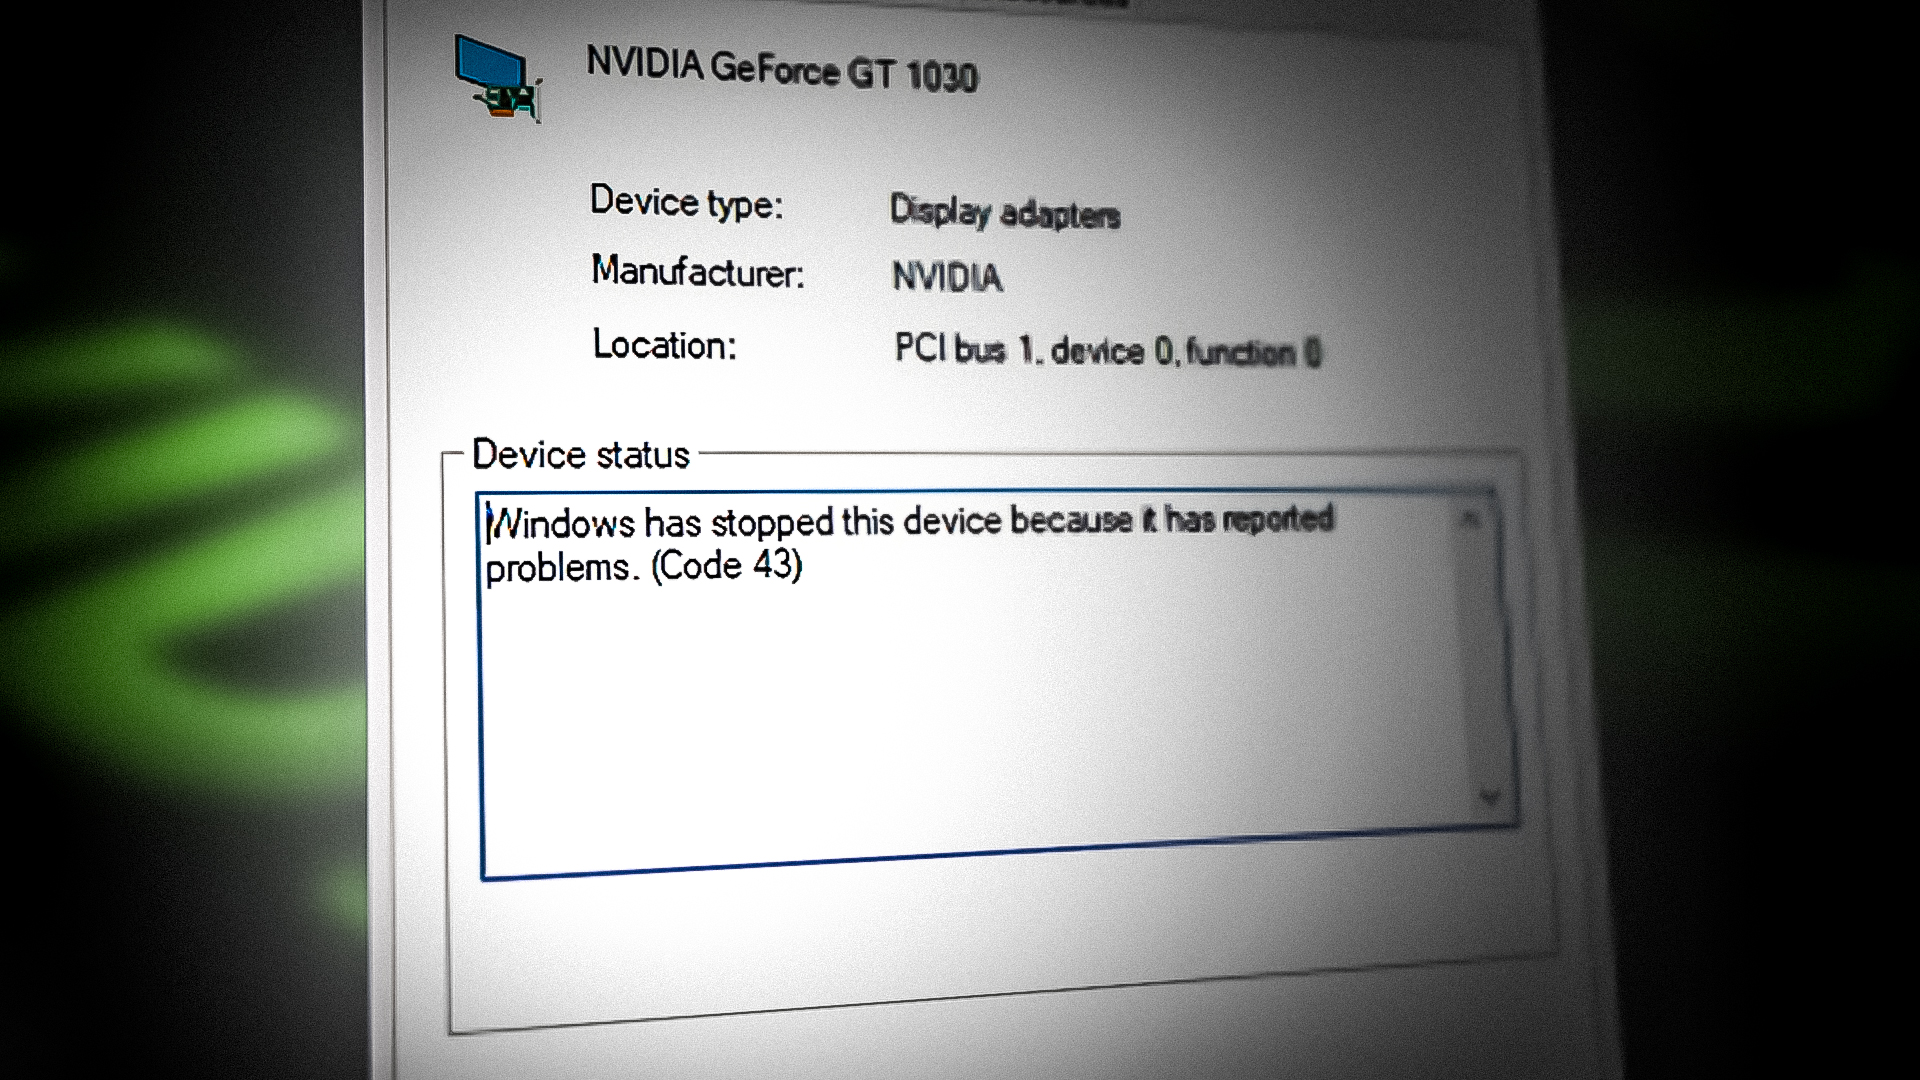
An examination of the Windows Device Manager will unveil the culprit – Code 43
Windows has stopped this device because it has reported problems. (Code 43)
 nvidia error code 43 in Windows 10 device manager
Luckily, KVM/QEMU is able to hide the fact that the Nvidia driver is running a virtual environment.
The tested system setup
This method has been tested for the following versions
Host:
- OS: Ubuntu 18.04, as well as a 16.04
- Kernel: 4.15 – 5.3.6
- Hypervisor: QEMU 2.12.0 up to 4.1
- Libvirt: version 4.6.0 up to 4.7.0
One can use virsh version in order to display the current version status.
Guest:
- OS: Windows 10 1803 – 1903
- VM chipset: i440FX, Q35
- Nvidia driver: 399.07 – 441.12
- GPU: Geforce GTX 970 and Geforce GTX 1060
Fixing error 43
In order to hide that the system is running on a hypervisor, KVM supports the “hidden” flag.
Depending on whether you call QEMU directly or call it via Libvirt the flag syntax differs.
Set KVM hidden via Libvirt xml
In order edit the virtual machines configuration use:
virsh edit your-windows-vm-name
Once your done editing, you can use CTRL+x CTRL+y to save the changes.
For QEMU 3.0 and later the required flags are “ vendor_id ” in the hyperv section, and “ hidden ” in the kvm section, of the features block, of the virtual machines xml definiton. I think it is recommended to use a 12 character value (see excerpt marked green ).
Additionally, in case you are using QEMU 4.0 (or higher) in combination with a Q35 chip, the flag ‘ ioapic driver=’kvm’ ‘ needs to be added in the features section (see excerpt marked blue ).
Excerpt from libvirt xml file
Set KVM hidden for direct QEMU usage
In case you call QEMU directly you have to add the flags ‘ kvm=off ‘ and ‘ vendor_id=null ‘ on your cpu argument (see excerpt marked green ).
Additionally, in case you are using QEMU 4.0 (or higher) in combination with a Q35 chip, use the machine argument ‘ kernel_irqchip=on ‘.
Example for virtual machine with host-passthrough set as CPU model and Q35 as machine type:
Using QEMU command arguments in the libvirt XML definition
Just for the sake of completeness (and historical compatibility of this article), there is a third way of enabling the hypervisor spoofing. Actually it is a combination of the two described earlier, as it is possible to add QEMU arguments to the libvirt xml defintion file.
These arguments are called after the definition has been parsed, and usually overwrite the settings made via XML structure. Thus it is not recommended to use both ways for one setting in the same definition file.
First of all find the very first line, which should read:
and replace it with:
Find the line which ends with
and add the following block afterwards (or alter the block if it already exists):
Attention: Make sure and have the same indent.
Thats it – these settings work for me.
Sources
As usual, the glorious arch wiki has further information and help; i.e. it recommends using a 12-character alphanumeric string as vendor ID.
Post updates
21.09.2019 – added further information regarding qemu 4.0 and error 43
07.11.2019 – updated the article structure
MICHAEL MAST
This got me past code 43, but now I get no video during Windows 10 boot. I can get into safe mode no issue, but normal boot produces no video signal and the monitor goes to sleep.
Graeme
How do i fix Code 43 in Xen, as KVM my USB 3 card is grabed by XHCI_HCD. and i don’t have much success recompiling Kernel to make it a damm module.
Mathias Hueber
Unfortunately, I don’t have much experience with Xen. Which USB-3 card are you using? I found this thread. Also see the redhat post they are referencing.
Frank
Can you please post the actual starting command of the VM? I’m using Proxmox thus “” does not exit there. I am trying to find its equivalent but got no good, the starting command would be really helpful. Thank you!
Enyce
Anyone succeed with the code43 ?
Bikram
Try virshpatcher you’ll know what i am talking about
Tosto
Nothing changed applying these instructions for me.
Arch/Virt-manager/kvm/geforce 840m
ledjoud
On my config I had an error in dmesg (Bar 3 : ….) which resulted in an error 43 in the Windows host.
I had to add video=efifb:off to the grub command line and now it works.
utilit
After looking around for a long time this was also the fix for me.
sudo nano /etc/default/grub
Add video=efifb:off
sudo update-grub
Now it’s working. Mostly. I can launch games on the Win10 host without the Nvidia driver error, and I have display either through spice or through direct attachment, but if I use Spice, mouse isn’t working from the host OS. Does work with a separate mouse redirected to the VM before rebooting.
If I use Spice as 1 of my 2 monitors, i.e. multi monitor with 1 pane of glass being from Ubuntu, 1 directly to Windows, host mouse isn’t working, and the pointer from Windows is invisible. Interesting.
Thanks for this great writeup. Helped me fix a botched install and get a GTX 970 running via passthrough.
eSavior
Hi, Mathias. Thanks for documenting this workaround! This article got me past the final Code 43 hurdle on my Linux Mint 20 GPU passthrough voyage for my GeForce 1050ti coupled with a basic Gigabyte B460M DS3H motherboard with a 10th gen Core i7 CPU. The only thing your main passthrough article didn’t describe was a way to make my 1050ti be the primary graphics adapter so Windows 10 would use it instead of the Spice display. To work around that issue, I just removed the Video QXL device and the Graphics Spice devices so that the 1050ti would be the only display adapter Windows 20H2 could access. Maybe now that I have this workaround in place, I can add back the other virtual display. For now, I press ahead into GPU passthrough territory and see what amazing 3d graphics stuff I can revel in 🙂
Источник
Эта ошибка возникает, когда драйвер устройства графики уведомляет Windows о том, устройство не работает надлежащим образом. Это может указывать на проблему с оборудованием, сбой драйвера или программного обеспечения драйвера. Чтобы устранить эту ошибку, выполните следующие действия.
Обновления драйверов для Windows 10 и многих устройств (например, сетевых адаптеров, мониторов, принтеров и видеоадаптеров) автоматически скачиваются и устанавливаются с помощью Центра обновления Windows. Хотя, возможно, вы уже установили последний драйвер, если возникают проблемы с устройством, можно попытаться их устранить, обновив драйвер.
-
Нажмите и удерживайте или щелкните правой кнопкой мыши кнопку Пуск и выберите пункт Диспетчер устройств.
-
Найдите в списке устройство, с драйвером которого возникли проблемы (обычно рядом с ним отображается желтый восклицательный знак). Затем нажмите и удерживайте устройство (или щелкните его правой кнопкой мыши) и выберите пункт Свойства.
-
Перейдите на вкладку Драйвер и выберите команду Обновить.
-
Выберите пункт Автоматический поиск обновленных драйверов.
Если найдено обновление драйвера, оно будет установлено автоматически. По завершении установки нажмите кнопку Закрыть.
Если Windows не найдет новый драйвер, можно попытаться его найти на веб-сайте изготовителя устройства и выполнить инструкции по установке.
Если недавно было установлено обновление системы, драйвера устройства или ПО драйвера, вы можете устранить эту проблему, выполнив откат драйвера до предыдущей версии.
Примечание: Windows 10 устанавливает драйверы автоматически, поэтому вам не придется самостоятельно выбирать, какие обновления необходимы. В редких случаях определенный драйвер может вызывать временные проблемы на устройстве. В этом случае можно предотвратить автоматическую переустановку проблемного драйвера при следующем обновлении Windows, выполнив откат к предыдущей версии.
-
Нажмите и удерживайте или щелкните правой кнопкой мыши кнопку Пуск и выберите пункт Диспетчер устройств.
-
Найдите в списке устройство, с драйвером которого возникли проблемы (обычно рядом с ним отображается желтый восклицательный знак). Затем нажмите и удерживайте устройство (или щелкните его правой кнопкой мыши) и выберите пункт Свойства.
-
Перейдите на вкладку Драйвер и выберите Откатить.
В некоторых случаях удаление и переустановка драйвера устраняет .
-
Нажмите Start кнопку «Пуск». В поле поиска введите диспетчер устройств, а затем выберите пункт Диспетчер устройств из списка результатов.
-
Найдите в списке устройство, с драйвером которого возникли проблемы (обычно рядом с ним отображается желтый восклицательный знак). Затем нажмите и удерживайте устройство (или щелкните его правой кнопкой мыши) и выберите Удалить > ОК.
-
После удаления драйвера нажмите и удерживайте (или щелкните правой кнопкой мыши) имя компьютера (в верхней части списка устройств) и выберите Обновить конфигурацию оборудования. Это позволит переустановить драйвер устройства.
-
Чтобы проверить, исправлена ли проблема, снова нажмите и удерживайте (или щелкните правой кнопкой мыши) имя устройства. На вкладке Общие в разделе Состояние устройства должно отобразиться сообщение «это устройство работает неправильно». Если вы не видите это сообщение, ознакомьтесь с документацией устройства или обратитесь к производителю.
Нужна дополнительная помощь?
На чтение 9 мин. Просмотров 6.6k. Опубликовано 03.09.2019
Код ошибки 43 обычно отображается в окне состояния устройства в окнах свойств оборудования. Код 43 гласит следующее: « Windows остановила это устройство, поскольку сообщала о проблемах (код 43). »
Так что, если вы получаете код ошибки 43 для вашей видеокарты, вот как это исправить.
Содержание
- Как я могу исправить код ошибки 43 для видеокарты в Windows 10?
- Решение 1 – вернуться к предыдущей точке восстановления системы
- Решение 2. Запустите средство устранения неполадок оборудования и устройств
- Решение 3. Обновите драйвер устройства
- Решение 4. Удалите и переустановите драйвер устройства.
- Решение 5 – Проверьте температуру графического процессора
- Решение 6. Запретите Windows автоматически обновлять драйверы видеокарты
- Решение 7. Загрузите и установите старую версию
- Решение 8. Проверьте правильность подключения видеокарты.
- Решение 9 – Установите последние обновления
- Решение 10 – Удалите программное обеспечение Lucid VIRTU MVP
Как я могу исправить код ошибки 43 для видеокарты в Windows 10?
Код ошибки 43 связан с вашей видеокартой и вызывает различные проблемы. Говоря о проблемах, вот некоторые распространенные проблемы, о которых сообщили пользователи:
- Gtx 1060, код 43, gtx 1070, код 43 – эта ошибка может повлиять на видеокарты Nvidia, и, если вы столкнетесь с ней, обязательно запустите поиск и устранение неисправностей оборудования и посмотрите, поможет ли это.
- Windows остановила это устройство, поскольку сообщала о проблемах. (код 43) Intel HD Graphics . Эта проблема также может повлиять на видеокарты Intel, и если вы столкнулись с ней, убедитесь, что у вас установлены последние версии драйверов.
- Код ошибки Nvidia Quadro 43 . Эта проблема может возникать при использовании серии Nvidia Quadro, и для ее устранения необходимо убедиться в отсутствии проблем с перегревом.
- Код ошибки 43 Windows 10 GPU, AMD, Nvidia . По мнению пользователей, эта ошибка может повлиять на видеокарты любой марки, и если вы столкнетесь с этой проблемой, обязательно попробуйте решения из этой статьи.
Решение 1 – вернуться к предыдущей точке восстановления системы
Если вы недавно добавили новое устройство или внесли другие изменения в диспетчере устройств, рассмотрите возможность восстановления Windows до более ранней даты с помощью функции «Восстановление системы».
Внесенные вами корректировки могли вызвать ошибку 43, и вы можете отменить эти системные изменения с помощью средства восстановления системы Windows следующим образом.
- Откройте Cortana, нажав кнопку на панели задач и введите тип «Восстановление системы» в поле поиска.
- Выберите Создать точку восстановления , чтобы открыть окно «Свойства системы» ниже.
-
Теперь нажмите кнопку Восстановление системы , чтобы открыть Восстановление системы.
- Нажмите Далее в окне «Восстановление системы», чтобы открыть список точек восстановления системы.
-
Выберите Показать больше точек восстановления , чтобы развернуть список точек восстановления.
- Теперь выберите подходящую точку восстановления, которая предшествует настройкам диспетчера устройств.
- Нажмите Далее и кнопку Готово , чтобы восстановить Windows до более ранней даты.


Если вы заинтересованы в получении дополнительной информации о том, как создать точку восстановления и как это вам поможет, ознакомьтесь с этой простой статьей, чтобы узнать все, что вам нужно знать.
Если восстановление системы не работает, не паникуйте. Посмотрите это полезное руководство и снова все исправьте.
Решение 2. Запустите средство устранения неполадок оборудования и устройств
Средство устранения неполадок оборудования и устройств в Windows может пригодиться для исправления аппаратных ошибок. Так что это также может разрешить код ошибки 43. Вот как вы можете открыть и запустить это средство устранения неполадок.
- Нажмите Ключ Windows + I , чтобы открыть приложение Настройки .
-
Когда откроется Приложение настроек , перейдите в раздел Обновление и безопасность .
-
Перейдите в раздел Устранение неполадок на левой панели. На правой панели перейдите в Оборудование и устройства и нажмите Запустить средство устранения неполадок .


Когда откроется окно устранения неполадок, следуйте инструкциям на экране для его завершения. После устранения неполадок ваша проблема должна быть полностью решена.
Если у вас возникли проблемы с открытием приложения Настройка, обратитесь к этой статье, чтобы решить эту проблему.
Если средство устранения неполадок останавливается до завершения процесса, исправьте его с помощью этого полного руководства.
Решение 3. Обновите драйвер устройства
Неисправные драйверы видеокарты обычно вызывают код ошибки 43. Поэтому один из лучших способов исправить это – обновить драйверы видеокарты. Вы можете обновить их с помощью диспетчера устройств следующим образом.
-
Нажмите клавишу Win + X, чтобы открыть меню Win + X, и выберите Диспетчер устройств . Кроме того, вы можете ввести «Диспетчер устройств» в окне поиска Windows, чтобы открыть окно ниже.
-
Нажмите Адаптер дисплея , а затем щелкните правой кнопкой мыши видеокарту, чтобы открыть дополнительные параметры контекстного меню, как показано ниже.
-
Теперь выберите Обновить программное обеспечение драйвера , чтобы открыть окно, расположенное ниже.
- Выберите в этом окне параметр Автоматический поиск обновленного программного обеспечения драйвера , чтобы узнать, требуются ли какие-либо обновления. Теперь Windows обновит драйверы видеокарты при необходимости.


Хотите последние версии драйверов для графических процессоров? Добавьте эту страницу в закладки и всегда оставайтесь в курсе последних и самых лучших.
Решение 4. Удалите и переустановите драйвер устройства.
В некоторых случаях код ошибки 43 может появиться, если ваши драйверы дисплея повреждены, и единственный способ исправить это переустановить их. Это довольно просто сделать, и вы можете сделать это, выполнив следующие действия:
- Откройте Диспетчер устройств .
-
Найдите драйвер видеокарты, щелкните его правой кнопкой мыши и выберите в меню Удалить устройство .
-
Когда появится диалоговое окно подтверждения, установите флажок Удалить программное обеспечение драйвера для этого устройства и нажмите кнопку Удалить .


После удаления драйвера перезагрузите компьютер, и Windows 10 автоматически установит драйвер дисплея по умолчанию.
Windows не может автоматически найти и загрузить новые драйверы? Не волнуйтесь, мы вас обеспечим.
Если вы хотите полностью удалить драйвер видеокарты, вы также можете использовать программное обеспечение Display Driver Uninstaller.
После установки драйвера по умолчанию проверьте, сохраняется ли проблема. Если все работает, вы также можете скачать последнюю версию драйвера от производителя вашей видеокарты.
Вы также можете использовать стороннее программное обеспечение для удаления и переустановки драйверов видеокарты. Driver Talent – одна из удобных утилит, с помощью которой вы можете переустанавливать и восстанавливать драйверы.
Посетите веб-сайт программного обеспечения и нажмите кнопку Загрузить сейчас , чтобы добавить программу в Windows. Затем вы можете нажать кнопку Сканировать , чтобы установить необходимые драйверы видеокарты.
Решение 5 – Проверьте температуру графического процессора
Распространенной причиной появления кода ошибки 43 может быть температура вашего графического процессора, и для решения этой проблемы необходимо убедиться, что на вашей видеокарте нет пыли. Чтобы почистить его, просто откройте корпус компьютера и удалите пыль с видеокарты с помощью сжатого воздуха.
Кроме того, вы можете установить дополнительное охлаждение или оставить корпус компьютера открытым и проверить, не влияет ли это на вашу видеокарту. Кроме того, обязательно удалите настройки разгона, поскольку разгон может привести к перегреву.
Если вы ищете хорошее программное обеспечение, позволяющее проверить температуру вашей системы, вам следует рассмотреть возможность использования AIDA64 Extreme .
Решение 6. Запретите Windows автоматически обновлять драйверы видеокарты
Windows 10 имеет тенденцию автоматически обновлять устаревшие драйверы, но в некоторых случаях это может привести к появлению кода ошибки 43 просто потому, что новый драйвер не полностью совместим с вашим ПК.
Чтобы решить эту проблему, вам нужно заблокировать Windows 10 от автоматического обновления драйверов. Если вы хотите сделать это, у нас есть специальное руководство по этому вопросу.
После предотвращения обновления драйверов в Windows проблема должна быть полностью решена.
Решение 7. Загрузите и установите старую версию
Иногда код ошибки 43 вызывается более новыми драйверами, и для устранения этой проблемы необходимо выполнить откат к более старому драйверу. Это довольно просто сделать, и для этого вам просто нужно удалить драйвер, как мы показали вам в одном из наших предыдущих решений.
После удаления драйвера перейдите на веб-сайт производителя видеокарты и загрузите драйвер, которому не менее пары месяцев. Установите более старый драйвер, и проблема должна быть решена.
Решение 8. Проверьте правильность подключения видеокарты.
Несколько пользователей сообщили, что появился код ошибки 43, потому что их видеокарта не была правильно подключена. По словам пользователей, 6-контактный кабель PCI-E не был надежно подключен, и это привело к появлению этой проблемы.
Чтобы решить эту проблему, откройте корпус компьютера и убедитесь, что ваша видеокарта правильно подключена.
Решение 9 – Установите последние обновления
Windows 10 – отличная операционная система, но иногда могут появляться определенные ошибки, которые приводят к появлению кода ошибки 43. Тем не менее, Microsoft усердно работает над устранением любых потенциальных проблем, и если у вас возникла эта проблема, мы советуем вам установить последние обновления Windows.
По умолчанию Windows 10 устанавливает необходимые обновления автоматически, но иногда вы можете пропустить одно или два обновления из-за определенных ошибок. Однако вы всегда можете проверить наличие обновлений вручную, выполнив следующие действия:
- Откройте Настройки приложения .
-
Перейдите в раздел Обновление и безопасность .
- Нажмите кнопку Проверить обновления на правой панели.

Если доступны какие-либо обновления, они будут автоматически загружены в фоновом режиме и установлены, как только вы перезагрузите компьютер. После установки последних обновлений проверьте, сохраняется ли проблема.
Если у вас возникли проблемы с открытием приложения Настройка, обратитесь к этой статье, чтобы решить эту проблему.
Не можете обновить Windows 10? Ознакомьтесь с этим руководством, которое поможет вам быстро их решить.
Решение 10 – Удалите программное обеспечение Lucid VIRTU MVP
По словам пользователей, иногда код ошибки 43 может появляться из-за программного обеспечения Lucid VIRTU MVP. Чтобы решить эту проблему, рекомендуется найти и удалить это приложение с вашего ПК.
Существует несколько способов удалить приложение, но лучше всего использовать программное обеспечение для удаления. Если вы не знакомы, такие инструменты, как IOBit Uninstaller , могут полностью удалить любое приложение с вашего компьютера, включая все его файлы и записи реестра.
Нужно больше вариантов? Вот лучшие деинсталляторы на рынке прямо сейчас.
После удаления проблемного приложения с помощью программного обеспечения для удаления проблема должна быть полностью решена.
Вот так вы можете исправить код ошибки 43 для видеокарт в Windows. Вы также можете исправить код 43 для других устройств почти так же.
Если вам известен другой способ решения проблемы, поделитесь им в разделе комментариев ниже, чтобы другие пользователи могли попробовать его.
Кроме того, оставьте там любые другие вопросы, которые могут у вас возникнуть, и мы обязательно их рассмотрим.
ЧИТАЙТЕ ТАКЖЕ
- ИСПРАВЛЕНИЕ: Код ошибки X80080008 Приложения не устанавливаются на ПК
- Исправьте ошибку Windows 10 0xc0000185 с помощью этих простых решений
- Как исправить ошибку обновления Windows с кодом 643
Windows has stopped this device because it has reported problems.
(Code 43) – Updated 2022.
This issue is becoming an headache for many users, we had the same bad time and took us several hours to fix the problem, the main reason is one: Not anyone can solve the problem in the same way.
We decided today explain you some of the possible ways to fix this.
At the beginning we thought was a problem of our PC with installed previously a ASUS GTX 1050 Ti and now a Zotac GTX 1070 Ti but we figure out very soon that this afflict all the RTX and GTX Nvidia cards from 2015 till now also for the Laptops.
The problem persist with the new generation cards from 2019 like GTX & RTX 2060 and 2080 we found several topics about it. Today we will tell you all the solution things we tested.
Let’s start to understand step by step how to solve this issue.
Mainly we understood the problem appears after accepted to install the Windows Update, and after restarting the system the multiple monitors did not work anymore:

“We would like to remind this problem can happen also in some cases with the update of the Nvidia Drivers.”

How to Solve Code 43 Error with your Nvidia Graphic Card
Solution 1 – Uninstall Device
This case we can consider the most common and easy to fix. Consider yourself lucky!
1) Press Win+R (Windows logo key and R key) together at the same time.
2) Type devmgmt.msc then click OK.
This is to open Device Manager Window.

3) Expand the “Display adapters” category and right-click on the NVIDIA device name. (You will see an yellow Exclamation mark the side of graphic card name)
The context menu will pop up.
Then click Uninstall.

4) Now restart your PC and check if the problem is solved properly.

Solution 2 – Reinstall Drivers
Many times can be due to faulty graphics drivers. As you can see, there’s the yellow mark next to the device name in Device Manager if you want to check that follow the first 2 steps of Solution 1.
Try now to uninstall the Nvidia graphics card driver using the following steps:
1) First of all we need to download a program dedicated to remove completely any track of the drivers named:
Display Drivers Uninstaller DDU,
If you can please restart your PC and enter in Safe Mode, we did it without and it worked fine anyway, remove all the drivers:

2) After the system Restart, follow this link to download the latest Nvidia drivers, remember to choose the correct card details.
3) Install the drivers using CUSTOM install, and select Perform a Clean Installation,
4) When finish, restart the system.
after check if the problem is solved.
Solution 3 – Windows Recovery
We found also the case where the problem was due to the latest windows update, so we decided to Revert to a Previous System Restore Point.

1) Press Win button and input type ‘System Restore’ in the search box.
2) Now press the System Restore button to open System Restore.

3) Select a suitable restore point that predates your device problem, and click Next to restore your Windows to an earlier date, NO any Software or Document will be deleted. So no worries about it.

4) When Windows will start check if the problem is solved.
Solution 4 – Install Older Drivers
We found also a way to solve the problem using a previous version of the drivers. Looks like sometime the new drivers can make this problem come out. For this reason we will explain you where and how to install the previous Nvidia Drivers.
1) First of all we need to download a program dedicated to remove completely any track of the drivers named: Display Drivers Uninstaller DDU,
If you can please restart your PC and enter in Safe Mode, we did it without and it worked fine anyway, remove all the drivers:
2) After the system Restart, you need to follow this link Nvidia Archive & Beta Drivers and select an older version of of your drivers version.
3) Install the drivers using CUSTOM install, and select Perform a Clean Installation,
4) When finish, restart the system.
after check if the problem is solved.
4) Now restart your PC and check if the problem is solved properly.
Solution 5 – Nothing of this works
This was what happened to our PC and the reason still not clear 100%. The only way to make it work as been to install the Geforce Gamer Ready Driver.
1) First of all you need in any case to follow the procedure removing all the drivers using DDU software as explained in Solution 2 and 4.
2) At this point follow the link to Geforce Ready Driver Download.
Follow the installation procedure as explained in Solution 2. (point 3 and 4)
3) When finish, restart the system. After check if the problem is solved.
4) We have now all the monitors working and preliminary test of some games give us a good result, without drop down FPS in gaming.
Solution 6 – Script Solution
This solution as not been made and tested from us differently that the others, but we can suggest you to have a look to the great work done by eGPU.io
They developed a script that fix the problem.
Issue solver for Windows 10/8/7 Device Manager showing an inoperable error code 43 against a Nvidia GTX10xx or RTX20xx eGPU running on a mPCIe, EC, M.2, LUA interface; or on a desktop PCIe slot GPU. Here a lengthy fix utilizing an older 368.81 driver + mods is distilled into a one-click script to instantly get your eGPU up and running. The latest Nvidia driver can be used without any introduced performance or functionality penalty.

1) Download this attachment:
2) Extract it to a folder & navigate to that folder
3) Double-click nvidia-error43-fixer.bat
4) Click YES to UAC approval prompt
5) Follow onscreen instructions & prompts as shown in above screenshot
IMPORTANT: You have also to consider that the issue can happen for HARDWARE problems. In some case the PCI of the graphic card was not plugged properly, in other cases the alimentation cable was not anymore plugged correctly, or double alimentation was missing.
In the worst cases the Graphic Card was broken or some component was not working properly.
We also want to advise that in some cases all the procedures above did not work, and a fresh format of the PC as been the only solution to solve the problem.
Are you a gamer? do you stream?
We get you cover!
We fully configure your Stream lab OBS account without make you move from your desk, we remotely add all the configurations necessary in few minutes for you!
Livestreaming gameplay has gone from strength to strength in recent years, and with eSports picking up traction, game-streaming services like Twitch, Mixer and YouTube Gaming are set to become more popular than ever.
But how can you get involved at home? Anybody that has eagerly signed up to Twitch with hopes of livestreaming gameplay will already know that it’s not as simple as you’d expect.

Don’t worry; we at Crazy Web Studio have your back and here, we will cover all the requirements to set up your Twitch stream page and using OBS, Streamlabs that we will configure also, you will have all the interactions working, with dedicated buttons and animations!
If your problem is solved leave us a comment!
If you are encountering Nvidia Error Code 43, there are two possible reasons for this error. Perhaps it might be the hardware problem of your graphics card, or it can be the software issue that causes Error Code 43. High temperature, having VIRTU MVP Application, improper connected PCI-E 6 pin cable, and corrupted drivers seem to be the main contributors to this issue.
We had research on this and discovered the error could be caused due to several reasons, including those mentioned below:-
- Lucid VIRTU MVP Software- Lucid VIRTU MVP is software that offers computer visuals with a faster response time but as per the Nvidia reports, using Lucid VIRTU MVP can bring many errors, including this one.
- Hardware Issue– The error could appear due to the hardware issues such as a wrong inserted graphics card and its cables. So before moving out, make sure to check that the graphics card and cables are correctly connected. You can also check the minimum watt of your power supply and how much your graphics card takes from it.
- Outdated Motherboard Bios- Having outdated bios can be one of the main reasons as it can cause errors.
- Outdated and Wrong Installed Drivers- If you have installed your graphics driver incorrectly, you may encounter this error. Please ensure the drivers you have are not obsolete or missing, as it can trigger error code 43.
- Defective System Files- If your Windows has corrupted files that cause error code 43, you must run some system commands to repair them.
1. Run a Batch File To Resolve Error Code 43
We have found an effective method that worked for almost every user encountering Error Code 43. Below we attached a batch file created explicitly for fixing error code 43 against Nvidia eGPU running on a mPCIe, EC, M.2, LUA interface, or desktop PCIe slot. Below are the steps to run a batch file.
- Download the batch file from Here
- Once the downloading is finished
- Right-click on it and select Extract to nvidia-error43-fixer_113
Note: You can use WinRar to extract the folder

Extracting Zip Folder - Once you have extracted it, navigate to the folder
- Right-click on nvidia-error43-fixer and click Run As Administrator

Run This File As Administrator - Once done, close the terminal and check if the error persists.
2. Uninstall VIRTU MVP Application
VIRTU MVP Application allows users to optimize their computers for the best gaming experience. The application offers faster response time, video processing, and smoother media playback. However, Nvidia does not support the VIRTU MVP Application, which can be why you are getting Error Code 43.
To uninstall the VIRTUP MVP application, press the Windows + R keys at the same time
- Type appwiz.cpl and press Enter

Inserting Command - Now find the VIRTU MVP application and right-click on it
- Click Uninstall from the listed options

Inserting Command - Once done, check if the error still causing.
3. Reinstall NVIDIA Drivers
As it turns out, a corrupted graphics driver can be the sole reason for this issue. Having corrupted drivers decreases GPU performance and brings many errors such as this one. So first, we need to remove the graphics driver properly. Many users use the device manager to remove their drivers. Still, some files cannot be removed properly and are being left behind, which can cause errors because when we remove drivers, we want to delete them permanently. Apparently, From the device manager, it does not happen, and when we install new drivers, they conflict with each other, which is terrible and can cause problems. To remove drivers properly, we use DDU (Display Driver Uninstaller), allowing us to remove drivers without any files left behind.
3.1 Uninstall Graphics Driver
- To uninstall Graphics Driver completely, Download Display Driver Uninstaller
- Once done, now boot your Windows in safe mode, as recommended by DDU. For that click the Start-Menu and click the Power button then select Restart While holding the shift key on the keyboard

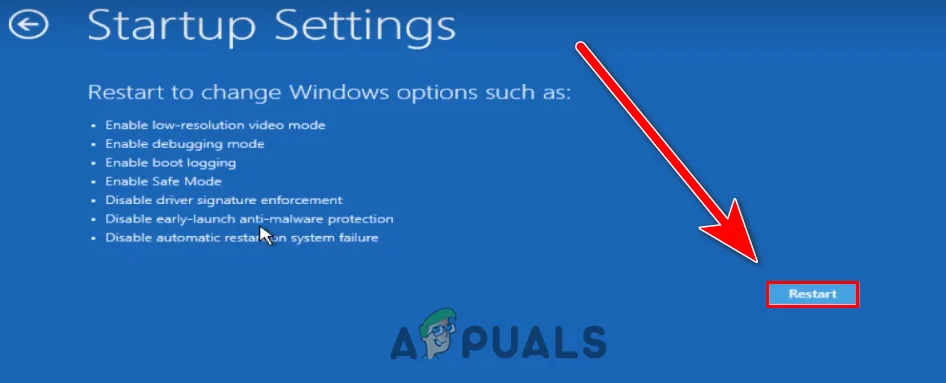
Restart Computer to Open Windows in Safe Mode - You will be redirected to the Windows options screen, where you will navigate to the Troubleshoot>Advanced option>Startup Settings
- Then, click Restart from the bottom right and wait for the Windows to boot up in the safe mode

Restarting Computer - Then, go to the downloads directory, right-click the zip folder and click Extract to [Guru3D.com] Note: You can use WinRar for this process to extract the zip folders.

Extracting DDU Zip Folder - Navigate to the extracted folder, and double click DDUv18.0.4.9
- A short Window will come up, click Extract

Extracting DDU Application - Again navigate to the extracted folder and launch the DDU application
- Now choose your device type and select the respective GPU vendor
- Once you selected, click Clean & Restart

Selecting Graphics Card Driver For the Uninstallation Process

3.2 Install Graphics Driver
We have mentioned the almost similar steps for installing the graphics driver, if you have AMD or INTEL graphics card, you either follow the below steps:-
- To install the latest Graphics driver, go to the respective GPU manufacturer’s website
- Choose the Graphics Card according to its specification and click on the Search button

Searching For Latest Graphics Drivers - Click Download to start the downloading process of the drivers

Downloading Graphics Driver - Once done, launch the installer and follow the on-screen instructions to install the drivers
- After the drivers’ installation, restart your computer for the changes to take effect
- Then, navigate to the device manager to check if the error is fixed.
4. Check legitimateness Of Nvidia Card
If the issue is still there, you may need to check the legitimacy of your Nvidia Card, if your card is fake, this error could arise until you change the graphics card. In this case, you need to ensure that your card is legit. For that, you have to install GPU-Z, an application that provides vital graphics card information. If your graphics card is fake, you will get a yellow warning with the [FAKE] before the model name of your graphics card.
- To check the legitimateness of the graphics card, Download GPU-Z
- After the downloading open the installer and follow the instruction to install it

Installing GPU-Z - Once done, launch the application and check your graphics card is legit.
5. Disable Automatically Updating Drivers From Windows
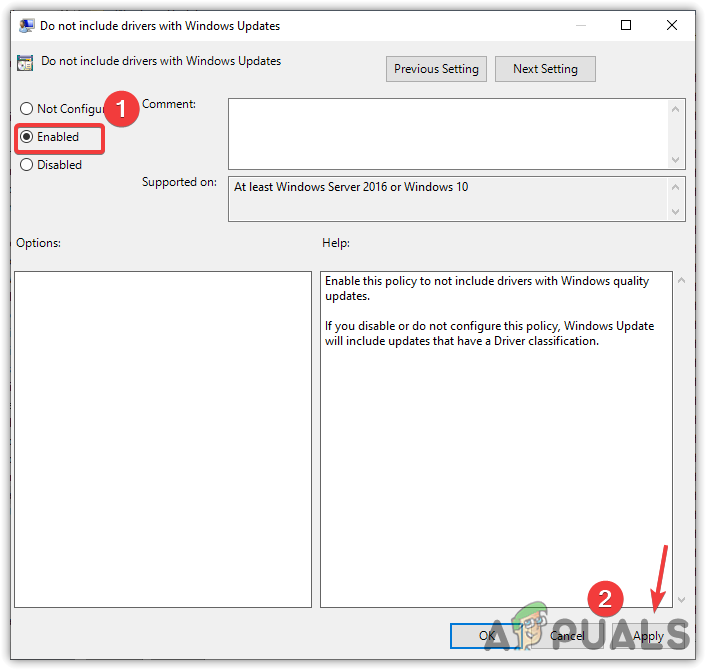
Another solution for this error is to disable automatic updates from windows as it can cause a conflict of drivers, which occurs when windows think it is the latest driver and install the outdated one. The driver you have already installed can conflict with a driver that windows installed. It is called driver conflict that can cause Error Code 43. To avoid this, you have to disable automatic driver updates from the Local Group Policy Editor.
Below are the steps that will help you to disable automatic updates:-
- Press the Windows + R keys simultaneously to open a Run dialogue box
- Type gpedit.msc and hit Enter to open Local Group Policy Editor
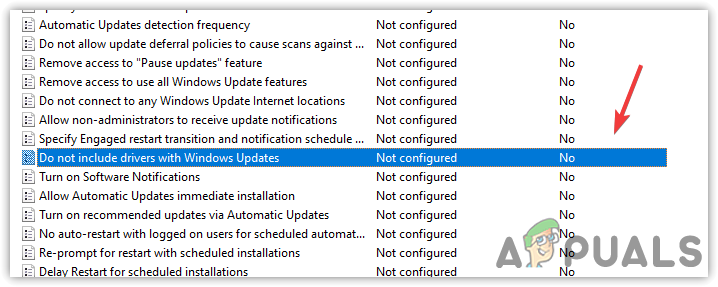
Launching Local Group Policy Editor - Once you are in the Group Policy Editor, navigate to the following directory
Computer Configuration > Administrative Templates > Windows Components > Windows Update
- For Windows 11 users, expand the Windows Update folder and navigate to Manage updates Offered From Windows Updates
- Now on the right pane, double click on Do not include drivers with Windows Update

Open Driver Setting - A short Window will appear, click Enabled then click Apply

Preventing Drivers From installing With Windows Updates - Once done, reinstall the drivers by following the above method.
6. Update BIOS
If the issue is still there, try updating bios as it can aid in fixing the problem. If your bios is outdated, try to update it from the manufacturer’s website and follow all the instructions they mentioned.
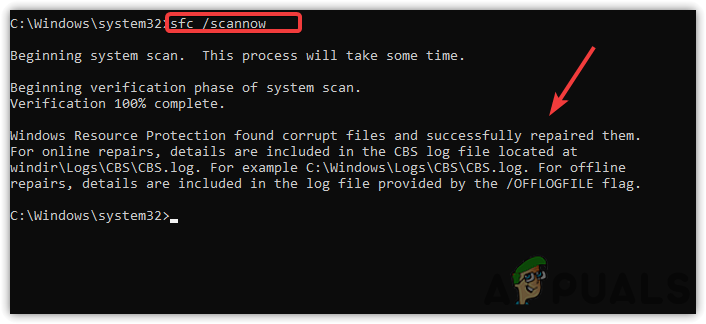
7. Run SFC and DISM Commands
Corrupted or missing system files are also included in causing Error Code 43. The easy way to repair corrupted files is by running commands to restore Windows images and files. These commands contain the DLL package and the files that will replace with the corrupted or missing ones.
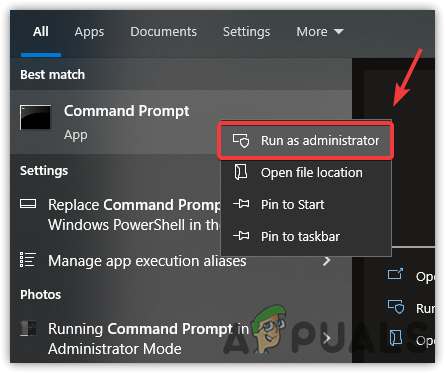
- To run SFC and DISM commands, click Start Menu and type Command Prompt
- Right-click on the command prompt and choose Run As Administrator

Running Command Prompt As Administrator - Once the terminal is launched, insert the following commands one by one and hit Enter
DISM /Online /Cleanup-Image /RestoreHealth
sfc /scannow

Repairing Corrupted Files - Once it is finished, go to the device manager and check if Error Code 43 persists.
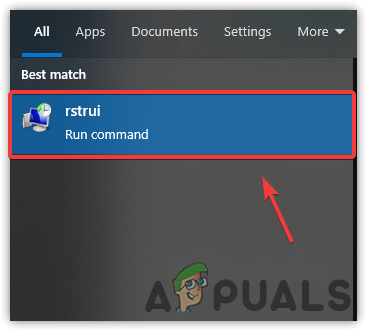
8. Revert System to Previous Restore Point
If none of the methods has worked, we recommend you restore Windows to a working condition. It requires a restore point created before you encounter the error message.
- To utilize a restore point, click Start Menu and type rstrui, and press enter to launch the restore settings

Launching System Restore Settings - Click Next and select a restore point then click Next

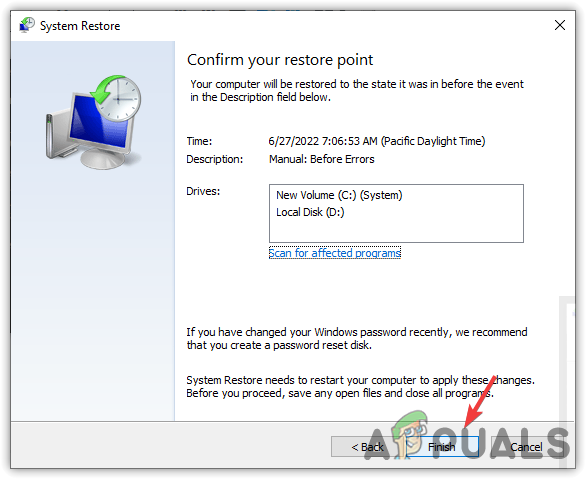
Selecting Restore Point - In the end, click Finish to start the restore process.
Click Finish To Proceed
Above, we have compiled all the solutions that have the potential to fix Error Code 43. If none of the methods worked, we recommend you take your laptop or computer to a repair shop as the problem might come from the hardware.

Kevin Arrows
Kevin is a dynamic and self-motivated information technology professional, with a Thorough knowledge of all facets pertaining to network infrastructure design, implementation and administration. Superior record of delivering simultaneous large-scale mission critical projects on time and under budget.