Вы хотите перейти на более новую версию Windows Server? Пришло время обновить Windows Server 2012 до Windows Server 2016. В Windows Server 2016 появилось множество полезных функций и улучшений.
Отметим основные особенности Windows Server 2016 – данная платформа поддерживает только 64-битную архитектуру, версия Itanium не поддерживается. Кроме того, имеется всего четыре редакции Windows Server 2012 и 2016.
Обновление Windows Server – это сложный процесс. Поэтому Microsoft рекомендует администраторам переносить роли и настройки на новый сервер с Windows Server 2016 не используя обновление (в режиме новой установки и миграции ролей), из-за возможности появления ошибок.
В нашей статье мы расскажем, как проапгрейдить Windows Server 2012 до Server 2016 без переустаноки (хотя это и не рекомендуется).
- Особенности обновления и конвертации Windows Server
- Запуск апгрейда Windows Server 2012 до Windows Server 2016
- Установка Windows Server 2016
Содержание:
Особенности обновления и конвертации Windows Server
Чтобы обновить Windows Server 2012 до Server 2016, вам необходимо учесть следующие требования:
Все редакции Windows Serer 2016 бывают только 64 битные (обновление с 32-разрядной Windows Server 2008 до 64-разрядной версии невозможно).
Windows Server 2012 можно обновить до Server 2016, более ранние версии Windows Server такой сценарий не поддерживают.
Не поддерживается обновление с одной редакции на другую ( т.е. нельзя обновить Windows Server 2012 Standart до версии Windows Server 2016 Datacenter).
- Обновление с одного языка на другой не поддерживается.
- Обновление, с переключением из режима Server Core в режим полноценного GUI (и наоборот) также не поддерживается.
- Обновление ранее установленной Windows Server на пробную версию Windows Server не поддерживается. Ознакомительные версии должны быть установлены в режиме чистой установки.
- При апгерейде отключите антивирусную защиту, поскольку она замедляет процесс, так как антивирус сканирует каждый файл, копируемый на диск.
- Если сервер использует NIC Teaming, отключите его. Вы можете включить NIC Teaming после завершения обновления ОС сервера.
- Прежде чем обновлять сервер создайте его резервную копию. При возникновении ошибок или проблем у вас будет возможность откатить систему к исходному состоянию.
- Проверьте, нет ли у в журналах сервера проблем и ошибок, если они есть – их необходимо устранить. В противном случае это может привести к ошибкам, которые способны спровоцировать сбой процесса обновления.
Запуск апгрейда Windows Server 2012 до Windows Server 2016
Теперь, когда вам известны и понятны правила апгрейда версий, давайте начнем.
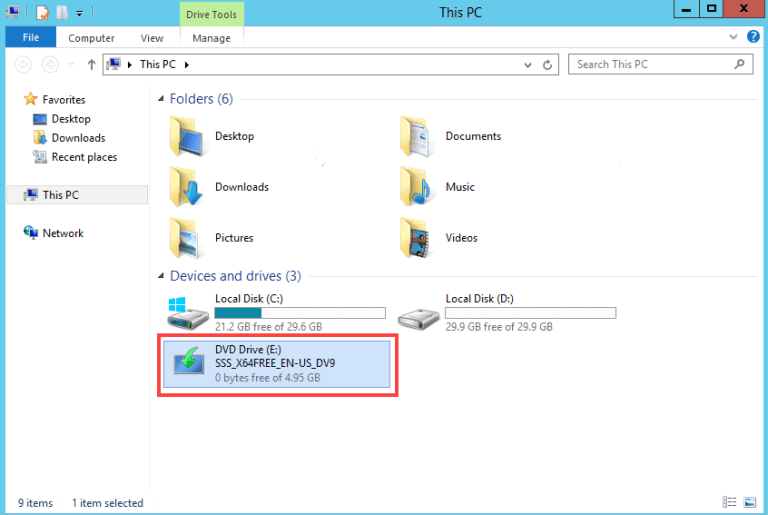
Авторизуйтесь на Windows Server 2012 и подключите к серверу установочный диск с Windows Server 2016 (в виде iso образа, или установочном DVD диске или USB флешке). Смонтируйте диск, откройте проводник и дважды щелкните по диску в устройстве DVD, чтобы запустить установку Windows Server 2016.
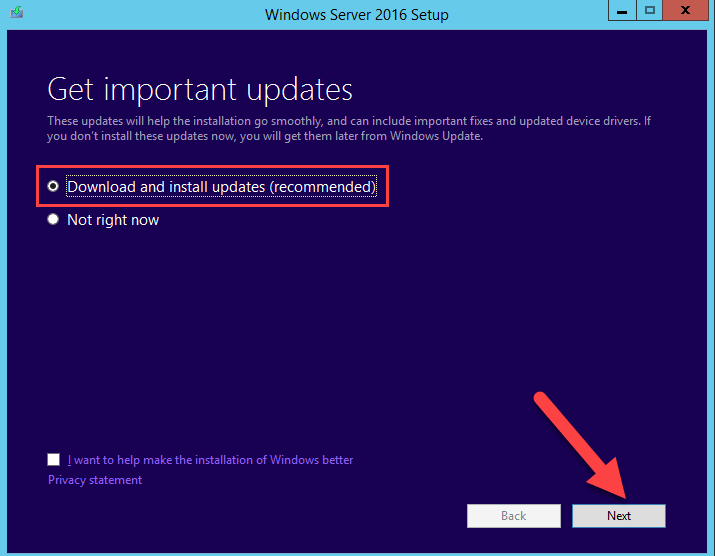
Выберите «Download & install updates», поставьте галочку напротив «I want to help make installation of Windows better». Нажмите кнопку «Next».
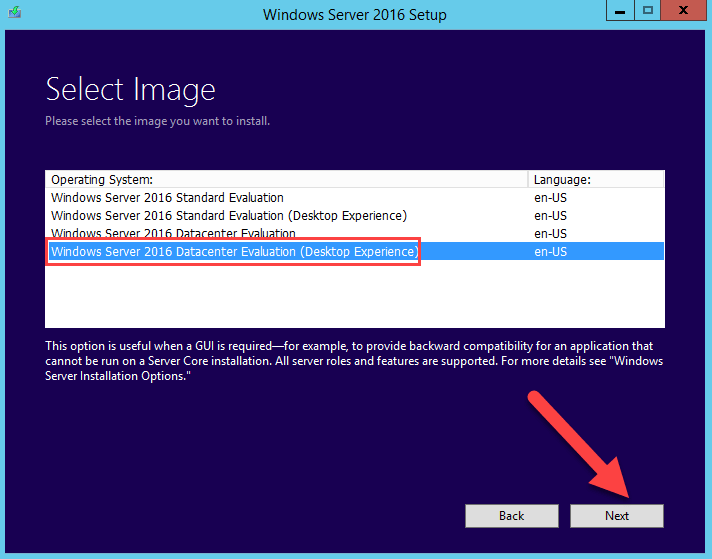
Выберите необходимую редакцию Windows Server 2016, которая соответствует ранее установленной редакции ОС. Нажмите кнопку «Next».
Прочитайте условия лицензионного соглашения. Если вы не согласны нажмите на кнопку «Decline», после чего вы вернетесь назад. Если вы согласны, нажмите кнопку «Accept».
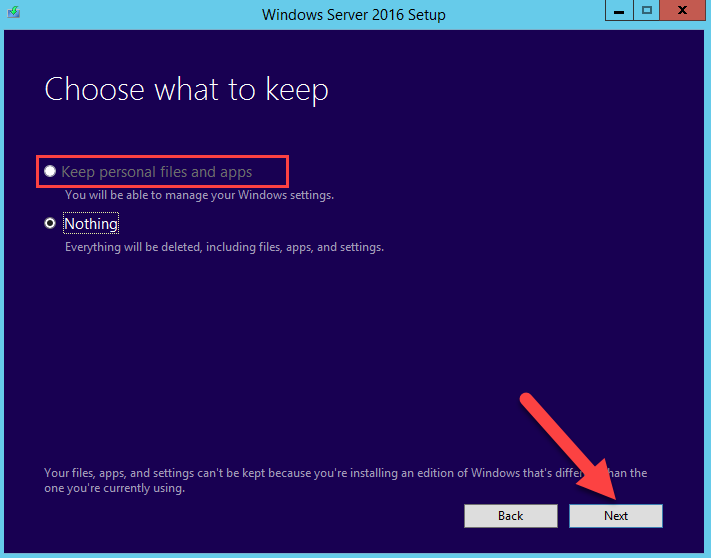
Если вы выбрали туже самую редакцию, которую используете в данный момент, вы можете сохранить свои приложения и файлы. Как уже упоминалось ранее, если вы выбрали неправильную редакцию, вы не сможете сохранить свои приложения и файлы. Выберите «Keep personal files and apps», если вы используете ту же редакцию или выберите «Nothing», чтобы затереть все. Затем нажмите кнопку «Next».
Установка Windows Server 2016
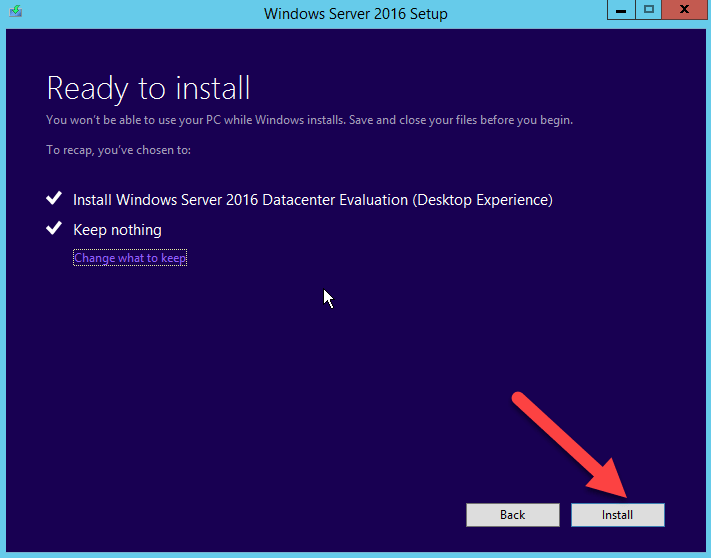
Windows Server автоматически проверит вашу систему на совместимость, поэтому просто нажмите кнопку «Install», чтобы начать установку.
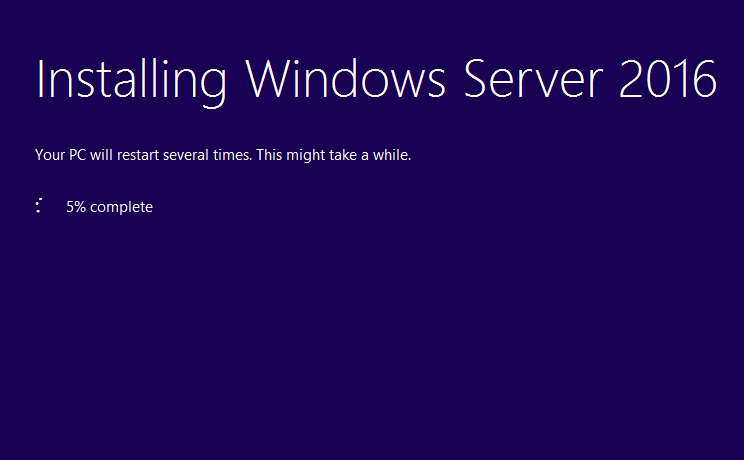
Будьте терпеливы, потому что процесс установки Windows Server занимает достаточно много времени. В процессе установки ваша система может перезагрузится несколько раз.
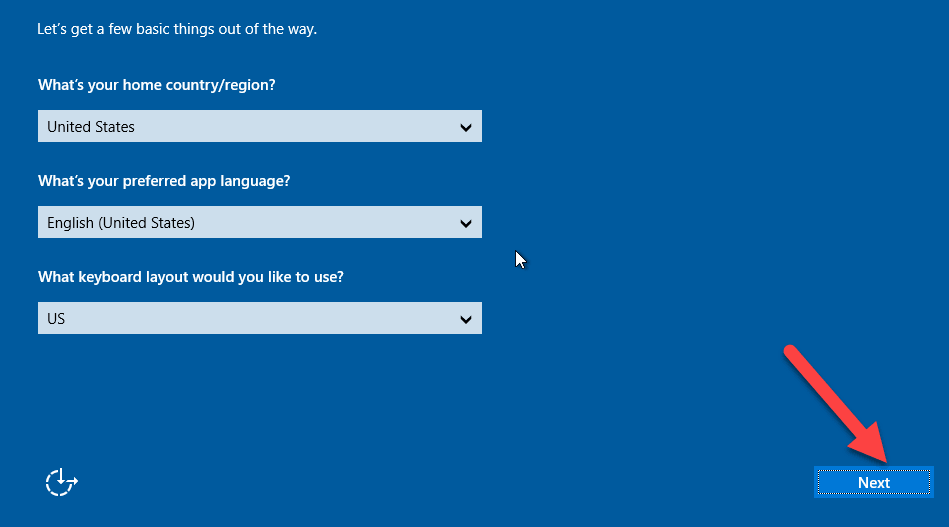
Выберите страну и предпочитаемую раскладку клавиатуры сервера.. Нажмите кнопку «Next», чтобы перейти к следующей странице.
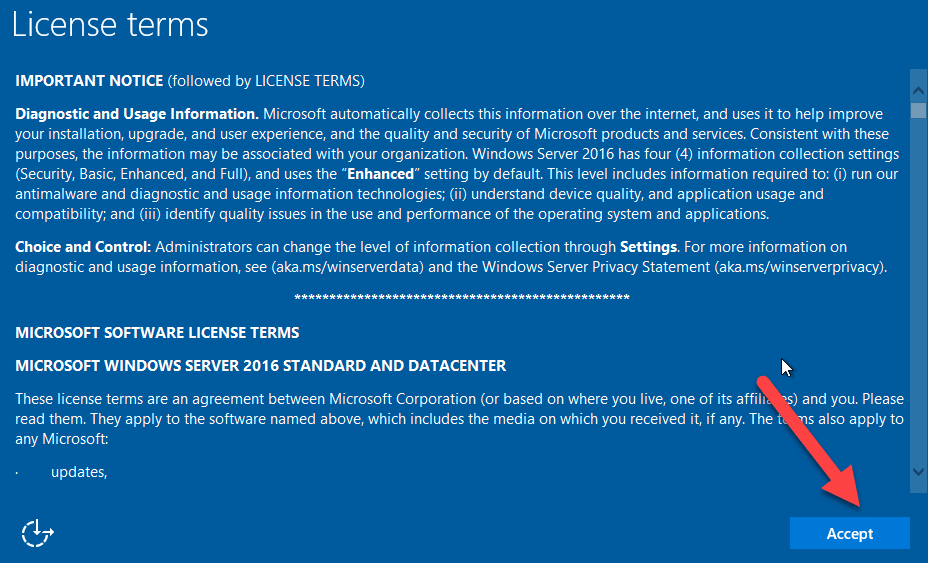
Внимательно прочитайте условия лицензии и нажмите кнопку «Accept».
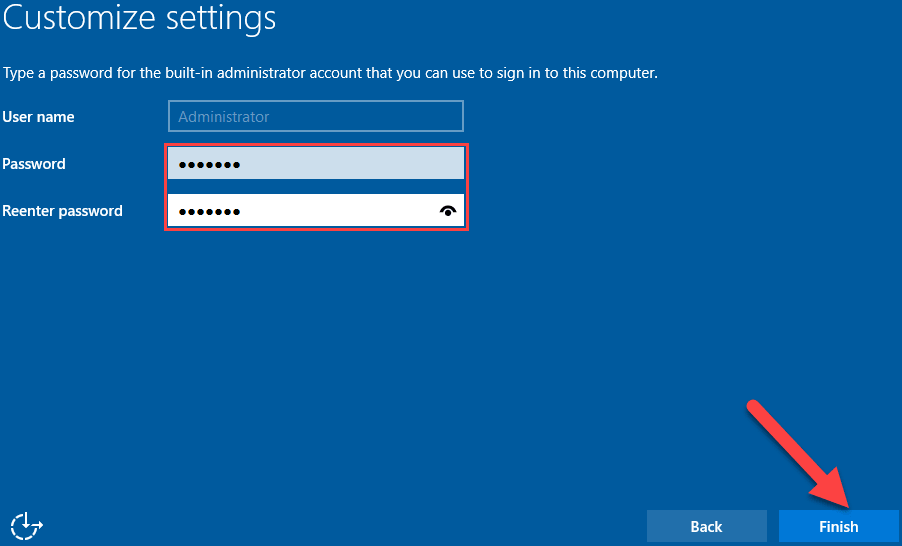
По умолчанию имя пользователя — «Administrator», придумайте ему сложный пароль (пароль, состоящий из строчных букв, прописных букв, цифр и символов). Повторно введите пароль. Затем нажмите кнопку «Finish». Используя эти имя пользователя и пароль, вы можете авторизоваться на сервере.
На экране входа нажмите нажатием клавиш Ctrl + Alt + Del, затем авторизуйтесь в системе, используя ранее созданную учетную запись.

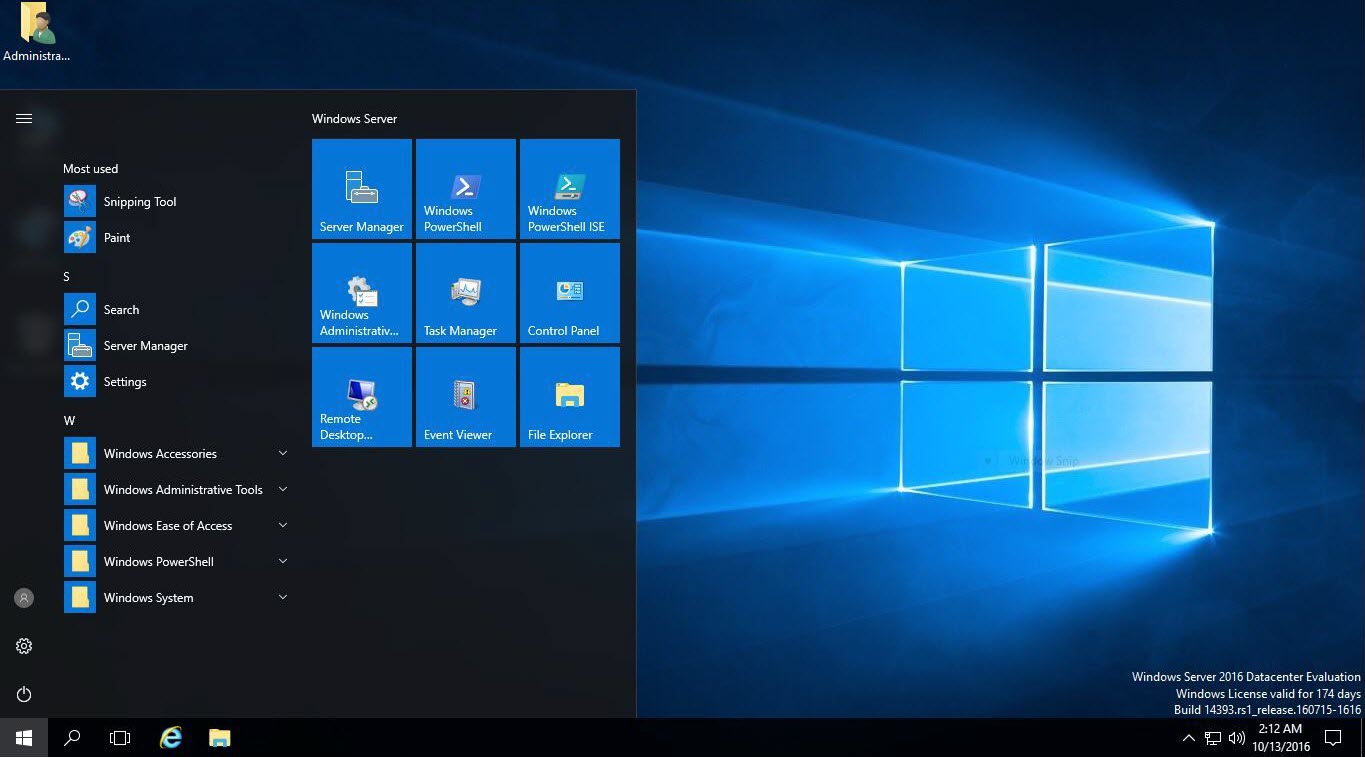
Добро пожаловать в Server Windows 2016. На этом процесс обновления Server Windows 2012 до Server Windows 2016 завершен. Теперь вы можете увидеть домашнюю страницу сервера Windows Server 2016 и оценить все нововведения.
Можете глубоко вдохнуть, процесс обновления прошел без ошибок. Не стесняйтесь, задавайте ваши вопросы и оставляйте комментарии ниже.
«… сильно плохо в 2016 с WSUS?? Я пока поднял DPM на нем для «попробовать», вроде нормально работает» — ну как Вам сказать… Для начала, потребовались некие пляски с бубном, для решения вроде бы известных
(как бы совсем старых) проблем, с которыми ранее (2008R2/2012R2) столкнуться не довелось, оно просто работало, на меньших ресурсах.
Сейчас вроде работает, системы (до 2016 / 10_1607) обновляются, только пару раз в день что-нибудь валится.
Попытка посмотреть в оснастке список синхронизаций уверенно заканчивается кнопкой «Сброс серверного узла» (никогда до 2016 не видел) с сопутствующей записью в логах —
System.Net.WebException — Время ожидания операции истекло
Source
System.Web.Services
Stack Trace:
в System.Web.Services.Protocols.WebClientProtocol.GetWebResponse(WebRequest request)
в Microsoft.UpdateServices.Internal.DatabaseAccess.ApiRemotingCompressionProxy.GetWebResponse(WebRequest webRequest)
в System.Web.Services.Protocols.SoapHttpClientProtocol.Invoke(String methodName, Object[] parameters)
в Microsoft.UpdateServices.Internal.ApiRemoting.ExecuteSPSearchUpdates(String updateScopeXml, String preferredCulture, Int32 publicationState)
в Microsoft.UpdateServices.Internal.DatabaseAccess.AdminDataAccessProxy.ExecuteSPSearchUpdates(String updateScopeXml, String preferredCulture, ExtendedPublicationState publicationState)
в Microsoft.UpdateServices.Internal.BaseApi.Update.SearchUpdates(UpdateScope searchScope, ExtendedPublicationState publicationState, UpdateServer updateServer)
в Microsoft.UpdateServices.UI.AdminApiAccess.UpdateManager.GetUpdates(ExtendedUpdateScope filter)
в Microsoft.UpdateServices.UI.AdminApiAccess.WsusSynchronizationInfo.InitializeDerivedProperties()
в Microsoft.UpdateServices.UI.SnapIn.Pages.SyncResultsListPage.GetSyncInfoRow(WsusSynchronizationInfo syncInfo)
в Microsoft.UpdateServices.UI.SnapIn.Pages.SyncResultsListPage.GetListRows()
При этом, я его сначала (сразу) обновил с MS, теперь он вроде благополучно обновляется сам с себя.
А вот ещё две тестовые установки… После попытки натравливания на WSUS, теперь не обновляются никак.
Логи Application по самое нехочу забиты вот этим —
Контейнер ошибки , тип 0
Имя события: WindowsUpdateFailure3
Отклик: Нет данных
Идентификатор CAB: 0
Сигнатура проблемы:
P1: 10.0.14393.0
…
Ну, и чтение англоязычных форумов по теме оптимизьма не внушает.
У Вас установка Core, или с GUI ? Если второе, в логах как? Оно обовляется? Сервайсы не валятся? Кортаны всякие, или ещё что, столь же необходимое на сервере?
S.A.
-
Изменено
Safronov A. _
22 декабря 2016 г. 16:45
| Workable Solutions | Step-by-step Troubleshooting |
|---|---|
| Windows Server Migration Checklist | #1. Download essential Windows server migration tool; #2. Find out your goals in Windows server migration…Full steps |
| Solution 1. Migration (Data, Apps, Account) | Step 1. Launch EaseUS Todo PCTrans on your source and target computers, connect both PCs via the internet…Full steps |
| Solution 2. In-place Upgrade (Everything) | Step 1. Create an image of all important data, apps, and even accounts on Windows Server 2012…Full steps |
Methods on this page are also applicable to Windows Server 2008/2008 R2/2012/2012 R2/2016/2019. It also works to upgrade and migrate Windows Server essentials to standards.
According to Microsoft, the new end-of-extended support date for Windows Server 2012 is October 10, 2023. The original date had been January 10, 2023.
It’s confirmed that Windows Server 2012 and Windows Server 2012 R2 supports will end by Oct.10th, 2023. And Microsoft has released two new Windows Servers — 2016 and 2019 for personal and enterprise users to explore their businesses on the new Windows Server systems. And it’s a smart choice to get things ready in advance. Therefore, it’s time to make a full plan of upgrading or migrating Windows Server 2012/2012 R2 to new Windows Server 2016/2019.
So how to successfully migrate your Windows Server 2012 to 2016 with all applications, data, and even accounts? If you are having the same doubts as listed here, stay calm and follow the provided tips in the following to get problems resolved:
- 1. Will I lose data while migrating Windows Server 2012 to 2016?
- 2. How do I upgrade Windows Server 2012 to 2019?
- 3. How to keep applications, data, accounts while migrating Windows Server 2012 to 2016/2019?
Windows Server Migration Checklist (2 Steps)
Here is a checklist that can be applied to upgrade and migrate Windows Servers applications, data, and accounts, etc., for all Windows Server users. Take the following two steps to get the right tool and resolution for Windows Server Migration:
- #1. Download Essential Windows Server Migration Tool
For most Windows Server users, the biggest challenge of migrating Windows Server is about how to fully transfer data, installed applications, and even Windows Server accounts to the new Windows Server machine. Advanced Windows Server PC transfer software — EaseUS Todo PCTrans Technician specializes in Windows Server data, app, account and settings migration between Windows Servers.
EaseUS Todo PCTrans Technician supports to transfer data, application, accounts via network or image on all Windows Servers, including Windows Server 2019/2016/2012/2012 R2/2008/2008 R2, etc.
EaseUS Todo PCTrans Technician
- ☆ Deploy & install Todo PCTrans on multiple PCs.
- Transfer unlimited files, programs, apps between Servers.
- Transfer account, domain account, and settings.
- Data rescue, find product key of installed programs.
- One license for multiple PCs.
- #2. Find Out Your Goals in Windows Server Migration
To find out the right way to migrate Windows Server, you should first find out your goals.
- If you want to transfer Windows Server OS to a new computer, try EaseUS Windows Server Migration Tool. You will successfully migrate Windows Server OS to a new computer without reinstalling the Server OS.
- If you only want to transfer Windows Server 2012 data, installed applications, account and settings to Windows Server 2016/2019 computer, follow Solution 1 listed below for help.
- If you want to perform an in-place upgrade from Windows Server 2012 to 2016/2019 or fresh install Windows Server 2016/2019 on old Windows Server 2012 but keep all data, installation apps, and account, follow Solution 2 on this page for help.
Solution 1. Migrate Windows Server 2012 to New Server 2016/2019 (Data, Apps, Account)
Applies to: Transfer data, installed applications, account and settings from Windows Server 2012 to new Windows Server 2016/2019 computers. No reinstallation is required.
To transfer Windows Server 2012 data, applications, and account, etc., to a new Windows server computer like 2016 or 2019, all you need is a reliable Windows Server PC Transfer software. EaseUS Todo PCTrans Technician is capable to help. It enables all levels of users to efficiently transfer everything from an old Windows Server computer to a new Server machine via the network connection.
See how to migrate Windows Server 2012 data, application, and even account to new Server step by step:
Step 1. Launch EaseUS Todo PCTrans on your source and target computers, connect both PCs via the internet.
1. At the «PC to PC» section, click «PC to PC» to continue.

2. Select your target computer via its device name, then enter its account password or verification code and select the transfer direction. Then click «Connect» to continue.
You can check the verification code on the right top of «PC to PC» mainscreen on the target computer.

Step 2. Select the categories Applications, Files, and Accounts to transfer via the internet.
If you want to transfer data selectively, click «Edit» under each category, and choose the specific items.

Step 3. Click «Transfer» to start transferring your apps/files/accounts from one computer to another computer via the Internet.

After the migration, you can restart the new Windows Server 2016 or 2019 computer and then continue using the software again. If some applications require reactivation, use your old key to activate the programs again.
Solution 2. In-place Upgrade Windows Server 2012 to 2016/2019, Keep Everything on Server
Applies to: In-place upgrade Windows Server 2012 to 2016 or 2019 and keep everything on the Server, including data, applications, and account, etc.
If you need to in-place upgrade Windows Server 2012 to newer Windows Server, keeping everything on the machine, follow the tutorial steps below carefully.
Step 1. Create an image of all important data, apps, and even accounts on Windows Server 2012
EaseUS Todo PCTrans with its Backup and Restore feature supports you to create an image backup of all important data, applications, accounts, etc., from Windows Server 2012 to an external hard drive.
Video Tutorial of Image Transfer using EaseUS Todo PCTrans:
Step 2. Perform in-place upgrade from Windows Server 2012 to 2016/2019, or fresh install Windows server 2016 on old Server PC.
If you don’t know how to perform Windows Server in-place upgrade, follow to the Microsoft tutorial: Upgrade Windows Server 2012 to Windows Server 2016 for help.
If you need to fresh install Windows Server 2016 or 2019 on the old Server machine, you need first download a Windows Server ISO and then follow the video below to clean install the Windows Server:
Video Tutorial to Install Windows Server 2016 produced by Server Academy on YouTube:
Step 3. Restore data, applications, accounts to new Windows Server via EaseUS Todo PCTrans using its Image Transfer feature.
If you lost some apps or data, you can use EaseUS Todo PCTrans Technician to selectively restore applications, data, and accounts to your new Windows Server 2016/2019.
Conclusion
On this page, we collected two solutions to help Windows Server users migrating Windows Server 2012 with data, applications, and accounts, etc., to Windows Server 2016/2019 using reliable PC transfer — EaseUS Todo PCTrans.
We also provide extra tips to help users to perform in-place upgrade or fresh install Windows Server 2016/2019 on old Windows Server machine. By following the provided tips, you can effortlessly move everything to the new Windows Server computer.
Windows Server 2012 Migration FAQs
If you have more questions about Windows Server migration, check the following questions and find answers here immediately.
1. Can Windows Server 2012 be upgraded to 2016?
Yes. Windows Server 2012 can be upgraded to 2016 in many ways. Here, we have collected all the possible ways that you can try to upgrade to Windows Server 2016 from 2012:
- Method 1. Use Windows Server migration tool: back up Windows Server 2016 OS and restore to the Windows Server 2012.
- Method 2. Perform in-place Windows Server upgrade from 2012 to 2016.
- Method 3. Clean install Windows Server 2016 on the old Windows Server 2012 computer.
2. Can Windows Server 2008 r2 be upgraded to 2016?
Sure. You can upgrade Windows Server 2008 r2 to 2016 by performing an in-place upgrade or fresh installing Windows Server 2016 on the computer. If you need to move data, applications, and account from the old Windows Server 2008 to new Windows server 2016, refer to Migrate Windows Server 20018 (R2) to 2016 step by step guide for help.
3. How do I migrate Windows Server 2012 R2 to 2019?
The ways to migrate Windows Server 2012 R2 to 2019 is similar to the ways as recommended on this page — migrating Windows Server 2012 to 216.
First, you need a reliable Windows PC transfer software that supports you to migrate old Windows Server data, apps, accounts to the new server computer.
Next, confirm your goals — to transfer data, apps, accounts between server machines, or to upgrade Windows server to 2019 but keep everything on the computer.
Last, take the right solution to migrate Windows Server 2012 R2 to 2019:
- If you need to migrate everything to a new Server computer, use the PC to PC feature in EaseUS Todo PCTrans Technician and migrate data, apps, accounts to Windows Server 2019 without losing anything.
- If you need to perform in-place upgrade or clean install Windows Sever 2019 on the old Server 2012 R2 computer, use Image Transfer feature in EaseUS Todo PCTrans to create an image of all important things, in-place upgrade or fresh install new Server, and then recover the image back to the computer.
| Workable Solutions | Step-by-step Troubleshooting |
|---|---|
| Windows Server Migration Checklist | #1. Download essential Windows server migration tool; #2. Find out your goals in Windows server migration…Full steps |
| Solution 1. Migration (Data, Apps, Account) | Step 1. Launch EaseUS Todo PCTrans on your source and target computers, connect both PCs via the internet…Full steps |
| Solution 2. In-place Upgrade (Everything) | Step 1. Create an image of all important data, apps, and even accounts on Windows Server 2012…Full steps |
Methods on this page are also applicable to Windows Server 2008/2008 R2/2012/2012 R2/2016/2019. It also works to upgrade and migrate Windows Server essentials to standards.
According to Microsoft, the new end-of-extended support date for Windows Server 2012 is October 10, 2023. The original date had been January 10, 2023.
It’s confirmed that Windows Server 2012 and Windows Server 2012 R2 supports will end by Oct.10th, 2023. And Microsoft has released two new Windows Servers — 2016 and 2019 for personal and enterprise users to explore their businesses on the new Windows Server systems. And it’s a smart choice to get things ready in advance. Therefore, it’s time to make a full plan of upgrading or migrating Windows Server 2012/2012 R2 to new Windows Server 2016/2019.
So how to successfully migrate your Windows Server 2012 to 2016 with all applications, data, and even accounts? If you are having the same doubts as listed here, stay calm and follow the provided tips in the following to get problems resolved:
- 1. Will I lose data while migrating Windows Server 2012 to 2016?
- 2. How do I upgrade Windows Server 2012 to 2019?
- 3. How to keep applications, data, accounts while migrating Windows Server 2012 to 2016/2019?
Windows Server Migration Checklist (2 Steps)
Here is a checklist that can be applied to upgrade and migrate Windows Servers applications, data, and accounts, etc., for all Windows Server users. Take the following two steps to get the right tool and resolution for Windows Server Migration:
- #1. Download Essential Windows Server Migration Tool
For most Windows Server users, the biggest challenge of migrating Windows Server is about how to fully transfer data, installed applications, and even Windows Server accounts to the new Windows Server machine. Advanced Windows Server PC transfer software — EaseUS Todo PCTrans Technician specializes in Windows Server data, app, account and settings migration between Windows Servers.
EaseUS Todo PCTrans Technician supports to transfer data, application, accounts via network or image on all Windows Servers, including Windows Server 2019/2016/2012/2012 R2/2008/2008 R2, etc.
EaseUS Todo PCTrans Technician
- ☆ Deploy & install Todo PCTrans on multiple PCs.
- Transfer unlimited files, programs, apps between Servers.
- Transfer account, domain account, and settings.
- Data rescue, find product key of installed programs.
- One license for multiple PCs.
- #2. Find Out Your Goals in Windows Server Migration
To find out the right way to migrate Windows Server, you should first find out your goals.
- If you want to transfer Windows Server OS to a new computer, try EaseUS Windows Server Migration Tool. You will successfully migrate Windows Server OS to a new computer without reinstalling the Server OS.
- If you only want to transfer Windows Server 2012 data, installed applications, account and settings to Windows Server 2016/2019 computer, follow Solution 1 listed below for help.
- If you want to perform an in-place upgrade from Windows Server 2012 to 2016/2019 or fresh install Windows Server 2016/2019 on old Windows Server 2012 but keep all data, installation apps, and account, follow Solution 2 on this page for help.
Solution 1. Migrate Windows Server 2012 to New Server 2016/2019 (Data, Apps, Account)
Applies to: Transfer data, installed applications, account and settings from Windows Server 2012 to new Windows Server 2016/2019 computers. No reinstallation is required.
To transfer Windows Server 2012 data, applications, and account, etc., to a new Windows server computer like 2016 or 2019, all you need is a reliable Windows Server PC Transfer software. EaseUS Todo PCTrans Technician is capable to help. It enables all levels of users to efficiently transfer everything from an old Windows Server computer to a new Server machine via the network connection.
See how to migrate Windows Server 2012 data, application, and even account to new Server step by step:
Step 1. Launch EaseUS Todo PCTrans on your source and target computers, connect both PCs via the internet.
1. At the «PC to PC» section, click «PC to PC» to continue.
2. Select your target computer via its device name, then enter its account password or verification code and select the transfer direction. Then click «Connect» to continue.
You can check the verification code on the right top of «PC to PC» mainscreen on the target computer.
Step 2. Select the categories Applications, Files, and Accounts to transfer via the internet.
If you want to transfer data selectively, click «Edit» under each category, and choose the specific items.
Step 3. Click «Transfer» to start transferring your apps/files/accounts from one computer to another computer via the Internet.
After the migration, you can restart the new Windows Server 2016 or 2019 computer and then continue using the software again. If some applications require reactivation, use your old key to activate the programs again.
Solution 2. In-place Upgrade Windows Server 2012 to 2016/2019, Keep Everything on Server
Applies to: In-place upgrade Windows Server 2012 to 2016 or 2019 and keep everything on the Server, including data, applications, and account, etc.
If you need to in-place upgrade Windows Server 2012 to newer Windows Server, keeping everything on the machine, follow the tutorial steps below carefully.
Step 1. Create an image of all important data, apps, and even accounts on Windows Server 2012
EaseUS Todo PCTrans with its Backup and Restore feature supports you to create an image backup of all important data, applications, accounts, etc., from Windows Server 2012 to an external hard drive.
Video Tutorial of Image Transfer using EaseUS Todo PCTrans:
Step 2. Perform in-place upgrade from Windows Server 2012 to 2016/2019, or fresh install Windows server 2016 on old Server PC.
If you don’t know how to perform Windows Server in-place upgrade, follow to the Microsoft tutorial: Upgrade Windows Server 2012 to Windows Server 2016 for help.
If you need to fresh install Windows Server 2016 or 2019 on the old Server machine, you need first download a Windows Server ISO and then follow the video below to clean install the Windows Server:
Video Tutorial to Install Windows Server 2016 produced by Server Academy on YouTube:
Step 3. Restore data, applications, accounts to new Windows Server via EaseUS Todo PCTrans using its Image Transfer feature.
If you lost some apps or data, you can use EaseUS Todo PCTrans Technician to selectively restore applications, data, and accounts to your new Windows Server 2016/2019.
Conclusion
On this page, we collected two solutions to help Windows Server users migrating Windows Server 2012 with data, applications, and accounts, etc., to Windows Server 2016/2019 using reliable PC transfer — EaseUS Todo PCTrans.
We also provide extra tips to help users to perform in-place upgrade or fresh install Windows Server 2016/2019 on old Windows Server machine. By following the provided tips, you can effortlessly move everything to the new Windows Server computer.
Windows Server 2012 Migration FAQs
If you have more questions about Windows Server migration, check the following questions and find answers here immediately.
1. Can Windows Server 2012 be upgraded to 2016?
Yes. Windows Server 2012 can be upgraded to 2016 in many ways. Here, we have collected all the possible ways that you can try to upgrade to Windows Server 2016 from 2012:
- Method 1. Use Windows Server migration tool: back up Windows Server 2016 OS and restore to the Windows Server 2012.
- Method 2. Perform in-place Windows Server upgrade from 2012 to 2016.
- Method 3. Clean install Windows Server 2016 on the old Windows Server 2012 computer.
2. Can Windows Server 2008 r2 be upgraded to 2016?
Sure. You can upgrade Windows Server 2008 r2 to 2016 by performing an in-place upgrade or fresh installing Windows Server 2016 on the computer. If you need to move data, applications, and account from the old Windows Server 2008 to new Windows server 2016, refer to Migrate Windows Server 20018 (R2) to 2016 step by step guide for help.
3. How do I migrate Windows Server 2012 R2 to 2019?
The ways to migrate Windows Server 2012 R2 to 2019 is similar to the ways as recommended on this page — migrating Windows Server 2012 to 216.
First, you need a reliable Windows PC transfer software that supports you to migrate old Windows Server data, apps, accounts to the new server computer.
Next, confirm your goals — to transfer data, apps, accounts between server machines, or to upgrade Windows server to 2019 but keep everything on the computer.
Last, take the right solution to migrate Windows Server 2012 R2 to 2019:
- If you need to migrate everything to a new Server computer, use the PC to PC feature in EaseUS Todo PCTrans Technician and migrate data, apps, accounts to Windows Server 2019 without losing anything.
- If you need to perform in-place upgrade or clean install Windows Sever 2019 on the old Server 2012 R2 computer, use Image Transfer feature in EaseUS Todo PCTrans to create an image of all important things, in-place upgrade or fresh install new Server, and then recover the image back to the computer.
[Updated on Date: 2021-01-27] Do you want to migrate to the new version of Windows Server? Since Windows Server 2016 offers new features compared to Windows Server 2012, your answer is probably yes. These new features have greatly improved the management of Windows Server. That’s why we decided to learn you How to upgrade Windows Server 2012 to 2016. You can choose your perfect Windows VPS Server Packages from Eldernode to install your required windows server.
Unlike upgrading previous versions of Windows Server to 2012, Windows Server 2016 only supports 64-bit architecture. In addition, Windows Server 2012 and 2016 have only 4 versions. Upgrading Windows Server is a complicated process. So, Microsoft recommends that instead of updating the entire Windows server, it upgrades the roles and settings of the Windows 2016 server.
Requirements for upgrading Windows 2012 to 2016
In order to be able to upgrade Windows Server 2012 to 2016, you must follow the following requirements:
1. All versions of Windows Server 2016 are 64-bit (upgrading from 32-bit to 64-bit is not possible.)
2. Only Windows Server 2012 can be upgraded to 2016, other versions cannot be upgraded.
3. Upgrades are not supported from one version to another. For example, you can’t upgrade the standard version of Windows Server 2012 to the Data Center version of Windows Server 2016.
4. It is not possible to upgrade from one language to another. For example, you can’t upgrade the German version of Windows Server to Chinese.
5. The upgrade from Server Core to Desktop version (or vice versa) is not supported.
6. Upgrading from older versions of Windows Server to trial versions of Windows Server is not supported. Trial versions must be installed manually.
7. Disable antivirus, because it scans every file that is copied to the disk and slows down the processing speed.
8. If this server uses NIC Teaming, disable it and reactivate it.
9. Make a full backup of the server, as you may have a problem during the upgrade and want to go back to the previous version.
10. Check that the server has no problems, if you see any problems, try to solve them. Otherwise, you may encounter an error that will cause the entire installation process to fail.
Upgrade with Step By Step :
Now that you understand the rules of the upgrade, let’s move on.
Log in to Windows Server 2012 and install DVD or Flash. Open File Explorer and click on DVD Drive as shown below:
Select Download & install updates to begin the Windows installation process.
Choose a version of Windows Server 2016 that suits your needs. You may need to enlarge the network in the future and require more roles and licenses. So be careful at this point.
In the license stage, click Accept. You will enter the next step.
If you have selected the same version as the previous version, you can keep all the applications and files in the system. As we said, if you don’t want to select the previous version, the apps and files will be deleted. Select Keep personal files and apps to save files and apps, otherwise, click Nothing to delete all files. Then click Next.
How to install Windows Server 2016
Windows Server automatically checks your system for compatibility. So, click Install to start the installation.
Wait a bit, because it will take a very long time to install Windows Server on your system. Your system will be reset several times during installation.
Select the country and keyboard language. Note that you cannot change the language. Click Next.
Click Accept on the License Terms page.
Username is the default Administrator, enter a password (code that contains uppercase and lowercase letters, numbers, and symbols), and re-enter the password. Then click Finish. You can log in to the server locally using this username and password.
Press Ctrl + Alt + Del to enter the login page and log in with the username and password.
Here we have successfully upgraded from Windows Server 2012 to 2016. By entering the Windows Server 2016 page, you can see the differences and improvements.
Conclusion
Before explaining how to upgrade Windows Server 2012 to 2016, we first needed to mention some of the requirements for updating to Windows Server 2016. Then, you were completely taught how to upgrade from Windows Server 2012 to Windows Server 2016.
| title | description | services | author | manager | ms.topic | ms.service | ms.date | ms.author | ms.openlocfilehash | ms.sourcegitcommit | ms.translationtype | ms.contentlocale | ms.lasthandoff | ms.locfileid |
|---|---|---|---|---|---|---|---|---|---|---|---|---|---|---|
|
Обновление Windows Server или System Center VMM 2012 R2 до Windows Server 2016-Azure Site Recovery |
Узнайте, как обновить узлы Windows Server 2012 R2 & SCVMM 2012 R2, настроенные с Azure Site Recovery, на Windows Server 2016 & SCVMM 2016. |
site-recovery |
Sharmistha-Rai |
gaggupta |
conceptual |
site-recovery |
12/03/2018 |
sharrai |
b3df487d690befadd249142c449163c2393f6df6 |
c8b50a8aa8d9596ee3d4f3905bde94c984fc8aa2 |
MT |
ru-RU |
03/28/2021 |
105640333 |
Обновление Windows Server Server/System Center 2012 R2 VMM до Windows Server или VMM 2016
В этой статье рассказывается об обновлении узлов Windows Server 2012 R2 и SCVMM 2012 R2, настроенных с помощью Azure Site Recovery, до Windows Server 2016 и SCVMM 2016
Служба Site Recovery помогает реализовать стратегию непрерывности бизнес-процессов и аварийного восстановления (BCDR). Служба гарантирует, что рабочие нагрузки ваших виртуальных машин остаются доступными, когда происходят ожидаемые и неожиданные сбои.
[!IMPORTANT]
При обновлении узлов Windows Server 2012 R2, которые уже настроены для репликации с помощью Azure Site Recovery, необходимо выполнить действия, описанные в этом документе. Любой альтернативный метод обновления может привести к неподдерживаемым состояниям и к сбою репликации или отработки отказа.
Из этой статьи вы узнаете, как обновить следующие конфигурации в вашей среде.
[!div class=»checklist»]
- Узлы Windows Server 2012 R2, которые не управляются SCVMM
- Узлы Windows Server 2012 R2, которые управляются автономным сервером SCVMM 2012 R2
- Узлы Windows Server 2012 R2, которые управляются высокодоступным сервером SCVMM 2012 R2
Предварительные условия и факторы, которые следует учитывать
Перед обновлением обратите внимание на следующее.
-
Если у вас узлы Windows Server 2012 R2, которые не управляются SCVMM, а работают в автономной конфигурации среды, при попытке выполнить обновление репликация завершится сбоем.
-
Если во время установки SCVMM 2012 R2 выбран параметр Не хранить мои ключи в Active Directory в разделе «Управление распределенными ключами», обновления могут завершиться сбоем.
-
Если вы используете System Center 2012 R2 VMM,
- Проверьте сведения о базе данных в VMM: параметры консоли VMM -> -> Общее -> Подключение к базе данных
- Проверьте учетные записи служб, которые используются для службы агента System Center Virtual Machine Manager
- Убедитесь, что у вас есть резервная копия базы данных VMM.
- Запишите имя базы данных задействованных в репликации серверов SCVMM. Это можно сделать, перейдя к параметрам консоли VMM -> -> Общее -> Подключение к базе данных .
- Запишите идентификаторы VMM: первичного сервера 2012 R2 и сервера восстановления VMM. Идентификатор VMM можно найти в реестре «HKLM: SOFTWAREMicrosoftMicrosoft System Center Virtual Machine Manager Серверсетуп».
- Убедитесь, что новые службы SCVMM, которые вы добавляете в кластер, имеют прежние имена.
-
Если вы выполняете репликацию между двумя сайтами, управляемыми службой SCVMM на обеих сторонах, прежде чем обновлять первичный сервер, убедитесь, что сервер восстановления обновлен.
[!WARNING]
При обновлении SCVMM 2012 R2 в разделе «Распределенное управление ключами», выберите хранить ключи шифрования в Active Directory. Тщательно выбирайте параметры для учетной записи службы и распределенного управления ключами. Исходя из вашего выбора, зашифрованные данные, такие как пароли в шаблонах, могут быть недоступны после обновления и могут повлиять на репликацию с помощью Azure Site Recovery.
[!IMPORTANT]
Дополнительные сведения о SCVMM см. в разделе Предварительные требования
Узлы Windows Server 2012 R2, которые не управляются SCVMM
Действия, описанные ниже, относятся к конфигурации пользователя из узлов Hyper-V в Azure, применяемой в соответствии с этим руководством.
[!WARNING]
Как уже упоминалось в предварительных условиях, эти шаги применимы только к сценарию кластерной среды, но не к автономной конфигурации узла Hyper-V.
- Выполните инструкции по использованию последовательного обновления кластера. для выполнения последовательного обновления кластера.
- Удалите ссылку на узел Windows Server 2012 R2 из Azure Site Recovery для каждого нового узла Windows Server 2016, представленного в кластере, выполнив шаги, упомянутые [здесь]. Это должен быть узел, выбранный для завершения задачи и отключения от кластера.
- Когда команда Update-VMVersion будет выполнена для всех виртуальных машин, эти обновления будут завершены.
- Выполните действия, указанные здесь, чтобы зарегистрировать новый узел Windows Server 2016 для Azure Site Recovery. Обратите внимание, что Hyper-V уже активирован на сайте, и вам просто нужно зарегистрировать новый узел в кластере.
- Перейдите к портал Azure и проверьте реплицированное состояние работоспособности в службах восстановления.
Обновление узлов Windows Server 2012 R2, которые управляются автономным сервером SCVMM 2012 R2
Перед тем как обновить узлы Windows Server 2012 R2, необходимо выполнить обновление SCVMM 2012 R2 до SCVMM 2016. Выполните следующие шаги.
Обновите автономную службу SCVMM 2012 R2 до SCVMM 2016
-
Чтобы удалить поставщик ASR, в Панели управления выберите «Программы -> Программы и компоненты ->Microsoft Azure Site Recovery» и нажмите «Удалить»
-
Сохраните базу данных SCVMM и обновите операционную систему
-
В разделе Установка и удаление программ выберите VMM > Удаление. b. Выберите удалить компоненты, а затем выберите V mm сервер управления и консоль VMM. c. В разделе Параметры базы данных выберите Сохранить базу данных. d. Просмотрите итоги и нажмите кнопку Удалить.
-
Установка VMM 2016
-
Запустите SCVMM и проверьте состояние каждого узла на вкладке структуры . Нажмите кнопку Обновить , чтобы получить самое последнее состояние. Вы должны увидеть состояние «требует внимания».
-
Установите последнюю версию Microsoft Azure Site Recovery Provider на сервер SCVMM.
-
Установите последнюю версию агента Microsoft Azure Recovery Service (MARS) на каждом узле кластера. Обновите, чтобы убедиться, что SCVMM успешно может запрашивать узлы.
Обновите Windows Server 2012 R2 до Windows Server 2016
- Для выполнения последовательного обновления кластера выполните действия, описанные здесь.
- После добавления нового узла в кластер, обновите его из консоли SCVMM для установки агента VMM на обновленный узел.
- Выполните обновление версии виртуальной машины с помощью команды Update-VMVersion.
- Перейдите к портал Azure и проверьте реплицированное состояние работоспособности виртуальных машин в хранилище служб восстановления.
Обновление узлов Windows Server 2012 R2, которые управляются высокодоступным сервером SCVMM 2012 R2
Перед тем как обновить узлы Windows Server 2012 R2, необходимо выполнить обновление SCVMM 2012 R2 до SCVMM 2016. При обновлении серверов SCVMM 2012 R2, настроенных с помощью Azure Site Recovery, поддерживаются следующие режимы обновления: смешанный режим без дополнительных серверов VMM и смешанный режим с дополнительными серверами VMM.
Обновление SCVMM 2012 R2 до SCVMM 2016
- Чтобы удалить поставщик ASR, в Панели управления выберите «Программы -> Программы и компоненты ->Microsoft Azure Site Recovery» и нажмите «Удалить»
- В зависимости от выбранного режима обновления, выполните шаги, описанные здесь.
- Запустите консоль SCVMM и проверьте состояние каждого узла на вкладке структуры . Нажмите кнопку Обновить , чтобы получить самое последнее состояние. Вы должны увидеть состояние «требует внимания».
- Установите последнюю версию Microsoft Azure Site Recovery Provider на сервер SCVMM.
- Обновите последнюю версию агента Microsoft Azure Recovery Service (MARS) на каждом узле кластера. Обновите, чтобы убедиться, что SCVMM успешно может запрашивать узлы.
Обновите Windows Server 2012 R2 до Windows Server 2016
- Для выполнения последовательного обновления кластера выполните действия, описанные здесь.
- После добавления нового узла в кластер, обновите его из консоли SCVMM для установки агента VMM на обновленный узел.
- Выполните обновление версии виртуальной машины с помощью команды Update-VMVersion.
- Перейдите к портал Azure и проверьте реплицированное состояние работоспособности виртуальных машин в хранилище служб восстановления.
Дальнейшие шаги
При выполнении обновления узлов можно выполнить тестовую отработку отказа, чтобы проверить работоспособность репликации и статус восстановления.
Обновлено 01.10.2020
Добрый день! Уважаемые читатели и гости одного из крупнейших IT блогов России Pyatilistnik.org. В прошлый раз мы с вами Рассматривали интеграцию драйверов в Windows 7 через usb 3.0 creator utility. Время идет вперед, операционные системы улучшаются и всегда встает задача перехода на более свежее ПО. В сегодняшней публикации мы с вами разберем, как производится мигрирование Remote Desktop Services High Availability на базе Windows Server 2012 R2 на Windows Server 2016-2019. Я покажу какие есть варианты перехода, которые будут зависеть от ваших размеров организации.
Постановка задачи
Есть доменная инфраструктура Active Directory, в ней существует отказоустойчивая RDS ферма на базе Windows Server 2012 R2, в компании было принято решение, о переходе в качестве корпоративного стандарта ОС на Windows Server 2016. Сама RDS ферма состоит из 50 RDSH хостов и обслуживает свыше 4000 пользователей. Хочется максимально безболезненно перевести пользователей на новую RDS. Ниже я покажу несколько вариантов миграции.
Варианты миграции RDS фермы
Существует как минимум два варианта, которые вам позволят произвести переход вашей старой RDS фермы на новую. Тут все будет зависеть от ваших свободных ресурсов. Будет ряд шагов общих для обоих вариантов. Вначале вы разворачиваете отказоустойчивую Remote Desktop Services High Availability на базе Windows Server 2016. Вам нужно получить как минимум два хоста RDCB и один хост RDSH, как это делается смотрите по ссылке. Далее два варианта:
- Вы уведомляете пользователей, что будут произведены работы по модернизации RDS фермы. Переводите все узлы подключения в режим стока. После чего вы удаляете один из RDSH хостов из коллекции в текущей RDS ферме, через оснастку управления.
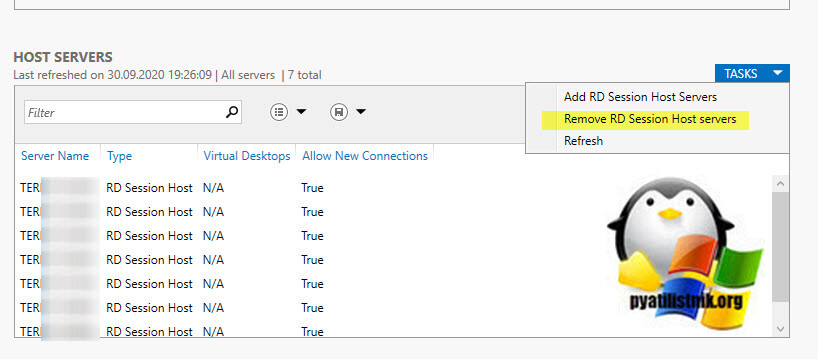
После чего вы данный хост добавляете в новую RDS ферму на базе WindowsServer 2016. Проделываем так со всеми RDSH хостами. Когда все хосты подключений будут управляться новыми брокерами и будут уже частью новой коллекции. Вам остается только произвести переключение DNS записи на новый RDS HA пул. Потом вы спокойно будите добавлять по одному новому хосту с Windows Server 2016, меняя его на старые с Windows Server 2012. Через какое-то время вы все так замените.
Не забываем про свои групповые политики которые были на старой RDS ферме. Вам нужно все будет перенести, чтобы пользователи ничего не увидели
На этом обновление RDS фермы Windows Server 2012 на Windows Server 2016 можно почти считать готовым, за исключением того, если у вас используются перемещаемые профили пользователей. Я не зря завел разговор про перемещаемые профили, так как у них немного другой формат в новой ОС. На RDS Windows Server 2012 R2 профиль имеет формат username.domain.V2, а вот уже у Windows Server 2016 формат username.domain.V6. Все отличие в цифре. Так, что если вы хотите, чтобы пользователи увидели свои данные при следующем подключении, вам необходимо переименовать старые профили на новый манер. Если у вас их мало, то можно сделать и вручную, но если как у меня, это тысячи пользователей, то тут нужно скриптовать.

Скрипт переименовывания профилей V2 на V6
Ниже скрипт PowerShell, он имеет два варианта, либо переименовать все профили в нужном каталоге, либо переименовать только те, что подсовываются в текстовом файле.
function Date {Get-Date -Format «yyyy.MM.dd HH:mm:ss»}
$folder_to_process = «M:ShareTS» # «Путь до папки с перемещаемыми профилями»
$userlist_file = «C:Tempuser.txt» # «Путь до файла со списком пользователей»
# 1. По возможности все папки у которых в имени .V2 на конце, переименовать в .V6
$process_full_folder = $false # Если стоит false, то массового переименовывания не будет, использовать при точечном варианте
# 2. Подсунуть список из файла с именами логинов, и только их папки если там .V2 переименовать в .V6
$process_from_file = $true # Ставим false, если нужно массово переименовать все профили в определенном каталоге
if ($process_full_folder)
{
«$(Date) Processing whole folder $folder_to_process»
foreach ($folder in (Get-ChildItem $folder_to_process -Directory | ? {$_.Name -like «*.V2»}))
{
$newname = $folder.Name -replace «.V2», «.V6»
«$(Date) Renaming folder $($folder.Name) to $newname»
try {
Rename-Item -Path $folder.FullName -NewName $newname -ErrorAction Stop
}
catch {
«$(Date) $($_.exception.message)» #| Tee-Object $log -Append
}
}
}
###
if ($process_from_file)
{
«$(Date) Processing folders from file $userlist_file»
foreach ($username in (Get-Content $userlist_file))
{
$folders = $null
$folders = Get-ChildItem $folder_to_process | ? {$_.Name -like «$username.*.V2»}
if ($folders)
{
foreach ($folder in $folders)
{
$newname = $folder.Name -replace «.V2», «.V6»
«$(Date) Renaming folder $($folder.Name) to $newname»
try {
Rename-Item -Path $folder.FullName -NewName $newname -ErrorAction Stop
}
catch {
«$(Date) $($_.exception.message)» #| Tee-Object $log -Append
}
}
}
else
{
«$(Date) Unable to find suitable folder for username `»$username`»»
}
}
}
Скрипт переименовывания профилей V6 на V2
function Date {Get-Date -Format «yyyy.MM.dd HH:mm:ss»}
$folder_to_process = «M:ShareTS» # «Путь до папки с перемещаемыми профилями»
$userlist_file = «C:Tempuser.txt» # «Путь до файла со списком пользователей»
# 1. По возможности все папки у которых в имени .V6 на конце, переименовать в .V2
$process_full_folder = $false
# 2. Подсунуть список из файла с именами логинов, и только их папки если там .V6 переименовать в .V2
$process_from_file = $true
if ($process_full_folder)
{
«$(Date) Processing whole folder $folder_to_process»
foreach ($folder in (Get-ChildItem $folder_to_process -Directory | ? {$_.Name -like «*.V6»}))
{
$newname = $folder.Name -replace «.V6», «.V2»
«$(Date) Renaming folder $($folder.Name) to $newname»
try {
Rename-Item -Path $folder.FullName -NewName $newname -ErrorAction Stop
}
catch {
«$(Date) $($_.exception.message)» #| Tee-Object $log -Append
}
}
}
###
if ($process_from_file)
{
«$(Date) Processing folders from file $userlist_file»
foreach ($username in (Get-Content $userlist_file))
{
$folders = $null
$folders = Get-ChildItem $folder_to_process | ? {$_.Name -like «$username.*.V6»}
if ($folders)
{
foreach ($folder in $folders)
{
$newname = $folder.Name -replace «.V6», «.V2»
«$(Date) Renaming folder $($folder.Name) to $newname»
try {
Rename-Item -Path $folder.FullName -NewName $newname -ErrorAction Stop
}
catch {
«$(Date) $($_.exception.message)» #| Tee-Object $log -Append
}
}
}
else
{
«$(Date) Unable to find suitable folder for username `»$username`»»
}
}
}
Ну и план отката, если нужно вернуть все профили в исходное состояние.
- Второй вариант миграции RDS фермы Windows Server 2012 на Windows Server 2016 заключается в том, что вы параллельно создаете с новым именем RDS ферму с небольшим количеством хостов, настраиваете там все групповые политики и нормативы вашей компании. Далее я вам советую произвести выгрузку пользователей, чтобы понять когда последний раз у них изменялся перемещаемый профиль, делается, это для того, чтобы исключить лишние профили, которые не нужно переносить. Далее начинаете процесс миграции и переименовывание профилей. По мере увеличения количества пользователей на новой RDS ферме вы будите тушить старые хосты и ресурсы освободившиеся от них добавлять новым RDSH хостам в новой ферме. Через какое-то время вы все спокойно перевезете, в конце сможете еще так же переключить старое DNS имя на новое, чтобы те кто по ошибке будут ошибочно подключаться, попадали так же на новый терминал. Данный метод хорош тем, что у вас при наличии ресурсов, останется старая ферма на случай проблем с новой.
Так же советую посмотреть документацию Microsoft — https://docs.microsoft.com/en-us/windows-server/remote/remote-desktop-services/migrate-rds-role-services
На этом у меня все, мы с вами разобрали варианты обновления RDS фермы Windows Server 2012 на Windows Server 2016. С вами был Иван Семин, автор и создатель IT портала Pyatilistnik.org.