![]()
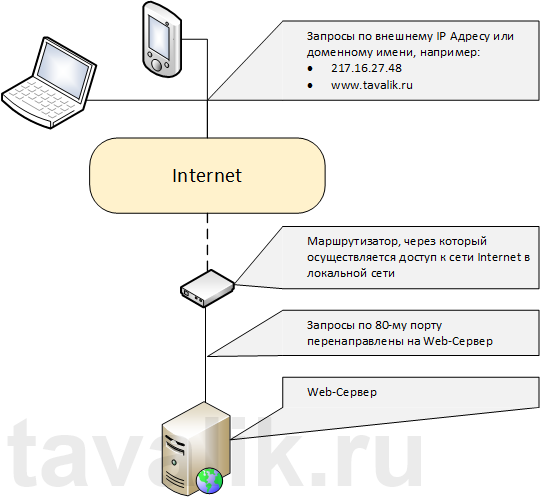
Веб-сервер представляет собой некоторую программу (службу), принимающую HTTP-запросы от клиентов, обычно от веб-браузеров, обрабатывающую данные запросы и выдающую им ответ, как правило, вместе с HTLM-страницей (сайтом), изображением, файлом, медиа-потоком или другими данными. Ниже подробно рассмотрим процесс установки подобной службы, а именно веб-сервера IIS 8 (Internet Information Server) входящего в поставку Microsoft Windows Server 2012 R2.
0. Оглавление
- Установка веб-сервера IIS
- Перезапуск сервера IIS
1. Установка веб-сервера IIS
Запускаем Диспетчер серверов (Server Manager). Его можно запустить с ярлыка на панели задач, или же выполнив команду servermanager.exe (Для этого необходимо нажать комбинацию клавиш Win + R, в появившемся окне в поле «Открыть» (Open) написать имя команды и нажать «ОК» ).

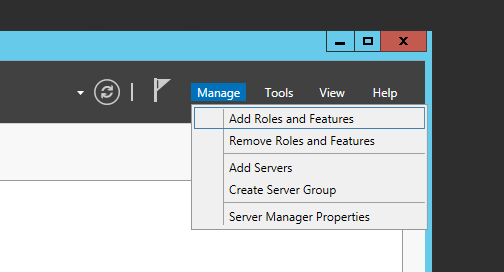
В диспетчере серверов, в меню, расположенном в правом верхнем углу окна, выберем «Управление» (Manage) — «Добавить роли и компоненты» (Add Roles and Features)

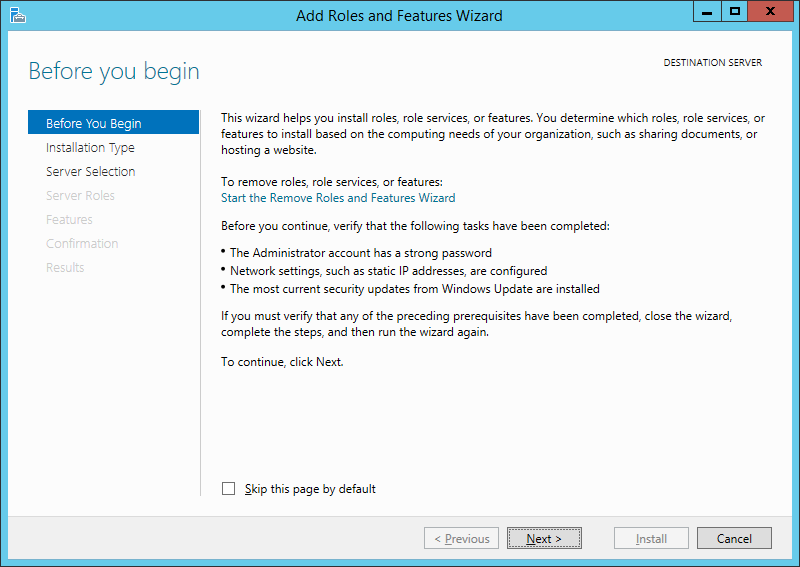
Запустится Мастер добавления ролей и компонентов (Add Roles and Features Wizard). Нажимаем «Далее» (Next) на стартовой странице.

Тип установки (Installation Type) отмечаем «Установка ролей или компонентов» (Role-based or feature-based installation) и нажимаем «Далее» (Next).

Выбираем текущий сервер из пула серверов (Select a server from the server pool) и снова жмем «Далее» (Next).

На следующем шаге выбираем роль, которую необходимо установить. В нашем случае это роль «Веб-сервер (IIS)» (Web Server). Отмечаем ее в списке.

При этом мастер предложит нам добавить компоненты, необходимые для Веб-сервера, а именно «Консоль управления службами IIS» (IIS Management Console). Соглашаемся на установку дополнительных компонент нажав «Добавить компоненты» (Add Features) и жмем «Далее» (Next).

Оставляя список компонент без изменений нажимаем «Далее» (Next).

Ознакомившись с информацией о роли веб-сервера снова жмем «Далее» (Next).

Затем необходимо выбрать службы ролей, которые будут установлены для веб-сервера. Этот набор зависит от конкретных задач, которые будет выполнять сервер IIS.
Например, для публикации баз данных «1С:Предприятие» 8 на веб-сервере или для запуска сайта на WordPress, требуется установка компонент:
- Общие функции HTTP (Common HTTP Features)
- Статическое содержимое (Static Content)
- Документ по умолчанию (Default Document)
- Обзор каталогов (Directory Browsing)
- Ошибки HTTP (HTTP Errors)
- Разработка приложений (Application Development)
- ASP
- ASP.NET 3.5
- Расширяемость .NET 3.5 (.NET Extensibility 3.5)
- Расширения ISAPI (ISAPI Extensions)
- Фильтры ISAPI (ISAPI Filters)
- Исправление и диагностика (Health and Diagnostics)
- Ведение журнала HTTP (HTTP Logging)
- Монитор запросов (Request Monitor)
- Средства управления (Management Tools)
- Консоль управления IIS (IIS Management Console)
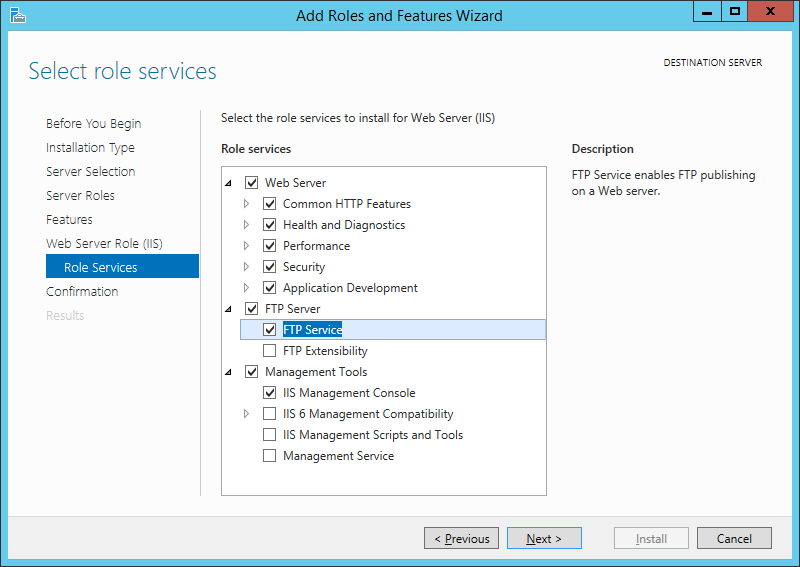
Для установки FTP-сервера требуются компоненты:
- FTP-Сервер (FTP Server)
- Служба FTP (FTP Service)
- Расширяемость FTP (FTP Extensibility)
и т. д. Если выделить службу в списке, слева доступно ее краткое описание. Выбрав необходимые службы ролей жмем «Далее» (Next).

Устанавливаем флаг «Автоматический перезапуск конечного сервера, если требуется» (Restart the destination server automatically if required) если перезагрузка не помешает работе других пользователей и жмем «Установить» (Install) для начала установки указанных в списке служб.

Дожидаемся завершения установки веб-сервера (может произойти перезагрузка сервера) и нажимаем «Закрыть» (Close) для завершения работы мастера.

Возвращаемся в диспетчер серверов, в меню «Средства» (Tools) выбираем появившейся там пункт «Диспетчер служб IIS» (Internet Information Services).

В запустившемся Диспетчере служб IIS, в окне подключений (Connections) увидим только что установленные веб-сервер (соответствует сетевому имени компьютера) а также один веб-сайт, добавленный по умолчанию, с названием Default Web Site.

Данный сайт представляет одну веб-страницу с приветствием на различных языках и откликается на все запросы к данному веб-серверу по 80-му порту. Чтобы просмотреть его, достаточно запустить веб-браузер, например Internet Explorer, и ввести в строку адреса http://localhost.

Также этот сайт можно просмотреть с любого другого компьютера в сети, забив в строку адресе IP компьютера где установлен веб-сервер IIS.

Файлы этого сайта, как и файлы всех других добавленных позже сайтов по умолчанию располагаются в каталоге C:interpubwwwroot.

Ну и соответственно, чтобы сайты расположенные на данном веб-сервере были доступны из сети Интернет по внешнему IP-адресу или доменному имени (о том как привязать доменное имя к IP-адресу читайте здесь), необходимо на маршрутизаторе выполнить проброс 80-ого порта на компьютер с установленным веб-сервером IIS.
2. Перезапуск сервера IIS
Иногда требуется перезапустить веб сервер IIS. Сделать это можно как из Диспетчера служб IIS, кликнув правой кнопкой мыши по серверу в окне подключений или из меню «Действия» (Action)

так и из командной строки, выполнив команду
iisreset /noforce <имя_компьютера>
где:
- параметр /noforce необязателен и используется для защиты от потери данных в случае, когда службы IIS не могут быть остановлены в течение одноминутного периода ожидания.
- параметр <имя_компьютера> также необязателен при работе на локальном компьютере. В случае удаленного администрирования сервера IIS в качестве параметра <имя_компьютера> указывается имя NetBIOS компьютера, на котором выполняется перезапуск IIS.

При перезапуске веб сервера IIS происходит перезапуск следующих служб (если они устанавливались при установке компонент IIS):
| Служба | Описание |
|---|---|
| Служба IIS Admin | Эта служба управляет всеми службами IIS, кроме службы WWW (FTP, NMTP и SMTP). |
| Служба WWW | Эта служба обеспечивает подключения клиентов к веб-узлам. |
| Служба HTTP SSL | Эта служба обеспечивает безопасные подключения клиентов к веб-узлам. |
| Служба FTP | Эта служба обеспечивает FTP-подключения и администрирование в диспетчере IIS. |
| Служба SMTP | Эта служба обеспечивает передачу электронной почты по сети. |
| Служба NNTP | Эта служба обеспечивает передачу электронных новостей по сети. |
| title | author | description | ms.date | ms.assetid | msc.legacyurl | msc.type |
|---|---|---|---|---|---|---|
|
Installing IIS 8.5 on Windows Server 2012 R2 |
rick-anderson |
This content describes how to install Internet Information Services (IIS) 8.5 on Windows Server 2012 R2 using Server Manager, DISM, or PowerShell. |
09/09/2013 |
0bdb99f5-43ee-4784-b7f4-d4f52b1949ad |
/learn/install/installing-iis-85/installing-iis-85-on-windows-server-2012-r2 |
authoredcontent |
Installing IIS 8.5 on Windows Server 2012 R2
This document describes how to install Internet Information Services (IIS) 8.5 on Windows Server® 2012 R2. IIS is the Web server role in Windows Server 2012 R2. The Windows Server 2012 R2 operating system has all the IIS features needed to support the hosting of Web content in production environments. Windows 8 also includes IIS features, but feature availability depends on the operating system version.
[!NOTE]
You can use the procedures in this document to install IIS 8.0 or IIS 8.5.
The Web server has a modular design that enables you to customize a server by adding or removing modules to meet your specific needs. The Install IIS 8.5 on Windows Server 2012 R2 section describes how to install modules, and the Modules in IIS 8.5 section below describes the functionality that each module provides and which modules are installed by default.
New in IIS 8.5
IIS 8.5 includes several new features not found in IIS 8.0 or lower:
- Enhanced logging. An administrator can enable the logging of additional custom fields from request or response headers, or from server variables.
- Logging to event tracing for Windows. An administrator can enable the sending of logging information to Event Tracing for Windows (ETW).
- Dynamic Website activation. If there are a large number of configured sites (100 or greater, by default), the service will not activate any of the sites when the service is started.
- Idle Worker Process Page-Out. An administrator can enable an idle worker process to be suspended rather than terminated.
For more information on these features, see What’s New in IIS 8.5.
For information on new features in IIS 8.0, see What’s New in IIS 8.0.
Before You Begin
Ensure that you have administrative user rights on the computer on which you plan to install IIS 8.5. Note that by default, you do not have administrative user rights if you are logged on as a user other than as the built-in administrator, even if you were added to the local Administrators group on the computer.
Log on either to the built-in administrator account, or explicitly invoke applications as the built-in administrator by using the runas command-line tool.
[!NOTE]
You can run runas /user:administrator cmd.exe so that every application you run from that command line will be elevated, eliminating the need to use the runas syntax from that command line.
If you are logged on to an account other than the built-in local administrator account, you may see the following security alert dialog box.

Install IIS 8.5 on Windows Server 2012 R2
IIS is one of the server roles on Windows Server 2012 R2, named Web Server (IIS). You can use the following to install IIS:
- The Server Manager user interface in Windows Server 2012 R2
- A command-line installation using DISM (Deployment Image Servicing and Management)
- A command-line installation using PowerShell cmdlets
[!NOTE]
IIS can also be installed on Windows 8 through the Turn Windows features on or off dialog box from the Programs and Features settings of the Control Panel.
Install IIS 8.5 using the Server Manager
Server Manager provides a single dashboard to install or uninstall server roles, role services, and features. Server Manager also gives an overview of all currently installed roles and features.
When you install IIS 8.5 using the Windows Server 2012 R2 Server Manager, the steps you perform are different when you install IIS for the first time, as opposed to when you add roles, services, or features to an existing IIS installation. The two procedures are provided below. Different procedures are also used to add and remove roles, role services, and features. You cannot add and remove from the same UI
For more information on how to run the installation wizards in Server Manager, see Install or Uninstall Roles, Role Services, or Features.
Install IIS 8.5 for the first time in the Server Manager
When the Web Server (UI) role is chosen for the first time in the Add Roles and Features Wizard in Server Manager, the basic components and services needed for IIS are automatically selected. The following procedure will install Internet Information Services on a running physical server when IIS has not already been installed. To change an existing installation of IIS, perform the next procedure, Install additional role services for IIS. These two procedures involve different steps.
-
Open Server Manager by clicking the Server Manager icon on the desktop.
-
In the Server Manager window, with the Dashboard and Quick Start selected, click Add roles and features, or click the Manage menu, and then click Add Roles and Features. The Add Roles and Features Wizard will start with a Before You Begin page. The wizard asks for verification of the following:
- The administrator account has a strong password.
- The network settings, such as IP addresses, are configured.
- The most current security updates from Windows® Update are installed.
-
On the Before You Begin page, click Next.
-
On the Installation Type page, select Role-based or feature-based installation to configure a single server. Click Next.

-
On the Server Selection page, select Select a server from the server pool, and then select a server; or select Select a virtual hard disk server, select a server to mount the VHD on, and then select a VHD file. Click Next.
[!NOTE]
To connect to the virtual hard disk, the virtual machine must be turned off and disconnected. If you select a VHD file from a network share, that share must grant Read and Write permissions to the computer (local system) account of the server that you selected to mount the VHD (user-only account access is not sufficient).[!NOTE]
Servers in a server pool will be available only if they have been added by the Add other servers to manage command in Server Manager. -
On the Server Roles page, select Web Server (IIS).
-
In the Add Roles and Features wizard, click Add Features if you want to install the IIS Management Console. If you do not want to install the Management Console, uncheck Include management tools (if applicable), and then click Continue.
-
On the Server Roles page, click Next.
[!NOTE]
The features required for the default role services of Management Tools and IIS Management Console will be preselected in the Features page. -
On the Features page, select any features that you would like to install, and then click Next. Note that you do not need to select any features on this page to install IIS. IIS setup will select the features that are required.
-
On the Web Server Role (IIS) page, click Next.
-
On the Role Services page, select any additional role services that you want to install.
[!NOTE]
When you install IIS for the first time by selecting Web Server (IIS), you will get at least the default installation that includes a minimum set of role services. You can see at this point that those default services are preselected on the Server Roles page. For a list of the server roles available, and which roles are installed by default, see Modules in IIS 8.5. You will have the chance to select more role services later in this procedure.[!NOTE]
You can also deselect role services that were selected by default when you selected Web Server. However, at least one role service must be selected for Web Server to be selected and installed. -
If you selected a role service that requires other role services or features to be installed, a page will be opened indicating the role services or features to be installed. Leave Include management tools (if applicable) selected to select the install management tools associated with the server role. You may not need the management tools on the destination server if you plan to manage the role remotely. Click Add Features to add the required role services or features.
-
After you have added the role services that you need on the Role Services page, click Next.
-
On the Confirmation page, verify the role services and features that are selected. Select Restart the destination server automatically if required to restart the destination server if the settings need to take immediate effect. To save the configuration information to an XML-based file that you can use for unattended installations with Windows PowerShell, select Export configuration settings, move to the appropriate path in the Save As dialog box, enter a file name, and then click Save.
When you are ready to start the installation process on the Confirmation page, click Install.
-
The Installation Progress page is displayed. You can close the wizard without interrupting running tasks. You can view task progress or open the page again by clicking Notifications in the notification area, and then clicking Task Details.
-
On the Results page, verify that the installation succeeds, and then click Close.
-
Confirm that the Web server works by opening a Web browser, and verifying that the following default Web page is displayed when you use the
http://localhostaddress.


Install additional IIS 8.5 role services in the Server Manager
After you have installed the Web Server role on a running physical server for the first time, you can run through the installation process again to install additional roles, role services, and features.
-
Open Server Manager by clicking the Server Manager icon on the desktop.
-
In the Server Manager window, with the Dashboard and Quick Start selected, click Add roles and features, or click the Manage menu, and then click Add Roles and Features. The Add Roles and Features wizard will start with a Before You Begin page. The wizard asks for verification of the following:
- The administrator account has a strong password.
- The network settings, such as IP addresses, are configured.
- The most current security updates from Windows® Update are installed.
-
On the Before You Begin page, click Next.
-
On the Installation Type page, select Role-based or feature-based installation to configure a single server. Click Next.
-
On the Server Selection page, select Select a server from the server pool, and then select a server; or select Select a virtual hard disk server, select the server to mount the VHD on, and then select the VHD file. Click Next.
[!NOTE]
To connect to the virtual hard disk, the virtual machine must be turned off and disconnected. If you select a VHD file from a network share, that share must grant Read and Write permissions to the computer (local system) account of the server that you selected to mount the VHD (user-only account access is not sufficient).[!NOTE]
Servers in a server pool will be available only if they have been added by the Add other servers to manage command in the Server Manager.[!NOTE]
On the Server Roles page, Web Server (IIS) will be selected when IIS 8.0 has already been installed. If Web server (IIS) is not selected, perform the procedure in Install IIS 8.5 for the first time in the Server Manager. -
On the Server Roles page, open the Web Server (IIS) tree until you see a role service that you want to install. Select the role service.
[!NOTE]
Those roles, services, and features that have already been installed will be identified by «Installed» in parentheses after the name, and the name will be grayed out. To remove a role, service, or feature, see Uninstall IIS 8.5 Using the Server Manager. Note, however, that you can expand the lower-level entries under a node even when the node is grayed out.[!NOTE]
For a list of the server roles that are available, and which roles are installed by default, see Modules in IIS 8.5 below. -
If the role service that you selected requires other role services or features to be installed, an Add Features page will be opened listing those required role services or features. Leave Include management tools (if applicable) selected to select the install management tools associated with the server role. You may not need the management tools on the destination server if you plan to manage the role remotely. Click Add Features to add the required role services or features to the installation.
-
If you need any additional role services, repeat steps 6 and 7.
[!NOTE]
Add only the modules that are necessary to minimize the IIS installation footprint and the attack surface.When you have selected all required role services, and their dependencies, on the Server Roles page, click Next.
-
On the Features page, select any features that you need to be installed. Any features required to be installed for role services that you selected in step 6 will already be selected. Click Next.
-
On the Confirmation page, verify the role services and features that are selected. Select Restart the destination server automatically if required to restart the destination server if the settings need to take immediate effect. To save the configuration information to an XML-based file that you can use for unattended installations with Windows PowerShell, select Export configuration settings, move to the appropriate path in the Save As dialog box, enter a file name, and then click Save.
When you are ready to start the installation process on the Confirmation page, click Install.
-
The Installation Progress page is displayed. You can close the wizard without interrupting running tasks. You can view task progress or open the page again by clicking Notifications in the notification area, and then clicking Task Details.
-
On the Results page, verify that the installation succeeds, and then click Close.
-
Confirm that the Web server works by opening a Web browser, and verifying that the following default Web page when you use the
http://localhostaddress.


Uninstall IIS 8.5 using the Server Manager
In the Add Roles and Features wizard of Server Manager, you cannot delete existing features that have already been installed. To delete roles and features, use the Remove Roles and Features wizard of Server Manager. You can remove an individual role, role service, or feature by unchecking it in the wizard, or you can uninstall all of IIS by unchecking the IIS Web Server Role.
-
Open Server Manager by clicking the Server Manager icon on the desktop.
-
Click Manage at the top of the Server Manager, and then click Remove Roles and Features.
-
On the Before you begin page, click Next.
-
On the Server Selection page, select the server from the server pool, and then click Next.
-
On the Remove Server Roles page, clear the check box of any server role or role service that you would like to remove.
-
If you uncheck a role service that has feature dependencies, the Remove Features dialog box will be displayed showing the dependencies. Click Remove Features to remove them. You can remove all of IIS by unchecking Web Server (IIS).
-
On the Remove Server Roles page, select any other role or role service that you want to remove, and then click Next.
-
On the Features page, uncheck any feature that you would like to remove. If you uncheck a feature that has feature dependencies, a dialog box will be displayed showing the dependencies. Click Remove Features to remove them. On the Features page, click Next.
-
On the Confirmation page, verify that the roles, role services, and features to be removed are correct, and then click Remove.
[!NOTE]
It is recommended that you do a restart if you are prompted to do so, unless you have other activities that you want to do before the restart takes place. A restart is especially important when you remove roles, role services, or features. -
The Removal Progress page is displayed. You can close the wizard without interrupting running tasks. You can view task progress or open the page again by clicking Notifications in the notification area, and then clicking Task Details.
-
On the Results page, click Close.
-
Restart the destination server to finish removing features.


Install IIS 8.5 from the Command Line
You can install IIS 8.5 from the command line using DISM or PowerShell. Note that DISM and PowerShell have different namespaces for installation parameters, so the parameter names used in their commands will be different. For more information, see Modules in IIS 8.5.
[!NOTE]
Pkgmgr.exe has been deprecated. Use DISM instead for scripts installing IIS 8.5.
Install IIS 8.5 using DISM
Automating the installation of IIS by using unattended scripts is very useful if you need to deploy multiple Web servers and want to ensure that each of the Web servers is set up with identical components and services. In Windows Server 2012 R2, DISM is used for unattended scripts, letting you install or uninstall optional features from a command prompt or scripts. To use DISM, you must make sure you have administrative user rights on the computer. For more information about DISM, see DISM Overview
If you do not explicitly include in the DISM code a feature that the IIS installation has a dependency on, the installation will fail, and will not generate an error message. For a list of dependencies required, see Feature Dependencies.
For a full list of the DISM parameters corresponding to IIS roles, services, and features, see Modules in IIS 8.5.
The following script will install all roles, role services, and features of IIS 8.5, getting the full IIS installation that includes all available feature packages. If there are roles, role services, or features that you do not need, you should edit the script to include only those that you require. The order of the commands in the DISM script does not matter. The entire script will be handed off to the engine and treated as one transaction. To install IIS 8.5 with a script, type the following on one line in an elevated command prompt.
[!code-consoleMain]
Install IIS 8.5 using PowerShell
You can use the following PowerShell cmdlets to install all of IIS 8.5:
[!code-powershellMain]
To install only specific features, list them in the PowerShell cmdlet, as in the following example:
[!code-powershellMain]
The following points apply to running the PowerShell cmdlets:
- The cmdlet requires elevation. You must be running a Windows PowerShell session as an administrator to run the cmdlet.
- The cmdlet does not install management tools for roles, role services, and features by default. You must add the IncludeManagementTools parameter to the cmdlet to do so.
For a full list of the PowerShell parameters corresponding to IIS 8.5 roles, services, and features, with more information, see Modules in IIS 8.5. The following lists all these parameters.
- Web-Server
- Web-WebServer
- Web-Security
- Web-Filtering
- Web-Cert-Auth
- Web-IP-Security
- Web-Url-Auth
- Web-Windows-Auth
- Web-Basic-Auth
- Web-Client-Auth
- Web-Digest-Auth
- Web-CertProvider
- Web-Common-Http
- Web-Http-Errors
- Web-Dir-Browsing
- Web-Static-Content
- Web-Default-Doc
- Web-Http-Redirect
- Web-DAV-Publishing
- Web-Performance
- Web-Stat-Compression
- Web-Dyn-Compression
- Web-Health
- Web-Http-Logging
- Web-ODBC-Logging
- Web-Log-Libraries
- Web-Custom-Logging
- Web-Request-Monitor
- Web-Http-Tracing
- Web-App-Dev
- Web-Net-Ext
- Web-Net-Ext45
- Web-ASP
- Web-Asp-Net
- Web-Asp-Net45
- Web-CGI
- Web-ISAPI-Ext
- Web-ISAPI-Filter
- Web-WebSockets
- Web-AppInit
- Web-Includes
- Web-Ftp-Server
- Web-Ftp-Service
- Web-Ftp-Ext
- Web-Mgmt-Tools
- Web-Mgmt-Console
- Web-Mgmt-Compat
- Web-Metabase
- Web-WMI
- Web-Lgcy-Mgmt-Console
- Web-Lgcy-Scripting
- Web-Scripting-Tools
- Web-Mgmt-Service
Uninstall IIS 8.5 using PowerShell
You can use the PowerShell cmdlet UnInstall-WindowsFeature to uninstall IIS 8.5. Run get-help Install-WindowsFeature at a PowerShell command line to see the syntax of the cmdlet. The following points apply to running the cmdlet:
- The cmdlet requires elevation. You must be running a Windows PowerShell session as an administrator to run the cmdlet.
- The cmdlet does not uninstall management tools for roles, role services, and features by default. You must add the IncludeManagementTools parameter to the cmdlet to do so.
Modules in IIS 8.5
IIS modules are individual role services that the server uses to process requests. The following table shows which modules are available to be installed in the Web server, which are installed by default, which role the role service is included in, the parameter used in DISM or PowerShell to install them, and a brief description of the functionality that they provide.
[!NOTE]
An asterisk (*) in the table below denotes a role or role service that is installed by default when the Web Server (IIS) role is installed.
| Role | Role Service | DISM Parameter | PowerShell Parameter | Functionality |
|---|---|---|---|---|
| Web Server Role | IIS-WebServerRole | Web-Server | Provides support for HTML Web sites and optional support for ASP.NET, ASP, and Web server extensions, enabling you to host an internal or external Web site or create Web-based applications. | |
| Web Server* | IIS-WebServer | Web-WebServer | Provides support for HTML Web sites and optional support for ASP.NET, ASP, and Web server extensions, enabling you to host an internal or external Web site or create Web-based applications. | |
| Common HTTP Features* | IIS-CommonHttpFeatures | Web-Common-Http | Supports basic HTTP functionality, such as delivering standard file formats and configuring custom server properties. | |
| Default Document* | IIS-DefaultDocument | Web-Default-Doc | Enables you to configure a default file for the Web server to return when users do not specify a file in a request URL. | |
| Directory Browsing* | IIS-DirectoryBrowsing | Web-Dir-Browsing | Enables users to see the contents of a directory on a Web server when they do not specify a file in a request URL and default documents are either disabled or not configured. | |
| HTTP Errors* | IIS-HttpErrors | Web-Http-Errors | Enables you to customize the error messages that are returned to the users’ browsers when the Web server detects a fault condition, improving the user experience. | |
| Static Content* | IIS-StaticContent | Web-Static-Content | Enables the Web server to publish static Web file formats, such as HTML pages and image files that can be viewed using a Web browser. | |
| HTTP Redirection | IIS-HttpRedirect | Web-Http-Redirect | Enables the Web server to redirect user requests that are sent to a specific destination. | |
| WebDAV Publishing | IIS-WebDAV | Web-DAV-Publishing | Web Distributed Authoring and Versioning. Enables you to publish files to and from a Web server by using the HTTP protocol, working through most firewalls without modification. | |
| Health and Diagnostics* | IIS-HealthAndDiagnostics | Web-Health | Provides an infrastructure to monitor, manage, and troubleshoot the health of Web servers, sites, and applications. | |
| HTTP Logging* | IIS-HttpLogging | Web-Http-Logging | Provides logging of Web site activity for the server, in addition to the logging provided by the operating system. | |
| Custom Logging | IIS-CustomLogging | Web-Custom-Logging | Enables you to create a custom logging module that performs logging of Web server activity in a format that differs from the logging normally performed by IIS. | |
| Logging Tools | IIS-LoggingLibraries | Web-Log-Libraries | Provides an infrastructure to manage Web server logs and automate common logging tasks. | |
| ODBC Logging | IIS-ODBCLogging | Web-ODBC-Logging | Provides an infrastructure that supports logging Web server activity to an ODBC-compliant database, enabling you to programmatically display and manipulate logging data on an HTML page. | |
| Request Monitor | IIS-RequestMonitor | Web-Request-Monitor | Provides an infrastructure to monitor Web application health by capturing information about HTTP requests. | |
| Tracing | IIS-HttpTracing | Web-Http-Tracing | Provides an infrastructure to diagnose and troubleshoot Web applications, including poor performance and authentication-related failures. | |
| Performance* | IIS-Performance | Web-Performance | Provides an infrastructure to enable more efficient use of bandwidth by performing compression of static and/or dynamic content. | |
| Static Content Compression* | IIS-HttpCompressionStatic | Web-Stat-Compression | Provides an infrastructure to configure HTTP compression of static content. | |
| Dynamic Content Compression | IIS-HttpCompressionDynamic | Web-Dyn-Compression | Provides an infrastructure to configure HTTP compression of dynamic content. | |
| Security* | IIS-Security | Web-Security | Provides an infrastructure for securing the Web server from users and requests, using one of multiple authentication methods. | |
| Request filtering* | IIS-RequestFiltering | Web-Filtering | Enables screening of all incoming requests to the server, and filters the requests based upon rules set by the administrator. | |
| Basic Authentication | IIS-BasicAuthentication | Web-Basic-Auth | An authentication method in which users are prompted to supply credentials that are transmitted unencrypted across the network. | |
| Centralized SSL Certificate | IIS-CertProvider | Web-CertProvider | An authentication method that uses SSL server certificates that are managed centrally using a file share. | |
| Client Certificate Mapping Authentication | IIS-ClientCertificateMappingAuthentication | Web-Client-Auth | An authentication method that uses client certificates to authenticate users, using Active Directory to offer one-to-one certificate mappings across multiple Web servers. | |
| Digest Authentication | IIS-DigestAuthentication | Web-Digest-Auth | An authentication method that sends a password hash to a Windows domain controller to authenticate users, especially useful if users who must be authenticated will access the Web site from behind firewalls and proxy servers. | |
| IIS Client Certificate Mapping Authentication | IIS-IISCertificateMappingAuthentication | Web-Cert-Auth | An authentication method that uses client certificates to authenticate users, using IIS to offer one-to-one or many-to-one certificate mapping. | |
| IP and Domain Restrictions | IIS-IPSecurity | Web-IP-Security | An authentication method that enables you to enable or deny content based upon the originating IP address or the domain name of the request. | |
| URL Authorization | IIS-URLAuthorization | Web-Url-Auth | An authentication method that enables you to create URL authorization rules that restrict access to Web content. | |
| Windows Authentication | IIS-WindowsAuthentication | Web-Windows-Auth | An authentication method that enables administrators in a Windows domain to take advantage of the domain infrastructure for authenticating users, a low-cost authentication solution for internal Web sites. | |
| Application Development | IIS-ApplicationDevelopment | Web-App-Dev | Provides an infrastructure for developing and hosting Web applications, useful for creating Web content and extending the functionality of IIS. | |
| .NET Extensibility 3.5 | IIS-NetFxExtensibility | Web-Net-Ext | Enables managed code developers to change, add, and extend Web server functionality in the entire request pipeline, the configuration, and the UI. | |
| .NET Extensibility 4.5 | IIS-NetFxExtensibility45 | Web-Net-Ext45 | Enables managed code developers to change, add, and extend Web server functionality in the entire request pipeline, the configuration, and the UI. | |
| Application Initialization | IIS-ApplicationInit | Web-AppInit | Enables you to perform expensive Web application initialization tasks before serving Web pages. | |
| ASP | IIS-ASP | Web-ASP | Provides a server-side scripting environment for building Web sites and Web applications, especially for existing applications. | |
| ASP.NET 3.5 | IIS-ASPNET | Web-Asp-Net | Provides a server-side object-oriented programming environment for building Web sites and Web applications using managed code. | |
| ASP.NET 4.5 | IIS-ASPNET45 | Web-Asp-Net45 | Provides a server-side object-oriented programming environment for building Web sites and Web applications using managed code. | |
| CGI | IIS-CGI | Web-CGI | Defines how a Web server passes information to an external program. | |
| ISAPI Extensions | IIS-ISAPIExtensions | Web-ISAPI-Ext | Internet Server Programming Interface Extensions. Provides support for dynamic Web content development. | |
| ISAPI Filters | IIS-ISAPIFilter | Web-ISAPI-Filter | Internet Server Programming Interface Filters. Enables you to extend or change the functionality provided by IIS, reviewing every request made to the Web server and processing the appropriate requests. | |
| Server Side Includes | IIS-ServerSideIncludes | Web-Includes | A scripting language used to dynamically generate HTML pages, using script that is run on the server before the page is delivered to the client. | |
| WebSocket Protocol | IIS-WebSockets | Web-WebSockets | Provides communication channels for server applications created with IIS 8.x and ASP.NET 4.5. | |
| FTP Server | IIS-FTPServer | Web-Ftp-Server | Enables the transfer of files between a client and a server, using either an FTP client or an FTP-enabled Web browser. | |
| FTP Service | IIS-FTPSvc | Web-Ftp-Service | Enables FTP publishing on a Web server. | |
| FTP Extensibility | IIS-FTPExtensibility | Web-Ftp-Ext | Enables support for FTP extensibility features such as customer providers, ASP.NET users, or IIS Manager users. | |
| IIS Hostable Web Core (IIS 8.0, not IIS 8.5) | IIS-HostableWebCore | Web-WHC | Enables you to write custom code that will host core IIS functionality in your own application that serves HTTP requests and uses its own applicationHost.config and root Web.config configuration files. | |
| Management Tools* | IIS-WebServerManagementTools | Web-Mgmt-Tools | Provides an infrastructure for managing a Web server that runs IIS 7.0 or later. | |
| IIS Management Console* | IIS-ManagementConsole | Web-Mgmt-Console | Provides an infrastructure for managing an IIS 7.0 or later Web server, local or remote, using a user interface. | |
| IIS 6 Management Compatibility | IIS-IIS6ManagementCompatibility | Web-Mgmt-Compat | Provides forward compatibility for applications and scripts that use the IIS 6 APIs, Admin Base Object (ABO) and Active Directory Service Interface (ADSI). | |
| IIS 6 Metabase Compatibility | IIS-Metabase | Web-Metabase | Provides an infrastructure for querying and configuring the Metabase, so that you can run applications and scripts migrated from earlier versions of IIS that use Admin Base Object (ABO), and Active Directory Service Interface (ADSI). | |
| IIS 6 Management Console | IIS-LegacySnapIn | Web-Lgcy-Mgmt-Console | Provides an infrastructure for administration of remote IIS 6.0 servers. | |
| IIS 6 Scripting Tools | IIS-LegacyScripts | Web-Lgcy-Scripting | Enable you to continue to use scripts built to manage IIS 6 in IIS 7.0 or later, especially if your applications and scripts use ActiveX Data Objects (ADO) or Active Directory Service Interface (ADSI). | |
| IIS 6 WMI Compatibility | IIS-WMICompatibility | Web-WMI | Provides Windows Management Instrumentation (WMI) scripting interfaces to programmatically manage and automate tasks for an IIS 8.0 or later Web server. | |
| IIS Management Scripts and Tools | IIS-ManagementScriptingTools | Web-Scripting-Tools | Provides an infrastructure to programmatically manage an IIS 7.0 or later Web server by using commands in a command window or by running scripts. | |
| Management Service | IIS-ManagementService | Web-Mgmt-Service | Enables the Web server to be managed remotely from another computer using IIS Manager. |
Feature Dependencies
The following table shows which role services and features must be installed for the role service or features in the table row to be installed.
The Add Roles and Features Wizard and Remove Roles and Features Wizard of Server Manager take care of dependencies by prompting you to add dependencies when adding a role service or feature, or to remove dependencies when removing a role service or feature. However, when you install IIS using DISM, you need to include in the DISM code any dependency that a role service or feature being installed has, or the installation will fail, and you may not receive an indication why it failed.
When you remove a role service or feature, make sure that you do not remove a service or feature that another service or feature has a dependency on. There can be an intersection of dependencies, for example between ASP and ASP.NET. So if you were to remove ASP, and remove its feature dependencies, you could remove dependencies for ASP.NET, as well.
| Role | Role Service | Dependency |
|---|---|---|
| Web Server Role | None | |
| Web Server* | None | |
| Common HTTP Features* | None | |
| Default Document* | None | |
| Directory Browsing* | None | |
| HTTP Errors* | None | |
| Static Content* | None | |
| HTTP Redirection | None | |
| WebDAV Publishing | Static Content | |
| Health and Diagnostics* | None | |
| HTTP Logging* | None | |
| Custom Logging | None | |
| Logging Tools | None | |
| ODBC Logging | None | |
| Request Monitor | None | |
| Tracing | None | |
| Performance* | None | |
| Static Content Compression* | None | |
| Dynamic Content Compression | None | |
| Security* | None | |
| Request filtering* | None | |
| Basic Authentication | None | |
| Centralized SSL Certificate | None | |
| Client Certificate Mapping Authentication | None | |
| Digest Authentication | None | |
| IIS Client Certificate Mapping Authentication | None | |
| IP and Domain Restrictions | None | |
| URL Authorization | None | |
| Windows Authentication | None | |
| Application Development | None | |
| .NET Extensibility 3.5 | — .NET Framework 3.5 (includes .NET 2.0 and 3.0) — ASP.NET 4.5 — .NET Framework 4.5 — Application Development — Request Filtering | |
| .NET Extensibility 4.5 | — ASP.NET 4.5 — .NET Framework 4.5 — Application Development — Request Filtering | |
| Application Initialization | None | |
| ASP | — Web Server (IIS)-Web Server- Application Development- ISAPI Extensions — Request Filtering | |
| ASP.NET 3.5 | — .NET Framework 3.5 (includes .NET 2.0 and 3.0) — ASP.NET 4.5 — .NET Framework 4.5 — ISAPI Extensions — ISAPI Filters — .NET Extensibility 3.5 — Request Filtering | |
| ASP.NET 4.5 | — ASP.NET 4.5 — .NET Framework 4.5 — ISAPI Extensions — ISAPI Filters — .NET Extensibility 3.5 — Request Filtering | |
| CGI | None | |
| ISAPI Extensions | None | |
| ISAPI Filters | None | |
| Server Side Includes | None | |
| WebSocket Protocol | None | |
| FTP Server | None | |
| FTP Service | None | |
| FTP Extensibility | FP Service | |
| IIS Hostable Web Core (IIS 8.0, not IIS 8.5) | None | |
| Management Tools* | — .NET Framework 4.5 — Graphic Management Tools and Infrastructure — Windows PowerShell 3.0 | |
| IIS Management Console* | — .NET Framework 4.5 — Graphic Management Tools and Infrastructure — Management Tools — Windows PowerShell 3.0 | |
| IIS 6 Management Compatibility | None | |
| IIS 6 Metabase Compatibility | None | |
| IIS 6 Management Console | — .NET Framework 4.5 — Graphic Management Tools and Infrastructure — IIS 6 Metabase Compability — Windows PowerShell 3.0 | |
| IIS 6 Scripting Tools | — IIS 6 Metabase Compatibility — IIS 6 WM Compatibility | |
| IIS 6 WMI Compatibility | IIS 6 Metabase Compatibility | |
| IIS Management Scripts and Tools | None | |
| Management Service | — ASP.NET 4.5 — .NET Framework 4.5 — Management Tools |
See also
- Install or Uninstall Roles, Role Services, or Features
- IIS.NET Install
- What’s New in IIS 8.5
- DISM Overview
- Editing Configuration Files
- Extending IIS Configuration
-
Question
-
Does Windows Server 2012 R2 supports IIS Manager 10?
Is there a way to upgrade IIS 8.5 to IIS 10 on windows server 2012 R2?
Is there any technet link to check IIS versions and it’s supported Operating Systems?
All replies
-
Check this,
https://en.wikipedia.org/wiki/Internet_Information_Services
6.0
Built-in component of Windows Server 2003.
7.0
Built-in component of Windows Vista and Windows Server 2008.
7.5
Built-in component of Windows 7 and Windows Server 2008 R2.
8.0
Built-in component of Windows 8 and Windows Server 2012.
8.5
Built-in component of Windows 8.1 and Windows Server 2012 R2
10
Built-in component of Windows 10 and Windows Server 2016
-
-
Proposed as answer by
Monday, October 7, 2019 6:26 AM
-
Proposed as answer by
-
Thanks, but looking for an reference link of technet!
-
Internet Information Services (IIS) is a role that is bound to the operating system, so you probably won’t find any link telling what’s supported or not.
The supported version is the version that comes with the operating system, only the IIS express can be installed separately.
Blog:
https://thesystemcenterblog.com
LinkedIn: -
Hello Sharjeel,
Just making sure your question has solved.
Please do not forget to mark helpful replies as answer.
Thank you
Mark it as answer if your question has solved in order to keep forums updated.

- Remove From My Forums
-
Question
Answers
-
User690216013 posted
IIS 7 and above are considered as the same thing (with minor changes in each releases, but not significant for Web Deploy), so you should be able to simply follow,
http://www.iis.net/learn/publish/using-web-deploy/synchronize-iis
The «migration» term is only meaningful for IIS 6 to any IIS 7+, as IIS 6 is completely a different animal.
-
Marked as answer by
Anonymous
Tuesday, September 28, 2021 12:00 AM
-
Marked as answer by
All replies
-
User690216013 posted
IIS 7 and above are considered as the same thing (with minor changes in each releases, but not significant for Web Deploy), so you should be able to simply follow,
http://www.iis.net/learn/publish/using-web-deploy/synchronize-iis
The «migration» term is only meaningful for IIS 6 to any IIS 7+, as IIS 6 is completely a different animal.
-
Marked as answer by
Anonymous
Tuesday, September 28, 2021 12:00 AM
-
Marked as answer by
-
User521890537 posted
If you have only one wesite to transfer, simply create website in IIS manager with same settings on new server and copy all files in home folder from old server to new server.

![]()
Пришла задача поднять IIS на Windows Server 2012 R2 для CRM BPM Online от Terrasoft. Указанные ниже настройки достаточны для работы данной приблуды. Однако, пришлось также забраться в конфиги данной сторонней системы и кое что править руками. Но это уже не относится к установке IIS и описываться здесь не будет.
Для ваших задач, скорее всего, потребуется ставить уже другие галки. Приступим.
Ссылки
Установка IIS в Windows 10
Установка
Запускаем Server Manager. Manage > Add Roles and Features.
Запускается мастер добавления ролей и фич.
Кликаем Next. Попадаем в выбор типа установки.
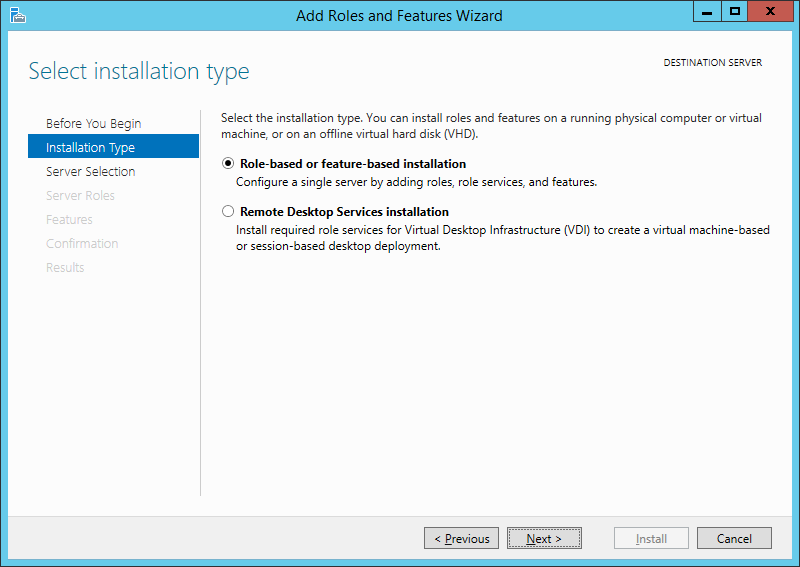
Оставляем Role-based or feature-based installation. Next. Попадаем на страницу выбора сервера.
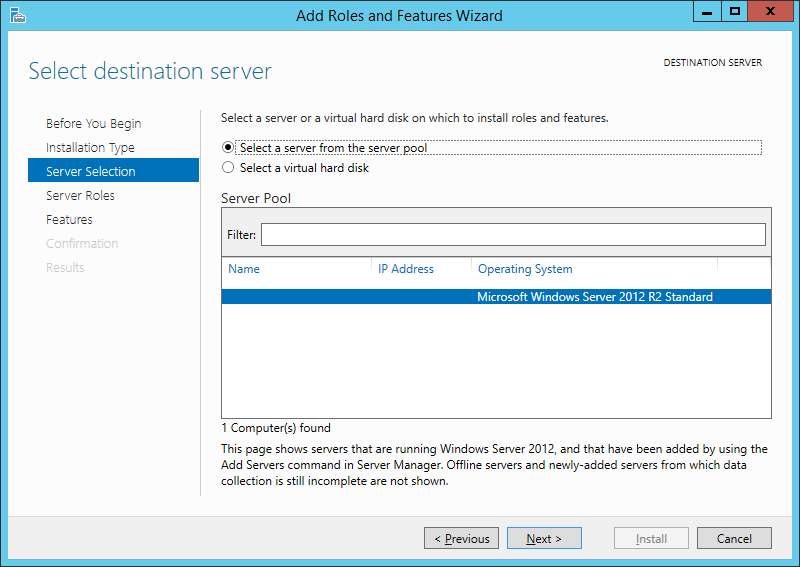
У меня один сервер. Next. Наконец попадаем в выбор ролей.
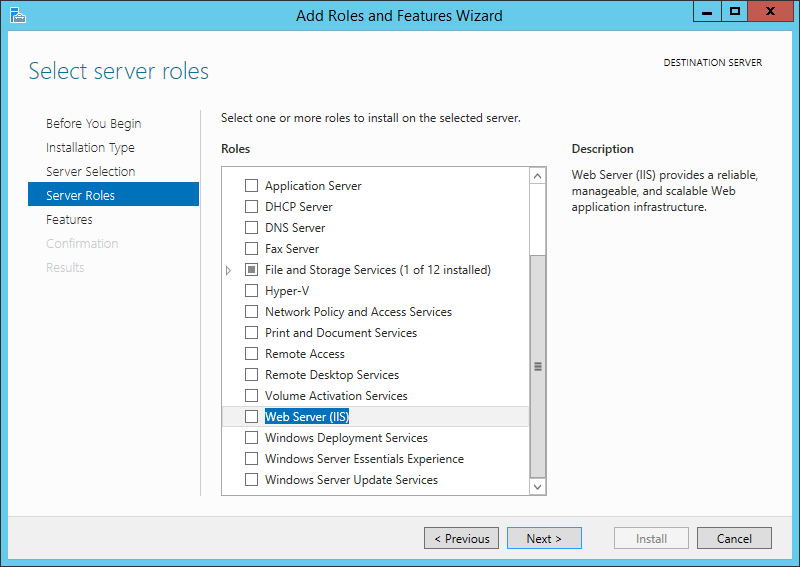
Ставим галку на Web Server (IIS). Сразу же всплывает окно.
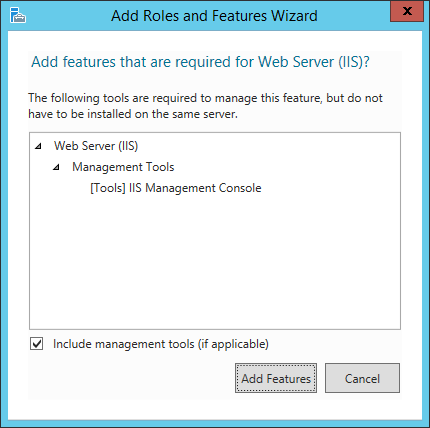
Нам предлагают с выбором роли Web Server (IIS) также поставить необходимые обязательные для этой роли фичи. Кликаем Add Features. Переходим к окну выбора фич.
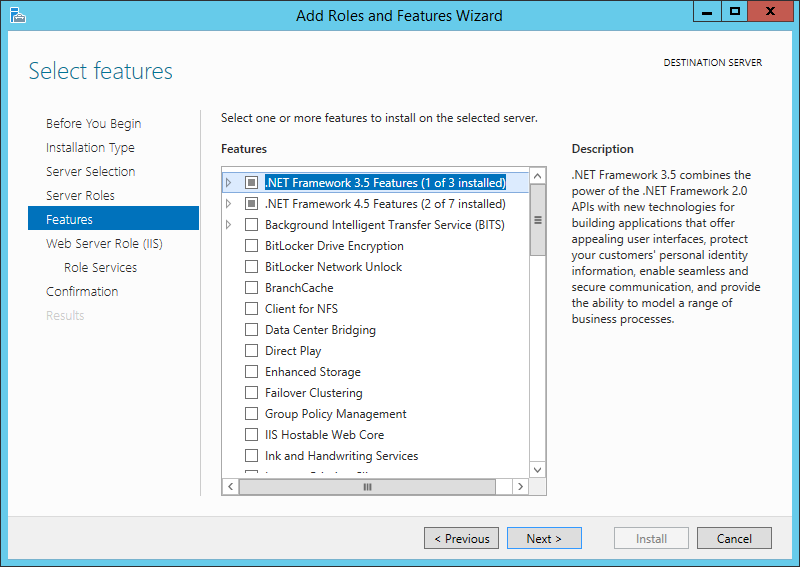
Кликаем Next. Переходим на вкладку Web Server Role (IIS).
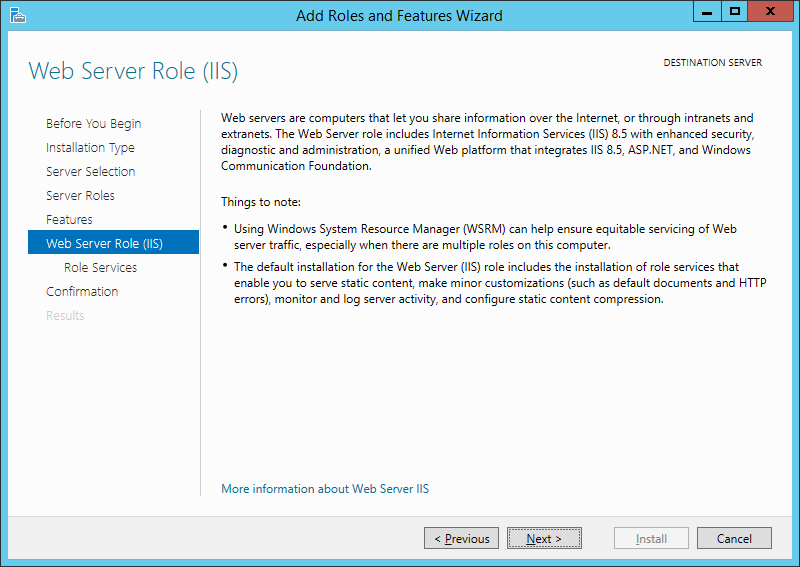
Кликаем Next. Переходим на вкладку Role Services.
Теперь настраиваем фичи для выбранной роли. Нас интересует раздел Web Server. Ставим галки на фичах.
Теперь нас интересует раздел FTP Server. Ставим галки на фиче FTP Service.
В разделе Management Tools ставим галки на фичах.
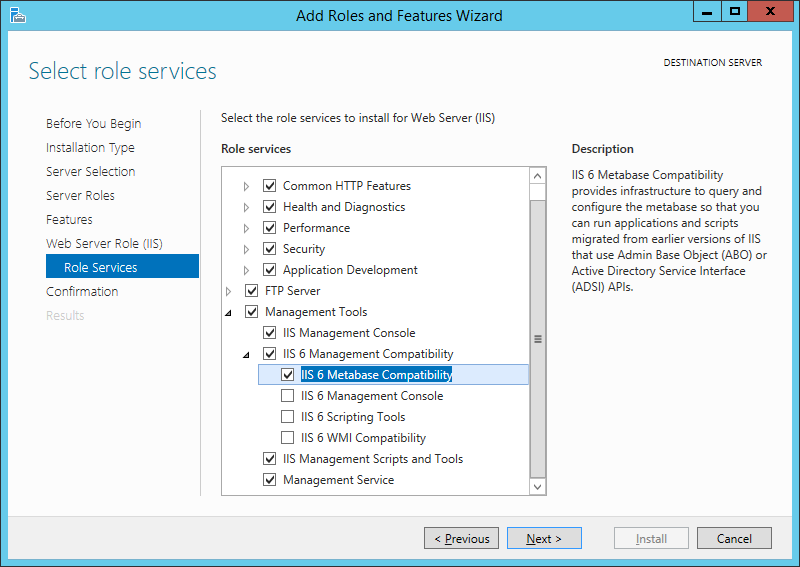
- IIS Management Console
- IIS 6 Management Compatibility
- IIS 6 Metabase Compatibility
- IIS Management Scripts and Tools
- Management Service
Кликаем Next. Попадаем на страницу подтверждения.
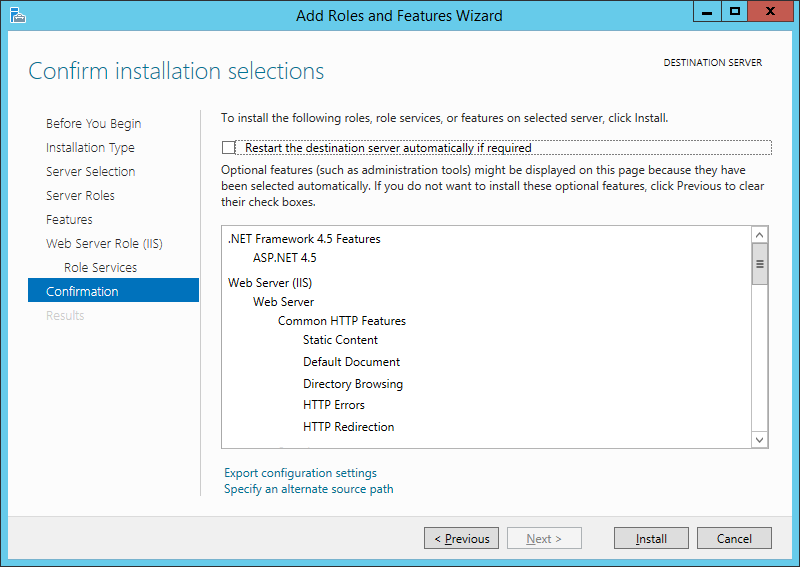
Кликаем Install. Начинается установка.

Installation succeeded.
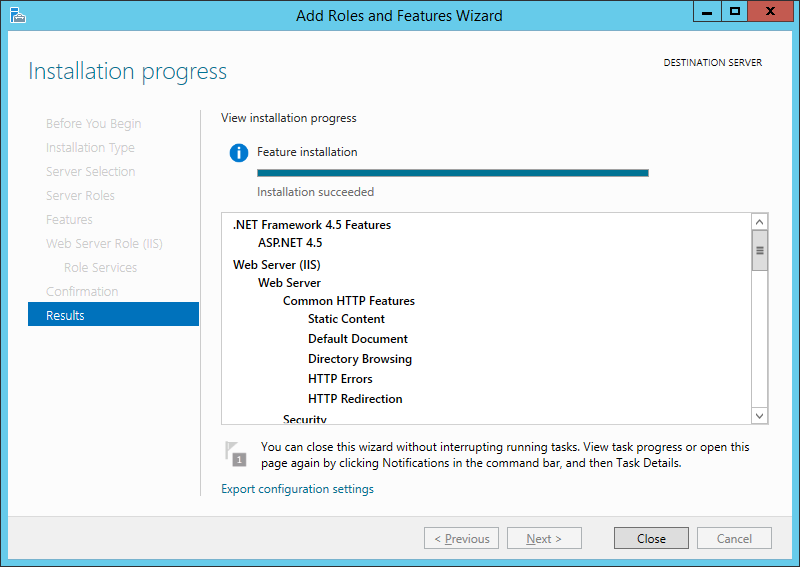
Даже не пришлось ребутать сервер.
Время прочтения
8 мин
Просмотры 96K
 Windows Server 2012 R2 вышел 18 октября 2013 года. С тех пор на эту серверную операционную систему Microsoft выпущено несколько сотен обновлений исправляющих уязвимости и дефекты продукта, а так же улучшающие функционал.
Огромное количество обновлений — источник головной боли. Наиболее актуальный дистрибутив сервера, так называемый «Update2», в который интегрированы обновления по ноябрь 2014 года, безнадежно устарел. Установив с него операционную систему, вы получите вдогонку еще 200+ обновлений, которые будут устанавливаться 2-4 часа.
В этой короткой инструкции мы освежим ноябрьский дистрибутив, интегрировав в него все кумулятивные пакеты обновлений и обновления безопасности.
Помимо дистрибутива мы освежим и память администратора, вспомнив как обновляется носитель для установки, зачем выполняется каждый шаг, и какие нас может ожидать подвохи на разных этапах.
Делать будем по максимуму просто, используя штатные инструменты.
Все работы лучше проводить на сервере с уже развернутом Windows Server 2012 R2, чтобы не было накладок с версией утилиты DISM. Так же на нем удобно подключать ISO файлы, не распаковывая их.
Готовим рабочие директории
Для работы потребуются следующие каталоги:
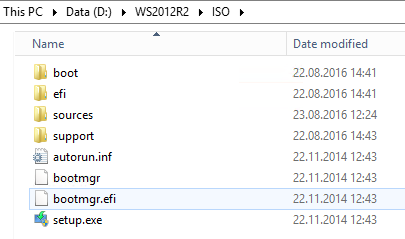
ISO — в этот каталог копируются файлы дистрибутива. В скопируйте в него содержимое дистрибутива SW_DVD9_Windows_Svr_Std_and_DataCtr_2012_R2_64Bit_English_-4_MLF_X19-82891.ISO, предварительно смонтировав образ, а затем размонтировав.
MOUNT — пустой каталог, в него будут монтироваться образы из wim-файла.
CU — в этот каталог поместим кумулятивные обновления
SU — в этом каталоге будут находиться обновления безопасности и другие обновления
mkdir D:WS2012R2ISO
mkdir D:WS2012R2MOUNT
mkdir D:WS2012R2CU
mkdir D:WS2012R2SU
Скачиваем кумулятивные обновления
Tip & Trick #1. Microsoft выпускает для Windows Server 2012 R2 кумулятивные пакеты обновлений, но в них входят только обновления, исправляющие ошибки и улучшающие функционал. Обновления безопасности не включены. При этом обновления и не особо кумулятивны. Некоторые не включают в себя предыдущие обновления, и надо ставить «кумулятивное» за каждый месяц. Бардак. В октябре эта ситуация изменится к лучшему.
Со списком кумулятивных обновлений вы можете ознакомиться на этой wiki странице.
С ноября 2014 года нам потребуется интегрировать следующие обновления:
1. December 2014 Windows RT 8.1, Windows 8.1, and Windows Server 2012 R2. KB3013769, cкачать.
2. July 2016 Windows RT 8.1, Windows 8.1, and Windows Server 2012 R2. KB3172614, скачать.
Пакеты за май и июнь поглощены этим июльским пакетом. Но перед установкой обязательно обновление April 2015 servicing stack update for Windows 8.1 and Windows Server 2012 R2. KB3021910, скачать.
3. August 2016 Windows RT 8.1, Windows 8.1, and Windows Server 2012 R2. KB3179574, скачать.
Обновленный клиент центра обновления можно не интегрировать
Свежий Windows Update Client for Windows 8.1 and Windows Server 2012 R2: June 2016 вошел в KB3161606
KB3161606 поглощен KB3172614.
UPD: Я несколько преувеличил то, насколько Microsoft качественно подготовила дистрибутив. Обновления April 2014 и November 2014 действительно интегрированы. А все промежуточные — нет. Поэтому добавляем
May 2014 update rollup for Windows RT 8.1, Windows 8.1, and Windows Server 2012 R2. KB2955164, скачать
June 2014 update rollup for Windows RT 8.1, Windows 8.1, and Windows Server 2012 R2. KB2962409, скачать.
July 2014 update rollup for Windows RT 8.1, Windows 8.1, and Windows Server 2012 R2. KB2967917, скачать.
August 2014 update rollup for Windows RT 8.1, Windows 8.1, and Windows Server 2012 R2. KB2975719, скачать.
September 2014 update rollup for Windows RT 8.1, Windows 8.1, and Windows Server 2012 R2. KB2984006, скачать.
October 2014 update rollup for Windows RT 8.1, Windows 8.1, and Windows Server 2012 R2. KB2995388, скачать.
Tip & Trick #2. В разных статьях для интеграции обновлений предлагается извлечь из msu cab-файл. Делать это для offline-образа необязательно — интегрируйте msu без распаковки.
В папку CU разместите упомянутые выше msu файлы — Windows8.1-KB3013769-x64.msu, Windows8.1-KB3021910-x64.msu, Windows8.1-KB3138615-x64.msu, Windows8.1-KB3172614-x64.msu, Windows8.1-KB3179574-x64.msu.
Скачиваем обновления безопасности
Помимо кумулятивных обновлений интегрируем обновления, которые способна скачать утилита WSUS Offline Update.
Для этого:
- Скачиваем программу download.wsusoffline.net
- Выбираем обновления для Windows Server 2012 R2
- После скачивания открываем каталог wsusofflineclientw63-x64glb и *.cab файлы копируем в каталог C:WS2012R2SU

ОСТОРОЖНО: Если в список попали KB2966828 или KB2966827, удалите их, иначе после установки не получится добавить компонент Net Framework 3.5 (подробности).
Обновления готовы, приступим к интеграции.
Интеграция обновлений
Для интеграции обновлений нам потребуется:
- Смонтировать содержимое одного из образов в install.wim
dism /mount-wim /wimfile:{путь к wim файлу} /Index:{N} /mountdir:{путь к директории монтирования} - Интегрировать в offline установку каждое обновление
dism /image:{путь к директории монтирования} /add-package /packagepath:{путь к *.msu или *.cab файлу} - Сохранить изменения
dism /Unmount-WIM /MountDir:{путь к директории монтирования} /Commit
Этот процесс легко следующим автоматизировать командным файлом:
for /l %%N in (1,1,4) do (
dism /mount-wim /wimfile:"D:WS2012R2ISOsourcesinstall.wim" /Index:%%N /mountdir:D:WS2012R2MOUNT
for %%f in (D:WS2012R2CU*.*) DO (dism /image:D:WS2012R2MOUNT /add-package /packagepath:%%f)
for %%f in (D:WS2012R2SU*.*) DO (dism /image:D:WS2012R2MOUNT /add-package /packagepath:%%f)
dism /unmount-WIM /MountDir:D:WS2012R2MOUNT /Commit
)
Tip: Запуская командный файл, перенаправьте вывод в журнал
UpdateWIM.cmd >>log.txt 2>>&1
В результате мы получим файл D:WS2012R2ISOsourcesinstall.wim размером в 6.15Gb. Можем ли мы его уменьшить? Да, с помощью экспорта можно получить оптимизированный файл размером в 5.85Gb.
Экономия небольшая, кроме того после этого не очень красиво выглядит диалог выбора операционной системы при установке, поэтому следующий шаг опционален.
Что надо сделать?
Для получения сжатого образа необходимо:
- Экспортировать первый образ из оригинального wim-файла в новый файл
dism /export-image /sourceimagefile:{путь к исходному файлу wim} /sourceindex:1 /destinationimagefile:{путь к новому файлу wim} /compress:max - Подключить следующий образ из оригинального wim-файла в точку монтирования
dism /mount-wim /wimfile:"D:WS2012R2ISOsourcesinstall.wim" /Index:2 /mountdir:{директория для монтированния образа} - Добавить в новый файл следующий образ методом «захвата»
dism /append-image /imagefile:{путь к новому файлу wim} /captureDir:{директория с смонтированным образом} /name:{оригинальное имя} /description:{оригинальное описание} - Размонтировать образ, повторить итерацию добавления для каждого дополнительного образа
dism /unmount-WIM /MountDir:{директория с смонтированным образом} /Discard
Автоматизируем скриптом:
dism /export-image /sourceimagefile:D:WS2012R2ISOsourcesinstall.wim /sourceindex:1 /destinationimagefile:D:WS2012R2ISOsourcesinstall1.wim  /compress:max

dism /mount-wim /wimfile:"D:WS2012R2ISOsourcesinstall.wim" /Index:2 /mountdir:D:WS2012R2MOUNT

dism /append-image /imagefile:D:WS2012R2ISOsourcesinstall1.wim /captureDir:mount /name:"Windows Server 2012 R2 SERVERSTANDARD" /description:"Windows Server 2012 R2 SERVERSTANDARD"

dism /unmount-WIM /MountDir:D:WS2012R2MOUNT /discard

dism /mount-wim /wimfile:"D:WS2012R2ISOsourcesinstall.wim" /Index:3 /mountdir:D:WS2012R2MOUNT

dism /append-image /imagefile:D:WS2012R2ISOsourcesinstall1.wim /captureDir:mount /name:"Windows Server 2012 R2 SERVERDATACENTERCORE" /description:"Windows Server 2012 R2 SERVERDATACENTERCORE"

dism /unmount-WIM /MountDir:D:WS2012R2MOUNT /discard

dism /mount-wim /wimfile:"D:WS2012R2ISOsourcesinstall.wim" /Index:4 /mountdir:D:WS2012R2MOUNT

dism /append-image /imagefile:D:WS2012R2ISOsourcesinstall1.wim /captureDir:mount /name:"Windows Server 2012 R2 SERVERDATACENTER" /description:"Windows Server 2012 R2 SERVERDATACENTER"

dism /unmount-WIM /MountDir:D:WS2012R2MOUNT /discard
Удалите оригинальный install.wim, а сформированный install1.wim переименуйте в install.wim
Создание компактного образа install.esd
По совету D1abloRUS, если вы хотите получить инсталляционный диск минимального размера умещающийся на DVD5, можно экспортировать один (и только один) из образов в esd файл. Например, для экспорта Windows Server 2012 R2 Standard, используйте команду
dism /export-image /sourceimagefile:D:WS2012R2ISOsourcesinstall.wim /sourceindex:2 /destinationimagefile:D:WS2012R2ISOsourcesinstall.esd /compress:recovery
Оригинальный install.wim можно удалить.
Сборка ISO-файла
Для сборки нам потребуется утилита oscdimg.exe из комплекта Windows ADK. Если у вас ее не оказалось, можно просто скачать утилиту по ссылке (не используйте из этого комплекта ничего, кроме самой утилиты).
Tip & Trick #3. Для того, чтобы не было проблем с загрузкой из образа, следует расположить загрузочные файлы в пределах первых 4 гигабайт образа. Для этого используем файл bootorder.txt
bootbcd
bootboot.sdi
bootbootfix.bin
bootbootsect.exe
bootetfsboot.com
bootmemtest.exe
booten-usbootsect.exe.mui
bootfontschs_boot.ttf
bootfontscht_boot.ttf
bootfontsjpn_boot.ttf
bootfontskor_boot.ttf
bootfontswgl4_boot.ttf
sourcesboot.wim
Пути в этом файле указываются относительно корневой директории с образом, поэтому подстраивать пути на ваши фактические не требуется.
Tip & Trick #4. Если install.wim имеет размер больше 4700Mb, то инсталлятор вылетит с ошибкой «Windows cannot open the required file D:sourcesinstall.wim. Error code: 0x8007000D».
Нас учили что жизнь — это бой, поэтому разделим исходный install.wim на два командой
dism /split-Image /imagefile:D:WS2012R2ISOsourcesinstall.wim /swmfile:D:WS2012R2ISOsourcesinstall.swm /filesize:4096
Оригинальный файл install.wim можно удалить.
Tip & Trick #5. Вообще Microsoft говорит, что
пить
так делать нельзя.
In Windows 8.1 and Windows 8, Windows Setup does not support installing a split .wim file.
Мы говорим, что будем! Инсталлятор прекрасно подхватывает swm-файл. Проблем с установкой не будет.
Собираем образ командой:
oscdimg -m -n -yoD:WS2012R2bootorder.txt -bD:WS2012R2ISOBOOTetfsboot.com -lIR5_SSS_X64FREV_EN-US_DV9 D:WS2012R2ISO en_windows_server_2012R2_August_2016.iso
Уважаемый ildarz подсказывает, что для создания образа, одинаково хорошо работающего с BIOS и EFI, следует руководствоваться KB947024 и создавать образ так:
oscdimg -m -u2 -udfver102 -yoD:WS2012R2bootorder.txt -bootdata:2#p0,e,bD:WS2012R2ISOBOOTEtfsboot.com#pEF,e,bD:WS2012R2ISOEFImicrosoftBOOTefisys.bin -lIR5_SSS_X64FREV_EN-US_DV9 D:WS2012R2ISO en_windows_server_2012R2_August_2016.iso
Работоспособность проверена в ESXi с любым типом загрузки (BIOS/EFI).
Все получилось? Поздравляю!

Но решена ли проблема полностью? Для идеала необходимо интегрировать еще сотню «опциональных» и «рекомендованных» обновлений, но с этим не будем торопиться. Дадим Microsoft шанс самим разобраться в том бардаке, который они устроили с обновлениями.
PS. Зачем мы все это делали? Для того, чтобы освежить память, сделать работу чуть удобнее и получить несколько простых командных файлов, при помощи которых в дальнейшем можно практически автоматизированно интегрировать обновления в серверный дистрибутив, экономя время ввода сервера в эксплуатацию. Тем более есть надежда, что начиная с октября интегрировать обновления станет гораздо проще.
Точно так же вы сможете интегрировать Windows 7 convenience rollup и не наступить на грабли распаковки обновлений, невозможности загрузки из образа, превышения размера install.wim.
Спасибо за внимание и до новых встреч, друзья.
Если есть возможность поделиться опытом — жду вас в комментариях.
If you want to clone all of the IIS websites and configuration from one server to another, you can use msdeploy.exe. On the source server, run the following command as admin to have it copy all of the files and IIS configuration to the destination server, replacing [DestinationServerName] with the name of the server you want to clone to:
"C:Program FilesIISMicrosoft Web Deploy V3msdeploy.exe" -verb:sync -source:webServer -dest:auto,computerName=[DestinationServerName] -disableSkipDirective:ConfigProtectedData
Note that if you have other IIS websites and configuration setup on the destination server, the above command may wipe it out.
You can also sync individual websites and app pools using the commands:
"C:Program FilesIISMicrosoft Web Deploy V3msdeploy.exe" -verb:sync -source:apppoolconfig="[APP POOL NAME GOES HERE]" -dest:auto,computerName=[DestinationServerName] -disableSkipDirective:ConfigProtectedData
"C:Program FilesIISMicrosoft Web Deploy V3msdeploy.exe" -verb:sync -source:apphostconfig="[WEBSITE NAME GOES HERE]" -dest:auto,computerName=[DestinationServerName] -disableSkipDirective:ConfigProtectedData
See this gist for a bit more info.
Once that is done the destination server should be a mirror of the source server, so if you want anything changed on the destination server (e.g. binding hostnames) you’ll still need to do that afterward, either through the IIS GUI, PowerShell, or the C:WindowsSystem32inetsrvconfigApplicationHost.config file (be sure to back it up before modifying it).
В этом разделе
- Обязательные компоненты IIS
Для ArcGIS Web Adaptor необходимо включение IIS и определенных компонентов IIS в Windows Server 2012/2012 R2. Установка не будет продолжена, если IIS не обнаружен, или не включены его отдельные компоненты.
Если вы уже активировали IIS, но обязательные компоненты IIS отсутствуют, появится сообщение программы установки с указанием отсутствующих компонентов IIS. Вы можете разрешить программе установки автоматически включить отсутствующие компоненты IIS. В зависимости от политики безопасности вашей организации вам может потребоваться вручную включить обязательные компоненты IIS.
Более подробно о том, как включить IIS и обязательные компоненты IIS в Windows Server 2012/2012 R2, описано ниже.
- Откройте Диспетчер сервера и щелкните Управление > Добавить роли и компоненты. Щелкните Далее.
- Выберите Установка на основе роли или на основе объекта и щелкните Далее.
- Выберите нужный сервер. Локальный сервер выбирается по умолчанию. Щелкните Далее.
- Включите Веб сервер (IIS) и щелкните Далее.
- Для установки Web Adaptor, дополнительных компонентов не требуется, поэтому щелкните Далее.
- В диалоговом окне Роль веб-сервера (IIS) щелкните Далее.
- Убедитесь, что в диалоговом окне Выбрать сервисы ролей включены перечисленные ниже компоненты веб-сервера. Щелкните Далее.
- Проверьте правильность всех настроек и щелкните Установить.
- По окончании установки щелкните Закрыть для выхода из мастера.
Обязательные компоненты IIS
Компоненты IIS, указанные ниже, соответствуют минимальным требованиям для запуска Web Adaptor. Если установлены другие компоненты IIS, их не нужно удалять.
- Web сервер
- Общие HTTP-компоненты
- Документ по умолчанию
- Статическое содержимое
- Безопасность
- Фильтрация запросов
- Базовая аутентификация
- Аутентификация Windows
- Разработка приложений
- .NET Extensibility 4.5
- .NET расширяемость
- ASP.NET 4.5
- ASP.NET
- Дополнительные модули ISAPI
- Фильтры ISAPI
- Общие HTTP-компоненты
- Инструменты управления
- Консоль управления IIS
- Совместимость функций управления IIS 6
- Совместимость метабазы IIS 6
- IIS скрипты и инструменты управления
- Сервис управления
Отзыв по этому разделу?