Вы хотите перейти на более новую версию Windows Server? Пришло время обновить Windows Server 2012 до Windows Server 2016. В Windows Server 2016 появилось множество полезных функций и улучшений.
Отметим основные особенности Windows Server 2016 – данная платформа поддерживает только 64-битную архитектуру, версия Itanium не поддерживается. Кроме того, имеется всего четыре редакции Windows Server 2012 и 2016.
Обновление Windows Server – это сложный процесс. Поэтому Microsoft рекомендует администраторам переносить роли и настройки на новый сервер с Windows Server 2016 не используя обновление (в режиме новой установки и миграции ролей), из-за возможности появления ошибок.
В нашей статье мы расскажем, как проапгрейдить Windows Server 2012 до Server 2016 без переустаноки (хотя это и не рекомендуется).
- Особенности обновления и конвертации Windows Server
- Запуск апгрейда Windows Server 2012 до Windows Server 2016
- Установка Windows Server 2016
Содержание:
Особенности обновления и конвертации Windows Server
Чтобы обновить Windows Server 2012 до Server 2016, вам необходимо учесть следующие требования:
Все редакции Windows Serer 2016 бывают только 64 битные (обновление с 32-разрядной Windows Server 2008 до 64-разрядной версии невозможно).
Windows Server 2012 можно обновить до Server 2016, более ранние версии Windows Server такой сценарий не поддерживают.
Не поддерживается обновление с одной редакции на другую ( т.е. нельзя обновить Windows Server 2012 Standart до версии Windows Server 2016 Datacenter).
- Обновление с одного языка на другой не поддерживается.
- Обновление, с переключением из режима Server Core в режим полноценного GUI (и наоборот) также не поддерживается.
- Обновление ранее установленной Windows Server на пробную версию Windows Server не поддерживается. Ознакомительные версии должны быть установлены в режиме чистой установки.
- При апгерейде отключите антивирусную защиту, поскольку она замедляет процесс, так как антивирус сканирует каждый файл, копируемый на диск.
- Если сервер использует NIC Teaming, отключите его. Вы можете включить NIC Teaming после завершения обновления ОС сервера.
- Прежде чем обновлять сервер создайте его резервную копию. При возникновении ошибок или проблем у вас будет возможность откатить систему к исходному состоянию.
- Проверьте, нет ли у в журналах сервера проблем и ошибок, если они есть – их необходимо устранить. В противном случае это может привести к ошибкам, которые способны спровоцировать сбой процесса обновления.
Запуск апгрейда Windows Server 2012 до Windows Server 2016
Теперь, когда вам известны и понятны правила апгрейда версий, давайте начнем.
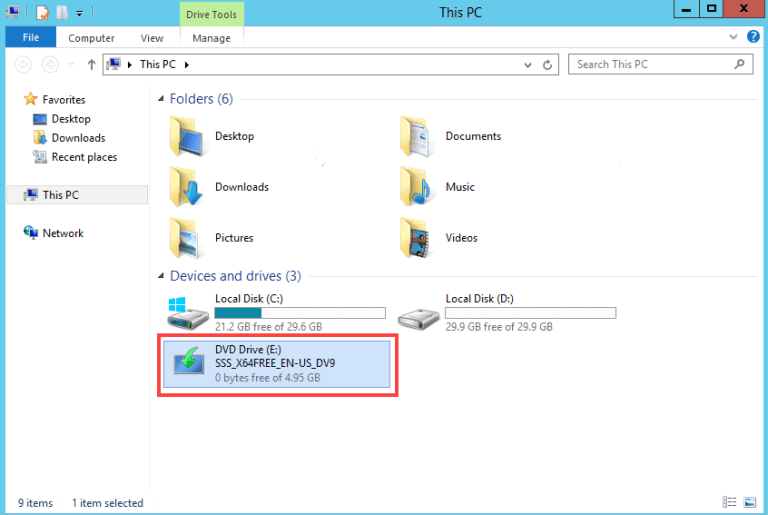
Авторизуйтесь на Windows Server 2012 и подключите к серверу установочный диск с Windows Server 2016 (в виде iso образа, или установочном DVD диске или USB флешке). Смонтируйте диск, откройте проводник и дважды щелкните по диску в устройстве DVD, чтобы запустить установку Windows Server 2016.
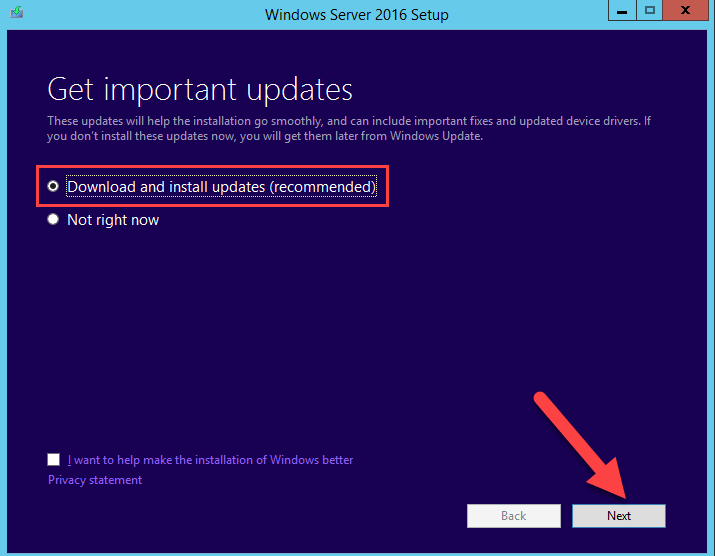
Выберите «Download & install updates», поставьте галочку напротив «I want to help make installation of Windows better». Нажмите кнопку «Next».
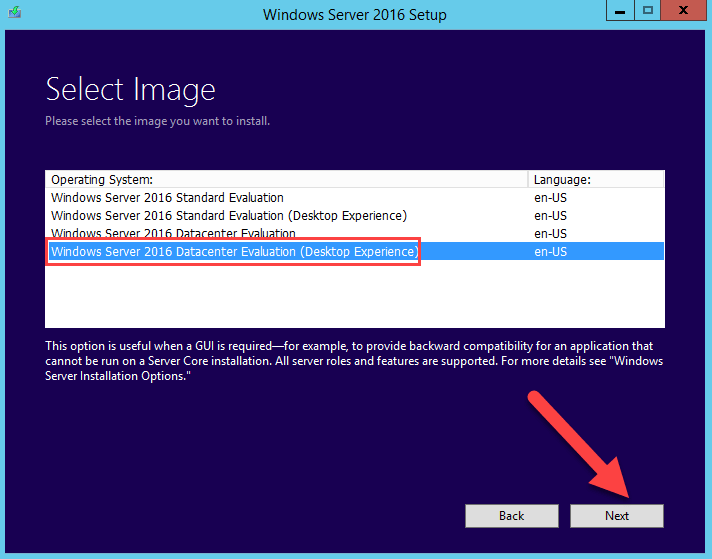
Выберите необходимую редакцию Windows Server 2016, которая соответствует ранее установленной редакции ОС. Нажмите кнопку «Next».
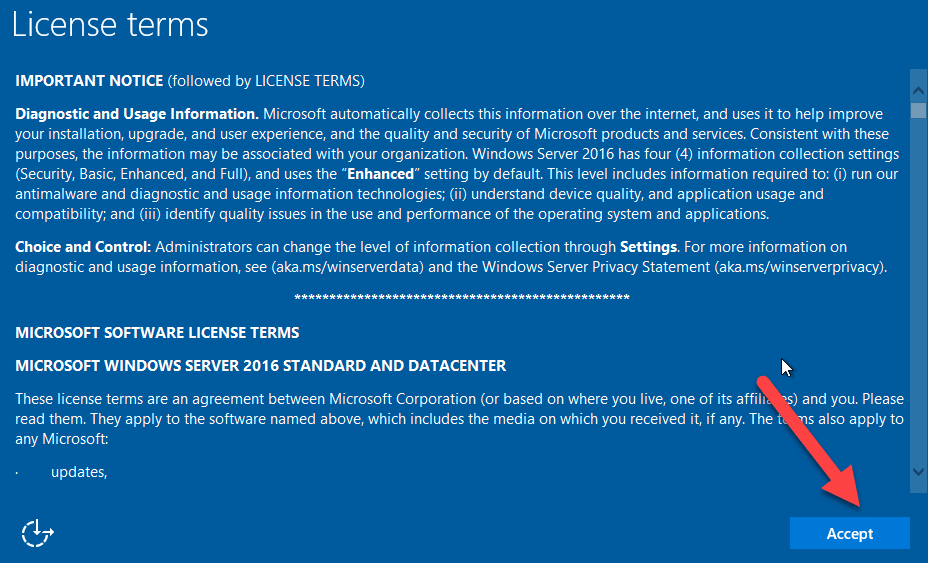
Прочитайте условия лицензионного соглашения. Если вы не согласны нажмите на кнопку «Decline», после чего вы вернетесь назад. Если вы согласны, нажмите кнопку «Accept».
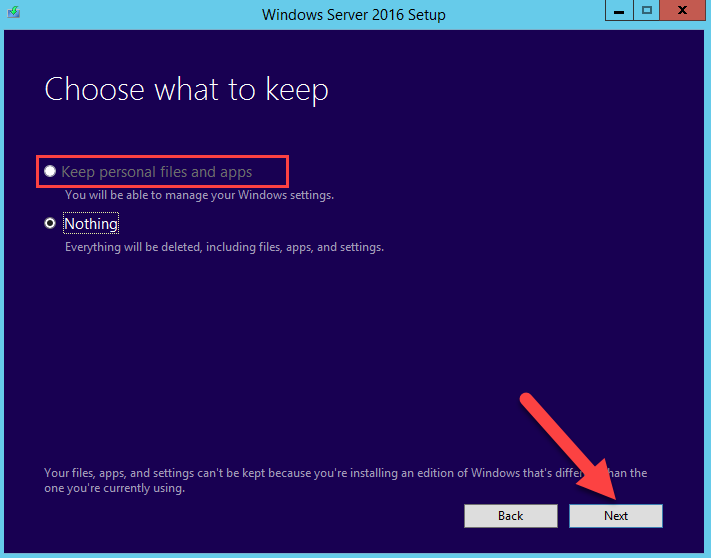
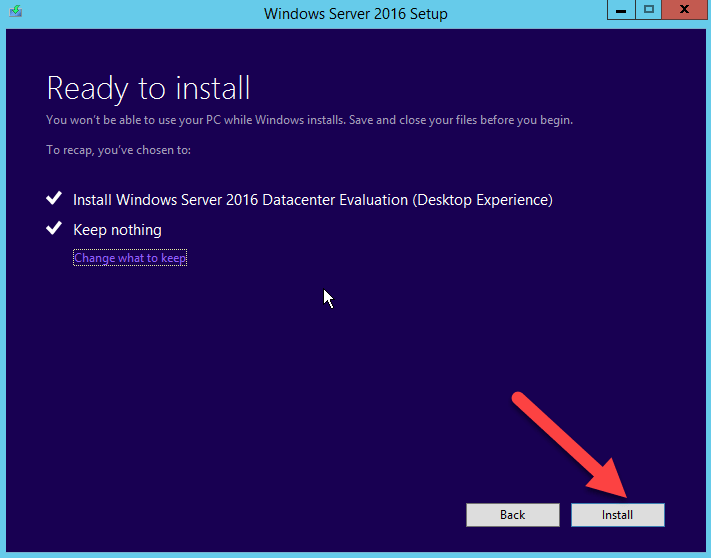
Если вы выбрали туже самую редакцию, которую используете в данный момент, вы можете сохранить свои приложения и файлы. Как уже упоминалось ранее, если вы выбрали неправильную редакцию, вы не сможете сохранить свои приложения и файлы. Выберите «Keep personal files and apps», если вы используете ту же редакцию или выберите «Nothing», чтобы затереть все. Затем нажмите кнопку «Next».
Установка Windows Server 2016
Windows Server автоматически проверит вашу систему на совместимость, поэтому просто нажмите кнопку «Install», чтобы начать установку.
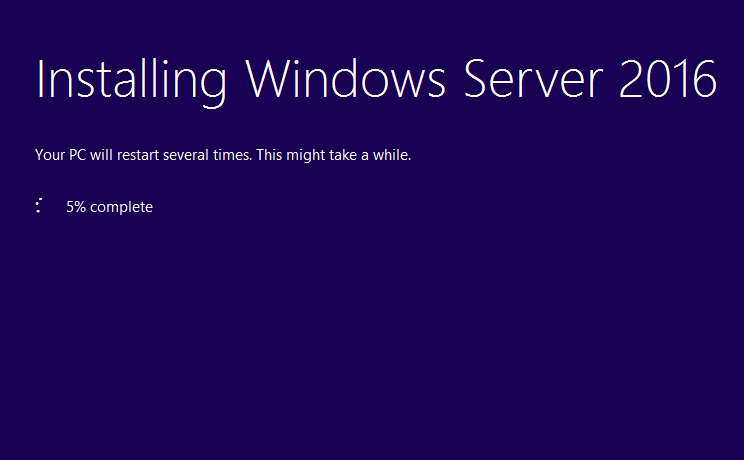
Будьте терпеливы, потому что процесс установки Windows Server занимает достаточно много времени. В процессе установки ваша система может перезагрузится несколько раз.
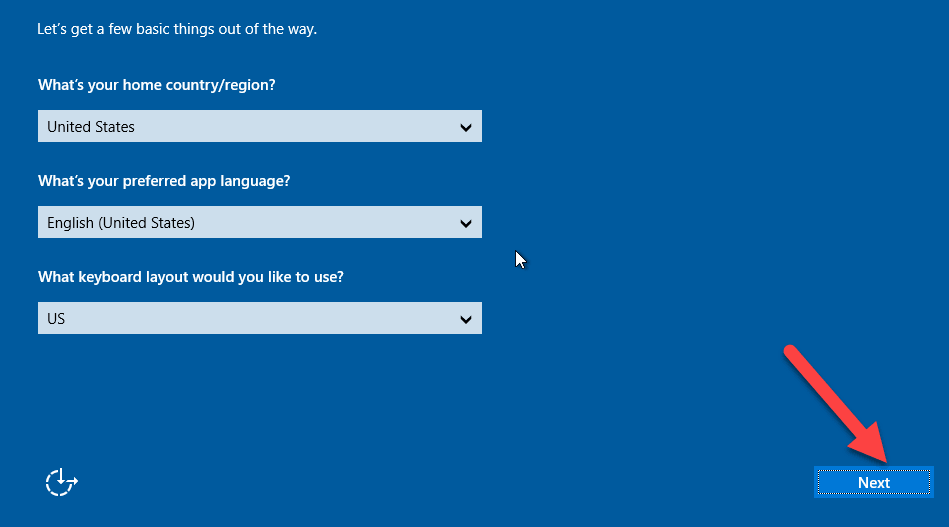
Выберите страну и предпочитаемую раскладку клавиатуры сервера.. Нажмите кнопку «Next», чтобы перейти к следующей странице.
Внимательно прочитайте условия лицензии и нажмите кнопку «Accept».
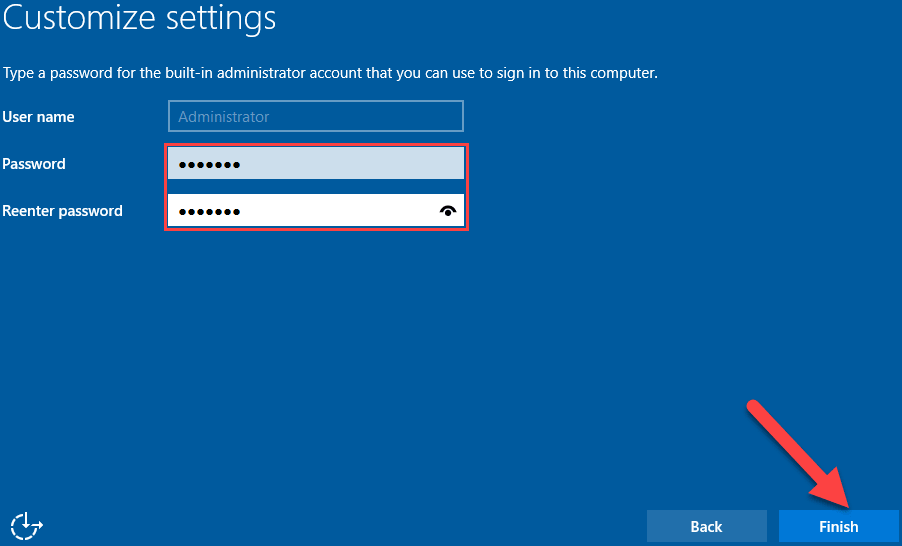
По умолчанию имя пользователя — «Administrator», придумайте ему сложный пароль (пароль, состоящий из строчных букв, прописных букв, цифр и символов). Повторно введите пароль. Затем нажмите кнопку «Finish». Используя эти имя пользователя и пароль, вы можете авторизоваться на сервере.
На экране входа нажмите нажатием клавиш Ctrl + Alt + Del, затем авторизуйтесь в системе, используя ранее созданную учетную запись.

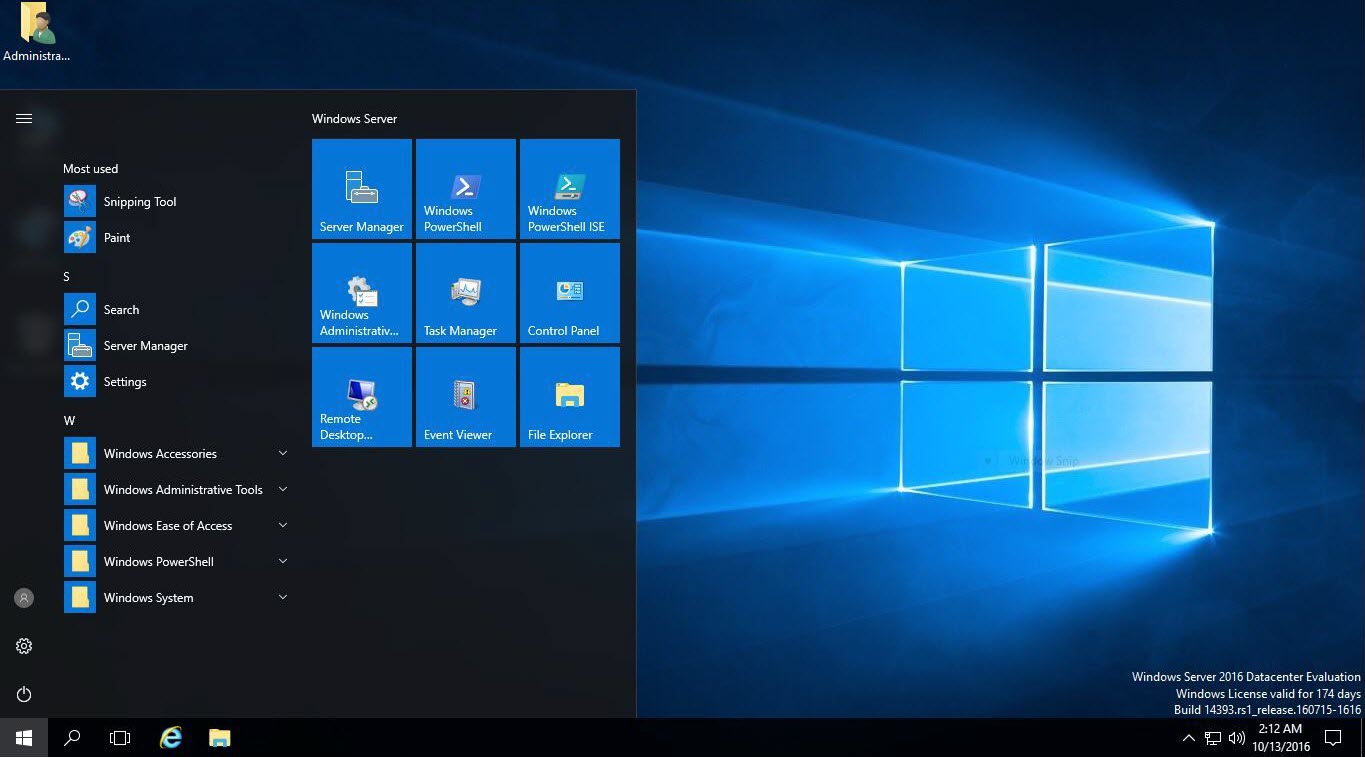
Добро пожаловать в Server Windows 2016. На этом процесс обновления Server Windows 2012 до Server Windows 2016 завершен. Теперь вы можете увидеть домашнюю страницу сервера Windows Server 2016 и оценить все нововведения.
Можете глубоко вдохнуть, процесс обновления прошел без ошибок. Не стесняйтесь, задавайте ваши вопросы и оставляйте комментарии ниже.
| Workable Solutions | Step-by-step Troubleshooting |
|---|---|
| Windows Server Migration Checklist | #1. Download essential Windows server migration tool; #2. Find out your goals in Windows server migration…Full steps |
| Solution 1. Migration (Data, Apps, Account) | Step 1. Launch EaseUS Todo PCTrans on your source and target computers, connect both PCs via the internet…Full steps |
| Solution 2. In-place Upgrade (Everything) | Step 1. Create an image of all important data, apps, and even accounts on Windows Server 2012…Full steps |
Methods on this page are also applicable to Windows Server 2008/2008 R2/2012/2012 R2/2016/2019. It also works to upgrade and migrate Windows Server essentials to standards.
According to Microsoft, the new end-of-extended support date for Windows Server 2012 is October 10, 2023. The original date had been January 10, 2023.
It’s confirmed that Windows Server 2012 and Windows Server 2012 R2 supports will end by Oct.10th, 2023. And Microsoft has released two new Windows Servers — 2016 and 2019 for personal and enterprise users to explore their businesses on the new Windows Server systems. And it’s a smart choice to get things ready in advance. Therefore, it’s time to make a full plan of upgrading or migrating Windows Server 2012/2012 R2 to new Windows Server 2016/2019.
So how to successfully migrate your Windows Server 2012 to 2016 with all applications, data, and even accounts? If you are having the same doubts as listed here, stay calm and follow the provided tips in the following to get problems resolved:
- 1. Will I lose data while migrating Windows Server 2012 to 2016?
- 2. How do I upgrade Windows Server 2012 to 2019?
- 3. How to keep applications, data, accounts while migrating Windows Server 2012 to 2016/2019?
Windows Server Migration Checklist (2 Steps)
Here is a checklist that can be applied to upgrade and migrate Windows Servers applications, data, and accounts, etc., for all Windows Server users. Take the following two steps to get the right tool and resolution for Windows Server Migration:
- #1. Download Essential Windows Server Migration Tool
For most Windows Server users, the biggest challenge of migrating Windows Server is about how to fully transfer data, installed applications, and even Windows Server accounts to the new Windows Server machine. Advanced Windows Server PC transfer software — EaseUS Todo PCTrans Technician specializes in Windows Server data, app, account and settings migration between Windows Servers.
EaseUS Todo PCTrans Technician supports to transfer data, application, accounts via network or image on all Windows Servers, including Windows Server 2019/2016/2012/2012 R2/2008/2008 R2, etc.
EaseUS Todo PCTrans Technician
- ☆ Deploy & install Todo PCTrans on multiple PCs.
- Transfer unlimited files, programs, apps between Servers.
- Transfer account, domain account, and settings.
- Data rescue, find product key of installed programs.
- One license for multiple PCs.
- #2. Find Out Your Goals in Windows Server Migration
To find out the right way to migrate Windows Server, you should first find out your goals.
- If you want to transfer Windows Server OS to a new computer, try EaseUS Windows Server Migration Tool. You will successfully migrate Windows Server OS to a new computer without reinstalling the Server OS.
- If you only want to transfer Windows Server 2012 data, installed applications, account and settings to Windows Server 2016/2019 computer, follow Solution 1 listed below for help.
- If you want to perform an in-place upgrade from Windows Server 2012 to 2016/2019 or fresh install Windows Server 2016/2019 on old Windows Server 2012 but keep all data, installation apps, and account, follow Solution 2 on this page for help.
Solution 1. Migrate Windows Server 2012 to New Server 2016/2019 (Data, Apps, Account)
Applies to: Transfer data, installed applications, account and settings from Windows Server 2012 to new Windows Server 2016/2019 computers. No reinstallation is required.
To transfer Windows Server 2012 data, applications, and account, etc., to a new Windows server computer like 2016 or 2019, all you need is a reliable Windows Server PC Transfer software. EaseUS Todo PCTrans Technician is capable to help. It enables all levels of users to efficiently transfer everything from an old Windows Server computer to a new Server machine via the network connection.
See how to migrate Windows Server 2012 data, application, and even account to new Server step by step:
Step 1. Launch EaseUS Todo PCTrans on your source and target computers, connect both PCs via the internet.
1. At the «PC to PC» section, click «PC to PC» to continue.

2. Select your target computer via its device name, then enter its account password or verification code and select the transfer direction. Then click «Connect» to continue.
You can check the verification code on the right top of «PC to PC» mainscreen on the target computer.

Step 2. Select the categories Applications, Files, and Accounts to transfer via the internet.
If you want to transfer data selectively, click «Edit» under each category, and choose the specific items.

Step 3. Click «Transfer» to start transferring your apps/files/accounts from one computer to another computer via the Internet.

After the migration, you can restart the new Windows Server 2016 or 2019 computer and then continue using the software again. If some applications require reactivation, use your old key to activate the programs again.
Solution 2. In-place Upgrade Windows Server 2012 to 2016/2019, Keep Everything on Server
Applies to: In-place upgrade Windows Server 2012 to 2016 or 2019 and keep everything on the Server, including data, applications, and account, etc.
If you need to in-place upgrade Windows Server 2012 to newer Windows Server, keeping everything on the machine, follow the tutorial steps below carefully.
Step 1. Create an image of all important data, apps, and even accounts on Windows Server 2012
EaseUS Todo PCTrans with its Backup and Restore feature supports you to create an image backup of all important data, applications, accounts, etc., from Windows Server 2012 to an external hard drive.
Video Tutorial of Image Transfer using EaseUS Todo PCTrans:
Step 2. Perform in-place upgrade from Windows Server 2012 to 2016/2019, or fresh install Windows server 2016 on old Server PC.
If you don’t know how to perform Windows Server in-place upgrade, follow to the Microsoft tutorial: Upgrade Windows Server 2012 to Windows Server 2016 for help.
If you need to fresh install Windows Server 2016 or 2019 on the old Server machine, you need first download a Windows Server ISO and then follow the video below to clean install the Windows Server:
Video Tutorial to Install Windows Server 2016 produced by Server Academy on YouTube:
Step 3. Restore data, applications, accounts to new Windows Server via EaseUS Todo PCTrans using its Image Transfer feature.
If you lost some apps or data, you can use EaseUS Todo PCTrans Technician to selectively restore applications, data, and accounts to your new Windows Server 2016/2019.
Conclusion
On this page, we collected two solutions to help Windows Server users migrating Windows Server 2012 with data, applications, and accounts, etc., to Windows Server 2016/2019 using reliable PC transfer — EaseUS Todo PCTrans.
We also provide extra tips to help users to perform in-place upgrade or fresh install Windows Server 2016/2019 on old Windows Server machine. By following the provided tips, you can effortlessly move everything to the new Windows Server computer.
Windows Server 2012 Migration FAQs
If you have more questions about Windows Server migration, check the following questions and find answers here immediately.
1. Can Windows Server 2012 be upgraded to 2016?
Yes. Windows Server 2012 can be upgraded to 2016 in many ways. Here, we have collected all the possible ways that you can try to upgrade to Windows Server 2016 from 2012:
- Method 1. Use Windows Server migration tool: back up Windows Server 2016 OS and restore to the Windows Server 2012.
- Method 2. Perform in-place Windows Server upgrade from 2012 to 2016.
- Method 3. Clean install Windows Server 2016 on the old Windows Server 2012 computer.
2. Can Windows Server 2008 r2 be upgraded to 2016?
Sure. You can upgrade Windows Server 2008 r2 to 2016 by performing an in-place upgrade or fresh installing Windows Server 2016 on the computer. If you need to move data, applications, and account from the old Windows Server 2008 to new Windows server 2016, refer to Migrate Windows Server 20018 (R2) to 2016 step by step guide for help.
3. How do I migrate Windows Server 2012 R2 to 2019?
The ways to migrate Windows Server 2012 R2 to 2019 is similar to the ways as recommended on this page — migrating Windows Server 2012 to 216.
First, you need a reliable Windows PC transfer software that supports you to migrate old Windows Server data, apps, accounts to the new server computer.
Next, confirm your goals — to transfer data, apps, accounts between server machines, or to upgrade Windows server to 2019 but keep everything on the computer.
Last, take the right solution to migrate Windows Server 2012 R2 to 2019:
- If you need to migrate everything to a new Server computer, use the PC to PC feature in EaseUS Todo PCTrans Technician and migrate data, apps, accounts to Windows Server 2019 without losing anything.
- If you need to perform in-place upgrade or clean install Windows Sever 2019 on the old Server 2012 R2 computer, use Image Transfer feature in EaseUS Todo PCTrans to create an image of all important things, in-place upgrade or fresh install new Server, and then recover the image back to the computer.
| Workable Solutions | Step-by-step Troubleshooting |
|---|---|
| Windows Server Migration Checklist | #1. Download essential Windows server migration tool; #2. Find out your goals in Windows server migration…Full steps |
| Solution 1. Migration (Data, Apps, Account) | Step 1. Launch EaseUS Todo PCTrans on your source and target computers, connect both PCs via the internet…Full steps |
| Solution 2. In-place Upgrade (Everything) | Step 1. Create an image of all important data, apps, and even accounts on Windows Server 2012…Full steps |
Methods on this page are also applicable to Windows Server 2008/2008 R2/2012/2012 R2/2016/2019. It also works to upgrade and migrate Windows Server essentials to standards.
According to Microsoft, the new end-of-extended support date for Windows Server 2012 is October 10, 2023. The original date had been January 10, 2023.
It’s confirmed that Windows Server 2012 and Windows Server 2012 R2 supports will end by Oct.10th, 2023. And Microsoft has released two new Windows Servers — 2016 and 2019 for personal and enterprise users to explore their businesses on the new Windows Server systems. And it’s a smart choice to get things ready in advance. Therefore, it’s time to make a full plan of upgrading or migrating Windows Server 2012/2012 R2 to new Windows Server 2016/2019.
So how to successfully migrate your Windows Server 2012 to 2016 with all applications, data, and even accounts? If you are having the same doubts as listed here, stay calm and follow the provided tips in the following to get problems resolved:
- 1. Will I lose data while migrating Windows Server 2012 to 2016?
- 2. How do I upgrade Windows Server 2012 to 2019?
- 3. How to keep applications, data, accounts while migrating Windows Server 2012 to 2016/2019?
Windows Server Migration Checklist (2 Steps)
Here is a checklist that can be applied to upgrade and migrate Windows Servers applications, data, and accounts, etc., for all Windows Server users. Take the following two steps to get the right tool and resolution for Windows Server Migration:
- #1. Download Essential Windows Server Migration Tool
For most Windows Server users, the biggest challenge of migrating Windows Server is about how to fully transfer data, installed applications, and even Windows Server accounts to the new Windows Server machine. Advanced Windows Server PC transfer software — EaseUS Todo PCTrans Technician specializes in Windows Server data, app, account and settings migration between Windows Servers.
EaseUS Todo PCTrans Technician supports to transfer data, application, accounts via network or image on all Windows Servers, including Windows Server 2019/2016/2012/2012 R2/2008/2008 R2, etc.
EaseUS Todo PCTrans Technician
- ☆ Deploy & install Todo PCTrans on multiple PCs.
- Transfer unlimited files, programs, apps between Servers.
- Transfer account, domain account, and settings.
- Data rescue, find product key of installed programs.
- One license for multiple PCs.
- #2. Find Out Your Goals in Windows Server Migration
To find out the right way to migrate Windows Server, you should first find out your goals.
- If you want to transfer Windows Server OS to a new computer, try EaseUS Windows Server Migration Tool. You will successfully migrate Windows Server OS to a new computer without reinstalling the Server OS.
- If you only want to transfer Windows Server 2012 data, installed applications, account and settings to Windows Server 2016/2019 computer, follow Solution 1 listed below for help.
- If you want to perform an in-place upgrade from Windows Server 2012 to 2016/2019 or fresh install Windows Server 2016/2019 on old Windows Server 2012 but keep all data, installation apps, and account, follow Solution 2 on this page for help.
Solution 1. Migrate Windows Server 2012 to New Server 2016/2019 (Data, Apps, Account)
Applies to: Transfer data, installed applications, account and settings from Windows Server 2012 to new Windows Server 2016/2019 computers. No reinstallation is required.
To transfer Windows Server 2012 data, applications, and account, etc., to a new Windows server computer like 2016 or 2019, all you need is a reliable Windows Server PC Transfer software. EaseUS Todo PCTrans Technician is capable to help. It enables all levels of users to efficiently transfer everything from an old Windows Server computer to a new Server machine via the network connection.
See how to migrate Windows Server 2012 data, application, and even account to new Server step by step:
Step 1. Launch EaseUS Todo PCTrans on your source and target computers, connect both PCs via the internet.
1. At the «PC to PC» section, click «PC to PC» to continue.
2. Select your target computer via its device name, then enter its account password or verification code and select the transfer direction. Then click «Connect» to continue.
You can check the verification code on the right top of «PC to PC» mainscreen on the target computer.
Step 2. Select the categories Applications, Files, and Accounts to transfer via the internet.
If you want to transfer data selectively, click «Edit» under each category, and choose the specific items.
Step 3. Click «Transfer» to start transferring your apps/files/accounts from one computer to another computer via the Internet.
After the migration, you can restart the new Windows Server 2016 or 2019 computer and then continue using the software again. If some applications require reactivation, use your old key to activate the programs again.
Solution 2. In-place Upgrade Windows Server 2012 to 2016/2019, Keep Everything on Server
Applies to: In-place upgrade Windows Server 2012 to 2016 or 2019 and keep everything on the Server, including data, applications, and account, etc.
If you need to in-place upgrade Windows Server 2012 to newer Windows Server, keeping everything on the machine, follow the tutorial steps below carefully.
Step 1. Create an image of all important data, apps, and even accounts on Windows Server 2012
EaseUS Todo PCTrans with its Backup and Restore feature supports you to create an image backup of all important data, applications, accounts, etc., from Windows Server 2012 to an external hard drive.
Video Tutorial of Image Transfer using EaseUS Todo PCTrans:
Step 2. Perform in-place upgrade from Windows Server 2012 to 2016/2019, or fresh install Windows server 2016 on old Server PC.
If you don’t know how to perform Windows Server in-place upgrade, follow to the Microsoft tutorial: Upgrade Windows Server 2012 to Windows Server 2016 for help.
If you need to fresh install Windows Server 2016 or 2019 on the old Server machine, you need first download a Windows Server ISO and then follow the video below to clean install the Windows Server:
Video Tutorial to Install Windows Server 2016 produced by Server Academy on YouTube:
Step 3. Restore data, applications, accounts to new Windows Server via EaseUS Todo PCTrans using its Image Transfer feature.
If you lost some apps or data, you can use EaseUS Todo PCTrans Technician to selectively restore applications, data, and accounts to your new Windows Server 2016/2019.
Conclusion
On this page, we collected two solutions to help Windows Server users migrating Windows Server 2012 with data, applications, and accounts, etc., to Windows Server 2016/2019 using reliable PC transfer — EaseUS Todo PCTrans.
We also provide extra tips to help users to perform in-place upgrade or fresh install Windows Server 2016/2019 on old Windows Server machine. By following the provided tips, you can effortlessly move everything to the new Windows Server computer.
Windows Server 2012 Migration FAQs
If you have more questions about Windows Server migration, check the following questions and find answers here immediately.
1. Can Windows Server 2012 be upgraded to 2016?
Yes. Windows Server 2012 can be upgraded to 2016 in many ways. Here, we have collected all the possible ways that you can try to upgrade to Windows Server 2016 from 2012:
- Method 1. Use Windows Server migration tool: back up Windows Server 2016 OS and restore to the Windows Server 2012.
- Method 2. Perform in-place Windows Server upgrade from 2012 to 2016.
- Method 3. Clean install Windows Server 2016 on the old Windows Server 2012 computer.
2. Can Windows Server 2008 r2 be upgraded to 2016?
Sure. You can upgrade Windows Server 2008 r2 to 2016 by performing an in-place upgrade or fresh installing Windows Server 2016 on the computer. If you need to move data, applications, and account from the old Windows Server 2008 to new Windows server 2016, refer to Migrate Windows Server 20018 (R2) to 2016 step by step guide for help.
3. How do I migrate Windows Server 2012 R2 to 2019?
The ways to migrate Windows Server 2012 R2 to 2019 is similar to the ways as recommended on this page — migrating Windows Server 2012 to 216.
First, you need a reliable Windows PC transfer software that supports you to migrate old Windows Server data, apps, accounts to the new server computer.
Next, confirm your goals — to transfer data, apps, accounts between server machines, or to upgrade Windows server to 2019 but keep everything on the computer.
Last, take the right solution to migrate Windows Server 2012 R2 to 2019:
- If you need to migrate everything to a new Server computer, use the PC to PC feature in EaseUS Todo PCTrans Technician and migrate data, apps, accounts to Windows Server 2019 without losing anything.
- If you need to perform in-place upgrade or clean install Windows Sever 2019 on the old Server 2012 R2 computer, use Image Transfer feature in EaseUS Todo PCTrans to create an image of all important things, in-place upgrade or fresh install new Server, and then recover the image back to the computer.
«… сильно плохо в 2016 с WSUS?? Я пока поднял DPM на нем для «попробовать», вроде нормально работает» — ну как Вам сказать… Для начала, потребовались некие пляски с бубном, для решения вроде бы известных
(как бы совсем старых) проблем, с которыми ранее (2008R2/2012R2) столкнуться не довелось, оно просто работало, на меньших ресурсах.
Сейчас вроде работает, системы (до 2016 / 10_1607) обновляются, только пару раз в день что-нибудь валится.
Попытка посмотреть в оснастке список синхронизаций уверенно заканчивается кнопкой «Сброс серверного узла» (никогда до 2016 не видел) с сопутствующей записью в логах —
System.Net.WebException — Время ожидания операции истекло
Source
System.Web.Services
Stack Trace:
в System.Web.Services.Protocols.WebClientProtocol.GetWebResponse(WebRequest request)
в Microsoft.UpdateServices.Internal.DatabaseAccess.ApiRemotingCompressionProxy.GetWebResponse(WebRequest webRequest)
в System.Web.Services.Protocols.SoapHttpClientProtocol.Invoke(String methodName, Object[] parameters)
в Microsoft.UpdateServices.Internal.ApiRemoting.ExecuteSPSearchUpdates(String updateScopeXml, String preferredCulture, Int32 publicationState)
в Microsoft.UpdateServices.Internal.DatabaseAccess.AdminDataAccessProxy.ExecuteSPSearchUpdates(String updateScopeXml, String preferredCulture, ExtendedPublicationState publicationState)
в Microsoft.UpdateServices.Internal.BaseApi.Update.SearchUpdates(UpdateScope searchScope, ExtendedPublicationState publicationState, UpdateServer updateServer)
в Microsoft.UpdateServices.UI.AdminApiAccess.UpdateManager.GetUpdates(ExtendedUpdateScope filter)
в Microsoft.UpdateServices.UI.AdminApiAccess.WsusSynchronizationInfo.InitializeDerivedProperties()
в Microsoft.UpdateServices.UI.SnapIn.Pages.SyncResultsListPage.GetSyncInfoRow(WsusSynchronizationInfo syncInfo)
в Microsoft.UpdateServices.UI.SnapIn.Pages.SyncResultsListPage.GetListRows()
При этом, я его сначала (сразу) обновил с MS, теперь он вроде благополучно обновляется сам с себя.
А вот ещё две тестовые установки… После попытки натравливания на WSUS, теперь не обновляются никак.
Логи Application по самое нехочу забиты вот этим —
Контейнер ошибки , тип 0
Имя события: WindowsUpdateFailure3
Отклик: Нет данных
Идентификатор CAB: 0
Сигнатура проблемы:
P1: 10.0.14393.0
…
Ну, и чтение англоязычных форумов по теме оптимизьма не внушает.
У Вас установка Core, или с GUI ? Если второе, в логах как? Оно обовляется? Сервайсы не валятся? Кортаны всякие, или ещё что, столь же необходимое на сервере?
S.A.
-
Изменено
Safronov A. _
22 декабря 2016 г. 16:45
[Updated on Date: 2021-01-27] Do you want to migrate to the new version of Windows Server? Since Windows Server 2016 offers new features compared to Windows Server 2012, your answer is probably yes. These new features have greatly improved the management of Windows Server. That’s why we decided to learn you How to upgrade Windows Server 2012 to 2016. You can choose your perfect Windows VPS Server Packages from Eldernode to install your required windows server.
Unlike upgrading previous versions of Windows Server to 2012, Windows Server 2016 only supports 64-bit architecture. In addition, Windows Server 2012 and 2016 have only 4 versions. Upgrading Windows Server is a complicated process. So, Microsoft recommends that instead of updating the entire Windows server, it upgrades the roles and settings of the Windows 2016 server.
Requirements for upgrading Windows 2012 to 2016
In order to be able to upgrade Windows Server 2012 to 2016, you must follow the following requirements:
1. All versions of Windows Server 2016 are 64-bit (upgrading from 32-bit to 64-bit is not possible.)
2. Only Windows Server 2012 can be upgraded to 2016, other versions cannot be upgraded.
3. Upgrades are not supported from one version to another. For example, you can’t upgrade the standard version of Windows Server 2012 to the Data Center version of Windows Server 2016.
4. It is not possible to upgrade from one language to another. For example, you can’t upgrade the German version of Windows Server to Chinese.
5. The upgrade from Server Core to Desktop version (or vice versa) is not supported.
6. Upgrading from older versions of Windows Server to trial versions of Windows Server is not supported. Trial versions must be installed manually.
7. Disable antivirus, because it scans every file that is copied to the disk and slows down the processing speed.
8. If this server uses NIC Teaming, disable it and reactivate it.
9. Make a full backup of the server, as you may have a problem during the upgrade and want to go back to the previous version.
10. Check that the server has no problems, if you see any problems, try to solve them. Otherwise, you may encounter an error that will cause the entire installation process to fail.
Upgrade with Step By Step :
Now that you understand the rules of the upgrade, let’s move on.
Log in to Windows Server 2012 and install DVD or Flash. Open File Explorer and click on DVD Drive as shown below:
Select Download & install updates to begin the Windows installation process.
Choose a version of Windows Server 2016 that suits your needs. You may need to enlarge the network in the future and require more roles and licenses. So be careful at this point.
In the license stage, click Accept. You will enter the next step.
If you have selected the same version as the previous version, you can keep all the applications and files in the system. As we said, if you don’t want to select the previous version, the apps and files will be deleted. Select Keep personal files and apps to save files and apps, otherwise, click Nothing to delete all files. Then click Next.
How to install Windows Server 2016
Windows Server automatically checks your system for compatibility. So, click Install to start the installation.
Wait a bit, because it will take a very long time to install Windows Server on your system. Your system will be reset several times during installation.
Select the country and keyboard language. Note that you cannot change the language. Click Next.
Click Accept on the License Terms page.
Username is the default Administrator, enter a password (code that contains uppercase and lowercase letters, numbers, and symbols), and re-enter the password. Then click Finish. You can log in to the server locally using this username and password.
Press Ctrl + Alt + Del to enter the login page and log in with the username and password.
Here we have successfully upgraded from Windows Server 2012 to 2016. By entering the Windows Server 2016 page, you can see the differences and improvements.
Conclusion
Before explaining how to upgrade Windows Server 2012 to 2016, we first needed to mention some of the requirements for updating to Windows Server 2016. Then, you were completely taught how to upgrade from Windows Server 2012 to Windows Server 2016.
Обновлено 01.10.2020
Добрый день! Уважаемые читатели и гости одного из крупнейших IT блогов России Pyatilistnik.org. В прошлый раз мы с вами Рассматривали интеграцию драйверов в Windows 7 через usb 3.0 creator utility. Время идет вперед, операционные системы улучшаются и всегда встает задача перехода на более свежее ПО. В сегодняшней публикации мы с вами разберем, как производится мигрирование Remote Desktop Services High Availability на базе Windows Server 2012 R2 на Windows Server 2016-2019. Я покажу какие есть варианты перехода, которые будут зависеть от ваших размеров организации.
Постановка задачи
Есть доменная инфраструктура Active Directory, в ней существует отказоустойчивая RDS ферма на базе Windows Server 2012 R2, в компании было принято решение, о переходе в качестве корпоративного стандарта ОС на Windows Server 2016. Сама RDS ферма состоит из 50 RDSH хостов и обслуживает свыше 4000 пользователей. Хочется максимально безболезненно перевести пользователей на новую RDS. Ниже я покажу несколько вариантов миграции.
Варианты миграции RDS фермы
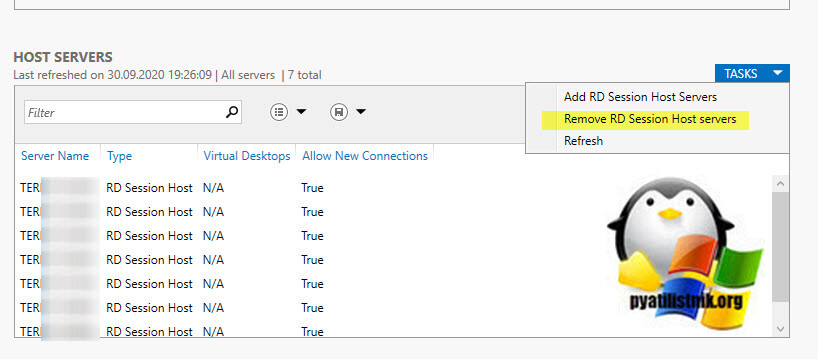
Существует как минимум два варианта, которые вам позволят произвести переход вашей старой RDS фермы на новую. Тут все будет зависеть от ваших свободных ресурсов. Будет ряд шагов общих для обоих вариантов. Вначале вы разворачиваете отказоустойчивую Remote Desktop Services High Availability на базе Windows Server 2016. Вам нужно получить как минимум два хоста RDCB и один хост RDSH, как это делается смотрите по ссылке. Далее два варианта:
- Вы уведомляете пользователей, что будут произведены работы по модернизации RDS фермы. Переводите все узлы подключения в режим стока. После чего вы удаляете один из RDSH хостов из коллекции в текущей RDS ферме, через оснастку управления.
После чего вы данный хост добавляете в новую RDS ферму на базе WindowsServer 2016. Проделываем так со всеми RDSH хостами. Когда все хосты подключений будут управляться новыми брокерами и будут уже частью новой коллекции. Вам остается только произвести переключение DNS записи на новый RDS HA пул. Потом вы спокойно будите добавлять по одному новому хосту с Windows Server 2016, меняя его на старые с Windows Server 2012. Через какое-то время вы все так замените.
Не забываем про свои групповые политики которые были на старой RDS ферме. Вам нужно все будет перенести, чтобы пользователи ничего не увидели
На этом обновление RDS фермы Windows Server 2012 на Windows Server 2016 можно почти считать готовым, за исключением того, если у вас используются перемещаемые профили пользователей. Я не зря завел разговор про перемещаемые профили, так как у них немного другой формат в новой ОС. На RDS Windows Server 2012 R2 профиль имеет формат username.domain.V2, а вот уже у Windows Server 2016 формат username.domain.V6. Все отличие в цифре. Так, что если вы хотите, чтобы пользователи увидели свои данные при следующем подключении, вам необходимо переименовать старые профили на новый манер. Если у вас их мало, то можно сделать и вручную, но если как у меня, это тысячи пользователей, то тут нужно скриптовать.

Скрипт переименовывания профилей V2 на V6
Ниже скрипт PowerShell, он имеет два варианта, либо переименовать все профили в нужном каталоге, либо переименовать только те, что подсовываются в текстовом файле.
function Date {Get-Date -Format «yyyy.MM.dd HH:mm:ss»}
$folder_to_process = «M:ShareTS» # «Путь до папки с перемещаемыми профилями»
$userlist_file = «C:Tempuser.txt» # «Путь до файла со списком пользователей»
# 1. По возможности все папки у которых в имени .V2 на конце, переименовать в .V6
$process_full_folder = $false # Если стоит false, то массового переименовывания не будет, использовать при точечном варианте
# 2. Подсунуть список из файла с именами логинов, и только их папки если там .V2 переименовать в .V6
$process_from_file = $true # Ставим false, если нужно массово переименовать все профили в определенном каталоге
if ($process_full_folder)
{
«$(Date) Processing whole folder $folder_to_process»
foreach ($folder in (Get-ChildItem $folder_to_process -Directory | ? {$_.Name -like «*.V2»}))
{
$newname = $folder.Name -replace «.V2», «.V6»
«$(Date) Renaming folder $($folder.Name) to $newname»
try {
Rename-Item -Path $folder.FullName -NewName $newname -ErrorAction Stop
}
catch {
«$(Date) $($_.exception.message)» #| Tee-Object $log -Append
}
}
}
###
if ($process_from_file)
{
«$(Date) Processing folders from file $userlist_file»
foreach ($username in (Get-Content $userlist_file))
{
$folders = $null
$folders = Get-ChildItem $folder_to_process | ? {$_.Name -like «$username.*.V2»}
if ($folders)
{
foreach ($folder in $folders)
{
$newname = $folder.Name -replace «.V2», «.V6»
«$(Date) Renaming folder $($folder.Name) to $newname»
try {
Rename-Item -Path $folder.FullName -NewName $newname -ErrorAction Stop
}
catch {
«$(Date) $($_.exception.message)» #| Tee-Object $log -Append
}
}
}
else
{
«$(Date) Unable to find suitable folder for username `»$username`»»
}
}
}
Скрипт переименовывания профилей V6 на V2
function Date {Get-Date -Format «yyyy.MM.dd HH:mm:ss»}
$folder_to_process = «M:ShareTS» # «Путь до папки с перемещаемыми профилями»
$userlist_file = «C:Tempuser.txt» # «Путь до файла со списком пользователей»
# 1. По возможности все папки у которых в имени .V6 на конце, переименовать в .V2
$process_full_folder = $false
# 2. Подсунуть список из файла с именами логинов, и только их папки если там .V6 переименовать в .V2
$process_from_file = $true
if ($process_full_folder)
{
«$(Date) Processing whole folder $folder_to_process»
foreach ($folder in (Get-ChildItem $folder_to_process -Directory | ? {$_.Name -like «*.V6»}))
{
$newname = $folder.Name -replace «.V6», «.V2»
«$(Date) Renaming folder $($folder.Name) to $newname»
try {
Rename-Item -Path $folder.FullName -NewName $newname -ErrorAction Stop
}
catch {
«$(Date) $($_.exception.message)» #| Tee-Object $log -Append
}
}
}
###
if ($process_from_file)
{
«$(Date) Processing folders from file $userlist_file»
foreach ($username in (Get-Content $userlist_file))
{
$folders = $null
$folders = Get-ChildItem $folder_to_process | ? {$_.Name -like «$username.*.V6»}
if ($folders)
{
foreach ($folder in $folders)
{
$newname = $folder.Name -replace «.V6», «.V2»
«$(Date) Renaming folder $($folder.Name) to $newname»
try {
Rename-Item -Path $folder.FullName -NewName $newname -ErrorAction Stop
}
catch {
«$(Date) $($_.exception.message)» #| Tee-Object $log -Append
}
}
}
else
{
«$(Date) Unable to find suitable folder for username `»$username`»»
}
}
}
Ну и план отката, если нужно вернуть все профили в исходное состояние.
- Второй вариант миграции RDS фермы Windows Server 2012 на Windows Server 2016 заключается в том, что вы параллельно создаете с новым именем RDS ферму с небольшим количеством хостов, настраиваете там все групповые политики и нормативы вашей компании. Далее я вам советую произвести выгрузку пользователей, чтобы понять когда последний раз у них изменялся перемещаемый профиль, делается, это для того, чтобы исключить лишние профили, которые не нужно переносить. Далее начинаете процесс миграции и переименовывание профилей. По мере увеличения количества пользователей на новой RDS ферме вы будите тушить старые хосты и ресурсы освободившиеся от них добавлять новым RDSH хостам в новой ферме. Через какое-то время вы все спокойно перевезете, в конце сможете еще так же переключить старое DNS имя на новое, чтобы те кто по ошибке будут ошибочно подключаться, попадали так же на новый терминал. Данный метод хорош тем, что у вас при наличии ресурсов, останется старая ферма на случай проблем с новой.
Так же советую посмотреть документацию Microsoft — https://docs.microsoft.com/en-us/windows-server/remote/remote-desktop-services/migrate-rds-role-services
На этом у меня все, мы с вами разобрали варианты обновления RDS фермы Windows Server 2012 на Windows Server 2016. С вами был Иван Семин, автор и создатель IT портала Pyatilistnik.org.
Прочитано:
5 906
Задача: Я поставил себе задачу, разобрать как имея домен уровня Server 2012 R2 повысить его до уровня Server 2016, т. е. Я не только хочу перевести все инфраструктуру Windows на Server 2016 но и его доменную часть, а именно контроллеры домена.
Потому, как я уже практически делал с 2003 на 2008 R2 и после до 2012 R2 и как в тестовых условиях, так и боевых что меня очень порадовало, т. к. я не зря потратил время на разбор. Я знаю одну компанию где начальник самодур не любит ничего тестировать, а все подводит под вот прям сейчас и сею секунду нужно делать, а когда у него что-то спрашивает его любимый ответ — разберитесь, я что буду помогать Вам, я нанял Вас это делать, а не делать сам. Или другая фраза: — «Давай я расскажу тебе свою «видение». Если Вы столкнетесь с таким, то мой Вам совет смените работу, он Вас обязательно будет подставлять, а перед начальством показывать какой он хороший, а Вы плохой.
Ну да ладно, вернусь к задаче.
[stextbox id=’alert’ color=’000000′]На заметку: Мой Вам совет на рабочем месте всегда и везде использовать только англоязычный дистрибутив, он стабильнее, проще искать ошибки в гугле и можно на форумах разговаривать со знающими людьми об одном и том же, а не русском переводе.[/stextbox]
Предварительные действия:
Домен контроллер под управлением Windows Server 2012 R2 Eng развернут по заметке.
- Hostname: srv-dc1.polygon.local
- IP Addr: 10.90.90.2
- Netmask: 255.255.255.0
- Gateway: 10.90.90.1 (В роли шлюза выступит Mikrotik или система pfSense если компания не может выделить Вам деньги на покупку железа под шлюз)
Еще одна система под управлением Windows Server 2016 развернута в той же сети что и домен.
- Hostname: Srv-dc2.polygon.local
- IP Addr: 10.90.90.3
- Netmask: 255.255.255.0
- Gateway: 10.90.90.1
Вам понадобится доменная учетная запись, в моем случае это ее логин ekzorchik, а пароль присвоенный ей это 712mbddr@
Шаг №1: Авторизуюсь на системе srv-dc2 пока под локальным администратором и ввожу в домен polygon.local
Шаг №2: Поднимаю введенную в домен систему с осью Windows Server 2016 до уровня контроллер домена, но перед этим авторизуюсь на ней под доменной учетной записью логина ekzorchik.
Win + X — Панель управления — Администрирование — Диспетчер серверов — Управление — Добавить роли и компоненты — Установка ролей или компонентов — отмечаю галочкой роль «Доменные службы Active Directory» и проследовав по шагам мастера нажимаю «Установить». После перехожу все еще в запущенной оснастке «Диспетчер серверов» — на элемент AD DS в левой части, затем нажимаю «Подробнее» — «Повысить роль этого сервера до уровня контроллера домена» и следую по шагам за мастером который и проведет меня по всем этапам:
- Выберите операцию развертывания: Добавить контроллер домена в существующий домен
- Домен: polygon.local
- Учетные данные: POLYGONekzorchik (текущий пользователь)
и нажимаю кнопку «Далее», затем в шаге «Параметры контроллера домена» оставляю все как есть за исключение, что нужно указать пароль для режима восстановления служб каталогов (DSRM):
- Пароль: 712mbddr@
- Подтверждение пароля: 712mbddr@
и нажимаю «Далее» — «Далее» — в роли источника репликации указываю хост srv-dc1.polygon.local и нажимаю «Далее» — «Далее» — «Далее» — «Далее», тут важно чтобы все проверки мастера завершились надписью «Все проверки готовности к установке выполнены успешно» и только после этого нажимаю «Установить». После окончания установки сервер будет перезагружен.
Шаг №3: Проверяю сколько сейчас контроллеров домена в лесу:
К примеру через оснастку Win + X — «Панель управления» — «Администрирование» — «Пользователи и компьютеры Active Directory» — polygon.local — Domain Controllers и вижу две записи: srv-dc1 & srv-dc2 = значит шаг №2 выполнен корректно.
Или через консоль командной строки:
Win + X - Командная строка (администратор)
C:Windowssystem32>netdom query dc
Список контроллеров домена с учетными записями в домене:
SRV-DC1
SRV-DC2
Команда выполнена успешно.
Шаг №4:
Чтобы отобразить какой функциональный уровень леса:
C:Windowssystem32>dsquery * "CN=Partitions,CN=Configuration,DC=polygon,DC=local" -scope base -attr msDS-Behavior-Version
msDS-Behavior-Version 6 — где данное значение расшифровывается, как Windows Server 2012 R2
Чтобы отобразить какой функциональный уровень домена:
C:Windowssystem32>dsquery * "dc=polygon,dc=local" -scope base -attr msDS-Behavior-Version ntMixedDomain
msDS-Behavior-Version ntMixedDomain
6 0 — где данное значение расшифровывается, как Windows Server 2012 R2
Чтобы отобразить версию схемы Active Directory Schema:
C:Windowssystem32>dsquery * "CN=Schema,CN=Configuration,dc=polygon,dc=local" -scope base -attr objectVersion
objectVersion
87 — где данное значение расшифровывается, как Windows Server 2016, а все из-за того, что я в текущем домене сделал контроллером домена новую систему, а значит и могу поднять функциональный уровень домена и уровень леса.
Шаг №5: Начинаю модернизацию уровня домена и уровня леса, дабы ввести после еще один контроллер домена на базе Windows Server 2016, а текущий srv-dc1 (на базе Windows Server 2012 R2) понизить, тем самым я буду использовать в домене все самое последнее и новое.
[stextbox id=’alert’ color=’000000′]На заметку: Первым делом следует проверить через команду dcdiag, что в текущем домене нет ошибок и только после этого приступать к действиям ниже, а также не забыть проверить логи системы Windows.[/stextbox]
Авторизуюсь на домен контроллере srv-dc2 под учетной записью ekzorchik (она состоит в следующих группах: Domain Admins, Enterprise Admins, Schema Admins)
Смотрю какие роли FSMO у какого контроллера домена сейчас:
Win + X — Командная строка (Администратор)
C:Windowssystem32>netdom query fsmo
Хозяин схемы srv-dc1.polygon.localХозяин именования доменов srv-dc1.polygon.localPDC srv-dc1.polygon.localДиспетчер пула RID srv-dc1.polygon.localХозяин инфраструктуры srv-dc1.polygon.local
Команда выполнена успешно.
[stextbox id=’alert’]
На заметку: Обозначение ролей FSMO
- Schema Master (Владелей схемы) — Отвечает за внесение изменений в схему Active Directory. Эта роль необходима для предотвращения противоречивых изменений с двух серверов.
- Domain Naming Master (Владелец доменных имен) — Отвечает за состав леса, принимает и удаляет домены.
- RID Master (Владелец относительных идентификаторов) — Выдает и удаляет относительные идентификаторы любых объектов (пользователей, компьютеров, принтеров) в домене.
- PDC Emulator (Эмулятор основного контроллера домена) — Эмулирует основной контроллер домена для приложений, работающих с возможностями домена Windows NT.
- Infrastructure Master (Владелец инфраструктуры домена) — Поддерживает идентификаторы удаляемых или перемещаемых объектов на время репликации изменений (с удалением или перемещением) между контроллерами домена.
[/stextbox]
Забирать роли можно как через GUI-оснастки, как делалось при миграции с Server 2003, 2008/R2, 2012/R2 так и через консоль командной строки. Я буду рассматривать второй вариант, т. к. это быстрее и чуть больше буду знать в последствии, также следует учесть что захват ролей можно сделать не только через powershell, но и через команду ntdsutil.
rolesconnectionsconnect to server <имя сервера>quit
Затем применительно к каждой роли FSMO производим захват/миграцию:
seize schema masterseize domain naming masterseize pdcseize rid masterseize infrastructure master
После не забывает выйти из консоли команды ntdsutil вводом quit.
C:Windowssystem32>powershell
Windows PowerShell
(C) Корпорация Майкрософт (Microsoft Corporation), 2016. Все права защищены.
PS C:Windowssystem32>
Вы можете ввести имя каждого — OperationMasterRole или числа используются для указания роли, где 0,1,2,3,4 — это эквивалент набранного: SchemaMaster, DomainNamingMaster, PDCEmulator, RIDaster, InfrastructureMaster
PS C:Windowssystem32> Move-ADDirectoryServerOperationMasterRole -Identity "srv-dc2" -OperationMasterRole 0,1,2,3,4
[stextbox id=’alert’]
Для справки:
PDCEmulator 0RIDMaster 1InfrastructureMaster 2SchemaMaster 3DomainNamingMaster 4
[/stextbox]
Перемещение роли хозяина операций
Вы хотите переместить роль "PDCEmulator" на сервер "srv-dc2.polygon.local"?
[Y] Да - Y [A] Да для всех - A [N] Нет - N [L] Нет для всех - L [S] Приостановить - S [?] Справка
(значением по умолчанию является "Y"):A
Move-ADDirectoryServerOperationMasterRole : Служба каталогов недоступна
строка:1 знак:1
+ Move-ADDirectoryServerOperationMasterRole -Identity "srv-dc2" -Operat ...
+ ~~~~~~~~~~~~~~~~~~~~~~~~~~~~~~~~~~~~~~~~~~~~~~~~~~~~~~~~~~~~~~~~~~~~~
+ CategoryInfo : NotSpecified: (srv-dc2:ADDirectoryServer) [Move-ADDirector...ationMasterRole], ADExcepti
on
+ FullyQualifiedErrorId : ActiveDirectoryServer:8207,Microsoft.ActiveDirectory.Management.Commands.MoveADDirectory
ServerOperationMasterRole
Так почему-то вываливается в ошибку, разбираюсь почему и как это исправить. Смотрю, какие роли FSMO сейчас у кого в подчинении:
PS C:Windowssystem32> netdom query fsmo
Хозяин схемы srv-dc1.polygon.localХозяин именования доменов srv-dc1.polygon.localPDC srv-dc2.polygon.localДиспетчер пула RID srv-dc2.polygon.localХозяин инфраструктуры srv-dc2.polygon.local
Команда выполнена успешно.
Так осталось разобраться с ошибкой и перевести роль «Хозяина схемы» и «Хозяина именования доменов»:
PS C:Windowssystem32>> Move-ADDirectoryServerOperationMasterRole -Identity "srv-dc2" -OperationMasterRole 4
Перемещение роли хозяина операций
Вы хотите переместить роль "DomainNamingMaster" на сервер "srv-dc2.polygon.local"?
[Y] Да - Y [A] Да для всех - A [N] Нет - N [L] Нет для всех - L [S] Приостановить - S [?] Справка
(значением по умолчанию является "Y"):A
Команда отработала без ошибок, а вот с ролью «Хозяин схемы» все также ошибка, применил ключ форсировки переноса роли:
PS C:Windowssystem32>> Move-ADDirectoryServerOperationMasterRole -Identity "srv-dc2" -OperationMasterRole 3 -force
Перемещение роли хозяина операций
Вы хотите переместить роль "SchemaMaster" на сервер "srv-dc2.polygon.local"?
[Y] Да - Y [A] Да для всех - A [N] Нет - N [L] Нет для всех - L [S] Приостановить - S [?] Справка
(значением по умолчанию является "Y"):A
PS C:Windowssystem32>> netdom query fsmo
Хозяин схемы srv-dc2.polygon.localХозяин именования доменов srv-dc2.polygon.localPDC srv-dc2.polygon.localДиспетчер пула RID srv-dc2.polygon.localХозяин инфраструктуры srv-dc2.polygon.local
Команда выполнена успешно.
PS C:Windowssystem32>> exit
Перемещение роли хозяина операций
Вы хотите переместить роль "PDCEmulator" на сервер "srv-dc2.polygon.local"?
[Y] Да - Y [A] Да для всех - A [N] Нет - N [L] Нет для всех - L [S] Приостановить - S [?] Справка
(значением по умолчанию является "Y"):A
PS C:Windowssystem32> exit
C:Windowssystem32>
Шаг №6: Удаляю контроллер домена под управлением Windows Server 2012 R2 из глобального каталога. На Server 2016 (srv-dc2) открываю оснастку:
Win + X — Панель управления — Администрирование — Active Directory Сайты и Службы и выделяю левой кнопкой мыши сервере srv-dc1 который являлся контроллером домена ранее в текущей сайте «Default-First-Site-Name» на NTDS Settings снимаю в свойствах галочку с настройки «Глобальный каталог»
Шаг №7: Понижаю уровень и удаляю контроллер домена под управлением Windows Server 2012 R2. Авторизуюсь на системе srv-dc1, запускаю командную строку с правами администратора и через powershell:
PS C:Windowssystem32> Uninstall-ADDSDomainController -DemoteOperationMasterRole -RemoveApplicationPartition
LocalAdministratorPassword: ********* → здесь указываю пароль который задавал для режима восстановлена контроллера домена, он у меня такой же как и для локального администратораConfirm LocalAdministratorPassword: ********* → здесь указываю пароль который задавал для режима восстановлена контроллера домена, он у меня такой же как и для локального администратора
The server will be automatically restarted when this operation is complete. The
domain will no longer exist after you uninstall Active Directory Domain
Services from the last domain controller in the domain.
Do you want to continue with this operation?
[Y] Yes [A] Yes to All [N] No [L] No to All [S] Suspend [?] Help
(default is "Y"):A после ожидаю…все отработало как надо и система автоматически отправится в перезагрузку. Так и должно быть.
Шаг №8: Теперь можно повысить функциональный уровень домена и леса. Авторизуюсь на srv-dc2 (Windows Server 2016) и через Powershell:
Win + X — Командная строка (Администратор)
C:Windowssystem32>powershell
PS C:Windowssystem32> Set-ADDomainMode -identity polygon.local -DomainMode Windows2016Domain
Подтверждение
Вы действительно хотите выполнить это действие?
Выполнение операции "Set" над целевым объектом "DC=polygon,DC=local".
[Y] Да - Y [A] Да для всех - A [N] Нет - N [L] Нет для всех - L [S] Приостановить - S [?] Справка
(значением по умолчанию является "Y"):A
PS C:Windowssystem32> Set-ADForestMode -identity polygon.local -ForestMode Windows2016Forest
Подтверждение
Вы действительно хотите выполнить это действие?
Выполнение операции "Set" над целевым объектом "CN=Partitions,CN=Configuration,DC=polygon,DC=local".
[Y] Да - Y [A] Да для всех - A [N] Нет - N [L] Нет для всех - L [S] Приостановить - S [?] Справка
(значением по умолчанию является "Y"):A
Шаг №9: Проверяю текущий функциональный уровень домена и леса:
PS C:Windowssystem32> get-addomain | fl Name,DomainMode ;get-adforest | fl Name,ForestMode
Name : polygon
DomainMode : Windows2016Domain
Name : polygon.local
ForestMode : Windows2016Forest
Как видно модернизация домена с Windows Server 2012R2 на Windows Server 2016 прошла успешно и я могу пользоваться новыми возможностями и строить доменную структуру на новом, самом последнем релизе что не может не радовать. Это же замечательно, когда все действия отрепетированы и для тебя нет ничего страшного если вдруг что-то пойдет не так.
Задача данной заметки выполнена и я прощаюсь, с уважением автор блога Олло Александр aka ekzorchik.
Чтобы выполнить обновление
Убедитесь, что значение BuildLabEx указывает на то, что вы используете Windows Server 2012. Найдите установочный носитель Windows Server 2016 и выберите setup.exe. … На экране Windows Server 2016 выберите Установить сейчас. Для устройств, подключенных к Интернету, выберите Загрузить и установить обновления (рекомендуется).
Можно ли обновить Windows Server 2012 до 2019?
Сервер Windows 2019 Функция обновления позволит вам обновить существующие выпуски канала долгосрочного обслуживания (LSTC), такие как Windows Server 2012 R2 — Windows Server 2016 — Windows Server 2019.
Как мне обновить Windows Server Essential до 2016?
вам необходимо связаться с продавцом dell для покупки 2016 Лицензионный ключ STD OEM и CAL, затем модернизация надежная Основы сервера 2016. Не забудьте пометить ответы как ответы, если они помогают. вам необходимо связаться с продавцом dell для покупки 2016 Лицензионный ключ STD OEM и CAL, затем модернизация надежная Основы сервера 2016.
Может ли SQL Server 2012 работать в Windows Server 2016?
Согласно следующему официальному документу, SQL Server 2012 не поддерживается в Windows Server 2016. Измените операционную систему на Windows Server 2012 R2 или установите SQL Server 2014 / SQL Server 2016 вместо SQL Server 2012 в Windows 2016.
Поддерживается ли по-прежнему Windows Server 2012 R2?
Windows Server 2012 и 2012 R2 Приближается конец расширенной поддержки в соответствии с политикой жизненного цикла: расширенная поддержка Windows Server 2012 и 2012 R2 будет конец 10 октября 2023 г.. Клиенты обновляются до последней версии Windows Server и применяют последние инновации для модернизации своей ИТ-среды.
Могу ли я обновить Windows 2008 R2 до 2016?
Для локальных серверов есть нет прямого пути обновления с Windows Server 2008 R2 на Windows Server 2016 или более поздней версии. Вместо этого обновите сначала до Windows Server 2012 R2, а затем обновитесь до Windows Server 2016.
Какие есть версии Windows Server 2019?
Windows Server 2019 имеет три редакции: Essentials, Standard и Datacenter. Как следует из их названий, они предназначены для организаций разного размера и с различными требованиями к виртуализации и центрам обработки данных.
Поддерживает ли Microsoft обновление на месте?
Обновление на месте с Windows Storage Server Editions до Windows Server 2019 не поддерживается. Вместо этого вы можете выполнить либо миграцию, либо установку.
Как обновить пробную версию Windows 2016 до полной версии?
Затем введите следующую команду, чтобы преобразовать ознакомительную версию Server 2016 в полноценную розничную (лицензионную): DISM / online / Set-Edition:ServerEdition / ProductKey: XXXXX-XXXXX-XXXXX-XXXXX-XXXXX / AcceptEula.
Как мне перейти с Windows Server 2019 Essentials до стандартной?
Давайте пройдемся по процессу обновления.
- Откройте административную команду PowerShell.
- Выполните следующую команду, чтобы проверить целевую версию: DISM / Online / Get-TargetEditions. …
- Выполните следующую команду, чтобы завершить обновление: DISM / online / Set-Edition: ServerStandard / ProductKey: XXXXX-XXXXX-XXXXX-XXXXX-XXXXX / AcceptEula.
Поддерживает ли Windows Server 2016 SQL 2019?
В этой таблице перечислены серверные приложения Microsoft, которые поддерживают установку и функциональность на Window Server 2019.
…
В этой статье.
| Продукт | Microsoft SQL Server 2016 |
|---|---|
| Поддерживается в Server Core | Да* |
| Поддерживается на сервере с возможностями рабочего стола | Да |
| Выпущенный | Да |
Будет ли SQL Server 2016 работать на Windows Server 2019?
SQL Server 2019 не поддерживается в Windows 8.1 или Windows Server 2012 R2. Релиз поддерживается в версии SQL Server 2017 в Windows RTM Release. Вы должны применить SQL Server 2016 с пакетом обновления 2 или более поздней версии. Дополнительные сведения см. В разделе Как получить последний пакет обновления для SQL Server 2016.
Поддерживается ли SQL Server 2012 в Windows Server 2019?
SQL Server 2012 std не поддерживается в Windows Server 2019. Официально поддерживаемая последняя версия — Windows Server 2014, а в Windows Server 2016 она официально не поддерживалась, но вы все равно сможете установить.