
- Remove From My Forums
-
Question
-
I have windows server 2012 r2 installed on a physical server which is setup as hyper-v server, All ohter servers including AD DC/DHCP, Remote Dekstop services are installed on VMs,
I have windows server 2012 r2 installed across the environment and would like to upgrade to windows server 2019.
What is the best approach to do that witout falling into any problem.
Regards
PS: Physical server is also domain joined.
-
Edited by
Techvisor
Sunday, May 19, 2019 12:32 AM
-
Edited by
All replies
-
The simplest / safest thing to do is stand up the new Server 2019 on new host, patch it fully, add Hyper-V role and either export / import VMs or live migrate them. If you’re also upgrading VMs then I’d stand up new ones, join existing domain and migrate
roles and applications over to new host.If using same host hardware then export them, do the rebuild with Server 2019, patch fully, add Hyper-V role and import.
Regards, Dave Patrick ….
Microsoft Certified Professional
Microsoft MVP [Windows Server] Datacenter ManagementDisclaimer: This posting is provided «AS IS» with no warranties or guarantees, and confers no rights.
-
Hi and thanks. To me the easiest way to upgrade is run setup from ISO and upgrade as with other windows OSs (in place upgrade). Is there anything wrong with it?
-
Is there anything wrong with it?
Very risky and existing corruption carry-forward. In-place upgrades are not recommeded.
Regards, Dave Patrick ….
Microsoft Certified Professional
Microsoft MVP [Windows Server] Datacenter ManagementDisclaimer: This posting is provided «AS IS» with no warranties or guarantees, and confers no rights.
-
I can’t setup another physical host because it’s costly. It has only hyper v role installed. But I do take weekly full system backups including Hyper V stored on a separate HDD. What would you suggest?
-
The second option. If using same host hardware then export VMs, do the rebuild with Server 2019, patch fully, add Hyper-V role and import VMs.
I’d also check here and with server manufacturer about support for Server 2019
https://www.windowsservercatalog.com/
Regards, Dave Patrick ….
Microsoft Certified Professional
Microsoft MVP [Windows Server] Datacenter ManagementDisclaimer: This posting is provided «AS IS» with no warranties or guarantees, and confers no rights.
-
Edited by
Dave PatrickMVP
Sunday, May 19, 2019 3:31 AM
-
Edited by
-
Rebuild meaning run setup from ISO and perform clean install? Another question about upgrading the whole environment, where to start the upgrade? Is it okay to upgrade another role without upgrading Active directory and domain controller?
-
I’d do the host, import VMs, then for domain controller upgrade (assuming server 2019)
Migrating sysvol replication from older FRS technology to DFSR is required.
https://techcommunity.microsoft.com/t5/Storage-at-Microsoft/Streamlined-Migration-of-FRS-to-DFSR-SYSVOL/ba-p/425405Also check the domain functional level is 2008 R2 or higher, then
use dcdiag / repadmin tools to verify health
correcting all errors found before starting. Then stand up the new 2019 guest, patch it fully, license it, join existing domain, add active directory domain services, promote it also making it a GC (recommended), transfer FSMO roles over (optional),
transfer pdc emulator role (optional), use dcdiag / repadmin tools to again verify health, when all is good you can decommission / demote old one, and move one to next one.
I’d ask experts here about upgrading an RDS deployment.
https://social.technet.microsoft.com/Forums/windowsserver/en-US/home?forum=winserverTS
(please don’t forget to mark helpfu replies as answer)
Regards, Dave Patrick ….
Microsoft Certified Professional
Microsoft MVP [Windows Server] Datacenter ManagementDisclaimer: This posting is provided «AS IS» with no warranties or guarantees, and confers no rights.
-
hi,
there are some documents for your reference about upgrading your remote desktop services deployments to windows 2019.
before we do in-place upgrade ,we need to backup and export vhdx files of all vms to external disk in order to restore them when in place upgrade fail.
Upgrading your Remote Desktop Services deployments to Windows Server 2016
https://docs.microsoft.com/en-us/windows-server/remote/remote-desktop-services/upgrade-to-rdsUpgrading your Remote Desktop Session Host to Windows Server 2016
https://docs.microsoft.com/en-us/windows-server/remote/remote-desktop-services/upgrade-to-rdshUpgrade Windows Server 2012 R2 to Windows Server 2019
https://www.microsoft.com/upgradecenter/scenario/WS2012R2-on-prem-to-WS2019
Please remember to mark the replies as answers if they help.
If you have feedback for TechNet Subscriber Support, contact
tnmff@microsoft.com.-
Edited by
Andy YOUMicrosoft contingent staff
Tuesday, May 21, 2019 3:59 PM
-
Edited by
-
Thank you so much for the prompt advice. I have the following VMs: 1-AD DC/ DHCP 2-subordinate enterprise CA 3-RD connection broker/RD Licence Manager 4-RD web access/RD Gateway 5-RD Session Host 6-CA (offline) All running windows server 2012 r2. I’m trying
to figure out where to start. I’ve already setup a new VM with Server 2019 installed. I’ll be promoting this as DC to replace current DC. I need to know after doing this, will this affect all other servers for as long they still run 2012 r2 until upgraded?
If I decide some roles to remain on 2012 r2, would I be able to raise domain and forest functional level to 2016? I’m planning to setup new VMs to replace 3,4 & 5; basically deploying a fresh RDS. I’m not sure whether to do an in-place upgrade or migrate roles
to new VMs for 2&6 or don’t upgrade them at all. Regards . -
I’ll be promoting this as DC to replace current DC. I need to know after doing this, will this affect all other servers for as long they still run 2012 r2 until upgraded?
The 2012 R2 DCs will be fine. I’d check that domain functional level is at least 2008 R2, also migrating sysvol replication from older FRS technology to DFSR is a prerequisite to adding a 2019 domain controller. I’d recommend use dcdiag / repadmin tools
to verify health correcting all errors found before starting.https://techcommunity.microsoft.com/t5/Storage-at-Microsoft/Streamlined-Migration-of-FRS-to-DFSR-SYSVOL/ba-p/425405
once done then use dcdiag / repadmin tools to verify health again, then stand up the new 2019, patch it fully, license it, join existing domain, add active directory domain services, promote it also making it a GC (recommended), transfer FSMO roles over
(optional), transfer pdc emulator role (optional), use dcdiag / repadmin tools to verify health, when all is good you can decommission / demote old one (optional).If I decide some roles to remain on 2012 r2, would I be able to raise domain and forest functional level to 2016?
You can raise level to the lowest existing domain controller OS. There is no new functional levels for 2019 (still 2016 is highest)
I’m planning to setup new VMs to replace 3,4 & 5; basically deploying a fresh RDS. I’m not sure whether to do an in-place upgrade or migrate roles to new VMs for 2&6 or don’t upgrade them at all. Regards .
I would not in-place upgrade any of them.
(please don’t forget to mark helpful replies as answer)
Regards, Dave Patrick ….
Microsoft Certified Professional
Microsoft MVP [Windows Server] Datacenter ManagementDisclaimer: This posting is provided «AS IS» with no warranties or guarantees, and confers no rights.
-
Edited by
Dave PatrickMVP
Tuesday, May 21, 2019 10:09 PM
-
Edited by
- Remove From My Forums
-
Question
-
Всем привет, необходимо обновить следующие сервера:
• Microsoft Windows Server 2012 Datacenter
• Microsoft Exchange Server Standard 2013Подскажите пожалуйста, всю систему надо удалить и новую покупать, (2019 версии) или есть возможность upgrade?
Если необходимо удалить, подскажите порядок действий: покупаем новые лицензии, но в системе уже стоит старая, каков процесс удаления старого и установка на эти железы новые лицензии? Спасибо!
Answers
-
Более подробно объясню данный кейс:
В филиале банка уже имеется следующие лицензии:
- • Microsoft Windows Server 2012 Datacenter
• Microsoft Exchange Server Standard 2013
• Microsoft Lync Server 2013
А также телефоны HP 4110 IP Phone и HP 4120 IP Phone которые подключены к Lync. К этой инфраструктуре нужно докупить новые оборудования и новые телефоны, при том сохряняя функционала старого Lync.
Необходимо также: обновить Windows Server 2012 Datacenter и Exchange Server Standard 2013, Lync Server 2013 до последних версий.
Возможно ли обновить докупив только Software Assurance? Какие есть варианты в целом?
Конечно же SA нельзя «докупить» когда вам потребуется обновиться.
 SA должно быть активным с момента покупки ПО
(кажется требуется покупка SA в течении месяца после покупки ПО) по меньшей мере до момента выхода ПО на которое вы собрались обновляться. Это форма подписки и она требует оплаты от и до…Таким образом если SA не была куплена много лет назад когда вы первоначально закупили ПО или же не была активной (то есть оплачивалась) на октябрь 2018 года (когда вышел Server 2019), то обновиться используя SA вы не сможете.
В этом случае как я уже написал есть только один вариант — покупка ПО за полную стоимость. Я бы сказал что при это надо менять и оборудование, срок службы серверов и ПК типично составляет 3-5 лет. Это так же позволит избежать «обновления»
серверных ОС которое типично не рекомендуется. Вместо этого новые сервера и ПО подключаются в существующий домен и заменяют их. Это так же значительно безопаснее в плане утраты данных и позволит избежать простоя.Еще один момент: Lync (с 2015 года — Skype for Business) является наследственным продуктом и заменяется Microsoft Teams.
This posting is provided «AS IS» with no warranties, and confers no rights.
-
Marked as answer by
Wednesday, February 10, 2021 9:40 AM
- • Microsoft Windows Server 2012 Datacenter
 SA должно быть активным с момента покупки ПО
If you are still running Windows Server, you should upgrade to Windows Server 2019 since Windows Server 2012 R2 will end the support. In this post from MiniTool Solution, you can see a full guide on the Windows Server upgrade. Also, some things that should be done before the upgrade are described here.
Windows Server is a family of operating systems created by Microsoft specifically for use on servers. Servers are extremely powerful machines designed to run continuously and provide resources to other computers. This means that in almost all cases, Windows Server is only used in business environments.
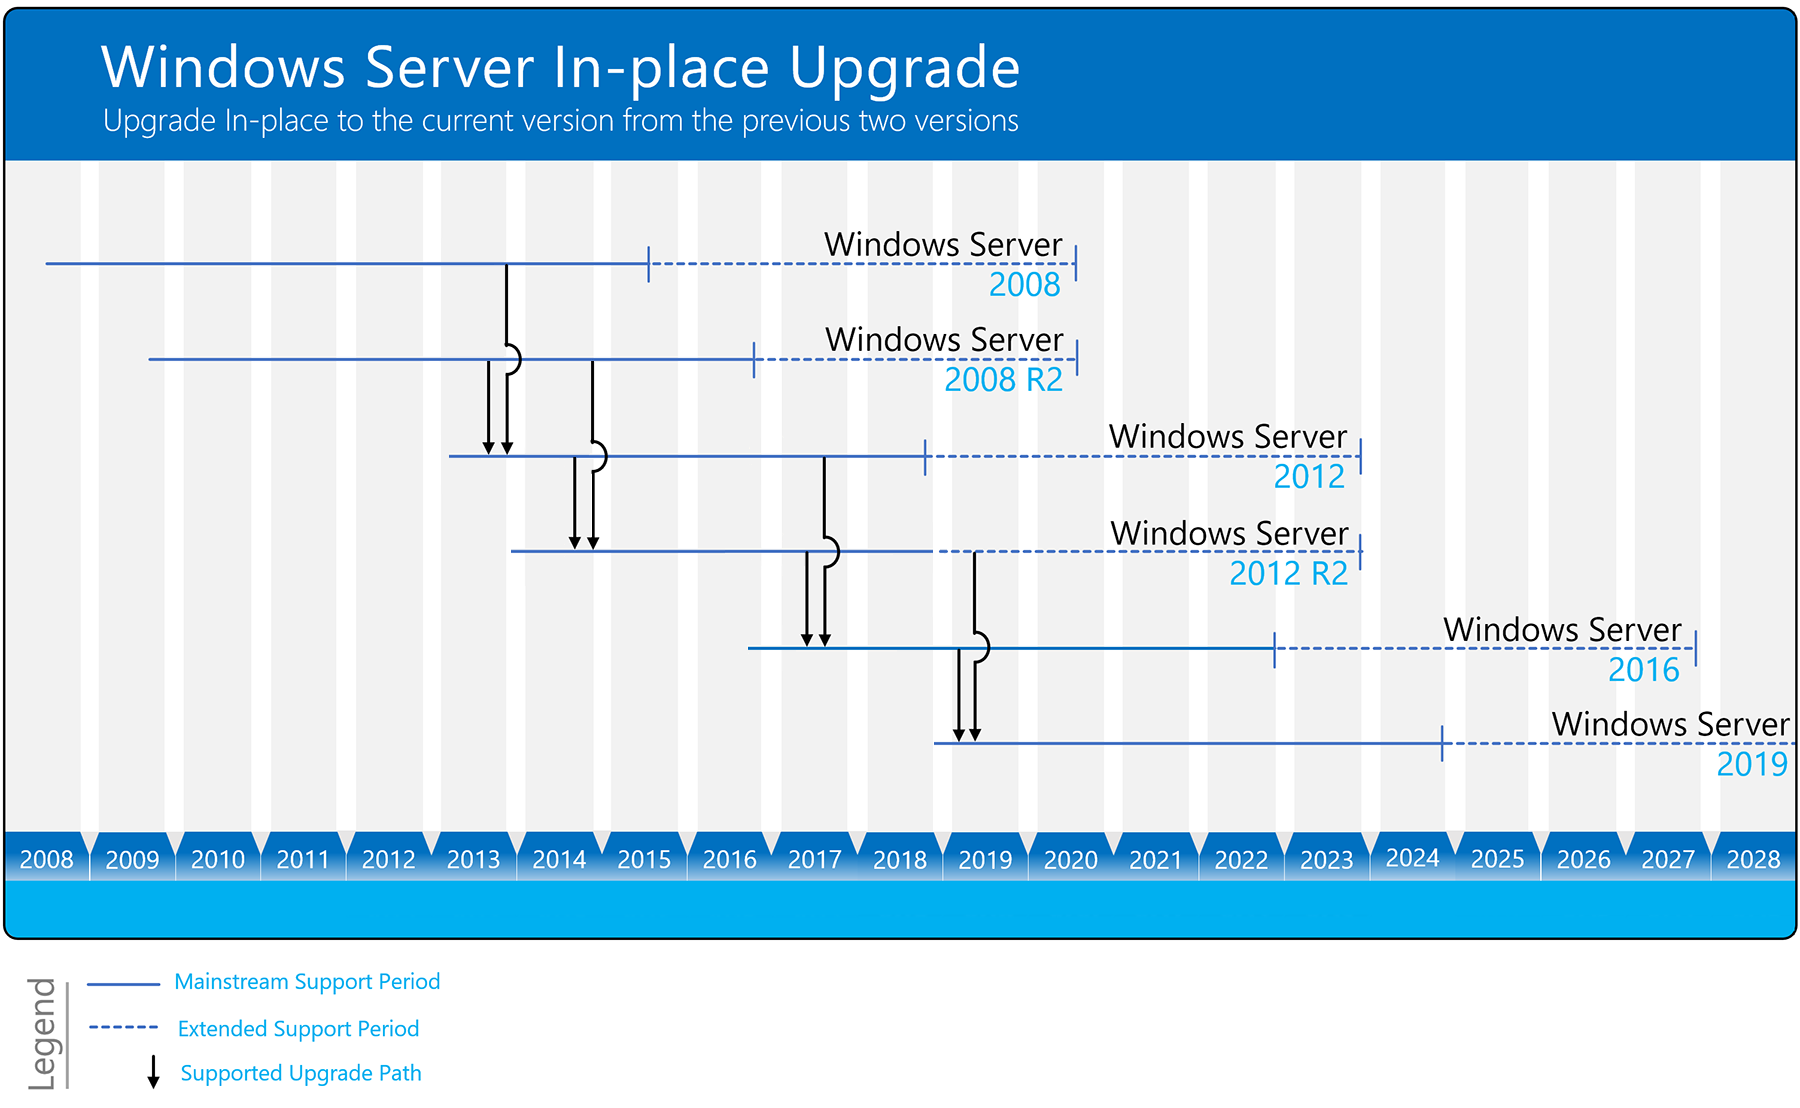
It Is Necessary to Upgrade Windows Server 2012 R2 to 2019
Since Windows Server 2012 R2 has ended mainstream support in 2018 and extended support in 2023, it’s recommended to upgrade Windows 2012 R2 to 2019.
Besides, there are other significant reasons.
1. The new system is more compatible with new services and applications.
Windows Server 2019 makes it easier to integrate Linux with new features such as Linux Containers on Windows, Windows Subsystem for Linux (WSL), and the new Windows Server 2019 application platform.
2. The new system is safer.
Windows Server 2019 is built on its strong security foundation. Now it not only blocks threats but also monitors and reacts to perceived threats. Windows Server 2019 is designed to be used with or in the cloud. Users can more easily connect their existing on-premises environments to Microsoft Azure.
Can You Upgrade Windows Server 2012 R2 to 2019?
Can you upgrade Windows Server 2012 R2 to 2019? The answer is Yes. You can upgrade Windows Server 2021 R2 to 2019. However, if you are upgrading Windows Server 2012 to 2019, you will need to upgrade Windows Server 2012 to 2016, and then upgrade from 2016 to 2019. Otherwise, you can only do a fresh install of 2019 to overwrite the existing OS and avoid data loss, it is necessary to back up the server in advance.
Before you upgrade Windows Server 2012 R2 to 2019, the following are some system requirements you need to meet:
Processor:
- 1.4 GHz 64-bit processor
- Compatible with x64 instruction set
- NX and DEP support
- Supports CMPXCHG16b, LAHF/SAHF and PrefetchW
- Supports secondary address translation (EPT or NPT)
Memory:
- 512 MB (2 GB for servers with Desktop Experience install option)
- ECC (Error Correcting Code) type or similar technology for physical host deployments
Disk space for system partition: A fresh or fresh installation requires 32 GB of free disk space. To perform an in-place upgrade, you should plan for at least 60 GB of free disk space.
Network Adapter Requirements:
- Ethernet adapter with at least gigabit throughput
- Compliant with PCI Express Architecture Specification
Other demands: DVD drive (if you plan to install the operating system from DVD media)
Another point you may need to consider is the price. How much will it cost to upgrade Windows Server 2012 R2 to 2019?
There are many factors affecting price, such as hardware, virtualization, etc. However, if you’re referring to the cost of upgrading licenses, the answer is clear. Microsoft typically doesn’t offer an upgrade sale, so you’ll need to buy a copy of Windows Server 2019 separately.
If you want to know the exact price, you can go to the Microfost official website.
Another issue worth considering is that some third-party applications may not be compatible with Windows Server 2019. So you had better check if the third-party applications support Windows Server 2019 before upgrading.
Public or private cloud companies may also support an in-place upgrade of Server 2012 R2 to 2019, but you will need to consult your cloud provider for details. Also, you cannot perform an in-place upgrade on any Windows Server that is configured to boot from a VHD. In-place upgrades from Windows Storage Server editions to Windows Server 2019 are also not supported. In this case, you can do a migration or a fresh install.
How to Upgrade Windows Server 2012 R2 to 2019
Before You Upgrade
If you decide to upgrade Windows Server 2012 R2 to 2019, there are some things you should pay attention to before the update to avoid some potential problems.
- Patch your Windows Server 2012 R2 with the latest updates.
- Insert and install Windows Server 2019 installation media.
- Before upgrading, Microsoft recommends that you collect some information about your device. You can use it for troubleshooting when an upgrade fails.
- Cannot run any virtual machines during an in-place upgrade.
- Create a system image for your system so that you can restore the system to a normal state if the update causes some system issues.
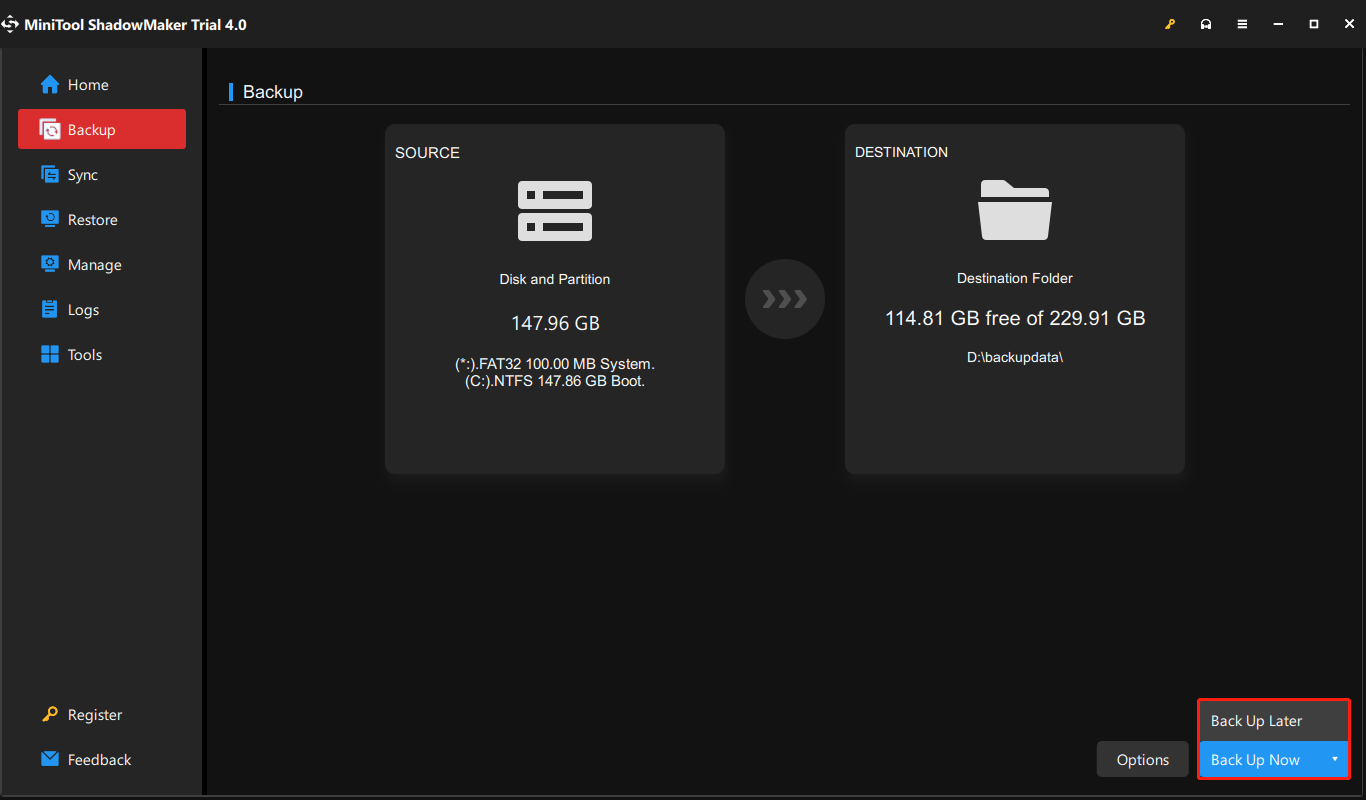
To create a system image, you can use the professional Windows backup software, MiniTool ShadowMaker. It is designed to back up the system by default. Besides, you can use it to back up files, disks, and partitions. Just download it by following the button below.
It is compatible with Windows 1110/8/8.1/7 and Windows Server 2019/2016/2012/2012 R2/2008/2008 R2/2003/2003 R2. Now get its trial edition by clicking the following download button and install it on your Windows Server.
Free Download
How to back up your PC before starting to update Windows Server 2012 R2 to 2019:
1. Double-click the icon of MiniTool ShadowMaker to launch it to its main interface.
2. When going to the Backup tab, you can see this software backs up the system by default. You only need to choose a destination to store the system image.
If you need to back up files, go to SOURCE to choose items that you want to back up and go to DESTINATION to select a storage path.
3. Click Back Up Now to start backing up immediately or click Back Up Later to delay the task.
It is recommended to create a bootable USB flash drive with MiniTool Media Builder so that you can perform a system recovery when your PC doesn’t work properly after Windows Server 2012 R2 to 2019 update.
Start to Upgrade
Now that you have completed the prerequisites you can perform the upgrade. In this section, you will use Windows Server Setup to choose upgrade settings. Windows Server Setup will use these settings to upgrade your version of Windows Server, during which time your computer will restart several times. Follow the guide below:
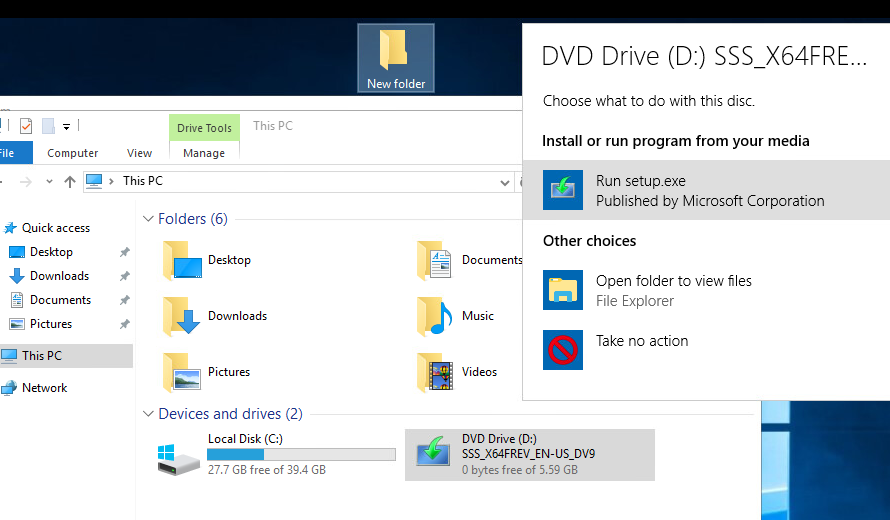
Step 1: Open File Explorer, and go to the Windows Server Setup media. Then open setup.exe. For example, if you’re using removal media the file path might be D:setup.exe.
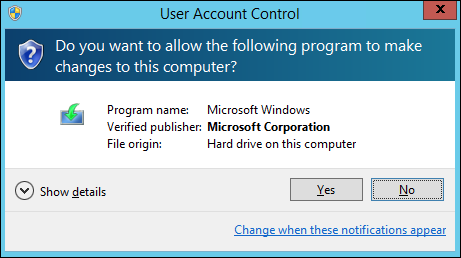
Depending on your security settings, User Account Control may prompt you to allow setup to make changes to your device. If you’re happy to continue select Yes.
Step 2: By default, the setup will automatically download updates for the installation. After checking the default settings, click Next to continue.
If you don’t want Setup to automatically download updates, you can select Change how Setup downloads updates and choose the option appropriate to your environment, then select Next.
Step 3: If prompted, enter your product key, then select Next.
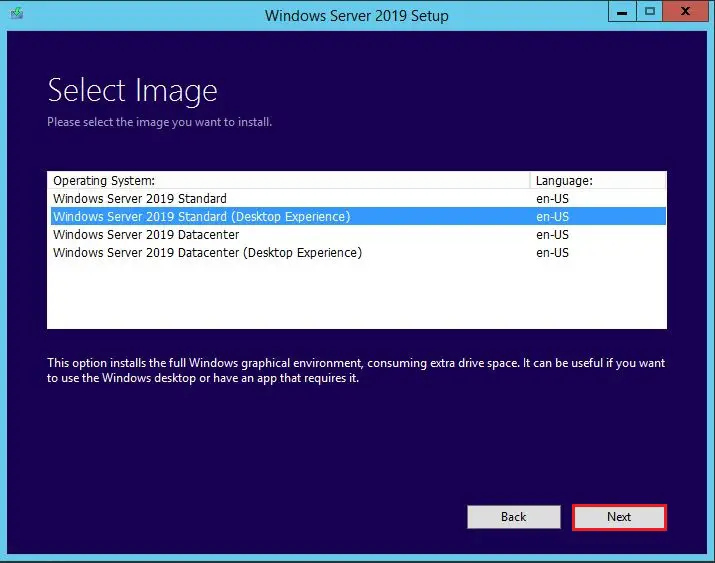
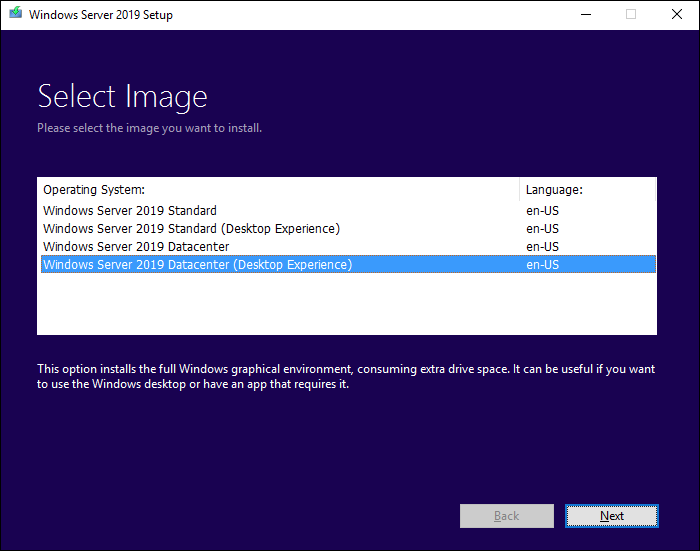
Step 4: Select the edition of Windows Server you want to install, then select Next.

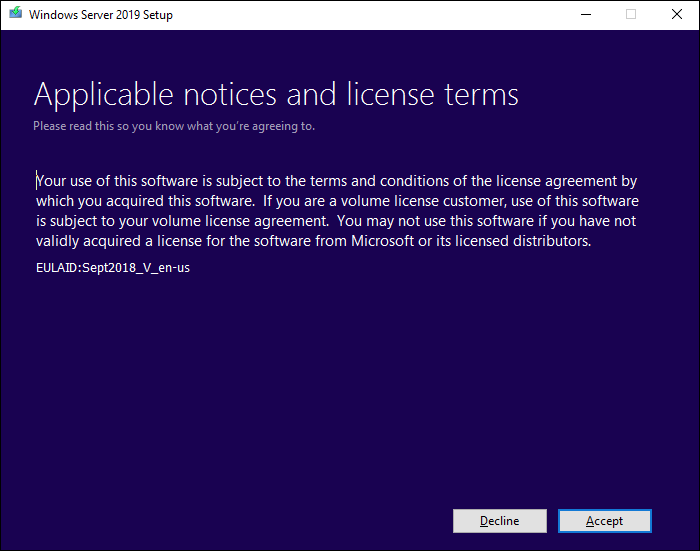
Step 5: Review the applicable notices and license terms, if you agree to the terms, select Accept.
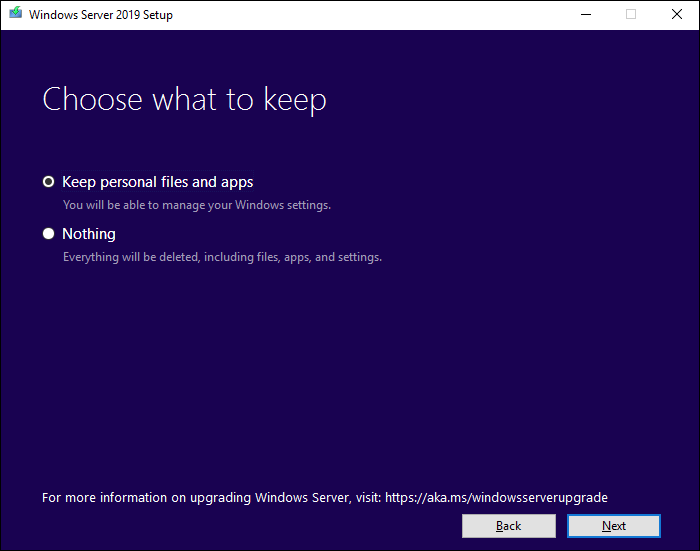
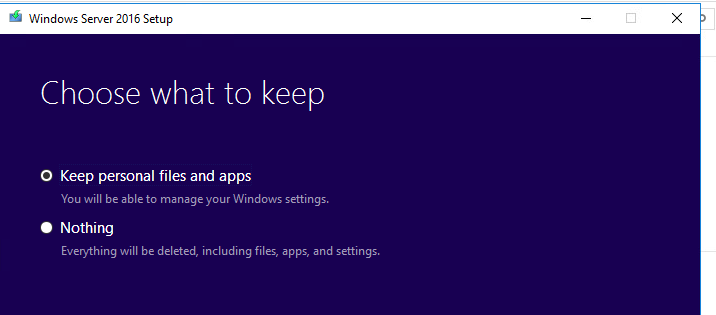
Step 6: Select Keep personal files and apps to choose to do an in-place upgrade, then select Next.
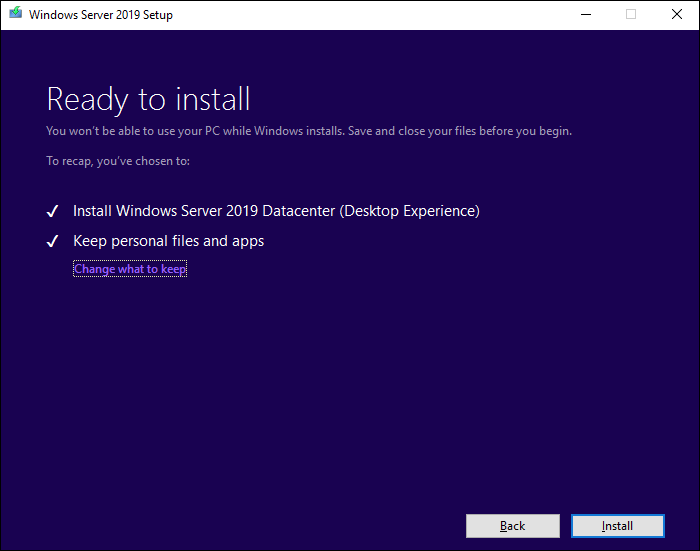
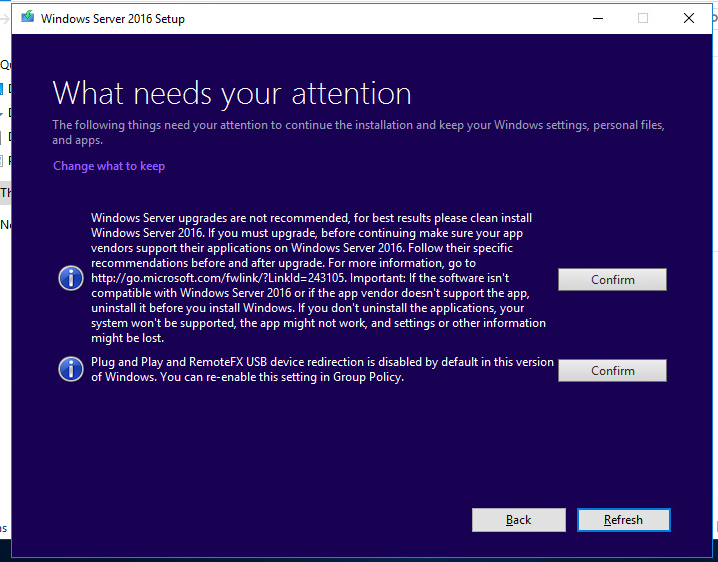
Step 7: After Setup finishes analyzing your device, the setup will display the Ready to install screen, to continue the upgrade select Install.
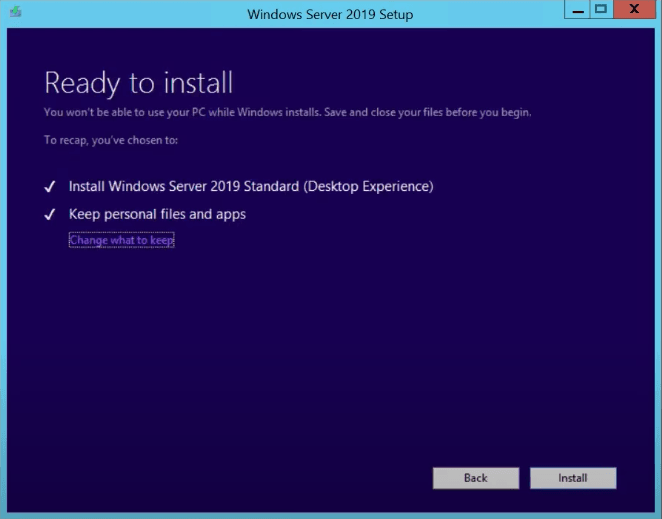
The in-place upgrade will start, and you should see a progress bar. After the upgrade finishes, your server will restart.
Check If Your Upgrade Was Successful
After the upgrade to Windows Server is done, you must make sure the upgrade was successful. To make sure your upgrade was successful:
Step 1: Open an elevated PowerShell prompt, and run the following command to verify the version and edition match the media and values you selected during setup.
PowerShellCopy
Get-ComputerInfo -Property WindowsProductName
Step 2: Make sure all of your applications are running and that your client connections to the applications are successful.
Bottom Line
Do you need to upgrade Windows Server 2012 R2 to 2019? How to Windows Server 2012 R2 to 2019? After reading this post, you know it. Also, what to do before the update is also told to you. Now, don’t hesitate to perform the Windows Server update by following the guide above.
On the other hand, if you have any questions or suggestions, remember to let us know. Leaving a comment below or contacting [email protected] is for you to choose.
Upgrade Windows Server 2012 R2 to 2019 FAQ
Can Windows Server 2016 be upgraded to 2019?
Yes, you can upgrade Windows Server 2016 to 2019. The steps are similar to is the same as the steps for upgrading 2012 R2 to 2019. You can take a reference from the content above.
Is Server 2012 R2 still supported?
The support for Windows Server 2012 R2 will end on October 10, 2023. After this date, Windows Server 2012 and 2012 R2 will stop receiving regular patches or critical security updates. Thus, you had better upgrade your Windows Server 2012 R2 as soon as possible.
How long can a server last?
However, according to a report by a leading analyst firm, the potential useful life of servers is between 7 and 10 years (typically 6 years for rack-mounted servers and 10 years for integrated systems).
Can SQL Server 2019 run on Windows Server 2012 R2?
In this article, I am going to upgrade Windows Server 2012 R2 standard to Windows Server 2019 standard. Locally upgrading of an operating system permits the Administrator to upgrade the currently installation of Windows Server to a new version without changing the existing settings & features.
The Windows Server 2019 in upgrade feature will permit you to upgrade the existing them (LSTC) long term servicing channel release like the Windows Server 2012 R2 – Windows Server 2016 – Windows Server 2019. The in places upgrade service permits organizations to handle upgrades to newer versions within the brief time possible. The straight upgrade is possible even when the existing Server Installation requires some dependencies before an upgrade.
Windows Server 2012 R2 Standard.

I have copied some folder before upgrading the Server.

Using the in-place upgrade to move to Windows Server 2019, use the DVD, USB Windows Server 2019 media to start the installation.
The existing installation will be discovered & you can perform the in place upgrade. The installation will not take more than 5 minutes, but it all depends on the speed of the server and running roles and features.
This following process shows an in-place upgrade from Windows Server 2012 R2 to 2019 using an ISO file.
Mount the ISO file and then click on setup
Watch Video: How to Upgrade Windows Server 2012 to Server 2019

Preparing

Get updates, click next to start (Download and install updates as the default option)

Getting Windows updates

Windows Server 2019 Setup

Specify the Windows product key and then click next.

Select the Server edition with the desktop experience option and then click next.
Accept user license terms and then click accept.

Choose the option for keeping personal files and programs because we intend to upgrade the Server. Select Next.

Upgrade making sure, ready to install.

Click on install to initiate the installation process.

Installing Windows Server 2019.

Updating Windows Server.

Windows Server 2019 Successfully upgrade.

Windows Server 2019 Standard Desktop with folders.

Related: Migrate Active Directory Server 2012 to Server 2019
Время прочтения
9 мин
Просмотры 27K

Windows Server уже 27 лет и с каждым новым обновлением компания Microsoft всё больше совершенствует свое детище. С момента выхода Windows Server 2016 прошло уже 4 года, но с этим обновлением — компанией был выбран новый курс обновления, разделенный на 2 канала.
1. Знакомство с Windows Server 2019, нововведения и обновления

LTSC (Long-term servicing channel) — это первый канал обновлений и выхода релизов от Microsoft. Релизы, выпущенные в LTSC — выходят каждые 2-3 года и поддерживаются эти релизы достаточно долго. Если быть точнее, то LTSC-релизы поддерживаются компанией на протяжении 5 лет после выхода. Вы можете обзавестись и расширенной поддержкой релиза сроком еще на 5 лет после истечения срока действия основной.
Semi-Annual Channel — это промежуточные релизы, выходящие в свет каждые полгода. Такие релизы поддерживаются компанией на протяжении 6 месяцев, по истечению срока действия основной поддержки пользователь может обзавестись расширенной поддержкой еще на полтора года.
Спустя 3 года после релиза Windows Server 2016 и принятия решения о новой системе обновлений — на свет появился новый релиз — Windows Server 2019. Направления, в которых работали сотрудники компании Microsoft создавая этот продукт были следующими:
- Гибридное облако — целью было связать новый релиз с облачным хранилищем компании Microsoft Azure. Такое решения было принято из-за проблемы утери данных на физических носителях пользователей. Гибридное облако сделало возможным backup информации с серверов Microsoft с целью последующего восстановления.
- Безопасность системы и информации — одним из главных плюсов нового релиза стала обновленная система безопасности, с встроенными службами — затрудняющими проникновение и внедрение вредоносного ПО.
- Развитие контейнеров и поддержка Linux — контейнеры Microsoft пользовались популярностью после выхода Windows Server 2016, благодаря их использованию осуществлялась доставка приложений в различные системы. С релизом Windows Server 2019 компания не только усовершенствовала привычные пользователю контейнеры, но и добавила поддержку контейнеров Linux и подсистему Windows для Linux (WSL).
- Гиперконвергентная инфраструктура — благодаря такой инфраструктуре пользователь может собрать на одной архитектуре и вычисления и хранилище данных — без потерь в производительности. Такой подход обходится пользователю дешевле и не требует увеличения производительности для корректной работы.
Система управления так же получила дополнение в виде Windows Admin Center.
Это средство администрирования загружается локально и вносится в вашу инфраструктуру, благодаря чему у пользователя есть возможность управлять не только локальными и облачными версиями Windows Server, но и компьютерами под управлением Windows 10, а также кластерами и гиперконвергентными инфраструктурами.
2. Отличия между релизами Windows Server 2008 и Windows Server 2019

В течение жизненного цикла Windows Server обзавелась несколькими версиями. Самыми популярными релизами компании Microsoft признаны версии 2008 и 2019 года. Ниже представлена таблица, где собраны различия между этими двумя версиями:
Подводя итоги, можно с уверенностью сказать — Windows Server 2008 не может составить конкуренцию обновленному продукту Microsoft. Релиз 2008 года чересчур устарел, а из-за потери поддержки со стороны компании-создателя, старая версия в скором времени станет крайне нестабильной системой и, следовательно, не самым лучшим вариантом при выборе ОС для создания сервера.
Кстати, наша компания предлагает виртуальные серверы на Windows Server. Для автоматической установки доступны Windows Server 2012, 2016 или 2019, лицензия уже входит в стоимость!
3. Как выиграть время перед переходом на новую версию Windows Server

Период основной поддержки релиза Windows Server 2008 компания Microsoft прекратила еще в 2015 году. Единственным выходом для компаний, чья работа была завязана на этом релизе системы — стала расширенная программа поддержки, предполагающая под собой лишь обновления системы безопасности. Расширенная программа поддержки функционировала на протяжении 3-х лет и по окончанию ее работы у пользователей возник вопрос, как выиграть время перед переходом на новую версию ПО?
Есть несколько возможностей отсрочить переход, но самым безопасным способом “отсрочки” является предложенный самой компанией Microsoft вариант.
4. Облачное размещение данных в Azure для последующего переноса

Microsoft с окончанием периода поддержки WS 2008 получала сотни писем с вопросом, как же оттянуть переход системы на новую версию ПО, без риска для данных.
Компания не заставила пользователей долго ждать ответа и анонсировала переход на облачное хранилище Azure. Такой вариант подойдет, если в данный момент у вас нет возможности перейти на новое ПО — а деятельность завязана именно на WS 2008.
Вы можете перенести все данные на виртуальную систему и продолжить работу. Если хостинг уже оплачивается — компания предоставит все обновления системы безопасности бесплатно, ну а если нет — обновления системы придется докупить.
Перейдя на облачное хранилище Azure, можно оттянуть переход на обновленную систему. Таким образом будет достаточно времени собрать всю необходимую информацию для переноса данных на новую версию Windows Server.
5. Решения Veeam как один из вариантов для безопасного переноса данных

Еще один помощник для плавного перехода на новую версию ПО — это Veeam Backup & Replication.
Данная утилита способна копировать информацию любых объемов для последующего восстановления системы или переноса файлов в облако Azure. Помимо облака Azure есть также возможность воспользоваться облачным хранилищем компании Veeam.
Еще одним плюсом данного софта является то, что Veeam Backup & Replication поддерживает восстановление данных. Эта функция будет крайне полезна если вы часто сталкиваетесь со сбоями в системах. Моментальное восстановление данных в Veeam Backup & Replication стало возможным благодаря фирменной технологии компании- vPower.
6. Сравнение софта для копирования данных

Помимо Veeam Backup & Replication на рынке есть еще несколько программ для переноса данных. Для упрощения выбора подходящего ПО — мы собрали в таблице сходства и различия.
Vmware Data Recovery + vCenter —удобный пакет, обладающий сравнительно урезанным функционалом в сравнении со своими оппонентами, тем не менее, главным плюсом данного софта является возможность ввода Data Recovery в систему на любом этапе работы.
Veeam BackUp& Replication — один из лидеров среди программ для создания backup в VSphere. Данный софт обладает огромным потенциалом благодаря наличию различного рода дополнительных опций, которые пользователь может приобрести отдельно. Veeam BackUp& Replication способен похвастаться самым полным пакетом функций.
В Veeam BackUp& Replication имеется крайне удобная функция репликации данных. Эта функция будет полезна, если вы хотите не просто обезопасить свои данные от утери, но и проводить тесты на стрессоустойчивость системы с разными параметрами и в разных ситуациях — без риска для данных.
Большим преимуществом данного софта является возможность мгновенного восстановления системы в случае непредвиденных обстоятельств. Такая возможность станет очень полезна после перехода на новую ОС Windows Server 2019 и возобновления работы на новой операционной системе.
Symantec Backup Exec System Recovery — сильными сторонами данного софта можно назвать возможность восстановления системы c использованием другой аппаратной среды, наличие функции преобразования виртуальной среды в физическую, а также возможность интеллектуального копирования на USB носитель.
Для создания копии с файл-сервера необходима лишь одна лицензия — SSR, но для использования данного софта в полной мере и работы с разными базами и структурами пользователю потребуются агенты — которых необходимо будет приобрести отдельно.
Еще одна сильная сторона данного софта — и одно из его главных отличий — это способность агентов Symantec распознавать все типы серверов, в том числе и те, что созданы для определенных ОС. Благодаря этому программа копирует данные, с учетом особенностей каждого сервера.
Acronis Backup & Recovery 10 — данный софт использует технологии, схожие с технологиями Veeam BackUp& Replication. Продукт компании Acronis также способен на мгновенное восстановление системы в случае технических ошибок или неисправностей. Еще одним плюсом данного софта смело можно назвать цену — стоимость пакета Acronis Backup & Recovery 10 держится на средней отметке среди своих конкурентов и при этом предлагает схожий пакет функций. Благодаря своей стоимости и функционалу этот софт способен составить конкуренцию Veeam BackUp& Replication, ввиду схожих возможностей.
7. Порядок перехода на новую ОС

Microsoft предлагает несколько вариантов обновления операционной системы Windows Server.
Первый и, пожалуй, самый безопасный метод — “чистая установка”.
Под чистой установкой подразумевается создание новой среды на основе обновленной WS 2019. Пользователям придется перекодировать имеющиеся данные согласно требованиям операционной системы и продолжить работу уже на обновленной ОС. Это самый безопасный метод, но с точки зрения затраты времени, это несколько проблематично, а если у пользователя имеются обязательства перед сервисом или же организацией — такой метод не подойдет.
Второй вариант миграции на обновленную ОС — плавный переход от версии к версии. Для этого необходимо скопировать все данные и постепенно сменить версии ОС, начиная с WS 2012 и вплоть до относительно недавно вышедшей WS 2019.
Такой метод рекомендует сама Microsoft с целью минимизировать риски потери данных, а также, как выход для компаний, у которых в данный момент нет возможности перейти сразу на последнюю версию ОС.
Для копирования данных и последующего их хранения вы можете воспользоваться утилитами от лидеров ниши и впоследствии перенести их на облачное хранилище Azure.
Третий путь — небольшая хитрость, оставленная Microsoft на радость пользователям.
Для ускоренного перехода первоначально необходимо перейти на версию WS 2012 R2. Перенеся систему на W S2012 R2, можно без труда обновиться до последней доступной версии Windows Server 2019.
8. Безопасность каждого из вариантов миграции, положительные и отрицательные стороны

Миграция с одной ОС на другую — всегда ответственный шаг. Важно выбрать подходящий метод перехода. Ниже перечень сильных и слабых сторон каждого из методов:
Если разобраться детально и взвесить все факторы, можно смело сказать, что нет единого — самого безопасного и удобного метода перехода на новую ОС. Ввиду определенных параметров и обязательств каждого пользователя — выбор подходящего метода миграции остается за вами.

Reading Time: 3 minutes
Microsoft recommend upgrading your server OS to the latest version, but this is not always possible. Your business may be running third party applications that are not compatible with later Windows Server Operating Systems.
Before upgrading, always check whether the applications running on your current Operating System are supported. It will save you a lot of time and disappointment.
So let’s continue on the basis that you have carried out your checks and the applications currently running on your server supports Server 2019.
Firstly, ensure you have a full backup of your server, so in the event the upgrade goes horribly wrong, you have a backup.
Note: If you have Microsoft Endpoint Protection installed, you will be prompted to remove this app. This app is not compatible with server 2019
Now, that you are all set, you may be thinking, can I upgrade directly from server 2012 or server 2012 R2 to Server 2016? The answer is yes, you can and it’s a supported method. See support matrix from Microsoft below. So whether you decide to upgrade from Server 2012 to 2019 or from 2016 to 2019 a one hop in-place upgrade is supported.
Ok, so we now have a full system backup, and we know that third party apps are supported with server 2016/2019.
Before we get started with the upgrade, Microsoft recommend that you collect some information from your device, for diagnostic and troubleshooting purposes. Because this information is intended for troubleshooting purposes only, store the information at a location where it’s easy accessible and not on the server being upgraded.
To collect your info
- Open a command prompt, go to
c:Windowssystem32, and then type systeminfo.exe. - Copy, paste, and store the resulting system information somewhere off of your device.
- Type ipconfig /all into the command prompt, and then copy and paste the resulting configuration information into the same location as above.
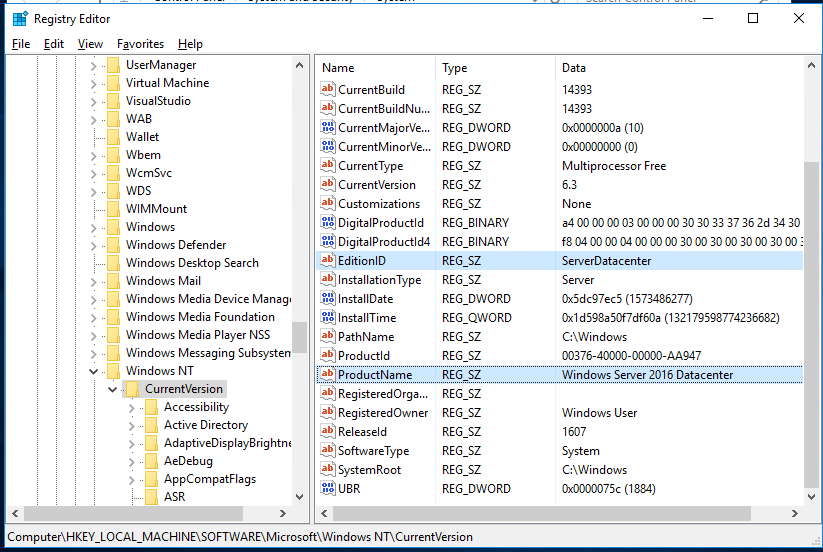
- Open the Registry Editor, go to the HKEY_LOCAL_MACHINESOFTWAREMicrosoftWindowsNTCurrentVersion hive, and then copy and paste the Windows Server BuildLabEx (version) and EditionID (edition) into the same location as above.
Upgrade Server 2012 to 2019
1) Patch your server with the latest windows updates if not already up to date
2) Locate the Windows Server 2019 Setup media, and then select setup.exe
3) Select the Windows Server version you wish to upgrade to
4) Accept the licensing terms
5) If you’re running Microsoft Endpoint Protection on your server, setup will prompt for this app to be removed as it isn’t compatible with Windows Server 2019
6) Select Keep personal files and apps, and then select Next
7) After Setup analyses your server, setup will prompt you to proceed with your upgrade by clicking install
 Wait for the upgrade to complete

9) To ensure the upgrade completed successfully
– Open the Registry Editor, go to the HKEY_LOCAL_MACHINESOFTWAREMicrosoftWindowsNTCurrentVersion hive, and view the ProductName. You should see your edition of Windows Server 2019, for example Windows Server 2019 Standard. Make sure all of your applications are running and that your client connections to the applications are successful.
If you think something might have gone wrong during your upgrade, copy and zip the %SystemRoot%Panther (usually C:WindowsPanther) directory and contact Microsoft support.
Содержание
- Обновление Windows Server 2012 R2 до Windows Server 2019 Upgrade Windows Server 2012 R2 to Windows Server 2019
- Подготовка к обновлению на месте Before you begin your in-place upgrade
- Сбор данных To collect your info
- Выполнение обновления To perform the upgrade
- Действия по завершении обновления After your upgrade is done
- Проверка успешности обновления To make sure your upgrade was successful
- Downgrade редакции в Windows Server с Datacenter до Standard
- Как понизить контроллер домена и удалить роль AD DS
- Подготовка системы
- Перенос ролей контроллера домена
- Проверка состояния AD
- Понижение контроллера домена
- Графика
- Powershell
- Удаление роли AD DS
- Графика
- Powershell
- Вывод сервера из домена
- Графика
- Powershell
- Вопросы и ответы
Обновление Windows Server 2012 R2 до Windows Server 2019 Upgrade Windows Server 2012 R2 to Windows Server 2019
Если вы хотите сохранить существующее оборудование и все роли сервера, которые вы настроили, без сжатия сервера, необходимо выполнить обновление на месте. If you want to keep the same hardware and all the server roles you’ve already set up without flattening the server, you’ll want to do an in-place upgrade. При обновлении на месте вы переходите с более старой версии операционной системы на более новую, сохраняя свои параметры, роли сервера и данные. An in-place upgrade allows you to go from an older operating system to a newer one, while keeping your settings, server roles, and data intact. Эта статья поможет вам перейти с Windows Server 2012 R2 на Windows Server 2019. This article helps you to move from Windows Server 2012 R2 to Windows Server 2019.
Подготовка к обновлению на месте Before you begin your in-place upgrade
Перед началом обновления Windows Server рекомендуется выполнить сбор данных с устройств для диагностики и устранения неполадок. Before you start your Windows Server upgrade, we recommend that you collect some information from your devices, for diagnostic and troubleshooting purposes. Так как эти сведения предназначены для использования только в случае сбоя обновления, необходимо убедиться в том, что вы храните информацию в расположении, доступ к которому можно получить с вашего устройства. Because this information is intended for use only if your upgrade fails, you must make sure that you store the information somewhere that you can get to it off of your device.
Сбор данных To collect your info
Откройте командную строку, перейдите в c:Windowssystem32 , а затем введите systeminfo.exe. Open a command prompt, go to c:Windowssystem32 , and then type systeminfo.exe.
Скопируйте, вставьте и сохраните полученные сведения о системе в любом расположении на устройстве. Copy, paste, and store the resulting system information somewhere off of your device.
Введите ipconfig /all в командной строке, а затем скопируйте и вставьте полученные сведения о конфигурации в то же расположение, что и ранее. Type ipconfig /all into the command prompt, and then copy and paste the resulting configuration information into the same location as above.
Откройте редактор реестра, перейдите в куст HKEY_LOCAL_MACHINESOFTWAREMicrosoftWindowsNTCurrentVersion, а затем скопируйте и вставьте значения BuildLabEx (версия) и EditionID (выпуск) для Windows Server в то же расположение, что и выше. Open the Registry Editor, go to the HKEY_LOCAL_MACHINESOFTWAREMicrosoftWindowsNTCurrentVersion hive, and then copy and paste the Windows Server BuildLabEx (version) and EditionID (edition) into the same location as above.
После получения всех данных, относящихся к Windows Server, мы настоятельно рекомендуем создать резервную копию операционной системы, приложений и виртуальных машин. After you’ve collected all of your Windows Server-related information, we highly recommend that you backup your operating system, apps, and virtual machines. Кроме того, необходимо завершить работу, выполнить быструю миграцию или динамическую миграцию всех виртуальных машин, выполняющихся в данный момент на сервере. You must also Shut down, Quick migrate, or Live migrate any virtual machines currently running on the server. Во время обновления на месте виртуальные машины не могут работать. You can’t have any virtual machines running during the in-place upgrade.
Выполнение обновления To perform the upgrade
Убедитесь, что значение BuildLabEx указывает, что используется Windows Server 2012 R2. Make sure the BuildLabEx value says you’re running Windows Server 2012 R2.
Найдите установочный носитель Windows Server 2019 и выберите setup.exe. Locate the Windows Server 2019 Setup media, and then select setup.exe.

Выберите Да, чтобы начать процесс установки. Select Yes to start the setup process.
Для устройств, подключенных к Интернету, выберите вариант Скачать обновления, драйверы и дополнительные компоненты (рекомендуется) , а затем щелкните Далее. For internet-connected devices, select the Download updates, drivers and optional features (recommended) option, and then select Next.
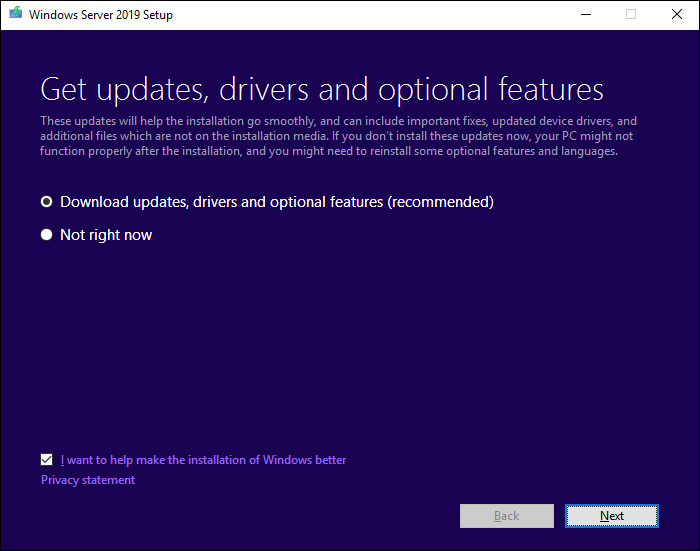
Программа установки проверяет конфигурацию устройства. Дождитесь ее завершения и щелкните Далее. Setup checks your device configuration, you must wait for it to finish, and then select Next.
В зависимости от канала распространения, из которого был получен носитель Windows Server (розничная, корпоративная, OEM, ODM и т. д.) и лицензия на сервер, может появиться запрос на ввод лицензионного ключа для продолжения. Depending on the distribution channel that you received Windows Server media from (Retail, Volume License, OEM, ODM, etc.) and the license for the server, you may be prompted to enter a licensing key to continue.
Выберите выпуск Windows Server 2019, который вы хотите установить, а затем щелкните Далее. Select the Windows Server 2019 edition you want to install, and then select Next.

Выберите Принимаю, чтобы подтвердить условия лицензионного соглашения, исходя из вашего канала распространения (например, розничная, корпоративная, OEM, ODM версия и т. д.). Select Accept to accept the terms of your licensing agreement, based on your distribution channel (such as, Retail, Volume License, OEM, ODM, and so on).

Программа установки предложит вам удалить модуль Microsoft Endpoint Protection через оснастку Установка и удаление программ. Setup will recommend that you remove Microsoft Endpoint Protection using Add/Remove programs.
Эта функция несовместима с Windows Server 2019. This feature isn’t compatible with Windows Server 2019.
Выберите Сохранить личные файлы и приложения, чтобы выполнить обновление на месте, а затем щелкните Далее. Select Keep personal files and apps to choose to do an in-place upgrade, and then select Next.

Когда программа установки завершит анализ устройства, она предложит перейти к обновлению, выбрав действие Установить. After Setup analyzes your device, it will prompt you to proceed with your upgrade by selecting Install.

Начнется обновление на месте, в котором отображается окно Обновление Windows с информацией о ходе выполнения. The in-place upgrade starts, showing you the Upgrading Windows screen with its progress. После завершения обновления сервер перезапустится. After the upgrade finishes, your server will restart.

Действия по завершении обновления After your upgrade is done
После завершения обновления необходимо убедиться, что обновление до Windows Server 2019 прошло успешно. After your upgrade completes, you must make sure the upgrade to Windows Server 2019 was successful.
Проверка успешности обновления To make sure your upgrade was successful
Откройте редактор реестра, перейдите в куст HKEY_LOCAL_MACHINESOFTWAREMicrosoftWindowsNTCurrentVersion и просмотрите запись ProductName. Open the Registry Editor, go to the HKEY_LOCAL_MACHINESOFTWAREMicrosoftWindowsNTCurrentVersion hive, and view the ProductName. Вы должны увидеть здесь выпуск Windows Server 2019, например Windows Server 2019 Datacenter. You should see your edition of Windows Server 2019, for example Windows Server 2019 Datacenter.
Убедитесь, что все приложения работают, и что подключения клиентов к приложениям выполняются успешно. Make sure all of your applications are running and that your client connections to the applications are successful.
Если вы считаете, что во время обновления возникли проблемы, скопируйте и создайте архив каталога %SystemRoot%Panther (обычно C:WindowsPanther ) и обратитесь в службу поддержки Майкрософт. If you think something might have gone wrong during your upgrade, copy and zip the %SystemRoot%Panther (usually C:WindowsPanther ) directory and contact Microsoft support.
Downgrade редакции в Windows Server с Datacenter до Standard
При анализе используемых серверных лицензий в сети с KMS сервером мы обнаружили, что на одном из серверов установлена значительно более дорогая редакция Windows Server Datacenter, чем требуют задачи, запущенные на сервере (на сервере не используется виртуализация, S2D, Azure Stack, Storage Replica и прочее). Возникала идея изменить (понизить) редакцию установленного Windows Server 2016 Datacenter на Standard в целях экономии более дорогих лицензий. Чистую переустановку Windows Server мы не рассматривали, потому что на сервере уже настроены ряд ролей и установлено дополнительное ПО, лицензии которого жестко привязаны к ОС и железу.

Несмотря на то, что Microsoft поддерживает только апгрейд редакции Windows Server с младшей на старшую с помощью DISM (см. статью о конвертировании ознакомительной версии Windows Server), вы можете выполнить и обратную процедуру – downgrade версии Datacenter до Standard с сохранением всех текущих настроек и установленных ролей, программ.
Настоятельно рекомендуем перед выполнением даунгрейда сделать бэкап системы (хотя бы через Windows Server Backup).
Также будьте внимательны при выполнении даунгрейда Windows Server с ролью контроллера домена AD. Желательно сначала перенести с него FSMO роли и понизить его до рядового сервера домена (предварительно сделайте бэкап DC, к которому можно будет вернуться при проблемах).
- На работающем Windows Server 2016 Datacenter запустите редактор реестра и перейдите в ветку HKEY_LOCAL_MACHINESOFTWAREMicrosoftWindows NTCurrentVersion;
- Проверьте значения следующих REG_SZ параметров: EditionID = ServerDatacenter, ProductName = Windows Server 2016 Datacenter;
- Измените значения параметров следующим образом: EditionID на ServerStandard, ProductName на Windows Server 2016 Standard;
- Закройте редактор реестра;
- Смонтируйте установочный ISO образ с Windows Server 2016 и запустите мастер установки (setup.exe);
- При выборе вариантов установки в окне Windows Server Setup выберите Upgrade и редакцию Windows Server 2016 Standard (Desktop Experience);
- Укажите, что вы хотите сохранить персональные данные и установленные программы — Keep personal files and apps (если эта опция недоступна, проверьте каталог установки Windows);
- Нажмите на кнопку Confirm у каждого обнаруженного пункта. В моем случае в первом пункте было указано, что апгрейд версии Windows Server не рекомендуется, лучше выполнить чистую установку; во втором – в этой версии Windows по-умолчанию отключены PnP и RemoteFX USB перенаправление устройств;
- Запустите обновление Windows, дождитесь его окончания и после нескольких перезагрузок проверьте, что теперь на сервере запущена редакция Windows 2016 Standard.


Данный способ даунгрейда должен работать во всех поддерживаемых версиях Windows Server (2012R2/2016/2019). Кроме того, вы можете использовать его для даунгрейда с обновлением версии, например, с Windows Server 2012 R2 Datacenter до Windows Server 2019 Standard (хотя это также не рекомендуемый сценарий).
Как понизить контроллер домена и удалить роль AD DS
Мы рассмотрим пример корректного удаление роли Active Directory Domain Services для Windows Server 2012 / 2012 R2 / 2016 / 2019.
Процесс полного удаления разобьем на несколько этапов:
Подготовка системы
Если в нашей среде AD не один контроллер домена и мы не хотим удалять сам домен, а только один из его серверов со службой каталогов, стоит выполнить предварительные операции, чтобы минимизировать возможные проблемы.
Перенос ролей контроллера домена
Active Directory насчитываем 5 FSMO ролей, которые отвечают за корректную работу службы каталогов. Смотрим, на каких серверах запущены данные роли с помощью команд в Powershell:
Get-ADForest dmosk.local | ft DomainNamingMaster, SchemaMaster
Get-ADDomain dmosk.local | ft InfrastructureMaster, PDCEmulator, RIDMaster
* где dmosk.local — домен, для которого нужно узнать назначенные роли FSMO.
Если какие-то роли назначены на сервере, который планируется понизить, то необходимо с помощью команды типа:
Проверка состояния AD
На любом из контроллеров домена вводим команду:
Данная команда запустит проверку состояния среды AD и выдаст ошибки, если такие будут. Необходимо обратить внимание на сообщения и, по возможности, решить проблемы.
Понижение контроллера домена
Первым шагом понизим наш сервер до рядового сервера. Это можно сделать с помощью графического интерфейса, Powershell или командной строки.
Графика
Открываем Диспетчер серверов и переходим в Управление — Удалить роли и компоненты:

Если откроется окно с приветствием, то просто нажимаем Далее (при желании, можно поставить галочку Пропускать эту страницу по умолчанию):

В окне «Выбор целевого сервера» выбираем сервер, для которого мы будем понижать уровень AD:

. и нажимаем Далее.
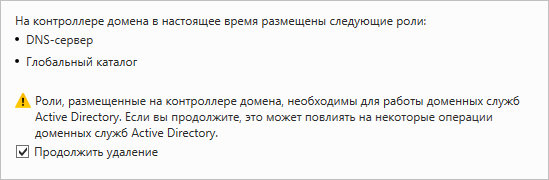
Снимаем галочку Доменные службы Active Directory. откроется окно в котором отобразится список компонентов для удаления — нажимаем Удалить компоненты:

Система вернет ошибку с предупреждением, что сначала нужно понизить AD — кликаем по ссылке Понизить уровень этого контроллера домена:

В следующем окне мы увидим предупреждение о том, что компьютер будет перезагружен и возможность принудительно понизить уровень — просто нажимаем Далее:

Система отобразит роли AD, которые будут удалены. Ставим галочку Продолжить удаление и нажимаем Далее:
Вводим дважды пароль учетной записи локального администратора, который будет использоваться после понижения до рядового сервера:

Кликаем по Понизить уровень:

Процесс займет какое-то время. После мы увидим «Уровень контроллера домена Active Directory успешно понижен»:

Сервер автоматически будет перезагружен.
Powershell
Открываем консоль Powershell от администратора и вводим:
Система запросит пароль для локальной учетной записи администратора, которая будет использоваться после понижения — задаем новый пароль дважды:
LocalAdministratorPassword: **********
Подтвердить LocalAdministratorPassword: **********
Мы получим предупреждение о перезагрузки сервера. Соглашаемся:
После завершения этой операции сервер будет автоматически перезапущен. Когда вы удалите доменные службы Active
Directory на последнем контроллере домена, этот домен перестанет существовать.
Вы хотите продолжить эту операцию?
[Y] Да — Y [A] Да для всех — A [N] Нет — N [L] Нет для всех — L [S] Приостановить — S [?] Справка
(значением по умолчанию является «Y»): A
Для выполнения команды уйдет некоторое время, после чего сервер уйдет в перезагрузку.
После понижения сервера роль, по-прежнему, будет установлена. Для ее удаления мы также можем воспользоваться графической оболочкой или командной строкой.
Графика
В диспетчере серверов кликаем снова по Управление — Удалить роли и компоненты:
Среди серверов выбираем тот, на котором будем удалять роль:
* сервер может быть только один. Тогда выбираем его.
Снимаем галочку Доменные службы Active Directory, в открывшемся окне кликаем по Удалить компоненты:
Галочка для доменных служб будет снята:

. кликаем по Далее несколько раз.
В последнем окне ставим галочку Автоматический перезапуск конечного сервера, если требуется и подтверждаем действие ответом Да:
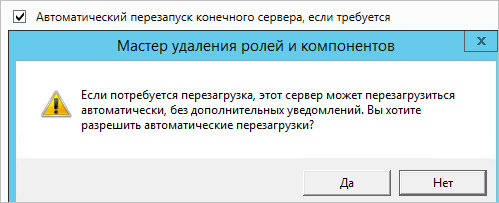
Роль будет удалена, а сервер отправлен в перезагрузку.
Powershell
Запускаем Powershell от администратора и вводим:
Remove-WindowsFeature -Name AD-Domain-Services
Роль контроллера будет удалена. Перезагружаем сервер:
Вывод сервера из домена
В случае, если у нас есть другие контроллеры домена, наш сервер останется в домене. При необходимости его окончательного вывода из эксплуатации, стоит вывести его из среды AD.
Графика
Открываем свойства системы (команда control system или свойства Компьютера) и кликаем по Изменить параметры:
В открывшемся окне нажимаем на Изменить:

И переводим компьютер в рабочую группу:

* в данном примере в группу с названием WORKGROUP.
Система запросит логин и пароль от пользователя Active Directory, у которого есть права на вывод компьютеров из домена — вводим данные.
Если все сделано верно, мы должны увидеть окно:

После перезагружаем сервер или выключаем его.
Powershell
Запускаем Powershell от имени администратора и вводим:
Remove-Computer -UnjoinDomaincredential dmoskmaster -PassThru -Verbose
* где dmoskmaster — учетная запись в домене с правами вывода компьютеров из AD.
Соглашаемся продолжить, ознакомившись с предупреждением:
Подтверждение
Чтобы войти в систему на этом компьютере после его удаления из домена, вам потребуется пароль учетной записи локального
администратора. Вы хотите продолжить?
[Y] Да — Y [N] Нет — N [S] Приостановить — S [?] Справка (значением по умолчанию является «Y»): Y
Вопросы и ответы
Дополнительные сведения относительно понижения и удаления AD.
1. Как удалить дочерний домен?
Мы должны быть уверены, что в данном домене не осталось важных ресурсов предприятия. После необходимо по очереди удалить все контроллеры домена по данной инструкции. При удалении последнего сервера AD для дочернего домена, будет удален сам дочерний домен из леса.
2. Как понизить режим работы домена?
Данный режим не понизить — это односторонняя операция. Максимум, что можно сделать, это восстановить службу AD из резервной копии, когда режим был нужного уровня.
3. Что делать, если умер основной контроллер домена?
Рассмотрим несколько вариантов:
- Если есть резервная копия, восстанавливаемся из нее.
- Если в среде несколько контроллеров домена, захватываем FSMO-роли (подробнее в инструкции Управление FSMO ролями Active Directory с помощью Powershell) и вручную удаляем уже несуществующий контроллер. После можно поднять новый контроллер, сделав его резервным.
- Хуже, когда нет ни копий, ни второго контроллера. В таком случае, поднимаем новый контроллер, создаем новый лес, домен и переводим все компьютеры в него.
4. Что делать, если контроллер домена возвращает ошибку при понижении?
Самый лучший способ, разобраться с ошибкой, решив проблему, которая ее вызывает. Если это не удалось сделать, принудительно понижаем сервер командой: