Во время диалога можно предоставить собеседникам общий доступ к своему рабочему столу. Например, если на вашем рабочем столе открыта презентация или документ, который вы хотите показать собеседникам, можно начать сеанс демонстрации рабочего стола непосредственно в окне беседы. Во время демонстрации вашего рабочего стола приглашенные пользователи могут видеть все действия, которые вы выполняете на экране.
Выполните одно из указанных ниже действий.
Общий доступ к рабочему столу
-
В окне беседы нажмите кнопку
, а затем выберите Рабочий стол.
Откроется окно демонстрации рабочего стола. При этом на экране вашего компьютера появится светящаяся рамка, которая показывает, что ваш рабочий стол виден другим участникам.
Примечание: Чтобы пригласить других пользователей на сеанс демонстрации рабочего стола, нажмите
, выберите Пригласить по имени или номеру телефона, затем выберите пользователя.
-
В окне беседы у выбранного участника появится сообщение Приглашение на демонстрацию рабочего стола.
Участник может нажать кнопку Принять и присоединиться к сеансу или нажать кнопку Отклонить и отказаться от приглашения.
Прекратить общий доступ к рабочему столу
-
В окне совместного доступа к рабочему столу щелкните всплывающее меню
, выберите рабочий стол, совместный доступ к которому вы хотите прекратить, и щелкните Прекратить совместный доступ.
Прием и отказ от приглашений на сеансы демонстрации рабочего стола
-
Если в окне беседы появилось приглашение на демонстрацию рабочего стола, нажмите Присоединиться, чтобы присоединиться к сеансу, или нажмите Игнорировать, чтобы отклонить приглашение.
Замена демонстрируемого рабочего стола собственным
Одновременно можно предоставить общий доступ только к одному рабочему столу. Чтобы показать участникам текущего сеанса свой рабочий стол, можно поменять демонстрируемый рабочий стол на собственный.
-
В окне демонстрации рабочего стола откройте меню
и выберите Предоставить общий доступ к новому рабочему столу.
Примечание: Если вы уже начали демонстрацию своего рабочего стола во время текущего сеанса, можно открыть меню
, выбрать свой рабочий стол и нажать кнопку Предоставить общий доступ сейчас.
Управление демонстрируемым рабочим столом
Важно: Эта функция доступна в Lync для Mac, только если сеанс демонстрации рабочего стола начат на компьютере с ОС Windows.
Если организатор сеанса разрешил участникам отправлять запросы на управление, можно запросить его согласие на управление демонстрируемым рабочим столом.
-
В окне демонстрации рабочего стола откройте меню
, выберите текущий рабочий стол и нажмите кнопку Запросить разрешение на управление.
См. также
Участие в онлайн-презентации PowerPoint
Передача файла
Нужна дополнительная помощь?
Используйте удаленный рабочий стол на устройстве с Windows, Android или iOS, чтобы дистанционно подключиться к компьютеру с Windows 10. Вот как настроить компьютер для разрешения удаленных подключений, а затем подключиться к настроенному компьютеру.
Примечание: В то время как сервер удаленного рабочего стола (например, компьютер, к которому вы подключаетесь) должен работать под управлением версии Windows Pro, клиентский компьютер (устройство, с которым вы подключаетесь) может работать под управлением любой версии Windows (Pro или Home). или даже другой операционной системы.
-
Включите удаленные подключения на компьютере, к которому требуется подключиться.
-
Убедитесь, что у вас установлена Windows 11 Pro. Чтобы проверить это, выберитеПуск и откройте Параметры . Затем в разделе Система , выберите О системе и в разделе Характеристики Windows найдите Выпуск. Сведения о том, как получить Windows 11 Pro, см. в статьеОбновление Windows Home до Windows Pro.
-
Когда будете готовы, нажмитеПуск и откройтеПараметры . Затем в разделе Система выберите Удаленный рабочий стол, установите для параметра Удаленный рабочий стол значение Включить, затем выберитеПодтвердить.
-
Запишите имя этого компьютера в поле Имя компьютера. Оно понадобится позже.
-
-
Используйте удаленный рабочий стол для подключения к настроенному компьютеру.
-
На локальном компьютере с Windows: В поле поиска на панели задач введите Подключение к удаленному рабочему столу и выберите Подключение к удаленному рабочему столу. В окне «Подключение к удаленному рабочему столу» введите имя компьютера, к которому необходимо подключиться (из шага 1), а затем нажмите кнопку Подключиться.
-
На устройстве с Windows, Android или iOS: Откройте приложение «Удаленный рабочий стол» (можно скачать бесплатно в Microsoft Store, Google Play и Mac App Store) и добавьте имя компьютера, к которому вы хотите подключиться (см. шаг 1). Выберите имя удаленного компьютера, которое вы добавили, и дождитесь завершения подключения.
-
-
Включите удаленные подключения на компьютере, к которому требуется подключиться.
-
Убедитесь, что у вас установлена Windows 10 Pro. Чтобы это проверить, перейдите в Пуск > Параметры > Система > О системе и найдите Выпуск. Сведения о том, как получить Windows 10 Pro, см. в статье Обновление Windows 10 Домашняя до Windows 10 Pro.
-
Когда будете готовы, выберите Пуск > Параметры > Система > Удаленный рабочий стол, и выберите Включить удаленный рабочий стол.
-
Запомните имя компьютера в разделе Как подключиться к этому ПК. Оно понадобится позже.
-
-
Используйте удаленный рабочий стол для подключения к настроенному компьютеру.
-
На локальном компьютере с Windows: В поле поиска на панели задач введите Подключение к удаленному рабочему столу и выберите Подключение к удаленному рабочему столу. В окне «Подключение к удаленному рабочему столу» введите имя компьютера, к которому необходимо подключиться (из шага 1), а затем нажмите кнопку Подключиться.
-
На устройстве с Windows, Android или iOS Откройте приложение «Удаленный рабочий стол» (можно скачать бесплатно в Microsoft Store, Google Play и Mac App Store) и добавьте имя компьютера, к которому вы хотите подключиться (см. шаг 1). Выберите имя удаленного компьютера, которое вы добавили, и дождитесь завершения подключения.
-
Включить удаленный рабочий стол
Нужна дополнительная помощь?
From Wikipedia, the free encyclopedia
| Other names | Terminal Services |
|---|---|
| Developer(s) | Microsoft |
| Operating system | Microsoft Windows |
| Service name | TermService |
| Type | Remote desktop software |
| Website | docs.microsoft.com/en-us/windows/win32/termserv/terminal-services-portal |
Remote Desktop Services (RDS), known as Terminal Services in Windows Server 2008 and earlier,[1] is one of the components of Microsoft Windows that allow a user to initiate and control an interactive session[2] on a remote computer or virtual machine over a network connection. RDS was first released in 1998 as Terminal Server in Windows NT 4.0 Terminal Server Edition, a stand-alone edition of Windows NT 4.0 Server that allowed users to log in remotely. Starting with Windows 2000, it was integrated under the name of Terminal Services as an optional component in the server editions of the Windows NT family of operating systems,[3] receiving updates and improvements with each version of Windows.[4] Terminal Services were then renamed to Remote Desktop Services with Windows Server 2008 R2[5] in 2009.
RDS is Microsoft’s implementation of thin client architecture, where Windows software, and the entire desktop of the computer running RDS, are made accessible to any remote client machine that supports Remote Desktop Protocol (RDP). User interfaces are displayed from the server onto the client system and input from the client system is transmitted to the server — where software execution takes place.[6] This is in contrast to application streaming systems, like Microsoft App-V, in which computer programs are streamed to the client on-demand and executed on the client machine.
RemoteFX was added to RDS as part of Windows Server 2008 R2 Service Pack 1.
Overview[edit]
Windows includes three client components that use RDS:
- Windows Remote Assistance – only Windows 10 and later
- Remote Desktop Connection (RDC)
- Fast user switching
The first two are individual utilities that allow a user to operate an interactive session on a remote computer over the network. In case of Remote Assistance, the remote user needs to receive an invitation and the control is cooperative. In case of RDC, however, the remote user opens a new session on the remote computer and has every power granted by its user account’s rights and restrictions.[6][7][8] Fast User Switching allows users to switch between user accounts on the local computer without quitting software and logging out. Fast User Switching is part of Winlogon and uses RDS to accomplish its switching feature.[9][10] Third-party developers have also created client software for RDS. For example, rdesktop supports Unix platforms.
Although RDS is shipped with most editions of all versions of Windows NT since Windows 2000,[3] its functionality differs in each version. Windows XP Home Edition does not accept any RDC connections at all, reserving RDS for Fast User Switching and Remote Assistance only. Other client versions of Windows only allow a maximum of one remote user to connect to the system at the cost of the user who has logged onto the console being disconnected. Windows Server allows two users to connect at the same time. This licensing scheme, called «Remote Desktop for Administration», facilitates administration of unattended or headless computers. Only by acquiring additional licenses (in addition to that of Windows) can a computer running Windows Server service multiple remote users at one time and achieve virtual desktop infrastructure.[5][9]
For an organization, RDS allows the IT department to install applications on a central server instead of multiple computers.[11] Remote users can log on and use those applications over the network. Such centralization can make maintenance and troubleshooting easier. RDS and Windows authentication systems prevent unauthorized users from accessing apps or data.
Microsoft has a long-standing agreement with Citrix to facilitate sharing of technologies and patent licensing between Microsoft Terminal Services and Citrix XenApp (formerly Citrix MetaFrame and Citrix Presentation Server). In this arrangement, Citrix has access to key source code for the Windows platform, enabling its developers to improve the security and performance of the Terminal Services platform. In late December 2004 the two companies announced a five-year renewal of this arrangement to cover Windows Vista.[12]
Server components[edit]
The key server component of RDS is Terminal Server (termdd.sys), which listens on TCP port 3389. When a Remote Desktop Protocol (RDP) client connects to this port, it is tagged with a unique SessionID and associated with a freshly spawned console session (Session 0, keyboard, mouse and character mode UI only). The login subsystem (winlogon.exe) and the GDI graphics subsystem is then initiated, which handles the job of authenticating the user and presenting the GUI. These executables are loaded in a new session, rather than the console session. When creating the new session, the graphics and keyboard/mouse device drivers are replaced with RDP-specific drivers: RdpDD.sys and RdpWD.sys. The RdpDD.sys is the device driver and it captures the UI rendering calls into a format that is transmittable over RDP. RdpWD.sys acts as keyboard and mouse driver; it receives keyboard and mouse input over the TCP connection and presents them as keyboard or mouse inputs. It also allows creation of virtual channels, which allow other devices, such as disc, audio, printers, and COM ports to be redirected, i.e., the channels act as replacement for these devices. The channels connect to the client over the TCP connection; as the channels are accessed for data, the client is informed of the request, which is then transferred over the TCP connection to the application. This entire procedure is done by the terminal server and the client, with the RDP mediating the correct transfer, and is entirely transparent to the applications.[13] RDP communications are encrypted using 128-bit RC4 encryption. Windows Server 2003 onwards, it can use a FIPS 140 compliant encryption schemes.[6]
Once a client initiates a connection and is informed of a successful invocation of the terminal services stack at the server, it loads up the device as well as the keyboard/mouse drivers. The UI data received over RDP is decoded and rendered as UI, whereas the keyboard and mouse inputs to the Window hosting the UI is intercepted by the drivers, and transmitted over RDP to the server. It also creates the other virtual channels and sets up the redirection. RDP communication can be encrypted; using either low, medium or high encryption. With low encryption, user input (outgoing data) is encrypted using a weak (40-bit RC4) cipher. With medium encryption, UI packets (incoming data) are encrypted using this weak cipher as well. The setting «High encryption (Non-export)» uses 128-bit RC4 encryption and «High encryption (Export)» uses 40-bit RC4 encryption.[14]
Terminal Server[edit]
Terminal Server is the server component of Terminal services. It handles the job of authenticating clients, as well as making the applications available remotely. It is also entrusted with the job of restricting the clients according to the level of access they have. The Terminal Server respects the configured software restriction policies, so as to restrict the availability of certain software to only a certain group of users. The remote session information is stored in specialized directories, called Session Directory which is stored at the server. Session directories are used to store state information about a session, and can be used to resume interrupted sessions. The terminal server also has to manage these directories. Terminal Servers can be used in a cluster as well.[6]
In Windows Server 2008, it has been significantly overhauled. While logging in, if the user logged on to the local system using a Windows Server Domain account, the credentials from the same sign-on can be used to authenticate the remote session. However, this requires Windows Server 2008 to be the terminal server OS, while the client OS is limited to Windows Server 2008, Windows Vista and Windows 7. In addition, the terminal server may be configured to allow connection to individual programs, rather than the entire desktop, by means of a feature named RemoteApp. Terminal Services Web Access (TS Web Access) makes a RemoteApp session invocable from the web browser. It includes the TS Web Access Web Part control which maintains the list of RemoteApps deployed on the server and keeps the list up to date. Terminal Server can also integrate with Windows System Resource Manager to throttle resource usage of remote applications.[4]
Terminal Server is managed by the Terminal Server Manager Microsoft Management Console snap-in. It can be used to configure the sign in requirements, as well as to enforce a single instance of remote session. It can also be configured by using Group Policy or Windows Management Instrumentation. It is, however, not available in client versions of Windows OS, where the server is pre-configured to allow only one session and enforce the rights of the user account on the remote session, without any customization.[6]
Remote Desktop Gateway[edit]
The Remote Desktop Gateway service component, also known as RD Gateway, can tunnel the RDP session using a HTTPS channel.[15] This increases the security of RDS by encapsulating the session with Transport Layer Security (TLS).[16] This also allows the option to use Internet Explorer as the RDP client. The official MS RDP client for macOS supports RD Gateway as of version 8. This is also available for iOS and Android.
This feature was introduced in the Windows Server 2008 and Windows Home Server products.
In October 2021, Thincast, the main contributor of the FreeRDP project, published the first Remote Desktop Gateway solution running natively on Linux.[17]
Remote Desktop HTML5 Web Client[edit]
In late 2018 Microsoft released the Remote Desktop HTML5 Web Client. The client allows users to connect to their remote apps or to their remote desktops without using an installed remote desktop client.[18][19] The web client uses the TLS secured port 443 and does not use the RD Gateway to transport traffic, instead relying solely on the remote desktop session host aspect of remote desktop services.[20][21]
Roles[edit]
- Remote Desktop Gateway
- Enables authorized users to connect to virtual desktops, Remote-App programs, and session-based desktops over a private network or the Internet.
- Remote Desktop Connection Broker Role
- Allows users to reconnect to their existing virtual desktop, RemoteApp programs, and session-based desktops. It enables even load distribution across RD Session Host servers in a session collection or across pooled virtual desktops in a pooled virtual desktop collection, and provides access to virtual desktops in a virtual desktop collection.
- Remote Desktop Session Host
- Enables a server to host RemoteApp programs as session-based desktops. Users can connect to RD Session Host servers in a session collection to run programs, save files, and use resources on those servers. Users can access Remote Desktop Session Host server by using the Remote Desktop Connection client or by using RemoteApp programs.
- Remote Desktop Virtualization Host
- Enables users to connect to virtual desktops by using RemoteApp and Desktop Connection.
- Remote Desktop Web Access
- Enables users to access RemoteApp and Desktop Connection through the Start Menu or through a web browser. RemoteApp and Desktop Connection provides users with a customized view of RemoteApp programs, session-based desktops, and virtual desktops.
- Remote Desktop Licensing
- Enables a server to manage RDS client access licenses (RDS CALs) that are required for each device or user to connect to a Remote Desktop Session Host server. RDS CALs are managed using the Remote Desktop Licensing Manager application.[22]
RemoteApp[edit]
RemoteApp (or TS RemoteApp) is a special mode of RDS, available in Windows Server 2008 R2 and later, where remote session configuration is integrated into the client operating system. The RDP 6.1 client ships with Windows XP SP3, KB952155 for Windows XP SP2 users,[23] Windows Vista SP1 and Windows Server 2008. The UI for the RemoteApp is rendered in a window over the local desktop, and is managed like any other window for local applications. The end result of this is that remote applications behave largely like local applications. The task of establishing the remote session, as well as redirecting local resources to the remote application, is transparent to the end user.[24] Multiple applications can be started in a single RemoteApp session, each with their own windows.[25]
A RemoteApp can be packaged either as a .rdp file or distributed via an .msi Windows Installer package. When packaged as an .rdp file (which contains the address of the RemoteApp server, authentication schemes to be used, and other settings), a RemoteApp can be launched by double clicking the file. It will invoke the Remote Desktop Connection client, which will connect to the server and render the UI. The RemoteApp can also be packaged in a Windows Installer database, installing which can register the RemoteApp in the Start menu as well as create shortcuts to launch it. A RemoteApp can also be registered as handler for file types or URIs. Opening a file registered with RemoteApp will first invoke Remote Desktop Connection, which will connect to the terminal server and then open the file. Any application which can be accessed over Remote Desktop can be served as a RemoteApp.[24]
Windows 7 includes built-in support for RemoteApp publishing, but it has to be enabled manually in registry, since there is no RemoteApp management console in client versions of Microsoft Windows.[26]
Windows Desktop Sharing[edit]
In Windows Vista onwards, Terminal Services also includes a multi-party desktop sharing capability known as Windows Desktop Sharing. Unlike Terminal Services, which creates a new user session for every RDP connection, Windows Desktop Sharing can host the remote session in the context of the currently logged in user without creating a new session, and make the Desktop, or a subset of it, available over RDP.[27] Windows Desktop Sharing can be used to share the entire desktop, a specific region, or a particular application.[28] Windows Desktop Sharing can also be used to share multi-monitor desktops. When sharing applications individually (rather than the entire desktop), the windows are managed (whether they are minimized or maximized) independently at the server and the client side.[28]
The functionality is only provided via a public API, which can be used by any application to provide screen sharing functionality. Windows Desktop Sharing API exposes two objects: RDPSession for the sharing session and RDPViewer for the viewer. Multiple viewer objects can be instantiated for one Session object. A viewer can either be a passive viewer, who is just able to watch the application like a screencast, or an interactive viewer, who is able to interact in real time with the remote application.[27] The RDPSession object contains all the shared applications, represented as Application objects, each with Window objects representing their on-screen windows. Per-application filters capture the application Windows and package them as Window objects.[29] A viewer must authenticate itself before it can connect to a sharing session. This is done by generating an Invitation using the RDPSession. It contains an authentication ticket and password. The object is serialized and sent to the viewers, who need to present the Invitation when connecting.[27][29]
Windows Desktop Sharing API is used by Windows Meeting Space and Windows Remote Assistance for providing application sharing functionality among network peers.[28]
Client software[edit]
Remote Desktop Connection[edit]

Remote Desktop Connection client on Windows 8 |
|
| Developer(s) | Microsoft |
|---|---|
| Operating system | Microsoft Windows |
| Type | Remote desktop software |
| Website | docs.microsoft.com/en-us/windows-server/remote/remote-desktop-services/welcome-to-rds |
Remote Desktop Connection client on macOS
Remote Desktop Connection (RDC, also called Remote Desktop or just RD,[30][31] formerly Microsoft Terminal Services Client, mstsc or tsclient)[32][33] is the client application for RDS. It allows a user to remotely log into a networked computer running the terminal services server. RDC presents the desktop interface (or application GUI) of the remote system, as if it were accessed locally.[6] In addition to regular username/password for authorizing for the remote session, RDC also supports using smart cards for authorization.[6] With RDC 6.0, the resolution of a remote session can be set independently of the settings at the remote computer.
With version 6.0, if the Desktop Experience component is plugged into the remote server, remote application user interface elements (e.g., application windows borders, Maximize, Minimize, and Close buttons etc.) will take on the same appearance of local applications. In this scenario, the remote applications will use the Aero theme if the user connects to the server from a Windows Vista machine running Aero.[4] Later versions of the protocol also support rendering the UI in full 32-bit color, as well as resource redirection for printers, COM ports, disk drives, mice and keyboards. With resource redirection, remote applications can use the resources of the local computer. Audio is also redirected, so that any sounds generated by a remote application are played back at the client system.[6][4] Moreover, a remote session can also span multiple monitors at the client system, independent of the multi-monitor settings at the server. RDC can also be used to connect to Windows Media Center (WMC) remote sessions; however, since WMC does not stream video using RDP, only the applications can be viewed this way, not any media.
RDC prioritizes UI data as well as keyboard and mouse inputs, as opposed to print jobs or file transfers. so as to make the applications more responsive. It redirects plug and play devices such as cameras, portable music players, and scanners, so that input from these devices can be used by the remote applications as well.[4] RDC can also be used to connect to computers which are exposed via Windows Home Server RDP Gateway over the Internet.[34] Finally, few shortcuts that will be handy
- To achieve Ctrl+Alt+Del effect on remote desktop, you can use the Ctrl+Alt+End key combination.
- To alternate between the full screen and window mode of remote desktop, you can use Ctrl+Alt+Break ( Ctrl+Fn+Alt+⇧ Shift on certain HP laptops).
Other clients[edit]
Microsoft produces an official client for a variety of non Windows platforms:
- Windows Mobile[35][36]
- MacOS: Microsoft Remote Desktop for Mac
- Android: Microsoft Remote Desktop
- iOS and iPadOS: Microsoft Remote Desktop
There have been numerous non-Microsoft implementations of clients that implement subsets of the Microsoft functionality for a range of platforms. The most common are:
- FreeRDP — Open Source under Apache license
- rdesktop for Linux/Unix and Microsoft Windows
- Remmina for Linux (based on FreeRDP)
- CoRD for macOS (Discontinued in April 2020)
- Thincast Client for Linux, macOS and Windows
See also[edit]
- BlueKeep (security vulnerability)
- Windows MultiPoint Server
- Microsoft NetMeeting, a discontinued Microsoft product also provides Shared-desktop feature, in the similar time-frame of Windows NT Terminal Services Edition
- Virtual Network Computing
References[edit]
- ^ «Windows Remote Desktop Services spotlight». Retrieved 2010-11-18.
- ^ QuinnRadich. «Remote Desktop Sessions — Win32 apps». docs.microsoft.com. Retrieved 2022-07-09.
- ^ a b «Remote Desktop Connection». PC World. IDG. 17 August 2011.
- ^ a b c d e «Whats new in Terminal Services in Windows Server 2008». Retrieved 2007-07-23.
- ^ a b Russel, Charlie; Zacker, Craig (2009). «4: Remote Desktop Services and VDI: Centralizing Desktop and Application Management» (PDF). Introducing Windows Server 2008 R2. Redmond, WA: Microsoft Press. Archived from the original (PDF) on 29 August 2017. Retrieved 11 January 2014.
- ^ a b c d e f g h «Technical Overview of Terminal Services in Windows Server 2003». Microsoft. Archived from the original on 2003-01-26. Retrieved 2007-07-23.
- ^
«How to change the listening port for Remote Desktop». Retrieved 2010-11-18. - ^
«Frequently Asked Questions about Remote Desktop». Microsoft. Retrieved 2007-07-23. - ^ a b
Russinovich, Mark; Solomon, David A.; Ionescu, Alex (2012). Windows Internals (6th ed.). Redmond, WA: Microsoft Press. pp. 20–21. ISBN 978-0-7356-4873-9. - ^
«Architecture of Fast User Switching». Support. Microsoft. 15 January 2006. Retrieved 11 January 2014. - ^ «Remote Services». Log me in 123.
- ^ «Citrix and Microsoft Sign Technology Collaboration and Licensing Agreement». Citrix. 2004-12-21. Archived from the original on 2011-07-05. Retrieved 2012-04-13.
- ^
«How Terminal Services Works». Microsoft. 2003-03-28. Retrieved 2007-07-23. - ^ «Connection Configuration in Terminal Server». Support (5.0 ed.). Microsoft. 22 June 2014.
- ^ «Terminal Services Gateway (TS Gateway)». Microsoft TechNet. Retrieved 2009-09-10.
- ^ «Remote Desktop Protocol». Microsoft Developer Network (MSDN). Retrieved 2009-09-10.
- ^ «RD Gateway Documentation». Thincast. Retrieved 2021-10-17.
- ^ Waggoner, Rob. «Microsoft Has Released the HTML5-Based RDP Web Client». blog.mycloudit.com. Retrieved 2020-05-10.
- ^ «Remote Desktop HTML5 client on Windows Server 2019». msfreaks. 2018-10-06. Retrieved 2020-05-10.
- ^ «RD Web Client (HTML5) – New Features In 1.0.11». www.rdsgurus.com. Retrieved 2020-05-10.
- ^ Berson, Freek (2018-01-12). «The Microsoft Platform: HTML5 client for Microsoft Remote Desktop Services 2016: Remote Desktop Web Client». The Microsoft Platform. Retrieved 2020-05-10.
- ^ TechNet: Remote Desktop Licensing
- ^ «Description of the Remote Desktop Connection 6.1 client update for Terminal Services in Windows XP Service Pack 2». Retrieved 2010-11-18.
- ^ a b «Terminal Services RemoteApp (TS RemoteApp)». Retrieved 2007-07-23.
- ^ «Terminal Services RemoteApp Session Termination Logic». Retrieved 2007-10-02.
- ^ «How to enable RemoteApp (via RDP 7.0) within VirtualBox or VMWare running Windows 7, Vista SP1+ or Windows XP SP3». Retrieved 2010-11-18.
- ^ a b c «Windows Desktop Sharing». Retrieved 2007-10-11.
- ^ a b c «Windows Desktop Sharing API». Retrieved 2007-10-11.
- ^ a b «About Windows Desktop Sharing». Retrieved 2007-10-11.
- ^ «Remote Desktop Services — Access from anywhere». Microsoft.
{{cite web}}: CS1 maint: url-status (link) - ^ «Get started with the Android client». Microsoft.
{{cite web}}: CS1 maint: url-status (link) - ^ «Why doesn’t the New Folder command work in the root of a redirected drive resource in a Remote Desktop session?». The Old New Thing. Microsoft. 17 December 2013. Retrieved 18 December 2013.
- ^ Savill, John (1 October 2008). The Complete Guide to Windows Server 2008. Pearson Education. p. 1752. ISBN 978-0-13-279758-0. Retrieved 1 June 2012.
Windows XP, Windows Server 2003, Windows Vista, and Windows Server 2008 all contain the RDC tool,
mstsc.exe[…] MSTSC in the filenamemstsc.exestands for Microsoft Terminal Services Client. - ^ «Remote Desktop Connection». Remote Support.
- ^ Drager, Dave (27 March 2008). «How to Remotely Control your Mobile Phone from Desktop». MakeUseOf. Retrieved 27 January 2022.
- ^ Miniman, Brandon (2009-03-16). «Tutorial: Setting up Remote Desktop in Windows Mobile». PocketNow. Archived from the original on 2009-08-01. Retrieved 27 January 2022.
External links[edit]
- Welcome to Remote Desktop Services
- Download Chrome Remote Desktop
From Wikipedia, the free encyclopedia
| Other names | Terminal Services |
|---|---|
| Developer(s) | Microsoft |
| Operating system | Microsoft Windows |
| Service name | TermService |
| Type | Remote desktop software |
| Website | docs.microsoft.com/en-us/windows/win32/termserv/terminal-services-portal |
Remote Desktop Services (RDS), known as Terminal Services in Windows Server 2008 and earlier,[1] is one of the components of Microsoft Windows that allow a user to initiate and control an interactive session[2] on a remote computer or virtual machine over a network connection. RDS was first released in 1998 as Terminal Server in Windows NT 4.0 Terminal Server Edition, a stand-alone edition of Windows NT 4.0 Server that allowed users to log in remotely. Starting with Windows 2000, it was integrated under the name of Terminal Services as an optional component in the server editions of the Windows NT family of operating systems,[3] receiving updates and improvements with each version of Windows.[4] Terminal Services were then renamed to Remote Desktop Services with Windows Server 2008 R2[5] in 2009.
RDS is Microsoft’s implementation of thin client architecture, where Windows software, and the entire desktop of the computer running RDS, are made accessible to any remote client machine that supports Remote Desktop Protocol (RDP). User interfaces are displayed from the server onto the client system and input from the client system is transmitted to the server — where software execution takes place.[6] This is in contrast to application streaming systems, like Microsoft App-V, in which computer programs are streamed to the client on-demand and executed on the client machine.
RemoteFX was added to RDS as part of Windows Server 2008 R2 Service Pack 1.
Overview[edit]
Windows includes three client components that use RDS:
- Windows Remote Assistance – only Windows 10 and later
- Remote Desktop Connection (RDC)
- Fast user switching
The first two are individual utilities that allow a user to operate an interactive session on a remote computer over the network. In case of Remote Assistance, the remote user needs to receive an invitation and the control is cooperative. In case of RDC, however, the remote user opens a new session on the remote computer and has every power granted by its user account’s rights and restrictions.[6][7][8] Fast User Switching allows users to switch between user accounts on the local computer without quitting software and logging out. Fast User Switching is part of Winlogon and uses RDS to accomplish its switching feature.[9][10] Third-party developers have also created client software for RDS. For example, rdesktop supports Unix platforms.
Although RDS is shipped with most editions of all versions of Windows NT since Windows 2000,[3] its functionality differs in each version. Windows XP Home Edition does not accept any RDC connections at all, reserving RDS for Fast User Switching and Remote Assistance only. Other client versions of Windows only allow a maximum of one remote user to connect to the system at the cost of the user who has logged onto the console being disconnected. Windows Server allows two users to connect at the same time. This licensing scheme, called «Remote Desktop for Administration», facilitates administration of unattended or headless computers. Only by acquiring additional licenses (in addition to that of Windows) can a computer running Windows Server service multiple remote users at one time and achieve virtual desktop infrastructure.[5][9]
For an organization, RDS allows the IT department to install applications on a central server instead of multiple computers.[11] Remote users can log on and use those applications over the network. Such centralization can make maintenance and troubleshooting easier. RDS and Windows authentication systems prevent unauthorized users from accessing apps or data.
Microsoft has a long-standing agreement with Citrix to facilitate sharing of technologies and patent licensing between Microsoft Terminal Services and Citrix XenApp (formerly Citrix MetaFrame and Citrix Presentation Server). In this arrangement, Citrix has access to key source code for the Windows platform, enabling its developers to improve the security and performance of the Terminal Services platform. In late December 2004 the two companies announced a five-year renewal of this arrangement to cover Windows Vista.[12]
Server components[edit]
The key server component of RDS is Terminal Server (termdd.sys), which listens on TCP port 3389. When a Remote Desktop Protocol (RDP) client connects to this port, it is tagged with a unique SessionID and associated with a freshly spawned console session (Session 0, keyboard, mouse and character mode UI only). The login subsystem (winlogon.exe) and the GDI graphics subsystem is then initiated, which handles the job of authenticating the user and presenting the GUI. These executables are loaded in a new session, rather than the console session. When creating the new session, the graphics and keyboard/mouse device drivers are replaced with RDP-specific drivers: RdpDD.sys and RdpWD.sys. The RdpDD.sys is the device driver and it captures the UI rendering calls into a format that is transmittable over RDP. RdpWD.sys acts as keyboard and mouse driver; it receives keyboard and mouse input over the TCP connection and presents them as keyboard or mouse inputs. It also allows creation of virtual channels, which allow other devices, such as disc, audio, printers, and COM ports to be redirected, i.e., the channels act as replacement for these devices. The channels connect to the client over the TCP connection; as the channels are accessed for data, the client is informed of the request, which is then transferred over the TCP connection to the application. This entire procedure is done by the terminal server and the client, with the RDP mediating the correct transfer, and is entirely transparent to the applications.[13] RDP communications are encrypted using 128-bit RC4 encryption. Windows Server 2003 onwards, it can use a FIPS 140 compliant encryption schemes.[6]
Once a client initiates a connection and is informed of a successful invocation of the terminal services stack at the server, it loads up the device as well as the keyboard/mouse drivers. The UI data received over RDP is decoded and rendered as UI, whereas the keyboard and mouse inputs to the Window hosting the UI is intercepted by the drivers, and transmitted over RDP to the server. It also creates the other virtual channels and sets up the redirection. RDP communication can be encrypted; using either low, medium or high encryption. With low encryption, user input (outgoing data) is encrypted using a weak (40-bit RC4) cipher. With medium encryption, UI packets (incoming data) are encrypted using this weak cipher as well. The setting «High encryption (Non-export)» uses 128-bit RC4 encryption and «High encryption (Export)» uses 40-bit RC4 encryption.[14]
Terminal Server[edit]
Terminal Server is the server component of Terminal services. It handles the job of authenticating clients, as well as making the applications available remotely. It is also entrusted with the job of restricting the clients according to the level of access they have. The Terminal Server respects the configured software restriction policies, so as to restrict the availability of certain software to only a certain group of users. The remote session information is stored in specialized directories, called Session Directory which is stored at the server. Session directories are used to store state information about a session, and can be used to resume interrupted sessions. The terminal server also has to manage these directories. Terminal Servers can be used in a cluster as well.[6]
In Windows Server 2008, it has been significantly overhauled. While logging in, if the user logged on to the local system using a Windows Server Domain account, the credentials from the same sign-on can be used to authenticate the remote session. However, this requires Windows Server 2008 to be the terminal server OS, while the client OS is limited to Windows Server 2008, Windows Vista and Windows 7. In addition, the terminal server may be configured to allow connection to individual programs, rather than the entire desktop, by means of a feature named RemoteApp. Terminal Services Web Access (TS Web Access) makes a RemoteApp session invocable from the web browser. It includes the TS Web Access Web Part control which maintains the list of RemoteApps deployed on the server and keeps the list up to date. Terminal Server can also integrate with Windows System Resource Manager to throttle resource usage of remote applications.[4]
Terminal Server is managed by the Terminal Server Manager Microsoft Management Console snap-in. It can be used to configure the sign in requirements, as well as to enforce a single instance of remote session. It can also be configured by using Group Policy or Windows Management Instrumentation. It is, however, not available in client versions of Windows OS, where the server is pre-configured to allow only one session and enforce the rights of the user account on the remote session, without any customization.[6]
Remote Desktop Gateway[edit]
The Remote Desktop Gateway service component, also known as RD Gateway, can tunnel the RDP session using a HTTPS channel.[15] This increases the security of RDS by encapsulating the session with Transport Layer Security (TLS).[16] This also allows the option to use Internet Explorer as the RDP client. The official MS RDP client for macOS supports RD Gateway as of version 8. This is also available for iOS and Android.
This feature was introduced in the Windows Server 2008 and Windows Home Server products.
In October 2021, Thincast, the main contributor of the FreeRDP project, published the first Remote Desktop Gateway solution running natively on Linux.[17]
Remote Desktop HTML5 Web Client[edit]
In late 2018 Microsoft released the Remote Desktop HTML5 Web Client. The client allows users to connect to their remote apps or to their remote desktops without using an installed remote desktop client.[18][19] The web client uses the TLS secured port 443 and does not use the RD Gateway to transport traffic, instead relying solely on the remote desktop session host aspect of remote desktop services.[20][21]
Roles[edit]
- Remote Desktop Gateway
- Enables authorized users to connect to virtual desktops, Remote-App programs, and session-based desktops over a private network or the Internet.
- Remote Desktop Connection Broker Role
- Allows users to reconnect to their existing virtual desktop, RemoteApp programs, and session-based desktops. It enables even load distribution across RD Session Host servers in a session collection or across pooled virtual desktops in a pooled virtual desktop collection, and provides access to virtual desktops in a virtual desktop collection.
- Remote Desktop Session Host
- Enables a server to host RemoteApp programs as session-based desktops. Users can connect to RD Session Host servers in a session collection to run programs, save files, and use resources on those servers. Users can access Remote Desktop Session Host server by using the Remote Desktop Connection client or by using RemoteApp programs.
- Remote Desktop Virtualization Host
- Enables users to connect to virtual desktops by using RemoteApp and Desktop Connection.
- Remote Desktop Web Access
- Enables users to access RemoteApp and Desktop Connection through the Start Menu or through a web browser. RemoteApp and Desktop Connection provides users with a customized view of RemoteApp programs, session-based desktops, and virtual desktops.
- Remote Desktop Licensing
- Enables a server to manage RDS client access licenses (RDS CALs) that are required for each device or user to connect to a Remote Desktop Session Host server. RDS CALs are managed using the Remote Desktop Licensing Manager application.[22]
RemoteApp[edit]
RemoteApp (or TS RemoteApp) is a special mode of RDS, available in Windows Server 2008 R2 and later, where remote session configuration is integrated into the client operating system. The RDP 6.1 client ships with Windows XP SP3, KB952155 for Windows XP SP2 users,[23] Windows Vista SP1 and Windows Server 2008. The UI for the RemoteApp is rendered in a window over the local desktop, and is managed like any other window for local applications. The end result of this is that remote applications behave largely like local applications. The task of establishing the remote session, as well as redirecting local resources to the remote application, is transparent to the end user.[24] Multiple applications can be started in a single RemoteApp session, each with their own windows.[25]
A RemoteApp can be packaged either as a .rdp file or distributed via an .msi Windows Installer package. When packaged as an .rdp file (which contains the address of the RemoteApp server, authentication schemes to be used, and other settings), a RemoteApp can be launched by double clicking the file. It will invoke the Remote Desktop Connection client, which will connect to the server and render the UI. The RemoteApp can also be packaged in a Windows Installer database, installing which can register the RemoteApp in the Start menu as well as create shortcuts to launch it. A RemoteApp can also be registered as handler for file types or URIs. Opening a file registered with RemoteApp will first invoke Remote Desktop Connection, which will connect to the terminal server and then open the file. Any application which can be accessed over Remote Desktop can be served as a RemoteApp.[24]
Windows 7 includes built-in support for RemoteApp publishing, but it has to be enabled manually in registry, since there is no RemoteApp management console in client versions of Microsoft Windows.[26]
Windows Desktop Sharing[edit]
In Windows Vista onwards, Terminal Services also includes a multi-party desktop sharing capability known as Windows Desktop Sharing. Unlike Terminal Services, which creates a new user session for every RDP connection, Windows Desktop Sharing can host the remote session in the context of the currently logged in user without creating a new session, and make the Desktop, or a subset of it, available over RDP.[27] Windows Desktop Sharing can be used to share the entire desktop, a specific region, or a particular application.[28] Windows Desktop Sharing can also be used to share multi-monitor desktops. When sharing applications individually (rather than the entire desktop), the windows are managed (whether they are minimized or maximized) independently at the server and the client side.[28]
The functionality is only provided via a public API, which can be used by any application to provide screen sharing functionality. Windows Desktop Sharing API exposes two objects: RDPSession for the sharing session and RDPViewer for the viewer. Multiple viewer objects can be instantiated for one Session object. A viewer can either be a passive viewer, who is just able to watch the application like a screencast, or an interactive viewer, who is able to interact in real time with the remote application.[27] The RDPSession object contains all the shared applications, represented as Application objects, each with Window objects representing their on-screen windows. Per-application filters capture the application Windows and package them as Window objects.[29] A viewer must authenticate itself before it can connect to a sharing session. This is done by generating an Invitation using the RDPSession. It contains an authentication ticket and password. The object is serialized and sent to the viewers, who need to present the Invitation when connecting.[27][29]
Windows Desktop Sharing API is used by Windows Meeting Space and Windows Remote Assistance for providing application sharing functionality among network peers.[28]
Client software[edit]
Remote Desktop Connection[edit]

Remote Desktop Connection client on Windows 8 |
|
| Developer(s) | Microsoft |
|---|---|
| Operating system | Microsoft Windows |
| Type | Remote desktop software |
| Website | docs.microsoft.com/en-us/windows-server/remote/remote-desktop-services/welcome-to-rds |
Remote Desktop Connection client on macOS
Remote Desktop Connection (RDC, also called Remote Desktop or just RD,[30][31] formerly Microsoft Terminal Services Client, mstsc or tsclient)[32][33] is the client application for RDS. It allows a user to remotely log into a networked computer running the terminal services server. RDC presents the desktop interface (or application GUI) of the remote system, as if it were accessed locally.[6] In addition to regular username/password for authorizing for the remote session, RDC also supports using smart cards for authorization.[6] With RDC 6.0, the resolution of a remote session can be set independently of the settings at the remote computer.
With version 6.0, if the Desktop Experience component is plugged into the remote server, remote application user interface elements (e.g., application windows borders, Maximize, Minimize, and Close buttons etc.) will take on the same appearance of local applications. In this scenario, the remote applications will use the Aero theme if the user connects to the server from a Windows Vista machine running Aero.[4] Later versions of the protocol also support rendering the UI in full 32-bit color, as well as resource redirection for printers, COM ports, disk drives, mice and keyboards. With resource redirection, remote applications can use the resources of the local computer. Audio is also redirected, so that any sounds generated by a remote application are played back at the client system.[6][4] Moreover, a remote session can also span multiple monitors at the client system, independent of the multi-monitor settings at the server. RDC can also be used to connect to Windows Media Center (WMC) remote sessions; however, since WMC does not stream video using RDP, only the applications can be viewed this way, not any media.
RDC prioritizes UI data as well as keyboard and mouse inputs, as opposed to print jobs or file transfers. so as to make the applications more responsive. It redirects plug and play devices such as cameras, portable music players, and scanners, so that input from these devices can be used by the remote applications as well.[4] RDC can also be used to connect to computers which are exposed via Windows Home Server RDP Gateway over the Internet.[34] Finally, few shortcuts that will be handy
- To achieve Ctrl+Alt+Del effect on remote desktop, you can use the Ctrl+Alt+End key combination.
- To alternate between the full screen and window mode of remote desktop, you can use Ctrl+Alt+Break ( Ctrl+Fn+Alt+⇧ Shift on certain HP laptops).
Other clients[edit]
Microsoft produces an official client for a variety of non Windows platforms:
- Windows Mobile[35][36]
- MacOS: Microsoft Remote Desktop for Mac
- Android: Microsoft Remote Desktop
- iOS and iPadOS: Microsoft Remote Desktop
There have been numerous non-Microsoft implementations of clients that implement subsets of the Microsoft functionality for a range of platforms. The most common are:
- FreeRDP — Open Source under Apache license
- rdesktop for Linux/Unix and Microsoft Windows
- Remmina for Linux (based on FreeRDP)
- CoRD for macOS (Discontinued in April 2020)
- Thincast Client for Linux, macOS and Windows
See also[edit]
- BlueKeep (security vulnerability)
- Windows MultiPoint Server
- Microsoft NetMeeting, a discontinued Microsoft product also provides Shared-desktop feature, in the similar time-frame of Windows NT Terminal Services Edition
- Virtual Network Computing
References[edit]
- ^ «Windows Remote Desktop Services spotlight». Retrieved 2010-11-18.
- ^ QuinnRadich. «Remote Desktop Sessions — Win32 apps». docs.microsoft.com. Retrieved 2022-07-09.
- ^ a b «Remote Desktop Connection». PC World. IDG. 17 August 2011.
- ^ a b c d e «Whats new in Terminal Services in Windows Server 2008». Retrieved 2007-07-23.
- ^ a b Russel, Charlie; Zacker, Craig (2009). «4: Remote Desktop Services and VDI: Centralizing Desktop and Application Management» (PDF). Introducing Windows Server 2008 R2. Redmond, WA: Microsoft Press. Archived from the original (PDF) on 29 August 2017. Retrieved 11 January 2014.
- ^ a b c d e f g h «Technical Overview of Terminal Services in Windows Server 2003». Microsoft. Archived from the original on 2003-01-26. Retrieved 2007-07-23.
- ^
«How to change the listening port for Remote Desktop». Retrieved 2010-11-18. - ^
«Frequently Asked Questions about Remote Desktop». Microsoft. Retrieved 2007-07-23. - ^ a b
Russinovich, Mark; Solomon, David A.; Ionescu, Alex (2012). Windows Internals (6th ed.). Redmond, WA: Microsoft Press. pp. 20–21. ISBN 978-0-7356-4873-9. - ^
«Architecture of Fast User Switching». Support. Microsoft. 15 January 2006. Retrieved 11 January 2014. - ^ «Remote Services». Log me in 123.
- ^ «Citrix and Microsoft Sign Technology Collaboration and Licensing Agreement». Citrix. 2004-12-21. Archived from the original on 2011-07-05. Retrieved 2012-04-13.
- ^
«How Terminal Services Works». Microsoft. 2003-03-28. Retrieved 2007-07-23. - ^ «Connection Configuration in Terminal Server». Support (5.0 ed.). Microsoft. 22 June 2014.
- ^ «Terminal Services Gateway (TS Gateway)». Microsoft TechNet. Retrieved 2009-09-10.
- ^ «Remote Desktop Protocol». Microsoft Developer Network (MSDN). Retrieved 2009-09-10.
- ^ «RD Gateway Documentation». Thincast. Retrieved 2021-10-17.
- ^ Waggoner, Rob. «Microsoft Has Released the HTML5-Based RDP Web Client». blog.mycloudit.com. Retrieved 2020-05-10.
- ^ «Remote Desktop HTML5 client on Windows Server 2019». msfreaks. 2018-10-06. Retrieved 2020-05-10.
- ^ «RD Web Client (HTML5) – New Features In 1.0.11». www.rdsgurus.com. Retrieved 2020-05-10.
- ^ Berson, Freek (2018-01-12). «The Microsoft Platform: HTML5 client for Microsoft Remote Desktop Services 2016: Remote Desktop Web Client». The Microsoft Platform. Retrieved 2020-05-10.
- ^ TechNet: Remote Desktop Licensing
- ^ «Description of the Remote Desktop Connection 6.1 client update for Terminal Services in Windows XP Service Pack 2». Retrieved 2010-11-18.
- ^ a b «Terminal Services RemoteApp (TS RemoteApp)». Retrieved 2007-07-23.
- ^ «Terminal Services RemoteApp Session Termination Logic». Retrieved 2007-10-02.
- ^ «How to enable RemoteApp (via RDP 7.0) within VirtualBox or VMWare running Windows 7, Vista SP1+ or Windows XP SP3». Retrieved 2010-11-18.
- ^ a b c «Windows Desktop Sharing». Retrieved 2007-10-11.
- ^ a b c «Windows Desktop Sharing API». Retrieved 2007-10-11.
- ^ a b «About Windows Desktop Sharing». Retrieved 2007-10-11.
- ^ «Remote Desktop Services — Access from anywhere». Microsoft.
{{cite web}}: CS1 maint: url-status (link) - ^ «Get started with the Android client». Microsoft.
{{cite web}}: CS1 maint: url-status (link) - ^ «Why doesn’t the New Folder command work in the root of a redirected drive resource in a Remote Desktop session?». The Old New Thing. Microsoft. 17 December 2013. Retrieved 18 December 2013.
- ^ Savill, John (1 October 2008). The Complete Guide to Windows Server 2008. Pearson Education. p. 1752. ISBN 978-0-13-279758-0. Retrieved 1 June 2012.
Windows XP, Windows Server 2003, Windows Vista, and Windows Server 2008 all contain the RDC tool,
mstsc.exe[…] MSTSC in the filenamemstsc.exestands for Microsoft Terminal Services Client. - ^ «Remote Desktop Connection». Remote Support.
- ^ Drager, Dave (27 March 2008). «How to Remotely Control your Mobile Phone from Desktop». MakeUseOf. Retrieved 27 January 2022.
- ^ Miniman, Brandon (2009-03-16). «Tutorial: Setting up Remote Desktop in Windows Mobile». PocketNow. Archived from the original on 2009-08-01. Retrieved 27 January 2022.
External links[edit]
- Welcome to Remote Desktop Services
- Download Chrome Remote Desktop
Содержание
- Доступ к локальным файлам и папкам в сеансе удаленного рабочего стола
- Сохранение настроек RDC с файлом ярлыка RDP
- Совместное использование файлов и папок через VNC
- Общая папка в Windows 10: как создать, настроить и открыть общий доступ
- Настраиваем общий доступ в Windows 10
- Способ №1
- Способ №2
- Как подключиться к общей папке в Windows 10
- Как включить анонимный доступ без ввода данных
- Устранение неполадок при настройке общего доступа
- Заключение
- Как подключиться к сетевой папке в Windows (SMB)
- Как подключиться с общей папке на Windows, для которой требуется ввод учётных данных
- Общий доступ к папке — поэтапная настройка
- Разрешаем доступ к ресурсам ПК через Панель инструментов
- Создаем папку с общим доступом
- Открываем доступ к разделу через «Компьютер» и «Этот Компьютер»
- Открываем доступ к папке через командную строку
- Заходим в сетевую папку с другого ПК
- Создаем и входим в «Домашнюю группу»
- Становимся владельцем сетевой папки
- В заключение
- Как расшарить файлы и папки в локальной сети и интернет (общие папки)
- Создание общей папки (расшаривание)
- Папка для локальной сети
- Папка для работы через интернет
- Вариант 1
- Вариант 2
- Что делать, если общая папка не видна
Доступ к локальным файлам и папкам в сеансе удаленного рабочего стола
Функция «Подключение к удаленному рабочему столу» (RDC) Windows позволяет удаленно просматривать и управлять удаленными рабочими столами Windows. Совместное использование ресурсов между вашим локальным и удаленным ПК может быть сложным, но можно обмениваться локальными файлами и папками через сеанс удаленного рабочего стола, используя RDC или другие инструменты удаленного рабочего стола, такие как TightVNC.
Если вы используете RDC и хотите подключиться к файлам и папкам на вашем ПК, когда вы подключены, вам необходимо настроить настройки RDC. Вы можете установить это при каждом подключении или, альтернативно, создать файл ярлыка протокола удаленного рабочего стола (RDP) для сохранения настроек.
Средство подключения к удаленному рабочему столу использует протокол удаленного рабочего стола Microsoft для создания сеанса удаленного рабочего стола на ПК и серверах Windows. Он включен во все выпуски Windows 10 и Windows Server.
Microsoft также предлагает программное обеспечение с поддержкой RDP, позволяющее подключаться к ПК с Windows на Mac, а также на мобильных платформах, таких как Android и iOS. Если вы работаете на Mac, вы можете поделиться своими файлами и папками Mac с Windows на вкладке «Перенаправление» приложения «Удаленный рабочий стол».
В Windows встроенный инструмент «Подключение к удаленному рабочему столу» позволяет настроить параметры общего доступа к файлам и папкам перед подключением.
Средство подключения к удаленному рабочему столу при первом запуске довольно простое. Обычно вы вставляете IP-адрес для вашего удаленного ПК и нажимаете кнопку «Подключиться», но вам нужно будет настроить его перед подключением, если вы хотите получить доступ к локальным файлам и папкам.
Эти настройки могут действовать только на время вашего подключения к удаленному рабочему столу. Чтобы сохранить эти настройки, вам нужно сохранить соединение в виде ярлыка, используя файл настроек RDP.
Сохранение настроек RDC с файлом ярлыка RDP
Файлы настроек протокола удаленного рабочего стола предназначены для взаимозаменяемости с другим программным обеспечением, которое позволяет RDP-соединения.
После сохранения файла RDP вы можете использовать его для прямого подключения к удаленному рабочему столу в будущем. Двойной щелчок по файлу, чтобы открыть его, запустит инструмент RDC и автоматически соединится с вашими заданными настройками.
Вы также можете получить доступ к файлу из инструмента «Подключение к удаленному рабочему столу», нажав «Открыть» в разделе «Параметры подключения».
Если в какой-то момент вы хотите изменить эти настройки, следуйте инструкциям выше, чтобы перезаписать сохраненный файл RDP.
Совместное использование файлов и папок через VNC
Хотя Windows поставляется с инструментом RDC, вы можете использовать другое стороннее программное обеспечение для подключения к удаленному рабочему столу для подключения к Windows и другим операционным системам. VNC является одним из наиболее популярных альтернативных протоколов RDP, с различными клиентами для подключения, которые вы можете использовать.
Для этого вам понадобится VNC-сервер, установленный на вашем удаленном рабочем столе. При установке TightVNC обычно устанавливаются как сервер, так и компоненты средства просмотра, если вы не настроите это в процессе установки.
Источник
Общая папка в Windows 10: как создать, настроить и открыть общий доступ
Предоставление общего доступа к папкам – необходимая процедура для создания локальной сети. Если нужно организовать обмен данными между несколькими компьютерами, без этого не обойтись. Задача несложная, однако у начинающих пользователей часто возникают трудности.
В сегодняшнем руководстве я на пальцах объясню, как создать, настроить и открыть общий доступ к папке в Windows 10.
Настраиваем общий доступ в Windows 10
Прежде чем переходить к настройке общего доступа, для начала нам потребуется установить частный сетевой профиль – в таком случае компьютер будет виден прочим устройствам и может быть открыт для совместного использования файлов.
Изменяем профиль сети:
Теперь можем спокойно переходить к настройке общего доступа.
Способ №1
Открываем доступ к папке:
Папка для общего доступа открыта, и теперь в нее можно войти с другого компьютера, подключенного в ту же локальную сеть.
Способ №2
Данный способ подойдет не только для расшаривания папок, но и дисков. Например, вы можете предоставить доступ к локальному диску С. Сделать это можно следующим образом:
Аналогичным образом можно предоставить доступ для любого другого диска или папки.
Как подключиться к общей папке в Windows 10
Дело за малым – запустить компьютер из локальной сети и всего в несколько кликов перейти в общую папку. Не забудьте, что данный ПК также должен использовать частную сеть, о чем я говорил в начале.
Подключаемся к общей папке:
При успешной попытке мы подключимся к другому компьютеру и увидим все файлы, к которым предоставили доступ.
Как включить анонимный доступ без ввода данных
Ранее мы получали доступ к папке через авторизацию – вводили логин и пароль. Иногда в подобных манипуляциях нет необходимости, и их можно избежать. Работает, к сожалению, данный способ только на Windows 10 Pro и Enterprise. Если на вашем компьютере домашняя версия, то активировать анонимный доступ не получится.
Подключаем анонимный доступ:
На этом все. Теперь мы можем спокойно получить доступ к папке с другого компьютера без ввода логина и пароля.
В случае с диском все немного иначе:
Вот так мы можем предоставить доступ к локальному диску без логина и пароля. Обязательно в конце примените внесенные изменения, по желанию добавьте нужные разрешения. Настройка редактора групповых политик аналогична той, что мы проводили выше.
Устранение неполадок при настройке общего доступа
В некоторых случаях система Windows 10 может выдавать предупреждения о недоступности сетевого ресурса либо просто «ругаться» на настройки. Все это можно исправить в «Центре управления сетями и общим доступом». Настройки стоит проверять на компьютере, к которому вы пытаетесь подключиться. Выглядеть они должны следующим образом:
Теперь можете снова подключиться к папке – все должно заработать. В некоторых случаях может потребоваться перезагрузка устройства.
Заключение
Получение общего доступа к папке или диску – простая задача, но со своими нюансами. Важно, чтобы оба устройства были подключены к одной сети – это может быть как проводное соединение, так и через Wi-Fi роутер. Если все учтено, но ошибки до сих пор не дают подключиться, то стоит отключить антивирусное средство либо воспользоваться вышеуказанной инструкцией.
Источник
Как подключиться к сетевой папке в Windows (SMB)
На компьютерах, которые должны подключаться к общей сетевой папке, перейдите в «Изменение расширенных параметров общего доступа», для этого нажмите правой кнопкой мыши на значок сетевого соединения и нажмите «Открыть параметры сети и Интернет»:
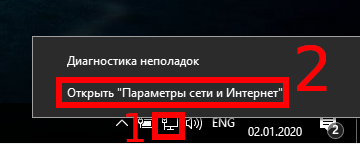
В открывшемся окне нажмите на «Параметры общего доступа»:

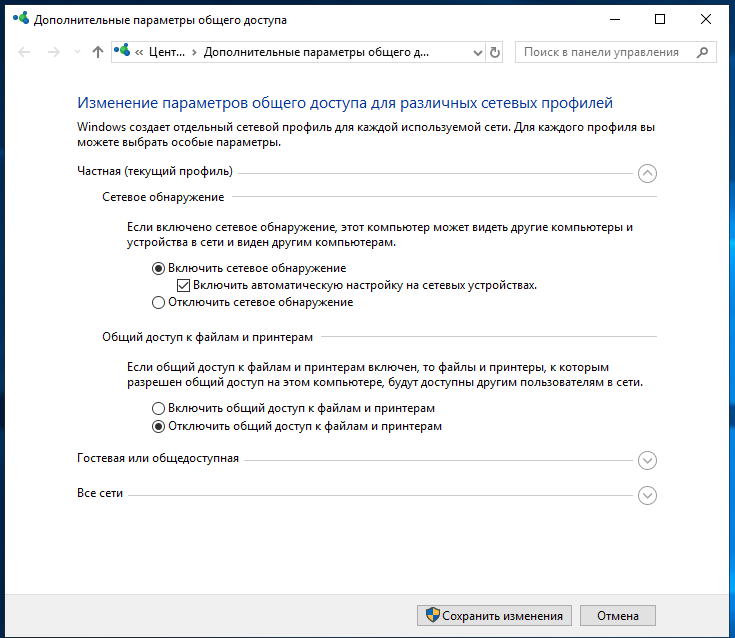
На компьютерах, которые должны подключаться к общей сетевой папке, перейдите в «Изменение расширенных параметров общего доступа» и выберите опцию «Включить сетевое обнаружение»:
С недавнего времени, после очередного обновления Windows 10 в некоторых случаях перестали открываться сетевые папки. Дело в том, что теперь вход без ввода пароля нужно настраивать не только на компьютерах, где находится сетевая папка, но и на компьютерах, с которых выполняется подключение. Это довольно странное решение объясняется тем, чтобы вы случайно не подключились к папке злоумышленника и не скачали с неё вредоносное ПО. Вам НЕ НУЖНО делать настройку в gpedit.msc если вы подключаетесь к сетевой шаре по паролю. Если же вы настроили вход в общую папку без пароля, то для исправления ситуации нажмите Win+r (Пуск->Выполнить) и запустите:
Далее необходимо перейти по следующему пути «Конфигурация компьютера» → «Административные шаблоны» → «Сеть» → «Рабочая станция Lanmann»:
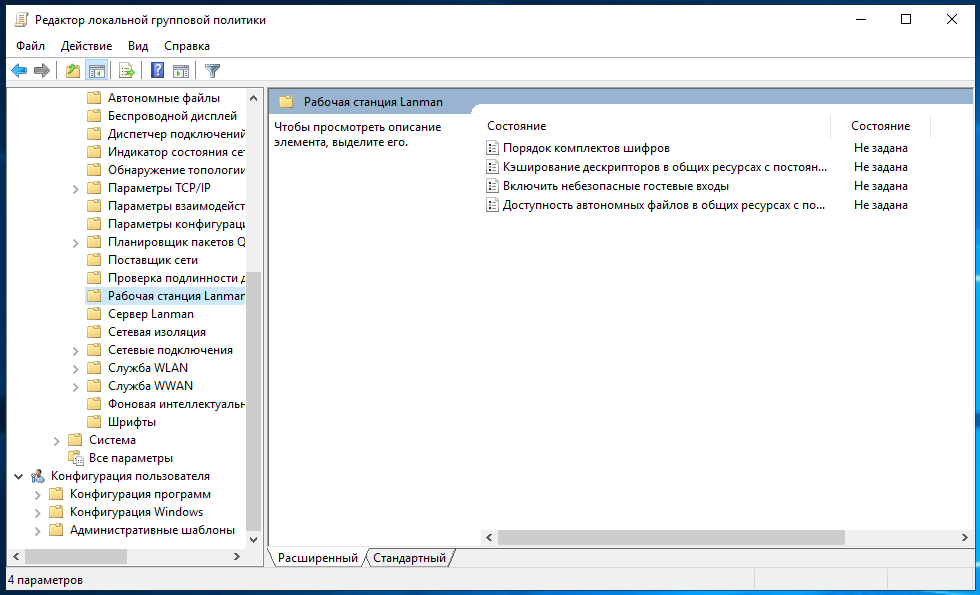
Теперь выставите параметр «Включить небезопасные гостевые входы» в положение «Включено»:

Описание в документации:
Этот параметр политики определяет, разрешит ли клиент SMB небезопасные гостевые входы на сервер SMB.
Если этот параметр политики включён или не настроен, клиент SMB разрешит небезопасные гостевые входы.
Если этот параметр политики отключён, клиент SMB будет отклонять небезопасные гостевые входы.
Небезопасные гостевые входы используются файловыми серверами для разрешения доступа без проверки подлинности к общим папкам. Небезопасные гостевые входы обычно не используются в среде предприятия, однако часто используются потребительскими запоминающими устройствами, подключёнными к сети (NAS), которые выступают в качестве файловых серверов. Для файловых серверов Windows требуется проверка подлинности, и на них по умолчанию не используются небезопасные гостевые входы. Поскольку небезопасные гостевые входы не проходят проверку подлинности, важные функции безопасности, такие как подписывание и шифрование SMB-пакетов отключены. В результате этого клиенты, которые разрешают небезопасные гостевые входы, являются уязвимыми к различным атакам с перехватом, которые могут привести к потере данных, повреждению данных и уязвимости к вредоносным программам. Кроме того, какие-либо данные, записанные на файловый сервер с использованием небезопасного гостевого входа, являются потенциально доступными для любого пользователя в сети. Майкрософт рекомендует отключить небезопасные гостевые входы и настроить файловые серверы на требование доступа с проверкой подлинности.»
Наконец-то, можно подключиться к общей папке (share) в локальной сети. Для этого откройте проводник и перейдите в раздел «Сеть»:

Обратите внимание на глючность этой службы — в левой части проводника мы видим 4 компьютера, а в главном разделе окна — только два.
Если вы не видите нужный компьютер, то попробуйте открыть его по прямой ссылке, например, у меня имя компьютера с сетевой папкой HACKWARE-MIAL, тогда я открываю его по ссылке \HACKWARE-MIAL.
Примечание для Windows Server: в серверных версиях Windows даже когда разрешено подключаться без пароля, всё равно появляется окно запроса:
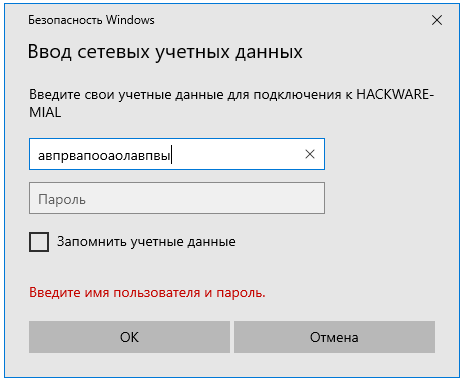
Достаточно ввести произвольные данные и, моём случае, сетевая папка успешно открывалась. При подключении к этой же папке с обычного Windows 10, запрос на ввод пароля не появлялся. Видимо, для сервера настроены какие-то более строгие политики.
При клике на имя компьютера вы увидите доступные сетевые папки. При переходе в папку вы увидите её содержимое:
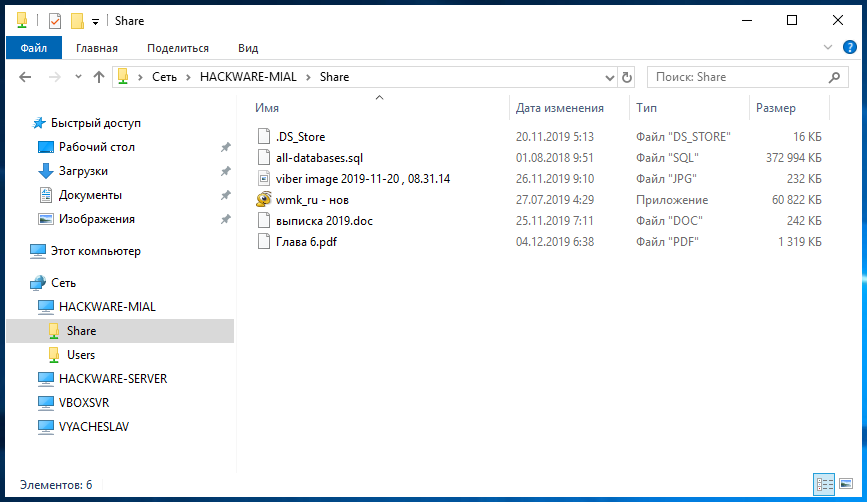
Вы можете открывать файлы по сети, то есть не нужно предварительно копировать их на свой компьютер. Можете копировать файлы из общей папки, добавлять туда новые или удалять существующие — с сетевой папкой можно работать как с обычной локальной папкой.
В Windows сетевые папки можно сделать доступными в качестве дисков с буквой. Для этого правой кнопкой мыши кликните по слову «Сеть» и выберите пункт «Подключить сетевой диск»:

Выберите букву для диска, введите путь до папки, поставьте галочку «Восстанавливать подключение при входе в систему»:
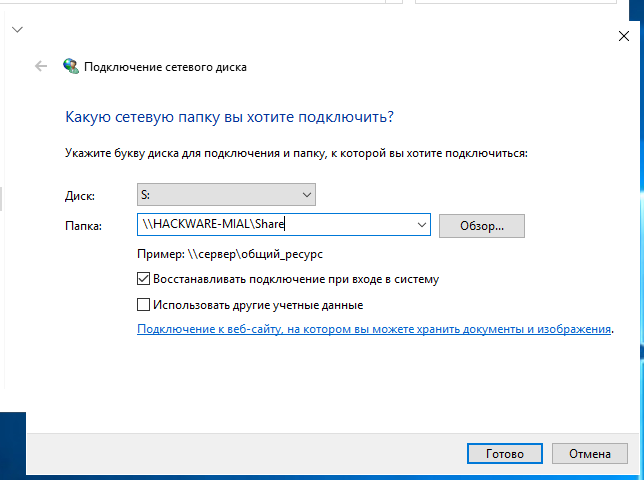
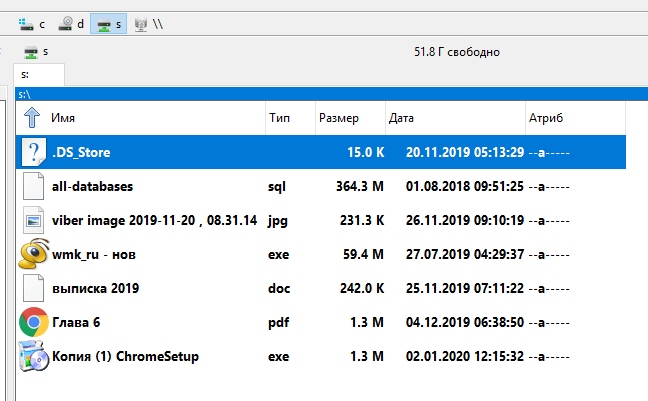
Теперь вы будете видеть сетевую папку как диск в любом файловом менеджере:
Как подключиться с общей папке на Windows, для которой требуется ввод учётных данных
В целом процесс очень схож с подключением к незащищённой папке, но при попытке подключения появится такое окно:
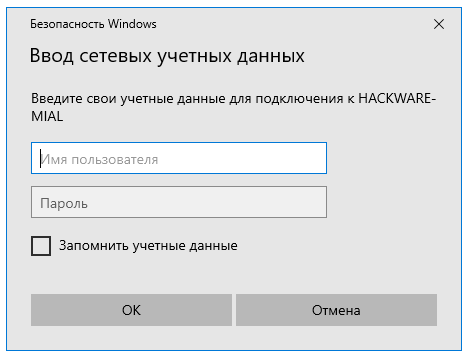
Чуть выше я создал папку, для доступа к которой нужно ввести учётные данные пользователя ShareOverlord, ссылка на эту папку: \HACKWARE-MIALShareRestricted
В это окно авторизации нужно вводить имя пользователя и пароль того пользователя, который имеет права на доступ к этой папке на УДАЛЁННОМ компьютере, то есть на том компьютере, где находится эта папка с совместным доступом.
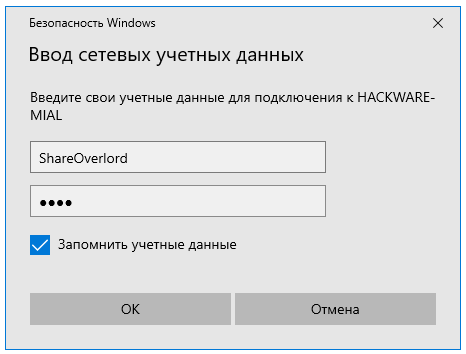
Доступ в папку ShareRestricted получен:

Смотрите такжке полное Руководство по SMB и Samba.
Источник
Общий доступ к папке — поэтапная настройка
Все современные версии операционной системы Windows, начиная с легендарного Win XP, снабжены полезным функционалом для работы в локальных и интертет-сетях, о котором многие владельцы компьютеров даже не догадываются. В данном случае речь идет об организации общего доступа к папке для определенной группы людей (устройств), подключенных к единой локальной сети.
Эта техническая возможность находит применение во многих сферах деятельности:
Сегодня мы расскажем и покажем вам, как сделать общий доступ к папке в Windows 7 и 10, не прибегая к использованию стороннего ПО или сетевых ресурсов.
Разрешаем доступ к ресурсам ПК через Панель инструментов
Чтобы открыть общий доступ к папке нужно настроить систему компьютера должным образом. Также вы должны указать имена разрешенных пользователей (или группы), и установить пароль для входа (при необходимости). Процесс настройки практически идентичен для Windows 7 и 10.
Выполняем следующие действия:

Теперь ваш компьютер виден в локальной сети. Чтобы убедиться в этом — перейдите в меню «Сеть» через «Этот компьютер» или «Компьютер».
Создаем папку с общим доступом
После настройки компьютера переходим к созданию сетевой папки в Windows 7 и 10.
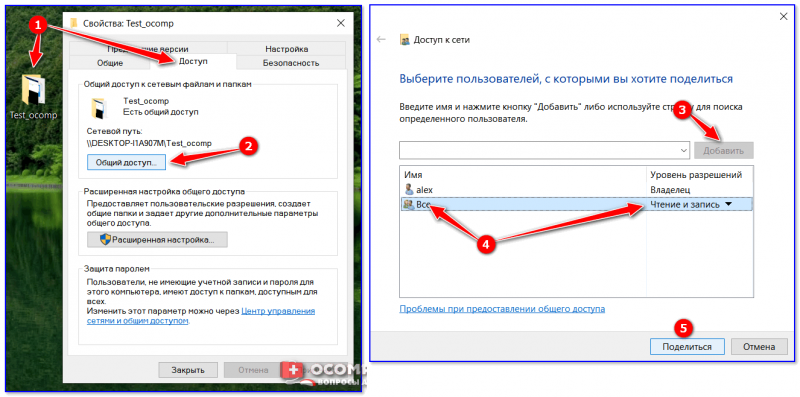
Мы выбираем пункт «Все» и нажимаем «Добавить».
После добавления нового профиля предоставляем ему права чтения и записи, и нажимаем «Общий доступ».
На экране появится окно с уведомлением об успешной настройке общего доступа к выбранным папкам в Windows и указанием пути к ресурсу.
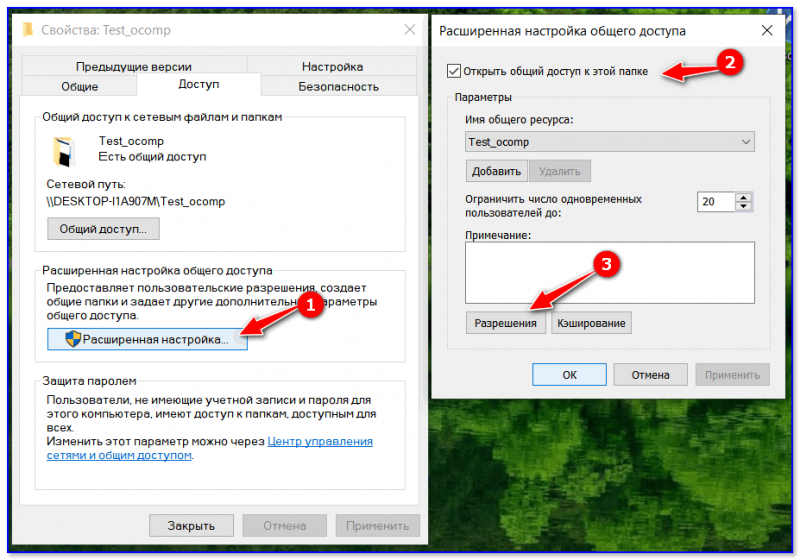
Открываем доступ к папке в Windows по галочке в верхней части окна, выбираем нужный ресурс, и устанавливаем разрешения по одноименной кнопке.
Открывшееся окно представляет собой список пользователей, имеющих разрешение на работу с папкой и ее содержимым. Жмем по кнопке «Добавить».
Тут мы вольны ввести имя пользователя самостоятельно или выбрать из имеющегося списка. Выберем второй вариант, нажимая на «Дополнительно».
Следующая консоль содержит все имеющиеся в системе профили пользователей, группы и служебные субъекты. Кликаем по «Поиск» и выбираем профиль «Все» из списка. В конце нажимаем «ОК».
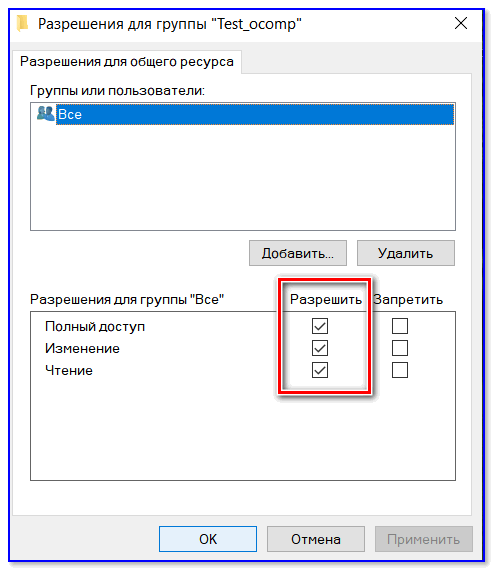
Разрешаем все действия для профиля и соглашаемся с настройками.
Теперь папка «деловая документация» отображается в сети, и доступна всем пользователям.
Открываем доступ к разделу через «Компьютер» и «Этот Компьютер»
Сетевая папка в Windows 7 и 10 может быть создана более простыми способами. Сейчас мы сделаем это непосредственно в меню «Компьютер» и «Этот Компьютер».
На «Семерке» это выглядит так:
Отмечаем группу «Все» и соглашаемся с внесенными изменениями.
Открываем доступ к папке через командную строку
Наверное, самый быстрый метод создания сетевого раздела – через командную строку Windows 7 и 10.
Для этого делаем следующее:
Заходим в сетевую папку с другого ПК
После расшаривания нашего раздела в локальной сети переходим к его использованию на другом компьютере.
Выглядит это следующим образом:
Ищем IPv4-адрес в списке. Запоминаем наш IP:192.168.1.3 (у вас будет другой).
Создаем и входим в «Домашнюю группу»
Благодаря функционалу «Домашняя группа» члены вашей семьи и близкие люди могут стать полноправными владельцами сетевой папки на едином ПК в Windows 7 и 10.
Для ее создания делаем следующее:
Теперь вы будете иметь доступ к открытым ресурсам пользователей домашней группы.
Становимся владельцем сетевой папки
В некоторых ситуациях вы можете столкнуться с проблемами в работе с расшаренным разделом. Если новый компьютер в сети не наделен правами пользования ресурсом, то вы получите сообщение о том, что у вас нет доступа к сетевой папке. Выходом из ситуации станет изменение политики безопасности путем смены владельца. Сделать это можно лишь имея права администратора.
Чтобы сменить владельца папки делаем следующее:
По окончании настройки нажимаем «ОК» или «Применить». Если владелец был успешно изменен — система оповестит вас об этом в окне уведомления.
Завершаем настройку кнопкой «ОК».
В заключение
В этой статье мы рассмотрели несколько простых способов, как открыть доступ к папкам в пределах локальной сети. Все вышеуказанные алгоритмы действий для Windows 7 и 10 не имеют различий, за исключением визуальной составляющей интерфейса и перестановки некоторых кнопок управления.
Не бойтесь экспериментировать со своим компьютером, запоминайте пройденные шаги во время настройки, и у вас все получится!
Источник
Как расшарить файлы и папки в локальной сети и интернет (общие папки)

Для быстрого обмена файлами или совместной работы над какими-нибудь документами часто требуется сделать определенную папку (или диск) общедоступной. Т.е. чтобы ее можно было открыть с любого компьютера в локальной сети.
В этой небольшой заметке я хотел показать как можно сделать такую папку не только для своих домашних ПК/ноутбуков, но и один из вариантов, как расшарить папку через интернет (т.е. любой компьютер из вне может сможет подключиться к вашей локальной сети и стать ее частью, в том числе пользоваться общими папками).
Как передать большой файл или папку по Интернету (даже если размер больше 1000 ГБ!) — пошаговая инструкция
Создание общей папки (расшаривание)
Папка для локальной сети
Общий доступ для всех!
В ней отметьте галочками те разрешения, которые вы даете другим пользователям (например, полный доступ или только чтение. ).
Папка для работы через интернет
Вариант 1
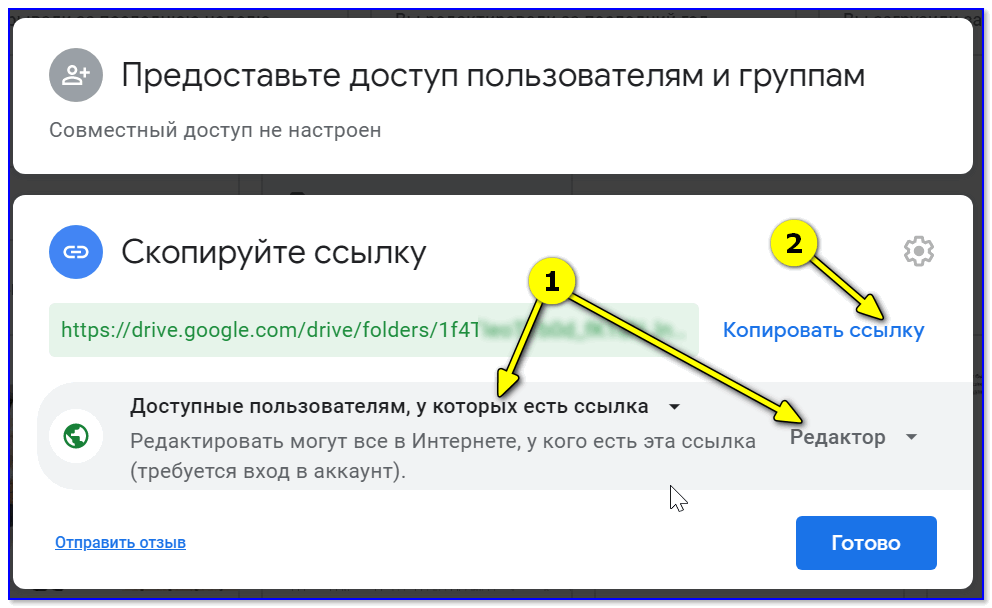
Если вам нужна папка, которая будет доступна 24 часа в сутки, и в нее мог бы зайти и загрузить файл (или подредактировать документ) любой пользователь — то неплохим выбором может стать сервис 👉 Google Drive.
Далее разрешаете к ней доступ тем пользователям, у кого есть ссылка, и ставите режим доступа «Редактор» (т.е. они смогут делать в этой папке, что захотят. ).
Собственно, после вам останется скопировать ссылку на папку и скинуть ее тем людям, для которых она и предназначалась.
Доступна всем, у кого есть ссылка (права: редактор)
Вариант 2
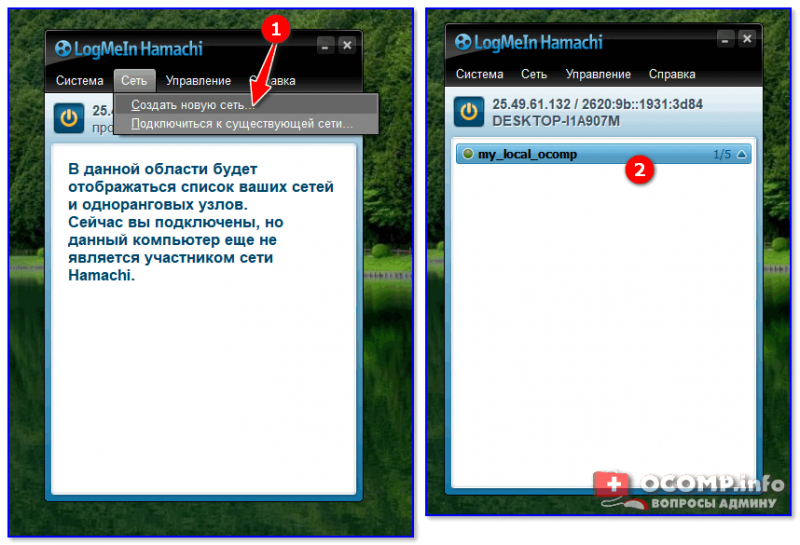
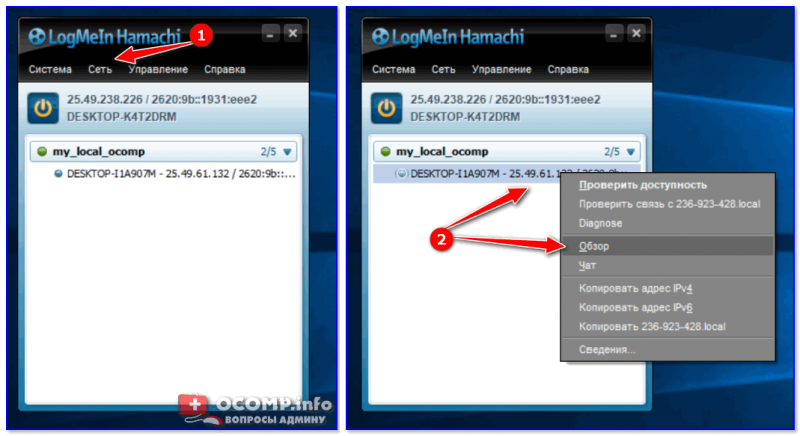
Этот способ более «замороченный», зато он позволяет получать доступ не только к файлам, но и даже к принтеру. К тому же, можно более «точечно» настроить права доступа.
2) Далее нужно установить спец. утилиту — Hamachi (ссылка на офиц. сайт). Она позволит объединить в одну локальную сеть компьютеры, расположенные в разных частях страны/Мира!
Примечание : установить утилиту нужно на все ПК, на которых планируется доступ к общей папке.
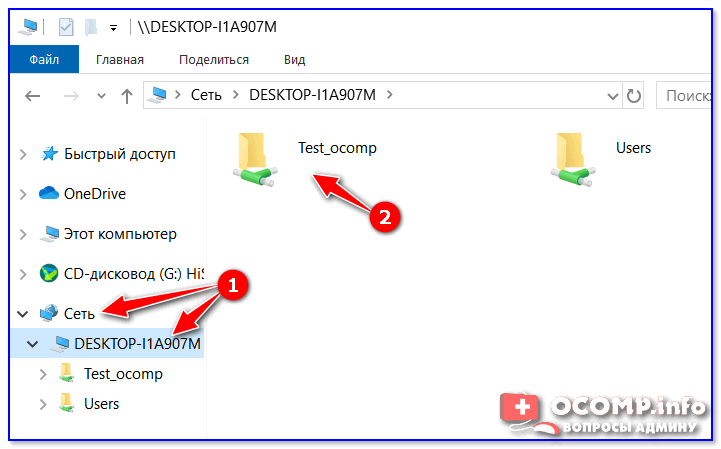
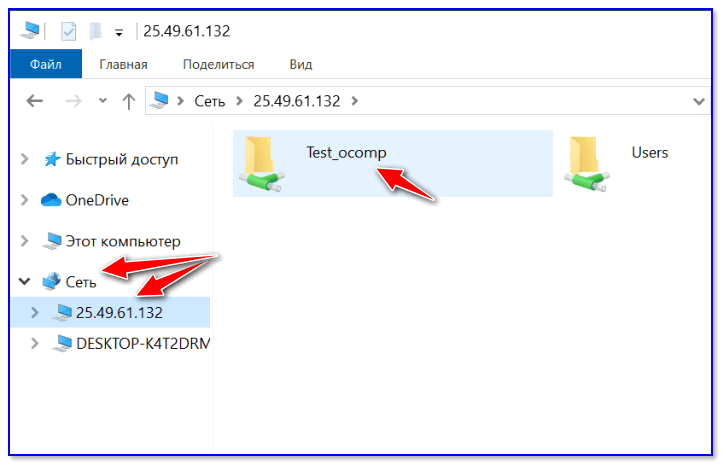
5) Далее можно работать со всеми общедоступными папками на нем. См. скрин ниже.
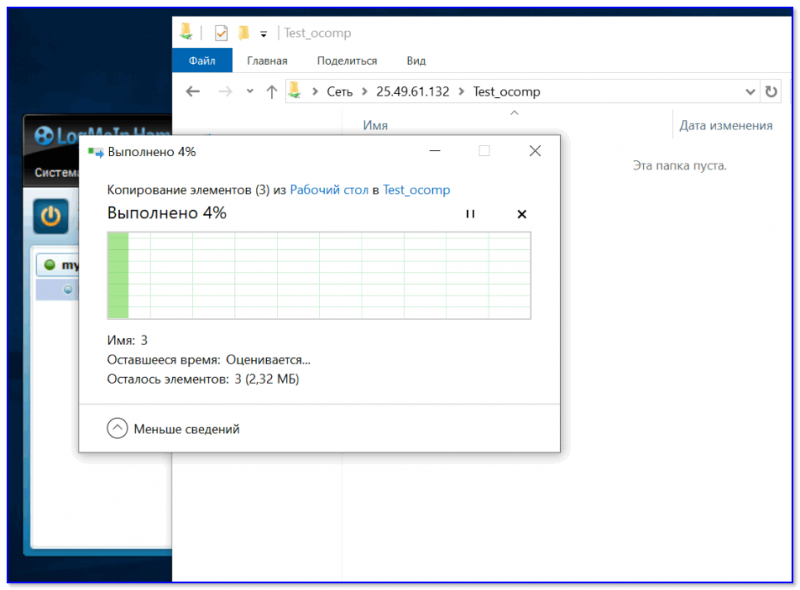
6) В своем примере я просто скопировал несколько файлов в папку — всё работает 👇.
Что делать, если общая папка не видна
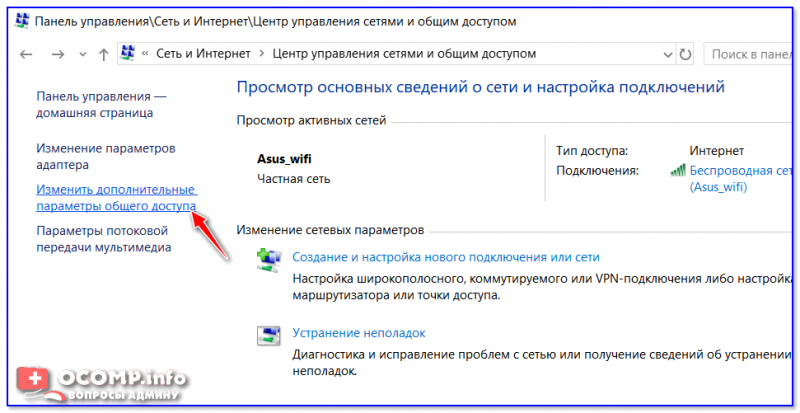
Изменить параметры общего доступа
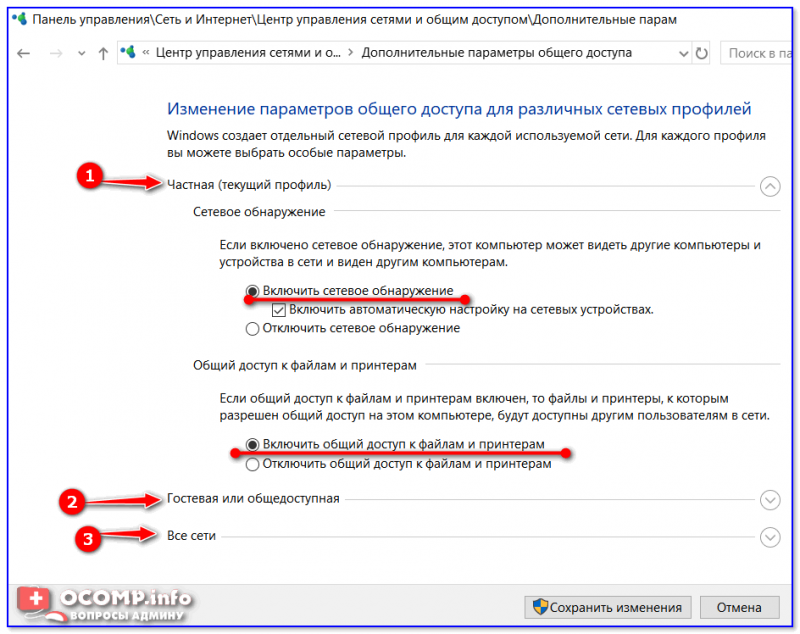
Далее нужно поочередно раскрыть три вкладки » Частная «, » Гостевая «, » Все сети « и включить общий доступ к файлам и принтерам, сетевое обнаружение, отключить парольную защиту.
Включить общий доступ
После введенных настроек — перезагрузите ПК и попробуйте вновь получить доступ к расшаренной папке.
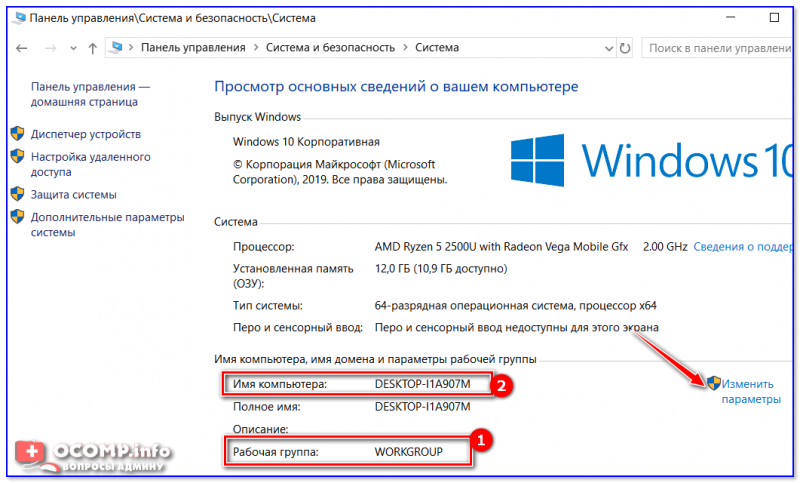
Имя компьютера и рабочей группы
Третья достаточно популярная причина — работа антивирусов и брандмауэров. Отключите их на время диагностики (дабы любой современный антивирус, обычно, легко позволяет это сделать. См. скрин ниже).
Источник

 , а затем выберите Рабочий стол.
 , выберите Пригласить по имени или номеру телефона, затем выберите пользователя.
 , выберите рабочий стол, совместный доступ к которому вы хотите прекратить, и щелкните Прекратить совместный доступ.
