Обновлено 07.09.2020
![]()
Добрый день! Уважаемые читатели и гости одного из крупнейших IT блогов Pyatilistnik.org. В прошлый раз мы с вами научились разбираться в звуковых сигналах биоса на разных материнских платах. В сегодняшней статье я хочу рассмотреть функцию очистки кэша на сервере DNS, который является наверное самой важной службой в Active Directory, так как без нее домен просто не смог бы корректно работать. Я вам покажу, где вы можете посмотреть все кэшированные записи, разберу их плюсы. Думаю, что не все знают, где это искать, а уметь нужно.
Что такое кэш DNS?
Ранее я вам рассказывал, что такое DNS сервер, как его устанавливать в Windows Server. В своей практике вы легко можете столкнуться с тем, вы обратились к какому-то сайту, его DNS имя и IP-адрес попали в кэш сервера. Потом у данного сайта поменялся IP-адрес, но при обращении к нему ваши пользователи все равно попадают на старый IP. Вам необходимо его удалить, лично я столкнулся с данной задачей когда искал проблему с ошибкой:
Именно DNS кэш этому виной. DNS кэш — это некая область в которую попадают записи относящиеся к запрашиваемому домену и зоне, например NS-записи, A-записи и так далее. Данный кэш, не нужно путать с локальным, тут логика у сервера такая, когда клиент запрашивает сопоставление DNS-имени и IP-адреса, он в первую очередь смотрит не является ли он сам этим адресом, если нет, то он обращается уже по рекурсии к вышестоящему DNS-серверу. Когда вся информация получена, то сервер для ускорения последующего разрешения имен просто кладет к себе в кэшированные просмотры эту информацию, что ускоряет скорость ответа для клиента который потом запросит данную информацию, так как не придется делать рекурсивный запрос и так же снимет часть нагрузки с DNS сервера, короче одни плюсы.
Как посмотреть кэшированные просмотры на DNS сервере
Откройте оснастку DNS и перейдите в меню «Вид — Расширенный«
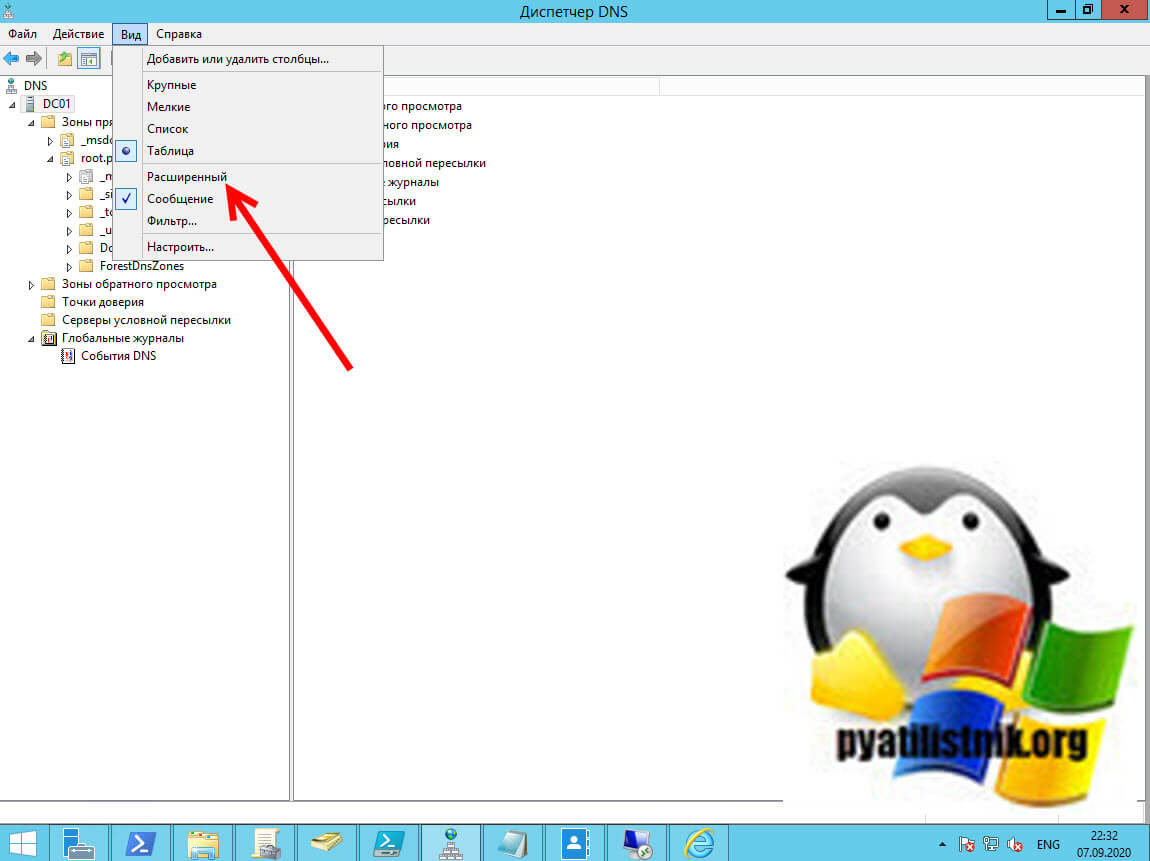
После этого у вас появится скрытый раздел «Кэшированные просмотры«
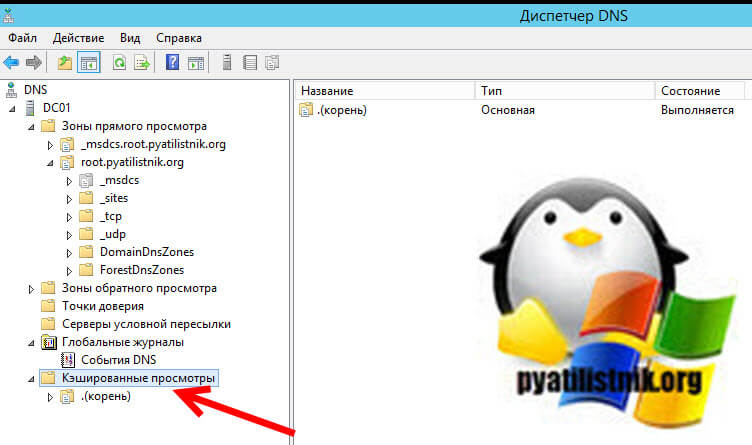
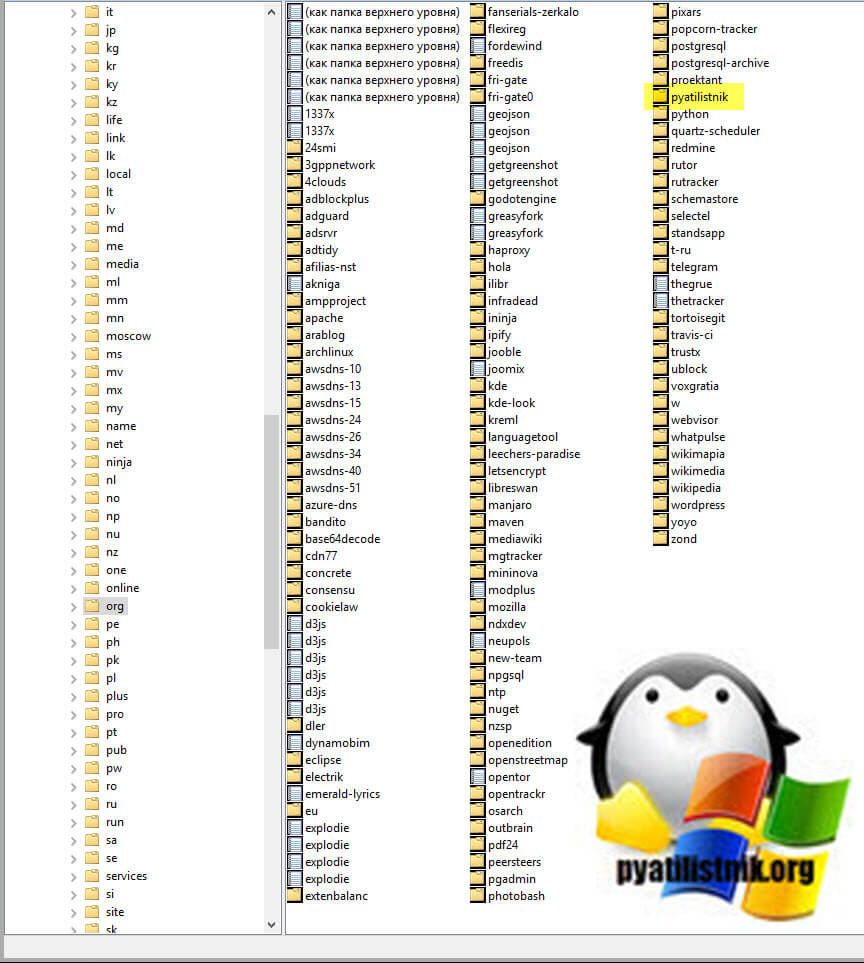
Если у вас очень много пользователей, то вы тут обнаружите огромное количество зон верхнего уровня, а уже в них вы найдете привычные вам домены третьего уровня.
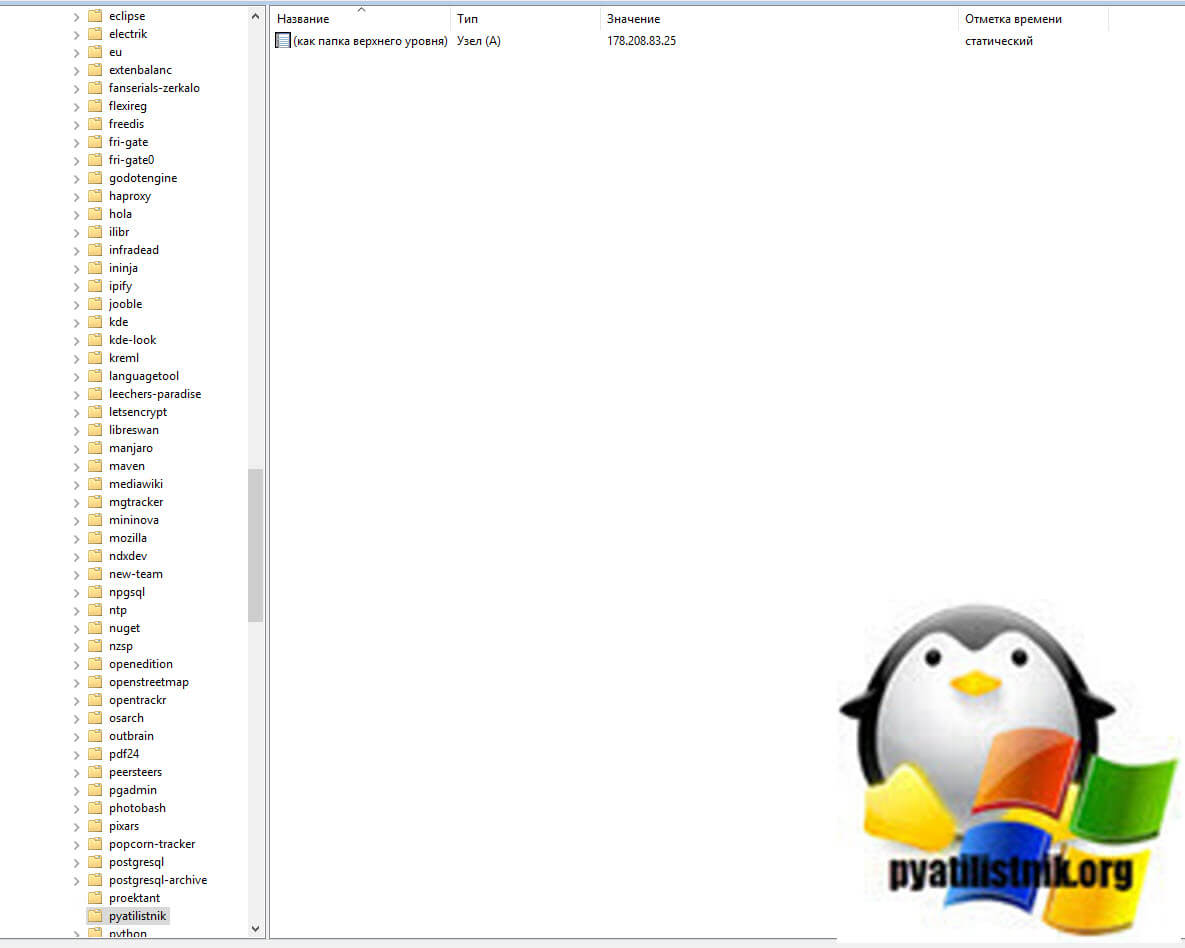
Тут будут обычные записи, например вот A-запись для моего домена.
То же самое можно посмотреть и через PowerShell. Открываем оболочку и попробуйте выполнить такой командлет:
Show-DnsServerCache -ComputerName dc01.root.pyatilistnik.org
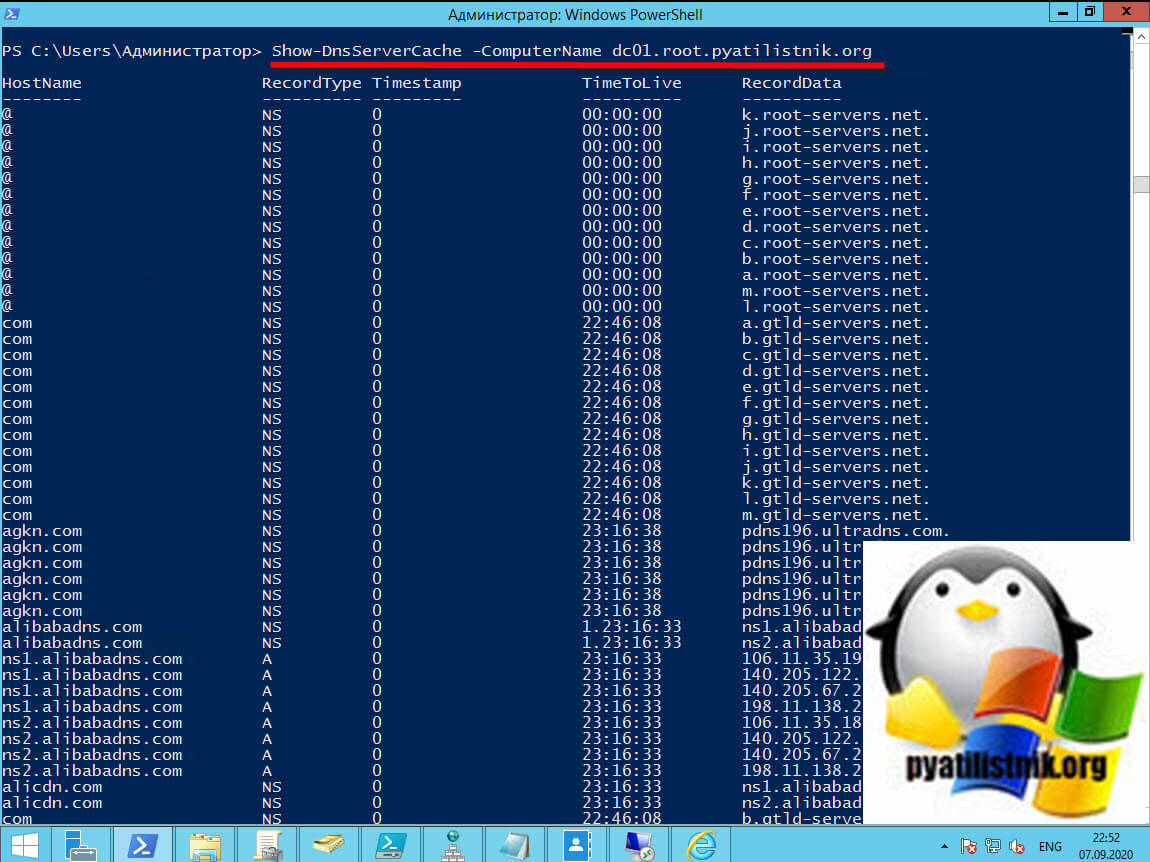
Дополнительные ключи для Show-DnsServerCache — https://docs.microsoft.com/en-us/powershell/module/dnsserver/show-dnsservercache?view=win10-ps
Как удалить кэш на DNS сервере
Я покажу три метода позволяющих вам удалить текущий DNS-кэш на вашем сервере, они будут отличаться от чистки на клиенте:
- Как очистить dns кэш на клиентском компьютере
- Как очистить dns кэш на клиентском компьютере с помощью PowerShell
Первый метод очистки вашего сервера от кэшированных запросов, это через саму оснастку DNS. Для этого просто выберите имя вашего DNS-сервера и через контекстное меню произведите очистку.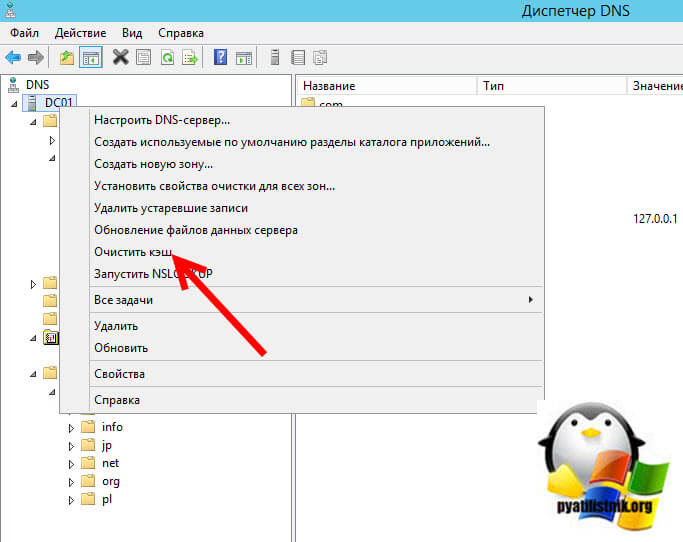
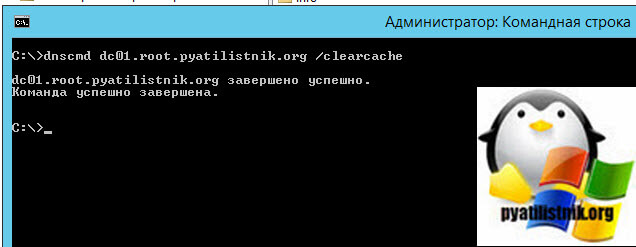
Второй метод, это в командной строке введите команду:
dnscmd dc01.root.pyatilistnik.org /clearcache
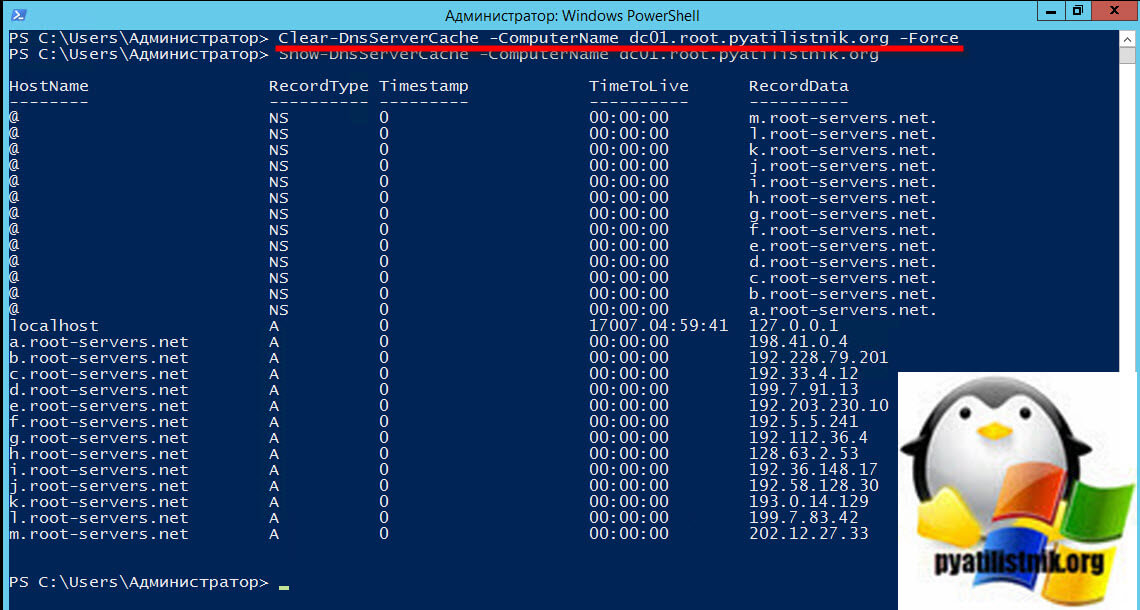
То же самое еще выполним через PowerShell:
Clear-DnsServerCache -ComputerName dc01.root.pyatilistnik.org -Force
Как видите в итоге остались только корневые записи.
Настройка времени хранения DNS кэша на сервере
Каждая запись DNS имеет значение времени жизни (TTL), связанное с ней, и именно это значение обычно определяет, как долго запись будет сохраняться в кэше, но это можно изменить с помощью значения реестра MaxCacheTtl. Существуют настройки MaxCacheTtl как для серверного, так и для клиентского кеша, которые хранятся в разных местах реестра:
- Для сервера — HKEY_LOCAL_MACHINESYSTEMCurrentControlSetServicesDNSParameters
- Для клиента — HKEY_LOCAL_MACHINESYSTEMCurrentControlSetServicesDNSCacheParameters
На этом у меня все. С вами был Иван Семин, автор и создатель IT портала Pyatilistnik.org, до скорых встречь.
How to clear the DNS Server and Client Caches to Remove Bogus IP Addresses
Have you ever had bogus name resolution data in your DNS cache? This happens when you’re pointed to a DNS server with outdated records, or perhaps a misconfigured server. You might see symptoms like all fully-qualified domain names (FQDNs) resolving to the same IP address, or even all FQDNs resolving to 127.0.0.1 (localhost).
Even when you configure clients and servers to use a properly configured DNS server they will retain previously resolved DNS addresses. The DNS resolution data is usually cached on both the client computer and the DNS server. So until the cache expiration time expires you will continue to see bogus name resolution results.
If you’re using Windows there are quick ways to purge the DNS cache on the client and on the server. I suggest you start with the server.
Purging the DNS Server Cache on a Windows DNS Server
If you’re using Windows Server 2003, Windows Server 2008, or Windows Server 2012 as your DNS server you can easily purge the server-side DNS cache using either a command-line tool or Windows PowerShell.
Purging the DNS Server Cache From the Command Prompt
At the command prompt, run the following command:
Dnscmd /ClearCache
Purging the DNS Server Cache With Windows PowerShell
To clear the DNS server cache using Windows PowerShell, use the following cmdlet from the dnsserver module:
Clear-DnsServerCache
Purging the DNS Cache on Windows Clients
This command purges the DNS client (or resolver) cache on Windows XP, Windows 7, and Windows 8, as well as Windows 2000, Windows Server 2003, Windows Server 2008, and Windows Server 2012.
At a command prompt, run the following command:
Ipconfig /FlushDNS
I hope this helps you resolve DNS resolution issues without needlessly rebooting computers to purge the cache.
Enjoy!
Mike Danseglio -CISSP / CEH
Interface Technical Training – Technical Director and Instructor
Videos You May Like
Write a Comment
The contents of the DNS server cache can be viewed only in the DNS console. To view the cache contents, from the View menu select Advanced, as shown in Figure 4-12.
|
j^dnsmgmt — [DNS .COMPUTERl .Forward Lookup Zonesdoma..0|II^| |
||
|
^ File Action [ |
View Window Help | — Ifll x| |
|
|
I |
Add/Remove Columns… |
1 • |
|
B g COMPUTER 0 (3 Event V Ö-O Forwan |
Large Icons Small Icons List • Detail |
.local 3 record(s) |
|
1 Typ« |
||
|
i as parent folder) Star i as parent folder) Nam uteri Host |
||
|
B-O Revers« |
Advanced |
|
|
Mjp 192 |
Filter… |
|
|
Customize… |
1 ►! |
|
|
¡Toggle into Advanced view mode. |
Figure 4-12 DNS console Advanced view
Tip All of the SRV records required for an Active Directory domain controller can be found in a file named Netlogon.dns, located in the WINDOWSSystem32Config folder. If SRV records are missing in your DNS zone, you can reload them automatically by running the Netdiag /fix command at a command prompt. (The Netdiag command is available after you install Windows Support Tools from the Windows Server 2003 CD-ROM.) Alternatively—and this is a procedure you should know for the 70-291 exam—you can simply restart the Net Logon service. Restarting the service will force the SRV records to attempt to reregister themselves.
Figure 4-12 DNS console Advanced view
Once the DNS console View mode is set to Advanced, a new folder appears in the DNS console tree, Cached Lookups. This folder displays the DNS server cache in a hierarchical format. Figure 4-13 shows sample contents of the Cached Lookups folder.
j^dnsmgmt — [DNS’.COMPUTERl ,.Cached Lookups.(root)commsnbc]
File Action View Window Help
B J COMPUTER 1 ElHpl Event Viewer El LD Forward Lookup Zones El LD Reverse Lookup Zones B-LJ Cached Lookups E=]»{j?p .(root) E LJ com
E LH microsoft E LJ msimg E O msn e-LJ IfiEffllfi j u ib
E-LJ passportimages E-LJ windows E LJ windowsupdate
Name
Pi (same a; Pi (same a; Pi (same a; p| (same a; p| (same a; p| (same a; p| (same a; p| (same a;
(5 cpnsOl @ tknsOl
; parent folder) ; parent folder) ; parent folder) ; parent folder) ; parent folder) ; parent folder) ; parent folder) ; parent folder) ; parent folder) ; parent folder)
Name Server (NS) Name Server (NS) Name Server (NS) Name Server (NS) Name Server (NS) Name Server (NS) Host(A) Host(A) Host(A) Host(A) Alias (CNAME) Host(A) Host(A) Alias (CNAME)
Figure 4-13 DNS server cache
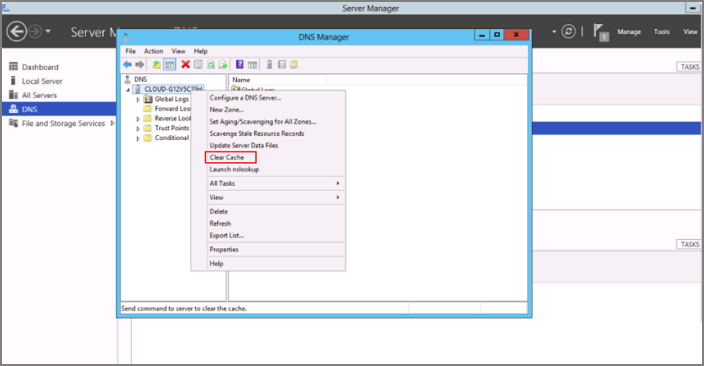
To clear the DNS server cache, you can right-click the DNS Server icon in the DNS console and select Clear Cache, as shown in Figure 4-14. Alternatively, you can restart the DNS Server service or use the Dnscmd /clearcache command.

- Figure 4-14 Clearing the DNS server cache

Continue reading here: Setting the Primary DNS Suffix
Was this article helpful?
Difficulties with accessing a web page despite strong internet might be an indication to clear windows DNS cache Windows server/workstation. Doing so will solve problems of broken/corrupted cache due to technical errors.
It could also be a problem of DNS cache poisoning probably caused by a computer virus or network hack. Such would redirect the visitor to a malicious link or advert bugged page. When any of such issues are encountered, clearing the Windows DNS cache Windows server is a recommended step to try.
Main Content:
What is DNS Cache?
Is It Safe to Delete DNS Cache?
How to Clear Windows DNS Cache on Windows Server/Workstation (2 Methods)
Extra Tip: Optimize SSD Performance with Windows Server Disk Manager
What is DNS Cache?
Understanding the DNS Cache starts with knowing what DNS represents. DNS stands for Domain Name System. It converts the website domain names into IP addresses that can be processed by the computer. These IP addresses are what the computer’s browser identifies whenever you try visiting a web page.
Many public DNS servers maintain the record of previously visited IPs. They make the next search process faster because the computer already has the appropriate IP address records. However, Windows went the extra mile to make a local copy of this DNS server. Think of it as a phone diary for the number of people you know. This local DNS storage is what we refer to as the DNS Cache.
Therefore, the DNS Cache is a temporary catalog/archive managed by the computer’s operating system that contains recent records of actual/attempted visits to public domains, together with their IP addresses.
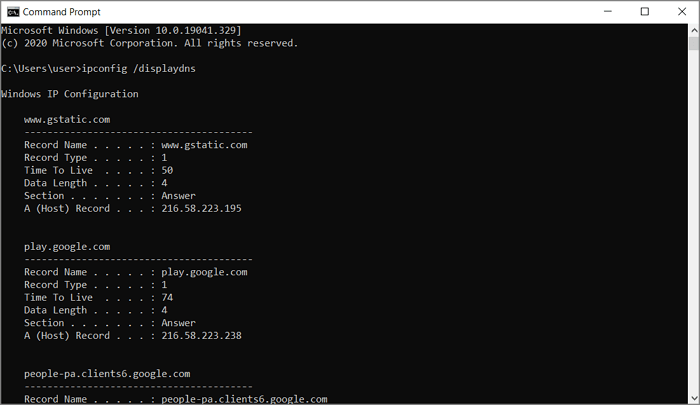
How to Check the DNS Cache: it is possible to check your Windows OS directory for local cache records. The process differs for Windows OS and Mac. Here, our focus is on the Windows operating system.
- Locate the search bar and enter cmd to open the command prompt.
- On the display window, type ipconfig /displaydns and hit enter. You should have results similar to the below screenshot.
Is It Safe to Delete DNS Cache?
The answer is YES. Even though the DNS Cache is essential in providing quick access to recently visited websites, deleting it does no specific harm. The only challenge is that your computer is forced to request the DNS server for addresses it had previously stored in the cache.
However, the benefits outweigh that one disadvantage. You only have to understand when to clear Windows DNS cache Windows server/workstation. A common application is when a website admin is trying to help out with a DNS server complaint.
Other reasons to consider deleting the DNS cache includes:
- Resolving outdated IPs caused by moved DNS servers
- Clearing unwanted cookies that might be monitoring your web activities
- Troubleshooting Internet connectivity complaints
Relate article:
How to Clear Windows DNS Cache on Windows Server/Workstation
Now that you understand when to clear a DNS cache, the next question arises. How to do it? Check out two different methods to clear Windows DNS cache Windows server/workstation.
Option 1: Directly Clear Cache on DNS Console
- First of all, ensure you already have a DNS server installed on your Windows computer.
- Navigate to the Windows server application and open it.
- On the left column, you should see DNS. Right-click on it.
- Next is a drop-down menu. Locate the clear cache option and click.
Option 2: Run PowerShell to Clear Cache
This method is a second option to try if you do not have the Windows server application already installed. The steps to clear Windows DNS cache Windows server/workstation using PowerShell are fast and straightforward.
- Using the search bar, type PowerShell and click on the application icon that appears on the result.

- The interface of the launched Windows PowerShell should like the image below:
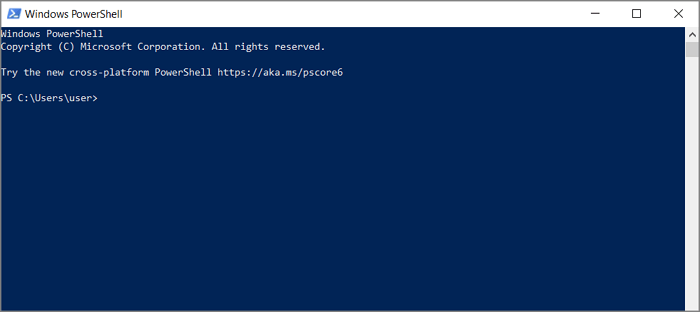
- Use any of the following commands, depending on the specific actions you want.
To clear the client cache:
Enter Clear-DnsClientCache and press enter
To clear the local DNS server cache:
Input the command Clear-DnsServerCache
To clear the cache on a particular DNS server:
Use Clear-DnsServerCache-PCName «DC1» – Force. Remember to change «PCName» to the name of that server you wish to clear.
Extra Tip: Optimize SSD Performance with Windows Server Disk Manager
While a DNS cache improves the browsing time to access websites, a Windows Server Disk Manager is another way to achieve that. An example is our EaseUS Partition Master Enterprise Edition software. It resolves low space issues on the server’s hard disk and subsequently speeds up the Windows server.
EaseUS Partition Master Enterprise
Your trustworthy Windows Server disk manager.
- Extend System drive, combine/split partitions.
- Clone disk, migrate OS to HDD/SSD.
- Convert MBR to GPT, GPT to MBR, no data loss.
- 1-click adjust disk layout, create volumes at one time.
24/7 Tech Chat
Free Inquiry
You can also troubleshoot the start-up failure of the server by using this EaseUS Partition master tool. The process involves creating a WinPE bootable disk that provides access to the hard drives.
Other main features of the EaseUS Partition Master Enterprise Edition are:
- Extend system partition without reinstalling the Windows OS.
- Clone the hard disk and migrate the OS to HDD/SSD.
- Convert MBR to GPT, GPT to MBR, with zero data loss.
- 1-click adjust disk layout to create different partitions at the same time.
- Supports Windows Server 2003, 2008 (R2), 2012 (R2), 2011, 2016, and 2019.
Conclusion
An effective Windows DNS cache helps to speed up the Windows server when accessing recently visited websites. However, invalid or changed IP addresses are some of the reasons we have learned that can cause connectivity problems. That’s when it becomes necessary to clear Windows DNS cache Windows server/workstation.
The process can be done via the DNS console or using Windows PowerShell. Another alternative to boost the Windows server speed is getting a server disk manager like the EaseUS Partition Master Enterprise Edition. Beyond supporting the server speed, it also extends system partition and can help migrate the OS to HDD/SSD. Check out the installation page to get started.
24/7 Tech Chat
Free Inquiry
Difficulties with accessing a web page despite strong internet might be an indication to clear windows DNS cache Windows server/workstation. Doing so will solve problems of broken/corrupted cache due to technical errors.
It could also be a problem of DNS cache poisoning probably caused by a computer virus or network hack. Such would redirect the visitor to a malicious link or advert bugged page. When any of such issues are encountered, clearing the Windows DNS cache Windows server is a recommended step to try.
Main Content:
What is DNS Cache?
Is It Safe to Delete DNS Cache?
How to Clear Windows DNS Cache on Windows Server/Workstation (2 Methods)
Extra Tip: Optimize SSD Performance with Windows Server Disk Manager
What is DNS Cache?
Understanding the DNS Cache starts with knowing what DNS represents. DNS stands for Domain Name System. It converts the website domain names into IP addresses that can be processed by the computer. These IP addresses are what the computer’s browser identifies whenever you try visiting a web page.
Many public DNS servers maintain the record of previously visited IPs. They make the next search process faster because the computer already has the appropriate IP address records. However, Windows went the extra mile to make a local copy of this DNS server. Think of it as a phone diary for the number of people you know. This local DNS storage is what we refer to as the DNS Cache.
Therefore, the DNS Cache is a temporary catalog/archive managed by the computer’s operating system that contains recent records of actual/attempted visits to public domains, together with their IP addresses.
How to Check the DNS Cache: it is possible to check your Windows OS directory for local cache records. The process differs for Windows OS and Mac. Here, our focus is on the Windows operating system.
- Locate the search bar and enter cmd to open the command prompt.
- On the display window, type ipconfig /displaydns and hit enter. You should have results similar to the below screenshot.
Is It Safe to Delete DNS Cache?
The answer is YES. Even though the DNS Cache is essential in providing quick access to recently visited websites, deleting it does no specific harm. The only challenge is that your computer is forced to request the DNS server for addresses it had previously stored in the cache.
However, the benefits outweigh that one disadvantage. You only have to understand when to clear Windows DNS cache Windows server/workstation. A common application is when a website admin is trying to help out with a DNS server complaint.
Other reasons to consider deleting the DNS cache includes:
- Resolving outdated IPs caused by moved DNS servers
- Clearing unwanted cookies that might be monitoring your web activities
- Troubleshooting Internet connectivity complaints
Relate article:
How to Clear Windows DNS Cache on Windows Server/Workstation
Now that you understand when to clear a DNS cache, the next question arises. How to do it? Check out two different methods to clear Windows DNS cache Windows server/workstation.
Option 1: Directly Clear Cache on DNS Console
- First of all, ensure you already have a DNS server installed on your Windows computer.
- Navigate to the Windows server application and open it.
- On the left column, you should see DNS. Right-click on it.
- Next is a drop-down menu. Locate the clear cache option and click.
Option 2: Run PowerShell to Clear Cache
This method is a second option to try if you do not have the Windows server application already installed. The steps to clear Windows DNS cache Windows server/workstation using PowerShell are fast and straightforward.
- Using the search bar, type PowerShell and click on the application icon that appears on the result.
- The interface of the launched Windows PowerShell should like the image below:
- Use any of the following commands, depending on the specific actions you want.
To clear the client cache:
Enter Clear-DnsClientCache and press enter
To clear the local DNS server cache:
Input the command Clear-DnsServerCache
To clear the cache on a particular DNS server:
Use Clear-DnsServerCache-PCName «DC1» – Force. Remember to change «PCName» to the name of that server you wish to clear.
Extra Tip: Optimize SSD Performance with Windows Server Disk Manager
While a DNS cache improves the browsing time to access websites, a Windows Server Disk Manager is another way to achieve that. An example is our EaseUS Partition Master Enterprise Edition software. It resolves low space issues on the server’s hard disk and subsequently speeds up the Windows server.
EaseUS Partition Master Enterprise
Your trustworthy Windows Server disk manager.
- Extend System drive, combine/split partitions.
- Clone disk, migrate OS to HDD/SSD.
- Convert MBR to GPT, GPT to MBR, no data loss.
- 1-click adjust disk layout, create volumes at one time.
24/7 Tech Chat
Free Inquiry
You can also troubleshoot the start-up failure of the server by using this EaseUS Partition master tool. The process involves creating a WinPE bootable disk that provides access to the hard drives.
Other main features of the EaseUS Partition Master Enterprise Edition are:
- Extend system partition without reinstalling the Windows OS.
- Clone the hard disk and migrate the OS to HDD/SSD.
- Convert MBR to GPT, GPT to MBR, with zero data loss.
- 1-click adjust disk layout to create different partitions at the same time.
- Supports Windows Server 2003, 2008 (R2), 2012 (R2), 2011, 2016, and 2019.
Conclusion
An effective Windows DNS cache helps to speed up the Windows server when accessing recently visited websites. However, invalid or changed IP addresses are some of the reasons we have learned that can cause connectivity problems. That’s when it becomes necessary to clear Windows DNS cache Windows server/workstation.
The process can be done via the DNS console or using Windows PowerShell. Another alternative to boost the Windows server speed is getting a server disk manager like the EaseUS Partition Master Enterprise Edition. Beyond supporting the server speed, it also extends system partition and can help migrate the OS to HDD/SSD. Check out the installation page to get started.
24/7 Tech Chat
Free Inquiry

- Remove From My Forums
-
Общие обсуждения
-
Доброго времени суток!
Дано
2 сервера windows 2003 ent sp1 — контр домена — на обоих стоит dns с зонами интегрированными в AD
на 2 сервере стоит еще dhcp
проблема в том что в dns не удаляются записи о машинах которых уже давно нет в сети… и сейчас есть дублирующие записи — 1 ip несколько имен…
настройки очистки вроде выставлены, однако не очищает…
если кто знает в чем пролема помогите решить пожалуйста.
заранее спасибо-
Изменен тип
ILYA [ sie ] Sazonov
25 ноября 2010 г. 19:33
-
Изменен тип
Все ответы
-
В том то и дело что все это сделано — выставлено и указано очищать…
в dhcp тоже сказано удалять записи из dns при удалении адреса из аренды.
результат нулевой..может нужны еще какие то данные для полной картины? -
Проверьте
1. Включено Scavenging Records в свойствах DNS сервера (Advanced Tab)
2. Настроена ли Aging [and Scavenging Records] для конкретной зоны (General Tab)
Дополнительно
3. Включите галочку Advanced в меню View, и посмотрите свойства A записи — будет виден конкретный Time Stamp.
-
1. включено — 7 дней
2. включено — 7 дней 7 дней… разрешить очистку после 21.11.2007
3 например — есть запись со штампом времени записи 14.09.2007 8:00:00
галочка удалить запись стоит…
может после 21.11 почистится все? как думаете? -
Должно (если штамп времени не измениться)
-
ок. то есть, если я правильно понял после 21 числа у меня должны остаться записи в домене у которых штам времени не превышает 7 дней.
тогда остается просто ждать
но если не получится придется вернуться к решению проблемы Вы не против? -
Вы бы прочитали все таки ссылочки то сверху
-
все прочитал.. проникся
теперь жду 21 числа

