Утилита очистки диска (Disk Cleanup) позволяет администратору быстро очистить системный диск Windows Server, удалив ненужные и временные файлы, в том числе очистить каталог WinSxS от файлов устаревших компонентов, которые остались после установки обновлений. Утилита Disk Cleanup (cleanmgr.exe) по умолчанию уже установлена в графической версии Windows Server 2016/2019 (Desktop Experience), однако в предыдущих версиях Windows Server (2012 R2/ 2012/ 2008 R2) утилита cleanmgr.exe по-умолчанию отсутствует.
Содержание:
- Очистка диска с помощью Disk Cleanup в Windows Server 2016
- Очистка диска с помощью cleanmgr.exe из командной строки
- Запуск cleanmgr в Windows Server 2012 R2/ 2008 R2 без установки Desktop Experience
- Использование Disk Cleanup в Windows Server Core
Очистка диска с помощью Disk Cleanup в Windows Server 2016
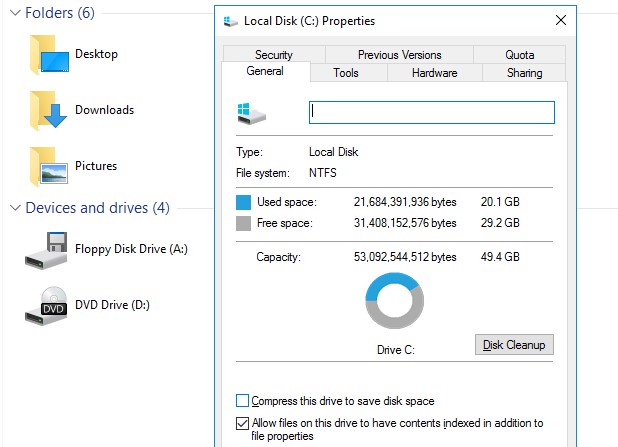
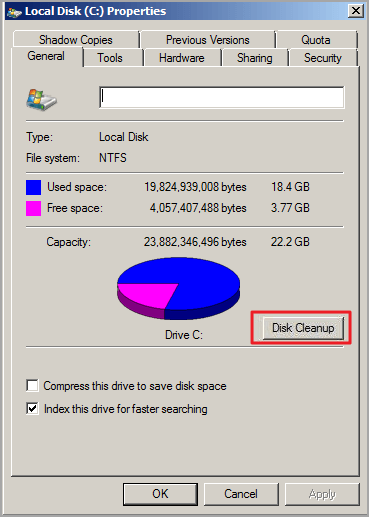
Чтобы очистить системный диск от ненужных файлов в Windows Server 2016 с помощью утилиты Disk Cleanup, нужно в File Explorer открыть свойства диска и нажать кнопку Disk Cleanup.
Также можно в поисковой строке набрать «disk cleanup» или cleanmgr.exe.
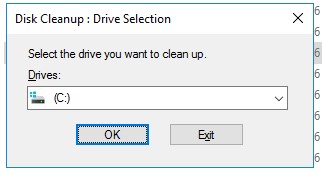
Выберите диск, который вы хотите очистить.
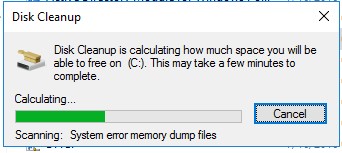
Дождитесь пока мастер очистки проверит ваш диск и найдет ненужные файлы, которые можно безболезненно удалить.
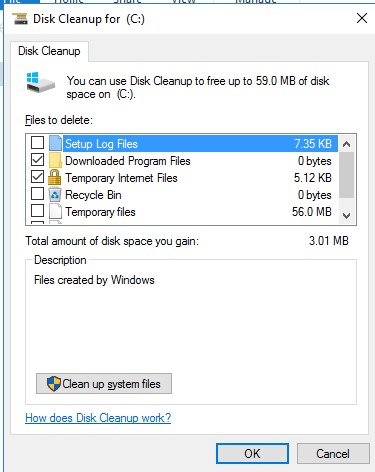
Вы можете выбрать компоненты, файлы которых можно удалить. Вам предлагается удалить следующие временные файлы:
- Setup Log Files
- Downloaded Program Files
- Temporary Internet Files
- Recycle Bin
- Temporary files
- Thumbnails
Чтобы удалить ненужные системные файлы нажмите на кнопку Clean up system files.
Дополнительно предлагается очистить:
- Устаревшие файлы Windows Defender
- System archived Windows Error Reporting (каталог C:ProgramDataMicrosoftWindowsWERReportQueue)
- System queued Windows Error Reporting
- Device driver packages
- Windows Update Cleanup — при этом выполняется очистка хранилища компонентов в каталоге WinSxS. Удаляются старые версии компонентов, которые остались после установки обновленных версий.
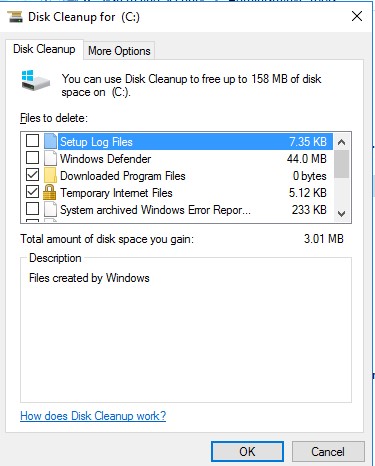
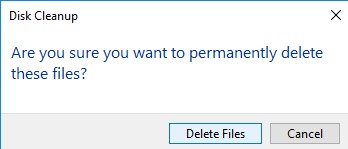
Выберите нужные опции, при этом Disk Cleanup покажет количество места, которое освободится. Нажмите Ок и подтвердите удаление временных файлов.
Дождитесь, пока утилита cleanmgr.exe удалит ненужные файлы.
Очистка диска с помощью cleanmgr.exe из командной строки
Утилита
cleanmgr.exe
имеет различные параметры командной строки, которые позволяют использовать ее в различных сценариях автоматической очистки системного диска. Их можно использовать как в Windows Server, так и на рабочих станциях пользователей с Windows 10.
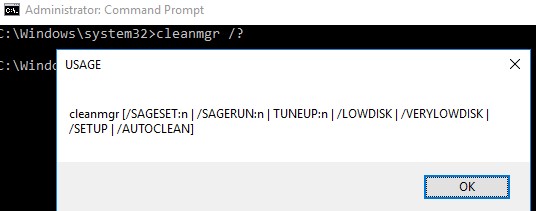
cleanmgr [/d driveletter] [/SAGESET:n | /SAGERUN:n | TUNEUP:n | /LOWDISK | /VERYLOWDISK | /SETUP | /AUTOCLEAN]
Ключ
/AUTOCLEAN
используется для очистки старых файлов, оставшихся после апгрейда билда Windows. Параметр
/SETUP
позволяет удалить файлы, оставшиеся от предыдущей версии Windows (если вы выполняли in-place upgrade).
Команда
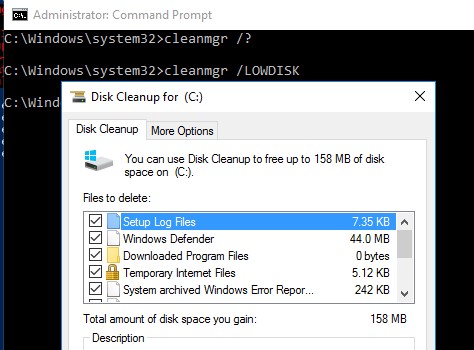
cleanmgr /LOWDISK
– запускает графический интерфейс Disk Cleanup с уже выбранными параметрами очистки.
Команда
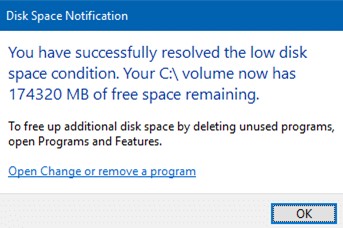
cleanmgr /VERYLOWDISK
выполняет автоматическую очистку, а после окончания оторажает информацией о выполненных действиях и свободном месте.
You have successfully resolved the low disk space condition. Your C: volume now has 10000 Mb of free space remaining.
С помощью параметров
/sageset:n
и
/sagerun:n
вы можете создать и выполнить настроенный набор параметров очистки.
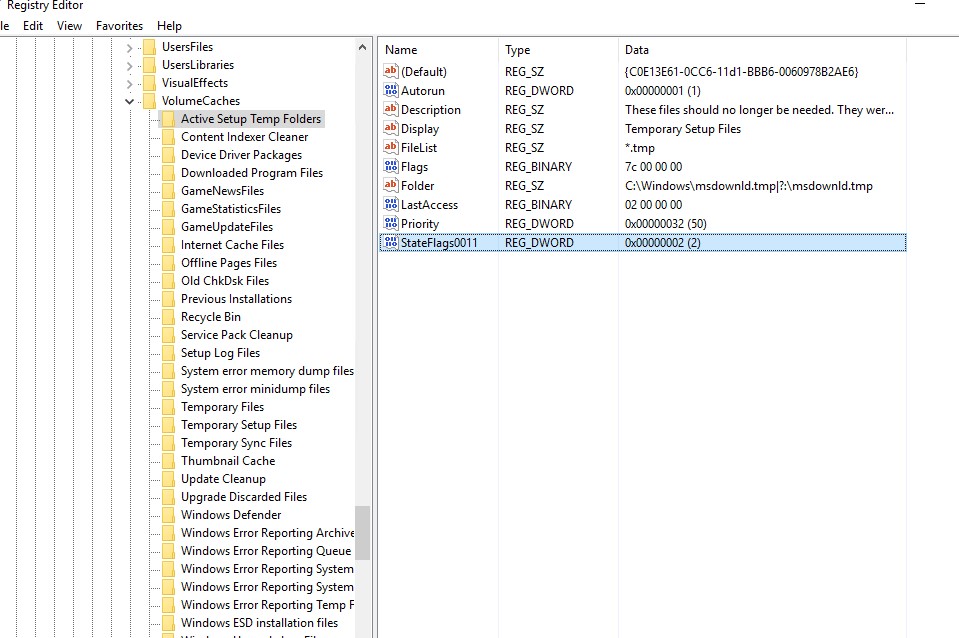
Например, выполните команду
cleanmgr /sageset:11
. В открывшемся окне выберите компоненты и файлы, которые нужно автоматически очищать (я выбрал все опции).
Эти настройки сохраняются в ветке реестра HKEY_LOCAL_MACHINESOFTWAREMicrosoftWindowsCurrentVersionExplorerVolumeCaches. В этой ветке перечислены все компоненты Windows, которые можно очистить с помощью Disk Cleanup. Для каждой опции, которую вы выбрали создается параметр типа DWORD с именем StateFlags0011 (
0011
это число, которое вы указали в параметре sageset).
Чтобы запустить процесс очистки с выбранными параметрами, выполните команду:
cleanmgr /sagerun:11
Если вам нужно настроить автоматическую очистку дисков на компьютерах (или серверах) в домене, вам достаточно экспортировать эту ветку реестра и распространить ее через GPO.
Для автоматического запуска очистки системного диска на рабочих станциях с Windows 10 можно создать задание в планировщике со следующим PowerShell скриптом:
Start-Process -FilePath CleanMgr.exe -ArgumentList '/sagerun:11' -WindowStyle Hidden -Wait
Запуск cleanmgr в Windows Server 2012 R2/ 2008 R2 без установки Desktop Experience
В Windows Server 2012 / R2 и 2008 /R2 по умолчанию не установлена утилита очистки диска Disk Cleanup (cleanmgr.exe). Чтобы воспользоваться утилитой cleanmgr сначала нужно установить отдельный компонент сервера Desktop Experience (Возможности рабочего стола) с помощью Server Manager или PowerShell (
Install-WindowsFeature Desktop-Experience
).
Но вместе с Desktop Experience устанавливается множество других компонентов, которые абсолютно не нужны на сервере:
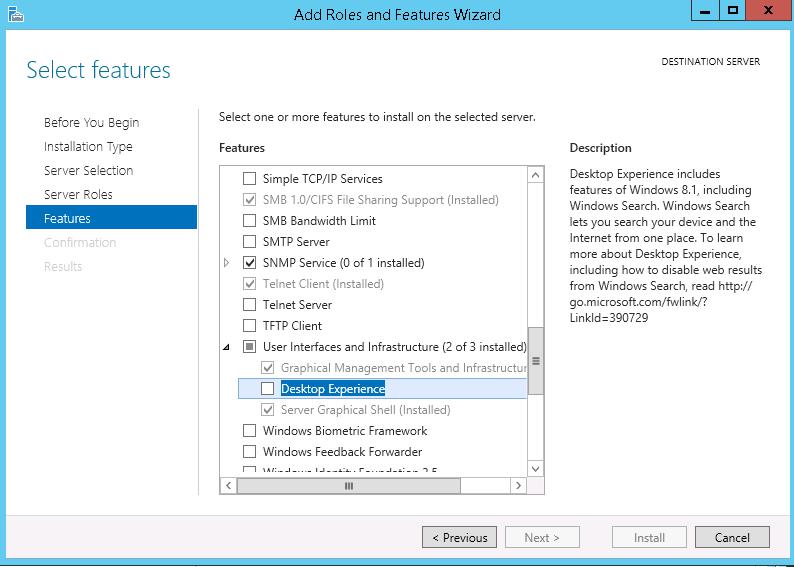
- Windows Media Player
- Темы рабочего стола
- Поддержка AVI для Windows
- Windows SideShow
- Windows Defender
- Disk Cleanup
- Sync Center
- Запись звука
- Character Map
- Snipping Tool
Для запуска мастера очистки дисков в Windows Server можно воспользоваться более простым методом: достаточно скопировать в системный каталог два файла из каталога WinSxS: Cleanmgr.exe и Cleanmgr.exe.mui. Ниже представлены команды для копирования файлов cleanmgr из каталога WinSxS для разных версий Windows Server (во всех случаях используется путь для английских редакций ОC).
| ОС | Команда копирования файлов cleanmgr |
| Windows Server 2008 R2 x64 |
copy C:Windowswinsxsamd64_microsoft-windows-cleanmgr_31bf3856ad364e35_6.1.7600.16385_none_c9392808773cd7dacleanmgr.exe C:WindowsSystem32
|
| Windows Server 2008 x64 |
copy C:Windowswinsxsamd64_microsoft-windows-cleanmgr_31bf3856ad364e35_6.0.6001.18000_none_c962d1e515e94269cleanmgr.exe C:WindowsSystem32
|
| Windows Server 2012 x64 |
copy C:WindowsWinSxSamd64_microsoft-windows-cleanmgr_31bf3856ad364e35_6.2.9200.16384_none_c60dddc5e750072acleanmgr.exe C:WindowsSystem32
|
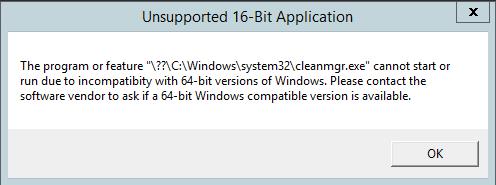
Windows Server 2012 R2 x64
Рассмотренный выше трюк не работает в Windows Server 2012 R2 из-за изменений, внесенных обновлением KB2821895. Дело в том, что после установки данного обновления для хранения бинарных файлов компонентов стала использоваться компрессия. При попытке запустить скопированный cleanmgr.exe появляется ошибка:
The Program or feature ??C:Windowssystem32cleanmgr.exe cannot start or run due to incompatibility with 64-bit version of Windows
В качестве обходного решения можно воспользоваться такой методикой:
- Установить компонент Windows Desktop Experience:
Install-WindowsFeature Desktop-Experience - Перезагрузить сервер;
- Скопировать файлы %windir%system32cleanmgr.exe и %windir%system32en-UScleanmgr.exe.mui в произвольный каталог (c:temp)
- Удалить компонент:
Uninstall-WindowsFeature Desktop-Experience - Перезагрузка;
- Скопировать файлы cleanmgr.exe и cleanmgr.exe.mui в указанные выше каталоги
В дальнейшем эти два файла можно скопировать и на все другие сервера или интегрировать в шаблоны виртуальных машин с Windows Server 2012 R2.
Ссылка на скачивание готового комплекта файлов cleanmgr.exe.mui + cleanmgr.exe для Windows Server 2012 R2 на ЯндексДиске (thks Alex Kornev).
Для запуска утилиты очистки диска теперь достаточно выполнять с правами администратора команду
cleanmgr.exe
.

Совет. Для очистки устаревших файлов компонентов, оставшихся после установки обновлений, в Windows Server R2 можно воспользоваться командой DISM:
dism.exe /online /Cleanup-Image /StartComponentCleanup /ResetBase
В Windows Server 2008 R2, чтобы cleanmgr могла удалять устаревшие файлы обновлений нужно установить отдельный патч KB2852386.
Использование Disk Cleanup в Windows Server Core
В Windows Server Core 2016, в котором отсутствует полноценный графический интерфейс, утилита Disk Cleanup также не установлена. Если вы хотите использовать cleanmgr.exe для очистки диска в Server Core, достаточно скопировать следующие файлы из каталога WinSXS:
copy C:WindowsWinSxSamd64_microsoft-windows-cleanmgr_31bf3856ad364e35_10.0.14393.0_none_9ab8a1dc743e759acleanmgr.exe C:WindowsSystem32
copy C:WindowsWinSxSamd64_microsoft-windows-cleanmgr.resources_31bf3856ad364e35_10.0.14393.0_en-us_8b4adb68af596a23cleanmgr.exe.mui C:WindowsSystem32en-US
Categories
- Transfer Programs from C Drive to D Drive
- Transfer Installed Software to New PC
- Transfer Files from Old PC to New PC
- Transfer Microsoft Office
- Find Office Product Key
- Move User Folder
- Move Google Chrome Bookmarks
| Workable Solutions | Step-by-step Troubleshooting |
|---|---|
| Solution 1. Run C Drive Cleaner | Step 1. Open EaseUS Todo PCTrans on your computer. Click «System Cleanup» and click the «Scan» button to…Full steps |
| Solution 2. Launch Disk Cleanup | Steps to enable Disk Cleanup…Full steps |
| Solution 3. Remove Unnecessary Software |
Step 1. Open Control Panel again. Step 2. Under the Programs section…Full steps |
| Solution 4. Clean Temp Files | Step 1. Press Windows + R to get the Run box up…Full steps |
| Solution 5. Extend C Drive Space | Step 1. Free up unallocated space for C drive…Full steps |
Get one question from social.technet.microsoft.com:
I am unable to free space on my server C drive. Have activated the desktop experience service and running disk cleanup. This freed a very small disk volume after removing all the previous updates. The defragmentation did not help much either and continued to remain 52% fragmented after running through a full cycle multiple times. The windows folder on the C drive is currently 92 GB!! I believe it is occupying a lot of volume. What should i be doing now. Do I need to add in more hard disks?
C drive filling up issue is the hit for all Windows users. Most PC nightmare is C drive running out of space, which could slow down your PC’s speed and cause any stuck error. If you try to free up space on C drive on Windows 2008 (R2), this how-to guide provides five solutions to increasing space. Solutions 1 and 5 refer to the third-party software unveiled by EaseUS software. The other options focus on manual methods.
Solution 1. Run C Drive Cleaner to Free Up Space on Server 2008 (R2)
To fix Windows Server 2008 C drive that keeps filling up, you need a professional disk cleaner to safely clear C drive space without extra hassle. By using such a system cleanup tool, EaseUS Todo PCTrans, you do not need to enable Disk Cleanup, frown at the Disk Cleanup missing issue, and take time to delete unnecessary files one by one.
This software is equipped with cleaning series functions, including system cleanup, large file cleanup, and app management. It works to save space by cleaning system & apps junk files, browsing history, Windows built-in applications, large files, and unnecessary apps.
Download software and start to free up C drive space:
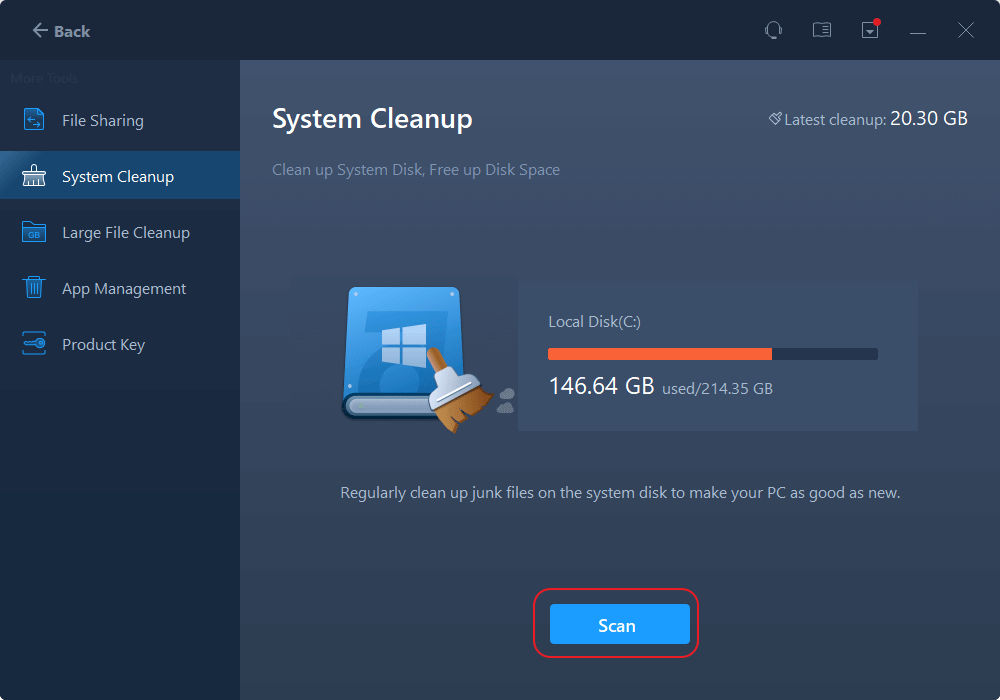
How to Use «System Cleanup» of EaseUS Todo PCTrans:
Step 1. Open EaseUS Todo PCTrans on your computer. Click «System Cleanup» and click the «Scan» button to go on.
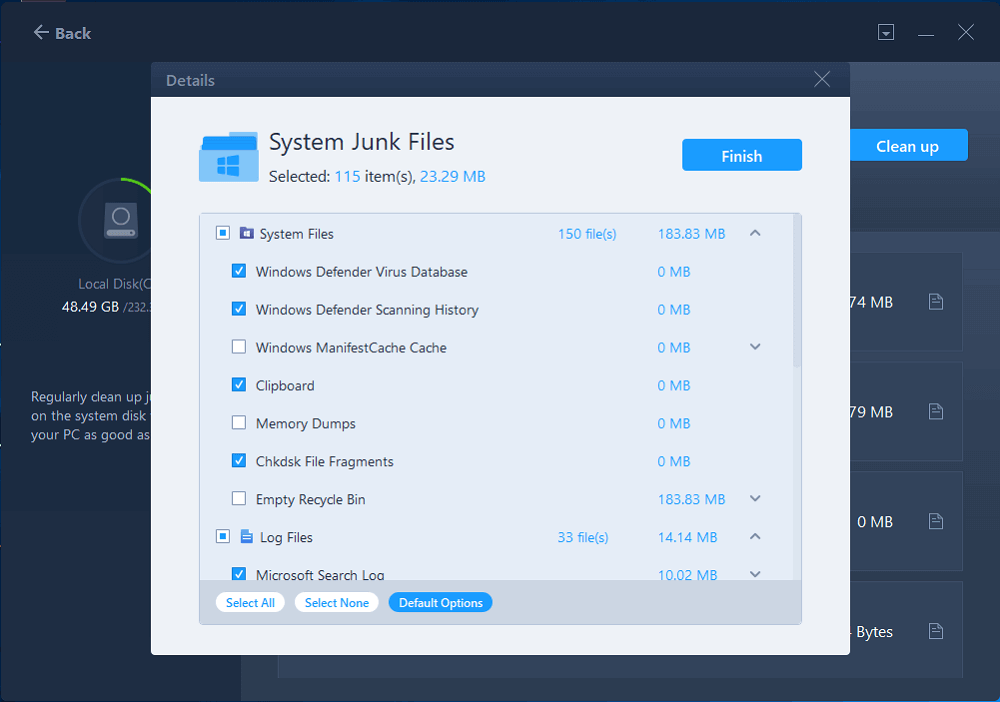
Step 2. When the scan completes, junk files will be listed. Selected the unwanted files. Be careful not to mistakenly delete files that affect the normal operation of your computer or software.
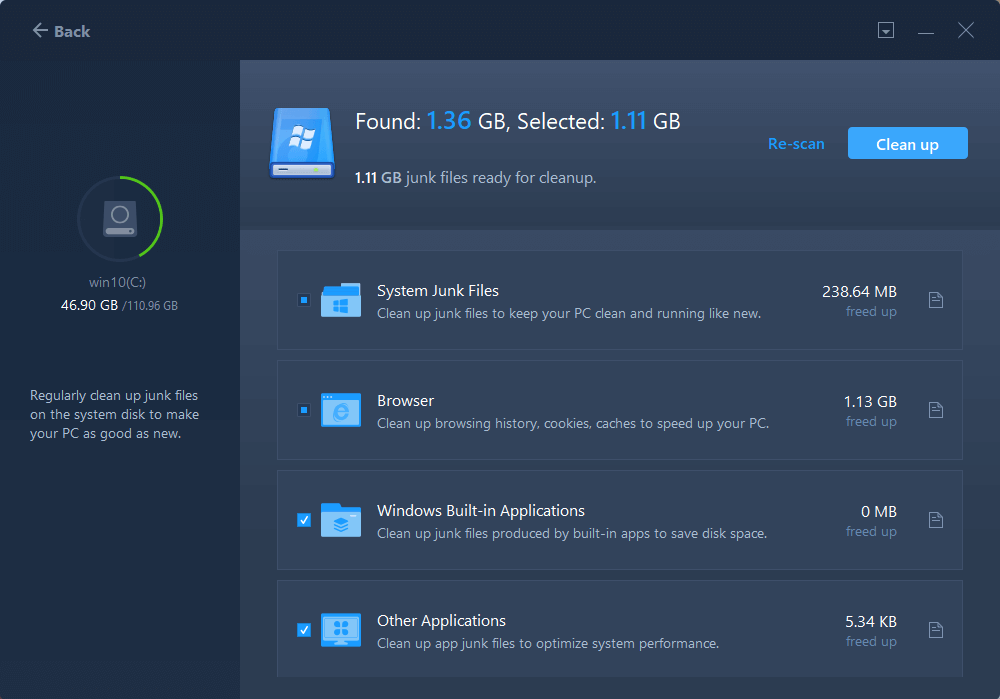
Step 3. Click the «Clean up» button and confirm the cleanup operation. You can regularly use this function to free up disk space.
Solution 2. Launch Disk Cleanup to Clean Hard Drive on Windows Server 2008 R2
The Disk Cleanup is suitable for all Windows Server versions, including Windows Server 2008 R2, which runs to clear junk or unnecessary files for server users. To use this Windows Utility on Server, you need to check the «Desktop Experience» to enable Disk Cleanup.
Steps to enable Disk Cleanup: Search «Control Panel» through the search bar > Click to open «Control Panel» > Select «Programs and features» > Move to the left side and click «Turn Windows Features on or off» > Tick feature «Desktop Experience» > Click «Next» > Click «Install.»
Note: Remember to restart your Server PC.
Follow the steps to free up C drive space on the server computer:
Step 1. Locate «Computer» on the desktop and double-click it.
Step 2. Right-click the C drive and select «Properties» from the pop-menu. Click the «Disk Cleanup» button.
Step 3. Select the files you want to delete. (To avoid unexpected data loss, you can click the «View Files» button on the Description box.) Click OK.
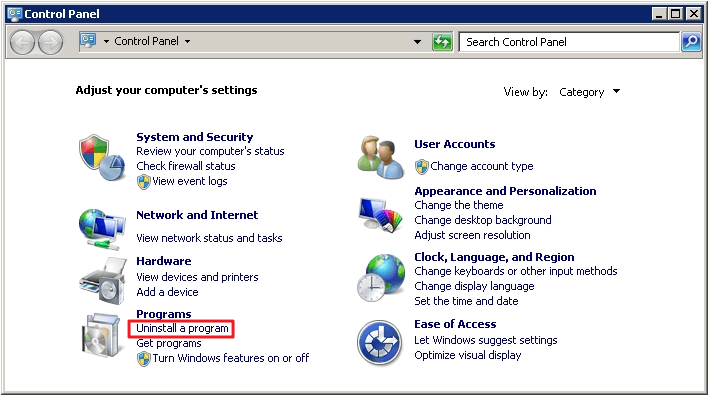
Solution 3. Remove Unnecessary Software on Windows Server 2008 (R2)
Step 1. Open Control Panel again.
Step 2. Under the Programs section, click the «Uninstall a program.» Then you can see the program list. Pick the one you haven’t used for a long time and choose the «Uninstall» button.
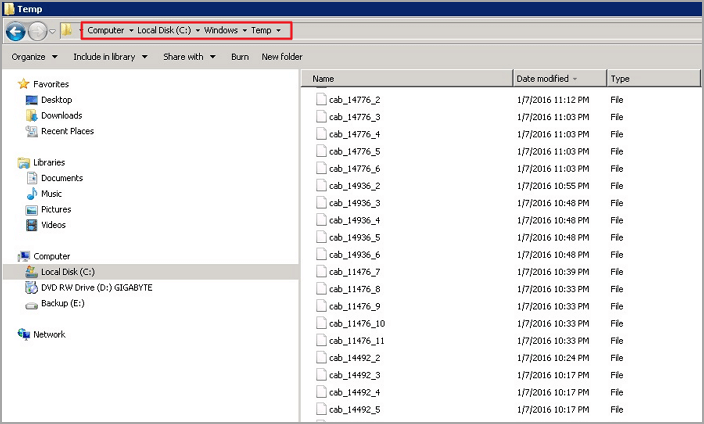
Solution 4. Clean Temp Files to Fix Windows Server C Drive Filling Up
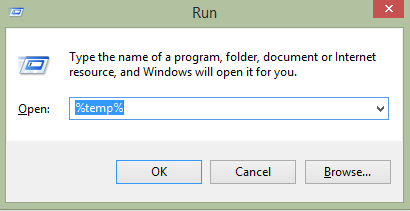
Step 1. Press Windows + R to get the Run box up.
Step 2. Type %temp% on the box and press Enter.
Step 3. Delete all files.
Solution 5. Server 2008 (R2) Extend C Drive Space
Besides file deletion, the other option to free up disk space on Windows Server 2008 (R2) is to extend the C drive with EaseUS Partition Master. It can adjust the hard disk size by using an intelligent resize function. Easy drag and execution help you quickly allocate space from another drive to a C drive.
See steps to extend C drive by EaseUS Partition Master:
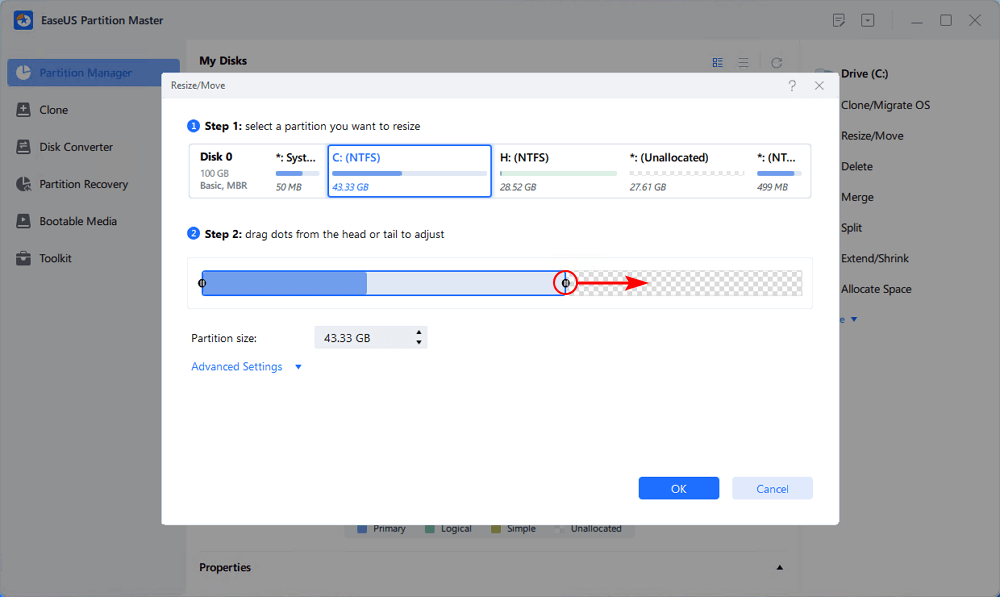
Step 1: Free up unallocated space for C drive.
If there is no unallocated space on the system disk, go to Partition Manager and right-click on a partition next to the C: drive and select «Resize/Move».
Drag left panel of the partition to shrink and leave unallocated space behind the system C: drive and click «OK».
Step 2: Increase C drive space.
1. Right-click on C: drive and select «Resize/Move».
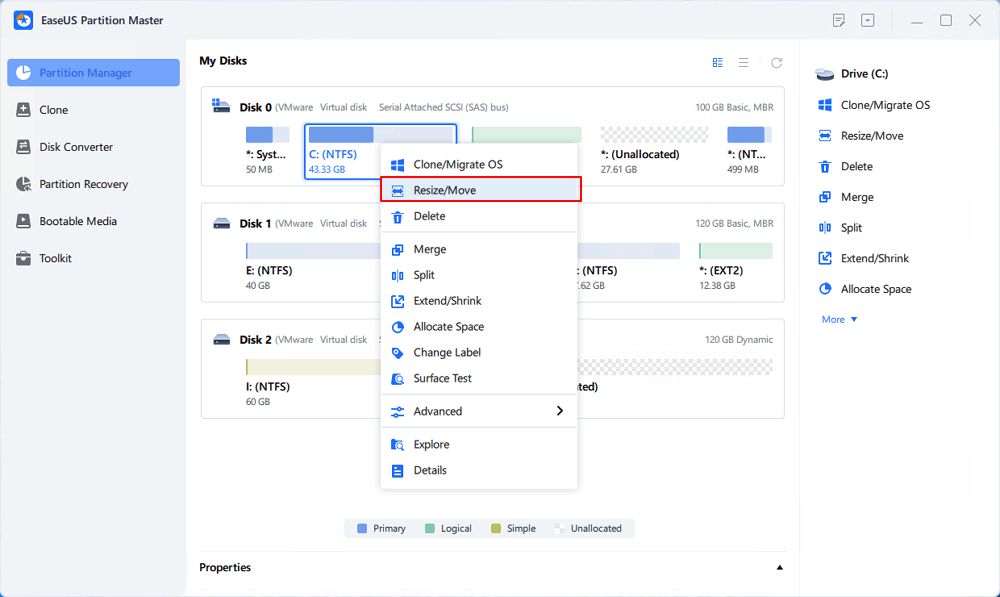
2. Drag the system partition end into unallocated space so to add space to C: drive and click «OK».
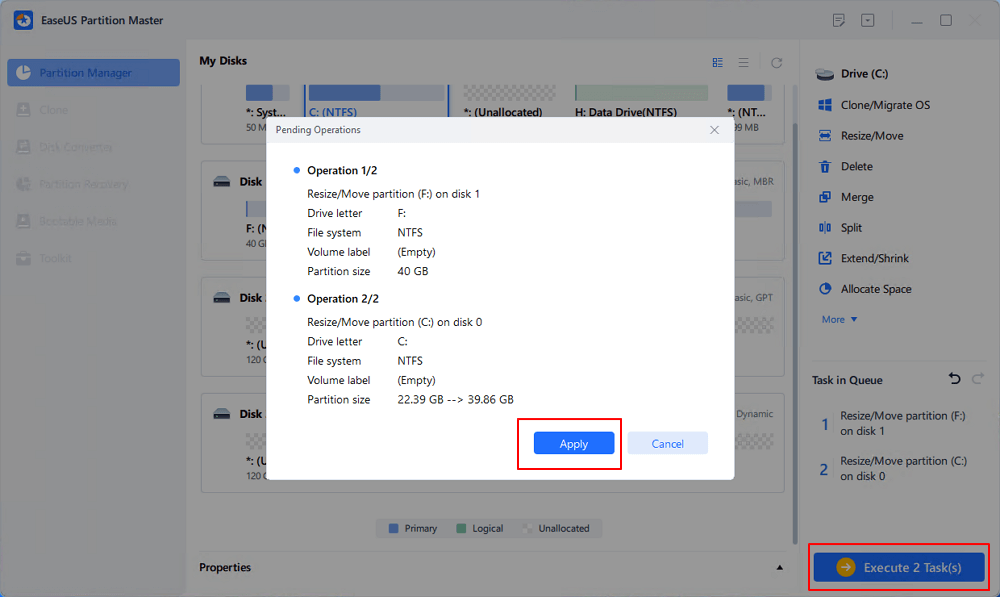
Step 3: Keep all changes to extend C: drive.
Click the «Execute Task» and click «Apply» to keep all changes so to extend the system C: drive.
Final Thoughts
There are five ways to free up Windows Server 2008 (R2) C drive space:
- Clean up hard drive space by EaseUS Todo PCTrans, Disk Cleanup, Control Panel, temp files.
- Extend C drive space by a free partition manager — EaseUS Partition Master.
Categories
- Transfer Programs from C Drive to D Drive
- Transfer Installed Software to New PC
- Transfer Files from Old PC to New PC
- Transfer Microsoft Office
- Find Office Product Key
- Move User Folder
- Move Google Chrome Bookmarks
| Workable Solutions | Step-by-step Troubleshooting |
|---|---|
| Solution 1. Run C Drive Cleaner | Step 1. Open EaseUS Todo PCTrans on your computer. Click «System Cleanup» and click the «Scan» button to…Full steps |
| Solution 2. Launch Disk Cleanup | Steps to enable Disk Cleanup…Full steps |
| Solution 3. Remove Unnecessary Software |
Step 1. Open Control Panel again. Step 2. Under the Programs section…Full steps |
| Solution 4. Clean Temp Files | Step 1. Press Windows + R to get the Run box up…Full steps |
| Solution 5. Extend C Drive Space | Step 1. Free up unallocated space for C drive…Full steps |
Get one question from social.technet.microsoft.com:
I am unable to free space on my server C drive. Have activated the desktop experience service and running disk cleanup. This freed a very small disk volume after removing all the previous updates. The defragmentation did not help much either and continued to remain 52% fragmented after running through a full cycle multiple times. The windows folder on the C drive is currently 92 GB!! I believe it is occupying a lot of volume. What should i be doing now. Do I need to add in more hard disks?
C drive filling up issue is the hit for all Windows users. Most PC nightmare is C drive running out of space, which could slow down your PC’s speed and cause any stuck error. If you try to free up space on C drive on Windows 2008 (R2), this how-to guide provides five solutions to increasing space. Solutions 1 and 5 refer to the third-party software unveiled by EaseUS software. The other options focus on manual methods.
Solution 1. Run C Drive Cleaner to Free Up Space on Server 2008 (R2)
To fix Windows Server 2008 C drive that keeps filling up, you need a professional disk cleaner to safely clear C drive space without extra hassle. By using such a system cleanup tool, EaseUS Todo PCTrans, you do not need to enable Disk Cleanup, frown at the Disk Cleanup missing issue, and take time to delete unnecessary files one by one.
This software is equipped with cleaning series functions, including system cleanup, large file cleanup, and app management. It works to save space by cleaning system & apps junk files, browsing history, Windows built-in applications, large files, and unnecessary apps.
Download software and start to free up C drive space:
How to Use «System Cleanup» of EaseUS Todo PCTrans:
Step 1. Open EaseUS Todo PCTrans on your computer. Click «System Cleanup» and click the «Scan» button to go on.
Step 2. When the scan completes, junk files will be listed. Selected the unwanted files. Be careful not to mistakenly delete files that affect the normal operation of your computer or software.
Step 3. Click the «Clean up» button and confirm the cleanup operation. You can regularly use this function to free up disk space.
Solution 2. Launch Disk Cleanup to Clean Hard Drive on Windows Server 2008 R2
The Disk Cleanup is suitable for all Windows Server versions, including Windows Server 2008 R2, which runs to clear junk or unnecessary files for server users. To use this Windows Utility on Server, you need to check the «Desktop Experience» to enable Disk Cleanup.
Steps to enable Disk Cleanup: Search «Control Panel» through the search bar > Click to open «Control Panel» > Select «Programs and features» > Move to the left side and click «Turn Windows Features on or off» > Tick feature «Desktop Experience» > Click «Next» > Click «Install.»
Note: Remember to restart your Server PC.
Follow the steps to free up C drive space on the server computer:
Step 1. Locate «Computer» on the desktop and double-click it.
Step 2. Right-click the C drive and select «Properties» from the pop-menu. Click the «Disk Cleanup» button.
Step 3. Select the files you want to delete. (To avoid unexpected data loss, you can click the «View Files» button on the Description box.) Click OK.
Solution 3. Remove Unnecessary Software on Windows Server 2008 (R2)
Step 1. Open Control Panel again.
Step 2. Under the Programs section, click the «Uninstall a program.» Then you can see the program list. Pick the one you haven’t used for a long time and choose the «Uninstall» button.
Solution 4. Clean Temp Files to Fix Windows Server C Drive Filling Up
Step 1. Press Windows + R to get the Run box up.
Step 2. Type %temp% on the box and press Enter.
Step 3. Delete all files.
Solution 5. Server 2008 (R2) Extend C Drive Space
Besides file deletion, the other option to free up disk space on Windows Server 2008 (R2) is to extend the C drive with EaseUS Partition Master. It can adjust the hard disk size by using an intelligent resize function. Easy drag and execution help you quickly allocate space from another drive to a C drive.
See steps to extend C drive by EaseUS Partition Master:
Step 1: Free up unallocated space for C drive.
If there is no unallocated space on the system disk, go to Partition Manager and right-click on a partition next to the C: drive and select «Resize/Move».
Drag left panel of the partition to shrink and leave unallocated space behind the system C: drive and click «OK».
Step 2: Increase C drive space.
1. Right-click on C: drive and select «Resize/Move».
2. Drag the system partition end into unallocated space so to add space to C: drive and click «OK».
Step 3: Keep all changes to extend C: drive.
Click the «Execute Task» and click «Apply» to keep all changes so to extend the system C: drive.
Final Thoughts
There are five ways to free up Windows Server 2008 (R2) C drive space:
- Clean up hard drive space by EaseUS Todo PCTrans, Disk Cleanup, Control Panel, temp files.
- Extend C drive space by a free partition manager — EaseUS Partition Master.
7 комментариев на «очистка диска в windows server 2008/2008 r2»
Вы можете подписаться на RSS-ленту комментариев или оставить трекбек для публикации «Очистка диска в Windows Server 2008/2008 R2».
Запуск утилиты disk cleanup в windows server 2021 и 2008 без desktop experience | ithelp
Ниже показаны пути расположения файлов в зависимости от архитектуры и версии сервера.
Папки назначения у файлов:
- Cleanmgr.exe в %systemroot%System32.
- Cleanmgr.exe.mui в %systemroot%System32en-US.
И команды, что б скопировать
Windows Server 2008 R2 x64
copy C:Windowswinsxsamd64_microsoft-windows-cleanmgr_31bf3856ad364e35_6.1.7600.16385_none_c9392808773cd7dacleanmgr.exe C:WindowsSystem32
copy C:Windowswinsxsamd64_microsoft-windows-cleanmgr.resources_31bf3856ad364e35_6.1.7600.16385_en-us_b9cb6194b257cc63cleanmgr.exe.mui C:WindowsSystem32en-US
Windows Server 2008 x64
copy C:Windowswinsxsamd64_microsoft-windows-cleanmgr.resources_31bf3856ad364e35_6.0.6001.18000_en-us_b9f50b71510436f2cleanmgr.exe.mui C:WindowsSystem32en-US
Для Windows Server 2021 x64 не всё так просто. После обновления KB2821895 пропала возможность копировать файлы из winsxs, так как стала использоваться компрессия.
Просто скопировать файлы не удастся, так как система будет ругаться на несоответствие архитектуры. Если установить Desktop Experience, то видно, что файлы бóльшего размера чем те, что из папки winsxs.
Но их можно скопировать отдельно и развернуть на другом сервере простым копированием.
Архив с файлами, взятыми из Windows Server 2021 R2 ENU можно скачать отсюда.
Распаковываем и копируем их так же, как и для других систем, только заменив папку источник. Папка назначения остаётся той же.
Далее же утилиту очистки можно запустить командой cleanmgr из-под администратора.

Так же, для удаления старых обновлений в Windows Server 2021 R2 можно воспользоваться командой DISM:
dism.exe /online /Cleanup-Image /StartComponentCleanup /ResetBaseНо я встречался, что и dism может отсутствовать в 2021 сервере.
У меня есть ac: на сервере, который заполняется, скорее всего, из-за накопления исправлений за эти годы.
Служба поддержки Microsoft PSS сообщила, что неразумно просто удалять сжатые каталоги удаления из каталогов Windows. Учитывая, что у нас есть сотни серверов Windows, это рассеяние исправлений потребляет значительное количество места в нашей сети SAN (эти серверы Windows находятся в VMWare).
Можете ли вы сказать мне, что я могу сделать, кроме списка ниже, чтобы очистить место на диске C: ? Я надеюсь, что у вас может быть больше понимания, чем рекомендация, которую я получил.
-
Не устанавливайте виртуальную память pagefile.sys на диске C. (Системные свойства Параметры производительности Дополнительно изменить виртуальную память)
-
Очистить временные файлы (C: windows temp и C: Users % Имя пользователя% AppData Local Temp).
-
Не устанавливайте ваши временные файлы Интернета на диске C. (Свойства обозревателя Настройки просмотра истории Переместить папку)
-
Переместите базу данных службы поиска Windows . Если вы запустили службы поиска Microsoft, переместите файл Windows.edb на другой диск.
(C: ProgramData Microsoft Search Data Applications Windows)
-
Сжатие папок для экономии места на диске и очистки диска
-
Используйте точку монтирования для установки дополнительного диска.
-
«Compln.exe» можно использовать только для очистки пакета обновления, например (RTM и SP1). В вашей системе Windows Server 2008 r2 он не содержит никакого пакета обновления. Он не может очистить патчи в вашей системе.
-
???? (не уверен, что это за идея) «Microsoft предоставляет встроенный инструмент – очистку диска. (Для получения очистки диска необходимо установить функцию« Desktop Experience ».»)
Что еще можно сделать, чтобы очистить ваш сервер и освободить место?
Наконец, было бы неплохо получить представление о том, какой размер диска вы используете для c: для любой версии Windows, которую вы используете.
Очистка каталога %windir%winsxs в windows server 2008 r2
Не прошло и 5 лет, и у нас появился официально поддерживаемый способ очистки каталога %windir%winsxs в Windows Server 2008 R2, портированный из 2021. Для серверов с дисками на 74Гб это может быть очень актуально, т.к. каталог легко может занимать 15-20Гб.
Для очистки надо:
1) Установить обновление KB2852386 (приходит через WSUS);
2) Установить фичу Desktop Experience (требует перезагрузки) – мастер очистки входит в неё;
3) Запустить мастер очистки (system Tools – Disk Cleanup), там выбрать Windows Update Cleanup и, если надо, Service Pack Backup Files.
Как не очень поддерживаемый способ, если нет возможности перезагрузки или места для установки, можно скопировать
cleanmgr.exe из C:Windowswinsxsamd64_microsoft-windows-cleanmgr_31bf3856ad364e35_6.1.7600.16385_none_c9392808773cd7da в %systemroot%System32, и cleanmgr.exe.mui из C:Windowswinsxsamd64_microsoft-windows-cleanmgr.resources_31bf3856ad364e35_6.1.7600.16385_en-us_b9cb6194b257cc63 в %systemroot%System32en-US (для английской версии).
Информация отсюда, обходное решение с копированием от Tom_Floor:
http://blogs.technet.com/b/askpfeplat/archive/2021/05/13/how-to-clean-up-the-winsxs-directory-and-free-up-disk-space-on-windows-server-2008-r2-with-new-update.aspx
PS Первая же перезагрузка сервера после очистки может оказаться очень, очень долгой, при этом будет выполняться часть работ по очистке.
First published on TechNet on May 13, 2014
It’s finally here! After pages and pages of comments from you requesting the ability to clean up the WinSxS directory and component store on Windows Server 2008 R2, an update is available.
http://support.microsoft.com/kb/2852386
As a refresher, the Windows Server 2008 R2 update is directly related to my previous blog post announcing a similar fix for Windows 7 client .
The Windows 7 version of this fix introduced an additional option to the Disk Cleanup wizard that would cleanup previous versions of Windows Update files. KB2852386 adds a Disk Cleanup option on Windows Server 2008 R2, similar to the Windows 7 update.
What does this mean for Windows Server 2008 R2? After installing this update and prior to being able to perform the cleanup, the Desktop Experience feature must be installed. Why you ask? Disk Cleanup is not installed by default on Windows Server 2008 R2. It is instead a component installed with the Desktop Experience feature.
Why was the update not included as a DISM switch like Windows Server 2012 R2?
This was evaluated, however, due to the amount of changes required and the rigorous change approval process, it was not feasible to back port the functionality this way. Knowing that it would be some time before everyone could upgrade to Windows Server 2012 R2 and based on feedback from an internal survey taken of a subset of enterprise customers, it was determined that this update would still be useful in its Disk Cleanup form, even with the Desktop Experience prerequisite. We hope you agree. However, we are aware that for some of you, the Desktop Experience requirement will be a deal breaker, but decided to release it anyway hoping it will help in some instances.
How can I get the update?
The update is available on Windows Update. It can also be manually downloaded from the Microsoft Update Catalog . The KB article listed above will also direct you to a download link in the Microsoft Download Center.
Let’s Cleanup those Old Windows Update Files!
First, let’s take a look at our starting point. Looking at my Windows 2008 R2 Server with SP1 installed, according to Windows Explorer, the size of my Windows/WinSxS directory is as follows:

The size of the WinSxS directory will vary by server. Some of you will have smaller WinSxS directories, some larger.
Installing the update is just like installing any other update. Just download and double-click on the .msu file:

Installing the update does not require Desktop Experience to be installed beforehand, but if you check your WinSxS directory again, you’ll see there has been no change to the size. This is expected as we need to run Disk Cleanup in order for this to take effect. It also does not require a reboot to install the hotfix.
But…we can’t do anything with what we just installed until we get Disk Cleanup which is installed with the Desktop Experience feature.

When installing Desktop Experience, it does require additional features. Select the button to Add Required Features and click Next and then Install:


A reboot is required to finalize the install.

Click Close and Reboot when prompted.

After we reboot, a Disk Cleanup option can be found under Start —> All Programs —> Accessories —> System Tools:

On launch, Disk Cleanup prompts for the drive you want to clean up:

After clicking Ok, a scan is performed:

Several options are provided for cleanup, including a new option for Windows Update Cleanup:

Just like the Windows 7 cleanup, mileage will vary. Also like Windows 7, the actual cleanup occurs during the next reboot. After the reboot, taking a look at the WinSxS directory, it has shrunk to the following:

Automation
My super knowledgeable scripting cohort Tom Moser wrote a PowerShell script that automates THE ENTIRE PROCESS. Can I get a cheer? Ok. So maybe it is a bit much to expect IT admins to cheer, but can I get an appreciative grunt? The script certainly beats the alternative of doing this all manually.
You can find the script on the TechNet Script Center here:
http://gallery.technet.microsoft.com/scriptcenter/CleanMgrexeKB2852386-83d7a1ae

What does the script do?
In short, the script does the following:
1) Installs Desktop Experience, if not previously installed, and performs a reboot.
2) Sets the appropriate registry keys to automate the cleanup. The script will cleanup not only previous Windows Update files as well as Service Pack files.
3) The script then initiates the cleanup.
4) If Desktop Experience was not previously installed, the script uninstalls it.
5) Performs final reboot.
For more details, read below.
The script can be run from any directory on the server. It has two parameters: LogPath and a switch called NoReboot. LogPath will allow the user to specify a log location or if none is specified, by default, the script will create a log in the same directory from which the script was executed. NoReboot allows the user to suppress reboots, but will require manual reboots by an administrator.
Note : Make sure to check the log file to verify the process completed successfully and to verify there is no manual interaction required. If the script has completed successfully, the log will end with CleanMgr complete .
The script has several phases, using a registry key to keep track of progress. After initial run, it inserts itself as a scheduled task, which runs as local system. The final phase removes the task.
Depending on pending reboots, etc, we have found that this phase may generate a few reboots. Do not be concerned if the server reboots a few times.
Other Options
Aside from the cleanup mechanism included with this fix, if you have applied SP1 and have not cleaned up afterwards, I’d highly recommend doing so by running the following command from an administrative command prompt:
dism /online /cleanup-image /spsuperseded
or
If you have installed the Desktop Experience feature and thus have the Disk Cleanup utility, you can select the following option to do the same thing:

Specifying the /spsuperceded switch or choosing to remove service pack backup files will remove the ability to uninstall the service pack. If you haven’t done it before, it is certain to free up some space.
The Origins of this Update (Hint: Windows Server 2012 R2)
I’ve mentioned a couple of times that this is a back port. What does that mean? Well, it means that this functionality is already built into a later operating system. In this case, that operating system is Windows Server 2012 R2. Not only do we have several mechanisms to automatically cleanup previous versions of Windows Update files like this update does, we even have the ability to more accurately determine the size of the component store (aka the WinSxS directory).
The command to accurately determine the size of the component store on Windows Server 2012 R2 is as follows:
Dism.exe /Online /Cleanup-Image /AnalyzeComponentStore
Running this command analyzes the component store to determine the size and whether cleanup is recommended. Notice in the screen shot that it provides you with the Windows Explorer reported size and the actual size:

Notice that the component store is much smaller than Windows Server 2008 R2 right out of the gate? This isn’t because I’ve used Features on Demand to remove roles and features. It’s because by default in Windows Server 2012 R2, we compress all unused binaries. Another win for Windows Server 2012 R2!
Looking at the breakdown of the 5.12GB. We see that Shared with Windows accounts for 3.83GB of the 5.12GB. Shared with Windows refers to the size of the files that are hardlinked between the WinSxS directory and the Windows location of the file. Because these hardlinks appear to take up space, but don’t really, we can subtract them from our component store size. Therefore, the actual size of the component store is the total of Backups and Disabled Features plus Cache and Temporary Data or 1.28GB.
But back to our cleanup.
In the above screen shot, it’s stated that component store cleanup is recommended. We can manually cleanup the component store on Windows Server 2012 R2 by running the following command:
Dism.exe /online /Cleanup-Image /StartComponentCleanup

What does this do? When this runs, Windows cleans up the previous versions of the component that was updated. In other words, it is doing exactly what our update does for Windows Server 2008 R2 SP1. It removes previous versions of the files updated by Windows Updates.
After running /StartCompomentCleanup, upon analyzing the size again, we see it is as follows:

So no notable difference really. Largely because we’ve been running this cleanup all along. This same command is run every 30 days as a scheduled task with a time limit of 1 hour.
With the scheduled task however, the task will wait at least 30 days after an updated component has been installed before uninstalling the previous versions of the component. This scheduled task can be found in Task Scheduler under the Task Scheduler LibraryMicrosoftWindowsServicingStartComponentCleanup directory:

More information on this can be found here: http://technet.microsoft.com/en-us/library/dn251565.aspx
If you’re in all out spring cleaning mode and want to perform super deep cleanup, you can use the /resetbase command with the /startcomponentcleanup to remove all superseded versions of every component in the component store:
Dism.exe /online /Cleanup-Image /StartComponentCleanup /ResetBase
This removes the ability to uninstall any updates applied until this point in time.
And don’t forget the ability to completely remove any role or feature which also reduces the size. Take a look at one of my earlier blogs for more details on Features on Demand: http://blogs.technet.com/b/askpfeplat/archive/2013/02/24/how-to-reduce-the-size-of-the-winsxs-direc…
Here’s a handy table showing when we introduced the various different cleanup and WinSxS size reductions by operating system:
| Operating System | Compress Unused WinSxS Binaries | Cleanup Previous Windows Update Files | Automatically Clean Up Previous Windows Update Files | Cleanup All Components | Features on Demand |
| Windows Server 2008 R2 | With KB2852386 | ||||
| Windows Server 2012 | With KB2821895 | x | x | x | |
| Windows Server 2012 R2 | x | x | x | x | x |
Want more information on how all this works under the covers?
Check out the following series on the AskCore team blog for an in-depth look at servicing improvements on Windows Server 2012 R2:
What’s New in Windows Servicing: Part 1
What’s New in Windows Servicing: Reduction of Windows Footprint : Part 2
What’s New in Windows Servicing: Service Stack Improvements: Part 3
More on the Desktop Experience Feature
The Desktop Experience feature includes the following components and features:
* Windows Media Player
* Desktop themes
* Video for Windows (AVI support)
* Windows SideShow
* Windows Defender
* Disk Cleanup
* Sync Center
* Sound Recorder
* Character Map
* Snipping Tool
* Ink Support
Most of these are not automatically turned on with the exception of Windows Defender whose service is started after reboot. You’ll likely want to stop the service and disable it after reboot. Not all 3rd party anti-viruses conflict with Windows Defender, but there have been reports that some do.
~ Charity Shelbourne and Tom Moser, Spring cleaning servers since 1998
Update May 15th, 2014
We are aware of a method of copying in the appropriate Disk Cleanup/CleanMgr files into the appropriate location to avoid installing the Desktop Experience. If this were a tested and supported option, we certainly would have included these details in this post and definitely would have used this method to automate the cleanup. However, it was determined early on that this method would not be supported. If you decide to do this, do so at your own risk.
После появления предупреждение о нехватке места на диске выскакивает на сервере Windows 2008, это означает, что системный диск C заполнен и не хватает свободного места. В этой ситуации вам лучше попытаться решить эту проблему как можно быстрее, потому что операционная система сразу работает намного медленнее. Это может привести к неожиданной перезагрузке сервера, сбою системы или потере данных. Когда появляется предупреждающее сообщение «Недостаточно места на диске» и место на диске заканчивается, наиболее важными являются 2 шага: освободить место на диске и расширить диск C как можно больше.
Освободить дисковое пространство в Windows Server 2008 R2 легко, и существует множество способов, здесь я расскажу о 6 наиболее распространенных способах.
1. Удалите временные файлы, чтобы освободить место на диске
Нажмите Начать > Run, ввод «% Temp%»Или шаг за шагом открыть каталог« C: Users Administrator AppData Local Temp »
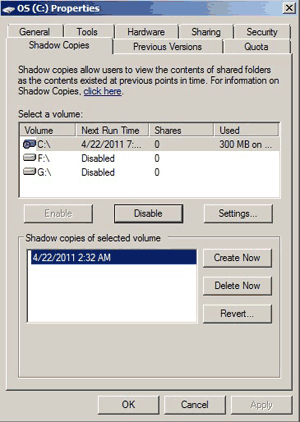
2. Удалите старые теневые копии.
Откройте «Мой компьютер», щелкните правой кнопкой мыши диск C, выберите Объявления, перейдите на вкладку «Теневые копии», удалите старые тома.
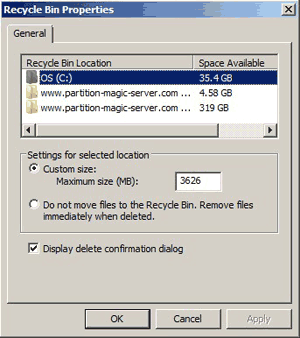
3. Очистите корзину и уменьшите размер диска
Очистите корзину, чтобы удалить неиспользуемые файлы, но перед этим вам лучше еще раз проверить, можно ли удалить эти файлы навсегда.
Чтобы уменьшить размер использования диска корзины:
Щелкните правой кнопкой мыши Корзина> ОбъявленияВы можете легко настроить размер.
4. Очистите или уменьшите использование диска в веб-браузерах для кэшированных файлов.
Каждый веб-браузер имеет область настроек или опций для настройки временных интернет-файлов и использования кэша.
5. Удалить старые вещи
Просто зайдите в «Установка и удаление программ» или «Программы и компоненты» и приведите в порядок. Скорее всего, там куча старого дерьма, занимающего место.
6. Запустите утилиту очистки диска Windows.
Чтобы освободить место на диске в Windows Server 2008 r2, лучший вариант — запустить Очистка диска который является родным инструментом Windows. Он может быстро и безопасно удалить большую часть нежелательных и ненужных файлов с вашего сервера. Конечно, вы можете использовать стороннее программное обеспечение для оптимизации системы, но, на мой взгляд, Disk Cleanup достаточно для выполнения этой задачи.
Действия по освобождению дискового пространства в Windows Server 2008 R2 с помощью очистки диска:
- Нажмите Начать -> Выполнить -> введите cleanmgr -> нажмите Enter.
- Выберите диск C: и нажмите ОК.
- Установите флажки напротив файлов, которые вы хотите удалить.
- Подтвердите эту операцию.
- Повторите шаг 1 и нажмите Очистить системный файл на шаге 3.
Если не удается освободить более 20 ГБ свободного места, диск C может снова заполниться через короткое время, поскольку новые ненужные файлы создаются постоянно. Чтобы полностью решить эту проблему, вам лучше продолжить следующие шаги:
- Устанавливать программы в отдельный раздел, не закидывать все на диск C.
- Измените путь загрузки и кэширования приложений по умолчанию.
- Если вы включаете точку резервного копирования и восстановления Windows, не устанавливайте ее слишком большой.
- Регулярно удаляйте кэши и временные файлы с помощью утилиты очистки Windows.
- Добавьте свободное место из другого раздела и расширьте диск C: как можно больше.
Разверните диск C как можно больше
к расширить диск C в Windows Server 2008 r2, вам лучше сделать резервную копию заранее и запустить программу безопасного раздела диска. Лучше, чем другие инструменты, NIUBI Partition Editor имеет уникальные технологии 1-секундного отката, виртуального режима и отмены на скважине для защиты системы и данных. Чтобы изменить размер раздела и расширить диск C, вам просто нужно перетащить его на карту диска. После этого все (кроме размера раздела) остается прежним.
Как увеличить место на диске C в Windows Server 2008 R2:
Помимо изменения размера раздела и расширения диска C, NIUBI Partition Editor поможет вам сделать много других операций управления разделами диска.
Скачать
$OtherCleanPathsArr = «C:Temp*», `
«C:WindowsTemp*», `
«C:`$Recycle.Bin*», `
«C:swsetup», `
«C:WindowsSystem32*.tmp», `
«C:WindowsServiceProfilesLocalServiceAppDataLocalFontCache-S-*.*», `
«C:WindowsServiceProfilesLocalServiceAppDataLocal~FontCache-S-*.*», `
«C:Windows*.dmp»
#системные пути для очистки
$InProfilesCleanPathsArr = «AppDataLocalTemp*», `
«Downloads*», `
«AppDataLocal*.auc», `
«AppDataLocalMicrosoftTerminal Server ClientCache*», `
«AppDataLocalMicrosoftWindowsTemporary Internet Files*», `
«AppDataLocalMicrosoftWindowsWERReportQueue*», `
«AppDataRoamingMicrosoftWord*», `
«AppDataRoamingMicrosoftExcel*», `
«AppDataLocalMicrosoftWindowsWebCache*», `
«AppDataLocalMicrosoftWindowsExplorer*.db», `
«AppDataLocalMicrosoftOffice15.0LyncTracing*», `
«AppDataLocalApps*», `
«AppDataLocalMicrosoftWindows Mail*»
#пути в профилях для очистки
Get-ChildItem -Path -Include *.flv, *.mp4, *.wmv, DOMA.DBF, STREET.DBF, KLADR.DBF -Recurse | Remove-Item -Force -ErrorAction SilentlyContinue
#удалили некоторые файлы напрямую
$Profiles = Get-ChildItem (Get-ItemProperty -path «HKLM:SOFTWAREMicrosoftWindows NTCurrentVersionProfileList»).ProfilesDirectory `
-Exclude «Администратор», «Administrator», «Setup», «Public», «All Users», «Default User»
#извлекли из реестра местоположение профилей, сформировали список
ForEach ($Path in $OtherCleanPathsArr) {
Remove-Item -Path $Path -Recurse -Force -ErrorAction SilentlyContinue
}
ForEach ($Profile in $Profiles) {
ForEach ($Path in $InProfilesCleanPathsArr) {
Remove-Item -Path $Profile$Path -Recurse -Force -ErrorAction SilentlyContinue
}
$temp = ($Profile.FullName + ‘AppDataLocal*.’)
#echo $temp
cmd.exe /c «del /Q `»$temp`»»
}
 Как известно, папка winsxs, располагающаяся в системном каталоге Windows, используется этими операционными системами для хранения старых версий файлов для отката к ним в случае неудачного обновления системы. Со временем папка способна разрастись до нескольких десятков гигабайт, что может быть критично для старых серверов с небольшими жесткими дисками или для виртуальных серверов. Чистить эту папку вручную крайне не рекомендуется, а встроенный механизм очистки компания Microsoft ввела не сразу. К числу «пострадавших»систем относится Windows Server 2008 R2.
В сущности, есть два, скажем так, «законных» пути очистки папки winsxs, которые могут гарантировать Вам, что операционная система сохранит работоспособность. Это встроенная утилита Очистка диска и консольная утилита DISM.exe. Нюанс, однако, в том, что утилита Очистка диска не сразу обзавелась функцией чистки папки winsxs, понадобится установить KB2852386. Кроме того, в данных серверных ОС компания Microsoft скрыла утилиту очистки от пользовательских глаз. А вот использовать для этих целей в Windows Server 2008 R2 DISM.exe и вовсе нельзя. Виной тоже старая версия утилиты, в которой нет такой функции.

Поэтому первым делом проверяем, установлено ли в системе KB2852386, и, если нет, ставим его. Потребуется перезагрузить сервер.

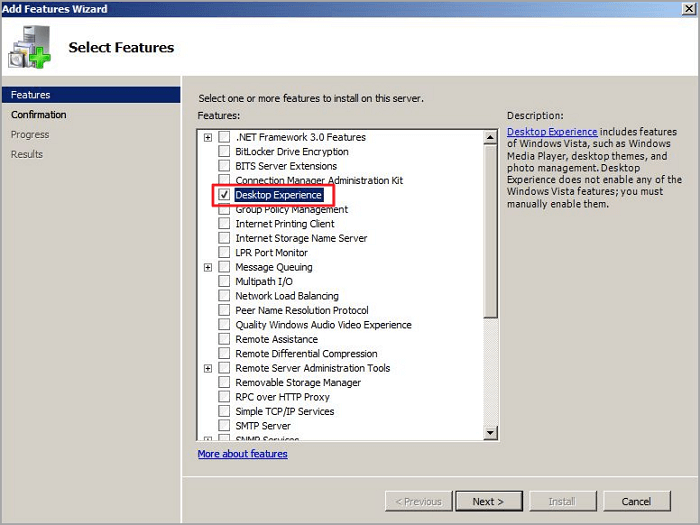
После этого нам нужно добавить компонент, который включает в Windows Server 2008 R2 утилиту очистки диска и некоторые другие возможности Windows 7. Собственно, как видим, первоначально возможности очищать папку winsxs не было и у владельцев Windows 7, но, если те своевременно обновляют свою операционную систему, то она уже давно есть. А вот в Windows Server 2008 R2 её надо дополнительно включать. Делается это через Диспетчер сервера, раздел Компоненты.

Нужный нам компонент называется Возможности рабочего стола (Desktop Experience в английской версии). Отмечаем его галочкой и нажимаем Далее.

Подробнее об этом компоненте можно прочитать здесь.
Учтите, что после включения компонента потребуется перезагрузка сервера. Об успешной установке будет свидетельствовать такое окно:

Теперь в меню Пуск можно будет наблюдать нужную нам утилиту.

Теперь Вы можете освобождать дисковое пространство на сервере таким же способом, как на любой рабочей станции.

Summary
If your C drive is full of useless files, you can find solutions here to delete temporary files in Windows server 2008 r2.
Table of Contents
- C drive is full
- How to Free Up Space on c drive Windows Server 2008 R2
- How to Delete Temp Files in Windows Server 2008 R2
- Extend c drive with IM-Magic Partition Resizer
C drive is full
Windows Server 2008 R2, no doubt, comes with a lot of benefits including optimized performance, new features, and constant updates. However, these updates and features also affect the performance of the computer with low disk space problems. In simple words, low disk space can slow down a computer and crash the certain system or partition software.
In such a scenario, many people try to delete unused files and programs and end up deleting the case-sensitive system files – thus crashing the OS. As this article talks about deleting temporary files when using Windows Server 2008 R2, let’s get straight to the point. And the point is, deleting temporary files cannot harm your computer in any way.
How to Free Up Space on c drive Windows Server 2008 R2
Following solutions can be used to free up space on c-drive windows server 2008 r2
Deleting temporary files
Using disk cleanup
Removing unnecessary programs
Note that the above solutions can either free up GBs of data or just a few MBs.
How to Delete Temp Files in Windows Server 2008 R2
There are two ways of deleting temporary files on Windows Server 2008 r2. The simplest one is following
Press Windows+R
Type “%temp%” and press ok
A new window with a lot of files will open
Select and all delete these files to free up disk space
On the other hand, you can also use the Disk Cleanup Utility to free up disk space. Disk Cleanup removes the unnecessary files, delete temporary files, and rearranges the data to help the computer run effectively.
Press Windows+R
Type “cleanmgr” and press ok
Select the partition and complete the process
Extend c drive with IM-Magic Partition Resizer
If deleting temporary files does not help you free up enough space to get rid of low disk space problems, it is recommended to use a partition resizer and extend the c-drive. IM-Magic Partition resizer is one of the best disk management software that allows you to shrink, extend, create, delete, format, and resize the partitions with just a few clicks. It comes in 4 different editions
IM-Magic Free Edition
IM-Magic Professional Edition
IM-Magic Server Edition
IM-Magic Unlimited
The best thing about using this third-party disk manage software is that it provides efficient data security and all your personal & system data remains untouched. Click here and learn more about the working and features of IM-Magic Partition Resizer.

[Guide] Steps to extend volume without data loss
This step by step guide will show you the right way to extend any volume using IM-Magic Partition Resizer Unlimited edition;
Step-1 Download install, and launch the program.
Step-2 Right click the large volume to produce unallocated free space.
 Steps to resize your partition when you can not extend volume
Step-3 Then right click c and drag the border to acquire the free space.
Step-4 Apply the changes.
- Remove From My Forums
-
Question
-
I have searched throughout this site and still not found an answer to how to miminse the size of the winsxs folder.
regardless of if the files are actually there or hardlinks or etc, the fact is that somefiles somehwere on the drive are using all the free space and windows reports that it is taking up 18GB on a 30Gb drive. and we are constantly running out of
free space and exchange stops working. This server is not used for anything but exchange and the logs and data are on other drives.Now please direct me to a fix for this issue as the OS should not be consuming this much free space.
Answers
-
If Service Pack is installed on the server, you can use below command to free up some space from winsxs folder.
You need to run the command from elevated cmd (run as administrator)
DISM /online /Cleanup-Image /SpSuperseded
Having said that, its not recommended to touch winsxs !
Please refer a recent discussion on same topic.
Windows 2008 R2 winsxs/vss
http://social.technet.microsoft.com/Forums/en-US/winservergen/thread/f5c40113-4464-48ef-a436-b0f355258741/
If it looks good, Eat it ! Likewise, If you don’t know the answers, don’t hesitate to ask questions !!
This posting is provided «AS IS» with no warranties or guarantees and confers no rights.
About Me !!!
-
Marked as answer by
Thursday, April 19, 2012 6:28 AM
-
Marked as answer by
-
Hi,
Thank you for the post.
Please read KB2592038:
To remove the Service Pack files from a Windows installation use the following in-box utilities:
Windows 7 or Windows Server 2008 R2 Service Pack 1: DISM /online /Cleanup-Image /SpSuperseded or Disk Cleanup Wizard (cleanmgr.exe)If there are more inquiries on this issue, please feel free to let us know.
Regards
Rick Tan
TechNet Community Support

-
Marked as answer by
Rick Tan
Thursday, April 19, 2012 6:28 AM
-
Marked as answer by
-
-
Proposed as answer by
Meinolf Weber
Thursday, April 12, 2012 6:57 AM -
Marked as answer by
Rick Tan
Thursday, April 19, 2012 6:28 AM
-
Proposed as answer by