November 10, 2017 updated by
Leave a reply »
How can I open the 32-bit ODBC Data Source Administrator in Windows 10 64-bit? ODBC Data Source Administrator is a Windows component that lets you create and manage ODBC data sources. In this tutorial we’ll show you 5 ways to open ODBC Data Source Administrator in Windows 10.
Note: The 32 -bit version of the ODBC Data Source Administrator must be used to configure data sources for 32- bit applications.
Method 1: Open ODBC Data Source Administrator from Control Panel
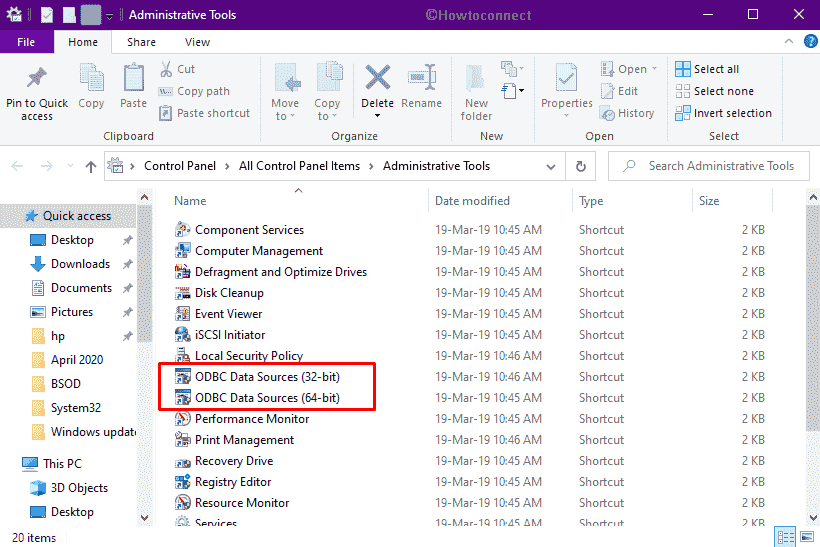
Open the Control Panel and set the View by option to Large icons, and click Administrative Tools.
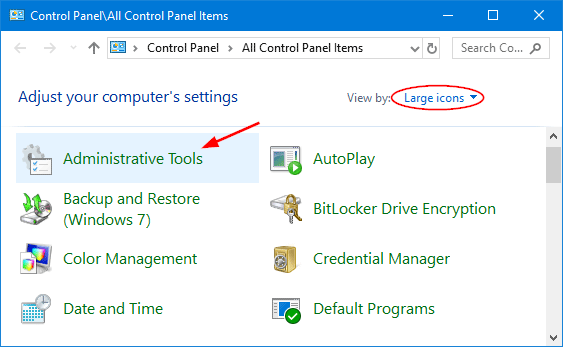
You can then access both 32-bit and 64-bit versions of ODBC Data Source applet.
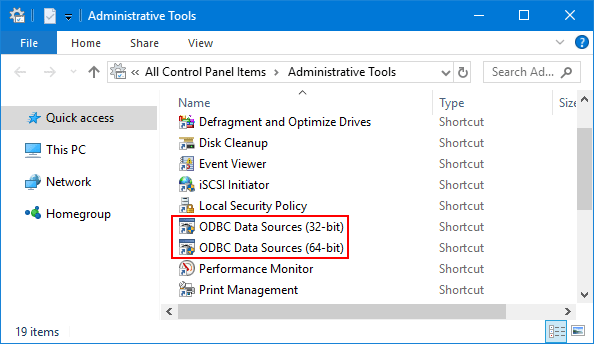
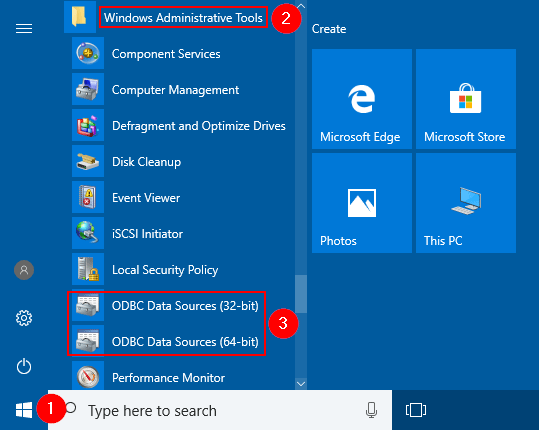
Method 2: Open ODBC Data Source Administrator from Start Menu
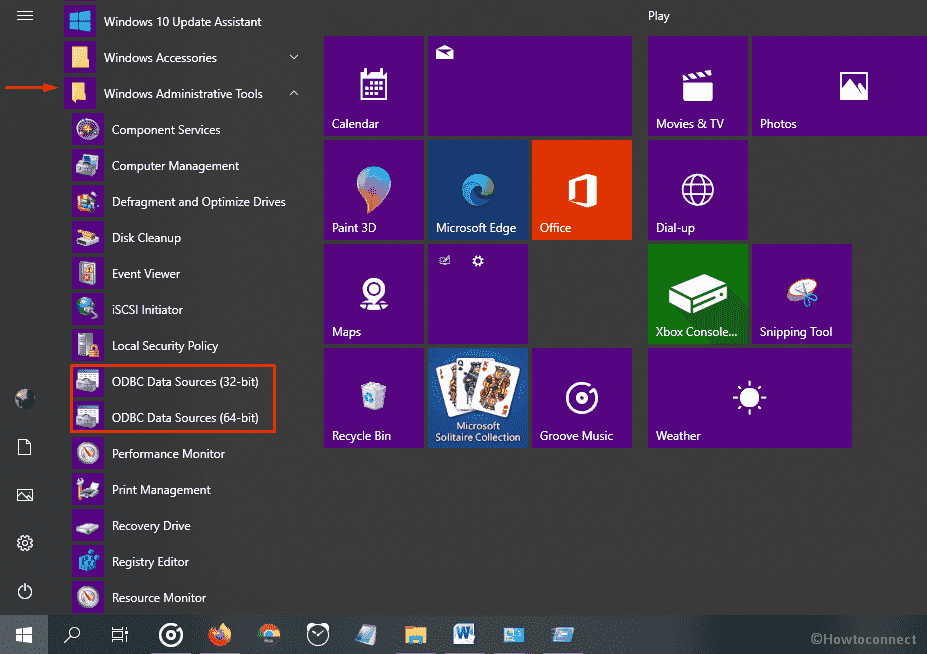
Click the Start button. When the Start Menu comes up, scroll down until you see the “Administrative Tools” folder. Expand that folder and you can then open either ODBC Data Source (32-bit) or ODBC Data Source (64-bit).
Method 3: Open ODBC Data Source Administrator via Search
Simply type odbc into the Cortana Search box on your Windows 10 taskbar, the ODBC Data Source tool will show up in the search result and you can click to launch.

Method 4: Open ODBC Data Source Administrator via Run or Command Prompt
Open the Command Prompt, or press the WIN + R keys to open the Run dialog box. Type odbcad32 and press Enter.
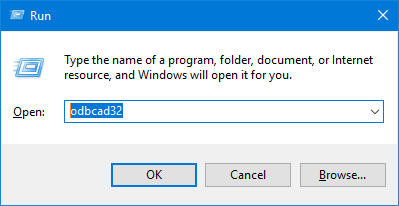
If you’re running Windows 10 64-bit, this should launch ODBC Data Source (64-bit). Otherwise, it will open ODBC Data Source (32-bit) instead.
Method 5: Create ODBC Data Source Administrator Shortcut
A 32-bit version of Windows includes only ODBC Data Source (32-bit), which is located in C:WINDOWSSystem32odbcad32.exe
If you’re running Windows 64-bit operating system, you can access both 32-bit and 64-bit ODBC Data Source from the following locations:
- ODBC Data Source (64-bit) – C:WINDOWSSystem32odbcad32.exe
- ODBC Data Source (32-bit) – C:WINDOWSSysWOW64odbcad32.exe
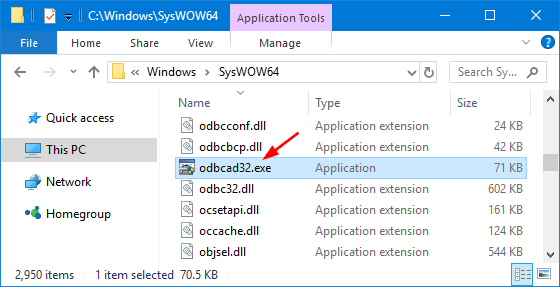
When you need to access ODBC Data Source frequently, you can create a desktop shortcut that points to odbcad32.exe.
- Previous Post: How to Reset PIN from Lock Screen on Windows 10 Fall Creators Update
- Next Post: 2 Ways to Change MAC Address on Windows 11 / 10 / 8 / 7
ODBC is basically a protocol generally used for connecting Microsoft Access Database with another outbound source like Microsoft SQL server. Open Database Connectivity (in short ODBC) is a driver permitting applications to access data from DBMS (Database Management Systems) with the help of SQL. So in this write-up today, we will show you a few most effective methods to start ODBC Data Sources in Windows 11 or 10.
Maximum number of interoperability is permissible by ODBC which eventually proves that; one program can retrieve various DBMS. It’s a significant Windows component and you may need to use it in order to create along with managing the ODBC data source.
Here is How to Start ODBC Data Sources in Windows 11 or 10 –
1] Use taskbar search
- Click the search icon located in the taskbar.
- Type odbc in the text bar.
- When ODBC Data Sources app for both 64-bit and 32-bit shows up in search result, click preferred one to launch.
2] Start ODBC Data Sources through Start menu
- Press Windows key to invoke the Start menu.
- Reach to Windows Administrative Tools by approaching alphabetically.
- Expand the same folder.
- From available ODBC Data Source (32-bit) and ODBC Data Source (64-bit), opt for the desired one.
3] Take help of Run dialog box
- Press Win+R at one go to directly open Run dialog box.
- Insert odbcad32 in the command box and click OK button.
Note – Whether your Windows 11 or 10 device runs 64-bit or 32-bit, the command will open the right version automatically.
4] By means of Control panel
- Press Win+S and type in control panel and hit Enter key to launch the same.
- Set View by option to Large icons and select Administrative Tools.
- When a separate window turns up, look for ODBC Data Sources.
- The app will be available in both 32 and 64 bit, hence click the one compatible with your system.
5] Access Command Prompt to open ODBC Data Sources
- Right-click on Start button and choose Run.
- Put cmd in the text field and hit Enter.
- Insert odbcad32 after the blinking cursor followed by pressing the Enter key.
6] Navigate the directory of ODBC
- Bring forth File Explorer with hotkey Win+E.
- In its address bar, insert
C:WINDOWSSystem32odbcad32.exeand press Enter key. This will open ODBC that is compatible with 64-bit. - In the case of running 32-bit, you need to insert
C:WINDOWSSysWOW64odbcad32.exedirectory instead.
7] Create a shortcut key for ODBC Data Sources
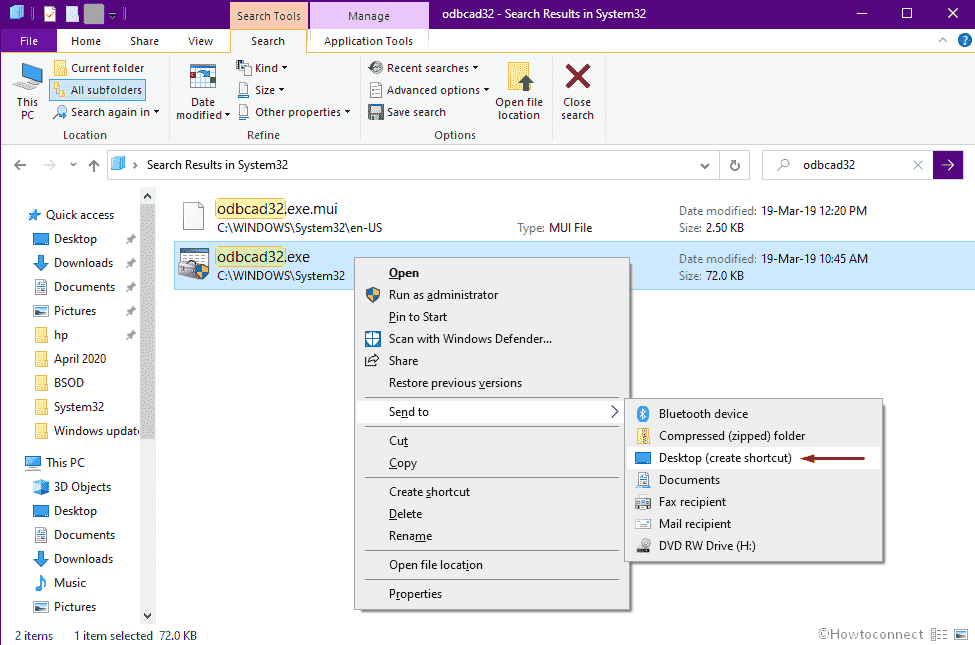
- Open File Explorer and go to the following directory –
C:WINDOWSSystem32
- After reaching there, press Ctrl+F to activate its search function.
- Type odbcad32 and press Enter key.
- When the search result appears, right-click on odbcad32.exe and choose Send to => Desktop (create shortcut).
8] With the assistance of PowerShell
- Press Win+X and select Windows PowerShell.
- Insert odbcad32.exe after the winking cursor and hit Enter.
Methods:
1] Use taskbar search
2] Open ODBC Data Sources through Start menu
3] Take help of Run dialog box
4] By means of Control panel
5] Access Command Prompt to open ODBC Data Sources
6] Navigate the directory of ODBC
7] Create a shortcut key for ODBC Data Sources
8] With the assistance of PowerShell
That’s all!!
Содержание
- Installing and Configuring an ODBC Driver in Windows 10 (32 / 64-bit)
- What is ODBC Driver and Data Source?
- Installing ODBC Driver for Windows 10
- Configuring a DSN for ODBC Driver in Windows 10 (64-bit)
- Configuring a DSN for ODBC Driver in Windows 10 (32-bit)
- Step-by-step ODBC Data Source Setup in Windows 10
- Настройка драйвера ODBC для Oracle
- Настройка драйвера ODBC для Oracle
- How to Install Oracle ODBC Driver on Windows 10
- Steps to Install Oracle ODBC Driver on Windows 10
- Step 1. Install Oracle Instant Client Basic
- Step 2. Add the Oracle Client directory to the PATH environment
- Step 3. Install the Oracle ODBC Client
- Step 4. Create a new ODBC Data Source on Windows 10
- Troubleshooting
- Share this:
- Like this:
- 9 Comments
- Iguana Documentation
- Introduction
- Connect to Oracle [top]
- Setup ODBC [top]
- Troubleshooting [top]
Installing and Configuring an ODBC Driver in Windows 10 (32 / 64-bit)
This tutorial explores how to install 32-bit and 64-bit ODBC drivers in Windows 10 and create a DSN for an ODBC data source.
What is ODBC Driver and Data Source?
Open Database Connectivity (ODBC) is a standard application programming interface that allows external applications to access data from diverse database management systems. The ODBC interface provides for maximum interoperability – an application that is independent of any DBMS, can access data in various databases through a tool called an ODBC driver, which serves as an interface between an external program and an ODBC data source, i.e. a specific DBMS or cloud service.
The ODBC driver connection string is a parameterized string that consists of one or more name-value pairs separated by semi-colons. Parameters may include information about the data source name, server address and port, username and password, security protocols, SQL dialects, and many more. The required information is different depending on the specific driver and database. Here’s an example of ODBC connection string:
Devart ODBC Drivers are powerful connectors for a host of database management systems and cloud services that allow you to connect to your data from virtually any third-party application or programming language that supports the ODBC API. By a third-party application, we mean tools like Power BI, Tableau, Microsoft Excel, etc. See this page for the list of external applications that have been tested for compatibility with our drivers.
Installing ODBC Driver for Windows 10
1. Run the downloaded installer file. If you already have another version of the driver installed in the system, you will get a warning — click Yes to overwrite the old files, though it’s recommended to first uninstall the old version. If this is the first time you install Devart ODBC driver, just click Next.

2. Read and accept the license agreement, then click Next.

3. Select the installation directory for the ODBC driver and click Next.

4. In the Select Components tab, select which version of the driver to install (64-bit / 32-bit), and whether to include the help files.

5. Confirm or change the Start Menu Folder and click Next.
6. Input your activation key or choose Trial if you want to evaluate the product before getting a license. You can load the activation key by clicking on the Load Activation Key… button and selecting the license file from your machine. Click Next and then Install.

7. After the installation is completed, click Finish.

Configuring a DSN for ODBC Driver in Windows 10 (64-bit)
Before connecting a third-party application to a database or cloud source through ODBC, you need to set up a data source name (DSN) for the ODBC driver in the Data Source Administrator. A 64-bit version of the Microsoft Windows operating system includes both the 64-bit and 32-bit versions of the Open Database Connectivity (ODBC) Data Source Administrator tool (odbcad32.exe):
1. In your Windows Search bar, type ODBC Data Sources. The ODBC Data Sources (64 bit) and ODBC Data Sources (32 bit) apps should appear in the search results.

Alternatively, you can open the Run dialog box by pressing Windows+R, type odbcad32 and click OK.

Yet another way to open the ODBC Data Source Administrator is via the command prompt: enter cmd in the search bar and click the resulting Command Prompt button. Enter the command odbcad32 and hit Enter.

2. Since most modern computer architectures are 64-bit, we’ll select the 64-bit version of the ODBC Data Source Administrator to create a DSN for our ODBC driver. The odbcad32.exe file displays two types of data source names: System DSNs and User DSNs. A User DSN is only accessible to the user who created it in the system. A System DSN is accessible to any user who is logged in into the system. If you don’t want other users on the workstation to access your data source using the DSN, choose a User DSN.

3. In the administrator utility, click on the Add button. The Create New Data Source dialog box will display the list of installed ODBC drivers in the system. Choose the needed driver from the list. The choice of the driver is determined by the data source you are trying to connect to — for example, to access a PostgreSQL database, choose Devart OBDC Driver for PostgreSQL. Click Finish.

4. Enter a name for your data source in the corresponding field. Fill in the parameters for the ODBC connection string, which is driver-specific. In most of our ODBC drivers for databases, a connection string with basic parameters requires the user to only input their server address, port number, and login credentials, since Devart ODBC drivers allow direct access to the database without involving additional client libraries.

5. Click Test Connection to verify connectivity. If you see the Connection Successful message, click OK to save the DSN. You should now see your new DSN in the User DSN tab of the ODBC Data Source Administrator tool.

Configuring a DSN for ODBC Driver in Windows 10 (32-bit)
The steps for configuring an ODBC DSN for a 32-bit driver are practically the same as for the 64-bit driver, except for the step where you select the 32-bit version of the ODBC Data Source Administrator. Running the odbcad32 command in the Command Prompt or in the Run dialog box will start the 64-bit version of the ODBC administrator on the 64-bit Windows by default, therefore your best option is to select the 32-bit version of the administrator in the search results of the Windows search box.
Note though that if you have both versions (32-bit and 64-bit) of the driver installed and you have configured a User DSN (in contrast to a System DSN), you will be able to use the same DSN for 32-bit and 64-bit applications (see the Platform column in the screenshot below).

In a situation where you need to use an application that is available only in 32-bit, the 32-bit ODBC driver does the trick. An example is Apache OpenOffice, which is distributed as a 32-bit application.

Step-by-step ODBC Data Source Setup in Windows 10
If you would like to test our ODBC connectors, visit the ODBC drivers page.
Источник
Настройка драйвера ODBC для Oracle
Эта функция будет удалена в следующей версии Windows. Избегайте использования этого компонента в новых разработках и запланируйте изменение существующих приложений, в которых он применяется. Вместо этого используйте драйвер ODBC, предоставляемый Oracle.
Производительностью драйвера ODBC для Oracle можно управлять, зная среду данных и правильно задавая параметры подключения к источнику данных с помощью диалогового окна Администратор источников данных ODBC или параметров строки подключения. Диалоговое окно предоставляет следующие элементы управления для подключения к источнику данных с помощью диалогового окна или строк подключения.
Вкладка «DSN пользователя» Перечисляет имена источников данных, которые являются локальными для компьютера.
Вкладка «Системное DSN» Позволяет добавлять или удалять системные источники данных. К системным источникам данных могут обращаться все пользователи на локальном компьютере.
Вкладка «Файловый DSN» Позволяет добавлять или удалять файловый источник данных с локального компьютера. Файловые источники данных могут совместно использоваться всеми пользователями, у которых установлен один и тот же драйвер.
Вкладка «драйверы» Выводит список установленных драйверов ODBC.
Вкладка «трассировка» Позволяет указать, каким образом диспетчер драйверов ODBC отслеживает вызовы функций ODBC. Трассировку можно настроить отдельно для каждого установленного приложения ODBC.
Вкладка «пулы соединений» Позволяет выбрать параметры подключения для каждого установленного драйвера.
Вкладка «о программе» Список установленных файлов компонентов ODBC.
После добавления источника данных можно использовать диалоговое окно Администратор источников данных ODBC для настройки доступа к источнику данных. Выберите источник данных, а затем щелкните одну из вкладок, чтобы изменить или проверить сведения.
Источник
How to Install Oracle ODBC Driver on Windows 10

Hello everyone, welcome to my blog. In this article, I am going to show you how to install Oracle ODBC Driver on Windows 10. I have a working Oracle Database 12c on another computer on my home network. I am trying to connect to my Oracle database from Microsoft Access using ODBC connection. By default, Windows 10 does not shipped with Oracle ODBC connection utility. In other word, I was unable to connect to my Oracle database from MS Access.
Installing Oracle ODBC Driver on Windows 10 is a bit tricky. It’s not as simple as installing PostgreSQL ODBC driver or MySQL ODBC Driver. I was struggling to get it works. The following method works very well on my home network. So let’s dig inside.
My Setup
Steps to Install Oracle ODBC Driver on Windows 10
Step 1. Install Oracle Instant Client Basic
Oracle ODBC Driver needs this Instant Client package to run. So, we need to download this package from the official download website of Oracle.

Select the correct architecture of your system either 32 bit or 64 bit. In this example I am going to install the 32 bit version since I have MS Office 32 bit version.

Next, download the Instant Client Basic package as shown on the picture above. Also, you will need to download the Instant Client SDK and Instant Client ODBC as shown below

So now we have three packages:
Now Create a new folder for the Oracle client. For example, in this case I created a new folder : C:OracleProductclient. Put all those three zip packages in that new directory. Next, extract them all. It will produce a new directory called: instantclient_12_2. If you download the different version, for example version 18.3, it will create new directory instantclient_18_3.
Step 2. Add the Oracle Client directory to the PATH environment
Now we need to add our Oracle Client directory to the Windows PATH environment. Right-click My Computer >> Advanced System Settings >> Environment Variables

On the System Variables, click New and then enter the following details:
Change C:OracleProductclientinstantclient_12_2 with your actual Oracle Client folder.
Next step is to add the Oracle Client directory to system path. Double click the path and create a new entry as follow

Step 3. Install the Oracle ODBC Client
Now open the folder instantclient_12_2, in your Oracle Client folder created on the Step 1 and double click the file odbc_install.

Please note that there is no GUI installation wizard when you open this file.
Step 4. Create a new ODBC Data Source on Windows 10
To create a new Oracle ODBC Data Source, open Control Panel >> Administrative Tools >> ODBC Data Sources (32bit). If you are using 64 bit version, choose the ODBC Data Sources (64bit).
Click Add to add a new DSN. Select “Oracle in instantclient_12_2” from the list. Click Finish. Next, enter the Oracle ODBC Driver Configuration. Give the new Data Source Name, select TNS Service Name and User ID. Click Test Connection to validate the connection to the Oracle Database Server.


Troubleshooting
On my first attempt, I cannot get the list of the TNS Service when creating a new ODBC Connection. To solve this, we need to copy or create the tnsnames.ora in the Oracle Client Directory. Open Notepad and then copy and paste these lines and then save it as tnsname.ora. Save the file in the Oracle Client directory (C:OracleProductclientinstantclient_12_2).
This is the content of my tnsnames.ora which is works well
After that, we need to tell the system to use this tnsnames.ora config file. Open the Environment Variable again and add a new entry with the following value:
Don’t forget to change the variable value with your Oracle Client Directory.

Now you should be able to pick or select the TNS service. Thanks for reading this how to install Oracle ODBC driver on Windows 10. Cheers
Like this:
Mejor explicado no puedo quedar, mil gracias.
You have saved my life!!
I tryedl everything, and no solution. This looks to first “some” open SQLORA32.DLL and not release it, or I do not know something stay blocked and cannot connect again.
No help reinstall driver, unistal/install, nothing. Interesting is that test connection from ODBC driver assistent still work,only my app cannot connect more than once, sometimes after some delay I connect but again still blocked.
Interesting is that on third PC with also W10 64 bit this works for me that I mean some can be in Windows configuration, some process or dll open and stay opened, or rewrite some parameter in registry, do not know.
Please thanks for any advice.
Thanks for the article! One more possible solution is ODBC Driver for Oracle
https://www.devart.com/odbc/oracle/
Devart ODBC Driver for Oracle provides a high-performance and feature-rich connectivity solution for ODBC-compliant applications to access Oracle databases from Windows, macOS, or Linux, both 32-bit and 64-bit. Full support for standard ODBC API functions and data types implemented in our driver makes interaction of your database applications with Oracle fast, easy and extremely handy.
Thanks for the suggestion, will try it next.
Источник
Iguana Documentation
Introduction
This article explains how to connect to Oracle with ODBC when using Windows 10.
It covers the following topics:
We recommend using system DSNs (available to all users).
Connect to Oracle [top]
We strongly recommend using connection objects to connect to databases, and this is what we demonstrate in the code samples.
Follow these steps to connect:
Your channel will need a From/To Translator or a Filter component.
If your script uses connection object methods conn:query<> or conn:execute<> to connect to a remote Oracle database, the location of the remote host is specified as part of the name parameter in the db.connect < >command. If you use conn:merge<> to connect the remote host is specified as part of the name parameter in the conn:merge<> command itself.
Setup ODBC [top]
Note: Iguana may not always support the very latest version of Oracle drivers, so you can simply download an earlier version if necessary. This is particularly true if you are not able to use the the latest version of Iguana.
If you need to know which versions of Oracle drivers are supported by the version of Iguana you are using please contact us at support@interfaceware.com.
To set up a new ODBC data source for Oracle Server:
The Oracle ODBC package depends on the OCI drivers — so you need to set them up first.
Windows 10 (64 bit version) supports 32 and 64 bit ODBC sources — always use the 64 bit ODBC Administrator.
Troubleshooting [top]
Speak to your DBA (database administrator) for general connection issues like: User name and password, Database Server network name etc.
Please contact us at support@interfaceware.com if you need to know the latest supported version of the ODBC drivers.
Login authentication errors:
Authentication errors usually relate to how the Oracle Server you are connecting to is setup. You will need to talk to the DBA (database administrator) that manages the Oracle server.
If you wish to use Windows integrated security speak to your DBA (database administrator).
Источник
- Introduction
- Connect to Microsoft SQL Server
- Setup ODBC
- Troubleshooting
- More Information
Introduction
This article explains how to connect to Microsoft Access with ODBC from Windows 10.
It covers the following topics:
- How to connect to Microsoft Access (with code samples).
- How to setup ODBC:
- Configure ODBC using the ODBC Data Source Administrator:
We recommend using system DSNs (available to all users).
- Configure ODBC using the ODBC Data Source Administrator:
Connect to Microsoft Access [top]
We strongly recommend using connection objects to connect to databases, and this is what we demonstrate in the code samples.
Follow these steps to connect:
- Create a new channel to try out the code:
- Create a channel like this:
- Name: DB Access Connection (or similar)
- Source: From Translator
- Destination: To Channel
- Alternatively use an existing channel:
Your channel will need a From/To Translator or a Filter component.
- Create a channel like this:
- Connect to a database using ODBC:
- Paste this code into the Translator:
If your script uses connection object methods
conn:query{}orconn:execute{}to connect to a remote Microsoft SQL Server database, the location of the remote host is specified as part of the name parameter in thedb.connect{ }command. If you useconn:merge{}to connect the remote host is specified as part of the name parameter in theconn:merge{}command itself.function main() local conn = db.connect{ api=db.ACCESS, name='your_odbc_server_name', user='', -- use empty string for integrated security password='', -- use empty string for integrated security use_unicode = true, live = true } conn:execute{sql='SELECT * FROM <your table>', live=true} end - The name is the name of an ODBC source that you create using the ODBC Administrator.
- Paste this code into the Translator:
- Adapt the code to your requirements.
Setup ODBC [top]
To set up a new ODBC data source for Microsoft Access:
- Install the latest Microsoft Access Database Engine Redistributable:
At the time of writing this was the 2016 version. This version contains 64 bit ODBC drivers.
- Download the latest redistributable from the Microsoft Download Center.
- Run the installer and accept the defaults.
- Open the 64 bit ODBC Administrator:
Windows 10 (64 bit version) supports 32 and 64 bit ODBC sources — always use the 64 bit ODBC Administrator.
- Open the System DSN tab and click Add:

- Choose the latest Access ODBC driver and click Finish:

- Enter the ODBC credentials:
- Use any Name and Description you prefer.
- Click Select and browse to choose your Access database file.
- Alternatively you Create a new database.
- Click OK to create the ODBC data source:

- Your Access ODBC source should now be ready to use.


Troubleshooting [top]
- Problems with connection settings:
Speak to your DBA (database administrator) for general connection issues like: User name and password, Database Server network name etc.
- Using integrated security:
Using integrated security is the usual way to connect to a Microsoft Access database. If this does not work speak to your DBA (database administrator) about the user credentials you should use to connect to the database.
If you need more help please contact us at support@interfaceware.com.
More Information [top]
- Using Database Connection Objects
- Forum thread on Windows ODBC
| title | description | ms.custom | ms.date | ms.service | ms.reviewer | ms.subservice | ms.topic | ms.assetid | author | ms.author |
|---|---|---|---|---|---|---|---|---|---|---|
|
Connect to an ODBC Data Source (SQL Server Import and Export Wizard) | Microsoft Docs |
How to configure an ODBC DSN or create an ODBC connection string to use with SQL Server Import and Export Wizard |
06/29/2020 |
sql |
vanto |
integration-services |
conceptual |
e6318776-a188-48a7-995d-9eafd7148ff2 |
chugugrace |
chugu |
Connect to an ODBC Data Source (SQL Server Import and Export Wizard)
[!INCLUDEsqlserver-ssis]
This topic shows you how to connect to an ODBC data source from the Choose a Data Source or Choose a Destination page of the SQL Server Import and Export Wizard.
You may have to download the ODBC driver you need from Microsoft or from a third party.
You may also have to look up the required connection info that you have to provide. This third-party site — The Connection Strings Reference — contains sample connection strings and more info about data providers and the connection info they require.
Make sure the driver you want is installed
-
Search for or browse to the ODBC Data Sources (64-bit) applet in the Start Menu or Control Panel. If you only have a 32-bit driver, or you know that you have to use a 32-bit driver, search for or browse to ODBC Data Sources (32-bit) instead.
-
Launch the applet. The ODBC Data Source Administrator window opens.
-
On the Drivers tab, you can find a list of all the ODBC drivers installed on your computer. (The names of some of the drivers may be listed in multiple languages.)
Here’s an example of the list of installed 64-bit drivers.


[!TIP]
If you know that your driver’s installed and you don’t see it in the 64-bit applet, look in the 32-bit applet instead. This also tells you whether you have to run the 64-bit or 32-bit SQL Server Import and Export Wizard.To use the 64-bit version of the SQL Server Import and Export Wizard, you have to install SQL Server. SQL Server Data Tools (SSDT) and SQL Server Management Studio (SSMS) are 32-bit applications and only install 32-bit files, including the 32-bit version of the wizard.
Step 1 — Select the data source
The ODBC drivers installed on your computer aren’t listed in the drop-down list of data sources. To connect with an ODBC driver, start by selecting the .NET Framework Data Provider for ODBC as the data source on the Choose a Data Source or Choose a Destination page of the wizard. This provider acts as a wrapper around the ODBC driver.
Here’s the generic screen that you see immediately after selecting the .NET Framework Data Provider for ODBC.

Step 2 — Provide the connection info
The next step is to provide the connection info for your ODBC driver and your data source. You have two options.
-
Provide a DSN (data source name) that already exists or that you create with the ODBC Data Source Administrator applet. A DSN is the saved collection of settings required to connect to an ODBC data source.
If you already know the DSN name, or know how to create a new DSN now, you can skip the rest of this page. Enter the DSN name in the Dsn field on the Choose a Data Source or Choose a Destination page, then continue to the next step of the wizard.
Provide a DSN
-
Provide a connection string, which you can look up online, or create and test on your computer with the ODBC Data Source Administrator applet.
If you already have the connection string or know how to create it, you can skip the rest of this page. Enter the connection string in the ConnectionString field on the Choose a Data Source or Choose a Destination page, then continue to the next step of the wizard.
Provide a connection string
If you provide a connection string, the Choose a Data Source or Choose a Destination page displays all the connection info that the wizard is going to use to connect to your data source, such as server and database name and authentication method. If you provide a DSN, this information isn’t visible.
Option 1 — Provide a DSN
If you want to provide the connection information with a DSN (data source name), use the ODBC Data Source Administrator applet to find the name of the existing DSN, or to create a new DSN.
-
Search for or browse to the ODBC Data Sources (64-bit) applet in the Start Menu or Control Panel. If you only have a 32-bit driver, or have to use a 32-bit driver, search for or browse to ODBC Data Sources (32-bit) instead.
-
Launch the applet. The ODBC Data Source Administrator window opens. Here’s what the applet looks like.
-
If you want to use an existing DSN for your data source, you can use any DSN that you see on the User DSN, System DSN, or File DSN tab. Check the name, then go back to the wizard and enter it in the Dsn field on the Choose a Data Source or Choose a Destination page. Skip the rest of this page and continue to the next step of the wizard.
-
If you want to create a new DSN, decide whether you want it to be visible only to you (User DSN), visible to all users of the computer including Windows services (System DSN), or saved in a file (File DSN). This example creates a new System DSN.
-
On the System DSN tab, click Add.
-
In the Create a New Data Source dialog box, select the driver for your data source, then click Finish.
-
The driver now displays one or more driver-specific screens where you enter the info needed to connect to your data source. (For the SQL Server driver, for example, there are four pages of custom settings.) After you finish, the new system DSN appears in the list.
-
Go back to the wizard and enter the DSN name in the Dsn field on the Choose a Data Source or Choose a Destination page. Continue to the next step of the wizard.


Option 2 — Provide a connection string
If you want to provide your connection information with a connection string, the rest of this topic helps you get the connection string you need.
This example is going to use the following connection string, which connects to Microsoft SQL Server. The database example that is used is WideWorldImporters and we’re connecting to the SQL Server on the local machine.
Driver={ODBC Driver 13 for SQL Server};server=localhost;database=WideWorldImporters;trusted_connection=Yes;
Enter the connection string in the ConnectionString field on the Choose a Data Source or Choose a Destination page. After you enter the connection string, the wizard parses the string and displays the individual properties and their values in the list.
Here’s the screen that you see after entering the connection string.

[!NOTE]
The connection options for an ODBC driver are the same whether you’re configuring your source or your destination. That is, the options you see are the same on both the Choose a Data Source and the Choose a Destination pages of the wizard.
Get the connection string online
To find connection strings for your ODBC driver online, see The Connection Strings Reference. This third-party site contains sample connection strings and more info about data providers and the connection info they require.
Get the connection string with an app
To build and test the connection string for your ODBC driver on your own computer, you can use the ODBC Data Source Administrator applet in the Control Panel. Create a File DSN for your connection, then copy settings out of the File DSN to assemble the connection string. This requires several steps, but helps to make sure you have a valid connection string.
-
Search for or browse to the ODBC Data Sources (64-bit) applet in the Start Menu or Control Panel. If you only have a 32-bit driver, or have to use a 32-bit driver, search for or browse to ODBC Data Sources (32-bit) instead.
-
Launch the applet. The ODBC Data Source Administrator window opens.
-
Now go to the File DSN tab of the applet. Click Add.
For this example, create a File DSN rather than a User DSN or System DSN, because the File DSN saves the name-value pairs in the specific format required for the connection string.
-
In the Create New Data Source dialog box, select your driver in the list, and then click Next. This example is going to create a DSN that contains the connection string arguments we need to connect to Microsoft SQL Server.
-
Select a location and enter a filename for the new File DSN, and then click Next. Remember where you save the file so you can find it and open it in a subsequent step.
-
Review the summary of your selections, and then click Finish.
-
After you click Finish, the driver that you selected displays one or more proprietary screens to gather the info it needs to connect. Typically this info includes server, login info, and database for server-based data sources, and file, format, and version for file-based data sources.
-
After you configure your data source and click Finish, you typically see a summary of your selections and have an opportunity to test them.
-
After you test your data source and close the dialog boxes, find the File DSN where you saved it in the file system. If you didn’t change the file extension, the default extension is .DSN.
-
Open the saved file with Notepad or another text editor. Here are the contents of our SQL Server example.
[ODBC]
DRIVER=ODBC Driver 13 for SQL Server
TrustServerCertificate=No
DATABASE=WideWorldImporters
WSID=<local computer name>
APP=Microsoft® Windows® Operating System
Trusted_Connection=Yes
SERVER=localhost
-
Copy and paste the necessary values into a connection string in which the name-value pairs are separated by semi-colons.
After you assemble the necessary values from the sample file DSN, you have the following connection string.
DRIVER=ODBC Driver 13 for SQL Server;SERVER=localhost;DATABASE=WideWorldImporters;Trusted_Connection=YesYou don’t typically need all the settings in a DSN created by the ODBC Data Source Administrator to create a connection string that works.
- You always have to specify the ODBC driver.
- For a server-based data source like SQL Server, you typically need Server, Database, and login information. In the sample DSN, you don’t need TrustServerCertificate, WSID, or APP.
- For a file-based data source, you need at least file name and location.
-
Paste this connection string into the ConnectionString field on the Choose a Data Source or Choose a Destination page of the wizard. The wizard parses the string and you’re ready to continue!


See also
Choose a Data Source
Choose a Destination