Установка Office 365 на сервер удаленных рабочих столов


В официальной документации указано, что Office 365 можно использовать на сервере удаленного рабочего стола (ранее назывался — терминальный сервер) с ОС не ниже Windows Server 2008 R2:
Операционная система Windows: Windows 10, Windows 8.1, Windows 7 с пакетом обновления 1 (SP1), Windows Server 2016, Windows Server 2012 R2, Windows Server 2012 или Windows Server 2008 R2
Перед тем, как начать использовать сервер удаленного рабочего стола, рекомендуется выполнить т.н. подготовку Windows Server 2008 R2 к функционированию в этом режиме. Ввод сервера в домен я опущу. Для остальной подготовки проводим ряд настроек (у каждого предприятия и администратора они могут быть индивидуальны, но, как показывает практика, их лучше выполнить в указанном мной порядке ![]() ):
):
- Установка обновлений;
- Установка Windows Server 2008 R2 Service Pack 1;
- Установка компоненты Возможности рабочего стола (Desktop Experience);
- Установка компоненты Microsoft .Net Framework 3.5.1;
- Установка дополнительных языков и выполнение региональных настроек;
- Установка роли сервера удаленных рабочих столов;
- Активация сервера удаленных рабочих столов;
- Создание конфигурационного файла для загрузки и установки Office 365;
- Загрузка Office 365;
- Установка Office 365;
- Активация Office 365
Установка обновлений
После чистой установки Windows Server 2008 первое, что запускается при старте операционной системы — это окно Initial Configurations Tasks (ICT) / Задачи начальной настройки.
Выбираем ссылку Download and Install updates (Загрузить и установить обновления):
Запускаем Check for updates:
Просмотрим предлагаемые к установке обновления:
и выберем к установке максимально все:
и в том числе необязательные. После нажимаем Ok:
Теперь можно нажать кнопку Install updates:
Возможно, потребуется несколько перезагрузок прежде, чем установятся все обновления. Нажимаем Restart now:
Автоматическая перезагрузка:

Применение настроек:
И устанавливаем остальные обновления — Install updates:
Все последние обновления установлены:
Установка Windows Server 2008 R2 Service Pack 1
Теперь установим Service Pack 1. Как скачать и распаковать *.iso опустим (загрузка производится с VLSC, немного об этом есть на странице Office 2019. Установка без привязки к облаку. Немного общих фраз о корпоративном лицензировании)
Распаковываем Service Pack 1 в папку по умолчанию:
и запускаем setup:
Нажимаем Next:
Отмечаем I accept the license terms и выбираем еще раз Next:
и нажимаем Install:
По окончании процесса нажимаем Close:
Установка компоненты Возможности рабочего стола
Возможности рабочего стола / Desktop Experience включают в себя следующие компоненты и функции Windows 7:
- Windows Media Player
- Desktop themes / Темы рабочего стола
- Video for Windows (AVI support) / Видео для Windows (поддержка AVI)
- Windows SideShow
- Windows Defender / Защитник Windows
- Disk Cleanup / Очистка диска
- Sync Center / Центр синхронизации
- Sound Recorder / Звукозаписывающее устройство
- Character Map / Таблица символов
- Snipping Tool / Ножницы
Для установки компоненты Возможности рабочего стола нажимаем Add features:
Выбираем компоненту Desktop Experience:
После выбора чекбокса откроется окно Add Features Wizard, нажимаем кнопку Add Required Features:
Установка компоненты Microsoft .Net Framework 3.5.1
Процесс установки нескольких компонент удобнее всего совместить и поэтому перед тем как нажать кнопку Next установим еще и .Net Framework 3.5.1:
После выбора чекбокса .Net Framework 3.5.1 Features .Net Framework 3.5.1 на экране опять появится окно Add Features Wizard, нажимаем кнопку Add Required Role Services:
Необходимые компоненты выбраны и теперь нажимаем кнопку Next:
далее нажимаем кнопку Install:
По окончании процесса установки обращаем внимание на то, что установленные компоненты требуют перезагрузки сервера и нажимаем кнопку Close:
На запрос хотим ли мы перезагрузить сервер сейчас отвечаем утвердительно Yes:
После перезагрузки и входа процесс продлится:
Об успешном окончании процесса установки компонент сообщат подтверждающие галочки зеленого цвета с текстом Installation succeeded. Для закрытия окна нажмем кнопку Close:
Установка дополнительных языков и выполнение региональных настроек
Это, в принципе, как и предыдущие пункты — стандартная процедура, но для чистоты эксперимента мы ее тоже выполним. Заходим в Пуск / Start -> Панель управления / Control Panel:
Часы и регион / Clock, Language, and Region:
На вкладке Форматы меняем, если нужно, формат даты и времени:
На вкладке Местоположение выбираем Украина:
и нажимаем Применить / Apply:
Переходим на вкладку Keyboard and Languages и нажимаем кнопку Change keyboards…:
В открывшемся окне Text Services and Input Languages на вкладке General нажимаем кнопку Add:
Выбираем необходимую раскладку клавиатуры и нажимаем Ok:
Нажимаем кнопку Apply и переходим на вкладку Language Bar:
На вкладке Language Bar выбираем радиокнопку Docked in the taskbar :
и — чекбокс Show additional Language bar icons in the taskbar, и нажимаем Ok:
Теперь на вкладке Administrative настроим Экран приветствия / Welcome screen и новые учетные записи / new user accounts. Выбираем кнопку Copy settings… :
Проставляем чекбоксы Welcome screen and system accounts и New user accounts и нажимаем кнопку Ok:
Вернувшись в окно Region and Language выбираем Change system locale…:
Выбираем язык, который будет использоваться для программ, которые не поддерживают Unicode:
Подтверждаем — Ok:
И, поскольку изменения глобальны, подтверждаем Restart now:
Установка роли сервера удаленных рабочих столов
Входим в систему под учетной записью администратора:
В окне Server Manager запускаем апплет Add Roles:
Далее — Next:
Выбираем роль Remote Desktop Services и нажимаем Next:
Далее — Next:
Выбираем роль Remote Desktop Session Host:
и Remote Desktop Licensing:
В зависимости от требований безопасности к этой роли выбираем может ли компьютер с любой версией клиента Remote Desktop Connection client подсоединяться к серверу Remote Desktop Session Host и нажимаем Next:
Выбираем режим лицензирования в зависимости от того, требуется лицензирование на устройство / Per Device или на пользователя / Per User и нажимаем Next:
Добавляем пользователей или группы пользователей для доступа через кнопку Add…:
В окне Select Users, Computers, or Groups вводим имя объекта, например, domain users и нажимаем кнопку Check Names:
Поскольку эта операция требует административных прав в домене, то вводим имя и пароль административной учетной записи:
и после проверки нажимаем Ok:
Далее — Next:
Конфигурируем возможности клиента. Добавляем возможности: проигрывания аудио и видео контента в окне удаленного рабочего стола / Audio and video playback, перенаправление звука микрофона / Audio recording redirection и включение графического интерфейса с элементами Windows Aero / Desktop composition (provides the user interface elements of Windows Aero) и нажимаем Next:
Теперь необходимо определиться с пулом обнаружения для выдачи лицензий: для рабочей группы, для этого домена или для леса:
Далее — Next:
Все необходимые настройки закончены и нажимаем Install:
Завершить — Close:
Поскольку изменения глобальны, подтверждаем Restart now — Yes:
Для продолжения входим с учетной записью администратора:
Все. Процесс установки служб Remote Desktop завершен. Нажимаем Close:
Прим. Пусть не смущает, что Remote Desktop Services с предупреждающим желтым значком:
Если есть сомнения, то идем в Go to Role и проверяем установлена ли роль:
Далее Часть 2 — https://bga68.livejournal.com/694579.html
Intro
This article will see us use Server 2012 R2 Essentials to integrate with Office 365 for Exchange. This will be one of the options I’ll discuss during my session titled “Exploring options for moving a small Exchange or Small Business Server environment to Office 365 or remaining on-premises” at Exchange Connections 2014 in Las Vegas Sept 15th-19th. It’s a long title for a session but it’s fitting considering the many options you’ll have for you or your customer’s business.
First we should know what Server 2012 R2 Essentials is. You could say it’s the spiritual successor to Small Business Server 2011, which was essentially (pun intended) discontinued. For a detailed walkthrough of Windows Server 2012 R2 Essentials, watch this great multi-part video series on it from Microsoft. It’ll answer all your licensing, deployment, & configuration questions.
History & Now
The last version of Small Business Server was SBS 2011. This was a Server 2008 R2 Domain Controller which ran Exchange 2010, along with WSUS, File Services, SharePoint Foundation, & SQL. The solution had several other cool features like Remote Web Workplace which was a web portal (running on top of Remote Desktop Services) that allowed any remote user to connect through a web interface & remote into a client machine on the company LAN. It also included a singular management interface named the SBS Console where Admins could manage Users, Groups, Mailboxes, Backups, Alerts, & Updates. This solution was aimed at small businesses (as the name implied) with less than 75 users.
Fast forward to today & we have Server 2012 R2 Essentials which has new features but also is a bit lighter. Exchange, SharePoint, & SQL are no longer included with the product; however you can still utilize these applications either on-premises (on another server) or in the cloud. The Windows Server Essentials Dashboard allows you to perform many of the same user management functions as the SBS Console, as well as manage mailboxes if you’ve chosen to run Exchange on another server on-premises or have connected your server to Office 365 (more on that later). New with 2012 R2 is the ability to install Essentials as a Server Role on Server 2012 R2 Standard or Datacenter; this is called the Windows Server Essentials Experience Role. See the aforementioned video series to learn about all the additional features of 2012 R2 Essentials.
Our Goal
In this article I’ll be Installing the Windows Server Essentials Experience Role, configuring the environment as if I were a small business, & connecting my environment to an Office 365 Tenant. I chose to use the server role (instead of a full Essentials OS install) in this guide for my own convenience. The experience should be the same, it’s really just the licensing that differs. Once we’ve performed these steps we’ll explore management of users; most notably, managing Office 365 mailboxes from the Essentials Dashboard. We’ll also see how passwords are synched to O365 (yes that’s right, Essentials had PasswordSync before the full version of DirSync did!).
Adding the Windows Server Essentials Experience Server Role
- Launch Server Manager, select Local Server, select Manage, & click Add Roles and Features.
- Proceed to the Select Server Roles page & place a checkmark next to Windows Server Essentials Experience. Take note of the additional Features that will be installed. Select Add Features & click Next a few times & then click Install. Reboot afterwards.

Exploring & Configuring Essentials
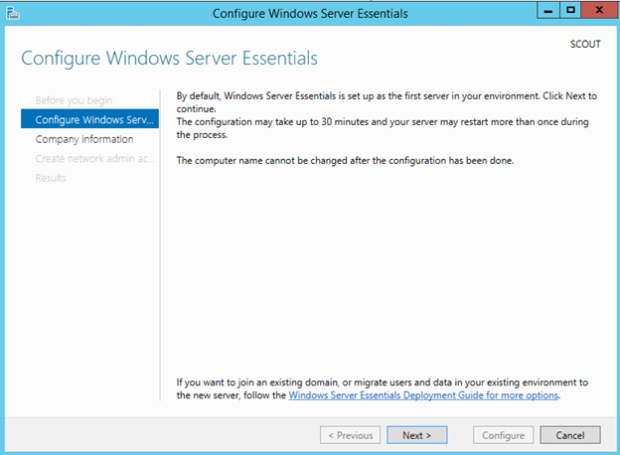
- Upon logging back into the server post-reboot, open Server Manager & click the flag in the top-right corner of the screen indicating post-deployment tasks requiring action. Click Configure Windows Server Essentials
- Take note of the initial page & click Next.
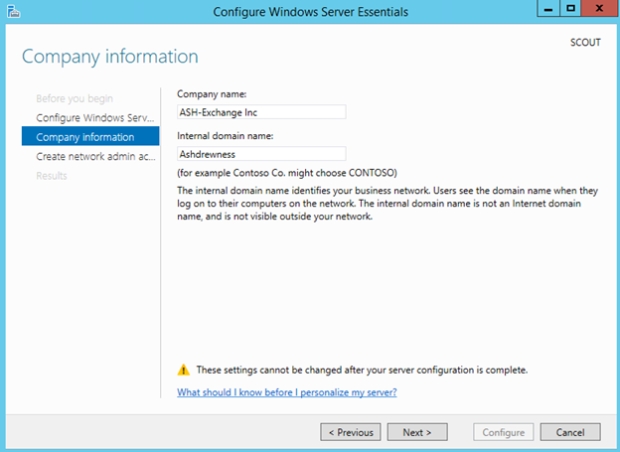
- As part of the Role configuration, your server will be made into a Domain Controller of a new Active Directory Domain (if you do not already have a domain). In this case I’ll put “ASH-Exchange Inc” for my Company Name (a fake Company Name I chose in hopes of not being sued 😉 ). I’ll also put “Ashdrewness” as the Internal Domain Name (I own ashdrewness.com; replace that domain in this guide with a domain you own). Click Next.
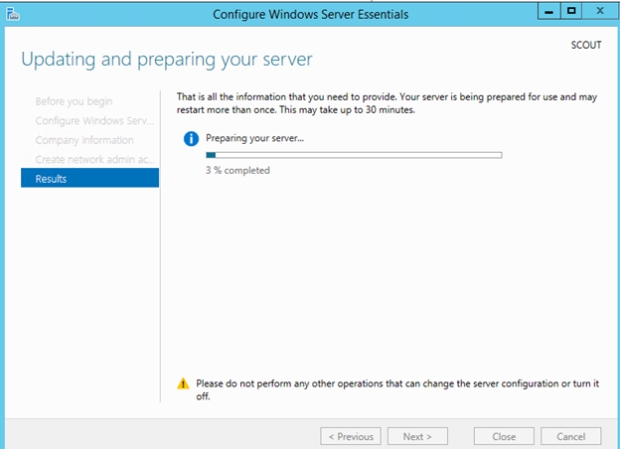
- When asked for an Administrator account I put “Andrew-Admin” & entered my preferred password twice. Click Configure. This next phase may take up to 30min, feel free to grab your favorite beverage. The server will eventually reboot.
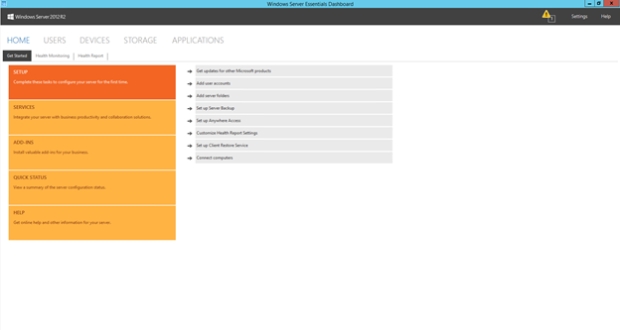
- After the server has rebooted you can log back in with the account you were using to perform the install/configuration (Administrator in my case) or the account you just created. After opening Server Manager you’ll be greeted with a dialog box saying the configuration is complete. Click Close.
- My server is now a Domain Controller for the Ashdrewness.local domain. From the Desktop, click the icon for the “Dashboard.” You’ll be greeted by the Essentials Dashboard.
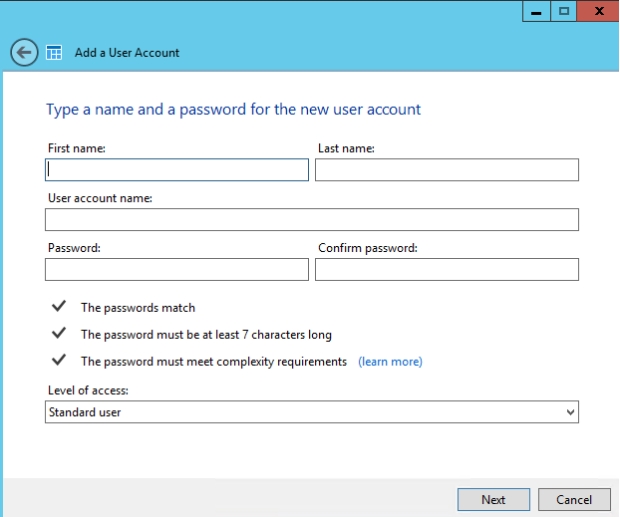
- I’ll go ahead & create some test user accounts by clicking on “Add user accounts” & then clicking “Click to add user accounts”.
- Here I’ll create an account named John Smith with a “User account name” of JohnSmith. I’ll create a password, make the user a Standard user & click Next. On the shared folder screen click Next. On the Enable Anywhere Access screen click “Create account”. I’ll repeat this process for users Sally Smith & Mike Smith.

Configuring Office 365 Integration
- Now at this point there are many things I could setup on the server from within this wizard such as Backup, Anywhere Access, & adding computers to the domain; but for now I’ll just go straight to the “Services” section of the Dashboard.
- With “Services” selected, click “Integrate with Office 365.” Then click “Integrate with Office 365” again. This wizard will help us setup integration with an Office 365 tenant. You can either have a tenant already created or you can use the wizard to create one (or create a trial tenant). We’ll use the wizard to create our tenant now.
- Click Next & then click “Try” under “Microsoft Office 365 for midsize business and enterprises”. On the page it takes you to, input the requested information. On the next page I’ll create a username of “Andrew” & put “ashdrewnesstrial” as my company name. After creating a password click Next. You may be asked to provide a phone number for text message verification to prove that you’re not a bot. Afterwards click “Create my account.”
- Afterwards you’ll be given some information to write down, similar to :

Office 365 sign-in page:
https://portal.office.com
Your Office 365 user ID:
andrew@ashdrewnesstrial.onmicrosoft.com
- Click on “You’re ready to go” to be taken to the main dashboard of your Office 365 tenant. (Note: as time goes on, some of these O365 menu options may change so please use your best judgment to get through them. Also, If your browser crashes or you need to get back to the O365 Admin portal then just login to https://portal.office.com using the account you just created; andrew@ashdrewnesstrial.onmicrosoft.com in my case.)
- From the top of the Dashboard click Admin>Office 365. On the next page click “Domains”. Click “Add Domain”.
- I own “ashdrewness.com” so at this point I’ll add it to this Office 365 tenant (Note: a domain can only exist in one Office 365 tenant at a time). Use this wizard to add your domain. In my case the domain is hosted by GoDaddy so I’m prompted to have the Office 365 wizard confirm ownership for me by creating a randomly generated TXT record. I will be prompted for my GoDaddy credentials & the required records will be created for me. Click Finish when complete.
- At this point of the wizard I’ll be asked to add users & assign licenses. Click “Start step 2” & say “I don’t want to add users right now” & then Next.
- Click “Start step 3” & then click Next to say I wish to use this domain for Exchange & Lync Online.
- Now click “Setup records” to add the appropriate DNS records in your zone. Click Finish.
- [Back in Essentials] At this point, go back to the “Integrate with Microsoft Office 365” wizard in the Essentials Dashboard. If you’re still on the page where we left off then click Next.
- Enter the credentials for the Office 365 admin account we created; in my case this will be Andrew@ashdrewnesstrial.onmicrosoft.com. Click Next after entering the credentials.
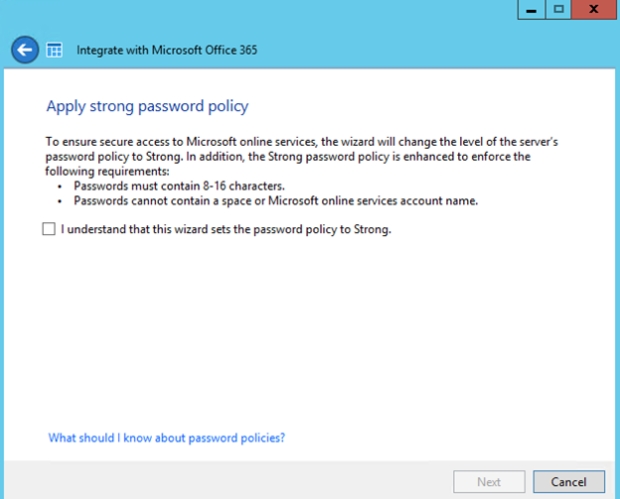
- The next page will inform you that a strong password policy will be configured. Check the box & click Next (by doing this, users may be prompted to change their passwords).
- After completing the wizard & restarting the Dashboard, click on “Services” again to see that your Windows Azure Active Directory & Office 365 integrations are now Enabled.

Matching your Active Directory Users with an Office 365 Mailbox
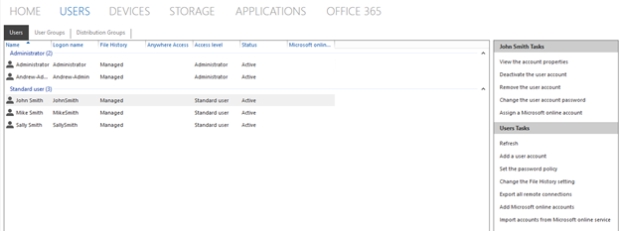
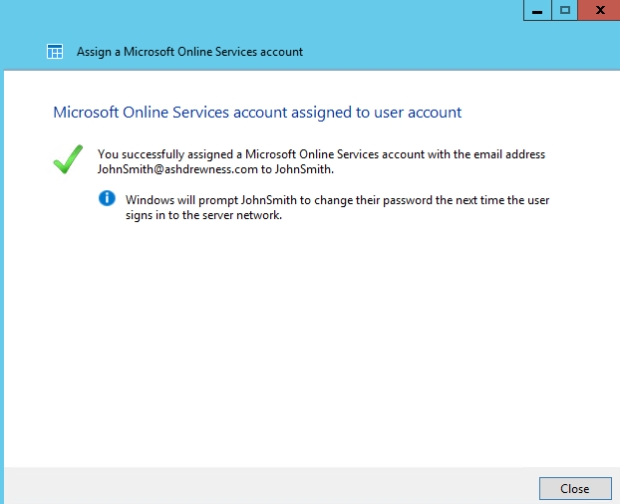
- Click on “Users” within the Essentials Dashboard & then select John Smith. In the right-hand pane click “Assign a Microsoft online account”
- On the first page of the wizard, leave the default selection of “Create a new Microsoft Online Services account & assign to this user account”. Click Next
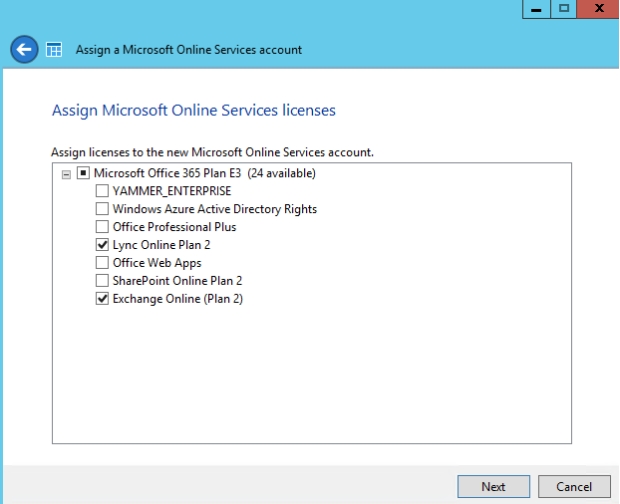
- On the next page, at this time just select Exchange & Lync (while I’m sure all your users will be anxious to start using Yammer, they can be patient). Click Next.
- The next page should provide verification that the account has been created & will also notify you that John Smith will be prompted to change his credentials the next time he signs in. Click Close.
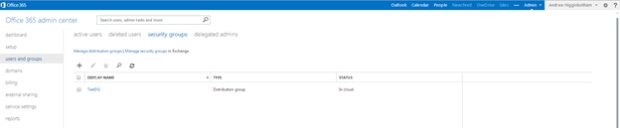
- At this point if I look at the user account of John Smith in Active Directory I can see that his User Principal name has been changed from JohnSmith@ashdrewness.local to JohnSmith@ashdrewness.com. Also, if I open the Office 365 Admin Center I’ll see that John Smith has been added to the tenant with a Status of “in cloud” which is different than it would show up if it were synched from my local Active Directory using DirSync. This is because Essentials does not use DirSync but its own custom framework for synching users to the cloud & keeping Passwords in sync (in fact, it could do Password Synchronization before DirSync could). Speaking of passwords…..

- Now if you were to try & login to the Office 365 portal right now as JohnSmith@Ashdrewness.com you would get a login error. What you must first do is either try to login to your local Active Directory environment, have it prompt you to change your credentials, change them to a password that meets your new complexity policy OR an admin could use the Essentials Dashboard or Active Directory Users & Computers to reset the password.
- Afterwards, connect to https://portal.office.com & login using JohnSmith@Ashdrewness.com with your new credentials. You’ll be presented with the below page. Note: In my testing, it is a matter of seconds between changing a password on-premises & having it take effect in the Office 365 tenant. This is much faster than DirSync; however using the Essentials Office 365 features (and its own custom web-based sync service) is only supported in a single Domain Controller environment, aka small environments (UPDATE: It is now supported in multi-DC environments per this article).
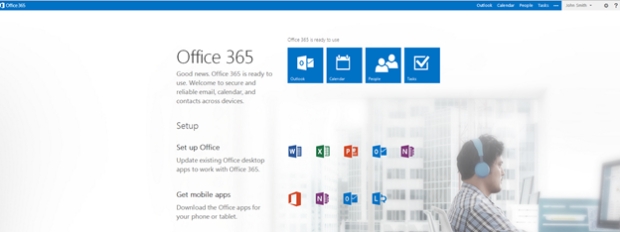
- You will now be able to use Office 365 features like Exchange Online.
Map an existing On-Premises user account to an existing Office 365 mailbox
We’ll now act as if we already have an Office 365 mailbox created & now we wish to map it to an on-prem AD user account. For instance, this would be the case if you had migrated from another version of Exchange to Office 365 using a Cutover Migration or similar.
- Login to the Office 365 admin portal with Andrew@ashdrewnesstrial.onmicrosoft.com & navigate to “Users and groups”. Click the plus symbol to create a new user called “Mike Smith” with a user name of “MikeSmith”.
- Now back in the Essentials Dashboard, select Mike Smith & then click “Assign a Microsoft online account.”
- This time select “Assign an existing Microsoft Online Services account to this user’s account”. Notice how a drop-down will appear which will automatically populate with your tenant accounts which have yet to be mapped to an on-prem user account. Select MikeSmith@ashdrewness.com & click Next.

Managing your Office 365 properties from the Essentials Dashboard
- From the Users pane of the Essentials Dashboard, double-click John Smith’s user account. On the Properties of John’s account, click the “Microsoft online” tab. Notice it’ll take a second to connect.
- Notice you can do things like block access to the service, add additional email addresses, & assign/un-assign services to the account. Close out of the Properties of John’s account.
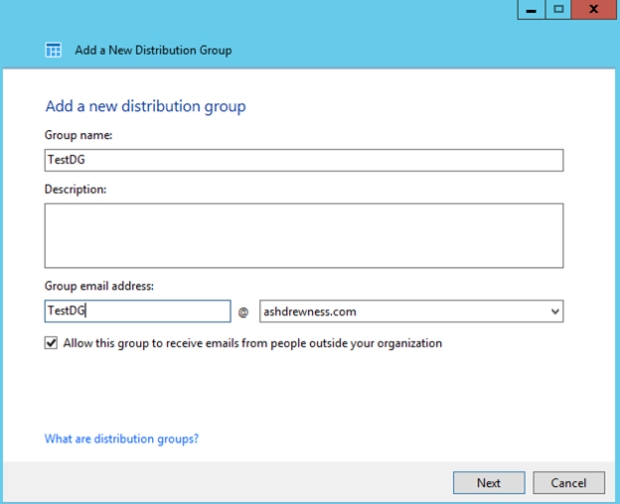
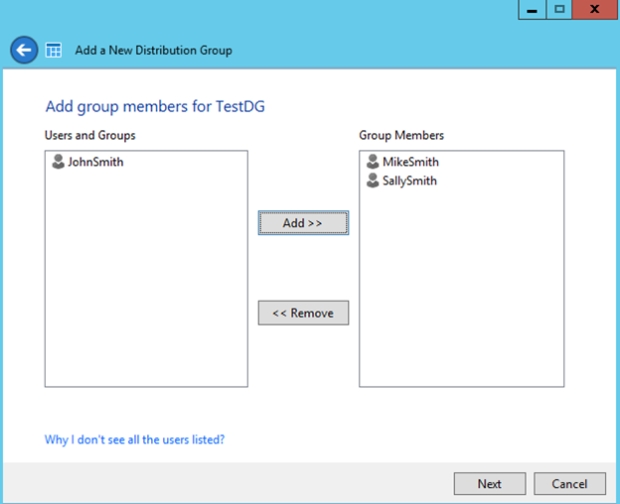
- Within the Users pane of the Essentials Dashboard, click the Distribution Groups tab & then click “Add a distribution group”.
- Create a group called “TestDG” & give it an email address of TestDB@ashdrewness.com & click Next.
- Add Mike & Sally to TestDG & click Next. The group will be created in your Office 365 tenant.
- If you login to your tenant you will now see that the group has been added with the users you selected as members.
Summary
Hopefully this gives you an idea of what’s possible with Server 2012 R2 Essentials & can be looked at as a viable option for you or your customers.
Again, I’ll be speaking at Exchange Connections 2014 in Las Vegas Sept 15th-19th on the topic of small businesses & Office 365, as well as Exchange troubleshooting. I hope to see you there!
Edit: The Office 365 Integration features are now supported in multiple Domain Controller environments. It now appears that the only limit is the 100 user supported limit mentioned in this article
http://blogs.technet.com/b/sbs/archive/2014/08/13/announcing-the-availability-of-enabling-windows-server-2012-r2-essentials-integration-of-microsoft-online-services-in-environments-with-multiple-domain-controllers.aspx
В этой статье рассмотрим особенности подготовки и установки Office 365 (Microsoft 365) на терминальном сервере с ролью Remote Desktop Services (RDS) для одновременного использования множеством пользователя. Режим совместной активации Office 365 ProPlus используется в RDS, VDI решениях, и в сценариях, когда несколько пользователей по очереди используют один общий компьютер.
По умолчанию лицензия Microsoft 365 Apps позволяет пользователю установить и активировать Office 365 на максимум 5 устройствах. Однако есть сценарии, когда у пользователя нет персонального компьютера и ему приходится постоянно работать под своим аккаунтом за разными компьютерами (RDS, VDI хосты, общие компьютеры и т.д.). Чтобы не учитывать лимит на количество активаций лицензий Office 365 для пользователя, вы можете установить Office 365 на таких компьютерах, RDS серверах в режиме shared computer activation.
В этой статье рассмотрены основные правила лицензирования и отличия между классическими версиями Office (2013,2016,2019) и Office 365.
Требования:
- В первую очередь, нужно иметь в виду что для использования на терминальном (RDS) сервере подходят следующие лицензии (подписки) Office 365 с поддержкой desktop virtualization: Microsoft 365 Apps for Enterprise (он же Office 365 ProPlus), Office 365 E3 или Office 365 E5;
- Пользователи должны авторизоваться на общем компьютере (RDS сервере) под своим учетными записями, к которым привязаны лицензии Microsoft 365 Apps;
- На вашем сервере должна быть установлена и настроена роль Remote Desktop Services (это может быть как отдельно стоящий сервер, так и сервер в ферме RDS с Connection Broker). RDS хост должен быть нацелен на сервер лицензирования RDS, а на сервере лицензирования должно быть достаточное количество User или Device RDS CAL.
- Все предыдущие версии Microsoft Office необходимо удалить перед установкой Office 365 ProPlus.
Установка Office 365 ProPlus на RDS сервере в режиме общего использования выполняется из командной строки с помощью специального XML файла конфигурации.
Ранее мы уже рассказывали, что для установки современных версий MS Office (Office 365 и Office 2019) вместо MSI установщиков используется метод установки Click-to-run (C2R). C2R Installer загружает установочные файлы из Интернета (из CDN сети Microsoft)
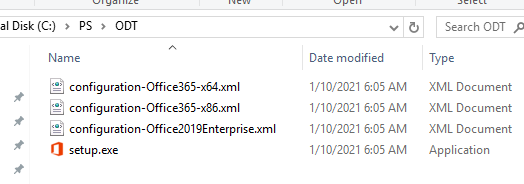
Для кастомной установки C2R версий Office нужно использовать специальную утилиту развёртывания Microsoft Office Deployment Tool (ODT) — https://www.microsoft.com/en-us/download/details.aspx?id=49117.
Скачайте и установите officedeploymenttool. В каталоге установки появятся примеры XML файлы для настройки параметров установки пакетов Office 365 и Office 2019 Enterprise, а также установочный файл C2R – setup.exe.
В конфигурационном файле configuration-Office365-x64.xml вы можете указать какие продукты из состава Office 365 нужно установить. По умолчанию устанавливаются все приложения, установить определенные приложения Office из графического Click2Run Installer нельзя (подробнее об этом в статье “Как выборочно установить отдельное приложение в Office 365/2019/2016”).
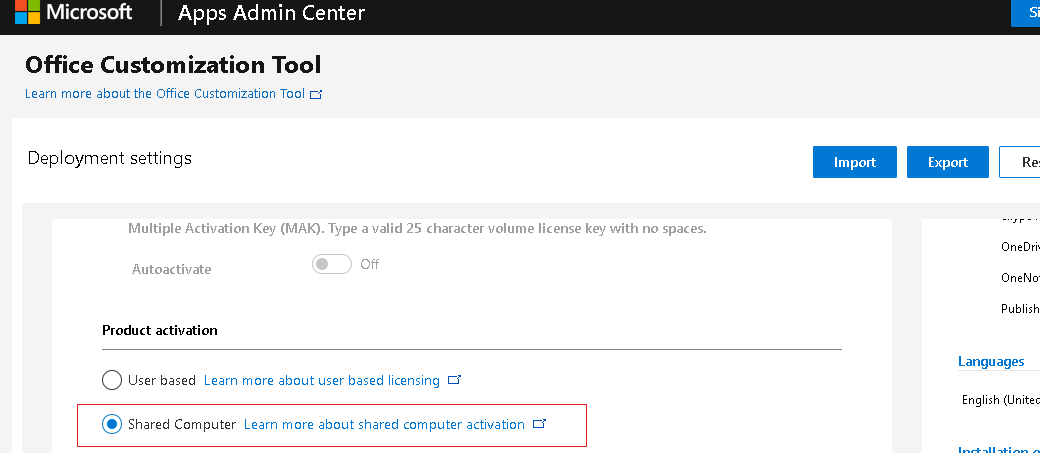
Вы можете вручную задать нужные параметры установки Office в конфигурационном файле configuration-Office365-x64.xml. Однако гораздо проще сгенерировать XML с нужными параметрами установки с помощью веб-инструмента Microsoft — https://config.office.com/ (Office Customization Tool). Перейдите на эту страницу, выберите параметры установки Office (архитектура, язык, какие программы устанавливать, нужно ли ставить Visio и Office и ряд других параметров). Обязательно в разделе Licensing and Activation выберите Product activation – Shared Computer.
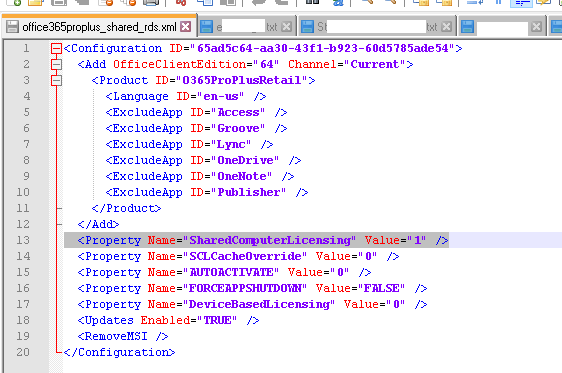
Сохраните полученный XML файл как office365proplus_shared_rds.xml и откройте его в любом текстовом редакторе.
В данном XML файле указаны параметры установки пакета Office 365. Обратите внимание на следующий параметр:
<Property Name="SharedComputerLicensing" Value="1" />
Этот параметр (совместная активация компьютера) нужно обязательно указать, если вы планируете использовать копию Office 365 для одновременной работы нескольких пользователей (RDS сервер, VDI компьютер, общий компьютер, или обычная Windows с возможностью одновременного RDP доступа). Без этого параметра вам придется активировать Office 365 только для одного пользователя.
Переведите RDS сервер в режим установки приложений:
change user /install
Если на RDS сервере в ферме есть активные RDP сессии пользователей, можно перевести его в режим обслуживания и завершить текущие сессии:
change logon /drain
Для установки Office 365 на RDS сервере в соответствии с данными, указанными в конфигурационном файле, используйте команду:
setup /configure office365proplus_shared_rds.xml
Обратите внимание, что в нашем случае C2R установщик Office 365 скачает все необходимые файлы из Интернета. Однако вы можете заранее загрузить установочный файлы Office 365 в сетевую папку на вашем файлом сервере и использовать ее в качестве источника установочных файлов. В этом случае в XML файле можно указать источник установки.
Замените строку
<Add OfficeClientEdition="64" Channel="Current">
на
<Add SourcePath="\msk-fs01DistrOffice365" Add OfficeClientEdition="64" Channel="Current">
После окончания установки, переведите RDS хост в обычный режим:
change user /execute
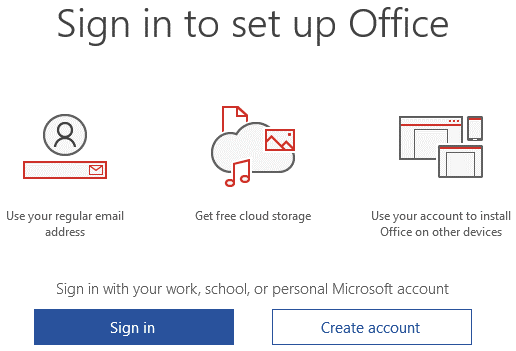
Как происходит активация лицензия Office 365 пользователей? Каждый пользователь при первом запуске любого приложения Office получит запрос на вход в аккаунт Office 365 (email и пароль). Если у вас настроена синхронизация между Office 365 (Azure Active Directory) и on-premises Active Directory, то если пользователя вошел на компьютер под аккаунтом, которому в Office 365 уже назначена лицензия, его лицензия автоматически активируется.
Для такого пользователя будет получен токен лицензии с серверов активации Office Licensing Service в Интернете со сроком действия 30 дней. Через 30 дней, Office 365 попробует автоматически продлить токен лицензии.
Думаю, понятно, что в случае с исползованием Office 365 с RDS хоста нужен постоянный доступ в интернет для проверки и активации лицензий пользователей на серверах Microsoft. Какого-то аналога службы KMS нет.
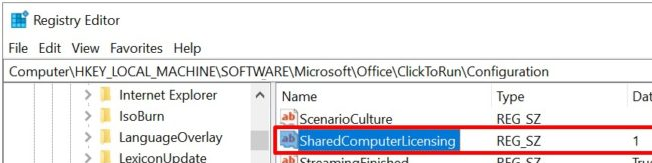
Если вы установили Office 365 без опции SharedComputerLicensing в XML файле, то чтобы целиком переставлять пакет, можно изменить тип установки Office365 из реестра. Для этого в ветке реестра HKEY_LOCAL_MACHINESOFTWAREMicrosoftOfficeClickToRunConfiguration нужно изменить значение Reg_SZ параметра SharedComputerLicensing на 1.
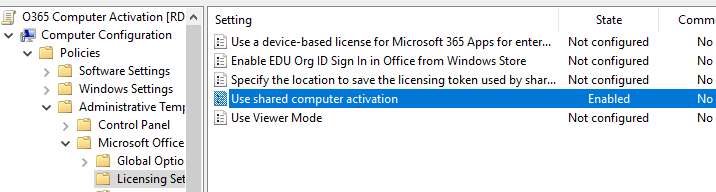
Либо включить отдельный параметр групповой политики Use shared computer activation из административных шаблонов GPO для Office в секции. Computer Configuration -> Administrative Templates -> Microsoft Office 2016 (Computer) –> License Settings.
Если этого не сделать, то при запуске приложений Office 365 вторым пользователям появится ошибка:
This copy of Microsoft Office cannot be used on a computer running Terminal Services. To use Office on a computer running Terminal Services, you must use a Volume License of Office.

When you want to use Office 365 it is easy all in the cloud easy to manage , one click setup yes it is easy or not ?
suppose you have 25 users and all need to setup O365 and you have several windows servers 2012R2 but no real deployment tools like #SCCM
Well deploy the Office 365 with a Group policy easy to setup and quick response.
First we need to login to office 365 https://login.microsoftonline.com/
Office 365 login Login to your Office 365 portal or webmail with a simple click. www.office365login.com/
 This is how it works the user logs in and do the thing. but for 25 users.. this will take some time. So my Sample user has Plan E3

The installation can be done by a user simple give the user the login password and select software and go. But I want control..

Easy there is a tool called Office Deployment Tool for Click-to-Run. You can download the Office Deployment Tool from the Microsoft Download Center site. Administrators download and run the self-extracting executable file, which contains the Office Deployment Tool .exe file, dynamic link library resources (dlls), and a sample configuration file, configuration.xml.
I downloaded the tool did an extract and there was a setup.exe and the Config file.
Create a Shared folder that can be accessed but the computers in your domain. In my case I have only a Windows Server 2012R2 this is all I need.


First we are changing the default configuration.xml. and there are a lot of options
But in this case I want Office NL and the EN version and it should be activated and I want a log file just in case and If you want more languages just add them this is for download only.
<Configuration>
<Add SourcePath=»\mvpdc01office365″ OfficeClientEdition=»32″>
<Product ID=»O365ProPlusRetail» >
<Language ID=»nl-nl» />
<Language ID=»en-en» />
</Product>
</Add>
<Display Level=»None» AcceptEULA=»TRUE» />
<Logging Name=»OfficeSetup.txt» Path=»%temp%» />
<Property Name=»AUTOACTIVATE» Value=»1″ />
</Configuration>
Now that the config file is ready we can start the download.
setup.exe /download configuration.xml

I did run this from my share so I do not need the move my files.

and now all we have to do is start an batch or CMD with one line
\mvpdc01Office365Setup.exe /configure \mvpdc01Office365configuration.xml
where is the setup file and the config that I should use. that is it. I use only the NL version for install.
And yes the batch can be with checking etc but for now I only want to deploy 
@echo off
\mvpdc01Office365Setup.exe /configure \mvpdc01Office365configuration.xml
echo Office 365 Install Complete > %SystemDrive%usersComplete_o365.txt
Nice but I have still to click the back file. I can place this in the login from the user easy. yes you can but nay this user install software ?
I create a office OU and placed the users in this OU.
![]()
I create a GPO that is going to install Office 365 and so that I can change things


I created the Batch that I used earlier and copied this file to a new folder in the windows directory and if this folder is not there create it.
Now we create a task that is doing the job on the Windows 7 machine.

Fill in the Name and configure it for windows 7

Next create a new Trigger that is on the Logon and make sure it is enabled !
 For starting a program this is the batch file located on the local machine copied by the GPO.
As an admin I want to have control and maybe I want to start the task by myself sometime.
So select on demand also.

After this apply the GPO and start your Windows 7 machines. I logon with my dummy account and there is the Install account.


And the user is ready to use Office 365 , remember the user must logon to the office 365 during the wizard so make sure he/she has the email and password.
![]()
Robert Smit is Senior Technical Evangelist and is a current Microsoft MVP in Clustering as of 2009.
Robert has over 20 years experience in IT with experience in the educational, health-care and finance industries.
Robert’s past IT experience in the trenches of IT gives him the knowledge and insight that allows him to communicate effectively with IT professionals
who are trying to address real concerns around business continuity, disaster recovery and regulatory compliance issues. Robert holds the following certifications:
MCT — Microsoft Certified Trainer, MCTS — Windows Server Virtualization, MCSE, MCSA and MCPS. He is an active participant in the Microsoft newsgroup community and is currently focused on Hyper-V, Failover Clustering, SQL Server, Azure and all things related to Cloud Computing and Infrastructure Optimalization.
Follow Robert on Twitter @ClusterMVP
Or follow his blog https://robertsmit.wordpress.com
Linkedin Profile Http://nl.linkedin.com/in/robertsmit
Robert is also capable of transferring his knowledge to others which is a rare feature in the field of IT. He makes a point of not only solving issues but also of giving on the job training of his colleagues.
A customer says » Robert has been a big influence on our technical staff and I have to come to know him as a brilliant specialist concerning Microsoft Products. He was Capable with his in-depth knowledge of Microsoft products to troubleshoot problems and develop our infrastructure to a higher level. I would certainly hire him again in the future. »
Details of the Recommendation: «I have been coordinating with Robert implementing a very complex system. Although he was primarily a Microsoft infrastructure specialist; he was able to understand and debug .Net based complext Windows applications and websites. His input to improve performance of applications proved very helpful for the success of our project
View all posts by Robert Smit [MVP]