 В этой инструкции о том, что делать, если при чистой установке Windows 10 или 8 (8.1) с флешки или диска на компьютере или ноутбуке, программа сообщает, что установка на данный диск невозможна, так как на выбранном диске находится таблица MBR-разделов. В системах EFI Windows можно установить только на GPT-диск. В теории, такое может произойти и при установке Windows 7 при EFI-загрузке, но сам не сталкивался. В конце руководства также есть видео, где все способы исправления проблемы показаны наглядно.
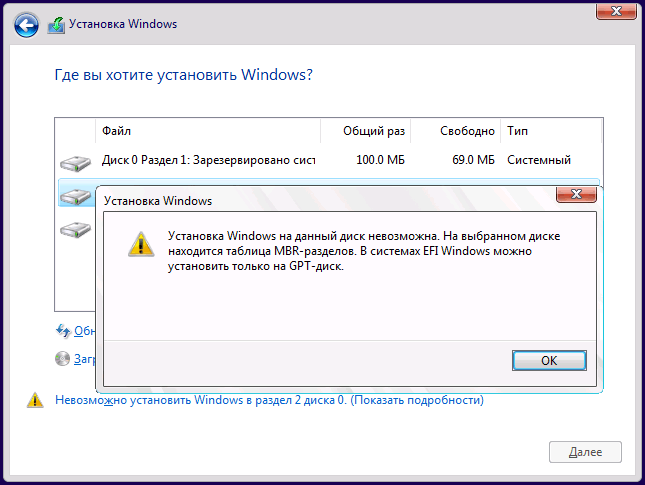
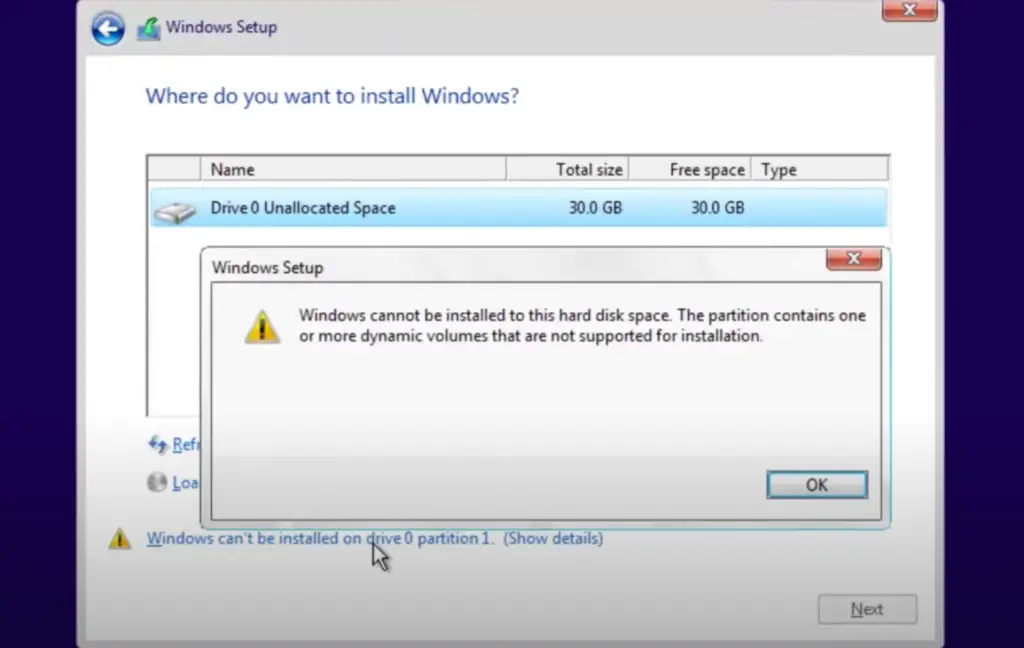
Текст ошибки говорит нам о том (если что-то в объяснении непонятно, ничего страшного, дальше разберем), что вы загрузились с установочной флешки или диска в режиме EFI (а не Legacy), однако на текущем жестком диске, на который вы хотите установить систему, находится не соответствующая этому типу загрузки таблица разделов — MBR, а не GPT (это может быть по той причине, что раньше на этом компьютере была установлена Windows 7 или XP, а также при замене жесткого диска). Отсюда и ошибка в программе установки «Невозможно установить Windows в раздел на диске». См. также: Установка Windows 10 с флешки. Также вы можете столкнуться со следующей ошибкой (по ссылке — ее решение): Нам не удалось создать новый или найти существующий раздел при установке Windows 10
Есть два способа исправить проблему и произвести установку Windows 10, 8 или Windows 7 на компьютер или ноутбук:
- Конвертировать диск из MBR в GPT, после чего установить систему.
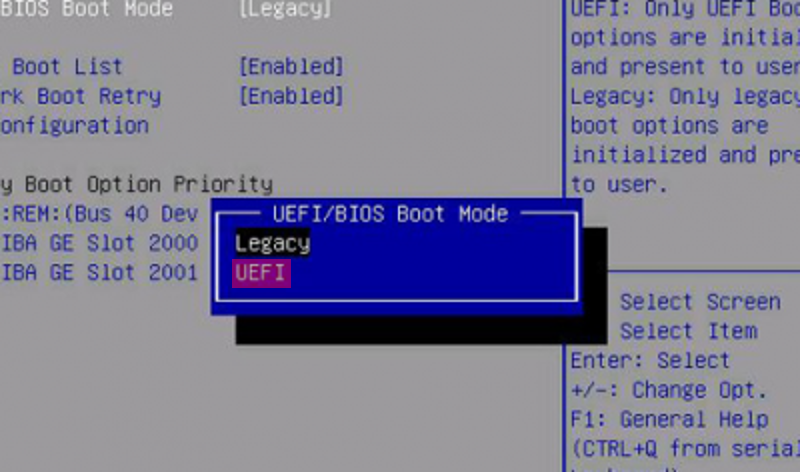
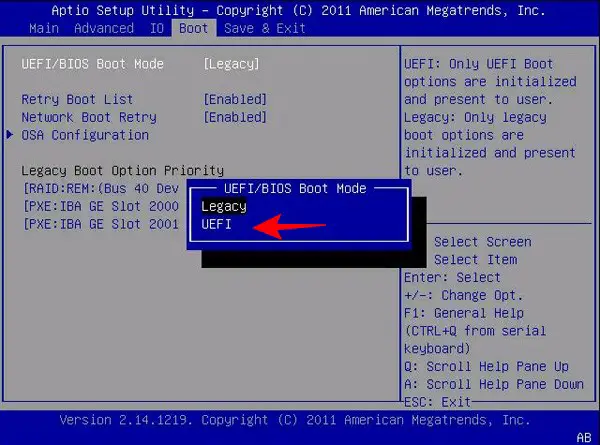
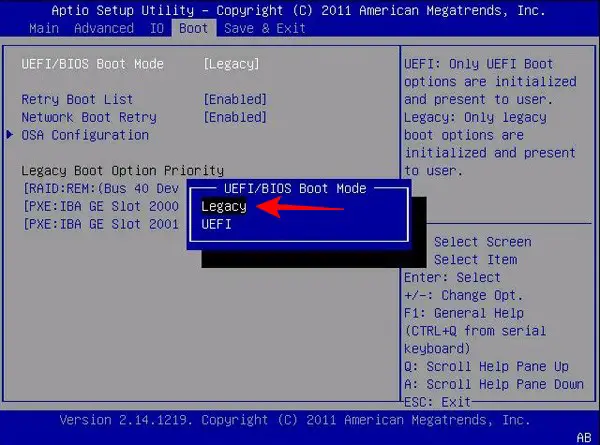
- Изменить тип загрузки с EFI на Legacy в БИОС (UEFI) или выбрав его в Boot Menu, в результате чего ошибка о том, что на диске находится таблица MBR-разделов не появится.
В этой инструкции будут рассмотрены оба варианта, однако в современных реалиях я бы рекомендовал воспользоваться первым из них (хотя споры о том, что лучше — GPT или MBR или, вернее, о бесполезности GPT можно услышать, тем не менее, уже сейчас это становится стандартной структурой разделов для жестких дисков и SSD).
Исправление ошибки «В системах EFI Windows можно установить только на GPT-диск» путем конвертации HDD или SSD в GPT
Первый способ предполагает использование EFI-загрузки (а у нее есть преимущества и лучше оставить ее) и простую конвертацию диска в GPT (точнее конвертацию его структуры разделов) и последующую установку Windows 10 или Windows 8. Именно этот способ я рекомендую, а реализовать его можно двумя способами.
- В первом случае все данные с жесткого диска или SSD будут удалены (со всего диска, даже если он разбит на несколько разделов). Зато этот способ быстр и не требует от вас никаких дополнительных средств — это можно сделать прямо в программе установки Windows.
- Второй способ сохраняет данные на диске и в разделах на нем, но потребует использования сторонней бесплатной программы и записи загрузочного диска или флешки с этой программой.
Конвертация диска в GPT с потерей данных
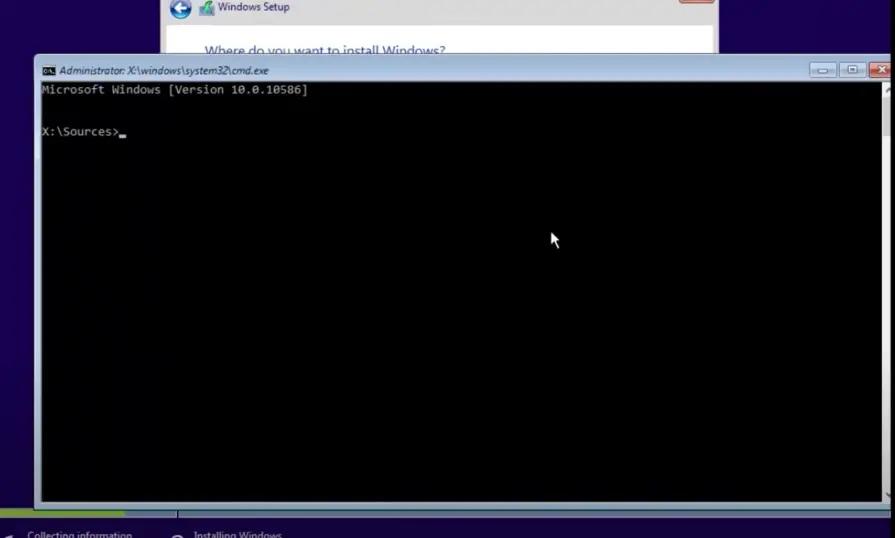
Если этот способ вам подходит, то просто нажмите клавиши Shift + F10 в программе установки Windows 10 или 8, в результате откроется командная строка. Для ноутбуков может потребоваться нажать комбинацию Shift + Fn + F10.
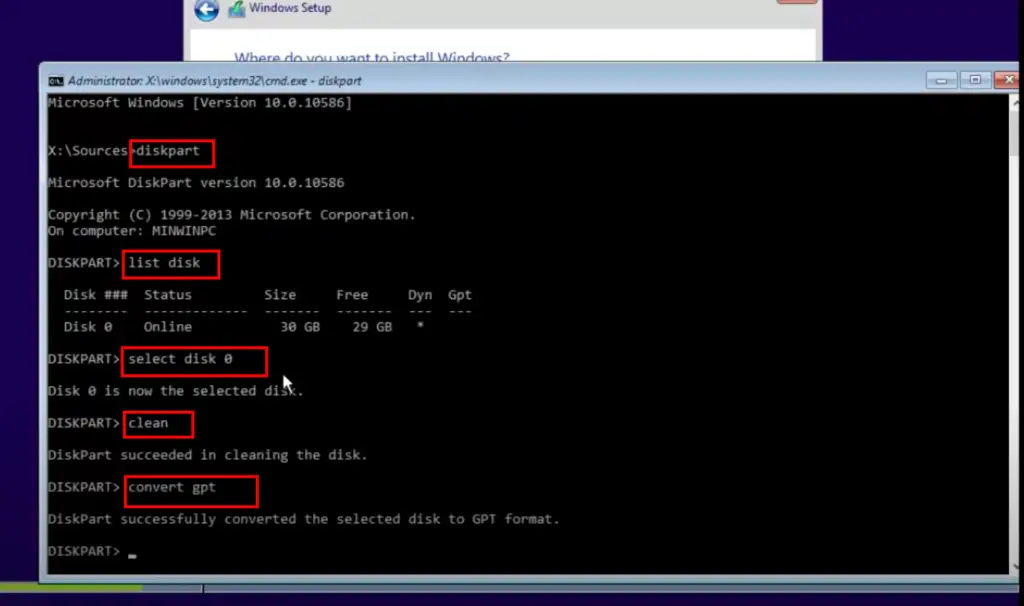
В командной строке по порядку введите команды, нажимая Enter после каждой (ниже также есть скриншот с демонстрацией выполнения всех команд, но часть команд в нём не обязательны):
- diskpart
- list disk (после выполнения этой команды в списке дисков отметьте для себя номер системного диска, на который нужно установить Windows, далее — N).
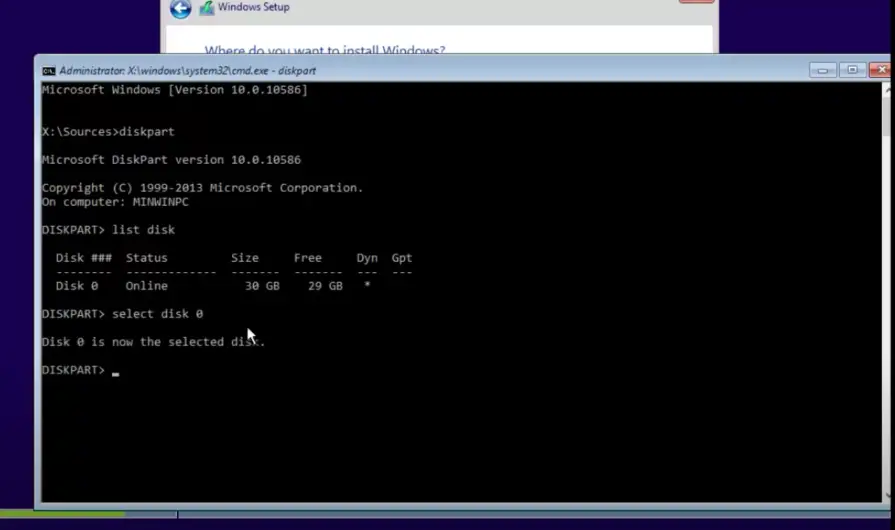
- select disk N
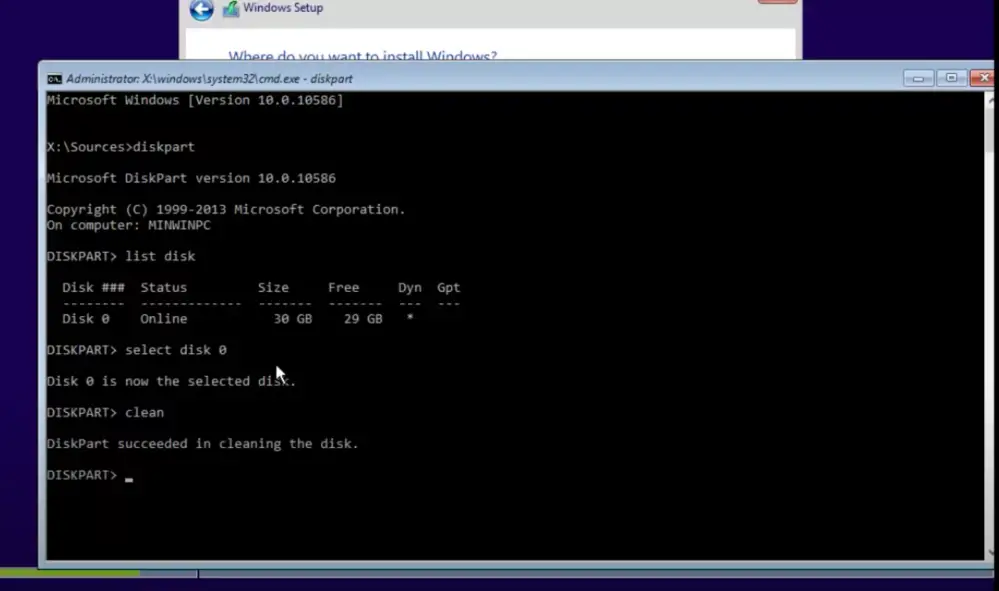
- clean
- convert gpt
- exit

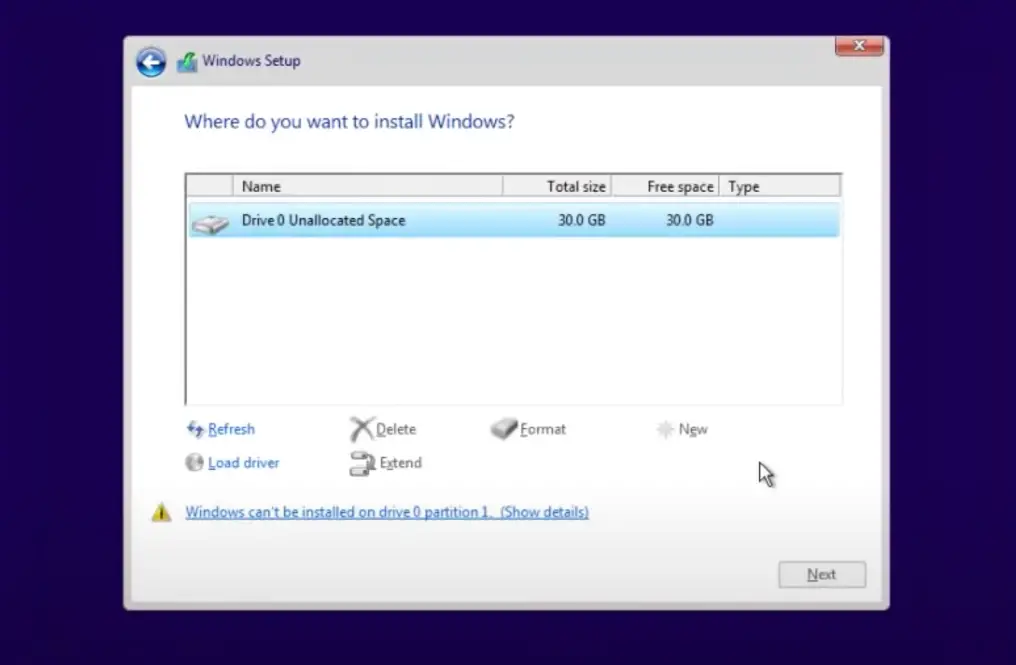
После выполнения этих команд, закройте командную строку, в окне выбора разделов нажмите «Обновить», а затем выберите незанятое пространство и продолжите установку (а можете предварительно использовать пункт «Создать», чтобы разбить диск на разделы), она должна пройти успешно (в некоторых случаях, если диск не отображается в списке, следует перезагрузить компьютер с загрузочной флешки или диска с Windows снова и повторить процесс установки).
Обновление 2018: а можно и просто в программе установки удалить все без исключения разделы с диска, выбрать незанятое пространство и нажать «Далее» — диск будет автоматически конвертирован в GPT и установка продолжится.
Как преобразовать диск из MBR в GPT без потери данных
Примечание: если вы устанавливаете Windows 10, а диск, на который происходит установка уже является системным (т.е. содержит предыдущую ОС Windows), вы можете использовать встроенную утилиту mbr2gpt.exe для конвертации в GPT без потери данных, подробнее о том, как именно это сделать: Конвертация диска из MBR в GPT с помощью встроенной утилиты Windows 10 MBR2GPT.EXE.
Второй способ — на тот случай, если на жестком диске находятся данные, которые вы ни в коем случае не хотите терять при установке системы. В этом случае вы можете использовать сторонние программы, из которых для данной конкретной ситуации я рекомендую Minitool Partition Wizard Bootable, представляющую из себя загрузочный ISO с бесплатной программой для работы с дисками и разделами, которая, в том числе, может конвертировать диск в GPT без потери данных.
Скачать ISO образ Minitool Partition Wizard Bootable можно бесплатно с официальной страницы http://www.partitionwizard.com/partition-wizard-bootable-cd.html (обновление: они убрали с этой страницы образ, но скачать его всё равно можно, как именно показано в видео ниже в текущей инструкции) после чего его потребуется записать либо на CD либо сделать загрузочную флешку (для данного образа ISO при использовании EFI загрузки достаточно просто переписать содержимое образа на флешку, предварительно отформатированную в FAT32, чтобы она стала загрузочной. Функция Secure Boot должна быть отключена в БИОС).
После загрузки с накопителя, выберите запуск программы, а после ее запуска проделайте следующие действия:
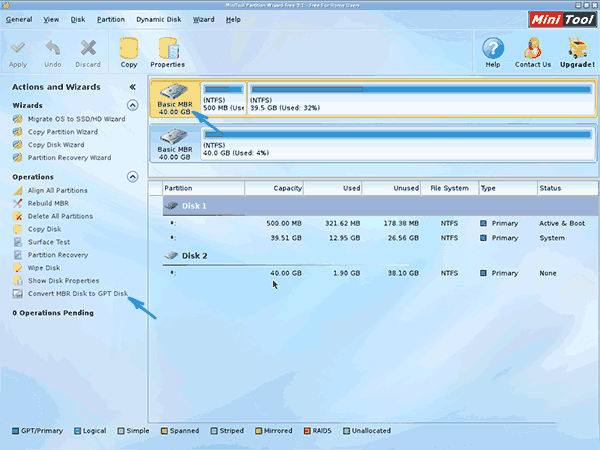
- Выберите диск, который нужно конвертировать (не раздел на нем).
- В меню слева выберите «Convert MBR Disk to GPT Disk».

- Нажмите Apply, ответьте утвердительно на предупреждение и дождитесь завершения операции конвертирования (в зависимости от объема и занятого пространства на диске, может занять продолжительное время).
Если во втором действии вы получите сообщение об ошибке, что диск является системным и его конвертация невозможна, то можно поступить следующим образом, чтобы обойти это:
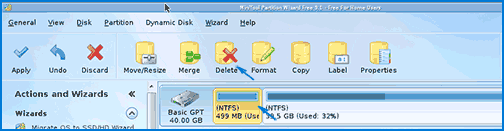
- Выделите раздел с загрузчиком Windows, обычно занимающий 300-500 Мб и находящийся в начале диска.
- В верхней строке меню нажмите «Delete», а затем примените действие с помощью кнопки Apply (можно также сразу создать на его месте новый раздел под загрузчик, но уже в файловой системе FAT32).

- Снова выделите действия 1-3 для конвертирования диска в GPT, которые ранее вызывали ошибку.
Вот и все. Теперь вы можете закрыть программу, загрузиться с установочного накопителя Windows и произвести установку, ошибка «установка на данный диск невозможна, так как на выбранном диске находится таблица MBR-разделов. В системах EFI Windows можно установить только на GPT-диск» не появится, а данные будут в сохранности.
Видео инструкция
Исправление ошибки при установке без конвертации диска
Второй способ избавиться от ошибки В системах EFI Windows можно установить только на GPT-диск в программе установки Windows 10 или 8 — не превращать диск в GPT, а превратить систему не в EFI.
Как это сделать:
- Если вы запускаете компьютер с загрузочной флешки, то используйте Boot Menu для этого и выберите при загрузке пункт с вашим USB накопителем без пометки UEFI, тогда загрузка произойдет в режиме Legacy.
- Можно точно так же в настройках БИОС (UEFI) поставить на первое место флешку без пометки EFI или UEFI на первое место.
- Можно в настройках UEFI отключить режим EFI-загрузки, а установить Legacy или CSM (Compatibility Support Mode), в частности, если вы загружаетесь с компакт-диска.
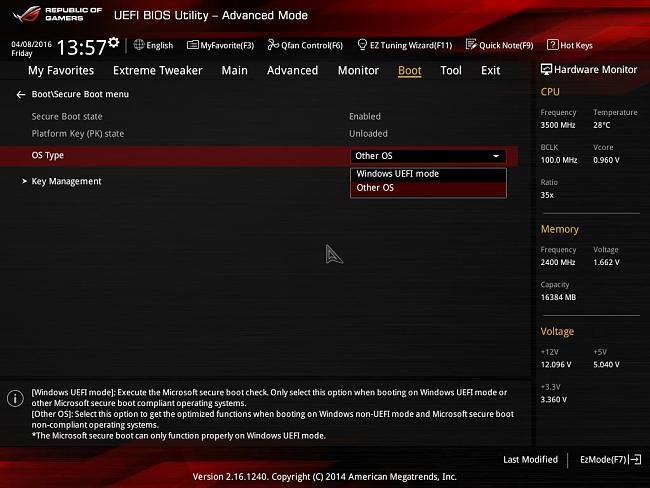
Если в данном случае компьютер отказывается загружаться, убедитесь, что у вас в БИОС отключена функция Secure Boot. Также она может выглядеть в настройках как выбор ОС — Windows или «Не-Windows», вам нужен второй вариант. Подробнее: как отключить Secure Boot.
По-моему, учел все возможные варианты исправления описываемой ошибки, но если что-то продолжает не работать, спрашивайте — постараюсь помочь с установкой.
Поскольку ПК приобретается раз в несколько лет, а его комплектующие периодически заменяются, программные и аппаратные компоненты порой плохо соответствуют друг другу. Сам ПК может быть достаточно старым, но вы укомплектовали его современным SSD. Уже не первый год доступна Windows 10, а вы до сих пор отдаете предпочтение привычной «семерке».
Помимо таких заметных каждому вещей, как производительность процессора и интерфейс ПО, есть значимые характеристики, которые начинают представлять интерес только в тех случаях, когда становятся причиной сбоев.
К ним относится и формат таблиц разделов HDD или SSD. Вы могли и не слышать о существовании характеристики накопителя, которая неожиданно огорчила, препятствуя установке Windows 7, 10 или 8.
ПК «говорит», что установка Windows невозможна. Причина: таблица разделов диска — GPT или MBR. Увы, технологии прошлого не всегда «дружат» с современными. К счастью, это легко исправимо.

Не получается поставить ОС на GPT-диск. Решения, которые помогут
Содержание
- Не получается поставить ОС на GPT-диск. Решения, которые помогут
- Настоящее (UEFI и GPT) и прошлое (BIOS и MBR)
- Выбор метода
- Помните:
- BIOS или UEFI
- Чаще всего не получается установить Windows 7
- Преобразование GPT в MBR
- Невозможно поставить ОС на диск с MBR-разделами
- Преобразование MBR в GPT. Вся информация будет удалена
- Как не потерять данные при преобразовании
- Как обойтись без преобразования
Существуют две возможности:
- Установка ОС на диск GPT.
- Преобразование в MBR.
Настоящее (UEFI и GPT) и прошлое (BIOS и MBR)
Раньше материнская плата ПК оснащалась ПО BIOS. Оно осуществляло диагностику и анализ железа, а затем загружало ОС, опираясь на загрузочную запись раздела MBR.

В более современных моделях роль BIOS выполняет UEFI. Загружается быстрее и поддерживает:
- Безопасную загрузку.
- HDD, зашифрованные на аппаратном уровне.
- Драйвера UEFI.
- GPT-диски.

GPT превосходит MBR по важным параметрам:
- Работает с HDD большего объема.
- Большее число разделов на HDD.
Выбор метода
Пытаться все же установить систему на «несовместимый HDD» или преобразовать его в MBR и тем самым сделать так, что ошибка больше появляться не будет. В каждом случае решение зависит от ряда факторов:
- Для старого ПК со старомодным BIOS и 32-битным процессором оптимальным решением будет преобразование GPT в MBR.
- Обладателям ПК с 64-битным процессором и UEFI предпочтительно установить систему на GPT-диск.
Помните:
- Предельный объем MBR-диска — 2 терабайта.
- Возможность создания на MBR-диске более четырех разделов затруднено.
BIOS или UEFI
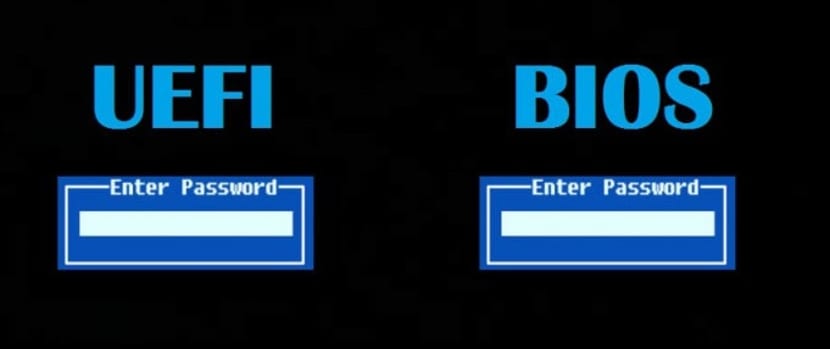
Когда вы заходите в BIOS и видите старомодный синий экран — перед вами традиционный BIOS. Если интерфейс с современной графикой и поддержкой мыши — это UEFI.
Чаще всего не получается установить Windows 7
Сложности с установкой системы на GPT-диск с большей вероятностью возникают у пользователей, которые предпочитают Windows 7.
Для установки Windows на диск со стилем разделов GPT необходимо соблюсти два условия:
- 64-битная ОС.
- Загрузка в режиме EFI.
Исхожу из того, что вы устанавливаете 64-битную версию Windows. Это означает, что сообщение об ошибке появляется по причине несоответствия второму требованию.
Не исключено, что будет достаточно поменять настройки BIOS. Зайдите в него, нажав предусмотренную для этого клавишу. Вы увидите, какую клавишу нажимать в процессе загрузки компьютера. В ноутбуках чаще всего применяется F2, в настольных моделях — Delete.
Поменяйте загрузку CSM (Compatibility Support Mode) на UEFI.
Ищите в разделах «BIOS Setup», «BIOS Features» или подобных по смыслу. В SATA определите режим AHCI, а не IDE.

Для седьмой (и еще более древних) версий Windows нужно также выключить Secure Boot.

BIOS вашей модели компьютера может выглядеть иначе. Названия пунктов меню также могут быть другими. Но смысл всегда сохраняется.
После изменения и сохранения вами новых параметров BIOS у вас появится возможность установки системы на GPT-диск. Если вы устанавливаете ОС с DVD, то сообщение об ошибке при повторной попытке установки, скорее всего, не появится.
В случае установки с USB-накопителя сообщение может отобразиться опять. В этой ситуации необходимо пересоздать установочную флешку таким образом, чтобы она поддерживала загрузку UEFI.
Не забудьте подписаться на наш Дзен
Если накопителем поддерживаются два метода загрузки, удалите файл «bootmgr» в корневой директории флешки. Тем самым вы предотвратите возможность загрузки в режиме BIOS. Если нужна загрузка в режиме BIOS, удалите каталог «efi». Не делайте этого в тех случаях, когда есть хоть малейшие сомнения. Можно повредить дистрибутив.
Преобразование GPT в MBR
Если вы располагаете ПК с классическим BIOS и собираетесь поставить Windows 7, этот вариант будет лучшим (и, возможно, единственным). В процессе преобразования вся информация с накопителя будет удалена.
Во время работы мастера установки ОС нажмите F10 и Shift. В некоторых моделях ноутбуков — F10, Fn и Shift. В открывшейся командной строке последовательно введите такие команды:
— diskpart
— list disk (запишите номер подлежащего преобразованию диска)
— select disk N (вместо N — записанный номер)
— clean (команда очистит диск)
— convert mbr
— create partition primary
— active
— format fs=ntfs quick (быстрое форматирование в файловой системе NTFS)
— assign
— exit

Невозможно поставить ОС на диск с MBR-разделами
Вероятна обратная ситуация. Появляется ошибка:
«Установка Windows на данный диск невозможна. На выбранном диске находится таблица MBR-разделов. В системах EFI Windows можно установить только на GPT-диск»
Она означает, что вы пытаетесь установить систему с DVD или USB-накопителя в режиме EFI. Таблица разделов HDD или SSD старая — MBR. В этом случае вы можете:
- Преобразовать SSD или HDD в GPT.
- В UEFI или BIOS поменять установленный способ загрузки с Legacy на EFI.
Первый вариант предпочтительнее, поскольку проще и быстрее. Помните, что информация со всех разделов накопителя будет полностью потеряна.
Преобразование MBR в GPT. Вся информация будет удалена
В установщике системы запустите командную строку:
- F10 и Shift (на настольных ПК).
- F10, Fn и Shift (на некоторых ноутбуках).
В открывшемся окне:
- Последовательно вводите показанные команды.
- Нажимайте Enter после ввода каждой из них.
Последовательность команд:
— diskpart
— list disk (запишите номер подлежащего преобразованию диска)
— select disk N (вместо N — записанный номер)
— clean (команда очистит диск)
— convert gpt
— exit

Когда команды применены:
- Закройте окно командной строки.
- Нажмите «Обновить» в окне выбора разделов.
- Нажмите «Создать» для формирования нескольких разделов на HDD или SSD.
- Выберите свободное пространство и запустите установку ОС.

Более простой способ преобразования с потерей информации на накопителе:
- Удалите все разделы на HDD или SSD.
- Выберите свободное пространство.
- Нажмите «Далее».
Результатом ваших действий станет автоматическое преобразование в GPT. Следующим шагом стартует установка ОС.
Как не потерять данные при преобразовании
Используйте стороннюю утилиту Minitool Partition Wizard Bootable. Скачайте ISO-образ и запишите его на флешку, отформатированную в FAT32. Необходимые условия:
- Используется загрузка EFI.
- В BIOS выключена функция «Secure Boot».
Загрузите ПК с созданного вами накопителя. В окне программного инструмента:
- Выберите HDD или SSD таблицу разделов которого нужно преобразовать.
- В левой части окна программы выберите пункт «Convert MBR Disk to GPT Disk».
- Примените изменения нажатием кнопки «Apply».
- Дайте положительный ответ на предупреждение утилиты.
- Ждите завершения преобразования. Время, которое потребуется, зависит от объема накопителя и занятого пространства на нем.

Если диск системный, может появиться сообщение о том, что его преобразование невозможно. Чтобы все же преобразовать его:
- Выберите раздел загрузчика ОС, который располагается в самом начале.
- Удалите его, нажав «Delete» и подтвердив действие кнопкой «Apply». Вместо него вы можете тут же создать новый раздел загрузчика, но уже в файловой системе FAT32.
- Повторите действия для преобразования таблицы разделов.
Как обойтись без преобразования
Зайдите в BIOS и установите режим загрузки CSM (Compatibility Support Mode) или Legacy, отключив EFI. Отключите «Secure Boot».
Ранее я подробно рассмотрел процессы чистой установки Windows 10 и Windows 7.
Какие другие затруднения возникали у вас при установке Windows?
Вот уже четыре человека обратилось ко мне с одним и тем же вопросом: как быть если при установке Windows на MAC выдает ошибку о несовместимости таблиц разделов MBR (Master Boot Record) и GPT (GUID Partition Table)?
Проблема действительно существует и затрагивает установку различных версий Windows (7, 8, 10). Покопавшись на буржуйских форумах и на официальном сайте поддержки Apple, я нашел несколько путей решения.
Некоторые из них, как и ожидалось, не работают, но я лично попробовал несколько из них и готов выдать рабочее решение по устранению ошибки несовместимости MBR и GPT разделов. Поехали!
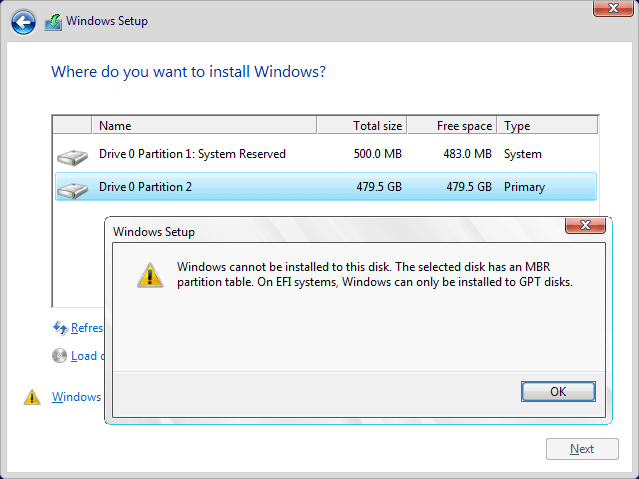
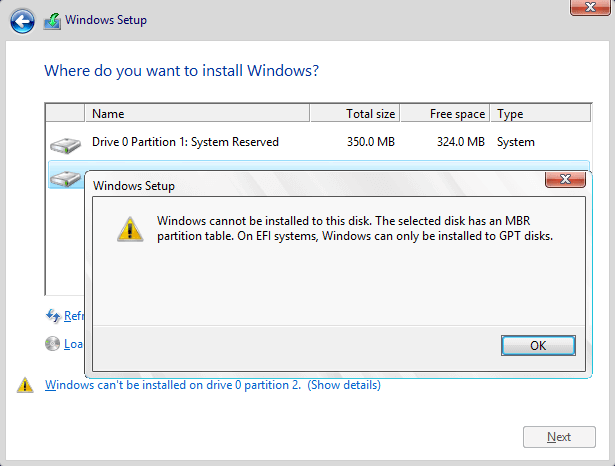
Давайте для начала поймем суть проблемы. Скорее всего вы уже пробовали создавать дополнительный раздел для установки Windows, используя «Ассистент Boot Camp», но в итоге у вас ничего не получилось и при выборе раздела для установки Windows на экран выскакивало следующее сообщение:
Windows cannot be installed to this disk. The selected disk has an MBR partition table. On EFI systems, Windows can only be installed to GPT disks.
Все дело в том, что «Ассистент Boot Camp» создает в новом разделе гибридную MBR таблицу, которая в OS X распознается как GPT, а в Windows как MBR. Вот это и есть камень преткновения, который мешает вам выбрать данный раздел при установке Windows на MAC.
Сразу же перейдем к первому варианту решения данной проблемы.
Содержание
- Создаем нормальный GPT раздел для установки Windows
- Форматируем новый раздел в NTFS из командной строки
- Полезное из комментариев
Создаем нормальный GPT раздел для установки Windows
Идея этого способа очень проста. Нам необходимо удалить раздел, созданный Ассистентом Boot Camp и создать новый раздел, используя Дисковую Утилиту (Disk Utility). Для этого делаем так:
ШАГ 1 — Запускаем Дисковую Утилиту и удаляем раздел с названием BOOTCAMP нажав на «минус».
ШАГ 2 — Восстанавливаем раздел Macintosh HD до максимального размера. Это очень важно, т.к. именно этот шаг вернет «свободному» пространству необходимую GPT разметку.
ШАГ 3 — Вручную отделяем СВОБОДНОЕ пространство для установки Windows. Я устанавливаю облегченную версию Windows 7, и мне с головой хватает 10Гб. В вашем случае, решайте сами. В поле Формат необходимо ОБЯЗАТЕЛЬНО выбрать «MS-DOS (FAT)».

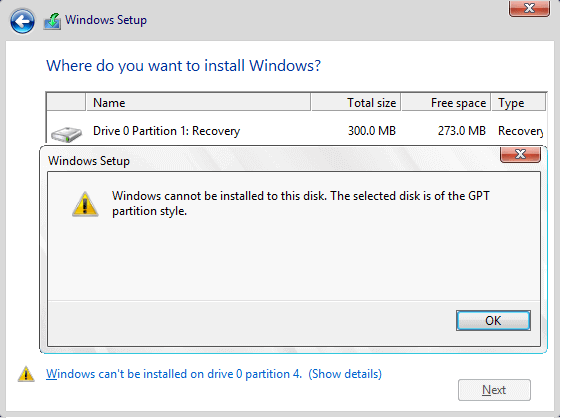
Если при создании нового раздела в поле Формат выбрать «Свободно», установщик Windows сначала попросит вас создать на свободном месте новый раздел, затем отформатировать его, а потом отправит вас подальше еще одним капризным сообщением типа: «Windows cannot be installed to this disk. The selected disk is of the GPT partition style».
ШАГ 4 — Перезагружаем MAC с зажатой кнопкой Alt (Option) и пробуем установить Windows. На странице выбора раздела для установки, выбираем созданный только что раздел. Установщик будет ругаться что указанный вами раздел не форматирован как NTFS. Удовлетворите его пожелания, нажав на кнопку Format на этой же странице.
Сегодня я установил Windows на свой MacBook Air уже четыре раза!!! И все ради того чтобы отличить «что работает, а что нет». Так вот способ, описанный выше, РАБОТАЕТ для меня ТОЧНО. Если вам не пошептало, пробуем способ ниже.
Форматируем новый раздел в NTFS из командной строки
Все ниже перечисленные действия необходимо выполнять в запущенном мастере установки Windows. Например на странице где вас просят ознакомиться с условиями лицензии.
Как только мастер установки дойдет до этого места, начинайте действовать по плану ниже:
ШАГ 1 — Нажимаем комбинацию Shift + F10 для запуска командной сроки. Появится привычное окно с белыми буквами на черном фоне.
ШАГ 2 — Вводим команду diskpart и нажимаем Enter. Запустится утилита для управления дисками.
ШАГ 3 — Вводим команду list disk и подтверждаем по Enter. На экране отобразится список дисков с которыми мы можем работать. В идеале это должен быть всего один диск, но их может быть и больше. Нас интересует основной жесткий диск и почти всегда он обозначен как Disk 0.
ШАГ 4 — Вводим команду select Disk 0 для выбора диска и подтверждаем по кнопке Enter. На экране появится сообщение о том, что Диск 0 теперь является выбранным диском.
ШАГ 5 — Теперь отобразим разделы для выбранного диска. Для этого вводим команду list partition.
ШАГ 6 — В списке находим наш раздел (ориентируйтесь по размеру). Обычно последний созданный раздел расположен самым последним (простите за тофтологию). В моем случае это Partition 4. Вводим команду select partition 4. Будьте внимательны с выбранным номером диска, так как здесь очень просто что-то запороть.
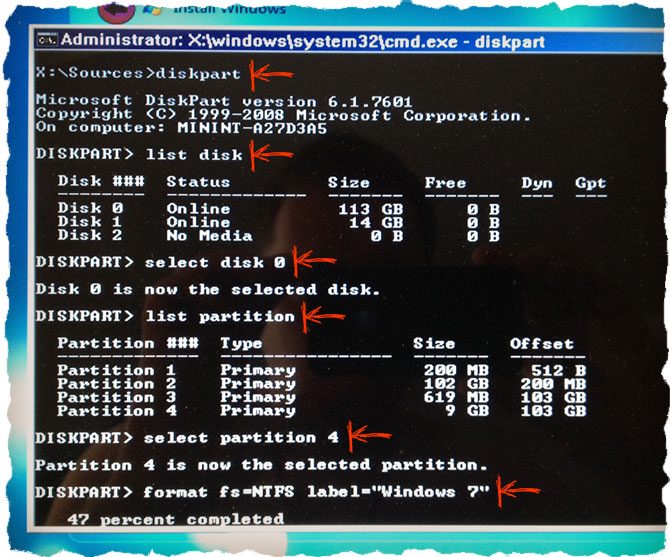
ШАГ 7 — Теперь форматируем выбранный раздел при помощи команды format fs=NTFS label="Windows".
ШАГ 8 — После того как форматирование закончится, вводим команду exit для выхода из утилиты управления дисками. Закрываем окно с командной строкой.
Теперь можно пробовать продолжать установку Windows.
Полезное из комментариев
Комментарий от baseman
Когда выскакивает: «Установка Windows на данный диск невозможна.На выбранном диске находится таблица MBR-разделов.В системах EFI Windows можно установить только на GPT-диск» — необходимо прогрузиться в OS X удалить Boot Camp/ом том Windows (до одного раздела), дисковой утилитой создать дополнительный mac/овский том (Mac OS Extended (журнальный) и прогружаемся с флэшки (установщика Windows). В установке удаляем том, который только что создали и на неразмеченной области создаем диск. И далее устанавливаем Windows.
Комментарий от Антона
Ребята! Мучался с этой проблемой 2 дня, сначала на macOS sierra не мог запихнуть через буткамп Вин7, ругается вставьте образ Вин10 64бит и info.plist менял и т.д., надоело, ладно поставлю 10. Все вроде ок, буткамп создает флеху, а кстати у меня эир 2010, и после того как он скачал файл поддержки выдал мне сообщение, что мол мне Вин 10 ставить нельзя, поставь Вин 7/8… Думаю загрузочная флэха создана, хрен с тобой, через менеджер дисков разбил на разделы и загрузился с юсб, все красиво дохожу до выбора диска а мне MBR, GPT… Искать в гугле, нашел этот сайт попробовал два способа, не помогло в дисковой утилите создать второй диск в формате MacOs журнальный, и во время выбора диска установки — удаляем созданный и создаем новый с программы установки Вин. После этого все пошло.
Комментарий от Neffy:
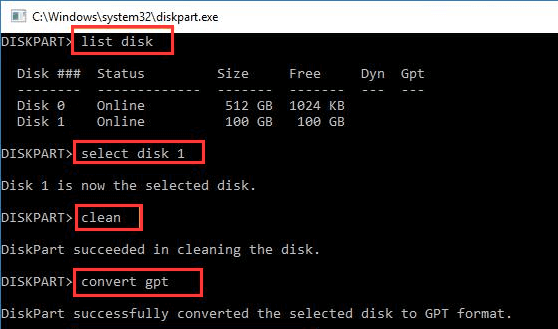
Нужно выполнить команды:Diskpart
List disk
Select disk 0 (основной диск)
List partition
Select partition 1(отдел где будет Windows)
Clean
Convert gpt
ExitВ установке кликнула рефреш. Диск пропал куда собиралась устанавливать, но появилась кнопка «создать новый». Кликнула создать новый, ввела количество необходимой памяти, попросил создать ещё части для каких то системных файлов кликнула ок, НАЧАЛАСЬ УСТАНОВКА!!
Windows 10 home с флешки
MacBook Pro retina 13 late 2012 os high Sierra
Я надеюсь после таких шаманских обрядов, Windows установится раз и навсегда.
Если у вас все-таки не получилось продолжить установку, пишите в комментариях что не так. А еще почитайте о других проблемах при установке Windows на компьютеры MAC.
Подписывайтесь на наш Telegram, VK.
Position: How Tos — Disk Utilities — Fixed: The Selected Disk Has an MBR Partition Table
Table of Contents:
Error overview
When you install Windows operating system on your computer, you may often run into an annoying error that prevents you from successfully installing system on your PC. The error message might be «Windows cannot be installed to this disk. The selected disk has an MBR partition table. On EFI system, Windows can only be installed to GPT disks». This computer’s hardware may not support booting to this disk. Ensure that the disk’s controller is enabled in the computer’s BIOS menu; or «Windows cannot be installed to this disk. The selected disk is of the GPT partition table» The error «the selected disk has an MBR partition table» is very common which appears on many Windows versions such as Windows 7, windows 8, Windows server 2008, etc. Here is a real case found on forum:
«I have a Dell laptop running Windows home on an SSD hard drive. I want to format hard drive and reinstall Windows 7, for current system is very slow. I went to BIOS to change boot option to legacy (There are no other options besides Legacy and UEFI). Both hard drive and SSD can be recognized in BIOS. The Windows setup couldn’t work as expected and constantly gave «the selected disk has an MBR partition table» error when I select the partition that I want to format.»
MBR VS GPT
MBR VS GPT, which one is better for your computer? MBR stands for Master Boot Record which is a special boot sector located at the very beginning of storage device. It contains boot loader for operating system. The shortcoming lies in that MBR disk can manage up to 2TB disk space and it can hold four primary partitions at most.
GPT is the short form of GUID (Global Unique Identifier) Partition Table and it is another way to storing partition information. GPT disk eliminates limitations on MBR, thus it doesn’t have limit on disk capacity or partition numbers. When you set up new disk on Windows 8 or 10, you will be recommended to use GPT.
It mainly depends on your BIOS configuration whether you can use MBR or GPT. Old computers usually employ Legacy BIOS + MBR boot mode, while recent computers use UEFI + GPT. If you do not follow these rules, you are likely to encounter error messages talked about in this post. For information about GPT and MBR, please refer to Windows and GPT FAQs
Therefore, if you want to use the GPT partition scheme, you need to enter BIOS, so that you can change boot option from Legacy to UEFI. Then you also need to make sure the hard drive where you want to install Windows is partitioned with GUID partition table. If not, you need to convert MBR disk to GPT or repartition hard drive.
This article provides three solutions to fix «Windows cannot be installed to this disk. The selected disk has an MBR partition table. On EFI system, Windows can only be installed to GPT disks.» so that you can complete Windows installation process smoothly. You can choose any solution based on your own preference and actual situation on your computer.
The first solution helps to change BIOS boot settings, by which you can install operating system on an MBR disk. If you want to keep UEFI and GPT, you can just convert current hard drive to GPT disk. Then you won’t be blocked by the issue. Both solution 2 and solution 3 explain methods to convert MBR to GPT: DiskGenius and Command Prompt.
DiskGenius is third-party and free partition manager software, and it is able to convert disk between MBR and GPT without losing data. The converting process is quite easy and simple. The third method presents how to convert MBR to GPT using DiskPart commands, which is complicated in operation and clears all data on the disk.
Solution #1: Change BIOS boot settings
Step 1. You can go through BIOS setting and change the UEFI boot configuration. What you need to do is temporarily switching EFI boot to SATA or legacy mode so that Windows can be installed to Legacy + MBR booted computer.
Step 2. Restart computer and enter BIOS by pressing Del or F10 before system boots. The specific key varies from Motherboard brand to another, but you can see it on screen soon after computer is powered on.
Step 3. In BIOS, go to Boot Devices and find Boot order where you can disable EFI sources or change DVD drive from UEFI to SATA or Legacy Mode.
Step 4. Save changes and exit.
Step 5. Boot computer with system installing CD or disk and try install again.
Solution #2: Convert MBR disk to GPT without data loss
For the moment, your hard drive is of MBR style while BIOS is set to UEFI boot mode. Thus, another way to solve this error is converting MBR partition table to GPT. When the disk is converted to GPT, you will no longer face the issue.
Many guides on the Internet suggest converting MBR to GPT using command line, but that will erase all partition and data on the disk. You should make sure all important files are backed up. The most convenient and easy method to convert MBR to GPT is using third party software which is able to do the converting without disturbing existing files, saving time and effort to backup data. Let’s see how to convert MBR disk to GPT using free partition manager DiskGenius Free.
Step 1. Install and launch DiskGenius Free. You can download this free partition manger free of charge from download center.
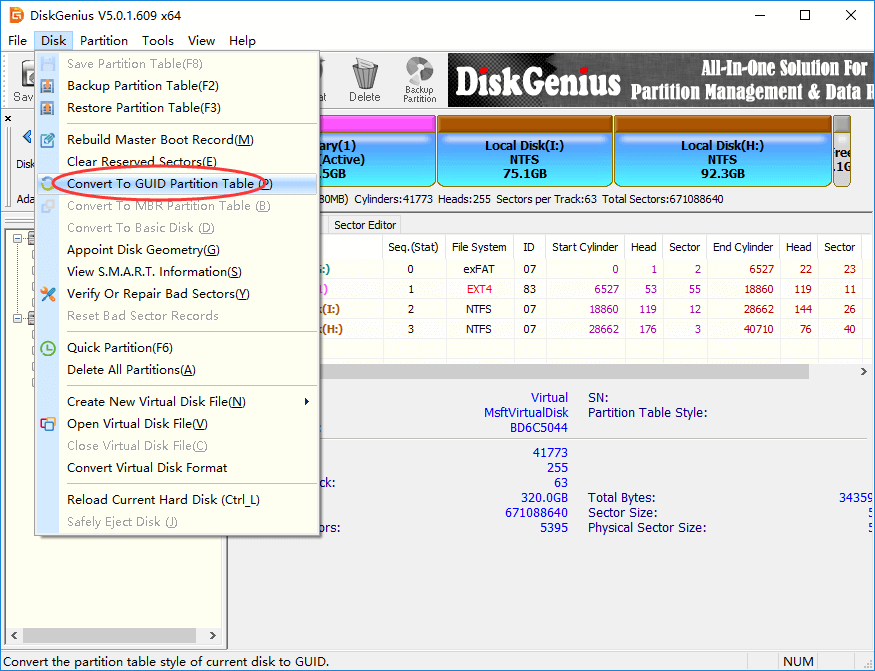
Step 2. Locate and select the MBR disk to be converted to GPT in DiskGenius Free and click Disk menu to choose Convert To GUID Partition Table.
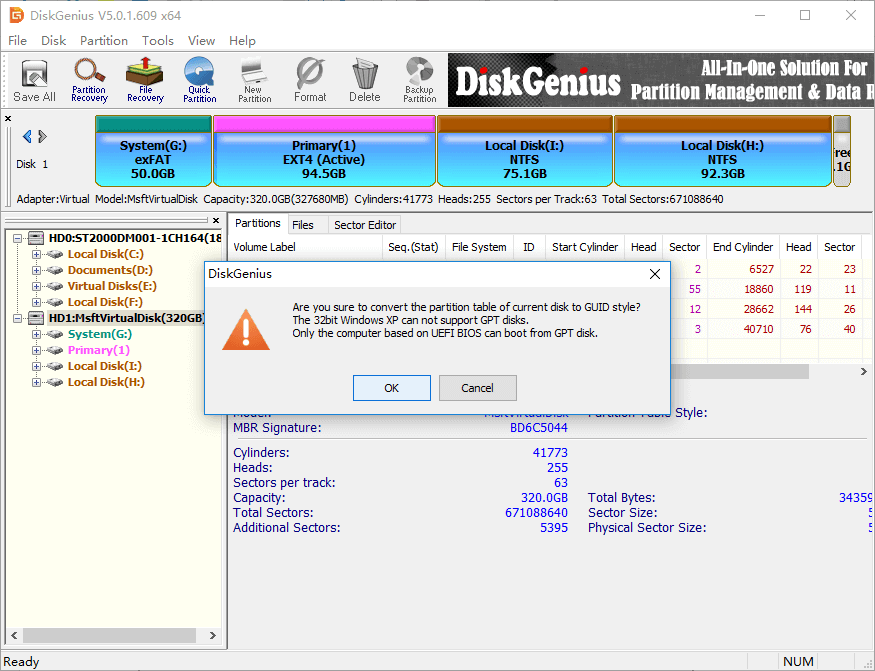
Step 3. Click OK button on the message box.
Step 4. Click Save All button to save changes to partition table and the conversion takes effect.
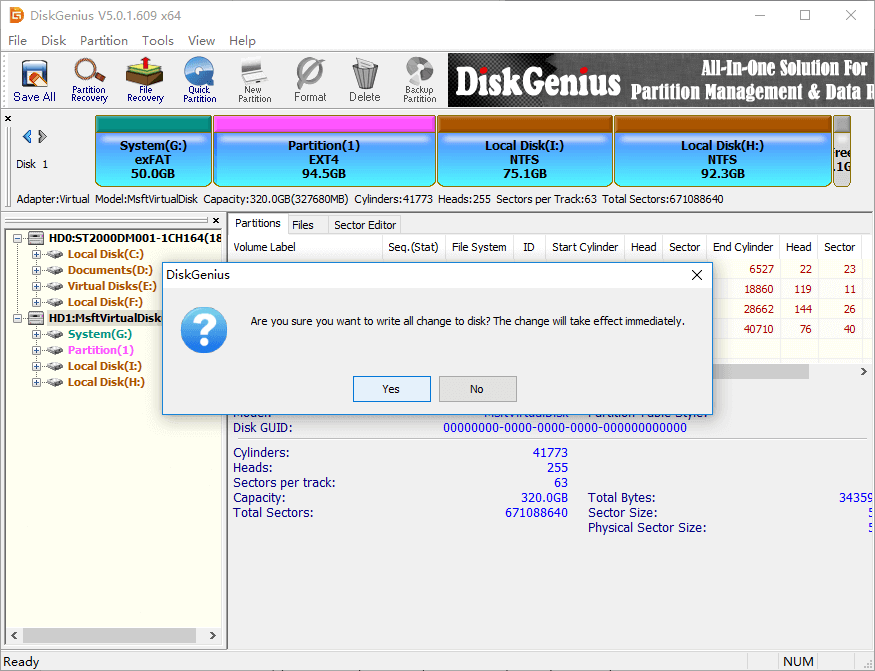
Note: The converting process does not affect data on the disk. When the disk is converted to GPT, you can retry installing Windows again. If your computer is not able to boot to system, you can do the converting under Windows PE. DiskGenius is able to boot to WinPE version directly, or create a WinPE bootable USB disk.
Solution #3: Convert MBR disk to GPT disk using Command Prompt
This method is capable of converting MBR disk to GPT, as well, but it is data destructive, which means you will certainly lose data and partition on the disk. Thus, you need to backup all crucial files to a different hard drive in advance. Try this method your own risk.
Step 1. At the Windows installation screen, go to command prompt by pressing Shift and F10 key.
Step 2. Type following commands in Command Prompt and press Enter key after each command.
diskpart
list disk (remember the disk number for which you want to convert to GPT)
select disk # (replace # with the number of the disk to be converted partition table type)
clean (this command removes all partition and data off the disk)
convert gpt
Step 3. Once the disk is converted to GPT, you can create partitions on the disk and install Windows without errors.
Conclusion
This article presents three methods to fix «The selected disk has an MBR partition table», and hope you can fix it easily and get Windows installed successfully. If you have any questions regarding this issue, please feel free to contact us vis email.
На чтение 6 мин Просмотров 1.7к.
Обновлено 01.03.2022
Содержание
- MBR или GPT при установке Windows на Mac
- Как создать раздел GPT или преобразовать MBR в GPT при установке Windows
- Как отформатировать раздел в NTFS на MacOS
- Опыт пользователей
- Дополнительный способ решить задачу
При установке ОС Windows на Macbook или iMac от Apple пользователи часто встречаются с проблемой несовместимости таблиц разделов GPT в MBR. То есть, фактически система уведомляет об ошибке системного установщика Windows 7, 8, 10, 11 версии.
Ошибка на английском выглядит следующим образом: Windows cannot be installed to this disk. The selected disk has an MBR partition table. On EFI systems, Windows can only be installed to GPT disks.
MBR или GPT при установке Windows на Mac

Когда речь идет об установке Windows на Мак, в диске нужно сначала создать разделы. MBR (или главная загрузочная запись) содержит программный код, который осуществляет поиск уже установленной программы и загружает ее, находя необходимые элементы для данной операции. Формат считается устаревшим, а на его смену постепенно пришел GPT.
GPT создаёт для каждого раздела диска уникальную запись, а также позволяет сделать несколько копий сегментов хранилища памяти. Это является большим плюсом. Если в MBR происходит сбой, то есть вероятность не запустить компьютер, так как вся загрузочная информация может находиться на поврежденном сегменте.
При попытке создать отдельный раздел на диске система выдает ошибку, которая говорит о том, что для установки Windows на системы EFI могут применяться только носители информации, поддерживающие GPT. Это происходит сразу после попытки использовать опцию «Assistent Boot Camp».
Несовместимость MBR и GPT имеет интересную особенность. Выбрав «ABC», создается новый раздел, помещается туда таблица MBR, но операционная система Mac OS X «видит» эту таблицу в качестве GPT. Windows же распознает ее как MBR. Получается, в итоге, двойной вариант. Программное обеспечение не знает, что выбрать, поэтому и появляется сообщение об ошибке.
Вопрос можно решить несколькими способами. Однако пользователям приходится выбирать наиболее действенный вариант в конкретной ситуации.
Как создать раздел GPT или преобразовать MBR в GPT при установке Windows
Метод легко используется на практике. Удаляется раздел, который появился благодаря опции «Assistent Boot Camp». Далее создается новый раздел дискового пространства. Для этого следует использовать специальную утилиту Disk Utility. Она была разработана специально для системы macOS, облегчая работу с файлами хранителей информации.
Создание раздела GMT включает в себя несколько этапов:
- Запуск Disk Utility и удаление раздела BOOTCAMP (появился для установки Windows).
- Восстановление Macintosh HD (это выделенный системой том, на котором хранится защищенная от перезаписи информация). Указать нужно максимально возможный размер, и разметка GPT тоже восстановится.
- Далее предстоит произвести ручные настройки, поэтому это нужно делать очень внимательно. Сначала необходимо освободить место для установки Windows. Каждая версия OC имеет свой объем. В меню «Информация о разделе» выбирается пункт «Формат». После в пустое поле этого пункта вписывается «MS-DOS (FAT)». Это универсальная файловая система, которая работает на большинстве устройств и даже используется в бытовой технике.
Вариант «Свободно» применять нельзя, так как это ведет к ошибке о невозможности установки Windows из-за диска, поддерживающего сегментацию формата GPT.
- Теперь нужно перезагрузить Mac, при этом зажав кнопку «Alt (Option)». На этом этапе можно устанавливать Windows. Выбирается новый раздел на диске. Система укажет, что выбранный сегмент требует форматирования NTFS (создано специально для Windows). Поэтому достичь нужного стандарта можно при помощи клавиши «Format».
Как отформатировать раздел в NTFS на MacOS
Форматирование диска на MacOS в NTFS можно произвести через командную строку. Но процесс требует запуска среды установки Windows. Нужно дождаться, когда на экране появятся условия лицензирования ПО, и в этот момент приступить к следующему алгоритму действий.
- Для запуска командной строки нужно зажать сочетание клавиш «Shift» + F10.
- Далее необходимо запустить Disk Utility. Для этого следует ввести в поле ввода команду diskrapt и нажать «Enter».
- После этого нужно получить доступ к списку установленных дисков. Для этого вводится list disk, подтвержденный клавишей «Enter». Нужно найти базовый Hard Disk, на котором установлена операционная система. Обычно он единственный в списке, но иногда может быть несколько хранилищ данных. Стандартно нужный диск отображается под названием Disk 0. Его нужно сделать рабочим. Вводится команда select Disc 0, и нажимается кнопка «Enter».
- После необходимо проверить созданные на Disk 0 разделы. Поможет увидеть командный перечень list partition.
- Затем пользователю будет представлен список. Найти нужный раздел проще всего по размеру. Самый свежий раздел, как правило, размещен в конце перечисления. На этом этапе нужно соблюдать внимательность и осторожность, чтобы не удалить важные данные.
Далее на основе данных объема носителя находится нужный раздел и вводится команда с его названием (например, select solution 5).
- Теперь можно производить форматирование. Делается это с помощью команды format fs=NTFS label= «Windows».
- После совершенной операции нужно выйти из утилиты, нажав команду exit. Далее продолжается стандартная установка новой операционной системы.
Опыт пользователей
Представленные способы достаточно эффективны, однако многие продолжают находить новые варианты решения проблемы несовместимости разделов MBR и GPT.
Один из владельцев Mac предлагает следующий метод:
- Нужно загрузить MacOS X или выше.
- С помощью Boot Camp удалить том Windows, создав том для «родной» ОС Mac OS Extended.
- Далее с помощью образа на флеш-карте необходимо загрузить установщик Windows. Новый созданный том удаляется, и создается еще один — в области без разметки. После этого идет свободная установка ОС.
Другой пользователь отметил тот факт, что методы рабочие, почти. На моменте создания разделов нужно записать второй диск, отформатированный в MacOS Extended. Этап выбора установочных дисков знаменуется удалением вновь созданного пространства и запускается еще один диск, который появляется с установочной флеш-карты.
Вариант для MacBook Pro на OS High Sierra и домашней Windows 10. Пользователь предлагает такой алгоритм:
- первой вводится команда diskpart;
- затем необходимо выбрать list disk;
- после этого нужно найти select disk 0;
- далее следует ввести команду list partition;
- после этого – select partition 1 (это то место на диске, куда установится Windows);
- далее – clean;
- затем необходимо выбрать команду convert GPT;
- exit
После проделанных операций начнется установка. Нужно нажать «Refresh», появится предложение о создании нового диска. Далее вводится необходимый объем памяти, и создаются новые сегменты. После выбора «OK» начинается установка ОС Windows.
Дополнительный способ решить задачу
Когда появляется сообщение: «Установка Windows на данный диск невозможна. На выбранном диске находится таблица MBR-разделов. В системах EFI Windows можно установить только на GPT-диск» делаем следующее:
- Загружаемся через MacOS и удаляем через BootCamp том содержащий Windows.
- Создаем с помощью менеджера дисков дополнительный том MacOS Extended.
- Пробуем загрузиться с установочной флешки Windows.
- При установке удаляем том MacOS и на нем создаем новый раздел.
- После этого Windows будет успешно установлен на мак с нужным разделом.
Несмотря на эффективность различных методов, стоит соблюдать осторожность, особенно с командами clean. Иногда это приводит к безвозвратному удалению важных системных файлов.
Друзья, я надеюсь я помог вам этим материалом, и при установке виндовс на мак теперь не должно быть проблем связанных с несовместимостью разделов GPT и MBR. Если остались вопросы, давайте обсудим их через форму комментариев. Рад был помочь!
Are you having problems installing Windows on your target GPT or MBR drive? On this page, we’ll thoroughly discuss this issue in two parts and you can follow to find respective solutions toward different errors.
| Workable Solutions | Step-by-step Troubleshooting |
|---|---|
| Fix Can’t Install Windows on GPT Disk | Fix 1. Convert GPT Disk to MBR Disk using EaseUS Partition Master…Full steps Fix 2. Enable UEFI Boot Option in BIOS…Full steps Fix 3. Convert MBR to GPT via EaseUS Partition Master…Full steps Fix 4. Convert MBR to GPT using DiskPart…Full steps |
| Fix Windows Cannot Be Installed the This Disk | Fix 1. Convert Dynamic Disk to Basic Disk…Full steps Fix 2. Remove HDD Protection and Change SATA Controller Mode…Full steps Fix 3. Repair Your HDD…Full steps Fix 4. Format the Partition to NTFS…Full steps |
Check out and find the easiest solution to resolve your problem, installing Windows on your PC without any issue now.
Note that if you have saved important data on the target disk, back up your data first as some of the following fixes may remove data on your target drive.
Applies to: Fix «Windows Cannot Be Installed on GPT Partition Drive’ or «Can’t Install Windows on GPT» error.
Problem: Can’t Install Windows on GPT Disk
«I’m trying to install Windows 10 on a new SSD, but the computer keeps giving me this message ‘Windows cannot be installed on this disk. The selected disk is of the GPT partition style.’ What does this mean? Do I have to convert the GPT disk to MBR? Or to enable UEFI boot mode in BIOS?«
You won’t be able to install Windows on GPT disk if you are receiving this notice from your PC as listed below:
Error 1. «Windows cannot be installed to this disk. The selected disk is of the GPT partition style.»
Error 2. «Windows cannot be installed on this disk. The selected disk has an MBR partition table. On EFI systems, Windows can only installed on GPT disks».
Those two errors mean that the Windows cannot be installed on GPT drive. Don’t be panic. In the following, we’ll explain why you cannot install Windows to the selected disk and list practical solutions to help you out.
Why You Fail to Install Windows on GPT Drive
1. You forget to enable UEFI boot option. Or the motherboard supports Legacy BIOS only. (Error 1)
2. If you receive Error 2, you must learn something about UEFI and BIOS. Know the differences and relations between them.
Usually, when you install Windows on UEFI-based PC using Windows Setup, the target disk must be set up to UIEFI mode or BIOS compatibility mode. If your computer is booted in UEFI mode,while your target disk is not configured UEFI mode, you’ll met Error 2.
4 Fixes to Resolve «Cannot Install Windows on GPT Disk» Error
Here, we’ll provide you with 4 effective methods to fix this error issue and relative errors. Note that the former method is presented, the higher success rate it will be.
Fix 1. Convert GPT Disk to MBR Disk using EaseUS Partition Master [Error 1]
When the computer doesn’t support UEFI, you cannot install the Windows on GPT drive unless you convert the disk from GPT to MBR.
Professional partition manager software — EaseUS Partition Master can organize your hard drive and change the partition style easily. You can easily convert GPT to MBR with the help of this software, making disk available to install Windows again:
Step 1. Install and launch EaseUS Partition Master on your computer, go to the Disk Converter section.
Step 2. Select «Convert GPT to MBR» and click «Next» to continue.
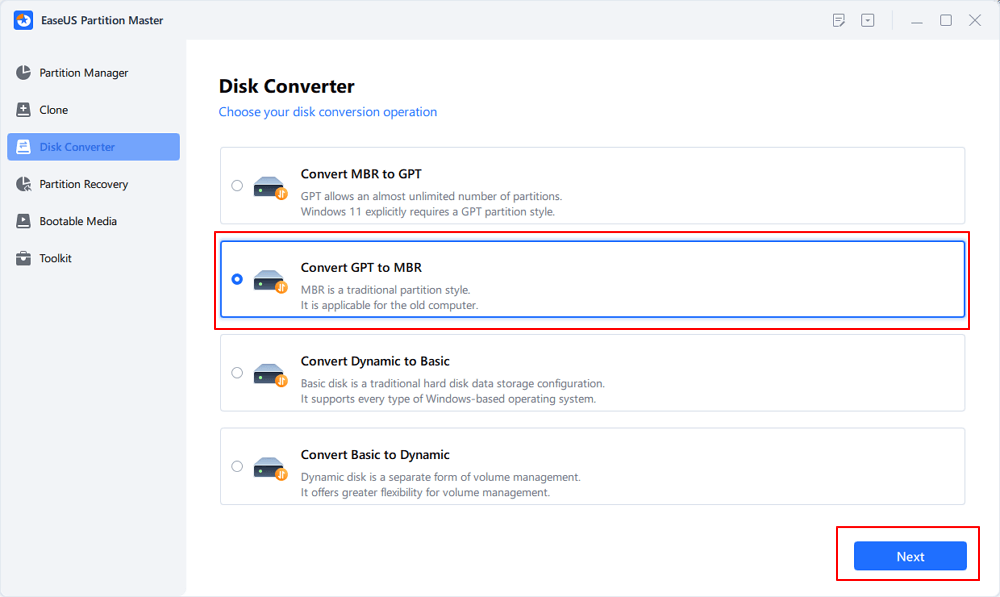
Step 3. Select the target GPT disk that you want to convert to MBR, and click «Convert» to start the conversion.

Fix 2. Enable UEFI Boot Option in BIOS to Fix Windows Cannot Install on GPT Drive Error
If you are faced with Error 1 — «Windows cannot be installed to this disk. The selected disk is of the GPT partition style.», you can boot to UEFI mode if your motherboard supports UEFI.
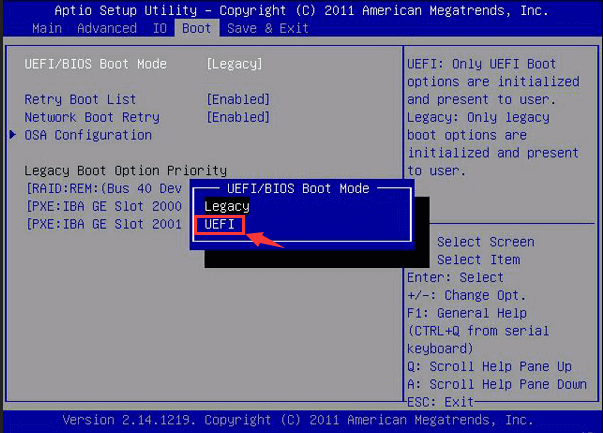
Step 1. Reboot the PC and press the key that opens the boot device menu. You can press the Esc, F2, F9, F12, or another key to enter the boot menus.
Step 2. Boot into UEFI mode and locate the boot options menu.
Step 3. Confirm in the Boot Priority List that the USB UEFI OS Boot option is at the top of the list. Save your changes and continue to install Windows.
Fix 3. Convert MBR to GPT to using EaseUS Partition Master
If you encounter Error 2, you can fix the «The Selected Disk Has an MBR Partition Table» error by converting MBR disk to GPT disk.
On the UEFI system, Windows can only be installed to GPT disks or something similar. That’s because MBR is compatible with BIOS while GPT is compatible with UEFI.
The steps are similar to those of converting GPT to MBR. The difference is that you need to convert to GPT with the help of EaseUS Partition Master:
Step 1. Download and launch EaseUS Partition Master on your computer.
Step 2. Go to Disk Converter, select «Convert MBR to GPT» and click «Next» to continue.

Step 3. Select the target MBR disk that you tend to convert to GPT, and click «Convert» to start the conversion.

Fix 4. Convert MBR to GPT using DiskPart
Aims to resolve Error 2.
Step 1. Turn off the PC and put in the Windows installation DVD or USB.
Step 2. Boot the PC from the DVD or USB.
Step 3. In Windows Setup, press «Shift + F10» to start Command Prompt.
Step 4. Enter the following command in order:
- diskpart
- list disk
- select disk
- clean
- convert gpt
- exit
Step 5. Close Command Prompt.
After removing «Can’t install Windows on GPT disk» error, you can now continue installing Windows on your PC. You can refer to Install Windows 10 on GPT disk for a detailed tutorial guide.
Part 2. Fix «Windows Cannot Be Installed the This Disk» Error
Applies to: Fix «Windows Cannot Be Installed to This Disk» Error.
Error: Windows Cannot Be Installed to This Disk
When you are going to install Windows 10/8/7, you might receive different kinds of errors saying Windows cannot be installed to this disk. Here are some common errors that you might receive:
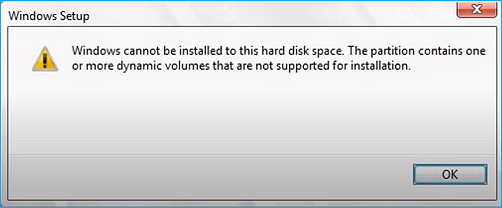
Error 1. «Windows cannot be installed to this hard disk space. The partition contains one or more dynamic volumes that are not supported for installation».
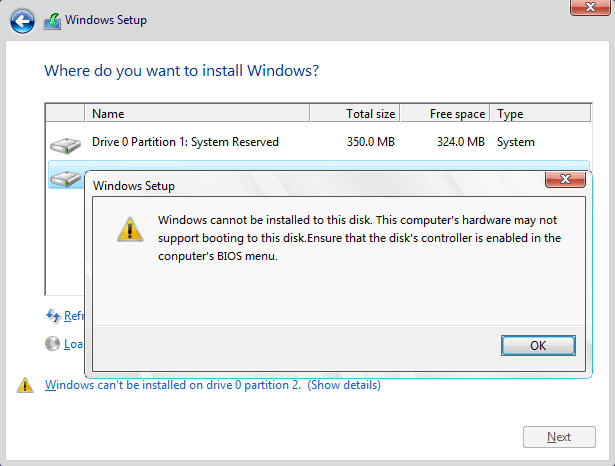
Error 2. «Windows cannot be installed to this disk. This computer’s hardware may not support booting to this disk. Ensure the disk’s controller is enabled in the computer’s BIOS menu.»
Error 3. «Windows cannot be installed to this disk. The disk may fail soon. If other hard disks are available, install Windows to another location.»
Error 4. «Windows cannot be installed to the hard disk space. Windows must be installed to a partition formatted in NTFS.»
Why Windows Cannot Be Installed to The Selected Disk
Why you could receive these errors? What are the main reasons? According to the error messages, the main reasons are as follows:
1. Users can only make a fresh install on a dynamic volume only when the volume was converted from a basic disk and was a boot partition or system partition. (Error 1)
2. Hardware protection and SATA Controller mode could bring up Error 2.
3. If you get Error 3, you can take your hard disk failure into account.
4. An incompatible file system of the partition to be installed with Windows. Microsoft rules that Windows must be installed to a partition formatted in NTFS since Windows Vista. (Error 4)
Fixes to Remove «Windows Cannot Be Installed to This Disk» Error
You can now selectively choose one of the solutions to fix Windows cannot be installed to the disk issue on your own PC.
Fix 1. Convert Dynamic Disk to Basic Disk
If you receive Error 1 — «Windows cannot be installed to this hard disk space. The partition contains one or more dynamic volumes that are not supported for installation», convert dynamic to basic disk.
EaseUS Partition Master also helps you convert dynamic disk to basic disk easily and quickly.
Here are the detailed steps:
Step 1. Install and open EaseUS Partition Master and go to Disk Converter.
Step 2. Select the disk disk conversion mode that suits your need:
- Convert Basic to Dynamic: change a Basic disk to Dynamic.
- Convert Dynamic to Basic: change a Dynamic disk to Basic.
Step 3. Select the target disk — Basic or Dynamic, confirm you’ve select the correct disk and click «Convert» to start.
0:00 — 0:18 Convert Basic to Dynamic Disk; 0:19- 0:36 Convert Dynamic to Basic Disk.
Fix 2. Remove HDD Protection and Change SATA Controller Mode (for Error 2)
If you receive this message «Windows cannot be installed to this disk. This computer’s hardware may not support booting to this disk. Ensure the disk’s controller is enabled in the computer’s BIOS menu.» — Error 2, you should do two things:
Phrase 1. Remove Hard Disk Protection
Check if your hard disk protection is enabled. If it is, contact the salesperson and remove the protection according to his instructions.
Here is a quick guide that you can follow to remove write protection from hard drive using DiskPart:
Step 1. Start > Run -> type CMD and press enter.
Step 2. Type diskpart and press enter.
Step 3. Type the following command lines and hit enter each time:
- list volume
- select volume # (# is the number of your HDD.)
- attributes disk clear read-only
- clean
Step 4. Type exit and hit Enter. Close DiskPart to finish the process.
After this, you’ve successfully removed write protection from your hard drive. If you need more practical solutions, refer to How to Remove Write Protection on SSD for help.
Phrase 2. Change SATA Controller Mode
This error may indicate that BIOS settings of your computer are not properly configured. Make sure you have changed the SATA Controller mode in BIOS. Then, you can try setting BIOS to the factory and go back to the default setting.
Fix 3. Repair Your HDD to Fix «Windows Cannot Be Installed to the Hard Disk Space»
Error 3 — «Windows cannot be installed to this disk. The disk may fail soon.» occurs when there’s something wrong with your HDD. What to do with a dying HDD? How to repair it? You should stop Windows installation, and then clone or back up important data immediately. Then, you can start repairing your HDD.
Also read: How to Repair HDD Without Losing Data
Fix 4. Format the Partition to NTFS
This method aims to solve Error 4. When partitions on the target disk are not with the NTFS file system, Windows cannot be installed to the disk.
Changing a volume’s file system is not an easy task for those who are not familiar with computer management and command line. Thus, an easy and safe solution is needed.
Comprehensive partition manager software — EaseUS Partition Master can fully meet this requirement. It enables you to format HDD to NTFS easily.
For this case, you need to create a bootable drive and then format hard drive from USB.
After fixing Windows cannot be installed to this disk or GPT/MBR drive error, you can then continue installing Windows on your target disk in your PC.
Conclusion
This page covers 4 fixes to get rid of «Can’t install Windows on GPT disk» error and 4 practical methods to remove «Windows cannot be installed to the drive» error for all levels of Windows users.
If you are faced with any one of the errors, you can find answers here. If your target disk has unsupported partition styles disallow you installing Windows on it, EaseUS Partition Master helps convert GPT to MBR, Convert MBR to GPT, and even change Dynamic to Basic disk.
This software plays an important role during the fixing process. Why not get it now.
Extended Reading: Cannot Install Windows FAQs
Besides the above issues, if you have further concerns about installing Windows on GPTor MBR disk, check the questions and answer below.
You may get a clue:
1. How do I fix Windows cannot be installed to this disk MBR?
How do you fix ‘Windows cannot be installed to this disk’? The solution is easy to conclude: change MBR to GPT.
Here are two methods that you can try:
- Method 1. Change MBR to GPT using EaseUS Partition Master (as presented on this page in Fix 3 Part 1)
- Method 2. Run DiskPart to change MBR disk to GPT (as presented on this page in Fix 4 Part 1)
2. Can GPT boot into Windows?
Yes. GPT can be used to boot Windows OS as long as you have a Windows system installed on the disk or you have migrated your computer operating system on the disk.
If you need a guide to migrate OS to GPT, follow this link for help: Transfer Windows 10 to New Hard Drive (HDD/SSD).
3. How do I change GPT partition to BIOS?
Mostly, GPT partition supports UEFI boot mode and BIOS compatibility mode. In order to change GPT partition to Legacy BIOS mode, you need to follow the following tips:
- #1. Check if your computer motherboard supports BIOS boot mode. (Check BIOS)
- #2. If the motherboard supports BIOS boot, then you need to check if your disk is with the MBR partition style.
- If not, convert GPT to MBR disk using provided method on this page in Part 1.
- #3. Install Windows that support BIOS boot on the disk.
- #4. Finish Windows installation, enter BIOS and set the computer to boot on the MBR disk which was with GPT partition.
- #5. Save the changes, and restart PC.
Are you trying to install Windows 8.1 or Windows 10 on your computer and getting an error “Windows cannot be installed to this disk. The selected disk is of GPT style”? There may be a different variation of this error as “Windows cannot be installed to this hard disk space. The partition contains one or more dynamic volumes that are not supported for installation”? These errors are related to the disk partition style.
It is not necessary that you will get the exact same error but the error may vary which will cause the disk partition to be greyed out. The error also maybe ” The selected disk has an MBR partition table. On EFI system, Windows can only be installed to GPT disks.”
In this article, you will find the reason behind all these disk errors and foolproof solutions with detailed explanations.
Why Error “Windows cannot be installed to this disk. The selected disk is of GPT style” Occurs
This error occurs when you try to install Windows on a system having mismatching boot mode and partition style of your hard disk or SSD. Windows installation depends on the boot process of the motherboard and the partition style of the hard disk.
There are two different types of motherboard firmware, BIOS and UEFI.
And the boot processes used by this firmware are –
- Legacy boot (Legacy BIOS)- The boot process used by the “BIOS” firmware of the motherboard.
- UEFI – The boot process used by “UEFI” firmware.
Before we dig into the error and fix it, you need to understand some basics about BIOS, UEFI, MBR, and GPT. Once you have an idea of how the system works then, you can easily fix any error related to the boot process and hard disk partition style.
What Is BIOS
BIOS – Stands for Basic Input/Output System; it is a firmware embedded in the motherboard’s chip. BIOS is a pre-installed firmware on the computer’s motherboard.
You can not change this firmware, and it is a non-volatile memory that does not disappear when your computer turns off. When you turn ON, your computer BIOS loads the first and initializes the computer hardware to ensure they are working correctly.
After that, it loads the bootloader to initialize the Windows or other operating systems.
BIOS is older firmware running for decades which employs only 1 MB of space and must run in 16-bit processor mode. If you have more hardware connected to your computer, it will take time to initialize them.
Hence, the BIOS-based system tends to be slower while booting up or when shutting off.
What Is UEFI
UEFI – Stands for Unified Extensible Firmware Interface, is a newer firmware that has many new features and advantages over BIOS. The UEFI has the same job to initialize the hardware components and load the operating system.
But UEFI stores all the information about hardware initialization and startup in a .efi file. This file is stored on a partition called EFI System Partition (ESP). ESP also contains the bootloader program for the operating system.
Due to this, UEFI can directly boot the operating system, unlike self-test by BIOS. Hence it makes the boot process faster resulting in a faster computer.
Both are firmware, but there are some major differences between BIOS and UEFI.
1. UEFI supports more than 2 TB of hard disk while BIOS supports up to 2 TB.
2. BIOS supports a maximum of 4 hard disk partitions, while UEFI supports more than 4 disk partitions.
3. Computers with UEFI firmware have faster booting than BIOS.
4. UEFI offers a secure boot that validates the operating system to ensure there is no tampering with the boot process by any malware.
5. UEFI supports the network functioning in the firmware, which helps in remote troubleshooting.
6. Unlike BIOS, UEFI offers a simple graphical user interface where you can navigate using the mouse.
UEFI is the successor of BIOS, which inherited the properties of BIOS. Modern computers use UEFI firmware, and if you try to use an old hard drive with UEFI, it won’t work.
To use UEFI firmware, the hardware in the disk drive must support UEFI. And your system disk needs to be GPT style.
GPT & MBR Disk Structures
Microsoft Windows uses two partition structures to read data from your hard disk.
- MBR – Master Boot Record
- GPT – GUID Partition Table
MBR Partition Style
The MBR is an old partition style on Windows-based systems. It was introduced in 1983 with IBM PC DOS 2.0. MBR is known as Master Boot Record since MBR is a special boot sector located at the beginning of the disk.
This sector contains a bootloader for the installed operating system.
MBR partition structure is traditional and supports hard disks up to 2 TB in size. And you can create only 4 logical partitions of the hard disk.
GPT Partition Style
The GPT is the newer standard for disk partitioning. GPT replaces the old MBR partitioning system with modern tech. This tech is called GUID or “Globally Unique Identifier”.
Every partition on the disk has a globally unique identifier. GUID is a random string that is so long that every GPT partition on the planet likey to have its own unique identifier.
GPT supports larger than 2 TB hard drives with an unlimited number of partitions. The size and partition limits depend on the operating system and its file system.
Reason Behind GPT MBR Disk Errors
Now you have a fair idea about BIOS, UEFI, GPT, and MBR; it will be easy to understand such disk errors.
Your computer will boot in one of these two modes BIOS or UEFI.
If your computer firmware is BIOS-based, then you need to install Windows on an MBR disk. In the same way, if your computer is UEFI-based, then you have to install Windows on a GPT disk.
Hence, BIOS is incompatible with the GPT disk, and if you are trying to install Windows on a computer having BIOS firmware, you will get the error “Windows cannot be installed to this disk. The selected disk is of GPT style”
Similarly, if you try to install Windows on an MBR disk on a UEFI-based computer, you will get an error ” Windows cannot be installed to this disk. The selected disk has an MBR partition table. On EFI systems, Windows can only be installed to GPT disks.”
How To Fix ” Windows cannot be installed to this disk. The selected disk is of GPT style”
You have some options to fix this error. If you want to install Windows, then you need to convert GPT to MBR disk to fit on BIOS-based computers. OR boot into UEFI to fit the GPT disk. But it is not necessary that your computer would have UEFI if it is an older computer.
Option 1 – Change Hard Disk From GPT to MBR
If you are getting the error “Selected disk is of GPT style,” that means your computer has booted into Legacy BIOS mode that needs an MBR disk. Now you need to convert GPT to MBR disk to match the compatibility.
Since you are already trying to install Windows, that means you have the bootable media available which can be a flash drive or DVD.
1. Turn off your computer.
2. Boot your computer using installation media.
3. At the Windows Setup Screen, press the “Shift+F10” keys together to open the command prompt.
The command prompt would look like the below image.
4. Type “diskpart” into the command prompt and hit enter. It will go into disk partition mode.
5. Type in “list disk” and hit enter, and it will show you the hard disks connected to your computer.
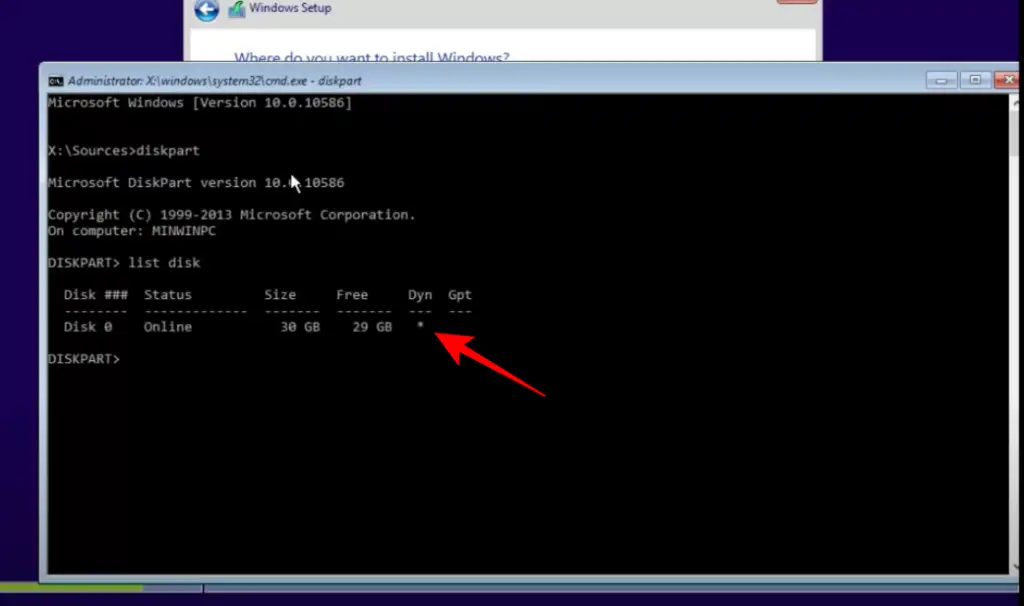
In the above image, the computer has only 1 disk, which is shown as “Disk o“. You will get the same if there is only one hard disk on your computer.
(Do you see the * under “Dyn” which means the selected disk is dynamic. If the * is under “Gpt,” then the disk is GPT, and if there is no *, then the selected disk is an MBR disk)
6. Now type “select disk <disk_number>” in this case.
It would be “select disk 0” then hit enter on the keyboard. (If you have more than 1 hard disk, then choose the disk where you want to install Windows.)
7. This will select the desired disk. At this point, you need to clean the disk completely. Cleaning the disk will delete everything from the hard disk. If you have existing data on the disk, then create a backup first.
Type “Clean” and press the enter key.
Now you can re-formatted the cleaned disk. You need to change the partition style to MBR.
8. Type “convert MBR” and hit enter.
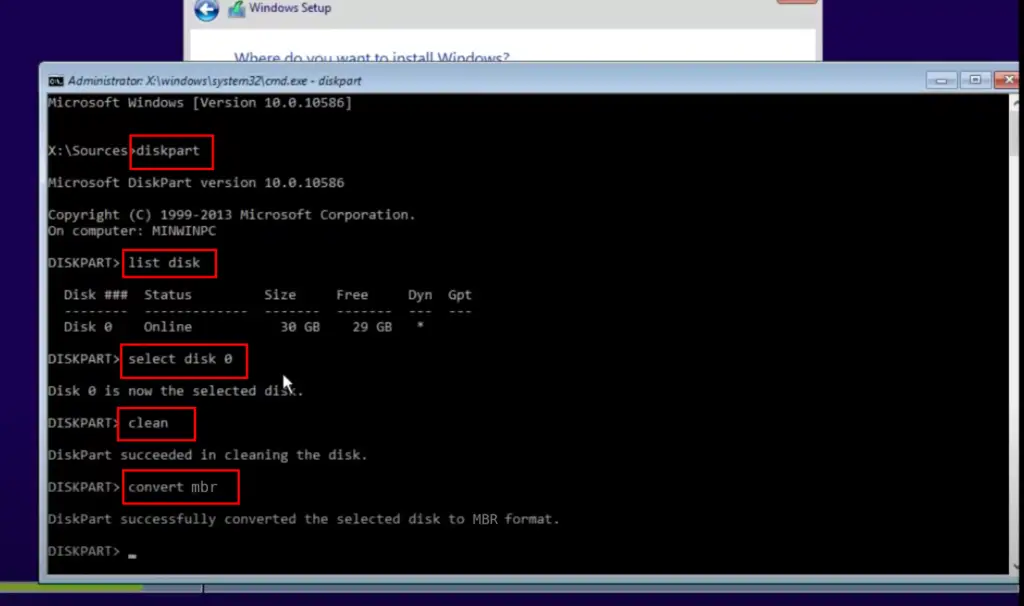
After a successful conversion, exit the command prompt and continue Windows installation on the MBR disk.
Option 2 – Change to UEFI Mode
This option is not applicable to every computer since you need to have UEFI firmware on your motherboard. On BIOS-based systems, you won’t be able to run a GPT disk.
Most of the computers running these days come with UEFI firmware with Legacy BIOS support. You have to check if your computer has UEFI firmware.
If you are getting UEFI options, then this method won’t delete any existing data on your computer.
Follow these steps to change to UEFI Mode-
1. Turn off your computer completely.
2. Turn ON and press the boot key to enter into boot (BIOS) options. The boot key varies from the computer manufacturer. Generally, it is F1, F2, F10, F12, Del, or Esc keys. If you are not sure, then search for the boot key for your computer on Google.
3. Once you are in the BIOS menu, navigate to the “Boot” option.
4. Now select the “UEFI” option and save the changes. Use up-down arrow keys to navigate.
Now, try to install Windows, and you will be able to install it on a GPT disk without any error.
On modern computers, you will get a feature-rich UEFI interface where you can select the options using your mouse.
However, the basics are the same; you just need to change the boot from Legacy to UEFI.
How To Fix ” The selected disk has an MBR partition table. On EFI system, Windows can only be installed to GPT disks.”
This error means you have a computer running the UEFI firmware, but the disk you are using has the MBR partition style. In this case, you have 2 options as well.
- The first option is to convert the MBR disk to GPT (This will erase all the data from the hard disk)
- Select the “Legacy” BIOS and run the existing MBR disk. ( It won’t delete data)
Option 1 – Convert MBR disk to GPT
Follow the mentioned steps to open the command prompt on the installation screen. Enter “diskpart“, list the disks, and then choose the desired disk.
After selecting the disk, type “convert GPT” and hit enter on your keyboard.
The above command will clean your disk completely and convert it to the GPT partition style.
Option 2 – Change to Legacy BIOS mode
Since you already have UEFI firmware on the computer, it does inherit the Legacy BIOS as well. To fix “The selected disk has an MBR partition table. On EFI system, Windows can only be installed to GPT disks” error, you can simply select the legacy BIOS and run the existing MBR disk.
1. To choose the Legacy BIOS mode, shut down your computer and turn it ON again.
2. Press the boot key to enter to UEFI/BIOS menu.
3. Go to the boot tab and select “Legacy,” and save the changes.
4. Restart your computer and proceed further.
You would be able to run the MBR disk using Legacy BIOS mode.
Remember, you already have UEFI, but if you have selected Legacy BIOS, then it will slow down your computer.
What is the best option, BIOS or UEFI? GPT or MBR?
The best option is UEFI firmware with the GPT disk.
If you have UEFI firmware, then convert your disk to GPT. If your disk is too old, then you won’t be able to convert it to GPT. In this case, you have to buy a new hard disk with the latest technologies.
UEFI and GPT combination will provide you with a secure boot and faster speed. on the other hand, MBR and BIOS are old, slow, and prone to boot sector malware.
Now you have an idea about BIOS, UEFI firmware, and MBR, GPT partition styles. You can easily fix any such disk-related errors by making them compatible.
Also Read –
- Fix Slow Running Windows 10 – 200% Faster PC
- How to Install Windows 10 From USB Flash Drive & DVD
- Make Flash Drive Bootable Using Command Prompt (cmd) and install Windows
I bought a new laptop without windows. Now i want to install windows 8. I formatted entire hard disk (file format = NTFS) and then tried to install windows 8. When selecting the disk to install, the following error is displayed:
Windows cannot be installed to this disk. the selected disk has an MBR
partition table. On EFI system, windows can only be installed to GPT
disks.
What i can do?
![]()
Ramhound
40.3k34 gold badges100 silver badges127 bronze badges
asked Jan 30, 2014 at 17:56
![]()
5
Inside windows installer, hit Shift+F10 to get a command prompt, then run diskpart and select the target disk. Zap the drive (with the clean command), create GPT table (new gpt), create the GPT-EFI special partitions.
Step-by-step instructions provided by Microsoft here (For Windows XP x64, newer versions of diskpart such as included in your Windows 8 support all these commands and more)
Then reboot so the firmware finds those partitions and adds the disk to the EFI-native boot order (Windows installer checks this).
answered Jan 30, 2014 at 18:12
![]()
As per technet.microsoft.com follow the below steps:
-
Turn off the PC, and put in the Windows installation DVD or USB key.
Boot the PC to the DVD or USB key in UEFI mode. For more info, see Boot to UEFI -
Mode or Legacy BIOS mode.
-
From inside Windows Setup, press Shift+F10 to open a command prompt window. Open the diskpart tool:
diskpart -
Identify the drive to reformat:
list disk -
Select the drive, and reformat it:
select disk <disk number> clean convert gpt exit -
Close the command prompt window.
Continue the Windows Setup installation.
When choosing an installation type, select Custom. -
The drive will appear as a single area of unallocated space.
-
Select the unallocated space and click Next.
-
Windows begins the installation.
![]()
Giacomo1968
51.6k18 gold badges161 silver badges205 bronze badges
answered Nov 23, 2015 at 12:32
![]()
JerryJerry
5911 gold badge4 silver badges4 bronze badges
6
Windows installation failed with error “Windows cannot be installed to this disk. The Selected disk has an MBR Partition table. On EFI systems, Windows can only be installed to GPT. And now looking for How to Convert MBR to GPT During Windows 10/8.1/7 Installation? Lets first understand what is Different between MBR Partition table and GPT Partition table. And how to Convert MBR to GPT partition During windows 10 installation.
Different between MBR and GPT Partition table
MBR (Master Boot Record) is an older partition structured that was first introduced in 1983 And developed for IBM PCs. This was the default partition table format before hard drives were larger than 2 TB. The maximum hard drive size of MBR is 2 TB. As such, if you have a 3 TB hard drive and you use MBR, only 2 TB of your 3 TB hard drive will be accessible Or usable.
And to Remedy this issue GPT partition table introduced, Where G stands for GUID (Globally Unique Identifier), and the P and T stand for Partition Table. Thre is no limit 2TB hard drive issue, as GPT partition table support maximum 9400000000 TB, with sector sizes of 512 (the standard size for most hard drives at this time).
— Advertisement —
The GUID Partition Table (GPT) hard drive gives you more exciting features than the traditional Master boot record (MBR) hard drive, this is a newer and more convenient partitioning method. Among the main features of GPT is that it gives the ability to store multiple copies of the data within the OS. In case the data is overwritten or corrupted, the GPT partitioning method allows to restore it and make the operating system functioning again (you can’t do that using MBR disk).
So If you have a hard drive that you would like to use and it is 2 TB or smaller, select MBR when you initialize the hard drive for the first time. Or If you have a hard drive that you would like to use but not boot from and it is larger than 2 TB, select GPT (GUID). But you will also need to be running a supported operating system and the system’s firmware must be UEFI, not BIOS.
In short Different between MBR vs GPT is
Master Boot Record (MBR) disks use the standard BIOS partition table. Where GUID Partition Table (GPT) disks use Unified Extensible Firmware Interface (UEFI). One advantage of GPT disks is that you can have more than four partitions on each disk. GPT is also required for disks larger than two terabytes (TB).
As MBR is the default partition table, and if you are using a HDD which is more then 2 TB, That cause you need to convert MBR to GPT as MBR support Maximum 2TB only and GPT support more then 2TB.
Convert MBR to GPT During Windows 10 Installation
Sometimes you may face issue while performing clean install windows 10, 8.1 or 7, The installation didn’t allow continuing with an error like “Windows cannot be installed to this disk. the selected disk has an MBR partition table. On EFI system, Windows can only be installed to GPT disks ”
— Advertisement —
That means that either you have to Temporarily disable the EFI Boot Sources setting in the BIOS and install Windows Operating system. Or change partition method ( convert MBR to GPT partition ) while installing Windows to UEFI based computer. It’s important to mention that you will lose all data on the disk!
Temporarily disable the EFI Boot Sources
— Advertisement —
So if you have important data on your HDD, first try to Temporarily disable the EFI Boot Sources setting in the BIOS: (Follow these steps if the hard disk volume size is less than 2.19 TB:)
- Restart the computer, and then press F10, Del key to enter the BIOS.
- Navigate to Storage > Boot Order, and then disable the EFI Boot Sources.
- Select File > Save Changes > Exit.
- Install the Windows operating system.
After installing the Os you an Enable the EFI Boot Sources setting in the BIOS:
- Restart the computer, and then press F10 to enter the BIOS.
- Navigate to Storage > Boot Order , and then enable the EFI Boot Sources .
- Select File > Save Changes > Exit.
Convert MBR to GPT using Diskpart command
Converting MBR to GPT during Windows installation can be performed by using a few commands. Follow these easy steps:
It’s important to mention that you will lose all data on the disk!
- When the Windows installer interface loads (or when the error mentioned above appears), press Shift + F10 to run the command prompt console;
- In newly appeared window type in and run command diskpart;
- Now you need to run command List disk to display all of the connected drives. Find the disk on which you want to install the operating system;
- Type in and run command select disk X (X – a number of the disk that you want to use). For example, the command should look like this: select disk 0;
- The next command will clean the MBR table: type in and run clean;
- Now you need to convert the clean disk to GPT. To do this type in and run command convert gpt
- Now wait until you’ll see a message noticing you that the procedure is completed successfully. After that type in and run exit to quit the console. Now you need to continue Windows installation in a usual way.
| Value | Description |
|---|---|
| list disk | Displays a list of disks and information about them, such as their size, the amount of available free space, whether the disk is a basic or dynamic disk, and whether the disk uses the Master Boot Record (MBR) or GUID Partition Table (GPT) partition style. The disk marked with an asterisk (*) has focus. |
| select disk disknumber | Selects the specified disk, where disknumber is the disk number, and gives it focus. |
| clean | Removes all partitions or volumes from the disk with focus. |
| convert gpt | Converts an empty basic disk with the Master Boot Record (MBR) partition style into a basic disk with the GUID Partition Table (GPT) partition style. |
That’s all you have successfully Convert MBR to GPT During Windows 10 Installation and bypass error Windows cannot be installed to this disk. the selected disk has an MBR partition table. On EFI system, Windows can only be installed to GPT disks. Still need any help feel free to discuss on the comments below. Also Read Fix windows 10 Inaccessible boot device BSOD, Bug Check 0x7B.