Parental control for the computer is an important part of the system of raising a child and an adolescent. But sometimes basic functions are not enough to completely restrict the child’s access to the network, games or applications. In this case, the best solution is to issue one-time passwords for the PC.
Create one-time passwords for logging into a Windows account
Child is naughty at school, teenager spends too much time on online games, there are medical indications for the limitations of the work at the computer? You, as a parent, can establish a complete restriction of access to the PC, issuing one-time passwords only when you consider it necessary.
We recommend a convenient system for creating one-time passwords Rohos Logon Key. By the way, if you are a user of KidLogger, then you can purchase it with a 50% discount.
To limit the child’s access to the computer using one-time passwords, you should make the following steps:
- Install Google Authenticator (freeware) on your smartphone.
- Create a PC account for the child with a password.
- Install the Rohos Logon Key program: http://www.rohos.ru/products/rohos-logon-key/
Download for Android / for iPhone
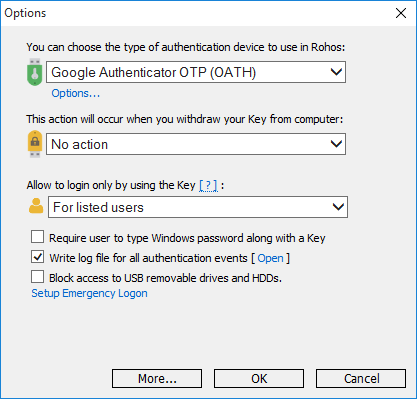
Next, you need to configure the program:
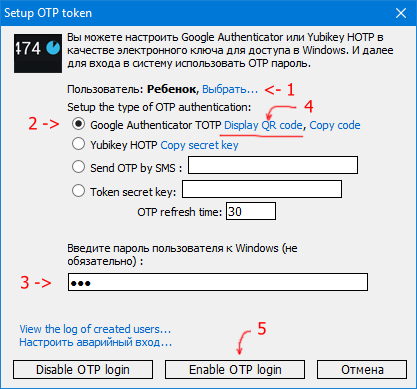
- In the program options, select «Google Authenticator» in the first list and «For users from the list» in the third.
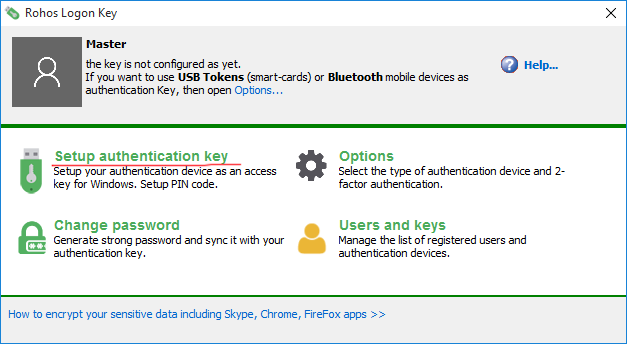
- From the main window of Rohos Logon Key, run the command «Configure Access Key»
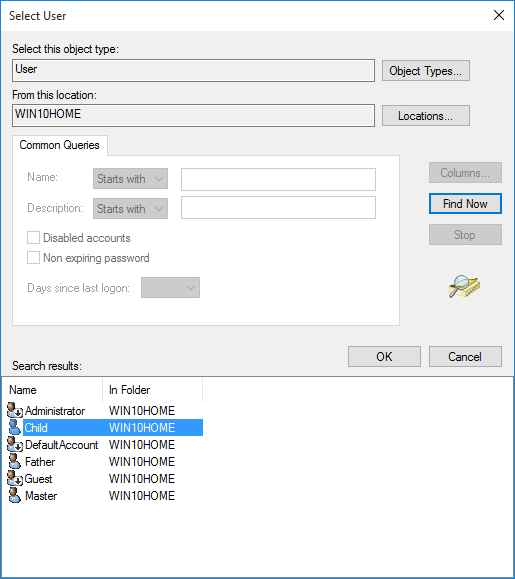
- Use the «Select» link to select a child account. The «Select User» window appears. Click «Advanced» button, then «Find Now». Select the name of your child’s account from the list.
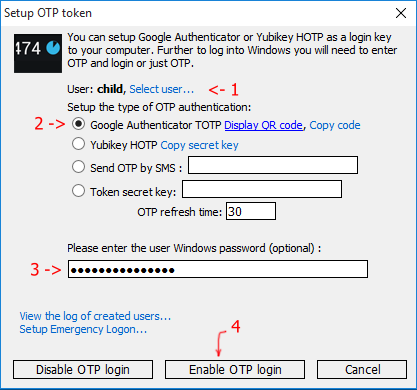
- Enter the password and click on the link «Display QR code». A browser window appears with the code for the Google Authenticator program.
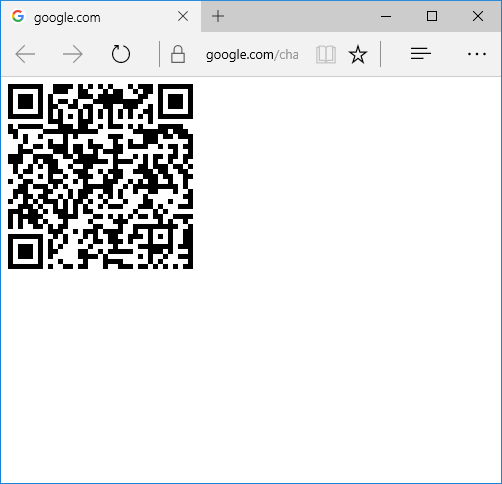
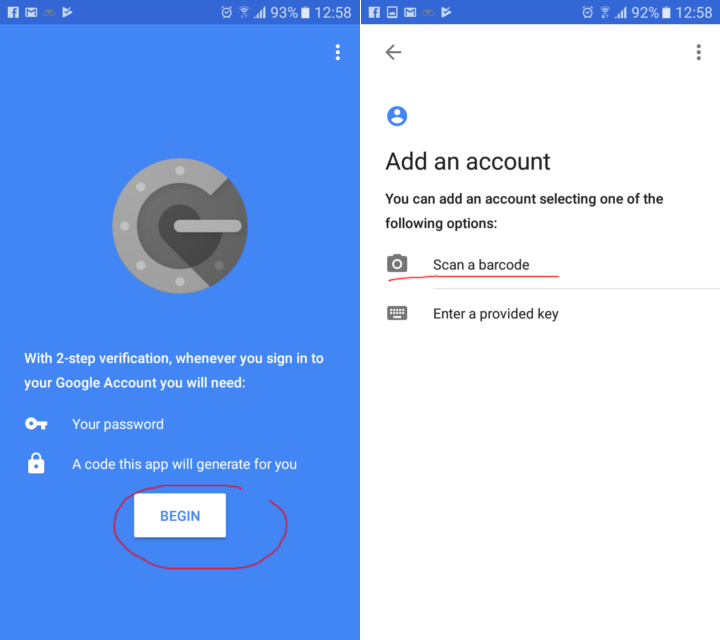
- Launch the Google Authenticator program on your phone and run the Setup / Scan a barcode command.

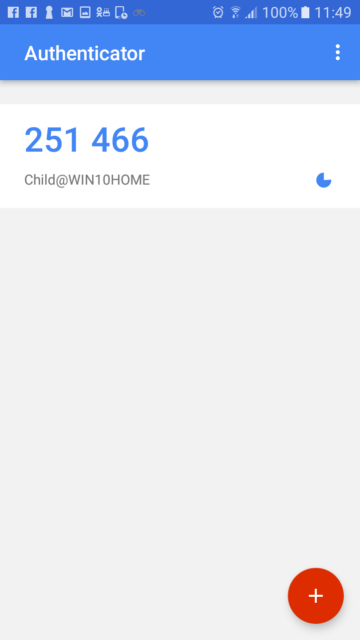
- Scan the received code and a 6-digit one-time password appears on the smartphone’s screen.
- Click the «Enable OTP Login» button on the computer.
Google Authenticator application is a freeware, you can download it from Play Market for Android devices and from Apple store for iPhones.
How does it work?
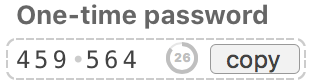
The technology of Google Authenticator is based on the use of one-time passwords that are generated simultaneously on the computer and on the phone. In our case, to enter the account, you need to get a one-time password, which will be displayed on the phone. The main advantage of one-time passwords is that they cannot be selected, since such a password changes every 30 seconds. To successfully log in to the system, the clock on the phone and the computer must be synchronized. On the computer, it is recommended to synchronize the time with the time server, and use the network time on the phone.
When you specify in the Rohos Logon Key program «For users from the list», you enable protection from entering by an ordinary password. Now your child or any other user can not log into the system without having received a one-time password.
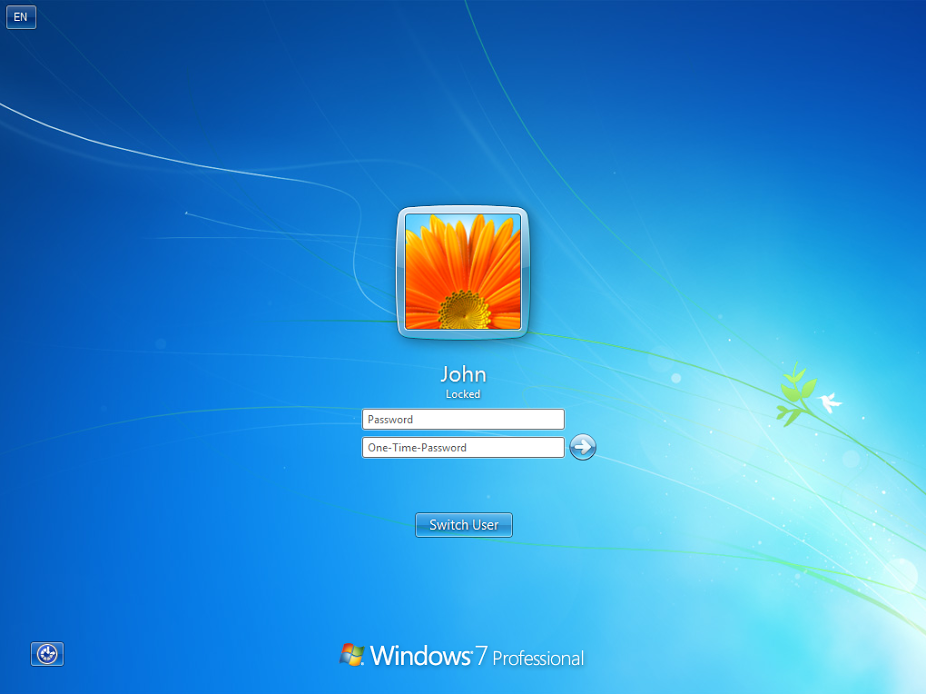
After configuring the program, the welcome window in Windows will change: instead of two fields, there will be three: User name, password and OTP.
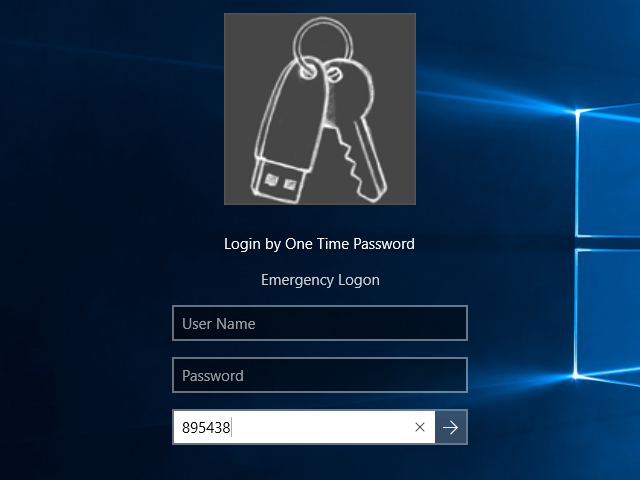
If the child enters only his name and password, the system will not let him in.
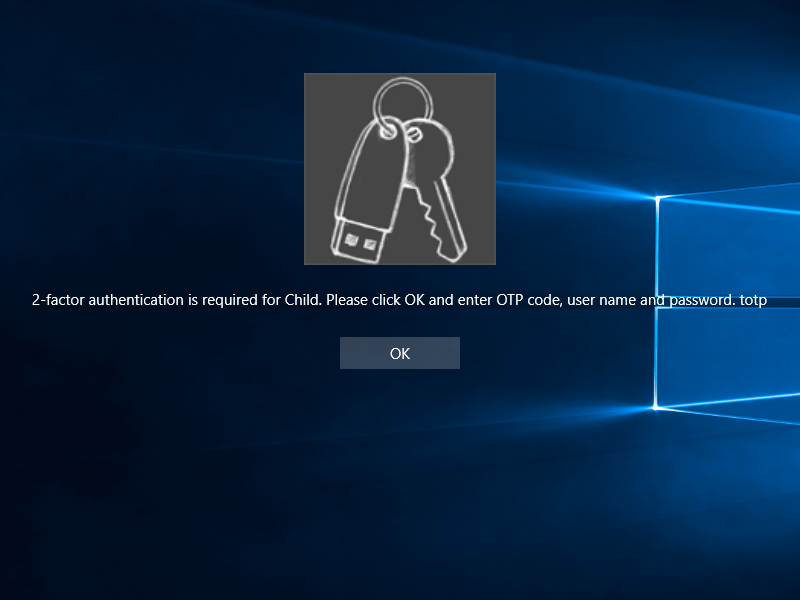
To enter the system, the child should call you and get a one-time password (OTP) from you.
If you want to limit the child’s working hours at the computer, we recommend using the built-in Windows parental control. More details — in our future text.
One-time passwords on a PC are the ability to fully control access to a computer by your child or any other person. You can use Rohos Logon Key program as a complement to the Parental Control KidLogger or to enhance the security level of your computer.
Note: if a child has logged off, of if a computer was turned in sleeping mode, he needs the OTP password again.
Although the one-time password changes every 30 seconds, it may be used during 1-2 miniutes on the computer.
Download 15-day trial version of Rohos logon Key applicaiton
Buy full version of Rohos Logon Key with 50% discount
На хабре уже давно знают об одноразовых паролях и технологиях OTP (One Time Password). Даже Яндекс придумал собственное решение. Я же хочу поведать вам о том как прикрутил интересную реализацию OTP к окну входа в сервер терминалов Windows.
Как все это работает
Весь функционал решения держится на замечательном проекте multiotp, опенсорсовом PHP софте, умеющим работать как с TOTP так и c HOTP , и даже с OCRA. Причем запустить эту красоту можно и в *nix и в Windows. Есть даже веб-интерфейс и релизы для систем виртуализации, но это уже вы сами копайтесь, мы размеберем минимально необходимый для старта набор действий.
Привязка mutltiotp к окну входа в винду осуществляется при помощи плагина MultiOneTimePassword-CredentialProvider.
Пользователь будет генерировать одноразовые пароли у себя на компьютере или мобильном устройстве.
Порядок действий указан на странице плагина, но в последней версии multiotp изменился синтаксис, поэтому я пробегусь по всем действиям для вас еще раз.
Установка сервиса multiotp
Скачиваем multiotp и располагаем его где-нибудь на сервере. Я брошу в корень системного диска C:multiotp.
Генерация ключей
Затем нужно создать ключ для каждого пользователя, заведенного на сервере. Подчеркну — мы говорим именно о локальных пользователях. У multiotp есть возможность привязки к ldap, но это слишком большая тема для одной статьи.
Для создания пользователей потребуются 160-битные ключи HEX (т.е. 20 символов в шестнадцатеричной системе счисления). Вы можете (и должны) генерировать их у себя сами в защищенное среде, в лабораторных же целях я вам предложу этот генератор. Указываете ему длину ключа (20) и количество пользователей в вашей системе, он все сделает сам. Сохраните куда-нибудь эти ключи, они нам дальше пригодятся.
Создание пользовательских ключей
Команда создания пользователей выглядит так (само собой в cmd перейдите в директорию с распакованным multiotp):
multiotp.exe -debug -create %USERNAME% %TOTP% %KEY% %PIN% %LENGTH% %LIVETIME%
где
%USERNAME% — имя учетки пользователя в Windows;
%TOTP% — создание ключей для технологии TOTP (основанной на метке времени);
%KEY% — ключ созданный на предыдущем шаге;
%PIN% — дополнительный постоянный пин, который пользователь будет дописывать перед своим временным паролем (его можно не использовать, но команда требует указать какой-нибудь ключ);
%LENGTH% — длина одноразовых паролей (рекомендуются 6-ти символьные, так как большинство приложений генерируют именно их);
%LIVETIME% — срок действия одноразовых паролей (рекомендуется указать 30 секунд, так как большинство приложений генерируют именно их).
Пример:
multiotp.exe -debug -display-log -create rdpclient1 TOTP 6696f39315f4c6388216 1234 6 30
т.е. создал ключ для пользователя rdpclient1 с пином 1234 (синтаксис команды требует указывать пин, даже если мы планируем его не использовать);
multiotp.exe -debug -display-log -set user pin=
т.е. сказал что пин на самом деле не нужен.
Конвертация ключей для пользователей
Теперь нам нужно как-то передать пользователям их ключ, чтоб они могли у себя генерировать одноразовые пароли. Полноценный функционал multiotp позволяет через веб-интерфейс создать QR-код, который мы снимаем на наши телефоны и дальше работаем с ними. Я показываю минимальный функционал без интерфейса, так что придется работать руками.
Нужно будет ключи, созданные на втором шаге переконвертировать из 160-битного HEX в Base32. Опять же лучше это делать у себя в защищенной среде, кому лень, вот вам онлайн конвертер. Он даже не https, так что осторожней с ним. Он вроде бы понятно работает, обращайте внимание на регистр при вводе ключей.
Приложения для создания ключей
Переконвертированные ключи нужно дать пользователю. Есть куча приложений для мобильных ОС, которые могут генерировать одноразовые пароли. Я люблю Google Authenticator, он работает на большинстве ОС. Кому хочется побаловаться и не засорять мобильное устройство — можете поставить плагин в браузер.
Приложению или плагину нужно указать ключ, созданный на четвертом шаге. Там ничего сложного, думаю разберетесь сами.
Проверка работы сервиса
Чтобы проверить корректную работу сервиса multiotp следует потестировать создаваемые ключи в командной строке следующим образом:
multiotp.exe -display-log user %GENERATED_TOKEN%
где user — имя пользователя в винде;
%GENERATED_TOKEN% — ключ генерируемый приложением на мобильном устройстве (следите за временем, у вас всего 30 сек с момента генерации пароля)
Ответ в командной строке выглядеть должен так:
0 OK: Token accepted
Подключение плагина авторизации в Windows
Осталось малое — скачать и установить плагин для Windows. Вопросов установщик задает мало. Нужно установить компонент «Default Provider» (иначе он ничего делать не будет), указать путь к multiotp и написать сообщение для окна входа в систему Windows.
Готово. Можно проверять работу.
Нюансы:
1) Обязательно создайте пароли для всех, в том числе для администратора, иначе его не пустит в систему.
2) Обязательно настройте точное время на серваке и на устройствах пользователей, иначе ваши ключи не будут работать. Дело не именно в точности, а в том что время там и там должно совпадать.
3) Иногда не показывает в командной строке результат, но вы всегда можете почитать лог.
4) Если вам интересно как прикрутить это красоту к домену — скажите, я попробую и отпишусь.
5) Функционал огромный, все есть на вики multiotp: смс, QR, синхронизация, резервное копирование, привязка к чему угодно.
Тем, кто информацию любит воспринимать наглядно может быть полезен этот ролик.
UPD:
Получил невероятно хорошие комментарии и уточнения от пожелавшего остаться неизвестным товарища:
1) В самом начале настройки сервера, вводите команду:
multiotp.exe -debug -config default-request-prefix-pin=0 display-log=1
после неё не требуется вводить пин-код при настройке пользователя и включается отображение лога каждой операции в консоль.
2) С помощью этой команды можно регулировать bantime, для пользователей, которые ошиблись с паролем (по умолчанию 30 сек):
multiotp.exe -debug -config failure-delayed-time=60
3) То, что будет написано в приложении google Authenticator над 6 цифрами, называется issuer, можно поменять с дефолтного MultiOTP на что-то другое:
multiotp.exe -debug -config issuer=other
4) После проделанных операций, команда по созданию пользователя становится чуть проще:
multiotp.exe -debug -create user TOTP 12312312312312312321 6
(время обновления цифр, равное 30 секундам, я не задаю, кажется оно по умолчанию равно 30).
5) Каждому пользователю можно изменить description (текст под цифрами в приложении Google Auth):
multiotp.exe -set username description=2
6)
QR-коды можно создавать сразу в приложении:
multiotp.exe -qrcode username c:multiotpqrcodeuser.png:multiotpqrcodeuser.png
7) Можно использовать не только TOTP, но и HOTP (на вход функции хэширования подаётся не текущее время, а значение инкрементального счетчика):
multiotp.exe -debug -create username HOTP 12312312312312312321 6
Пример
HOTP можно использовать в ситуациях, когда начальство любит железные решения, а не софт: к примеру, Yubikey программируется для использования HOTP и подходит для этого. Мы впоследствии отказались полностью от Yubikey+HOTP, поскольку если пользователь нажал на Yubikey не в том окне, где надо, то его последующие коды будут неподходящими (счетчик yubikey будет впереди на единицу) и придётся их с сервером синхронизировать:
multiotp.exe -resync user 061735 729371
 Если пользователь забыл/потерял телефон, можно сгенерировать десяток одноразовых кодов с помощью команды:
multiotp.exe -scratchlist username
9) И хорошие пояснения
по поводу стабильности решения:
Работает уже больше года на нескольких серверах, никогда проблем с ним не было. Если и возникнет какая-то проблема с multiotp (мы к этому готовились и тестировали возможные варианты) — то достаточно сервер загрузить в безопасном режиме: в таком случае он загрузится с дефолтным credential provider (без участия multi-otp) и после этого нужно будет либо отключить в реестре провайдер multiotp, либо временно его деинсталлировать, сделав предварительно резервную копию папки c:multitop
Содержание
- Одноразовые пароли для ПК
- Создаем одноразовые пароли для входа в учетную запись Windows
- Как это работает?
- Use 1Password as an authenticator for sites with two-factor authentication
- Set up two-factor authentication for a website
- Save your QR code
- To save your QR code using 1Password in your browser:
- To save your QR code on 1Password.com
- To save your QR code in the apps
- Confirm your one-time password
- Use your one-time password
- Get help
- One time passwords windows
Одноразовые пароли для ПК
Родительский контроль для компьютера – это важная часть системы воспитания ребенка и подростка. Но иногда базовых функций не хватает для того, чтобы полностью ограничить доступ ребенка к сети, играм или приложениям. В таком случае оптимальным вариантом может стать выдача одноразовых паролей для ПК.
Создаем одноразовые пароли для входа в учетную запись Windows
Ребенок провинился в школе, подросток слишком много времени тратит на онлайн-игры, есть медицинские показания для ограничений работы за компьютером? Вы, как родитель, можете установить полное ограничение доступа к ПК, выдавая одноразовые пароли только тогда, когда считаете нужным.
Мы рекомендуем удобную систему для создания одноразовых паролей RohosLogonKey. Кстати, если вы являетесь пользователем KidLogger, то вы можете приобрести ее с 50% скидкой.
Чтобы ограничить доступ ребенка к компьютеру по одноразовым паролям, необходимо выполнить следующие действия:
- Установите Google Authenticator на свой смартфон. Скачать для Android / для iPhone
- Создайте на ПК учетную запись для ребенка с указанием пароля.
- Установить программу Rohos Logon Key(15-дневная пробная версия);
Далее вам нужно настроить программу:
- В опциях программы выберите «Google Authenticator» в первом списке и «Для пользователей из списка» в третьем.
_14_04_2017_15_05_42.png)
- Из главного окна программы Rohos Logon Key выполните команду «Настроить Ключ Доступа»
_14_04_2017_15_06_06.png)
- При помощи ссылки «Выбрать» следует выбрать учетную запись ребенка. Появится окно «выбор пользователя». Следует нажать кнопку «Дополнительно», потом – «Поиск». Выберите в списке имя учетной записи вашего ребенка.
_14_04_2017_15_15_27.png)
- Введите пароль и нажмите ссылку «Display QR code». На экране появится окно браузера с кодом для программы Google Authenticator.
- Запустите на телефоне программу Google Authenticator и выполните в ней команду Setup/Scan a barcode.
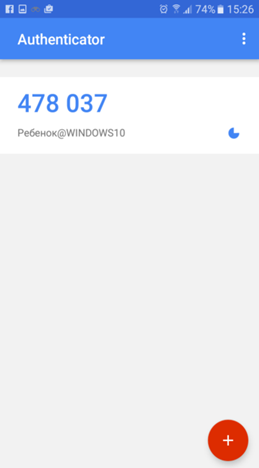
- На компьютере нажмите кнопку «Enable OTP Login».
Как это работает?
Технология «Google Authenticator» основана на использовании одноразовых паролей, которые генерируются одновременно на компьютере и на телефоне. В нашем случае, чтобы войти в учетную запись, нужно получить одноразовый пароль, который будет отображаться на телефоне. Главное преимущество одноразовых паролей в том, что их нельзя подобрать, поскольку такой пароль меняется каждые 30 секунд. Для успешного входа в систему необходимо чтобы часы на телефоне и компьютере были установлены правильно. На компьютере рекомендуется синхронизировать время с сервером точного времени, а на телефоне использовать время сети.
Когда вы указываете в программе RohosLogonKey «Для пользователей из списка», вы включаете защиту от входа по обыкновенному паролю. Теперь ваш ребенок или любой другой пользователь не сможет войти в систему, не получив одноразовый пароль.
После настройки программы, окно приветствия в Windows изменится: вместо двух полей теперь будет три: Имя пользователя, пароль и OTP.
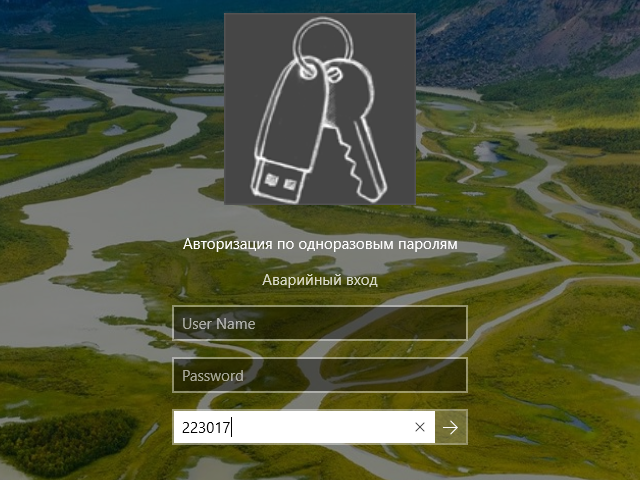
Если ребенок введет только свое имя и пароль, система его не пропустит.
_14_04_2017_15_40_09.png)
Для того чтобы все-таки войти в систему, ребенок теперь должен позвонить вам и получить от вас одноразовый пароль (OTP).
Если вы хотите ограничить время работы ребенка за компьютером, рекомендуем воспользоваться встроенным родительским контролем Windows. Подробнее – в нашем следующем материале.
Одноразовые пароли на ПК – это возможность полностью контролировать доступ к компьютеру вашим ребенком или любым другим человеком. Вы можете использовать программу RohosLogonKey в качестве дополнения к Родительскому контролю KidLogger или для повышения уровня безопасности вашего компьютера.
Внимание: Если компьютер перешел в спящий режим или ребенок вышел из своей учетной записи, для повторного входа ему снова понадобится одноразовый пароль.
Хотя одноразовый пароль меняется каждые 30 секунд, он может быть использован на компьютере в течение 1-2 минут.
Специально для читателей этой статьи мы предоставляем 50% ссылку на покупку программы Rohos Logon Key через компанию allsoft.ru. В поле серия купона введите RXL50 а в поле номер — любое число от 1 до 10.
Здесь вы можете найти новости программы KidLogger, интересные статьи и советы по использованию нашего сервиса. Новые возможности, рекомендации по установке и настройке приложения для Windows, Mac, Android, Symbian, Blackberry и iOS.
Use 1Password as an authenticator for sites with two-factor authentication
Set up two-factor authentication for a website
Before you can use 1Password as an authenticator, you’ll need to set up two-factor authentication for a website:
- Search 2fa.directory for the website.
- Click
 next to the name of the website.
 - Follow the instructions the website provides.
 next to the name of the website.
When you see a QR code for 1Password to scan, continue with the next steps.
Save your QR code
To save your QR code using 1Password in your browser:
- Open and unlock 1Password in your browser.
- Select the Login item for the website.
- Click to scan the QR code and copy the one-time password.
If you’re using Safari, follow the steps to save your QR code in the 1Password app.
To save your QR code on 1Password.com
- Sign in to your account on 1Password.com.
- Select the Login item for the website and click Edit.
- Click “label” in a new section, and enter “One-time password”.
- Click to the right of the field and choose One-Time Password.
- On the website, choose to enter the code manually. Copy the code, then paste it in the One-Time Password field.
If the website only supports QR codes, you’ll need to scan it using a 1Password app.
To save your QR code in the apps
- Open and unlock 1Password, select the Login item for the website, then click Edit.
- Click the item detail menu to the right of a new field and choose One-Time Password.
- Click to open the QR code scanner window.
- Drag the QR code from the website to the scanner window.
If you can’t drag the QR code, most sites will give you a string of characters you can copy and paste instead.
- Open and unlock 1Password, select the Login item for the website, then tap Edit.
- Tap “Add new one-time password”.
- Tap to scan the QR code from another device.
If you can’t scan the QR code, most sites will give you a string of characters you can copy and paste instead.
To automatically copy one-time passwords to the clipboard after filling a login, tap Settings > Password AutoFill and turn on Auto-Copy One-Time Passwords.
- Open and unlock 1Password, select the Login item for the website, then select Edit.
- Select to the right of the field (ShiftВ +В Enter) and choose One-Time Password.
- Click and choose “From my screen” to scan the QR code.
If you can’t scan the QR code, make sure it’s visible when you minimize 1Password. Alternatively, most sites will give you a string of characters you can copy and paste instead.
- Open and unlock 1Password, select the Login item for the website, then tap .
- Tap “Add new section”, then tap “Add new field” and choose One-Time Password from the list.
- Tap to scan the QR code from another device.
 .
.If you can’t scan the QR code, most sites will give you a string of characters you can copy and paste instead.
To automatically copy one-time passwords to the clipboard after filling a login, tap Settings > Filling and turn on “Auto-copy one-time passwords”.
Confirm your one-time password
Use your one-time password
- Fill your username and password on a website where you’re using two-factor authentication. 1Password copies your one-time password to the clipboard for 30 seconds.
- Paste the code where the website asks for it.
Get help
If websites aren’t accepting your one-time passwords, make sure the date and time are set correctly on MacВ , iOSВ , WindowsВ , and AndroidВ .
One time passwords windows
Safer Authentication with a One-Time Password Solution
This article discusses:
- The problems with passwords
- One-time password generation
- Building a Web service-based OTP solution
- Testing and deploying OTP
This article uses the following technologies:
IIS 7.0, SQL Server
Contents
One-Time Passwords
A Complete OTP Solution
Test OTP Generator Client
The Sample Web Site
The Authentication Web Service
The Complete Architecture
Running the Code Sample
Deployment Considerations
Give It a Try
Passwords can be a big security and manageability headache for enterprise IT administrators. Users often create simple passwords or write their passwords down to make sure that they’ll remember them. In addition, there are few secure and efficient procedures for resetting passwords.
Knowing these limitations, how can you mitigate these types of security problems when remote users access your network? Seeing that many users write down their passwords, how would you make your company’s password solution more robust? I’ll show you how to use standards-based technologies with C# and C to develop a one-time password (OTP) proof of concept. First, though, I want to briefly take a broader look at password-replacement technologies.
There are a few ways that you could go about eliminating standard passwords for your remote users. You could use certificate authorities to issue certificates to your users, but this requires a public key infrastructure (PKI) and is expensive to set up and maintain. It can also be difficult to manage certificates for remote users, especially if you are using a hardware-based token, such as a smart card. This kind of trade-off of high cost for high security is a common theme.
Alternatively, you could use SecureID, which is the one-time password solution from RSA. However, you should note that SecureID is not based on a standard, which can cause incompatibilities and licensing overhead.
A third option is to use a standards-based OTP solution. But what kind of one-time password options are out there, and why is OTP better than traditional passwords anyway? Well, let’s see.
A traditional, static password is usually only changed when necessary: either when it has expired or when the user has forgotten it and needs to reset it. Because passwords are cached on computer hard drives and stored on servers, they are susceptible to cracking. This is especially a concern for laptops since they can be easily stolen.
Many businesses give employees laptops and open their networks to remote access. They also hire temporary employees and vendors. In this environment, a simple static password solution can become a liability.
Unlike a static password, a one-time password changes each time the user logs in. The passwords themselves are generated in one of two ways: either as time-synchronized or counter-synchronized. Both approaches typically require the user to carry a small hardware device (often on a key chain) that is synchronized with a server, and both typically use some algorithm to generate the password.
Time-synchronized OTPs are widely deployed but are subject to problems caused by clock skew. That is, if the authentication server and the user token don’t keep the same time, then the expected OTP value won’t be produced and the user authentication will fail. With time-synchronized OTPs, the user typically must enter the password within a certain period of time before it’s considered expired and another one must be generated.
A counter-synchronized OTP solution synchronizes a counter between the client device and the server. The counter is advanced each time an OTP value is requested of the device. Just like with time-synchronized OTPs, when the user wants to log on, he enters the OTP that is currently displayed on the device.
Challenge-based OTPs are a special case and also often use a hardware device. However, the user must provide a known value, such as a personal identification number (PIN), to cause the OTP to be generated. This type of OTP is currently being rolled out in Europe to add authentication to credit and debit cards. The OTP solutions in use today are all built on some sort of cryptographic processing to generate the current password from a synchronization parameter (that is, the time or counter value), a secret key, and possibly a PIN.
For example, hash-based OTPs use cryptographic hashing algorithms to compute the password. As you know, a cryptographic hash is a one-way function that maps an arbitrary length message to a fixed-length digest. Thus, a hash-based OTP starts with the inputs (synchronization parameter, secret key, PIN), runs them through the one-way function, and produces the fixed-length password.
So, which method should you choose? I wanted to know how to do this too, so I created and tested a solution. Next, I’ll show you how you can create counter-synchronized OTPs using IIS 7.0 and keyed-hash message authentication, as described in the RFC 2104 and RFC 4426 standards (RFC 2104, «HMAC: Keyed-Hashing for Message Authentication» at www.ietf.org/rfc/rfc2104.txt, and RFC 4226, «HOTP: An HMAC-Based One-Time Password Algorithm» at www.ietf.org/rfc/rfc4226.txt).
Because this is a test deployment, I will use a simple client application to create the OTPs. As mentioned previously, in the real world, you would want to integrate this with a tamper-resistant hardware device. I’ll go over the basics of what that would require and point you to some resources to get you started.
A Complete OTP Solution
In order to build my OTP solution, I’ll need to create a standards-based OTP authentication Web service that is backed by SQL ServerВ® and integrated into ASP.NET. I’ll create an OTP generator that is installed on each client computer, which users will run to generate a new OTP.
The user will type the OTP value when prompted by the Web browser and click Submit to authenticate. The OTP plug-in module is notified by IIS and subsequently calls the Web service to verify authentication attempts. The Web service looks up the user’s key and counter value in the SQL Server table, verifies the OTP computation, and responds with authentication success or failure.
Figure 1 shows the architecture of the sample solution. Keep in mind that in a production environment, this architecture should be further hardened against denial of service (DoS) attacks by actions such as configuring a trust relationship between the client and server and throttling invalid logon attempts.

Figure 1**В One-Time Password Solution ComponentsВ **
The sample code that accompanies this article, in the download section of the MSDNВ® Magazine Web site, consists of a Visual StudioВ® 2005 solution that includes a C++ DLL to generate the OTP (HmacOtpDll). Because this DLL is used by the OtpClient and the Web service, I put it into the system32 folder. (I use a post-build event to automatically copy it there.) The sample also includes a console application called OtpClient that generates the OTP value. OtpClient uses an XML file to store the secret code and counter. Every time the application is rebuilt, it copies the XML from the project root to the target directory, causing the counter to reset to 0.
An IIS module called IIS7Module provides OTP authentication services, and a Web service (called WebService) is used by the module to verify the OTP value. The Web service contains a SQL Server Express database, which is located in App_Data. Finally, I’ve included Web pages in the TestWebsite project, which I use for testing the solution.
Test OTP Generator Client
The test OTP generator client application is a self-contained tool that allows users to obtain OTP authentication values. It takes the place of a hardware device plus the challenge (such as a PIN request) that would typically be required in a real deployment. To compute OTPs, this client component uses a DLL that is shared with the authentication Web service. For the purpose of this sample application, the user will run the tool to create the next OTP and then manually type that value into a form in a Web browser. I’ll do all of this using C# and some C. (I chose C for the low-level implementation of the OTP cryptography.)
You’ve seen how OTPs work at a user level, but how does this solution work at a functional level? This hash-based OTP solution takes two values as input: a key and a count. However, an OTP solution also has metadata relevant to the implementer, including the length of the key and the length of the expected OTP value that the user will have to type in when authenticating.
My sample produces OTPs that are six characters in length and can support up to eight characters. For the sake of simplicity, this implementation uses some fixed-length buffers that limit the key length to 64 bytes. However, assuming that the key is a high-quality, cryptographically random number, that’s a huge key space. Such a key would not be the weak link in a production deployment. (A typical size for a random key today is 256 bits, or 32 bytes.)
The count value increments each time an authentication attempt is made by a given user (or technically, with a given key). The security of the OTP solution depends upon the count value never being reused; this is enforced by the OTP server. In this implementation, the count is a 64-bit unsigned integer. As I discussed earlier, another way to deploy this would be to use time synchronization with a server.
A keyed hash message authentication code (HMAC) is a key-based cryptographic hash. Or to put it another way, an HMAC takes an arbitrary message and a key and maps the message to a fixed-size digest value (20 bytes, for example), ensuring that only someone with the same key can produce the same digest value from the same message.
The first computational step for HMAC-OTP is to take the count value and encode it as the input message for an HMAC computation. In this implementation, the message is an 8-byte buffer set to the counter value. Figure 2 depicts this and the following two steps.The next computational step is to compute the HMAC of the above message with the user’s key. Note that I addressed byte ordering in this implementation in order ensure that it is compliant with the RFCs.
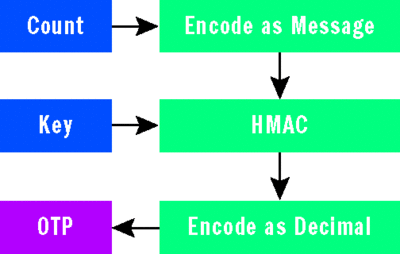
Figure 2**В One-Time Password FlowВ **
The 20-byte HMAC result is then turned into the OTP value, which is accomplished by making a decimal encoding of the HMAC result. There are two practical requirements here: first, I need to preserve as many bits of the HMAC computation as possible, up to the length of the OTP result (six numbers in this case), since losing bits exposes the computation to cryptographic attack. Second, I need to create an OTP that is compatible with as many varieties of input devices as possible. This compatibility requirement is why I implement decimal encoding. (This strong-authentication implementation is even compatible with a rotary phone!)
The Sample Web Site
My goal is to ensure that I have designed the site properly to show whether users have successfully or unsuccessfully logged in using OTPs. In order to facilitate testing, the OTP solution includes a sample Web site. The first page in the site is Default.htm, a landing page for authenticated users that demonstrates how even non-ASP.NET pages are protected by the OTP module. Test.aspx, a file that shows the currently authenticated user name, is also included, as is Test.aspx.cs, the file that shows how the Test.aspx page retrieves the authenticated user name from the System.Web.UI.Page.User property. Also included in the solution are a web.config file that includes a reference to OtpModule and a Visual Studio project solution with a reference to the IISModule.dll file.
The IIS HTTP OTP plug-in module is a component of the Web site. The module interfaces with IIS and redirects users to a Web form where they can enter their user names and OTPs. When a user submits a user name and OTP, the module validates the input and redirects the user to the appropriate success or failure page. The module also pairs the authentication status of the user with the user’s session.
For maintainability and supportability, I wanted the module to be managed, so I wrote it in C#. The plug-in module is a client of the authentication Web service, which I discuss next.
The OTP module implements the IHttpModule interface. In fact, the module is remarkably simple and consists of only three public methods. The first is Init, as shown here:
As you can see, the module uses this method to register its BeginRequest handler, application_BeginRequest. The purpose of the OTP BeginRequest handler is to ensure that all HTTP requests are made by an authenticated user. This is accomplished by using a few helper functions: one to determine whether the caller is authenticated and a few others to perform the authentication if the caller is not already authenticated. It is also worth mentioning here that intercepting the request during the BeginRequest event does not follow the standard authentication pattern used by ASP.NET applications. This approach is recommended, however, if you don’t want other modules to see the request, even those that, by design, want to intercept requests prior to authentication.
The IsAuthenticated helper function determines if the request indicates an authenticated user. This is done by checking the application context for a properly encrypted authentication cookie using the classes HttpContext, HttpCookie, and Security.FormsAuthenticationTicket within the System.Web namespace. If the cookie is present and decrypts without error, the caller is deemed to be authenticated. Otherwise, there are two possible states: either this is an OTP authentication request that should be processed, or the Web client request is invalid (unauthenticated) and a login form is displayed.
The OTP module includes a built-in login form known as LoginPage.htm. It consists of five HTML elements: an initially empty error message field, a user name field, a password field, a submit button, and a hidden input field named hdLoginForm.
If the caller is already authenticated, the module takes no further action. Accordingly, the request continues to process. In this demonstration, the Default.htm page is loaded.
If the caller isn’t authenticated, the IsAuthenticationPost helper function is called. It checks whether the request type is POST and if the request form has the hdLoginForm input field. The method returns true if both conditions are confirmed.
If the request is an authentication request, the TryAuthenticate helper function is called. The user name and OTP values are retrieved from the request context and passed to the authentication Web service’s VerifyOtpCode method. If the verification is successful, a new encrypted authentication cookie is attached to the response. The response is then redirected to the default page (Default.htm). One way to extend this demo would be to save the original page requested by the user and redirect the user to that page following a successful authentication.
If the VerifyOtpCode Web service call fails, the request is redirected back to the login form, which now displays an error message, and the helper function ShowLoginForm is called. The helper function loads the login page from the resource section of the module, sets the error message string in the page (if appropriate), and sets the login page as the response to the current request. It then signals the request as complete (this happens regardless of the nature of the request).
The Authentication Web Service
The authentication Web service is responsible for performing the actual OTP authentication by determining whether the provided OTP value demonstrates that the named user has knowledge of the secret key.
The implementation of the OTP authentication Web service is quite simple since it reuses the low-level cryptographic library, which implements the OTP computation discussed in the earlier section on the test OTP generator client. This reuse comes in the form of a P/Invoke call to the GenerateOTP export of the native HmacOtpDll.dll.
The Web service exposes a single Web method, VerifyOtpCode, which returns true for a successful authentication. The first step in that method is to load the SQL Server row corresponding to the user name indicated in the authentication request. If SQL Server cannot find a matching row, the method returns false.
If the user name is found in the SQL Server database, the following data items are passed to the native GenerateOTP: the OTP value that is specified in the request, the secret key for the user (retrieved from SQL Server), and a counter value (also retrieved from SQL Server).
GenerateOTP is retried with sequential counter values until either it returns a matching OTP value or until at most 1,000 sequential counter values have been checked. That allows for the user to have accidentally advanced the client counter offline, although that’s admittedly unlikely to have happened a thousand times since the last successful authentication!
Reducing this range would also reduce the already unlikely chance that an attacker might actually guess an OTP value that happens to be in the sequence, but it increases the possibility that the user may accidentally advance the client counter beyond the range attempted by the server. In the latter case, administrator intervention would be required in order for the user to be able to authenticate again.
If a matching OTP value is found within the counter range, the new counter value is written back to the database. While that unfortunately requires the authentication Web service to have write access to the database, it’s also critical to the security of the OTP since, as I described previously, a counter value must never be reused. (For a one-time password to be unique, it really must only be used one time.)
A SQL Server database with a simple schema is used to store user names and their corresponding OTP secret key or seed value. You can also extend the schema to include logging information, such as the number and times of successful and unsuccessful logons using an OTP. The database consists of the Username, SecretCode, and Counter columns. For an explanation of each of these elements, see the Authentication Web service section. The copy of the database that accompanies the sample code has only one row for the user name «testuser.»
The Complete Architecture
Figure 3 shows what the solution looks like when it’s complete. As you can see in the figure, the user launches the client application, generates an OTP, then navigates to the authentication Web application, and pastes the OTP into the Web browser form. The form is generated by the OTP module when it detects that the request isn’t authenticated. When the user clicks Submit, the Web browser form sends the request to the server where it’s again intercepted by the OTP module. Next, the OTP module calls the OTP Web service to verify the user authentication data. Finally, if successful, the Web server calls the handler for the requested page, which could be of any type (HTML, ASP.NET, PHP, and so on).
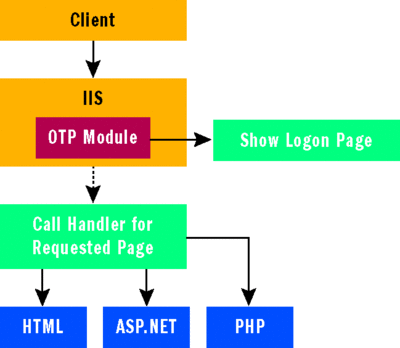
Figure 3**В Detailed OTP Solution ArchitectureВ **
Running the Code Sample
To run the code sample, you’ll need Windows VistaВ® or Windows ServerВ® 2008 with IIS 7.0 (with the Application Server role enabled for Windows Server 2008), Visual Studio 2005, SQL Server 2005 or SQL Server Express, and the OTP sample code. For experimenting with the demo, I recommend using Windows Server 2008 and SQL Server Express, since that’s what I used. In the following description, I will assume that the OTP sample code solution file is located at C:TestOTPOtp.sln.
To prepare your environment, install the IIS module using either the IIS Manager or by editing the web.config file. Enable read and write access to C:TestOTPwebserviceapp_data for either the IIS_IUSRS account or the account configured as the identity for a custom application pool. Then add a Web site for OtpTest and OtpService.
Registering the IIS module using the web.config file (this step has already been completed in the sample—see TestWebsiteWeb.Config) requires the following configuration markup:
You should also add the module DLL to the bin folder or the global assembly cache (GAC). To register the OTP module DLL with the GAC, use a command such as the following:
To use IIS Manager, open it and click on the name of your computer in the console tree. In the middle pane, double-click the Modules icon, and then click Add Managed Module in the actions pane. Next, select OtpModule from the dropdown listbox. If you put the DLL into the GAC and you’re using IIS Manager to add the module, then you might need to restart IIS in order to refresh the modules list.
In order to properly increment the number-of-attempts value in SQL Server Express, the NETWORK SERVICE account requires read and write access to the C:TestOtpWebServiceApp_Data directory. The required permissions for this object are read and execute, list folder contents, read, and write, as you see in Figure 4.
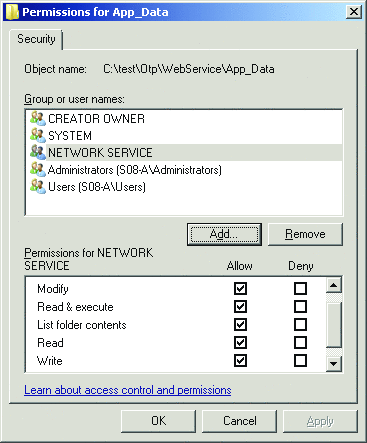
Figure 4**В Required Permissions for the App_Data DirectoryВ **
You must also set up a site in IIS for the test Web site. To do this, open the IIS Manager console, and in the ISS Manager console tree, expand the node with your computer’s name, right-click Sites, and click Add Web Site. Use the following settings for your new site, and then click OK (Figure 5 shows these settings):
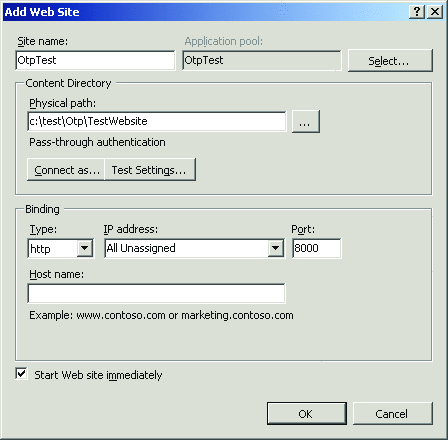
Figure 5**В OtpTest Web Site SettingsВ **
- Site name: OtpTest
- Physical path: C:testOtpTestWebsite
- Port: 8000
You must also create a site for the Web service. Use the following settings for this site: site name should be OtpService, physical path should be C:TestOtpWebService, and the port should be 8080.
Next, open the Otp.sln solution in Visual Studio, expand IIS7Module in the solution explorer, expand Web References, right-click OtpService, click Properties, and confirm that the Web Reference URL is set to http://localhost:8080/service.asmx. In the Build menu, click Build Solution and confirm that no build errors have occurred.
Now, you should test to ensure that the OTP module has been properly registered and loads correctly. To do so, navigate to http://localhost:8000 and verify that you see a page that looks like the logon page in Figure 6. To test the implementation, type in the test user name of testuser.
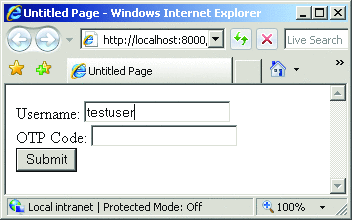
Figure 6**В First Page of Test Web SiteВ **
To get the value for the OTP Code textbox, open a Command Prompt Window as an administrator and navigate to the build directory of the OTP client program (C:TestOtpotpclientbindebug). Run OtpClient.exe to get the next OTP value. You should get something like Figure 7.
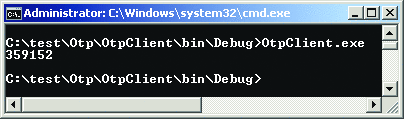
Figure 7**В Running OtpClient.exe to Get OTP ValueВ **
Type the OTP value into the OTP Code textbox, and then click Submit. Figure 8 shows the sample OTP code in the page. If the authentication is successful, you should be directed to the Default.htm page.
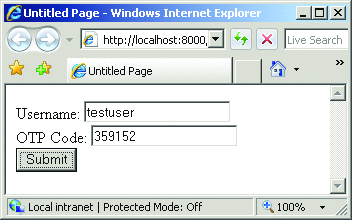
Figure 8**В Test Page with Sample OTP ValueВ **
Click the Text.aspx link on the default page to go to a demo page, which displays the name of the currently authenticated user (if any). If the authentication credentials were incorrect, you should see the page shown in Figure 9.
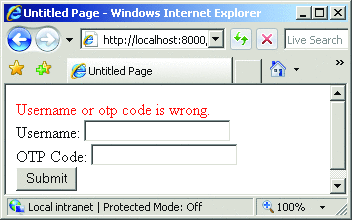
Figure 9**В Authentication was UnsuccessfulВ **
If you were to deploy this sample solution in a real-world environment, there are a number of items that you would want to consider. Real deployments store the user key/seed in a tamper-resistant device, such as hardware tokens. I would recommend that you modify the solution to lock the account in response to too many consecutive failed authentication attempts. You can do this by adding SQL Server columns and a feature to the Web service.
If interoperability is a concern, I recommend that you perform interoperability testing on the low-level HMAC code. Also realize that the MD5 hash algorithm is no longer considered secure. I used it in this sample solution in order to run some basic Known-Vector Tests with what’s available in the RFC documents. But a deployable solution should use one of the SHA-2 algorithms to create the hashes.
When developing more user-friendly authentication pages, be sure not to distinguish between bad user name and bad password. Otherwise, you’re letting attackers learn valid user names. You’ll also need some sort of provisioning solution for adding and removing users or perhaps synchronizing the authentication database with another repository such as Active DirectoryВ®.
If you are just targeting ASP.NET, the module could have been implemented as a standard ASP.NET HTTP module. However, such a solution would only secure .aspx files. Note that the IHttpModule interface is the same whether you are configuring it with the ASP.NET runtime or IIS 7.0, so if an original solution was an ASP.NET-specific module, then enabling it to support all file types is a simple change in configuration.
I used Visual Studio for editing the database, a cool feature of the IDE of which I had not previously been aware. To edit the database, go to the Solution Explorer tree view, expand WebService, expand App_Data, and select the Open option from the context menu. In the Server Explorer panel that appears, expand Data Connections, expand otp.mdf, expand Tables, right-click Users, and then click Show Table Data. Figure 10 shows the table data in the Visual Studio IDE. Just be sure not to leave the database open in the IDE when testing; the Web service won’t be able to open it and, thus, the authentication will fail.

Figure 10**В One-Time Password Solution ComponentsВ **
One-time passwords are an excellent alternative to standard passwords. Because users do silly things with their passwords, such as writing them down and falling victim to phishing attacks, you must strengthen the authentication process. Using the IIS 7.0 plug-in module model, you can create a standards-based OTP solution and more robust, production-ready OTP solutions using hardware tokens and challenges.
You should follow the sample here and give it a try for yourself. Since many employers, as well as consumer-facing interfaces such as online banking, are adapting OTP, you should familiarize yourself with the technology.
Read first: Previous version support information
I just read the blog post (https://blog.agilebits.com/2015/01/26/totp-for-1password-users/) about the one-time password feature being available for windows and iOS but I don’t see where or how to do that in the windows software. I checked the userguide and I didn’t see anything either.
Is it really just (for now) an iOS feature and the addition to windows is just that the one-time password info will sync to windows? Also, when’s this coming to Android?
Thanks!
Comments
-
I’ll get it into the documentation as soon as possible; in the meantime, please see this discussion in the 1Password for Windows (Beta) forum.
(TOTP only just got added to the stable build.)
-
I don’t see any options in the UI
- Start 1Password
- Unlock
- Locate your Login item
- Double-click on it (or press the Pencil button)
- Click on «Add Section» and give it a name (for example: «2-step verification»)
- Inside your newly created section, click on the button labelled «Add»
- Click on: «One-time password»
- Paste your OTP secret into the edit box (or click on the icon and then paste it into the edit box labelled «Secret»)
- Press OK
1Password should generate and display your TOTP in detail view. From here, you can copy your TOTP to the clipboard, or auto-type it into another application (probably your web browser).
-
@DBrown Thanks for the quick reply. Isn’t documentation supposed to come first
Also, any word when this is coming to Android?
-
In a perfect world, software wouldn’t need documentation or support, and I’d be out of work.
I don’t have any information about plans for 1Password for Android, though it seems like a reasonable assumption, given the current level of excitement about TOTP.
-
Thanks @svondutch dI just spent some period of time looking at both the application and the documentation before assuming the feature was broken and coming to the forums to research. Turns out it’s not broken, just not documented at all and not at all intuitive (I’ve never added another section before, don’t really even know what they do).
I’ve now added a TOTP to one of my logins and it displays correctly within 1Password. How do I get it to auto-type or submit into a webform?
-
I’ve now added a TOTP to one of my logins and it displays correctly within 1Password. How do I get it to auto-type or submit into a web form?
- Start your web browser
- Click on the 1Password button
- Unlock
- Locate your Login item (in an ideal world, it should be at the top of the 1Password popup menu, otherwise you can search for it)
- Right-click on your Login item (or press Tab while the mouse cursor is over it)
- A new sub-menu appears. From here, you can copy your TOTP to the clipboard, and then paste it where you need it.
-
Thanks, I’d assumed that 1Pass could/would enter it during form submission but can obviously copy/paste instead before submitting the form (less relevant for places where the 2FA is on a second page). Cheers
-
MikeT
Agile Samurai
Team MemberHi @wraith,
I’d assumed that 1Pass could/would enter it during form submission
That’s one of things we’d like to do in the future for the extension, to fill in the code like it does with the username and password.
We’re just getting started with the TOTP feature, expect it to get more easier to use as we continue to iterate with more improvements in 1Password and the browser extensions.

 MikeT
MikeT This discussion has been closed.
При предотвращении вторжений злоумышленников одной из важнейших мер по усилению безопасности являются системы многофакторной аутентификации. Среди наиболее эффективных подходов — метод одноразовых паролей (One-Time Password, OTP). Однако до сих пор ведутся споры о том, насколько его преимущества превышают недостатки. Представляем обзор глобального и российского рынков систем аутентификации с применением одноразовых паролей.
- Введение
- Алгоритм работы аутентификации с одноразовым паролем
- Где применяется One-Time Password (OTP)
- Мировой рынок One-Time Password (OTP)
- Российский рынок One-Time Password (OTP)
- Наиболее популярные системы OTP
- 6.1. Пользовательские продукты
- 6.1.1. Google Authenticator
- 6.1.2. Яндекс.Ключ
- 6.2. Корпоративные продукты
- 6.2.1. Аппаратные токены OTP
- 6.2.1.1. JaCarta WebPass
- 6.2.1.2. RSA SecurID
- 6.2.1.3. SafeNet
- 6.2.2. Приложения и платформы с возможностью аутентификации через OTP
- 6.2.2.1. Duo Security
- 6.2.2.2. ESET Secure Authentication
- 6.2.2.3. GateKeeper Enterprise
- 6.2.2.4. JaCarta Authentication Server (JAS) + Aladdin 2FA
- 6.2.2.5. Microsoft MFA
- 6.2.2.6. Multifactor
- 6.2.2.7. SafeNet Authentication Services
- 6.2.1. Аппаратные токены OTP
- 6.1. Пользовательские продукты
- Недостатки технологии One-Time Password (OTP)
- Выводы
Введение
Всё чаще появляются новости о новых попытках взлома той или иной организации, и иногда успешные попытки приводят к необратимым последствиям, начиная с компрометации критически важных данных и заканчивая штрафами и прочими неприятными последствиями вплоть до требований многомиллионного выкупа (как в случае с Garmin). С появлением в нашей жизни карантина и всеобщим переходом на удалённый режим работы у злоумышленников появилось больше возможностей для манёвра, в связи с чем возросли потребности организаций в обеспечении безопасности сегментов сети. Особенно остро ощущается необходимость предотвращения несанкционированного доступа — усиления мер аутентификации пользователей.
Как известно, существует множество способов аутентификации (подробнее о них можно узнать в нашей статье). Одним из наиболее распространённых вариантов на сегодняшний день остаётся метод OTP (One-Time Password), о котором пойдёт речь в этом обзоре.
Для усиления мер защиты всё чаще применяется гибридный подход, подразумевающий использование нескольких факторов аутентификации. OTP может являться одним из них.
Алгоритм работы аутентификации с одноразовым паролем
OTP — это способ аутентификации, при котором пользователь получает пароль доступный только для одного сеанса входа или одной транзакции в информационной системе или приложении. В основу OTP заложен принцип, что генерируемый пароль действителен для одной сессии. Дополнительно он может быть ограничен по времени (обычно смена пароля осуществляется в течение 30–60 секунд).
Рисунок 1. Принцип работы One-Time Password

Для расчёта пароля принимаются два параметра — секретный ключ (начальное значение для генератора) и текущее значение времени (или внутренний счётчик). Секретный ключ хранится одновременно как в самом устройстве, так и на сервере аутентификации. Средства для генерации одноразовых паролей условно можно разбить на две группы: либо у пользователя есть физические инструменты для такой генерации, например аппаратные устройства с экраном, ключи, мобильные приложения и т. д., либо пароли приходят по некоему каналу — в виде SMS-сообщения, пуш-уведомления и др.
Где применяется One-Time Password (OTP)
Двухфакторная аутентификация популярна во многих крупных организациях. Это обусловлено увеличением объёма онлайн-транзакций из-за перехода клиентов на цифровой банкинг, быстрым ростом электронной коммерции, использованием интернет-банкинга для покупки продуктов и прочих товаров. Также распространению строгой аутентификации способствуют запуск платёжных систем в режиме реального времени и внедрение POS-систем в торговых точках для удобства пользователей.
OTP, как один из факторов, широко применяется в банковском секторе, в приложениях электронной коммерции. Многие из нас почти ежедневно сталкиваются с этой технологией, например, при попытке перевести деньги с карточки (одноразовый пароль приходит в SMS-сообщении или в виде пуш-уведомления при попытке выполнить транзакцию).
Среди решений для OTP есть как коммерческие, так и полностью бесплатные. Многие поставщики предоставляют бесплатный доступ к OTP-приложениям с определёнными ограничениями (например, по количеству пользователей), и если возникнет потребность, можно будет приобрести версию с расширенными возможностями. Таким образом, технология защиты с OTP стала доступна каждому, кто хочет усилить защиту своих данных.
Мировой рынок One-Time Password (OTP)
За последнее десятилетие многие компании начали активно усиливать меры аутентификации. Количество организаций, применяющих многофакторную аутентификацию с использованием криптографии, утроилось для потребительских приложений и увеличилось почти вдвое для корпоративных. Во многом такой рост обусловлен развитием киберпреступности. Только за последние несколько лет произошёл ряд инцидентов, в результате которых были затронуты крупнейшие организации, такие как Facebook, Google, Garmin и другие.
Метод One-Time Password на сегодняшний день остаётся одним из самых распространённых на рынке двухфакторной аутентификации. К 2018 году этот сектор оценивался в 1,5 млрд долларов США из общих для рынка двухфакторной аутентификации 3,5 млрд. Согласно результатам исследования Market Research, к 2024 году он достигнет 3,2 (из 8,9) миллиарда долларов.
Мировой рынок токенов OTP сегментирован по типу, технологии и отрасли. Так, устройства можно разделить на две основные группы — физические (hard tokens) и программные (soft tokens). В зависимости от типа физического устройства есть сегменты токенов SIM, USB-токенов, мини-токенов. По типу технологии выделяются секторы физических устройств с поддержкой NFC и биометрических токенов. Программные устройства представляют собой приложения для генерации одноразовых паролей, которые могут быть встроены в платформы двухфакторной аутентификации. Приложения устанавливаются на ноутбук, планшет или мобильное устройство. В зависимости от отрасли рынок OTP делится на сектор банковских, финансовых и страховых услуг (BFSI), розничную торговлю, правительство, «оборонку» и другие.
Технология OTP уже давно используется на мировом рынке, и долгое время одноразовые пароли передавались через SMS и пуш-уведомления. Однако на сегодняшний день многие компании и авторитетные источники призывают отказаться от такого типа передачи OTP в пользу методов, при которых пользователь имеет на руках устройство для генерации одноразовых паролей (например, токен или приложение). Не так давно Microsoft обнародовала заявление о том, что предприятиям следует отказаться от OTP, отправляемых с помощью SMS и голосовых вызовов. Согласно сообщению в блоге директора по информационной безопасности Microsoft Алекса Вайнерта, предприятиям настоятельно рекомендуется усилить свои решения, отказавшись от незашифрованных методов многофакторной аутентификации, таких как одноразовые пароли через SMS (поскольку они могут быть перехвачены или подвержены фишинговой атаке).
В 2016 г. в Минкомсвязи РФ также заявляли о том, что стоит отказаться от SMS-сообщений в пользу других методов, например отправки пуш-уведомлений. В особенности эта рекомендация относится к банковскому сектору.
Мировой рынок двухфакторной аутентификации является высококонкурентным, при этом безопасность и конфиденциальность данных играют центральную роль для клиентов и заказчиков. Разработка мер по предотвращению проникновения вредоносных программ и других угроз, вероятно, будет способствовать развитию продуктов, соперничество между игроками неизбежно усилится. Основными участниками мирового рынка двухфакторной аутентификации являются Thales, Symantec, RSA, Fujitsu, Suprema, Google и многие другие.
Наиболее активно используемые на сегодняшний день OTP-решения будут рассмотрены ниже.
Российский рынок One-Time Password (OTP)
Среди отечественных вендоров самым популярным является компания «Аладдин Р. Д.», предлагающая платное решение для организаций. Также на российском рынке представлены средства аутентификации с OTP от Rainbow Technologies, «Яндекса», TeddyID и других поставщиков, но они занимают незначительную долю рынка. Среди пользователей популярны бесплатные приложения с OTP, такие как Google Authenticator или Microsoft Authenticator.
Наиболее популярные системы OTP
В данном разделе будут рассмотрены наиболее часто используемые продукты и платформы с поддержкой OTP, разделённые на две группы в зависимости от их типа применения: корпоративные и пользовательские.
Пользовательские продукты
Эти разработки предназначены для персонального применения, однако они могут быть использованы также в составе сторонних систем.
![]()
Google Authenticator
Приложение OTP от Google является самым простым и интуитивно понятным в использовании по сравнению с остальными. Оно отвечает за генерацию 6- или 8-значных кодов, может быть интегрировано со сторонними приложениями, например менеджерами паролей. С недавних пор приложение позволяет переносить учётные записи с одного устройства на другое. Инструмент экспорта-импорта создаёт QR-код, который потребуется отсканировать на устройстве-получателе.
Рисунок 2. Интерфейс Google Authenticator

К достоинствам программы можно отнести:
- Простоту и удобство использования.
- Возможность переноса учётных данных на другие устройства.
- Возможность интеграции со сторонними приложениями.
К недостаткам программы можно отнести ограниченные функциональные возможности.
Подробнее с продуктом можно ознакомиться здесь.
![]()
Яндекс.Ключ
Компания «Яндекс» запустила механизм двухфакторной аутентификации и приложение «Яндекс.Ключ», генерирующее на мобильном устройстве код доступа к аккаунту на «Яндексе». Можно сказать, что приложение очень напоминает рассмотренный выше Google Authenticator. Для доступа к приложению нужен четырёхзначный PIN, срок действия одноразового пароля составляет 30 секунд. Также доступна авторизация в приложении с помощью QR-кода.
Рисунок 3. Интерфейс «Яндекс.Ключа»

К достоинствам программы можно отнести:
- Простоту и удобство использования.
- Создание резервных копий токенов в облаке для использования на нескольких устройствах и перехода на новые.
- Возможность быстрого переноса данных на другие устройства.
К недостаткам программы можно отнести не вполне удобный для использования с большим количеством токенов интерфейс.
Подробнее с продуктом можно ознакомиться здесь.
Корпоративные продукты
Аппаратные токены OTP
![]()
JaCarta WebPass
Устройство российского производителя позволяет реализовать двухфакторную аутентификацию пользователя в защищённых информационных системах с использованием одноразового или многоразового пароля. JaCarta WebPass может работать совместно с автономным высокопроизводительным сервером аутентификации JaCarta Authentication Server для обеспечения безопасного подключения к шлюзам удалённого доступа (Microsoft, Citrix, Palo Alto, Check Point, VMware, Fortinet и др. — список постоянно пополняется), корпоративным системам (CRM, порталы, электронная почта и т. д.), в том числе Microsoft SharePoint и Microsoft Outlook Web App, веб-приложениям, сайтам и облачным сервисам, системам дистанционного банковского обслуживания.
Рисунок 4. USB-токен JaCarta WebPass

К достоинствам JaCarta WebPass можно отнести:
- Возможность автоматической подстановки паролей в поля экранных форм.
- Возможность хранения адресов защищённых веб-ресурсов и автоматический запуск веб-браузера с переходом по сохранённому адресу при нажатии на кнопку на токене.
- Полную совместимость с классическими ОТР-токенами (eToken PASS, eToken NG-OTP и др.) согласно RFC 4226.
- Поддержку всех популярных ОС: Microsoft Windows, Linux, macOS, Google Android, Apple iOS (через Camera Connection Kit).
- Возможность хранения криптоконтейнеров программных СКЗИ, что позволяет использовать токен не только для аутентификации, но и для работы с электронной подписью.
Стоит отметить, что токен имеет широкую функциональность (например, доступно создание и защищённое хранение сложных многоразовых паролей).
Подробнее с продуктом можно ознакомиться здесь.
![]()
RSA SecurID
Генератор (брелок) содержит встроенные высокоточные часы, которые каждые 60 секунд используются для вычисления нового пароля. Второй параметр, применяемый для генерации одноразового пароля, — вектор начальной инициализации (Seed). Он «прошивается» в генераторе при его производстве. Для аутентификации сервер Authentication Manager вычисляет текущий пароль пользователя используя показания системных часов и начальный вектор инициализации (с каждым аппаратным токеном поставляется файл с Seed, который загружается на сервер).
Рисунок 5. Токен RSA

В последнее время вместо токенов всё чаще используется приложение для смартфона.
Рисунок 6. Интерфейс приложения RSA SecurID

SecurID используется для защиты VPN, беспроводных сетей, веб-приложений, порталов дистанционного банковского обслуживания, терминальных серверов Citrix и Windows, доступа привилегированных пользователей, локального доступа к рабочим станциям.
Основное достоинство системы заключается в том, что SecurID «из коробки» работает с более чем 350 партнёрскими продуктами, включая веб-серверы (Oracle Application Server, Microsoft IIS, Apache и др.), VPN и прочие сетевые устройства (Cisco, Check Point, Microsoft и др.), терминальные серверы (Citrix, Microsoft), ОС Windows. Есть API, позволяющее встроить SecurID практически в любую систему.
Подробнее с продуктом можно ознакомиться здесь.
![]()
SafeNet
SafeNet OTP от Thales — это аппаратные токены OTP, которые обеспечивают возможности двухфакторной аутентификации для широкого спектра ресурсов и поддерживают функции протоколов OATH TOTP и HOTP. Компания представила несколько токенов: SafeNet OTP 110 (основным отличием является водонепроницаемый корпус), SafeNet eToken Pass и SafeNet Gold (в этой версии реализован дополнительный механизм защиты в виде пользовательского PIN). Существуют также OTP-карты SafeNet (OTP Display Card), которые взаимодействуют с SafeNet Trusted Access — сервисом управления облачным доступом, который предлагает технологию единого входа, защищённого детальными политиками доступа.
Рисунок 7. Пример токена SafeNet OTP 110 и смарт-карты SafeNet


К достоинствам SafeNet можно отнести:
- Лёгкость и простоту использования.
- Пожизненную гарантию на некоторые модели (предоставляется на весь срок действия подписки SafeNet Trusted Access, включая бесплатную замену).
- Безопасный удалённый доступ к сетям (VPN), приложениям SaaS, VDI, веб-порталам и пользовательским приложениям.
- Простое управление благодаря лёгкой внутренней конфигурации, низкому уровню потребности в техническом обслуживании и длительному сроку службы аккумулятора.
- Соответствие отраслевым нормам.
- Возможность работы в составе разных платформ — Eset, JaCarta Authentication Server, Microsoft MFA, SafeNet Authentication Services и других.
В качестве недостатков следует отметить:
- Отсутствие пользовательской документации на русском языке.
- Недостаточно информативные сообщения об ошибках и другие неточности пользовательского интерфейса.
- Отсутствие сертификата ФСТЭК России для некоторых моделей.
Подробнее с продуктом можно ознакомиться здесь.
Приложения и платформы с возможностью аутентификации через OTP
![]()
Duo Security
Duo Security — система многофакторной аутентификации, реализованная по облачной модели. В настоящее время поглощена Cisco. Помимо широко распространённой корпоративной версии системы, которая также позволяет решать административные задачи, существует бесплатная версия для домашнего использования. Приложение Duo Mobile даёт возможность выбора удобного метода аутентификации: телефонный звонок, SMS-сообщение, код Duo Mobile, Duo Push, электронный ключ.
Рисунок 8. Пример окна аутентификации Duo

К достоинствам DUO Mobile можно отнести:
- Скорость внедрения.
- Гибкие тарифные планы.
- Масштабируемость.
- Возможность реализации единой точки входа для информационных систем организации с поддержкой SAML для реализации SSO в масштабах предприятия.
- Возможность гибкого управления аутентификацией в соответствии со внутренними политиками.
- Интеграцию с большим количеством облачных сервисов, а также с корпоративными приложениями и сервисами.
- Возможность контроля рабочего места пользователя и автоматизации обеспечения соответствия корпоративным требованиям.
К недостаткам системы можно отнести:
- Базирование на инфраструктуре публичного облака Amazon AWS, что может вызвать определённые риски при внедрении в РФ.
Подробнее с продуктом можно ознакомиться здесь.
![]()
ESET Secure Authentication
ESET Secure Authentication (ESA) предлагает пользователю большое количество способов доставки одноразовых паролей, начиная от SMS‑сообщений и заканчивая аппаратными токенами и пуш‑уведомлениями. Кроме того, когда пользователь получает пуш-уведомление на мобильное устройство или смарт-часы, в сообщении указывается, с какого IP-адреса производится подключение к ресурсам. Также есть возможность внести доверенные IP-адреса (подсети) пользователей в списки исключений, позволяя им подключаться к корпоративным ресурсам только по логину и паролю.
Рисунок 9. Интерфейс ESET Secure Authentication

К достоинствам системы можно отнести:
- Возможность лёгкого внедрения двухфакторной аутентификации в работу локальной сети предприятия и обеспечения доступа к веб-приложениям.
- Высокую степень интеграции со службами Active Directory и RADIUS.
- Интеграцию с другими средствами информационной безопасности от ESET.
- Хорошую локализацию и техническую поддержку в РФ.
- Интеграцию со сторонними аутентификаторами, поддерживающими стандарт FIDO.
К недостаткам системы можно отнести:
- Ориентированность на инфраструктуру Windows.
- Традиционную модель развёртывания системы на серверах в локальной сети, сложности масштабирования в больших организациях.
Подробнее с решением можно ознакомиться в нашем обзоре.
![]()
GateKeeper Enterprise
Ещё одно решение для многофакторной аутентификации с OTP — это GateKeeper. Помимо стандартных функциональных возможностей здесь представлена автоматическая блокировка устройства при уходе сотрудника с рабочего места. Корпоративный вариант системы позволяет осуществлять интеграцию с другими системами безопасности и аутентификации, такими как Azure AD ADFS.
Рисунок 10. Внешний вид приложения GateKeeper

К достоинствам системы можно отнести:
- Гибкость за счёт облачной модели развёртывания.
- Поддержку широкого спектра сетевых технологий для интеграции с существующей инфраструктурой корпоративной сети.
- Возможность многофакторной аутентификации, в том числе с помощью аппаратных токенов.
К недостаткам системы можно отнести:
- Низкую степень локализации.
- Зависимость от провайдера облачных сервисов.
Подробнее с продуктом можно ознакомиться здесь.
![]()
JaCarta Authentication Server (JAS) + Aladdin 2FA
JaCarta Authentication Server (JAS) — автономный высокопроизводительный сервер аутентификации, поддерживающий работу как c аппаратными OTP-токенами (например, JaCarta WebPass), так и с мобильными приложениями, реализующими функциональность OTP-токенов: Aladdin 2FA, разработанным компанией «Аладдин Р. Д.», а также сторонними продуктами, например Google Authenticator, «Яндекс.Ключом» и любыми другими работающими по такому же стандарту. Совместное использование JAS с Aladdin 2FA позволяет обеспечить повышенный уровень защищённости.
Преимущества использования JAS:
- Усиленная аутентификация пользователей по одноразовым паролям (OTP).
- Обеспечение аутентификации на настольных компьютерах, ноутбуках (JAS OTP Logon).
- Простая интеграция с прикладным ПО по стандартным протоколам и шлюзам удалённого доступа.
- Высокая производительность (более 1000 аутентификаций в секунду).
JAS зарегистрирован в Едином реестре российских программ для электронных вычислительных машин и баз данных (№ 2128).
Aladdin 2FA — мобильное приложение для генерации одноразовых паролей по времени (TOTP) или по событию (HOTP). По функциональным возможностям приложение Aladdin 2FA — такое же простое и интуитивное, как Google Authenticator, однако при корпоративном использовании Aladdin 2FA совместно с сервером аутентификации JaCarta Authentication Server приложение надёжно защищает передаваемый пользователю секрет. Кроме того, Aladdin 2FA защищает аккаунт (данные для генерации одноразовых паролей) от клонирования при передаче и активации.
Рисунок 11. Интерфейс приложения Aladdin 2FA и сообщение о невозможности повторной активации аккаунта

Aladdin 2FA позволяет защитить данные приложения при помощи биометрии или PIN-кода. Самостоятельно попробовать и сравнить различные сценарии работы приложения Aladdin 2FA (открытый по аналогии с Google Authenticator и защищённый Aladdin 2FA) можно на демо-портале.
К достоинствам системы можно отнести:
- Простоту интеграции и использования.
- Поддержку в Aladdin 2FA механизма усиленной безопасности в процессе передачи секрета (вектора инициализации) совместно с сервером аутентификации JAS.
К недостаткам системы можно отнести:
- Ограничение мобильного приложения по минимальной версии операционной системы: iOS 12 и выше, Android 5 и выше.
Подробнее с продуктом можно ознакомиться здесь.
![]()
Microsoft MFA
Этот комплекс аутентификации входит в экосистему сервисов Microsoft Azure и Office 365. Когда пользователь входит в приложение или службу и получает запрос многофакторной аутентификации, он может выбрать одну из зарегистрированных форм дополнительной проверки: приложение Microsoft Authenticator, токен оборудования OATH, SMS, голосовой звонок.
Рисунок 12. Интерфейс приложения Microsoft Authenticator

Также система интегрируется с Active Directory, что позволяет легко внедрять её на уровне предприятия при условии использования доменной службы Microsoft, и может функционировать в качестве отдельного облачного сервиса.
К достоинствам системы можно отнести:
- Доступность для пользователей сервисов Azure и Office 365.
- Информационную и техническую поддержку.
- Наличие хорошей инфраструктуры публичного облака.
- Возможность интеграции с Active Directory.
К недостаткам системы можно отнести:
- Традиционную ориентированность на экосистему Microsoft.
Подробнее с продуктом можно ознакомиться здесь.
![]()
Multifactor
«Мультифактор» — облачная система многофакторной аутентификации с поддержкой корпоративного SSO для любого количества пользователей и информационных ресурсов. Система предназначена для защиты сайтов, приложений, VPN- / VDI- / RDP-соединений, Windows- и Linux-инфраструктуры дополнительным фактором доступа.
В мобильном приложении реализована технология интеллектуальной адаптивной аутентификации с комбинацией пуш-запроса доступа в одно касание и одноразового TOTP-кода для обеспечения максимальной безопасности и удобства использования.
Рисунок 13. Интерфейс приложения Multifactor


К достоинствам приложения Multifactor можно отнести:
- Кроссплатформенность (iOS, Android, Huawei).
- Простую аутентификацию в одно касание из пуш-запроса доступа.
- Поддержку режима регистрации второго фактора в режиме диалога с пользователем в VPN- и VDI-клиентах.
- Сервер аутентификации в РФ (датацентр DataLine).
- Дополнительную защиту доступа одноразовым TOTP-кодом.
- Надёжную защиту от фишинговых атак за счёт комбинации Push и TOTP.
- Возможность неограниченного использования внешних TOTP-аккаунтов.
К недостаткам системы можно отнести следующее:
- Интеллектуальное комбинированное решение Push и TOTP предоставляется бесплатно только для трёх пользователей.
![]()
SafeNet Authentication Services
SafeNet Trusted Access (STA) — это облачное решение, которое упрощает управление доступом как к облачным службам, так и к корпоративным приложениям. STA поддерживает методы аутентификации OTP через пуш-уведомление в приложении, через SMS или с использованием аппаратных токенов.
Приложение для генерации OTP SafeNet MobilePASS совместимо с широким спектром мобильных клиентов, а также обеспечивает удобство управления системами удалённого доступа, такими как VPN, приложениями Citrix, облачными приложениями и веб-порталами.
Рисунок 14. Интерфейс приложения SafeNet MobilePASS

Также помимо MobilePASS в качестве приложения для генерации OTP в STA можно использовать Google Authenticator.
К достоинствам системы можно отнести:
- Облачную реализацию с возможностью создавать независимые полноценные серверы аутентификации.
- Интеграцию через RADIUS, OpenID и SAML, взаимодействие с AD.
- Вход пользователей в разные приложения через единую точку (SSO).
- Возможность реализации требований основных российских регуляторов в части обеспечения защиты информации при управлении доступом пользователей.
К недостаткам системы можно отнести:
- Отсутствие русифицированного интерфейса.
Недостатки технологии One-Time Password (OTP)
Как и любая другая технология, OTP имеет ряд изъянов, которые стоит принять во внимание.
- В некоторых случаях использование одноразовых паролей повышает риск компрометации данных всей системы, так как при доступе злоумышленника на сервер аутентификации OTP все компоненты системы будут доверять этому серверу.
- Риск передачи одноразовых паролей злоумышленнику, например при утере токена. Здесь стоит упомянуть о том, что зачастую в приложении помимо одноразового пароля следует вводить многоразовый, однако он также может быть скомпрометирован аналогично обычному паролю.
- Некорректное функционирование систем OTP, которое может привести к наличию уязвимостей — например, к увеличению срока действия одноразового пароля, что позволит злоумышленнику за это время подобрать пароль.
- Возможность получить одноразовые пароли в результате фишинга, как это произошло в 2005 году в Банке Швеции и в 2006 году в Citibank (США).
- Рассинхронизация OTP-токенов и серверов аутентификации во времени, в результате чего в определённый момент на сервере может быть несколько «правильных» одноразовых паролей. Предположим для примера, что приблизительное время рассинхронизации составляет 5 минут, а период смены OTP — 30 секунд; в такой ситуации одновременно может существовать до 10 «правильных» паролей, что повышает вероятность несанкционированного доступа.
Выводы
Подводя итог, следует отметить, что технология One-Time Password многократно повышает устойчивость информационной системы к атаке в сравнении с традиционными статическими парольными фразами. Для повышения общего уровня безопасности предпочтительнее сочетать OTP с другими методами, такими как биометрия или PIN.
Системы, которые присылают одноразовые пароли на телефон, небезопасны. Более правильный способ — использование аппаратных устройств. Мобильные приложения — это компромисс между безопасностью и удобством.
Some background:
Protocols: Radius, LDAP, SAML, OATH. Radius is great for internal use (ldap is more of a directory protocol than an auth, IMO) and the last two are designed for external/internet auth. Choose an internal protocol and then an external method. Limiting yourself in this way keeps it clean and helps you to learn.
First, ubuntu: that’s easy. you just need to learn a little bit about PAM — the Pluggable authentication module. PAM supports a bunch of protocols. Build the library for your protocol and then edit the services files in /etc/pam.d/. So, sshd, login, su, sudo, whatever. Here’s a doc on how to add two-factor authentication to SSH: http://www.wikidsystems.com/support/wikid-support-center/how-to/how-to-secure-ssh-with-two-factor-authentication-from-wikid/. Just do the same for login, and you should be good. One caveat: leave a way to get in! You don’t want to be locked out. This is one reason why most companies only worry about remote access and not local access.
Windows login: This means changing the windows login or GINA. Do this at your own risk as well. Check out the opensource pgina project. I tested this with WiKID using radius on windows xp a long time ago and it worked great. But none of our customers implemented this because of the risk of lock-out and potential support costs.
Websites: Increasingly companies are separating «login creds» from «accounts» and seeing that they can get more of the latter if they let someone else handle the former. Hooray. However, not all the authenticating parties are doing two-factor auth. Google is the only one. You may not be comfortable with google knowing your every login, though and you might want a server that you can control and use for other services too.
If so, our open-source version includes a plugin for GoogleSSO for Google Domains: http://www.wikidsystems.com/support/wikid-support-center/how-to/how-to-wikid-strong-authentication-to-google-apps-for-your-domain/.
Windows Credential Provider
Windows Credential Provider
Normal Login flow

Simple Login flow

Push Login flow
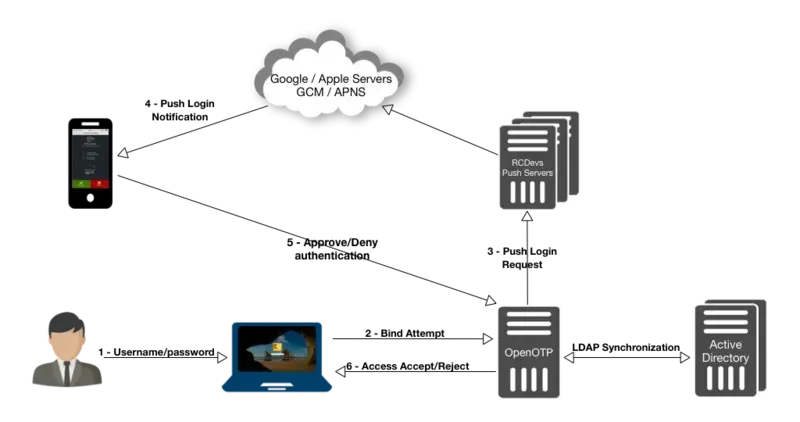
1. Product Documentation
This document is an installation guide for the OpenOTP Credential Provider for Windows. Hence, the installation or configuration of WebADM, including token registration is not covered in this guide. For installation and usage guides to WebADM refer to the RCDevs WebADM Installation Guide and the RCDevs WebADM Administrator Guide available through the RCDevs online documentation Website.
2. Product Overview
The OpenOTP Credential Provider for Windows is a component that integrates the RCDevs OpenOTP one-time password authentication into the Windows login process. RCDevs OpenOTP Authentication Server is a Web Service that is tightly coupled to the RCDevs WebADM application server.
For this recipe, you will need to have WebADM/OpenOTP installed and configured. Please, refer to WebADM Installation Guide and WebADM Manual to do it.
3. System Requirements
The OpenOTP Credential Provider runs on any x86/x64 Windows platforms starting with Windows Vista and Windows Server from 2008 versions.
Your environment should fulfill the following requirements:
- x86/x64 Windows 2008 Server/Vista or later.
- Workstation joined to AD domain or not.
- Network access.
- An instance of WebADM and OpenOTP running in your network.
- Permanent connection to OpenOTP server’s network API (except in Offline mode).
- NetBIOS over TCP/IP enabled and resolvable.
- DNS suffix set to match your AD domain.
4. Preliminary Information
Administrative/elevated permissions are necessary on any workstation to correctly set up and/or change the OpenOTP Credential Provider’s configuration.
To correctly setup the provider, please gather the following information. You will need to enter during the installation process:
- The URI(s)s of the OpenOTP web-service(s) (mandatory)
- These URIs are mandatory, due to the client needs to know where the OpenOTP SOAP network API can be reached. They are entered as a comma-separated list. At least one URI is necessary.
- Your local domain (optional)
- Needed to force a domain, which is not set as default on the OpenOTP side.
- A custom login text or tile caption (optional)
- A text that is displayed on the Windows login pane.
- A client ID (optional)
- An ID to identify a particular client on the server-side.
- A certificate authority (CA) file (optional)
- A certificate file (optional)
- The certificate’s password (optional)
- SOAP timeout delay (optional)
The login-mode LDAP+OTP must be set at server-side in WebADM, as the Windows Domain Controller (DC) needs the full credential (including LDAP password) to issue a Kerberos ticket.
5. Installation and Configuration
The Credential Provider’s setup and configuration are done in about 5 minutes. The installer is the only utility that is needed to set up and to configure the provider. The provider can be automatically deployed to your clients. This is covered later.
Note
Administrative/elevated permissions are necessary on any workstation to correctly set up and/or change the OpenOTP Credential Provider’s configuration. Please, run Windows PowerShell or command prompt as Administrator. Right click on Windows PowerShell then select Run as Administrator.
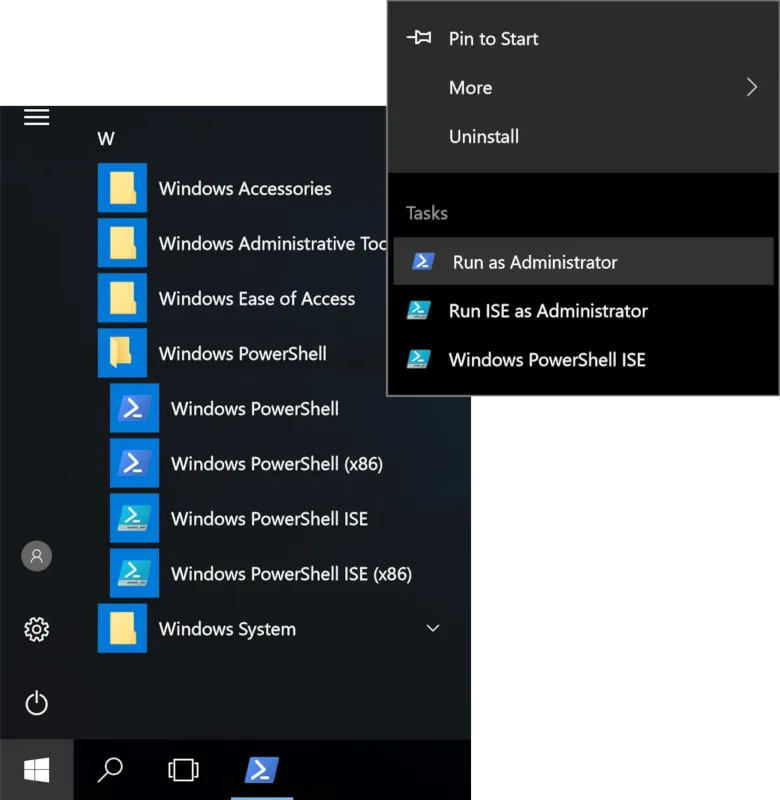

5.1 Local Installation
First, you have to download OpenOTP Credential Provider x86 or x64.
Extract files from the archive on your Windows machine(s), run the MSI file and click on Next.
Accept the End-User License Agreement and click on Next.
Now, you have to select which features to install. On top of Core Components (mandatory), you can select to install the Credential Provider as default or Smartcard login. You may also change the default installation directory as you wish.
Note that Smartcard login is only supported beginning with Windows 8 or Windows Server 2012 and on 64 bits systems.
Click Next when you are done.
Note
Installing the provider as default disables all other credential providers on the target system. Only Credential Providers provided by RCDevs will be available for login. If any problem occurs you can still log in with other providers using the Windows failsafe boot. It is possible to force OTP login in failsafe mode. This is covered later. To log in on a Windows Server through RDP client with a One-Time Password, OpenOTP Credential Provider should be installed by default on the remote host to perform an OTP login. While testing: Do not install as default provider! Before choosing OpenOTP Credential Provider as default provider, perform a login test!

On the first configuration page, you have to configure the following elements:
WebADM URL,Server URL, andadditional Server URLsettings:- if you select
Auto, fillWebADM URLwith at least one of your WebADM server URL (e.g. https://localhost), and click onConfigure. This will automatically fill theServer URL,additional Server URLandCertificate Authority filefields. - if you select
Manual, please configure at leastServer URLsetting with one of your OpenOTP SOAP URL(s). This should be like:https://your-webadm-ip-address-or-dns-name:8443/openotp/.
- if you select
Loading Text(optional): The text to display during a connection attempt to Webadm. If you are using push login, it could be useful to remind the user here to check his mobile phone.Login Text(optional): you can also define a login text which will be displayed to the user when authenticating.Loading Text(optional) : This is the text displayed during a connection attempt to webadm. If using push login, it could be useful to remind the user here to check his mobile phone.
Note : Let it empty to keep the default message.Client ID(optional): you can also define a Client ID referring to a client policy in WebADM.

Click on Next.
On the second configuration page, you can configure the following elements:
Certificate Authority File(optional): this has to be configured if you configured HTTPS in your Server URL during the previous step. This must contains the CA file of your webadm servers. The file will be automatically copied into the installation folder of OpenOTP Windows Credential Provider.Certificate File,Certificate Password, andConfirm Password(optional): if you configured OpenOTP to require a client certificate, you can set it with these settings.Note
OpenOTP Credential Provider will automatically download the CA certificate on the default WebADM server port if you are using the automatic configuration. You can also obtain it manually with
https://mywebadmserver/cacert.

Click on Next.
On the third configuration page, you can configure the following elements:
SOAP Timeout(Default to 30) : this is the timeout for connection to the Server URL.Server Selection Policy(Default to Ordered) : If you have more than one webadm server, this is the way the Windows OpenOTP Credential Provider will contact them.Ordered: the first server is always preferredBalanced: the server is chosen randomly for each requestConsistent: the server selection depends on the user ID

Click on Next.
On the fourth configuration page, you can configure the following elements:
-
Authentication form(Default to Simple). You have 2 choices:Simple: On the Windows login page, you will have 2 fields in the first step (Username and Password LDAP), after pressinglogin, you will have a second screen with the OTP field.Normal: With this option, you will have 3 fields on the login page, one for the Username, one for the LDAP password and the last one for the OTP.
-
Login Tile Image(optional) : the path of the image on the filesystem displayed on the login page (must be a 128x128px 24 bit bitmap file) -
Http Proxy Host and Port(optional) : this config is for HTTP proxy. If you are running OpenOTP behind an HTTP proxy you need to set the host and the port of the proxy. -
Remote LDAP Password Check(Default to Yes) : enable this option if your OpenOTP server does not use your AD or if this host is not connected to the Windows Domain. -
Auto Create Local Accounts(optional): this can be enabled when the host is not connected to a Windows domain and you want the Credential Provider to create user accounts at first login. See this page for more information. -
Credential Providers Filter Whitelist :(optional): If you are installing OpenOTP Credential Provider as default, no other providers will be available during login. Use this setting to override this behavior and allow specific credential providers to be used.
Please keep in mind that the login process will only be as secure as the least secure of the available credential providers!
This is a list of the allowed Credential Providers CLSID separated by “;”, a CLSID is of the form {60b78e88-ead8-445c-9cfd-0b87f74ea6cd}.
All the CLSID of the registered Credential Providers on your machine can be found in the following registry location :
HKEY_LOCAL_MACHINESOFTWAREMicrosoftWindowsCurrentVersionAuthenticationCredential Providers
This will change depending on your Windows version and if you have installed other third party Credential Providers.

Click on Next.
On the fifth configuration page, you can configure the following elements:
-
RDP Client ID(optional). RDP client ID can be used if you want to match a different client policy for RDP sessions. -
MFA Required for RDP(optional): this option is to force or bypass the MFA check using RDP from the machine when the OpenOTP Windows Credential Provider is installed as the default credential provider. That means when this setting is disabled, you are able to select the default Windows credential provider during an RDP authentication. -
Offline Mode Support(Default to Yes): enable this option if you want to use the offline mode of Windows Credential Provider. This will permit you to authenticate to your machine even if webadm is not reachable. -
Max hours to bypass MFA(Default to Disabled): this setting can be used to define for how much time the OpenOTP Windows Credential Provider will not ask for a MFA since the last login. -
Whitelist(optional) : List of user SID separated by ; that won’t be asked for 2FA/MFA to login, skipping any OpenOTP calls.
Tip : You can get an user SID using this command from a cmd prompt :
wmic useraccount where (name='Username' and domain='Domain') get sid

Important
The setting MFA Required for RDP includes all other scenarios different than the local login.
For example RunAsDifferentUser or RunAsAdministrator on a program or on a installer will trigger the RDP scenario.
If that setting is enabled and you use Windows Remote Desktop tool to login on a remote machine, then the OpenOTP Credential Provider will be triggered locally during the login process. If the OpenOTP-CP is also installed on the remote host as default provider, then it will also be triggered on the remote host during the login purpose. So in that scenario, the OpenOTP call will happens twice and 2 authentications will be performed with OpenOTP.
In RDP login scenario, the domain value is not automatically passed to Windows like for local logins scenario. Windows will then refuse the login if no domain value is passed in RDP scenario. This behavior is the expected behavior. If the domain value was automatically retrieved then we would encountered issues to login on a remote host which is not in the same domain.
In that scenario, you must use DOMAINusername in username field to perform the login and target the correct domain according to where your are trying to login.
Click on Next.
If you selected the Smartcard login feature, you will be presented a sixth page.
Enable additional MFA for smartcard login(Default to false). Specify whether or not you want an additional second factor authentication after a successful smartcard login

Click on Next.
Configuration is done, you can click on Install and Finish after the installation.
5.2 Configuration for Smartcard logins
Requirements :
- Windows 8 and later for workstations or Windows Server 2012 and later
- 64 bits architecture
Important
To achieve smartcard login with maximum compatibility, the OpenOTP Credential Provider is actually wrapping the builtin Microsoft Smartcard Credential Provider. Therefore you should check first you are able to login with the builtin smartcard CP before using the OpenOTP CP Smartcard Login feature.
5.2.1 With Microsoft PKI
You can use certificates generated by Windows, to configure all the Windows PKI infrastructure please refer to the following Microsoft documentation.
Before continuing, make sure you are able to log with the Microsoft Smartcard Credential Provider.
In order to use the OpenOTP Credential Provider with smartcard you will need some additional configuration :
If you look into your user object, you should notice WebADM automatically detected your certificate, but the CA is not trusted.

To resolve this, first you will have to export your CA certificate into a base64 encoded X509 certificate.
This can be done via certlm, Right click > All Tasks > Export. Select the second format option.
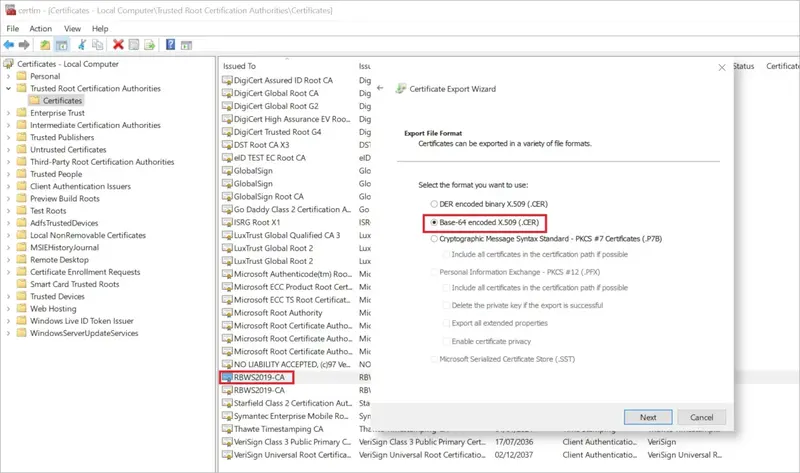
Once done, in your WebADM Admin tab, click on Trusted CA Certificates
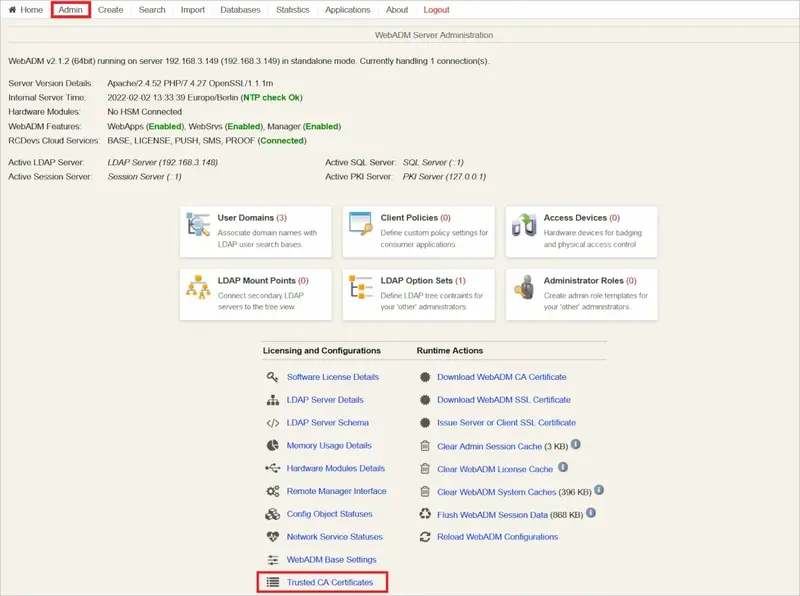
Click Import CA Certificate, select your file and import it (You can also paste its content with the method 2)
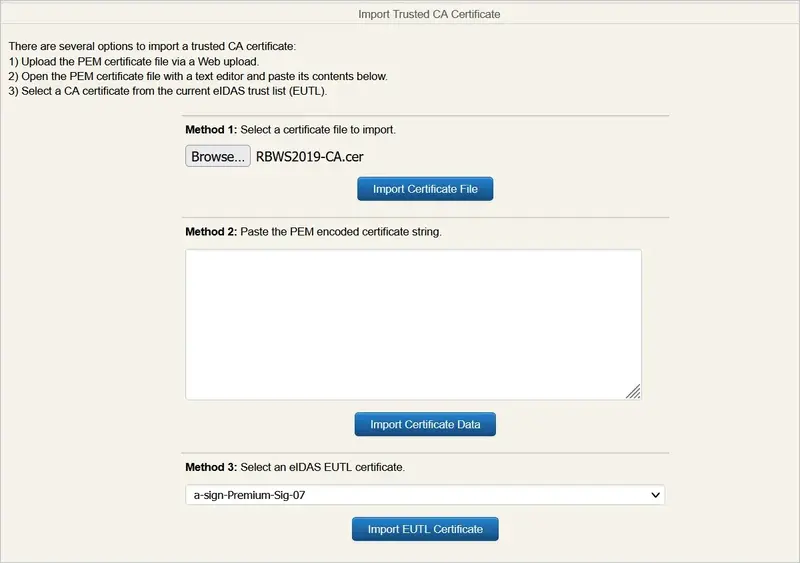

The CA is now trusted and your user object should reflect this

You should now be able to login with the OpenOTP Credential Provider and a smartcard.
5.2.2 With WebADM PKI
You can also generate user certificates directly with WebADM and then transfer them on your smartcard. The generated certificate meet by default all the requirements to be used with the Microsoft smartcard logon workflow so you should not have to override them in a GPO.
On your user object, click on Create certificate, select User usage and fill the information then click Create Cert.
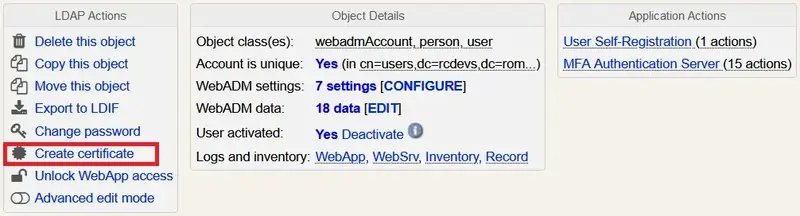
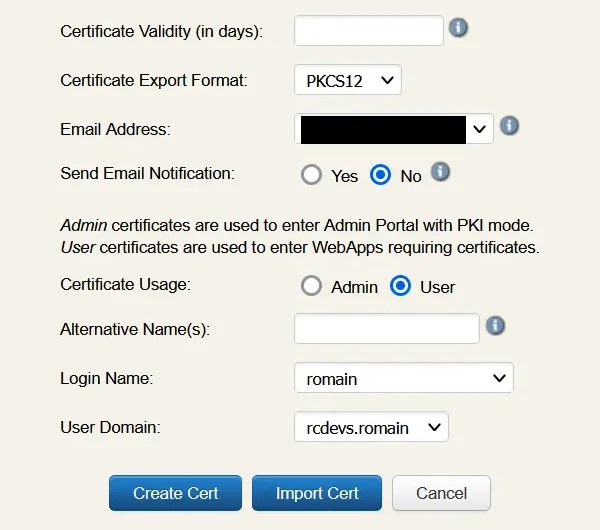
You will then be prompted to download the certificate, do it. Note the password, you will need it to store the private key.
You will now have to store this certificate with its private key on your smartcard. The method to do so depends of your smartcard manufacturer so please consult their technical documentation.
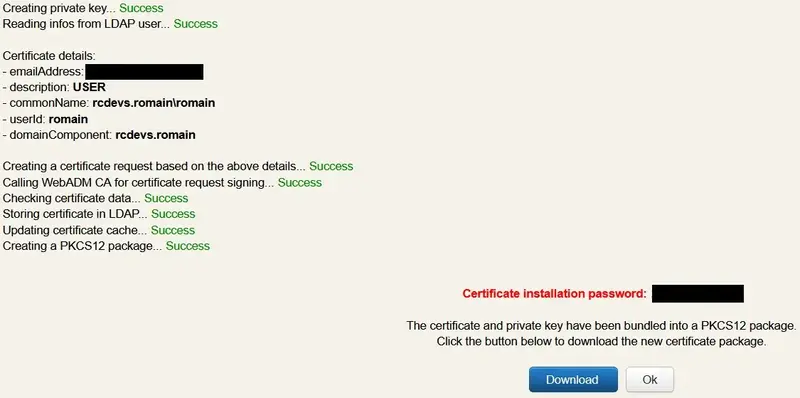
You should now be able to see your newly generated certificate on your user object.

You will now need your WebADM CA certificate. It can be retrieved in your Admin tab, with the Download WebADM CA certificate link or in the Trusted CA Certificates section.
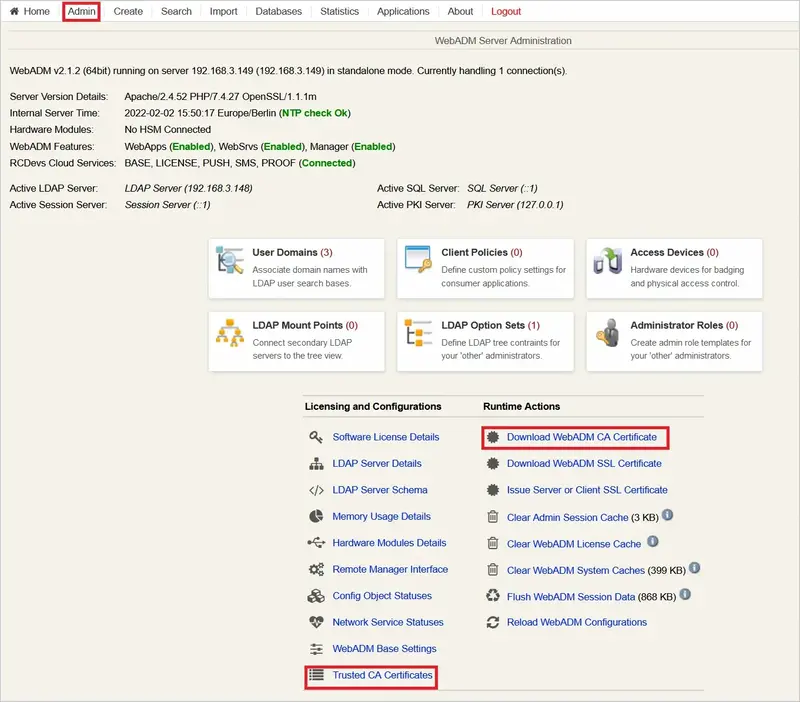
Lastly you will need some additional configuration on Windows side. Please follow those Microsoft configuration instructions, at this point you should only have to do steps 2 and 3.
In summary the WebADM CA certificate should be in the Trusted Root Certification Authorities store of all workstations (this can be automated via a Group Policy) and in the NTAuth store of Active Directory.
This link provides additional information for the latter.
If everything is correctly configured you should now be able to login with a smartcard with the builtin Microsoft Smartcard Credential Provider. Please make sure this is the case and then you can install the OpenOTP Credential Provider with the smartcard login feature.
5.3 Modifying the Configuration
5.3.1 If you are under Testing
To configure the OpenOTP Credential Provider, navigate to the “Windows Control Panel” and select “Programs and Features”. Search for “RCDevs OpenOTP-CP Credential Provider for Windows” and click “Change”. Now the installer shows up. Select “Change” and modify the provider’s configuration as you need.
5.3.2 If OpenOTP Credential Provider is running in Production
To configure the OpenOTP Credential Provider, you must get the MSI installer file, for the example on your Desktop. Run command line as administrator:
- Click Start, click All Programs, and then click Accessories.
- Right-click Command prompt, and then click Run as administrator.
- If the User Account Control dialog box appears, confirm that the action it displays is what you want, and then click Continue.
Run the installer, and click “Change” to update settings.
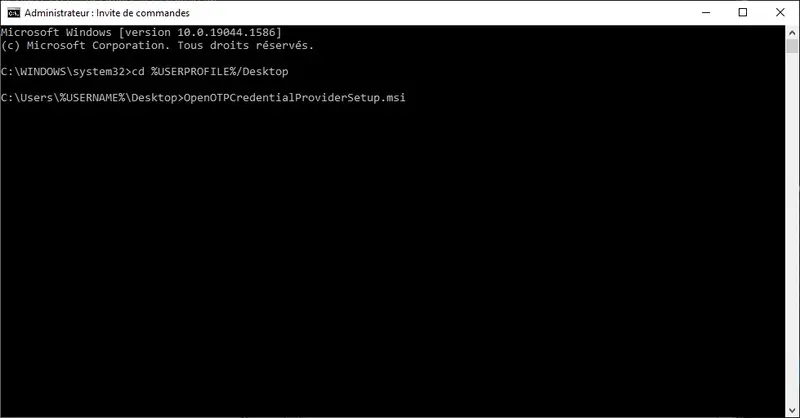
5.4 Automatic Deployment / Quiet Installation
The MSI installer package is prepared to take all configuration parameters that can be set during local installation for auto-deployment in quiet mode. Hence, you can deploy the setup to any clients and automatically install the Credential Provider without user interaction.
Example of quiet installation with PowerShell:
msiexec /qb /i OpenOTP_CredentialProvider.msi SERVER_URL=https://webadm.test.local:8443/openotp/ CA_FILE=c:ca.crt OFFLINE_MODE=1 CLIENT_ID=windows
The parameters are as follows:
| Parameter | Value |
|---|---|
| SERVER_URL | URI pointing to one OpenOTP web‐service. Example: https://webadm.test.local:8443/openotp/ Mandatory. |
| SERVER_URL_2 | URI pointing to the second node of your OpenOTP cluster. Optional. |
| USER_IDENTIFIER_TYPE | This option defines what the Credential Provider sends as the username to OpenOTP.
Note : Depreciated. Prefer using the ‘UPN Mode’ WebADM setting |
| LOADING_TEXT | The text to display during a connection attempt to Webadm. If you are using push login, it could be useful to remind the user here to check his mobile phone. |
| LOGIN_TEXT | A text that is displayed on the Windows login page. Default (Empty) “OpenOTP Login” |
| CLIENT_ID | Client ID which is sent to OpenOTP in the login requests. This client ID will appear in the WebADM audit database. Optional. |
| CA_FILE | The file-system path to a Certificate Authority (CA) file. Mandatory. Example: c:ca.crt |
| CERT_FILE | The file-system path to a user certificate. Optional. |
| CERT_PASSWORD | The user certificate’s password. Optional. |
| SOAP_TIMEOUT | Request timeout when connecting to OpenOTP Authentication Server URL. The default is 30 seconds (If empty it will be the 30s). Optional. |
| LOGIN_METHOD | There are two login methods available:
Simple mode uses the OpenOTP SimpleLogin method where the semantic of the password input is handled by the OpenOTP server and based on the user login policy. |
| V1_BITMAP_PATH | The path of the image on the filesystem displayed on the login page. Optional. |
| CHECK_LDAP | Enable this option if your OpenOTP server does not use your AD or if this host is not connected to the Windows Domain. By default, the LDAP password is checked by OpenOTP first and checked by the credential provider at session start. When disabled, the LDAP check is performed locally only.
|
| AUTO_CREATE | You can enable this option when this host is not connected to the Windows Domain and you want the Credential Provider to create users accounts at first login. The local LDAP password is transparently reset at each login.
Note: This option is only available if the Remote LDAP Password Check Option is enabled. |
| POLICY | Routing Policy. If two server URLs are defined in server URL, you can configure a request routing policy (ie. the server selection policy). There are three policies available:
|
| PROXY_HOST PROXY_PORT |
This config is for HTTP proxy. If you are running OpenOTP behind an HTTP proxy you need to set the host and the port of the proxy. |
| OFFLINE_MODE | According to this option OpenOTP will permit users to log in when server/network is not reachable, using the OpenOTP Token mobile Application.
PS: this mode requires at least one online login using push service to fetch its offline information. |
| DEBUG_MODE | This setting enables or not the debug logs of the OpenOTP Credential Provider for Windows, and how verbose it should be
|
| F2A_BYPASS_TIMER | This setting can be used to define for how much time in seconds the OpenOTP Windows Credential Provider will not ask for MFA since the last login, Max : 86400 (24h).
|
| RDP_CLIENT_ID | RDP client ID can be used if you want to match a different client policy for RDP sessions. |
| RDP_DEFAULT_ENABLED | This option is to force or bypass the MFA check using RDP from the machine when the OpenOTP Windows Credential Provider is installed as the default credential provider. That means when this setting is disabled, you are able to select the default Windows credential provider during an RDP authentication.
|
| WHITELIST (optional) : | List of user SID separated by ; that won’t be asked for 2FA/MFA to login, skipping any OpenOTP calls. |
| CP_FILTER_WHITELIST (optional) : | Only relevant if you have selected the InstallAsDefault feature. List of the credential providers CLSID separated by ‘;’ that should still be enabled, overriding the filter. All the CLSID of the registered Credential Providers on your machine can be found in the following registry location : HKEY_LOCAL_MACHINESOFTWAREMicrosoftWindowsCurrentVersionAuthenticationCredential Providers |
| SMARTCARD_MFA : | Only present if you have installed the SmartcardLogin feature. If enabled, an additional authentication factor will be required after a successful smartcard login.
|
In order to set the OpenOTP Windows Credential Provider as the default credential provider in case of silent or remote deployment, the option ADDLOCAL=InstallAsDefault must be added to the msiexec command line:
msiexec /qb /i OpenOTP_CredentialProvider.msi SERVER_URL=https://webadm.test.local:8443/openotp/ ADDLOCAL=InstallAsDefault CA_FILE=c:ca.crt OFFLINE_MODE=1 CLIENT_ID=windows
You can also specify the SmartcardLogin feature, eg ADDLOCAL=SmartcardLogin or ADDLOCAL=InstallAsDefault,SmartcardLogin.
5.5 Windows FailSafe Mode
In order to force the use of the OpenOTP Credential Provider even in Windows failsafe mode, some registry changes need to be made.
Important
In case of failure during the provider configuration or unreachable network, even failsafe mode will not help you to login to a workstation that is set-up to force the use of the Credential Provider.
To register the Credential Provider enforcement, copy the following text to a new text file, name it register.reg and execute it.
Windows Registry Editor Version 5.00

[HKEY_LOCAL_MACHINESOFTWAREMicrosoftWindowsCurrentVersionAuthenticationCredential Providers]
"ProhibitFallbacks"=dword:1
To disable and unregister the failsafe enforcement copy the following text.
Windows Registry Editor Version 5.00

[HKEY_LOCAL_MACHINESOFTWAREMicrosoftWindowsCurrentVersionAuthenticationCredential Providers]
"ProhibitFallbacks"=-
6. Online Authentication Test
6.1 With OTPs/Push
You are now able to log in your Windows machine in MFA. Please log out and enter your LDAP Credentials on the first screen.

On the next screen, your OTP is asked to finish the authentication.
Enter your OTP and you are logged in.

6.2 With Smartcards
Insert your smartcard. If it is detected and the stored certificate can be used for logon, you will now have a new credential tile for smartcard logon.
Select it and enter your PIN code.
If you have enabled the additional MFA authentication during installation, you will then be prompted for the configured additional factor (OTP/Push/FIDO etc). Enter what is required.
You are now logged in.

6.3 With Fido
Please enter your LDAP Credentials :
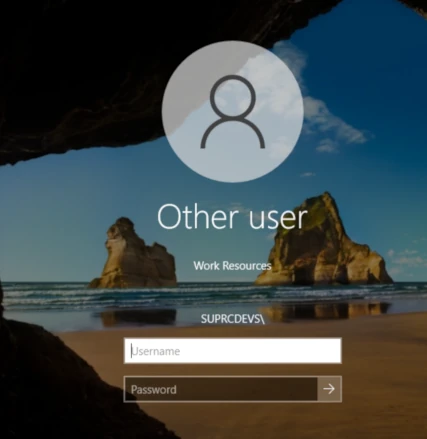
Please touch your FIDO token :
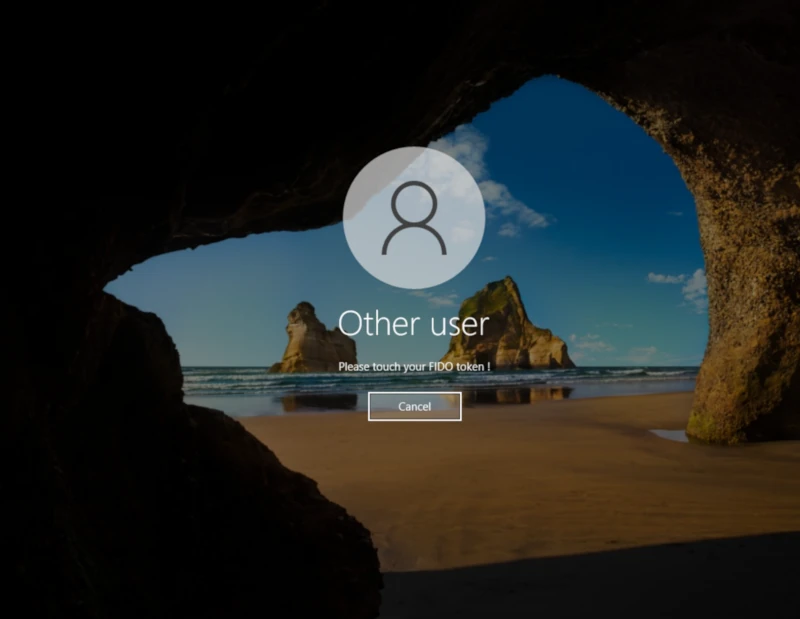
Note
Offline mode Authentication is similar to online mode. Another point is that one online login is required to enable offline mode!
7. Offline Authentication Test
Important information for offline logins
One online login with OTP or FIDO is required to enable offline login mode! This is specific to the user and computer where the login is made, which means, if computers are shared in the company, all users needs to perform an online login on a specific machine to enable the offline logins for their accounts on this computer.
Procedure must be repeated on all machines they want to enable the offline login mode.
Compatible token must be registered first on the user account in order to be able to use that feature (OpenOTP Token application or FIDO key).
Push login infrastructure is mandatory to use the offline mode with OpenOTP Token application.
If both kind of tokens (OTP with OpenOTP Token app and FIDO keys) are registered on the user account before the online login, OpenOTP will send back information to the OpenOTP Credential Provider for the 2 types of devices and after one online login you will be able to login offline with all compatible devices regustered on the user account.
With OpenOTP token application, ONLY THE FIST TOKEN REGITERED ON THE USER ACCOUNT IS USABLE IN OFFLINE MODE!!!
With FIDO keys, all registered FIDO keys will works in offline mode but only one key must be plugged to the Windows machine during the authentication process.
7.1 With OTPs/QRCode
Note
Offline authentication is available for Windows and MacOS login, and requires at least the following versions: WebADM 1.6, OpenOTP 1.3.6, OpenOTP Token 1.4 and OpenOTP Credential Provider 1.2.
When your laptop is offline, you are now able to login with an OTP or a fido key. So for this test, I disable the network adapter to simulate the offline mode.
Like above, enter your LDAP Credentials on the first screen.
OpenOTP Credential Provider is not able to contact OpenOTP server so, it will switch automatically to the offline mode. The offline mode will prompt you a QRCode if using an OTP or to touch your fido key.
You have to scan the QRCode with the OpenOTP Token application.

Open your OpenOTP Token application, press on the camera button and scan the QRCode.
After scanning the QRCode, a window with an OTP is displayed on your smartphone like below:
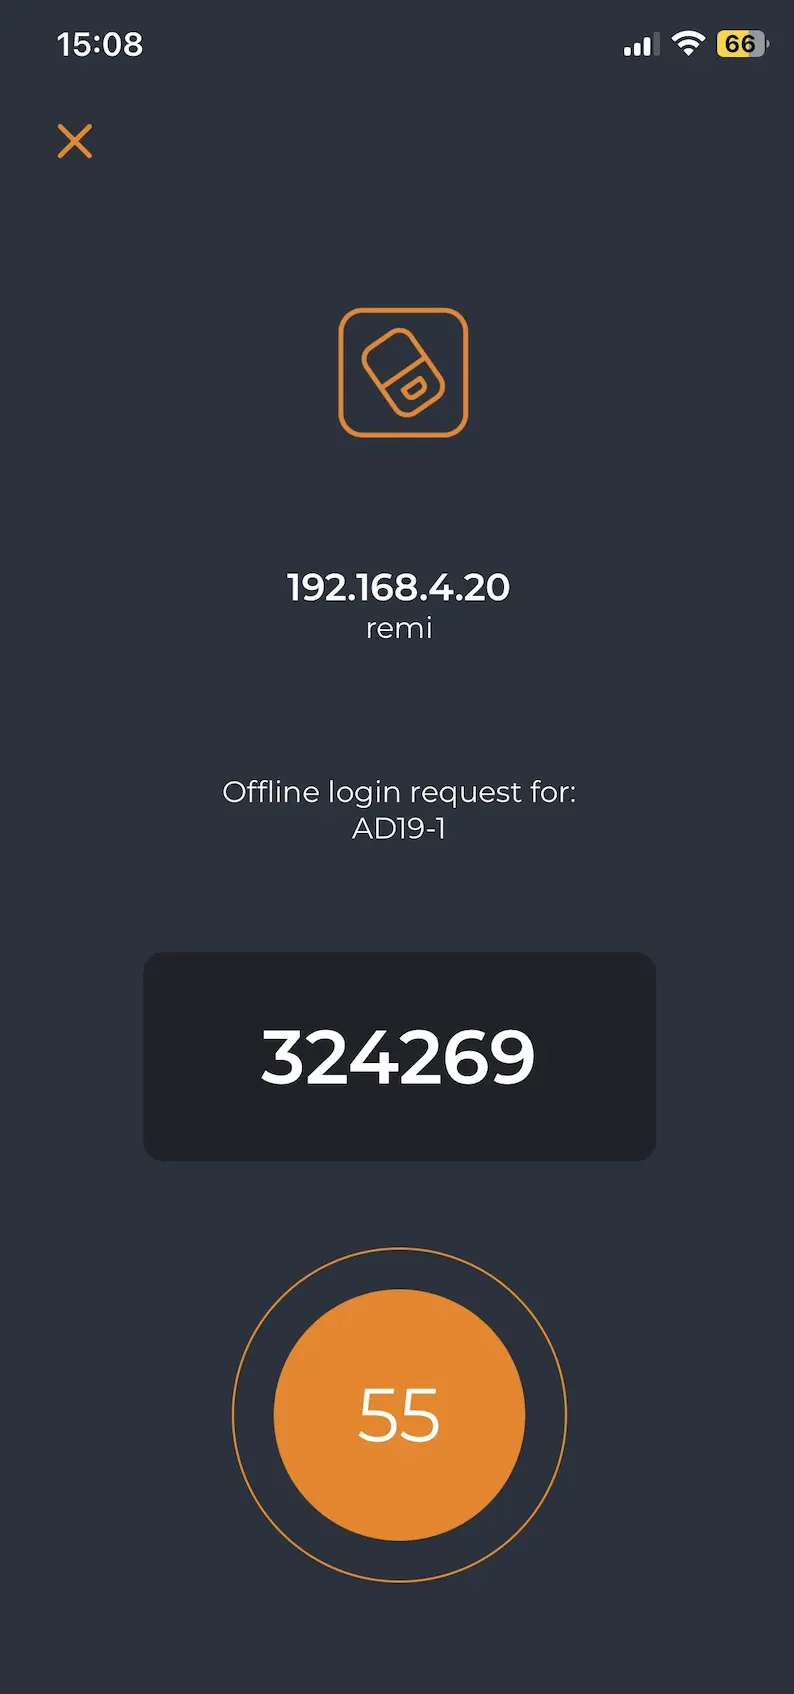
Enter your OTP and you are logged in.
Note
To be sure that you are in offline mode, you can check in your Registry Editor if there is an offline_otp string.
In your AD, it should be possible to find this offline_otp string in the file of the user concerned by going in the Registry Editor and following this path : HKEY_LOCAL_MACHINE/SOFTWARE/RCDevs/OpenOTP-CP/UserData.

7.2 With Smartcards
Smartcard login is currently not supported in offline mode.
7.3 With Fido
Offline mode Authentication is similar to online mode.
Note
To be sure that you are in offline mode, you can check in your Registry Editor if there is an offline_fido string.
In your AD, it should be possible to find this offline_fido string in the file of the user concerned by going in the Registry Editor and following this path : HKEY_LOCAL_MACHINE/SOFTWARE/RCDevs/OpenOTP-CP/UserData.
8. Troubleshooting
Troubleshooting steps depend on the specific issue you are facing. Please consult the following chapters for instructions.
8.1 Authentication Issues
In case of failed authentication, the first check should be the webadm.log on the OpenOTP/WebADM server. This can be found on the server at /opt/webadm/logs/webadm.log or in the WebADM web-interface under Databases > WebADM Server Log Files.
This log should have a trace of the OpenOTP authentication and its result. In case the OpenOTP authentication is successful, but the Windows login fails, the reason is typically a missing local account or wrong local Windows password.
If the login fails and there is no trace of it in the webadm.log, then the installation is not correct. Please see chapter 8.3
8.2 Offline Authentication Issues
Offline authenticate requires a successful online login using mobile push-based authentication and RCDevs OpenOTP mobile soft token. This login must be done on the same Windows machine and with the same user account. If this prerequisite is not complete then you will receive error message: “Offline login is not available for this user.”
To configure mobile message push-based authentication, please see
Configure Push Login with OpenOTP PUSH login Web-Service.
8.3 Installation Issues
Windows settings and permissions can cause the installation to fail for a various reason. While debugging your installation and OpenOTP environment have a look at the Windows Event Viewer.
In case the installation is completed but CP is not working, please check the following items:
- You should have an entry in the registry at
ComputerHKEY_LOCAL_MACHINESOFTWARERCDevsOpenOTP-CP. If not please check that the user you are running the installer as has got write permissions to the registry folder:ComputerHKEY_LOCAL_MACHINESOFTWARE. - You should also have these two files, if not then check the effective access of the installation user to the
System32folder:
C:WindowsSystem32OpenOTPCredentialProvider.dll
C:WindowsSystem32OpenOTPCredentialProviderFilter.dll
8.4 Unable to login at all
In case you have installed the OpenOTP Credential Provider as the default credential provider and are unable to login at all, you stil have the following options to gain access to the machine again:
8.4.1 Remote registry modification
If you can manage the registry of the machine in question remotely, for example in case of a domain joined machine, you can remove the default credential provider registration. Remotely access the registry of the server in question and delete the below registry key:
Windows Registry Editor Version 5.00

[HKEY_LOCAL_MACHINESOFTWAREMicrosoftWindowsCurrentVersionAuthenticationCredential Provider Filters{5AE8C610-7541-4FF8-9845-C363410D574C}]
@="OpenOTPCredentialProviderFilter"
8.4.2 Boot to Windows “Safe mode”
As long as you have not enabled CP also for safe mode and can boot to it, you can use it to remove or modify credential provider Please refer to Microsoft documentation on how to boot to Safe Mode. Once in safe mode, rename or remove the two below files and reboot to log in with the regular Windows login.
C:WindowsSystem32OpenOTPCredentialProvider.dll
C:WindowsSystem32OpenOTPCredentialProviderFilter.dll
8.4.2 Mount disk drive on other system
In case Safe Mode boot is not available (for example on cloud deployed Windows), you need to shut down the machine, mount the C: drive and rename/remove the two DLL files in previous step. After that you should be able to boot into regular login.
8.5 Push Login issue
If you have increased the Mobile response timeout setting under OpenOTP configuration, then you also have to increase the Windows 10 lock screen timeout and the RDP login timeout on the Windows machine.
The SOAP timeout value at the OpenOTP Credential Provider level must be also configured in adequation of the mobile response timeout.
E.g : If my mobile response timeout under OpenOTP is configured to 45 seconds, then I have to configure the SOAP timeout and Windows timeouts to 60 seconds.
For the Windows lock creen timeout, you have to create a new registry key in the following container :
HKEY_LOCAL_MACHINESOFTWAREMicrosoftWindowsCurrentVersionAuthenticationLogonUI
Simply add a new DWORD value named IdleTimeout in that container and configure the timeout value in milliseconds. If your push timeout is configured to 45 seconds, then the value of the new IdleTimeout key must be at least 60 seconds.
60 seconds is equal to 60000 ms in decimal and EA60 in hexadecimal.
For the Windows RDP timeout, you have to create a new registry key in the following container only if NLA is enabled on the Windows side for RDP login :
HKEY_LOCAL_MACHINESYSTEMCurrentControlSetControlTerminal ServerWinStationsRDP-Tcp
Simply create a new DWORD key named LogonTimeout, containing the timeout value in seconds. Restart the Terminal Services service to changes takes effect.
8.6 Could not be authenticated
8.6.1 Server Sent No Response
Error example

Possible reasons/Solutions :
- OpenOTP URL/port configured during Credential Provider installation are invalid or not reachable from the Windows machine.
- CA file is missing or incorrect.
Check server URL and CA path through Windows registry ComputerHKEY_LOCAL_MACHINESOFTWARERCDevsOpenOTP-CP.
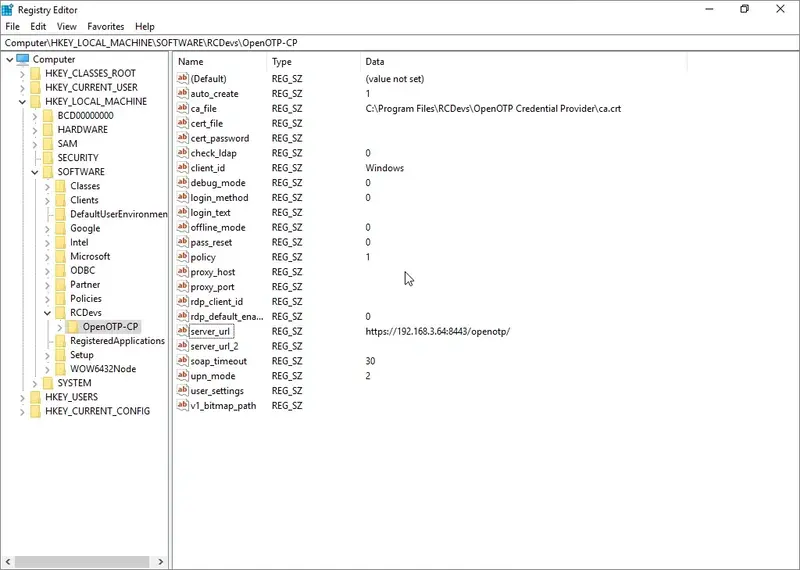
8.6.2 Wrong Username or Password?
error example
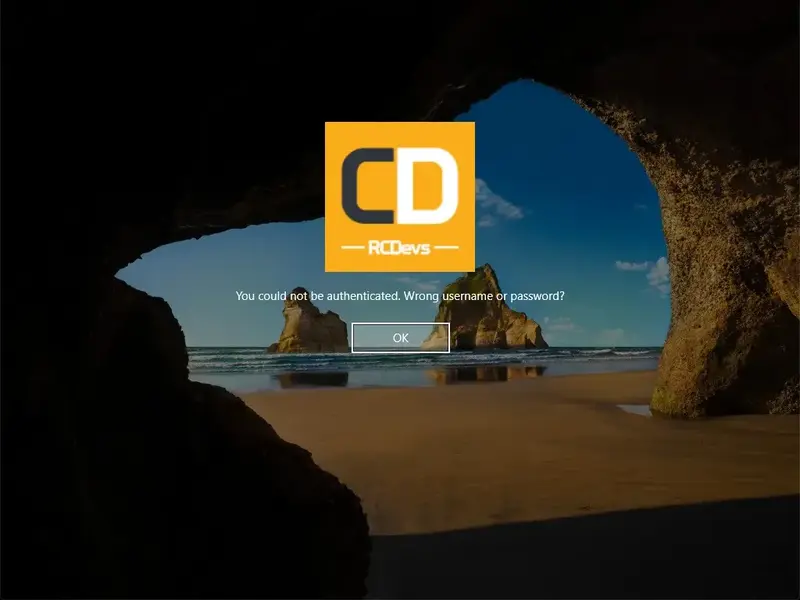
- Double check that the username and password are correct.
- Check WebADM logs, if you can see the authentication request in logs with the following error :
[2020-04-21 10:48:09] [192.168.3.68] [OpenOTP:386DCN2T] Domain 'yorcdevs.eu' not existing
Please refer to part 2.9 of Troubleshooting documentation to solve it.
8.7 Endpoint could not be initialized
To troubleshoot that kind of error, you need to enable the debug logs of the OpenOTP Credential Provider for Windows.
8.7.1 Enable Debug Logs
For advanced troobleshooting, debug mode can be enabled through Windows registry ComputerHKEY_LOCAL_MACHINESOFTWARERCDevsOpenOTP-CPdebug_mode=4.
This option can be set from 0 (disabled) to 4, depending on how verbose you want it to be.
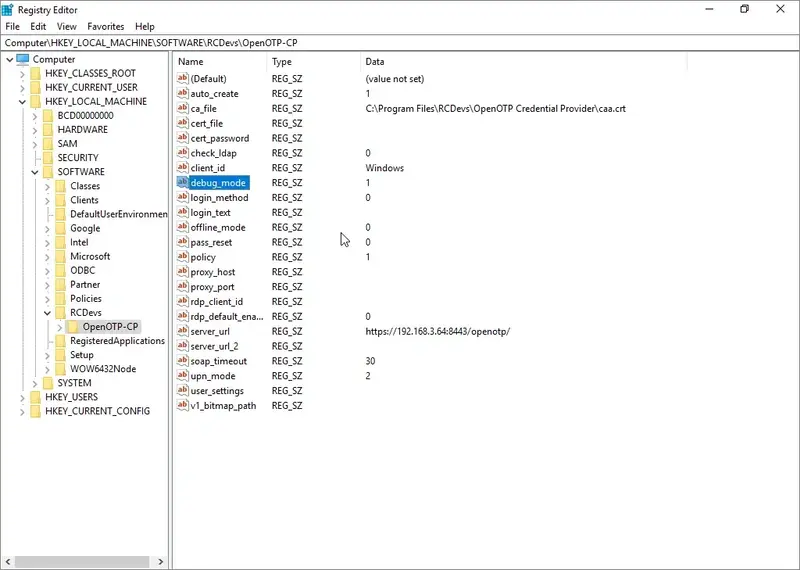
Debug logs will be accessible in C:RCDevsLogsCP-Logs
Perform a new authentication after debug_mode enabled and check debug logs.
8.7.2 Debug Logs
Open C:RCDevsLogsCP-Logs file and check logs :
[21-04-2020 11:02:51] [5724-6044] [INFO] CProvider::CProvider
[21-04-2020 11:02:51] [5724-6044] [INFO] Configuration::Init
[21-04-2020 11:02:51] [5724-6044] [INFO] Configuration::Default
[21-04-2020 11:02:51] [5724-6044] [INFO] Configuration::Read
[21-04-2020 11:02:51] [5724-6044] [INFO] Data::Provider::Init
[21-04-2020 11:02:51] [5724-6044] [INFO] CProvider::SetUsageScenario
[21-04-2020 11:02:51] [5724-6044] [INFO] CProvider::Advise
[21-04-2020 11:02:51] [5724-6044] [INFO] CProvider::GetCredentialCount
[21-04-2020 11:02:51] [5724-6044] [INFO] No serialized creds set
[21-04-2020 11:02:51] [5724-6044] [INFO] CProvider::GetCredentialAt
[21-04-2020 11:02:51] [5724-6044] [INFO] Checking for serialized credentials
[21-04-2020 11:02:51] [5724-6044] [INFO] No serialized creds set
[21-04-2020 11:02:51] [5724-6044] [INFO] No serialized creds set
[21-04-2020 11:02:51] [5724-6044] [INFO] No serialized creds set
[21-04-2020 11:02:51] [5724-6044] [INFO] Checking for missing credentials
[21-04-2020 11:02:51] [5724-6044] [INFO] Looking-up missing user name from session
[21-04-2020 11:02:51] [5724-6044] [INFO] Looking-up missing domain name from session
[21-04-2020 11:02:51] [5724-6044] [INFO] Data::General::Init
[21-04-2020 11:02:51] [5724-6044] [INFO] GetFieldStatePairFor
[21-04-2020 11:02:51] [5724-6044] [INFO] CCredential::Initialize
[21-04-2020 11:02:51] [5724-6044] [INFO] Copying user_name to credential
[21-04-2020 11:02:51] [5724-6044] [INFO] Copying domain to credential
[21-04-2020 11:02:51] [5724-6044] [INFO] YORCDEVS
[21-04-2020 11:02:51] [5724-6044] [INFO] Init result:
[21-04-2020 11:02:51] [5724-6044] [INFO] OK
[21-04-2020 11:02:51] [5724-6044] [INFO] Checking for successful initialization
[21-04-2020 11:02:51] [5724-6044] [INFO] Checking for successful instantiation
[21-04-2020 11:02:51] [5724-6044] [INFO] Returning interface to credential
[21-04-2020 11:02:51] [5724-6044] [INFO] Non-CredUI: returning an IID_IConnectableCredentialProviderCredential
[21-04-2020 11:02:51] [5724-6044] [INFO] Hook::CredentialHooks::GetBitmapValue
[21-04-2020 11:02:51] [5724-6044] [INFO] Hook::CredentialHooks::GetSubmitButtonValue
[21-04-2020 11:02:51] [5724-6044] [INFO] GetFieldStatePairFor
[21-04-2020 11:02:51] [5724-6044] [INFO] CCredential::Advise
[21-04-2020 11:02:51] [5724-6044] [INFO] CCredential::SetSelected
[21-04-2020 11:02:51] [5724-6044] [INFO] Hook::Serialization::EndpointInitialization
[21-04-2020 11:02:51] [5724-6044] [INFO] Endpoint::Init
[21-04-2020 11:02:51] [5724-6044] [INFO] Endpoint::Default
[21-04-2020 11:02:51] [5724-6044] [INFO] Hook::Serialization::EndpointDeinitialization
[21-04-2020 11:02:51] [5724-6044] [INFO] Endpoint::Deinit
[21-04-2020 11:02:51] [5724-6044] [INFO] Endpoint::Default
[21-04-2020 11:02:54] [5724-6044] [INFO] CCredential::Connect
[21-04-2020 11:02:54] [5724-6044] [INFO] Hook::Serialization::Initialization
[21-04-2020 11:02:54] [5724-6044] [INFO] Hook::Serialization::EndpointInitialization
[21-04-2020 11:02:54] [5724-6044] [INFO] Endpoint::Init
[21-04-2020 11:02:54] [5724-6044] [INFO] Endpoint::Default
[21-04-2020 11:02:54] [5724-6044] [INFO] DataInitialization
[21-04-2020 11:02:54] [5724-6044] [INFO] Data::Gui::Init
[21-04-2020 11:02:54] [5724-6044] [INFO] Data::Gui::Default
[21-04-2020 11:02:54] [5724-6044] [INFO] Hook::Serialization::ManageUpnMode
[21-04-2020 11:02:54] [5724-6044] [INFO] Helper::SeparateUserAndDomainName
[21-04-2020 11:02:54] [5724-6044] [INFO] Loading domain from external credentials
[21-04-2020 11:02:54] [5724-6044] [INFO] Loading password from GUI
[21-04-2020 11:02:54] [5724-6044] [INFO] Loading OTP from GUI
[21-04-2020 11:02:54] [5724-6044] [INFO] Loading challenge from GUI
[21-04-2020 11:02:54] [5724-6044] [INFO] Hook::Serialization::EndpointLoadData
[21-04-2020 11:02:54] [5724-6044] [INFO] Copy username to epPack
[21-04-2020 11:02:54] [5724-6044] [INFO] Copy ldapPass to epPack
[21-04-2020 11:02:54] [5724-6044] [INFO] Copy domain to epPack
[21-04-2020 11:02:54] [5724-6044] [INFO] Endpoint::Call
[21-04-2020 11:02:54] [5724-6044] [INFO] Endpoint::ShowInfoMessage
[21-04-2020 11:02:54] [5724-6044] [INFO] Endpoint::ShowInfoMessage
[21-04-2020 11:02:54] [5724-6044] [INFO] Endpoint::Concrete::OpenOTPInit
[21-04-2020 11:02:55] [5724-6044] [INFO] Unable to read certification authority "C:Program FilesRCDevsOpenOTP Credential Providercaa.crt"
The last line of logs interest us :
[21-04-2020 11:02:55] [5724-6044] [INFO] Unable to read certification authority "C:Program FilesRCDevsOpenOTP Credential Providercaa.crt"
Possible reasons/Solutions :
OpenOTP Credential Provider for Windows is not able to read the CA file.
-
Double check if CA file configured is the correct one and coming from your WebADM server. WebADM CA file can be downloaded from a web browser by accessing the following addresses :
- https://webadm_server/cacert
- https://webadm_server:8443/cacert
If you have multiple WebADM servers configured in cluster mode, the CA must be identical on all nodes. If for any reasons you have different CA certificates within the same WebADM cluster, then your WebADM setup is incorrect and you have to re-do WebADM slave setup on node(s) where the CA is incorrect.
- Check the CA path. Here the CA name configured in the registry is wrong and it prevent the CP to read it.
Normally, the CA file is automatically downloaded during the Credential Provider setup. If not, you can manually download and configure it.
The CA file must be accessible by OpenOTP Credential Provider that is why it is advised to move the CA file in the installation folder of OpenOTP Credential Provider after CP installation.
The default OpenOTP Credential Provider installation folder is :
C:Program FilesRCDevsOpenOTP Credential provider
This is required ONLY if CA file is not automatically downloaded. Registry key for CA file location must also be adapted through the registry after CA file has been moved to installation folder :
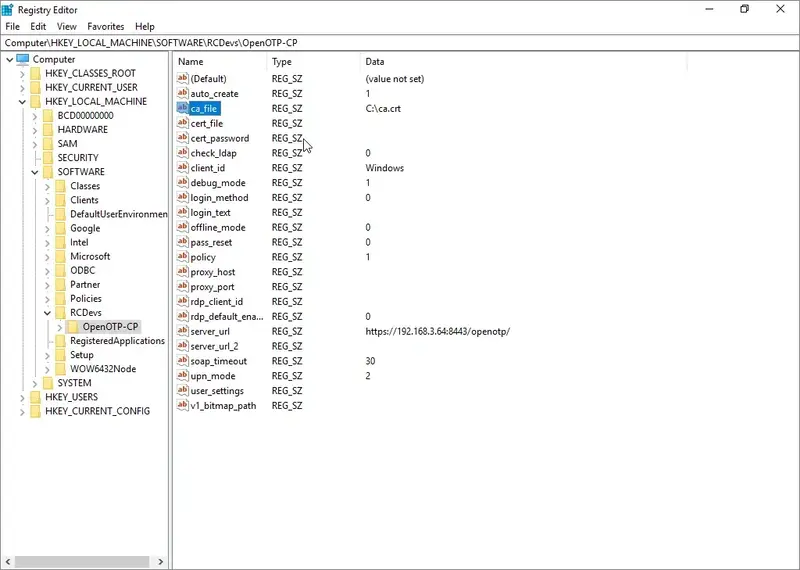
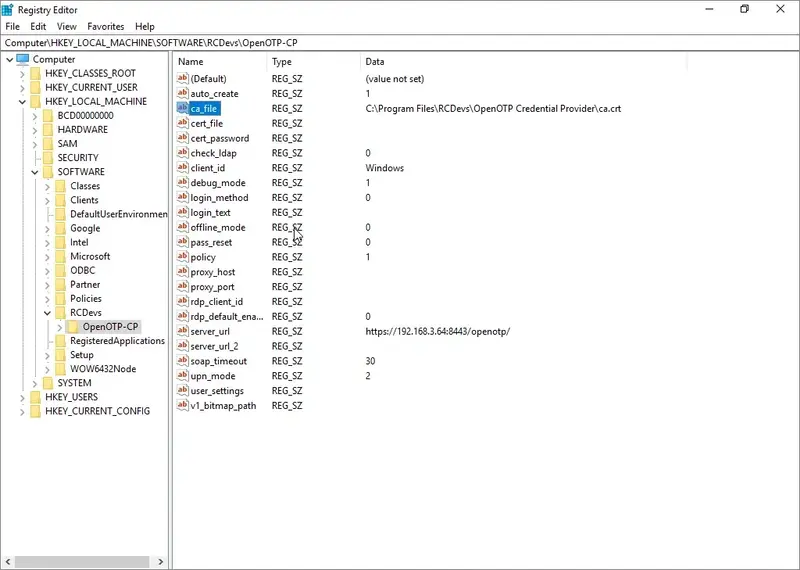
Warning
CA file can not be stored and used through shared folder/path like :
\STORAGEca.crt
8.7 Disable auto-reconnect bypassing OpenOTP
Starting from Windows 10 version 1803 and Windows server 2019, Microsoft introduced usage of local client cache for credentials when reconnecting to a locked RDP session.
This behaviour does not permit Credential Provider to re-authenticate the user as it would do in previous versions of Windows 10 and Windows Server.
The solution is to disable the automatic reconnection setting in the registry of the machine. This can be done using Group policy feature of Windows (either Edit group policy if machine are not part of the domain, or Group policy management if machines are part of the domain)
Open the following path in the policy edition:
Computer Configuration->Administrative Templates->Windows Components->Remote Desktop Services
->Remote Desktop Session Host->Connections, and double-click on Automatic reconnection, then switch to Disabled, press “OK”, and close all group policy windows.
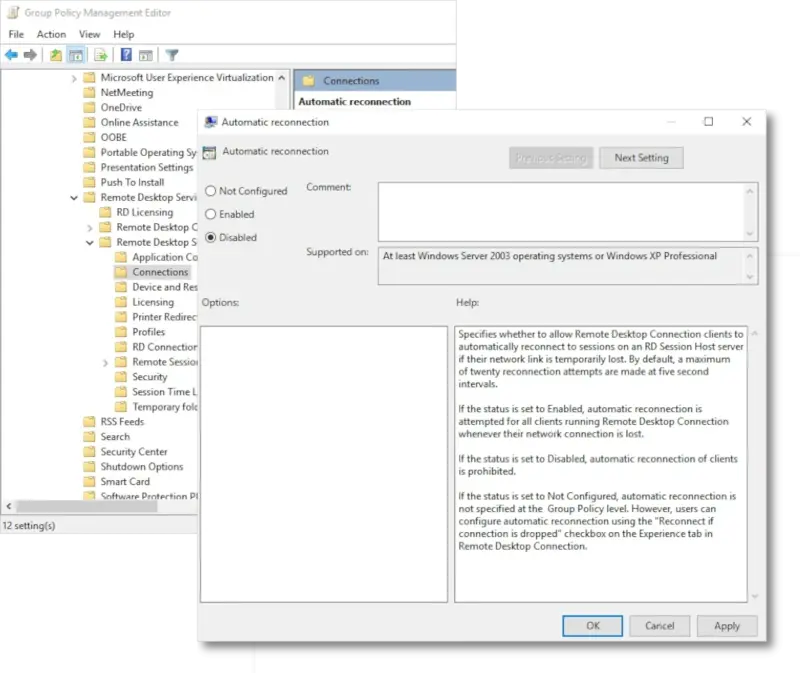
You may have to restart the machine, or update GPO on remote machines so the setting is applied.
9. Video Tutorial for Windows 10 and Server 2012R2
9.1 Online Authentication
Play Video on Youtube
9.2 Offline Authentication
Play Video on Youtube

The access to your computer or user account is usually password-protected. But sometimes it is not enough, especially, when your data requires high level of confidentiality. You don’t want to provide attackers with the chance to get hold of your most secret stuff and your data, don’t you? We has included Google Authenticator and Yubikey HOTP support into Rohos Logon Key. Now Windows login is performed in High-Safety mode by using Time based One Time Password and HOTP codes.
If you have Android, iOS or BlackBerry phones, use Google Authenticator program. Protect your computer with strong OTP password (One Time Password). OTP password – is the password generated by special device or program, and it is valid only once and right at the moment it has been generated. And there is no sense to spy on or capture such password. Whenever you try to enter the same password one more time or a bit later i.e. beyond the time interval predetermined – it will be rejected. Each time you log on to your computer, you will be requested a new OTP password from your phone.
Integrated into Rohos Logon Key program, Google Authenticator will serve as logon key to your PC. You will always have your secret password with you in your phone. You won’t have to enter Windows password manually, the program will do it for you. Comfortable and reliable. OTP token can be used along with other types of key. So, you can configure both: OTP and Flash drive and use one you prefer in the moment.
How to use Google Authenticator app to log in to your PC?
So, let us take, for example, the Android phone and consider how to set up Rohos Logon Key for Windows using OTP password from Google Authenticator app.
1. Make sure you have Google Authenticator app intalled on your phone. (Googles or Barcode Scanner additionally may be required for QR code scan).
2. Once the applications installed on the phone, you can start setting up Rohos Logon Key for your computer.
- Install the latest Rohos Logon Key v3.4 for Windows.
- Open Rohos Logon > Setup OTP token.

- Choose “Google Authenticator” and Click Display QR-code
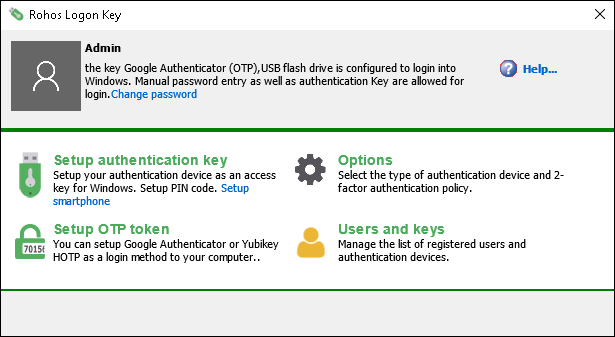
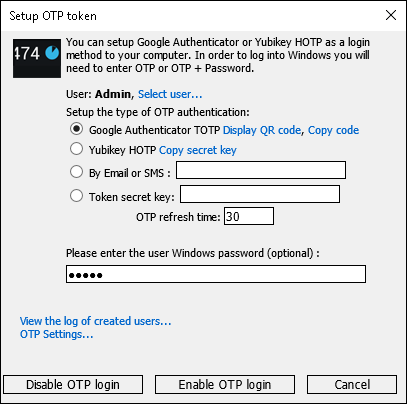
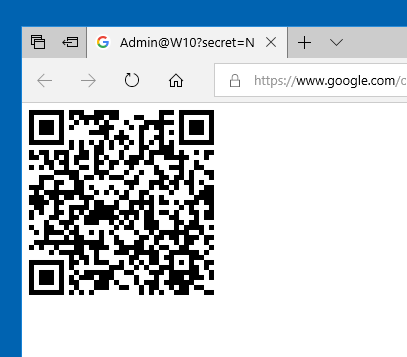
- Launch in your phone the Google Authenticator application and scan the barcode. Then hold your phone in front of the monitor for the barcode to be captured by the program.
- Optionally you may enter your current Windows password – if you want to replace your Windows login & pwd with only OTP code. This is less secure is some circumstances.
If you left password field blank – then you will need to use User Name + Password + OTP code for Windows login. - Click Enable OTP login button.
Done! From this moment your mobile phone works like access key for your Windows.
It means your mobile phone with Google Otp works like a digital key for windows login and desktop unlock as well
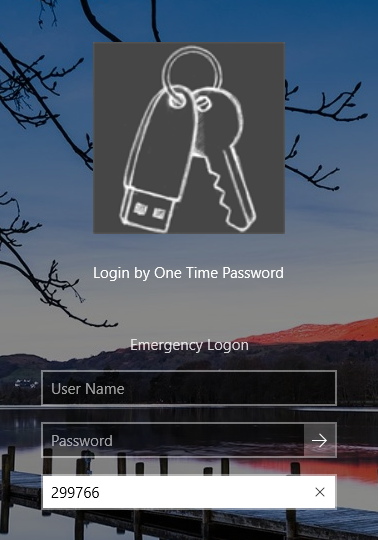
Google Authenticator will provide a computer name for each PC and register the name of Rohos Logon program. Thus, you can set up one phone and use it as a double protection key for any of your computers, be it your office computer, your personal notebook or any other PC you work with.

The smart phone screenshot shows that Google Authenticator application has been set up for logging in to two computers. To avoid any confusion the name of the computer will be given above each secret key. To the right of the one-time password there is a 30 second timer’s time for entering the password. Once the time interval has expired, a new password will be generated.
3. Enforcing strong 2-factor authentication
You may still login into Windows by using your Windows password as usually or by using Rohos Logon Key icon (by Google Authenticator OTP code).
If you wish to make your Windows authentication more secure you should enable 2-factor authentication in Rohos.
Open Rohos Logon Key > Options dialog and choose another value in the list «Require two-factor authentication for selected users». This will enforce 2-factor authentication for all or selected users.
And now in order to login they need to provide OTP + their Windows password. No one else will be able to login just by password.

4. If you have selected ‘for any user’ option please set up an ‘Emergency Logon’ option also in order to be able to access Windows in case your phone is not available.
We recommend that you use a two-factor authorization in Windows. In case of two-step authorization in the Windows authentication box you will be requested to enter both OTP one-time key and standard password for Windows. Two-factor authentication logon will provide you with double protection keeping curious and unwanted people away from your data. Or it can stop too smart and tech savvy children from touching your personal info.
Note: After setting up Google Authenticator authorization do not forget your phone at home. In case you don’t have your phone with you, you will be able to log in to your computer only through Emergency Logon of Rohos Logon Key. The OTP key will be requested even if your computer boot-up is performed in a safety mode. This prevents your computer from being hacked.
How to use Yubikey HOTP configuration for Windows Login
You need any Yubikey 2.0 with a free slot configuration and Yubikey Personalization Tool.
First you need to setup Rohos Logon Key:
Execute Options, select Google authenticator(OATH).
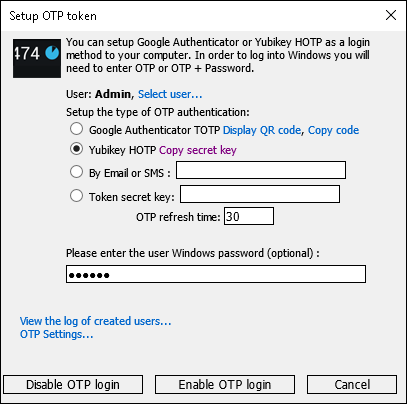
1. Open Rohos > Setup OTP token
If on your computer was previously installed Google Authenticator with Yubikey, click Disable OTP login.
2. Choose “Yubikey HOTP” and click “Copy secret key” – this will copy 20 bytes hex string into clipboard. It should be used later in Yubikey Personalization Tool.
3. Click Enable OTP login.
Now let’s setup Yubikey with HOTP configuration.
Setting up Yubikey second slot with HOTP by using Yubikey Personalization Tool
Insert Yubikey into PC and open Yubikey Personalization Tool:

- Click on “OATH – HOTP” > Advanced button
- Select free Configuration Slot. By default slot 2 is free.
- Ensure HOTP length is set to 6.
- Uncheck the option OATH token Identifier.
- Click on “Secret Key” field and paste (Ctrl+A and Ctrl+V) the secret key from clipboard (rohos copied it for you before).
If there were no 20 chars pasted – copy it again in Rohos Logon Key > Setup USB Key dialog box. - Click “Write Configuration”
Now your YubiKey 2nd slot is ready to be used for Windows Login. You need to restart your PC and Select Rohos Logon Key in welcome screen. Put your cursor in OTP field and long-touch your Yubikey.
Rohos Logon Key accepts both types of HOTP codes – with or without OATH identifier
cc0062465807101069 or
101069
last 6 digits are verified
Sending OTP codes by SMS/email to your mobile phone
Rohos Logon Key allows to use automated 2-factor authentication for Remote Desktop users. Rohos will automatically sent One-Time-Password code by SMS to user account telephone number or email during login into Remote Desktop.
Your Terminal Server must meet the following requirement:
- Telephone/mobile number field contains user mobile number of the user; Or Email field is filled in;
- Rohos Logon Key is configured with SMS-gateway support or Email credentials;
Setting up SMS-gateway or another OTP-delivery method
Requirements:
- PowerShell v.3 and higher (Windows 2012 R2 and higher has it by default);
Or Windows 2008 with an update; - Script execution policy is enabled;
In order to enable it run “Set-ExecutionPolicy -ExecutionPolicy RemoteSigned” command in PowerShell ISE (x86). You need to run both PowerShell and PowerShell (x86) as Admin and execute this command; See the screenshot. - An account in 3rd party SMS gateway delivery service with HTTP API to send SMS messages.
Open Rohos Logon Key > Setup OTP Token > OTP Settings…
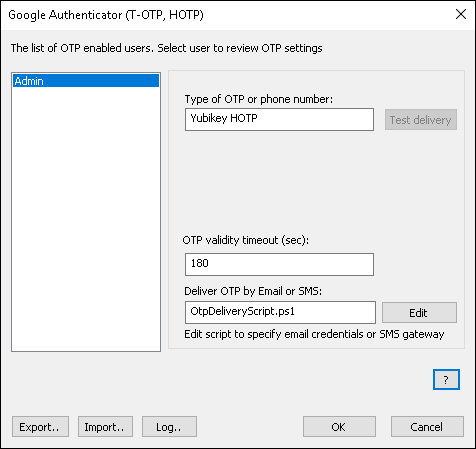
- Click Edit to open OtpDeliveryScript.ps1 file and edit Email options such as smtp server, email and password credentials for the mailbox that will be used to send emails:

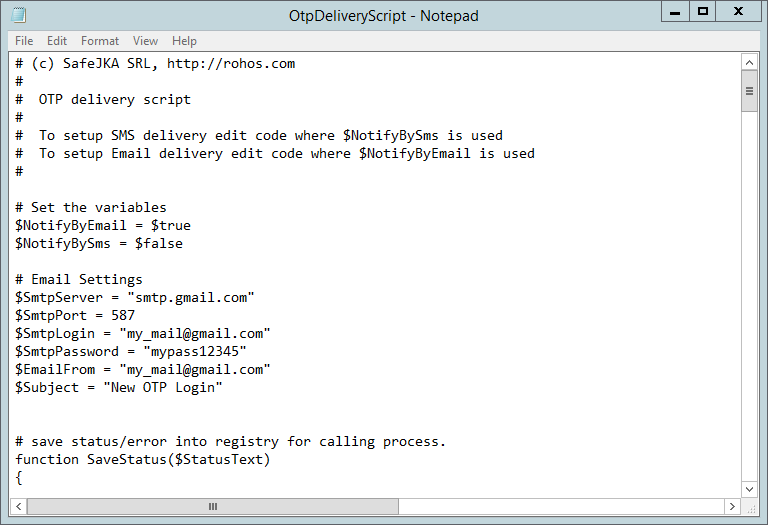
To setup SMS delivery Find string:
$SmsGatewayUrl = “https://api.clickatell.com/http/sendmsg?api_id=xxxx&user=xxxx&password=xxxx&to=$($AdUserName.telephoneNumber)&text=$($SmsNotificationText)”
And customize xxxx URL parameters so that it should be your SMS provider HTTP API url;
Both $($AdUserName.telephoneNumber) and $($AdUserName.telephoneNumber) are script variables and you should not touch them;
Here is an example for well known SMS delivery services:
$SmsGatewayUrl = “https://api.clickatell.com/http/sendmsg?api_id=xxxx&user=xxxx&password=xxxx&to=$($AdUserName.telephoneNumber)&text=$($SmsNotificationText)”
$SmsGatewayUrl = “https://api-mapper.clicksend.com/http/v2/send.php?method=http&username=xxxx&key=xxxx&to=$($AdUserName.mobile)&message=$($SmsNotificationText)”
You may select user from Left or enter Email/Phone and click “test delivery” button to sent OTP code by using configured delivery method. Please note: In order to use gmail as email delivery service you need to setup your gmail settings: “Allow less secure apps”
https://support.google.com/accounts/answer/6010255?hl=en
Learn More about setting up an OTP delivery method by Email>
Remote Desktop login with SMS authentication enabled:

Security benefits of using Google Authenticator for Windows Login
- Two-factor authentication – higher security level of Windows authentication:
Windows Password + Mobile phone is required for login. - No drivers or software are required for YubiKey or OTP by SMS.
- No USB port needed for Google Authenticator, it works without connection to computer.
- You may use Google Authenticator, YubiKey or just Mobile phone in the same time!
- Possibility for Network Administrator to login in a regular way by using just a password.
- Secure 2-factor login into Windows Remote Desktop with flexible authentication policy: by user list, group membership or only RDC users.
Rohos Logon Key Download
This update is free for all Rohos Logon Key registered users. But since April v.3.0 update will be paid.