DHCP means (Dynamic Host Configuration Protocol) its provided automatically IP on your subnet. The DHCP controlled by the DHCP Server distribute network configuration such as IP, subnetmask, gateway and dns information.
When client host request IP address for DHCP server then each computer assign same subnet IP address. Another way you can use Static IP Address on your machine.
★ How To Configure Static IP address On Ubuntu 18.04
★ How To Install Zabbix Server On Ubuntu 18.04
★ How To Install Zabbix Server 3.4.4 Into Ubuntu 17.04
★ How To Create Custom Boot Partition On Ubuntu 16.04 Server
Now I have to show using portable dhcp server your windows 10 machine.
Step #01: Goto download portable dhcp server then choose latest version and click download icon.
When completed download then using it very softly otherwise you can face many problem.
!Warning – Can’t install two dhcp server on your same network
Step #02: Now open dhcpwiz file for configure dhcp IP pool.
Click Next button select your network interface on LAN. Provide DNS server name or click Next button for dhcp main IP configuration.
Type your network IP-Pool start and ending IP address then click Next button. See your configure as like below image.
Finally click Next button without dhcpsrv.ini file and Finish. If you can check box Run dhcp server immediately.
Step #03: After configuration is ok then open dhcpsrv file for start and stop dhcp server.
Thank you for using portable dhcp server on your network.
- Author
- Recent Posts

I am system administrator as Windows and Linux platform. I have 4 years skilled from the professional period. I have to configure Linux based system such as an Asterisk VOIP system, Network monitoring tools (ZABBIX), Virtualization (XEN Server), Cloud computing (Apache CloudStack) etc. Now share my professional skill each interested person.
Thanks to all.
Ставим на ноут с Windows 7 Open DHCP Server через виндовый интсталлятор в папку по умолчанию c:OpenDHCPServer (в папках с длинными путями a-la c:Program Files и т.д. могут быть проблемы с запуском линуксовых приложений).
Обжимаем crossover ethernet-кабель и подключаем ноут к плате BeagleBone Black под управлением Debian 8 с настроенным по умолчанию получением ip-адреса через DHCP.
Выставляем в ноуте в настройках ethernet-адаптера статический ip-адрес 192.168.100.1 и маску 255.255.255.0. Открываем в вашем любимом виндовом текстовом редакторе (у меня Notepad++) файл OpenDHCPServer.ini. В нем находим секцию [RANGE_SET] и устанавливаем параметр DHCPRange=192.168.100.10-192.168.100.200. Кроме этого, надо задать фильтрацию секции либо по MAC-адресу биглбона, либо по подсети (192.168.100.1). Чтобы биглбон с любым mac-адресом попадал в нашу секцию адресов (RANGE_SET) добавим строку FilterMacRange=00:00:00:00:00:00-ff:ff:ff:ff:ff:ff. Либо фильтрацию можно сделать через наш статический адрес следующим образом FilterSubnetSelection=192.168.100.1. Полезно стереть секции, специфичные для конкретных mac-адресов, которые имеются в файле настроек по умолчанию. Прописываем в секции [LISTEN_ON] наш статический ip-адрес — таким образом мы задается фильтр адресов, которых надо слушать серверу. Результирующий файл настроек OpenDHCPServer.ini под виндой у меня получисля следующим:
[LISTEN_ON]
192.168.100.1
[RANGE_SET]
DHCPRange=192.168.100.10-192.168.100.200
FilterMacRange=00:00:00:00:00:00-ff:ff:ff:ff:ff:ff
FilterSubnetSelection=192.168.100.1
SubnetMask=255.255.255.0
Таким образом мы установили пул, из которого будут выбираться адреса для раздачи. Запускаем на ноуте командный интерпретатор cmd и переходим в папку с сервером (cd c:OpenDHCPServer). Запускаем RunStandAlone.bat. В консоли появляется ожидание подключения сетевого кабеля.
Запускаем BBB. На стадии загрузки ядра производится запрос адреса. Процесс получения отображается в консоли на ноуте. На BBB после загрузки можно будет проверить адрес через ifconfig. Они должны совпасть. После этого можно зайти c ноута на BBB через winscp или putty.
Использованные источники:
1) https://sourceforge.net/projects/dhcpserver/files/Open%20DHCP%20Server%20%28Regular%29/OpenDHCPServerManual.pdf/download
The Open DHCP server is free software used to provide IP addresses on your client network. The latest version can be downloaded from http://dhcpserver.sourceforge.net/
Software installation is very simple, it is done through the downloaded installer with a few clicks.
You should let the installer install the server as NT Service.
Server configuration is done through OpenDHCPServer.ini file which is located in the Open DHCP installation folder.
To configure the Open DHCP server, please follow these steps:
(If using Windows ICS) Change the IP address of your network card (192.168.0.1) to some other IP e.g. 192.168.100.1
Open Windows Start menu and go to Programs – Open DHCP Server – Configure entry
Important: All configuration entries that have ‘ character in front of them will not be used
• Go to [LISTEN_ON] section and replace default IP address with the address of your network card connected to the client network.
• Go to the first [RANGE_SET] section.
• Set DHCP_Range value, this option determines which IP addresses will be leased to client computers, e.g. 192.168.100.2 – 192.168.101.254.
• Set Subnet_Mask that will be assigned to clients, it must match DHCP_Range, for the example above it would be 255.255.254.0
• Specify primary and secondary DNS_Server which your clients will use to resolve web addresses (it could be DNS server of your ISP or some free like Google DNS 8.8.8.8, 8.8.4.4.)
• Router value will be used to set gateway address on client computers, this value has to match the IP address of server network card connected to the client network.
After you configure DHCP server settings, you need to start Open DHCP server service from Control Panel – Administrative Tools – Services application or restart server pc to automatically run DHCP server.
If the program is not assigning addresses, please check:
1. Check network hardware and ensure that client machines have different hostnames from the server and each other.
2. No other service should be running on Server on ports 67.
3. If you get an error like port 67 already in use means some other DHCP program or proxy server with DHCP service is running. Use any port scanner program like Active Ports to detect which program is listening on these ports. It is also possible that another copy of DHCP server itself is running, or Microsoft connection sharing (ICS) is running, which uses these ports.
How to disable ICS DNS/DHCP Service on your target networks, see above INTERNET CONNECTION SHARING.
4. If you still get error Static Interfaces/Listening Ports not available, it may be because of another DHCP Server is running or Interfaces specified on [LISTEN-ON] section are not available. If your interface may not be ready when your computer/Service starts and due to this service fails to start, use Window’s recovery option in Services applet to try starting service at the later time.
5. Look at OpenDHCPServer.log (if running as service) or Run in standalone mode, it will provide all debug information as it verbatim the activities.
6. If you use Broadband router, which also has DHCP Server, this program may still run, but some hosts configured by other DHCP Server may not use this DNS or DHCP Service. Please disable DHCP Service on Broadband Router.
7. DHCP server state file backs up current leases and is read back when the server restarts. If you want to clean previous leases, you may delete this file and restart the server.
8. If you are not able to receive DHCP Discover messages from clients, make sure that DHCP server and client are on the same physical network (not separated by routers).
If it is separated by routers and it is the same subnet, please allow routers to pass broadcast messages to Server on Port 67. If these are different subnets, use the BOOTP relay agent.
 opendhcpd.state file backs up current leases and is read back when server restarts. If you want to
 A DHCP Server is a protocol server for TCP/IP networks that supplies IP addresses to other computers. DHCP Server for Windows also supports TFTP, DNS and HTTP protocol which makes a nice package for easy and simple to install networks e.g. for remote boot and other purposes. DHCP server runs on all Win32 capable Windows operating systems starting from Windows 95 to Windows 8.
Installation
The DHCP Server is a portable application and runs from anywhere on your computer. Extract the content of the zip file wherever you like, e.g. D:dhcpsrv. You will now find the following files in there:
- dhcpsrv.exe
- dhcpwiz.exe
- readme.txt
- wwwroot
- dhcpstyle.xsl
- dhcppkgstyle.xsl
- favicon.ico
- index.html
- RJ45_5.jpg
- RJ45_52.jpg
Configuration with dhcpwiz.exe
If you are a first time user of DHCP server then the dhcpwiz.exe program gives you a good head start in setting up the ini file needed to run the DHCP server. The dhcpwiz.exe program is a wizard style configuration program for the DHCP server. It will guide you in 6 easy steps through the basic configuration of the software.
1. Welcome to the DHCP configuration wizard
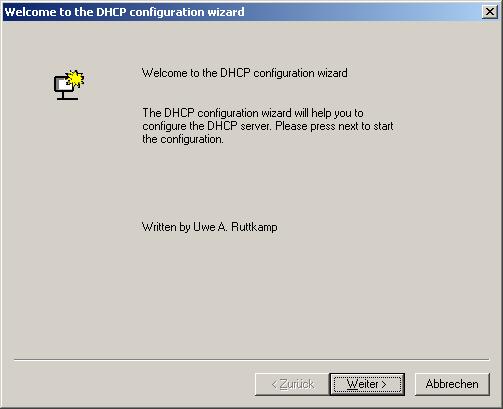 There is not much more to do than to hit the next button.
2. Network interface cards
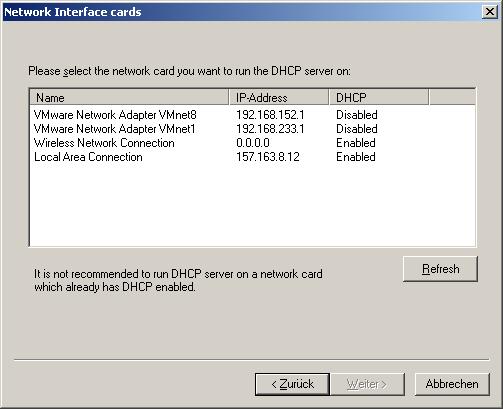 The DHCP configuration wizard lists all currently identified network interfaces on your computer. It is necessary to select one. This is going to be the interface that will be used by DHCP server. It is a good idea to choose a network interface that by itself is not getting it’s IP address from a DHCP server. This would probably cause conflicts. Hit next after interface has been selected.
3. Supported protocols
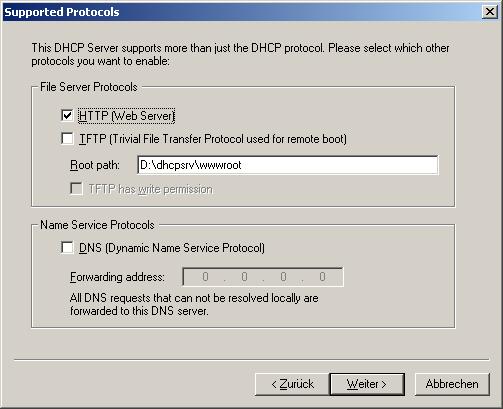 Now you can select which TCP/IP protocols should be activated. I’m suggesting to enable HTTP (Web Server) and hit next.
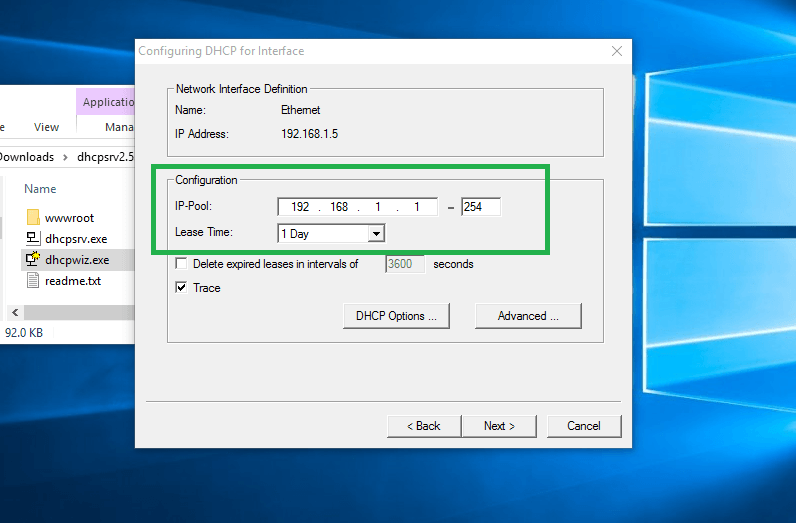
4. Configuring DHCP for interface
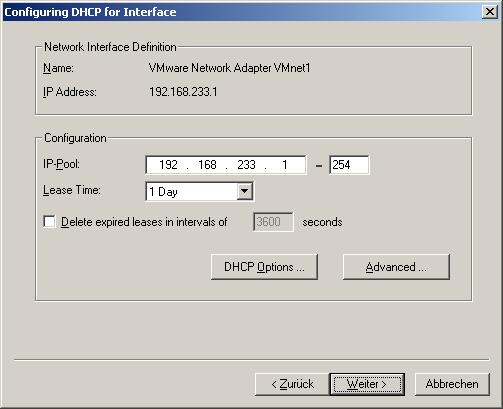 In this step you define the pool of IP addresses. A client will get an IP addresses assigned out of this pool. With the Advanced button, you get access to a dialog that allows you to define the subnet mask, the gateways and the DNS and WINS servers. DHCP wizard automatically takes the appropriate defaults based on the selected network interface card. The DHCP Options button opens a dialog that gives access to further DHCP options such as next (TFTP) server, bootfile, domain name and others including customized options. The default values should be good and lead you to the next step after hitting the next button.
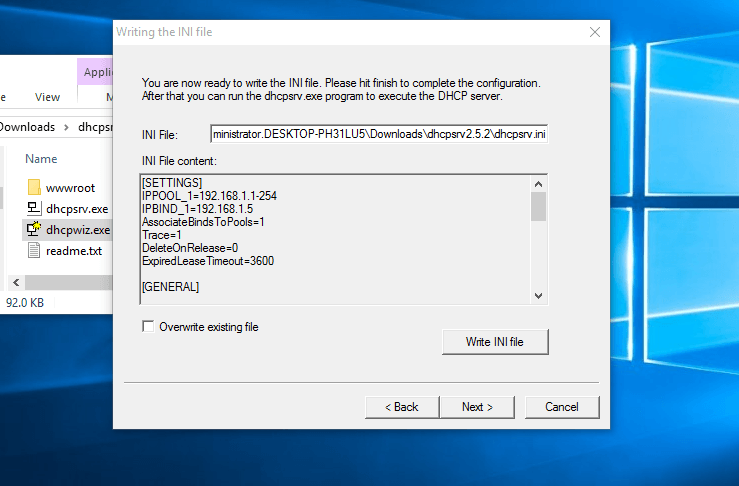
5. Writing the INI file
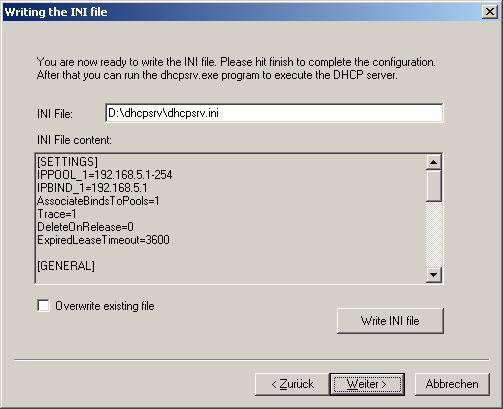 The final result of the DHCP configuration wizard is an INI file. This file will contain all the configuration options. The filename and path shown here should point to d:dhcpsrvdhcpsrv.ini, depending on where you’ve exctracted the zip file. It is important that the INI file is placed into the same folder as dhcpsrv.exe resides. If that is all ok, then hit the “Write INI file” button and then the next button to enter the final step of the configuration. Please note that DHCP wizard is not intended to reedit the INI file once it is written. Its purpose is the first time configuration. But of course nothing prevents you from using the wizard again. Just please make sure that you don’t overwrite your INI file unintended. That is the reason why the “Overwrite existing file” is by default unchecked.
6. DHCP configuration completed
 The windows firewall is a great thing to have. But it can be a pain also to get communication server programs working. That is the reason why the wizard gives you at this stage the option to add the dhcp server program to the exception list of the windows firewall. Please hit the configure button and wait for the status to change from “Not configured” to “configured”. If you are not running the DHCP configuration wizard with administrator privileges, then you need to do that after you have elevated your rights accordingly by hitting the “Admin…” button.
It is now time to start the DHCP server program. The DHCP server can run as a service or as an application. If you want to run it as a service then you can install and start the service here also. Again, non-administrators can do that only after elevation (the “Admin…” button). The status needs to change from “Not installed” to “Running”. If you decide not to install DHCP server as a service but wants to run DHCP server as an application, then you can tick the “Run DHCP server immediately” check box and click finish.
Running dhcpsrv.exe
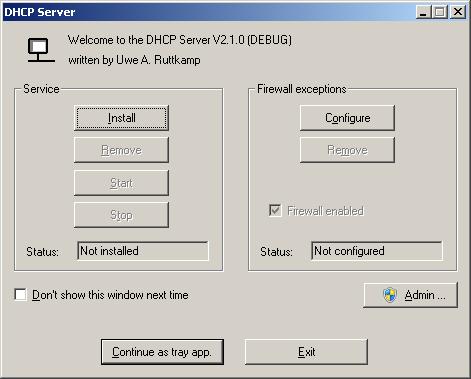
Once the INI file has been created by the DHCP configuration wizard, it is now time to start the actual DHCP server program. If you have done that already as part of the DHCP configuration wizard step 6, then you are done and don’t need to read the rest.
If you have not already done so, start the dhcpsrv.exe. If you are running Windows NT or Windows 2000/XP/VISTA/7/8 then the DHCP server will show you the following dialog box:
 On all older operating systems (Windows 98, etc..) the DHCP server will go straight into the tray as a tray icon application.
If you are running the windows firewall, then DHCP server can enter itself into the exception list. Please hit the configure button and wait for the status to change from “Not configured” to “configured”. If you are not running the DHCP server with administrator privileges, then you need to do that after you have elevated your rights accordingly by hitting the “Admin…” button.
It is now time to really start the DHCP server program. The DHCP server can run as a service or as an application. If you want to run it as a service then you can install and start the service here. Again, non-administrators can do that only after elevation (the “Admin…” button). The status needs to change from “Not installed” to “Running”. If you decide not to install DHCP server as a service, then you hit the “Continue as a tray app” button. If you tick the “Don’t show this window next time”, then DHCP server will not bother you again with this dialog and goes straight into the tray. If you forgot to configure the firewall or you didn’t trust DHCP server to handle your firewall configuration correctly, then Windows will ask you for permission to let DHCP server communicate through the firewall. Say yes to everything that might come up and you will see a little tray icon showing that DHCP server is running.
Once the DHCP configuration has been performed and DHCP server is started, you probably want to know whether it actually works. If you have activated the HTTP support as part of step 3 during the DHCP configuration wizard, then you can use your internet browser to open the DHCP status web site: http://127.0.0.1/dhcpstatus.xml. Also easily accessible through the tray icon, right mouse, Open status. This should show the configured and operating connections and also all currently active clients. I assume there aren’t any yet. Once a DHCP client is assigned an IP address it will show up after reloading the page.
Since V1.7 command line options are supported to better integrate the DHCP server into setups or to quickly install and remove the service. The command line options are:
| -install | installs the DHCP Server as a service |
| -remove | removes the service |
| -start | starts the service |
| -stop | stops the service |
| -control | opens the above dialog box to control the service |
| -help | shows a help message dialog box |
| -runapp | runs the DHCP Server in application mode (regardless of service installs) |
| -ini filename | sets the pathname of the ini file to be used by the DHCP Server (default is dhcpsrv.ini). This works only in application mode |
| -configfirewall | Configures firewall exceptions for dhcpsrv.exe |
| -removefirewall | Removes firewall exceptions for dhcpsrv.exe |
Command line options are interpreted from left to right and can be given in any order. Example
dhcpsrv -install -start installs and starts the DHCP server service with one command
Please be aware that you need to have administrator privileges to install the DHCP Server as a service.
Вопрос может быть глупый, но я отталкиваюсь от слов своего преподавателя. Было задание развернуть сетку с DHCP сервером на Windows 10, я не справился. После я стал искать, а можно ли вообще на обычной винде поднять DHCP. Ответа так и не нашёл. Решил задать этот вопрос здесь.
P.S. Только базовыми возможностями Windows 10, без доп софта
-
Вопрос задан19 мая 2022
-
2990 просмотров
Единственный вариант с Windows 10 и DHCP без использования дополнительного ПО — это, как уже сказали, включение Internet Connection Sharing. Но назвать это полноценным сервером тяжело.
Вообще говоря, специально для сетей без DHCP-сервера была разработана APIPA: https://docs.microsoft.com/en-us/windows-server/tr…
Пригласить эксперта
Препод немного гонит))
Можно сделать способом internet sharing, как уже сказали
Но полноценным dhcp это назвать крайне сложно
-
Показать ещё
Загружается…
04 февр. 2023, в 20:45
1000 руб./за проект
04 февр. 2023, в 20:44
20000 руб./за проект
04 февр. 2023, в 20:04
35000 руб./за проект
Минуточку внимания
How to DHCP with Open DHCP Server — Quick Walkthrough
A quick install, setup, and run of Open DHCP Server.
1) Obtain Open DHCP Server from:
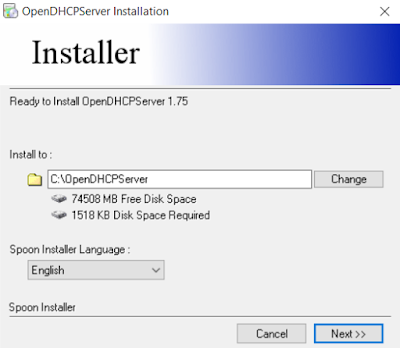
2) Double-click the OpenDHCPServerInstallerVX.XX.exe
And follow the prompts to install.
Image: Open DHCP Server Installer
Image: Open DHCP Server Installation
C:OpenDHCPServerinstallservice.exe
— which installs a service ‘OpenDHCPServer’ with the path
to executable:
C:OpenDHCPServerOpenDHCPServer.exe
Image: Installing OpenDHCPServer — Installation
Completed

Image: Open DHCP Server Service

Image: Contents of Install Folder C:OpenDHCPServer

3) Edit OpenDHCPServer.ini as required
Note: Save the original .ini as say .ini.backup
4) To run, double-click ‘RunStandAlone.bat’.
5) To stop, close the cmd.exe window.
IMPORTANT NOTE: Before running
OpenDHCP, be very careful that OpenDHCP is not connected/listening on any
networks that it shouldn’t be. You don’t want to accidentally give out DHCP
addresses.
Note: The ‘Open DHCP Server’ service only runs if you
need to run Open DHCP as a service. Default state is ‘Startup Type’ = ‘Automatic’
and ‘Status’ = ‘Not Running’. When you run ‘RunStandAlone.bat’ that
doesn’t start the service.
Image: Running OpenDHCP

Configuring IPMIs using
OpenDHCP (or Not Having to Plug a KVM into every Server to Configure the IPMI/iLO/DRAC/whatever)
The reason why I’m writing a post about Open DHCP Server,
is because I sometimes have to configure a number of servers (e.g. NetApp HCI/NetApp
SolidFire) and it’s a bit of a pain needing to go to every server with a Keyboard,
Video, Mouse (KVM), and configure the IPMI by: boot node, wait for key press to
enter setup, configure IPMI, reboot, and so on (if there is already DHCP on
the IPMI network, it can help.)
Using OpenDHCP and a portable switch (I bought a Netgear
ProSafe GS116 for about £60), I can plug up to all the IPMI ports, see what’s
got what on my private DHCP scope, connect over IPMI, and apply whatever
configurations are required, without needing KVM (also, can RTFI nodes over the
IPMI with new images if required, rather than carrying a set of USB keys.)
[LISTEN ON]
{IP of my laptop on the IPMI network}
[RANGE_SET]
DHCPRANGE = {Range of IPs I want to use — i.e. not the
static IPMI IPs I will configure later}
SubNetMask={as required}
Router={as required}
Image: Very simple OpenDHCPServer.ini example

The default HTTP interface for OpenDHCP is http://127.0.0.1:6789/
and for some reason this didn’t work for my laptop. Not a massive issue
as can see all the DHCPREQUEST in the cmd.exe. The error was “HTTP Client 127.0.0.1, Message Receive failed, WSAError 0”.
I tried on another laptop, didn’t get that error, but still the webpage failed
to load.
Image: Netgear ProSafe GS116 16-port Gigabit Switch

DHCP Overview
DHCP (Dynamic Host Configuration Protocol) is a networking service that will automatically assign and manage computer IP addresses on their network.
DHCP is commonly used to manage client computers such as laptops and mobile devices. It is less likely to be used to configure server infrastructure (like domain controllers or web servers) because these servers generally require a static IP address.
DHCP will hand a computer an IP address with a lease for any number of days (default is 8). Once that lease expires, the DHCP server will then negotiate with the DHCP server and obtain a new IP address.
Install DHCP
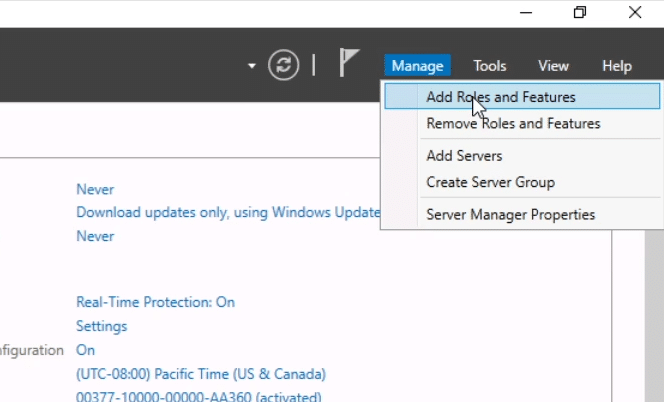
Step 1. Open Server Manager
To install DHCP, open Server Manager by clicking the Windows button and clicking Server Manager or by searching for Server Manager.
Step 2. Add roles and features
Inside of Server Manager, select Manage > Add Roles and Features:
Step 3. Proceed to the Server Roles page
Now click Next until you reach the Server Roles page. Click the DHCP Server checkbox.
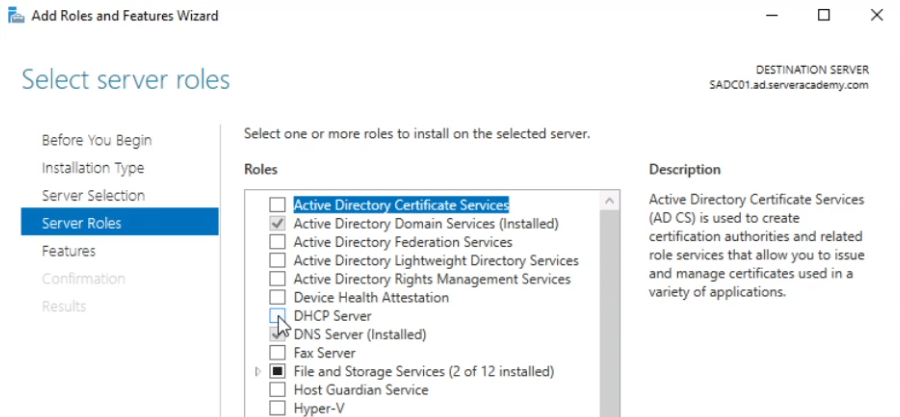
After you click this checkbox you will see a popup for adding the features that are required by DHCP. Click Add Features then click Next until you get to the install page.
Step 4. Begin the Server Role Installation
On the install page, click Install and wait for the installation to complete.
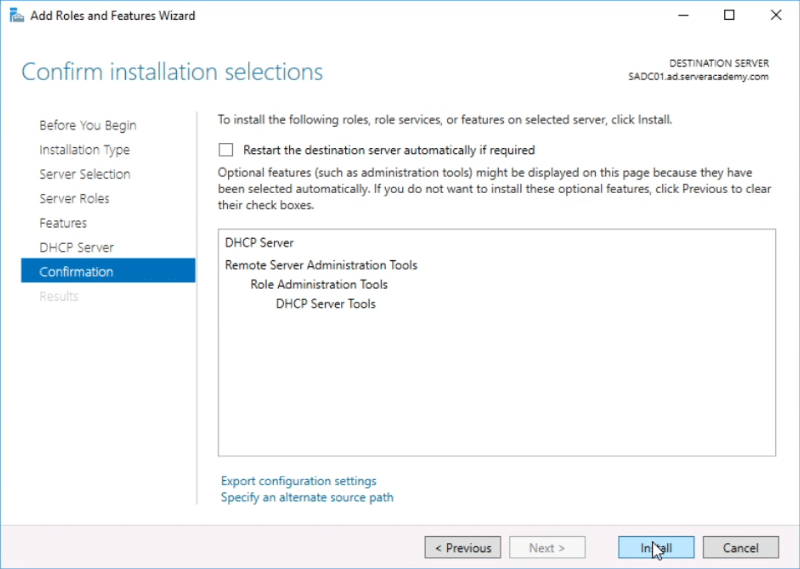
Wait for the installation to complete. Leave the wizard open so we can easily launch the post installation configuration once it is done.
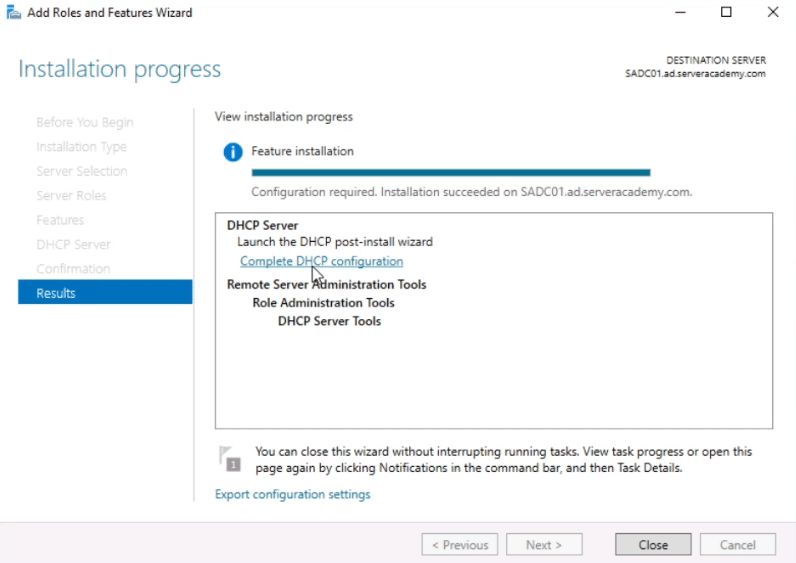
Step 5. Complete DHCP Post-install Wizard
Once the installation is complete you can click the Complete DHCP configuration button:
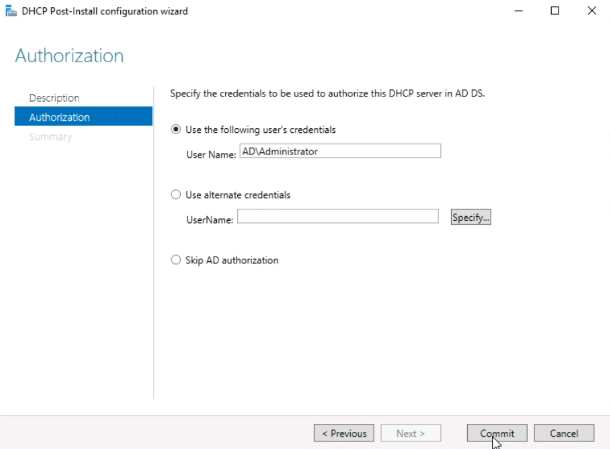
Once the Post-install configuration wizard appears click next until you get to the Authorization page.
The default option should work. In my case I am using the domain administrator credentials so I will click Commit:
Now click Close to close the DHCP config wizard.
Configure a DHCP Scope
We have successfully installed DHCP but it won’t do anything yet. That’s because we need to configure a DHCP scope. A DHCP scope tells DHCP what range of IP addresses it should hand out to DHCP clients.
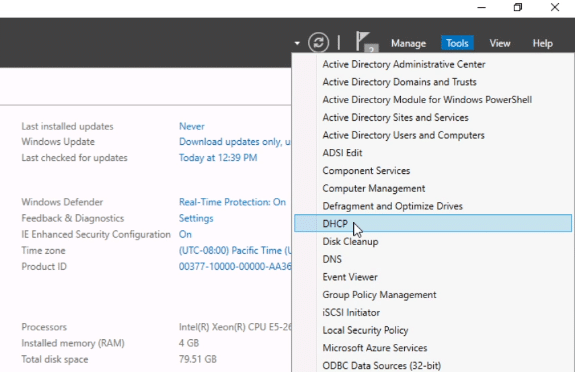
Step 1. Start the DHCP Console
We need to start the DHCP console which can be done by switching back to Server Manager then clicking Tools > DHCP:
Step 2. Create a New Scope
Expand your DHCP server and right-click IPv4 and select New Scope…
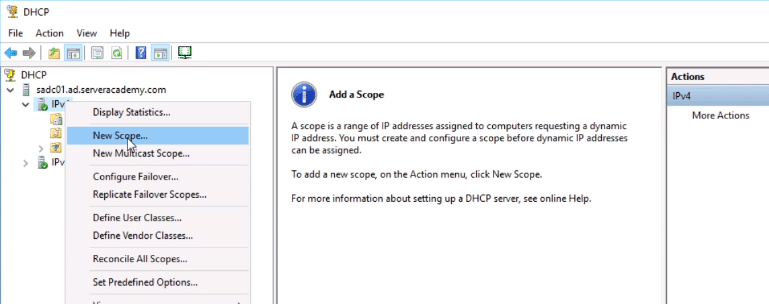
Click next until you get to the Scope Name page.
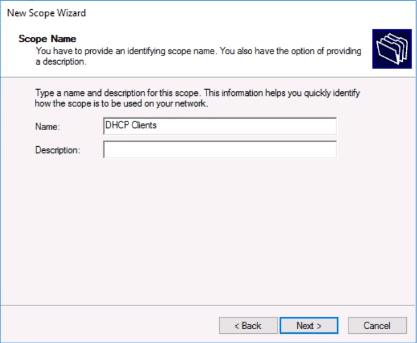
Step 3. DHCP Scope Name
I am going to use the name “DHCP Clients” and click Next.
Step 4. IP Address Range
Now enter your desired start and end IP address ranges. I am going to use 10.1.0.100 – 10.1.0.200.
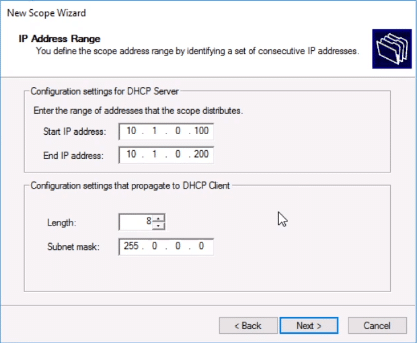
Now click Next.
Step 5. Configure DHCP Exclusions and Delays (optional)
If you want to exclude an IP address or range of IPs that fall within the scope you specified above you can enter that now.
You can also add a subnet delay which is the amount of time the DHCP server will wait before offering an IP address. This would only be useful when you have multiple DHCP servers and don’t want the possibility of them both to answer at the same time.
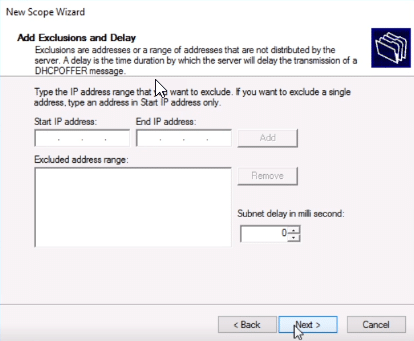
I don’t need to use any of these settings so I am going to just click Next.
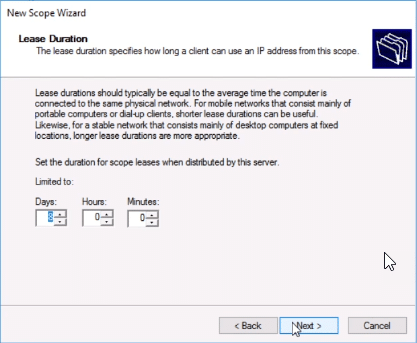
Step 6. Configure your lease duration
A DHCP lease duration defines how long your DHCP clients will hold the IP address by DHCP before it is released back to the server and the client needs to obtain a new IP.
This can be useful for mobile devices and laptops so if a user gets an IP address from your DHCP server, then leaves the facility the DHCP server can cycle that IP address and hand it out to another user.
I am going to proceed with the default value of 8 and click Next.
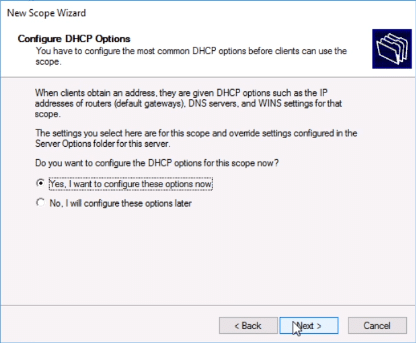
Step 7. Configure DHCP Options
The next screen will give you the opportunity to configure the DHCP options related to your DHCP scope. This is where you configure things like the default gateway, DNS servers and the AD domain.
Select the Yes I want to configure these options now and click Next to continue.
Step 8. Configure the Router (default gateway)
Enter your default gateway and click Add. In my case, it’s 10.0.0.1. Your default gateway will almost certainly be different.
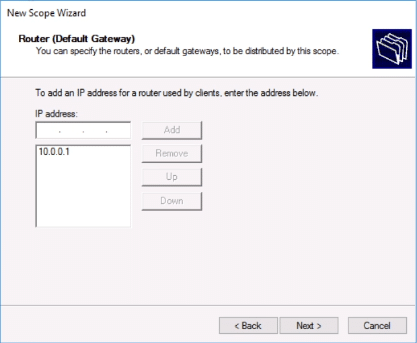
If you’re unsure you can open CMD and run the ipconfig /all command:

Step 9. Domain Name and DNS Servers
The next page allows you to define your parent domain and DNS servers. Since my host is already joined to active directory and has these settings configured they are already populated for me.
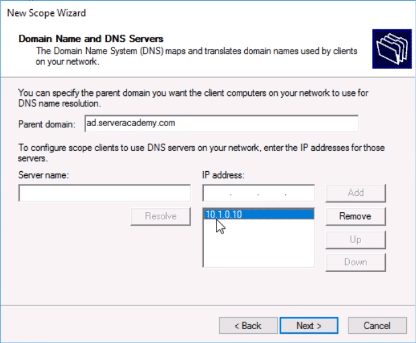
Click Next to continue on to the next screen.
Step 10. Configure WINS Servers (optional)
The next step allows you to configure your WINS (Windows Internet Name Service). WINS has nearly been entirely been replaced by DNS so it’s pretty unlikely you will need to configure these settings… but you can do so here if you need to.
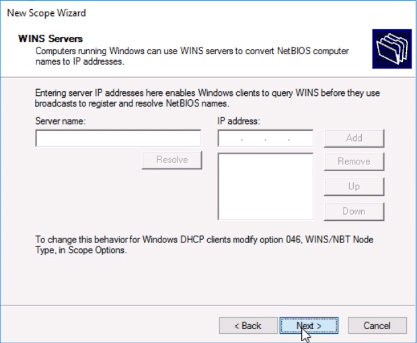
I’m going to click Next without entering any data.
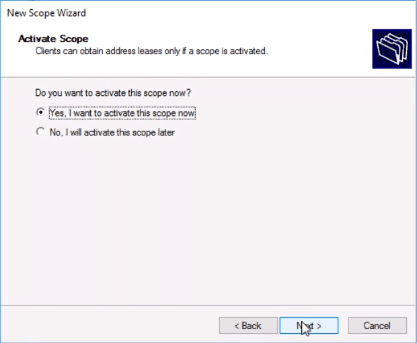
Step 11. Activate the DHCP Scope
Most likely you will want to activate the DHCP scope so just click Next unless you have a need to activate it at a later time.
Once you click next you can click Finish to close the wizard and finalize your DHCP scope.
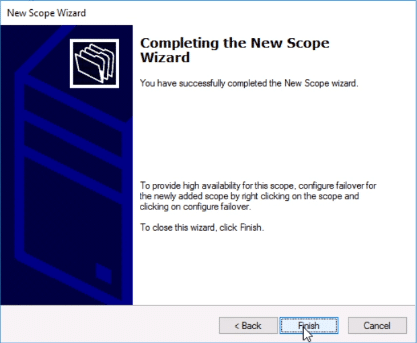
That is all you need to do to get DHCP up and running! Great job getting through this one.
Remember if you want to learn more about DHCP or take your Windows Server IT skills to the next level consider signing up to Server Academy with a free trial!