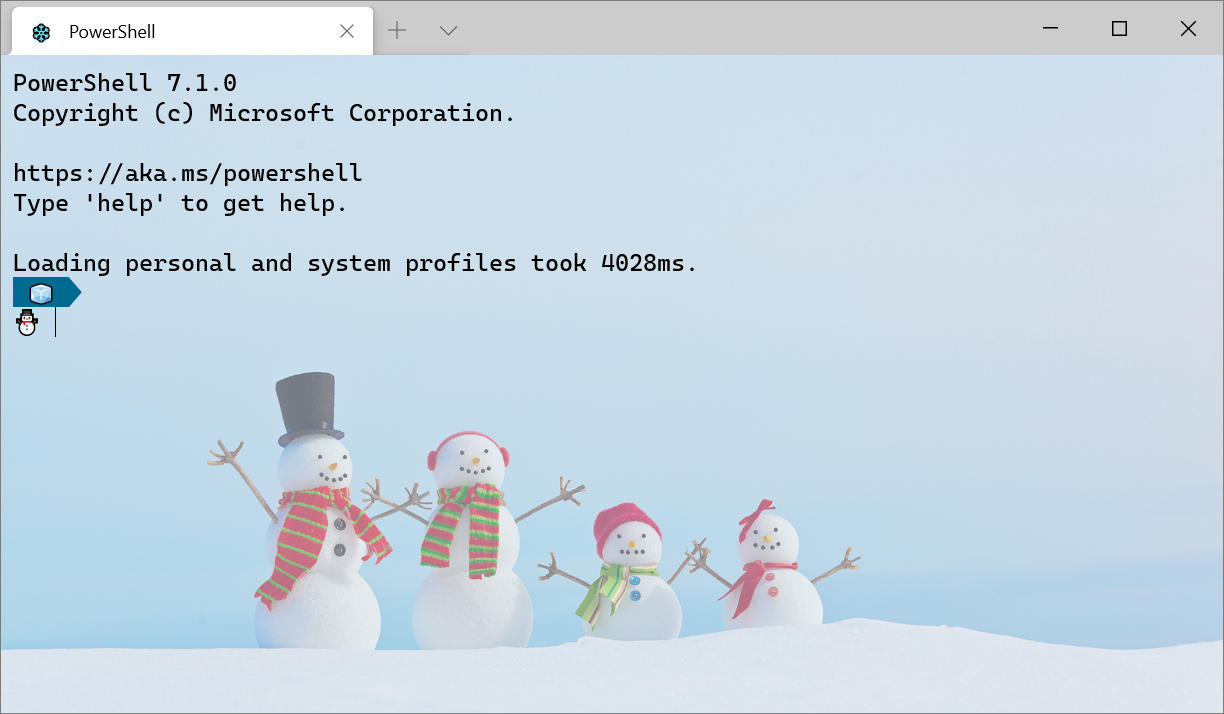
Привет, Хабр! Сегодня делимся гайдом по началу работы с Windows Terminal. Да, поскольку он о начале работы с инструментом, в основном в материале описываются какие-то базовые моменты. Но я думаю, что и профессионалы смогут подчерпнуть для себя что-то полезное, как минимум из списка полезных ссылок в конце статьи. Заглядывайте под кат!
Установка
Windows Terminal доступен в двух разных сборках: Windows Terminal и Windows Terminal Preview. Обе сборки доступны для загрузки в Microsoft Store и на странице выпусков GitHub.
Требования
Для запуска любой сборки Windows Terminal на вашем компьютере должна быть установлена Windows 10 1903 или более поздняя версия.
Windows Terminal Preview
Windows Terminal Preview — это сборка, в которой в первую очередь появляются новые функции. Эта сборка предназначена для тех, кто хочет видеть новейшие функции сразу после их выпуска. Эта сборка имеет ежемесячный цикл выпуска с новейшими функциями каждый месяц.

Windows Terminal
Терминал Windows — это основная сборка продукта. Функции, которые поступают в Windows Terminal Preview, появляются в Windows Terminal через месяц эксплуатации. Это позволяет проводить обширное тестирование ошибок и стабилизацию новых функций. Эта сборка предназначена для тех, кто хочет получить функции после того, как они были изучены и протестированы сообществом Preview.
Первый запуск
После установки терминала вы можете запустить приложение и сразу приступить к работе с командной строкой. По умолчанию терминал включает профили Windows PowerShell, Command Prompt и Azure Cloud Shell в раскрывающемся списке. Если на вашем компьютере установлены дистрибутивы Подсистемы Windows для Linux (WSL), они также должны динамически заполняться как профили при первом запуске терминала.
Профили
Профили действуют как различные среды командной строки, которые вы можете настраивать внутри терминала. По умолчанию в каждом профиле используется отдельный исполняемый файл командной строки, однако вы можете создать столько профилей, сколько захотите, используя один и тот же исполняемый файл. Каждый профиль может иметь свои собственные настройки, которые помогут вам различать их и добавить в каждый свой собственный стиль.
Дефолтный профиль
При первом запуске Windows Terminal в качестве профиля по умолчанию устанавливается Windows PowerShell. Профиль по умолчанию — это профиль, который всегда открывается при запуске терминала, и это профиль, который открывается при нажатии кнопки новой вкладки. Вы можете изменить профиль по умолчанию, установив «defaultProfile» на имя вашего предпочтительного профиля в файле settings.json.
"defaultProfile": "PowerShell"Добавление нового профиля
Новые профили можно добавлять динамически с помощью терминала или вручную. Терминал Windows автоматически создаст профили для распределений PowerShell и WSL. Эти профили будут иметь свойство «source», которое сообщает терминалу, где он может найти соответствующий исполняемый файл.
Если вы хотите создать новый профиль вручную, вам просто нужно сгенерировать новый «guid», указать «name» и предоставить исполняемый файл для свойства «commandline».
Примечание. Вы не сможете скопировать свойство «source» из динамически созданного профиля. Терминал просто проигнорирует этот профиль. Вам нужно будет заменить «source» на «commandline» и предоставить исполняемый файл, чтобы дублировать динамически созданный профиль.
Структура Settings.json
В Терминал Windows включены два файла настроек. Один из них — defaults.json, который можно открыть, удерживая клавишу Alt и нажав кнопку «Настройки» в раскрывающемся списке. Это неизменяемый файл, который включает в себя все настройки по умолчанию, которые поставляются с терминалом. Второй файл — settings.json, в котором вы можете применить все свои пользовательские настройки. Доступ к нему можно получить, нажав кнопку «Настройки» в раскрывающемся меню.
Файл settings.json разделен на четыре основных раздела. Первый — это объект глобальных настроек, который находится в верхней части файла JSON внутри первого {. Примененные здесь настройки повлияют на все приложение.
Следующим основным разделом файла является объект «profiles». Объект «profiles» разделен на два раздела: «defaults» и «list». Вы можете применить настройки профиля к объекту «defaults», и они будут применяться ко всем профилям в вашем «list». «list» содержит каждый объект профиля, который представляет профили, описанные выше, и это элементы, которые появляются в раскрывающемся меню вашего терминала. Настройки, примененные к отдельным профилям в «списке», имеют приоритет над настройками, примененными в разделе «defaults».
Далее в файле расположен массив «schemes». Здесь можно разместить собственные цветовые схемы. Отличный инструмент, который поможет вам создать свои собственные цветовые схемы, — это terminal.sexy.
Наконец, в нижней части файла находится массив «actions». Перечисленные здесь объекты добавляют действия в ваш терминал, которые можно вызывать с клавиатуры и/или находить внутри палитры команд.
Базовая кастомизация
Вот несколько основных настроек, которые помогут вам начать настройку вашего терминала.
Фон
Одна из самых популярных настроек — настраиваемое фоновое изображение. Это настройка профиля, поэтому ее можно либо поместить внутри объекта «defaults» внутри объекта «profiles», чтобы применить ко всем профилям, либо внутри определенного объекта профиля.
"backgroundImage": "C:Usersadminbackground.png"Параметр «backgroundImage» принимает расположение файла изображения, которое вы хотите использовать в качестве фона вашего профиля. Допустимые типы файлов: .jpg, .png, .bmp, .tiff, .ico и .gif.
Цветовая схема
Список доступных цветовых схем можно найти на нашем сайте документации. Цветовые схемы применяются на уровне профиля, поэтому вы можете поместить настройку внутри «значений по умолчанию» или в конкретный объект профиля.
"colorScheme": "COLOR SCHEME NAME"Этот параметр принимает название цветовой схемы. Вы также можете создать свою собственную цветовую схему и поместить ее в список «schemes», а затем установить в настройках профиля имя этой новой схемы, чтобы применить ее.
Начертание шрифта
По умолчанию Windows Terminal использует Cascadia Mono в качестве шрифта. Начертание шрифта — это настройка уровня профиля. Вы можете изменить шрифт, установив «fontFace» на имя шрифта, который вы хотите использовать.
"fontFace": "FONT NAME"`Совет: Терминал Windows также поставляется с начертанием шрифта Cascadia Code, который включает программные лигатуры (см. Gif ниже). Если вы используете Powerline, Cascadia Code также поставляется в PL-версии, которую можно загрузить с GitHub.

Полезные ресурсы
Докуметация Windows Terminal
Скотт Хансельман: как сделать красивым Windows Terminal с помощью Powerline, шрифтов Nerd, кода Cascadia, WSL и oh-my-posh
Скотт Хансельман: Как настроить терминал с помощью Git Branch, Windows Terminal, PowerShell, + Cascadia Code!
Скотт Хансельман: Windows Terminal Feature PREVIEW – Кастомизируйте свои привязки клавиш, цветовые схемы, панели, и многое другое!
>_TerminalSplash – темы Windows Terminal
Upgrade the command line with this free tool
Updated on September 16, 2022
Windows Terminal is a terminal application from Microsoft. It only works with Windows 11 and Windows 10.
You might already know about Command Prompt and PowerShell, two command-line utilities that come with most versions of Windows. Terminal is different for multiple reasons, but primarily because it’s a single program that provides developers with quick access to those tools and more.
Windows Terminal Features
Terminal looks pretty basic at first glance, but there are a handful of features that set it apart from other Windows command-line tools:
- Full screen mode
- Tabbed interface to open multiple instances of the tools
- Shortcut keys to quickly open new tabs
- Zoom with the mouse
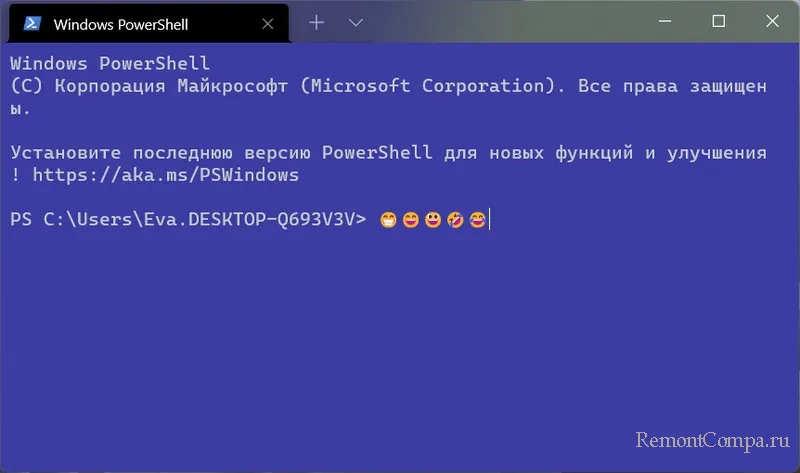
- Unicode and UTF-8 character support permits the use of emoji and non-English characters
- GPU-accelerated text rendering engine
- Custom themes and styles can be created
- Stylus support
- Windows Subsystem for Linux (WSL), SSH, PowerShell, Command Prompt, and Azure Cloud Shell support
How to Use Windows Terminal
If you’re on Windows 11, there are several ways to open it:
- Search for Terminal from the Start menu
- Trigger it from the Power User Menu (WIN+X)
- Use the Run dialog box with the wt or cmd command (it fully replaces Command Prompt in W11)
- Right-click an empty space in any folder, and choose Open in Terminal.
Windows 10 users need to follow these steps to download it:
-
Download and install Terminal from the Microsoft Store.
-
Use the search bar at the bottom of Windows to find and select Terminal.
-
PowerShell will open. You can enter commands just like you would if you’d had opened Windows PowerShell directly.
-
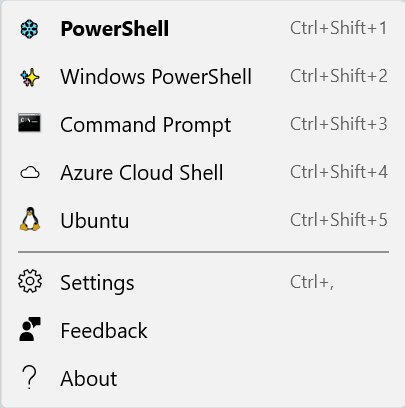
To open another PowerShell tab, use the plus sign at the top of Windows Terminal. Or, to launch a different tool, select the down arrow and select Command Prompt or Azure Cloud Shell.
Editing Windows Terminal Settings
Changing the settings for Terminal is easy: Use the down arrow at the top of the program, and then select Settings.
There are a number of options you can customize there, like to switch to a different color scheme, edit how text looks, force Terminal to always stay on top of other windows, edit shortcuts, change the default starting directory, run as administrator automatically, and a lot more.
To edit additional settings, select Open JSON file from the bottom of that screen. The file settings.json will open in your default text editor (likely Notepad, but you can use a different text editor if you want).
Microsoft has directions for using the Settings JSON file. There are also example edits here.
Tips for Using Windows Terminal
The default shell is PowerShell, so every time you open Terminal, PowerShell will be the utility you see first (you can change this in the settings). This also means that the plus sign next to the tabs at the top of Terminal will always open PowerShell, regardless of the tool you’re currently using.
There are shortcut keys you can use to quickly open an item from the menu. These are the default key bindings for running these actions:
- Ctrl+Shift+1 opens Windows PowerShell
- Ctrl+Shift+2 opens Command Prompt
- Ctrl+Shift+3 opens Azure Cloud Shell
- Ctrl+Shift+F opens the find box
- Ctrl+, opens Settings
Use the Command Palette menu option (Ctrl+Shift+P) to see other shortcuts.
Terminal requires Windows 10 version 18362.0 or higher. If you can’t install it, update Windows to the latest version.
Thanks for letting us know!
Get the Latest Tech News Delivered Every Day
Subscribe
Upgrade the command line with this free tool
Updated on September 16, 2022
Windows Terminal is a terminal application from Microsoft. It only works with Windows 11 and Windows 10.
You might already know about Command Prompt and PowerShell, two command-line utilities that come with most versions of Windows. Terminal is different for multiple reasons, but primarily because it’s a single program that provides developers with quick access to those tools and more.
Windows Terminal Features
Terminal looks pretty basic at first glance, but there are a handful of features that set it apart from other Windows command-line tools:
- Full screen mode
- Tabbed interface to open multiple instances of the tools
- Shortcut keys to quickly open new tabs
- Zoom with the mouse
- Unicode and UTF-8 character support permits the use of emoji and non-English characters
- GPU-accelerated text rendering engine
- Custom themes and styles can be created
- Stylus support
- Windows Subsystem for Linux (WSL), SSH, PowerShell, Command Prompt, and Azure Cloud Shell support
How to Use Windows Terminal
If you’re on Windows 11, there are several ways to open it:
- Search for Terminal from the Start menu
- Trigger it from the Power User Menu (WIN+X)
- Use the Run dialog box with the wt or cmd command (it fully replaces Command Prompt in W11)
- Right-click an empty space in any folder, and choose Open in Terminal.
Windows 10 users need to follow these steps to download it:
-
Download and install Terminal from the Microsoft Store.
-
Use the search bar at the bottom of Windows to find and select Terminal.
-
PowerShell will open. You can enter commands just like you would if you’d had opened Windows PowerShell directly.
-
To open another PowerShell tab, use the plus sign at the top of Windows Terminal. Or, to launch a different tool, select the down arrow and select Command Prompt or Azure Cloud Shell.
Editing Windows Terminal Settings
Changing the settings for Terminal is easy: Use the down arrow at the top of the program, and then select Settings.
There are a number of options you can customize there, like to switch to a different color scheme, edit how text looks, force Terminal to always stay on top of other windows, edit shortcuts, change the default starting directory, run as administrator automatically, and a lot more.
To edit additional settings, select Open JSON file from the bottom of that screen. The file settings.json will open in your default text editor (likely Notepad, but you can use a different text editor if you want).
Microsoft has directions for using the Settings JSON file. There are also example edits here.
Tips for Using Windows Terminal
The default shell is PowerShell, so every time you open Terminal, PowerShell will be the utility you see first (you can change this in the settings). This also means that the plus sign next to the tabs at the top of Terminal will always open PowerShell, regardless of the tool you’re currently using.
There are shortcut keys you can use to quickly open an item from the menu. These are the default key bindings for running these actions:
- Ctrl+Shift+1 opens Windows PowerShell
- Ctrl+Shift+2 opens Command Prompt
- Ctrl+Shift+3 opens Azure Cloud Shell
- Ctrl+Shift+F opens the find box
- Ctrl+, opens Settings
Use the Command Palette menu option (Ctrl+Shift+P) to see other shortcuts.
Terminal requires Windows 10 version 18362.0 or higher. If you can’t install it, update Windows to the latest version.
Thanks for letting us know!
Get the Latest Tech News Delivered Every Day
Subscribe
 Впервые новая оболочка для команд Windows 11 и Windows 10 была представлена в мае 2020, а уже осенью была выпущена первая стабильная версия. С тех пор Windows Terminal продолжает обновляться, но уже сейчас более чем пригоден к работе как с командной строкой или PowerShell, так и другими оболочками, например, Ubuntu, установленной в рамках WSL (Подсистема Windows для Linux).
В этом обзоре — базовые сведения о том, где скачать и как настроить Windows Terminal, о некоторых его возможностях и дополнительная информация, которая может оказаться полезной.
Где скачать Windows Terminal
Прежде чем приступить, два важных примечания: в Windows 11 Терминал Windows уже встроен (нажмите правой кнопкой мыши по кнопке Пуск и вы сможете его запустить), а для работы нового терминала в Windows 10 требуется версия 1903 или новее.
Бесплатно скачать Windows Terminal можно из двух официальных источников:
- Microsoft Store — достаточно ввести Windows Terminal в поиске магазина или перейти на страницу приложения https://www.microsoft.com/ru-ru/p/windows-terminal/9n0dx20hk701

- Загрузить последний релиз из GitHub, скачиваем файл .msixbundle из раздела Assets и устанавливаем его как обычное приложение — https://github.com/microsoft/terminal/releases/

После установки Windows Terminal готов к работе — можно запускать. При первом старте по умолчанию будет открыта вкладка с PowerShell.

Использование Windows Terminal, возможности управления
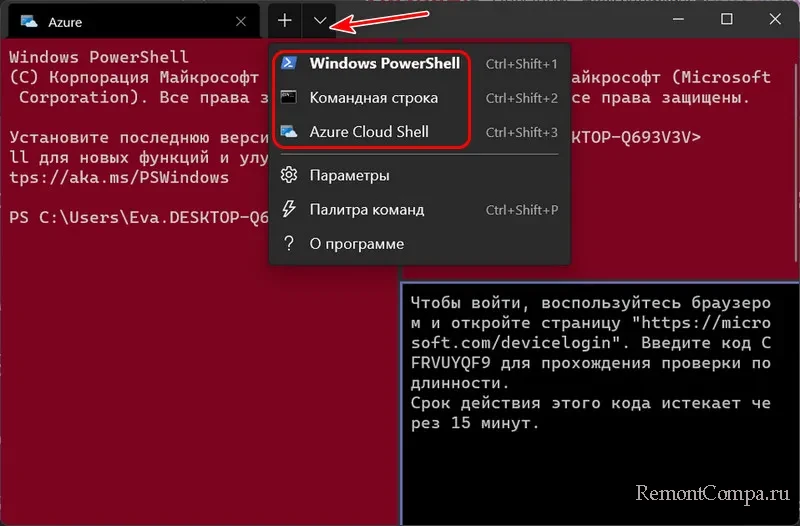
Скорее всего, с открытием новых вкладок с командной строкой, PowerShell и другими оболочками проблем не возникнет, достаточно нажать «+» если требуется открыть новую вкладку с консолью по умолчанию, либо по стрелке и выбрать нужную оболочку, там же можно увидеть и сочетания клавиш для быстрого открытия соответствующих новых вкладок.
Не будем торопиться с переходом к настройкам Windows Terminal, для начала некоторые вещи, которые вы можете сделать, не переходя к ним:
- Сочетания клавиш Ctrl + «+» и аналогичное сочетание с клавишей «минус» позволяет изменить размер текста в текущей вкладке.

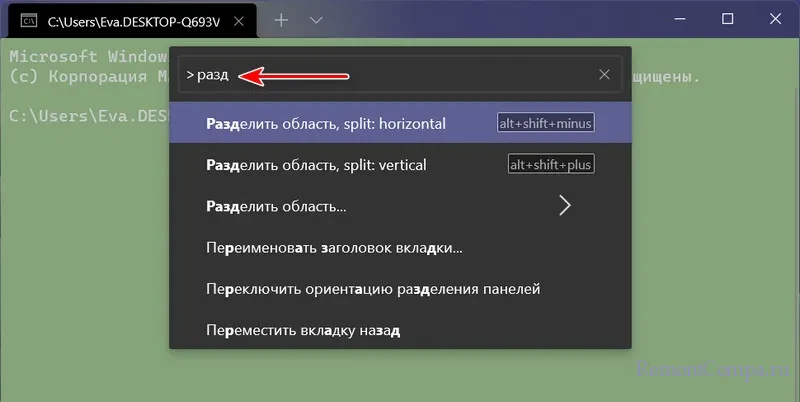
- Нажмите клавиши Alt+Shift+D, чтобы разделить текущую вкладку на две панели. Действие можно повторять: выделенная панель будет разделяться при нажатии этих клавиш. Если вместо D использовать клавишу «минус» или «плюс», разделение будет происходить горизонтально и вертикально соответственно.

- Для панелей доступны и другие клавиши: Ctrl+Shift+W — закрыть текущую, Alt+Shift+стрелки — изменение размеров, Alt+стрелки — переключение между панелями.
- Если в Windows включены эффекты прозрачности, удержание клавиш Ctrl+Shift и вращение колеса мыши вниз позволяет сделать активное окно Windows Terminal более прозрачным.
- Windows Terminal добавляет пункт в контекстное меню Windows, позволяющий быстро запустить оболочку по умолчанию в текущей вкладке.

- «Стандартные» сочетания клавиш, такие как копирование и вставка, отмена (Ctrl+Z) и другие здесь также исправно работают.
- Если вам нужно запустить Windows Terminal от имени администратора, можно использовать правый клик по нему в меню «Пуск» и выбор нужного пункта в разделе «Дополнительно» или, поиск в панели задач, как на изображении ниже.


Настройки
Зайти в настройки Windows Terminal можно, нажав по кнопке со стрелкой или же с помощью сочетания клавиш Ctrl + «запятая». Параметры меняются от версии к версии и на момент написания этого обзора выглядят следующим образом:

Большинство вкладок вполне понятны и на русском языке:
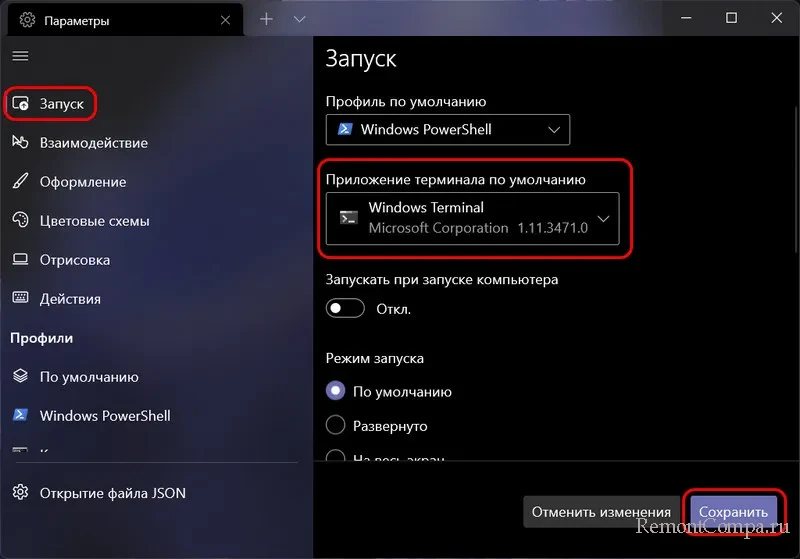
- На вкладке «Запуск» можно выбрать оболочку по умолчанию, например, выбрать «Командная строка» вместо «Windows PowerShell», включить автозапуск, изменить режим запуска.
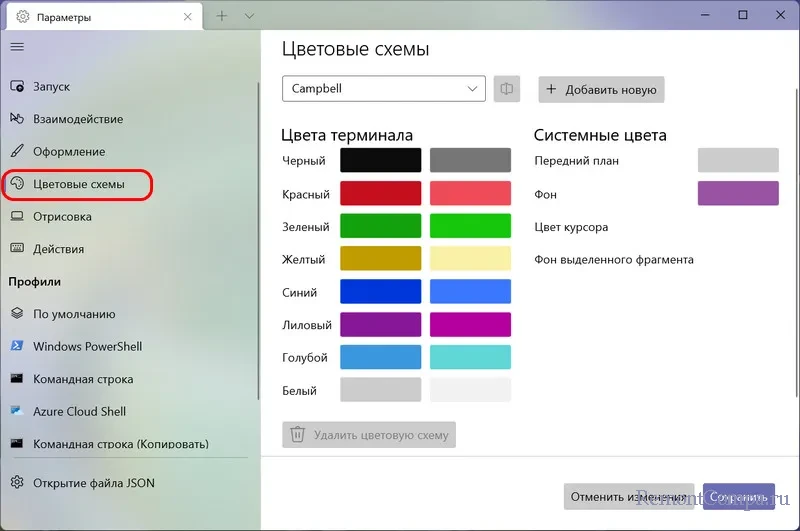
- Вкладки «Оформление» и «Цветовые схемы» позволяют изменить общие параметры оформления приложения, а также отредактировать цветовые схемы (их мы можем указать отдельно для каждой консоли в разделе «Профили»), при необходимости — создать собственную цветовую схему.
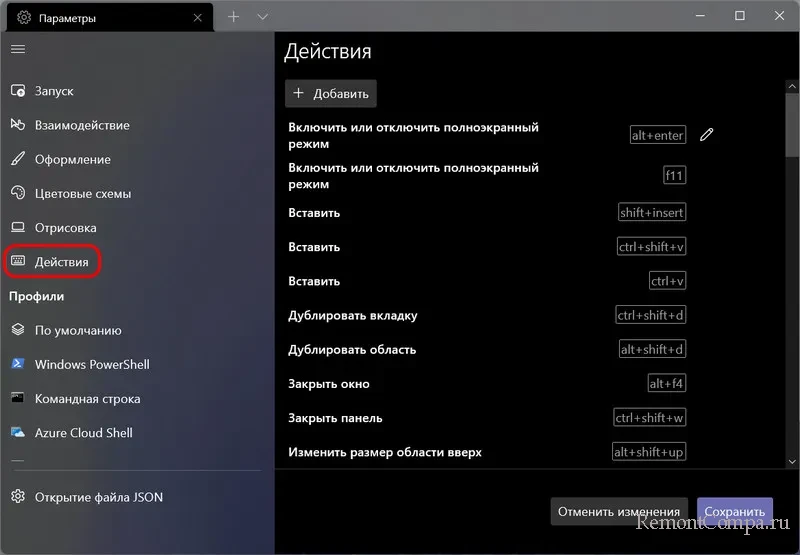
- В разделе «Действия» — базовые сочетания клавиш для работы в Windows Terminal. Эти сочетания подлежат редактированию в файле конфигурации.
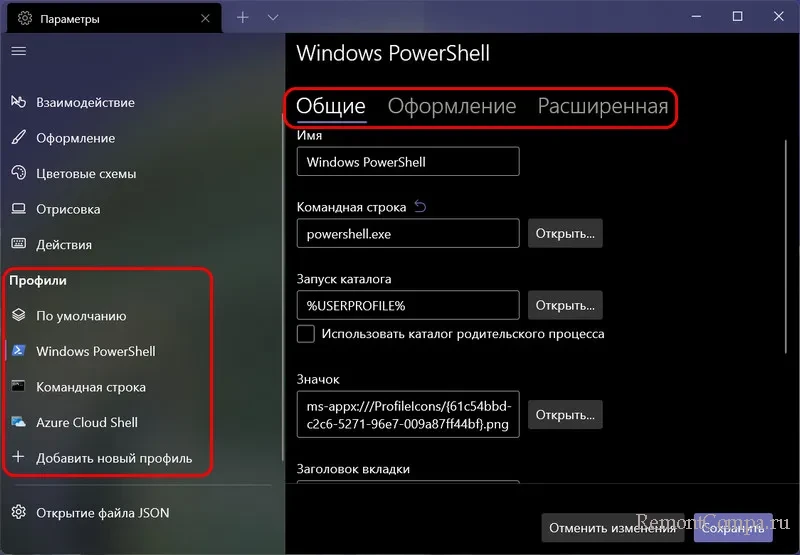
- Если перейти в подраздел «Профили», мы можем настроить отдельные параметры оформления, запуска, значка, папки запуска, прозрачности и другие для каждой «командной строки». В оформлении можно не только выбрать цветовую схему и настроить прозрачность (акриловый эффект), но и задать обои для соответствующих вкладок.

- Настройки в достаточной мере гибкие и скриншот ниже — далеко не всё, чего можно добиться.

- При нажатии кнопки «Добавить», вы можете добавить собственную консоль в Windows Terminal (или использовать системную — тот же PowerShell или Командную строку, но с другим профилем настроек).
- Кнопка «Открытие файла JSON» позволяет открыть файл конфигурации для редактирования.


Если после проделанных экспериментов с настройками вам потребуется сбросить все параметры Windows Terminal на настройки по умолчанию, достаточно проделать следующие шаги:
- Запустите Windows Terminal и перейдите в его параметры.
- Нажмите «Открытие файла JSON» и откройте его в текстовом редакторе.
- Удалите всё содержимое файла и сохраните файл.
- Закройте и снова запустите Windows Terminal — он будет запущен с настройками по умолчанию.
Download PC Repair Tool to quickly find & fix Windows errors automatically
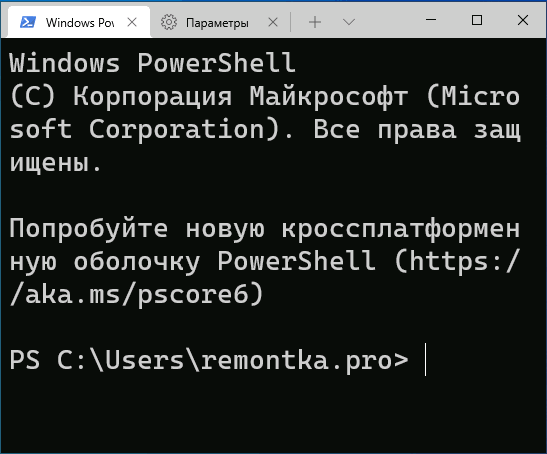
The Windows Terminal works as a cross-command-line tool platform for PC users. You can instantaneously use different command-line tools or profiles within this app. In this post, we will show you how to use Windows Terminal in Windows 10.
The WindowsTerminal app is now baked into the Windows 10 operating system and is generally available for everyone. WindowsTerminal can be installed or updated via Microsoft Store, as required.
We’ll explore this topic under the methods outlined below in this section as follows.
Open Windows Terminal

To open WindowsTerminal on your Windows 10 device, you can use Windows Search or use Cortana to locate and open it. You can also use right-click context menu to open an item in Terminal. The Open in Windows Terminal option will be appearing on supported items only. It will help you to quickly access the Terminal app.
The quickest approach to open Windows Terminal if you use it frequently is to Pin Windows Terminal to Taskbar as the first item. You could then press Win+Ctrl+Shift+1 keyboard shortcut combination to open WindowsTerminal with admin privilege.
You can also launch Windows Terminal from the Command Prompt or via the Windows Run dialog – to do this simply open CMD prompt OR press Windows key + R to invoke the Run dialog box, and then type wt and hit Enter.
Another way to launch the Terminal app in Windows 10 is to invoke the Run dialog, and then type or copy and paste the environment variable below into the box and hit Enter.
%LocalAppData%MicrosoftWindowsAppswt.exe
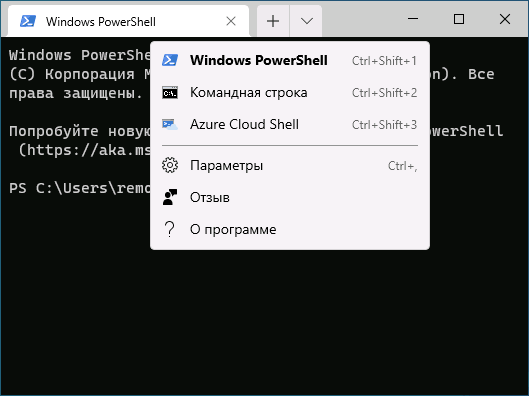
Switching between different profiles in WindowsTerminal

The Windows Terminal app, by default, opens with a Windows PowerShell profile. If you click the plus (+) sign, then another Windows PowerShell tab will open.
To switch to other profiles, such as Command Prompt etc., you can click on the chevron (the downward-facing arrowhead) over the Tab bar and click the profile you want to switch.
This post will show you how to use the Search function in Windows Terminal.
Read: How to run a Profile as Administrator in Windows Terminal
Change WindowsTerminal settings

You can customize the Windows Terminal app to your liking. You can click on the chevron over the Tab bar and select Settings. Alternatively, you can press Ctrl+, key combination.
In the Terminal Settings tab, you can personalize your preferences like changing the cursor shape, enabling a Transparent Background, setting a Background Image, changing font size and font-weight, changing the Default Shell and save them.
Troubleshoot Windows Terminal problems
If the Terminal app is not working due to heavy customizations or you just want the default settings back, you can reset Windows Terminal via its Settings page or since Terminal app is a UWP app, you can also reset the app via the Settings app on your Windows 10 PC. Alternatively, you can reset the Terminal app using PowerShell.
Other troubleshooting you can try is to sign out of Windows 10 and then sign in the back or restart your system.
If nothing helps you can always uninstall and reinstall Windows Terminal.
Want more? Take a look at this Windows Terminal Tips and Tricks post.

Obinna Onwusobalu has studied Information & Communication Technology and is a keen follower of the Windows ecosystem. He has been a Windows Insider MVP (2020). He runs a computer software clinic.
В этой публикации, друзья, поговорим об одной значимой новинке Windows 11, но значимой не для массового пользователя, а лишь для системщиков-профессионалов и отдельных опытных пользователей. В Windows 11 в числе штатных средств появилось новое консольное приложение в довесок к имеющимся приложениям командной строки и PowerShell, унаследованным от Windows 10 и ранних версий операционной системы. Эта новинка – интегрированное приложение Windows Terminal, приложение-терминал, современное консольное приложение, являющее собой комплексную среду для работы с командной строкой (CMD), PowerShell, подсистемой Windows для Linux (WSL) и Azure Cloud Shell. Windows Terminal – это современный терминал с поддержкой вкладок, с рендерингом текста, настраиваемый в плане оформления интерфейса и поведения, с поддержкой горячих клавиш. Давайте посмотрим, что являет собой Windows Terminal в Windows 11.
Итак, друзья, Windows Terminal – интегрированное в Windows 11 консольное приложение современного формата.
Windows Terminal – это образцово-показательный пример, как сегодня, в эпоху доминирования программ в расчёте на массового пользователя, в эпоху доминирования графического интерфейса может выглядеть консольное приложение, казалось бы, рудимент IT. Это новый взгляд на старые вещи, и это взгляд компании Microsoft, которая не просто взяла и сделала современную консоль. Но создала проект с исходным кодом современной консоли, пригласила желающих присоединиться к его разработке и продолжает развивать проект параллельно с массовым использованием, давая ему шанс на ещё большую эволюцию. Проект с открытым исходным кодом и свободной лицензией Windows Terminal компания Microsoft представила на конференции разработчиков в 2019 году. Коды проекта выложены на GitHub, любой желающий программист может присоединиться к разработке.
Windows Terminal – это современное приложение, которое изначально создавалось для Windows 10, в эту операционную систему его можно установить из Microsoft Store. В Windows 11 Microsoft решила интегрировать Windows Terminal. Современный терминал поставляется в числе штатного функционала новой операционной системы, его можно запустить в меню «Пуск», через поиск, а также в контекстном меню на рабочем столе, это меню содержит пункт «Открыть в терминале Windows».
Если у Microsoft ранее и возникали идеи осовременить системную командную строку, они, очевидно, не доходили даже до ранней стадии реализации по причине нецелесообразности таких идей. Кое-как в процессе эволюции Windows Microsoft всё же командную строку улучшала, много новых возможностей она получила в рамках совершенствования Windows 10. Но компания, скорее всего, не видела, как можно кардинально преобразить столь плоский инструмент, как командная строка. Но увидела это в комплексе улучшений для всех консольных приложений Windows – PowerShell, подсистемы Linux и прочих. Создать консоль с современными возможностями, которая охватывала бы несколько консольных инструментов и предлагала бы единый интерфейс для работы с ними – это годная идея, даже как идея сама по себе. И с реализацией, как видим, компания не облажалась, она пошла по проторённому пути PowerShell, также проекта с открытым исходным кодом, стартовавшим в 2016 году. Пошла по пути наибольшей целесообразности в создании такого рода продуктов — если хочешь что-то создать для профи, спроси у него, как или дай ему самому это сделать.
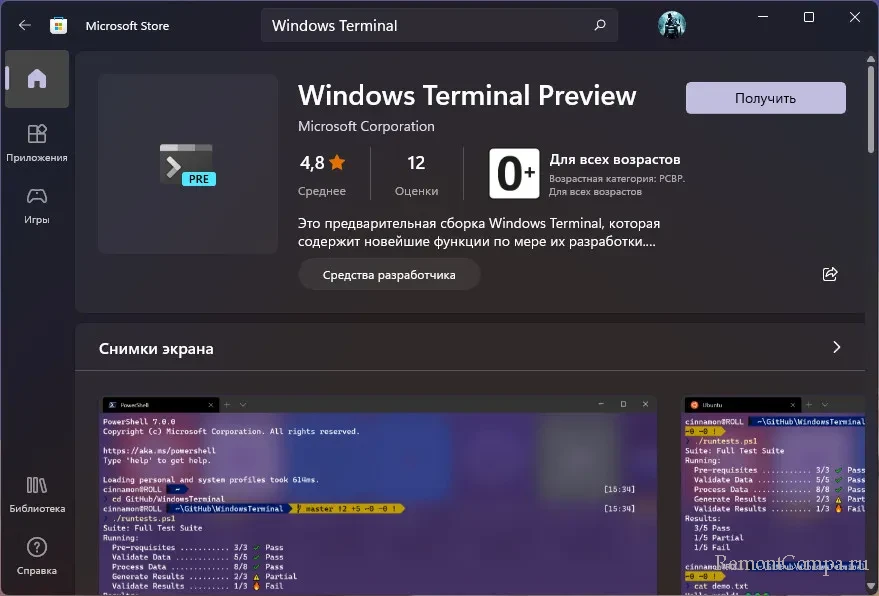
Поскольку Windows Terminal – это живой разрабатываемый проект, наряду с его стабильной версией, интегрированной в Windows 11 и устанавливаемой из Microsoft Store в Windows 10, существует тестовая предварительная версия Windows Terminal Preview. Её можно установить в Windows 10 и 11 из Microsoft Store и использовать новейшие возможности приложения.
Ну и давайте непосредственно о самом терминале. Windows Terminal – это современное, производительное и эффективное консольное приложение, являющее собой единый интерфейс для командной строки (CMD), PowerShell, подсистемы Windows для Linux (WSL) и Azure Cloud Shell. По умолчанию в современном терминале открывается PowerShell, выбор других инструментов предусмотрен в меню.
Из ключевых возможностей Windows Terminal:
- Поддержка множества вкладок и многопанельного вида;
- Полная поддержка Юникода и UTF-8;
- Рендеринг текста с GPU-ускорением;
- Настраиваемость интерфейса;
- Команды управления терминалом;
- Широкий перечень поддержки горячих клавиш.
Давайте посмотрим на ключевые возможности современного терминала.
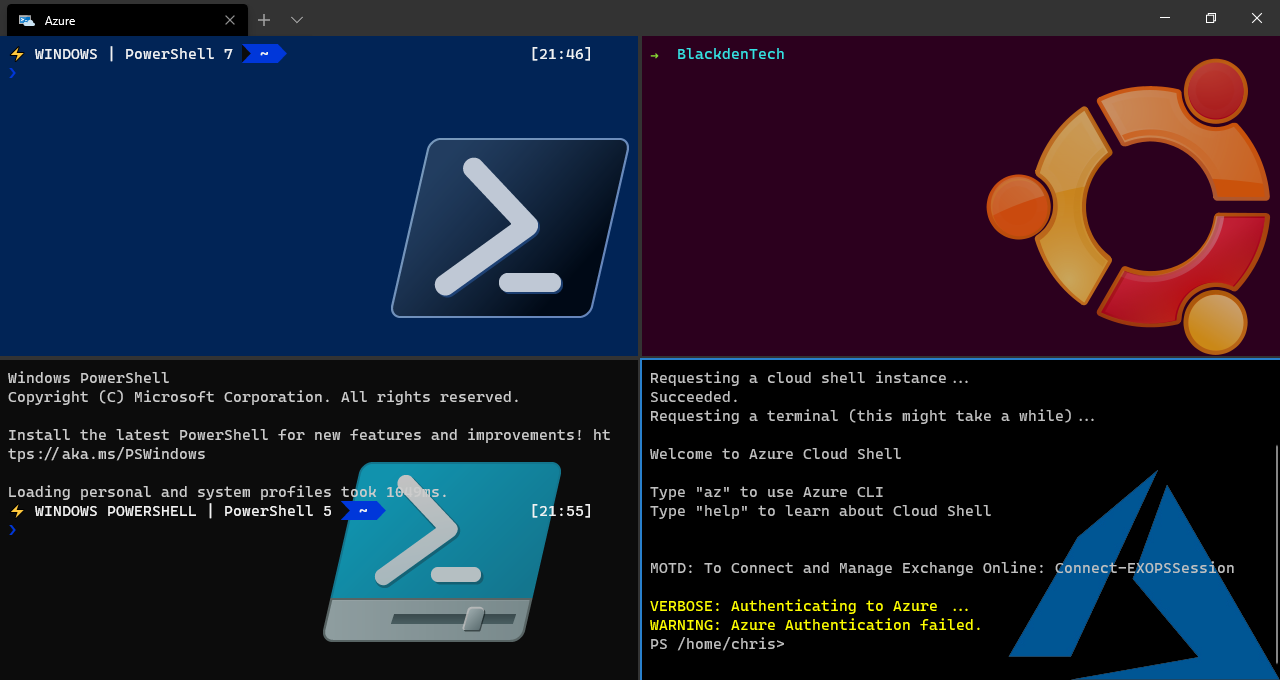
Наиболее значимая фишка Windows Terminal – поддержка многовкладочности, это самая часто запрашиваемая функция для консольных приложений Windows. В разных вкладках терминала можно открывать разные консольные инструменты и разные их сеансы. Но Microsoft сделала даже больше: она реализовала возможность открытия разных инструментов и их сеансов внутри вкладки, в разделённых панелях по типу многопанельных файловых менеджеров. Используя команды управления или функцию разделения вкладки в её контекстном меню, можем делить вкладку на две, три или более панели и работать с несколькими сеансами текущего консольного инструмента.
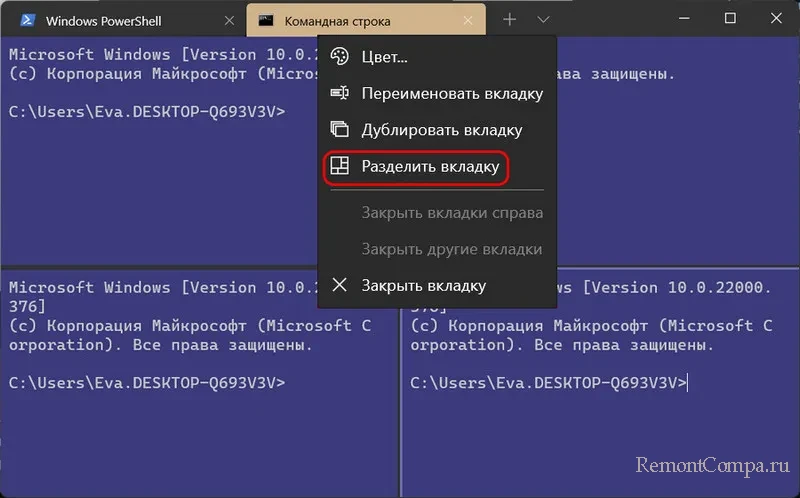
А можем открыть в панелях другие консольные инструменты. Для этого их необходимо запустить текущей вкладке с зажатой клавишей Alt.
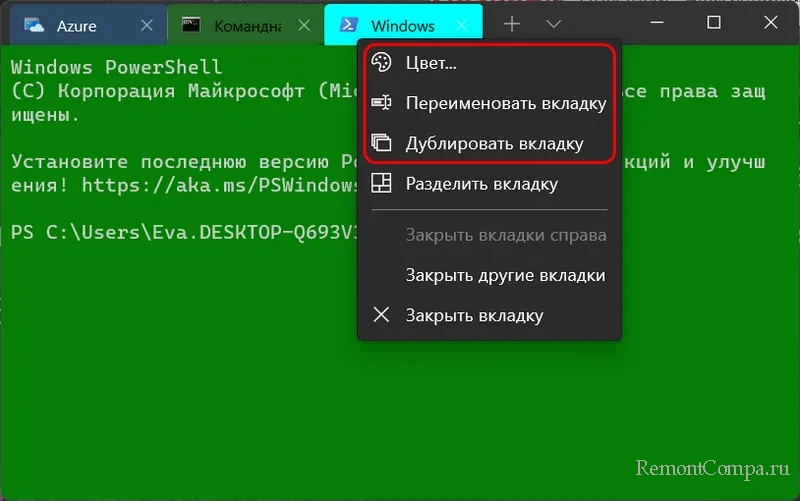
Вкладки можно дублировать, переименовывать назначать им цвета.
В Windows Terminal используется современный производительный движок рендеринга текста с GPU-ускорением. Он отображает любые символы и смайлы, присутствующие в шрифтах Windows.
У Windows Terminal гибко настраиваемый внешний вид, он настраивается в параметрах приложения. Будучи современным, приложение предусматривает светлую и тёмную тему оформления, по умолчанию подвязанную к системной теме оформления Windows 11. У терминала несколько тем внутреннего оформления с разными расцветками фона, текста и прочих моментов, эти темы можно кастомизировать.
Для лучшего внешнего вида можно включить эффект акрила в верхней панели. Есть возможность установить ширину вкладки приложения, сделать так, чтобы терминал был поверх остальных окон и т.п.
Современный терминал при необходимости может автоматически копировать выделенный фрагмент в буфер обмена, отображать текст с форматированием и без, переводить фокус на панели при помещении в них курсора. Может запускаться вместе с компьютером, при своём запуске может переходить в разный режим – полноэкранный, свёрнутый и т.п., для запуска можно даже настроить статичный размер окна. Для Windows Terminal можно сменить консольный инструмент, запускаемый по умолчанию. Таким является, как упоминалось, PowerShell, и вместо него можем установить командную строку или прочие инструменты. Также можем установить современный терминал приложением по умолчанию для командной строки. Таковым сам он станет в следующем году в Windows 11, как заявила недавно Microsoft. Пока же это делается в параметрах запуска терминала.
Одна из интересных возможностей Windows Terminal – профили. Это шаблоны запуска консольных инструментов. Их можно настраивать для запуска от имени разных пользователей, с разными процессами и сценариями, с разными заголовками вкладок, с разными темами оформления и расширениями.
И ещё одна примечательная функция Windows Terminal – «Палитра команд».
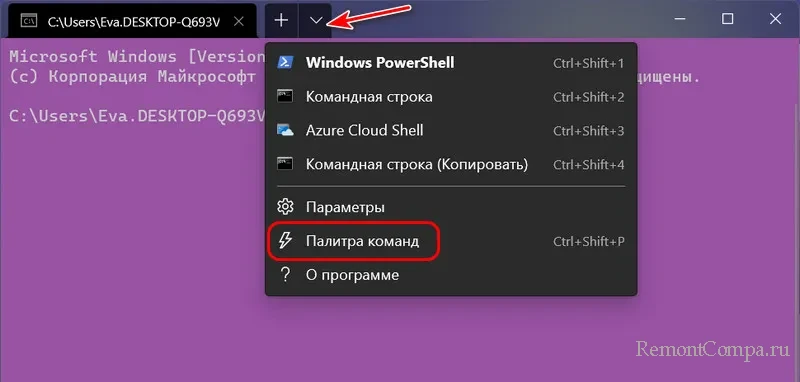
Всё, что не реализовано в графическом интерфейсе приложения, выполняется в масть самой консоли – с помощью команд. Команды управления терминалом расположены в алфавитном порядке, есть возможность поиска по ключевым словам. Рядом с командами значатся горячие клавиши, которые отвечают за эти команды.
Возможность оперирования горячими клавишами в Windows Terminal реализована максимально широко. В разделе параметров «Действия» можно настроить свои горячие клавиши на существующие команды управления приложением и на те, для которых клавиши не предустановлены.
Вот такой, друзья, современный терминал есть в штате Windows 11. Не всё гладко с этим приложением, есть ещё некоторые недоработки, но проект развивается и с надеждой идёт в будущее. Детально о возможностях Windows Terminal можно почитать на сайте документации Microsoft.
На чтение 11 мин Просмотров 2.9к. Опубликовано 07.04.2021
В этой статье мы рассмотрим Терминал Windows, идеальное дополнение к WSL2. Он быстрый, настраиваемый, отлично выглядит и предлагает все преимущества разработки как для Windows, так и для Linux.
Windows полностью приняла Linux, и WSL2 делает это безупречным.
К терминалу вашего дистрибутива можно получить доступ:
- щелкнув значок меню Пуск
- ввод wsl или bash в Powershell или командной строке
- с помощью стороннего терминала, такого как Cmder, ConEmuи Hyper с профилем, который запускает%windir%system32bash.exe ~
- установка Linux в качестве оболочки по умолчанию в VS Code, нажав Ctrl+ Shift+ Pи набрав / выбрав Терминал: выберите оболочку по умолчанию и выберите WSL Bash.
Терминал Windows (загружаемый из Microsoft Store) предлагает дополнительный выбор, но вы не пожалеете об его установке. Новые возможности приложения:
- поддержка WSL2, SSH, Powershell, cmd и других командных строк
- несколько вкладок и разделенных панелей
- настраиваемые темы, фоновые изображения и эффекты прозрачности
- окно поиска
- пользовательские привязки клавиш
- Рендеринг текста с ускорением на GPU
- красивый новый шрифт Cascadia Code
- низкое использование ресурсов (обычно 10 МБ на вкладку)
- автоматическое обновление (при использовании Microsoft Store)
Содержание
- Как установить терминал Windows
- Начало работы с терминалом Windows
- Управление вкладками и панелями
- Размер текста
- Прокрутка
- Поиск
- Скопировать и вставить
- Настройки
- Глобальные настройки
- Настройки профиля
- Настройки цветовой схемы
- Настройки привязки клавиш
- Параметры командной строки
- Примеры
- Заключение
Как установить терминал Windows
Самый простой способ установить Терминал Windows — через Microsoft Store:
ms-windows-store://pdp/?ProductId=9n0dx20hk701
Если эта ссылка не работает, попробуйте открыть Microsoft Store в своем браузере или запустить приложение Microsoft Store из меню «Пуск» Windows и выполнить поиск по запросу «Терминал».
Примечание: будьте осторожны, чтобы не выбрать более раннее приложение «Windows Terminal Preview».

Нажмите » Получить» и подождите несколько секунд для завершения установки.
Если у вас нет доступа к Магазину, вы можете загрузить последнюю версию с GitHub.
Windows Terminal значок приложения теперь доступны в меню Пуск в Windows. Для облегчения доступа щелкните значок правой кнопкой мыши и выберите » Закрепить на начальном экране» или » Еще», а затем — » Закрепить на панели задач«.
Начало работы с терминалом Windows
При первом запуске Windows Terminal запускается с Powershell в качестве профиля по умолчанию. Выпадающее меню доступно для запуска других вкладок и доступа к настройкам :

Терминал автоматически генерирует профили для всех установленных вами дистрибутивов WSL и оболочек Windows, хотя можно отключить генерацию в глобальных настройках.
Управление вкладками и панелями
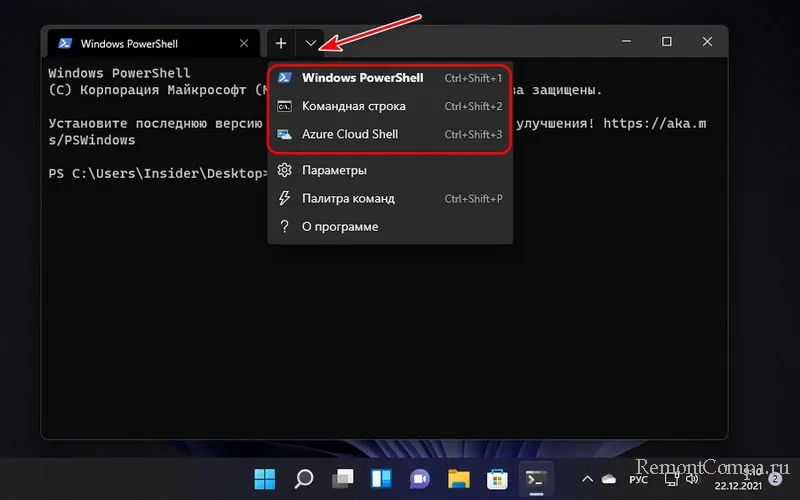
Откройте новую вкладку для профиля по умолчанию, нажав на + или значок Ctrl+ Shift+ T. Чтобы открыть вкладку для другого профиля, выберите ее из раскрывающегося меню или нажмите Ctrl+ Shift+ N, где N — номер профиля.
Нажмите Alt+ Shift+, D чтобы продублировать и разделить панель. Активная панель делится на две части по самой длинной оси при каждом использовании:

Чтобы принудительно создать:
- вертикальная панель, нажмите Alt+ Shift+ +или
- горизонтальная панель, нажмите Alt+ Shift±
Чтобы открыть другой профиль на новой панели, удерживайте Altклавишу при выборе его в раскрывающемся меню.
Удерживайте Altи используйте клавиши курсора для переключения между активными панелями с клавиатуры. Размер панели можно настроить, удерживая Alt+ Shiftи используя клавиши курсора для соответствующего изменения размера.
Вкладки можно переименовать, дважды щелкнув текст. Вы также можете изменить имя или цвет, щелкнув вкладку правой кнопкой мыши и выбрав пункт меню:

Это влияет только на текущую вкладку, он не меняет профиль навсегда.
Чтобы закрыть активную панель или вкладку, нажмите Alt+ Shift+ Wили введите стандартную команду выхода терминала (обычно exit).
Размер текста
Размер текста активного терминала можно изменить с помощью Ctrl+ +и Ctrl+ -. Также можно удерживать Ctrlи прокручивать колесико мыши.
Прокрутка
Используйте полосу прокрутки для навигации по выводам терминала. Либо удерживайте Ctrlи нажимайте курсор вверх, курсор вниз Page Upили Page Downдля навигации с помощью клавиатуры.
Поиск
Нажмите Ctrl+ Shift+, F чтобы открыть окно поиска:

Введите любой термин, затем используйте значки вверх и вниз для поиска вывода терминала. Щелкните Aaзначок, чтобы активировать или деактивировать соответствие с точным регистром.
Скопировать и вставить
По умолчанию копирование и вставка привязаны к Ctrl+ Shift+ Cи Ctrl+ Shift+ Vсоответственно, хотя Ctrl+ Cи Ctrl+ Vтакже будут работать.
Примечание: будьте осторожны, так как Ctrl+ Cможет завершить работу приложения Linux, поэтому Shiftрекомендуется использовать.
Параметр автоматического копирования при выборе доступен в глобальных настройках, и вы также можете вставить текущий элемент буфера обмена, щелкнув правой кнопкой мыши.
Настройки
Доступ к настройкам осуществляется из раскрывающегося меню или Ctrl+,(запятая). Конфигурация определяется в одном settings.jsonфайле, поэтому вам может быть предложено выбрать текстовый редактор. VS Code — отличный выбор, хотя Блокнот подойдет, если вы хотите редактировать без цветового кодирования и проверки синтаксиса.
settings.json элементы управления:
- глобальные настройки, которые применяются ко всем профилям
- настройки профиля, которые определяют профили
- пользовательские настройки цветовой схемыи
- настройки привязки клавиш
Файл имеет следующий формат:
// This file was initially generated by Windows Terminal
{

  // general settings, e.g.
  "initialRows": 40,

  // profile settings
  "profiles":
  {

    "defaults":
    {
      // settings that apply to all profiles
    }
    "list":
    [
      // list of individual profiles, e.g.
      {
        "guid": "{81d1dceb-c123-5678-90a1-123abc456def}",
        "name": "Windows PowerShell",
        "commandline": "powershell.exe"
      },
      {
        "guid": "{91d1dceb-c123-5678-90a1-123abc456def}",
        "name": "Ubuntu",
        "source": "Windows.Terminal.Wsl"
      }
    ]

  }

  // custom color schemes, e.g.
  "schemes": [
    {
      "name": "My new theme",
      "cursorColor": "#FFFFFF",
      "selectionBackground": "#FFFFFF",
      "background" : "#0C0C0C",
      "foreground" : "#CCCCCC"
    }
  ],

  // custom key bindings, e.g.
  "keybindings:
  [
    { "command": "find", "keys": "ctrl+shift+f" }
  ]

}
Значения по умолчанию определены в defaults.json. Откройте его, удерживая нажатой Altкнопку » Настройки» в раскрывающемся меню.
Предупреждение: не меняйте файл по умолчанию! Используйте его для просмотра настроек по умолчанию и, при необходимости, для добавления или изменения настройки в settings.json.
Глобальные настройки
Следующие глобальные настройки являются наиболее полезными, хотя другие задокументированы в документации Терминала.
«defaultProfile» определяет GUID профиля, который используется по умолчанию при запуске Windows Terminal.
Установите «copyOnSelect»для trueавтоматического копирования выделенного текста в буфер обмена без необходимости нажимать Ctrl+ Shift+ C.
Установите, «copyFormatting»чтобы falseпросто копировать простой текст без какого-либо стиля. (Хотелось бы, чтобы это было по умолчанию для всех приложений!)
Задайте «initialColumns»и «initialRows«равным количеству знаков для горизонтального и вертикального размеров.
«tabWidthMode» может быть установлен на:
- «equal»: каждая вкладка одинаковой ширины (по умолчанию)
- «titleLength»: каждая вкладка устанавливается равной ширине ее заголовка, или
- «compact»: неактивные вкладки уменьшаются до ширины их значка.
«disabledProfileSources«устанавливает массив, который предотвращает автоматическое создание профилей. Например:
  "disabledProfileSources": [
    "Windows.Terminal.Wsl",
    "Windows.Terminal.Azure",
    "Windows.Terminal.PowershellCore"
  ],
Это отключит все сгенерированные профили; удалите те, которые хотите сохранить.
Настройки профиля
Новые профили определяются создания группы объектов в «profiles», «list«массиве. Пример WSL2 Ubuntu:
{
  "guid": "{91d1dceb-c123-5678-90a1-123abc456def}",
  "name": "Ubuntu",
  "source": "Windows.Terminal.Wsl",
  "startingDirectory": "//wsl$/Ubuntu/home/username/",
  "colorScheme": "Tango Dark",
  "useAcrylic": true,
  "acrylicOpacity": 0.75,
  "hidden": false
},
Каждый профиль определяется со следующими настройками:
| параметр | описание |
| «guid» | уникальный идентификатор (обязательно). Для новых профилей вы можете сгенерировать GUID онлайн на сайте guidgen.com. |
| «source» | генератор профилей. Это используется только в том случае, если профиль был добавлен автоматически, и его нельзя редактировать. |
| «commandline» | исполняемый файл для запуска, если установлено no «source». Например, это может быть команда SSH, такая как»ssh yourname@domain.com» |
| «startingDirectory» | каталог, в котором запускается оболочка. Для дистрибутивов WSL лучше всего указать, «//wsl$/Ubuntu/home/username/»где usernameпользователь создается во время установки. |
| «name» | имя профиля, отображаемое в раскрывающемся меню |
| «tabTitle» | имя, показанное в заголовке вкладки |
| «suppressApplicationTitle» | установить trueдля принудительного использования «tabTitle»или «name»в bash |
| «icon» | полный путь к значку, показанному в раскрывающемся списке и на вкладке, например «C:/images/tux.png». 24-битные PNG — лучший вариант; к сожалению, SVG не поддерживаются |
| «hidden» | если установлено true, профиль не отображается в раскрывающемся меню |
| «fontFace» | использовать определенный шрифт |
| «fontSize» | использовать конкретное целое число размера шрифта |
| «fontWeight» | используйте шрифт определенного веса. Это может быть OpenType целое число или ключевое слово: «normal», «thin», «extra-light», «light», «semi-light», «medium», «semi-bold», «bold», «extra-bold», «black»,»extra-black» |
| «padding» | отступ вокруг текста на краю окна. Можно установить одно, два или четыре значения с разделителями-запятыми, например, «1, 2, 3, 4″установить левое, верхнее, правое и нижнее соответственно. |
| «antialiasingMode» | метод сглаживания. Установите «grayscale»(по умолчанию) «cleartype», или»aliased» |
| «cursorShape» | тип курсора. Установите «bar»(по умолчанию), «vintage», «underscore», «filledBox», или»emptyBox» |
| «cursorHeight» | высота «vintage»курсора, определяемая как целое число от 25до100 |
| «cursorColor» | цвет курсора, определенный как «#rgb»или»#rrggbb» |
Наконец, добавьте «experimental.retroTerminalEffect»: trueв профиль ретро-эффект ЭЛТ!

Настройки цветовой схемы
Каждому профилю «colorScheme«можно присвоить имя любой цветовой схемы, включенной в defaults.json. Например:
«Campbell»:

«Campbell Powershell»:

«One Half Dark»:

«One Half Light»:

«Tango Dark»:

«Tango Light»:

«Vintage»:

Создайте свою собственную цветовую схему
Ваши собственные объекты схемы могут быть определены в «schemes«массиве в формате settings.json. Каждый цвет определяется шестнадцатеричным значением. Например:
"schemes": [
  {
    "name": "My New Theme",
    "foreground": "#EEEEEE",
    "background": "#111111",
    "cursorColor": "#FFFFFF",
    "black": "#000000",
    "red": "#CC0000",
    "green": "#4E9A06",
    "yellow": "#C4A000",
    "blue": "#3465A4",
    "purple": "#75507B",
    "cyan": "#06989A",
    "white": "#EEEEEE",
    "brightBlack": "#555753",
    "brightRed": "#EF2929",
    "brightGreen": "#8AE234",
    "brightYellow": "#FCE94F",
    "brightBlue": "#729FCF",
    "brightPurple": "#AD7FA8",
    "brightCyan": "#34E2E2",
    "brightWhite": "#FFFFFF"
  }
],
Затем схему можно использовать, добавив ее «name» в «colorScheme«настройки профиля. Например:
"colorScheme": "My New Theme"
Настройки привязки клавиш
«keybindings»Массив в settings.jsonпереопределениях или дополнениях клавиша по умолчанию, установленный в defaults.json. Каждая привязка клавиш определяется как объект с «command«комбинацией клавиш и «keys». Например:
// Ctrl + Shift + F to open the search box
{ "command": "find", "keys": "ctrl+shift+f" },
В некоторых случаях это «command»может быть приложение «action«с одним или несколькими аргументами. Например:
// Ctrl + Shift + 1 to open the first profile in a new tab
{
  "command": { "action": "newTab", "index":  },
  "keys": "ctrl+shift+1"
},
«keys»Значение принимает модификаторы ctrl+, shift+и alt+затем:
| тип | ключи |
| функциональные клавиши | f1-f24 |
| буквенно-цифровые клавиши | a-z, 0-9 |
| символьные клавиши | -, =, [, ], , ;, ‘,,,.,/ |
| клавиши курсора | down, left, right, up, pagedown, pageup, pgdn, pgup, end, home,plus |
| клавиши действий | tab, enter, esc, escape, space, backspace, delete,insert |
| клавиши цифровой клавиатуры | numpad_0-numpad_9, numpad0-numpad9, numpad_add, numpad_plus, numpad_decimal, numpad_period, numpad_divide, numpad_minus, numpad_subtract,numpad_multiply |
Например, если вы хотите открыть поле поиска с помощью Ctrl+ F, вы можете добавить строку в «keybindings«массив в settings.json:
"keybindings":
[
  { "command": "find", "keys": "ctrl+f" }
]
Поле поиска также откроется с Ctrl+ Shift+, Fпотому что этот параметр определен в defaults.json-, если вы не назначите комбинацию клавиш другой команде.
Параметры командной строки
Терминал Windows можно запустить с ярлыка или с любого терминала Windows или Linux, запустив его wt.exe. Поддерживаются следующие варианты:
| вариант | описание |
| —help, -h, -?,/? | отображает справку |
| —maximized, -M | запуск максимизирован |
| —fullscreen, -F | запускать в полноэкранном режиме |
Вы также можете передать список команд, разделенных точкой с запятой. Команды используются для определения новых вкладок и панелей с дополнительными параметрами управления:
| команда | параметры | описание |
| new-tab | —profileили -p, —startingDirectoryили -d, commandline,—title | открыть новую вкладку |
| split-pane | —horizontalили -H, —verticalили -V, —profileили -p, —startingDirectoryили -d, commandline,—title | открыть новую панель |
| focus-tab | —target или же -t | сфокусировать вкладку |
Примеры
Следующие примеры необходимо запускать из стандартной cmdкомандной строки или ярлыка.
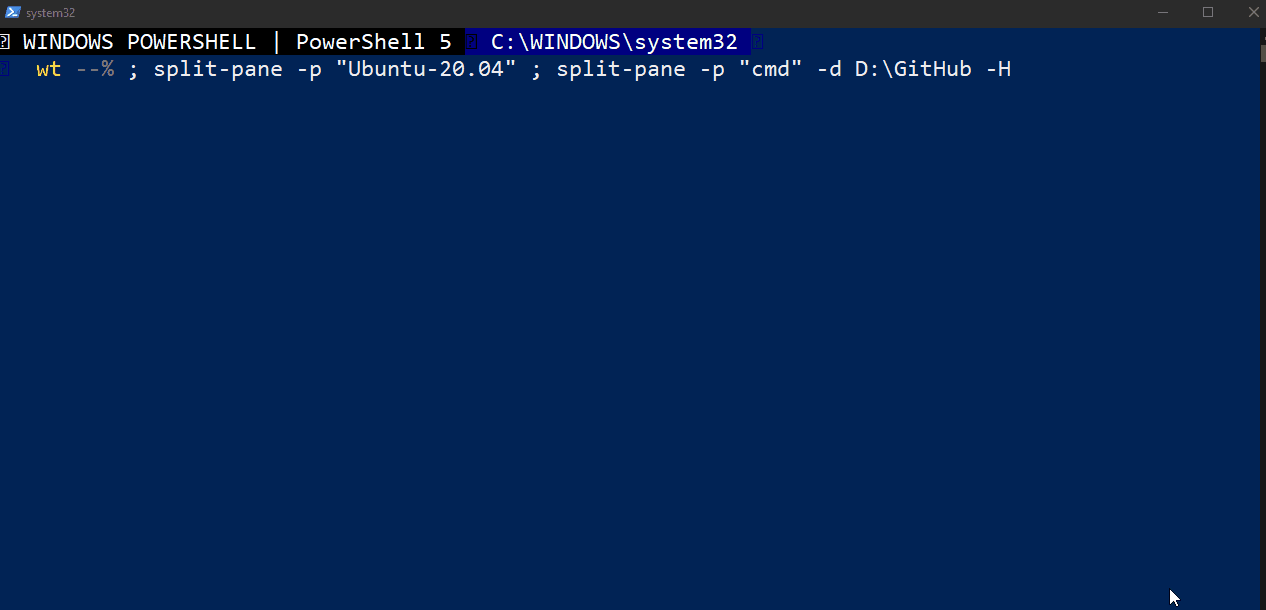
Открыть терминал для Windows с Ubuntuи Windows Powershellзакладками:
wt -p "Ubuntu" ; new-tab -p "Windows PowerShell"
Откройте Windows Terminal с Ubuntu, Windows Powershell, и Command Promptпрофили в отдельных областях:
wt -p "Ubuntu" ; split-pane -V -p "Windows PowerShell" ; split-pane -H -p "Command Prompt"

Дополнительные примеры запуска Windows Terminal из оболочки Linux или Powershell доступны в документации Windows Terminal.
Заключение
Надеюсь, вам понравилось это введение в Windows Terminal. Как уже было сказано, это идеальное дополнение к WSL2. Он быстрый, настраиваемый, отлично выглядит и предлагает все преимущества разработки как для Windows, так и для Linux.
Developing software is a finicky job. At the end of the day, the entire job is about writing instructions in a strange language for a picky interpreter that will shut down everything you’ve worked on. Well, it’s time to install Windows Terminal and discover a better way.
Not a reader? Watch this related video tutorial!
Not seeing the video? Make sure your ad blocker is disabled.
In this Ultimate Guide, you’re going to learn about one of the best consoles around for developers; the Windows Terminal. You’re going to get a full rundown of nearly all features of Windows Terminal. You will learn how it can help you get things on Windows at the command line.
Windows Terminal enhances the console experience with modern terminal features like tabs, panes, and even background images. You can even have a full Linux shell running alongside Windows PowerShell or cmd.exe without having to switch between console sessions.
This article will be a walkthrough on many Windows Terminal capabilities. It will be a hands-on tutorial throughout so be prepared to get to work!
Prerequisites
The requirements to install and use the Windows Terminal itself are pretty basic. All you need is a Windows 10 machine with build 1903 (May 2019) or later. If you want to follow along with all of the demos in this article, you’ll need a few other tools installed as well:
- The Windows Subsystem for Linux (WSL) feature enabled with a Linux distribution installed (all demos shown are using Ubuntu 20.04)
- Visual Studio Code (VS Code)
- Python with the rich text library installed
- Visual Studio 2019 or later with:
- The Windows 10 1903 SDK installed
- The Desktop Development with C++ Component Installed
- The Universal Windows Platform Development Component Installed
- The C++ (v142) Universal Windows Platform Tools Component Installed
Terminal vs. Console vs. Shell
Because we’ll be covering many terms in this article, it’s important to first get a grasp on some terminology differences so you don’t get confused.
Even though the concepts are similar, it’s important to note that a terminal is not a console is not a shell. Each has its own specific purpose. Scott Hanselman has a great blog post on the definitions of each, but here is how they’ll be used in this article:
- Terminal: The Windows Terminal application.
- Console: Any console host application that is not the Windows Terminal.
- Shell: The program between the terminal and the operating system. (pwsh, cmd, zsh, etc.)
Install Windows Terminal
There are a few different ways to install Windows Terminal, but the easiest by far (and the Microsoft-recommended way) is to install it from the Microsoft Store. There are two different versions you can download; the standard Windows Terminal and the Windows Terminal Preview.
For the purposes of this article, you can use either one. The installation is straightforward so we won’t cover that in this article and will assume you’ve already installed it.
When you open up Windows Terminal for the first time, it doesn’t look or feel impressive. There are a lot of tweaks you’ll have to make to get there, but it all starts with a window like this one below.
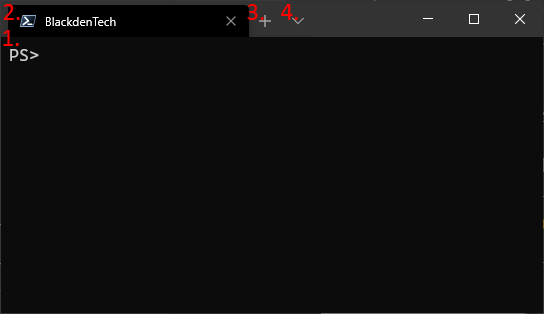
Notice that the Windows Terminal has four primary components:
- Terminal Window – Here is where you will be doing the bulk of your work, and where you can customize the most.
- Tab Name – Windows Terminal supports tabs, which means that you can have different shells
- New Tab – This button will open a new tab of your default profile
- Profiles list – This will list the profiles that are available to open.
Windows Terminal has a minimalist layout, but there’s a lot of functionality hidden away behind it.
Building the Terminal from Source
While this is the Windows Terminal, and it does come from Microsoft, it’s also completely open-source, which means that if you wanted to, you can contribute to it. It’s a C++ program with a very active community.
Even though this is a GA product, at the time of writing there are still a few minor bugs being addressed and features on the road map for future development. Maybe it’ll be you that helps contribute to them!
If you’re a developer and really want to get into the code, you can build the Windows Terminal from PowerShell, follow these steps:
- Run
git submodule update --init --recursiveto update all the git submodules - Run the below PowerShell commands:
Import-Module .toolsOpenConsole.psm1
Set-MsBuildDevEnvironment
Invoke-OpenConsoleBuild
The settings.json file: Customizing all the things
Eventually, you’ll probably want to make the terminal your own and customize it. One of the best things about Windows Terminal is just how customizable it is. The most common way to customize the Windows Terminal is by editing the settings.json file located in the %LOCALAPPDATA%PackagesMicrosoft.WindowsTerminal_8wekyb3d8bbweLocalState directory.
You can also access the settings.json file by clicking on the profiles list and selecting Settings.
The settings.json file is where you will perform most of the customizations for Windows Terminal until a graphical option is available.
The Windows Terminal team has promised in an upcoming release that a GUI will be released for managing settings soon!
Other than just having all settings stored in one convenient spot, when settings are stored in a JSON file, you can put your settings in source control or back them up in case you move between different machines.
You can even share the settings with others. If you’d like to take a peek on an example settings.json looks like, check one out here.
The settings.json Schema
If you’re using Visual Studio Code, the terminal includes a JSON schema that will help validate any customization you make inside of settings.json, including auto-fill any new ones.
As soon as your changes are saved (as long as settings.json is still valid) the new changes will be reflected right away in the terminal or an error will be shown without needing to refresh the terminal.
While Visual Studio Code isn’t required to edit JSON, it’s definitely recommended when it comes to customizing the Windows Terminal.
There are currently four different sections of settings.json that control how Windows Terminal looks and feels: Globals, Profiles, Schemes, and Key Bindings. Let’s take a look at each section.
Globals
The globals section is responsible for determining the behavior of the Windows Terminal. Always at the very top of the file, the global section controls things like confirm on close, visual theme, and the default profile. You can see an example in the following code snippet.
// settings.json

{
    "$schema": "<https://aka.ms/terminal-profiles-schema>",

    "defaultProfile": "{d21f5dd0-bdc3-4cf7-9e3c-5d5d721074c9}",

    // You can add more global application settings here.
    // To learn more about global settings, visit <https://aka.ms/terminal-global-settings>

    // If enabled, selections are automatically copied to your clipboard.
    "copyOnSelect": false,

    // If enabled, formatted data is also copied to your clipboard
    "copyFormatting": false,

		...
		...
}
Profiles
A profile is a configuration of the Windows Terminal that has its own shell, theme, and settings. When you open up a Windows Terminal profile, it will open a session with the assigned shell, environment, or WSL distribution. This means you can have different shells open at the same time, or different sessions of the same shell, which can be useful when testing code cross-platform or need to run a background process.
Windows Terminal comes with three profiles by default: Windows PowerShell, cmd.exe, and Azure Cloud Shell. If you have WSL installed, it will also generate a profile for each WSL distribution you have installed. It also includes a defaults section that will apply settings to every profile in settings.json. This is a great place to put Unicode-compatible fonts which will be covered later in this article.
You can see an example of what a profile looks like in the following code snippet.
// settings.json

"profiles":
    {
        "defaults": {},
        "list":
        [
            {
                "guid": "{d2df7eb9-1d7e-4a05-91a6-04ac0ee99970}",
                "name": "Windows PowerShell",
                "commandline": "powershell.exe",
                "hidden": false
            }
				]
		}
Creating a New Profile
Setting up profiles can be useful if you want to add variations on the same shell, or add custom remote profiles to the terminal.
To create a new Windows Terminal profile in settings.json, here are the steps you’ll need to take:
Make sure to add a comma after each profile except the last to make the JSON valid.
- Copy any profile from your profiles section. These start at
[and end at]under the list node in the JSON file. This is lines seven through 14 above. - Generate a new GUID by running
[guid]::NewGuid()from any PowerShell session. Replace the current value forguidin your new profile with the GIUD that you generated. GUIDs are randomly generated when the terminal sets up the default profiles. - Add or change any other parameters to customize the profile.
- Copy the contents of settings.json and validate that it’s still valid by running it through JSON Lint or another JSON linter. Fix any issues.
- Save your changes.
There are many options available to configure in a profile. Keep in mind if you have a setting in the defaults section in settings.json, and you have that same setting set in your new profile, you will override the default. For a complete breakdown, check out the Windows Terminal Settings documentation.
Schemes
This section refers to color schemes for your Windows Terminal profiles. A color scheme tells the terminal which hex value to use for each color that shows up in the terminal. Since the terminal can render colors in 24-bit, these colors can get quite creative. Each scheme will have a name and a list of colors that map to a hex value which can be easily changed as shown below.
// settings.json

"schemes": [
        {
            "name" : "Ubuntu",
            "background" : "#2C001E",
            "black" : "#4E9A06",
            "blue" : "#3465A4",
            "brightBlack" : "#b3b3b3",
            "brightBlue" : "#729FCF",
            "brightCyan" : "#34E2E2",
            "brightGreen" : "#8AE234",
            "brightPurple" : "#AD7FA8",
            "brightRed" : "#EF2929",
            "brightWhite" : "#EEEEEE",
            "brightYellow" : "#FCE94F",
            "cyan" : "#06989A",
            "foreground" : "#EEEEEE",
            "green" : "#300A24",
            "purple" : "#75507B",
            "red" : "#CC0000",
            "white" : "#D3D7CF",
            "yellow" : "#C4A000"
        }
    ]
These colors will correspond to the background and text colors while you are using that scheme in the Windows Terminal. If you have settings.json open in Visual Studio Code, you can click on the hex values which have a graphical slider that shows the actual colors as seen below.
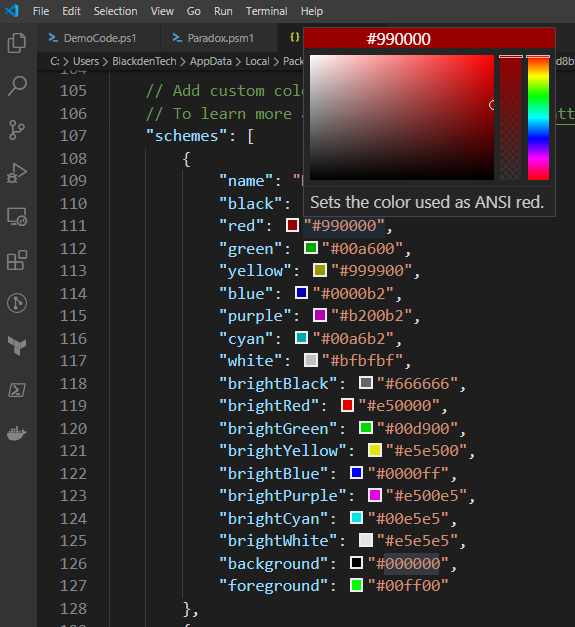
Terminal themes (referred to as schemes in the Windows Terminal) are not uncommon in the terminal program world. While there’s not a single way to create a theme (scheme) that works across different terminal applications, you can find many tools out there to make them no matter what application you use, You can find a pre-made one fairly easily, or make your own!
Key Bindings
Key bindings are how the Windows Terminal assigns hotkeys for actions like new panes, tabs, or even basic actions like copy and paste. There are a lot of actions that can be assigned custom hotkeys, making it easy to customize the terminal any way that’s comfortable for you.
You can see in the following code snippet some default key bindings.
// settings.json

"keybindings":
    [
        { "command": {"action": "copy", "singleLine": false }, "keys": "ctrl+c" },
        { "command": "paste", "keys": "ctrl+v" },
        { "command": "find", "keys": "ctrl+f" },
        { "command": { "action": "splitPane", "split": "auto", "splitMode": "duplicate" }, "keys": "alt+d" },
        { "command": { "action": "closePane" }, "keys": "ctrl+w" },
        { "command": { "action": "newTab" }, "keys": "ctrl+t" }
    ]
By now, your terminal might start to behave the way you want it to, but you’re not done yet. Now it’s time to learn how to keep customizing the look and feel of the terminal.
Visual settings
When you spend the majority of your working life staring at text on a screen, it’s worth taking a few extra steps to make that text easier to look at. Whether that’s changing the fonts, sizes, or colors, putting a little time into the appearance of your new Windows Terminal will pay huge dividends after staring at it for a full workday.
Text Enhancements
One of the most advertised features that the Windows Terminal is 24-bit color support and accelerated text rendering. That might not sound impressive on its own until you compare it to how powershell.exe or cmd.exe renders text and color. Using Python’s rich library to demonstrate, it’s pretty clear how large the differences in rendering capability are between the old consoles and the Windows Terminal.
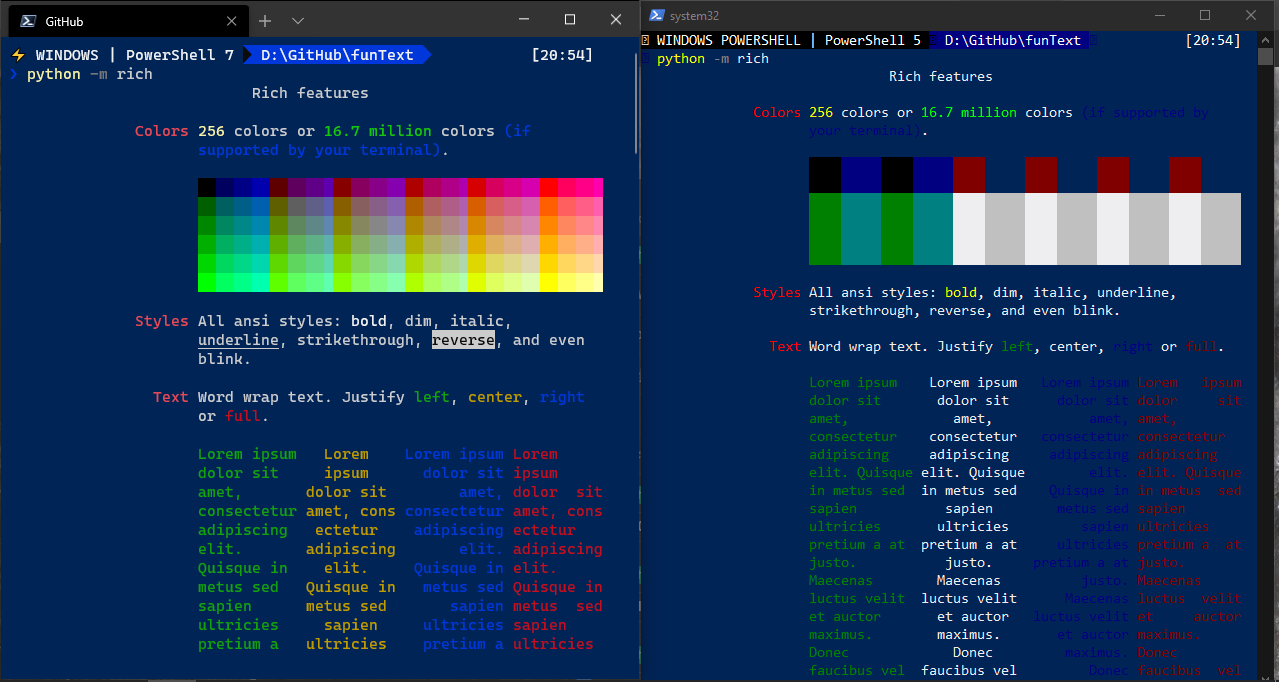
Opening the rich library from Python in the Windows Terminal and powershell.exe
The Windows Terminal also has support for Unicode characters, which means that it can be used with other alphabets and symbols, including Cyrillic characters, Kanji, and any other character will render without issues. That’s because of the Cascadia Code Font, which will be covered later.

Writing in Japanese Kanji with the Windows Terminal and powershell.exe
This has some obvious internationalization benefits, but supporting Unicode and UTF-8 also means that the Windows Terminal can also support…
Emoji 🙂
Emoji might not seem like a useful thing to include in a command-line tool, but they’re becoming more and more of a mainstay in development. Software engineers are using them to label commits and issues, respond quickly to messages with apps like Slack or Microsoft Teams, and there’s even an emoji programming language. While some of those are definitely more useful than the other, it’s clear that emoji aren’t going anywhere.
Below is an example of rendering Emojis on the powershell.exe console and the same in the Windows Terminal using python’s rich library. Notice the The Terminal is pretty line and see the difference.
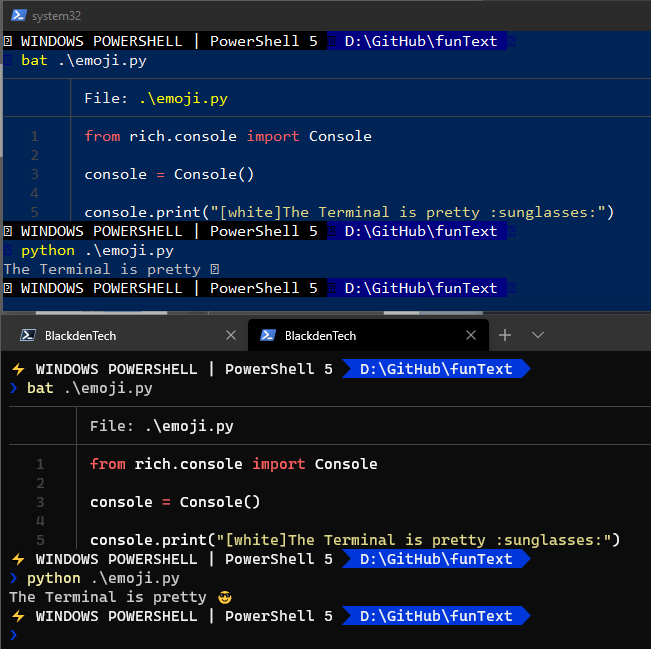
Displaying emoji with the python rich text library
Cascadia Fonts
As mentioned earlier, the Cascadia Code font is what allows displaying some of the characters. But the font also has some other subtle changes that make it easier to look at for hours on end, like ligatures.
FYI: The same team that designed the Windows Terminal made the Cascadia Code font specifically for use on the Windows Terminal.
In addition to special characters, the Cascadia Code font also supports ligatures. Ligatures are symbols that render a little differently when displayed on the screen. You can see a list of the ones supported by the Cascadia Code here.
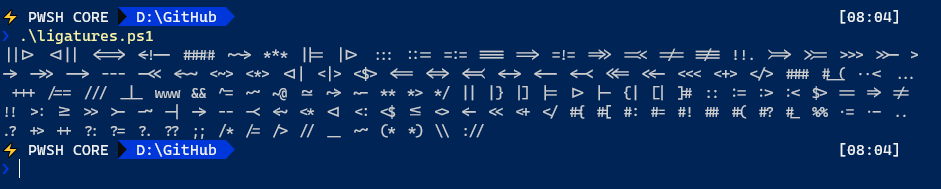
A printout of all the ligatures supported by Cascadia Code. Code here.
If you prefer not to use ligatures but still want the other benefits of Cascadia Code, the Windows Terminal also ships with a font called Cascadia Mono that does just that. Each of them also has a variant for powerline, (Cascadia Code PL and Cascadia Mono PL) which will be covered next.
Powerline
Powerline is originally a vim plugin that added information to the shell, and has been around in the Linux world for a long time. The idea was to provide more information at in the prompt, making more information available at your fingertips while working in the console.
Powerline has been ported, cloned, and replicated in every modern shell, including PowerShell, but because of the limitations of the previous consoles, it’s been missing something. The terminal solves that problem by including specific symbols called glyphs. Glypes are used in powerline to give the prompt a lot more information at a glance.
Powerline in PowerShell
For PowerShell, you can configure a powerline-like prompt by installing oh-my-posh by using the sample code below.
# PowerShell

Install-Module posh-git -Scope CurrentUser
Install-Module oh-my-posh -Scope CurrentUser
Set-Prompt
Once that’s installed, your PowerShell prompt will have more information, including the git branch name and commits between remote and local repositories. You can see an example below.
This is the Paradox theme from oh-my-posh with some customization to display the current OS and PowerShell version.
Powerline in Bash
For Bash, you’ll need to install a shell-like zsh or fishshell. These add some features and custom highlighting to the terminal, but can be a little tough to use on their own. It’s recommended that you also install a framework for zsh like ohmyzsh, which will make using it a lot easier. ohmyzsh comes with themes and bash prompt customization similar to how oh-my-posh does for a PowerShell prompt.
Once that’s installed, you can change the theme by modifying the ZSH_THEME property in the ~/.zshrc file. Change that using an editor like vim or nano and save the file. Once that’s done, run source ~/.zshrc and your changes will be applied.

Changing from the agnoster theme to the robbyrussell theme in zsh.
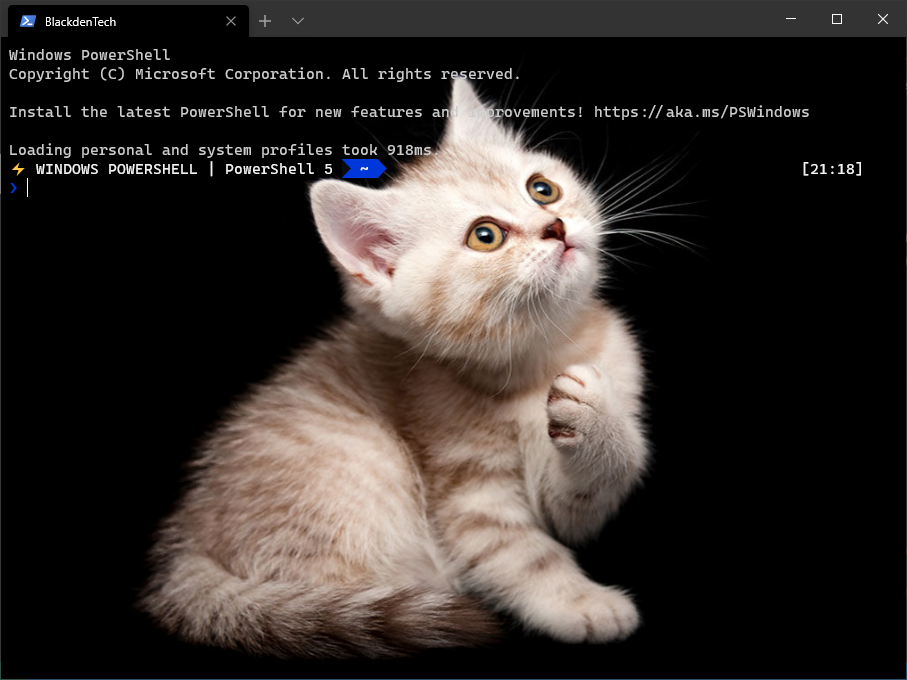
Background Images
One of the most talked-about features of the Windows Terminal on its release was the ability to use images in each profile. Up until now, you’ve probably noticed that the backgrounds have all been a single color defined in the settings.json file with the background tag.
Some people find images to be distracting when they’re coding, so if you’re one of those people, here is an example of using a single color background in settings.json.
// settings.json

"profiles":
    {
        "defaults": {},
        "list":
        [
            {
                "guid": "{d2df7eb9-1d7e-4a05-91a6-04ac0ee99970}",
                "name": "Windows PowerShell",
                "commandline": "powershell.exe",
								"background": "#006e1c",
                "hidden": false
            }
				]
		}
With a single color set, that color will become the background for that profile. If no background tag is set in your profile, the Windows Terminal will default to whatever is in your schema.
The example profile above will show this color as the background.
To use a background image, you’ll need to have the image on your local file system. At the time of writing, the Terminal doesn’t support background images from a URL. In settings.json, navigate to the profile that you want to assign the background image to. From here, add in the backgroundImage tag and give it the value of the path to the image. Below is an example that sets the profile background to a picture of a cat.
// settings.json

"profiles":
    {
        "defaults": {},
        "list":
        [
            {
                "guid": "{d2df7eb9-1d7e-4a05-91a6-04ac0ee99970}",
                "name": "Windows PowerShell",
                "commandline": "powershell.exe",
								"backgroundImage": "%USERPROFILE%Picturesterminal_cat.jpg",
                "hidden": false
            }
				]
		}
If you decide to customize your own background, know that the terminal doesn’t take your colors into account against your background. The terminal will default to whatever colors are in your current profile’s schema. If you’re not careful, you might put a light color font on a light color background, which would make it really hard to read. Not all backgrounds are good terminal backgrounds.
Terminal cat is in your terminal, taking up your background.
As long as settings.json is still a valid JSON file and still adheres to the terminal schema, you will see the background update right away with no need to manually refresh or close and re-open the terminal. You can see a great example of this real-time updating below.
The Windows Terminal will update as soon as you make changes in settings.json and save.
Positioning Images
You might be thinking that images are too distracting in a terminal window, and they can be. However they can also be a quick reference if you need to switch between tabs and profiles a lot. Below is an example of using a background image to highlight the shell being used.
// settings.json
"profiles":
{
"defaults": {},
"list":
[
{
"guid": "{d8a5efb7-25a0-4d75-8c6c-1f2603188971}",
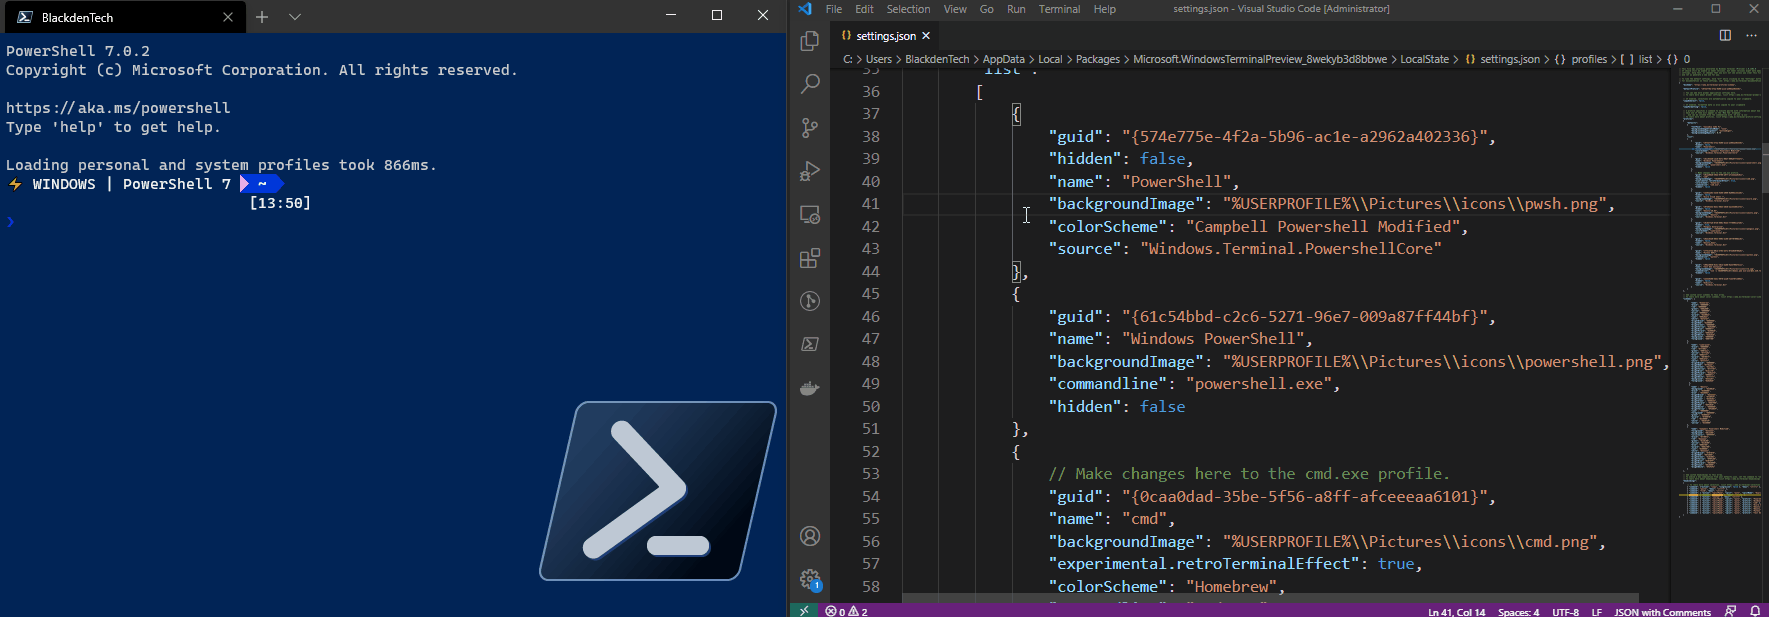
"name": "PowerShell 7",
"source": "Windows.Terminal.PowershellCore",
"backgroundImage": "%USERPROFILE%Picturesiconspwsh.png",
"backgroundImageStretchMode": "none",
"backgroundImageAlignment": "bottomRight",
"backgroundImageOpacity": 0.75,
"hidden": false
}
]
}To set a background image, as shown above, you need three additional parameters that start with backgroundImage to help control the size, location, and opacity of the image on the screen. Always remember to check the documentation to see what options are available. Below is an example of the profile shown above.
The Windows Terminal also supports animated gifs, so if you don’t find it too distracting, you can also have some fun with your profiles as well.
Advanced Windows Terminal Commands
So now that your terminal is set up and customized to your liking, it’s time to explore some of the more advanced capabilities of the Windows Terminal.
Split Panes with Different Kernels
The Windows Terminal supports multiple panes. This means that you can run parallel sessions in the same Terminal window. This behavior isn’t new. Other console applications have had support for panes for years. The Windows Terminal is different because since it supports profiles (in settings.json), you can have each session open in its own pane. Even if each session is a completely different operating system like when using WSL or a remote profile (more on remote profiles in a bit), you can show a pane for each OS.
To create split panes of different profiles, in settings.json each profile must have its own splitPane key binding. By specifying the profile parameter with either the name or the GUID of the Windows Terminal profile, you can have open each one side by side.
The split property can be set to horizontal, vertical or auto which will pick the orientation that provides the most space based on the currently selected pane. You can see below an example of setting key bindings for four panes.
// settings.json

"keybindings":
    [
        { "command": { "action": "splitPane", "split": "auto", "splitMode": "duplicate" }, "keys": "alt+d" },
        { "command": { "action": "splitPane", "split": "auto", "profile": "Windows PowerShell" }, "keys": "ctrl+alt+1" },
        { "command": { "action": "splitPane", "split": "auto", "profile": "Command Prompt" }, "keys": "ctrl+alt+2" },
				{ "command": { "action": "splitPane", "split": "auto", "profile": "a4b7092a-6825-422c-bdb8-89b9251f4d7d" }, "keys": "ctrl+alt+4" }
    ]
Customizing how the Windows Terminal is Opened
If you don’t like hotkeys, or you want a quick way to open up the terminal with the CLI, then you’re in luck. The Windows Terminal includes a command-line executable called wt that allows you to automate opening it in whichever configuration you want.
Below you can see an example of passing various arguments while opening up the terminal which changes the behavior.
Remote profiles
Most of the time, your profiles be running local shells. However, Windows Terminal can also display remote sessions through a concept called remote profiles too!
If you take a look at other sample profiles for the Windows Terminal, you may notice that some of them aren’t using .exe applications at all. The Windows Terminal is flexible enough that you can even use the ssh command or the Enter-PsSession PowerShell command to create profiles that map to remote servers or other shells. You can even use terraform console to bring up a Terraform session! You can see an example of that in the profile below.
By using the commandline parameter in the profile section of settings.json, you can open almost anything as it’s own Windows Terminal Profile that doesn’t need to login interactively.
// settings.json

"profiles":
    {
        "defaults": {},
        "list":
        [
            {
                "guid": "{f74c374e-d9ce-4f53-b3f1-072e020f08a5}",
                "name": "Python REPL",
                "backgroundImage": "%USERPROFILE%Picturesiconspython.png",
                "commandline": "python",
                "hidden": false
            },
            {
                "guid": "{98a15d46-813c-4d1e-badd-5a22798e73c1}",
                "name": "Test EC2 Instance",
                "backgroundImage": "%USERPROFILE%Picturesiconsvm.jpg",
                "commandline": "ssh -i %USERPROFILE%demos.pem [email protected]",
                "hidden": false
            }
        ]
    }
Opening the Python REPL and an SSH connection to an AWS EC2 instance with Windows Terminal profiles
Summary
At this point, you should be not only familiar with the Windows Terminal, but have configured your custom settings and have a fairly comfortable configuration set up. You should be able to customize profiles and key bindings to control the look and operation of the terminal, as well as know how to modify the fonts, glyphs, and characters that you can use in the terminal.
Command-line tools aren’t going anywhere. Developers and engineers alike need to keep using them. The new Windows Terminal won’t stop software development from being a job where you stare at small text on a screen but it might make it a lot easier to keep doing it!
We will review different way to open Windows Terminal in Windows 11. It has become the default console tool, replacing the classic command prompt and its successor, PowerShell. Actually, it doesn’t replace both, but unifies them under the new, modern and useful UI.
Windows 11 comes with a pre-installed Windows Terminal by default. It is a new console app from Microsoft that combines several command line-based applications in a single environment. Windows Terminal also supports hardware acceleration, custom fonts, tabbed interface, etc.
Here is how you can open Windows Terminal in Windows 11. We will review several methods of launching the app, including the Start menu, Search, the Run dialog, and File Explorer. Other methods involve the Task Manager app, and the Win + X menu.
Tip: Working with Windows Terminal quite often requires an Administrator access level. Learn how to «Run as Administrator» in Windows 11 using our dedicated guide.
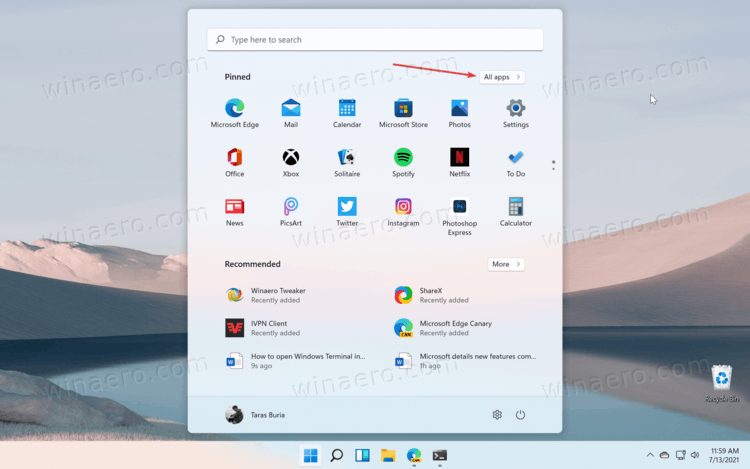
- Press the Start button, which now has four blue squares and is the leftmost icon at the taskbar center. You can disable the centered taskbar in Windows 11.
- Click All Apps.

- Scroll down the list and click Windows Terminal. You can also find apps by letter in Windows 11 using alphabet navigation.
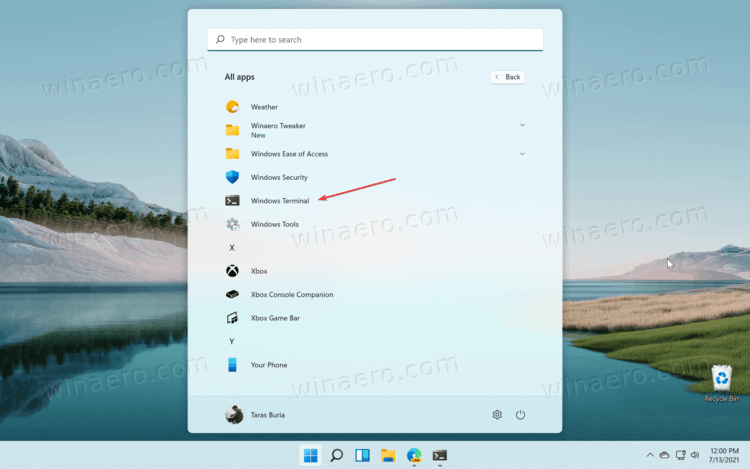
Tip: If you plan to work with Windows Terminal frequently, pin the app to the taskbar so that you always have it nearby. Launch Windows Terminal using any of the methods in this article, then right-click its icon and select Pin to Taskbar.

The same idea applies to the Start menu. Windows 11 allows pinning any app, including Windows Terminal, to the Start menu. Right-click Windows Terminal in the list of all apps and select Pin to Start.

Launch Windows Terminal using Search
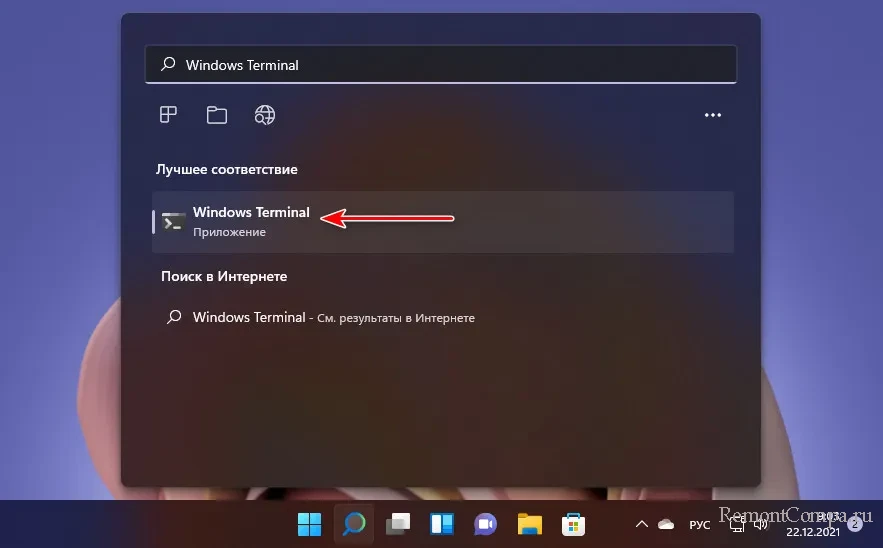
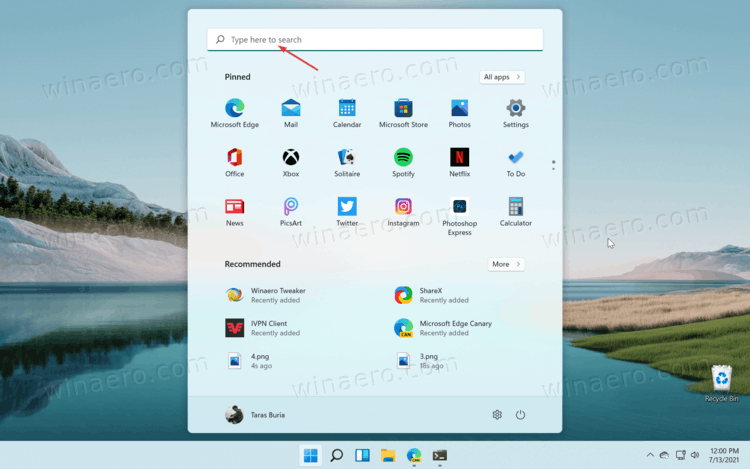
- Press Win + S or open the Start menu and click the search bar at the top. Alternatively, you can just start typing right away after opening the Start menu.
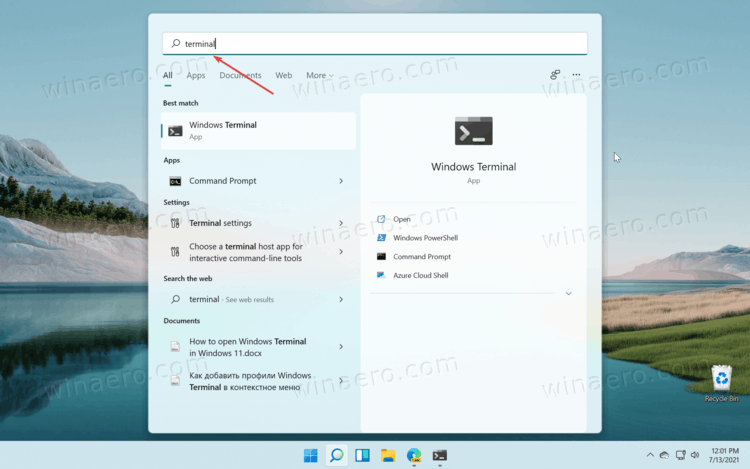
- Enter Windows Terminal or Terminal. Windows will show the app in the Best Match or Apps section.
- Click on the Open entry. There you can also find a button to run Windows Terminal as an Administrator.
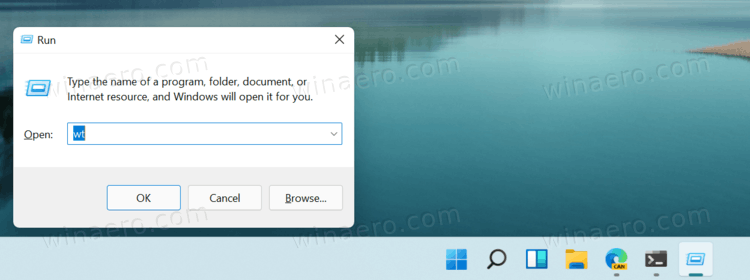
Open Windows Terminal in Windows 11 using the Run dialog box
- Press Win + R, then enter the following two-letter command:
wt. - Press Enter.

- From there, you can also open Windows Terminal as Administrator by pressing the Ctrl + Shift + Enter shortcut keys.
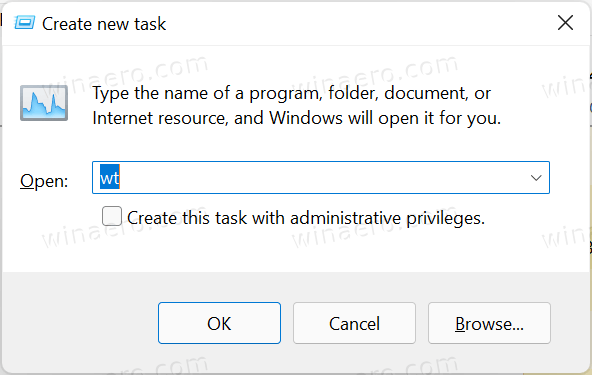
Using Task Manager
Windows 11 allows launching apps and processes within Task Manager. Before you proceed, we recommend reading the «How to open Task Manager in Windows 11» article, as Microsoft removed some popular ways many people used to open Task Manager.
- Open Task Manager.
- Click File > Run new Task.

- Enter the
wtcommand. If needed, place a checkmark next to the Create this task with administrator privileges option.

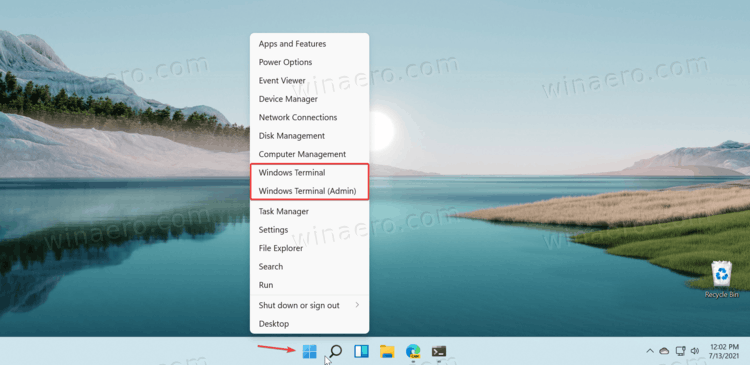
You can also use the Win + X menu in Windows 11 to launch different utilities, such as Task Manager, Device Manager, Disk Management, and Windows Terminal.
- Press Win + X, or right-click the Start button. If you have a computer with a touch screen, you can tap and hold the Start button.
- Click Windows Terminal.

- Alternatively, if needed, click Windows Terminal (Admin) to open Windows Terminal as Administrator in Windows 11.
Finally, you can open any folder in Windows Terminal using the built-in command, or add a set of custom commands to open it directly in the required profile and/or as Administrator.
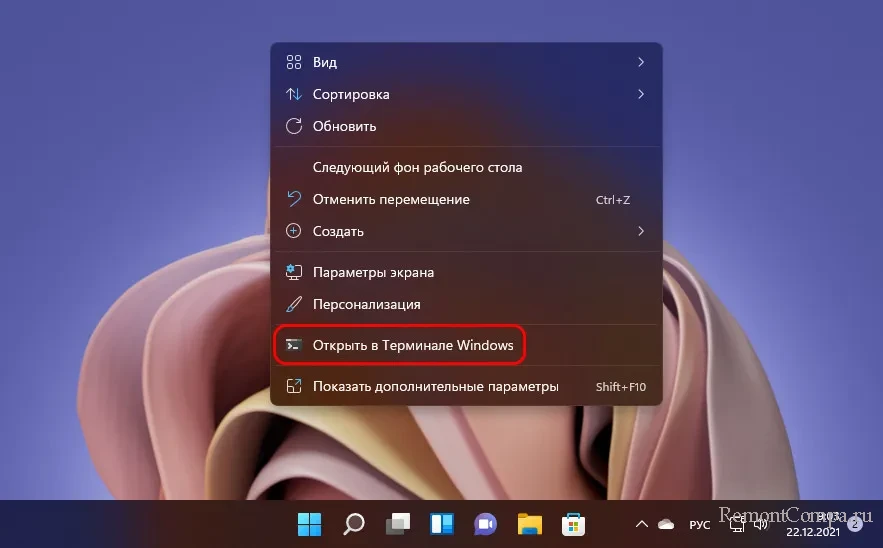
Right-click to open Windows Terminal in File Explorer
Finally, you can open any folder in Windows Terminal by right-clicking it and selecting Open in Windows Terminal. That works on the Desktop and any other directory.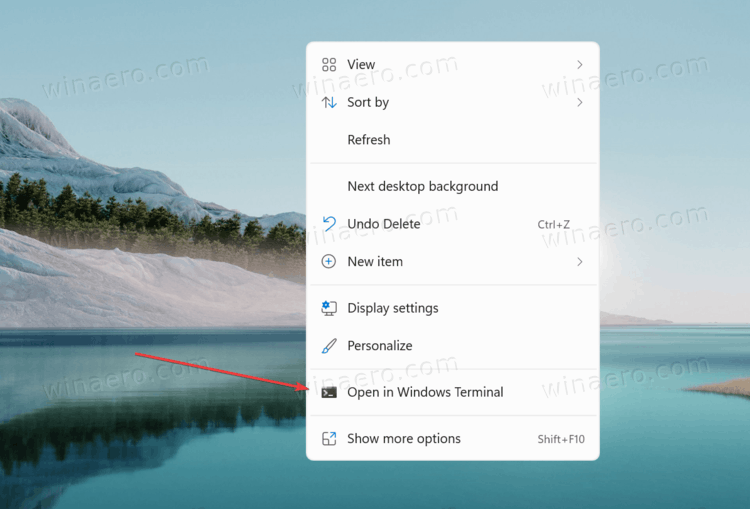
Note that the previous method does not allow you to run Windows Terminal as an Administrator. Also, you cannot select a profile other than the default one. You can change that using Winaero Tweaker. It allows you to place a Windows Terminal option with different profiles in cascading menus in Windows 11.
- Download Winaero Tweaker and install it.
- Launch the app, then find the Windows Terminal option.
- Place a checkmark next to the Add Windows Terminal Cascading Menu and/or Add Windows Terminal (Administrator) settings. You can enable both. Also, Winaero Tweaker allows you to specify the profiles you want to have in the menu.

- Now, right-click on any folder in File Explorer and select Show more options.
- Select one of the Windows Terminal items.


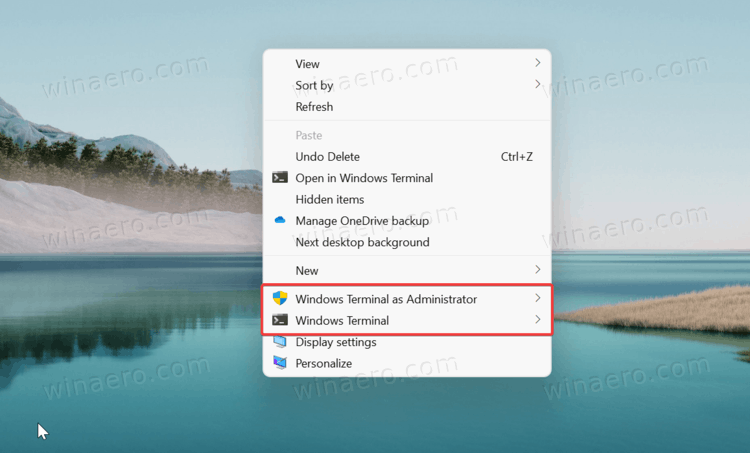
If you don’t like the idea of using Winaero Tweaker, there are also ready-to-use Registry files that are available in the following blog post for the regular menu commands, and in this one for elevated.
That is it. Now you know all the ways to open Windows Terminal in Windows 11.
Support us
Winaero greatly relies on your support. You can help the site keep bringing you interesting and useful content and software by using these options:
If you like this article, please share it using the buttons below. It won’t take a lot from you, but it will help us grow. Thanks for your support!