- Можно ли установить Open Shell на Windows 11?
- Скачивание, установка Open Shell
- Русификация Open Shell
- Настройка программы Open Shell
Многие пользователи новой версии операционной системы Windows 11 остались недовольными стилем оформления меню «Пуск». Впрочем, недовольства начались еще с выходом Windows 8 с ее непривычными плитками разного размера, занимавшими, к тому же, большое пространство меню «Пуск». Положение дел решили исправить независимые от Microsoft разработчики, которые представили миру свой бесплатный программный продукт «Classic Shell» — утилиту, позволяющую заменить оригинальное меню «Пуск» Windows 8 и всех последующих версий (включая Win 11) классическим меню со времен Windows XP.
В настоящее время проект под названием «Classic Shell» закрыт — программа более не обновляется, но ее последняя версия до сих пор доступна для скачивания с официального сайта. Зато этот проект подхватили другие независимые разработчики. Программа была переименована в «Open Shell», но от этого не изменилась ни модель ее распространения (она также бесплатна и имеет открытый исходный код), ни предназначение. Именно ее мы и будем рассматривать здесь.
Можно ли установить Open Shell на Windows 11?
На репозитории GitHub, откуда и можно скачать установщик программы Open Shell, указано, что она предназначена для операционных систем Windows 7, 8, 8.1 и 10. Однако она прекрасно работает и в новой Windows 11 — мы бы не стали работать над этой статьей, если это было бы не так.
Также у некоторых могут возникнуть вопросы по поводу разрядности Open Shell — существует только 32-битная ее версия, в то время как Windows 11 — 64-битная (32-разрядной системы, скорее всего, не будет). Но и это не помеха.
Скачивание, установка Open Shell
Последнюю версию программы Open Shell вместе с русификатором можно скачать с нашего сайта. Установка утилиты проходит по обычному сценарию, но во избежание конфликтов рекомендуем отключить инсталляцию двух вспомогательных модулей Open Shell — «Classic Explorer» и «Classic IE». Это осуществляется в разделе «Custom Setup» установщика программы:
 1
1
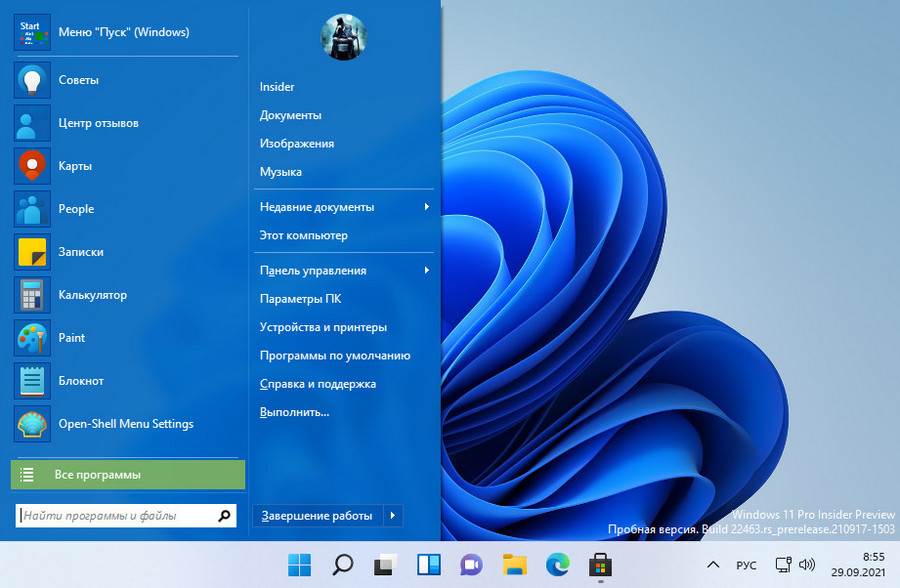
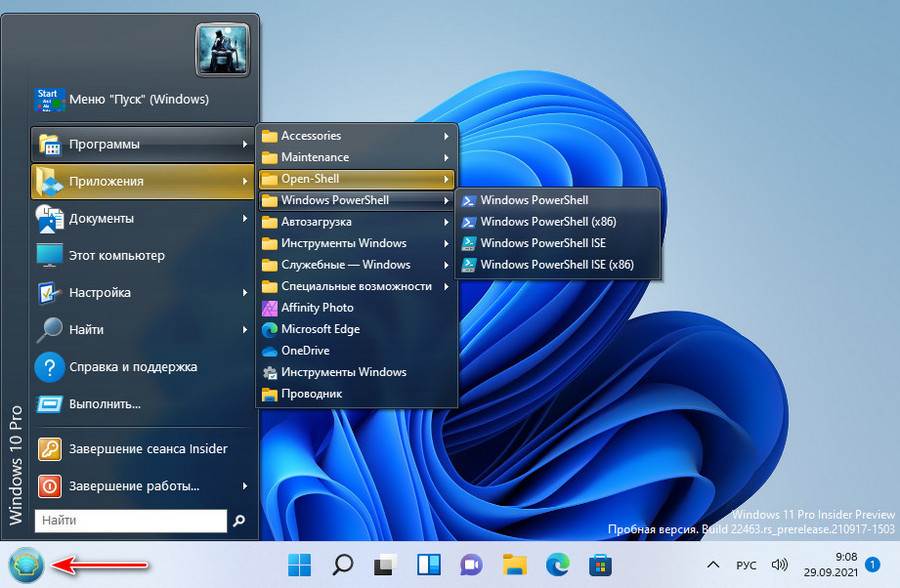
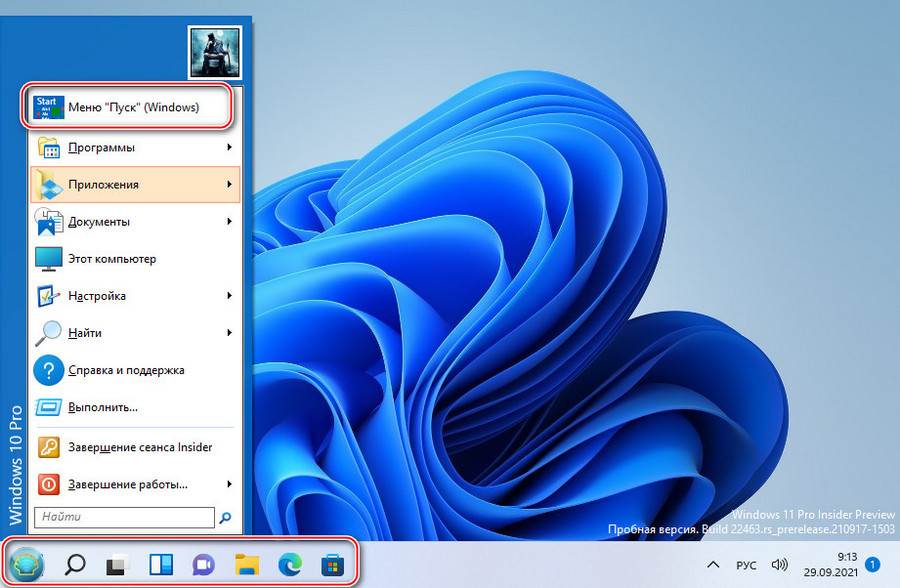
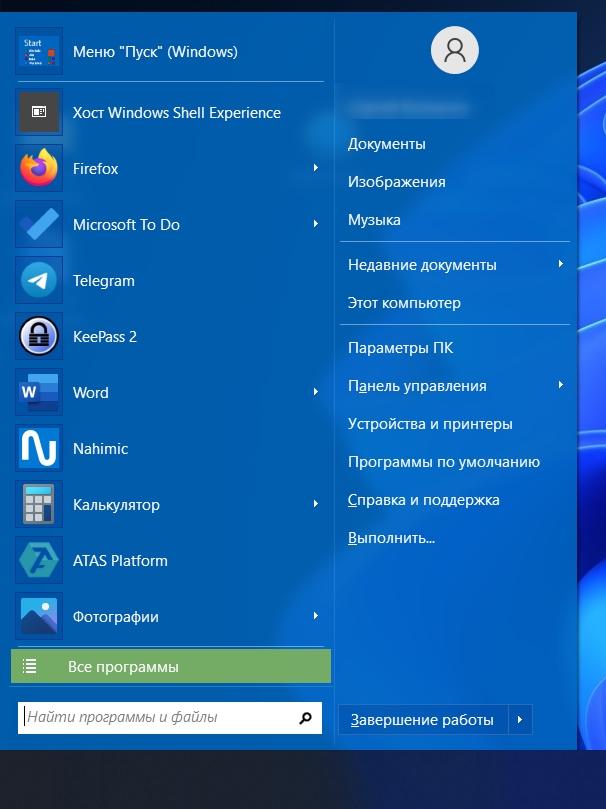
По завершению установки Open Shell автоматически начнет свою работу. Чтобы проверить — просто кликните по кнопке меню «Пуск» или нажмите клавишу «Win»:
Русификация Open Shell
Программа Open Shell поддерживает русский язык, но перевод неполный. Чтобы полностью русифицировать интерфейс, необходимо сначала установить русификатор, а затем активировать русский язык в настройках. Если утилита была скачано с нашего сайта в виде архива, то при его распаковке рядом с инсталлятором будет находиться файл «ru-RU.dll». Его нужно скопировать в папку установки Open Shell.
Инсталлятор почему-то не создает ярлыка на рабочем столе (по крайней мере, так было в нашем случае). Потому открываем папку установки утилиты вручную. По умолчанию — это «C:Program FilesOpen-Shell». Копируем/перемещаем русификатор «ru-RU.dll» в эту папку. Теперь нужно активировать русский язык в настройках.
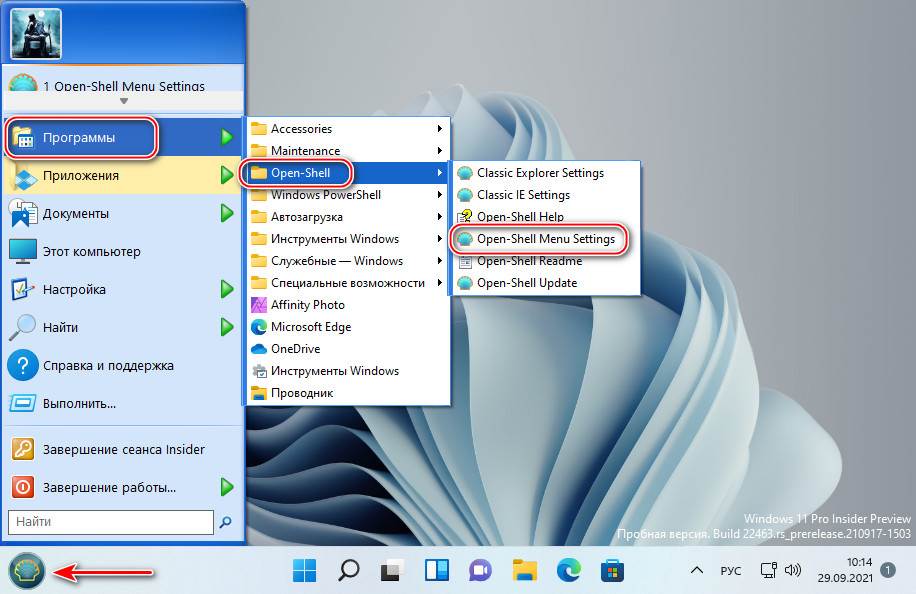
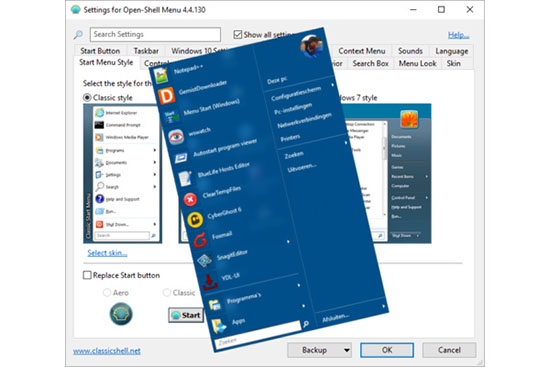
За настройку отвечает ярлык «Start Menu Settings» — запускаем его из папки установки программы:
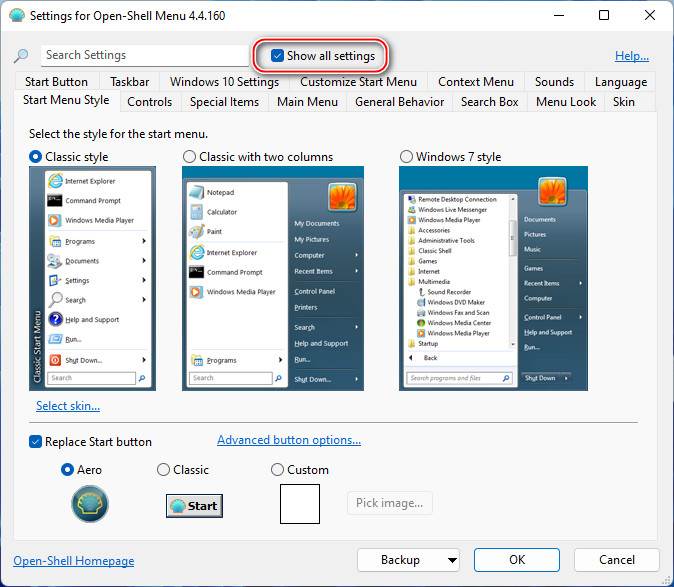
Чтобы активировать русский язык, сначала установите флажок напротив «Show all settings» в верхней части окна настроек, затем перейдите в отобразившуюся вкладку «Language»:
Найдите в списке доступных языков элемент «ru-RU — Русский (Россия)», выделите его и нажмите снизу кнопку «ОК». Это приведет к закрытию окна настроек.
![]()
Чтобы изменения вступили в силу, потребуется перезапустить программу Open Shell. По умолчанию это делается путем нажатия правой кнопки мыши поверх значка «Пуск» и выбора пункта «Выход» с последующим повторным запуском приложения. Но это сработает только в случае, если заменить стандартный значок меню «Пуск» на один из тех, что предлагает программа:
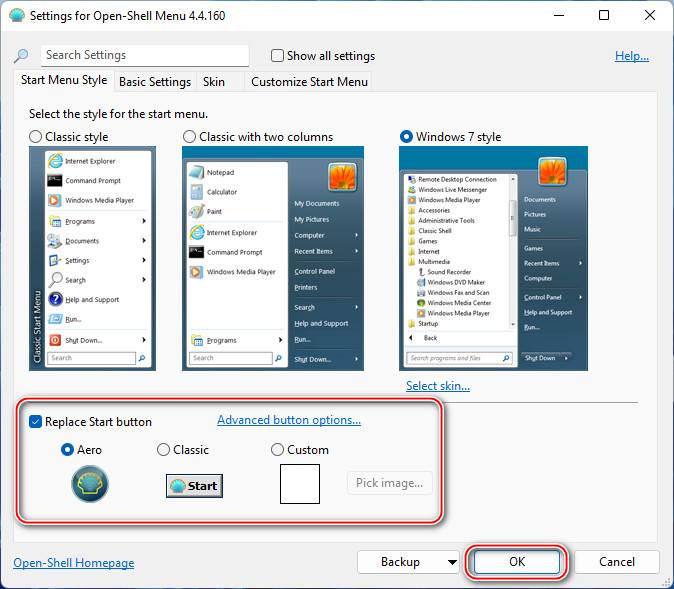
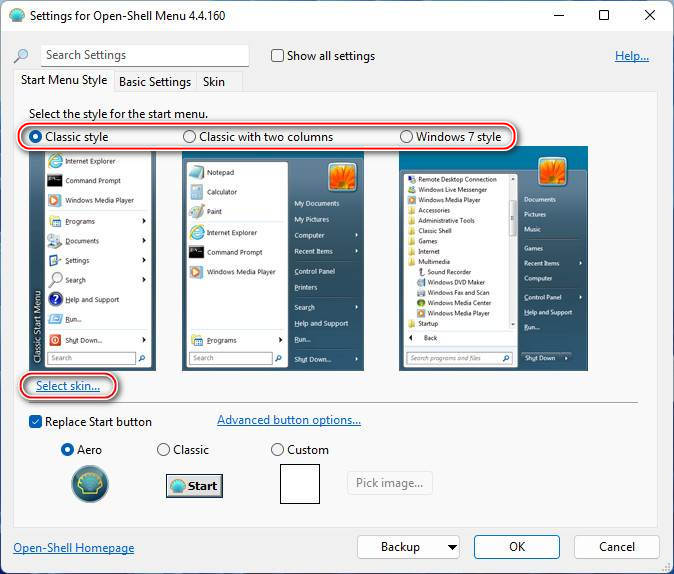
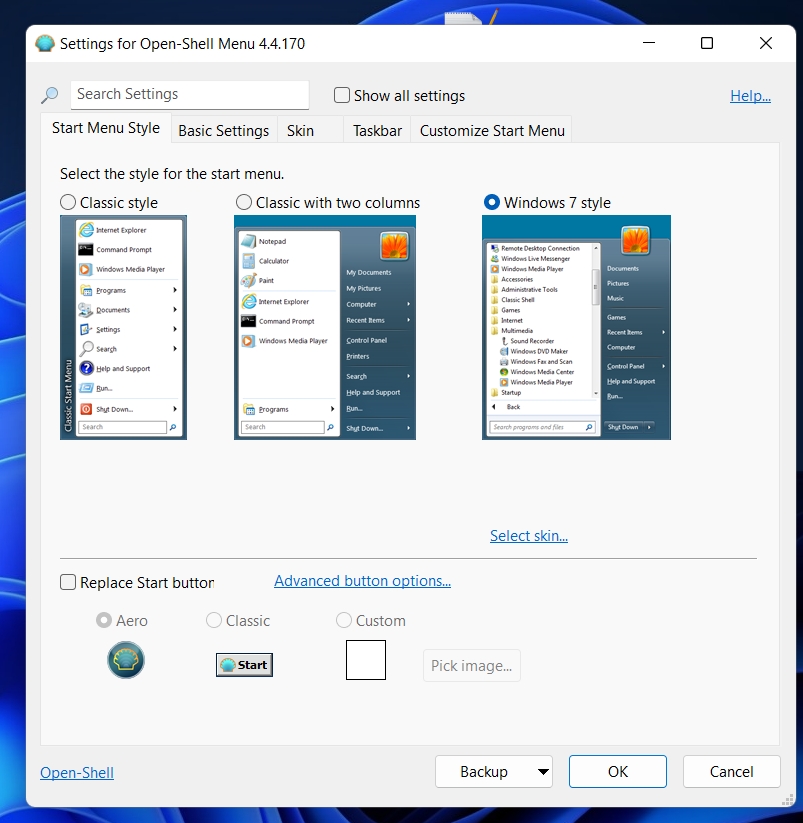
- Запустите ярлык настроек «Start Menu Settings», затем перейдите во вкладку «Start Menu Style».
- Здесь же активируйте опцию «Replace Start button», выберите один их вариантов альтернативного значка для кнопки «Пуск» и нажмите «ОК».
- Теперь можно кликнуть правой кнопкой мыши по новому значку «Пуска», чтобы затем завершить работу программы выбором пункта «Выход».
![]()
- Вновь запустите ярлык «Replace Start button», чтобы проверить успешность русификации.
Настройка программы Open Shell
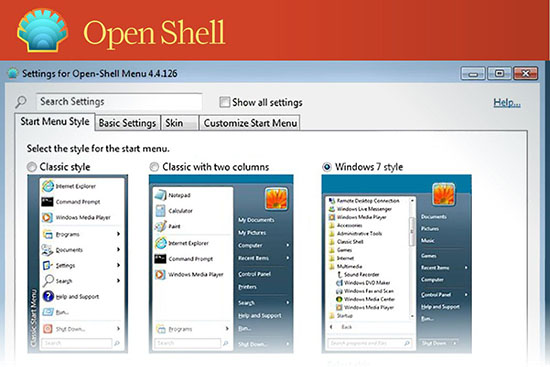
Простым пользователям вполне хватает то оформление меню «Пуска», что по умолчанию устанавливает программа Open Shell. Если нужно сменить стиль, откройте в настройках вкладку «Стиль меню Пуск» и выберите подходящий вариант оформления:
Во вкладке «Основные параметры» можно настроить поведение кнопки «Пуск» при клике по ней мышкой, клике с зажатой клавишей «Shift», нажатию клавиши «Win» и т.д. Open Shell не заменяет оригинальный «Пуск» Windows 11, а просто перехватывает нажатия клавиш и/или клики мышью, блокируя вывод «настоящего» меню свои собственным. Именно здесь можно настроить, когда Open Shell будет выводить свое, а когда системное меню «Пуск»:
Оформление заднего фона (обложки/заставки) меню «Пуск» можно дополнительно выполнить во вкладке «Обложка». Доступно несколько вариантов — от классического до Windows 8, выбираемого по умолчанию.
Все остальные настройки утилиты Open Shell связаны с функционалом и наполнением меню «Пуск». Мы не будем их рассматривать, но вы можете поэкспериментировать. Если что-то пойдет не так, настройки всегда можно сбросить (правда, придется повторно активировать и русский язык):
В этой публикации, друзья, поговорим о том, как в Windows 11 сделать меню «Пуск» формата Windows 7. Или как сделать даже два меню «Пуск» — формата Windows 11 и формата Windows 7. У новой 11-й Windows современное, стильное меню «Пуск», более юзабильное из-за своего центрированного расположения на панели задач. Но если вам хочется привнести в современную операционную систему немного привычной архаики, так сказать, кастомизировать систему отголосками прошлого, это можно сделать с помощью программы Open-Shell, реализующей в Windows меню «Пуск» из старой Windows 7. Программа совершенно бесплатная, являет собой замену известной Classic Shell, ставшей популярной с выходом Windows 8 из-а отсутствующего в ней классического меню «Пуск». Разработка Classic Shell впоследствии прекратилась, а Open-Shell переняла все её возможности. Давайте более детально о последней.
Как сделать в Windows 11 меню «Пуск» как в Windows 7 с помощью Open-Shell
Программа Open-Shell, бесплатно распространяемая на GitHub, реализует в Windows 10 и 11 классическое меню «Пуск» в стиле Windows 7. Но в Windows 11, в отличие от Windows 10, оно не подменяет собой системное меню «Пуск», а реализует второе. И реализует его, как и подобает классике, в левом углу панели задач. Центрированная кнопка «Пуск» запускает системное меню «Пуск» Windows 11, у меню же Open-Shell будет своя кнопка «Пуск». Но она может по умолчанию не установиться, и тогда для запуска меню «Пуск» Open-Shell просто жмём клавишу Win.
В меню запускаем настройки меню Open-Shell.
И настраиваем отображение кнопки «Пуск». Можем выбрать вид кнопки из двух предложенных, либо добавить свой вид. Виды кнопки «Пуск» можно скачать на сайтах, посвящённых кастомизации Windows, просто вбейте в веб-поиск запрос «кнопка пуск скин».
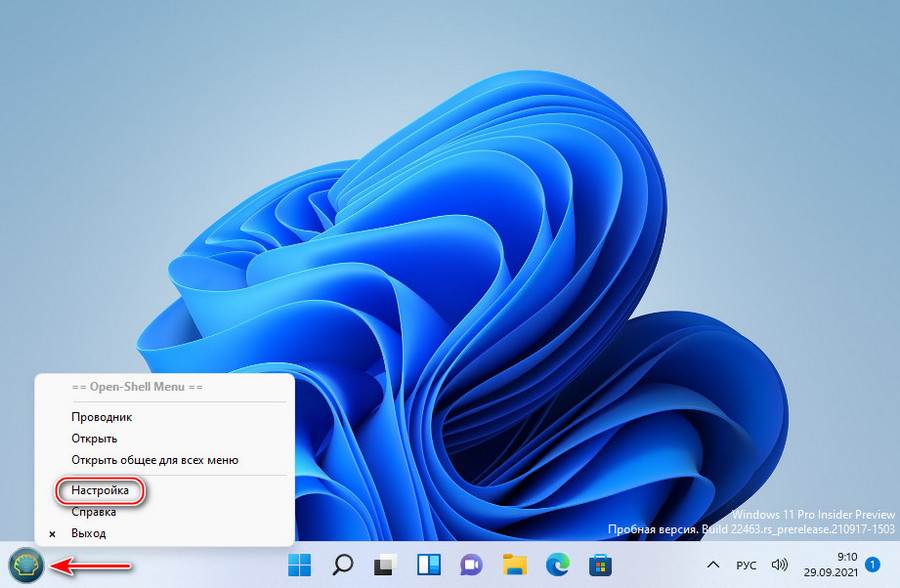
После добавления кнопки «Пуск» в дальнейшем можем открывать настройки меню Open-Shell в контекстном меню на кнопке.
В настройках также можем сменить скин меню.
На выбор нам предлагается несколько скинов в стиле Windows XP, 7 или 8.
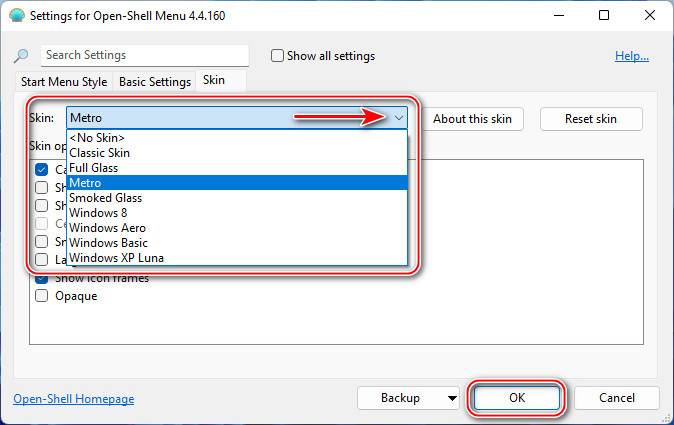
Есть светлые и тёмные скины.
При необходимости можем в настройках установить галочку «Show all settings» и получим доступ ко всем настроечным возможностям программы.
В числе возможностей Open-Shell:
- Настройка внешнего вида меню «Пуск», выбор разных скинов;
- Настройка кнопки «Пуск»;
- Настройка размера меню, шрифтов, иконок, прозрачности, анимации;
- Настройка поведения меню;
- Настройка контактного меню для меню «Пуск»;
- Внедрение панели инструментов для проводника;
- И прочие.
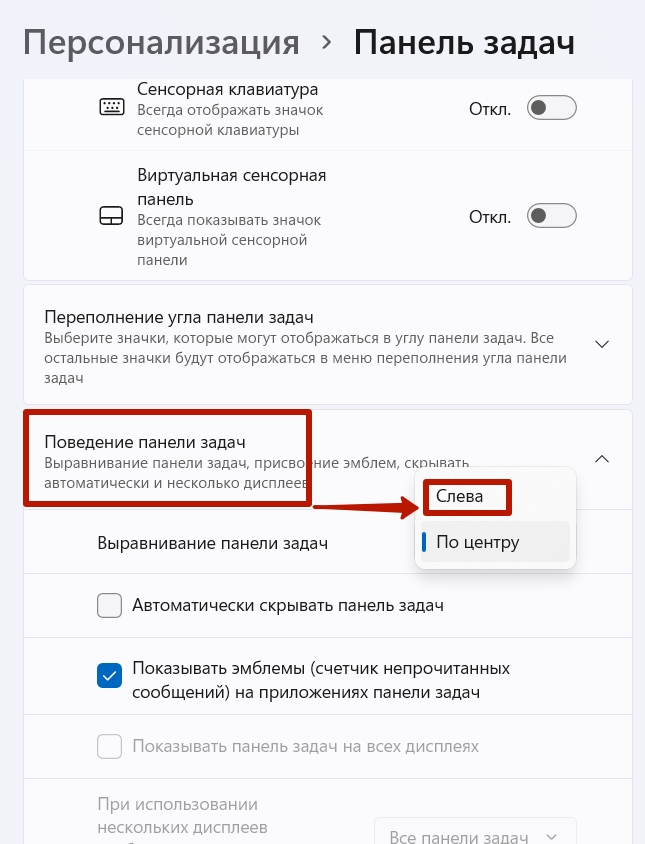
Друзья, в Windows 11 убрать системное меню «Пуск» невозможно, но если вы хотите пользоваться только меню «Пуск» Open-Shell, зайдите в приложение системных параметров по пути «Персонализация → Панель задач». И в блоке настроек «Поведение панели задач» установите выравнивание слева.
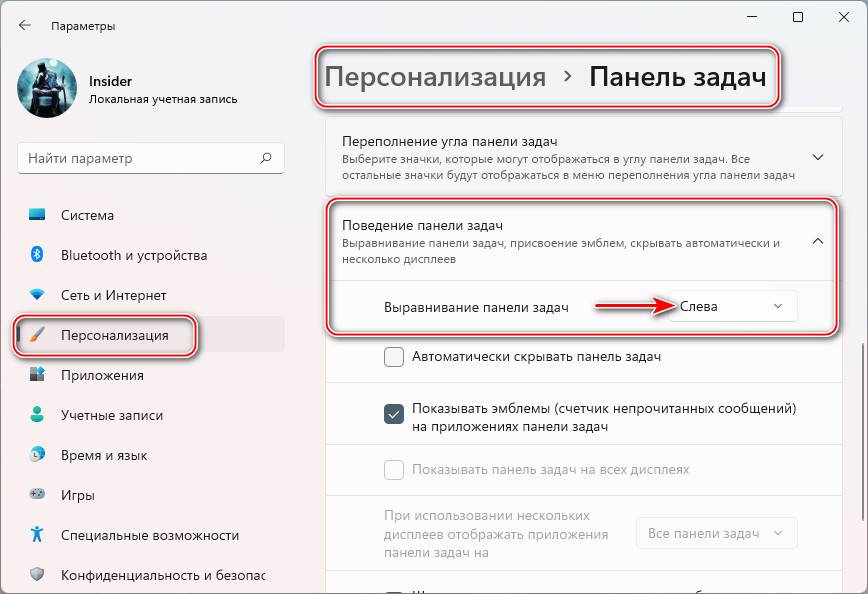
В таком случае кнопка «Пуск» Open-Shell попросту перекроет кнопку системного меню Windows 11. И у вас будет привычный классический формат панели задач и меню «Пуск» Windows. При необходимости системное меню «Пуск» Windows 11 можно запускать специальной кнопкой вверху меню Open-Shell.
by Loredana Harsana
Loredana is a passionate writer with a keen interest in PC software and technology. She started off writing about mobile phones back when Samsung Galaxy S II was… read more
Updated on January 26, 2023
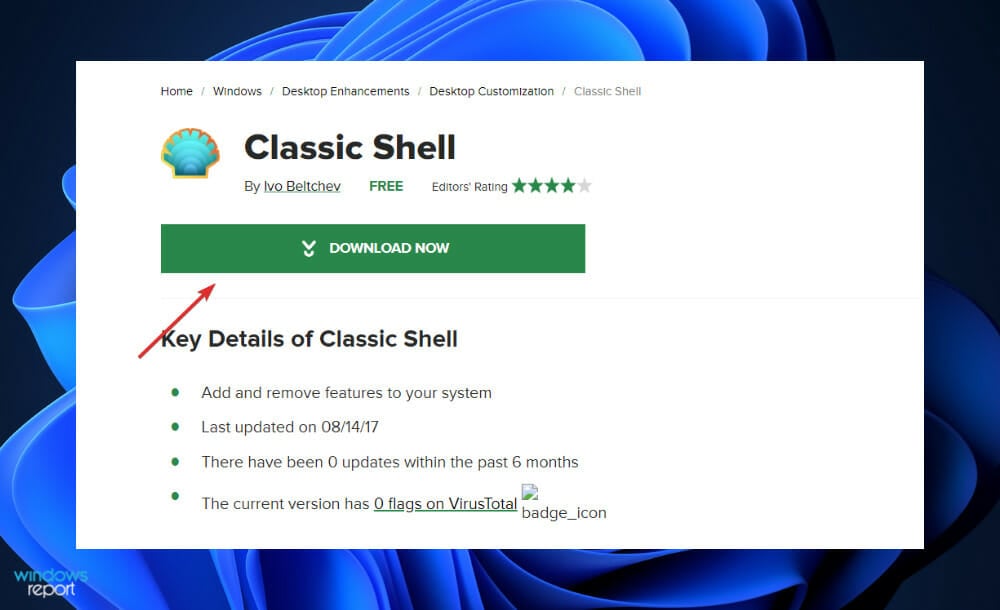
- Users asked us how they can install Classic Shell on Windows 11, to which we respond today with two methods.
- The first is to navigate to the Open-Shell Github repository and download the assets from there.
- Alternatively, there are other secure websites from which you can install the software.
XINSTALL BY CLICKING THE DOWNLOAD FILE
- Download Restoro PC Repair Tool that comes with Patented Technologies (patent available here).
- Click Start Scan to find Windows 11 issues that could be causing PC problems.
- Click Repair All to fix issues affecting your computer’s security and performance
- Restoro has been downloaded by 0 readers this month.
Customizing your operating system is a fantastic way to make your regular life a little more enjoyable. You have the ability to change the user interface, apply a custom theme, add widgets, and much more. Thus, we will show you today how you can install Classic Shell on Windows 11.
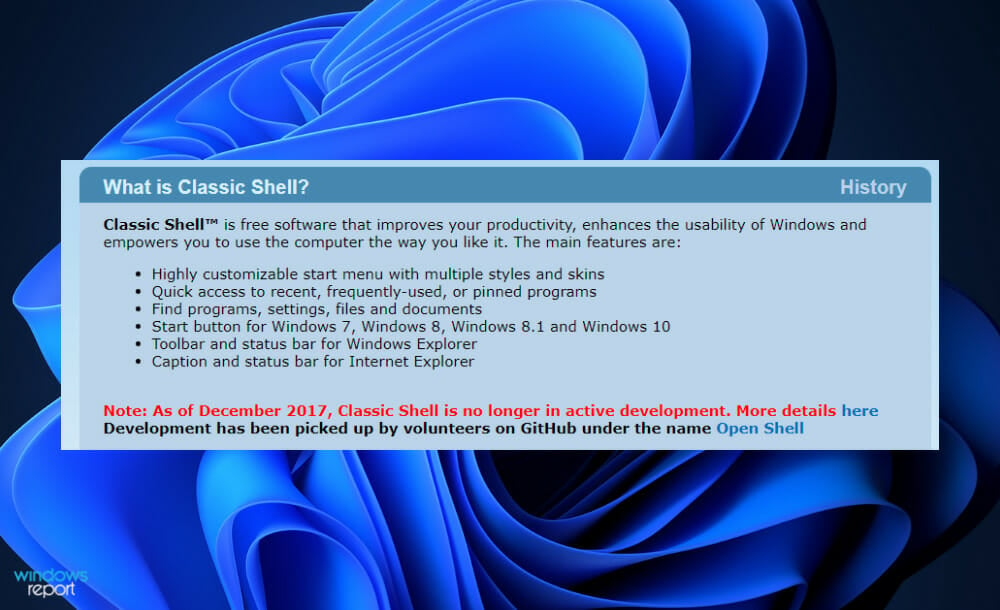
The program has been around for a long time and allows you to modify the OS. Volunteers have now taken up the running of the organization, which was disbanded in 2017. The new project is titled Open Shell, and it is presently available on Github for those who are interested.
Follow along as we will show you how you can download and install the software on your computer, right after we see a little bit of its history. Keep up with us!
How are Open Shell and Classic Shell related?
A derivative of the popular but now-defunct Original Shell program for Windows, Open Shell can be used to restore the classic Start Menu, Explorer, and Internet Explorer shells to a computer’s operating system.
Classic Shell was a popular software that allowed users to restore functionality to OS iterations that had been discontinued by Microsoft. After the first introduction of Windows 8, the software gained in popularity as users chose to operate with a traditional Start Menu rather than the Start UI.
It was not the only program to see an increase in user numbers as a result of the record-breaking amount of Start Menu programs that were downloaded.
Classic Shell’s principal developer said in 2017 that he would no longer be working on the project. He made the decision to make the software’s source code public in order to allow other developers the opportunity to fork the program and continue development.
The name of one of the very first forks was Classic Start. It was published in June 2018 that the initial version of Classic Start was made available. When the first stable version of the application was launched in September 2018, the program was renamed Open Shell.
Their project is not defunct, as work on the Nightly versions of the software is still ongoing. Users are welcome to download and install these Nightly versions, which can be seen on the main GitHub page. Below, we will show you how you can get Classic Shell on your Windows 11 PC.
How can I install Classic Shell on Windows 11?
1. Download the Open Shell asset
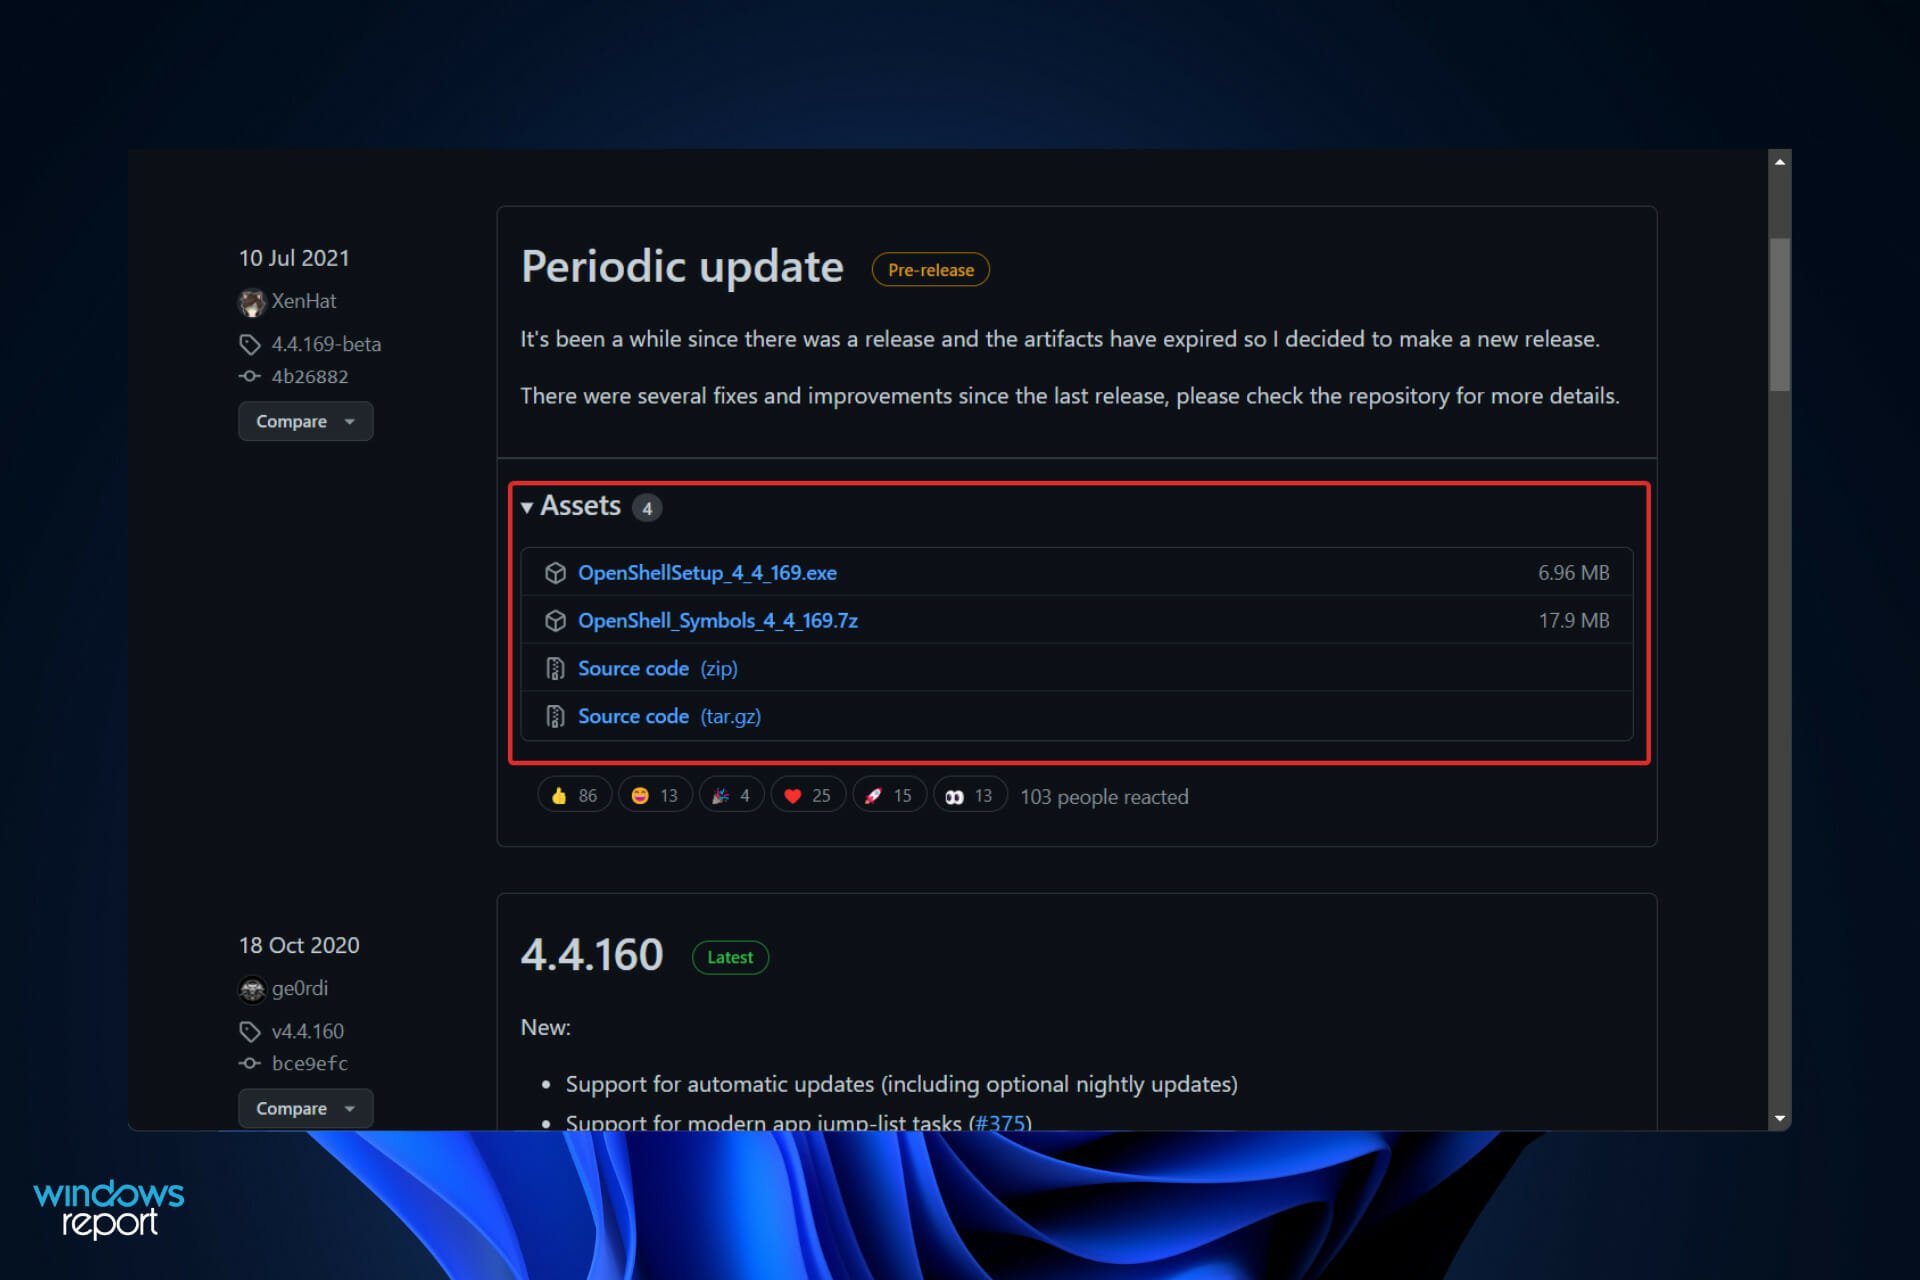
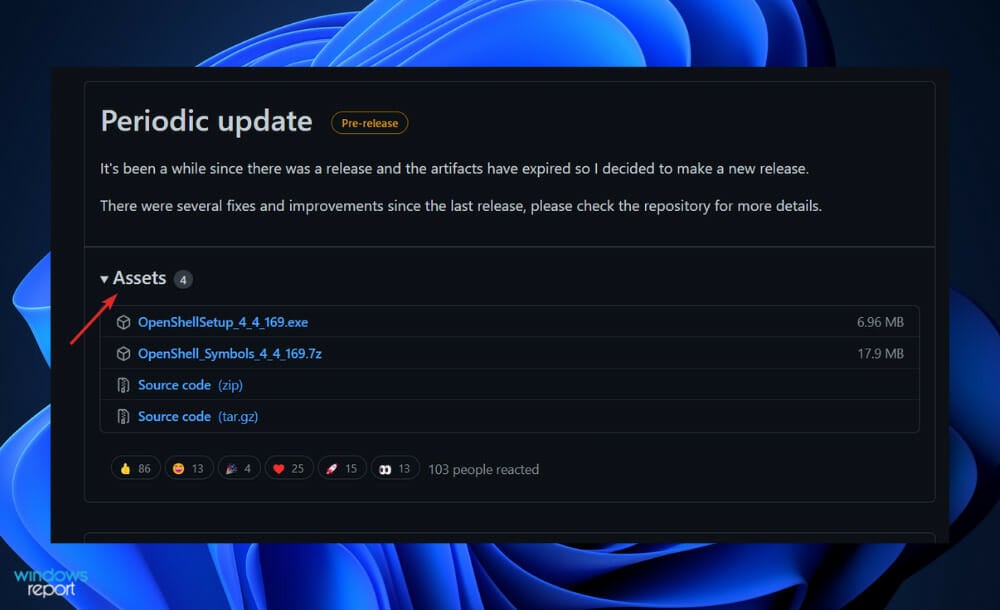
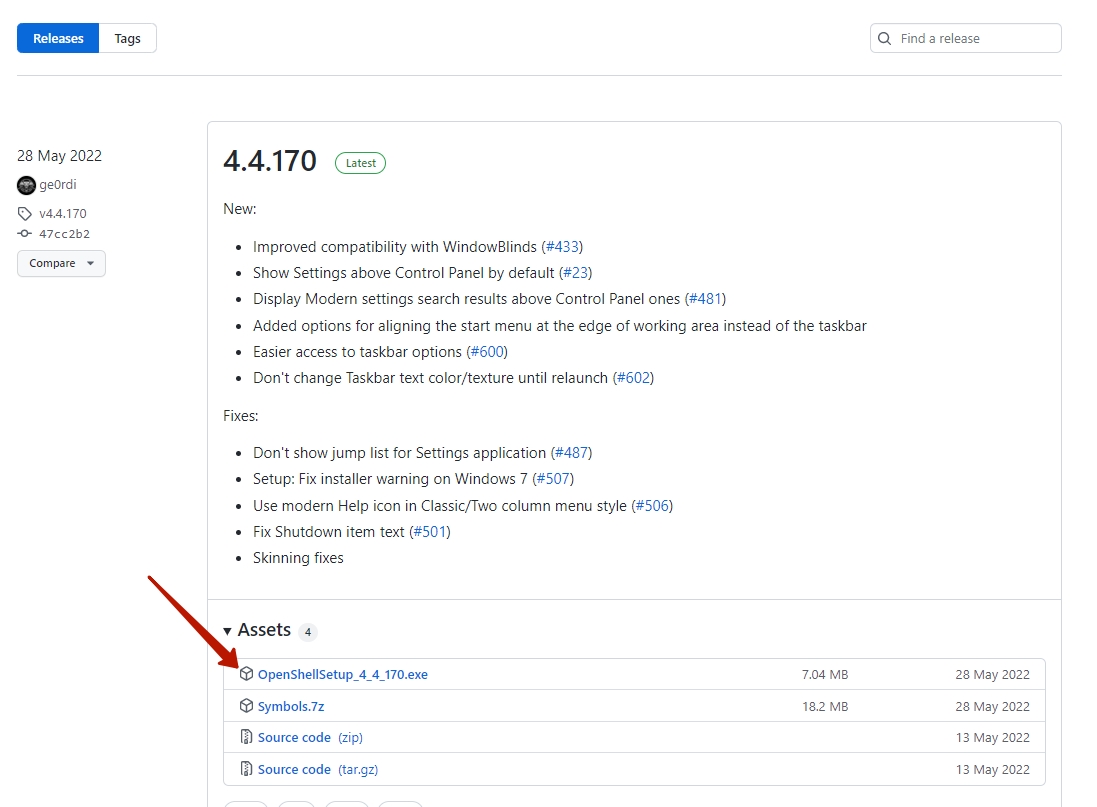
- Visit the Github repository and expend the Assets section under Periodic update.

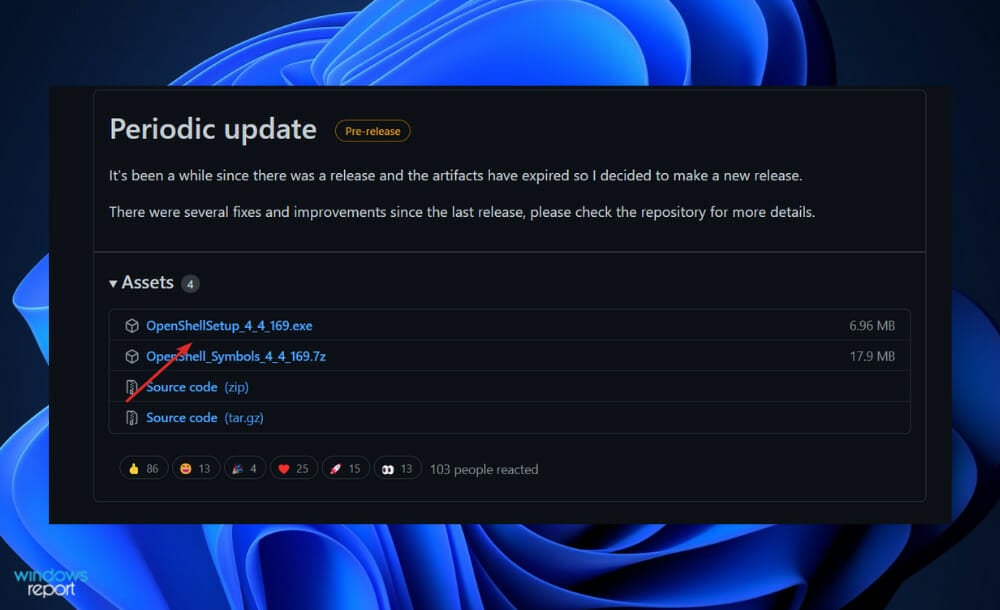
- Now click on OpenShellSetup_4_4_169 to download the file to your PC.
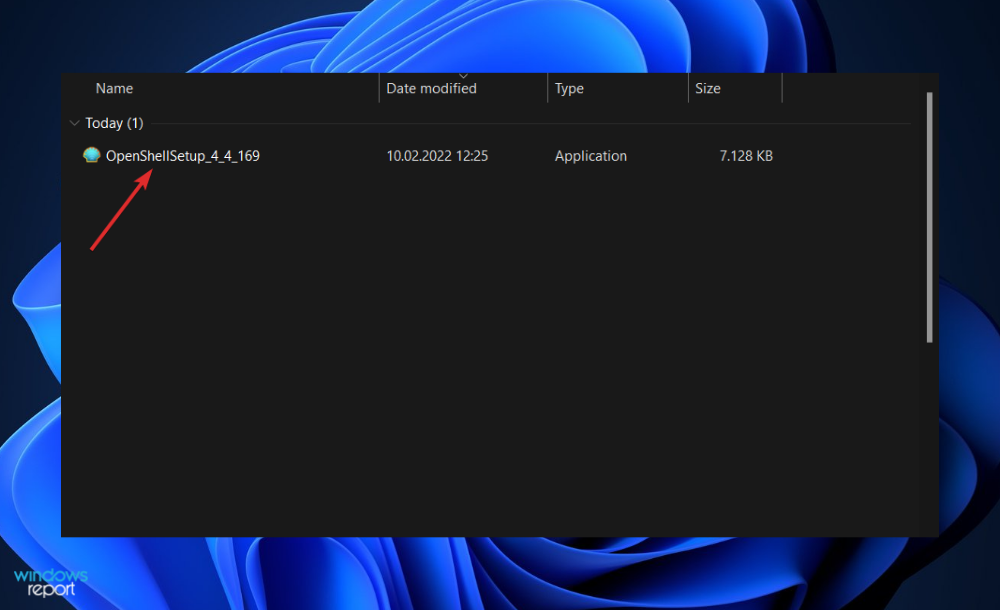
- Double-click on the setup file and follow the on-screen instructions in order to install OpenShell on your system.
Some PC issues are hard to tackle, especially when it comes to corrupted repositories or missing Windows files. If you are having troubles fixing an error, your system may be partially broken.
We recommend installing Restoro, a tool that will scan your machine and identify what the fault is.
Click here to download and start repairing.
Once installed, you can launch the app from your Start menu and customize Windows 11 according to your liking. Optionally, some computers may require a reboot.
2. Use a third party website
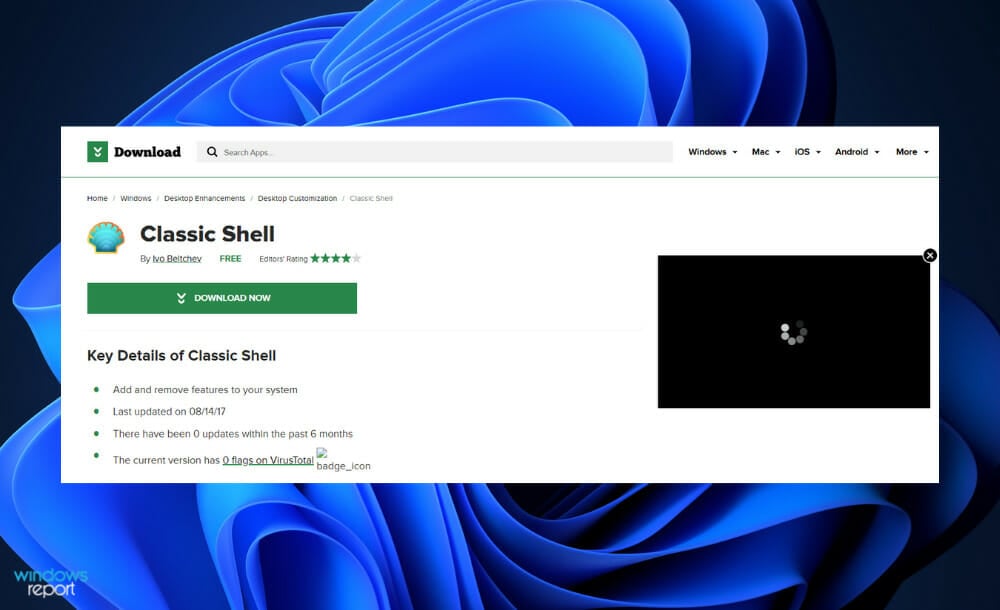
- There are other secure websites from which you can download Classic Shell from such as SourceForge.
- The interface of all of them is simple enough to just click a button and get delivered what you had came for.
Keep an eye out for websites that appear to be untrustworthy by having Not secure next to their link at the top of your browser’s window. You should definitely refrain from interacting with them.
To ensure your computer’s privacy and security, we recommend that you use a specialized and trustworthy tool such as ESET.
Why shouldn’t I use an old iteration of Windows?
Unlike other items in our lives, computers are not something that we replace frequently. When compared to cellphones, which typically have a lifespan of two to three years, a computer has a lifespan of more than five years.
If it’s of good quality, it should be able to last for at least 10 years after you initially purchased it. However, a large number of people have a propensity not to update their hardware at all.
Windows 7 and Windows XP are two Windows iterations that we all hold dear to our hearts. However, if we were to go on a nostalgia trip and use them on an older system, we would most likely want to keep that machine away from the Internet in order to maintain privacy.
The problem with obsolete and discontinued Windows iterations extends beyond simply upgrading to a newer iteration of the operating system. The underlying problem is that the company has already stopped providing maintenance for these systems.
This implies that if a severe security vulnerability is discovered in Windows XP or Windows 7, you will not be able to receive any updates to address it. In the coming years, Windows 8.1 and 10 will be confronted with the same problem, and you can anticipate that viruses will emerge.
However, if a vulnerability is severe enough, Microsoft has been known to defy its own standards on occasion. For example, it is well-known for issuing patches for the Meltdown and Spectre vulnerabilities in Windows XP.
But, for the vast majority of reasons, Microsoft considers Windows XP and 7 to be out-of-date platforms that they no longer provide support for. Other difficulties, such as major browsers or even device drivers ceasing to support your system, could potentially result in your PC being inoperable.
For further information and changes, you can make to your OS, check out our article on how to change Windows 11 to classic view. Alternatively, you should take a look at five best Windows 11 tips to streamline your OS.
And lastly, since we talked about privacy and security, don’t miss out on our post with five of the best antiviruses for Windows 11.
Let us know in the comments section below whether the guide was helpful for you as well as how you will change your OS with Open Shell.
![]()
Newsletter
by Loredana Harsana
Loredana is a passionate writer with a keen interest in PC software and technology. She started off writing about mobile phones back when Samsung Galaxy S II was… read more
Updated on January 26, 2023
- Users asked us how they can install Classic Shell on Windows 11, to which we respond today with two methods.
- The first is to navigate to the Open-Shell Github repository and download the assets from there.
- Alternatively, there are other secure websites from which you can install the software.
XINSTALL BY CLICKING THE DOWNLOAD FILE
- Download Restoro PC Repair Tool that comes with Patented Technologies (patent available here).
- Click Start Scan to find Windows 11 issues that could be causing PC problems.
- Click Repair All to fix issues affecting your computer’s security and performance
- Restoro has been downloaded by 0 readers this month.
Customizing your operating system is a fantastic way to make your regular life a little more enjoyable. You have the ability to change the user interface, apply a custom theme, add widgets, and much more. Thus, we will show you today how you can install Classic Shell on Windows 11.
The program has been around for a long time and allows you to modify the OS. Volunteers have now taken up the running of the organization, which was disbanded in 2017. The new project is titled Open Shell, and it is presently available on Github for those who are interested.
Follow along as we will show you how you can download and install the software on your computer, right after we see a little bit of its history. Keep up with us!
How are Open Shell and Classic Shell related?
A derivative of the popular but now-defunct Original Shell program for Windows, Open Shell can be used to restore the classic Start Menu, Explorer, and Internet Explorer shells to a computer’s operating system.
Classic Shell was a popular software that allowed users to restore functionality to OS iterations that had been discontinued by Microsoft. After the first introduction of Windows 8, the software gained in popularity as users chose to operate with a traditional Start Menu rather than the Start UI.
It was not the only program to see an increase in user numbers as a result of the record-breaking amount of Start Menu programs that were downloaded.
Classic Shell’s principal developer said in 2017 that he would no longer be working on the project. He made the decision to make the software’s source code public in order to allow other developers the opportunity to fork the program and continue development.
The name of one of the very first forks was Classic Start. It was published in June 2018 that the initial version of Classic Start was made available. When the first stable version of the application was launched in September 2018, the program was renamed Open Shell.
Their project is not defunct, as work on the Nightly versions of the software is still ongoing. Users are welcome to download and install these Nightly versions, which can be seen on the main GitHub page. Below, we will show you how you can get Classic Shell on your Windows 11 PC.
How can I install Classic Shell on Windows 11?
1. Download the Open Shell asset
- Visit the Github repository and expend the Assets section under Periodic update.
- Now click on OpenShellSetup_4_4_169 to download the file to your PC.
- Double-click on the setup file and follow the on-screen instructions in order to install OpenShell on your system.
Some PC issues are hard to tackle, especially when it comes to corrupted repositories or missing Windows files. If you are having troubles fixing an error, your system may be partially broken.
We recommend installing Restoro, a tool that will scan your machine and identify what the fault is.
Click here to download and start repairing.
Once installed, you can launch the app from your Start menu and customize Windows 11 according to your liking. Optionally, some computers may require a reboot.
2. Use a third party website
- There are other secure websites from which you can download Classic Shell from such as SourceForge.
- The interface of all of them is simple enough to just click a button and get delivered what you had came for.
Keep an eye out for websites that appear to be untrustworthy by having Not secure next to their link at the top of your browser’s window. You should definitely refrain from interacting with them.
To ensure your computer’s privacy and security, we recommend that you use a specialized and trustworthy tool such as ESET.
Why shouldn’t I use an old iteration of Windows?
Unlike other items in our lives, computers are not something that we replace frequently. When compared to cellphones, which typically have a lifespan of two to three years, a computer has a lifespan of more than five years.
If it’s of good quality, it should be able to last for at least 10 years after you initially purchased it. However, a large number of people have a propensity not to update their hardware at all.
Windows 7 and Windows XP are two Windows iterations that we all hold dear to our hearts. However, if we were to go on a nostalgia trip and use them on an older system, we would most likely want to keep that machine away from the Internet in order to maintain privacy.
The problem with obsolete and discontinued Windows iterations extends beyond simply upgrading to a newer iteration of the operating system. The underlying problem is that the company has already stopped providing maintenance for these systems.
This implies that if a severe security vulnerability is discovered in Windows XP or Windows 7, you will not be able to receive any updates to address it. In the coming years, Windows 8.1 and 10 will be confronted with the same problem, and you can anticipate that viruses will emerge.
However, if a vulnerability is severe enough, Microsoft has been known to defy its own standards on occasion. For example, it is well-known for issuing patches for the Meltdown and Spectre vulnerabilities in Windows XP.
But, for the vast majority of reasons, Microsoft considers Windows XP and 7 to be out-of-date platforms that they no longer provide support for. Other difficulties, such as major browsers or even device drivers ceasing to support your system, could potentially result in your PC being inoperable.
For further information and changes, you can make to your OS, check out our article on how to change Windows 11 to classic view. Alternatively, you should take a look at five best Windows 11 tips to streamline your OS.
And lastly, since we talked about privacy and security, don’t miss out on our post with five of the best antiviruses for Windows 11.
Let us know in the comments section below whether the guide was helpful for you as well as how you will change your OS with Open Shell.
![]()
Newsletter
С появления в сети первой версии Windows 11 сразу же появляются программы, которые позволяют воспользоваться прежними настройками и Пуском. Одной из них является программа Classic Shell в Windows 11. Она продолжает работать и с прежними версиями, но производство и обновление утилиты больше не ведется. Но основатель дистрибутива разрабатывает несколько исходных кодов, которые появились для активации программы.
Если вы еще не знакомы с программой, то ознакомиться с правилами и подробными настройками не составить труда. Утилита работает с любой ОС, к тому же ее вы легко импортируете с первой версии на новую.
Classic Shell – это совершенно бесплатный вариант программы, состоящий из многочисленных утилит, необходимых для определенного ПО. Состоит из 3 элементов: утилитой, позволяющей воспользоваться пуском, проводником и настройками. В основном работает, как приложение, не меняя основные настройки. Как утверждают производители Виндовс 11, то новую разработку они компонуют отдельно. То есть, любой, кто установит новинку на свой компьютер, ему придется дополнить ПО утилитами, позволяющими без проблем управлять.
Как скачать и установить
Процедура установки Open Shell в Windows 11 проста:
- Начальный этап производится на английском языке. Но все представлено в понятном формате. Выберите необходимые компоненты. Используя программу, вы легко поменяете меню в проводнике, установите новый Пуск, настройку произведете, используя рабочий браузер, который обычно устанавливается по умолчанию. Также в программу входит утилита, проводящая обновления.
- Установив программу, перед вами появится специальное окно с настройками. Все необходимые для работы функции расположены на главном меню. Обычно настройки запускаются исключительно на английском языке, но меню определяет автоматически ваш выбор. Если же нет отображения нужного языка, то выделите пункт «Show All Settings», там выберите нужный вариант.
- На основной странице программы выберите любой привлекающий ваше внимание внешний вид и дизайн. Если придется вы легко замените клавишу пуск собственной. Так использование программы не доставит хлопот.

- После нажатия на клавишу «Select Skin» вы легко подберете интересную тему для оформления, настроите параметры иконок, установите необходимые тексты. Выделите прозрачность при помощи специальных отметин, доступных в настройке.
- В разделе Basic Settings легко настроите чуткость кликов при нажатии на программу, включите и отключите авто-запуск стандартного меню особенно после перезагрузки ПК.
- При помощи специальной вкладки Customize Start Menu вы легко подключите либо отключите выделение необходимых для работы пунктов.
- По умолчанию войдите в раздел настройки и нажмите в пункт Пуск, где выберите раздел Настройка.
- Если намерены вернуть привычное меню, то в настройках выделите категорию Show All Settings. После в разделе Контроль подберите категорию Right click opens Win+X menu.
В основном вся процедура пользования программой не доставляет трудностей и работает исправно.
Как русифицировать утилиту
Программа не имеет русифицированный вариант меню, поэтому его придется настроить под свои параметры. Бывает, что человек не особо разбирается в иностранных языках, потому воспользуйтесь «Show All Settings». Все это расположено в разделе главного меню, где выберите настройки интерфейса. В меню пройдитесь по каждым разделам и выберите полезную настройку. В основном пользователи легко подберут любую необходимую для работы с программой настройку.
Инструкция по настройке
Необходимая инструкция для работы с утилитой прилагается. Предлагаем действовать строго представленным в программе подсказкам. Все необходимые клавиши и пункты предлагаются в разделе «настройки». Пользователи выделят все необходимые параметры в главном меню. Необходимо предварительно выделить все особенности процесса и получить максимум от утилиты. Программа действует лишь при правильном выборе версии, которая подойдет для вашего устройства или ПО.
Предварительно изучите все тонкости программы и получите необходимые настройки. Утилита считается необходимым атрибутом для новейшей Виндовс. Хотя его использовали при настройке предыдущей версии. Процедура не трудоемкая и позволяет оценить качество утилиты без труда. Новые возможности раскрываются после тщательной проверки совместимости новой версии ПО с наличием утилиты в программе. Скачать ее вы можете на официальном сайте производителя, где представлены версии предыдущих годов.
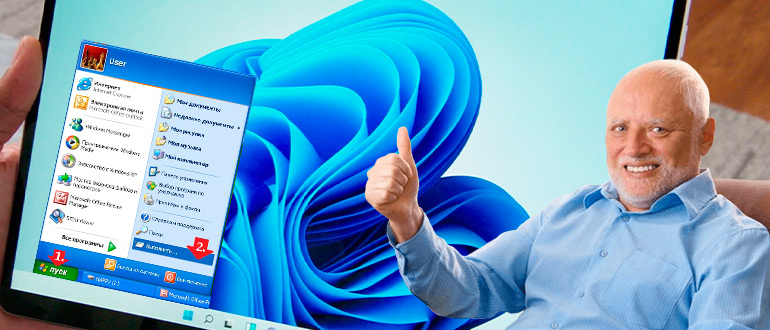
Друзья, приветствую вас на портале WiFiGid! В этой статье я покажу вам во всех деталях как можно вернуть классическое меню «Пуск» для Windows 11, если вдруг вам оно очень сильно надо. Лично я уже привык и к новому меню «Пуск», но для любителей классики выделил время на эту заметку.
Содержание
- Способ 1 – Просто переносим влево
- Способ 2 – Open-Shell (Classic-Shell)
- Задать вопрос автору статьи
Способ 1 – Просто переносим влево
Внимание! Чуть ниже мы поговорим про классическое меню «Пуск» как на Windows 7. Этот способ больше про расположение самой кнопки.
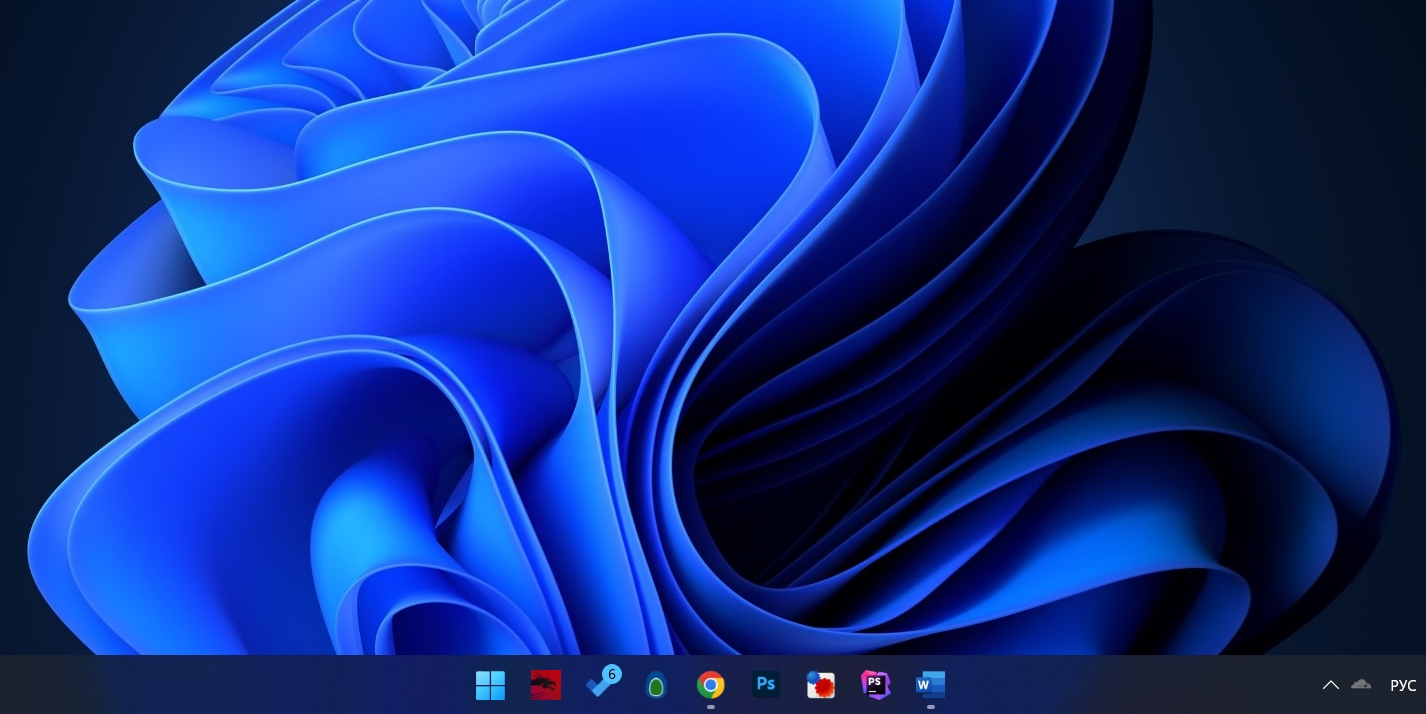
В новой Windows 11 всю панель быстрого доступа и саму кнопку «Пуск» расположили по центру:
В первые дни моя мышь так и стремилась в левый угол, но со временем переобучение прошло успешно. Тем же, кто не может до сих пор свыкнуться с этим нововведением есть официальный способ переместить его влево.
- Щелкаем правой кнопкой мыши по любому пустому месту панели задач и выбираем «Параметры панели задач» (тот же самый пункт вы можете найти через поиск Windows 11).
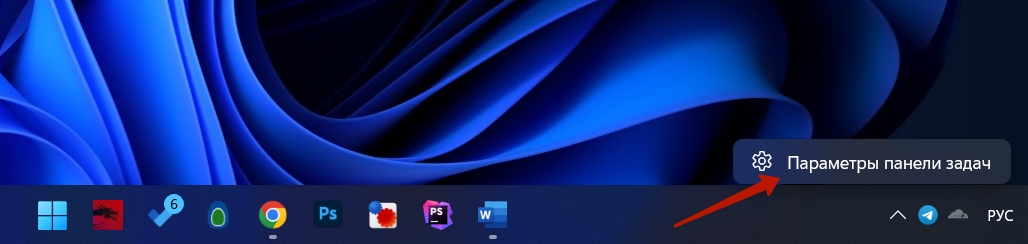
- Листаем в самый низ открывшегося окна, раскрываем вкладку «Поведение панели задач» и здесь ставим «Выравнивание панели задач» «Слева»:
Готово! И хотя сам «Пуск» остался тем же, зато он расположен под руку. Далее предлагаю посмотреть вариант получения классического меню.
Способ 2 – Open-Shell (Classic-Shell)
Если нужно вернуть классику, стандартного способа в самой Windows 11 еще нет (и даже не знаю, будет ли). Остается использовать внешнее решение – Open-Shell.
- Идем на GitHub программы и скачиваем актуальный релиз.
- Запускаем установщик, проходим все этапы и… не получаем ничего!!! Ну так было у меня, у вас, возможно, все прошло по-другому. Нажимаем на клавишу и получаем вот такое окошко настройщика:
- На скриншоте выше можно смело нажимать кнопку «ОК» (но при желании можете покопаться в настройках, а если проблемы с языком – используем переводчик или просто пишем свои вопросы в комментарии к этой статье). После этого все настройки меню применяются.
А теперь поговорим про главный недостаток. Если на Windows 10 эта программа полностью подменяла меню «Пуск», то в Windows 11, что-то пока не так (быть может уже поправили). Если щелкнуть мышкой по кнопке «Пуск», то открывается стандартное меню Windows 11. Но если нажать клавиши , то открывается классический «Пуск». При этом в самой настройке программы есть возможность установить вторую кнопку «Пуск» на панель задач, но полной подмены нет.
А использовать оба способа (установить это меню, вывести иконку на панель, а обычное меню выравнять влево), то кнопка пуск Open-Shell будет перекрывать кнопку «Пуск» от Windows 11.
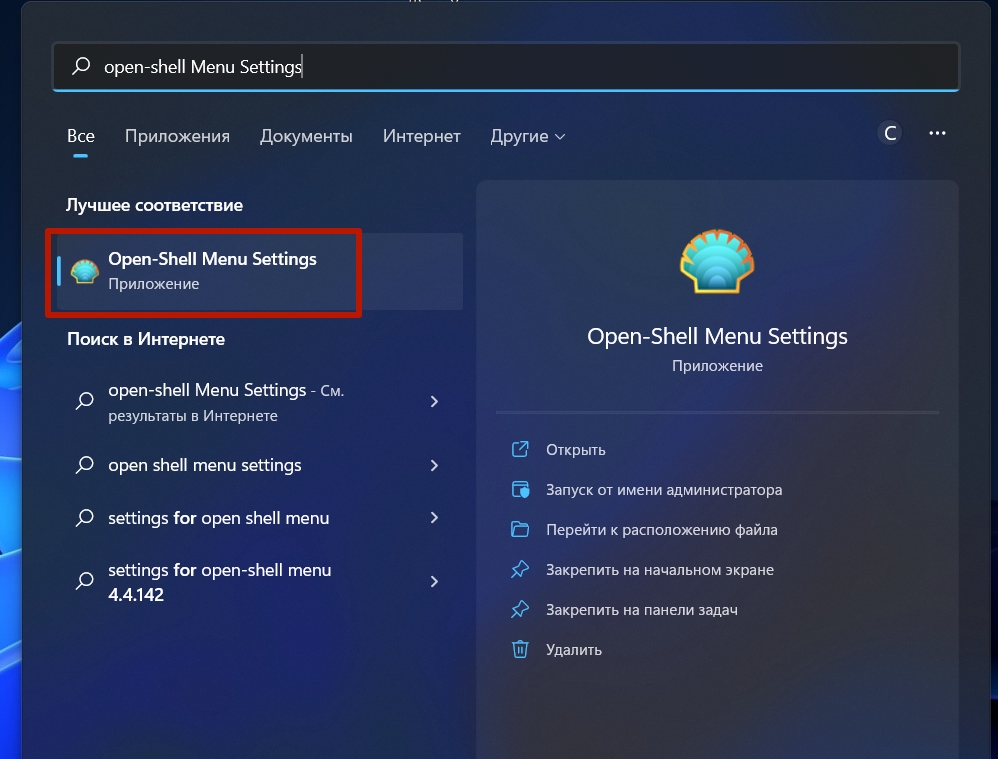
Для информации. Чтобы заново войти в настройки Open-Shell, можно щелкнуть правой кнопкой мыши по ЕЕ кнопке «Пуск» и выбрать пункт «Настройка». Если же вы эту кнопку не вынесли, то через стандартный поиск Windows 11 ищем программу Open-Shell Menu Settings.
Yeah so for Windows 11, you need to know first that although its Taskbar and Start Menu suck completely, the classic Taskbar code is still intact and can be revived. And Start Menu replacements (Classic Shell/Open Shell, or StartIsBack/StartAllBack or Stardock’s apps) continue to work. 7+ Taskbar Tweaker, probably the most important app for the Taskbar also works if this classic Taskbar is activated.
Open Shell/Classic Shell works with the new Taskbar as well as the classic taskbar. StartIsBack/StartAllBack works only with the classic one. Stardock’s Start11 works only with the new Taskbar. Anyway, the more functional classic Taskbar is the one everyone wants — that is the far superior one. The new one is a total joke, I won’t even bother to mention how messed up the new taskbar is. It is an insult to 25 years of Windows releases and drops features introduced by Windows 95, 98, 2000, Me, XP, Vista and 7. ![]()
Now, to bring back the classic Taskbar, there are currently two projects — one free, open source one called ExplorerPatcher and another very affordable, commercial, proprietary app called StartAllBack.
As for the choice of Start Menus, this is always your own decision but Classic Shell’s menu is objectively superior to the Start menu in StartAllBack, or Stardock’s and of course to the Windows 7 menu, Windows 10 menu, or Windows 11 Start. Also, Open Shell is definitely now better than Classic Shell for Windows 10 and Windows 11 because of the various fixes and enhancements it made after Classic Shell’s last release in 2017.
As of the current first «RTM» release of Windows 11 and the latest dev channel build for the version scheduled for release next year, (
22483.1011), there are many ways to use Classic Shell/Open Shell:
1.⠀Use the ExplorerPatcher project to revert first to the Classic Taskbar without losing the rest of Windows 11 functionality
2.⠀Use StartAllBack to enable the Classic Taskbar and revert many bad changes in Windows 11 but keep using the Classic Shell/Open Shell menu.
3.⠀Use⠀Classic Shell/Open Shell just as is with the Modern Taskbar (but you will have to use a square button — more on that below, read on)
4.⠀Revert to the Classic Taskbar with a Registry key instead of the in-memory patch that ExplorerPatcher does but a ton of functionality breaks. So although this UndockingDisabled Registry tweak was popular earlier, it is not the optimum way to keep Windows 11 fully functional yet usable.
1.⠀If you use ExplorerPatcher, there are no compromises required
2.⠀StartAllBack⠀is yet another excellent, easy to use option with an installer with no compromises required
3.⠀If you use Open Shell with the new Taskbar in Windows 11, you lose a huge amount of Classic Taskbar features which has better usability
4.⠀Below described is the Regedit value that revives the classic Taskbar but it breaks a lot of things. Therefore either using ExplorerPatcher or⠀StartAllBack⠀to revive the classic Taskbar is a better option.
⠀
Windows Registry Editor Version 5.00
[HKEY_LOCAL_MACHINESOFTWAREMicrosoftWindowsCurrentVersionShellUpdatePackages]
«UndockingDisabled»=dword:00000001
Restart Explorer or log off and login again. In this old Taskbar, most things work as before, including Classic Shell/Open Shell and the precious gem of an app, 7+ Taskbar Tweaker. Unlike Windows 11’s new Taskbar, there are no Start button position, replacement and custom image issues with the classic Taskbar.
For the system tray icons, run the command:
Explorer shell:::{05d7b0f4-2121-4eff-bf6b-ed3f69b894d9}SystemIcons
Use it to enable any icons you want — Volume, Date/Time/Clock, Action Center and other things like Language/Input indicator. Only the Power and Network icons on Classic Taskbar are useless or broken. Taskbar Toolbars (DeskBands) such as NetSpeedMonitor and Everything Toolbar also work. You can use Winaero Tweaker to enable classic Volume control with the Volume icon (and also fix a lot of broken Windows 11/10 stuff).
Since they split Quick actions from notifications in Windows 11, the cogwheel icon on the classic Taskbar (Win+A) opens the flyout from where you can access Wifi/Network, Volume and other things. Win+N shows calendar and notifications (but not calendar events/agenda).
If you still need direct icons for some broken/missing tray icon functionality, try these apps.
● For replacing/augmenting Network icon even though you can access Wifi from Win+A, use NetAnimate 1.8. Here’s what NetAnimate is (it’s an app that gives direct access to network adapters’ status and properties and also has its own internet connectivity indicator per network interface — both Ethernet and Wi-Fi). Alternate download link if original website goes down: https://1drv.ms/u/s!AqQf4TJSwxe-ggHjTBgD3J36QoUO?e=5mCYWs.
● For Sound/Volume, use Winaero SimpleSndVol especially with the Jloud theme which shows the current volume level directly in the taskbar with a clear white icon + green bar: https://winaero.com/simplesndvol/
● For Power icon, use Battery Mode app by Artem Tarasov: https://en.bmode.tarcode.ru/ This is far superior to the Windows power icon
● To launch the Wi-Fi/Network pane, use this command from Run dialog: ms-availablenetworks: or create a AutoHotkey script to open it with for example Win+W for Wifi.
Turn off any extra Taskbar icons from Settings if you want (Task View button, Search icon etc).
Features that remain broken on the classic Taskbar as of the build mentioned above of Windows 11 if you use UndockingDisabled Registry value:
● The Windows 11 Start Menu obviously stops working as well as the new Windows cloud-powered search user interface (Win+S/Win+W). Workaround: Classic Shell’s Start search still remains far superior to the Windows menu and to Win+S search.
● Touch keyboard with emoji (Workaround: Use an app like Telegram Desktop for entering emoji — it has search for emoji too)
● Win+X menu stops working (Workaround: You don’t really need the Win+X menu when you have the full power of the Classic Shell/Open Shell Start Menu! You can just recreate the Win+X menu in Classic Shell’s Start menu itself or link to Windows Administrative Tools in a subfolder/custom item and put Win+X menu shortcuts there)
● Widgets don’t work. As a workaround, you can use the commercial app, True Launch Bar. It has various plugins including News, Weather and a lot more.
● Explorer search box is broken after «UndockingDisabled» as well. (Workaround: Use Everything Search and Windows Search integration of Classic Shell/Open Shell as an alternative.) In Everything Search, you can type: <searchquery> path:<folderpath> to search a specific folder
● Snap Previews on the Maximize button/the new snap layouts of Windows 11 are disabled with UndockingDisabled=1. Workaround: You can use the FancyZones Microsoft PowerToy.
● Win+H (Windows cloud-powered dictation) is disabled with UndockingDisabled=1. As a workaround, you can use Google Docs Voice Typing to dictate text.
● The Windows Startup sound is disabled with UndockingDisabled=1. Workaround: Just have a VBscript playing a sound at startup.
● Screen snip (Win+Shift+S) does not work. Use any of the dozens of third party screenshot taking tools.
● There is a considerable delay before Windows 11 logs on when this above Registry value is set to 1.
Because of so many things breaking when you use the Registry value, I strongly recommend ExplorerPatcher or StartAllBack only!
Regardless of some features lost from the new Taskbar such as fancy animations, the classic Taskbar has far more features and remains the more functional and easy-to-use one. The new one is dumbed down and custom Start button images of Classic Shell/Open Shell also won’t work correctly with it.
Most importantly, 7+ Taskbar Tweaker works with the Classic Taskbar, all the older Registry values work, as does StartAllBack and Open Shell for changing the taskbar’s appearance.
⠀StartAllBack⠀taskbar msstyles/themes also work with it to restore the taskbar appearance like Windows Vista, 7 or 8.1.
See here if you need screenshots and step-by-step guidance: https://winaero.com/how-to-restore-classic-start-menu-in-windows-11-and-get-back-live-tiles/
As for the skin to use with the Classic Shell/Open Shell Start Menu, I recommend this one: viewtopic.php?f=17&t=8557 Unlike the Windows XP skin which had only 3 colors (Blue, Olive Green and Silver), this one follows your Windows accent color while still maintaining the practical and beautiful XP layout.
Finally if you would like more people to know how to properly configure Classic Shell and Open Shell with Windows 11 and to make them aware that they still work with Windows 11 brilliantly, please share the link of this topic everywhere on the web as many people mistakenly seem to think it no longer works. They repeatedly keep asking in the Open Shell Github to update it for Windows 11 when actually it is not required if you fix the taskbar correctly first.
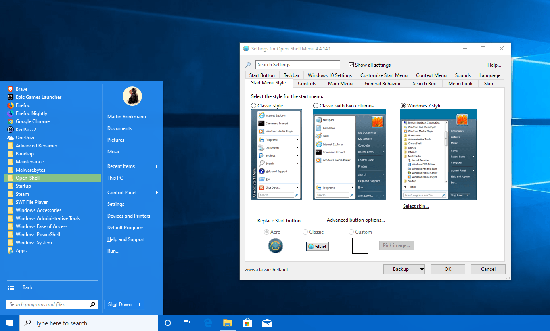
I have attached screenshots of Open Shell Start Menu with this skin in 7 style and XP style, and some examples of fixed Taskbar with a combination of Open Shell/Classic Shell and⠀StartAllBack⠀on Windows 11.
P.S. The taskbar is intentionally cluttered in the screenshots to demonstrate all the features that Windows 11’s new taskbar removes (but the classic Taskbar has intact).
_________________
Links to some general topics:
● Compare Start Menus
● Read the Search box usage guide.
I am a Windows enthusiast and helped a little with Classic Shell’s testing and usability/UX feedback.
Классическое меню «Пуск» для Windows 11 можно вернуть с помощью программы Open Shell и Start11, доступные по ссылкам github.com/Open-Shell/Open-Shell-Menu/releases и stardock.com/products/start11/ соответственно. После установки программа позволяет вернуть прежнее оформление, как в Виндовс 10 и выполнить настройку с учетом собственных предпочтений. Ниже рассмотрим каждый из вариантов подробнее.
Можно ли вернуть
Не всем пользователям новой Windows 11 нравится изменение классического меню «Пуск». При этом разработчики отметили, что такие нововведения, вплоть до значков, шрифта и звука были сделаны специально для удобства пользования. Сам «Пуск» оказался в центре для упрощения поиска. При этом пользователь видит последние файлы вне зависимости от платформы, на которой осуществлялся просмотр.
Жалобы на оформление повлекли за собой вопросы, как вернуть старый «Пуск» в Windows 11, и можно ли это сделать без отката до 10. Такое желание возникает у людей, которые не хотят перестраиваться и планируют пользоваться классическим меню. Его легко вернуть с помощью специальных приложений Open Shell и Start11 (платное), которые находятся в свободном доступе. В некоторых случаях может помочь внесение изменение в реестр, но последнее время этот метод почти не работает.
Как вернуть: все способы
Ниже рассмотрим три способа, как вернуть классический «Пуск» в Виндовс 11 и получить привычное меню. Первый метод, позволяющий внести изменения с помощью реестра, может не сработать, а вот два других (с применением дополнительного софта) дают желаемый результат с гарантией. Рассмотрим все варианты подробнее.
Изменение реестра
До недавнего времени вернуть старое меню «Пуск» в Windows 11 можно было с помощью внесения правок в реестр. Сегодня в большинстве случаев он не сработает, но попробовать стоит. Алгоритм действий такой:
- Войдите в поиск Windows 11 и введите «реестр». Как вариант, жмите Win+R, а потом введите regedit.
- Вверху укажите путь HKEY_CURRENT_USERSoftwareMicrosoftWindowsCurrentVersionExplorerAdvanced для получения доступа к нужной папке.
- Кликните правой кнопкой мышки на раздел «Advanced» и кликните «Создать».
- Выберите параметр DWORD на 32 бита (Value).
- Дайте название Start_ShowClassicMode и жмите «Ввод».
- Два раза жмите на сделанный DWORD-параметр и поменяйте значение с «0» на «1».
- Перезапустите ПК / ноутбук.
В случае успеха должен появиться стандартный пуск Windows 11 в классическом исполнении меню. Еще раз отметим, что в большинстве случаев этот вариант не работает. В таком случае используйте рассмотренные ниже решения.

Вообще способ с реестром спасает от многих проблем с ОС. Начиная от ситуаций, когда пропадает панель задач.
Open Shell
Действенный метод, как вернуть классическое меню «Пуск» Windows 11, как в 10 — применение софта Open Shell. Алгоритм действий в таком случае имеет следующий вид:
- Установите программу Open Shell по ссылке github.com/Open-Shell/Open-Shell-Menu/releases.
- Установите программу. Выберите компонент меню «Пуск», который необходимо изменить.
- Жмите на кнопку меню «Пуск», далее «Все приложения».
- Выберите «Открыть настройки меню Open Shell» из перечня удаленных программ.

- Поставьте флажок возле параметра «Заменить кнопку Пуск». Как только эта работа сделана приложение Опен Шелл помещает значок слева внизу — в то место, где ранее размещалось классическое меню.

- Перейдите на вкладку «Обложка (Skin)».
- Выберите подходящий вариант.
- Отключите панель задач по центру для Виндовс 11. Для этого зайдите в «Параметры» Windows 11, а далее «Персонализация» и «Панель задач».
- Жмите на кнопку «Поведение панель задач» и выберите «Выравнивание панели задач с левой стороны».

Таким способом в Windows 11 можно вернуть старый Пуск в классическом исполнении. Выполнение девятого пункта является обязательным, ведь пока программа Open Shell после активации сохраняет расположение старой панели и придется пользоваться двумя одновременно. Чтобы этого избежать, необходимо отключить отображение строки по центру.
Изменение значка «Пуск»
Чтобы в Windows 11 остался старый «Пуск», необходимо сделать еще один шаг. Дело в том, что после внесения изменений с помощью программы Open Shell значок классического меню имеет немного иной вид. Не такой, как в Виндовс 10, 8 или 7. Для исправления ситуации этот символ необходимо поменять. Для этого сделайте следующие шаги:
- Запустите приложение из пускового раздела.
- В разделе меню «Заменить Пуск» жмите на «Пользовательский».
- Кликните на «Выбрать изображение».
- Выберите подходящий значок и сохранитесь.
При желании можно менять и другие параметры, к примеру, ручное поведение, внешний вид, изменить цвет и т. д. Для загрузки новых стилей можно использовать сайт deviantart.com/gliczide/art/Windows-11-Start-Buttons-Taskbars-882839915.
Start11
Специалисты компании Stardock выпустили еще одну программу, позволяющую вернуть классическое меню «Пуск» в Windows 11. Софт доступен для загрузки на официальном сайте stardock.com/products/start11/. С ее помощью можно выбрать один из нескольких вариантов оформления, расположить панель задач сверху или снизу, поменять цвет, прозрачность или углы, отрегулировать размытие и прозрачность, размер.
Разобраться, как вернуть старую панель задач Windows 11 не составляет труда, ведь интерфейс программы очень простой. На выбор доступно несколько стилей, в том числе классическое меню для Виндовс 7 или 10. Можно также персонализировать отображение под собственное предпочтение.
Собственно, с помощью Start11 можно быстро вернуть кнопку «Пуск» в Windows 11 в классическом варианте. При этом пользователю вправе менять цвета, текстуры, вариант отображения, стили и т. д. Кроме того, в программе доступна привычная поисковая строка. Разработчики приложения заявляют, что новый софт всего лишь возвращает то, что потеряли пользователи Windows 11.
Главный недостаток в том, что программа не бесплатная. При оплате 5,99 долларов доступна 1 активная установка, 30 дней поддержки и 11 языков на выбор (в том числе русский). При этом разработчики обещают 30 дней бесплатного пользования. Также имеется тариф за 14,99 долларов. В этом случае доступно пять установок и месяц поддержки.
Теперь вы знаете, как поменять меню «Пуск» в Windows 11 в стиле 10 и получить его в классическом варианте. Лучший способ — использовать бесплатную программу Open Shell, но при наличии свободных денег можно купить Start11. Что касается внесения изменений в реестр, этот способ в 9 из 10 случаев не работает.
В комментариях поделитесь своим опытом возврата классического меню, и какой еще метод можно использовать.
Отличного Вам дня!