This repository has been archived by the owner on Mar 20, 2021. It is now read-only.
v1.5.3
Couple of fixes and few small improvements:
- Don’t lose password in batch mode and keys from storage (resolve #220, #142, #144)
- No disconnection triggered before quit (#202)
- Don’t use system wide defined proxy when disabled in profile (#208)
- Unable to use socks5 proxy built by ssh tunneling (#187)
- Invalid routes (#190)
- macOS tray icons improved for dark/light dock panel (#192)
Note: when you get «decoding of OTP token failed» message on edit profile action, please try to remove the profile and create it again.
Please refer to Changelog for further details.
OS requirements: Win7+
Note: attached ‘High Sierra’ macOS package at this time is really experimental build for Homebrew just for testing…
v1.5.2
Couple of fixes and few small improvements:
- tun interface with the correct MTU
- non-english interface names
- vpnc-script: undo custom routes
- accept VPN profile name in command line; connect immediatelly after start
- automatically pick a group if it is the only option
- HiDPI support improved
Update 3rd party depenendencies:
- Windows: GnuTLS (3.5.13), stoken (0.91), spdlog (0.13.0), gmp (6.1.2), nettle (3.3), Qt (5.9.1)
- macOS: GnuTLS (3.5.14), spdlog (0.13.0), Qt (5.9.1)
Please refer to Changelog for further details.
OS requirements: Win7+ and macOS 10.10+
Notes/limitations:
- when dynamic MTU apply, the connection may appears 2-3 seconds later after GUI connecting state (will be solved in next releases)
- sorry — no macOS package (because of pre-build package stability issues; but source code build should be OK)
Note: attached ‘High Sierra’ macOS package at this time is really experimental build for Homebrew just for testing…
v1.5.1
Only a small release to share the promised macOS preview package.
macOS build is native application linked against:
- OpenConnect v7.08
- GnuTLS v3.5.8
- Qt 5.8.0
There are open few cosmetic graphical issues and some ‘OpenConnect’ v7.08 features are not yet implemented (but they are planned).
When you will find connection problem, please try at first upstream OpenConnect console application (e.g. build via Hombrew).
Please refer to Changelog for further details.
OS requirements: Win7+ and macOS 10.9+
v1.5.0
Couple of small changes, updates and bugfixes, probably most notable:
- libraries updated (OpenConnect v7.08, GnuTLS 3.5.5 Qt 5.8 etc.)
- initial Juniper server support in UI
- new quick profile setup/connect dialog; in addition to former advanced connection setup
- changes in logger; single instance (no support for multiple instance now)
- incorrect error messages about multiple VPN instances solved
Please take a look to Changelog for more details.
(sorry, macOS pre-build drag&drop installer and homebrew support will come in 1-2 weeks; I need to make one fix)
Note: this binary relesase requires at least Windows 7
v1.4.1
- Flushing Route Breaks OpenConnect-GUI (#113)
- building from source code snapshots should be fixed (i.e. without cloning the repo)
Note: this is the last relesase supporting WindowsXP
v1.4.0
- updated gnutls(3.4.14), stoken (0.90), gmp(6.1.0), nettle(3.2), p11-kit(0.23.2), zlib (1.2.8), libxml2 (2.9.3)
- updated TAP-windows(9.21.2), Qt(5.6)
- new component based NSIS installer (with optional console client, vcredist/tap drivers)
- couple of changes, fixes and logging improvements in ‘vpnc-script.js’
- many small UI changes/improvements/fixes everywhere
- VPN profiles management simplified; it remember last selected
- notification area icon allow connect/disconnect and show log as well
- minimize to notification area, minimize instead of close and start minimized settings introduced
- main and log dialogs store their size/position
Changes:
- NDIS5 drivers are not bundled in installer (can be installed manually)
Known limitations:
- close & open log window to load vpnc script output
- project may be compiled only from git-cloned source tree (will be fixed soon)
- MacOS build is broken now, will be fixed in next week
v1.3
- Properly notify the server of the VPN session shutdown (#39)
v1.2
- Corrected execution of the vpnc-script (#38)
- Corrected issue with SPNEGO auth
v1.1
- Corrected issue with the negotiation of DTLS 0.9
v1.0
- Corrected issue with certain popup dialogs freezing the UI.
- Corrected import of PKCS #12 files.
- Added tray icon in UI.
- updated to libopenconnect 7.06.
- updated to latest prerelease of nettle and GnuTLS 3.4.0.
-
- GitLab: the DevOps platform
- Explore GitLab
- Install GitLab
- How GitLab compares
- Get started
- GitLab docs
- GitLab Learn
- Pricing
- Talk to an expert
-
/
-
Help
- Help
- Support
- Community forum
- Submit feedback
- Contribute to GitLab
- Switch to GitLab Next
-
Projects
Groups
Snippets -
Sign up now - Login
-
Sign in / Register

OpenConnect GUI
Project ID: 12274423
Star
87
Topics:
openconnect
Qt
gui
Graphical OpenConnect client

Find file
Download source code
tar.gz
tar.bz2
tar
Clone
-
Clone with SSH
-
Clone with HTTPS
-
Open in your IDE
Visual Studio Code (SSH)Visual Studio Code (HTTPS)IntelliJ IDEA (SSH)IntelliJ IDEA (HTTPS)
- Copy SSH clone URLgit@gitlab.com:openconnect/openconnect-gui.git
- Copy HTTPS clone URLhttps://gitlab.com/openconnect/openconnect-gui.git
- README
- GNU GPLv2
- CHANGELOG
- CONTRIBUTING
Содержание
- OpenConnect Setup Tutorial
- OpenConnect Setup Tutorial for Windows
- 1. Download OpenConnect
- 2. Unknown Publisher
- 3. Run Installer
- 4. Install OpenConnect
- 5. Installation Options
- 6. Install Location
- 7. Start Menu Folder
- 8. Choose Components
- 9. Finish Installation
- 10. Run OpenConnect GUI
- 11. Creating a new profile
- 12. New Profile (advanced)
- 13. Server Details
- 14. Username
- 15. CA Certificate
- 16. Import Certificate File
- 17. Save Configuration
- 18. Connect
- 19. Profile Trust
- 20. Enter Password
- 21. Connected.
- OpenConnect-GUI VPN client
- Review
- Free Download
- Simplistic client that provides you with a streamlined and user-friendly environment for making the most out of of the open-source OpenConnect VPN service
- What’s new in OpenConnect-GUI VPN client 1.5.3 Beta:
- Simple VPN client that’s both easy to install and to get along with
- Smoothly integrates with your computer’s taskbar
- Visually-unimpressive but efficient VPN client
- OpenVPN Connect for Windows
- The Interface
- Frequently Asked Questions
- Can the new and old client co-exist?
- Can I connect to multiple servers at the same time?
- Is the old client still available?
- Where can I get this for other OS?
- Should I use this client or the client from my instance of Access Server?
- How do I install the Windows client?
- How do I install the client directly from my Access Server?
- How do I import a profile from a server?
- How do I import a profile from my computer?
- Why did I receive an error message that TAP mode is not supported when importing a profile?
- Why am I getting a certificate error? How can I fix using a self signed certificate?
- Where do I find my Access Server Hostname and credentials?
- What do I enter for “Title”?
- What does “import autologin profile” mean?
- Why did I get this message: “In this version compression was disabled by default. If you need it, please re-enable this setting.”
- Настройка доступа VPN
- Общая информация
- Получение доступа
- Параметры, необходимые для подключения
- Программное обеспечение для VPN
- Windows
- Linux
- MacOS
- Настройка подключения
- OpenConnect GUI 1.5.1
OpenConnect Setup Tutorial
OpenConnect Setup Tutorial for Windows
The following instructions go step–by–step through an OpenConnect installation on Windows.
1. Download OpenConnect
Download the OpenConnect from here: OpenConnect Windows.
If you have any problems downloading or installing files from our server please contact our Live Help team, we are always available to help.
2. Unknown Publisher
You may receive a Windows UAC prompt, click ‘Yes’, the software is perfectly safe to use.

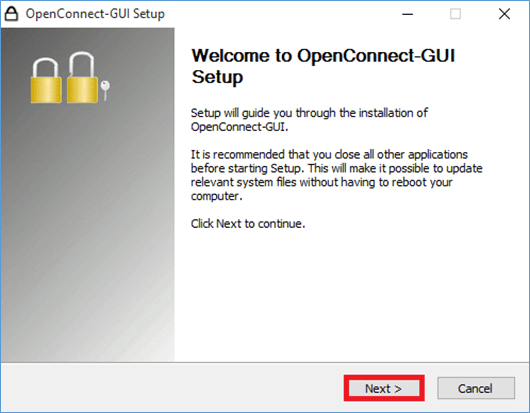
3. Run Installer
Run the installer application.

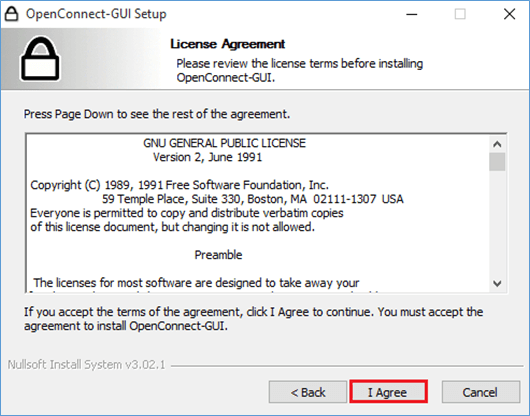
4. Install OpenConnect
Click ‘I Agree’ to initiate the installation.

5. Installation Options
You may wish to create a desktop shortcut. Then click ‘Next’ to confirm the installation options.

6. Install Location
If you are happy with the installation location click ‘Next’.

Confirm the shortcut folder, then click ‘Next’.

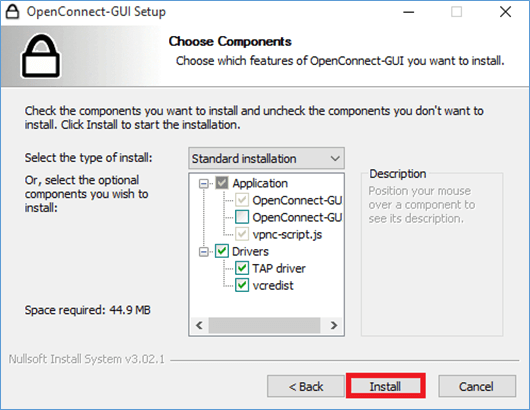
8. Choose Components
Click onto the ‘Install’ button.

9. Finish Installation
Click onto the ‘Finish’ button. The OpenConnect software application will now be installed on your system.

10. Run OpenConnect GUI
If the GUI does not automatically open, double click onto the OpenConnect desktop shortcut.

11. Creating a new profile
Click onto the ‘Options’ button to begin the configuration of a new OpenConnect Profile.

12. New Profile (advanced)
Select the option to add a ‘New Profile (advanced).

13. Server Details
Input your server details.
Name: Any name you choose. (We recommend adding a name you will easily recognise, if you pla n on adding multiple profiles).
Gateway: Enter the server IP or DNS address of the server you would like to connect to, followed by a colon and the port number.
For example, if your account is located on UK23, you would enter its DNS address as: https://uk23.vpnuk.net:4443 or its IP followed by :4443

14. Username
Enter your login username into the ‘Username’ field.

15. CA Certificate

16. Import Certificate File
Click onto the ‘Import’ button and locate the ‘vpnuk-ca.crt’ certificate file.

17. Save Configuration
Click onto the ‘Save’ button.
Note: If you would like the OpenConnect GUI to remember the password for this profile, place a check in the ‘Batch mode’ checkbox.

18. Connect
Your OpenConnect profile will now be available on the list of Servers. You can now connect by clicking onto the ‘Connect’ button.

19. Profile Trust
The first time you connect to your newly created profile you will be asked to confirm the connection is genuine. You can review the information tallies up correctly and points to our security certificate, then click onto ‘Accurate information’.

20. Enter Password
Enter your connection password.
Note: If you placed a check into the ‘Batch Mode’ checkbox during the Profile configuration, this will be the only time the OpenConnect GUI will ask for your password.

21. Connected.
You will now connect to your VPNUK server. If you would like to disconnect, click onto the ‘Disconnect’ button.
Источник
OpenConnect-GUI VPN client
Review
Free Download
Simplistic client that provides you with a streamlined and user-friendly environment for making the most out of of the open-source OpenConnect VPN service
What’s new in OpenConnect-GUI VPN client 1.5.3 Beta:
Originally created to replace the security-orientated Cisco AnyConnect SSL VPN, OpenConnect is SSL VPN client that, as expected, allows you to connect to various secure point-to-point private networks.
Since handling OpenConnect requires a little bit of command line knowledge, it’s understandable if you might be looking for a more user-friendly solution.
Meet OpenConnect-GUI VPN client, a rather simplistic utility that provides you with a compact GUI to get about while using OpenConnect. Before anything, we should point out that the application is still in a fairly young, Beta development stage.
Simple VPN client that’s both easy to install and to get along with
The application does not require any kind of special treatments when it comes to its deployment process. Simply let yourself be guided by the typical wizard-based installer and, in just a couple of seconds, you should be greeted by the app’s compact main window.
There are two main tab sections, one that allows you to add, configure and connect to various profiles and VPN servers, while the other offers you detailed information regarding the chosen private networks such as IPv4, DNS, DTLS Cipher, as well as download and upload counters.
Smoothly integrates with your computer’s taskbar
It’s also worth pointing out that, in spite of its barren looks, the utility presents good taskbar integration. Once you configure one or two profiles, you can literally use the app without having to access its main window only with the help of its taskbar menu.
While we’re on the subject, you should also know that you can configure the app to minimize to the tray area, to minimize instead of closing and to start as minimized.
Visually-unimpressive but efficient VPN client
To end with, OpenConnect-GUI VPN client does exactly what a typical VPN client should do: make the overall service more accessible, increase user productivity by simplifying the workflow and be as unobtrusive as possible.
Источник
OpenVPN Connect for Windows
This is the official OpenVPN Connect client software for Windows workstation platforms developed and maintained by OpenVPN Inc. This is the recommended client program for the OpenVPN Access Server to enable VPN for Windows. The latest version of OpenVPN for Windows is available on our website.
If you have an OpenVPN Access Server, it is recommended to download the OpenVPN Connect client software directly from your own Access Server, as it will then come pre configured for use for VPN for Windows. The version available here contains no configuration to make a connection, although it can be used to update an existing installation and retain settings.
sha256 signature: 6c62ce1843203ae61fa655cb1090567e1404e7b934c5c0300dabec9fc23d3abf
For Windows 7, 8, 8.1, and 10.
sha256 signature: 1a2516b0f713f90298a944d72cce8022ad5dce7df367d3e097560f7e6db97621
Previous generation OpenVPN Connect V2 is available here:
sha256 signature: f65dd0ea784dd63632be64f89b1f83d51c199fd7319888883780cb9e975c325a
For Windows 7, 8, 8.1, and 10.
The Interface
Our latest line of OpenVPN for Windows (OpenVPN Connect) software available for the major platforms features a new and improved user interface, making the experience of installing and using the OpenVPN for Windows software a snap. With an easy to use import feature you can import profiles straight from your OpenVPN Access Server or just import a saved profile from disk.


Frequently Asked Questions
Can the new and old client co-exist?
Yes, you may continue to use both v2 and v3 on the same connect device and import the profiles desired into each. If you like, you can run either one or both.
Can I connect to multiple servers at the same time?
No, the client cannot connect to multiple servers at once. It does support multiple connection profiles, giving you the option to switch easily from one server to the next, but you can only be connected to one at a time. This is by design, to prevent unexpected traffic paths when connecting to multiple VPN servers at the same time. If you are a system administrator and you require a complex setup where multiple connections are active at the same time, there is the option to use the open source community OpenVPN client software available from our website.
Is the old client still available?
The OpenVPN client v1 was called “OpenVPN Desktop Client” and is no longer available. It is also not safe to use this anymore as it hasn’t been maintained for many years. It was replaced with the OpenVPN client v2. The OpenVPN client v2 is called “OpenVPN Connect Client” and has been in use for many years. It is still available from our website. You can download it from the direct link new the top of this page. The OpenVPN client v3 is called “OpenVPN Connect” and is the latest generation of our software. It is available on our website as a beta version. It is also offered in the OpenVPN Access Server client web interface itself.
Where can I get this for other OS?
Should I use this client or the client from my instance of Access Server?
This is the official OpenVPN Connect software for Windows workstation platforms developed and maintained by OpenVPN Inc. This is the recommended client program for the OpenVPN Access Server. The latest versions are available on our website. If you have an OpenVPN Access Server, you can download the OpenVPN Connect client software directly from your own Access Server, and it will then come pre-configured for use. The version available here contains no configuration to make a connection, although it can be used to update an existing installation and retain settings.
How do I install the Windows client?
How do I install the client directly from my Access Server?
How do I import a profile from a server?
How do I import a profile from my computer?
Why did I receive an error message that TAP mode is not supported when importing a profile?
Layer 2 bridging (TAP) is no longer supported. Switch over to TUN Mode to resolve this issue.
Why am I getting a certificate error? How can I fix using a self signed certificate?
OpenVPN Access Server starts with a self-signed certificate. With this, you will receive warnings from your web browser about the site not being secure as well as a certificate error when importing a profile with the Connect Client. You can simply override the warnings or add an exception for your web browser. To resolve this, you can set up a DNS host name that resolves to the public address of your Access Server and install a valid SSL certificate that corresponds to that DNS host name. Going forward, you would use that hostname to access your server instead of the IP address. This is also the recommended method as validated SSL certificates can only ever function with a valid public DNS hostname.
Where do I find my Access Server Hostname and credentials?
Your Access Server Hostname is the address at which your Access Server can be reached. For example it could be https://vpn.yourcompany.com/. If a DNS hostname is not set up, it is also possible to specify the IP address where your Access Server. For example: https://55.193.55.55 Your credentials are your username and password. You may need to get that information from your Access Server administrator if you don’t know it.
What do I enter for “Title”?
Title is the name for the profile. It is automatically defined as the username with the hostname or IP address(example: user1@hostname). It differentiates between multiple profiles. You can define it manually as well. The title can be anything you want just so you can see which profile is which.
What does “import autologin profile” mean?
Choosing this option allows you to import an autologin profile with the address and credentials for your Access Server, then simply start the connection with the tap of a button. You would not need to re-enter credentials each time you connect. The autoprofile itself contains an embedded secure certificate that identifies and authorizes your connection automatically. It is an optional setting on the OpenVPN Access Server that the administrator of the server can choose to make available to you. If you find you cannot import the autologin profile, your administrator may not have allowed autologin through user permissions.
Why did I get this message: “In this version compression was disabled by default. If you need it, please re-enable this setting.”
During investigation of a vulnerability called VORACLE, it was found that using compression to make the data that goes through the VPN tunnel smaller, and thus faster, has an adverse effect on security. To learn more about this see our security notification on our website regarding the VORACLE attack vulnerability. In order to protect our customers, we are disabling compression by default. Some servers of the open source variety can be configured in such a way that the client must do compression, or else the client may not connect successfully. In such a case, you should get the server updated to disable compression. But we understand that this is not always possible, and you may need to be able to connect to such a server. In that event you can go into the settings and re-enable compression.
Источник
Настройка доступа VPN
Общая информация
После подключения к VPN вам становятся доступны внутренние сетевые ресурсы ИО РАН и подключенных филиалов. Вы можете подключаться по RDP или по SSH к своим рабочим станциям из внутренних сетей. Весь ваш Интернет-трафик при подключении к VPN выходит в Интернет в Москве из-под IP адресов, принадлежащих ИО РАН; благодаря этому становятся доступны подписки ИО РАН на сайтах журналов и библиотек.
В случае необходимости проверки или получения какого-либо дополнительного сетевого доступа, оперативной организации дополнительных сетевых сервисов, обращайтесь в Отдел информационных технологий к дежурному системному инженеру.
Получение доступа
Параметры, необходимые для подключения
Для доступа к VPN используйте следующе параметры:
Программное обеспечение для VPN
Для подключения необходимо использовать VPN-клиент OpenConnect или CiscoAnyconnect.
Windows
Linux
Версии OpenConnect client для различных дистрибутивов Linux чаще всего уже включены в дистрибутив и ищутся по именам: network-manager-openconnect, network-manager-openconnect-gnome, openconnect
MacOS
Для планшетов и телефонов под Android и IOS следует использовать приложение Cisco AnyConnect из официальных магазинов (это бесплатно) этих операционных систем.
Настройка подключения
После установки OpenConnect выберете: New profile: Необходимо указать только Gateway: https://vpn.ocean.ru Все остальные настройки оставить по умолчанию.

Создание нового профиля.

Настройки профиля по умолчанию.

Также, при успешном подключении и время работы VPN-подключения, значек в области уведомлений сменится c вилки на вилку включенную в розетку :


После подключения к VPN весь ваш трафик направляется в сеть Института и выходит в Интернет через оборудование ИО РАН. Об этом следует вспомнить при просмотре непрофильных фильмов on-line и скачивании файлов в несколько десятков Гб.
© Copyright 2020, ОИТ ИО РАН.
Создано с помощью Sphinx 1.8.4.
Источник
OpenConnect GUI 1.5.1


OpenConnect uses TLS and DTLS to secure your Internet connection, which makes comparable to the CISCO AnyConnect SSL VPN protocol. It gives you the possibility of surfing the web in safety and anonymity. With OpenConnect GUI, brings a graphical user interface to this utility, so you can enjoy its protection capabilities without any difficulties.
The software is compatible with all modern Windows versions and it takes about a minute to install it. The setup wizard places a few useful configuration options at your disposal, but the installation process is still straightforward and easy.
Unlike most VPN clients, OpenConnect GUI doesn’t limit you to a certain number of virtual private networks, but at the same time it doesn’t present any networks. It lets you connect to whatever networks you want or know of. You can define several connection profiles and when you wish to secure your traffic, you only need to select a profile and click a button.
Defining a connection profile can be done in two ways. You can just specify a name and a gateway and your profile will be ready for use. Alternatively, you can opt for the advanced mode, in which you can make many more tweaks. You can specify a username, certificates, OTP tokens, choose between different VPN protocols and more.
Created profiles can be selected in a drop menu, on the main user interface. Once you select a profile, you only need to click a button to connect. It takes a few seconds to establish a connection, but once it is done, you will be able to surf the web anonymously and you can also circumvent region-related restrictions.
OpenConnect GUI gives you full control over the security of your Internet connection.
Pros:
You can define your own VPN connections. You can switch between connection profiles on the fly. The software provides a wide range of configuration options.
Cons:
You need your own gateway addresses if you wish to secure your connection.
You can download OpenConnect GUI free here.
Источник
OpenConnect VPN Setup for Windows 7, 8, 10, 11
This tutorial explains how you can set up FastestVPN with the OpenConnect/ SSL protocol using the OpenConnect GUI (SSL VPN Client) on Windows 7, 8, 10, and 11.
The Windows VPN configured with OpenConnect GUI (SSL VPN Client) masks your internet traffic with port “443“, making it very difficult for any firewall or blocking system to block or detect your VPN connection.
Step #1: Download the OpenConnect GUI Setup file.
Download OpenConnect GUI Setup
Step #2: Click on the downloaded file to run the setup. Click on Next.
Step #3: Click on “I Agree”.
Step #4: Click “Next” on the next three steps.
Step #5: Don’t change anything and click on “Install”.
During the installation, if it prompts to download TAP-Windows Provider, then click on “Install”. Otherwise, proceed to the next step.

Step #6: Click “Finish”.
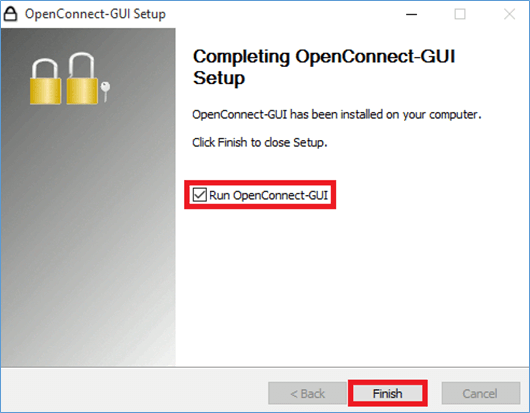
Step #7: OpenConnect GUI VPN client will appear in a few seconds. (If it doesn’t show up, then search “OpenConnect” from Windows search and launch it from there).

Step #8: Click on the “Settings” icon and select “New profile”.
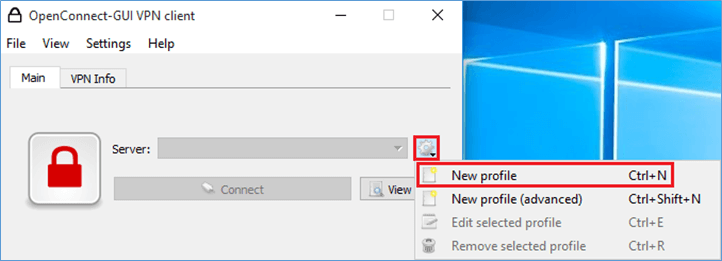
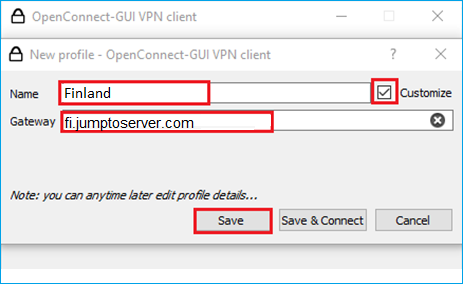
Step #9: Enter the following details:
- Put a checkmark on ‘Customize‘
- Name: VPN Server location name, or whatever you like
- Gateway: Your desired VPN server address. Here you can find the complete list of FastestVPN Server addresses. For example: fi.jumptoserver.com
- Click on “Save“
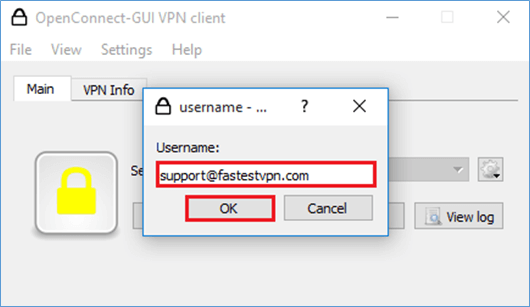
Step #10: Click on “Connect.

Step #11: Enter your FastestVPN “Username” and click “OK”, then enter your FastestVPN “Password” and click “OK”.
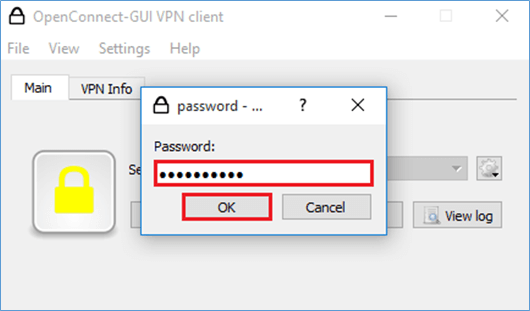
Once the “Lock” turns green that means you are “Connected” to the FastestVPN.
Use the Disconnect button when you need to disconnect from the VPN connection.

Use the OpenConnect GUI icon in the system tray/ taskbar hidden items to connect and disconnect your VPN later.
19 мая 2022
Как использовать OpenConnect вместо CiscoAnyConnect
Простой последовательный план первого подключения.
Илья Зверев
Архитектор IT-решений
Устанавливаем нужный софт
- Chocolatey (если ещё не установили) — https://chocolatey.org/
- Choco install openssl
- Choco install openconnect-gui
Готовим сертификат для использования
- Обычно на вход дают сертификат в формате pfx и пароль к нему. Наша цель — получить сертификат в формате crt и ключ key в формате pem.
- Открываем cmd в папке с pfx файлом.
- Выполняем команду openssl pkcs12 -in [yourfile.pfx] -clcerts -nokeys -out [certificate.crt].
- Вводим пароль нужное количество раз (обычно 1). Сертификат crt получен.
- Выполняем команду openssl pkcs12 -in [yourfile.pfx] -nocerts -out [keyfile-encrypted.key].
- Вводим пароль нужное количество раз (обычно 3 раза, вводите тот же пароль все 3 раза). Мы получили ключ key, но не в том формате, который нам нужен.
- Опционально можем снять пароль с ключа если он достаточно защищен, выполнив команду openssl rsa -in [keyfile-encrypted.key] -out [keyfile-decrypted.key].
- Конвертируем ключ в формат pem командой openssl rsa -in [keyfile-decrypted.key] -outform PEM -out [keyfile-decrypted-pem.key], если ключ расшифровали, или openssl rsa -in [keyfile-encrypted.key] -outform PEM -out [keyfile-encrypted-pem.key].
Настраиваем соединение
- Запускаем OpenConnect-GUI VPN client.
- Жмем на кнопку с шестерёнкой, выбираем опцию New Profile (advanced) и заполняем поля.
- Name — имя соединения (любое). Можно ввести домен, который дали, чтобы не запутаться.
- Gateway — вводим https://vpn.domain.name — доменное имя или ip, который дали вместе с сертификатом и паролем.
- GroupName — пропускаем. Заполнится при необходимости при первом подключении.
- CA Certificate — пропускаем, но если есть crt соответствующий — можно указать.
- OTP Token — пропускаем, если в инструкциях к Cisco не предлагалось опций в настройках.
- VPN protocol — оставляем Cisco AnyConnect по умолчанию.
- Вкладка Local Certificate — указываем crt и key в формате pem из файлов которые подготовлены на предыдущем шаге.
- Остальное можно оставить по умолчанию. Жмем Save.
Первое подключение
- Выбираем профиль из списка, жмем Connect.
- При запросе могут предложить выбрать группу — выбираем соответственно переданной инструкции к VPN.
- При просьбе ввести логин + пароль или только пароль — вводим указанные данные.
- PROFIT!
Official OpenVPN Connect client program
This is the official OpenVPN Connect client software for Windows workstation platforms developed and maintained by OpenVPN Inc. This is the recommended client program for the OpenVPN Access Server to enable VPN for Windows. The latest version of OpenVPN for Windows is available on our website.
If you have an OpenVPN Access Server, it is recommended to download the OpenVPN Connect client software directly from your own Access Server, as it will then come pre configured for use for VPN for Windows. The version available here contains no configuration to make a connection, although it can be used to update an existing installation and retain settings.
Download OpenVPN Connect v3
sha256 signature: 6e964b3a5e26d40eb8b13c173df7908426babfc04f8d34dce06f9ace84185f0f
For Windows 7, 8, 10, and 11.
A 32 bits version is also available:
Download OpenVPN Connect v3 for 32 bits
sha256 signature: fde2349e4ce8e07dd82d7f23c8a17643ed71bd91e74fa64383a85c217244c9a8
Previous generation OpenVPN Connect V2 is available here:
Download OpenVPN Connect v2.7.1
sha256 signature: f65dd0ea784dd63632be64f89b1f83d51c199fd7319888883780cb9e975c325a
For Windows 7, 8, and 10.
The Interface
Our latest line of OpenVPN for Windows (OpenVPN Connect) software available for the major platforms features a new and improved user interface, making the experience of installing and using the OpenVPN for Windows software a snap. With an easy to use import feature you can import profiles straight from your OpenVPN Access Server or just import a saved profile from disk.
Frequently Asked Questions
Yes, you may continue to use both v2 and v3 on the same connect device and import the profiles desired into each. If you like, you can run either one or both.
No, the client cannot connect to multiple servers at once. It does support multiple connection profiles, giving you the option to switch easily from one server to the next, but you can only be connected to one at a time. This is by design, to prevent unexpected traffic paths when connecting to multiple VPN servers at the same time. If you are a system administrator and you require a complex setup where multiple connections are active at the same time, there is the option to use the open source community OpenVPN client software available from our website.
The OpenVPN client v1 was called “OpenVPN Desktop Client” and is no longer available. It is also not safe to use this anymore as it hasn’t been maintained for many years. It was replaced with the OpenVPN client v2. The OpenVPN client v2 is called “OpenVPN Connect Client” and has been in use for many years. It is still available from our website. You can download it from the direct link new the top of this page. The OpenVPN client v3 is called “OpenVPN Connect” and is the latest generation of our software. You can download it with the link above. It is also offered in the OpenVPN Access Server client web interface itself.
This is the official OpenVPN Connect software for Windows workstation platforms developed and maintained by OpenVPN Inc. This is the recommended client program for the OpenVPN Access Server. The latest versions are available on our website. If you have an OpenVPN Access Server, you can download the OpenVPN Connect client software directly from your own Access Server, and it will then come pre-configured for use. The version available here contains no configuration to make a connection, although it can be used to update an existing installation and retain settings.
- Download the MSI file
- Open and start the setup wizard.
- Give permissions to install on your Windows OS.
- Complete the OpenVPN Connect Setup Wizard.
- The OpenVPN logo displays in your tray (bottom right) with DISCONNECTED status.
- Click on the icon to start the Onboarding Tour.
- Review how to import a profile from a server by entering the Access Server Hostname and credentials or uploading a profile from your computer.
- Agree to the data collection use and retention policies after reviewing them.
- Import a profile, either from the server or from file.
- Navigate to your OpenVPN Access Server client web interface.
- Login with your credentials.
- Select ‘OpenVPN Connect for Windows’.
- Wait until the download completes, and then open it (specifics vary depending on your browser).
- Click Run to start the installation process.
- Click Yes to approve the privilege escalation request.
- Wait until the installation process completes.
- In the system tray, the OpenVPN Connect Client is now ready for use.
- From the OpenVPN Connect UI, choose “Import from Server”.
- Enter your Access Server Hostname, Title, Port (optional), and your credentials—username and password.
- Click Add.
- If you choose to Import autologin profile, it is less secure, but you won’t need to re-enter credentials.
- Choose “Import from File”.
- Drag and drop a .OVPN file or click on Browse to navigate to the location on your computer.
- The message displays that the profile is successfully imported and displays the hostname and the title. You can change the title if desired.
- Click on Add to complete the import.
Layer 2 bridging (TAP) is no longer supported. Switch over to TUN Mode to resolve this issue.
OpenVPN Access Server starts with a self-signed certificate. With this, you will receive warnings from your web browser about the site not being secure as well as a certificate error when importing a profile with the Connect Client. You can simply override the warnings or add an exception for your web browser. To resolve this, you can set up a DNS host name that resolves to the public address of your Access Server and install a valid SSL certificate that corresponds to that DNS host name. Going forward, you would use that hostname to access your server instead of the IP address. This is also the recommended method as validated SSL certificates can only ever function with a valid public DNS hostname.
Your Access Server Hostname is the address at which your Access Server can be reached. For example it could be https://vpn.yourcompany.com/. If a DNS hostname is not set up, it is also possible to specify the IP address where your Access Server. For example: https://55.193.55.55 Your credentials are your username and password. You may need to get that information from your Access Server administrator if you don’t know it.
Title is the name for the profile. It is automatically defined as the username with the hostname or IP address(example: user1@hostname). It differentiates between multiple profiles. You can define it manually as well. The title can be anything you want just so you can see which profile is which.
Choosing this option allows you to import an autologin profile with the address and credentials for your Access Server, then simply start the connection with the tap of a button. You would not need to re-enter credentials each time you connect. The autoprofile itself contains an embedded secure certificate that identifies and authorizes your connection automatically. It is an optional setting on the OpenVPN Access Server that the administrator of the server can choose to make available to you. If you find you cannot import the autologin profile, your administrator may not have allowed autologin through user permissions.
During investigation of a vulnerability called VORACLE, it was found that using compression to make the data that goes through the VPN tunnel smaller, and thus faster, has an adverse effect on security. To learn more about this see our security notification on our website regarding the VORACLE attack vulnerability. In order to protect our customers, we are disabling compression by default. Some servers of the open source variety can be configured in such a way that the client must do compression, or else the client may not connect successfully. In such a case, you should get the server updated to disable compression. But we understand that this is not always possible, and you may need to be able to connect to such a server. In that event you can go into the settings and re-enable compression.
- OpenVPN Connect v3 supports Windows 7, Windows 8, Windows 10, and Windows 11.
- OpenVPN Connect v2 supports Windows Vista, Windows 7, Windows 8, and Windows 10.
- For Windows XP, you’ll need to get an open source client from the Open Source Community.
Downloading and installing
Release Notes v3
Release date: 22 March 2022
- OpenSSL updated to 1.1.1n (to address CVE-2022-0778)
- Minor change for Web Authentication in a system browser
Release date: 9 March 2022
- Added import using Web Authentication in system browser
- Added reporting of UUID device identifier as UV_UUID parameter
Release date: 16 December 2021
- Resolved a bug when importing OpenVPN Cloud profiles
Release date: 17 November 2021
- Changed Web Auth flow to use external browser for authentication
Release date: 7 October 2021
- Updated OpenSSL library to 1.1.1l version
- Added support of local DNS resolvers
- Added Device ID on Settings page
- Added Confirmation Dialogs setting
- Fixed UI issues on Windows 11
- Various bug fixes and improvements
Release date: 23 June 2021
- Resolved a security issue related to OpenSSL configuration (CVE-2021-3613) reported by Xavier Danest
Release date: 3 June 2021
- Added command line interface. Refer to Command Line functionality for OpenVPN Connect.
- Added support for PKCS11 hardware tokens. Refer to Support of #PKCS11 physical tokens for OpenVPN Connect.
- Updated OpenVPN 3 library to 3.6.2 version.
- Added captive portal detection.
- Added network loss detection.
- Added new functionality for software updates.
- Replaced reconnect on reboot setting with launch options
- Added external certificates on Windows 7.
- Added an Advanced Settings section.
- Added colorful tray icons to show connection status.
- Removed the «force AES-CBC cipher» legacy compatibility option.
- Various bug fixes and UX improvements.
Release date: 25 February 2021
- Added support for deep linking and web authentication using system web browser
- Removed optional wintun driver support
Release date: 30 October 2020
- Minor changes for Web Auth flow
- Added reporting UV_APP_VER values to the VPN server
- Implemented a new way of profile bundling (distribution of MSI and profile as separate files)
- Fixed an issue where an OpenVPN server could not be reached if it was not reachable through the default gateway
- Fixed an issue where a large amount of routes pushed to the VPN client would cause the client to fail
- Fixed issues with the display of the application version
Release date: 26 August, 2020
- Added reporting UV_ASCLI_VER and UV_PLAT_REL values to the VPN server
- Fixed not prompting user for certificate approval under certain conditions
- Updated Wintun driver to v0.8.1 that contains a patch for a driver update issue
- Added installer routine that ensures presence of a particular Windows hotfix on Windows 7 machines (KB2921916)
Release date: 13 July, 2020
- This is now a stable release and no longer considered beta software
- As part of the transition from Mbed TLS to OpenSSL the list of negotiable TLS cipher suites no longer includes weak cipher suites that lack forward secrecy support (DH/ECDH)
- Switchover from Mbed TLS library to OpenSSL library
- Support of TLS 1.3 version
- Support signing with RSA-PSS signatures during TLS handshake
- Update of OpenVPN3 library to OpenVPN core 3.5.6 version
- Optional WinTun driver is available during installation
- Implemented possibility to run VPN connection as system service
- Improved stability and performance
- Updated MbedTLS to 2.7.13 to resolve a security issue (CVE-2019-18222)
- Fixed a failure of installation process on some operating systems with non-English localization
- Implemented a fix for a security issue related to the location of installation files (CVE-2020-9442)
- New profile import flow with WebAuth support
- Added EULA license during installation
- Added .ovpn file association
- Added possibility to connect without external certificate when the client certificate is not required
- Fixed connection with DUO authentication service
- Fixed connection via server-locked profile with 2FA
- Fixed proxy basic authentication
- Fixed issue with long client-side scripts
- Fixed issue with unquoted path privilege escalation reported by Yogesh Prasad (CVE-2014-5455)
- New unified UI with 2 color scheme options
- Dropped support of MD5 algorithm
- Disabled tunnel compression by default (could be enabled back in the app settings)
- Ability to add proxies for connection from within the app
- Ability to manage external certificates directly from within the app (except in Windows 7 for the moment)
- Separate screen with extended statistics of connection session
- Log File with options to pause/resume, clear and save logs for sharing
- Plenty of other settings like reconnect on reboot, seamless tunnel, IP/TLS versions etc.
- Ability to create connect and disconnect shortcuts.
Release Notes v2
Release date: October 22, 2020
- Added support for tls-crypt (v1 and v2)
Release date: May 27, 2020
- Resolved an issue where DNS records were not being deleted properly in some rare cases.
Release date: April 29, 2020
- Resolved some issues on Windows with driver signing.
Release date: April 15, 2020
- Added multi-factor support for the dynamic challenge/response model.
- Updated TAP driver to latest version and signed with latest driver signing certificate.
- Updated MbedTLS to 2.7.13 to resolve a security issue (CVE-2019-18222)
- Improved round-robin DNS server exclusion route handling.
- Resolved a problem where ’empty credentials’ error could occur.
- Resolved some various other minor stability issues.
Release date: January 22, 2020
- Resolved an issue where DNS records were not being deleted properly in some rare cases.
- Resolved a problem with saving connection profiles when using a Windows username that contains non-latin characters.
Release date: March 11, 2019
- Signed this build with a new software publisher EV certificate valid until 23-2-2022, as the old certificate had expired.
- Resolved a problem where reconnect would fail on a round-robin DNS hostname as server address in combination with full-tunnel redirection.
Release date: December 11, 2018
- Added DHCP option PROXY_AUTO_CONFIG_URL capability for proxy auto configuration (PAC) in the operating system. It is now possible to do for example:
- push “dhcp-option PROXY_AUTO_CONFIG_URL (url to proxy PAC settings file)»
- DNS default suffix pushed by the VPN server should now have priority when the client already had a DNS default suffix set locally.
Release date: April 18, 2018
- Fixed launch issue on some older Windows platforms when Microsoft Visual C++ redistributable wasn’t present
- Fixed and improved platform and client version reporting to the server
Release date: March 22, 2018
- mbedTLS: fix incompatibility with PKI created by OpenSSL 1.1
- mbedTLS: add support for ECDSA
- mbedTLS: updated to fix CVE-2018-0487 vulnerability.
- Issue OpenVPN client showing ‘no VPN servers’ when a connection profile with an excessively long server host name was loaded is now fixed.
- TLS key refresh (TLS soft reset) connection interruption when using –opt-verify is now fixed.