19 мая 2022
Как использовать OpenConnect вместо CiscoAnyConnect
Простой последовательный план первого подключения.
Илья Зверев
Архитектор IT-решений
Устанавливаем нужный софт
- Chocolatey (если ещё не установили) — https://chocolatey.org/
- Choco install openssl
- Choco install openconnect-gui
Готовим сертификат для использования
- Обычно на вход дают сертификат в формате pfx и пароль к нему. Наша цель — получить сертификат в формате crt и ключ key в формате pem.
- Открываем cmd в папке с pfx файлом.
- Выполняем команду openssl pkcs12 -in [yourfile.pfx] -clcerts -nokeys -out [certificate.crt].
- Вводим пароль нужное количество раз (обычно 1). Сертификат crt получен.
- Выполняем команду openssl pkcs12 -in [yourfile.pfx] -nocerts -out [keyfile-encrypted.key].
- Вводим пароль нужное количество раз (обычно 3 раза, вводите тот же пароль все 3 раза). Мы получили ключ key, но не в том формате, который нам нужен.
- Опционально можем снять пароль с ключа если он достаточно защищен, выполнив команду openssl rsa -in [keyfile-encrypted.key] -out [keyfile-decrypted.key].
- Конвертируем ключ в формат pem командой openssl rsa -in [keyfile-decrypted.key] -outform PEM -out [keyfile-decrypted-pem.key], если ключ расшифровали, или openssl rsa -in [keyfile-encrypted.key] -outform PEM -out [keyfile-encrypted-pem.key].
Настраиваем соединение
- Запускаем OpenConnect-GUI VPN client.
- Жмем на кнопку с шестерёнкой, выбираем опцию New Profile (advanced) и заполняем поля.
- Name — имя соединения (любое). Можно ввести домен, который дали, чтобы не запутаться.
- Gateway — вводим https://vpn.domain.name — доменное имя или ip, который дали вместе с сертификатом и паролем.
- GroupName — пропускаем. Заполнится при необходимости при первом подключении.
- CA Certificate — пропускаем, но если есть crt соответствующий — можно указать.
- OTP Token — пропускаем, если в инструкциях к Cisco не предлагалось опций в настройках.
- VPN protocol — оставляем Cisco AnyConnect по умолчанию.
- Вкладка Local Certificate — указываем crt и key в формате pem из файлов которые подготовлены на предыдущем шаге.
- Остальное можно оставить по умолчанию. Жмем Save.
Первое подключение
- Выбираем профиль из списка, жмем Connect.
- При запросе могут предложить выбрать группу — выбираем соответственно переданной инструкции к VPN.
- При просьбе ввести логин + пароль или только пароль — вводим указанные данные.
- PROFIT!
OpenConnect VPN Setup for Windows 7, 8, 10, 11
This tutorial explains how you can set up FastestVPN with the OpenConnect/ SSL protocol using the OpenConnect GUI (SSL VPN Client) on Windows 7, 8, 10, and 11.
The Windows VPN configured with OpenConnect GUI (SSL VPN Client) masks your internet traffic with port “443“, making it very difficult for any firewall or blocking system to block or detect your VPN connection.
Step #1: Download the OpenConnect GUI Setup file.
Download OpenConnect GUI Setup
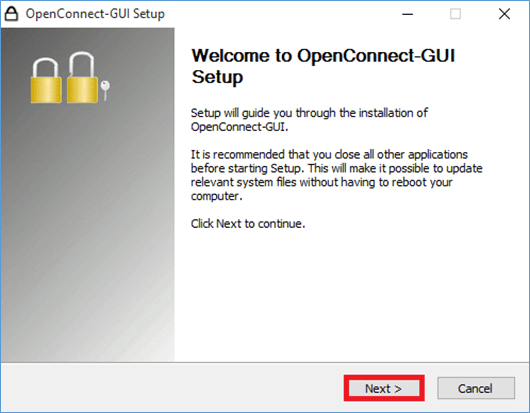
Step #2: Click on the downloaded file to run the setup. Click on Next.
Step #3: Click on “I Agree”.

Step #4: Click “Next” on the next three steps.
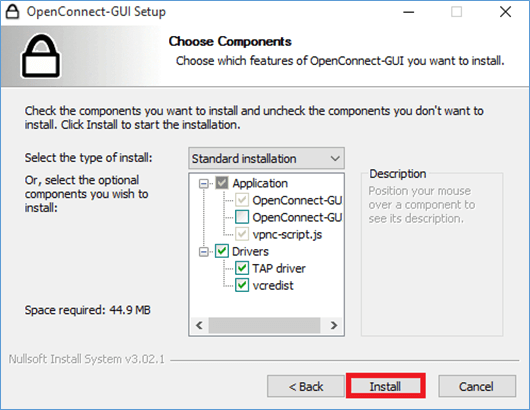
Step #5: Don’t change anything and click on “Install”.
During the installation, if it prompts to download TAP-Windows Provider, then click on “Install”. Otherwise, proceed to the next step.

Step #6: Click “Finish”.

Step #7: OpenConnect GUI VPN client will appear in a few seconds. (If it doesn’t show up, then search “OpenConnect” from Windows search and launch it from there).

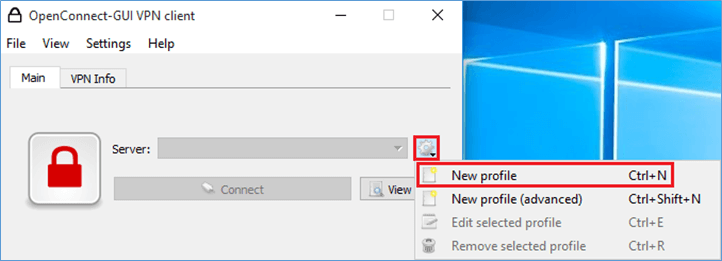
Step #8: Click on the “Settings” icon and select “New profile”.
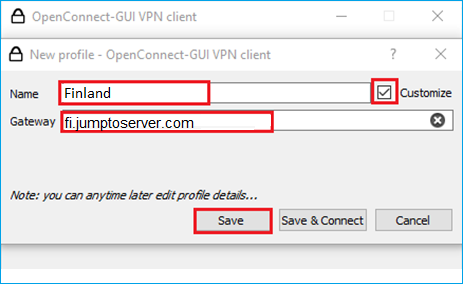
Step #9: Enter the following details:
- Put a checkmark on ‘Customize‘
- Name: VPN Server location name, or whatever you like
- Gateway: Your desired VPN server address. Here you can find the complete list of FastestVPN Server addresses. For example: fi.jumptoserver.com
- Click on “Save“
Step #10: Click on “Connect.

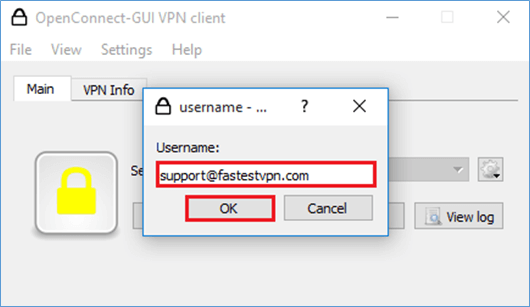
Step #11: Enter your FastestVPN “Username” and click “OK”, then enter your FastestVPN “Password” and click “OK”.
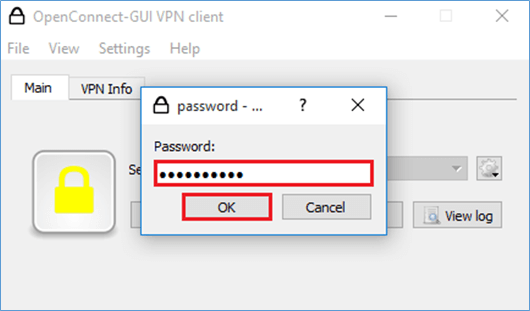
Once the “Lock” turns green that means you are “Connected” to the FastestVPN.
Use the Disconnect button when you need to disconnect from the VPN connection.

Use the OpenConnect GUI icon in the system tray/ taskbar hidden items to connect and disconnect your VPN later.
Содержание
- OpenConnect Setup Tutorial
- OpenConnect Setup Tutorial for Windows
- 1. Download OpenConnect
- 2. Unknown Publisher
- 3. Run Installer
- 4. Install OpenConnect
- 5. Installation Options
- 6. Install Location
- 7. Start Menu Folder
- 8. Choose Components
- 9. Finish Installation
- 10. Run OpenConnect GUI
- 11. Creating a new profile
- 12. New Profile (advanced)
- 13. Server Details
- 14. Username
- 15. CA Certificate
- 16. Import Certificate File
- 17. Save Configuration
- 18. Connect
- 19. Profile Trust
- 20. Enter Password
- 21. Connected.
- OpenConnect-GUI VPN client
- Review
- Free Download
- Simplistic client that provides you with a streamlined and user-friendly environment for making the most out of of the open-source OpenConnect VPN service
- What’s new in OpenConnect-GUI VPN client 1.5.3 Beta:
- Simple VPN client that’s both easy to install and to get along with
- Smoothly integrates with your computer’s taskbar
- Visually-unimpressive but efficient VPN client
- OpenVPN Connect for Windows
- The Interface
- Frequently Asked Questions
- Can the new and old client co-exist?
- Can I connect to multiple servers at the same time?
- Is the old client still available?
- Where can I get this for other OS?
- Should I use this client or the client from my instance of Access Server?
- How do I install the Windows client?
- How do I install the client directly from my Access Server?
- How do I import a profile from a server?
- How do I import a profile from my computer?
- Why did I receive an error message that TAP mode is not supported when importing a profile?
- Why am I getting a certificate error? How can I fix using a self signed certificate?
- Where do I find my Access Server Hostname and credentials?
- What do I enter for “Title”?
- What does “import autologin profile” mean?
- Why did I get this message: “In this version compression was disabled by default. If you need it, please re-enable this setting.”
- Настройка доступа VPN
- Общая информация
- Получение доступа
- Параметры, необходимые для подключения
- Программное обеспечение для VPN
- Windows
- Linux
- MacOS
- Настройка подключения
- OpenConnect GUI 1.5.1
OpenConnect Setup Tutorial
OpenConnect Setup Tutorial for Windows
The following instructions go step–by–step through an OpenConnect installation on Windows.
1. Download OpenConnect
Download the OpenConnect from here: OpenConnect Windows.
If you have any problems downloading or installing files from our server please contact our Live Help team, we are always available to help.
2. Unknown Publisher
You may receive a Windows UAC prompt, click ‘Yes’, the software is perfectly safe to use.

3. Run Installer
Run the installer application.

4. Install OpenConnect
Click ‘I Agree’ to initiate the installation.

5. Installation Options
You may wish to create a desktop shortcut. Then click ‘Next’ to confirm the installation options.

6. Install Location
If you are happy with the installation location click ‘Next’.

Confirm the shortcut folder, then click ‘Next’.

8. Choose Components
Click onto the ‘Install’ button.

9. Finish Installation
Click onto the ‘Finish’ button. The OpenConnect software application will now be installed on your system.

10. Run OpenConnect GUI
If the GUI does not automatically open, double click onto the OpenConnect desktop shortcut.

11. Creating a new profile
Click onto the ‘Options’ button to begin the configuration of a new OpenConnect Profile.

12. New Profile (advanced)
Select the option to add a ‘New Profile (advanced).

13. Server Details
Input your server details.
Name: Any name you choose. (We recommend adding a name you will easily recognise, if you pla n on adding multiple profiles).
Gateway: Enter the server IP or DNS address of the server you would like to connect to, followed by a colon and the port number.
For example, if your account is located on UK23, you would enter its DNS address as: https://uk23.vpnuk.net:4443 or its IP followed by :4443

14. Username
Enter your login username into the ‘Username’ field.

15. CA Certificate

16. Import Certificate File
Click onto the ‘Import’ button and locate the ‘vpnuk-ca.crt’ certificate file.

17. Save Configuration
Click onto the ‘Save’ button.
Note: If you would like the OpenConnect GUI to remember the password for this profile, place a check in the ‘Batch mode’ checkbox.

18. Connect
Your OpenConnect profile will now be available on the list of Servers. You can now connect by clicking onto the ‘Connect’ button.

19. Profile Trust
The first time you connect to your newly created profile you will be asked to confirm the connection is genuine. You can review the information tallies up correctly and points to our security certificate, then click onto ‘Accurate information’.

20. Enter Password
Enter your connection password.
Note: If you placed a check into the ‘Batch Mode’ checkbox during the Profile configuration, this will be the only time the OpenConnect GUI will ask for your password.

21. Connected.
You will now connect to your VPNUK server. If you would like to disconnect, click onto the ‘Disconnect’ button.
Источник
OpenConnect-GUI VPN client
Review
Free Download
Simplistic client that provides you with a streamlined and user-friendly environment for making the most out of of the open-source OpenConnect VPN service
What’s new in OpenConnect-GUI VPN client 1.5.3 Beta:
Originally created to replace the security-orientated Cisco AnyConnect SSL VPN, OpenConnect is SSL VPN client that, as expected, allows you to connect to various secure point-to-point private networks.
Since handling OpenConnect requires a little bit of command line knowledge, it’s understandable if you might be looking for a more user-friendly solution.
Meet OpenConnect-GUI VPN client, a rather simplistic utility that provides you with a compact GUI to get about while using OpenConnect. Before anything, we should point out that the application is still in a fairly young, Beta development stage.
Simple VPN client that’s both easy to install and to get along with
The application does not require any kind of special treatments when it comes to its deployment process. Simply let yourself be guided by the typical wizard-based installer and, in just a couple of seconds, you should be greeted by the app’s compact main window.
There are two main tab sections, one that allows you to add, configure and connect to various profiles and VPN servers, while the other offers you detailed information regarding the chosen private networks such as IPv4, DNS, DTLS Cipher, as well as download and upload counters.
Smoothly integrates with your computer’s taskbar
It’s also worth pointing out that, in spite of its barren looks, the utility presents good taskbar integration. Once you configure one or two profiles, you can literally use the app without having to access its main window only with the help of its taskbar menu.
While we’re on the subject, you should also know that you can configure the app to minimize to the tray area, to minimize instead of closing and to start as minimized.
Visually-unimpressive but efficient VPN client
To end with, OpenConnect-GUI VPN client does exactly what a typical VPN client should do: make the overall service more accessible, increase user productivity by simplifying the workflow and be as unobtrusive as possible.
Источник
OpenVPN Connect for Windows
This is the official OpenVPN Connect client software for Windows workstation platforms developed and maintained by OpenVPN Inc. This is the recommended client program for the OpenVPN Access Server to enable VPN for Windows. The latest version of OpenVPN for Windows is available on our website.
If you have an OpenVPN Access Server, it is recommended to download the OpenVPN Connect client software directly from your own Access Server, as it will then come pre configured for use for VPN for Windows. The version available here contains no configuration to make a connection, although it can be used to update an existing installation and retain settings.
sha256 signature: 6c62ce1843203ae61fa655cb1090567e1404e7b934c5c0300dabec9fc23d3abf
For Windows 7, 8, 8.1, and 10.
sha256 signature: 1a2516b0f713f90298a944d72cce8022ad5dce7df367d3e097560f7e6db97621
Previous generation OpenVPN Connect V2 is available here:
sha256 signature: f65dd0ea784dd63632be64f89b1f83d51c199fd7319888883780cb9e975c325a
For Windows 7, 8, 8.1, and 10.
The Interface
Our latest line of OpenVPN for Windows (OpenVPN Connect) software available for the major platforms features a new and improved user interface, making the experience of installing and using the OpenVPN for Windows software a snap. With an easy to use import feature you can import profiles straight from your OpenVPN Access Server or just import a saved profile from disk.


Frequently Asked Questions
Can the new and old client co-exist?
Yes, you may continue to use both v2 and v3 on the same connect device and import the profiles desired into each. If you like, you can run either one or both.
Can I connect to multiple servers at the same time?
No, the client cannot connect to multiple servers at once. It does support multiple connection profiles, giving you the option to switch easily from one server to the next, but you can only be connected to one at a time. This is by design, to prevent unexpected traffic paths when connecting to multiple VPN servers at the same time. If you are a system administrator and you require a complex setup where multiple connections are active at the same time, there is the option to use the open source community OpenVPN client software available from our website.
Is the old client still available?
The OpenVPN client v1 was called “OpenVPN Desktop Client” and is no longer available. It is also not safe to use this anymore as it hasn’t been maintained for many years. It was replaced with the OpenVPN client v2. The OpenVPN client v2 is called “OpenVPN Connect Client” and has been in use for many years. It is still available from our website. You can download it from the direct link new the top of this page. The OpenVPN client v3 is called “OpenVPN Connect” and is the latest generation of our software. It is available on our website as a beta version. It is also offered in the OpenVPN Access Server client web interface itself.
Where can I get this for other OS?
Should I use this client or the client from my instance of Access Server?
This is the official OpenVPN Connect software for Windows workstation platforms developed and maintained by OpenVPN Inc. This is the recommended client program for the OpenVPN Access Server. The latest versions are available on our website. If you have an OpenVPN Access Server, you can download the OpenVPN Connect client software directly from your own Access Server, and it will then come pre-configured for use. The version available here contains no configuration to make a connection, although it can be used to update an existing installation and retain settings.
How do I install the Windows client?
How do I install the client directly from my Access Server?
How do I import a profile from a server?
How do I import a profile from my computer?
Why did I receive an error message that TAP mode is not supported when importing a profile?
Layer 2 bridging (TAP) is no longer supported. Switch over to TUN Mode to resolve this issue.
Why am I getting a certificate error? How can I fix using a self signed certificate?
OpenVPN Access Server starts with a self-signed certificate. With this, you will receive warnings from your web browser about the site not being secure as well as a certificate error when importing a profile with the Connect Client. You can simply override the warnings or add an exception for your web browser. To resolve this, you can set up a DNS host name that resolves to the public address of your Access Server and install a valid SSL certificate that corresponds to that DNS host name. Going forward, you would use that hostname to access your server instead of the IP address. This is also the recommended method as validated SSL certificates can only ever function with a valid public DNS hostname.
Where do I find my Access Server Hostname and credentials?
Your Access Server Hostname is the address at which your Access Server can be reached. For example it could be https://vpn.yourcompany.com/. If a DNS hostname is not set up, it is also possible to specify the IP address where your Access Server. For example: https://55.193.55.55 Your credentials are your username and password. You may need to get that information from your Access Server administrator if you don’t know it.
What do I enter for “Title”?
Title is the name for the profile. It is automatically defined as the username with the hostname or IP address(example: user1@hostname). It differentiates between multiple profiles. You can define it manually as well. The title can be anything you want just so you can see which profile is which.
What does “import autologin profile” mean?
Choosing this option allows you to import an autologin profile with the address and credentials for your Access Server, then simply start the connection with the tap of a button. You would not need to re-enter credentials each time you connect. The autoprofile itself contains an embedded secure certificate that identifies and authorizes your connection automatically. It is an optional setting on the OpenVPN Access Server that the administrator of the server can choose to make available to you. If you find you cannot import the autologin profile, your administrator may not have allowed autologin through user permissions.
Why did I get this message: “In this version compression was disabled by default. If you need it, please re-enable this setting.”
During investigation of a vulnerability called VORACLE, it was found that using compression to make the data that goes through the VPN tunnel smaller, and thus faster, has an adverse effect on security. To learn more about this see our security notification on our website regarding the VORACLE attack vulnerability. In order to protect our customers, we are disabling compression by default. Some servers of the open source variety can be configured in such a way that the client must do compression, or else the client may not connect successfully. In such a case, you should get the server updated to disable compression. But we understand that this is not always possible, and you may need to be able to connect to such a server. In that event you can go into the settings and re-enable compression.
Источник
Настройка доступа VPN
Общая информация
После подключения к VPN вам становятся доступны внутренние сетевые ресурсы ИО РАН и подключенных филиалов. Вы можете подключаться по RDP или по SSH к своим рабочим станциям из внутренних сетей. Весь ваш Интернет-трафик при подключении к VPN выходит в Интернет в Москве из-под IP адресов, принадлежащих ИО РАН; благодаря этому становятся доступны подписки ИО РАН на сайтах журналов и библиотек.
В случае необходимости проверки или получения какого-либо дополнительного сетевого доступа, оперативной организации дополнительных сетевых сервисов, обращайтесь в Отдел информационных технологий к дежурному системному инженеру.
Получение доступа
Параметры, необходимые для подключения
Для доступа к VPN используйте следующе параметры:
Программное обеспечение для VPN
Для подключения необходимо использовать VPN-клиент OpenConnect или CiscoAnyconnect.
Windows
Linux
Версии OpenConnect client для различных дистрибутивов Linux чаще всего уже включены в дистрибутив и ищутся по именам: network-manager-openconnect, network-manager-openconnect-gnome, openconnect
MacOS
Для планшетов и телефонов под Android и IOS следует использовать приложение Cisco AnyConnect из официальных магазинов (это бесплатно) этих операционных систем.
Настройка подключения
После установки OpenConnect выберете: New profile: Необходимо указать только Gateway: https://vpn.ocean.ru Все остальные настройки оставить по умолчанию.

Создание нового профиля.

Настройки профиля по умолчанию.

Также, при успешном подключении и время работы VPN-подключения, значек в области уведомлений сменится c вилки на вилку включенную в розетку :


После подключения к VPN весь ваш трафик направляется в сеть Института и выходит в Интернет через оборудование ИО РАН. Об этом следует вспомнить при просмотре непрофильных фильмов on-line и скачивании файлов в несколько десятков Гб.
© Copyright 2020, ОИТ ИО РАН.
Создано с помощью Sphinx 1.8.4.
Источник
OpenConnect GUI 1.5.1


OpenConnect uses TLS and DTLS to secure your Internet connection, which makes comparable to the CISCO AnyConnect SSL VPN protocol. It gives you the possibility of surfing the web in safety and anonymity. With OpenConnect GUI, brings a graphical user interface to this utility, so you can enjoy its protection capabilities without any difficulties.
The software is compatible with all modern Windows versions and it takes about a minute to install it. The setup wizard places a few useful configuration options at your disposal, but the installation process is still straightforward and easy.
Unlike most VPN clients, OpenConnect GUI doesn’t limit you to a certain number of virtual private networks, but at the same time it doesn’t present any networks. It lets you connect to whatever networks you want or know of. You can define several connection profiles and when you wish to secure your traffic, you only need to select a profile and click a button.
Defining a connection profile can be done in two ways. You can just specify a name and a gateway and your profile will be ready for use. Alternatively, you can opt for the advanced mode, in which you can make many more tweaks. You can specify a username, certificates, OTP tokens, choose between different VPN protocols and more.
Created profiles can be selected in a drop menu, on the main user interface. Once you select a profile, you only need to click a button to connect. It takes a few seconds to establish a connection, but once it is done, you will be able to surf the web anonymously and you can also circumvent region-related restrictions.
OpenConnect GUI gives you full control over the security of your Internet connection.
Pros:
You can define your own VPN connections. You can switch between connection profiles on the fly. The software provides a wide range of configuration options.
Cons:
You need your own gateway addresses if you wish to secure your connection.
You can download OpenConnect GUI free here.
Источник
- Коллективные
- Персональные
 И снова здравствуйте.
Эта последняя статья посвященная OpenVPN в целом и настройке клиента в частности. В этот раз мы настроим с вами клиента под Windows 10 но на предыдущих версиях этой операционной системы все это тоже будет работать. Задача следующая, обеспечить подключение клента к нашему OpenVPN серверу, который мы настраивали в с статье: Настраиваем OpenVPN сервер Linux на примере Ubuntu мы уже можем настраивать клиента Ubuntu, осталось дело за малым, чем мы сейчас и займемся.
Чтобы приступить к настройке, нам необходимо скачать, этого самого, клиента для Windows, я качал под 64 разрядную ОС.
Тут все просто, качаем клиента с сайта openvpn.net/index.php/download/community-downloads.html
Запускаем установку и следуем указаниям инсталятора, по принципу Next -> Next -> OK
Переходим в директорию с установленным OpenVPN
C:Program FilesOpenVPNconfigНам необходимо создать там файл, назовем его client.ovpn с содержимым:
# Тип подключения -клиент
client

# Через какое устройство подключаемся
dev tun

По какому протоколу будем работать
proto tcp
#proto udp

# Адрес OpenVPN сервера и его порт (можно указать IP или URL)
remote openvpn.example.org 1194

# Тип шифрования, как на OpenVPN сервере
cipher AES-256-CBC

# Сертификат удостоверяющего центра
ca ca.crt

# Сертификат и ключ клиента
cert user.crt
key user.key

# Клиент поддерживает шифрование
tls-client

# Указываем путь к ключу TLS
tls-auth ta.key 1

# Включаем компрессию данных
comp-lzo

# Не использовать специфический порт для работы
nobind

persist-key
persist-tun

# Уровень логирования если нужно подробнее, то выставляем 9 для дебагинга
verb 3
# Количество записей после которых будет производиться запись в лог
#mute 20
Нам необходимо получить с OpenVPN сервера 4 файла:
ca.crt
ta.key
user.crt
user.key
Где:
ca.crt и ta.key первый является сертификатом удостоверяющего центра, второй это ключ шифрования OpenVPN сервера, они должны быть у каждого пользователя!
user.crt и user.key ключ и сертификат пользователя, у каждого пользователя они свои т.е. создаются персонально
Дальше на остается запустить OpenVPN клиента:

Нажимаем подключиться:

Появится лог подключения, который при установке соединения исчезнет:

Иконка подключения станет зеленой, значит соединение установлено и работает нормально, также появится плашка в которой будет написан присвоенный IP адрес

Для клиентов Windows есть особенность, необходимо указывать IP адреса из диапазона в 4 адреса т.е. если вы хотите присвоить клиенту адрес 172.16.10.4 то соединение на другом конце должны быть из диапазона:
172.16.10.1 172.16.10.2 172.16.10.3 172.16.10.4
172.16.10.5 172.16.10.6 172.16.10.7 172.16.10.8
172.16.10.9 172.16.10.10 172.16.10.11 172.16.10.12
Иначе соединение обрывается, во так все просто.
На этой оптимистической ноте я закончу свое повествование, если возникли вопросы, задавайте их в комментариях.
Есть что добавить? Регистрируйся и оставляй комментарии!
Содержание
- Openconnect для windows 10
- OpenVPN Connect for Windows
- The Interface
- Frequently Asked Questions
- Can the new and old client co-exist?
- Can I connect to multiple servers at the same time?
- Is the old client still available?
- Where can I get this for other OS?
- Should I use this client or the client from my instance of Access Server?
- How do I install the Windows client?
- How do I install the client directly from my Access Server?
- How do I import a profile from a server?
- How do I import a profile from my computer?
- Why did I receive an error message that TAP mode is not supported when importing a profile?
- Why am I getting a certificate error? How can I fix using a self signed certificate?
- Where do I find my Access Server Hostname and credentials?
- What do I enter for “Title”?
- What does “import autologin profile” mean?
- Why did I get this message: “In this version compression was disabled by default. If you need it, please re-enable this setting.”
- Экстренный VPN сервер Openconnect с двухфакторной авторизацией на Centos 8
- Предисловие
- Муки выбора
- Настройка
Openconnect для windows 10
horar released this Mar 25, 2018
Couple of fixes and few small improvements:
- Don’t lose password in batch mode and keys from storage (resolve #220, #142, #144)
- No disconnection triggered before quit (#202)
- Don’t use system wide defined proxy when disabled in profile (#208)
- Unable to use socks5 proxy built by ssh tunneling (#187)
- Invalid routes (#190)
- macOS tray icons improved for dark/light dock panel (#192)
Note: when you get «decoding of OTP token failed» message on edit profile action, please try to remove the profile and create it again.
Please refer to Changelog for further details.
OS requirements: Win7+
Note: attached ‘High Sierra’ macOS package at this time is really experimental build for Homebrew just for testing.
horar released this Aug 7, 2017
Couple of fixes and few small improvements:
- tun interface with the correct MTU
- non-english interface names
- vpnc-script: undo custom routes
- accept VPN profile name in command line; connect immediatelly after start
- automatically pick a group if it is the only option
- HiDPI support improved
Update 3rd party depenendencies:
- Windows: GnuTLS (3.5.13), stoken (0.91), spdlog (0.13.0), gmp (6.1.2), nettle (3.3), Qt (5.9.1)
- macOS: GnuTLS (3.5.14), spdlog (0.13.0), Qt (5.9.1)
Please refer to Changelog for further details.
OS requirements: Win7+ and macOS 10.10+
- when dynamic MTU apply, the connection may appears 2-3 seconds later after GUI connecting state (will be solved in next releases)
- sorry — no macOS package (because of pre-build package stability issues; but source code build should be OK)
Note: attached ‘High Sierra’ macOS package at this time is really experimental build for Homebrew just for testing.
OpenVPN Connect for Windows
This is the official OpenVPN Connect client software for Windows workstation platforms developed and maintained by OpenVPN Inc. This is the recommended client program for the OpenVPN Access Server to enable VPN for Windows. The latest version of OpenVPN for Windows is available on our website.
If you have an OpenVPN Access Server, it is recommended to download the OpenVPN Connect client software directly from your own Access Server, as it will then come pre configured for use for VPN for Windows. The version available here contains no configuration to make a connection, although it can be used to update an existing installation and retain settings.
sha256 signature: 58973ceba1dfb77ac98977f264b5aebe4ca094c17ada72c4d2767d2a2c7607c5
For Windows 7, 8, 8.1, and 10.
sha256 signature: bfd176271cca8c1e7fae446621a985388bf55d023668af8e5dcec9ec4560dd85
Previous generation OpenVPN Connect V2 is available here:
sha256 signature: f65dd0ea784dd63632be64f89b1f83d51c199fd7319888883780cb9e975c325a
For Windows 7, 8, 8.1, and 10.
The Interface
Our latest line of OpenVPN for Windows (OpenVPN Connect) software available for the major platforms features a new and improved user interface, making the experience of installing and using the OpenVPN for Windows software a snap. With an easy to use import feature you can import profiles straight from your OpenVPN Access Server or just import a saved profile from disk.
Frequently Asked Questions
Can the new and old client co-exist?
Yes, you may continue to use both v2 and v3 on the same connect device and import the profiles desired into each. If you like, you can run either one or both.
Can I connect to multiple servers at the same time?
No, the client cannot connect to multiple servers at once. It does support multiple connection profiles, giving you the option to switch easily from one server to the next, but you can only be connected to one at a time. This is by design, to prevent unexpected traffic paths when connecting to multiple VPN servers at the same time. If you are a system administrator and you require a complex setup where multiple connections are active at the same time, there is the option to use the open source community OpenVPN client software available from our website.
Is the old client still available?
The OpenVPN client v1 was called “OpenVPN Desktop Client” and is no longer available. It is also not safe to use this anymore as it hasn’t been maintained for many years. It was replaced with the OpenVPN client v2. The OpenVPN client v2 is called “OpenVPN Connect Client” and has been in use for many years. It is still available from our website. You can download it from the direct link new the top of this page. The OpenVPN client v3 is called “OpenVPN Connect” and is the latest generation of our software. It is available on our website as a beta version. It is also offered in the OpenVPN Access Server client web interface itself.
Where can I get this for other OS?
Should I use this client or the client from my instance of Access Server?
This is the official OpenVPN Connect software for Windows workstation platforms developed and maintained by OpenVPN Inc. This is the recommended client program for the OpenVPN Access Server. The latest versions are available on our website. If you have an OpenVPN Access Server, you can download the OpenVPN Connect client software directly from your own Access Server, and it will then come pre-configured for use. The version available here contains no configuration to make a connection, although it can be used to update an existing installation and retain settings.
How do I install the Windows client?
- Download the MSI file
- Open and start the setup wizard.
- Give permissions to install on your Windows OS.
- Complete the OpenVPN Connect Setup Wizard.
- The OpenVPN logo displays in your tray (bottom right) with DISCONNECTED status.
- Click on the icon to start the Onboarding Tour.
- Review how to import a profile from a server by entering the Access Server Hostname and credentials or uploading a profile from your computer.
- Agree to the data collection use and retention policies after reviewing them.
- Import a profile, either from the server or from file.
How do I install the client directly from my Access Server?
- Navigate to your OpenVPN Access Server client web interface.
- Login with your credentials.
- Select ‘OpenVPN Connect for Windows’.
- Wait until the download completes, and then open it (specifics vary depending on your browser).
- Click Run to start the installation process.
- Click Yes to approve the privilege escalation request.
- Wait until the installation process completes.
- In the system tray, the OpenVPN Connect Client is now ready for use.
How do I import a profile from a server?
- From the OpenVPN Connect UI, choose “Import from Server”.
- Enter your Access Server Hostname, Title, Port (optional), and your credentials–username and password.
- Click Add.
- If you choose to Import autologin profile, it is less secure, but you won’t need to re-enter credentials.
How do I import a profile from my computer?
- Choose “Import from File”.
- Drag and drop a .OVPN file or click on Browse to navigate to the location on your computer.
- The message displays that the profile is successfully imported and displays the hostname and the title. You can change the title if desired.
- Click on Add to complete the import.
Why did I receive an error message that TAP mode is not supported when importing a profile?
Layer 2 bridging (TAP) is no longer supported. Switch over to TUN Mode to resolve this issue.
Why am I getting a certificate error? How can I fix using a self signed certificate?
OpenVPN Access Server starts with a self-signed certificate. With this, you will receive warnings from your web browser about the site not being secure as well as a certificate error when importing a profile with the Connect Client. You can simply override the warnings or add an exception for your web browser. To resolve this, you can set up a DNS host name that resolves to the public address of your Access Server and install a valid SSL certificate that corresponds to that DNS host name. Going forward, you would use that hostname to access your server instead of the IP address. This is also the recommended method as validated SSL certificates can only ever function with a valid public DNS hostname.
Where do I find my Access Server Hostname and credentials?
Your Access Server Hostname is the address at which your Access Server can be reached. For example it could be https://vpn.yourcompany.com/. If a DNS hostname is not set up, it is also possible to specify the IP address where your Access Server. For example: https://55.193.55.55 Your credentials are your username and password. You may need to get that information from your Access Server administrator if you don’t know it.
What do I enter for “Title”?
Title is the name for the profile. It is automatically defined as the username with the hostname or IP address(example: user1@hostname). It differentiates between multiple profiles. You can define it manually as well. The title can be anything you want just so you can see which profile is which.
What does “import autologin profile” mean?
Choosing this option allows you to import an autologin profile with the address and credentials for your Access Server, then simply start the connection with the tap of a button. You would not need to re-enter credentials each time you connect. The autoprofile itself contains an embedded secure certificate that identifies and authorizes your connection automatically. It is an optional setting on the OpenVPN Access Server that the administrator of the server can choose to make available to you. If you find you cannot import the autologin profile, your administrator may not have allowed autologin through user permissions.
Why did I get this message: “In this version compression was disabled by default. If you need it, please re-enable this setting.”
During investigation of a vulnerability called VORACLE, it was found that using compression to make the data that goes through the VPN tunnel smaller, and thus faster, has an adverse effect on security. To learn more about this see our security notification on our website regarding the VORACLE attack vulnerability. In order to protect our customers, we are disabling compression by default. Some servers of the open source variety can be configured in such a way that the client must do compression, or else the client may not connect successfully. In such a case, you should get the server updated to disable compression. But we understand that this is not always possible, and you may need to be able to connect to such a server. In that event you can go into the settings and re-enable compression.
Экстренный VPN сервер Openconnect с двухфакторной авторизацией на Centos 8
Предисловие
Вечерком воскресенья в середине марта мне поступил телефонный звонок, суть которого заключалась а том, что 200+ человек не приедут в понедельник в офис, а переводятся на «удалёнку». Фраза: одни на «удаленку», а админы на «продлёнку», завертелась у меня в голове.
Нельзя сказать, что удаленного доступа к внутренним ресурсам у нас не было совсем, но мы использовали IPSEC VPN на связке Shrew soft VPN client + Pfsense для экстренного доступа некоторых IT специалистов к вмененным им в поддержку информационным системам. У Shrew soft VPN client проявлялась особенность, заключавшаяся в том, что после некоторого количества успешных соединений перестают работать ipv4 маршруты. Лечилась данная ситуация перезапуском Windows служб или перезагрузкой конечного устройства. Перспектива объяснять коллегам этот нюанс неопределенное количество раз в день вызывала нервный тик и тремор конечностей одновременно.
Муки выбора
Я определил следующие требования к решению для организации VPN до офисных систем:
- Простота настройки. В надежде, что некоторые справятся самостоятельно;
- Наличие клиента для популярных операционных систем;
- Поддержка парольной авторизации Active Directory; Срочный Выпуск ключей(сертификатов) не входил в мои планы
- Двухфакторная аутентификация. Желательно бесплатно;
- Минимальные вложения, а лучше бесплатно, поскольку бюджет 2020 на IT-оборудование не предполагал затрат на шлюз удаленного доступа;
- И предсказуемая стабильность и производительность;
Новомодный WireGuard работает на ключах, openvpn-gui, имхо, имеет не самый дружелюбный интерфейс клиента, пару лет назад я пробовал SoftEther VPN, но остался недоволен производительностью, про Shrew soft писал выше. Openconnect VPN Server + OpenConnect SSL VPN Client — настройка клиента 1 строкой поддержка всех популярных платформ, возможность работать только по tcp, поддержка духфакторной аутентификации, интеграция с LDAP, то что надо! Еще и совместимость с Cisco Anyconnect client 🙂
Настройка
Настройку сервера я производил на базе ОС Centos 8. При установке Centos 8 в минимальной конфигурации я постоянно сталкиваюсь с некорректной работы русской локали, которая решается установкой glibc-langpack-en, и заменой системного шрифта>
Настройка межсетевого экрана:
OpenConnect SSL VPN Server может использовать для авторизации механизм pam. Для «сквозной» авторизации клиентов Active Directory добавим наш новый сервер в домен:
Автоматически будет сформирован конфигурационный файл службы SSSD (System Security Services Daemon) /etc/sssd/sssd.conf. Необходимо добавить пока еще не установленную службу VPN сервера ocserv в настройки. Параметр use_fully_qualified_names отвечает за формат имени пользователя.
[sssd]
domains = mydomain.ru
config_file_version = 2
services = nss, pam
default_domain_suffix = mydomain.ru
[domain/mydomain.ru]
ad_domain = mydomain.ru
ad_gpo_map_remote_interactive = +ocserv
krb5_realm = MYDOMAIN.RU
realmd_tags = manages-system joined-with-adcli
cache_credentials = True
id_provider = ad
krb5_store_password_if_offline = True
default_shell = /bin/bash
ldap_id_mapping = True
use_fully_qualified_names = True
fallback_homedir = /home/%u@%d
access_provider = ad
Включим и запустим службу SSSD
Существует возможность ограничивать набор пользователей имеющих право подключения. В данном случае я разрешил всем пользователям подключаться к серверу.
На данном этапе должна заработать аутентификация по ssh на сервер для пользователей домена.
Выбирая модуль для реализации двухфакторной двухэтапной аутентификации я посмотрел на стоимость поддерживаемого из коробки Duo security и выбрал TOTP (Time-based One-time Password) в лице Google Authenticator. В этой реализации критическим важным является момент синхронизации времени сервера службами точного времени. Проверить корректность работы демона chronyd можно командой: chronyc sources
Установка Google Authenticator:
Далее необходимо из под учетной записи пользователя на сервере(sudo su DomainUser) выполнить команду google-authenticator и ответив в положительно на все вопросы получить индентификатор/qr-код для приложения Google Authenticator на смартфоне пользователя (IOS, Google play)
Установка Openconnect VPN Server:
auth = «pam»
#IPv4 внешний адрес на котором работает служба
listen-host = 1.1.111.1
tcp-port = 443
udp-port = 443
run-as-user = ocserv
run-as-group = ocserv
socket-file = ocserv.sock
chroot-dir = /var/lib/ocserv
isolate-workers = true
max-clients = 0
#Ограничение на кол-во сессий с одинаковым логином
max-same-clients = 1
keepalive = 32400
dpd = 90
mobile-dpd = 1800
switch-to-tcp-timeout = 25
try-mtu-discovery = true
#LetsenCrypt сертификаты для шифрования
server-cert = /etc/letsencrypt/live/vpn.mydomain.ru/fullchain.pem
server-key = /etc/letsencrypt/live/vpn.mydomain.ru/privkey.pem
########################
cert-user-oid = 0.9.2342.19200300.100.1.1
compression = true
tls-priorities = «@SYSTEM»
auth-timeout = 240
idle-timeout = 1200
mobile-idle-timeout = 2400
min-reauth-time = 300
max-ban-score = 50
ban-reset-time = 300
cookie-timeout = 300
deny-roaming = false
rekey-time = 172800
rekey-method = ssl
use-occtl = true
pid-file = /var/run/ocserv.pid
device = vpns
predictable-ips = true
default-domain = vpn.mydomain.ru
#Адрес сети для VPN клиентов
ipv4-network = 192.168.178.0/24
#Настройка маршрутизации DNS-запросов
tunnel-all-dns = true
dns = 192.168.1.1
########################
ping-leases = false
#Маршрутизация VPN клиента к внутренним сетям
route = 192.168.1.0/255.255.255.0
route = 192.168.2.0/255.255.255.0
########################
cisco-client-compat = true
dtls-legacy = true
user-profile = profile.xml
Получаем сертификаты LetsEncrypt для шифрования VPN трафика. Поднимать веб сервер для этого вовсе не обязательно. Создавать задание на регулярный перевыпуск сертификатов я не стал, полагая, что 3-х месяцев хватит для разрешения ситуации с COVID-19 в том или ином ключе.
Включаем двухфакторную аудентификацию и запускаем службу VPN сервера
Включаем возможность пересылки трафика между интерфейсами
Клиентам предлагаем установить openconnect-gui. В настройках профиля указываем наш сервер vpn.mydomain.ru

При подключении на запрос Password от клиента необходимо заполнять OTP из Google Authenticator. На запрос Password1 пароль пользователя Active Directory.

Здравствуйте. Сегодня я расскажу о том, как выполняется настройка OpenVPN клиента на Windows 10. Использование данной технологии позволит объединить несколько компьютеров в частную сеть без прокладывания кабелей. То есть, в Интернете создается некое подобие туннеля, через который происходит обмен информацией между клиентским ПК и сервером. Полезно, когда нет возможности организовать сеть стандартными способами.
- Устраняем критическую ошибку меню «Пуск» на Windows 10
- Как восстановить системный реестр Windows 10
- Как правильно настроить Internet Explorer в Windows 10
- Проблемы с кнопкой пуск на Windows 10 — есть решение
Что такое VPN
Если не вдаваться в технические подробности VPN (Virtual Privat Network), то простым языком можно это объяснить так. Благодаря соединению ВПН вы создаете участок сети к которому имеете доступ только вы. Визуально представьте интернет — это шар, внутри этого шара еще один шарик чуть меньше, вот этот шарик, который меньше и есть VPN. Для того чтоб лучше понять перейдем следующему пункту.
Для чего нужен VPN
Есть несколько предназначений и применений данной сети.
- Защита себя от сети интернет, чтоб ваш интернет оператор не знал чем вы занимаетесь
- Для скачивание, просмотра чего-либо, если это не доступно в вашей стране или городе
- Для доступа к данным на работе или сервера, где доступ разрешен, только из рабочей сети и определенного IP адреса.
Можете предложить еще свои варианты использования.
Используем приложение OpenVPN
О штатных возможностях «десятки» я расскажу далее в статье. Но начну с описания стороннего приложения для настройки vpn.
- Сначала необходимо узнать, какая разрядность у Вашей ОС. Данная информация отображается в окне «Свойства», которое вызывается при выборе одноименного пункта в контекстном меню «Мой компьютер». Возможно два варианта. 64-х и 32-х разрядная система.

Внимание! Перед установкой обязательно проверьте правильность указания системной даты и времени. Если настройки неправильны, то клиент не сможет соединиться с сервером!
Скачать программу OpenVPN
Скачать
Скачать
- Запускаем установщик. По окончанию процесса НЕ открываем приложение!
- Заходим в директорию, где находятся файлы программы и переходим в папку с названием «config»:

- Содержимое архива с ключами (которые предоставляются поставщиком услуг) следует скопировать в указанный выше каталог:

- Теперь необходимо выполнить некоторые манипуляции с ярлыком установленного приложения. Кликаем на нём правой кнопкой и переходим к пункту «Свойства».
- В окне перемещаемся на вкладку «Ярлык». Находим поле для ввода с названием «Объект» и ничего в нём не удаляем. Просто в самом конце строки вставляем этот код: —connect «test.ovpn»
Только вместо выражения в кавычках нужно указать индивидуальное конфигурационное имя. - Нажимаем «Применить», но окно не закрываем. Нам еще нужно кое-что изменить на вкладке «Совместимость».
- Ставим отметку в чек-боксе: «Выполнять эту программу от имени администратора»:

- Закрываем свойства нажатием по кнопке «ОК» и запускаем утилиту OpenVPN.
- Загрузится окно соединения, после автоматического закрытия которого в панели уведомлений появится значок клиента:

- Как восстановить системный реестр Windows 10
- Как установить несколько ОС Windows 7 8 10 на одну флешку
- Все способы перехода на Windows 10
Использование штатных возможностей Windows 10
Как создать защищенное соединение без стороннего софта? К счастью, в «десятке» предусмотрена такая возможность. Вот подробная инструкция:
- Открываем «Центр управления сетями» и кликаем по самой первой ссылке «Создание нового подключения».

- Нас интересует второй вариант (как на скрине):

- Продолжаем в том же духе, выбрав на следующем этапе верхний пункт из списка:

- Чтобы корректно подключить ПК к сети, стоит указать данные для VPN:
- IP (или домен);
- Название соединения.
- После ввода нажимаем «Создать»:

Новое соединение будет отображаться в списке сетей. Чтобы установить связь достаточно кликнуть по названию, а затем на соответствующую кнопку:

Откроется форма для ввода личных данных:

Если всё настроено правильно, то спустя мгновение Вы подключитесь к серверу.
Платные и бесплатные VPN
И самый важный наверно вопрос, где взять эти имя и пароль для настройки. Тут все просто, можно купить VPN, как я, пользоваться и ни о чем не думать (цена, кстати, копеечная) или пользоваться тестовыми вариантами, которых обычно хватает не более чем на сутки.
Поздравляю! Вами пройден нелёгкий путь. Уверен, что статья полезна для многих пользователей. Свои вопросы и благодарности может оставлять в комментариях.
С уважением, Виктор

Вам помогло? Поделитесь с друзьями — помогите и нам!