windows:server:2008:r2:openssh:install
-
-
На момент написания это v8.1.0.0p1-Beta.
-
-
Распаковать в
C:Program Files;-
Или куда угодно, но помните, что из него в дальнейшем будут запускаться службы.
-
-
Добавить путь
C:Program FilesOpenSSH-Win64в переменную PATH.-
Свойства системы – Дополнительные параметры – Переменные среды… – Системные переменные – Path, далее в конце стоки через точку с запятой вставить путь без кавычек.
-
-
Запустить PowerShell с правами администратора, перейти в каталог
C:Program FilesOpenSSH-Win64и ввести./install-sshd.ps1(PowerShell пока не закрывать!); -
Запустить службу
OpenSSH SSH Server(sshd) и настроить ее на автоматический запуск; -
Вернуться в PowerShell и выполнить
./FixHostFilePermissions.ps1везде соглашаясь;
Если есть ошибки, проверить наличие папки C:ProgramDataSSH и ключевых файлов в ней. Ключевые файлы создаются при первом запуске службы.
Дисклеймер
-
Использование материалов данной базы знаний разрешено на условиях лицензии, указанной внизу каждой страницы! При использовании материалов активная гиперссылка на соответствующую страницу данной базы знаний обязательна!
-
Автор не несет и не может нести какую либо ответственность за последствия использования материалов, размещенных в данной базе знаний. Все материалы предоставляются по принципу «как есть». Используйте их исключительно на свой страх и риск.
-
Все высказывания, мысли или идеи автора, размещенные в материалах данной базе знаний, являются исключительно его личным субъективным мнением и могут не совпадать с мнением читателей!
-
При размещении ссылок в данной базе знаний на интернет-страницы третьих лиц автор не несет ответственности за их техническую функциональность (особенно отсутствие вирусов) и содержание! При обнаружении таких ссылок, можно и желательно сообщить о них в комментариях к соответствующей статье.
Последнее изменение: 2022/02/12 11:40 (внешнее изменение)
I wanted to setup a DNS and DHCP server for my home network. I could have used a Linux server to do this, but I wanted to write about server core. I also wanted to mess with working over ssh to do things, I found a SourceForge
project that worked really well on 2008 x86, I had errors on 2008 R2 which I’ll poke at next week.
I don’t think I need to explain these things too much, I’ll be using DNS and DHCP as they were intended to be used. I’m installing the SNMP service because I have setup a Zenoss server. It uses SNMP to monitor everything from disk usage to network usage.
You will need to have your network card set to a static IP in the proper network for it work correctly.
PowerShell Installation
Windows 2008 Core
Install PowerShell following these
instructions.
Windows 2008 R2 Core
Install PowerShell following these
instructions.
Install OpenSSH
- Download the install
file - The installation takes care of everything but the firewall
- Allow SSH through the firewall
- netsh firewall set portopening TCP 22 «OpenSSH TCP22»
Basic Networking Configuration
netsh interface set interface name=»Local Area Connection» newname=»Public»
netsh interface ipv4 set address name=»Public» static 192.168.1.1 255.255.255.0 192.168.1.254
netsh interface ipv4 set dnsserver name=»Public» static 192.168.1.1 primary
netdom renamecomputer %computername% /newname:{newComputerName}
Installing the required services
DNS
start /w ocsetup DNS-Server-Core-Role
DHCP
start /w ocsetup DHCPServerCore
SNMP
start /w ocsetup SNMP-SC
Configuration of these services can be done via a server with RSAT installed, but that would be no fun at all, so we’ll use the builtin tools to set things up. If you have read the above article you may already have SSH setup and be using puTTY or some other
client to perform these tasks.
Configuring the required services
DNS: dnscmd
The following command creates a forward lookup zone and marks it as the primary zone on this server.
dnscmd ServerName /ZoneAdd company.com /Primary /file company.com.dns
The following command creates a reverse lookup zone for 192.168.1.0/24 and marks it as the primary zone
dnscmd ServerName /ZoneAdd 1.168.192.in-addr.arpa /Primary /file 1.168.192.in-addr.arpa.dns
The following command creates an A record for the local server at 192.168.1.1
dnscmd ServerName /RecordAdd company.com @ A 192.168.1.1
The following command creates the reverse record for the server at 192.168.1.1
dnscmd ServerName /RecordAdd 1.168.192.in-addr.arpa 1 PTR company.com
Allow DNS traffic to pass through the firewall
netsh firewall set portopening TCP 53 «DNS-TCP»
netsh firewall set portopening UDP 53 «DNS-UDP»
DNSCMD Resources:
Setup DNS from the command-line
Configuring DNS on Server Core
DNSCMD Cheat Sheet
Administering DNS Server
DHCP: netsh
After installing the DHCP role on the core server you will need to run the following command to allow the service to auto-start
sc config dhcpserver start= auto
Original Content
Введение
Существует несколько опций командной строки, доступных для настройки Window Server 2008 через сеть. Например, Windows Powershell, ServerManager.exe, или сервер telnet. Однако, проверенным и надежным способом, который так хорошо работал практически на всех типах устройств инфраструктуры, использующихся сегодня (включая Windows Server 2008, Cisco Routers, Linux серверы и т.д.) является SSH. В этой статье мы узнаем, как устанавливать SSH Server в Windows Server 2008.
Что такое SSH?
SSH – это безопасная оболочка (secure shell), стандарт, определенный в RFC 4251. Это сетевой протокол, который открывает безопасный канал между двумя устройствами, используя TCP порт 22. Этот канал также можно использовать для SFTP и SCP (безопасного FTP и защищенного копирования соответственно). Чтобы он работал, вам нужен безопасный сервер в системе, к которому вы подключаетесь, и безопасный клиент на клиенте, с которого вы подключаетесь.
Следует помнить, что SSH функционально совместим с различными платформами. К примеру, вы можете подключить SSH сервер на маршрутизаторе Cisco с клиента Windows, вы можете подключиться к серверу Linux с маршрутизатора Cisco, а также можете подключиться к Windows 2008 Server с клиента Linux.
Единственной возможной проблемой совместимости может стать тот факт, что существует две версии SSH, SSH версии 1 и SSH версии 2. Вы должны убедиться, что клиент и сервер поддерживают одну и ту же версию, чтобы знать, какую версию использовать при подключении. Обычно версии могут быть оговорены.
Хотя ни одна из ОС Windows не идет с SSH сервером или клиентом, их очень просто устанавливать.
Имея SSH сервер на своем Windows 2008 Server, вы можете:
- Удаленно иметь доступ к командной строке вашего Windows 2008 Server
- Управлять сервером через сеть, даже если вы не имеете доступа к интерфейсу GUI
- Удаленно управлять вашим Windows 2008 Server с любого устройства, имеющего SSH клиента
- Делать все это через зашифрованное соединение, которое может безопасно проходить даже через интернет
Какие опции сервера SSH доступны для Windows 2008 Server?
Существует ряд опций сервера SSH, доступных для Windows Server 2008. Вот лишь некоторые из тех, с которыми мне довелось иметь дело:
- SSH.com ‘ Бесплатный некоммерческий SSH сервер
- SSH.com ‘ SSH Tectia клиент и сервер (коммерческий)
- OpenSSH ‘ смотреть статью о том, как устанавливать openssh сервер в Vista (применимо к Windows Server 2008)
- Van Dyke ‘ vShell 3.0 Server (коммерческий)
- Free SSHd
- WinSSHd (коммерческий)
- Kpym Telnet/SSH Server
- copSSH для Windows (измененная версия OpenSSH)
- Sysax Multi-Server (SSH Server) для Windows
Как только вы запустили SSH сервер, вам понадобится SSH клиент для Windows. Вот несколько самых популярных SSH клиентов для Windows, которых мне удалось найти:
- PuTTY
- Van Dyke — SecureCRT (коммерческий)
Как установить FreeSSHd — SSH сервер в Windows Server 2008?
Поскольку установка Free SSHd так проста по сравнению с другими опциями (особенно с OpenSSH в Windows), я выбрал эту версию, чтобы показать процесс установки Free SSHd. Помните, что FreeSSHd абсолютно бесплатен (как видно из его названия) для личного / некоммерческого использования, а также для коммерческого использования.
Чтобы начать процесс, я скачал FreeSSHd.exe на свою систему Windows Server 2008 и запустил загруженную программу. Графическая установка началась.
Я принял все параметры по умолчанию для установки и нажал «Установить», чтобы начать процесс.
По завершении я решил не запускать SSHd в качестве службы, однако вы можете выбрать этот вариант при желании.

Я заметил, что SSHd сервер уже работал.
Приложение FreeSSHd может предложить следующее:
- Возможности SSH сервера и Telnet сервера
- Опции запуска SSHd только в определенных интерфейсах
- Различные способы аутентификации, включая интегрированную NTLM аутентификацию на Windows AD
- Различные способы шифрования, включая AES 128, AES 256, 3DES, Blowfish и т.д.
- Опция создания защищенного туннеля в соединении
- Опциональный Secure FTP (sFTP) – для безопасного FTP, смотреть FreeFTPd website
- Возможность управлять пользователями и ограничивать доступ к безопасной оболочке, безопасному туннелю и безопасному FTP
- Возможность предоставлять доступ только определенным узлам или подсетям
- Возможность регистрировать в журнал все подключения и команды, выполненные через FreeSSHd
- Просмотр пользователей, подключенных в данный момент
- Автоматическое обновление FreeSSHd
Чтобы войти, мне понадобилось выполнить две вещи:
- Добавить новую пользовательскую учетную запись и разрешить доступ к командной строке SSH
- Открыть исключения в моем брандмауэре Windows Server 2008
Чтобы добавить нового пользователя, я перешел по вкладке «Пользователи» и нажал Добавить.
Я решил установить логин для моей учетной записи локального администратора Windows. Я установил авторизацию на NTLM. Так в базе данных FreeSSHd нет локального пароля, и если пароль администратора измениться в базе данных локальной учетной записи Windows, вам не придется менять пароль в базе данных учтенной записи FreeSSHd.
Я авторизировал этого нового пользователя на вход только в SSH.

Вот результаты:

Второе, что мне нужно было сделать для того, чтобы позволить себе вход, это открыть исключения брандмауэра Windows. Хотя я мог вообще отключить брандмауэр Windows вместо того, чтобы открывать порты, конечно, самой безопасной опцией было оставить брандмауэр включенным и разрешить исключение для SSH ‘ TCP порт 22.
Для этого я перешел в меню Пуск -> Администрирование -> Брандмауэр Windows с расширенной безопасностью.

Далее, я нажал на входящих правилах, а затем Новое правило.

Далее я выбрал добавление правила порта.

Я указал только TCP порт 22.

Воспользуйтесь умолчаниями чтобы Разрешить это соединение, примените ко Всем доменам, и назовите правило на свой вкус.
Протестируйте подключение
Чтобы протестировать подключение, я использовал SecureCRT со своей машины Windows XP на Windows Server 2008 сервер через SSH.
Для этого я подключился к серверу через IP адрес (или имя домена). Я выбрал опцию «Принять» сертификат сервера и сохранил его.

Я вошел на сервер, используя логин и пароль администратора.
И, успех! Я смог получить доступ к серверу через SSH!

03.06.2009 —
Posted by |
ms windows server 2008
Sorry, the comment form is closed at this time.
В современных версиях Windows уже есть встроенный SSH сервер на базе пакета OpenSSH. В этой статье мы покажем, как установить и настроить OpenSSH сервер в Windows 10/11 и Windows Server 2022/2019 и подключиться к нему удаленно по защищенному SSH протоколу (как к Linux).
Содержание:
- Установка сервера OpenSSH в Windows
- Настройка SSH сервера в Windows
- Sshd_config: Конфигурационный файл сервера OpenSSH
- Подключение по SSH к Windows компьютеру
- Логи SSH подключений в Windows
Установка сервера OpenSSH в Windows
Пакет OpenSSH Server включен в современные версии Windows 10 (начиная с 1803), Windows 11 и Windows Server 2022/2019 в виде Feature on Demand (FoD). Для установки сервера OpenSSH достаточно выполнить PowerShell команду:
Get-WindowsCapability -Online | Where-Object Name -like ‘OpenSSH.Server*’ | Add-WindowsCapability –Online
Или при помощи команды DISM:
dism /Online /Add-Capability /CapabilityName:OpenSSH.Server~~~~0.0.1.0
Если ваш компьютер подключен к интернету, пакет OpenSSH.Server будет скачан и установлен в Windows.
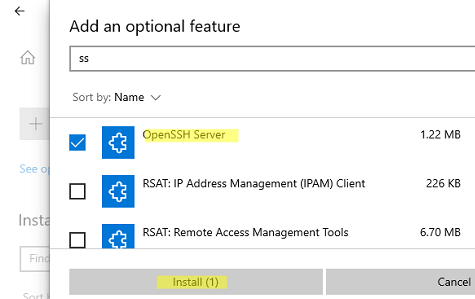
Также вы можете установить сервер OpenSSH в Windows через современную панель Параметры (Settings -> Apps and features -> Optional features -> Add a feature, Приложения -> Управление дополнительными компонентами -> Добавить компонент. Найдите в списке OpenSSH Server и нажмите кнопку Install).
На изолированных от интернета компьютерах вы можете установить компонент с ISO образа Features On Demand (доступен в личном кабинете на сайте Microsoft: MSDN или my.visualstudio.com). Скачайте диск, извлеките его содержимое в папку c:FOD (достаточно распаковать извлечь файл
OpenSSH-Server-Package~31bf3856ad364e35~amd64~~.cab
), выполните установку из локального репозитория:
Add-WindowsCapability -Name OpenSSH.Server~~~~0.0.1.0 -Online -Source c:FOD
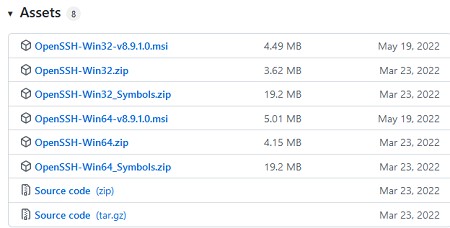
Также доступен MSI установщик OpenSSH для Windows в официальном репозитории Microsoft на GitHub (https://github.com/PowerShell/Win32-OpenSSH/releases/). Например, для Windows 10 x64 нужно скачать и установить пакет OpenSSH-Win64-v8.9.1.0.msi. Следующая PowerShell команда скачает MSI файл и установит клиент и сервер OpenSSH:
Invoke-WebRequest https://github.com/PowerShell/Win32-OpenSSH/releases/download/v8.9.1.0p1-Beta/OpenSSH-Win64-v8.9.1.0.msi -OutFile $HOMEDownloadsOpenSSH-Win64-v8.9.1.0.msi -UseBasicParsing
msiexec /i c:usersrootdownloadsOpenSSH-Win64-v8.9.1.0.msi
Также вы можете вручную установить OpenSSH сервер в предыдущих версиях Windows (Windows 8.1, Windows Server 2016/2012R2). Пример установки Win32-OpenSSH есть в статье “Настройка SFTP сервера (SSH FTP) в Windows”.
Чтобы проверить, что OpenSSH сервер установлен, выполните:
Get-WindowsCapability -Online | ? Name -like 'OpenSSH.Ser*'
State : Installed

Настройка SSH сервера в Windows
После установки сервера OpenSSH в Windows добавляются две службы:
- ssh-agent (OpenSSH Authentication Agent) – можно использовать для управления закрытыми ключами если вы настроили SSH аутентификацию по ключам;
- sshd (OpenSSH SSH Server) – собственно сам SSH сервер.
Вам нужно изменить тип запуска службы sshd на автоматический и запустить службу с помощью PowerShell:
Set-Service -Name sshd -StartupType 'Automatic'
Start-Service sshd

С помощью nestat убедитесь, что теперь в системе запущен SSH сервер и ждет подключений на порту TCP:22 :
netstat -na| find ":22"

Проверьте, что включено правило брандмауэра (Windows Defender Firewall), разрешающее входящие подключения к Windows по порту TCP/22.
Get-NetFirewallRule -Name *OpenSSH-Server* |select Name, DisplayName, Description, Enabled
Name DisplayName Description Enabled
---- ----------- ----------- -------
OpenSSH-Server-In-TCP OpenSSH SSH Server (sshd) Inbound rule for OpenSSH SSH Server (sshd) True

Если правило отключено (состоянии Enabled=False) или отсутствует, вы можете создать новое входящее правило командой New-NetFirewallRule:
New-NetFirewallRule -Name sshd -DisplayName 'OpenSSH Server (sshd)' -Enabled True -Direction Inbound -Protocol TCP -Action Allow -LocalPort 22
Рассмотрим, где храниться основные компоненты OpenSSH:
- Исполняемые файлы OpenSSH Server находятся в каталоге
C:WindowsSystem32OpenSSH
(sshd.exe, ssh.exe, ssh-keygen.exe, sftp.exe и т.д.) - Конфигурационный файл sshd_config (создается после первого запуска службы):
C:ProgramDatassh - Файлы authorized_keys и ssh ключи можно хранить в профиле пользователей:
%USERPROFILE%.ssh
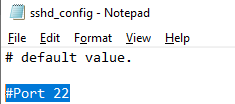
Sshd_config: Конфигурационный файл сервера OpenSSH
Настройки сервере OpenSSH хранятся в конфигурационном файле %programdata%sshsshd_config. Это обычный текстовый файл с набором директив. Для редактирования можно использовать любой текстовый редактор (я предпочитаю notepad++). Можно открыть с помощью обычного блокнота:
start-process notepad C:Programdatasshsshd_config
Например, чтобы запретить SSH подключение для определенного доменного пользователя (и всех пользователей указанного домена), добавьте в конце файле директивы:
DenyUsers winitpro[email protected]
DenyUsers corp*
Чтобы разрешить подключение только для определенной доменной группы:
AllowGroups winitprosshadmins
Либо можете разрешить доступ для локальной группы:
AllowGroups sshadmins
По умолчанию могут к openssh могут подключаться все пользователи Windows. Директивы обрабатываются в следующем порядке: DenyUsers, AllowUsers, DenyGroups,AllowGroups.
Можно запретить вход под учетными записями с правами администратора, в этом случае для выполнения привилегированных действий в SSH сессии нужно делать runas.
DenyGroups Administrators
Следующие директивы разрешают SSH доступ по ключам (SSH аутентификации в Windows с помощью ключей описана в отдельной статье) и по паролю:
PubkeyAuthentication yes
PasswordAuthentication yes
Вы можете изменить стандартный SSH порт TCP/22, на котором принимает подключения OpenSSH в конфигурационном файле sshd_config в директиве Port.
После любых изменений в конфигурационном файле sshd_config нужно перезапускать службу sshd:
restart-service sshd
Подключение по SSH к Windows компьютеру
Теперь вы можете попробовать подключиться к своей Windows 10 через SSH клиент (в этом примере я использую putty).
Вы можете использовать встроенный SSH клиентом Windows для подключения к удаленному хосту. Для этого нужно в командной строке выполнить команду:
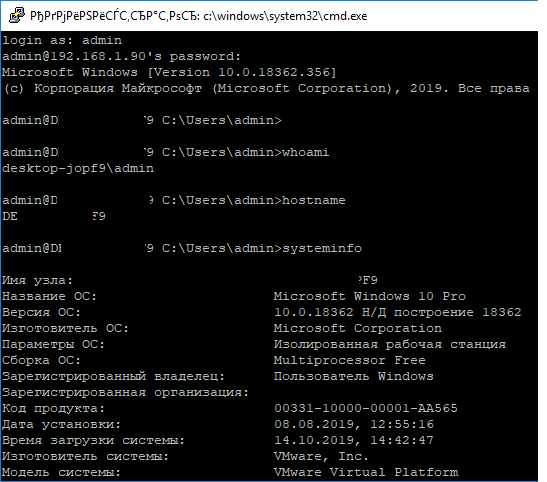
ssh [email protected]
В этом примере
alexbel
– имя пользователя на удаленном Windows компьютере, и 192.168.31.102 – IP адрес или DNS имя компьютера.
Обратите внимание что можно использовать следующие форматы имен пользователей Windows при подключении через SSH:
-
[email protected]
– локальный пользователь Windows -
[email protected]@server1
–пользователь Active Directory (в виде UPN) или аккаунт Microsoft/ Azure(Microsoft 365) -
winitpro[email protected]
– NetBIOS формат имени
В домене Active Directory можно использовать Kerberos аутентификацию в SSH. Для этого в sshd_config нужно включить параметр:
GSSAPIAuthentication yes
После этого можно прозрачно подключать к SSH сервер с Windows компьютера в домене из сессии доменного подключается. В этом случае пароль пользователя не указывается и выполняется SSO аутентификация через Kerberos:
ssh -K server1
При первом подключении появится стандартный запрос на добавление узла в список известных SSH хостов.
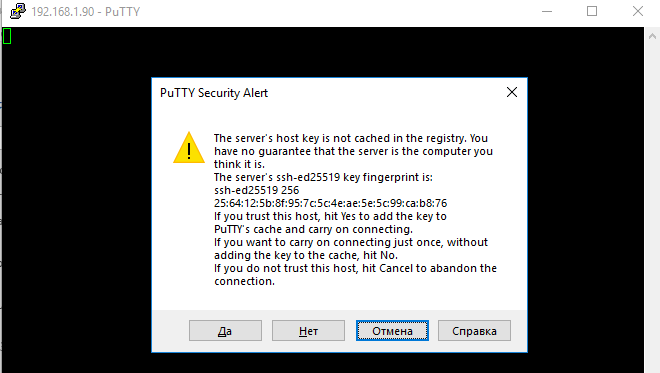
Нажимаем Да, и в открывшееся окне авторизуемся под пользователем Windows.
При успешном подключении запускается командная оболочка cmd.exe со строкой-приглашением.
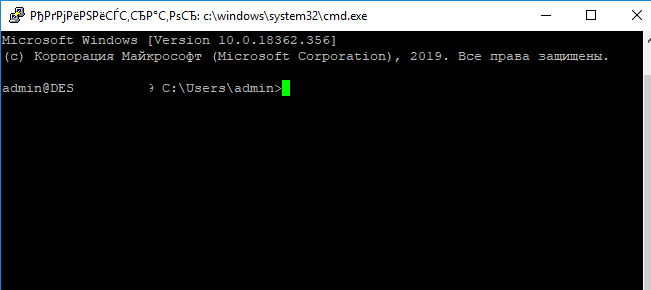
[email protected] C:Usersadmin>
В командной строке вы можете выполнять различные команды, запускать скрипты и программы.
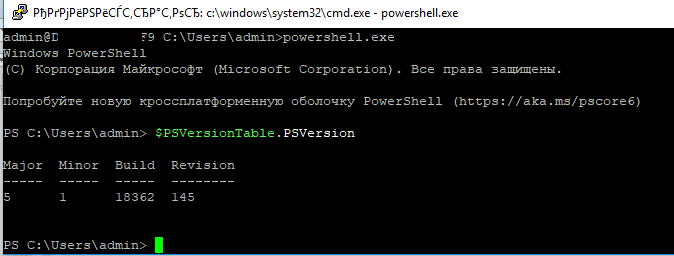
Я предпочитаю работать в командной строке PowerShell. Чтобы запустить интерпретатор PowerShell, выполните:
powershell.exe
Чтобы изменить командную оболочку (Shell) по умолчанию в OpenSSH с cmd.exe на PowerShell, внесите изменение в реестр такой командой:
New-ItemProperty -Path "HKLM:SOFTWAREOpenSSH" -Name DefaultShell -Value "C:WindowsSystem32WindowsPowerShellv1.0powershell.exe" -PropertyType String –Force
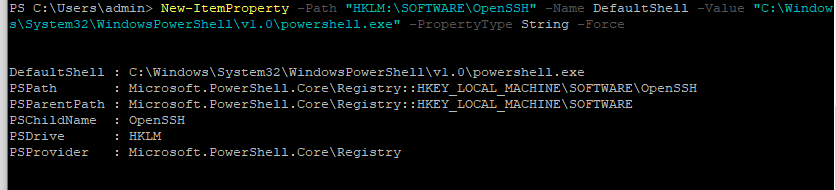
Осталось перезапустить SSH подключение и убедиться, что при подключении используется командный интерпретатор PowerShell (об этом свидетельствует приглашение
PS C:Usersadmin>
).
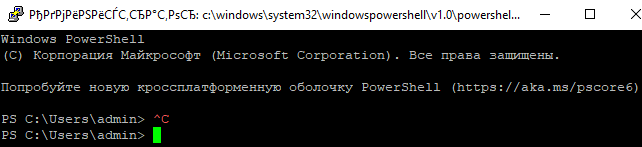
В SSH сессии запустилась командная строка PowerShell, в которой работают привычные функции: авто дополнение, раскраска модулем PSReadLine, история команд и т.д. Если текущий пользователь входит в группу локальных администраторов, то все команды в его сессии выполняются с повышенными правами даже при включенном UAC.
Логи SSH подключений в Windows
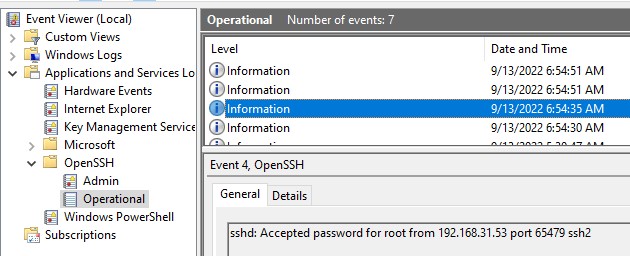
В Windows логи подключений к SSH серверу по-умолчанию пишутся не в текстовые файлы, а в отдельный журнал событий через Event Tracing for Windows (ETW). Откройте консоль Event Viewer (
eventvwr.msc
>) и перейдите в раздел Application and services logs -> OpenSSH -> Operational.
При успешном подключении с помощью к SSH серверу с помощью пароля в журнале появится событие:
EventID: 4
sshd: Accepted password for root from 192.168.31.53 port 65479 ssh2
Если была выполнена аутентификация с помощью SSH ключа, событие будет выглядеть так:
sshd: Accepted publickey for locadm from 192.168.31.53 port 55772 ssh2: ED25519 SHA256:FEHDEC/J72Fb2zC2oJNb45678967kghH43h3bBl31ldPs
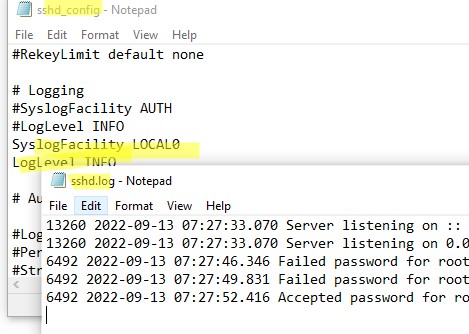
Если вы хотите, чтобы логи писались в локальный текстовый файл, нужно в файле sshd_config включить параметры:
SyslogFacility LOCAL0
LogLevel INFO
Перезапустите службу sshd и провеьте, что теперь логи SSH сервера пишутся в файл C:ProgramDatasshlogssshd.log
In the last few months I used my blog to post information on remotely managing your Server Core installations of Windows Server 2008 with numerous tools, including the Computer Management MMC Snap-Ins (compmgmt.msc), the Remote Server Administration Tools (RSAT), Remote Desktop Connection (using RDP) and Windows Remote Shell.
Now it’s time to go a little further into uncharted territory and manage Server Core using PuTTY over SSH.
Tools
I’ll be setting up OpenSSH on a x86 version of a Server Core installation of Windows Server 2008 Standard. To install it I’ll simply use Cygwin package 1.5.25-15, which can be downloaded from the Cygwin Website On the client level I’ll use PuTTY 0.60, which can be downloaded from the PuTTY Download Page for free.
In the table below are the versions of the tools used:
| Tool | Version |
| Cygwin installer | 2.573.2.2 |
| OpenSSH | 5.1p1-3 |
| DiffUtils | 2.8.7-1 |
| PuTTY | 0.60 |
Server side configuration
Download Cygwin
To install Cygwin you can use the Installation Wizard (setup.exe) from the website.
It weighs 405 KB.
This Installation Wizard was previously available as a FTP download, but recently the Cygwin people decided to stick with website hosting only, allowing the program to retrieve the files and packages it needs using FTP. This step makes installing Cygwin on a Server Core installation slightly more difficult, because you now need a browser to download it.
On the other hand it offers the ability to combine the Installation Wizard and the necessary packages on a different host than your Server Core installation, which might be useful when your Server Core box can’t access the Internet or you want to deploy loads of SSH servers to manage your Server Core boxes and don’t want to strain your Internet connection too much.
Get the Cygwin installer on your Server Core
After you’ve downloaded the Cygwin Installation Wizard you need to transfer the file to your Server Core installation. You can use various methods, including: (but not limited to)
- Copying the file to a USB or other portable rewritable media
- Burn the file onto a CD or DVD media
- Convert the file to a ISO file and mount it on your Server Core box (using DRAC/ILO)
- Place the file on a SMB File Share and map a drive to it on your Server Core box
- Place the file on an internally available FTP Server and grab it using ftp.exe.
Run the software installer
To start the installation change your prompt to the directory where setup.exe resides and type setup.exe. The Installation Wizard should appear. Perform the following steps:
- In the Cygwin Net Release Setup Program screen, which serves as a Welcome screen press Next >.
- In the Choose a Download Source select the Install from Internet (downloaded files will be kept for future re-use) option. When you have previously used the Download without Installing option to leech the 16 MB needed for OpenSSH and other utilities and distributed these files with setup.exe you can specify the Install from Local Directory option. Press Next >.
- In the Select Root Install Directory screen type a directory to install Cygwin in, or accept the default location of C:Cygwin. Under Install For verify All Users is selected. Under Default Text File Type verify Unix / binary is selected.
Press Next > when done. - When you’ve selected to Install from Internet (step 2) specify the Local Package Directory on the Select Local Package Directory screen where you want the Cygwin Installation Wizard to store the installation files it downloads. Afterwards press Next >.
- In the Select Your Internet Connection screen choose from Direct Connection and Use HTTP/FTP Proxy to best describe your connection to the Internet and press Next >.
- In the Choose A Download Site screen select a mirror site close to your location to download the remainder of the setup files from. Check the Cygwin Mirror Sites page for more information on the mirrors. Press Next > when done.
- In the Select Packages screen open the Net category and scroll down until you reach the openssh: The OpenSSH Server a… entry. Click on the Skip button thingy in the second column to change it. OpenSSL will be installed automatically as well, which is fine. Also open the Utils category and scroll down until you reach the Diffutils. Install these. Press Next >.
- When you receive a window stating you also need to download a couple of packages your packages depend on (dependencies) choose the recommended setting to install these and press Next >.
- Wait for the Cygwin Installation Wizard to download the necessary packages. Wait a little longer for the Cygwin Installation Wizard to install the programs. In the Create Icons screen deselect the Create icon on Desktop and Add icon to Start Menu options. We won’t be needing them. Press Finish when done.
I noticed my Server Core box downloaded 16,5 MB from the mirror website.
Configure OpenSSH
Type the following command in the folder where you installed Cygwin (refer to step 3) and run the following command:
Cygwin.bat
On the first run this will make Cygwin perform a couple of basic steps regarding the skeleton files before it will display its prompt. On the prompt type the following commands:
chmod +r /etc/passwd
chmod +r /etc/group
chmod 755 /var
ssh-host-config
Answer the following questions:
| Question | Answer |
| Should privilege separation be used? | yes |
| Should this script attempt to create a new local account ‘sshd’? | yes |
| Do you want to install sshd as a service? | yes |
| Enter the value of CYGWIN for the deamon : [ntsec] | ntsec |
| Do you want to use different name? | no |
| Create new privileged user account ‘cyg_server’? | yes |
| Please enter the password: | Any Password* |
| Reenter: | Any Password* |
* these two values should meet the password complexity requirements.
You should receive the message when done:
*** Info: Host configuration finished. Have fun!
Create a Firewall exclusion
The Installation Wizard will not create a firewall exception by default, so you need to make one yourself. Use the following command to do so:
netsh advfirewall firewall add rule name=»OpenSSH Server» protocol=TCP dir=in localport=22 action=allow
Start the OpenSSH Server
The last step on the server is to start the Open SSH Server, by typing:
net start sshd
Note:
The CYGWIN sshd service is set to start automatically every time you reboot. You will only have to type the above command once. Alternatively to typing the command you could restart your Server Core box.
Client side configuration
On the intended client download a SSH client. PuTTY is by far the most popular SSH client. It is a Graphical SSH client for Windows and the best thing it’s free.
Installing PuTTY
After installing and configuring OpenSSH on your Server Core installation you might suspect installing PuTTY on Windows is tricky as well, but it isn’t. Technically you can’t even install PuTTY: you simply download PuTTY and store putty.exe somewhere. (I’ve placed putty.exe on my desktop for easy access.)
Running PuTTY
To run PuTTY simple double-click it.
Note:
When you’ve downloaded putty.exe with Internet Explorer and stored it on a NTFS formatted drive you might get a Security Warning. To disable this warning right-click on putty.exe and open its properties. At the bottom of the General tab you’ll find a button labeled Unblock next to the text «This file came from another computer and might be blocked to help protect this computer.» Pressing the Unblock button will remove the text, the button and the Security Warning.
Connecting with PuTTY
To connect to your Server Core installation of Windows Server 2008 type the IP address or DNS name of your Server Core box in the Host Name (or IP address) field of the PuTTY Configuration Screen and press the Open button.
Log in with your credentials and presto!

Concluding
I hope this post helps you to connect to your Server Core boxes using SSH. It sure helped me convince a Linux minded firewall administrator to grant me access to one of my boxes, using the «I’m using all the right tools here» argument. Sometimes communication can be so much fun…
Although this post is only a brief exploration of SSH on a Server Core installation of Windows Server 2008, limitless options exist to manage your boxes using SSH tunneling.
When managing Server Core installations of Windows Server 2008 using SSH in an Active Directory environment, be sure to check out the documentation over on Port25.
Further reading
Setup an SSH Server in Vista
PuTTY Download Page
How to install OpenSSH on Windows 2000, XP or Vista
Installing OpenSSH for Windows 2003 Server – How to get it working
How to setup the secure shell daemon on a Windows 2003 server
Vista Blocked File Protection Control
OpenSSH with Kerberos and Active Directory
Port 25: OpenSSH on Linux using Windows/Kerberos for Authentication
Stupid SSH Tricks: Some Essentials
How to setup the secure shell daemon on a Windows 2003 server
ssh, Cygwin, and Samba
NT Security and usage of ntsec
Considerations
Updates
This blogpost endorses open source products. Open source products need patching. Patching OpenSSH on Windows Server 2008 requires manual interaction. You can use the Cygwin installer to update the open source packages installed. Please update your operational procedures to check for updates regularly. More information can be found in the Further reading section above.
Security
The version of OpenSSH used in this post offers both version 1 and version 2 of Secure Shell. (SSH1 and SSH2) SSH1 has inherent design flaws which make it vulnerable to, e.g., man-in-the-middle attacks, it is now generally considered obsolete and should be avoided. For security considerations you should disable SSH1 in the sshd_config file. More information can be found in the Further reading section above.
Меня всегда удручало подключение к Windows машинам. Нет, я не противник и не сторонник Microsoft и их продуктов. Каждый продукт существует для своей цели, но речь не об этом.
Для меня всегда было мучительно больно подключаться к серверам с Windows, потому что эти подключения либо настраиваются через одно место (привет WinRM с HTTPS) либо работают не очень стабильно (здравствуй RDP к виртуалкам за океаном).
Поэтому, случайно натолкнувшись на проект Win32-OpenSSH, я решил поделиться опытом настройки. Возможно кому-нибудь эта тулза сэкономить кучу нервов.

Варианты установки:
- Вручную
- Через пакет Chocolatey
- Через Ansible, например роль jborean93.win_openssh
Далее я буду рассказывать про первый пункт, так как с остальными и так все более менее понятно.
Отмечу, что данный проект пока что находится на стадии beta, поэтому его не рекомендуют использовать в production.
Итак, скачиваем последний релиз, на текущий момент это 7.9.0.0p1-beta. Есть версии как для 32 так и для 64 битных систем.
Распаковываем в C:Program FilesOpenSSH
Обязательный момент для корректной работы: права на запись в этой директории должны быть только у SYSTEM и у админской группы.
Устанавливаем сервисы скриптом install-sshd.ps1 находящимся в этой директории
powershell.exe -ExecutionPolicy Bypass -File install-sshd.ps1Разрешаем входящие подключения на 22 порт:
New-NetFirewallRule -Name sshd -DisplayName 'OpenSSH Server (sshd)' -Enabled True -Direction Inbound -Protocol TCP -Action Allow -LocalPort 22Уточнение: апплет New-NetFirewallRule используется на Windows Server 2012 и новее. В наиболее старых системах (либо десктопных) можно воспользоваться командой:
netsh advfirewall firewall add rule name=sshd dir=in action=allow protocol=TCP localport=22
Запускаем сервис:
net start sshdПри запуске будут автоматически сгенерированы хост-ключи (если отсутствуют) в %programdata%ssh
Автозапуск сервиса при запуске системы мы можем включить командой:
Set-Service sshd -StartupType AutomaticТак же, можно сменить командную оболочку по умолчанию (после установки, по умолчанию — cmd):
New-ItemProperty -Path "HKLM:SOFTWAREOpenSSH" -Name DefaultShell -Value "C:WindowsSystem32WindowsPowerShellv1.0powershell.exe" -PropertyType String -ForceУточнение: Необходимо указывать абсолютный путь.
Что дальше?
А дальше настраиваем sshd_config, который расположем в C:ProgramDatassh. Например:
PasswordAuthentication no
PubkeyAuthentication yes
И создаем в пользовательской папке директорию .ssh, а в ней файл authorized_keys. Туда записываем публичные ключи.
Важное уточнение: права на запись в этот файл, должен иметь только пользователь, в чьей директории лежит файл.
Но если у вас проблемы с этим, всегда можно выключить проверку прав в конфиге:
StrictModes noК слову, в C:Program FilesOpenSSH лежат 2 скрипта (FixHostFilePermissions.ps1, FixUserFilePermissions.ps1), которые должны
но не обязаны
фиксить права, в том числе и с authorized_keys, но почему-то не фиксят.
Не забывайте перезапускать сервис sshd после для применения изменений.
ru-mbp-666:infrastructure$ ssh Administrator@192.168.1.10 -i ~/.ssh/id_rsa
Windows PowerShell
Copyright (C) 2016 Microsoft Corporation. All rights reserved.

PS C:UsersAdministrator> Get-Host


Name             : ConsoleHost
Version          : 5.1.14393.2791
InstanceId       : 653210bd-6f58-445e-80a0-66f66666f6f6
UI               : System.Management.Automation.Internal.Host.InternalHostUserInterface
CurrentCulture   : en-US
CurrentUICulture : en-US
PrivateData      : Microsoft.PowerShell.ConsoleHost+ConsoleColorProxy
DebuggerEnabled  : True
IsRunspacePushed : False
Runspace         : System.Management.Automation.Runspaces.LocalRunspace

PS C:UsersAdministrator>
Субъективные плюсы/минусы.
Плюсы:
- Стандартный подход к подключению к серверам.
Когда есть немного Windows машин, очень неудобно когда:
Так, сюда мы ходим по ssh, а тут рдп,
и вообще best-practice с бастионами, сначала ssh-туннель, а через него RDP. - Простота настройки
Считаю что это очевидно. - Скорость подключения и работы с удаленной машиной
Нет графической оболочки, экономятся как ресурсы сервера, так и количество передаваемых данных.
Минусы:
- Не заменяет RDP полностью.
Не все можно сделать из консоли, увы. Я имею ввиду ситуации, когда требуется GUI.
Материалы использованные в статье:
Ссылка на сам проект
Варианты установки бессовестно скопированы с Ansible docs.
![]()
OpenSSH Version 0.16 — installed using chocolatey installer (barebones)
after installation, the service cannot be started with the user SSHD. Since managed service accounts were introduced in server 2008 R2, does this mean that this will not install on server 2008 standard?
thanks
![]()
win32-openssh support down to win7 client or windows server 2008 R2
![]()
Hi
i created a user (DOMAINSSHD) and edited the chocolately package to change all instances of «NT ServiceSSHD» to the new username.
the install was successful.
when i run SSHD.exe -d from an admin powershell, i can connect, however when i run the service i get «write failed — broken pipe»
now, i know that this is «not supported» on Server 2008 SP2, however any nudges in the right direction would be appreciated 
EDIT: Debug Log shows:
2384 10:28:14:332 debug1: server_input_channel_req: channel 0 request shell reply 1
2384 10:28:14:332 debug1: session_by_channel: session 0 channel 0
2384 10:28:14:332 debug1: session_input_channel_req: session 0 req shell
2384 10:28:14:332 Starting session: shell on console for XXX@YYY.ZZZ from 192.168.WWW.YYY port 41014 id 0
2384 10:28:14:332 debug1: Executing command: C:Program FilesOpenSSH-Win64ssh-shellhost.exe
2384 10:28:14:332 fatal: ERROR. Cannot create process (1349).n
2384 10:28:14:332 debug1: do_cleanup
2384 10:28:14:332 debug1: session_pty_cleanup: session 0 release console
note the single error, this does not work (broken pipe)
running sshd.exe -d i receive:
debug1: Executing command: C:Program FilesOpenSSH-Win64ssh-shellhost.exe
debug1: Recieved SIGCHLD
which works.
thanks
![]()
1349 — The type of the token is inappropriate for its attempted use.
Not sure why you are seeing this. Can you try running sshd as SYSTEM and see if it work?
sc.exe config sshd obj= localsystem
![]()
Why did you change the service to run as an ordinary domain user? The service needs to run at a high privilege level (System Service), even though the individual users will be authenticating against the domain.
SSHD is also not meant to be run directly in a console but through the sshd service (with sc.exe start/stop sshd).
![]()
@fpqc
the user is a domain admin, i shall shortly try running as localsystem as recommended by @manojampalam
![]()
@HSSupport Tell him to uninstall the edited package and reinstall it so it installs as a system service. What @manojampalam suggested is just undoing the error that the user made in the first place.
sshd runs as a localsystem-level service, but all authentication is carried through the server’s authentication mechanism and permissions are enforced at the user level.
![]()
@fpqc
sorry, i think i caused some confusion:
I installed this package. since its server 2008 (standard, not R2) it wont install as the NT AuthoritySSHD user. So ill be trying the localsystem next, and also localservice to see which works.
the domainsshd user was my workaround for a lack of service managed accounts thanks
![]()
@HSSupport Ah, that makes some sense. It might actually work then. Also, yeah, the domain admin token can be elevated to a system level token using the windows internals psexec tool (i.e. Admin -> SYSTEM is not a security boundary), but it is a permissions boundary and likely the cause of failure here.
This TechNet page also includes instructions for manually configuring Managed Service accounts on earlier versions of Windows Server (2003 and 2008) if they are using the updated AD Schema.
https://technet.microsoft.com/en-us/library/dd548356.aspx
![]()
ok so i have an update.
The service flat-out would not start using NT AuthorityLocalService account
it does work if you replace «NT AuthoritySSHD» with «NT AuthoritySYSTEM» and run the chocolatey installer, however something goes wrong at authentication: all forms fail. (note, using localsystem produces the exact same error)
i think this may have gone from «easily fixed» to «probably not going to work ever»…. logs below
if you can have a quick look and let me know what you think / if its easily possible to get this to run/work on Server 2008 SP2, i would be grateful, but i also accept this may not be possible (at least i/we/you tried!)
thanks
Logs note: i have the correct ssh key in place, and used the correct password 3x. this is a member server of a domain
2884 10:42:27:574 debug1: Forked child 2844.
2844 10:42:42:606 debug1: sshd version OpenSSH_7.5, LibreSSL 2.5.3
2844 10:42:42:653 debug1: private host key #0: ssh-rsa SHA256:5Fyhj/0z+V8Nito1hgyA
2844 10:42:42:653 debug1: private host key #1: ssh-dss SHA256:XcuzyzeZpycEpgA
2844 10:42:42:653 debug1: private host key #2: ecdsa-sha2-nistp256 SHA256:1bedKRzj3byW+P2b4+ZJb0HN4
2844 10:42:42:653 debug1: private host key #3: ssh-ed25519 SHA256:58fxaMcndYc/44mPIGvU
2844 10:42:42:653 debug1: child socket: 312
2844 10:42:42:653 debug1: child startup_pipe: 316
2844 10:42:42:653 Connection from AAA.BBB.CCC.25 port 47656 on AAA.BBB.CCC.80 port 2358
2844 10:42:42:668 debug1: Client protocol version 2.0; client software version OpenSSH_6.6.1
2844 10:42:42:668 debug1: match: OpenSSH_6.6.1 pat OpenSSH_6.6.1* compat 0x04000000
2844 10:42:42:668 debug1: Local version string SSH-2.0-OpenSSH_7.5
2844 10:42:42:668 debug1: list_hostkey_types: ssh-rsa,rsa-sha2-512,rsa-sha2-256,ecdsa-sha2-nistp256,ssh-ed25519
2844 10:42:42:668 debug1: SSH2_MSG_KEXINIT sent
2844 10:42:42:668 debug1: SSH2_MSG_KEXINIT received
2844 10:42:42:668 debug1: kex: algorithm: curve25519-sha256@libssh.org
2844 10:42:42:668 debug1: kex: host key algorithm: ecdsa-sha2-nistp256
2844 10:42:42:668 debug1: kex: client->server cipher: aes128-ctr MAC: hmac-sha1-etm@openssh.com compression: none
2844 10:42:42:668 debug1: kex: server->client cipher: aes128-ctr MAC: hmac-sha1-etm@openssh.com compression: none
2844 10:42:42:668 debug1: expecting SSH2_MSG_KEX_ECDH_INIT
2844 10:42:42:684 debug1: rekey after 4294967296 blocks
2844 10:42:42:684 debug1: SSH2_MSG_NEWKEYS sent
2844 10:42:42:684 debug1: expecting SSH2_MSG_NEWKEYS
2844 10:42:42:700 debug1: SSH2_MSG_NEWKEYS received
2844 10:42:42:700 debug1: rekey after 4294967296 blocks
2844 10:42:42:700 debug1: KEX done
2844 10:42:42:903 debug1: userauth-request for user XX.localYY service ssh-connection method none
2844 10:42:42:903 debug1: attempt 0 failures 0
2844 10:42:42:903 reprocess config line 45: Deprecated option RSAAuthentication
2844 10:42:47:950 Failed none for XX.localYY from AAA.BBB.CCC.25 port 47656 ssh2
2844 10:42:47:950 debug1: userauth-request for user XX.localYY service ssh-connection method publickey
2844 10:42:47:950 debug1: attempt 1 failures 0
2844 10:42:57:701 debug1: auth agent did not authorize client XX.localYY
2844 10:42:57:701 Failed publickey for XX.localYY from AAA.BBB.CCC.25 port 47656 ssh2: RSA SHA256:cWRbogIsue8Z37E
2844 10:42:57:701 debug1: userauth-request for user XX.localYY service ssh-connection method keyboard-interactive
2844 10:42:57:701 debug1: attempt 2 failures 1
2844 10:42:57:701 debug1: keyboard-interactive devs
2844 10:42:57:701 debug1: auth2_challenge: user=XX.localYY devs=
2844 10:42:57:701 debug1: kbdint_alloc: devices »
2844 10:42:57:701 Failed keyboard-interactive for XX.localYY from AAA.BBB.CCC.25 port 47656 ssh2
2844 10:43:37:970 debug1: userauth-request for user XX.localYY service ssh-connection method password
2844 10:43:37:970 debug1: attempt 3 failures 2
2844 10:43:37:970 debug1: auth agent did not authorize client XX.localYY
2844 10:43:37:970 Failed password for XX.localYY from AAA.BBB.CCC.25 port 47656 ssh2
2844 10:43:40:611 debug1: userauth-request for user XX.localYY service ssh-connection method password
2844 10:43:40:611 debug1: attempt 4 failures 3
2844 10:43:40:611 debug1: auth agent did not authorize client XX.localYY
2844 10:43:40:611 Failed password for XX.localYY from AAA.BBB.CCC.25 port 47656 ssh2
2844 10:43:42:736 debug1: userauth-request for user XX.localYY service ssh-connection method password
2844 10:43:42:736 debug1: attempt 5 failures 4
2844 10:43:42:736 debug1: auth agent did not authorize client XX.localYY
2844 10:43:42:736 Failed password for XX.localYY from AAA.BBB.CCC.25 port 47656 ssh2
2844 10:43:42:736 Connection closed by authenticating user XX.localYY AAA.BBB.CCC.25 port 47656
2844 10:43:42:736 debug1: do_cleanup
![]()
Server 2008 is out of support.