

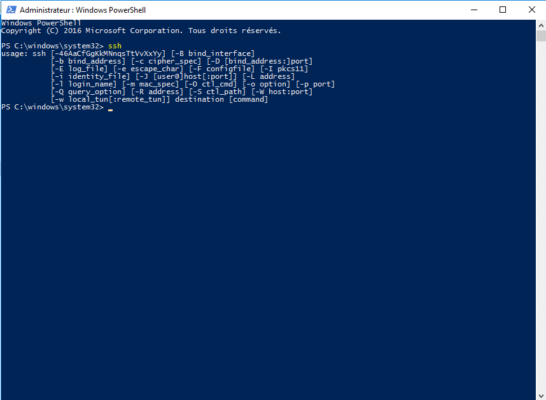
Если вам понадобился SFTP/SSH сервер на Windows Server 2012 R2, то вы попали по адресу. Установим, запустим, настроим и протестируем OpenSSH Server в Windows Server 2012 R2.
Установка OpenSSH в Windows Server 2012 R2
Скачиваем последнюю версию дистрибутива OpenSSH:
https://github.com/PowerShell/Win32-OpenSSH/releases
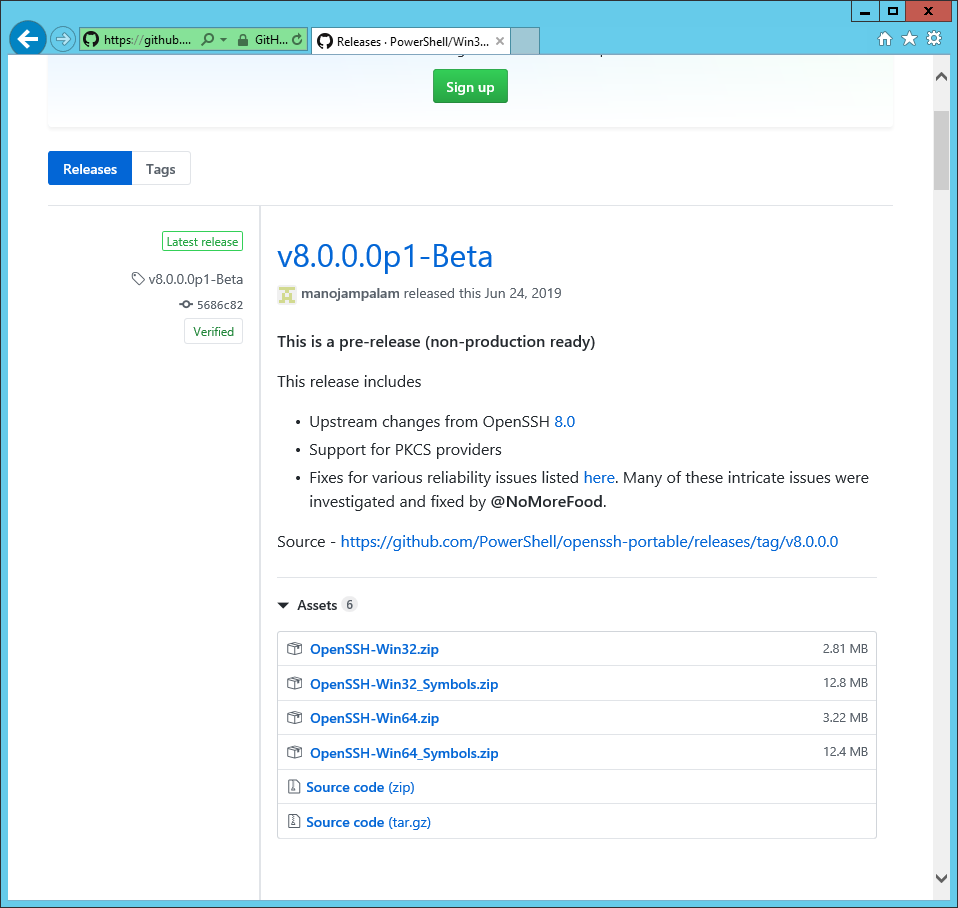
Сейчас доступна версия v8.0.0.0p1-Beta. Скачиваю OpenSSH-Win64.zip.
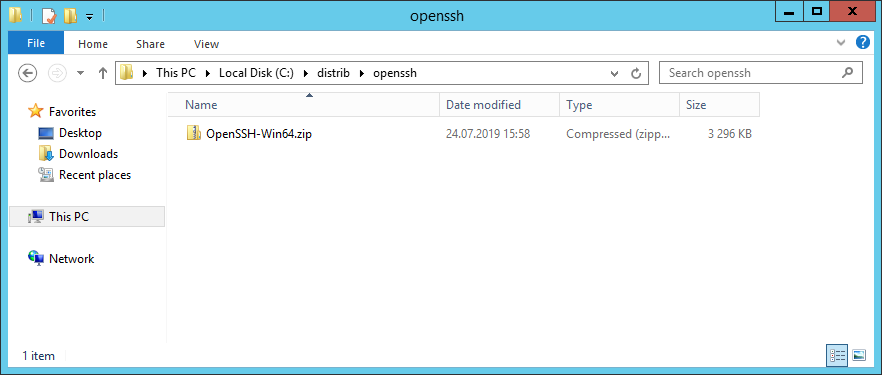
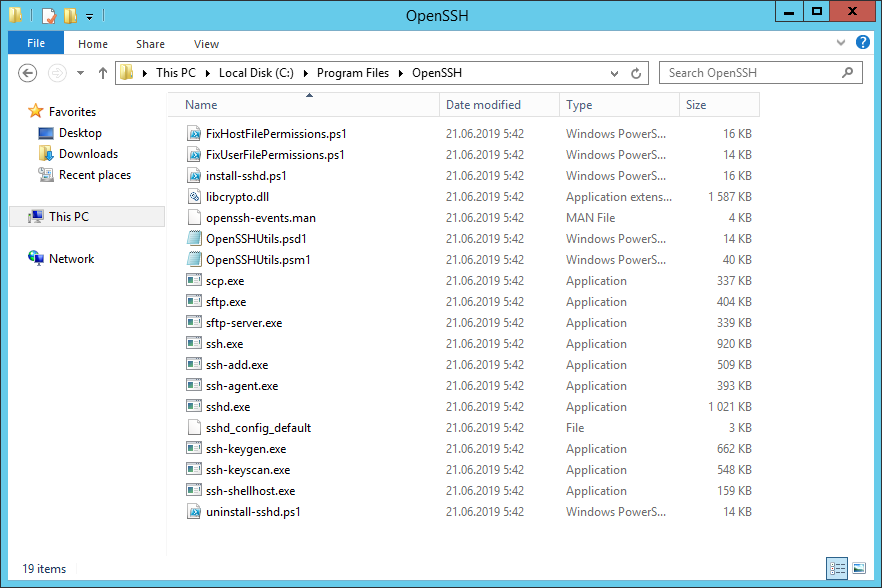
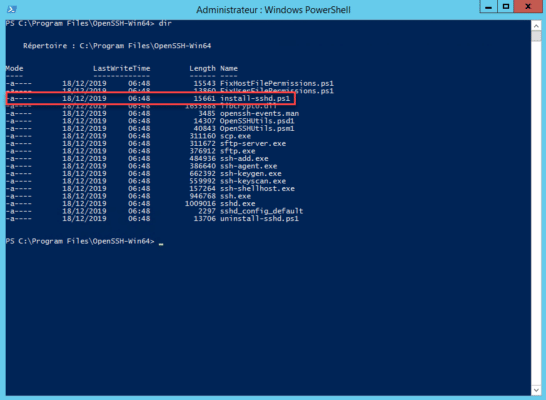
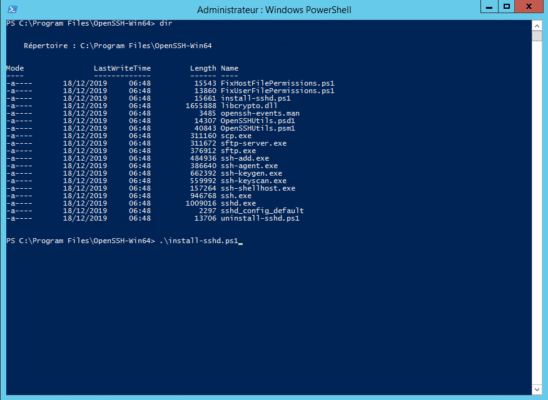
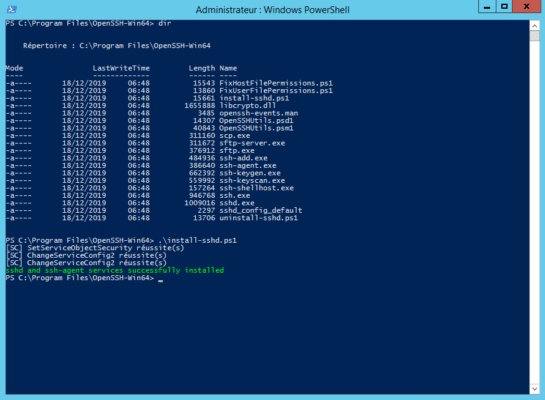
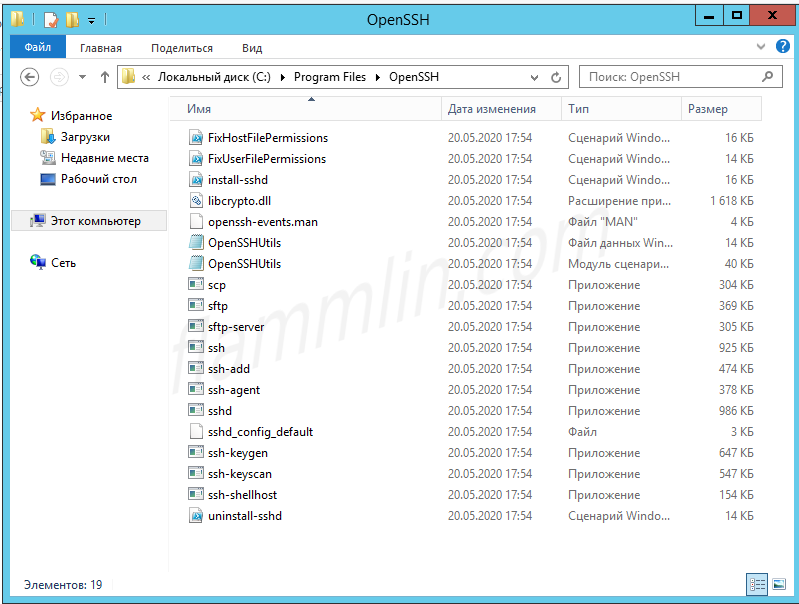
Создаю директорию C:Program FilesOpenSSH, распаковываю в неё содержимое архива.
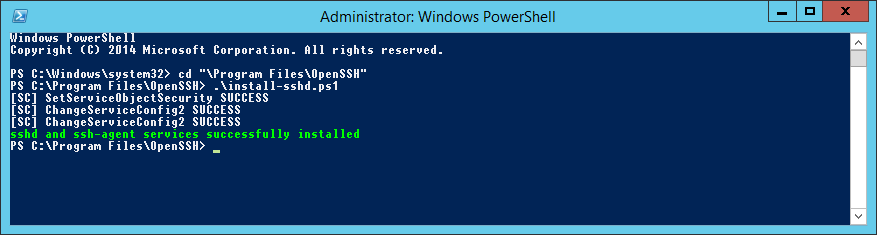
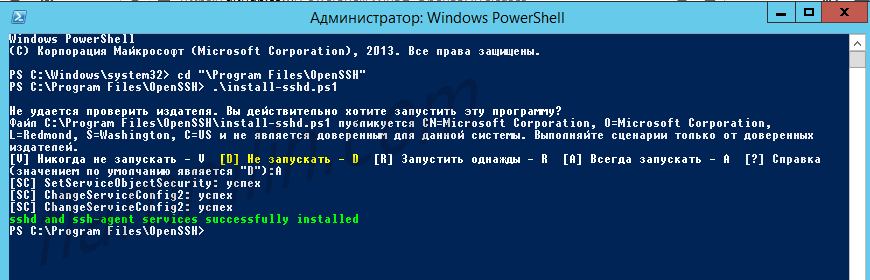
Запускаю powershell от имени администратора.

Выполняю скрипт установки:
cd "Program FilesOpenSSH"
.install-sshd.ps1
sshd and ssh-agent services successfully installed
Если произошла ошибка политики безопасности, то можно выполнить установку так:
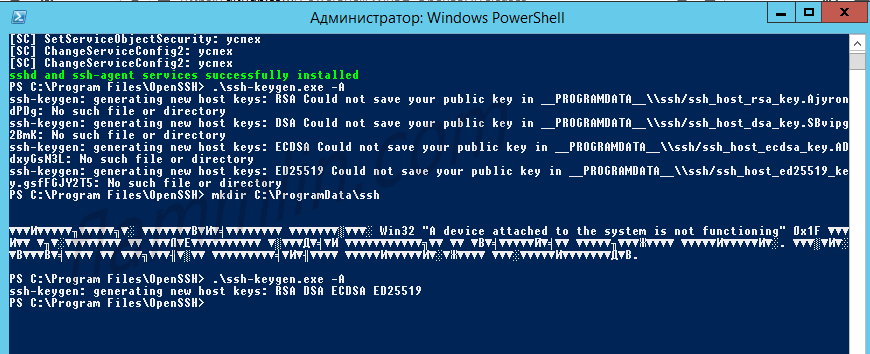
powershell -ExecutionPolicy Bypass -File .install-sshd.ps1Генерирую ключи:
.ssh-keygen.exe -AВ результате вижу ошибку:
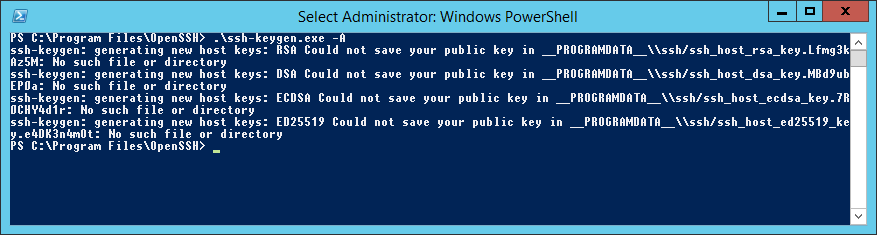
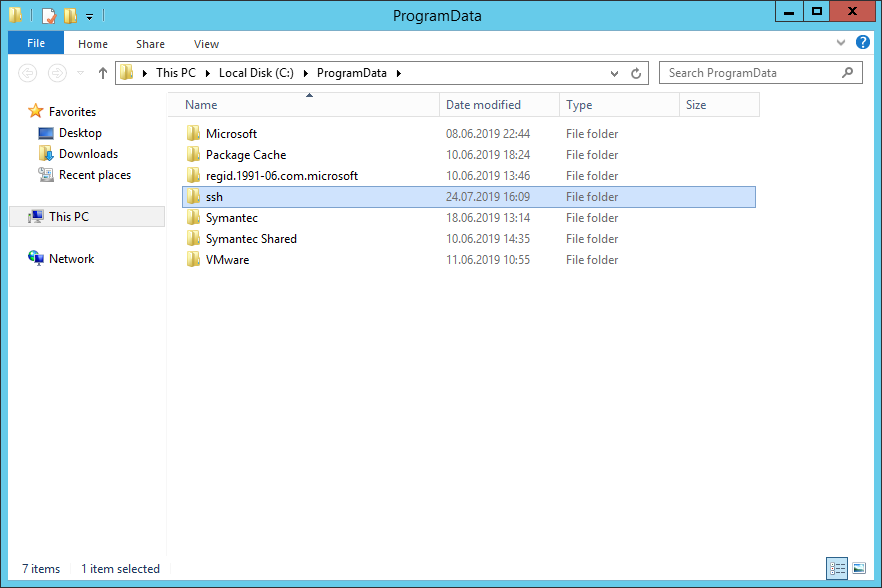
Исправляется легко, захожу в папку C:ProgramData и создаю вручную директорию «ssh».
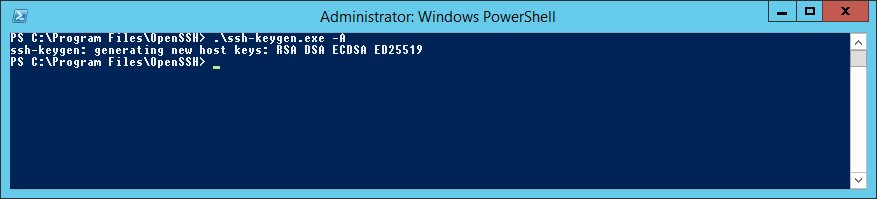
Снова пытаюсь сгенерировать ключи:
.ssh-keygen.exe -AНа этот раз процедура выполняется успешно.
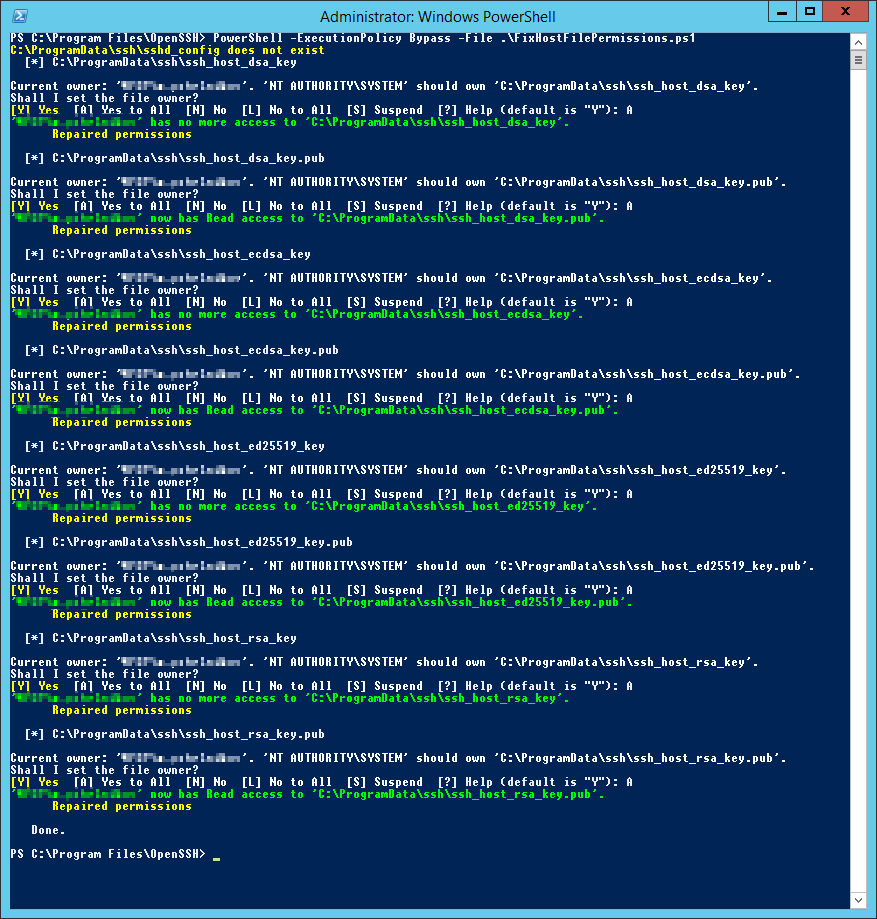
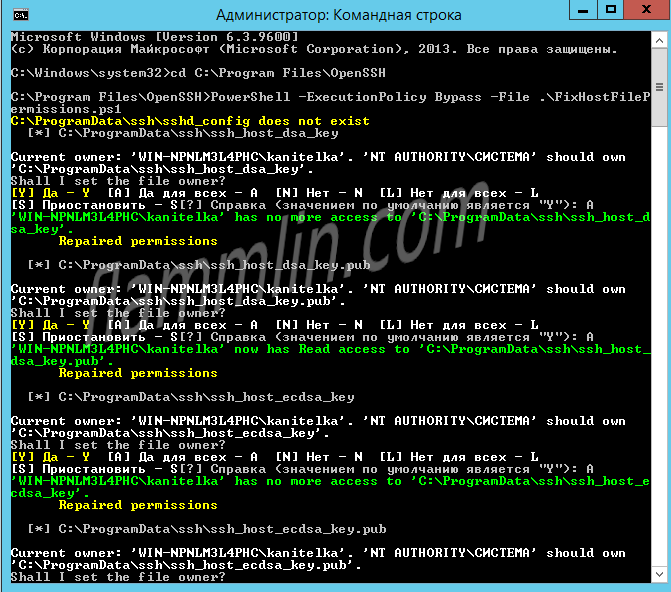
Настраиваю владельца файлов и права доступа:
PowerShell -ExecutionPolicy Bypass -File .FixHostFilePermissions.ps1На каждый вопрос отвечаю «A».
Открыть 22 порт
OpenSSH работает по порту TCP 22. Открою доступ в Firewall:
New-NetFirewallRule -Protocol TCP -LocalPort 22 -Direction Inbound -Action Allow -DisplayName SSH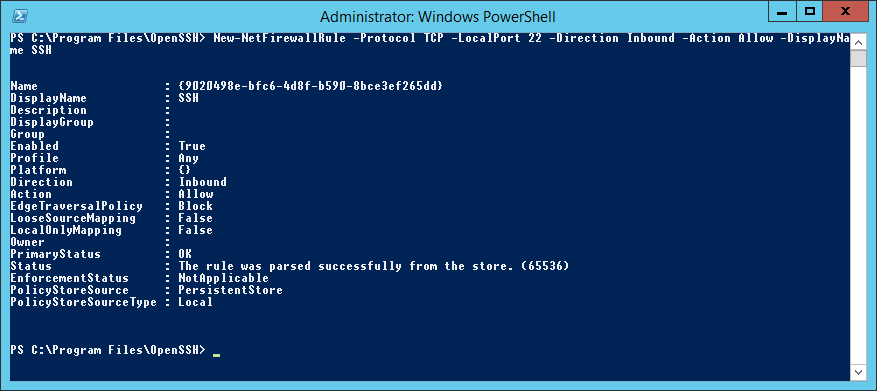
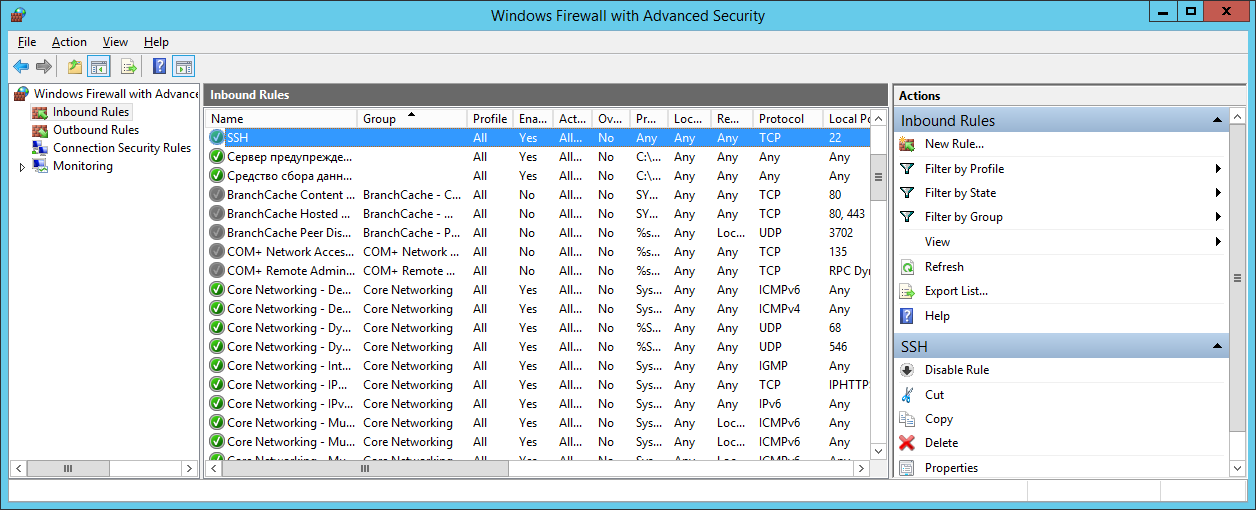
То же самое можно сделать через GUI в оснастке Windows Firewall with Advanced Security.
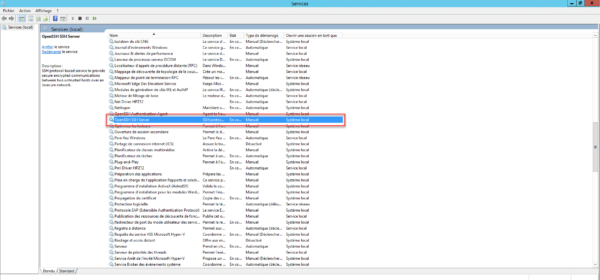
Запуск службы OpenSSH
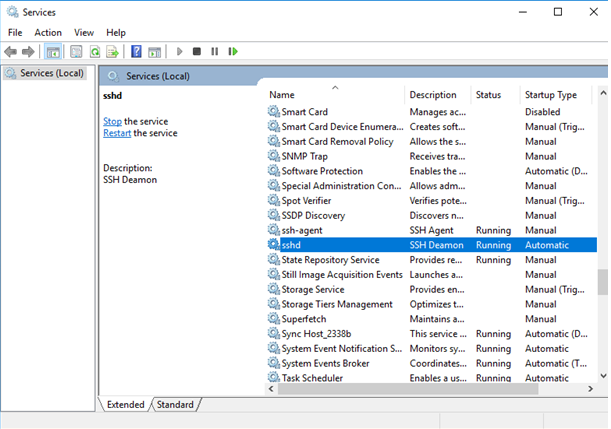
Открываю список служб:
services.msc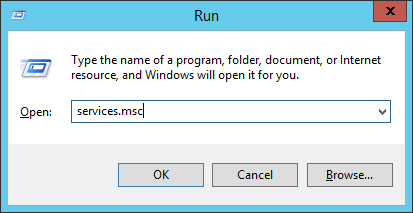
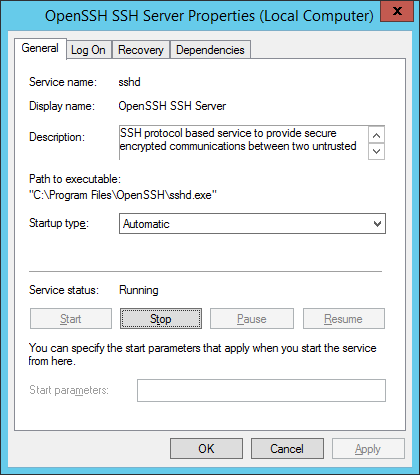
Нахожу службу «OpenSSH SSH Server». В свойствах службы делаю автоматический запуск и запускаю её.
Проверим что 22 порт работает:
netstat -tan | find "22"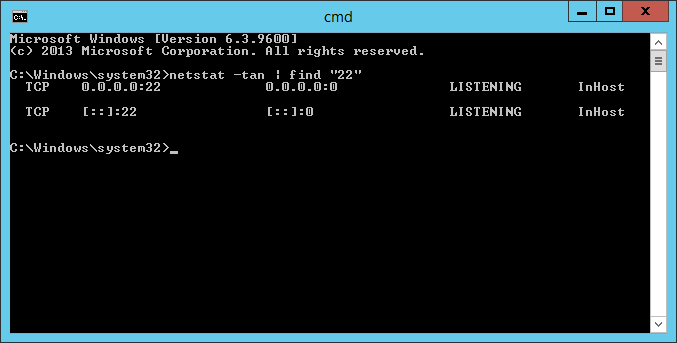
22 порт слушается.
Проверка OpenSSH
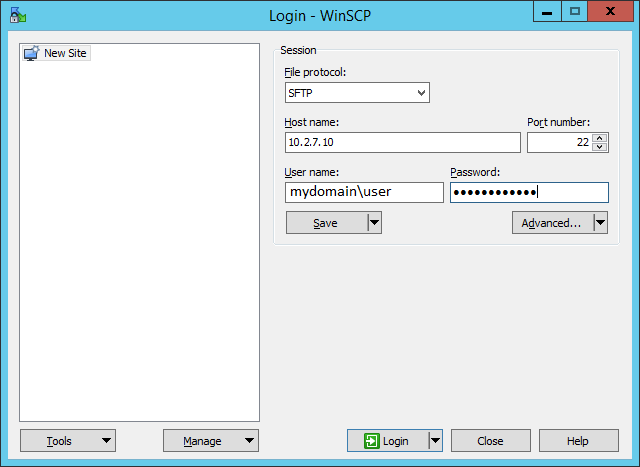
Проверю с помощью WinSCP. Для доменного пользователя используется логин вида domainusername.
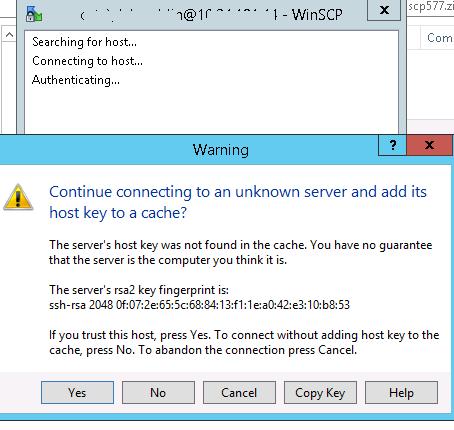
При первом входе появится окно:
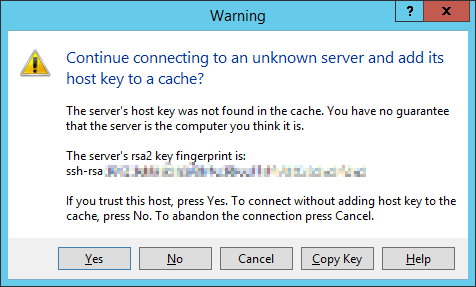
Yes.
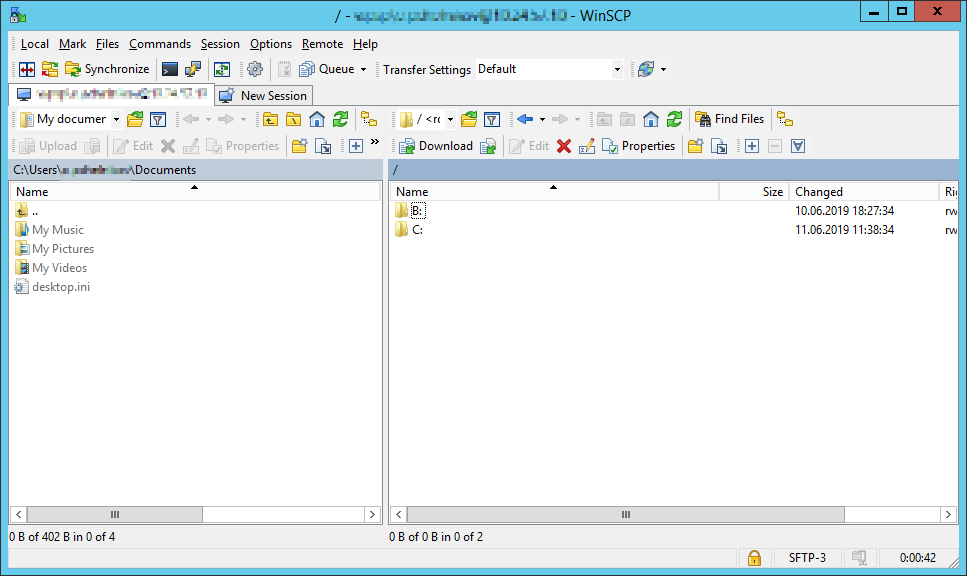
Всё работает.
Настройка доступа
Конфигурационный файл находится здесь: C:ProgramDatasshsshd_config.

Собственно, OpenSSH конфигурируется здесь. Например, чтобы разрешить доступ по OpenSSH определённой группе пользователей, допишу в конец файла:
DenyUsers *
AllowGroups my_domainmy_group_for_ssh_accessС помощью встроенного пакета OpenSSH для Windows вы можете легко настроить безопасную передачу файлов между клиентом и серверов Windows по защищенному протоколу передачи файлов SFTP (Secure FTP). В этой статье мы покажем, как установить и настроить установить SFTP сервер в Windows 10/11 или Windows Server 2022/2019/2016/2012R2 с помощью встроенных средств (Win32-OpenSSH).
Содержание:
- Установка OpenSSH в Windows
- Настройка SFTP сервера на базе OpenSSH в Windows
- Подключение к SFTP серверу с помощью PowerShell и WinSCP
- Настройка SFTP аутентификации по ключам
Протокол SFTP (Secure File Transfer Protocol , Secure FTP или SSH FTP) это расширение протокола SSH, являющимся стандартом мира UNIX/Linux систем. Хотя с точки зрения пользователей он похож на FTP, но на самом деле это абсолютно другой протокол, не имеющий с FTP ничего общего. Данные между клиентом и сервером передаются по порту 22 через SSH туннель.
Основные преимущества протокола SFTP:
- Передача файлов и команд происходит внутри защищенной SSH-сессии;
- Для передачи файлов и команд используется одно соединение;
- Поддерживаются символические ссылки, доступны функций прерывания, возобновления передачи, удаления файла и другие;
- Обычно на каналах, где FTP работает медленно или с перебоями, SFTP-соединение работает более надежно и быстро;
- Возможность аутентификации с помощью SSH ключей.
Не нужно путать протоколы SFTP и FTPS. FTPS – это по сути обычный FTP с SSL сертификатом, а SFTP – это передача FTP данных и команд внутри SSH сессии.
В современные версии Windows по-умолчанию встроен порт OpenSSH для win32 (Win32-OpenSSH). Вы можете использовать его для организации защищенного SFTP сервера вместо таких сторониих продуктов как Core FTP, FileZilla, CYGWIN, OpenSSH, FTP Shell, IPSwitch и пр.
Установка OpenSSH в Windows
Пакет OpenSSH уже включен в операционную систему в современных билдах Windows 10 (начиная с 1803), Windows 11, Windows Server 2022/2019 в виде Feature on Demand (как и RSAT).
В этих версиях Windows вы можете установить сервер OpenSSH с помощью PowerShell:
Add-WindowsCapability -Online -Name OpenSSH.Server*
Или с помощью DISM:
dism /Online /Add-Capability /CapabilityName:OpenSSH.Server~~~~0.0.1.0
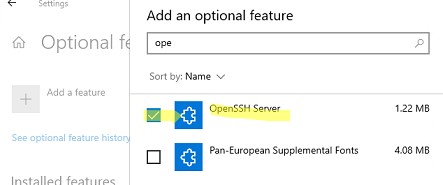
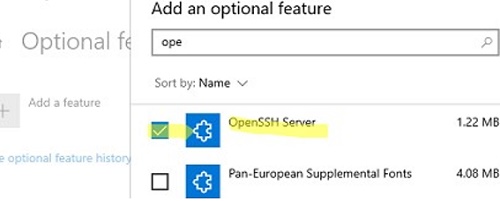
Также можно установить OpenSSH из графического интерфейса Windows 10 (Settings -> Apps -> Optional Features -> Add a feature -> Open SSH Server -> Install).
Чтобы проверить, установлен ли пакет:
Get-WindowsCapability -Online | ? Name -like 'OpenSSH*'
Исполняемые файлы OpenSSH находятся в каталоге:
C:windowssystem32OpenSSH
Конфигурационный файл sshd_config находится в каталоге C:ProgramDatassh (каталог создается после первого запуска службы).
Лог — c:windowssystem32OpenSSHlogssshd.log
Файл authorized_keys и ключи хранятся в каталоге %USERPROFILE%.ssh.
В предыдущих версиях Windows 10, в Windows 8.1 или в Windows Server 2016/2012 R2 вам придется скачать Win32-OpenSSH для Windows с GitHub и установить вручную (https://github.com/PowerShell/Win32-OpenSSH/releases). Нам нужна версия для 64 битной версии Windows: OpenSSH-Win64.zip (4,15 Мб).
- Распакуйте содержимое архива в целевой каталог, к примеру:
C:OpenSSH-Win - Запустите командную строку PowerShell с правами администратора и перейдите в каталог OpenSSH:
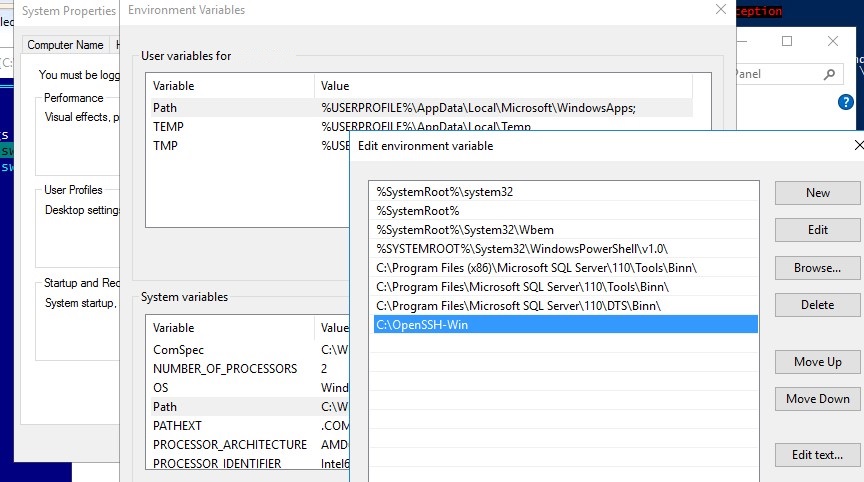
cd C:OpenSSH-Win - Добавьте путь к каталогу OpenSSH в переменную окружения Path;

- Установите сервер OpenSSH:
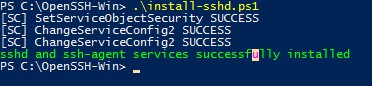
.install-sshd.ps1
должно появиться зеленое сообщение “sshd and ssh-agent services successfully installed”).
Настройка SFTP сервера на базе OpenSSH в Windows
Теперь вам нужно настроить OpenSSH для режима SFTP.
Включите автозапуск для службы SSHD и запустите ее с помощью следующих PowerShell команд управления службами:
Set-Service -Name sshd -StartupType ‘Automatic’
Start-Service sshd
С помошью PowerShell отройте в брандмауэре Windows порт TCP 22 для входящего трафика на SSH сервер:
New-NetFirewallRule -Protocol TCP -LocalPort 22 -Direction Inbound -Action Allow -DisplayName SSH
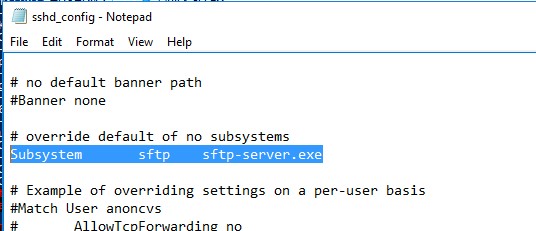
 Откройте в любом текстовом редакторе конфигурационный файл «C:ProgramDataSSHsshd_config», найдите и проверьте значение директивы Subsystem sftp. Здесь должен быть указан файл sftp-server.exe.
Рассмотрим полезные директивы в конфигурационном файле sshd_config:
# разрешить подключение к OpenSSH только для пользователей из этой группы
AllowGroups corpadmingroup
# включить аутентификацию по паролю (нельзя использовать ключи SSH)
AuthenticationMethods password
ForceCommand internal-sftp
#каталог для SFTP пользователей (по умолчанию пользователь подключается в каталог со своим профилем в папке C:usersusername)
ChrootDirectory C:SFTPRoot
#Для каждого пользователя можно индивидуальную chrootdirectory:
Match User user1
ChrootDirectory c:SFTPRootuser1
ForceCommand internal-sftp
X11Forwarding no
 AllowTcpForwarding no
Match User user2
ChrootDirectory c:SFTPRootuser2
ForceCommand internal-sftp
X11Forwarding no
AllowTcpForwarding no
Подключение к SFTP серверу с помощью PowerShell и WinSCP
Теперь вы может подключиться к вашему SSH серверу на Windows по протоколу SFTP. Ниже мы покажем, как подключиться к SFTP серверу с помощью бесплатного клиента клиент WinSCP, консоли PowerShell и встроенной утилиты sftp.exe.
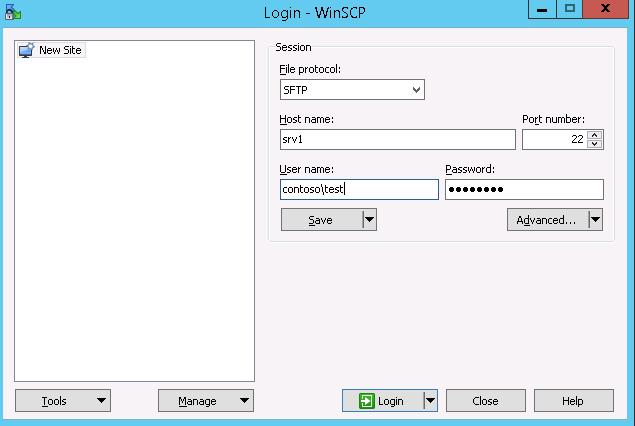
В окне настройки подключения выберите протокол передачи файлов SFTP, укажите имя сервера и данные учетной записи Windows (в формате
[email protected]
для доменных пользователей), под которой осуществляется подключение (возможно также настроить авторизацию по ключам). При первом подключении появится окно с предупреждением о том, что ключ хоста отсутствует в локальном кеше.
 При первом подключении появится окно с предупреждением о том, что ключ хоста отсутствует в локальном кеше.
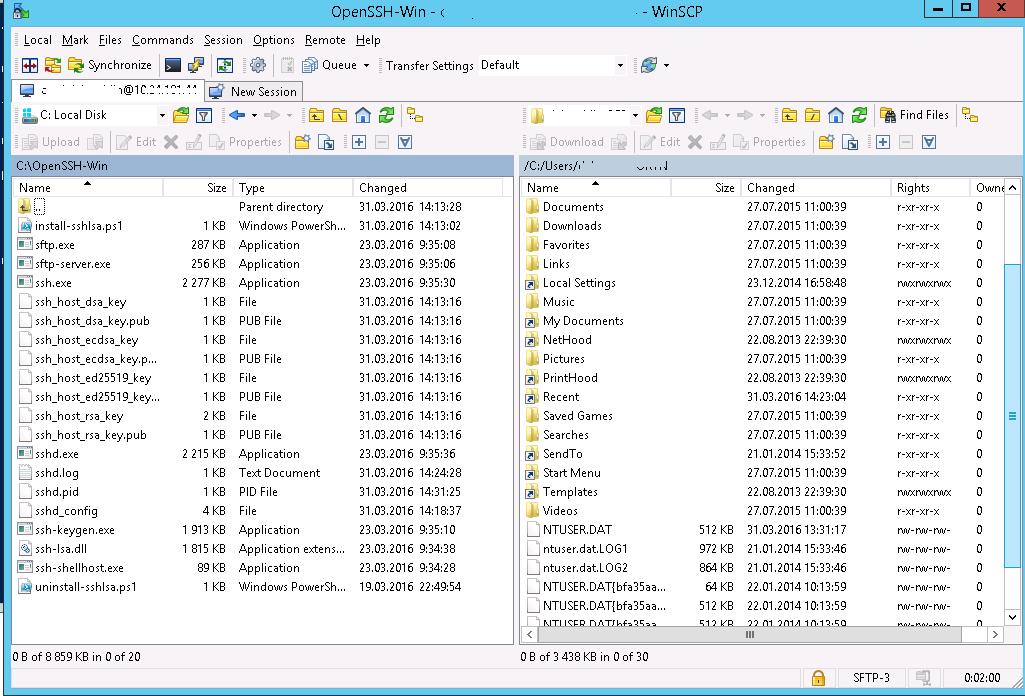
 Если все настроено правильно, клиент должен подключиться к SFTP серверу и отобразить список файлов в домашнем каталоге пользователя (по умолчанию каталог с профилем пользователя).
С помощью привычного интерфейса файлового менеджера можно безопасно копировать файлы между сервером и клиентом по защищённому протоколу SFTP.

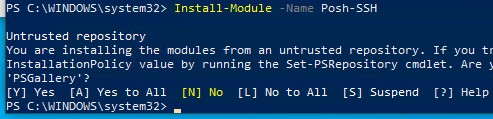
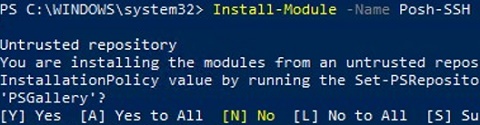
Для подключения к SFTP серверу из PowerShell можно использовать модуль Posh-SSH. Вы можете скачать установить модуль из PowerShell Gallery или офлайн:
Install-Module -Name Posh-SSH
Для подключения к SFTP серверу с помощью пароля, нужно получить имя пользователя и пароль через Get-Credential:
$usrCreds= Get-Credential
Теперь можно подключиться к вашем SFTPS серверу:
$SFTPSession = New-SFTPSession -ComputerName 192.168.13.200 -Credential $usrCreds
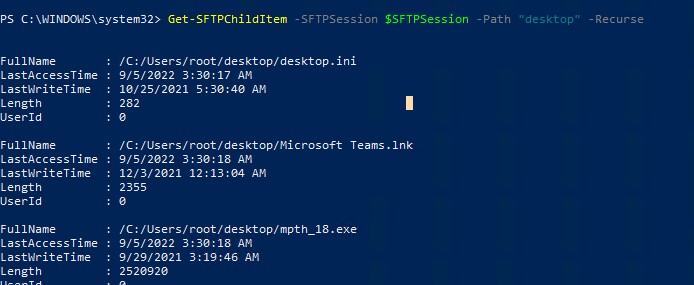
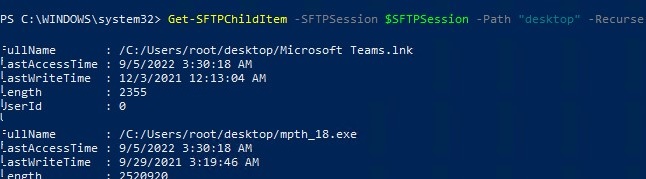
Теперь вы можете вывести список файлов в удаленном каталоге на SFTP сервере. В этом примере я получу список файлов на рабочем столе пользователя (профиль пользователя в этом случае будет являться корнем)
Get-SFTPChildItem -SFTPSession $SFTPSession -Path "desktop" –Recurse
Чтобы скачать файл с удаленного SFTP сервера:
Get-SFTPItem -SessionId $SFTPSession.SessionId -Path "desktop/OpenVPNScript.log" -Destination c:temp
Чтобы закачать файл с вашего компьютера на удаленный SFTP хост:
Set-SFTPItem -SessionId $SFTPSession.SessionId -Path C:Tempmytestfile.log -Destination “desktop”

Завершить SFTP сессию:
Remove-SFTPSession -SFTPSession $SFTPSession
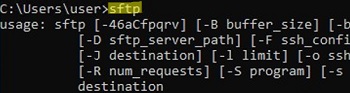
В Windows вы можете использоваться встроенную утилиту sftp.exe (устанавливается вместе с клиентом OpenSSH) для подключения к SFTP серверу.
Подключиться к sftp серверу:
sftp [email protected]
Подключиться с помощью ssh ключа:
sftp -i .ssh/id_rsa [email protected]
Вывести список файлов в удаленном каталоге:
pwd
Скачать файл с SFTP в локальный каталог на ваш компьютер:
get file-test1.txt
Загрузить файл с вашего компьютера на SFTP сервер:
put file-test2.txt
Закрыть сессию:
exit

Настройка SFTP аутентификации по ключам
Вы можете настроить SFTP аутентификацию по ключам. В этом случае при подключении к SFTP серверу вам не нужно будет указывать пароль пользователя.
Подробно настройка SSH аутентификации по ключам описана в этой статье.
Для этого нужно:
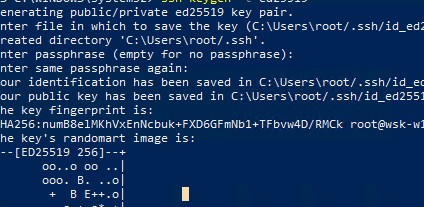
- Создать на вашем компьютере (SFTP клиент) ключи для пользователя, под которым вы будете подключаться к серверу:
ssh-keygen -t ed25519

- Утилита сгенерирует два файла
id_ed25519
(закрытый ключ для клиента) и
id_ed25519.pub
(открытый ключ для сервера); - Теперь нужно добавить ваш SSH ключ на сервер. Скопируйте файл id_ed25519.pub(или id_rsa.pub в зависимости от типа ключа) в каталог .ssh профиля пользователя, под которым вы будете подключаться к SFTP серверу. Переименуйте файл в authorized_keys (например для пользователя alex путь будет выглядеть так:
C:Usersalex.sshauthorized_keys
)
Теперь вы можете использоваться файл id_ed25519 для аутентификации на SFTP сервере в настройках WinSCP (настройки подключения Advanced -> to SSH > Authentication page -> Private key file).
Если вы хотите задать SSH ключ при подключении к SFTP из PowerShell, используйте такую команду:
New-SFTPSession -ComputerName 192.168.13.200 -Credential user1 -KeyFile C:Usersalex.sshid_ed25519" -Verbose
В этой статье мы рассмотрим, как установить SSH сервер (OpenSSH) на Windows Server и использовать его для удаленного управления сервером с помощью PowerShell по протоколу SSH.
Для удаленного управления компьютерами и серверами через PowerShell можно воспользоваться возможностями протокола WinRM, однако для более гладкого стыка с Linux системами удобнее использовать единый протокол удаленного управления — SSH. Одним из проектов команды Microsoft, занимающейся разработкой функционала PowerShell, является портирование популярного открытого сервера OpenSSH на Windows системы. Проект называется Win32-OpenSSH
- Установка пакета OpenSSH
- SSH авторизация в Windows по паролю
- SSH с аутентфикацией по ключу
- Подключение с клиента через модуль Posh-SSH
Содержание:
Установка пакета OpenSSH
Сервер Win32-OpenSSH для Windows можно установить, скачав дистрибутив с GitHub (https://github.com/PowerShell/Win32-OpenSSH), либо (гораздо проще), установив его через менеджер пакетов Chocolatey.
Если Chocolatey еще не установлен, установить его можно следующими командами PowerShell:
Set-ExecutionPolicy Unrestricted
iwr https://chocolatey.org/install.ps1 -UseBasicParsing | iex
Установка OpenSSH сервера после этого выполняется командой:
choco install openssh -params '"/SSHServerFeature /KeyBasedAuthenticationFeature"' –y
Данная команда выполнит установку как SSH сервера, так и клиента. Если нужно установить только клиент, нужно убрать аргумент param.
Сценарий установки автоматически создаст правило файервола, разрешающее подключение на 22 порт, и запустит службы sshd и ssh-agent.
Примечание. Если правило по каким-то причинам не создалось, вы можете создать его командой:
New-NetFirewallRule -Protocol TCP -LocalPort 22 -Direction Inbound -Action Allow -DisplayName SSH
Для перезагрузки переменных окружения, выполните команду:
refreshenv
SSH авторизация в Windows по паролю
Для удаленного подключения к данному SSH серверу под локальным пользователем user1, воспользуйтесь такой командой:
ssh user1@192.168.1.100
После запуска команды, для авторизации нужно указать пароль пользователя user1. Если SSH-сервер включен в домен, можно авторизоваться и под пользователем Active Directory. Имя пользователя в этом случае указывается в формате domaindomain_user_name или domain_user_name@domain.
ssh –l domain_user_name@domain remotehost
SSH с аутентфикацией по ключу
Для беспарольного входа можно использовать авторизацию на сервере SSH по ключу. Сначала нужно сгенерировать ключ на клиенте (в процессе нужно указать ключевую фразу)
Ssh-keygen.exe
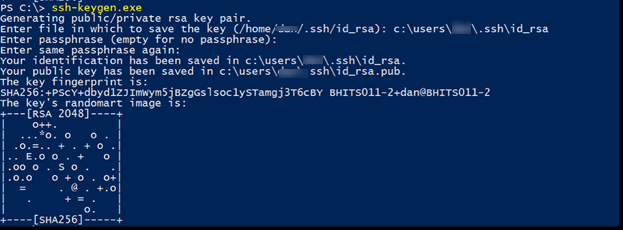
В результате в каталоге пользователя c:usersusername.ssh появится два файла id_rsa и id_rsa.pub.
Теперь нужно запустить службу ssh-agent
Start-Service ssh-agent
И добавить в настройки агента путь к нашему закрытому ключу:
ssh-add.exe C:usersusername.sshid_rsa
Затем нужно разрешить аутентфикацию по этому ключу на стороне сервера. Для этого, скопируйте файл открытого ключа(id_rsa.pub) на SSH сервер в файл C:usersusername.sshauthorized_keys. Либо, при наличии администартивного доступа сразу на обоих системах, скопировать файл можно так:
cat c:usersusername.sshid_rsa.pub | Add-Content '\192.168.1.100c$usersusername.sshauthorized_keys'
Теперь службе сервера SSH нужно дать право на чтение данных их каталога.ssh.
icacls C:usersusername.ssh /grant "NT Servicesshd:R" /T
Теперь можно подключится SSH-клиентом к серверу, указав параметр –i и путь к закрытому ключу:
Ssh –I c:usersusername.sshid_rsa –l user@domain 192.168.1.100![]()
По умолчанию открывается командная строка cmd, но можно запустить и PowerShell:

Подключение с клиента через модуль Posh-SSH
Для удаленного подключения к SSH серверу, модуль Posh-SSH используется следующим образом:
Подключаемся к серверу с сохранением сессии и указанием ключа:
New-SSHSession myclient -KeyFile "c:dataMyKeyPair.pem"
Выполним команду ifconfig в сессии с ID 0.
Invoke-SSHCommandStream "ifconfig" -SessionId 0
Для завершения сеанса, выполните:
Invoke-SSHCommand -SessionId 0 -Command "logout"
Удалим сессию:
Remove-SSHSession 0
In this tutorial, I will explain how to install the OpenSSH client and Server on Windows Server 2012R2 and 2016.
At the time of writing this tutorial, this feature is native to Windows 10 and Windows Server 2019 and you might also want to have OpenSSH client or server on an earlier version.
Personally, I use the SSH client very regularly through PowerShell or Command Prompt windows, it avoids having to install Putty.
- Recover Win32 OpenSSH
- “Installation” of files on the server
- Adding the environment variable
- Use the SSH client of Windows Server 2012R2 / 2016
- Install the OpenSSH server on Windows Server 2012R2 / 2016
- Connect to Windows on the SSH server
- Conclusion
Recover Win32 OpenSSH
The first step is to retrieve from the GitHub repository PowerShell/Win32-OpenSSH: Win32 port of OpenSSH (github.com), the latest version available.
Go to the realeases page and download the latest version available corresponding to the architecture of the Windows installation (32 or 64 bits).
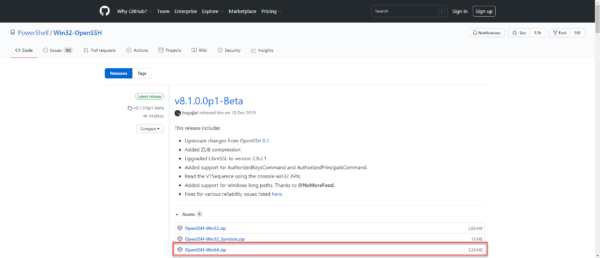
For me, it will be the 64 Bits version.
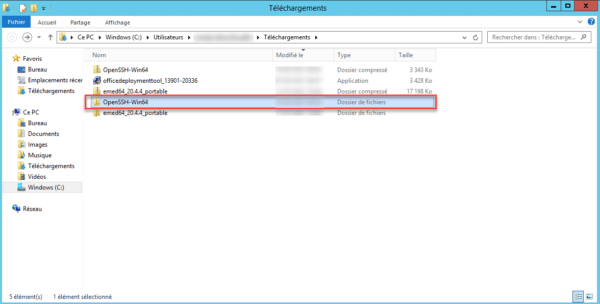
Once the archive has been downloaded, unzip it.
“Installation” of files on the server
Now, we will copy the folder from the unzipped archive to the C: Program Files folder.
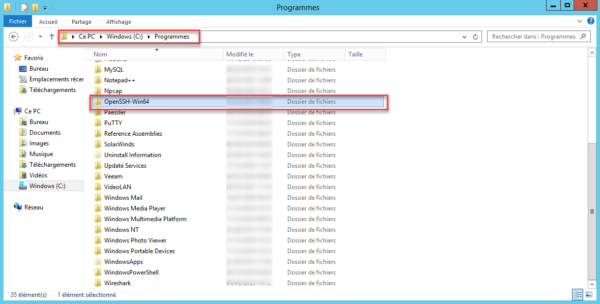
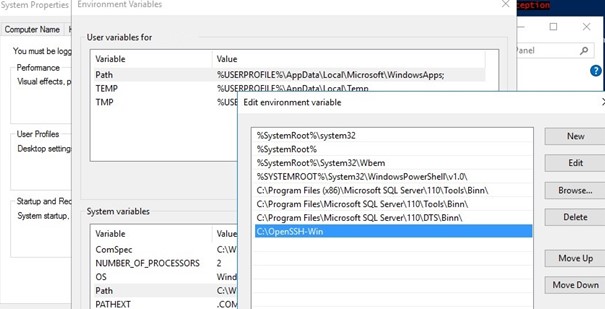
The SSH client is now functional, but for ease of use, we will configure its location in the environment variables so as not to have to call the executable by its full path.
Adding the environment variable
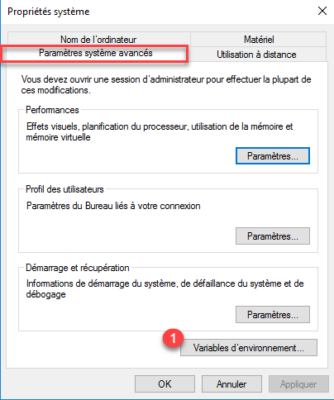
Open the system window and click on Advanced system settings 1.
On the Advanced system parameters tab, click on the Environment variables 1 button.
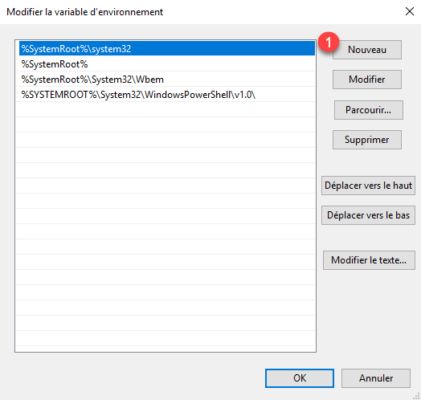
In the System variable part, find the Path 1 variable, once selected, click on the Modify 2 button.
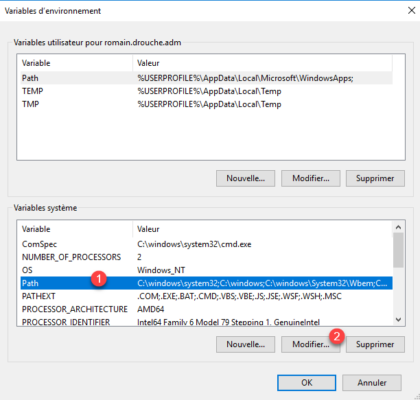
On Windows 2012R2, add at the end; C: Program FilesOpenSSH-Win64
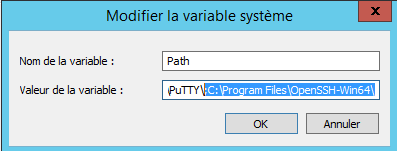
On Windows 2016, click on New 1.
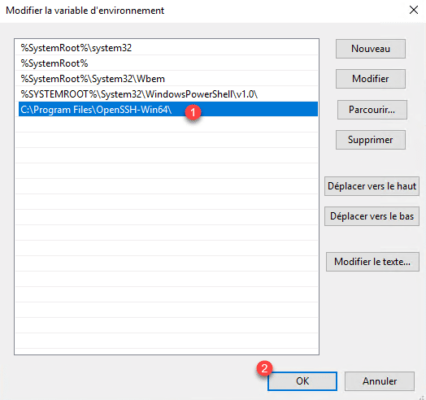
Add the location of the OpenSSH folder: C:Program FilesOpenSSH-Win64 1 and click on OK 2.
Close the various windows.
Use the SSH client of Windows Server 2012R2 / 2016
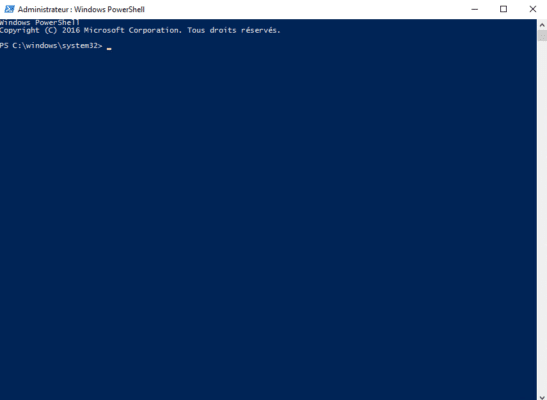
Open a command prompt or PowerShell.
The easiest way to find out if it’s okay is to enter the ssh command. This command should return the various parameters of the SSH utility.
To connect to a server (Linux) enter the command ssh USER @ IP_SERVER
It is also possible to configure an OpenSSH server on Windows Server with Win32 OpenSSH which will allow you to connect to the Windows server in the same way as a Linux OS.
From a PowerShell window, go to the C: Program Files OpenSSH-Win64 folder, in the folder is a PowerShell script that will configure the server part.
Run the install-sshd.ps1 PowerShell script
If the installation is successful, the message is displayed: sshd and ssh-agent services successfully installed.
Open Windows Service Manager and search for OpenSSH SSH Server, by default it is stopped. Start the service.
If necessary, configure the service to start automatically
Depending on your configuration, remember to allow incoming connections on port 22.
The server part is operational.
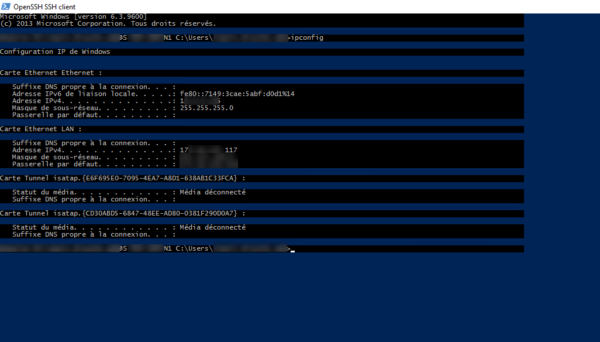
Connect to Windows on the SSH server
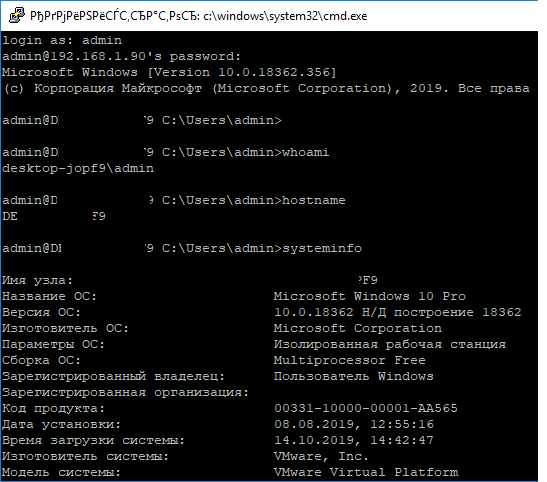
From another computer, use an SSH client to connect, being in an Active Directory environment, I just need to use the ssh IP_SERVER command and then enter my password.

Once connected, enter a command such as ipconfig or hostname to validate that the command has been executed on the remote server.
Conclusion
For the client part, for my part, I find the use in native practical which avoids going through a third-party tool and we quickly get used to when we use Windows 10 and the SSH client I find, missing on Windows 2012R2 and Windows 2016 , the problem is now resolved 🙂
For the server part, I find it useful for non-domain servers, because configuring WinRM and PSSession for connection can quickly become “a headache”.
Прочитано:
2 423
Пролистывая задачи на фриланс биржах наткнулся на такой вопрос — просьба поставить на Windows Server 2012 R2 сервис для безопасного подключения через SSH, т. к. на другом конце — сотрудник имевший в свою очередь практическое знакомство только с Linux серверами и ему консоль ближе. Данная тема также интересна, помнится мне что ранее я уже разбирал как поставить возможность подключения к Windows 7 через ssh, сейчас же разберу и для текущей задачи.
Итак есть установленная система из оригинального образа Windows Server 2012 R2 (English), имеется одна учетная запись Administrator с паролем 712mbddr@, некоторые действия будут браться из ранее опубликованной.
На момент написания данной заметки версия Cygwin — 2.876, а версия пакета openssh: — 7.3p1-2
Далее запускаю терминал cygwin:
Win +X — Command Prompt (Admin) -
C:CygwinCygwin.bat
Administrator@srv-ad ~
$ и мигает курсор ожидающий ввода команд
Генерируем ключи доступа (публичный и приватный):
$ ssh-host-config -y
*** Query: Please enter the password: 712mbddr@
*** Query: Reenter: 712mbddr@
$
Теперь переключаюсь через сочетание клавиш Alt + Tab во все еще открытое окно командной строки Windows и настраиваю правила для брандмауэра:
C:Windowssystem32>sc config sshd start= auto
C:Windowssystem32>net start sshd
C:Windowssystem32>netsh advfirewall firewall add rule name="SSH Server" dir=in protocol=tcp localport=22 action=allow
Ok.
C:Windowssystem32>netstat -an | findstr :22
TCP 0.0.0.0:22 0.0.0.0:0 LISTENING
TCP [::]:22 [::]:0 LISTENING
Отлично.
Если же нужно повесить сервис SSH на другой порт, то за редактирование следует обратиться к конфигурационному файлу который находится если через Alt +Tab переключиться в bash консоль или вызвать bat файл запускающий ее: C:CygwinCygwin.bat
(На заметку: работа с консольным редактором vi по аналогии, как и в Ubuntu)
$ vi /etc/sshd_config
Port 22
MaxAuthTries 6
MaxSessions 3
PasswordAuthentication yes
После нажимаю: Esc → :wq!
На заметку: вообще это честно говоря пародия на bash консоль, т. к. не с первого раза отрабатывает переключение в режим редактирования, да и странным образом ведут себя другие команды. А потому советую перед боевым редактированием сперва сделать резервную копию редактируемого файла.
,либо же не переключаюсь в консоль Cygwin, вызвать текстовый редактор notepad и отредактировать конфиг:
C:Windowssystem32>notepad c:Cygwinetcsshd_config
вот только все форматирование хромает, да и при сохранении не удается сохранить файл без расширения.
Все же лучше поставить простой редактор nano. Для этого запускаем скачанный файл: setup-x86_64.exe, далее все как обычно указываем сервер и пакет: nano
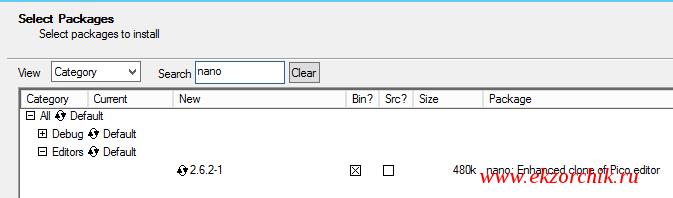
$ nano /etc/sshd_config
Port 22
Protocol 2
MaxAuthTries 6
MaxSessions 3
PasswordAuthentication yes
После: Ctrl + O, Ctrl + X и все, чем проще тем лучше.
Теперь нужно перезапустить сервис sshd для активации изменений:
(Остановить сервис sshd)
$ cygrunsrv.exe -E sshd
(Запустить сервис sshd)
$ cygrunsrv.exe -S sshd
или по старинке:
$ net stop sshd
The CYGWIN sshd service is stopping.
The CYGWIN sshd service was stopped successfully.
$ net start sshd
The CYGWIN sshd service is starting.
The CYGWIN sshd service was started successfully.
И если было настроено правило в брандмауэре на 22 порт, то видоизменяем правило:
$ netsh advfirewall firewall show rule name=all | findstr "SSH"
Rule Name: SSH Server
$ netsh advfirewall firewall set rule name="SSH Server" new localport=22777
Updated 1 rule(s).
Ok.
Проверяем, что можно с Ubuntu 12.04.5 Desktop amd64 системы подключиться к Windows Server 2012 R2 через ssh:
aollo@system:~$ ssh -l Administrator 10.7.8.193 -p 22777
The authenticity of host ‘[10.7.8.193]:22777 ([10.7.8.193]:22777)’ can’t be established.
ECDSA key fingerprint is 42:4e:f6:93:5c:f4:39:bc:44:a7:68:e9:92:de:05:e7.
Are you sure you want to continue connecting (yes/no)? yes
Warning: Permanently added ‘[10.7.8.193]:22777’ (ECDSA) to the list of known hosts.
Administrator@10.7.8.193’s password:712mbddr@
Administrator@srv-ad ~
$
$ net stop Themes
The Themes service is stopping.
The Themes service was stopped successfully.
Итого подключение успешно прошло, а если нужно поставить какое либо ПО (пакет lynx) без необходимости запускать инсталлятор (GUI оболочку) то сделать это можно так:
$ cd c:/Users/Administrator/Downloads/
$ cygcheck.exe -p 'lynx' | grep lynx
Found 12 matches for lynx
lynx-debuginfo-2.8.7-2 — lynx-debuginfo: Debug info for lynx (installed binaries and support files)
lynx-2.8.7-2 — lynx: A text-based Web Browser (installed binaries and support files)
lynx-2.8.7-2-src — lynx: A text-based Web Browser (source code)
$ ./setup-x86_64.exe --root c:/Cygwin --no-desktop --no-shortcuts --no-startmenu --quiet-mode -q -P lynx
Starting cygwin install, version 2.876
User has backup/restore rights
Current Directory: c:/Cygwin
Could not open service McShield for query, start and stop. McAfee may not be installed, or we don’t have access.
root: c:Cygwin system
Selected local directory: c:/Cygwin
net: Direct
site: http://cygwin.mirror.constant.com/
Downloaded c:/Cygwin/http%3a%2f%2fcygwin.mirror.constant.com%2f/x86_64/release/lynx/lynx-2.8.7-2.tar.bz2
Extracting from file://c:/Cygwin/http%3a%2f%2fcygwin.mirror.constant.com%2f/x86_64/release/lynx/lynx-2.8.7-2.tar.bz2
Changing gid back to original
running: c:Cygwinbindash.exe «/etc/postinstall/0p_000_autorebase.dash»
running: c:Cygwinbindash.exe «/etc/postinstall/0p_update-info-dir.dash»
running: c:Cygwinbinbash.exe —norc —noprofile «/etc/postinstall/lynx.sh»
Changing gid to Administrators
Ending cygwin install
На заметку: также можно ставить несколько пакетов просто перечисляя их после ключа: -P tar,wget,lynx,unrar
Что еще, вроде как есть специальный пакет на подобии утилиты apt-get как в Ubuntu и с его помощью можно устанавливать пакеты привычным мне способом:
$ wget raw.github.com/transcode-open/apt-cyg/master/apt-cyg
$ chmod +x apt-cyg
$ mv apt-cyg c:/Cygwin/bin/
$ apt-cyg install curl
Installing curl
—2016-09-19 11:45:49— http://cygwin.mirror.constant.com//x86_64/release/curl/curl-7.50.3-1.tar.xz
Resolving cygwin.mirror.constant.com (cygwin.mirror.constant.com)… 108.61.5.83
Connecting to cygwin.mirror.constant.com (cygwin.mirror.constant.com)|108.61.5.83|:80… connected.
HTTP request sent, awaiting response… 200 OK
Length: 289508 (283K) [application/octet-stream]
Saving to: ‘curl-7.50.3-1.tar.xz’
и далее, весь вывод установки приводить здесь не имеет смысла главное его конечная цель — пакет установлен.
Ладно что-то я отклонился от темы данной заметки, но все равно любой представленный материал у меня на блоге полезен. Так хоть и не совсем тривиальной был разбор как же все-таки установить openssh сервер на Windows Server 2012 R2 с упором на командную строку, с GUI же конечно же было бы проще, но нужно всегда заходить к решению проблемы с того, чего может не оказаться под рукой. А с помощью этой заметки я показал, как все же сделать. Итого, заметка функциональна и практична, на этом я прощаюсь, с уважением автор блога — ekzorchik.
I wasn’t lucky enough this week.
I have OpenSSH installed on my Windows Server 2012 R2 using Desired State Configuration and Chocolatey (more about that) with the following configuration:
Configuration SSHServerFeature
{
    param (
        [String]$NodeName
    )

    Import-DscResource -Module cChoco

    Node $NodeName
    {
        cChocoInstaller installChoco
        {
            InstallDir = "c:choco"
        }
        cChocoPackageInstaller installOpenSSH
        {
            Name                 = 'openssh'
            Ensure               = 'Present'
            DependsOn            = "[cChocoInstaller]installChoco"
            AutoUpgrade          = $True
        }
    }
}
Pretty simple, isn’t it? Too much .. after I had it installed, SSH service wasn’t there.
I dug deeper into DSC resource and added the property to `installOpenSSH`:
Params = '"/SSHServerFeature /KeyBasedAuthenticationFeature"'But, no luck. And I installed service up with C:Program FilesOpenSSH-Win64install-sshd.ps1.
Now OpenSSH Server’s service wasn’t starting. It was complaining so unclear that I had to research how to debug sshd on Windows.
The article that helped me very much is — Troubleshooting Steps in GitHub repo for Win32-OpenSSH. But a frustrating surprise was Win32-OpenSSH bug #1304 that lead to the inability of just performing troubleshooting steps, because sshd -d under user account is failing to fork unprivileged child. Oh, gosh…
So, the ultimate way to make OpenSSH Server working after manual crumpling stuff was:
- Install PsExec by Mark Russinovich.
- Delete keys from C:ProgramDatassh to avoid any possible issues with ACLs I have changed. Of course, if you already have clients to your server, don’t do this, instead read that article.
- Run: C:pstoolsPsExec64.exe -s ssh-keygen -A
- Run: C:pstoolsPsExec64.exe -s sshd.exe -d
After client logoff from SSH, sshd started with -d exits and writes to a console something like:
Received disconnect from 10.20.21.28 port 38572:11: disconnected by user
Disconnected from 10.20.21.28 port 38572
debug1: do_cleanup
debug1: do_cleanup
sshd.exe exited on CRM1 with error code 255.
It’s ok. When it’s started as a service, it works fine.

Для удаленного запуска скриптов на Windows Server 2012 решил установить OpenSSH Server. В Windows Server 2019 такая задача проходит легко, OpenSSH спрятан в программы и компоненты, пару галочек и все готово.
Дистрибутив для установки находится на гитхабе. Установка заключается в запуске скриптов на PowerShell.
Скачиваем последнюю версию программы и извлекаем архив. Распакованный архив копируем в C:Program FilesOpenSSH
Запускаем консоль PowerShell от имени администратора и запускам скрипт:
Дальше необходимо сгенерировать ключи:
Что бы избежать ошибки при генерации ключей, необходимо создать папку SSH в C:ProgramData
Далее необходимо проверить права доступа на файлы запустив скрипт:
|
.FixHostFilePermissions.ps1 |
На возникающие вопросы в скрипте отвечаем — А.
Если используется Windows Firewall, то необходимо добавить исключение для 22 порта.

Правило добавляется командой:
|
New—NetFirewallRule —Protocol TCP —LocalPort 22 —Direction Inbound —Action Allow —DisplayName Allow—SSH |
Теперь необходимо включить службу OpenSSH SSH Server в оснастке служб.

Тип запуска указываем автоматический и жмем кнопку — запустить.
You can use the built-in OpenSSH package in Windows to easily enable secure file transfers between the client and Windows server using the SFTP (Secure FTP) protocol. In this article, we will show how to install and configure an SFTP server on Windows 10 or Windows Server 2022/2019/2016/2012R2.
Contents:
- How to Install OpenSSH on Windows?
- How to Configure SFTP Server on Windows Using OpenSSH?
- Connecting to SFTP Server Using WinSCP or PowerShell
- Configuring SFTP Public Key Authentication
SFTP (Secure File Transfer Protocol, Secure FTP, or SSH FTP) is the extension of SSH protocol, which is the standard in the world of UNIX/Linux systems. From the user’s point of view, it is similar to FTP, but in fact, it is a completely different protocol, having nothing in common with FTP. Data between the client and the server is transmitted on port 22 through an SSH tunnel (TCP port 22).
The main advantages of SFTP:
- Files and commands are transferred within a secure SSH session;
- One connection is used to send both files and commands;
- Symbolic links, interrupt/resume the transfer, file delete functions, etc. are supported;
- SFTP connection is much faster and more reliable on WAN links where FTP is slow or intermittent;
- Possibility to authenticate using SSH keys.
Do not confuse SFTP and FTPS protocols. FTPS is essentially just a simple FTP with an SSL certificate, and SFTP is the protocol to transfer the FTP data and commands inside the SSH session.
The win32 port of OpenSSH (Win32-OpenSSH) is built into all modern versions of Windows by default. You can use it to configure a secure SFTP server instead of using third-party products like Core FTP, FileZilla, CYGWIN, FTP Shell, IPSwitch, etc.
How to Install OpenSSH on Windows?
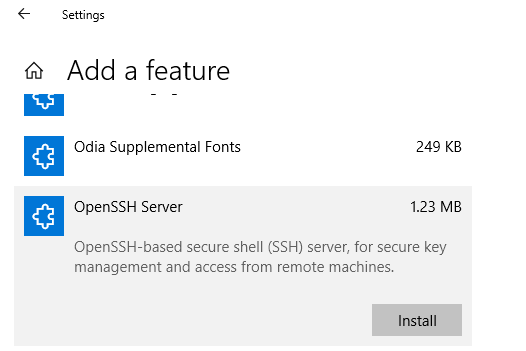
The OpenSSH package is a part of the operating system in modern builds of Windows 10 (starting from 1803), Windows 11, and Windows Server 2022/2019 as a Feature on Demand (like RSAT).
On these versions of Windows, you can install the OpenSSH server using PowerShell:
Add-WindowsCapability -Online -Name OpenSSH.Server*
Or using DISM:
dism /Online /Add-Capability /CapabilityName:OpenSSH.Server~~~~0.0.1.0
Also, you can install OpenSSH server from Windows 10 GUI (Settings -> Apps -> Optional Features -> Add a feature -> Open SSH Server -> Install).
To check if a package is installed:
Get-WindowsCapability -Online | ? Name -like 'OpenSSH*'
- OpenSSH executables are located in the directory:
c:windowssystem32OpenSSH; - The sshd_config configuration file is located in
C:ProgramDatassh(this directory is created after the first start of the sshd service); - Log file:
c:windowssystem32OpenSSHlogssshd.log; - The authorized_keys file and keys are stored in a directory:
%USERPROFILE%.ssh.
On the previous earlier builds of Windows 10, Windows 8.1, and on Windows Server 2016/2012 R2, you will have to download Win32-OpenSSH for Windows from GitHub and install it manually (https://github.com/PowerShell/Win32-OpenSSH/releases). We need a version for Windows x64: OpenSSH-Win64.zip (4,15 MB).
- Extract the archive to the target folder: C:OpenSSH-Win;
- Open an elevated PowerShell prompt and switch to the OpenSSH folder:
Cd C:OpenSSH-Win - Add the path to the OpenSSH directory to the Path environment variable (System Properties -> Advanced tab -> Environment Variables -> Select and edit the Path system variable -> Add the path to the OpenSSH folder);

- Install the OpenSSH server:
.install-sshd.ps1(a green message should appear “sshd and ssh-agent services successfully installed”);If running PowerShell scripts on your computer is blocked by your PowerShell Execution Policy, you can run the script with this command:
powershell.exe -ExecutionPolicy Bypass -File install-sshd.ps1

How to Configure SFTP Server on Windows Using OpenSSH?
Now you need to configure OpenSSH on Windows for SFTP mode.
Enable autostart for the SSHD service and start it using the following PowerShell service management commands:
Set-Service -Name sshd -StartupType 'Automatic'
Start-Service sshd
Use the PowerShell to open TCP port 22 in the Windows Firewall for incoming SSH traffic:
New-NetFirewallRule -Protocol TCP -LocalPort 22 -Direction Inbound -Action Allow -DisplayName SSH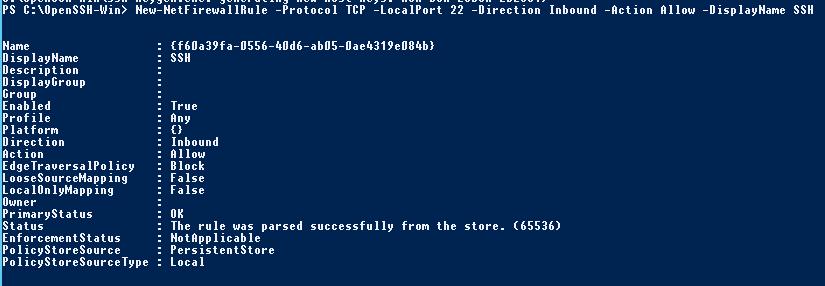
Note. The previous command won’t work in old desktop Windows versions. In this case, another command is used: netsh advfirewall firewall add rule name='SSH Port' dir=in action=allow protocol=TCP localport=22
Open the SSHD configuration file (C:ProgramDataSSHsshd_config) in any text editor. Find and check the value of the Subsystem sftp directive. The sftp-server.exe file should be specified here.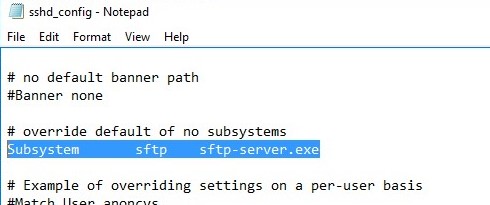
You can additionally configure the following parameters in the sshd_config configuration file:
# only allow users in this domain group to connect to OpenSSH
AllowGroups corpsftp_users
# enable password authentication (SSH keys cannot be used)
AuthenticationMethods password
#default (chrooot) directory for SFTP users  (by default, the user connects to the directory with his profile in the C:usersusername folder)
ChrootDirectory C:SFTP
ForceCommand internal-sftp
#You can set an individual chrootdirectory for each user:
Match User abrown
ChrootDirectory c:SFTPabrown
ForceCommand internal-sftp
X11Forwarding no
AllowTcpForwarding no

Match User jsmith
ChrootDirectory c:SFTPjsmith
ForceCommand internal-sftp
X11Forwarding no
AllowTcpForwarding no
Connecting to SFTP Server Using WinSCP or PowerShell
Now you can connect to your Windows SSH server using the SFTP protocol. Next, we’ll show you how to connect to an SFTP server using the free WinSCP client, the PowerShell console, and the built-in sftp.exe tool.
In the connection configuration window, select the SFTP as the file transfer protocol, specify the server name and the credentials of the Windows account (use the user@domain format for domain users), which is used for connection (it is also possible to configure public key authentication).

When you try to connect for the first time, the following notification of the host key not found in the local cache appears.
If everything is configured correctly, a client should connect to the SFTP server and display the list of files in the user’s home chroot directory (by default, it is the user’s profile directory).
Using the familiar file manager interface (like Total Commander), you can copy files between the server and the client using the secure SFTP protocol.
You can use the Posh-SSH module to connect to an SFTP server from PowerShell. You can download and install the module from the PowerShell Gallery or offline:
Install-Module -Name Posh-SSH
To connect to the SFTP server using a password, you need to get the username and password via Get-Credential:
$usrCreds= Get-Credential
Now you can connect to your SFTP server:
$SFTPSession = New-SFTPSession -ComputerName 192.168.3.20 -Credential $usrCreds
Now you can list the files in the remote directory on the SFTP server. In this example, I will get a list of files on the user’s Desktop (the user’s profile will be the root user folder/chroot in this case)
Get-SFTPChildItem -SFTPSession $SFTPSession -Path "desktop" –Recurse
Download a file from a remote SFTP server:
Get-SFTPItem -SessionId $SFTPSession.SessionId -Path "desktop/OpenVPNScript.log" -Destination c:PS
To upload a file from your computer to a remote SFTP host:
Set-SFTPItem -SessionId $SFTPSession.SessionId -Path C:PSmytestfile.log -Destination "desktop"
![]()
Close the SFTP session:
Remove-SFTPSession -SFTPSession $SFTPSession
On Windows, you can use the built-in sftp.exe console command (installed with the OpenSSH client) to connect to an SFTP server.
Connect to sftp server:
sftp user1@192.168.3.20
Connect using ssh private key:
sftp -i .ssh/id_rsa user1@192.168.3.20
List files in a remote directory:
pwd
Download the file from SFTP to a local directory on your computer:
get download_this_file_from_sftp.txt
Upload a file from your computer to an SFTP server:
put file_to_uplodad.txt
Close session:
exit
Configuring SFTP Public Key Authentication
You can enable SFTP key-based authentication in Windows. In this case, you can authenticate to the SFTP server without entering a password.
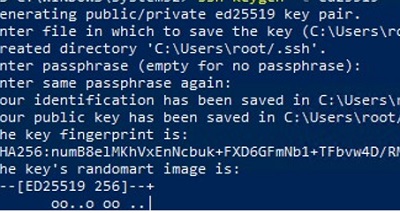
- Create SSH keys on your computer (SFTP client) for the user under which you will connect to the server:
ssh-keygen -t ed25519
- The ssh-keygen tool will generate two files id_ed25519 (private key for the client computer) and id_ed25519.pub (public key for the SFTP server);
- Now you need to add your SSH key to the Windows server (SFTP host). Copy the file id_ed25519.pub (or id_rsa.pub depending on the key type) to the .ssh directory of the user profile under which you will connect to the SFTP. Rename the file to authorized_keys (for example, the following key file is used for the user
max1:C:Usersmax1.sshauthorized_keys)
Now you can use the id_ed25519 file to authenticate on the SFTP server. You can set your key in the WinSCP settings (Advanced -> to SSH connection settings > Authentication page -> Private key file).
If you want to use an SSH key when connecting to SFTP from PowerShell, use the following command:
New-SFTPSession -ComputerName 192.168.3.20 -Credential remoteuser1 -KeyFile C:Usersmax1.sshid_ed25519" -Verbose
If you need an SFTP server, you can set it up easily on a Linux box since it’s supported out of the box. But if you’d like to set up one on Windows, you need to do some extra work since SFTP is not natively supported on Windows. Don’t get confused it with the FTPS, short for FTP over SSL, which is supported out of the box with IIS on Windows Servers.
Steps to set up a SFTP/SSH server using OpenSSH on Windows Server 2012 R2
1. Download the latest OpenSSH for Windows binaries. Choose the OpenSSH-Win64.zip package.
2. Extract the package and save them to C:Program FilesOpenSSH folder.
3. Open an elevated PowerShell console, and run the following commands to install SSHD and ssh-agent services.
cd "Program FilesOpenSSH"
.install-sshd.ps1
If failed due to the Policy that prevents it from executing, run this instead:
powershell -ExecutionPolicy Bypass -File .install-sshd.ps1

4. In the same PowerShell console, run the following commands to generate server keys and restrict an access to them.
.ssh-keygen.exe -A
PowerShell -ExecutionPolicy Bypass -File .FixHostFilePermissions.ps1 -Confirm:$false
5. Open an incoming port in Windows Firewall for the SSH server. You can either run the following PowerShell cmdlet to open it or do it through Windows Firewall set up from Control Panel.
New-NetFirewallRule -Protocol TCP -LocalPort 22 -Direction Inbound -Action Allow -DisplayName SSH

6. Open services window, locate the sshd service and click Start to start the service. If succeed, you are all set. And you need to change the Startup Type to Automatical so the service can be launched automatically.

Testing the connection to the server
You can use any tools that support SSH to connect to the SSH server you just set up, such as FileZilla, WinSCP, PuTTY to name a few. Take WinSCP for example, use the server’s name as Host name, leave the Port number at 22, and type in your Windows user account info as the username and password. If it’s part of the Windows domain, use the format of domain_nameusername or [email protected] instead.

In some cases where you need to verify the fingerprint of the server, this is how you can find out:
.ssh-keygen.exe -l -f ssh_host_ed25519_key -E md5
then, when you connect to the SSH server the first time, you can compare the info you just collected with the one popping on the screen.

Alternative options
I had to try a few times to make OpenSSH work for me. But if it doesn’t work out for you, there are a few other options you can try to use as well.
- CoreFTP
- BitVise SSH Server
- freeSSHd and freeFTPd
Resources
Installation Guide on WinSCP
Установка сервера OpenSSH на Windows Server
В этой статье мы рассмотрим, как установить SSH сервер (OpenSSH) на Windows Server и использовать его для удаленного управления сервером с помощью PowerShell по протоколу SSH.
Для удаленного управления компьютерами и серверами через PowerShell можно воспользоваться возможностями протокола WinRM, однако для более гладкого стыка с Linux системами удобнее использовать единый протокол удаленного управления — SSH. Одним из проектов команды Microsoft, занимающейся разработкой функционала PowerShell, является портирование популярного открытого сервера OpenSSH на Windows системы. Проект называется Win32-OpenSSH
Установка пакета OpenSSH
Сервер Win32-OpenSSH для Windows можно установить, скачав дистрибутив с GitHub (https://github.com/PowerShell/Win32-OpenSSH), либо (гораздо проще), установив его через менеджер пакетов Chocolatey.
Если Chocolatey еще не установлен, установить его можно следующими командами PowerShell:
Set-ExecutionPolicy Unrestricted
iwr https://chocolatey.org/install.ps1 -UseBasicParsing | iex
Установка OpenSSH сервера после этого выполняется командой:
choco install openssh -params ‘»/SSHServerFeature /KeyBasedAuthenticationFeature»‘ –y
Данная команда выполнит установку как SSH сервера, так и клиента. Если нужно установить только клиент, нужно убрать аргумент param.
Сценарий установки автоматически создаст правило файервола, разрешающее подключение на 22 порт, и запустит службы sshd и ssh-agent.
Примечание. Если правило по каким-то причинам не создалось, вы можете создать его командой:
New-NetFirewallRule -Protocol TCP -LocalPort 22 -Direction Inbound -Action Allow -DisplayName SSH

Для перезагрузки переменных окружения, выполните команду:
SSH авторизация в Windows по паролю
Для удаленного подключения к данному SSH серверу под локальным пользователем user1, воспользуйтесь такой командой:
После запуска команды, для авторизации нужно указать пароль пользователя user1. Если SSH-сервер включен в домен, можно авторизоваться и под пользователем Active Directory. Имя пользователя в этом случае указывается в формате domaindomain_user_name или domain_user_name@domain.
ssh –l domain_user_name@domain remotehost
SSH с аутентфикацией по ключу
Для беспарольного входа можно использовать авторизацию на сервере SSH по ключу. Сначала нужно сгенерировать ключ на клиенте (в процессе нужно указать ключевую фразу)

В результате в каталоге пользователя c:usersusername.ssh появится два файла id_rsa и id_rsa.pub.
Теперь нужно запустить службу ssh-agent
И добавить в настройки агента путь к нашему закрытому ключу:
Затем нужно разрешить аутентфикацию по этому ключу на стороне сервера. Для этого, скопируйте файл открытого ключа(id_rsa.pub) на SSH сервер в файл C:usersusername.sshauthorized_keys. Либо, при наличии администартивного доступа сразу на обоих системах, скопировать файл можно так:
cat c:usersusername.sshid_rsa.pub | Add-Content ‘\192.168.1.100c$usersusername.sshauthorized_keys’
Теперь службе сервера SSH нужно дать право на чтение данных их каталога.ssh.
icacls C:usersusername.ssh /grant «NT Servicesshd:R» /T
Теперь можно подключится SSH-клиентом к серверу, указав параметр –i и путь к закрытому ключу:
Ssh –I c:usersusername.sshid_rsa –l user@domain 192.168.1.100 
По умолчанию открывается командная строка cmd, но можно запустить и PowerShell:

Подключение с клиента через модуль Posh-SSH
Для удаленного подключения к SSH серверу, модуль Posh-SSH используется следующим образом:
Подключаемся к серверу с сохранением сессии и указанием ключа:
New-SSHSession myclient -KeyFile «c:dataMyKeyPair.pem»
Выполним команду ifconfig в сессии с ID 0.
Invoke-SSHCommandStream «ifconfig» -SessionId 0
Для завершения сеанса, выполните:
Invoke-SSHCommand -SessionId 0 -Command «logout»
Источник
Подключение к Windows по SSH с помощью встроенного OpenSSH
Начиная с Windows 10 1809 и Windows Server 2019 в операционной системе имеется встроенный SSH сервер, основанный на OpenSSH. В этой статье мы покажем, как установить и настроить OpenSSH сервер в Windows 10 и подключиться к нему удаленно по защищенному SSH протоколу (ну прям как в Linux 🙂 ).
Установка сервера OpenSSH в Windows
Рассмотрим, как установить компонент OpenSSH Server в Windows 10 1903 (Windows Server 2019 все выполняется аналогично).
Пакет OpenSSH (как и RSAT) уже включен в данные версии Windows в виде Feature on Demand (FoD).
При наличии прямого Интернет-подключения вы можете установить сервер OpenSSH с помощью PowerShell
Add-WindowsCapability -Online -Name OpenSSH.Server*
Или при помощи DISM:
dism /Online /Add-Capability /CapabilityName:OpenSSH.Server
В Windows 10 этот компонент также можно установить через панель Параметры (Приложения -> Управление дополнительными компонентами -> Добавить компонент). Найдите в списке Open SSH Server и нажмите кнопку Install).
Чтобы проверить, что OpenSSH сервер установлен, выполните:
Get-WindowsCapability -Online | ? Name -like ‘OpenSSH.Ser*’

Настройка SSH сервера в Windows
После уставной сервера OpenSSH в Windows вам нужно изменить тип запуска службы sshd на автоматический и запустить службу с помощью PowerShell:
Set-Service -Name sshd -StartupType ‘Automatic’
Start-Service sshd

С помощью nestat убедитесь, что теперь в системе запущен SSH сервер и ждет подключений на 22 порту:
netstat -na| find «:22»

Проверьте, что включено правило брандмауэра (Windows Defender Firewall), разрешающее входящие подключения к Windows по порту TCP/22.
Get-NetFirewallRule -Name *OpenSSH-Server* |select Name, DisplayName, Description, Enabled

Если правило отключено (состоянии Enabled=False) или отсутствует, вы можете создать новое входящее правило командой New-NetFirewallRule:
New-NetFirewallRule -Name sshd -DisplayName ‘OpenSSH Server (sshd)’ -Enabled True -Direction Inbound -Protocol TCP -Action Allow -LocalPort 22
По умолчанию важным компоненты OpenSSH хранятся в следующих каталогах:
- Исполняемые файлы OpenSSH Server: C:WindowsSystem32OpenSSH
- Конфигурационный файл sshd_config (создается после первого запуска службы): C:ProgramDatassh
- Журнал OpenSSH: C:windowssystem32OpenSSHlogssshd.log
- Файл authorized_keys и ключи: %USERPROFILE%.ssh
При установке OpenSSH сервера в системе создается новый локальный пользователь sshd.
Sshd_config: Конфигурационный файл сервера OpenSSH
Вы можете изменить настройки сервере OpenSSH в конфигурационном файле %programdata%sshsshd_config.
Например, чтобы запретить SSH подключение для определенного доменного пользователя (и всех пользователей указанного домена), добавьте в конце файле директивы:
Чтобы разрешить подключение только для определенной доменной группы:
Либо можете разрешить доступ для локальной группы:
Можно запретить вход под учетными записями с правами администратора, в этом случае для выполнения привилегированных действий в SSH сессии нужно делать runas.
Следующие директивы разрешают SSH доступ по ключам (доступ к Windows через SSH по ключам рассмотрим подробно в следующей статье) и по паролю:
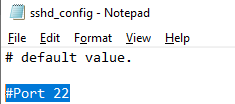
Вы можете изменить порт, на котором принимает подключения OpenSSH в конфигурационном файле sshd_config в директиве Port.
Подключение к Windows 10 через SSH
Теперь вы можете попробовать подключиться к своей Windows 10 через SSH клиент (я использую putty, но можно пользоваться встроенным ssh клиентом Windows).
При первом подключении появится стандартный запрос на добавление узла в список известных SSH хостов.
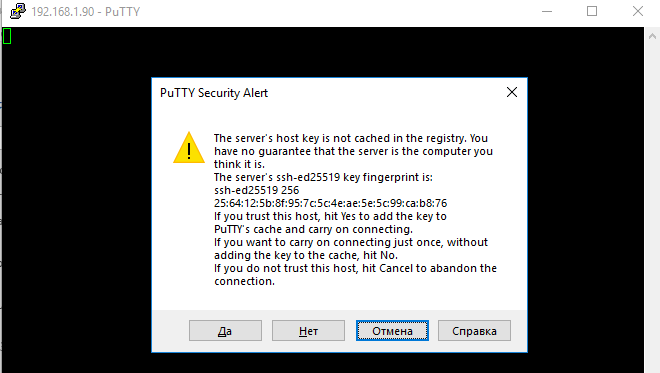
Нажимаем Да, и в открывшееся окне авторизуемся под пользователем Windows.
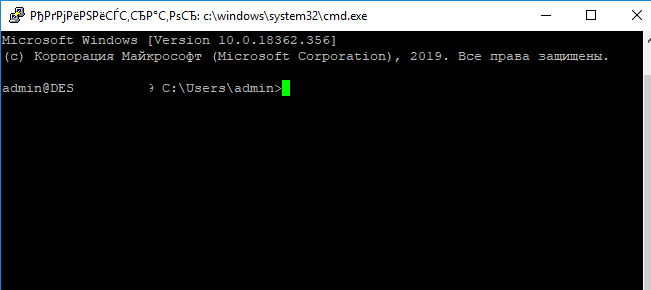
При успешном подключении запускается командная оболочка cmd.exe со строкой-приглашением.
В командной строке вы можете выполнять различные команды, запускать скрипты и программы.
Я предпочитаю работать в командной строке PowerShell. Чтобы запустить интерпретатор PowerShell, выполните:
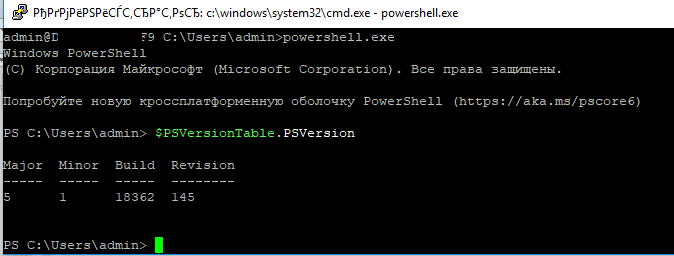
Чтобы изменить Shell по умолчанию в OpenSSH с cmd.exe на PowerShell, внесите изменение в реестр такой командой:
New-ItemProperty -Path «HKLM:SOFTWAREOpenSSH» -Name DefaultShell -Value «C:WindowsSystem32WindowsPowerShellv1.0powershell.exe» -PropertyType String –Force
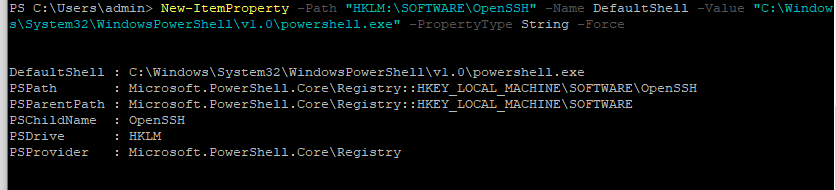
Осталось перезапустить SSH подключение и убедиться, что при подключении используется командный интерпретатор PowerShell (об этом свидетельствует приглашение PS C:Usersadmin> ).
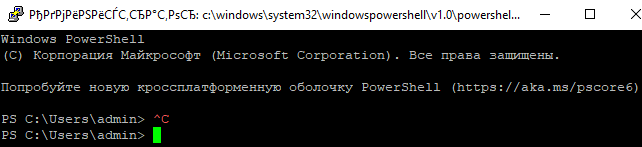
В SSH сессии запустилась консоль PowerShell, в которой работают привычные функции: авто дополнение, раскраска модулем PSReadLine, история команд и т.д. Если текущий пользователь входит в группу локальных администраторов, то все команды в его сессии выполняются с повышенными правами даже при включенном UAC.
Источник
Установка OpenSSH Server в Windows
Если вам понадобился SFTP/SSH сервер на Windows Server 2012 R2, то вы попали по адресу. Установим, запустим, настроим и протестируем OpenSSH Server в Windows Server 2012 R2.
Установка OpenSSH в Windows Server 2012 R2
Скачиваем последнюю версию дистрибутива OpenSSH:
Сейчас доступна версия v8.0.0.0p1-Beta. Скачиваю OpenSSH-Win64.zip .
Создаю директорию C:Program FilesOpenSSH , распаковываю в неё содержимое архива.
Запускаю powershell от имени администратора.
Выполняю скрипт установки:
Если произошла ошибка политики безопасности, то можно выполнить установку так:
powershell -ExecutionPolicy Bypass -File .install-sshd.ps1
В результате вижу ошибку:
Исправляется легко, захожу в папку C:ProgramData и создаю вручную директорию «ssh».
Снова пытаюсь сгенерировать ключи:
На этот раз процедура выполняется успешно.
Настраиваю владельца файлов и права доступа:
PowerShell -ExecutionPolicy Bypass -File .FixHostFilePermissions.ps1
На каждый вопрос отвечаю «A».
Открыть 22 порт
OpenSSH работает по порту TCP 22. Открою доступ в Firewall:
New-NetFirewallRule -Protocol TCP -LocalPort 22 -Direction Inbound -Action Allow -DisplayName SSH
То же самое можно сделать через GUI в оснастке Windows Firewall with Advanced Security .
Запуск службы OpenSSH
Открываю список служб:
Нахожу службу «OpenSSH SSH Server». В свойствах службы делаю автоматический запуск и запускаю её.
Проверим что 22 порт работает:
Проверка OpenSSH
Проверю с помощью WinSCP. Для доменного пользователя используется логин вида domainusername .
При первом входе появится окно:
Настройка доступа
Конфигурационный файл находится здесь: C:ProgramDatasshsshd_config .
Собственно, OpenSSH конфигурируется здесь. Например, чтобы разрешить доступ по OpenSSH определённой группе пользователей, допишу в конец файла:
DenyUsers *
AllowGroups my_domainmy_group_for_ssh_access
Если вам понравилась статья, то ставьте 👍🏻 каналу.
Пишите комментарии, задавайте вопросы, подписывайтесь.
Источник