Это инструкция о том как настроить автозапуск OpenVPN и подключиться к выбранному серверу автоматически при старте Windows. Для этого не нужно настраивать планировщик задач или создавать командные файлы как во многих других инструкциях доступных в сети.
Всё, что необходимо — это поместить ярлык OpenVPN GUI в папку «Автозагрузка». Тем не менее, чтобы данный способ заработал необходимо выполнить несколько условий.
Установите самую последнею версию OpenVPN и проверьте настройки привилегий
На момент написания данного текста последняя версия OpenVPN была 2.4.4, она содержит ряд важных исправлений и улучшений, самое главное из них — OpenVPN теперь можно запускать без прав администратора.
Важно! С версией ниже чем 2.4.4 описанный в инструкции способ работать не будет
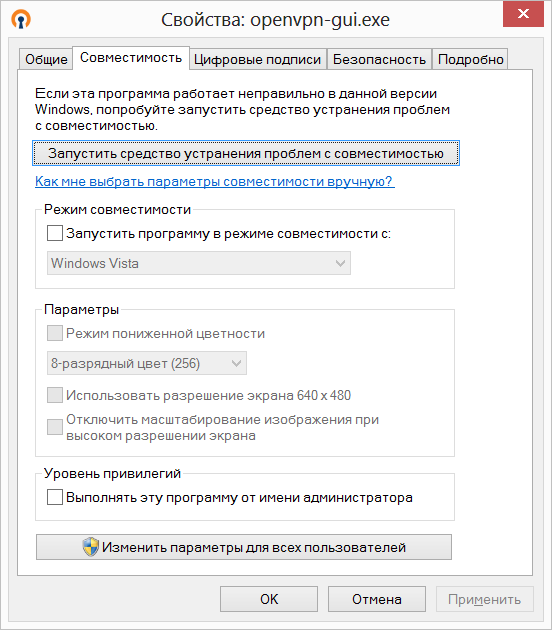
Важно! Если ранее у вас была установлена версия OpenVPN ниже чем 2.4.4 убедитесь в том, что для исполняемого файла openvpn-gui.exe не установлен уровень привилегий «Выполнять эту программу от имени администратора».
Для этого откройте свойства файла openvpn-gui.exe из папки «C:Program FilesOpenVPNbin» или «C:Program Files (x86)OpenVPNbin», перейдите на вкладку «Совместимость» и убедитесь в том, что настройка «Выполнять эту программу от имени администратора» отключена.
Автозапуск (автозагрузка) OpenVPN настройка
Поместите ярлык openvpn-gui.exe в папку «Автозагрузка», для этого:
Шаг 1. Чтобы открыть папку «Автозагрузка» нажмите сочетание клавиш Win+R и в открывшемся окне наберите shell:startup, после чего нажмите «Ок»

Шаг 2. Далее в открывшейся папке создайте ярлык и укажите следующее расположение объекта:
«C:Program FilesOpenVPNbinopenvpn-gui.exe» если у вас 64х разрядная Windows
Или
«C:Program Files (x86)OpenVPNbinopenvpn-gui.exe» если у вас 32х разрядная Windows
Примечание! Чтобы определить, установлена на компьютере 32-разрядная или 64-разрядная версия Windows воспользуйтесь этой ссылкой.
Шаг 3. После чего не торопитесь закрывать окно, а дополните указанную ранее строку следующими опциями:
—connect <имя_файла_конфигурации_openvpn>
—silent_connection 1
Опция connect позволяет выбрать файл конфигурации, а соответственно и сервер к которому подключаться. Опция silent_connection позволяет не показывать диалог состояния при подключении.
Ваши файлы конфигурации находятся в папке «C:Program FilesOpenVPNconfig» или «C:Program Files (x86)OpenVPNconfig»
Таким образом, если при старте системы Вы желаете подключать OpenVPN с конфигурацией nl01.secretvpn.net.ovpn, в расположение объекта при создании ярлыка вам необходимо прописать следующую строку:
«C:Program FilesOpenVPNbinopenvpn-gui.exe» —connect nl01.secretvpn.net.ovpn —silent_connection 1 для 64х разрядных систем
Или
«C:Program FilesOpenVPN(x86)binopenvpn-gui.exe» –-connect nl01.secretvpn.net.ovpn —silent_connection 1 для 32х разрядных систем

Шаг 4. Завершите создание ярлыка, автозапуск OpenVPN настроен и теперь ваш VPN будет запускаться и подключаться к выбранному серверу автоматически при входе в систему.
Полезное! Если Вы хотите избавиться от назойливого диалога ввода пароля каждый раз при подключении OpenVPN сохраните пароль в отдельный файл и укажите его в конфигурации OpenVPN так, как это сделано в инструкции «Как сохранить имя пользователя и пароль в OpenVPN клиенте» для версий более ранних чем 2.4.0 и тогда ваш OpenVPN будет запускаться без всяких дополнительных окон.
Остались вопросы? Мы всегда поможем:
- Telegram @secretvpn_support
- Электронная почта [email protected]
- Личный кабинет пользователя SECRETVPN https://secretvpn.net/login/ — «Техническая поддержка»
В этой статье мы рассмотрим, как настроить автоматическое подключение к OpenVPN серверу при входе пользователя в Windows с помощью ярлыка в автозапуске и с помощью службы Windows.
Автозапуск клиента OpenVPN при входе в Windows
Скопируйте ваш *.ovpn файл с настройками вашего VPN подключения в каталог C:UsersYourUsernNameOpenVPNconfig или в C:Program FilesOpenVPNconfig.
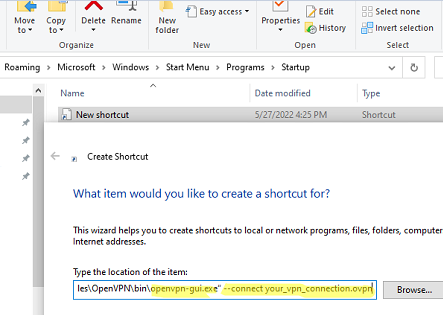
Теперь вам нужно открыть каталог автозапуска в Windows. Для этого нажмите сочетание клавиш Win+R и выполните команду shell:startup. Перед вами откроется папка в профиле текущего пользователя ((%APPDATA%MicrosoftWindowsStart MenuProgramsStartup). Windows при входе пользователя в систему автоматически запускает все программы из этой папки.
Если у вас используется клиент openvpn-gui.exe (OpenVPN 2.5), то для автоматического подключения с помощью указанного профиля из файла *.ovpn используется команда:
"C:Program FilesOpenVPNbinopenvpn-gui.exe" --connect your_vpn_connection.ovpn
Просто скопируйте ярлык OpenVPN GUI в каталог Startup и настройках ярлыка добавьте параметр --connect your_vpn_connection.ovpn.
Если вы хотите скрыть окно состояния клиента OpenVPN при подключении, добавьте в строку параметр --silent_connection 1.
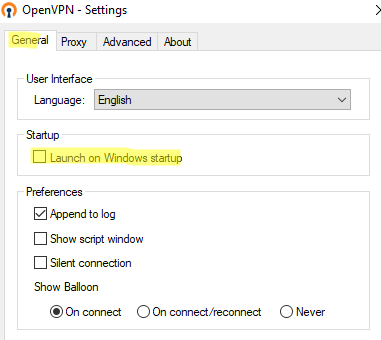
Теперь запустите клиент OpenVPN и отключите автоматический запуск при загрузке Windows (вкладка General -> Launch on Windows startup). Это позволит предотвратить конфликт с командой автозагрузки, которую мы создали ранее.
Теперь Windows будет автоматически устанавливать подключение с OpenVPN сервером при входе пользователя.
Если у вас используется клиент OpenVPNConnect.exe (3.3.x) от OpenVPN вместо комьюнити клиента, имейте в виду, что в нем пока нет опций командной строки для подключения к серверу с помощью настроенного профиля.
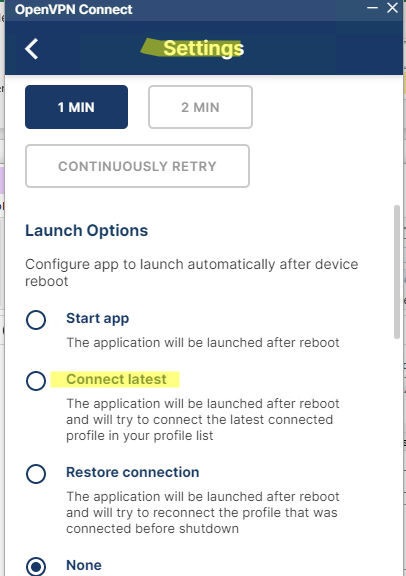
В настройках клиента OpenVPN Connect можно включить опцию Lauhch options -> Connect latest. В этом случае клиент будет автоматически подключаться с помощью последнего используемого ovpn профиля.
Эту же опцию можно включить из командной строки:
C:Program FilesOpenVPN ConnectOpenVPNConnect.exe --set-setting launch-options:connect-latest
В этом примере мы показали, как настроить автоматическое OpenVPN подключение для одного пользователя Windows. Если вам нужно настроить автоподключение для всех пользователей, можно создать аналогичное задание в Task Scheduler или настроить службу OpenVPN.
Запуск клиента OpenVPN как службы Windows
Вы можете настроить автоматическое подключение с помощью службы OpenVPN Service, которая позволит автоматически поднимать VPN подключение до входа пользователя в Windows.
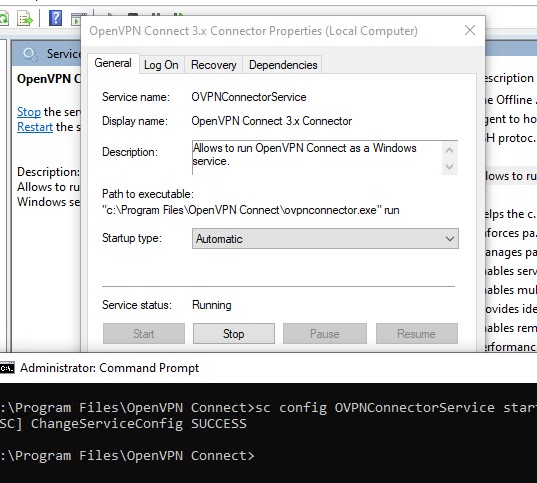
Если у вас используется клиент OpenVPN Connect 3.2+, вы можете запустить службу OpenVPN, которая будет автоматически подключаться к OpenVPN серверу после загрузки Windows.
- Откройте командную строку с правами администратора и перейдите в каталог:
cd "c:Program FilesOpenVPN Connect" - Установите службуOVPNConnectorService:
ovpnconnector.exe install - Задайте полный путь к конфигурационному файлу OVPN, который нужно использовать для подключения:
ovpnconnector.exe set-config profile "C:OpenVPNclient.ovpn" - Укажите имя файла, куда нужно записыват логи VPN подключения:
ovpnconnector.exe set-config log "C:OpenVPNclient.log"Логи OpenVPN также доступны в стандартном Event Viewer в разделе Windows Logs -> Applications -> включите фильтр по Event Source OVPNConnectorService.
- Запустите службу OpenVPN:
ovpnconnector.exe startПроверьте, что клиент успешно подключится в OpenVPN серверу. В логе должно появится сообщение:
Wed Feb  1 23:25:39 2023 Connected via TUN_WIN
Wed Feb  1 23:25:39 2023 EVENT: CONNECTED YourOpenVPNProfile via /UDPv4 on TUN_WIN/10.24.1.10/ gw=[10.24.1.9/]
И ваш виртуальный адаптер WinTUN получил IP адрес от сервера OpenVPN
- Теперь настройте автоматический запуск для службы OVPNConnectorService из консоли управления services.msc или с помощью команды:
sc config OVPNConnectorService start=auto - Теперь после перезагрузки Windows служба OpenVPN будет автоматически подключаться к серверу.
Если вы хотите отключить и удалить службу OVPNConnectorService, выполните команды:
ovpnconnector.exe stop
ovpnconnector.exe remove
Если у вас используется аутентификация OpenVPN ерез Active Directory, вы можете сохранить имя пользователя и пароль в текстовый файл и использовать его для автоматического подключения.
Создайте текстовый файл login.txt в каталоге C:Program FilesOpenVPNconfig.
И добавьте в конфигурационный файл ovpn строки:
auth-user-pass login.txt
auth-retry nointeract
auth-nocache
Если у вас используется клиент OpenVPN GUI, вы также можете настроить службу для автоматического подключения. Для этого:
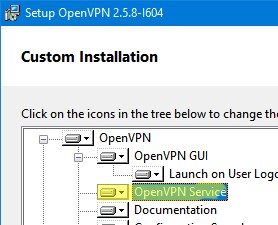
- При установке клиента обязательно выберите дополнительно службу OpenVPN Service
- Скопируйте ваши профили OpenVPN (файлы с расширением .ovpn) в каталог
"C:Program FilesOpenVPNconfig" - Служба OpenVPN будет автоматически запускать VPN туннель для каждого конфигурационного ovpn файла из этого каталога)
Если на компьютере должны быть одновременно активны несколько OpenVPN подключений, убедитесь, что в Windows создано достаточное количество виртуальных сетевых адаптеров TUN/TAP. Иначе в логах появится ошибка All TAP-Windows adapters on this system are currently in use. Также рекомендуется привязать OpenVPN подключение к конкретному сетевому интерфейсу с помощью следующей строки в .ovpn:
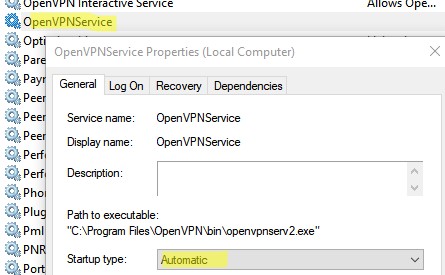
dev-node 'OpenVPN TAP-Windows2'(указывается имя сетевого адаптера в Window) - Проверьте что для службы OpenVPNService (
C:Program FilesOpenVPNbinopenvpnserv2.exe) настроен автоматический запуск.
В Linux вы можете подключиться к VPN серверу из командной строки или автоматически с помощью стандартного сервиса openvpn@client.service.
Данные демон автоматически создает VPN подключения для всех конфигурационных файлов .conf в каталоге /etc/openvpn (просто переименуйте ваши *.ovpn файлы в *.conf). И запустите сервис:
$ sudo systemctl enable openvpn@client.service
$ sudo systemctl start openvpn@client.service
Сегодня хочу рассказать о том как быстро и просто настроить автоматическое подключение клиента OpenVPN 2.5 к серверу при запуске операционной системы Windows 10. Немного предыстории, в одной организации было реализовано подключение клиентов через OpenVPN. Но у большинства пользователей не знаю почему не хватало ума после запуска ОС запустить еще и OpenVPN. И каждое утро в чат сыпалась куча сообщений у нас ни чего не работает. Хотя всем пользователям все объяснялось и показывалось.
Конечно по хорошему необходимо было изначально настраивать автоматическое подключение к серверу OpenVPN, дабы не напрягать пользователей.
В общем опыта в этом не было, обратился с этим вопросом к поисковым системам. Ответов было много но все они не точные и не полные. Кто то писал про настройку службы, кто-то про создания задачи в планировщике. Прочитав несколько статей, я нашел один простой способ, которым хочу поделиться с вами.
Так же рекомендую прочитать интересные статьи на тему настройки OpenVPN.
Как узнать кто подключен к OpenVpn серверу
Как просматривать логи OpenVPN в Linux
Как настроить OpenVPN Client в Windows 10
Простой способ автоподключения OpenVPN
Для того чтобы клиент OpenVPN при загрузки Windows сам в автоматическом режиме поднимал соединение нужно в свойствах ярлыка в поле «Объект» добавить следующею запись.
—connect client.ovpn

client.ovpn это название вашего файла конфигурации который храниться в папке ovpn. Название может быть любое.
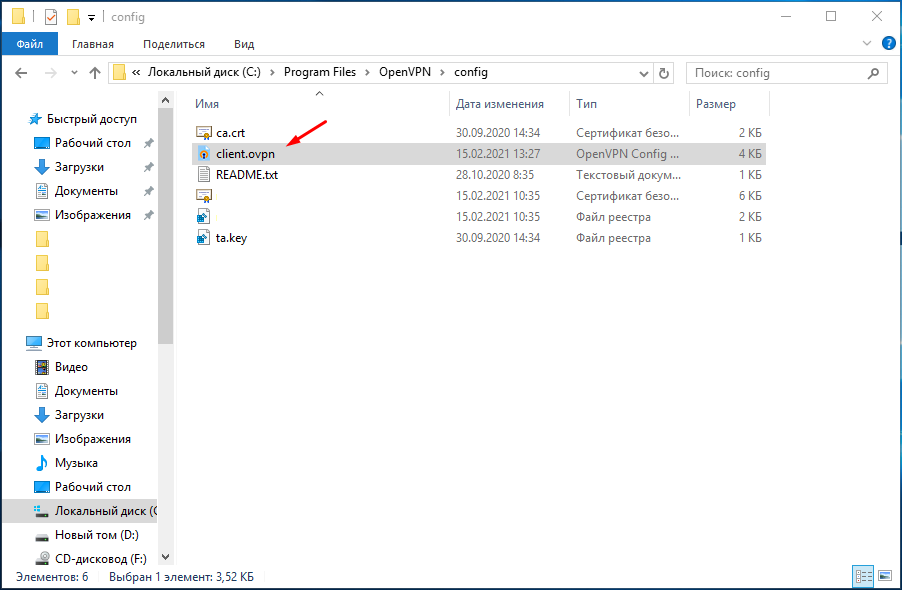
После чего проверяем, запускаем OpenVPN он должен сам подключиться к серверу.

Остается только этот ярлык добавить в автозагрузку.
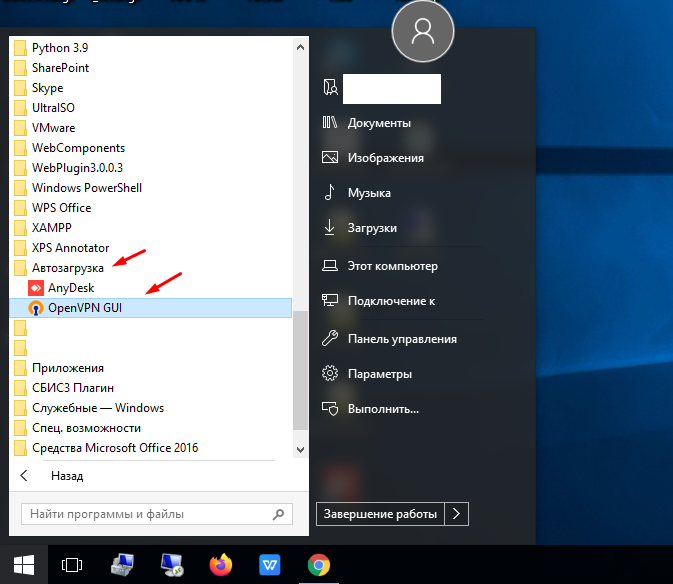
Если в вашей сборке Windows 10 в пуске нет папки «Автозагрузка» или вы просто не можете её найти, нажимаем клавиши Win+R и вводим команду «shell:startup».

В открывшиеся окно переносим измененный ярлык.

Все теперь OpenVPN после загрузки операционной системы будем автоматически подключаться к серверу и устанавливать соединение.
The best way is to use services:
- Install the OpenVPN service when you install the client;
- Place your OpenVPN profiles (with the extension .ovpn, not .conf as is common on Linux) in the config subdirectory of the OpenVPN installation directory, probably
C:Program FilesOpenVPNconfig. - Open the Services console (
services.msc); - Find OpenVPNService, right click on it, Properties, and change startup type from “Manual” to “Automatic”.
- Start the service, and OpenVPN will find and connect to the profiles in any .ovpn files. Keep in mind in most situations you need one TUN/TAP interface per connection file. In windows, I strongly advise to permanently associate an interface with their connection using the configuration files:
dev-node TAP_Servforces OpenVPN to bind the connection to the network interface named «Tap_Serv». Added after reading some comments: You need one interface per connection. In Linux this is trivial, but in windows it may be problematic. HAving two configurations that you can SEPARATEDLY test succesfully, doesn’t mean they’ll run together, as they may be competing for the same interface. OpenVPN is a ported program, and windows driver subsystem has allways been a pain in the a**.
You may want to investigate is there’s a way to elaborate a whitelist to force the service to connect only to specific files, and not all. I’ve had some issues in the past with people who needed to have a VPN server as a service plus several vpn client files in the same machine that only connect every now and then. In those situations, if I wanted OpenVPN GUI to show them a beautifull list of available connections, it meant that the service saw those files and was trying to connect to them automatically. In those cases, I decided not to use services at all:
If using a service is not an option, you can pass extra command line arguments to the OpenVPN GUI invocation to make it automatically connect on startup (as well as showing the tray icon as usual):
openvpn-gui.exe --connect myprofile.ovpn
To get that to run when you log in, place such a shortcut in the usual startup folder. (For all users, %ProgramData%MicrosoftWindowsStart MenuProgramsStartup; or for the current user only, %APPDATA%MicrosoftWindowsStart MenuProgramsStartup.)
I don’t know how to avoid the user to connect to the Internet before the VPN is set. The only way I can figure out if through Windows Firewall, and I’m not an expert on that subject. If you want to avoid a poweruser to be able to get to the Internet you need a firewall in your gateway to avoid so, or strong group policies to avoid privilege scalation.
For a normal user, you can configure the Windows client machine without a default gateway. Set a persistent static route to the VPN server on Windows clients using the following command (-P makes it persistent):
route -P add <target> mask <netmask> <gateway IP> metric <metric cost> if <interface>
Roues in Windows are stored under the following registry key:
HKEY_LOCAL_MACHINESYSTEMCurrentControlSetServicesTcpipParametersPersistentRoutes
At this point a disconnected client only has access to the VPN server. Then you can add the following lines in the VPN server configuration file to add routes on clients when they connect:
To configure the VPN server as the default gateway:
push "redirect-gateway def1 bypass-dhcp"
To add an specific route through the VPN Server:
push "route 192.168.1.0 255.255.255.0"
Sometimes route pushing doesnt work on Windows. When this happens to me, I completly uninstall OpenVPN and it’s interfaces from Windows, restart system and install the latest version of the software. Then, before stablishing the first connection, I restart Windows. This has allways solved the issues, however, Windows 10 Anniversary update (1607) is buggy with OpenVPN. There’s a link to a deeper discussion in OpenVPN forums:
Connection problems with Windows 10 anniversary update
Keep that in mind when you setup your Windows 10 OpenVPN clients.
If you’re a consultant looking SU to give advice to a client, please consider using some specific NATIVE windows solutions, if your client’s budget allows for it. I won’t name any to avoid being flagged, but most knowns networking hardware companies offer solutions compatible with their devices that provide native drivers for any edge OS you mayb think of. Disclaimer: I don’t work for any of those companies. For my own dialy life I use OpenVPN, but to remotely connect to my company they’ve a commercial solution bundled on the computers: I never had a single connection issue, while OpenVPN is usually more delicated. Don’t take me wrong, I’ve delivered OpenVPN to production environments for clients with total success, but you need to be extra cautionous (and put watchdog and recoverfy measures in place, or just train the user to «click reconnect if something doesn’t work properly»)
This is a guide explaining how you can set your OpenVPN client to run automatically when you start your computer. The guide is specific to Windows.
1. Task Scheduler
Click the Start button and go to Programs » Accessories » System. Then run Task Scheduler.
If you don’t have the Start button, just search for Task Scheduler.
Click Create basic task on the Actions menu on the right-hand side.
{<1>}
2. Create a basic task
Enter OpenVPN as the name for the new activity and click Next.
{<2>}
3. Set the trigger
It’s now time to set the trigger. Choose When I log on, and click Next.
{<3>}
4. Choose action
Under Action, choose Start a program, and click Next.
{<4>}
5. Choose an application to run
It’s time to choose the program that should be opened when you log in. Click Browse, and look up openvpn-gui.exe. Usually you can find the program in:
C:Program FilesOpenVPNbin
or
C:Program Files (x86)OpenVPNbin
In the field Add arguments (optional ), type:
—connect «OVPN — Sverige.ovpn»
IF the configuration file you are using is named OVPN — Sverige.ovpn. If the name of your file is different, enter that name instead
{<5>}
6. Finishing up
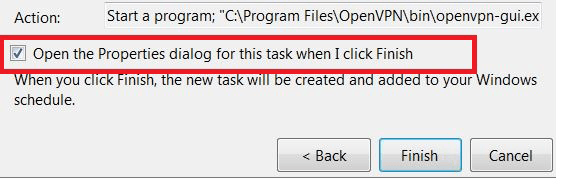
Check the box Open the Properties dialog for this task when I click Finish.
Then click Finish.
{<6>}
7. Set user privileges
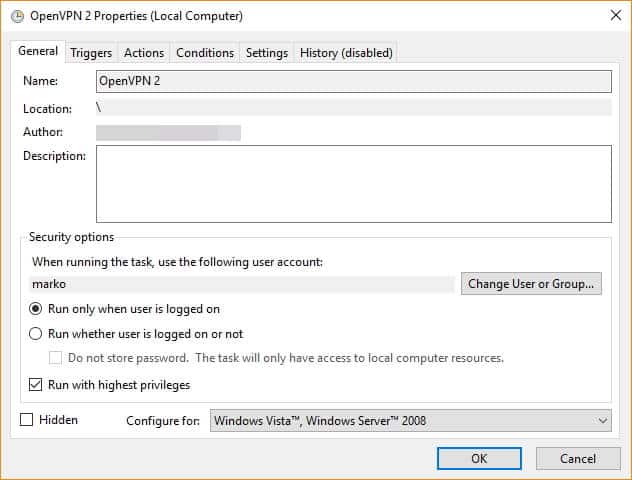
A new window should now open called Properties for OpenVPN (Local Computer). On the opened tab, check **Run with highest privileges **, and click OK.
{<7>}
Further configurations
If you’ve followed the steps in the guide, OpenVPN will now be run when you log in.
To automatically connect to OVPN, you need to make a few more configurations. This requires you to enter your username and password in a text file and save it on your computer.
If you are not comfortable with having a text file with your credentials saved, there is, unfortunately, no other way to automatically connect to OVPN on computer startup.
1 – Create a text file
Go to the configuration directory where you keep the configuration files for OVPN. Usually, they can be found in:
C:Program FilesOpenVPNconfig
or
C:Program Files (x86)OpenVPNconfig
Create a file called password.txt. On the first line, write your username and on the second line your password.
Edit the configuration file that you are using to connect to OVPN by opening the file with a text editor such as Notepad++.
Find the command auth-user-pass and change it to auth-user-pass password.txt.
Then save the configuration file.
3. Done
You’re done! You can test it by logging out and in again. If you automatically connect to OVPN when you log in, it’s working!


Тематические термины: OpenVPN, VPN, Windows, Linux, CentOS, Ubuntu
В данной инструкции подробно описан процесс настройки клиента OpenVPN на примере операционных систем Windows и Linux. Также, с ее помощью можно настроить скиента на Android.
Установка
Настройка
Пример конфигурационного файла
Ключи
Сертификаты
Запуск
Несколько конфигураций
Сертификаты внутри ovpn файла
Отзыв сертификата
Читайте также
Установка
Windows
Заходим на официальную страницу загрузки openvpn и скачиваем клиента для нужной Windows:
Запускаем скачанный файл и устанавливаем программу, нажимая «Далее».
Linux CentOS
Устанавливаем репозиторий EPEL:
yum install epel-release
Устанавливаем openvpn:
yum install openvpn
Linux Ubuntu
apt-get install openvpn
Android
Установка выполняется из Google Play. Набираем в поиске OpenVPN Connect — нажимаем установить и принимаем условия.
Настройка
После установки программы конфигурационный файл не создается автоматически и его нужно создать вручную.
В системах Windows создаем файл config.ovpn в папке %programfiles%OpenVPNconfig.
* имя файла может быть любым, расширение должно быть .ovpn.
Для создания конфигурационного файла в Linux выполняем команду:
vi /etc/openvpn/client.conf
* чтобы служба openvpn автоматически выполняла соединение, необходимо, чтобы конфигурационный файл назывался client.conf.
Пример конфигурационного файла
client
dev tun
proto udp
remote 192.168.0.15 443
resolv-retry infinite
nobind
persist-key
persist-tun
ca ca.crt
cert client.crt
key client.key
dh dh2048.pem
tls-client
tls-auth ta.key 1
float
keepalive 10 120
comp-lzo
verb 0
Параметры конфигурационного файла
| Параметр | Значения | Описание |
|---|---|---|
| client | Строка говорит о том, что конфигурационный файл описывает клиентское подключение (программа сама устанавливает соединение, а не ждет, как сервер). | |
| dev | tap или tun | Выбор виртуального сетевого драйвера. TUN — сетевой уровень модели OSI, оперирует IP-пакетами. TAP — эмулирует Ethernet устройство и работает на канальном уровне модели OSI, оперируя кадрами Ethernet. Настраивая OpenVPN клиента, в большинстве случаев, необходимо выбирать tun. TAP необходимо использовать для работы определенных сервисов, например DHCP. |
| dev-node | любая строка | Параметр используется в системах Windows в случаях, если имеется несколько сетевых интерфейсов. Значение этого параметра должно содержать название сетевого подключения, через который должен работать OpenVPN. |
| proto | udp или tcp | Указывает, какой протокол использовать для передачи данных. В большинстве случаев, лучше использовать UDP, так как данный протокол создает меньше нагрузки на сеть. |
| remote | VPN-сервер и порт | Задает сервер, к которому должен подключаться клиент, а также сетевой порт (по умолчанию 1194), на котором OpenVPN принимает запросы. Можно указать несколько строк. |
| remote-random | Если указано несколько строк remote, данный параметр говорит, что необходимо подключаться к удаленным серверам в случайном порядке. | |
| resolv-retry | количество секунд или infinite | Используется в тех случаях, когда в качестве сервера указано доменное имя. Параметр задает время в секундах для повторного переподключения, если не удалось узнать имя сервера. infinite — держать связь с сервером постоянно. |
| nobind | Клиент использует динамический порт для подключения. | |
| user | учетная запись | Задает определенного пользователя для работы клиента (только для UNIX-систем). |
| group | группа | Задает определенную группу для работы клиента (только для UNIX-систем). |
| persist-key | Не перечитывает ключи при перезагрузке сервиса OpenVPN. | |
| persist-tun | Не перечитывает параметры туннеля при перезагрузке сервиса OpenVPN. | |
| http-proxy | сервер прокси и порт | Использовать прокси-сервер для подключения. |
| http-proxy-retry | Переподключаться к прокси-серверу, если связь была разорвана. | |
| http-proxy-timeout | количество секунд | Время, через которое выполнять попытки переподключения к прокси-серверу. |
| mute-replay-warnings | Параметр стоит задавать при использовании беспроводного соединения. Он отключит дублирование предупреждений пакетов. | |
| ca | пут к сертификату | Корневой сертификат удостоверяющего центра. Генерируем на сервере. |
| cert | пут к сертификату | Открытый ключ клиента. Генерируем на сервере. |
| key | пут к сертификату | Закрытый ключ клиента. Генерируем на сервере. |
| dh | пут к сертификату | Ключ с алгоритмом Diffie-Hellman (Диффи-Хеллмана). |
| remote-cert-tls | сервер | Исключает возможность mitm атаки, включая верификацию сертификата сервера. |
| tls-client | Указание на то, что это клиент TLS. | |
| tls-auth | ta.key 1 | Дополнительный уровень аутентификации посредством ключа TLS. |
| float | Удаленный хост может менять IP-адрес в процессе соединения, при этом последнее не будет разорвано. | |
| keepalive | секунд1 секунд2 | Пинговать каждые секунд1 сервер и если в течение секунд2 не будут получены ответные пакеты, перезапустить подключение. |
| cipher | алгоритм | Указывает алгоритм шифрования. Примеры: AES-256-CBC, AES-128-CBC, BF-CBC, DES-EDE3-CBC. |
| comp-lzo | Использовать сжатие. | |
| verb | число от 0 до 9 | Уровень детализации лога. 0 отключает отладочную информацию. |
| mute | число | Указывает сколько лог-сообщений может отображаться для каждой категории события. |
| auth-user-pass | ничего или путь к файлу | Говорит клиенту, что необходима аутентификация. Если не указан путь к файлу, клиент выкинет окно для авторизации, иначе прочитает данные из файла. |
| ipchange | команда или путь к скрипту | Выполняет команду при смене IP. |
| connect-retry | секунд | Переподключиться к серверу через указанное количество секунд, если соединение было разорвано. |
| connect-retry-max | число | Сколько раз повторять соединение, если оно было разорвано. |
| shaper | байт | Задает максимальную скорость передачи данных для исходящего трафика. |
| tun-mtu | число | Задает MTU. |
| status | путь к файлу | Путь к фалу хранения статуса. |
| log | путь к файлу | Путь к лог-файлу. |
| askpass | путь к файлу | Путь к файлу с паролем для приватного ключа (private key password). |
Наиболее полный и актуальный список параметров для OpenVPN можно получить командой openvpn —help (в Linux и Windows).
Сертификаты
Клиентские сертификаты генерируются на стороне сервера. Процедура следующая.
Для Linux:
cd /etc/openvpn/easy-rsa
. ./vars
./build-key client
Для Windows:
cd %ProgramFiles%OpenVPNeasy-rsa
vars.bat
build-key.bat client
* в выше приведенных примерах был сгенерирован клиентский сертификат client. Более подробно про создание сертификатов для клиентов читайте на страницах настройка openvpn на Windows и настройка openvpn на CentOS.
Сгенерированные ключи появятся в каталоге keys. Их необходимо скопировать на клиентский компьютер вместе с сертификатами сервера и разместить по каталогам, указанным в конфигурационном файле. В нашем примере они должны быть скопированы в ту же папку, в которой находится сам файл конфигурации.
В итоге мы получаем, примерно, следующее.
Для Windows:
Для Linux:
ls /etc/openvpn/client/
ca.crt client.crt client.key client.conf dh2048.pem ta.key
Запуск
Для проверки можно запустить клиента вручную. Но для повседневного использования стоит настроить автоматический запуск.
Вручную
На Windows:
Запускаем OpenVPN GUI от имени администратора — в правом нижнем углу появится иконка программы:
Кликаем по ней правой кнопкой мыши и выбираем Подключиться:
На Linux:
Переходим в каталог с конфигурационным файлом:
cd /etc/openvpn
Вводим команду:
openvpn —config /etc/openvpn/client.conf
или:
systemctl start openvpn@client
* также служба может называться openvpn.
Автоматически
На Windows:
Выполняем 2 действия.
1. Наш конфигурационный файл с сертификатами переносим из каталога config в каталог config-auto:
* в старых версиях клиента каталога config-auto нет — тогда оставляем файлы в config.
2. Открываем службы и находим OpenVPNService. Переводим его в режим автозапуска:
На Linux:
Разрешаем автозапуск службы:
systemctl enable openvpn@client
или для старых версий.
CentOS / Red Hat / Fedora:
chkconfig openvpn on
Ubuntu / Debian:
update-rc.d openvpn defaults
Несколько конфигурационных файлов
Позволит держать несколько конфигураций для подключения к различным VPN-серверам. Между последними можно переключаться из клиентской программы.
Для Windows:
В каталоге config создаем для каждого сервера свою папку и помещаем в нее рабочие файлы (файл конфигурации, сертификаты и так далее). В каждой папке называем конфигурационные файлы ovpn своими именами (даже если файлы будут находиться в разных папках, но с одинаковыми именами, клиент OpenVPN будет воспринимать их как один конфиг).
Пример каталога config:
Пример файлов в одном из каталогов:
Теперь при подключении клиентом к можно выбрать конкретный VPN-сервер:
Для Linux:
Также как для Windows, создаем для каждого сервера свой каталог, куда скопируем рабочие файлы:
mkdir /etc/openvpn/server1
А в каталоге /etc/openvpn создаем для каждого подключения свой конфиг:
vi /etc/openvpn/client1.conf
* в конфигурационном файле все пути до файлов должны вести в соответствующий каталог (в нашем примере, /etc/openvpn/server1).
Запускаем OpenVPN:
openvpn —config /etc/openvpn/server1/client.conf
Для автоматического запуска мы уже ранее применяли команду:
systemctl enable openvpn@client
… где @client — указатель на использование конфигурационного файла client внутри папки openvpn (/etc/openvpn). Таким образом, если мы создали 2 файла client1.conf и client2.conf, команды для разрешения автозапуска бelen такие:
systemctl enable openvpn@client1
systemctl enable openvpn@client2
Сертификаты внутри конфигурационного файла
Ключи сертификатов можно хранить не в отдельных файлах, а внутри конфигурационного файла ovpn.
<ca>
——BEGIN CERTIFICATE——
…
——END CERTIFICATE——
</ca>
<tls-auth>
——BEGIN OpenVPN Static key V1——
…
——END OpenVPN Static key V1——
</tls-auth>
<cert>
——BEGIN CERTIFICATE——
…
——END CERTIFICATE——
</cert>
<key>
——BEGIN PRIVATE KEY——
…
——END PRIVATE KEY——
</key>
<dh>
——BEGIN DH PARAMETERS——
…
——END DH PARAMETERS——
</dh>
* key-direction 1 — необходим для tls-auth, в противном случае, работать не будет; ca — ключ центра сертификации (ca.crt); tls-auth — ta.key; cert — открытый сертификат клиента (clients.crt); key — закрытый сертификат клиента (clients.key); dh — сертификат, созданный на базе протокола Диффи Хеллмана.
Отзыв сертификата
Для Linux:
cd /etc/openvpn/easy-rsa
. ./vars
./revoke-full client
Для Windows:
cd %ProgramFiles%OpenVPNeasy-rsa
vars.bat
revoke-full.bat client
* с помощью данных манипуляций мы отзываем сертификат client.
Читайте также
Настройка сервера OpenVPN на Windows
Установка и настройка OpenVPN на Linux CentOS 7
Настройка OpenVPN сервера с включением аутентификации через LDAP (Active Directory)
Настройка доступа к локальной сети клиентам OpenVPN в CentOS 7
Write for Us: Familiar with Smart Home Automation, Media Streaming, HTPC, and Home Server topics? Write for us and get paid. Writing experience not required. APPLY HERE.
In this guide, I will show you how to auto connect to OpenVPN on Windows 10. OpenVPN increases your privacy on the Internet. If you care about privacy and want to do what you can do avoid other people and companies from spying on your activities on the web then you should continue reading. There are many different reasons for staying anonymous on the Internet that I won’t bore you with so let’s just continue with the guide so that you can take a big step to anonymity.
First let me explain to you what auto connect means, particularly in this context. Auto connect simply means that your computer automatically connects to a certain software program after you start it up and have logged in to Windows. Now, in this case we’re of course talking about a software program that has OpenVPN functionality and is a VPN service provider. Using a VPN service provider keeps your Internet connection secure and your downloads protected. Once you know how to auto connect to OpenVPN on Windows only the IP address of your VPN is leaked to the Internet, not the one you’re actually using! Hence, this is great for your privacy and anonymity and makes sure that you save time and focus only on enjoying the safety and security that a VPN offers to your home server connection! [Read: VPN on Kodi: Should you use it? What does it do?]
If you’re keen on protecting your privacy, here’s a guide to help you do what you can to protect it. It shows you how to auto connect to OpenVPN on Windows 10. It is really easy to follow and once you’ve completed it you really don’t have to do much more than boot up your computer. What a dream, right?
Table of Contents
- Auto connect to OpenVPN on Windows 10
- Prerequisites
- Task scheduler
- Create a basic task
- Set the trigger
- Set Action and add arguments
- Summary
- Create a notepad file
- Edit the .ovpn file
- Final step (optional)
- Restart your computer
Basically, there’s probably no better way to protecting your privacy on the web than to make sure that your computer auto connects to OpenVPN at startup. And folks, here’s the step-by-step guide that takes you through the easy process of auto connect to OpenVPN on Windows 10. Follow these steps and all you have to do to stay private is to start up your computer. If you do your browsing only from your Android device fear not because it’s very easy to set up a VPN on Android with IPVanish. There’s also the option to use IPVanish on Ubuntu . You can also autoconnect to OpenVPN from Linux Mint 18, if you use that OS. [Read: Guide: How to Install IPVanish OpenVPN on Linux Mint 18?]
NordVPN VPN Exclusive Offer — 66% off ($3.29/month):
♦ Hide your browsing (no logs), Anonymize Streaming and Downloads
♦ Wireguard Protocol support for VPN.
♦ Circumvent Geo/Country Restrictions and access worldwide content
♦ Works on Windows, Mac, Linux, Android, iOS, Router, and more
♦ 1 TB Encrypted Storage
♦ Money back guarantee — Sign Up Now
Prerequisites
First of all you need to have OpenVPN installed. Simply download OpenVPN and install it. A VPN service provider is also necessary because it will give you a .ovpn file. These files are needed to auto connect to OpenVPN on Windows. We have a guide on how to install OpenVPN on Windows. After that, you need to configure OpenVPN on Windows. Once these steps are completed, we can set up our system to autoconnect to OpenVPN on startup.
Task scheduler
A lot of stuff you need to do before you can actually start doing what brought you to this guide, I know. But I promise it’s worth your while because it helps you safeguard your privacy! And once you start following guides and implementing them you will eventually pick up your speed and understanding.
First, open the windows app Task scheduler. Simply click on the search icon on the bottom left side of the navigation bar and type task scheduler. Then double click on the result (task scheduler with the text Desktop app just below as shown in the image).
You can also just click on the Windows logo on the absolute bottom left of the navigation bar. Then click on the settings symbol. Type Task scheduler in the search bar. Then double click on the result named Task scheduler.
Create a basic task
First you need to Create a basic task. Click on Create a basic task as shown in the image below. Then click Next.
Set the trigger
Now it is time to set the Trigger. Here you set when you want the task that you’re creating to start (what should trigger it). Simply mark When I log on. Then click Next.
Set Action and add arguments
It is now time to set what Action you want the task to perform and because you want the task to start a program simply mark Start a program and then click Next.
Then it’s time to pinpoint what program you want the task to start. Click on Browse. Find the file named OpenVPN-gui.exe. You should find the file in one of the following two directories on your computer.
C:Program filesOpenVPNbin
or
C:Program files(x86)OpenVPNbin
This requires a special note because you either have one or the other. If you use Windows 64-bit you have the file that doesn’t contain (x86) and vice versa.
Then you need to Add arguments. Pay attention because this step is very important. Type the following:
--connect “THENAMEOFYOUR.OVPNFILE”
Your VPN service provider provides the .ovpn file as mentioned above. IPVanish provides a lot of .ovpn files so you have plenty to choose from. This is because they provide you with a whole lot of different IP addresses from all over the world. Just pick whichever fits your needs. Make sure that your .ovpn files are placed in the config folder of your Windows OpenVPN installation. The following example makes it look like you’re browsing and using the internet from Frankfurt (using one of the .ovpn files, previously downloaded):
--connect "ipvanish-DE-Frankfurt-fra-a01.ovpn"
Summary
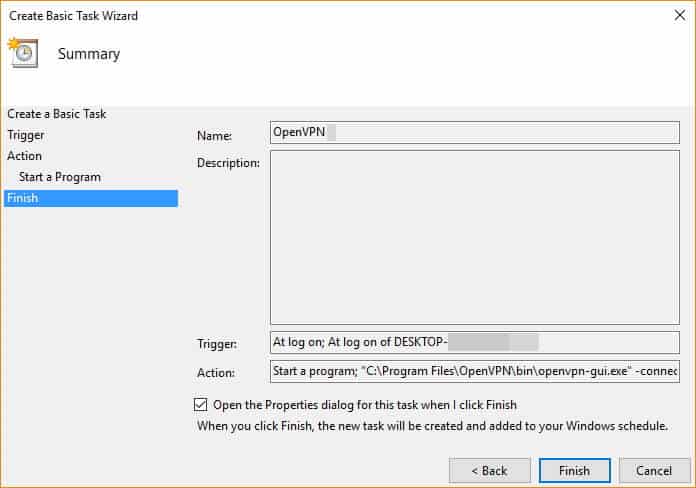
Now you’ll see a summary of your choices and settings for the basic rule that you’ve created to be able to auto connect to OpenVPN on Windows. Now, make sure that the box Open the Properties dialog for this task when I click Finish is ticked.
A new box will now open called OpenVPN properties (Local Computer). In the tab General, make sure that the box Run with highest privileges is ticked.
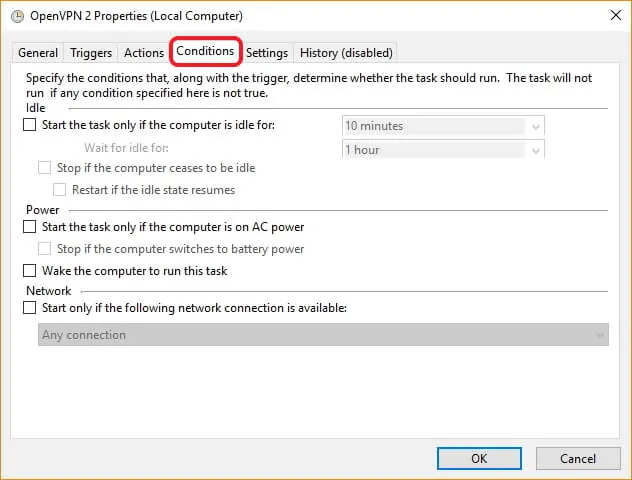
Now go to the tab Conditions and make sure that you have all the boxes unticked as shown in the image below.
Finally go to the tab Settings. Make sure that the boxes are ticked exactly as shown in the image below.
Now you’re all set in the Task scheduler. But for your computer to auto connect to OpenVPN on Windows some additional work need to be done.
Create a notepad file
Open the Windows software Notepad. Type the username of your IPVanish account in the first row of the notepad document. Hit enter. Type the password of your IPVanish account in the second row. For example, your username could be doctorpc and your password could be 12345678. Then the notepad should look like in the image below.
Save the file and name it password. Make sure that you save the file in the folder
C:Program FilesOpenVPNconfig
or
C:Program Files(x86)OpenVPNconfig
Edit the .ovpn file
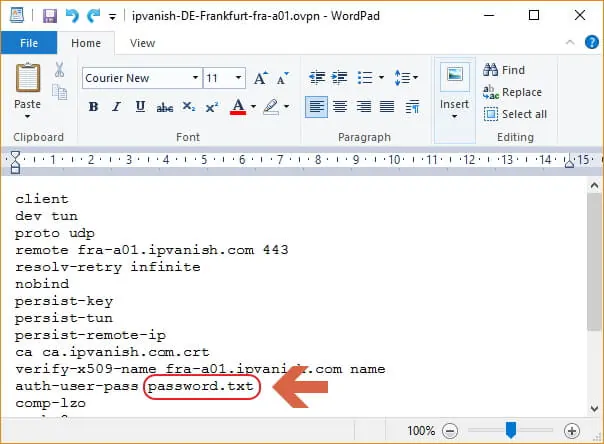
Now you need to edit the .ovpn file that you’re using. You’ll find this in the same folder as above, namely C:Program FilesOpenVPNconfig or C:Program Files(x86)OpenVPNconfig. In this example, the file that you must edit is named ipvanish-DE-Frankfurt-fra-a01.ovpn. Right click on the file. Choose Open with in the pop up menu. Then choose to open the file with Wordpad.
Add password.txt as shown in the image below. The complete line should read auth-user-pass password.txt.
Save the file in C:Program FilesOpenVPNconfig or C:Program Files(x86)OpenVPNconfig
If you can’t save the edited file in the above mentioned folder, do the following.
Save the file on your desktop. Don’t change the file name – in the example of this guide it should be ipvanish-DE-Frankfurt-fra-a01.ovpn.
Copy the edited file on your desktop in to C:Program FilesOpenVPNconfig or C:Program Files(x86)OpenVPNconfig.
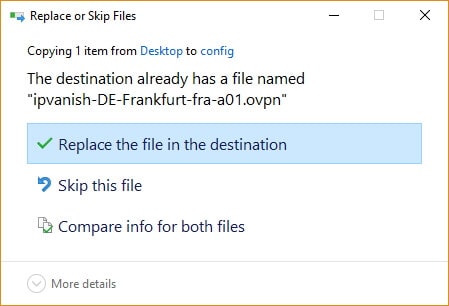
Now click on Replace the file in the destination.
Now a pop up window appears saying Destination Folders Access Denied. Just click on Continue.
Final step (optional)
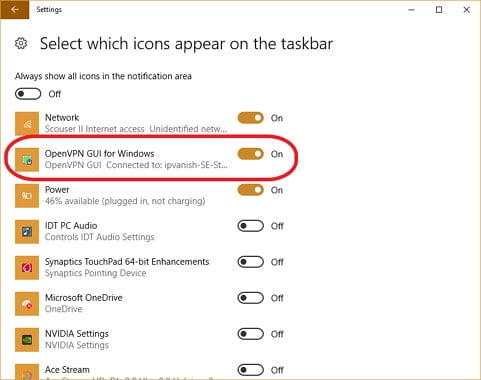
If you’d like to be able to control that your VPN is up and running then follow these quick steps because it makes sure that a symbol of the OpenVPN is shown in the taskbar. You’re connected to your VPN if the symbol is green. You’re NOT connected to your VPN if the symbol is gray.
First, you just click on the search icon on the bottom left side of the navigation bar and type select which icons appears on the taskbar. Then just double click on the result.
Finally make sure that the OpenVPN GUI for Windows is set to On, as shown in the image below.
Restart your computer
To finish the installation, restart your computer. OpenVPN will auto connect Windows after you have followed all the above steps. Surf safely and I hope you enjoyed our guide to setup Auto connect to OpenVPN on Windows! Looking for more alternatives to access geoblocked content and use the internet safely? Read our comparison between VPN vs DNS and learn how each of these different options can help you achieve a better and safer browsing and streaming!

