The OpenVPN community project team is proud to release OpenVPN 2.6.0. This is a new stable release with some major new features.
For details see: Changes.rst
The Changes document also contains a section with workarounds for common problems encountered when using OpenVPN with OpenSSL 3.
New features and improvements in 2.6.0 compared to 2.5.8:
- Data Channel Offload (DCO) kernel acceleration support for Windows, Linux, and FreeBSD.
- OpenSSL 3 support.
- Improved handling of tunnel MTU, including support for pushable MTU.
- Outdated cryptographic algorithms disabled by default, but there are options to override if necessary.
- Reworked TLS handshake, making OpenVPN immune to replay-packet state exhaustion attacks.
- Added —peer-fingerprint mode for a more simplistic certificate setup and verification.
- Added Pre-Logon Access Provider support to OpenVPN GUI for Windows.
- Improved protocol negotiation, leading to faster connection setup.
- Included openvpn-gui updated to 11.36.0.0. See CHANGES.rst.
- Updated easy-rsa3 bundled with the installer on Windows.
- Various bug fixes.
Windows 64-bit MSI installer |
GnuPG Signature | OpenVPN-2.6.0-I003-amd64.msi |
Windows ARM64 MSI installer |
GnuPG Signature | OpenVPN-2.6.0-I003-arm64.msi |
Windows 32-bit MSI installer |
GnuPG Signature | OpenVPN-2.6.0-I003-x86.msi |
Source zip |
GnuPG Signature | openvpn-2.6.0.tar.gz |
The OpenVPN community project team is proud to release OpenVPN 2.5.4. This release include a number of fixes and small improvements. One of the fixes is to password prompting on windows console when stderr redirection is in use — this breaks 2.5.x on Win11/ARM, and might also break on Win11/amd64. Windows executable and libraries are now built natively on Windows using MSVC, not cross-compiled on Linux as with earlier 2.5 releases. Windows installers include updated OpenSSL and new OpenVPN GUI. The latter includes several improvements, the most important of which is the ability to import profiles from URLs where available. Installer version I602 fixes loading of pkcs11 files on Windows. Installer version I603 fixes a bug in the version number as seen by Windows (was 2.5..4, not 2.5.4). Installer I604 fixes some small Windows issues.
Source tarball (gzip) |
GnuPG Signature | openvpn-2.5.4.tar.gz |
Source tarball (xz) |
GnuPG Signature | openvpn-2.5.4.tar.xz |
Source zip |
GnuPG Signature | openvpn-2.5.4.zip |
Windows 32-bit MSI installer |
GnuPG Signature | OpenVPN-2.5.4-I604-x86.msi |
Windows 64-bit MSI installer |
GnuPG Signature | OpenVPN-2.5.4-I604-amd64.msi |
Windows ARM64 MSI installer |
GnuPG Signature | OpenVPN-2.5.4-I604-arm64.msi |
Overview of changes since OpenVPN 2.4
Faster connections
Crypto specific changes
- ChaCha20-Poly1305 cipher in the OpenVPN data channel (Requires OpenSSL 1.1.0 or newer)
- Improved TLS 1.3 support when using OpenSSL 1.1.1 or newer
- Client-specific tls-crypt keys (—tls-crypt-v2)
- Improved Data channel cipher negotiation
- Removal of BF-CBC support in default configuration (see below for possible incompatibilities)
Server-side improvements
- HMAC based auth-token support for seamless reconnects to standalone servers or a group of servers.
- Asynchronous (deferred) authentication support for auth-pam plugin
- Asynchronous (deferred) support for client-connect scripts and plugins
Network-related changes
- Support IPv4 configs with /31 netmasks now
- 802.1q VLAN support on TAP servers
- IPv6-only tunnels
- New option —block-ipv6 to reject all IPv6 packets (ICMPv6)
Linux-specific features
- VRF support
- Netlink integration (OpenVPN no longer needs to execute ifconfig/route or ip commands)
Windows-specific features
- Wintun driver support, a faster alternative to tap-windows6
- Setting tun/tap interface MTU
- Setting DHCP search domain
- Allow unicode search string in —cryptoapicert option
- EasyRSA3, a modern take on OpenVPN CA management
- MSI installer
Important notices
BF-CBC cipher is no longer the default
Cipher handling for the data channel cipher has been significantly changed between OpenVPN 2.3/2.4 and v2.5, most notably there are no «default cipher BF-CBC» anymore because it is no longer considered a reasonable default. BF-CBC is still available, but it needs to be explicitly configured now.
For connections between OpenVPN 2.4 and v2.5 clients and servers, both ends will be able to negotiate a better cipher than BF-CBC. By default they will select one of the AES-GCM ciphers, but this can be influenced using the —data-ciphers setting.
Connections between OpenVPN 2.3 and v2.5 that have no —cipher setting in the config (= defaulting to BF-CBC and not being negotiation-capable) must be updated. Unless BF-CBC is included in —data-ciphers or there is a «—cipher BF-CBC» in the OpenVPN 2.5 config, a v2.5 client or server will refuse to talk to a v2.3 server or client, because it has no common data channel cipher and negotiating a cipher is not possible. Generally, we recommend upgrading such setups to OpenVPN 2.4 or v2.5. If upgrading is not possible we recommend adding data-ciphers AES-256-GCM:AES-128-GCM:AES-128-CBC (for v2.5+) or cipher AES-128-CBC (v2.4.x and older) to the configuration of all clients and servers.
If you really need to use an unsupported OpenVPN 2.3 (or even older) release and need to stay on BF-CBC (not recommended), the OpenVPN 2.5 based client will need a config file change to re-enable BF-CBC. But be warned that BF-CBC and other related weak ciphers will be removed in coming OpenVPN major releases.
Connectivity to some VPN service provider may break
Connecting with an OpenVPN 2.5 client to at least one commercial VPN service that
implemented their own cipher negotiation method that always reports back that it is using BF-CBC to the client is broken in v2.5. This has always caused warning about mismatch ciphers. We have been in contact with some service providers and they are looking into it. This is not something the OpenVPN community can fix. If your commercial VPN does not work with a v2.5 client, complain to the VPN service provider.
More details on these new features as well as a list of deprecated features and user-visible changes are available in Changes.rst.
The OpenVPN community project team is proud to release OpenVPN 2.5.3. Besides a number of small improvements and bug fixes, this release fixes a possible security issue with OpenSSL config autoloading on Windows (CVE-2021-3606). Updated OpenVPN GUI is also included in Windows installers.
Source tarball (gzip) |
GnuPG Signature | openvpn-2.5.3.tar.gz |
Source tarball (xz) |
GnuPG Signature | openvpn-2.5.3.tar.xz |
Source zip |
GnuPG Signature | openvpn-2.5.3.zip |
Windows 32-bit MSI installer |
GnuPG Signature | OpenVPN-2.5.3-I601-x86.msi |
Windows 64-bit MSI installer |
GnuPG Signature | OpenVPN-2.5.3-I601-amd64.msi |
Windows ARM64 MSI installer |
GnuPG Signature | OpenVPN-2.5.3-I601-arm64.msi |
Overview of changes since OpenVPN 2.4
Faster connections
- Connections setup is now much faster
Crypto specific changes
- ChaCha20-Poly1305 cipher in the OpenVPN data channel (Requires OpenSSL 1.1.0 or newer)
- Improved TLS 1.3 support when using OpenSSL 1.1.1 or newer
- Client-specific tls-crypt keys (—tls-crypt-v2)
- Improved Data channel cipher negotiation
- Removal of BF-CBC support in default configuration (see below for possible incompatibilities)
Server-side improvements
- HMAC based auth-token support for seamless reconnects to standalone servers or a group of servers.
- Asynchronous (deferred) authentication support for auth-pam plugin
- Asynchronous (deferred) support for client-connect scripts and plugins
Network-related changes
- Support IPv4 configs with /31 netmasks now
- 802.1q VLAN support on TAP servers
- IPv6-only tunnels
- New option —block-ipv6 to reject all IPv6 packets (ICMPv6)
Linux-specific features
- VRF support
- Netlink integration (OpenVPN no longer needs to execute ifconfig/route or ip commands)
Windows-specific features
- Wintun driver support, a faster alternative to tap-windows6
- Setting tun/tap interface MTU
- Setting DHCP search domain
- Allow unicode search string in —cryptoapicert option
- EasyRSA3, a modern take on OpenVPN CA management
- MSI installer
Important notices
BF-CBC cipher is no longer the default
Cipher handling for the data channel cipher has been significantly changed between OpenVPN 2.3/2.4 and v2.5, most notably there are no «default cipher BF-CBC» anymore because it is no longer considered a reasonable default. BF-CBC is still available, but it needs to be explicitly configured now.
For connections between OpenVPN 2.4 and v2.5 clients and servers, both ends will be able to negotiate a better cipher than BF-CBC. By default they will select one of the AES-GCM ciphers, but this can be influenced using the —data-ciphers setting.
Connections between OpenVPN 2.3 and v2.5 that have no —cipher setting in the config (= defaulting to BF-CBC and not being negotiation-capable) must be updated. Unless BF-CBC is included in —data-ciphers or there is a «—cipher BF-CBC» in the OpenVPN 2.5 config, a v2.5 client or server will refuse to talk to a v2.3 server or client, because it has no common data channel cipher and negotiating a cipher is not possible. Generally, we recommend upgrading such setups to OpenVPN 2.4 or v2.5. If upgrading is not possible we recommend adding data-ciphers AES-256-GCM:AES-128-GCM:AES-128-CBC (for v2.5+) or cipher AES-128-CBC (v2.4.x and older) to the configuration of all clients and servers.
If you really need to use an unsupported OpenVPN 2.3 (or even older) release and need to stay on BF-CBC (not recommended), the OpenVPN 2.5 based client will need a config file change to re-enable BF-CBC. But be warned that BF-CBC and other related weak ciphers will be removed in coming OpenVPN major releases.
Connectivity to some VPN service provider may break
Connecting with an OpenVPN 2.5 client to at least one commercial VPN service that
implemented their own cipher negotiation method that always reports back that it is using BF-CBC to the client is broken in v2.5. This has always caused warning about mismatch ciphers. We have been in contact with some service providers and they are looking into it. This is not something the OpenVPN community can fix. If your commercial VPN does not work with a v2.5 client, complain to the VPN service provider.
More details on these new features as well as a list of deprecated features and user-visible changes are available in Changes.rst.
The OpenVPN community project team is proud to release OpenVPN 2.5.2. It fixes two related security vulnerabilities (CVE-2020-15078) which under very specific circumstances allow tricking a server using delayed authentication (plugin or management) into returning a PUSH_REPLY before the AUTH_FAILED message, which can possibly be used to gather information about a VPN setup. In combination with «—auth-gen-token» or a user-specific token auth solution it can be possible to get access to a VPN with an otherwise-invalid account. OpenVPN 2.5.2 also includes other bug fixes and improvements. Updated OpenSSL and OpenVPN GUI are included in Windows installers.
Source tarball (gzip) |
GnuPG Signature | openvpn-2.5.2.tar.gz |
Source tarball (xz) |
GnuPG Signature | openvpn-2.5.2.tar.xz |
Source zip |
GnuPG Signature | openvpn-2.5.2.zip |
Windows 32-bit MSI installer |
GnuPG Signature | OpenVPN-2.5.2-I601-x86.msi |
Windows 64-bit MSI installer |
GnuPG Signature | OpenVPN-2.5.2-I601-amd64.msi |
Overview of changes since OpenVPN 2.4
Faster connections
- Connections setup is now much faster
Crypto specific changes
- ChaCha20-Poly1305 cipher in the OpenVPN data channel (Requires OpenSSL 1.1.0 or newer)
- Improved TLS 1.3 support when using OpenSSL 1.1.1 or newer
- Client-specific tls-crypt keys (—tls-crypt-v2)
- Improved Data channel cipher negotiation
- Removal of BF-CBC support in default configuration (see below for possible incompatibilities)
Server-side improvements
- HMAC based auth-token support for seamless reconnects to standalone servers or a group of servers.
- Asynchronous (deferred) authentication support for auth-pam plugin
- Asynchronous (deferred) support for client-connect scripts and plugins
Network-related changes
- Support IPv4 configs with /31 netmasks now
- 802.1q VLAN support on TAP servers
- IPv6-only tunnels
- New option —block-ipv6 to reject all IPv6 packets (ICMPv6)
Linux-specific features
- VRF support
- Netlink integration (OpenVPN no longer needs to execute ifconfig/route or ip commands)
Windows-specific features
- Wintun driver support, a faster alternative to tap-windows6
- Setting tun/tap interface MTU
- Setting DHCP search domain
- Allow unicode search string in —cryptoapicert option
- EasyRSA3, a modern take on OpenVPN CA management
- MSI installer
Important notices
BF-CBC cipher is no longer the default
Cipher handling for the data channel cipher has been significantly changed between OpenVPN 2.3/2.4 and v2.5, most notably there are no «default cipher BF-CBC» anymore because it is no longer considered a reasonable default. BF-CBC is still available, but it needs to be explicitly configured now.
For connections between OpenVPN 2.4 and v2.5 clients and servers, both ends will be able to negotiate a better cipher than BF-CBC. By default they will select one of the AES-GCM ciphers, but this can be influenced using the —data-ciphers setting.
Connections between OpenVPN 2.3 and v2.5 that have no —cipher setting in the config (= defaulting to BF-CBC and not being negotiation-capable) must be updated. Unless BF-CBC is included in —data-ciphers or there is a «—cipher BF-CBC» in the OpenVPN 2.5 config, a v2.5 client or server will refuse to talk to a v2.3 server or client, because it has no common data channel cipher and negotiating a cipher is not possible. Generally, we recommend upgrading such setups to OpenVPN 2.4 or v2.5. If upgrading is not possible we recommend adding data-ciphers AES-256-GCM:AES-128-GCM:AES-128-CBC (for v2.5+) or cipher AES-128-CBC (v2.4.x and older) to the configuration of all clients and servers.
If you really need to use an unsupported OpenVPN 2.3 (or even older) release and need to stay on BF-CBC (not recommended), the OpenVPN 2.5 based client will need a config file change to re-enable BF-CBC. But be warned that BF-CBC and other related weak ciphers will be removed in coming OpenVPN major releases.
Connectivity to some VPN service provider may break
Connecting with an OpenVPN 2.5 client to at least one commercial VPN service that
implemented their own cipher negotiation method that always reports back that it is using BF-CBC to the client is broken in v2.5. This has always caused warning about mismatch ciphers. We have been in contact with some service providers and they are looking into it. This is not something the OpenVPN community can fix. If your commercial VPN does not work with a v2.5 client, complain to the VPN service provider.
More details on these new features as well as a list of deprecated features and user-visible changes are available in Changes.rst.
The OpenVPN community project team is proud to release OpenVPN 2.5.1. It includes several bug fixes and improvements as well as updated OpenSSL and OpenVPN GUI for Windows.
Source tarball (gzip) |
GnuPG Signature | openvpn-2.5.1.tar.gz |
Source tarball (xz) |
GnuPG Signature | openvpn-2.5.1.tar.xz |
Source zip |
GnuPG Signature | openvpn-2.5.1.zip |
Windows 32-bit MSI installer |
GnuPG Signature | OpenVPN-2.5.1-I601-x86.msi |
Windows 64-bit MSI installer |
GnuPG Signature | OpenVPN-2.5.1-I601-amd64.msi |
Overview of changes since OpenVPN 2.4
Faster connections
- Connections setup is now much faster
Crypto specific changes
- ChaCha20-Poly1305 cipher in the OpenVPN data channel (Requires OpenSSL 1.1.0 or newer)
- Improved TLS 1.3 support when using OpenSSL 1.1.1 or newer
- Client-specific tls-crypt keys (—tls-crypt-v2)
- Improved Data channel cipher negotiation
- Removal of BF-CBC support in default configuration (see below for possible incompatibilities)
Server-side improvements
- HMAC based auth-token support for seamless reconnects to standalone servers or a group of servers.
- Asynchronous (deferred) authentication support for auth-pam plugin
- Asynchronous (deferred) support for client-connect scripts and plugins
Network-related changes
- Support IPv4 configs with /31 netmasks now
- 802.1q VLAN support on TAP servers
- IPv6-only tunnels
- New option —block-ipv6 to reject all IPv6 packets (ICMPv6)
Linux-specific features
- VRF support
- Netlink integration (OpenVPN no longer needs to execute ifconfig/route or ip commands)
Windows-specific features
- Wintun driver support, a faster alternative to tap-windows6
- Setting tun/tap interface MTU
- Setting DHCP search domain
- Allow unicode search string in —cryptoapicert option
- EasyRSA3, a modern take on OpenVPN CA management
- MSI installer
Important notices
BF-CBC cipher is no longer the default
Cipher handling for the data channel cipher has been significantly changed between OpenVPN 2.3/2.4 and v2.5, most notably there are no «default cipher BF-CBC» anymore because it is no longer considered a reasonable default. BF-CBC is still available, but it needs to be explicitly configured now.
For connections between OpenVPN 2.4 and v2.5 clients and servers, both ends will be able to negotiate a better cipher than BF-CBC. By default they will select one of the AES-GCM ciphers, but this can be influenced using the —data-ciphers setting.
Connections between OpenVPN 2.3 and v2.5 that have no —cipher setting in the config (= defaulting to BF-CBC and not being negotiation-capable) must be updated. Unless BF-CBC is included in —data-ciphers or there is a «—cipher BF-CBC» in the OpenVPN 2.5 config, a v2.5 client or server will refuse to talk to a v2.3 server or client, because it has no common data channel cipher and negotiating a cipher is not possible. Generally, we recommend upgrading such setups to OpenVPN 2.4 or v2.5. If upgrading is not possible we recommend adding data-ciphers AES-256-GCM:AES-128-GCM:AES-128-CBC (for v2.5+) or cipher AES-128-CBC (v2.4.x and older) to the configuration of all clients and servers.
If you really need to use an unsupported OpenVPN 2.3 (or even older) release and need to stay on BF-CBC (not recommended), the OpenVPN 2.5 based client will need a config file change to re-enable BF-CBC. But be warned that BF-CBC and other related weak ciphers will be removed in coming OpenVPN major releases.
Connectivity to some VPN service provider may break
Connecting with an OpenVPN 2.5 client to at least one commercial VPN service that
implemented their own cipher negotiation method that always reports back that it is using BF-CBC to the client is broken in v2.5. This has always caused warning about mismatch ciphers. We have been in contact with some service providers and they are looking into it. This is not something the OpenVPN community can fix. If your commercial VPN does not work with a v2.5 client, complain to the VPN service provider.
More details on these new features as well as a list of deprecated features and user-visible changes are available in Changes.rst.
The OpenVPN community project team is proud to release OpenVPN 2.5.0 which is a new major release with many new features.
Source tarball (gzip) |
GnuPG Signature | openvpn-2.5.0.tar.gz |
Source tarball (xz) |
GnuPG Signature | openvpn-2.5.0.tar.xz |
Source zip |
GnuPG Signature | openvpn-2.5.0.zip |
Windows 32-bit MSI installer |
GnuPG Signature | OpenVPN-2.5.0-I601-x86.msi |
Windows 64-bit MSI installer |
GnuPG Signature | OpenVPN-2.5.0-I601-amd64.msi |
Overview of changes since OpenVPN 2.4
Faster connections
- Connections setup is now much faster
Crypto specific changes
- ChaCha20-Poly1305 cipher in the OpenVPN data channel (Requires OpenSSL 1.1.0 or newer)
- Improved TLS 1.3 support when using OpenSSL 1.1.1 or newer
- Client-specific tls-crypt keys (—tls-crypt-v2)
- Improved Data channel cipher negotiation
- Removal of BF-CBC support in default configuration (see below for possible incompatibilities)
Server-side improvements
- HMAC based auth-token support for seamless reconnects to standalone servers or a group of servers.
- Asynchronous (deferred) authentication support for auth-pam plugin
- Asynchronous (deferred) support for client-connect scripts and plugins
Network-related changes
- Support IPv4 configs with /31 netmasks now
- 802.1q VLAN support on TAP servers
- IPv6-only tunnels
- New option —block-ipv6 to reject all IPv6 packets (ICMPv6)
Linux-specific features
- VRF support
- Netlink integration (OpenVPN no longer needs to execute ifconfig/route or ip commands)
Windows-specific features
- Wintun driver support, a faster alternative to tap-windows6
- Setting tun/tap interface MTU
- Setting DHCP search domain
- Allow unicode search string in —cryptoapicert option
- EasyRSA3, a modern take on OpenVPN CA management
- MSI installer
Important notices
BF-CBC cipher is no longer the default
Cipher handling for the data channel cipher has been significantly changed between OpenVPN 2.3/2.4 and v2.5, most notably there are no «default cipher BF-CBC» anymore because it is no longer considered a reasonable default. BF-CBC is still available, but it needs to be explicitly configured now.
For connections between OpenVPN 2.4 and v2.5 clients and servers, both ends will be able to negotiate a better cipher than BF-CBC. By default they will select one of the AES-GCM ciphers, but this can be influenced using the —data-ciphers setting.
Connections between OpenVPN 2.3 and v2.5 that have no —cipher setting in the config (= defaulting to BF-CBC and not being negotiation-capable) must be updated. Unless BF-CBC is included in —data-ciphers or there is a «—cipher BF-CBC» in the OpenVPN 2.5 config, a v2.5 client or server will refuse to talk to a v2.3 server or client, because it has no common data channel cipher and negotiating a cipher is not possible. Generally, we recommend upgrading such setups to OpenVPN 2.4 or v2.5. If upgrading is not possible we recommend adding data-ciphers AES-256-GCM:AES-128-GCM:AES-128-CBC (for v2.5+) or cipher AES-128-CBC (v2.4.x and older) to the configuration of all clients and servers.
If you really need to use an unsupported OpenVPN 2.3 (or even older) release and need to stay on BF-CBC (not recommended), the OpenVPN 2.5 based client will need a config file change to re-enable BF-CBC. But be warned that BF-CBC and other related weak ciphers will be removed in coming OpenVPN major releases.
Connectivity to some VPN service provider may break
Connecting with an OpenVPN 2.5 client to at least one commercial VPN service that
implemented their own cipher negotiation method that always reports back that it is using BF-CBC to the client is broken in v2.5. This has always caused warning about mismatch ciphers. We have been in contact with some service providers and they are looking into it. This is not something the OpenVPN community can fix. If your commercial VPN does not work with a v2.5 client, complain to the VPN service provider.
More details on these new features as well as a list of deprecated features and user-visible changes are available in Changes.rst.
The OpenVPN community project team is proud to release OpenVPN 2.4.11. It fixes two related security vulnerabilities (CVE-2020-15078) which under very specific circumstances allow tricking a server using delayed authentication (plugin or management) into returning a PUSH_REPLY before the AUTH_FAILED message, which can possibly be used to gather information about a VPN setup. This release also includes other bug fixes and improvements. The I602 Windows installers fix a possible security issue with OpenSSL config autoloading on Windows (CVE-2021-3606). Updated OpenSSL and OpenVPN GUI are included in Windows installers.
Source Tarball (gzip) |
GnuPG Signature | openvpn-2.4.11.tar.gz |
Source Tarball (xz) |
GnuPG Signature | openvpn-2.4.11.tar.xz |
Source Zip |
GnuPG Signature | openvpn-2.4.11.zip |
Windows 7/8/8.1/Server 2012r2 installer (NSIS) |
GnuPG Signature | openvpn-install-2.4.11-I602-Win7.exe |
Windows 10/Server 2016/Server 2019 installer (NSIS) |
GnuPG Signature | openvpn-install-2.4.11-I602-Win10.exe |
A summary of the changes is available in Changes.rst, and a full list of changes is available here.
Please note that LibreSSL is not a supported crypto backend. We accept patches and we do test on OpenBSD 6.0 which comes with LibreSSL, but if newer versions of LibreSSL break API compatibility we do not take responsibility to fix that.
Also note that Windows installers have been built with NSIS version that has been patched against several NSIS installer code execution and privilege escalation problems. Based on our testing, though, older Windows versions such as Windows 7 might not benefit from these fixes. We thus strongly encourage you to always move NSIS installers to a non-user-writeable location before running them.
Please note that OpenVPN 2.4 installers will not work on Windows XP. The last OpenVPN version that supports Windows XP is 2.3.18, which is downloadable as 32-bit and 64-bit versions.
If you find a bug in this release, please file a bug report to our Trac bug tracker. In uncertain cases please contact our developers first, either using the openvpn-devel mailinglist or the developer IRC channel (#openvpn-devel at irc.libera.chat). For generic help take a look at our official documentation, wiki, forums, openvpn-users mailing list and user IRC channel (#openvpn at irc.libera.chat).
Important: you will need to use the correct installer for your operating system. The Windows 10 installer works on Windows 10 and Windows Server 2016/2019. The Windows 7 installer will work on Windows 7/8/8.1/Server 2012r2. This is because of Microsoft’s driver signing requirements are different for kernel-mode devices drivers, which in our case affects OpenVPN’s tap driver (tap-windows6).
This is primarily a maintenance release with bugfixes and small improvements. Windows installers include the latest OpenSSL version (1.1.1i) which includes security fixes.
A summary of the changes is available in Changes.rst, and a full list of changes is available here.
Please note that LibreSSL is not a supported crypto backend. We accept patches and we do test on OpenBSD 6.0 which comes with LibreSSL, but if newer versions of LibreSSL break API compatibility we do not take responsibility to fix that.
Also note that Windows installers have been built with NSIS version that has been patched against several NSIS installer code execution and privilege escalation problems. Based on our testing, though, older Windows versions such as Windows 7 might not benefit from these fixes. We thus strongly encourage you to always move NSIS installers to a non-user-writeable location before running them.
Please note that OpenVPN 2.4 installers will not work on Windows XP. The last OpenVPN version that supports Windows XP is 2.3.18, which is downloadable as 32-bit and 64-bit versions.
If you find a bug in this release, please file a bug report to our Trac bug tracker. In uncertain cases please contact our developers first, either using the openvpn-devel mailinglist or the developer IRC channel (#openvpn-devel at irc.libera.chat). For generic help take a look at our official documentation, wiki, forums, openvpn-users mailing list and user IRC channel (#openvpn at irc.libera.chat).
Important: you will need to use the correct installer for your operating system. The Windows 10 installer works on Windows 10 and Windows Server 2016/2019. The Windows 7 installer will work on Windows 7/8/8.1/Server 2012r2. This is because of Microsoft’s driver signing requirements are different for kernel-mode devices drivers, which in our case affects OpenVPN’s tap driver (tap-windows6).
Source Tarball (gzip) |
GnuPG Signature | openvpn-2.4.10.tar.gz |
Source Tarball (xz) |
GnuPG Signature | openvpn-2.4.10.tar.xz |
Source Zip |
GnuPG Signature | openvpn-2.4.10.zip |
Windows 7/8/8.1/Server 2012r2 installer (NSIS) |
GnuPG Signature | openvpn-install-2.4.10-I601-Win7.exe |
Windows 10/Server 2016/Server 2019 installer (NSIS) |
GnuPG Signature | openvpn-install-2.4.10-I601-Win10.exe |
Instructions for verifying the signatures are available here.
This release is also available in our own software repositories for Debian and Ubuntu, Supported architectures are i386 and amd64. For details. look here.
The Windows installers are bundled with OpenVPN-GUI — its source code is available on its project page and as tarballs on our alternative download server.
This is primarily a maintenance release with bugfixes and improvements. This release also fixes a security issue (CVE-2020-11810, trac #1272) which allows disrupting service of a freshly connected client that has not yet not negotiated session keys. The vulnerability cannot be used to inject or steal VPN traffic.
A summary of the changes is available in Changes.rst, and a full list of changes is available here.
Please note that LibreSSL is not a supported crypto backend. We accept patches and we do test on OpenBSD 6.0 which comes with LibreSSL, but if newer versions of LibreSSL break API compatibility we do not take responsibility to fix that.
Also note that Windows installers have been built with NSIS version that has been patched against several NSIS installer code execution and privilege escalation problems. Based on our testing, though, older Windows versions such as Windows 7 might not benefit from these fixes. We thus strongly encourage you to always move NSIS installers to a non-user-writeable location before running them. We are moving to MSI installers in OpenVPN 2.5, but OpenVPN 2.4.x will remain NSIS-only.
Compared to OpenVPN 2.3 this is a major update with a large number of new features, improvements and fixes. Some of the major features are AEAD (GCM) cipher and Elliptic Curve DH key exchange support, improved IPv4/IPv6 dual stack support and more seamless connection migration when client’s IP address changes (Peer-ID). Also, the new —tls-crypt feature can be used to increase users’ connection privacy.
OpenVPN GUI bundled with the Windows installer has a large number of new features compared to the one bundled with OpenVPN 2.3. One of major features is the ability to run OpenVPN GUI without administrator privileges. For full details, see the changelog. The new OpenVPN GUI features are documented here.
Please note that OpenVPN 2.4 installers will not work on Windows XP. The last OpenVPN version that supports Windows XP is 2.3.18, which is downloadable as 32-bit and 64-bit versions.
If you find a bug in this release, please file a bug report to our Trac bug tracker. In uncertain cases please contact our developers first, either using the openvpn-devel mailinglist or the developer IRC channel (#openvpn-devel at irc.libera.chat). For generic help take a look at our official documentation, wiki, forums, openvpn-users mailing list and user IRC channel (#openvpn at irc.libera.chat).
Important: you will need to use the correct installer for your operating system. The Windows 10 installer works on Windows 10 and Windows Server 2016/2019. The Windows 7 installer will work on Windows 7/8/8.1/Server 2012r2. This is because of Microsoft’s driver signing requirements are different for kernel-mode devices drivers, which in our case affects OpenVPN’s tap driver (tap-windows6).
Source Tarball (gzip) |
GnuPG Signature | openvpn-2.4.9.tar.gz |
Source Tarball (xz) |
GnuPG Signature | openvpn-2.4.9.tar.xz |
Source Zip |
GnuPG Signature | openvpn-2.4.9.zip |
Windows 7/8/8.1/Server 2012r2 installer (NSIS) |
GnuPG Signature | openvpn-install-2.4.9-I601-Win7.exe |
Windows 10/Server 2016/Server 2019 installer (NSIS) |
GnuPG Signature | openvpn-install-2.4.9-I601-Win10.exe |
NOTE: the GPG key used to sign the release files has been changed since OpenVPN 2.4.0. Instructions for verifying the signatures, as well as the new GPG public key are available here.
We also provide static URLs pointing to latest releases to ease automation. For a list of files look here.
This release is also available in our own software repositories for Debian and Ubuntu, Supported architectures are i386 and amd64. For details. look here.
You can use EasyRSA 2 or EasyRSA 3 for generating your own certificate authority. The former is bundled with Windows installers. The latter is a more modern alternative for UNIX-like operating systems.
The Windows installers are bundled with OpenVPN-GUI — its source code is available on its project page and as tarballs on our alternative download server.
This is primarily a maintenance release with bugfixes and improvements. The Windows installers (I601) have several improvements compared to the previous release:
- New tap-windows6 driver (9.24.2) which fixes some suspend and resume issues
- Latest OpenVPN-GUI
- Considerable performance boost due to new compiler optimization flags
A summary of the changes is available in Changes.rst, and a full list of changes is available here.
Please note that LibreSSL is not a supported crypto backend. We accept patches and we do test on OpenBSD 6.0 which comes with LibreSSL, but if newer versions of LibreSSL break API compatibility we do not take responsibility to fix that.
Also note that Windows installers have been built with NSIS version that has been patched against several NSIS installer code execution and privilege escalation problems. Based on our testing, though, older Windows versions such as Windows 7 might not benefit from these fixes. We thus strongly encourage you to always move NSIS installers to a non-user-writeable location before running them. We are moving to MSI installers in OpenVPN 2.5, but OpenVPN 2.4.x will remain NSIS-only.
Compared to OpenVPN 2.3 this is a major update with a large number of new features, improvements and fixes. Some of the major features are AEAD (GCM) cipher and Elliptic Curve DH key exchange support, improved IPv4/IPv6 dual stack support and more seamless connection migration when client’s IP address changes (Peer-ID). Also, the new —tls-crypt feature can be used to increase users’ connection privacy.
OpenVPN GUI bundled with the Windows installer has a large number of new features compared to the one bundled with OpenVPN 2.3. One of major features is the ability to run OpenVPN GUI without administrator privileges. For full details, see the changelog. The new OpenVPN GUI features are documented here.
Please note that OpenVPN 2.4 installers will not work on Windows XP. The last OpenVPN version that supports Windows XP is 2.3.18, which is downloadable as 32-bit and 64-bit versions.
If you find a bug in this release, please file a bug report to our Trac bug tracker. In uncertain cases please contact our developers first, either using the openvpn-devel mailinglist or the developer IRC channel (#openvpn-devel at irc.libera.chat). For generic help take a look at our official documentation, wiki, forums, openvpn-users mailing list and user IRC channel (#openvpn at irc.libera.chat).
Important: you will need to use the correct installer for your operating system. The Windows 10 installer works on Windows 10 and Windows Server 2016/2019. The Windows 7 installer will work on Windows 7/8/8.1/Server 2012r2. This is because of Microsoft’s driver signing requirements are different for kernel-mode devices drivers, which in our case affects OpenVPN’s tap driver (tap-windows6).
Source Tarball (gzip) |
GnuPG Signature | openvpn-2.4.8.tar.gz |
Source Tarball (xz) |
GnuPG Signature | openvpn-2.4.8.tar.xz |
Source Zip |
GnuPG Signature | openvpn-2.4.8.zip |
Windows 7/8/8.1/Server 2012r2 installer (NSIS) |
GnuPG Signature | openvpn-install-2.4.8-I602-Win7.exe |
Windows 10/Server 2016/Server 2019 installer (NSIS) |
GnuPG Signature | openvpn-install-2.4.8-I602-Win10.exe |
NOTE: the GPG key used to sign the release files has been changed since OpenVPN 2.4.0. Instructions for verifying the signatures, as well as the new GPG public key are available here.
We also provide static URLs pointing to latest releases to ease automation. For a list of files look here.
This release is also available in our own software repositories for Debian and Ubuntu, Supported architectures are i386 and amd64. For details. look here.
You can use EasyRSA 2 or EasyRSA 3 for generating your own certificate authority. The former is bundled with Windows installers. The latter is a more modern alternative for UNIX-like operating systems.
The Windows installers are bundled with OpenVPN-GUI — its source code is available on its project page and as tarballs on our alternative download server.
This is primarily a maintenance release with bugfixes and improvements. One of the big things is enhanced TLS 1.3 support. A summary of the changes is available in Changes.rst, and a full list of changes is available here.
Please note that LibreSSL is not a supported crypto backend. We accept patches and we do test on OpenBSD 6.0 which comes with LibreSSL, but if newer versions of LibreSSL break API compatibility we do not take responsibility to fix that.
Also note that Windows installers have been built with NSIS version that has been patched against several NSIS installer code execution and privilege escalation problems. Based on our testing, though, older Windows versions such as Windows 7 might not benefit from these fixes. We thus strongly encourage you to always move NSIS installers to a non-user-writeable location before running them. We are moving to MSI installers in OpenVPN 2.5, but OpenVPN 2.4.x will remain NSIS-only.
Compared to OpenVPN 2.3 this is a major update with a large number of new features, improvements and fixes. Some of the major features are AEAD (GCM) cipher and Elliptic Curve DH key exchange support, improved IPv4/IPv6 dual stack support and more seamless connection migration when client’s IP address changes (Peer-ID). Also, the new —tls-crypt feature can be used to increase users’ connection privacy.
OpenVPN GUI bundled with the Windows installer has a large number of new features compared to the one bundled with OpenVPN 2.3. One of major features is the ability to run OpenVPN GUI without administrator privileges. For full details, see the changelog. The new OpenVPN GUI features are documented here.
Please note that OpenVPN 2.4 installers will not work on Windows XP. The last OpenVPN version that supports Windows XP is 2.3.18, which is downloadable as 32-bit and 64-bit versions.
If you find a bug in this release, please file a bug report to our Trac bug tracker. In uncertain cases please contact our developers first, either using the openvpn-devel mailinglist or the developer IRC channel (#openvpn-devel at irc.libera.chat). For generic help take a look at our official documentation, wiki, forums, openvpn-users mailing list and user IRC channel (#openvpn at irc.libera.chat).
Important: you will need to use the correct installer for your operating system. The Windows 10 installer will not work on Windows 7/8/8.1/Server 2012r2. This is because Microsoft’s driver signing requirements and tap-windows6. For the same reason you need to use an older installer with Windows Server 2016. This older installer has a local privilege escalation vulnerability issue which we cannot resolve for Windows Server 2016 until tap-windows6 passes the HLK test suite on that platform. In the meanwhile we recommend Windows Server 2016 users to avoid installing OpenVPN/tap-windows6 driver on hosts where all users can’t be trusted. Users of Windows 7-10 and Server 2012r2 are recommended to update to latest installers as soon as possible.
Source Tarball (gzip) |
GnuPG Signature | openvpn-2.4.7.tar.gz |
Source Tarball (xz) |
GnuPG Signature | openvpn-2.4.7.tar.xz |
Source Zip |
GnuPG Signature | openvpn-2.4.7.zip |
Windows 7/8/8.1/Server 2012r2 installer (NSIS) |
GnuPG Signature | openvpn-install-2.4.7-I607-Win7.exe |
Windows 10 installer (NSIS) |
GnuPG Signature | openvpn-install-2.4.7-I607-Win10.exe |
Windows Server 2016 installer (NSIS) |
GnuPG Signature | openvpn-install-2.4.7-I603.exe |
NOTE: the GPG key used to sign the release files has been changed since OpenVPN 2.4.0. Instructions for verifying the signatures, as well as the new GPG public key are available here.
We also provide static URLs pointing to latest releases to ease automation. For a list of files look here.
This release is also available in our own software repositories for Debian and Ubuntu, Supported architectures are i386 and amd64. For details. look here.
You can use EasyRSA 2 or EasyRSA 3 for generating your own certificate authority. The former is bundled with Windows installers. The latter is a more modern alternative for UNIX-like operating systems.
The Windows installers are bundled with OpenVPN-GUI — its source code is available on its project page and as tarballs on our alternative download server.
This is primarily a maintenance release with minor bugfixes and improvements, and one security relevant fix for the Windows Interactive Service. Windows installer includes updated OpenVPN GUI and OpenSSL. Installer I601 included tap-windows6 driver 9.22.1 which had one security fix and dropped Windows Vista support. However, in installer I602 we had to revert back to tap-windows 9.21.2 due to driver getting reject on freshly installed Windows 10 rev 1607 and later when Secure Boot was enabled. The failure was due to the new, more strict driver signing requirements. The 9.22.1 version of the driver is in the process of getting approved and signed by Microsoft and will be bundled in an upcoming Windows installer.
Please note that LibreSSL is not a supported crypto backend. We accept patches and we do test on OpenBSD 6.0 which comes with LibreSSL, but if newer versions of LibreSSL break API compatibility we do not take responsibility to fix that.
Also note that Windows installers have been built with NSIS version that has been patched against several NSIS installer code execution and privilege escalation problems. Based on our testing, though, older Windows versions such as Windows 7 might not benefit from these fixes. We thus strongly encourage you to always move NSIS installers to a non-user-writeable location before running them. Our long-term plan is to migrate to using MSI installers instead.
Compared to OpenVPN 2.3 this is a major update with a large number of new features, improvements and fixes. Some of the major features are AEAD (GCM) cipher and Elliptic Curve DH key exchange support, improved IPv4/IPv6 dual stack support and more seamless connection migration when client’s IP address changes (Peer-ID). Also, the new —tls-crypt feature can be used to increase users’ connection privacy.
A summary of the changes is available in Changes.rst, and a full list of changes is available here.
OpenVPN GUI bundled with the Windows installer has a large number of new features compared to the one bundled with OpenVPN 2.3. One of major features is the ability to run OpenVPN GUI without administrator privileges. For full details, see the changelog. The new OpenVPN GUI features are documented here.
Please note that OpenVPN 2.4 installers will not work on Windows XP.
If you find a bug in this release, please file a bug report to our Trac bug tracker. In uncertain cases please contact our developers first, either using the openvpn-devel mailinglist or the developha er IRC channel (#openvpn-devel at irc.libera.chat). For generic help take a look at our official documentation, wiki, forums, openvpn-users mailing list and user IRC channel (#openvpn at irc.libera.chat).
Source Tarball (gzip) |
GnuPG Signature | openvpn-2.4.6.tar.gz |
Source Tarball (xz) |
GnuPG Signature | openvpn-2.4.6.tar.xz |
Source Zip |
GnuPG Signature | openvpn-2.4.6.zip |
Windows installer (NSIS) |
GnuPG Signature | openvpn-install-2.4.6-I602.exe |
NOTE: the GPG key used to sign the release files has been changed since OpenVPN 2.4.0. Instructions for verifying the signatures, as well as the new GPG public key are available here.
We also provide static URLs pointing to latest releases to ease automation. For a list of files look here.
This release is also available in our own software repositories for Debian and Ubuntu, Supported architectures are i386 and amd64. For details. look here.
You can use EasyRSA 2 or EasyRSA 3 for generating your own certificate authority. The former is bundled with Windows installers. The latter is a more modern alternative for UNIX-like operating systems.
The Windows installers are bundled with OpenVPN-GUI — its source code is available on its project page and as tarballs on our alternative download server.
You can download Windows developments snapshots (MSI installers) from here (Index of /downloads/snapshots/github-actions/openvpn2/ ). Those are automatically built from commits to OpenVPN master branch and include functionality which will be available in the next release. Development snapshots are less stable than releases, so use at your own risk.
Ниже мы детально разберем все, что касается серверных настроек на Win Server2008 и Server2012, а также покажем, как сделать подключения юзеров к созданной сети.
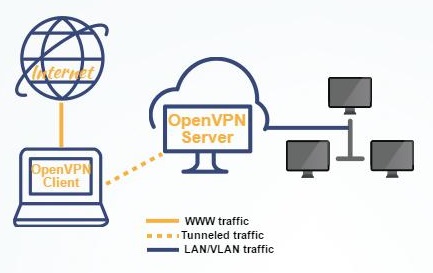
OpenVPN – это представление открытой (от англ. «open» — «открыть») частной виртуальной сети (от англ. «Virtual Private Network»). Данная технология помогает создавать виртуальные подключения групп клиентов к расположенных на расстоянии машинам посредством передачи данных по открытому каналу, то есть интернету.
При помощи OpenVPN возможно безопасно удалить или отключить заданные сетевые подключения к серверу, не задействуя прямые доступы через интернет. А благодаря шифрованию OpenSSL соединению будет обеспечен повышенный уровень безопасности.
Принципы работы

Произведенная настройка позволит серверу взаимодействовать с внешним защищенным шифрованием SSL и создавать безопасное подключение к виртуальной сетевой машине (tun/tap). При этом не нужно будет волноваться об обработке трафика, поступающего от внешнего адаптера и аналогичных интерфейсов. Для серверных машин можно будет создать общий доступ к одному из указанных серверных адаптеров.
Дополнительно будет рассказываться о туннелировании входящих/исходящих от юзеров данных. Подобная переадресация позволит хосту, который обрабатывает подключения к виртуальной сети, осуществить передачу данных от своего лица и одновременно выступить в качестве прокси, чтобы привести к единому виду всю интернет-активность пользователя.

Способы установки виртуальной сети
Для начала нужно зайти на официальный сайт и скачать последнюю версию OpenVPN, которая подойдет под требования ОС. Двумя кликами запустить инсталлятор.
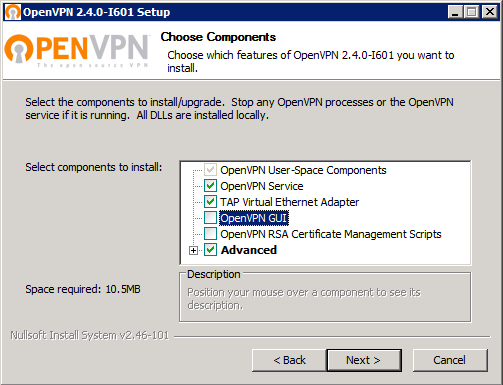
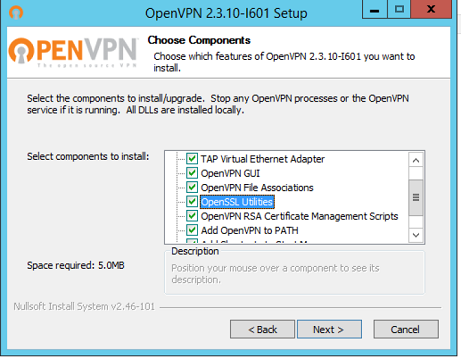
Когда откроется окно установок, на третьем этапе необходимо отметить галочками все предлагаемые компоненты.

Когда всплывает вопрос о сетевом адаптере TAP, следует разрешить его установку.
Стандартно OpenVPN загружается в папку с программными файлами, расположенную на диске C. Поэтому в ходе инструкции мы будем ссылаться к папке «C:Program FilesOpenVPN». Вы хотите изменить месторасположение файлов? Тогда учитывайте этот нюанс в дальнейшем.
Как сгенерировать ключи и выполнить их шифрование, алгоритм Diffie-Hellman
Для каждой пары ключей существуют свои собственные сертификаты, обеспечивающие безопасность передачи информации. Управлять ими можно специальным приложением Easy-rsa, которое запускается и работает в командной строке, аналогично консоли Линукс. Консоль открывается через нажатие клавиш Win + R и ввода в появившемся окне слова cmd.
Как работать с конфигурационным файлом
Загрузив соответствующий конфигурационный файл, нужно внести его вместо одноименного файла/скрипта, найти который можно в папке OpenVPNeasy-rsa. Директория располагается на диске C в Program Files. Или укажите тот путь, куда вы запланировали установку виртуальной частной сети.
В папке необходимо найти конфигурационный файл openssl-1.0.0.conf, его значения должны соответствовать вашим данным:
countryName_default
stateOrProvinceName_default
localityName_default
0.organizationName_default
emailAddress_default
Важный нюанс: в значении данных могут содержаться пробелы, такие переменные стоит обособить кавычками.
Как генерировать ключи в Центре Сертификации
1. Для начала следует переименовать два файла при помощи командной строки:
cd cd "C:Program FilesOpenVPNeasy-rsa" ren index.txt.start index.txt ren serial.start serial
2. Затем, чтобы создать новый ключ/сертификат, понадобится запуск скрипта:
.build-ca.bat
В окне будут возникать различные предложения, большинство из них можно подтверждать кнопкой Enter. А для поля KEY_CN (Common Name) следует ввести оригинальное название и его же продублировать для поля name.
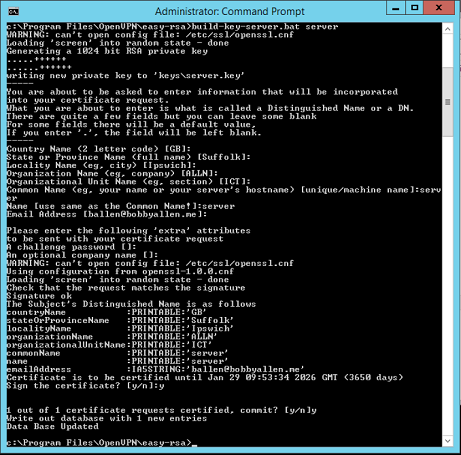
3. Так же генерируются сертификаты серверу. В этой строке вместе server нужно ввести оригинальное имя:
.build-key-server.bat server
4. Система начнет спрашивать, следует ли подписывать сертификаты для создаваемых ключей от имени Центра сертификации? Введите «да» — y (yes).

Как генерировать клиентский ключ и сертификат
Всем юзерам виртуальной сети понадобится генерировать свои индивидуальные SSL-сертификаты.
Можно воспользоваться специальной опцией, которая позволяет присваивать 1 сертификат сразу нескольким пользователям. Она называется «dublicate-cn» и размещается в файле server.ovpn. Однако такой ход небезопасен.
Рассмотрим, как сгенерировать сертификат клиенту client2:
cd cd "C:Program FilesOpenVPNeasy-rsa" .build-key.bat client2
Внимание: под переменной client2 подразумевается вносимое название файла. Далее следует ввести client2 в запрос строчки Common Name.
Работа с алгоритмом Диффи-Хеллмана
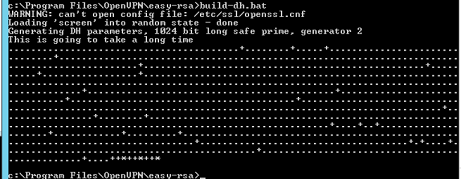
В завершение всех действий понадобится запуск шифрования, чтобы сгенерировать группу параметров по Диффи-Хеллману:
.build-dh.bat
<img width="461" height="179" src="https://serverspace.by/wp-content/uploads/2020/06/97_89_5.png" alt="OpenVPN" />
Перенос сгенерированных ключей/сертификатов
Все созданные данные располагаются в подпапке easy-rsakeys. Следующие наименования файлов следует перенести в другую подпапку — config, которая располагается в том же месте:
• dh2048.pem/dh1048.pem
• server.key
• ca.crt
• server.crt
Настройка конфигурации на сервере
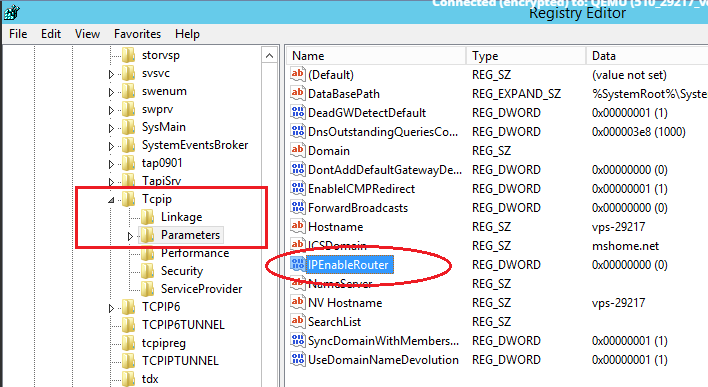
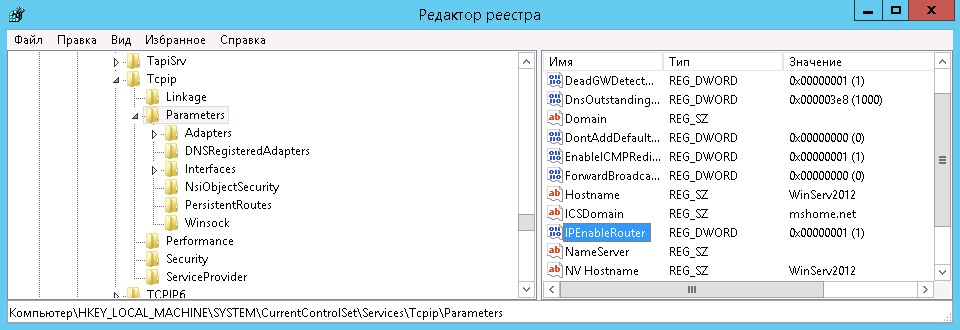
Запустите редактор реестра и отыщите в нем:
HKEY_LOCAL_MACHINESYSTEMCurrentControlSetServicesTcpipParameters.
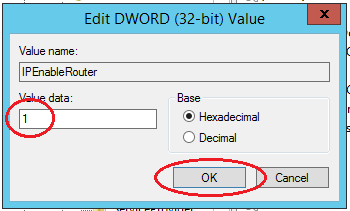
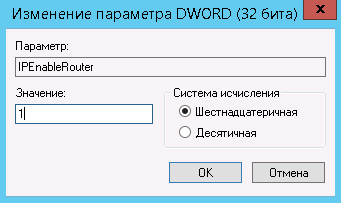
Справа вы увидите IPEnableRouter. Кликните по переменной два раза – откроется новое окошко для изменения параметров. В поле «Значение» поставьте единицу:


Настраивать сервер мы будем через конфигурационный файл server.ovpn. Перед работой его следует переместить в папку config.
Открыв его, необходимо проверить правильность построение маршрутов к перенесенным сертификатам:
port 1194
proto udp
dev tun
server 10.8.0.0 255.255.255.0
ca "C:Program FilesOpenVPNconfigca.crt"
cert "C:Program FilesOpenVPNconfigserver.crt"
key "C:Program FilesOpenVPNconfigserver.key"
dh "C:Program FilesOpenVPNconfigdh2048.pem"
push "redirect-gateway def1"
push "dhcp-option DNS 8.8.8.8"
keepalive 10 120
comp-lzo
persist-key
persist-tun
verb 3
Если нужно, то меняем пути на правильные и пересохраняем.
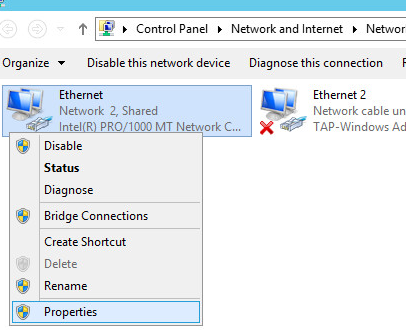
Чтобы успешно пересылать трафик от одного адаптера к другому, нужно зайти в раздел сети и интернета, который находится в панели управления ПК. В нем найти центр сетевого управления и кликнуть по предложению изменить параметры интернет адаптера.
Из нескольких предложенных вариантов надо взять тот, что отвечает за внешние подключения, то есть не TAP-тип, так как он работает с VPN-соединениями.

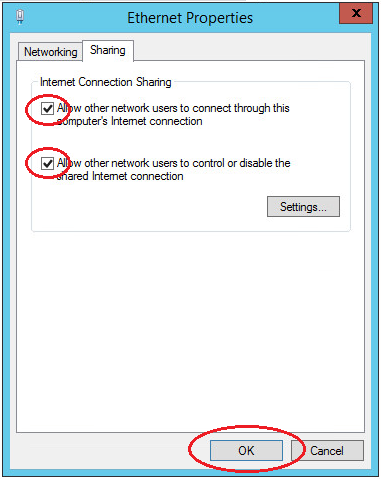
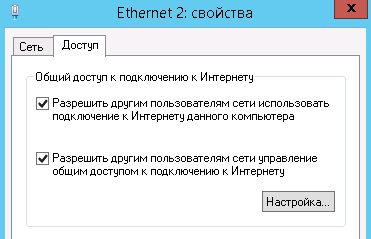
В свойствах зайдите на вкладку доступа и поставьте галочки на обоих пунктах:

Следующим шагом включается айпи-переадресация.
Зайдите в стандартный поиск ОС си введите следующее имя приложения:

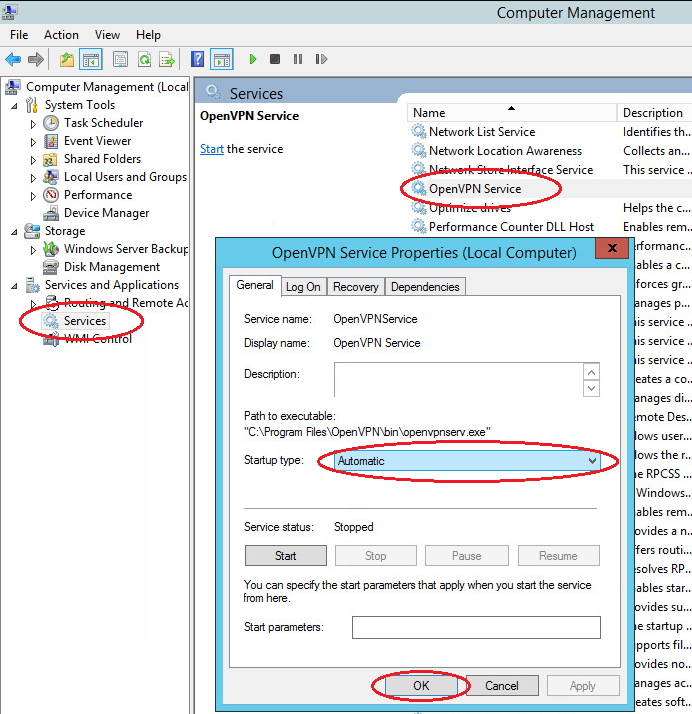
Настройка автозапуска
Чтобы служба стартовала при включении компьютера, нужно зайти в базовую папку «Службы», в открывшемся окне среди прочих программ найти OpenVPN, кликнуть по нему правой кнопкой, а в свойствах в значениях запуска выставить режим «Автоматически».
Стандартные настройки окончены. Чтобы запустить сервер и его новые настройки, надо еще раз войти в файл server.ovpn и написать в него следующую строчку:
Start OpenVPN on this config
Настройки клиентской конфигурации
Виртуальная частная сеть имеет свое клиентское приложение, которое одинаково хорошо загружается для любой существующей операционной системы за исключением Mac – к нему разработан Tunnelblick. Версии приложений функционируют одинаково, затрагивают определенные конфигурационные файлы. В зависимости от версий, могут различаться отдельные опции. Более подробная информация расписана в документации OpenVPN.
Далее мы расскажем, как подключить клиентов на ОС Виндовс, применяя те же дистрибутивы, которые до этого инсталлировались на сервере. В случае с другими операционными системами методы и шаги будут примерно такими же.
1. Для начала на ПК клиента ставится актуальная версия (желательно последняя) OpenVPN.
2. Конфигурационные файлы клиента client.ovpn вместе с сертификатами *.crt и ключами *.key, которые перед этим мы сгеренировали, необходимо поместить в подпапку config, хранящуюся в разделе OpenVPN. При этом желательно файл клиента удалить с директории сервера, чтобы не запутаться при будущих настройках.
3. При открытии client.ovpn необходимо отыскать строчку remote my-server-1 1194. Задайте ей айпи и домен работающего сервера:
remote 1194
Например:
remote 111.222.88.99 1194
4. Ниже в файле обозначен путь к каждому сертификату, меняем их на путь к скопированным версиям:
# See the server config file for more
# description. It's best to use
# a separate .crt/.key file pair
# for each client. A single ca
# file can be used for all clients.
ca "C:Program FilesOpenVPNconfigca.crt"
cert "C:Program FilesOpenVPNconfigclient2.crt"
key "C:Program FilesOpenVPNconfigclient2.key"
# This file should be kept secret
5. После сохранения базовые настройки будут окончены.
Как проверить правила брендмауэра
Чтобы функционирование виртуальной частной сети проходило корректно, на стороне сервера необходимо открыть соответствующий порт. Стандартно его имя UDP 1194.
Зайдите в установленный системный Firewall и посмотрите, разрешен ли доступ к порту антивирусным программным обеспечением и брендмауэром.
Как проверить OpenVPN-подключение
После запуска сервера потребуется зайти в папку config. В ней нужно отыскать конфигурационный server.ovpn файл. Кликнуть по нему правой кнопкой, вызвать контекстное меню и внести новую строчку:
Start OpenVPN on this config file
Те же действия необходимо проделать для клиента. Только в этот раз открывается client.ovpn. Остальные действия аналогичны.
Следом должно показаться окно, где отобразится статус соединения. Окно самостоятельно свернется в трею, там же загорится ярлык компьютера с зеленым индикатором (это будет свидетельствовать об успешно проведенной настройке).
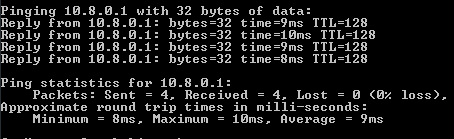
Чтобы проверить, доступен ли сервер с компьютера клиента, проведем следующие действия:
1. Запустим командную строку комбинацией клавиш Win + R и введением команды cmd.
2. Осуществим пинг к выбранному серверу (10.8.0.1). Для этого введем:
ping 10.8.0.1
3. Если настройка прошла отлично, в окне строки покажется передача пакетов ПК клиента к серверу:
4. Специальная утилита Tracert покажет маршрут, по которому происходит передача клиентских пакетов. Для этого в консоль вводится команда:
tracert ya.ru
Как показывает результат, клиентский пакет отправляется к виртуальному серверу, после чего перенаправляется к внешней сети:

После таких действий вы получаете VPN, которая полностью настроена и готова работать. С ее помощью владельцу сервера доступно быстро создание безопасного сетевого подключения типа клиент-сервер, использование открытых и территориально удаленных точек подключения к сети интернет.
220140
Минск
ул. Домбровская, д. 9
+375 (173) 88-72-49
![]()
700
300
ООО «ИТГЛОБАЛКОМ БЕЛ»
220140
Минск
ул. Домбровская, д. 9
+375 (173) 88-72-49
![]()
700
300
ООО «ИТГЛОБАЛКОМ БЕЛ»
This is a step-by-step guide on how to configure an Open VPN server on Windows Server 2008/2012 operating systems and connect clients to the created virtual private network.
Open VPN is an open implementation of VPN technology — the Virtual Private Network, which is designed to create virtual private networks between groups of geographically distant nodes on top of an open data transmission channel (Internet). Open VPN is suitable for tasks such as secure remote network connection to a server without opening Internet access to it, as if you are connecting to a host on your local network. Connection security is achieved by Open SSL encryption.
How it works?
When the Open VPN configuration is completed, the server will be able to accept external SSL-protected network connections to the virtual network adapter created at the start of the VPN service (tun / tap) without affecting the traffic processing rules of other interfaces (external Internet adapter, etc.). You can configure client sharing Open VPN to a specific network adapter from those present on the server. In the second part of the instruction, this tunneling of users’ Internet traffic is considered. With this method of forwarding, the host that handles VPN connections will also perform the function of a proxy server (Proxy) — to unify the rules of network activity of users and to route client Internet traffic on its own behalf.
Installing Open VPN on the server
Download and install version of Open VPN that matches your operating system. Run the installer; make sure that all features are selected for installation in the third step of the installation wizard.

Please note that in this instruction further commands are based on the fact that Open VPN is installed in the default directory «C: Program Files OpenVPN».
We allow adding a virtual network adapter TAP in response to the corresponding request and wait until the installation is complete (it may take several minutes).
Key generation (PKI) of the certification center, server, client; Diffie-Hellman algorithm
To manage the key / certificate pairs of all nodes of the private network being created, use the easy-rsa utility, which works via the command line, by analogy with the Linux console. To work with it, open, run the command line (Keyboard shortcut Win + R, then type cmd and press Enter)
Configuration files.
Running init-config.bat script will generate a new vars.bat file in our easy-rsa directory, this file will contain our configuration:
cd "C:Program FilesOpenVPNeasy-rsa"
init-config.bat
So now we need to open up the following directory using Windows Explorer: C:Program FilesOpenVPNeasy-rsa
Now, using Notepad (or another text editor) edit the batch file named vars.bat, we need to configure some variables…
Change the following settings (nearer the bottom of the file) to meet your requirements:
set KEY_COUNTRY=US
set KEY_PROVINCE=CA
set KEY_CITY=SanFrancisco
set KEY_ORG=OpenVPN
set KEY_EMAIL=mail@host.domain
set KEY_CN=changeme
set KEY_NAME=changeme
Note: if the value of the variable contains a space, enclose it in quotes.
Next you should save the changes to the file and then using Command Prompt, run the following commands:
cd "C:Program FilesOpenVPNeasy-rsa"
vars.bat
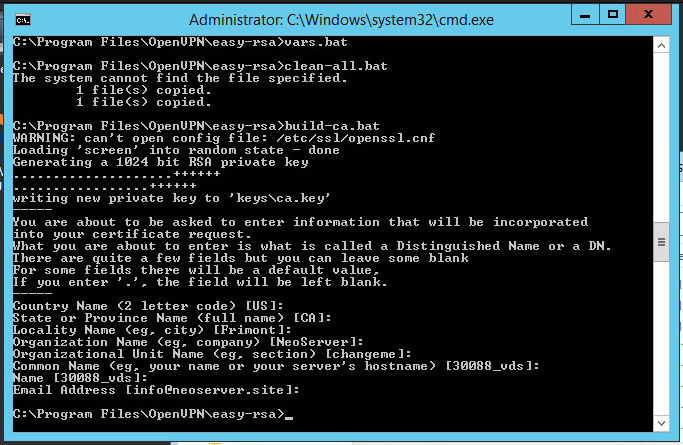
clean-all.batCertification Center and Server Key Generation
Let’s proceed to the creation of the key / certificate of the certification authority. Run the script:
build-ca.batIn response to the prompts that appear, you can simply press Enter. The only exception is the KEY_CN (Common Name) field — be sure to specify a unique name and insert the same name in the Name field:
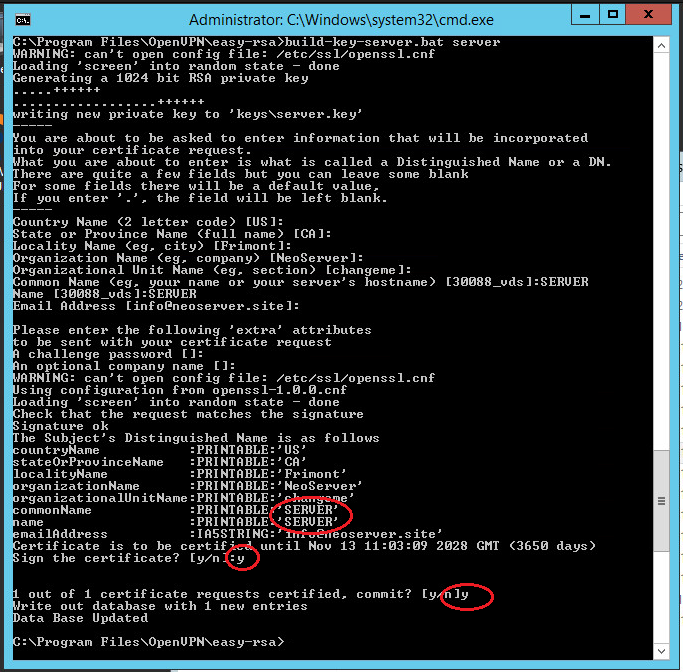
Similarly, we generate a server certificate. Here the value of the Common Name and Name fields is SERVER:
.build-key-server.bat serverNote: the server argument is the name of the future file.
All generated keys will now be asked whether to sign the generated certificate (Sign the certificate) on behalf of the certification authority. Answer y (yes).
Generating client keys and certificates
For each VPN client, you need to generate a separate SSL certificate.
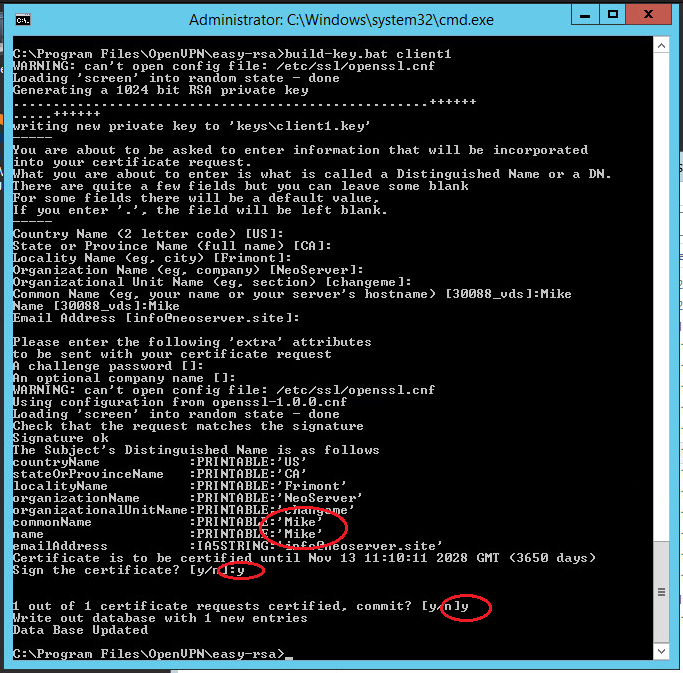
There is an option in the Open VPN configuration, by enabling which you can use one certificate for several clients (see the server.ovpn file -> «dublicate-cn» file), but this is not recommended from a security point of view. Certificates can be generated in the future, as new customers connect. Therefore, now we will create only one for client1:
Run the following commands to generate client keys:
cd
cd "C:Program FilesOpenVPNeasy-rsa"
.build-key.bat client1
Note: client1 argument is the name of the future file.
In the Common Name field, specify the name of the client (in our case client1).
Diffie Hellman Parameters
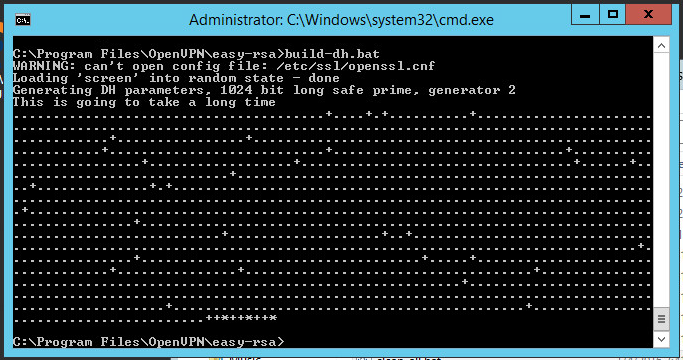
To complete the encryption setting, you need to run the Diffie-Hellman parameter generation script:
.build-dh.batDisplaying information about creating parameters looks like this:
Transferring generated keys / certificates
The generated certificates are located in the C: Program Files OpenVPN easy-rsa keys directory. Copy the files listed below to the directory C:Program FilesOpenVPNconfig:
- ca.crt
- dh2048.pem/dh1048.pem
- server.crt
- server.key
Open VPN server configuration
Let’s proceed to the configuration of the VPN server directly, use our configuration file with the name server.ovpn and place it in the C: Program Files OpenVPN config directory.
copy "C:Program FilesOpenVPNsample-configserver.ovpn" "C:Program FilesOpenVPNconfig"
copy "C:Program FilesOpenVPNsample-configclient.ovpn" "C:Program FilesOpenVPNconfig"
Open the file; find the path to the keys (see below). Check the paths to the previously copied certificates ca.crt, dh1024.pem / dh2048.pem, server.key, server.crt and, if necessary, change:
port 1194
proto udp
dev tun
server 10.8.0.0 255.255.255.0
ca "C:\Program Files\OpenVPN\config\ca.crt"
cert "C:\Program Files\OpenVPN\config\server.crt"
key "C:\Program Files\OpenVPN\config\server.key"
dh "C:\Program Files\OpenVPN\config\dh2048.pem"
push "redirect-gateway def1"
push "dhcp-option DNS 8.8.8.8"
keepalive 10 120
comp-lzo
persist-key
persist-tun
verb 3
Save the file.
Now you need to allow traffic forwarding between adapters. Follow these steps: Control Panel -> Network and Internet -> Network and Sharing Center -> Change adapter settings. Choose an adapter that looks to the external Internet (TAP-adapter is responsible for the VPN connection). In our example, this is Ethernet 2.
Double-click the adapter Properties and go to the Access tab, tick all the checkboxes. Save the changes.
Next you need to enable IP addressing.
Using Windows Search, locate the REGEDIT.exe application.

In the tree, find the directory HKEY_LOCAL_MACHINE SYSTEM CurrentControlSet Services Tcpip Parameters. In the right part of the window, find the IPEnableRouter variable, double-click into the value editing window and change it to 1, thereby allowing addressing on the VPS.
Autorun Open VPN
Immediately configure the Open VPN service to autorun at system startup.
Open the Windows Services. Find in the list Open VPN -> right-click -> Properties -> Start: Automatic
This completes the basic configuration of the virtual private network server. Find the file C: Program Files OpenVPN config server.ovpn -> right-click -> «Start OpenVPN on this config» to start the virtual private network server and the configuration file we prepared.
Open VPN Client Configuration
Open VPN client applications are available for all popular operating systems: Windows / Linux / iOS / Android. For MacOS, the Tunnelblick client is used. All of these applications work with the same configuration files. Only some differences of several options are possible. You can learn about them by examining the documentation for your Open VPN client. In this guide, we will look at connecting a Windows client using the same distribution package of the program that we installed on the server. When using applications for other operating systems, the setup logic is similar.
- Install the current version of Open VPN on the client computer.
- Copy to the directory C: Program Files OpenVPN config the client certificate files created earlier on the server (2 certificates with the .crt extension and the key with the .key extension) and use our client.ovpn client configuration file. After copying to the user’s device, the last file is deleted from the server or transferred from the config folder to avoid confusion in the future.
-
Open the client.ovpn file. Find the line remote my-server-1 1194 and specify the ip-address or domain name of the vpn-server in it:
remote <ip-address> 1194</ip-address>For example:
remote 83.166.241.155 1194 -
Find ways to certificates. Specify in it the paths to the ca.crt, client1.key, client1.crt certificates copied earlier as in the example below:
# See the server config file for more # description. It's best to use # a separate .crt/.key file pair # for each client. A single ca # file can be used for all clients. ca "C:\Program Files\OpenVPN\config\ca.crt" cert "C:\Program Files\OpenVPN\config\client1.crt" key "C:\Program Files\OpenVPN\config\client1.key" # This file should be kept secret - Save the file. Client setup complete.
Verify Windows Firewall Rules
Attention! For the correct operation of the OpenVPN service, it is required that the corresponding ports be opened on the server (by default UDP 1194). Check the relevant rule in your Firewall: Windows Firewall or third-party anti-virus software.
Check OpenVPN connections
Start the Open VPN server, to do this, go to the directory C: Program Files OpenVPN config and select the server configuration file (we have server.ovpn -> right-click -> «Start OpenVPN on this config file»).
Start the client, to do this, go to the directory C: Program Files OpenVPN config and select the client configuration file (we have client.ovpn -> right-click -> «Start Open VPN on this config file»).
The screen displays the connection status window. In a few seconds it will be minimized to tray. The green indicator of the Open VPN shortcut in the notification area indicates a successful connection.

Check the accessibility from the client device of the OpenVPN server using its internal private network address:
- Press the Win + R keys and type cmd in the window that appears to open the command line.
-
Execute the ping command to the address of our server in a virtual private network (10.8.0.1):
ping 10.8.0.1If the VPN is configured correctly, the packet exchange with the server will start.

- With the help of the tracert utility, we will check on which route the packets from the client go. In the console, enter the following command:
From the result of the utility, we see that the packets are first sent to the VPN server, and only then to the external network.
Now you have a ready-to-work virtual private network that allows you to make secure network connections between its clients and the server using open and geographically distant points of connection to the Internet.
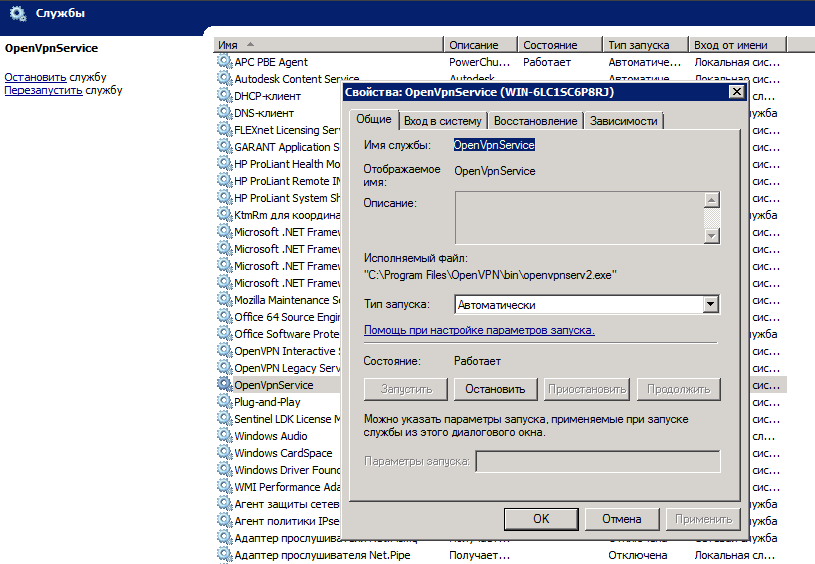
Встала задача настроить автоматическое поднятие OpenVPN канала на Windows. Я расскажу как это сделано у меня, на примере Windows Server 2008 R2 (он выступает в качестве клиента), аналогично делается и на любой другой версии Windows, не обязательно чтобы это был сервер.
На самом деле всё очень просто, достаточно настроить службу OpenVPN Service, которая по умолчанию отключена, на автозапуск. Для этого переходим в «Управление компьютером» -> «Службы» и находим там «OpenVPN Service». В свойствах службы следует выставить «Тип запуска» -> «Автоматически».
Отныне после перезагрузки или потере связи, служба OpenVPN будет автоматически переподключаться к VPN серверу.
Если вы не нашли службы OpenVPN Service в списке, то скорее всего вы просто не указали её при установке OpenVPN. Доустановите службу или просто переустановите OpenVPN с нужными опциями (теперь можно снять галочку и с установки OpenVPN GUI за ненадобностью).
Подписывайтесь на канал
Яндекс.Дзен
и узнавайте первыми о новых материалах, опубликованных на сайте.
В этой статье мы приводим подробную инструкцию по настройке частных серверов на ОС Windows Server, а также по присоединению клиентов к созданной программе OpenVPN.
Для начала расшифруем понятие. Программа предназначена для открытой работы виртуальной частной сети между двумя разными отдаленными узлами, помимо интернета, через который осуществляется передача данных. Применяется в тех случаях, когда требуется безопасное соединение путем шифрования программой OpenSSL. При этом доступ остается закрытым. Аренда виртуальных серверов от oblako.kz.
Содержание:
- Механизм работы
- Инсталляция
- Создание пар ключей, генерация параметров
- Настройки сервера
- Совокупность параметров клиента
- Проверка правил и соединения
Механизм работы
После завершения настройки сервер с открытой технологией работы будет способен принимать защищенные SSL-подключения с внешней стороны. Соединение будет осуществляться без участия иных сопряжений и передачи их данных, путем соединения с сетевым адаптером.
Общий доступ для клиентов можно настроить таким образом, что соединение будет происходить с определенным сетевым адаптером, расположенным на сервере. Также чуть ниже мы разберем соответствующие логическое построение трафика пользователей. При такой инкапсуляции протоколов хост, который проводит обработку входящих соединений, играет дополнительную роль прокси-сервера. Хост стандартизирует правила интернет-активности клиентов и определяет путь следования их трафика от своего имени.

Инсталляция
Первый шаг — это необходимость загрузить и установить последнюю версию программы, подходящей к требованиям вашей операционной системы. Скачать актуальное приложение можно здесь. После скачивания OpenVPN запустите инсталляцию программы. На третьем этапе установке необходимо удостовериться в том, что выбраны все компоненты программы для инсталляции, как это изображено ниже.
Важно! Прежде чем приступать к дальнейшим действиям, нужно учесть, что в данных примерах все действия проводятся с учетом того, что приложение устанавливается в директорию, расположенную по адресу C:Program FilesOpenVPN. Если вы выбираете другую, сообразуйте свои действия с данными другой директории.
Итак, далее система запросит добавление TAP. Следующий шаг – разрешение установки виртуального сетевого адаптера, после чего необходимо дождаться окончания инсталляции.
Создание пар ключей, генерация параметров
Чтобы создавать и менять пары «ключ-сертификат», необходимо использование вспомогательной программы. Утилита работает через консоль Windows. Чтобы запустить утилиту easy-rsa, войдите в консоль (одновременное нажатие кнопок Win+R), после введите команду cmd и щелкните на Enter.
Файлы настроек
С этой страницы вы можете загрузить конфигурационные и программные файлы, после чего переместить их туда, где расположена программа easy-rsa. Убедитесь в совпадении путей, при необходимости внесите изменения во все документы.
В файл настроек openssl-1.0.0.conf необходимо внести коррективы согласно вашим данным. Обратите внимание, если в значении переменной есть проблем, то необходимо заключить данные в кавычки.
 countryName_default

stateOrProvinceName_default

localityName_default

0.organizationName_default

emailAddress_default
Создание пар ключей Центра Сертификации и Сервера
- Необходимо внести изменения в названия документов index.txt.start и serial.start следующим образом: Запустите следующий скрипт:
 cd

	cd "C:Program FilesOpenVPNeasy-rsa"

	ren index.txt.start index.txt

ren serial.start serial - Начнется создание необходимого ключа:
.build-ca.bat - Система будет задавать вопросы, на которые можно реагировать нажатием клавиши Enter. Кроме одного случая, в строку KEY_CN внесите данные уникального имени, а затем скопируйте его в строку name.
- Создаем сертификат. В строки name и Common Name нужно внести данные имени будущего файла.
.build-key-server.bat serverПосле изменения для всех ключей, которые будут создаваться, будет всплывать запрос подписи генерируемого сертификата. Необходимо отвечать «Да» (y).

Создание пар для клиента
Уникальный сертификат шифрования нужно создавать для всех клиентов по отдельности. В настройках утилиты есть специальный параметр, который позволяет использовать всего один SSL-сертификат для разных клиентов, однако это не самый лучший выбор, так как опция не гарантирует полного соблюдения безопасности. Создавать сертификаты возможно в течение работы для каждого нового клиента согласно их присоединению, поэтому рассмотрим создание единственного SSL-сертификата для client1 (в дальнейшем название следует менять на имя вашего файла).
Введите такие команды, чтобы сгенерировать ключи клиента:
 cd

cd "C:Program FilesOpenVPNeasy-rsa"

.build-key.bat client1
В строке Common Name введите данные имени будущего клиента (сейчас указываем client1).
Обмен ключей по Диффи-Хеллману
Чтобы успешно завершить настройки шифрования, нужно запустить криптографический протокол Диффи-Хеллмана, позволяющий сторонам получить общий секретный ключ. Это производится таким образом:
.build-dh.bat
Созданные параметры будут отображаться следующим образом:
Перемещение ключей и сертификатов
Готовые данные расположены по такому пути C:Program FilesOpenVPNeasy-rsakeys. Выберите документы:
- ca.crt;
- dh2048.pem/dh1048.pem;
- server.crt;
- server.key.
Перенесите их по пути C:Program FilesOpenVPNconfig.
Настройки сервера
Войдите в редактор реестра, откройте HKEY_LOCAL_MACHINESYSTEMCurrentControlSetServicesTcpipParameters. С правой стороны экрана будет отображено содержание папки, где необходимо выбрать файл IPEnableRouter. Двойным нажатием левой клавиши мыши откройте окно редактирования переменной, измените значение параметра на «1», как показано ниже. Эти действия позволят разрешить переадресацию на VPS.
- Перейдем к настройке. Выберите документ настройки с названием server.ovpn (загрузить его можно у нас, ссылка была приведена выше) и перенесите его сюда — C:Program FilesOpenVPNconfig.
Откройте документ, согласно приведенному ниже примеру найдите пути к ключам, проверьте правильность введенных данных в строках, при необходимости внесите корректировки, после чего сохраните все внесенные данные.
 port 1194

	proto udp

	dev tun

	server 10.8.0.0 255.255.255.0

	ca "C:\Program Files\OpenVPN\config\ca.crt"

	cert "C:\Program Files\OpenVPN\config\server.crt"

	key "C:\Program Files\OpenVPN\config\server.key"

	dh "C:\Program Files\OpenVPN\config\dh2048.pem"

	push "redirect-gateway def1"

	push "dhcp-option DNS 8.8.8.8"

	keepalive 10 120

	comp-lzo

	persist-key

	persist-tun

verb 3 - Войдите в инструмент управления системой, выберите пункт «Сеть и интернет», затем перейдите к управлению подключениями и щелкните на «Изменение параметров адаптера». Для разрешения передачи данных между адаптерами, необходимо выбрать тот, который отвечает за внешнее соединение.

Двойным кликом левой клавиши мыши войдите в свойства сети, откройте вкладку «Доступ», после чего установите галочки напротив всех параметром. Закройте и сохраните внесенные данные.

- В строке поиска операционной системы найдите приложение REGEDIT.exe, которое поможет настроить адресацию по IP-адресу.


Автоматический запуск службы
Если вы хотите, чтобы OpenVPN включался автоматически при начале работы системы, необходимо произвести приведенные ниже настройки.
Войдите в меню «Службы» операционной системы. В списке найдите OpenVPN, далее выберите «ПКМ», затем «Свойства», в строке запуск поставьте значение «Автоматически».
Таким образом базовая настройка завершена. Перейдите по пути C:Program FilesOpenVPNconfigserver.ovpn. Нажмите на файл, во всплывающем меню щелкните на команду, которая помогает запустить сервер.
Совокупность параметров клиента
Существуют программы для всех распространенных систем (для MacOS применяется специальная утилита Tunnelblick). Все программы OpenVPN функционируют на основании одинаковых конфигурационных данных с небольшими различиями в некоторых параметрах. Чтобы выяснить разницу в опциях, необходимо ознакомиться с документацией определенного клиента. Ниже мы разберем подключение клиента операционной системы Windows, используя тот же установочный пакет, который применялся при установке сервера. Соответственно, при установке приложения на прочие операционные системы, пошаговое руководство аналогично (с учетом внесения изменений).
- Установите последнюю версию приложения.
- Скопируйте файлы сгенерированных ранее сертификатов в директорию C:Program FilesOpenVPNconfig. Файл с названием client.ovpn необходимо удалить с сервера, когда вы его перенесете.
- Откройте этот документ, найдите приведенную ниже строку и введите данные доменного имени сервера или его ip-адрес. Пример:
 remote  1194

remote 111.222.88.99 1194 - Согласно приведенному ниже примеру укажите пути до сертификатов, которые были скопированы во втором шаге.
 # See the server config file for more

	# description. It's best to use

	# a separate .crt/.key file pair

	# for each client. A single ca

	# file can be used for all clients.

	ca "C:\Program Files\OpenVPN\config\ca.crt"

	cert "C:\Program Files\OpenVPN\config\client1.crt"

	key "C:\Program Files\OpenVPN\config\client1.key"

# This file should be kept secret - Сохраните изменения и закройте файл – настройка окончена успешно.
Проверка правил и соединения
Важно! Для правильной работы приложения, необходимо открыть нужные порты. Чтобы сделать это, необходимо войти в файерволл вашей ОС (по умолчанию брандмауэр или иная установленная программа-антивирус) и проверить настройки — открыть порт UDP 1194.
Для проверки соединения клиента нужно включить OpenVPN сервер. Затем откройте установочный файл сервера, расположенный по пути C:Program FilesOpenVPNconfig.
Откроется окно, демонстрирующее параметр подключения, которое автоматически свернется и перейдет на панель задач. Если ярлык программы горит зеленым светом, значит, процедура подключения прошла успешно.
![]()
Затем необходимо убедиться в открытости сервера по отношению к устройству клиента с использованием внутреннего адреса сети.
- Откройте командную консоль;
- Введите данные ping;
ping 10.8.0.1 - Если все работает правильно, то запустится процесс обмена пакетами с сервером;

- В командную строку введите приведенную ниже команду для запуска программы, проверяющей маршрут:
tracert ya.ru - Ниже можно увидеть, что пакеты данных идут во внешнюю сеть только через виртуальный сервер.


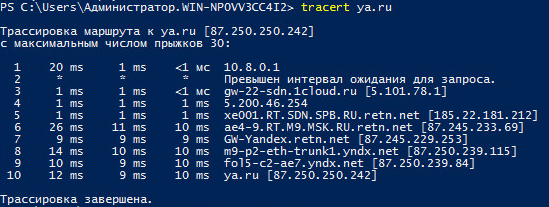
На этом настройка OpenVPN сервера на Windows Server 2008/2012 окончена. В нашей базе знаний вы найдёте ещё множество статей посвящённых различным аспектам работы в Windows, а если вы ищете надежный виртуальный сервер под управлением Windows, обратите внимания на нашу услугу — Аренда виртуального сервера Windows.