Unfortunately, none of the suggestions worked.
Got the same issue, here is my experience.
1. Running Windows 7, Ultimate edition, x64;
2. OpenVPN 2.5.3 gets installed fine;
however, setupapi.dev.log contains following:
sig: {_VERIFY_FILE_SIGNATURE} 15:18:46.274
sig: Key = oemvista.inf
sig: FilePath = c:program filestap-windowsdriveroemvista.inf
sig: Catalog = c:program filestap-windowsdrivertap0901.cat
! sig: Verifying file against specific (valid) catalog failed! (0x800b0109)
! sig: Error 0x800b0109: A certificate chain processed, but terminated in a root certificate which is not trusted by the trust provider.
sig: {_VERIFY_FILE_SIGNATURE exit(0x800b0109)} 15:18:46.331
sig: {_VERIFY_FILE_SIGNATURE} 15:18:46.331
sig: Key = oemvista.inf
sig: FilePath = c:program filestap-windowsdriveroemvista.inf
sig: Catalog = c:program filestap-windowsdrivertap0901.cat
sig: Success: File is signed in Authenticode(tm) catalog.
sig: Error 0xe0000241: The INF was signed with an Authenticode(tm) catalog from a trusted publisher.
sig: {_VERIFY_FILE_SIGNATURE exit(0xe0000241)} 15:18:46.351
(same applies to wintun)
So tap driver isn’t being recognized by the system (go to device manager/check network section/see tap driver with yellow triangle on the icon:
«This device is not working properly because Windows cannot load the drivers required for this device. (Code 31)»
3. To resolve the tap driver challenges, tried:
3.1 Full system cleanup (delete all the drivers, openvpn installs, tap installer/reinstalled everything w/ and w/o tap installer)
(i still do wander why other drivers may interfere with the install from openvpn, but that’s a diff story)
3.2 bcedit experiments & windows reboot with «disable driver signature enforcement»
3.3 manually imported certificates (via certmgr & mmc snap in for the local computer; to root & trusted publisher)
3.4 signed driver myself & used self-signed certificate
As an experiment, took clean windows 7 x64 sp1 — installed openvpn — has challenges too, works only under «disable driver signature enforcement».
But at least — tap driver is recognized as a driver — and is loaded properly if one chooses «disable driver signature»; so it sorta works.
~~~
After all the experiments, this is what i came down to:
There seem to be two issues that the latest OpenVPN installer has;
and latest tap driver installer has;
(and they seem to have it (at least) for the past ~8-10 releases (went as far as 9.9 with tap installer; and 2.0 with openvpn))
a) Challenge one: digital signature. Technically, one can bypass it by either experimenting bcedits; enabling test mode; or by loading via F8/disable driver signature. Who’s at fault — Microsoft, who started enforcing driver signatures; that’s annoying exercise to go through, a lot of projects out there choose not to do it;
b) Challenge two: busted certificate chain.
(that’s the one is unable to overcome).
Something is screwed up with certificates associated with openvpn/tap installer.
And not with the certificate itself — the one that’s assigned to it; it’s good and legit; but specifically with the intermediate certificate: the one that (in theory) you could get from the digisign guys.
Funny enough, Microsoft has exactly the same challenges with one of their .NET library installs: and to resolve it, they have provided combined — proper — certificate — that you can install yourself and make it work.
But with OpenVPN — we do not have (direct) access to combined (and verified!) certificate (yes, i tried to get it exported/imported; including chain of certs; didn’t work. tried to go to the source — digi sign website — to grab intermediate cert — no good either)
So cert challenges combined with digital signature challenges — and entire application becomes useless.
Direction that (in theory) could work:
If one updates registry; and adds following record to the driver:
«ComponentId» with the value «tap0901»:
It makes «Network card» to be visible to openVPN app;
So error from «hey, you have no tap devices out there»:
Turns into «hey, you have tap device there, but it’s busy».
(chances are, OpenVPN queries registry directly, bypassing Windows API; which is why it makes a difference)
Therefore if one manages to mimic «properly enabled driver» through regedits — it might actually work, and provide solution to all those people who have troubles. I’ll keep digging this direction, but if someone with a bit more experience could assist — help would be very much appreciated.
Alternative, is to provide chained certificate for the software (that’s question to openvpn devs) that’s been properly validated and considered to be valid by Microsoft.
That way, digital signature can be overrulled with bcedits/and/or/F8/disable driver signature enforcement):
And certs is legit:
And we’d be good.
Third alternative (unlikely) — is to include proper certificate & proper digital signature in the future releases of openvpn:
But while first one should be easy; getting proper signature in place doesn’t seem to look too good.
~~
any other suggestions/comments/possible ways to resolve it — will seriously appreciate some help here.
For now it doesn’t look too promising.
Столкнулся с неожиданной проблемой при установке клиента популярной реализации vpn. Не устанавливался openvpn клиент на Windows 10, выдавая ошибку установки TAP интерфейса: «An error occurred installing the TAP device driver«.
Ошибка установки openvpn на Windows 10 выглядела следующим образом. Инсталятор после выбора дефолтных настроек задумывается на несколько минут и в итоге выдает ошибку:

При этом сам клиент openvpn успешно устанавливается. Можно запустить GIU, но ясное дело, подключиться к серверу openvpn не получится, так как в системе не появляется TAP адаптера. В интернете нашел много советов по данной проблеме, но мне ни один не помог. Перечислю их, может вам поможет что-то из этого:
- Запустить скрипт на добавление TAP интерфейса — C:Program FilesTAP-Windowsbinaddtap.bat. У меня он так же не отрабатывал. Висел несколько минут, потом выдавал ошибку.
- Зайти в Пуск -> TAP Windows -> Add a new TAP virtual ethernet adapter. Это тоже не помогло.
- Повторить установку openvpn с выключенным антивирусом или защитником windows.
Два первых действия нужно выполнять от администратора. С помощью них можно добавить несколько tap адаптеров в систему, чтобы одновременно поднимать несколько openvpn туннелей.
После того, как ничего из предложенного не подошло, я крепко призадумался. Openvpn я использую постоянно. Ставил его на разные системы десятки раз и всегда все проходило успешно, либо проблема быстро решалась. Тут быстрого и простого решения не получалось.
Помогло в итоге вот что. Я открыл диспетчер устройств и посмотрел на сетевые адаптеры. В списке был TAP-Windows Adapter V9, что намекало на то, что все должно работать. Но не работало. В панели управления в списке адаптеров TAP адаптера не было.
Я включил отображение скрытых устройств и увидел там же в сетевых адаптерах неизвестное устройство (unknown device). Открыл у него вкладку Сведения. Путь к экземпляру устройства был следующий — ROOTNET000. Я нажал обновить драйвер для этого устройства и указал, что он должен быть найден автоматически. После этого устройство получило название TAP-Windows Adapter V9 #2 и в панели управления появился TAP адаптер.
После этого Openvpn заработал. Я смог подключиться к серверу и организовать туннель. После того, как я удалил openvpn на этой же системе и установил заново, все прошло без ошибок с первого раза. Появился только один TAP-Windows Adapter V9. Проверил еще на парочке тестовых виртуальных машин. Тоже все прошло без ошибок, так что не смог собрать актуальные скрины по проблеме, а сразу их не сделал.
Если решение не поможет, то обратите внимание на следующее, берите бубен и танцуйте:
Драйвер для TAP адаптера должен быть в директории C:WindowsSystem32DriverStoreFileRepositoryoemvista.inf_amd64_*. В конце могут быть разные символы. На той системе, где был глюк, были созданы 2 подобных директории с разными символами на конце. Когда проблем нет — только одна.
https://github.com/midnight47/
OpenVPN — это VPN-клиент с открытым исходным кодом, который вы можете использовать с различными провайдерами VPN. Пока ваш провайдер VPN поддерживает протокол OpenVPN TCP или UDP, вы можете установить соединение OpenVPN.
Вы можете запустить клиент OpenVPN со сценариями и настроить соединения через его файлы настроек.
Однако OpenVPN все еще может столкнуться с некоторыми трудностями. Это несколько разрешений, которые могут исправить соединения OpenVPN в Windows 10.
Как я могу исправить проблемы запуска OpenVPN в Windows 10?
- Отключить брандмауэр Windows
- Отключить стороннее антивирусное программное обеспечение
- Перезапустите адаптер TAP
- Переустановите и обновите драйвер TAP-Windows
- Проверьте, работает ли служба DHCP
- Очистить DNS
- Сброс Winsock
1. Отключите брандмауэр Windows
Брандмауэры и VPN не всегда хорошо сочетаются друг с другом. Брандмауэр Windows может заблокировать ваше соединение OpenVPN, если вы не настроили исходящие порты .
Лучший способ проверить, так ли это, — отключить брандмауэр Windows. Вот как вы можете отключить брандмауэр в Windows 10:
- Нажмите кнопку Cortana на панели задач, чтобы открыть это приложение.
- Введите ключевое слово «Брандмауэр Windows» в поле поиска и выберите, чтобы открыть Брандмауэр Защитника Windows .

- Нажмите Включить или выключить брандмауэр Защитника Windows, чтобы открыть настройки, показанные на снимке ниже.

- Выберите оба параметра « Отключить брандмауэр Защитника Windows» .
- Нажмите кнопку ОК .
Вы хотите проверить, блокирует ли ваш брандмауэр определенные порты? Следуйте простым шагам из этого руководства, чтобы узнать.
2. Отключите стороннее антивирусное программное обеспечение
Также обратите внимание, что стороннее антивирусное программное обеспечение может препятствовать VPN с их собственными брандмауэрами. Таким образом, отключение сторонних антивирусных утилит может также помочь исправить соединение OpenVPN.
Вы можете временно отключить некоторые антивирусные программы, выбрав отключить настройки в их контекстных меню. Или вы также можете удалить программное обеспечение из автозагрузки Windows следующим образом:
- Щелкните правой кнопкой мыши панель задач Windows и выберите « Диспетчер задач» в открывшемся контекстном меню.
- Откройте вкладку «Автозагрузка» в окне «Диспетчер задач».

- Выберите антивирусное программное обеспечение и нажмите кнопку « Отключить» .
- Затем перезагрузите свой ноутбук или рабочий стол.
Если вы хотите узнать, как добавлять или удалять загрузочные приложения в Windows 10, ознакомьтесь с этим простым руководством . Кроме того, если вы не можете открыть диспетчер задач в Windows 10, не беспокойтесь. У нас есть правильное решение для вас.
Если вы хотите заменить свой антивирус на лучший, который хорошо работает с VPN, посмотрите этот список с нашими лучшими выборами.
3. Перезапустите адаптер TAP.
Добавление программного обеспечения OpenVPN в Windows также добавляет адаптер TAP-Windows. В одном сообщении об ошибке OpenVPN говорится: « Все адаптеры TAP-Windows в этой системе в настоящее время используются. »
Если вы получаете это сообщение об ошибке, перезапуск адаптера TAP может исправить OpenVPN. Вы можете перезапустить адаптер TAP следующим образом:
- Нажмите сочетание клавиш Windows + R, чтобы открыть аксессуар «Запуск».
- Введите «Панель управления» в «Выполнить» и нажмите кнопку ОК .
- Нажмите « Центр управления сетями и общим доступом», чтобы открыть настройки панели управления , показанные непосредственно ниже.

- Нажмите Изменить настройки адаптера, чтобы открыть свои подключения, как показано ниже.

- Затем щелкните правой кнопкой мыши Адаптер TAP-Windows и выберите Отключить .
- Щелкните правой кнопкой мыши TAP-Windows Adapter и выберите Enable, чтобы перезапустить адаптер.
Вы не можете открыть панель управления? Посмотрите на это пошаговое руководство, чтобы найти решение.
4. Переустановите и обновите драйвер TAP-Windows
Если перезапуск адаптера не помогает, попробуйте переустановить драйвер TAP-Windows. Для этого сначала откройте диспетчер устройств, чтобы удалить адаптер, нажав клавишу Windows + горячую клавишу X.
- Выберите Диспетчер устройств, чтобы открыть окно в кадре прямо ниже.

- Дважды щелкните Сетевые адаптеры, чтобы развернуть список сетевых адаптеров.
- Щелкните правой кнопкой мыши TAP-Windows Adapter и выберите « Удалить устройство» .

- Теперь откройте эту страницу OpenVPN в вашем браузере .
- Прокрутите страницу до конца и нажмите tap-windows-9.21.2.exe, чтобы загрузить последнюю версию драйвера TAP (NDIS 6) для OpenVPN. Драйвер NDIS 5 предназначен для Windows XP.

- Щелкните правой кнопкой мыши исполняемый файл TAP-Windows и выберите « Запуск от имени администратора».
- Перезагрузите Windows после установки драйвера.
Ничего не происходит, когда вы нажимаете на Запуск от имени администратора? Не волнуйтесь, у нас есть правильное решение для вас.
Знаете ли вы, что большинство пользователей Windows 10 имеют устаревшие драйверы? Будьте на шаг впереди, используя это руководство.
5. Проверьте, работает ли служба DHCP
« Последовательность инициализации завершена с ошибками » — это еще одно сообщение об ошибке, которое может открыться для некоторых пользователей OpenVPN. Если это сообщение об ошибке открывается для вас, проверьте, что служба DHCP работает.
Вы можете запустить службу DHCP следующим образом:
- Введите «services.msc» в «Выполнить» и нажмите кнопку « ОК» .
- Прокрутите вниз до DHCP-клиента, показанного на снимке ниже.

- Дважды щелкните DHCP-клиент, чтобы открыть окно его свойств.

- Выберите « Автоматически» в раскрывающемся меню «Тип запуска».
- Затем нажмите кнопку « Начать обслуживание».
- Если DHCP-клиент уже запущен, нажмите кнопки « Стоп» и « Пуск», чтобы перезапустить его.
- Нажмите кнопку Применить и ОК .
DHCP-сервер продолжает останавливаться? Исправьте это прямо сейчас, следуя простым шагам из этого подробного руководства.
6. Очистите DNS
Различные ошибки подключения могут быть связаны с повреждением кэша DNS. Таким образом, очистка кеша DNS может стать потенциальным исправлением для OpenVPN. Вот как вы можете очистить DNS в Windows 10.
- Откройте меню Win + X с помощью клавиши Windows + X.
- Нажмите Командная строка (Администратор) в меню Win + X.
- Введите следующие команды отдельно в окне подсказки:
интерфейс netsh ip удалить arpcache
ipconfig / flushdns
ipconfig / renew
- Закройте командную строку и перезапустите Windows.
Если у вас возникли проблемы с доступом к командной строке от имени администратора, то вам лучше ознакомиться с этим руководством.
7. Сброс Winsock
Сброс поврежденных настроек TCP / IP Winsock также может исправить сообщения об ошибках OpenVPN. Для этого введите «Командная строка» в поле поиска Кортаны.
- Щелкните правой кнопкой мыши Командную строку и выберите Запуск от имени администратора, чтобы открыть ее.
- Затем введите «netsh int ip reset logfile.txt» в командной строке и нажмите клавишу Enter.

- Войдите в каталог сброса netsh winsock и нажмите кнопку возврата.
- Перезагрузите ваш рабочий стол или ноутбук.
Некоторые из этих решений могут исправить ошибки инициализации клиента OpenVPN в Windows 10. Ознакомьтесь с этой статьей, где приведены некоторые более общие советы по исправлению VPN-подключений.
Если у вас есть какие-либо другие предложения или вопросы, не стесняйтесь оставлять их в разделе комментариев ниже, и мы обязательно их рассмотрим.
СВЯЗАННЫЕ ИСТОРИИ, ЧТОБЫ ПРОВЕРИТЬ:
- ИСПРАВЛЕНИЕ: ExpressVPN не запускается в Windows 10
- VPN подключен, но не работает? Вот 9 быстрых решений, чтобы решить эту проблему
- VPN не будет работать с Netflix: вот 8 решений, чтобы это исправить
Tweak your settings to secure an unbreakable VPN connection
by Elena Constantinescu
Elena started writing professionally in 2010 and hasn’t stopped exploring the tech world since. With a firm grasp of software reviewing and content editing, she is always trying… read more
Updated on January 18, 2023
Reviewed by
Edgar Nicov

Since the dial-up Internet era, Edgar was interested in online resources. From forums to e-commerce websites, he started digging into how those resources could generate revenue. Today he… read more
- OpenVPN is one of the most popular VPN protocols, thanks to its superior security and connection speed.
- You can also use an official OpenVPN client for free.
- Many users report that OpenVPN is not working on their Windows 10 PCs.
- If you’re one of them, discover our easy workarounds, like adding an exception to the system firewall.
OpenVPN is an open-source VPN client and VPN protocol with immense popularity, thanks to high security and excellent connection speed.
You can separately download and install the OpenVPN client on all popular devices for free if you want to create a secure tunnel to the web.
Or, you can turn to a commercial VPN provider that adopts OpenVPN.
However, OpenVPN may stop working on Windows 10 computers, due to various issues. If you’re encountering this scenario, here’s what you need to do.
Speaking of scenarios, there are several errors that may appear when you have problems with OpenVPN, many users report issues when attempting to start up the app:
- OpenVPN GUI not opening
- Openvpnagent request error in Windows 7, Windows 10 or Windows 11
- Connecting to the Management interface failed in OpenVPN
Meanwhile, others manage to launch it only to encounter severe disruptions afterward:
- OpenVPNcrashing in Windows 10 or OpenVPN stopped working all of a sudden
- OpenVPN connected but not working windows 10
- DNS not working in Windows 10 with OpenVPN
- TAP mode is not supported in OpenVPN
- OpenVPN service is not available
- Error attempting to connect to the selected server in OpenVPN
- OpenVPN socket protect error
- OpenVPN Windows Firewall not working
Below you will find easy-to-follow instructions that should help fix any of the above-mentioned errors and be able to browse the web through a secure OpenVPN tunnel.
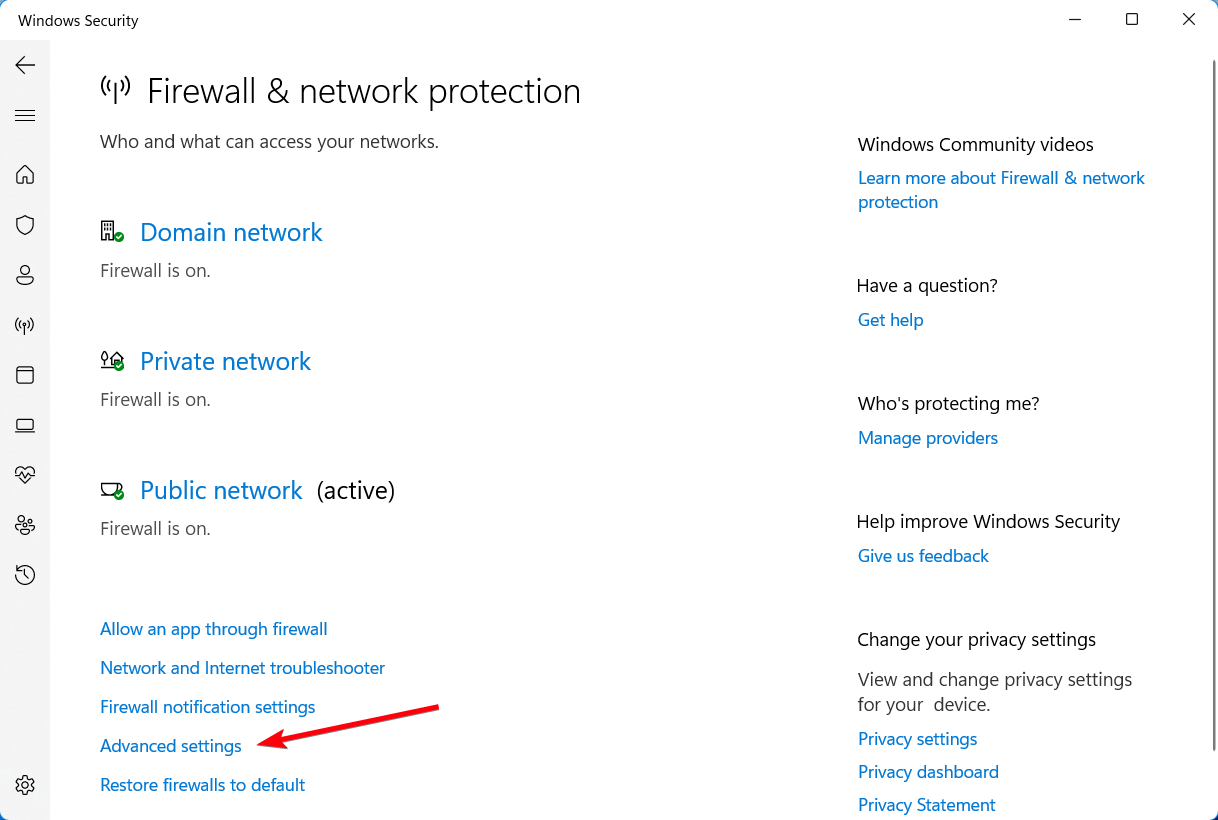
How do I enable OpenVPN in Firewall on Windows 10?
In case you have OpenVPN connected but not working in Windows 10, you can enable it by changing a few settings in your firewall security.
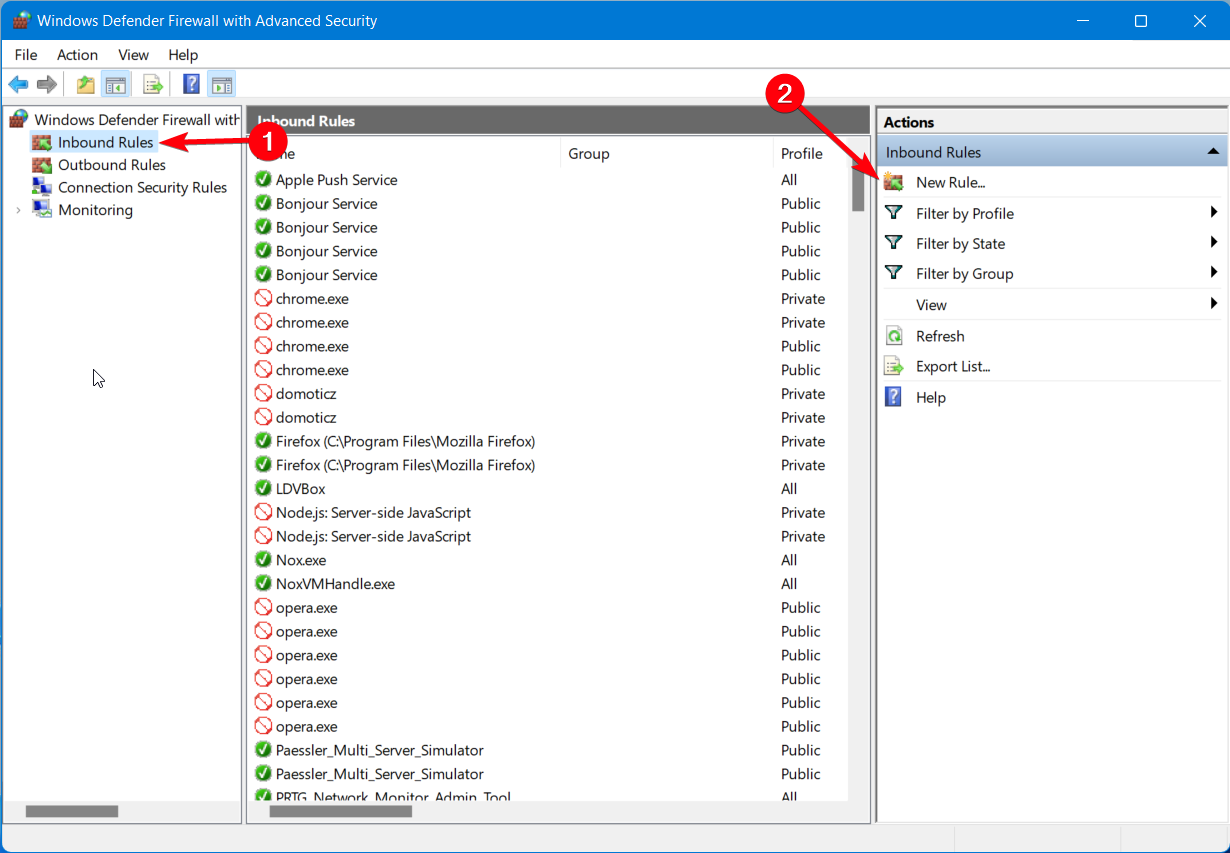
Hence, these are the short steps on how to enable OpenVPN in your Firewall:
- In the Start Menu, access Firewall settings.

- Click on the Advanced Settings.

- In the next windows, go to Inbound Rules.
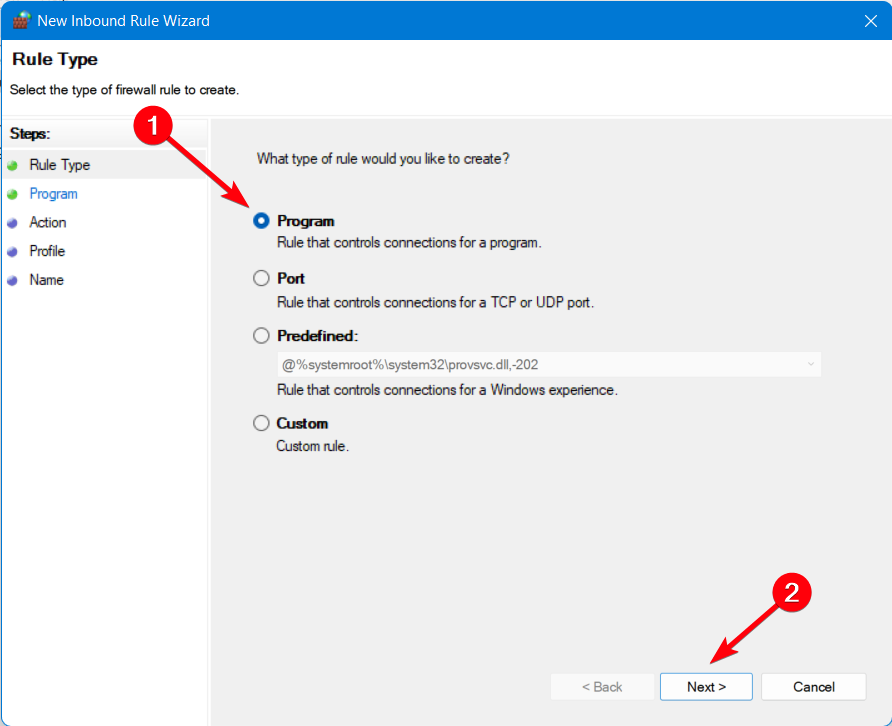
- Click on the New rule button.

- Select the Program option and Next.

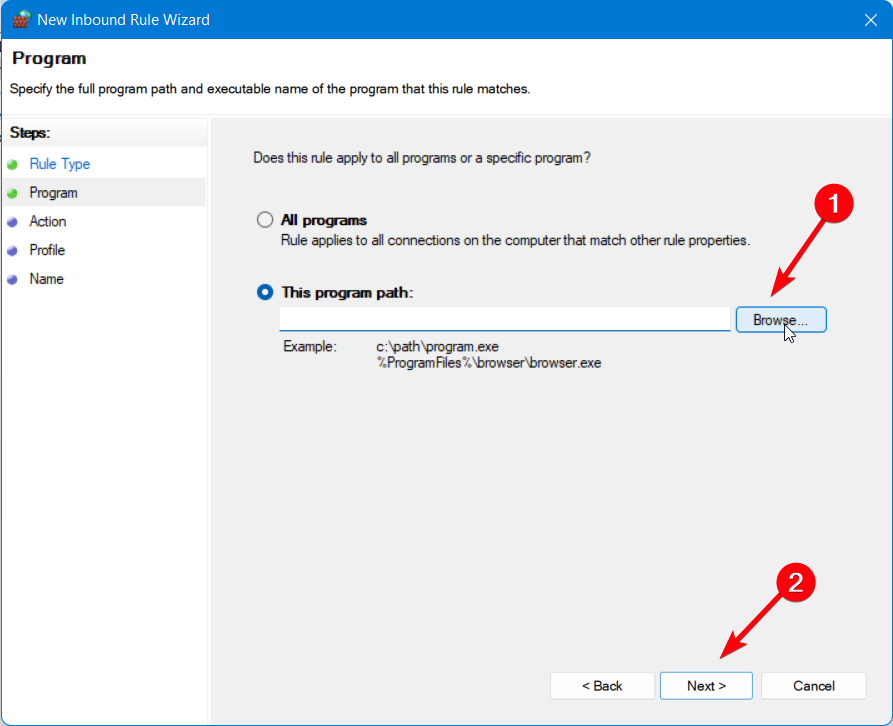
- Go to Program’s path and choose OpenVPN.

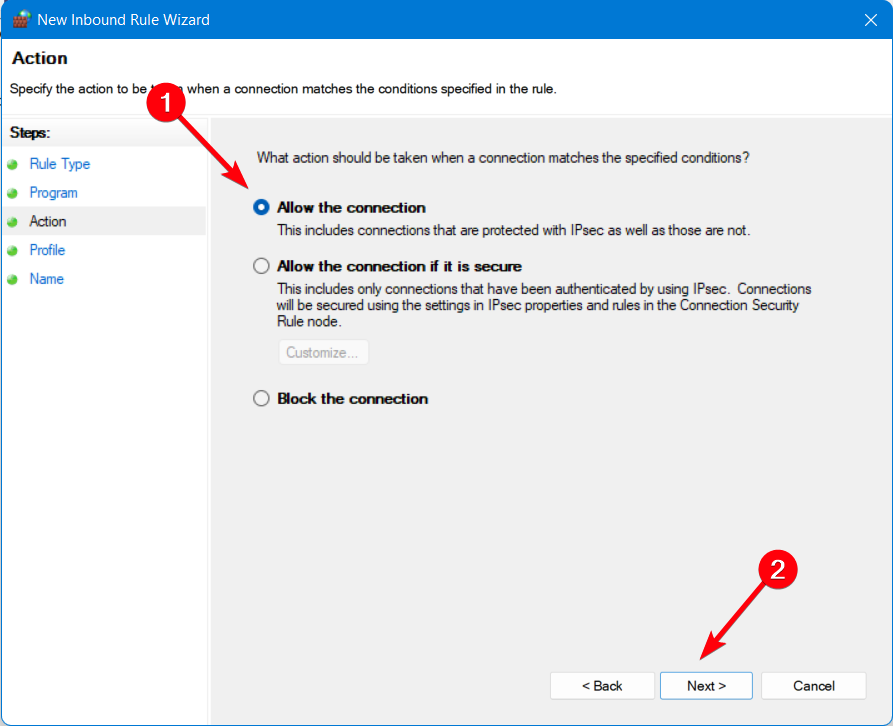
- On the Action window, select Allow the connection.
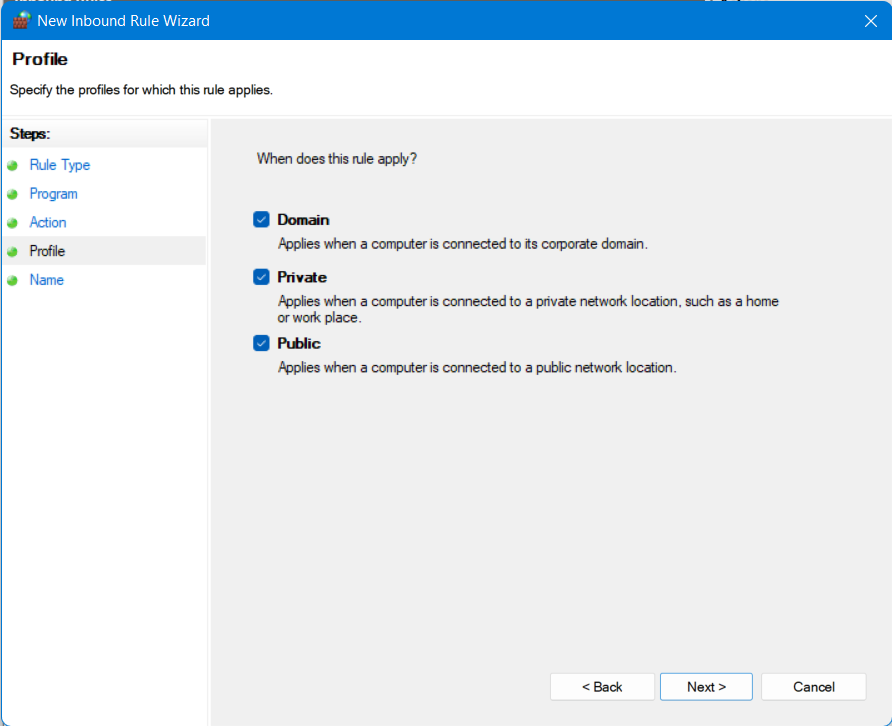
- Let all the three options checked and click Next.
- Set the name and description, and then click Finish.
At the same time, this step-by-step guide should resolve OpenVPN not working on Windows 11, so you can use the method on the newest OS version without problems.
How can I fix OpenVPN not working on Windows 10?
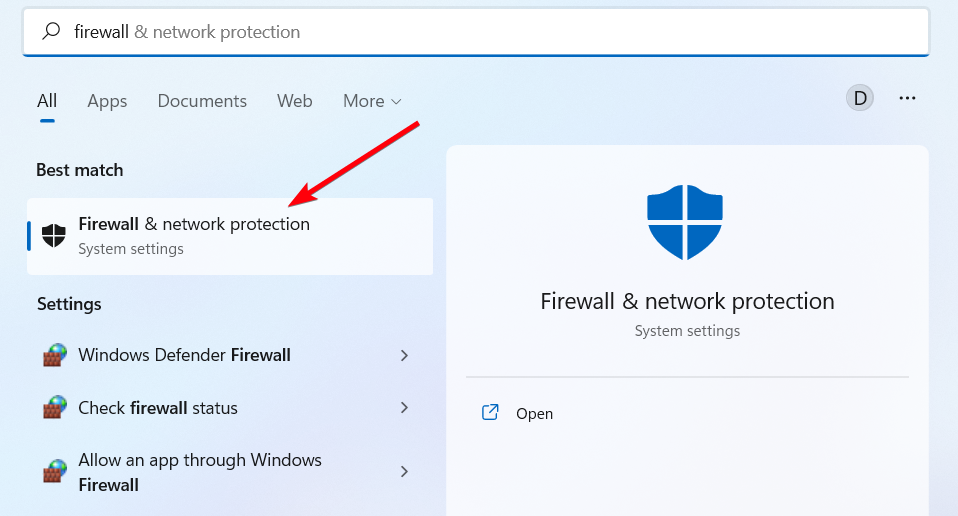
1. Add an exception to the firewall
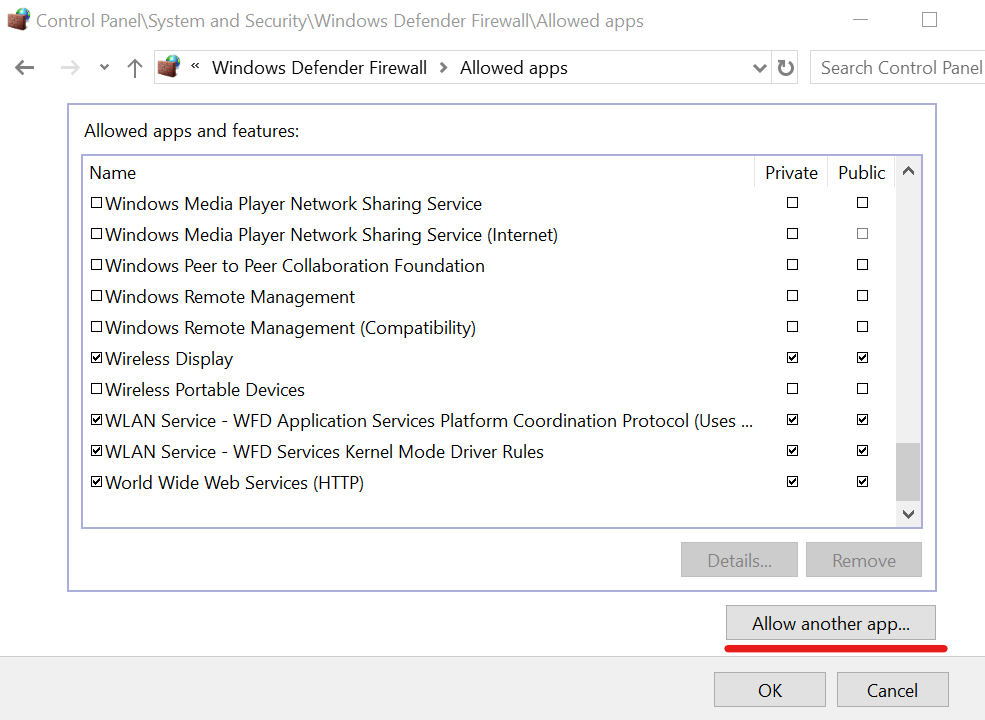
- Press the Win key, type firewall, and open Firewall & network protection
- Click Allow an app through the firewall
- Click Change settings (you need admin rights)
- Search for OpenVPN in this list and check its boxes for Private and Public
- If it’s not in this list, click Allow another app to browse and select it
It’s possible that your firewall didn’t whitelist OpenVPN when you installed the client. In that case, you have to manually add an exception for it in the system firewall.
If another application is responsible for your computer’s firewall, make sure to adjust the above settings accordingly.
To quickly test this theory, you can temporarily disable the firewall and check if OpenVPN works properly on Windows 10 now.
But don’t forget to turn it back on since you risk exposing your home network to vulnerabilities.
2. Use a reliable VPN client with OpenVPN support
If you’re trying and failing to get the OpenVPN to work on Windows 10, consider getting a commercial VPN app that supports the OpenVPN protocol.
And we can’t think of a better option than Private Internet Access. This software supports multiple protocols, including OpenVPN.
Some PC issues are hard to tackle, especially when it comes to corrupted repositories or missing Windows files. If you are having troubles fixing an error, your system may be partially broken.
We recommend installing Restoro, a tool that will scan your machine and identify what the fault is.
Click here to download and start repairing.
This VPN is compatible with all major operating systems and also has a manual configuration option for OpenVPN for those of you who want to add it directly to a supported router.
More about Private Internet Access
- 35 000+ servers in 80+ countries
- Split tunneling functionality
- Private DNS address on each server
- Zero-logs policy
- Bypass geo-blocking restrictions from other regions
- Compatibility with any devices like Windows, macOS, Android, or iOS
Private Internet Access
Utilize this leading VPN software to set up OpenVPN on your Windows device for complete privacy.
3. Whitelist OpenVPN in your antivirus
If your anti-malware application throws errors when you try to use OpenVPN on Windows 10, it could mean that it’s blocking the client or protocol.
However, it’s a false positive. In that case, make sure to add OpenVPN to the whitelist to prevent your antivirus from blocking your VPN.
As in the previous solution, you can quickly test it by temporarily deactivating the real-time detection engine of your anti-malware tool.
But we suggest turning it back on as soon as you finish the test and not leave your computer exposed to malware attacks.
If you’re interested in an anti-malware tool with built-in VPN functionality, check out our best picks.
4. Reset the TAP adapter
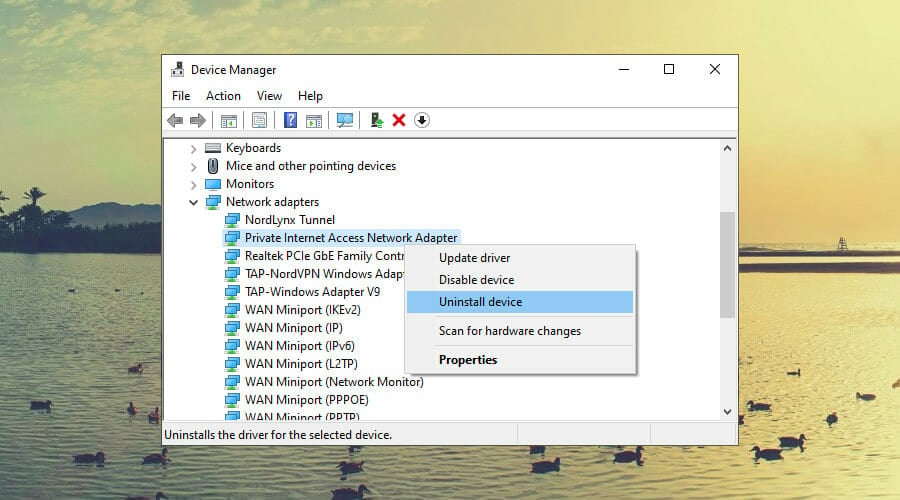
- Right-click the Start button and select Device Manager
- Expand the Network adapters menu
- Look for any TAP drivers, right-click and select Uninstall device
- Open the Action menu and select Scan for hardware changes
The OpenVPN client requires a TAP driver to work properly. If its functionality is broken, it could be the reason why OpenVPN is not working on your Windows 10 PC.
However, you can easily fix this by uninstalling the TAP driver from Device Manager – it should get automatically reinstalled.
As a general rule, it’s essential to keep Windows drivers updated to the latest version.
- Looker vs. Power BI vs. Tableau: Which Tool Is Better For You?
- How to Change Real Time Update Speed in Task Manager
- Fix: HP Support Assistant Stuck on Creating a Restore Point
- How to Check Your Windows Experience Index on Windows 11
- Games for Windows Live on Windows 11: Can You Still Use It?
5. Check if the DHCP service is running
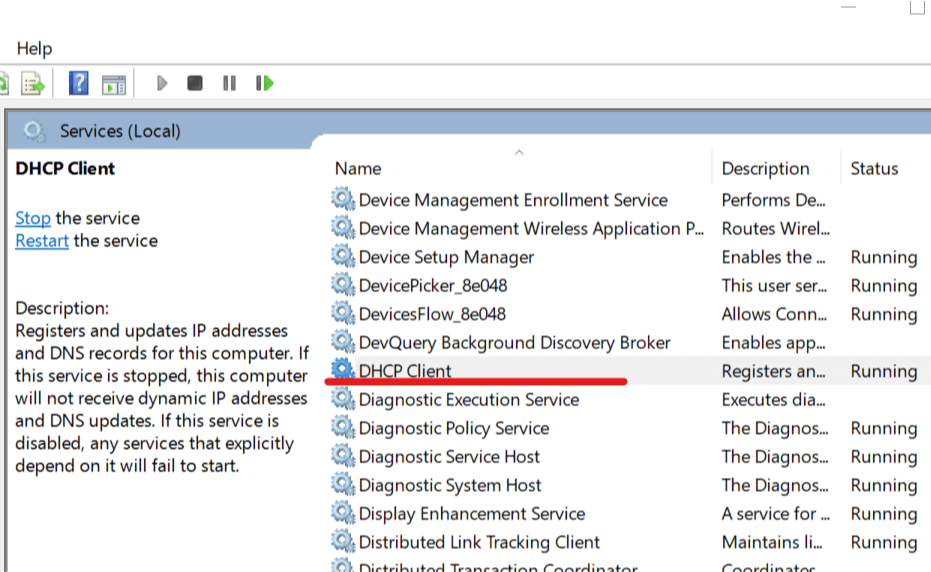
- Press the Win key, type services, and open Services
- Right-click DHCP Client and select Properties
- Set Startup type to Automatic
- Click OK
Many OpenVPN users report seeing the Initialization Sequence Completed with errors message on Windows 10.
It signals a problem with the DHCP client, which you can restart using the instructions above.
6. Flush DNS and reset Winsock
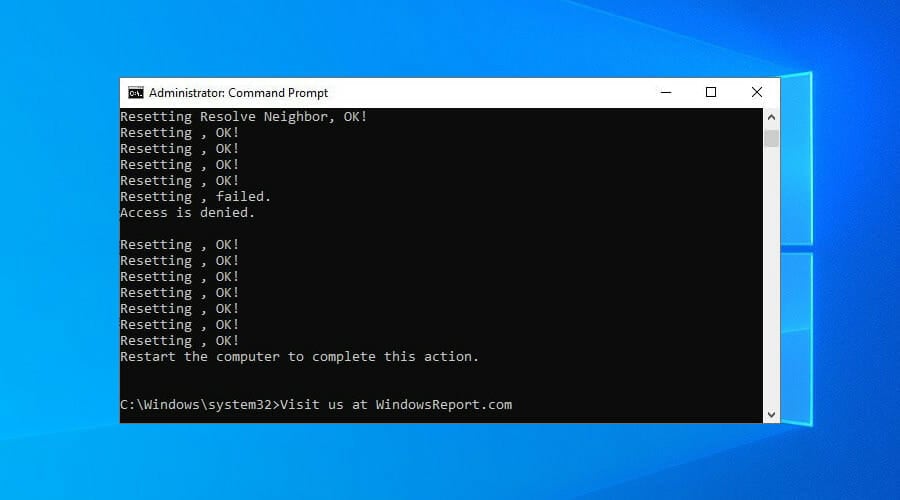
- Run Command Prompt as admin: press Ctrl + R, type cmd, hold Ctrl + Shift, and press Enter
- Copy and paste the next lines (press Enter between each line)
ipconfig /flushdns

ipconfig /registerdns

ipconfig /release

ipconfig /renew

NETSH winsock reset catalog

NETSH int ipv4 reset reset.log

NETSH int ipv6 reset reset.log

exit
Restart your PC to apply the new changes.
The DNS cache and Winsock configuration are responsible for your computer connectivity.
If they’re not initialized properly, it could be the reason why OpenVPN isn’t working on Windows 10.
To recap, if your OpenVPN configuration fails to work on Windows 10, you can fix this issue by adding an exception to the firewall and whitelisting OpenVPN in your antivirus.
You can also reset the TAP adapter, check if the DHCP service is running, as well as flush your DNS and reset Winsock.
But we suggest opting for a trustworthy VPN like Private Internet Access It has built-in support for the OpenVPN protocol, which means that you shouldn’t see any errors anymore.
Learn everything about OpenVPN to master this VPN protocol and client. Also, visit our VPN Troubleshooting Hub whenever you need a VPN quick fix.
Still having issues? Fix them with this tool:
SPONSORED
If the advices above haven’t solved your issue, your PC may experience deeper Windows problems. We recommend downloading this PC Repair tool (rated Great on TrustPilot.com) to easily address them. After installation, simply click the Start Scan button and then press on Repair All.
![]()
Newsletter
Tweak your settings to secure an unbreakable VPN connection
by Elena Constantinescu
Elena started writing professionally in 2010 and hasn’t stopped exploring the tech world since. With a firm grasp of software reviewing and content editing, she is always trying… read more
Updated on January 18, 2023
Reviewed by
Edgar Nicov
Since the dial-up Internet era, Edgar was interested in online resources. From forums to e-commerce websites, he started digging into how those resources could generate revenue. Today he… read more
- OpenVPN is one of the most popular VPN protocols, thanks to its superior security and connection speed.
- You can also use an official OpenVPN client for free.
- Many users report that OpenVPN is not working on their Windows 10 PCs.
- If you’re one of them, discover our easy workarounds, like adding an exception to the system firewall.
OpenVPN is an open-source VPN client and VPN protocol with immense popularity, thanks to high security and excellent connection speed.
You can separately download and install the OpenVPN client on all popular devices for free if you want to create a secure tunnel to the web.
Or, you can turn to a commercial VPN provider that adopts OpenVPN.
However, OpenVPN may stop working on Windows 10 computers, due to various issues. If you’re encountering this scenario, here’s what you need to do.
Speaking of scenarios, there are several errors that may appear when you have problems with OpenVPN, many users report issues when attempting to start up the app:
- OpenVPN GUI not opening
- Openvpnagent request error in Windows 7, Windows 10 or Windows 11
- Connecting to the Management interface failed in OpenVPN
Meanwhile, others manage to launch it only to encounter severe disruptions afterward:
- OpenVPNcrashing in Windows 10 or OpenVPN stopped working all of a sudden
- OpenVPN connected but not working windows 10
- DNS not working in Windows 10 with OpenVPN
- TAP mode is not supported in OpenVPN
- OpenVPN service is not available
- Error attempting to connect to the selected server in OpenVPN
- OpenVPN socket protect error
- OpenVPN Windows Firewall not working
Below you will find easy-to-follow instructions that should help fix any of the above-mentioned errors and be able to browse the web through a secure OpenVPN tunnel.
How do I enable OpenVPN in Firewall on Windows 10?
In case you have OpenVPN connected but not working in Windows 10, you can enable it by changing a few settings in your firewall security.
Hence, these are the short steps on how to enable OpenVPN in your Firewall:
- In the Start Menu, access Firewall settings.
- Click on the Advanced Settings.
- In the next windows, go to Inbound Rules.
- Click on the New rule button.
- Select the Program option and Next.
- Go to Program’s path and choose OpenVPN.
- On the Action window, select Allow the connection.
- Let all the three options checked and click Next.
- Set the name and description, and then click Finish.
At the same time, this step-by-step guide should resolve OpenVPN not working on Windows 11, so you can use the method on the newest OS version without problems.
How can I fix OpenVPN not working on Windows 10?
1. Add an exception to the firewall
- Press the Win key, type firewall, and open Firewall & network protection
- Click Allow an app through the firewall
- Click Change settings (you need admin rights)
- Search for OpenVPN in this list and check its boxes for Private and Public
- If it’s not in this list, click Allow another app to browse and select it
It’s possible that your firewall didn’t whitelist OpenVPN when you installed the client. In that case, you have to manually add an exception for it in the system firewall.
If another application is responsible for your computer’s firewall, make sure to adjust the above settings accordingly.
To quickly test this theory, you can temporarily disable the firewall and check if OpenVPN works properly on Windows 10 now.
But don’t forget to turn it back on since you risk exposing your home network to vulnerabilities.
2. Use a reliable VPN client with OpenVPN support
If you’re trying and failing to get the OpenVPN to work on Windows 10, consider getting a commercial VPN app that supports the OpenVPN protocol.
And we can’t think of a better option than Private Internet Access. This software supports multiple protocols, including OpenVPN.
Some PC issues are hard to tackle, especially when it comes to corrupted repositories or missing Windows files. If you are having troubles fixing an error, your system may be partially broken.
We recommend installing Restoro, a tool that will scan your machine and identify what the fault is.
Click here to download and start repairing.
This VPN is compatible with all major operating systems and also has a manual configuration option for OpenVPN for those of you who want to add it directly to a supported router.
More about Private Internet Access
- 35 000+ servers in 80+ countries
- Split tunneling functionality
- Private DNS address on each server
- Zero-logs policy
- Bypass geo-blocking restrictions from other regions
- Compatibility with any devices like Windows, macOS, Android, or iOS
Private Internet Access
Utilize this leading VPN software to set up OpenVPN on your Windows device for complete privacy.
3. Whitelist OpenVPN in your antivirus
If your anti-malware application throws errors when you try to use OpenVPN on Windows 10, it could mean that it’s blocking the client or protocol.
However, it’s a false positive. In that case, make sure to add OpenVPN to the whitelist to prevent your antivirus from blocking your VPN.
As in the previous solution, you can quickly test it by temporarily deactivating the real-time detection engine of your anti-malware tool.
But we suggest turning it back on as soon as you finish the test and not leave your computer exposed to malware attacks.
If you’re interested in an anti-malware tool with built-in VPN functionality, check out our best picks.
4. Reset the TAP adapter
- Right-click the Start button and select Device Manager
- Expand the Network adapters menu
- Look for any TAP drivers, right-click and select Uninstall device
- Open the Action menu and select Scan for hardware changes
The OpenVPN client requires a TAP driver to work properly. If its functionality is broken, it could be the reason why OpenVPN is not working on your Windows 10 PC.
However, you can easily fix this by uninstalling the TAP driver from Device Manager – it should get automatically reinstalled.
As a general rule, it’s essential to keep Windows drivers updated to the latest version.
- Looker vs. Power BI vs. Tableau: Which Tool Is Better For You?
- How to Change Real Time Update Speed in Task Manager
- Fix: HP Support Assistant Stuck on Creating a Restore Point
5. Check if the DHCP service is running
- Press the Win key, type services, and open Services
- Right-click DHCP Client and select Properties
- Set Startup type to Automatic
- Click OK
Many OpenVPN users report seeing the Initialization Sequence Completed with errors message on Windows 10.
It signals a problem with the DHCP client, which you can restart using the instructions above.
6. Flush DNS and reset Winsock
- Run Command Prompt as admin: press Ctrl + R, type cmd, hold Ctrl + Shift, and press Enter
- Copy and paste the next lines (press Enter between each line)
ipconfig /flushdns

ipconfig /registerdns

ipconfig /release

ipconfig /renew

NETSH winsock reset catalog

NETSH int ipv4 reset reset.log

NETSH int ipv6 reset reset.log

exit
Restart your PC to apply the new changes.
The DNS cache and Winsock configuration are responsible for your computer connectivity.
If they’re not initialized properly, it could be the reason why OpenVPN isn’t working on Windows 10.
To recap, if your OpenVPN configuration fails to work on Windows 10, you can fix this issue by adding an exception to the firewall and whitelisting OpenVPN in your antivirus.
You can also reset the TAP adapter, check if the DHCP service is running, as well as flush your DNS and reset Winsock.
But we suggest opting for a trustworthy VPN like Private Internet Access It has built-in support for the OpenVPN protocol, which means that you shouldn’t see any errors anymore.
Learn everything about OpenVPN to master this VPN protocol and client. Also, visit our VPN Troubleshooting Hub whenever you need a VPN quick fix.
Still having issues? Fix them with this tool:
SPONSORED
If the advices above haven’t solved your issue, your PC may experience deeper Windows problems. We recommend downloading this PC Repair tool (rated Great on TrustPilot.com) to easily address them. After installation, simply click the Start Scan button and then press on Repair All.
![]()
Newsletter
21 декабря 2016 г. 12:46:54
Если вы не можете подключиться к серверам b.VPN в Windows 10, 8.1, 8 или Windows 7, и вы получили сообщение об ошибке «Пожалуйста, установите драйвер TAP для использования OpenVPN», это может быть вызвано рядом причин. Одной из причин, по которым может возникнуть эта проблема, является наличие в вашей системе стороннего файла установки OpenVPN.
Чтобы устранить эту проблему, выполните следующие действия:
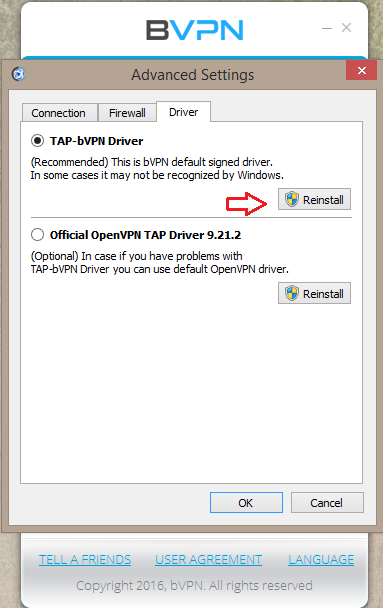
В главном окне b.VPN нажмите кнопку «Gear», чтобы открыть окно «Дополнительные настройки».

Нажмите «Драйвер».

Ниже «TAP-VPN Driver» нажмите «Переустановить».
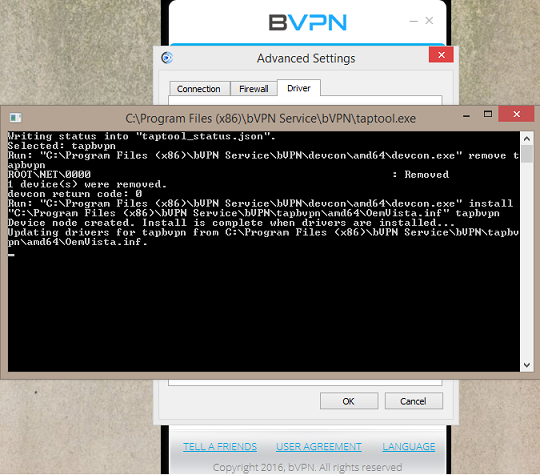
Подождите, пока «TAP-VPN Driver» будет установлен.
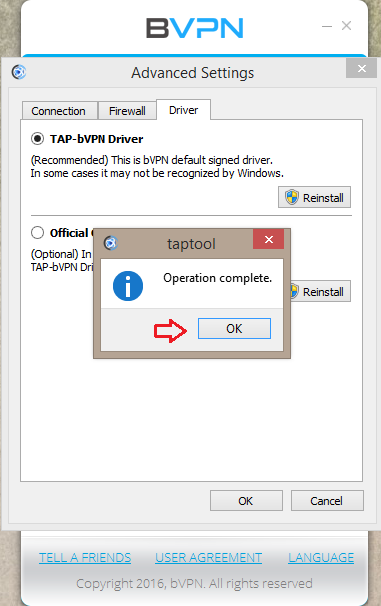
Вы получите уведомление о том, что «Операция завершена». Нажмите «ОК».
Снова нажмите «ОК».
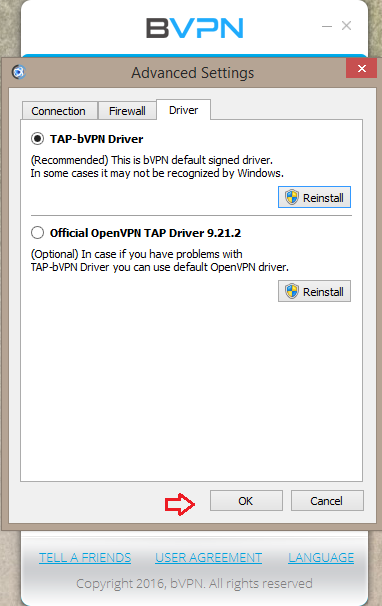
Теперь попробуйте «Подключиться».
Если проблема не устранена, попробуйте выполнить следующее:
Опять же, clicGear «, затем нажмите« Драйвер ».
Теперь включите «Официальный OpenVPN TAP Driver 9.21.2» и нажмите «Установить».
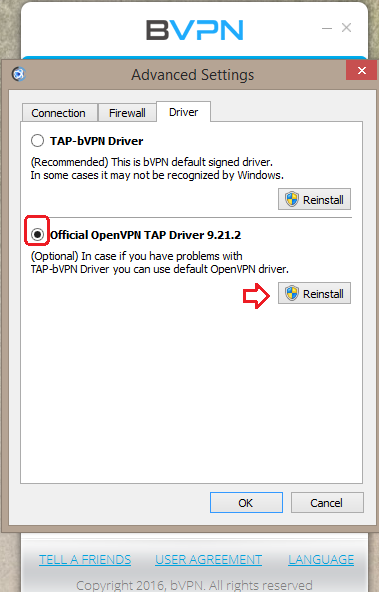
Подождите, пока «Официальный драйвер OpenVPN TAP 9.21.2» будет установлен.
Вы получите уведомление о том, что «Операция завершена». Нажмите «ОК».
Снова нажмите «ОК».