Tweak your settings to secure an unbreakable VPN connection
by Elena Constantinescu
Elena started writing professionally in 2010 and hasn’t stopped exploring the tech world since. With a firm grasp of software reviewing and content editing, she is always trying… read more
Updated on January 18, 2023
Reviewed by
Edgar Nicov

Since the dial-up Internet era, Edgar was interested in online resources. From forums to e-commerce websites, he started digging into how those resources could generate revenue. Today he… read more
- OpenVPN is one of the most popular VPN protocols, thanks to its superior security and connection speed.
- You can also use an official OpenVPN client for free.
- Many users report that OpenVPN is not working on their Windows 10 PCs.
- If you’re one of them, discover our easy workarounds, like adding an exception to the system firewall.
OpenVPN is an open-source VPN client and VPN protocol with immense popularity, thanks to high security and excellent connection speed.
You can separately download and install the OpenVPN client on all popular devices for free if you want to create a secure tunnel to the web.
Or, you can turn to a commercial VPN provider that adopts OpenVPN.
However, OpenVPN may stop working on Windows 10 computers, due to various issues. If you’re encountering this scenario, here’s what you need to do.
Speaking of scenarios, there are several errors that may appear when you have problems with OpenVPN, many users report issues when attempting to start up the app:
- OpenVPN GUI not opening
- Openvpnagent request error in Windows 7, Windows 10 or Windows 11
- Connecting to the Management interface failed in OpenVPN
Meanwhile, others manage to launch it only to encounter severe disruptions afterward:
- OpenVPNcrashing in Windows 10 or OpenVPN stopped working all of a sudden
- OpenVPN connected but not working windows 10
- DNS not working in Windows 10 with OpenVPN
- TAP mode is not supported in OpenVPN
- OpenVPN service is not available
- Error attempting to connect to the selected server in OpenVPN
- OpenVPN socket protect error
- OpenVPN Windows Firewall not working
Below you will find easy-to-follow instructions that should help fix any of the above-mentioned errors and be able to browse the web through a secure OpenVPN tunnel.
How do I enable OpenVPN in Firewall on Windows 10?
In case you have OpenVPN connected but not working in Windows 10, you can enable it by changing a few settings in your firewall security.
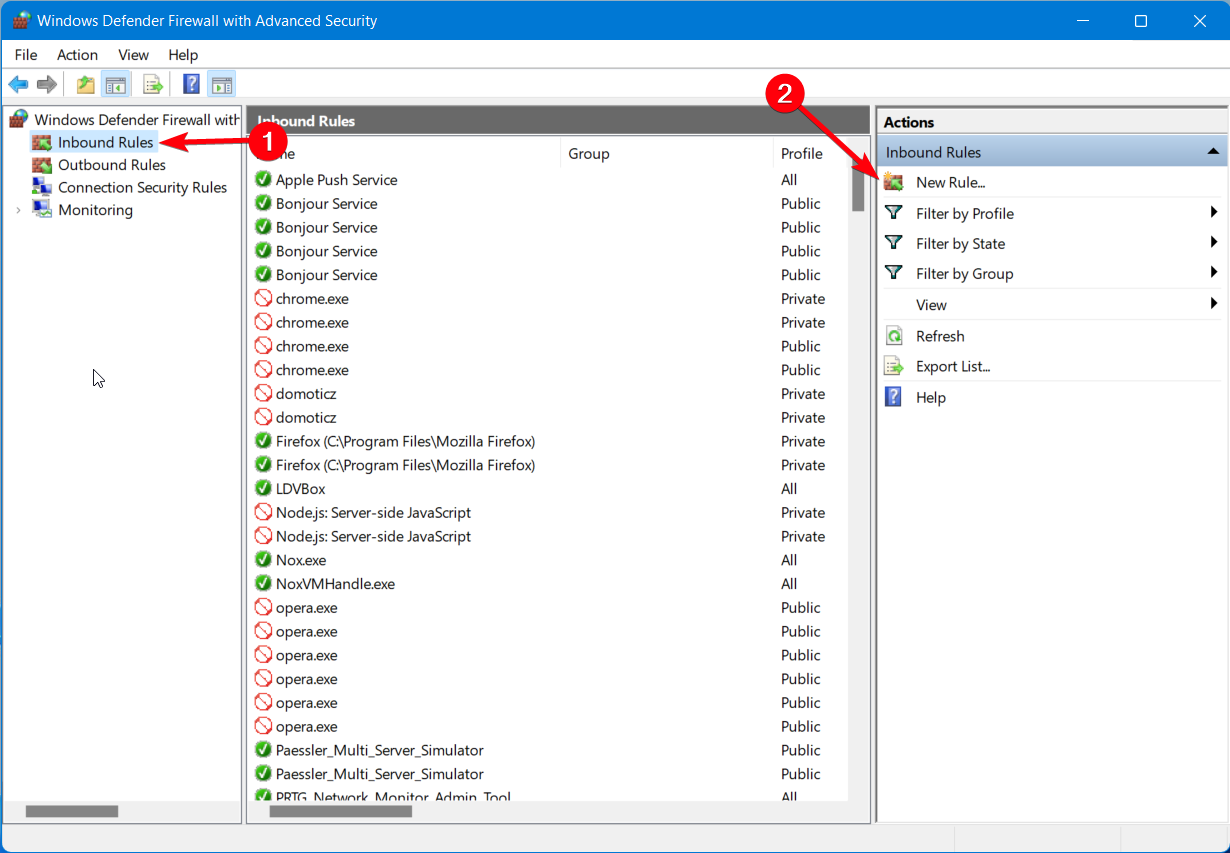
Hence, these are the short steps on how to enable OpenVPN in your Firewall:
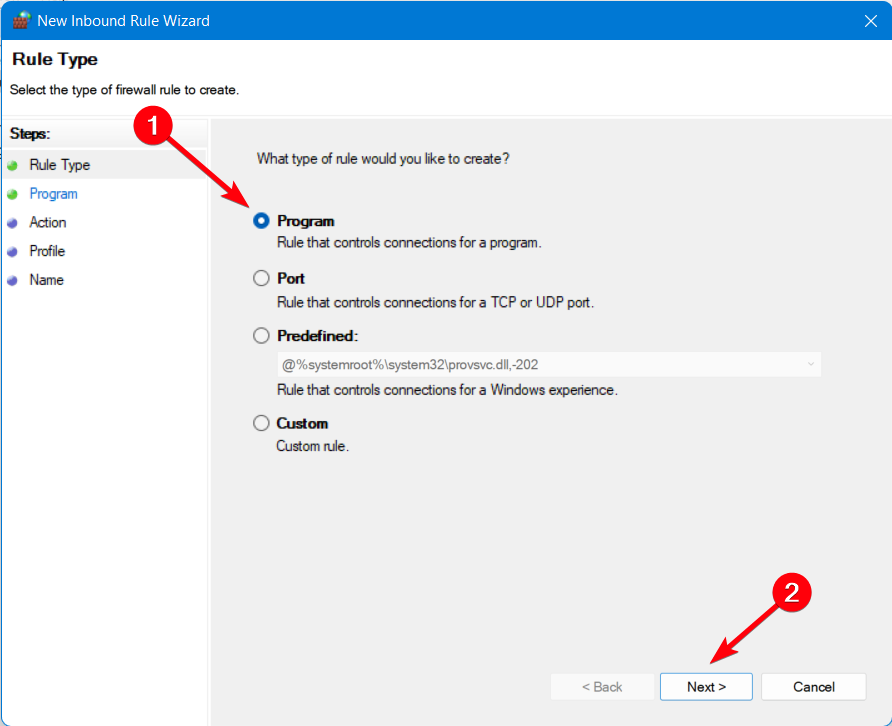
- In the Start Menu, access Firewall settings.

- Click on the Advanced Settings.

- In the next windows, go to Inbound Rules.
- Click on the New rule button.

- Select the Program option and Next.

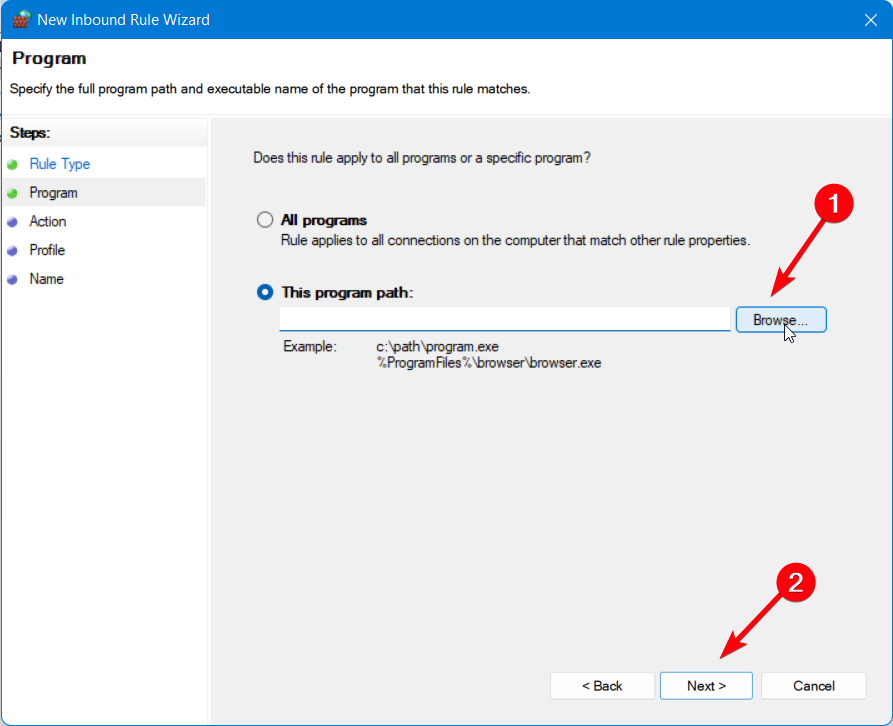
- Go to Program’s path and choose OpenVPN.

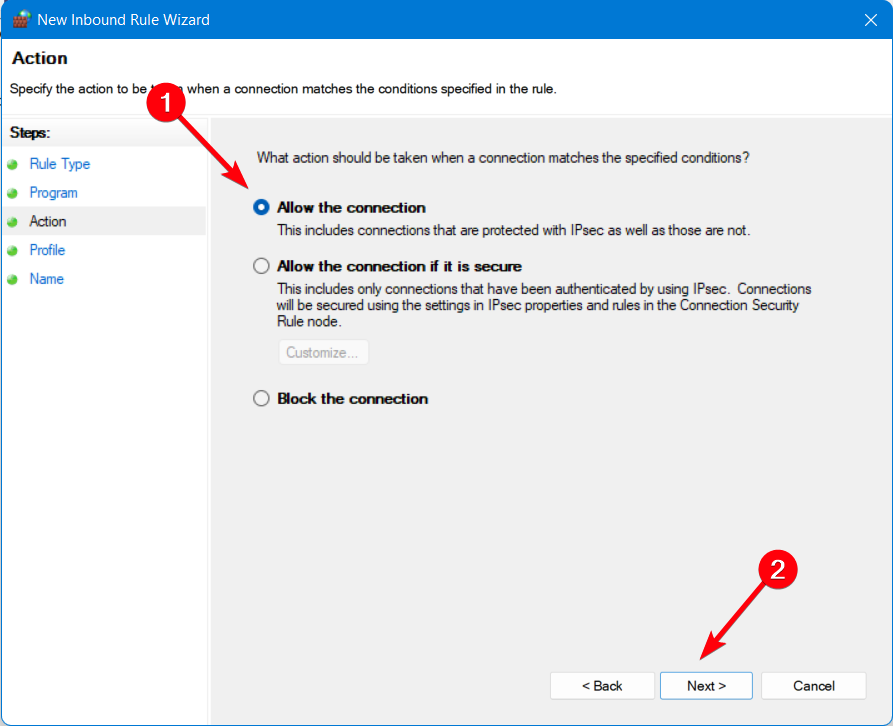
- On the Action window, select Allow the connection.
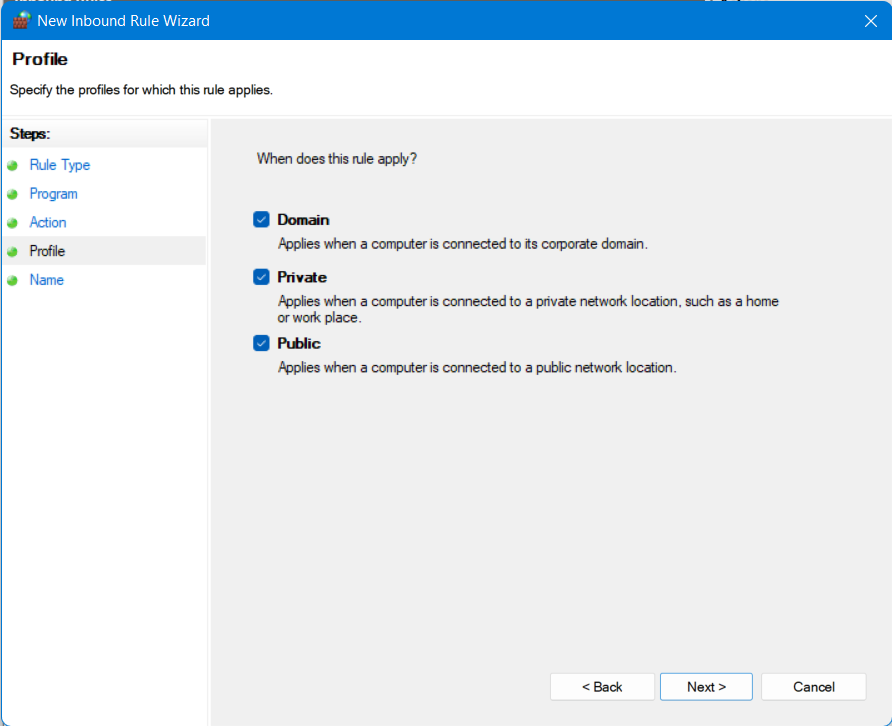
- Let all the three options checked and click Next.
- Set the name and description, and then click Finish.
At the same time, this step-by-step guide should resolve OpenVPN not working on Windows 11, so you can use the method on the newest OS version without problems.
How can I fix OpenVPN not working on Windows 10?
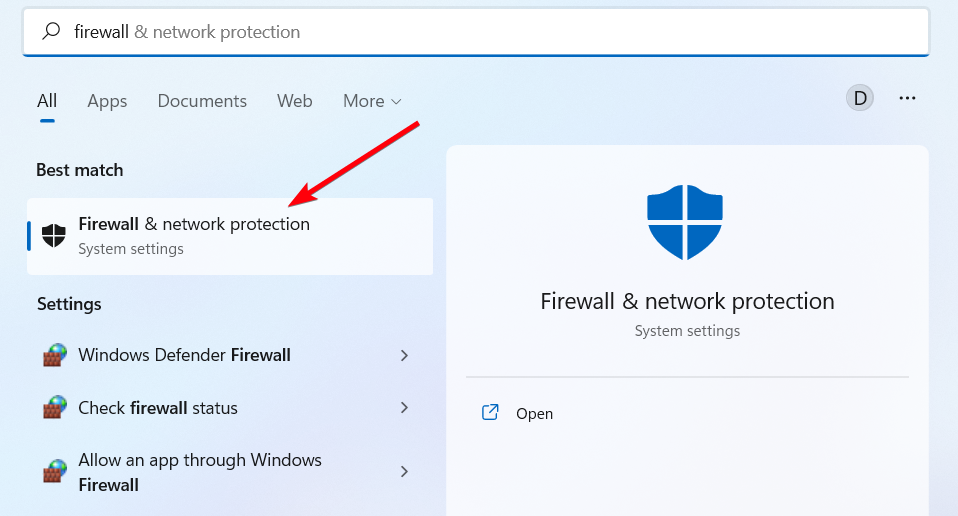
1. Add an exception to the firewall
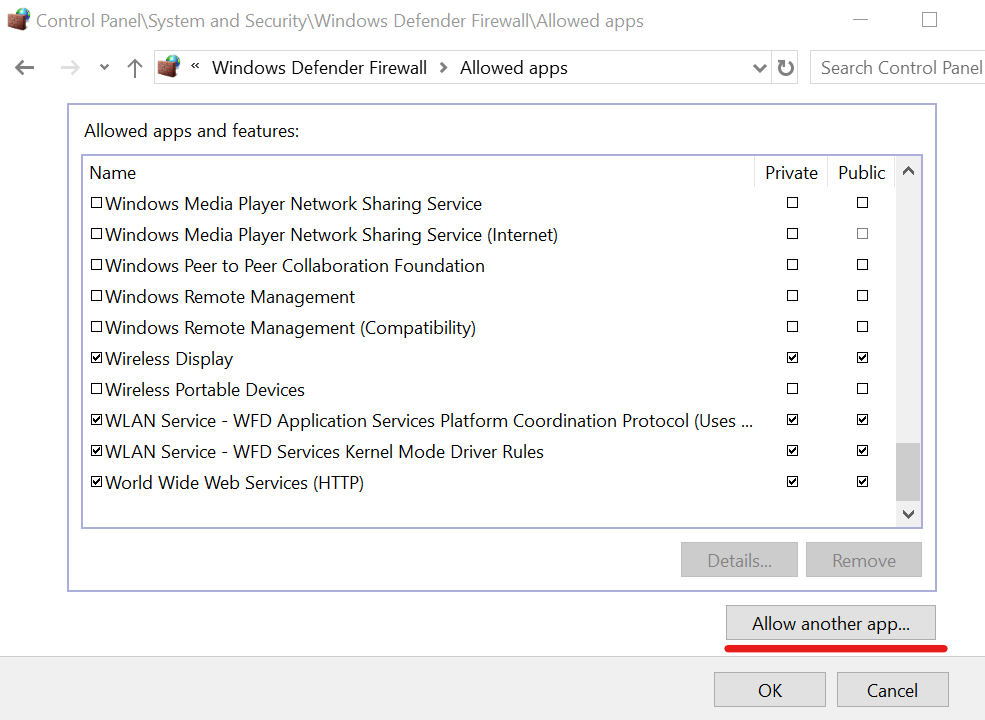
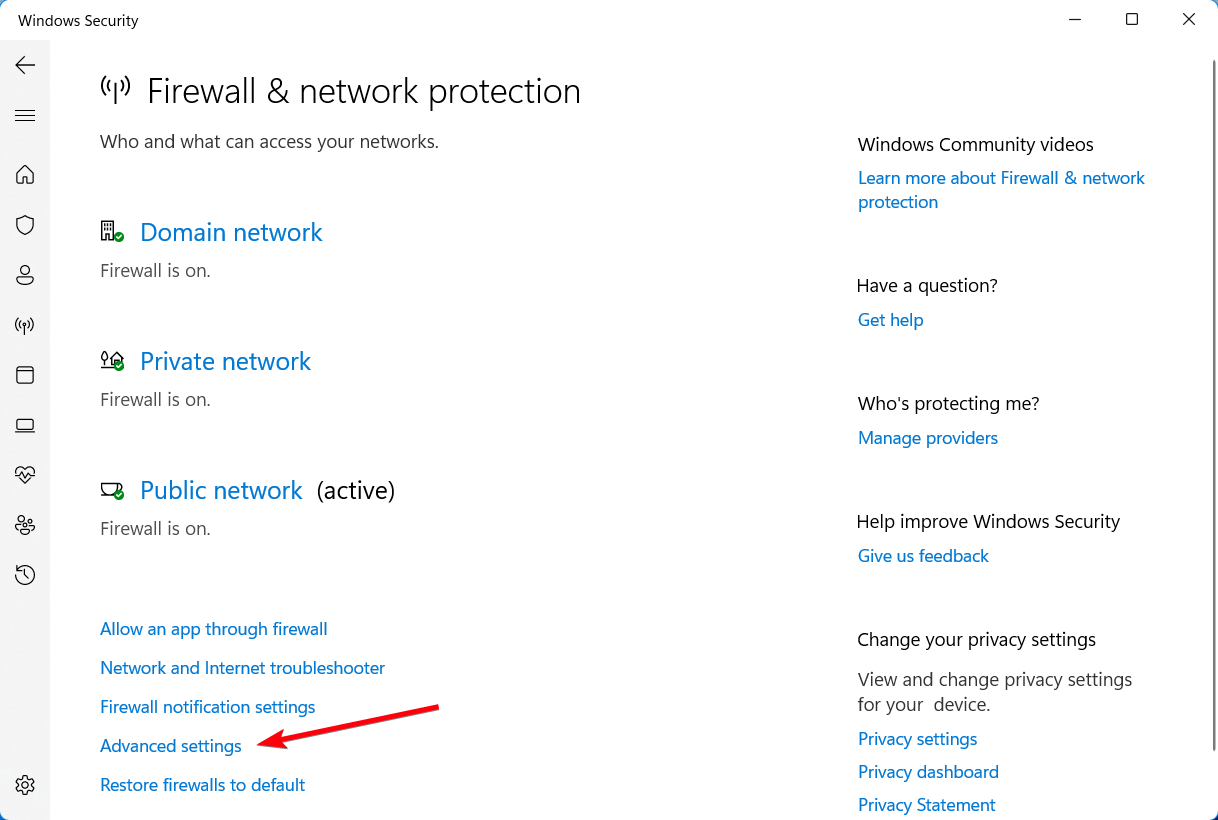
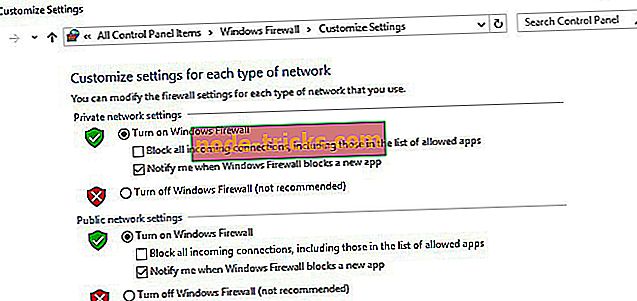
- Press the Win key, type firewall, and open Firewall & network protection
- Click Allow an app through the firewall
- Click Change settings (you need admin rights)
- Search for OpenVPN in this list and check its boxes for Private and Public
- If it’s not in this list, click Allow another app to browse and select it
It’s possible that your firewall didn’t whitelist OpenVPN when you installed the client. In that case, you have to manually add an exception for it in the system firewall.
If another application is responsible for your computer’s firewall, make sure to adjust the above settings accordingly.
To quickly test this theory, you can temporarily disable the firewall and check if OpenVPN works properly on Windows 10 now.
But don’t forget to turn it back on since you risk exposing your home network to vulnerabilities.
2. Use a reliable VPN client with OpenVPN support
If you’re trying and failing to get the OpenVPN to work on Windows 10, consider getting a commercial VPN app that supports the OpenVPN protocol.
And we can’t think of a better option than Private Internet Access. This software supports multiple protocols, including OpenVPN.
Some PC issues are hard to tackle, especially when it comes to corrupted repositories or missing Windows files. If you are having troubles fixing an error, your system may be partially broken.
We recommend installing Restoro, a tool that will scan your machine and identify what the fault is.
Click here to download and start repairing.
This VPN is compatible with all major operating systems and also has a manual configuration option for OpenVPN for those of you who want to add it directly to a supported router.
More about Private Internet Access
- 35 000+ servers in 80+ countries
- Split tunneling functionality
- Private DNS address on each server
- Zero-logs policy
- Bypass geo-blocking restrictions from other regions
- Compatibility with any devices like Windows, macOS, Android, or iOS
Private Internet Access
Utilize this leading VPN software to set up OpenVPN on your Windows device for complete privacy.
3. Whitelist OpenVPN in your antivirus
If your anti-malware application throws errors when you try to use OpenVPN on Windows 10, it could mean that it’s blocking the client or protocol.
However, it’s a false positive. In that case, make sure to add OpenVPN to the whitelist to prevent your antivirus from blocking your VPN.
As in the previous solution, you can quickly test it by temporarily deactivating the real-time detection engine of your anti-malware tool.
But we suggest turning it back on as soon as you finish the test and not leave your computer exposed to malware attacks.
If you’re interested in an anti-malware tool with built-in VPN functionality, check out our best picks.
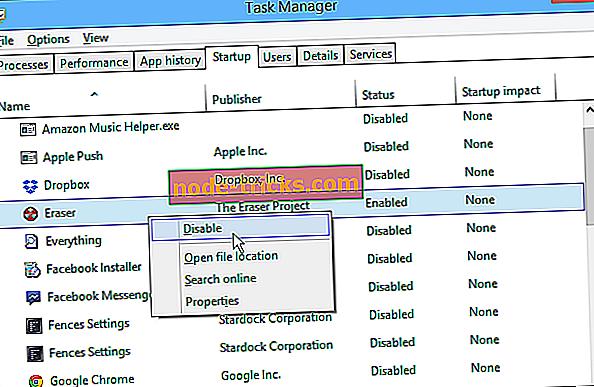
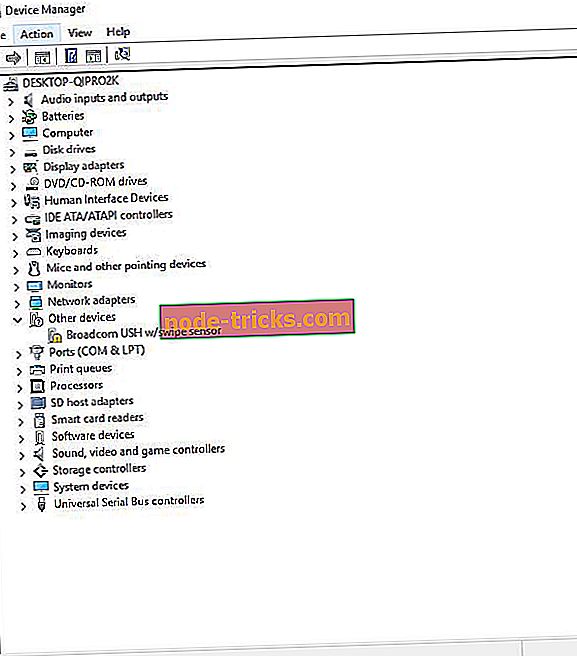
4. Reset the TAP adapter
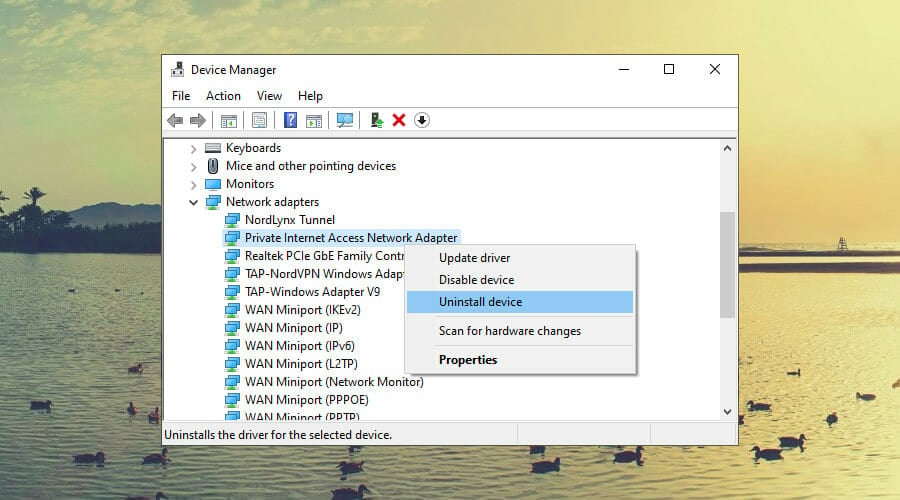
- Right-click the Start button and select Device Manager
- Expand the Network adapters menu
- Look for any TAP drivers, right-click and select Uninstall device
- Open the Action menu and select Scan for hardware changes
The OpenVPN client requires a TAP driver to work properly. If its functionality is broken, it could be the reason why OpenVPN is not working on your Windows 10 PC.
However, you can easily fix this by uninstalling the TAP driver from Device Manager – it should get automatically reinstalled.
As a general rule, it’s essential to keep Windows drivers updated to the latest version.
- Looker vs. Power BI vs. Tableau: Which Tool Is Better For You?
- How to Change Real Time Update Speed in Task Manager
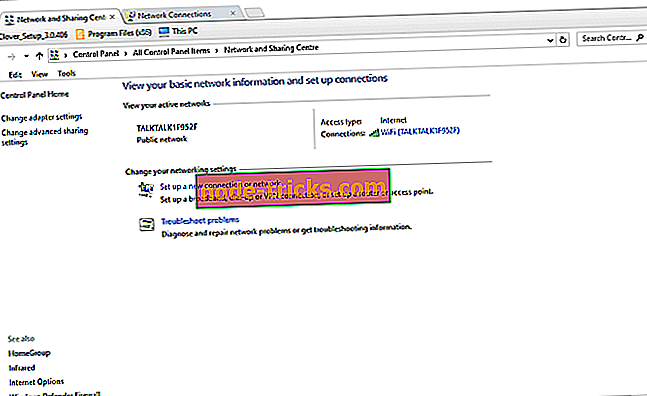
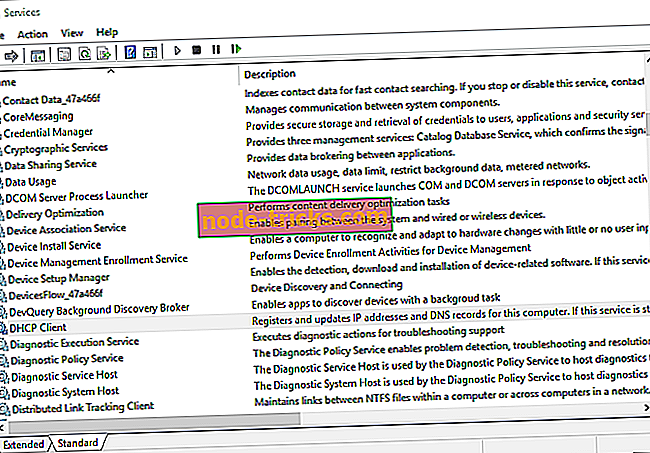
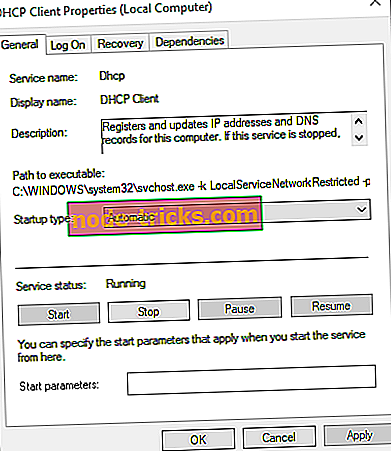
5. Check if the DHCP service is running
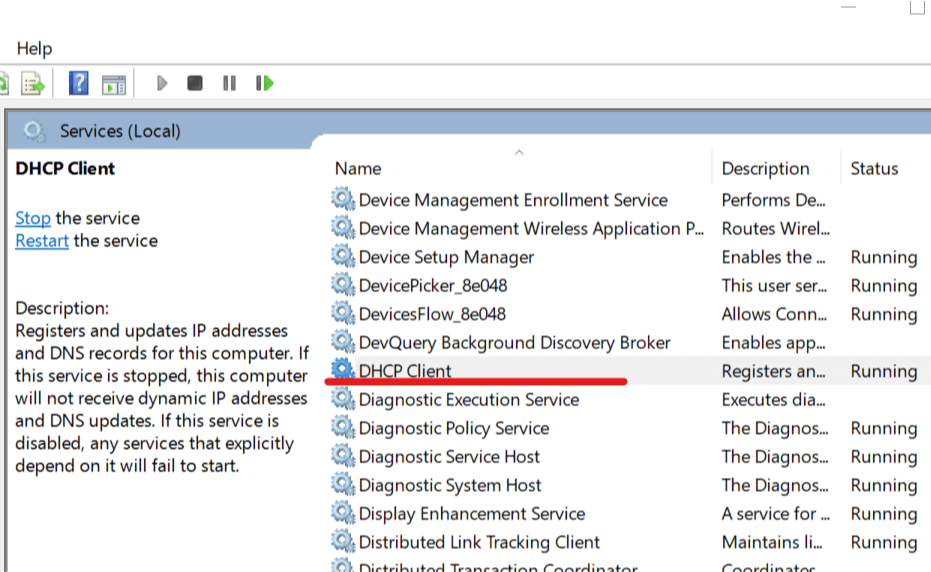
- Press the Win key, type services, and open Services
- Right-click DHCP Client and select Properties
- Set Startup type to Automatic
- Click OK
Many OpenVPN users report seeing the Initialization Sequence Completed with errors message on Windows 10.
It signals a problem with the DHCP client, which you can restart using the instructions above.
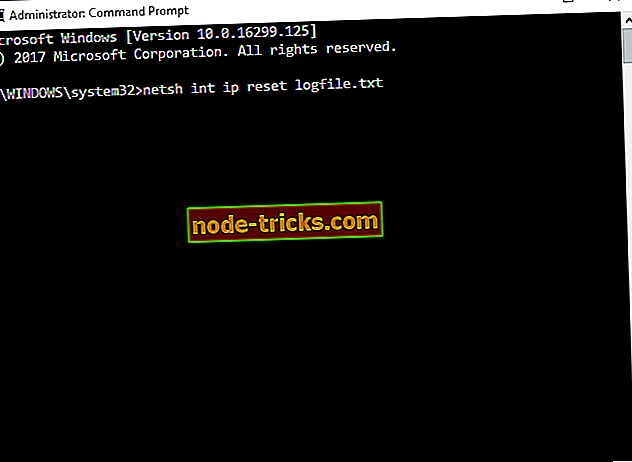
6. Flush DNS and reset Winsock
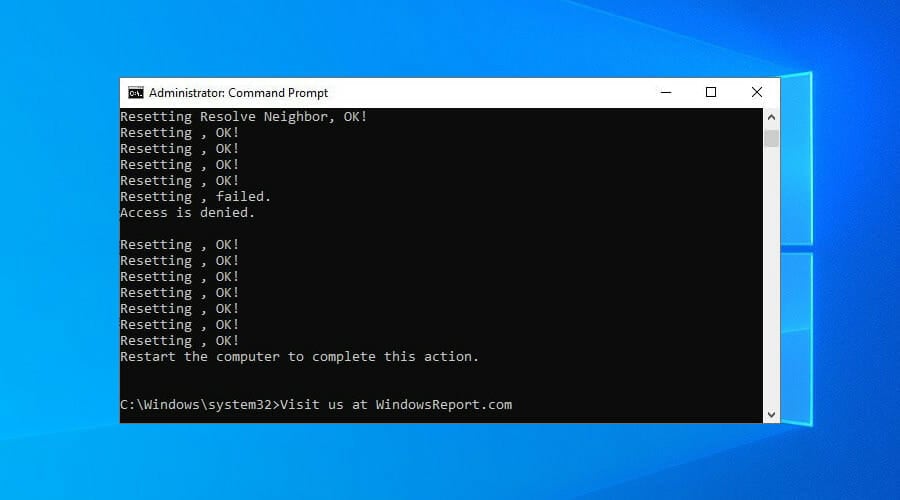
- Run Command Prompt as admin: press Ctrl + R, type cmd, hold Ctrl + Shift, and press Enter
- Copy and paste the next lines (press Enter between each line)
ipconfig /flushdns

ipconfig /registerdns

ipconfig /release

ipconfig /renew

NETSH winsock reset catalog

NETSH int ipv4 reset reset.log

NETSH int ipv6 reset reset.log

exit
Restart your PC to apply the new changes.
The DNS cache and Winsock configuration are responsible for your computer connectivity.
If they’re not initialized properly, it could be the reason why OpenVPN isn’t working on Windows 10.
To recap, if your OpenVPN configuration fails to work on Windows 10, you can fix this issue by adding an exception to the firewall and whitelisting OpenVPN in your antivirus.
You can also reset the TAP adapter, check if the DHCP service is running, as well as flush your DNS and reset Winsock.
But we suggest opting for a trustworthy VPN like Private Internet Access It has built-in support for the OpenVPN protocol, which means that you shouldn’t see any errors anymore.
Learn everything about OpenVPN to master this VPN protocol and client. Also, visit our VPN Troubleshooting Hub whenever you need a VPN quick fix.
Still having issues? Fix them with this tool:
SPONSORED
If the advices above haven’t solved your issue, your PC may experience deeper Windows problems. We recommend downloading this PC Repair tool (rated Great on TrustPilot.com) to easily address them. After installation, simply click the Start Scan button and then press on Repair All.
![]()
Newsletter
Tweak your settings to secure an unbreakable VPN connection
by Elena Constantinescu
Elena started writing professionally in 2010 and hasn’t stopped exploring the tech world since. With a firm grasp of software reviewing and content editing, she is always trying… read more
Updated on January 18, 2023
Reviewed by
Edgar Nicov
Since the dial-up Internet era, Edgar was interested in online resources. From forums to e-commerce websites, he started digging into how those resources could generate revenue. Today he… read more
- OpenVPN is one of the most popular VPN protocols, thanks to its superior security and connection speed.
- You can also use an official OpenVPN client for free.
- Many users report that OpenVPN is not working on their Windows 10 PCs.
- If you’re one of them, discover our easy workarounds, like adding an exception to the system firewall.
OpenVPN is an open-source VPN client and VPN protocol with immense popularity, thanks to high security and excellent connection speed.
You can separately download and install the OpenVPN client on all popular devices for free if you want to create a secure tunnel to the web.
Or, you can turn to a commercial VPN provider that adopts OpenVPN.
However, OpenVPN may stop working on Windows 10 computers, due to various issues. If you’re encountering this scenario, here’s what you need to do.
Speaking of scenarios, there are several errors that may appear when you have problems with OpenVPN, many users report issues when attempting to start up the app:
- OpenVPN GUI not opening
- Openvpnagent request error in Windows 7, Windows 10 or Windows 11
- Connecting to the Management interface failed in OpenVPN
Meanwhile, others manage to launch it only to encounter severe disruptions afterward:
- OpenVPNcrashing in Windows 10 or OpenVPN stopped working all of a sudden
- OpenVPN connected but not working windows 10
- DNS not working in Windows 10 with OpenVPN
- TAP mode is not supported in OpenVPN
- OpenVPN service is not available
- Error attempting to connect to the selected server in OpenVPN
- OpenVPN socket protect error
- OpenVPN Windows Firewall not working
Below you will find easy-to-follow instructions that should help fix any of the above-mentioned errors and be able to browse the web through a secure OpenVPN tunnel.
How do I enable OpenVPN in Firewall on Windows 10?
In case you have OpenVPN connected but not working in Windows 10, you can enable it by changing a few settings in your firewall security.
Hence, these are the short steps on how to enable OpenVPN in your Firewall:
- In the Start Menu, access Firewall settings.
- Click on the Advanced Settings.
- In the next windows, go to Inbound Rules.
- Click on the New rule button.
- Select the Program option and Next.
- Go to Program’s path and choose OpenVPN.
- On the Action window, select Allow the connection.
- Let all the three options checked and click Next.
- Set the name and description, and then click Finish.
At the same time, this step-by-step guide should resolve OpenVPN not working on Windows 11, so you can use the method on the newest OS version without problems.
How can I fix OpenVPN not working on Windows 10?
1. Add an exception to the firewall
- Press the Win key, type firewall, and open Firewall & network protection
- Click Allow an app through the firewall
- Click Change settings (you need admin rights)
- Search for OpenVPN in this list and check its boxes for Private and Public
- If it’s not in this list, click Allow another app to browse and select it
It’s possible that your firewall didn’t whitelist OpenVPN when you installed the client. In that case, you have to manually add an exception for it in the system firewall.
If another application is responsible for your computer’s firewall, make sure to adjust the above settings accordingly.
To quickly test this theory, you can temporarily disable the firewall and check if OpenVPN works properly on Windows 10 now.
But don’t forget to turn it back on since you risk exposing your home network to vulnerabilities.
2. Use a reliable VPN client with OpenVPN support
If you’re trying and failing to get the OpenVPN to work on Windows 10, consider getting a commercial VPN app that supports the OpenVPN protocol.
And we can’t think of a better option than Private Internet Access. This software supports multiple protocols, including OpenVPN.
Some PC issues are hard to tackle, especially when it comes to corrupted repositories or missing Windows files. If you are having troubles fixing an error, your system may be partially broken.
We recommend installing Restoro, a tool that will scan your machine and identify what the fault is.
Click here to download and start repairing.
This VPN is compatible with all major operating systems and also has a manual configuration option for OpenVPN for those of you who want to add it directly to a supported router.
More about Private Internet Access
- 35 000+ servers in 80+ countries
- Split tunneling functionality
- Private DNS address on each server
- Zero-logs policy
- Bypass geo-blocking restrictions from other regions
- Compatibility with any devices like Windows, macOS, Android, or iOS
Private Internet Access
Utilize this leading VPN software to set up OpenVPN on your Windows device for complete privacy.
3. Whitelist OpenVPN in your antivirus
If your anti-malware application throws errors when you try to use OpenVPN on Windows 10, it could mean that it’s blocking the client or protocol.
However, it’s a false positive. In that case, make sure to add OpenVPN to the whitelist to prevent your antivirus from blocking your VPN.
As in the previous solution, you can quickly test it by temporarily deactivating the real-time detection engine of your anti-malware tool.
But we suggest turning it back on as soon as you finish the test and not leave your computer exposed to malware attacks.
If you’re interested in an anti-malware tool with built-in VPN functionality, check out our best picks.
4. Reset the TAP adapter
- Right-click the Start button and select Device Manager
- Expand the Network adapters menu
- Look for any TAP drivers, right-click and select Uninstall device
- Open the Action menu and select Scan for hardware changes
The OpenVPN client requires a TAP driver to work properly. If its functionality is broken, it could be the reason why OpenVPN is not working on your Windows 10 PC.
However, you can easily fix this by uninstalling the TAP driver from Device Manager – it should get automatically reinstalled.
As a general rule, it’s essential to keep Windows drivers updated to the latest version.
- Looker vs. Power BI vs. Tableau: Which Tool Is Better For You?
- How to Change Real Time Update Speed in Task Manager
- Fix: HP Support Assistant Stuck on Creating a Restore Point
- How to Check Your Windows Experience Index on Windows 11
5. Check if the DHCP service is running
- Press the Win key, type services, and open Services
- Right-click DHCP Client and select Properties
- Set Startup type to Automatic
- Click OK
Many OpenVPN users report seeing the Initialization Sequence Completed with errors message on Windows 10.
It signals a problem with the DHCP client, which you can restart using the instructions above.
6. Flush DNS and reset Winsock
- Run Command Prompt as admin: press Ctrl + R, type cmd, hold Ctrl + Shift, and press Enter
- Copy and paste the next lines (press Enter between each line)
ipconfig /flushdns

ipconfig /registerdns

ipconfig /release

ipconfig /renew

NETSH winsock reset catalog

NETSH int ipv4 reset reset.log

NETSH int ipv6 reset reset.log

exit
Restart your PC to apply the new changes.
The DNS cache and Winsock configuration are responsible for your computer connectivity.
If they’re not initialized properly, it could be the reason why OpenVPN isn’t working on Windows 10.
To recap, if your OpenVPN configuration fails to work on Windows 10, you can fix this issue by adding an exception to the firewall and whitelisting OpenVPN in your antivirus.
You can also reset the TAP adapter, check if the DHCP service is running, as well as flush your DNS and reset Winsock.
But we suggest opting for a trustworthy VPN like Private Internet Access It has built-in support for the OpenVPN protocol, which means that you shouldn’t see any errors anymore.
Learn everything about OpenVPN to master this VPN protocol and client. Also, visit our VPN Troubleshooting Hub whenever you need a VPN quick fix.
Still having issues? Fix them with this tool:
SPONSORED
If the advices above haven’t solved your issue, your PC may experience deeper Windows problems. We recommend downloading this PC Repair tool (rated Great on TrustPilot.com) to easily address them. After installation, simply click the Start Scan button and then press on Repair All.
![]()
Newsletter
OpenVPN — это VPN-клиент с открытым исходным кодом, который вы можете использовать с различными провайдерами VPN. Пока ваш провайдер VPN поддерживает протокол OpenVPN TCP или UDP, вы можете установить соединение OpenVPN.
Вы можете запустить клиент OpenVPN со сценариями и настроить соединения через его файлы настроек.
Однако OpenVPN все еще может столкнуться с некоторыми трудностями. Это несколько разрешений, которые могут исправить соединения OpenVPN в Windows 10.
Как я могу исправить проблемы запуска OpenVPN в Windows 10?
- Отключить брандмауэр Windows
- Отключить стороннее антивирусное программное обеспечение
- Перезапустите адаптер TAP
- Переустановите и обновите драйвер TAP-Windows
- Проверьте, работает ли служба DHCP
- Очистить DNS
- Сброс Winsock
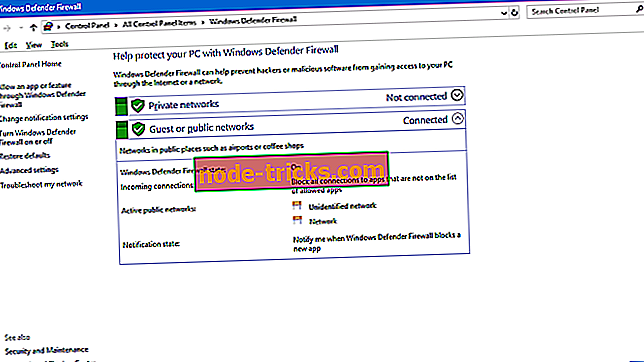
1. Отключите брандмауэр Windows
Брандмауэры и VPN не всегда хорошо сочетаются друг с другом. Брандмауэр Windows может заблокировать ваше соединение OpenVPN, если вы не настроили исходящие порты .
Лучший способ проверить, так ли это, — отключить брандмауэр Windows. Вот как вы можете отключить брандмауэр в Windows 10:
- Нажмите кнопку Cortana на панели задач, чтобы открыть это приложение.
- Введите ключевое слово «Брандмауэр Windows» в поле поиска и выберите, чтобы открыть Брандмауэр Защитника Windows .

- Нажмите Включить или выключить брандмауэр Защитника Windows, чтобы открыть настройки, показанные на снимке ниже.

- Выберите оба параметра « Отключить брандмауэр Защитника Windows» .
- Нажмите кнопку ОК .
Вы хотите проверить, блокирует ли ваш брандмауэр определенные порты? Следуйте простым шагам из этого руководства, чтобы узнать.
2. Отключите стороннее антивирусное программное обеспечение
Также обратите внимание, что стороннее антивирусное программное обеспечение может препятствовать VPN с их собственными брандмауэрами. Таким образом, отключение сторонних антивирусных утилит может также помочь исправить соединение OpenVPN.
Вы можете временно отключить некоторые антивирусные программы, выбрав отключить настройки в их контекстных меню. Или вы также можете удалить программное обеспечение из автозагрузки Windows следующим образом:
- Щелкните правой кнопкой мыши панель задач Windows и выберите « Диспетчер задач» в открывшемся контекстном меню.
- Откройте вкладку «Автозагрузка» в окне «Диспетчер задач».

- Выберите антивирусное программное обеспечение и нажмите кнопку « Отключить» .
- Затем перезагрузите свой ноутбук или рабочий стол.
Если вы хотите узнать, как добавлять или удалять загрузочные приложения в Windows 10, ознакомьтесь с этим простым руководством . Кроме того, если вы не можете открыть диспетчер задач в Windows 10, не беспокойтесь. У нас есть правильное решение для вас.
Если вы хотите заменить свой антивирус на лучший, который хорошо работает с VPN, посмотрите этот список с нашими лучшими выборами.
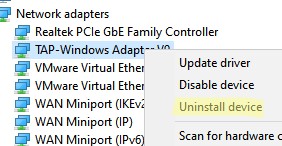
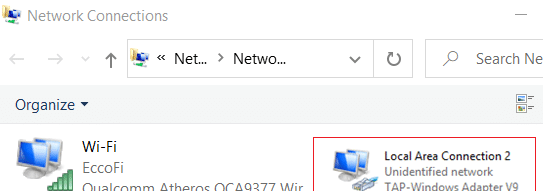
3. Перезапустите адаптер TAP.
Добавление программного обеспечения OpenVPN в Windows также добавляет адаптер TAP-Windows. В одном сообщении об ошибке OpenVPN говорится: « Все адаптеры TAP-Windows в этой системе в настоящее время используются. »
Если вы получаете это сообщение об ошибке, перезапуск адаптера TAP может исправить OpenVPN. Вы можете перезапустить адаптер TAP следующим образом:
- Нажмите сочетание клавиш Windows + R, чтобы открыть аксессуар «Запуск».
- Введите «Панель управления» в «Выполнить» и нажмите кнопку ОК .
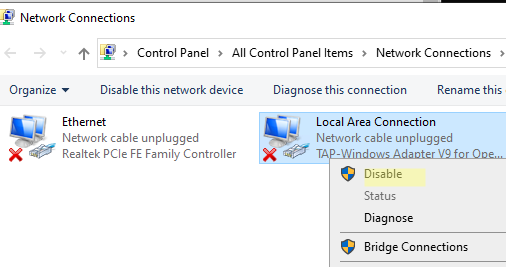
- Нажмите « Центр управления сетями и общим доступом», чтобы открыть настройки панели управления , показанные непосредственно ниже.

- Нажмите Изменить настройки адаптера, чтобы открыть свои подключения, как показано ниже.

- Затем щелкните правой кнопкой мыши Адаптер TAP-Windows и выберите Отключить .
- Щелкните правой кнопкой мыши TAP-Windows Adapter и выберите Enable, чтобы перезапустить адаптер.
Вы не можете открыть панель управления? Посмотрите на это пошаговое руководство, чтобы найти решение.
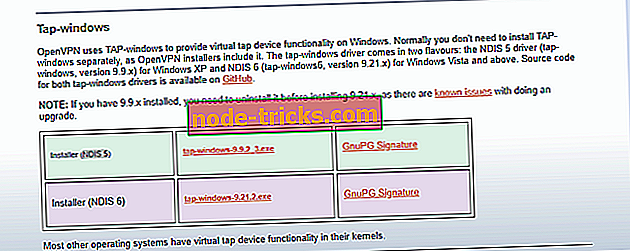
4. Переустановите и обновите драйвер TAP-Windows
Если перезапуск адаптера не помогает, попробуйте переустановить драйвер TAP-Windows. Для этого сначала откройте диспетчер устройств, чтобы удалить адаптер, нажав клавишу Windows + горячую клавишу X.
- Выберите Диспетчер устройств, чтобы открыть окно в кадре прямо ниже.

- Дважды щелкните Сетевые адаптеры, чтобы развернуть список сетевых адаптеров.
- Щелкните правой кнопкой мыши TAP-Windows Adapter и выберите « Удалить устройство» .

- Теперь откройте эту страницу OpenVPN в вашем браузере .
- Прокрутите страницу до конца и нажмите tap-windows-9.21.2.exe, чтобы загрузить последнюю версию драйвера TAP (NDIS 6) для OpenVPN. Драйвер NDIS 5 предназначен для Windows XP.

- Щелкните правой кнопкой мыши исполняемый файл TAP-Windows и выберите « Запуск от имени администратора».
- Перезагрузите Windows после установки драйвера.
Ничего не происходит, когда вы нажимаете на Запуск от имени администратора? Не волнуйтесь, у нас есть правильное решение для вас.
Знаете ли вы, что большинство пользователей Windows 10 имеют устаревшие драйверы? Будьте на шаг впереди, используя это руководство.
5. Проверьте, работает ли служба DHCP
« Последовательность инициализации завершена с ошибками » — это еще одно сообщение об ошибке, которое может открыться для некоторых пользователей OpenVPN. Если это сообщение об ошибке открывается для вас, проверьте, что служба DHCP работает.
Вы можете запустить службу DHCP следующим образом:
- Введите «services.msc» в «Выполнить» и нажмите кнопку « ОК» .
- Прокрутите вниз до DHCP-клиента, показанного на снимке ниже.

- Дважды щелкните DHCP-клиент, чтобы открыть окно его свойств.

- Выберите « Автоматически» в раскрывающемся меню «Тип запуска».
- Затем нажмите кнопку « Начать обслуживание».
- Если DHCP-клиент уже запущен, нажмите кнопки « Стоп» и « Пуск», чтобы перезапустить его.
- Нажмите кнопку Применить и ОК .
DHCP-сервер продолжает останавливаться? Исправьте это прямо сейчас, следуя простым шагам из этого подробного руководства.
6. Очистите DNS
Различные ошибки подключения могут быть связаны с повреждением кэша DNS. Таким образом, очистка кеша DNS может стать потенциальным исправлением для OpenVPN. Вот как вы можете очистить DNS в Windows 10.
- Откройте меню Win + X с помощью клавиши Windows + X.
- Нажмите Командная строка (Администратор) в меню Win + X.
- Введите следующие команды отдельно в окне подсказки:
интерфейс netsh ip удалить arpcache
ipconfig / flushdns
ipconfig / renew
- Закройте командную строку и перезапустите Windows.
Если у вас возникли проблемы с доступом к командной строке от имени администратора, то вам лучше ознакомиться с этим руководством.
7. Сброс Winsock
Сброс поврежденных настроек TCP / IP Winsock также может исправить сообщения об ошибках OpenVPN. Для этого введите «Командная строка» в поле поиска Кортаны.
- Щелкните правой кнопкой мыши Командную строку и выберите Запуск от имени администратора, чтобы открыть ее.
- Затем введите «netsh int ip reset logfile.txt» в командной строке и нажмите клавишу Enter.

- Войдите в каталог сброса netsh winsock и нажмите кнопку возврата.
- Перезагрузите ваш рабочий стол или ноутбук.
Некоторые из этих решений могут исправить ошибки инициализации клиента OpenVPN в Windows 10. Ознакомьтесь с этой статьей, где приведены некоторые более общие советы по исправлению VPN-подключений.
Если у вас есть какие-либо другие предложения или вопросы, не стесняйтесь оставлять их в разделе комментариев ниже, и мы обязательно их рассмотрим.
СВЯЗАННЫЕ ИСТОРИИ, ЧТОБЫ ПРОВЕРИТЬ:
- ИСПРАВЛЕНИЕ: ExpressVPN не запускается в Windows 10
- VPN подключен, но не работает? Вот 9 быстрых решений, чтобы решить эту проблему
- VPN не будет работать с Netflix: вот 8 решений, чтобы это исправить
Примечание: OpenVPN является программным обеспечением VPN. Если у вас возникли проблемы с программой, которую вы загрузили с нашего сайта, то этот раздел для вас.
Программа ZenVPN не запускается.
Проверьте C:Program FilesZenVPN OpenVPN bundlezenvpn.log на наличие сообщений об ошибках.
Как правило, это происходит, когда клиент не может обнаружить OpenVPN на компьютере. Это будет указано в следующей строке в файле лога:
Error communicating with OpenVPN
Если это причина, то попробуйте перейти Control Panel -> Административные инструменты -> Сервесы, местонахождение OpenVPN Service и запустить его. Если служба запускается успешно, и вы можете запустить OpenVPN после этого, убедитесь, что служба настроена на автоматический запуск.
OpenVPN сервис не запускается
Если Oper VPN сервис не запускается, то причину обычно можно найти, если посмотреть на Контрольную панель -> Административные инструменты -> Просмотр событий -> Система.
Самая распространённая причина заключается в проблемах с TAP драйвером. Если лог событий указывает на то, что причина в вашем действии, попробуйте сделать следующее:
- Установите TAP драйвер с сайта OpenVPN
- Установите драйвер TAP и выберите все доступные компоненты во время установки
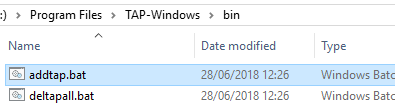
- Run C:Program FilesTAP-Windowsbinaddtap.bat
VPN-соединение установлено, но веб-сайты недоступны
Чаще всего это вызвано ошибкой в Windows, которая предотвращает OpenVPN от изменения имён системных серверов. Попробуйте установить их вручную Google’s public DNS servers- они должны работать независимо от того, подключены вы к VPN или нет.
При запуске OpenVPN сервера или подключения из клиента OpenVPN вы можете столкнуться с ошибкой:
All TAP-Windows adapters on this system are currently in use
Exiting due to fatal error
Или
All wintun adapters on this system are currently in use or disabled
Или
No TAP Adapter Available
Вы можете увидеть эту ошибку логе OpenVPN сервера (файл C:Program FilesOpenVPNlogopenvpn.log) или в клиенте OpenVPN GUI/
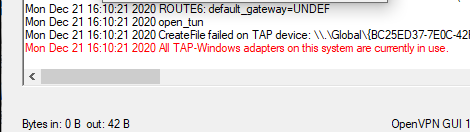
Это известная ошибка, связанная с тем что в Windows не установлены или некорректно работают виртуальные сетевые адаптеры TAP или wintun.
В OpenVPN 2.5+ вместо сетевых адаптеров TAP можно использовать WinTun от разработчиков WireGuard. По словам разработчиков, wintun драйвер работает быстрее чем классический OpenVPN драйвер TAP. Вы можете выбрать какой сетевой драйвер использовать при установке OpenVPN (TAP-Windows6 или Wintun).

Чтобы исправить эту ошибку нужно выполнить один из следующих шагов (расположены в порядке от самого простого к самому сложному):
- Перезапустить TAP-Windows/WinTun через панель управления.
- Переустановить драйвер TAP-Windows/Wintun;
- Создать новый сетевой адаптер для OpenVPN (или другого VPN клиента)
Выведите список всех TAP адаптеров, доступных клиенту OpenVPN:
cd "c:Program FilesOpenVPNbin"
“C:Program FilesOpenVPNbinopenvpn.exe” --show-adapters

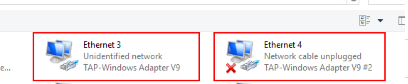
В нашем случае установлен как Wintun, так и TAP адаптер:
'OpenVPN Wintun' {1199219C-C5AD-4722-B195-C80332101710} wintun
'OpenVPN TAP-Windows6' {9C6B25CA-0AF0-4752-AD4A-032947F6A6FD} tap-windows6
Для устранения ошибки обычно достаточно включить и отключить TAP адаптер в панели управления Windows, перезагрузить компьютер или переустановить клиент OpenVPN.
Вы можете включить и отключить сетевой адаптер WinTap из панели управления ncpa.cpl. Щелкните в панели управления по нужному адаптеру (TAP-Windows или Wintun Userspace Tunnel) и выберите Disable. Затем включите его (Enable.)
Также вы можете перезапустить все сетевые интерфейсе OpenVPN TAP с помощью PowerShell:
$TapAdapter= Get-NetAdapter| where {$_.InterfaceDescription -like "*TAP-Windows*"}
Disable-NetAdapter -Name $TapAdapter -Confirm:$false
Enable-NetAdapter -Name $TapAdapter -Confirm:$false

Если предыдущий способ не помог, попробуйте переустановить драйвера для вашего виртуального TAP адаптера вручную
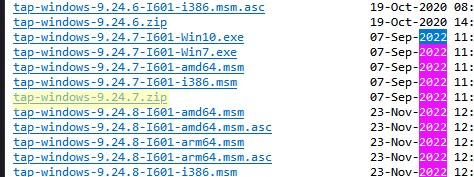
- Скачайте последнюю версию TAP драйвера для Windows здесь (http://build.openvpn.net/downloads/releases/). Например, tap-windows-9.24.7.zip или wintun-amd64-0.8.1.

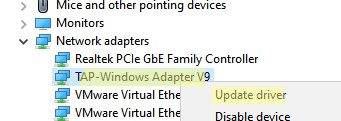
- Распакуйте архив, запустите Device Manager (
devmgmt.msc), щелкните правой кнопкой по сетевому адаптеру TAP-Windows Adapter v9 в секции Network Adapters и выберите Update driver;
- Укажите путь к каталогу с драйвером TAP.
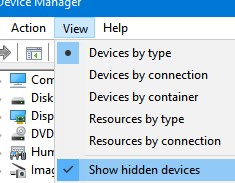
Если вы не видите в панели управления TAP-Windows Adapter V9, откройте консоль Device Manager и включите опцию View-> Show hidden device.
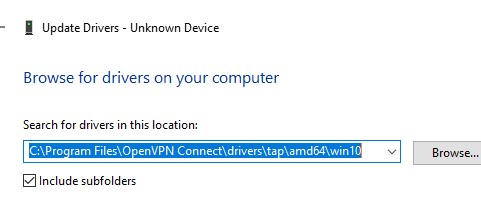
Если в секции Network adapters есть устройства типа unknown device, откройте его свойства, перейдите на вкладку Details и проверьте значение свойства Device instance path.
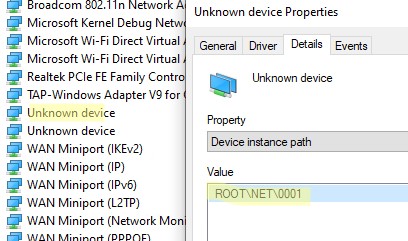
Если здесь указано ROOTNET000, значит попробуйте выполнить авматотический поиск дрвйвера или вручную укажите путь к INF файлу (например C:Program FilesOpenVPN Connectdriverstapamd64win10OemVista.inf). После этого в панели управления появится ваш TAP адаптер.
В Windows 7 драйвер TAP, подписанный с помощью SHA256, не будет работать корректно, пока вы вручную не установите обновление KB4474419.
В самых редких случаях может помочь полное пересоздание TAP/Wintun адаптера.
Перед установкой нужно удалить существующий сетевой адаптер TAP и его драйвер. Для этого запустите программу C:Program FilesTAP-WindowsUninstall.exe или просто удалите устройство из Device Manager (Uninstall device).
Для установки TAP драйвера используется утилита tapinstall.exe.

Распакуйте архив и запустите установочный файл с правами администратора.
В новых версиях OpenVPN для управления виртуальными сетевыми адаптерами используется утилита c:Program FilesOpenVPNbintapctl.exe.
Вывести список сетевых адаптеров OpenVPN:
tapctl.exe list

Удалить адаптер:
tapctl.exe delete "OpenVPN TAP-Windows6"
Создать новый адаптер TAP:
tapctl.exe create
Создать новый wintun адаптер:
tapctl.exe create --hwid wintun
Обязательно проверьте, что новый сетевой адаптер TAP-Windows Adapter появился в списке сетевых подключения в панели управления Windows (консоль ncpa.cpl).
Также ошибка “ All TAP-Windows adapters on the system are currently in use” может возникнуть, если вы пытаетесь установить несколько OpenVPN подключений с одного компьютера. Для каждого VPN подключения нужно создать свой адаптер.
Вы можете создать дополнительный WinTap сетевой адаптер с помощью скрипта (bat файл) %ProgramFiles%TAP-Windowsbinaddtap.bat.
Или с помощью команды (в современных версиях клиента OpenVPN):
c:Program FilesOpenVPNbintapctl.exe.tapctl.exe create
В результате в панели управления появится два (или более) сетевых адаптеров TAP-Windows Adapter V9, и вы сможете одновременно установить несколько одновременных OpenVPN сессий с разными серверами.
Теперь вы можете использовать ваше OpenVPN подключение в Windows и настроить автоматическое подключение к VPN. [/alert]
OpenVPN — это VPN-клиент с открытым исходным кодом, который вы можете использовать с различными VPN-провайдерами. Пока ваш провайдер VPN поддерживает протокол OpenVPN TCP или UDP, вы можете установить соединение OpenVPN. Вы можете запустить клиент OpenVPN со сценариями и настроить соединения через его файлы настроек.
Однако OpenVPN все еще может столкнуться с некоторыми трудностями. Это несколько разрешений, которые могут исправить соединения OpenVPN в Windows 10.
- Отключить брандмауэр Windows
- Отключить стороннее антивирусное программное обеспечение
- Перезапустите адаптер TAP
- Переустановите и обновите драйвер TAP-Windows
- Проверьте, работает ли служба DHCP
- Очистить DNS
- Сброс Winsock
1. Отключите брандмауэр Windows
Брандмауэры и VPN не всегда хорошо сочетаются друг с другом. Брандмауэр Windows может заблокировать ваше соединение OpenVPN, если вы не настроили исходящие порты. Лучший способ проверить, так ли это, — отключить брандмауэр Windows. Вот как вы можете отключить брандмауэр в Windows 10.
- Нажмите кнопку Cortana на панели задач, чтобы открыть это приложение.
- Введите ключевое слово «Брандмауэр Windows» в поле поиска и выберите, чтобы открыть Брандмауэр Защитника Windows.
- Нажмите Включить или выключить брандмауэр Защитника Windows, чтобы открыть настройки, показанные на снимке ниже.
- Выберите оба параметра « Отключить брандмауэр Защитника Windows» .
- Нажмите кнопку ОК .
-> ЧИТАЙТЕ ТАКЖЕ: ИСПРАВЛЕНИЕ: VPN не работает с Popcorn Time
2. Отключите стороннее антивирусное программное обеспечение
Также обратите внимание, что стороннее антивирусное программное обеспечение может препятствовать VPN с их собственными брандмауэрами. Поэтому отключение сторонних антивирусных утилит может также помочь исправить соединение OpenVPN. Вы можете временно отключить некоторые антивирусные программы, выбрав отключить настройки в их контекстных меню. Или вы также можете удалить программное обеспечение из автозагрузки Windows следующим образом.
- Щелкните правой кнопкой мыши панель задач Windows и выберите « Диспетчер задач» в открывшемся контекстном меню.
- Перейдите на вкладку «Автозагрузка» в окне «Диспетчер задач».
- Выберите антивирусное программное обеспечение и нажмите кнопку « Отключить» .
- Затем перезагрузите свой ноутбук или рабочий стол.
3. Перезапустите адаптер TAP.
Добавление программного обеспечения OpenVPN в Windows также добавляет адаптер TAP-Windows. В одном сообщении об ошибке OpenVPN говорится: « Все адаптеры TAP-Windows в этой системе в настоящее время используются. «Если вы получаете это сообщение об ошибке, перезапуск адаптера TAP может исправить OpenVPN. Вы можете перезапустить адаптер TAP следующим образом.
- Нажмите сочетание клавиш Run + R, чтобы открыть аксессуар Run.
- Введите «Панель управления» в «Выполнить» и нажмите кнопку ОК .
- Нажмите « Центр управления сетями и общим доступом», чтобы открыть настройки панели управления, показанные непосредственно ниже.
- Нажмите Изменить настройки адаптера, чтобы открыть свои подключения, как показано ниже.

- Затем щелкните правой кнопкой мыши Адаптер TAP-Windows и выберите Отключить .
- Щелкните правой кнопкой мыши TAP-Windows Adapter и выберите Enable, чтобы перезапустить адаптер.
4. Переустановите и обновите драйвер TAP-Windows
- Если перезапуск адаптера не помогает, попробуйте переустановить драйвер TAP-Windows. Для этого сначала откройте диспетчер устройств, чтобы удалить адаптер, нажав клавишу Windows + горячую клавишу X.
- Выберите Диспетчер устройств, чтобы открыть окно в кадре прямо ниже.
- Дважды щелкните Сетевые адаптеры, чтобы развернуть список сетевых адаптеров.
- Щелкните правой кнопкой мыши TAP-Windows Adapter и выберите « Удалить устройство» .

- Теперь откройте эту страницу OpenVPN в вашем браузере.
- Прокрутите страницу до конца и нажмите tap-windows-9.21.2.exe, чтобы загрузить последнюю версию драйвера TAP (NDIS 6) для OpenVPN. Драйвер NDIS 5 предназначен для Windows XP.
- Щелкните правой кнопкой мыши исполняемый файл TAP-Windows и выберите « Запуск от имени администратора».
- Перезагрузите Windows после установки драйвера.
-> ЧИТАЙТЕ ТАКЖЕ: TunnelBear VPN не будет установлен? Исправьте это с этими 3 шагами
5. Проверьте, работает ли служба DHCP
« Последовательность инициализации завершена с ошибками » — это еще одно сообщение об ошибке, которое может открыться для некоторых пользователей OpenVPN. Если это сообщение об ошибке открывается для вас, проверьте, что служба DHCP работает. Вы можете запустить службу DHCP следующим образом.
- Введите «services.msc» в «Выполнить» и нажмите кнопку « ОК» .
- Прокрутите вниз до DHCP-клиента, показанного на снимке ниже.
- Дважды щелкните DHCP-клиент, чтобы открыть окно его свойств.
- Выберите « Автоматически» в раскрывающемся меню «Тип запуска».
- Затем нажмите кнопку « Начать обслуживание».
- Если DHCP-клиент уже запущен, нажмите кнопки « Стоп» и « Пуск», чтобы перезапустить его.
- Нажмите кнопку Применить и ОК .
6. Очистите DNS
Различные ошибки подключения могут быть связаны с повреждением кэша DNS. Таким образом, очистка кеша DNS может стать потенциальным исправлением для OpenVPN. Вот как вы можете очистить DNS в Windows 10.
- Откройте меню Win + X с помощью клавиши Windows + X.
- Нажмите Командная строка (Администратор) в меню Win + X.
- Введите следующие команды отдельно в окне подсказки:
интерфейс netsh ip удалить arpcache
ipconfig / flushdns
ipconfig / renew
- Закройте командную строку и перезапустите Windows.
7. Сброс Winsock
- Сброс поврежденных настроек TCP / IP Winsock также может исправить сообщения об ошибках OpenVPN. Для этого введите «Командная строка» в поле поиска Кортаны.
- Щелкните правой кнопкой мыши командную строку и выберите « Запуск от имени администратора», чтобы открыть ее.
- Затем введите «netsh int ip reset logfile.txt» в командной строке и нажмите клавишу ввода.
- Войдите в каталог сброса netsh winsock и нажмите кнопку возврата.
- Перезагрузите ваш рабочий стол или ноутбук.
Некоторые из этих разрешений могут исправить ошибки инициализации клиента OpenVPN в Windows 10. Ознакомьтесь с этой статьей, где приведены более общие советы по исправлению VPN-подключений.