Hello,
my problem looks like this:
Code: Select all
Sun Mar 25 19:18:20 2018 NOTE: --user option is not implemented on Windows
Sun Mar 25 19:18:20 2018 NOTE: --group option is not implemented on Windows
Options error: Unrecognized option or missing or extra parameter(s) in client1.ovpn:135: < (2.4.5)
Use --help for more information.
I installed OpenVPN on Ubuntu Server 16.04 using this tutorial: link here this is polish version of this: digitalocean.com link
My client1.ovpn config looks like this:
Code: Select all
##############################################
# Sample client-side OpenVPN 2.0 config file #
# for connecting to multi-client server.     #
#                                            #
# This configuration can be used by multiple #
# clients, however each client should have   #
# its own cert and key files.                #
#                                            #
# On Windows, you might want to rename this  #
# file so it has a .ovpn extension           #
##############################################

# script-security 2
# up /etc/openvpn/update-resolv-conf
# down /etc/openvpn/update-resolv-conf

# Specify that we are a client and that we
# will be pulling certain config file directives
# from the server.
client

# Use the same setting as you are using on
# the server.
# On most systems, the VPN will not function
# unless you partially or fully disable
# the firewall for the TUN/TAP interface.
;dev tap
dev tun


# Windows needs the TAP-Win32 adapter name
# from the Network Connections panel
# if you have more than one.  On XP SP2,
# you may need to disable the firewall
# for the TAP adapter.
;dev-node MyTap

# Are we connecting to a TCP or
# UDP server?  Use the same setting as
# on the server.
;proto tcp
proto udp

# The hostname/IP and port of the server.
# You can have multiple remote entries
# to load balance between the servers.
remote CENSORED 1194
;remote my-server-2 1194

# Choose a random host from the remote
# list for load-balancing.  Otherwise
# try hosts in the order specified.
;remote-random

# Keep trying indefinitely to resolve the
# host name of the OpenVPN server.  Very useful
# on machines which are not permanently connected
# to the internet such as laptops.
resolv-retry infinite

# Most clients don't need to bind to
# a specific local port number.
nobind

# Downgrade privileges after initialization (non-Windows only)
user nobody
group nogroup

# Try to preserve some state across restarts.
persist-key
persist-tun

# If you are connecting through an
# HTTP proxy to reach the actual OpenVPN
# server, put the proxy server/IP and
# port number here.  See the man page
# if your proxy server requires
# authentication.
;http-proxy-retry # retry on connection failures
;http-proxy [proxy server] [proxy port #]

# Wireless networks often produce a lot
# of duplicate packets.  Set this flag
# to silence duplicate packet warnings.
;mute-replay-warnings


# SSL/TLS parms.
# See the server config file for more
# description.  It's best to use
# a separate .crt/.key file pair
# for each client.  A single ca
# file can be used for all clients.
#ca ca.crt
#cert client.crt
#key client.key

# Verify server certificate by checking that the
# certicate has the correct key usage set.
# This is an important precaution to protect against
# a potential attack discussed here:
#  http://openvpn.net/howto.html#mitm
#
# To use this feature, you will need to generate
# your server certificates with the keyUsage set to
#   digitalSignature, keyEncipherment
# and the extendedKeyUsage to
#   serverAuth
# EasyRSA can do this for you.
remote-cert-tls server

# If a tls-auth key is used on the server
# then every client must also have the key.
;tls-auth ta.key 1
auth SHA256
key-direction 1

# Select a cryptographic cipher.
# If the cipher option is used on the server
# then you must also specify it here.
cipher AES-128-CBC

# Enable compression on the VPN link.
# Don't enable this unless it is also
# enabled in the server config file.
comp-lzo

# Set log file verbosity.
verb 3

# Silence repeating messages
;mute 20
< ca >
-----BEGIN CERTIFICATE-----
MIIFtzCCBJ+gAwIBAgIJAK2JJ65ISFs4MA0GCSqGSIb3DQEBCwUAMIHsMQswCQYD
VQQGEwJQTDEbMBkGA1UECBMSa3VqYXdza28tcG9tb3Jza2llMR0wGwYDVQQHExRB
bGVrc2FuZHJvdyBLdWphd3NraTEcMBoGA1UEChMTSmFuIEJvcm93aWNraSdzIFZQ
TjEyMDAGA1UECxMpSmFuJ3MgUGVyc29uYWwgVXNhZ2UgKGVkdWNhdGlvbiBwdXJw
b3NlcykxIDAeBgNVBAMTF25vbmUsIHBlcnNvbmFsIHVzYWdlIENBMQ8wDQYDVQQp
EwZzZXJ2ZXIxHDAaBgkqhkiG9w0BCQEWDWphc2l1NGRAd3AucGwwHhcNMTgwMzI1
MTYwNDQ1WhcNMjgwMzIyMTYwNDQ1WjCB7DELMAkGA1UEBhMCUEwxGzAZBgNVBAgT
Emt1amF3c2tvLXBvbW9yc2tpZTEdMBsGA1UEBxMUQWxla3NhbmRyb3cgS3VqYXdz
a2kxHDAaBgNVBAoTE0phbiBCb3Jvd2lja2kncyBWUE4xMjAwBgNVBAsTKUphbidz
IFBlcnNvbmFsIFVzYWdlIChlZHVjYXRpb24gcHVycG9zZXMpMSAwHgYDVQQDExdu
b25lLCBwZXJzb25hbCB1c2FnZSBDQTEPMA0GA1UEKRMGc2VydmVyMRwwGgYJKoZI
hvcNAQkBFg1qYXNpdTRkQHdwLnBsMIIBIjANBgkqhkiG9w0BAQEFAAOCAQ8AMIIB
CgKCAQEA9CvDV+jUBE/5T+40zyhiLgfSl8zQxAwHFR+vwjxUQTG2VVtzmdF1suVa
uzQaGw4bSjM8BjrhMac5m1YDT7oKxPA2xkg0D1nZaGjSJb19nw7aRwwxqkWZ4QN5
8faBoxtEjQ8spEjKiz8XIDWmNDTXoqbWPy7IDFvIJgAbXYkSpJ8Jt+rbPagYEbKb
NHFubUcIYOAVZHDR3x1izCgQ+TvoETXTl61Gwqtkny6C+A/cY01jc+kgo5B5zn3v
L2eAA4jHBEhnypw+tahKxrbAzU3jzWWyOEXWgO9d1EMuyewje5GxXeCFJKbJXtQ6
QtLYcYbyOF3gzSi/2PoNxATgIyerWwIDAQABo4IBWDCCAVQwHQYDVR0OBBYEFDeC
KiLgw3ZWqvk0n7pSMTfQeHtLMIIBIwYDVR0jBIIBGjCCARaAFDeCKiLgw3ZWqvk0
n7pSMTfQeHtLoYHypIHvMIHsMQswCQYDVQQGEwJQTDEbMBkGA1UECBMSa3VqYXdz
a28tcG9tb3Jza2llMR0wGwYDVQQHExRBbGVrc2FuZHJvdyBLdWphd3NraTEcMBoG
A1UEChMTSmFuIEJvcm93aWNraSdzIFZQTjEyMDAGA1UECxMpSmFuJ3MgUGVyc29u
YWwgVXNhZ2UgKGVkdWNhdGlvbiBwdXJwb3NlcykxIDAeBgNVBAMTF25vbmUsIHBl
cnNvbmFsIHVzYWdlIENBMQ8wDQYDVQQpEwZzZXJ2ZXIxHDAaBgkqhkiG9w0BCQEW
DWphc2l1NGRAd3AucGyCCQCtiSeuSEhbODAMBgNVHRMEBTADAQH/MA0GCSqGSIb3
DQEBCwUAA4IBAQCf7AR3j+7VPhWhJrXwh296dhY5gpqiXLMm7ZcsJV1g1eyOCcW/
Uduks+O5cp5w0ZtYJudZ0PXpchudgG0NsH9Go8oKyKMDimu6PsZVwHIk2BfR/GWQ
hLWj0FY6g/DIIFPh5YdqZxl4mtySa1//eLMYrUXgk0f3bD1xywkLN/WqYhTt7YOb
+s+zBTTVDRJ21EXoTRD4ZywqeR+OX1AnQkHMXmKIG2ZOOiYnYHulDDeA5zOns8ah
hy+vP8yT4LNkU54l70FC5yDL3JbFWUF+FErH/ITdwHuOkM3slIEG+FH2t8CLc6t5
NvVebBFRnIxe/B+GknAppg3CGH9s36IVyXj0
-----END CERTIFICATE-----
< /ca >
< /cert >
Certificate:
    Data:
        Version: 3 (0x2)
        Serial Number: 2 (0x2)
    Signature Algorithm: sha256WithRSAEncryption
        Issuer: C=PL, ST=kujawsko-pomorskie, L=Aleksandrow Kujawski, O=Jan Borowicki's VPN, OU=Jan's Personal Usage (education purposes), CN=none, personal usage CA/name=server/emailAddress=jasiu4d@wp.pl
        Validity
            Not Before: Mar 25 16:11:39 2018 GMT
            Not After : Mar 22 16:11:39 2028 GMT
        Subject: C=PL, ST=kujawsko-pomorskie, L=Aleksandrow Kujawski, O=none, personal usage, OU=Jan's Personal Usage (education purposes), CN=client1/name=server/emailAddress=jasiu4d@wp.pl
        Subject Public Key Info:
            Public Key Algorithm: rsaEncryption
                Public-Key: (2048 bit)
                Modulus:
                    00:da:9e:d4:1f:84:2f:6d:be:15:73:b5:87:0a:6e:
                    e3:e0:b0:55:7b:4a:a5:d7:f0:60:c7:5f:99:a5:3b:
                    be:2b:cc:09:88:de:5d:28:7a:90:6c:07:84:de:90:
                    78:c3:04:04:03:13:54:ef:90:d2:2a:68:96:77:25:
                    f6:bb:d1:21:85:d7:81:ce:b2:76:09:74:02:90:c8:
                    32:86:df:67:8e:60:10:b4:28:f1:d4:46:28:61:8b:
                    3e:4f:8f:6b:5d:59:8a:4b:d0:0d:e9:d4:37:c9:84:
                    af:43:9a:16:29:4b:52:a5:d9:7b:bb:d5:df:43:e1:
                    46:19:b3:2e:7d:d8:ed:cc:0b:87:49:e9:be:ef:6c:
                    e3:cc:4e:4b:fc:0d:c2:af:10:cd:8c:bd:df:ce:9d:
                    f3:8b:ac:48:11:2c:8e:95:c2:b1:a2:fa:59:f8:98:
                    70:29:6e:47:43:e9:8c:c5:52:58:43:87:60:54:13:
                    7a:df:50:e2:05:fc:48:3e:4b:0e:2c:86:ba:2a:09:
                    2f:fe:62:d1:57:0e:03:11:ca:14:28:6f:4b:58:ee:
                    21:dd:6d:34:e4:39:5b:62:47:0f:d9:c8:ea:b8:b7:
                    39:34:c1:41:e6:64:58:bb:3b:3b:62:1f:76:8e:57:
                    e4:f0:4c:ce:41:b9:fd:1f:6c:6b:2b:af:5e:74:c9:
                    5a:05
                Exponent: 65537 (0x10001)
        X509v3 extensions:
            X509v3 Basic Constraints:
                CA:FALSE
            Netscape Comment:
                Easy-RSA Generated Certificate
            X509v3 Subject Key Identifier:
                55:E3:3E:AB:19:27:04:30:EB:E3:70:4A:E1:84:2D:F2:A8:48:F0:2F
            X509v3 Authority Key Identifier:
                keyid:37:82:2A:22:E0:C3:76:56:AA:F9:34:9F:BA:52:31:37:D0:78:7B:4B
                DirName:/C=PL/ST=kujawsko-pomorskie/L=Aleksandrow Kujawski/O=Jan Borowicki's VPN/OU=Jan's Personal Usage (education purposes)/CN=none, personal usage CA/name=server/emailAddress=jasiu4d@wp.pl
                serial:AD:89:27:AE:48:48:5B:38

            X509v3 Extended Key Usage:
                TLS Web Client Authentication
            X509v3 Key Usage:
                Digital Signature
            X509v3 Subject Alternative Name:
                DNS:client1
    Signature Algorithm: sha256WithRSAEncryption
         d9:7b:88:30:d0:85:e1:da:79:a6:11:86:8f:3c:9e:be:41:52:
         b8:87:fa:e5:23:5d:56:a8:fb:9e:4d:06:32:31:f7:86:73:15:
         5a:b5:7c:5b:89:ca:3f:84:6f:8a:b8:31:59:01:3a:d2:ba:b4:
         34:7c:51:5e:d5:56:5b:0f:78:91:fd:6d:98:60:05:b3:04:1c:
         4f:bd:df:9d:dd:07:14:49:23:68:a5:a1:d7:91:ca:9d:55:b0:
         34:50:cb:33:b4:31:3a:e2:6c:fc:ad:8f:31:f5:fa:87:2c:7f:
         ab:99:68:d5:69:88:99:37:b5:9c:0a:35:70:27:df:d9:77:db:
         7f:58:6a:15:60:27:4f:3f:8c:bb:81:b6:c7:aa:db:2e:67:a2:
         08:e3:bd:d1:43:00:02:e7:34:ee:ce:89:87:de:da:13:d9:f8:
         0b:e7:a7:83:21:c6:21:e2:94:72:bc:78:25:20:aa:f4:d9:fa:
         34:14:af:7c:98:50:ff:7f:45:85:29:55:7b:2f:73:cd:9a:ab:
         4a:fc:5b:31:af:98:db:b9:24:c3:a6:18:7c:b3:85:56:2a:d2:
         0c:84:a3:c5:cd:2f:66:b2:97:f9:c6:33:af:4c:64:e8:56:4b:
         6d:85:e0:f3:a2:e9:3e:8d:5c:65:e8:ee:cc:52:a6:48:85:96:
         2a:dc:d8:b4
-----BEGIN CERTIFICATE-----
MIIGAjCCBOqgAwIBAgIBAjANBgkqhkiG9w0BAQsFADCB7DELMAkGA1UEBhMCUEwx
GzAZBgNVBAgTEmt1amF3c2tvLXBvbW9yc2tpZTEdMBsGA1UEBxMUQWxla3NhbmRy
b3cgS3VqYXdza2kxHDAaBgNVBAoTE0phbiBCb3Jvd2lja2kncyBWUE4xMjAwBgNV
BAsTKUphbidzIFBlcnNvbmFsIFVzYWdlIChlZHVjYXRpb24gcHVycG9zZXMpMSAw
HgYDVQQDExdub25lLCBwZXJzb25hbCB1c2FnZSBDQTEPMA0GA1UEKRMGc2VydmVy
MRwwGgYJKoZIhvcNAQkBFg1qYXNpdTRkQHdwLnBsMB4XDTE4MDMyNTE2MTEzOVoX
DTI4MDMyMjE2MTEzOVowgd0xCzAJBgNVBAYTAlBMMRswGQYDVQQIExJrdWphd3Nr
by1wb21vcnNraWUxHTAbBgNVBAcTFEFsZWtzYW5kcm93IEt1amF3c2tpMR0wGwYD
VQQKExRub25lLCBwZXJzb25hbCB1c2FnZTEyMDAGA1UECxMpSmFuJ3MgUGVyc29u
YWwgVXNhZ2UgKGVkdWNhdGlvbiBwdXJwb3NlcykxEDAOBgNVBAMTB2NsaWVudDEx
DzANBgNVBCkTBnNlcnZlcjEcMBoGCSqGSIb3DQEJARYNamFzaXU0ZEB3cC5wbDCC
ASIwDQYJKoZIhvcNAQEBBQADggEPADCCAQoCggEBANqe1B+EL22+FXO1hwpu4+Cw
VXtKpdfwYMdfmaU7vivMCYjeXSh6kGwHhN6QeMMEBAMTVO+Q0ipolncl9rvRIYXX
gc6ydgl0ApDIMobfZ45gELQo8dRGKGGLPk+Pa11ZikvQDenUN8mEr0OaFilLUqXZ
e7vV30PhRhmzLn3Y7cwLh0npvu9s48xOS/wNwq8QzYy9386d84usSBEsjpXCsaL6
WfiYcCluR0PpjMVSWEOHYFQTet9Q4gX8SD5LDiyGuioJL/5i0VcOAxHKFChvS1ju
Id1tNOQ5W2JHD9nI6ri3OTTBQeZkWLs7O2Ifdo5X5PBMzkG5/R9sayuvXnTJWgUC
AwEAAaOCAbowggG2MAkGA1UdEwQCMAAwLQYJYIZIAYb4QgENBCAWHkVhc3ktUlNB
IEdlbmVyYXRlZCBDZXJ0aWZpY2F0ZTAdBgNVHQ4EFgQUVeM+qxknBDDr43BK4YQt
8qhI8C8wggEjBgNVHSMEggEaMIIBFoAUN4IqIuDDdlaq+TSfulIxN9B4e0uhgfKk
ge8wgewxCzAJBgNVBAYTAlBMMRswGQYDVQQIExJrdWphd3Nrby1wb21vcnNraWUx
HTAbBgNVBAcTFEFsZWtzYW5kcm93IEt1amF3c2tpMRwwGgYDVQQKExNKYW4gQm9y
b3dpY2tpJ3MgVlBOMTIwMAYDVQQLEylKYW4ncyBQZXJzb25hbCBVc2FnZSAoZWR1
Y2F0aW9uIHB1cnBvc2VzKTEgMB4GA1UEAxMXbm9uZSwgcGVyc29uYWwgdXNhZ2Ug
Q0ExDzANBgNVBCkTBnNlcnZlcjEcMBoGCSqGSIb3DQEJARYNamFzaXU0ZEB3cC5w
bIIJAK2JJ65ISFs4MBMGA1UdJQQMMAoGCCsGAQUFBwMCMAsGA1UdDwQEAwIHgDAS
BgNVHREECzAJggdjbGllbnQxMA0GCSqGSIb3DQEBCwUAA4IBAQDZe4gw0IXh2nmm
EYaPPJ6+QVK4h/rlI11WqPueTQYyMfeGcxVatXxbico/hG+KuDFZATrSurQ0fFFe
1VZbD3iR/W2YYAWzBBxPvd+d3QcUSSNopaHXkcqdVbA0UMsztDE64mz8rY8x9fqH
LH+rmWjVaYiZN7WcCjVwJ9/Zd9t/WGoVYCdPP4y7gbbHqtsuZ6II473RQwAC5zTu
zomH3toT2fgL56eDIcYh4pRyvHglIKr02fo0FK98mFD/f0WFKVV7L3PNmqtK/Fsx
r5jbuSTDphh8s4VWKtIMhKPFzS9mspf5xjOvTGToVkttheDzouk+jVxl6O7MUqZI
hZYq3Ni0
-----END CERTIFICATE-----
< /cert >
< /key >
-----BEGIN ENCRYPTED PRIVATE KEY-----
MIIFDjBABgkqhkiG9w0BBQ0wMzAbBgkqhkiG9w0BBQwwDgQIjY42yubaUP4CAggA
MBQGCCqGSIb3DQMHBAiAQ6UzJ1MdWwSCBMgcqeytevhrC7KJZxvHLyPvjgbmEUKh
rbi7yHtOD+XcKYY0Tl2gXXIPLkYVz/TSfhW/FbVNBIZy19fvW81IDijYm2gZY8mc
rki/VgjRvJ+7zbpXvKUGQL1zRv1yVQF4nDeQ9gvA2J/wKhhDL+2rpzfX+Bju24X7
FOV3ltCoJJNCOPsyPEZXhn2JAzNsoyh+VNtmoKuCbcebUtVf87RshZNgzdgAQQ+A
9xCI8pUjBDwrtedwlcuEe5WtgDxFE2m3x7V+2+jUZiHTSC3dUFVLHyTCsWU2gNDp
JI6kiXB/Zx0ABv1CS92D2OLC71H1b17xnr9rjf1U7ZL3RBlViNvGg6safvp0Z/4Q
MS/G9in1lcDGNkiUm3f4bOVohR0ccFd7n4elpvYFwSNc6i/gdYkHAZD8026A1L+h
xNmhNMAYEbQdv05g0xV/eb3ssVHsvsG/QmsFzkhnO1JVEfs2w7P05xMmpSvyXGvN
QDlmVnzohq4QmXPOKbY/XKxbmPwZVqjK3jrH6sDu4/U6S46euvL8f9Qoq4qffXff
LGxMglgRjfDyoQlerSNae/KRFGaPjE5fnvR49dJG9sLlZpJuXWPy0nYXJTHAk9Mc
Y7WR+WIHeuSrsENlwoZbEPUsbquTbI+ZPGsro3XqlfRvXhKmWuEDxuK+HlLeyoY8
oc5ZPXrZNs4b3hXoSBU6goI1lrJC0jl0jaI9lU+2w7/zTY7bvDLBJcCxCV/PIvNx
eWvAVsRCJg2s7/fzK239CYH8KEOBgI+iW3YsmyPuhO/esXyvWVyfLkorP67QtNn0
w5BdEeybcngZ+/plgouDQZRono4gj9svoCrthx2O0sZei29kFUD9M8sR+fbr6Mvr
Xn7bcyP0sb/RlLM+QFAXk45FZRt17/kOSNzqftK1aLniqU8324i0kOz44T9AnxtS
NhIsFsYmDHBLw0zmQFD0RU6TjS6H8/gQr27jsvzWnN9K4Jgbgn8M+o6Hnxudrqf7
i/kNLnhVSUFttecnSR0IHxHOatgfFtK/Jv6U/Ugmh+FKHp3RxDpzJVirH6Ukbwl7
g8/NuSEY7aEdHGwIHNAVBHGY1WCzKojLdm5f4y68Kfz6K5+mhoktrrdMpI2AqOZ+
ckks4EtS5Okh7HOQa7szfWfYKA4BrPP4qlbIktsRaitoRl2GcThhKW95Qod9bgVt
v4OcOTWHPMZn6LgQx/DnvmZapizUMBq2ychxMxOAcv28ocEMObJkiJjbME9eNeqR
LXxvhvpNRE+4LhF5+LNSe0F2CKBt0q8PAGGMjCYB/TfoeJagwbyFm2Vsltslnq3Q
4MQTUG8x5k3iiXIr1LS3kRclhreJC+yT2gjJZeOhDN/KtGJHYGzXuoV7dqsUBfa1
vvFhKOe89FPoHaaMeTnL5L2VjmlI3YcjyKepLX4/GIOfWXMSJw9NLyCmnPAztT8m
u3HK1SNVwRf5gdiKBoDLReOqzQYbpPqkQKmwZNFZyIj/BXrSu3qlTcvjnV50c3Yh
sbuFGQyO04Pf+/WH2Rw7z/xDtPNwjBOl96xAk9cntEL4q+pxiDWENqa1ziLEJUHa
67tTqNatbttUPl84C3I9DueS1nPF/6GtpHgdiQOP8xNOie+tRAq7XlKeQJL9PxOT
HJg=
-----END ENCRYPTED PRIVATE KEY-----
< /key >
< /tls-auth >
#
# 2048 bit OpenVPN static key
#
-----BEGIN OpenVPN Static key V1-----
ec6843be9c2dd3f49ff069fe1c29d90c
7a1ee3fec456639b7398aa6c342fa448
53a3c26fc976156126bd060c155e96da
865057221edeb322ae825ee53f844503
797f2356ea41e3449c1fa673b12798f6
fea1a322299dd6c61895beda4fd784f8
4a56b5ea7dfe9a34a3418b69690180bf
12deaf5dc4ce0315441c276b3bb62278
2e4f300b8822318fea02e247c6f0a224
d16ee1a5d397a48e4e6167c2adaece3b
19b012978f7d04c22e86ebc6ddc1216d
a91d2117aabbc8248194b371aa0b9427
8c79088bad97f2f0ffd61e84c0b8a456
b542251901a7ffe9361fa553dc8bc4c8
adbcf9c6c7b6cc54191f4146a3f29237
735286b50c2288f02d0ef50cde33c556
-----END OpenVPN Static key V1-----
< /tls-auth >
I really do not know what is wrong with line 135 — «< ca >», I did everything as written in tutorial including de-commenting lines:
I am using OpenVPN client on Windows 10, propably Home Edition.
Посмотрите https://forum.altlinux.org/index.php?topic=8557.msg163936#msg163936
и ниже.
Что-то с ключами.
Создайте по новой. Попробуйте варианты.
Проверьте работу сервера.
В части предложенной ссылки:
Создайте по новой. Попробуйте варианты.
В приведенной ссылке сказано:
Шаг № 1 Получаем готовые файлы
/var/lib/ssl/private/vova.key
/var/lib/ssl/certs/openvpn-client-CA.crt
/var/lib/ssl/certs/vova.cert
А процедура их генерации какая правильная?
Если не «берем ранее полученные» а «если надо добавить windows-клиента», то … ?
Я для генерации использовал создание нового ключа в разделе управления ssl-ключами (через веб-интерфейс) и подписывал полученный ключ в сооветствующем разделе УЦ, далее получил файл ответа (pem), брал подписанный (в примере это vova.cert), файл ключа брал с сервера сертификации и openvpn-client-CA.crt — это pem удостоверяющего центра. Потом забирал файлы по указанным путям полученные сертификаты.
Есть вариант сгенерировать комплект ключей посредством консоли? Так чтобы они выпали в конкретное место?
А также возник вопрос/просьба объяснить алгоритм работы (логику):
Есть УЦ на одной машине, есть openvpn сервер на другой. Как они связаны? Как работает «обновление сертификатов», если я на openvpn-сервере создал сертификат, перенёс его руками на другой ПК и подписал в УЦ — процесс закончился тем, что я получил файл ответа — и дальше что? На сервере я не нашёл «слепка» подписанного сертификата. Если пользователь (или удалённая сеть), скажем по-турецки, ёк, то что? УЦ сменился и всем переделывать сертификаты (ибо не сохранив старый уц мы не можем пересоздать сертификаты, но они работают до окончания срока их работы). А автообновление сертификатов — на кой оно? Только для внутренних сервисов?
И да, сертификат openvpn-сервера подтверждает только логин соединения? Так как всё, что есть у vpn-сервера — это наименование соединения, а сертификат — это только подтверждения принадлежности устанавливающего соединение к имени, которым он предствляется?
Простите, если вопросы покажутся глупыми, но … пока я много чего не понимаю, или не правильно использую.
И вообще, правильно ли я понимаю, что в приведенном примере:
vova.key получаем на сервере сертификации
openvpn-client-CA.crt — корневой сертификат удостоверяющего центра
vova.cert — это файл ответа (исходно pem-файл, получаемый в УЦ)?
Помогите настроить, гугль не помог, сдаюсь. Сервер на vps с kvm. С техподдержкой связывлся, говорят ограничений никаких.
Конфиг сервера
#################################################
# Sample OpenVPN 2.0 config file for            #
# multi-client server.                          #
#                                               #
# This file is for the server side              #
# of a many-clients <-> one-server              #
# OpenVPN configuration.                        #
#                                               #
# OpenVPN also supports                         #
# single-machine <-> single-machine             #
# configurations (See the Examples page         #
# on the web site for more info).               #
#                                               #
# This config should work on Windows            #
# or Linux/BSD systems.  Remember on            #
# Windows to quote pathnames and use            #
# double backslashes, e.g.:                     #
# "C:\Program Files\OpenVPN\config\foo.key" #
#                                               #
# Comments are preceded with '#' or ';'         #
#################################################
# Which local IP address should OpenVPN
# listen on? (optional)
;local a.b.c.d
# Which TCP/UDP port should OpenVPN listen on?
# If you want to run multiple OpenVPN instances
# on the same machine, use a different port
# number for each one. You will need to
# open up this port on your firewall.
port 1194
# TCP or UDP server?
;proto tcp
proto udp
# "dev tun" will create a routed IP tunnel,
# "dev tap" will create an ethernet tunnel.
# Use "dev tap0" if you are ethernet bridging
# and have precreated a tap0 virtual interface
# and bridged it with your ethernet interface.
# If you want to control access policies
# over the VPN, you must create firewall
# rules for the the TUN/TAP interface.
# On non-Windows systems, you can give
# an explicit unit number, such as tun0.
# On Windows, use "dev-node" for this.
# On most systems, the VPN will not function
# unless you partially or fully disable
# the firewall for the TUN/TAP interface.
;dev tap
dev tun
# Windows needs the TAP-Win32 adapter name
# from the Network Connections panel if you
# have more than one. On XP SP2 or higher,
# you may need to selectively disable the
# Windows firewall for the TAP adapter.
# Non-Windows systems usually don't need this.
;dev-node MyTap
# SSL/TLS root certificate (ca), certificate
# (cert), and private key (key). Each client
# and the server must have their own cert and
# key file. The server and all clients will
# use the same ca file.
#
# See the "easy-rsa" directory for a series
# of scripts for generating RSA certificates
# and private keys. Remember to use
# a unique Common Name for the server
# and each of the client certificates.
#
# Any X509 key management system can be used.
# OpenVPN can also use a PKCS #12 formatted key file
# (see "pkcs12" directive in man page).
ca /etc/openvpn/ca.crt
cert /etc/openvpn/server.crt
key /etc/openvpn/server.key # This file should be kept secret
# Diffie hellman parameters.
# Generate your own with:
# openssl dhparam -out dh1024.pem 1024
# Substitute 2048 for 1024 if you are using
# 2048 bit keys.
dh /etc/openvpn/dh2048.pem
# Configure server mode and supply a VPN subnet
# for OpenVPN to draw client addresses from.
# The server will take 10.8.0.1 for itself,
# the rest will be made available to clients.
# Each client will be able to reach the server
# on 10.8.0.1. Comment this line out if you are
# ethernet bridging. See the man page for more info.
server 10.8.0.0 255.255.255.0
# Maintain a record of client <-> virtual IP address
# associations in this file. If OpenVPN goes down or
# is restarted, reconnecting clients can be assigned
# the same virtual IP address from the pool that was
# previously assigned.
ifconfig-pool-persist ipp.txt
# Configure server mode for ethernet bridging.
# You must first use your OS's bridging capability
# to bridge the TAP interface with the ethernet
# NIC interface. Then you must manually set the
# IP/netmask on the bridge interface, here we
# assume 10.8.0.4/255.255.255.0. Finally we
# must set aside an IP range in this subnet
# (start=10.8.0.50 end=10.8.0.100) to allocate
# to connecting clients. Leave this line commented
# out unless you are ethernet bridging.
;server-bridge 10.8.0.4 255.255.255.0 10.8.0.50 10.8.0.100
# Configure server mode for ethernet bridging
# using a DHCP-proxy, where clients talk
# to the OpenVPN server-side DHCP server
# to receive their IP address allocation
# and DNS server addresses. You must first use
# your OS's bridging capability to bridge the TAP
# interface with the ethernet NIC interface.
# Note: this mode only works on clients (such as
# Windows), where the client-side TAP adapter is
# bound to a DHCP client.
;server-bridge
# Push routes to the client to allow it
# to reach other private subnets behind
# the server. Remember that these
# private subnets will also need
# to know to route the OpenVPN client
# address pool (10.8.0.0/255.255.255.0)
# back to the OpenVPN server.
;push "route 192.168.10.0 255.255.255.0"
;push "route 192.168.20.0 255.255.255.0"
# To assign specific IP addresses to specific
# clients or if a connecting client has a private
# subnet behind it that should also have VPN access,
# use the subdirectory "ccd" for client-specific
# configuration files (see man page for more info).
# EXAMPLE: Suppose the client
# having the certificate common name "Thelonious"
# also has a small subnet behind his connecting
# machine, such as 192.168.40.128/255.255.255.248.
# First, uncomment out these lines:
;client-config-dir ccd
;route 192.168.40.128 255.255.255.248
# Then create a file ccd/Thelonious with this line:
# iroute 192.168.40.128 255.255.255.248
# This will allow Thelonious' private subnet to
# access the VPN. This example will only work
# if you are routing, not bridging, i.e. you are
# using "dev tun" and "server" directives.
# EXAMPLE: Suppose you want to give
# Thelonious a fixed VPN IP address of 10.9.0.1.
# First uncomment out these lines:
;client-config-dir ccd
;route 10.9.0.0 255.255.255.252
# Then add this line to ccd/Thelonious:
# ifconfig-push 10.9.0.1 10.9.0.2
# Suppose that you want to enable different
# firewall access policies for different groups
# of clients. There are two methods:
# (1) Run multiple OpenVPN daemons, one for each
# group, and firewall the TUN/TAP interface
# for each group/daemon appropriately.
# (2) (Advanced) Create a script to dynamically
# modify the firewall in response to access
# from different clients. See man
# page for more info on learn-address script.
;learn-address ./script
# If enabled, this directive will configure
# all clients to redirect their default
# network gateway through the VPN, causing
# all IP traffic such as web browsing and
# and DNS lookups to go through the VPN
# (The OpenVPN server machine may need to NAT
# or bridge the TUN/TAP interface to the internet
# in order for this to work properly).
;push "redirect-gateway def1 bypass-dhcp"
# Certain Windows-specific network settings
# can be pushed to clients, such as DNS
# or WINS server addresses. CAVEAT:
# http://openvpn.net/faq.html#dhcpcaveats
# The addresses below refer to the public
# DNS servers provided by opendns.com.
;push "dhcp-option DNS 208.67.222.222"
;push "dhcp-option DNS 208.67.220.220"
# Uncomment this directive to allow different
# clients to be able to "see" each other.
# By default, clients will only see the server.
# To force clients to only see the server, you
# will also need to appropriately firewall the
# server's TUN/TAP interface.
;client-to-client
# Uncomment this directive if multiple clients
# might connect with the same certificate/key
# files or common names. This is recommended
# only for testing purposes. For production use,
# each client should have its own certificate/key
# pair.
#
# IF YOU HAVE NOT GENERATED INDIVIDUAL
# CERTIFICATE/KEY PAIRS FOR EACH CLIENT,
# EACH HAVING ITS OWN UNIQUE "COMMON NAME",
# UNCOMMENT THIS LINE OUT.
;duplicate-cn
# The keepalive directive causes ping-like
# messages to be sent back and forth over
# the link so that each side knows when
# the other side has gone down.
# Ping every 10 seconds, assume that remote
# peer is down if no ping received during
# a 120 second time period.
keepalive 10 120
# For extra security beyond that provided
# by SSL/TLS, create an "HMAC firewall"
# to help block DoS attacks and UDP port flooding.
#
# Generate with:
# openvpn --genkey --secret ta.key
#
# The server and each client must have
# a copy of this key.
# The second parameter should be '0'
# on the server and '1' on the clients.
tls-auth ta.key 0 # This file is secret
key-direction 0
# Select a cryptographic cipher.
# This config item must be copied to
# the client config file as well.
;cipher BF-CBC # Blowfish (default)
cipher AES-128-CBC # AES
auth SHA256
;cipher DES-EDE3-CBC # Triple-DES
# Enable compression on the VPN link.
# If you enable it here, you must also
# enable it in the client config file.
comp-lzo
# The maximum number of concurrently connected
# clients we want to allow.
;max-clients 100
# It's a good idea to reduce the OpenVPN
# daemon's privileges after initialization.
#
# You can uncomment this out on
# non-Windows systems.
user nobody
group nogroup
# The persist options will try to avoid
# accessing certain resources on restart
# that may no longer be accessible because
# of the privilege downgrade.
persist-key
persist-tun
# Output a short status file showing
# current connections, truncated
# and rewritten every minute.
status openvpn-status.log
# By default, log messages will go to the syslog (or
# on Windows, if running as a service, they will go to
# the "Program FilesOpenVPNlog" directory).
# Use log or log-append to override this default.
# "log" will truncate the log file on OpenVPN startup,
# while "log-append" will append to it. Use one
# or the other (but not both).
log openvpn.log
;log-append openvpn.log
# Set the appropriate level of log
# file verbosity.
#
# 0 is silent, except for fatal errors
# 4 is reasonable for general usage
# 5 and 6 can help to debug connection problems
# 9 is extremely verbose
verb 3
# Silence repeating messages. At most 20
# sequential messages of the same message
# category will be output to the log.
;mute 20
Конфиг клиента
##############################################
# Sample client-side OpenVPN 2.0 config file #
# for connecting to multi-client server.     #
#                                            #
# This configuration can be used by multiple #
# clients, however each client should have   #
# its own cert and key files.                #
#                                            #
# On Windows, you might want to rename this  #
# file so it has a .ovpn extension           #
##############################################
# Specify that we are a client and that we
# will be pulling certain config file directives
# from the server.
client
# Use the same setting as you are using on
# the server.
# On most systems, the VPN will not function
# unless you partially or fully disable
# the firewall for the TUN/TAP interface.
;dev tap
dev tun
# Windows needs the TAP-Win32 adapter name
# from the Network Connections panel
# if you have more than one. On XP SP2,
# you may need to disable the firewall
# for the TAP adapter.
;dev-node MyTap
# Are we connecting to a TCP or
# UDP server? Use the same setting as
# on the server.
;proto tcp
proto udp
# The hostname/IP and port of the server.
# You can have multiple remote entries
# to load balance between the servers.
remote 1.1.1.1 1194
;remote my-server-2 1194
# Choose a random host from the remote
# list for load-balancing. Otherwise
# try hosts in the order specified.
;remote-random
# Keep trying indefinitely to resolve the
# host name of the OpenVPN server. Very useful
# on machines which are not permanently connected
# to the internet such as laptops.
resolv-retry infinite
# Most clients don't need to bind to
# a specific local port number.
nobind
# Downgrade privileges after initialization (non-Windows only)
user nobody
group nogroup
# Try to preserve some state across restarts.
persist-key
persist-tun
# If you are connecting through an
# HTTP proxy to reach the actual OpenVPN
# server, put the proxy server/IP and
# port number here. See the man page
# if your proxy server requires
# authentication.
;http-proxy-retry # retry on connection failures
;http-proxy [proxy server] [proxy port #]
# Wireless networks often produce a lot
# of duplicate packets. Set this flag
# to silence duplicate packet warnings.
;mute-replay-warnings
# SSL/TLS parms.
# See the server config file for more
# description. It's best to use
# a separate .crt/.key file pair
# for each client. A single ca
# file can be used for all clients.
#ca ca.crt
#cert client.crt
#key client.key
# Verify server certificate by checking
# that the certicate has the nsCertType
# field set to "server". This is an
# important precaution to protect against
# a potential attack discussed here:
# http://openvpn.net/howto.html#mitm
#
# To use this feature, you will need to generate
# your server certificates with the nsCertType
# field set to "server". The build-key-server
# script in the easy-rsa folder will do this.
ns-cert-type server
# If a tls-auth key is used on the server
# then every client must also have the key.
;tls-auth ta.key 1
# Select a cryptographic cipher.
# If the cipher option is used on the server
# then you must also specify it here.
cipher AES-128-CBC
auth SHA256
key-direction 1
# Enable compression on the VPN link.
# Don't enable this unless it is also
# enabled in the server config file.
comp-lzo
# Set log file verbosity.
verb 3
# Silence repeating messages
;mute 20
<ca>
-----BEGIN CERTIFICATE-----
MIIEtzCCA5+gAwIBAgIJAOPJHUNjeVwRMA0GCSqGSIb3DQEBCwUAMIGYMQswCQYD
VQQGEwJSVTENMAsGA1UECBMEVFVMQTENMAsGA1UEBxMEVFVMQTERMA8GA1UEChMI
NG1haW5lcmExDjAMBgNVBAsTBXZwbmNhMRQwEgYDVQQDEws0bWFpbmVyYSBDQTEP
MA0GA1UEKRMGc2VydmVyMSEwHwYJKoZIhvcNAQkBFhI0bWFpbmVyYUBnbWFpbC5j
b20wHhcNMTcwMzI4MTAyODQyWhcNMjcwMzI2MTAyODQyWjCBmDELMAkGA1UEBhMC
UlUxDTALBgNVBAgTBFRVTEExDTALBgNVBAcTBFRVTEExETAPBgNVBAoTCDRtYWlu
ZXJhMQ4wDAYDVQQLEwV2cG5jYTEUMBIGA1UEAxMLNG1haW5lcmEgQ0ExDzANBgNV
BCkTBnNlcnZlcjEhMB8GCSqGSIb3DQEJARYSNG1haW5lcmFAZ21haWwuY29tMIIB
IjANBgkqhkiG9w0BAQEFAAOCAQ8AMIIBCgKCAQEAwgOv2nwUG3P88S4ODgjAYUVx
fryogF5t62Ui2S6ADhszxoYh7kUmu3twyyO57OQdKJ8e8gGc1h10U9i+cA56w/MT
51y4sdqZorwErPWmS2Tr3kQ3rvzQ083cthUHNnhqVQxG4EcYo0UhwiFfhJ78B8K0
HEKFBXn/Q1QMFyiy/sD9Hc3SzeZHHbOE1PXGGffFS3iEXHiQDiyDoc0cgfBey1HA
EtTC8NGXjssfAOs6Dlryt/txv/WmOEJiGbgpLUM0MUdTzZrE5EafknyPoHx+C1XY
ysmFxYTeSaemMTSlzszPV/9hPLWdmyCdPrz5POFrPlIGbCGfC+JSikS0mlxd/wID
AQABo4IBADCB/TAdBgNVHQ4EFgQU07nScNxxN42Px+sBVxFmzKlrIqUwgc0GA1Ud
IwSBxTCBwoAU07nScNxxN42Px+s5VxFmzKlrIqWhgZ6kgZswgZgxCzAJBgNVBAYT
AlJVMQ0wCwYDVQQIEwRUVUxBMQ0wCwYDVQQHEwRUVUxBMREwDwYDVQQKEwg0bWFp
bmVyYTEOMAwGA1UECxMFdnBuY2ExFDASBgNVBAMTCzRtYWluZXJhIENBMQ8wDQYD
VQQpEwZzZXJ2ZXIxITAfBgkqhkiG9w0BCQEWEjRtYWluZXJhQGdtYWlsLmNvbYIJ
AOPJHUNjeVwRMAwGA1UdEwQFMAMBAf8wDQYJKoZIhvcNAQELBQADggEBADYPXNgl
YqtMWGG2CA8W3M1i5xchkd4/IkM+/OX9iQ0UEETGhvfxYinNArxlIy4WEcmvmkp1
GDe/7eXE5Y78LzelSwKVDiOf4IgYrzjM7fHI7zxWPsTrMx89ROBpj9WEmTDtY30h
OwqTyl9Y8ugdXdjNWlo7nAATxPW2/fNDcLTP5svAmnaTaNY0E3qiWY8q6dwvFwVS
q+3P4ge2W844cy0vDjXEmAhDfn/DMEhU3a/AVqKVTkDUmwwVz8aTDh9mI+iLMuhQ
1V7YaN4+/X4Hk5+SEAwf05xTUa8J2ZRJ0m+vxJwDHtD7klX8kviBYaO42Nfd1+4g
aVb9db5uouKzaqk=
-----END CERTIFICATE-----
</ca>
<cert>
Certificate:
Data:
Version: 3 (0x2)
Serial Number: 3 (0x3)
Signature Algorithm: sha256WithRSAEncryption
Issuer: C=RU, ST=TULA, L=TULA, O=4mainera, OU=vpnca, CN=4mainera CA/name=server/emailAddress=4mainera@gmail.com
Validity
Not Before: Mar 28 12:31:45 2017 GMT
Not After : Mar 26 12:31:45 2027 GMT
Subject: C=RU, ST=TULA, L=TULA, O=4mainera, OU=jobpc, CN=jobpc/name=server/emailAddress=4mainera@gmail.com
Subject Public Key Info:
Public Key Algorithm: rsaEncryption
Public-Key: (2048 bit)
Modulus:
00:97:fd:e4:1d:4a:74:9d:69:6d:15:6f:d1:59:b4:
0c:4a:4c:bb:70:e8:9b:f1:00:66:6a:a6:bc:33:26:
6e:4c:cf:20:cd:66:c2:70:14:24:51:39:9d:37:a5:
61:ed:16:22:12:26:d1:4f:a3:de:bf:45:07:d6:52:
76:13:30:dd:60:94:76:17:89:24:cd:7e:58:b3:f6:
69:8f:f4:02:0e:53:9b:34:99:0b:7d:17:2b:b3:d0:
9f:7f:1c:9c:35:a4:24:58:83:52:42:49:fc:aa:fe:
f8:f6:e6:23:97:79:c9:a9:05:85:d0:33:1d:8e:2a:
9f:9b:1b:41:78:f6:1a:fb:bf:51:c6:a9:68:bd:ce:
9e:9a:b1:e5:0a:65:13:74:52:54:06:ec:ef:33:f6:
71:b9:e5:57:23:d7:8b:76:33:56:06:2d:cd:d8:ed:
c5:c2:ec:0e:19:ad:42:57:30:90:3d:a1:1e:ab:df:
53:6a:90:d1:18:e9:01:70:4b:0e:ea:4c:ff:ff:f2:
b5:81:9e:f3:b1:a1:60:ee:90:0f:54:29:14:17:34:
28:aa:0a:07:01:56:4d:0c:6e:32:eb:5b:e7:5b:1b:
72:9d:e4:92:cb:c6:67:94:65:87:21:08:7c:cc:3b:
3d:a5:89:fd:f4:71:21:c8:89:5b:f0:f1:d0:fc:37:
bb:6d
Exponent: 65537 (0x10001)
X509v3 extensions:
X509v3 Basic Constraints:
CA:FALSE
Netscape Comment:
Easy-RSA Generated Certificate
X509v3 Subject Key Identifier:
48:BB:D5:75:3A:8E:23:9E:B1:BF:D5:65:21:F7:26:E1:CE:A2:FE:2B
X509v3 Authority Key Identifier:
keyid:D3:B9:D2:70:DC:71:37:8D:8F:C7:EB:01:57:11:66:CC:A9:6B:22:A5
DirName:/C=RU/ST=TULA/L=TULA/O=4mainera/OU=vpnca/CN=4mainera CA/name=server/emailAddress=4mainera@gmail.com
serial:E3:C9:1D:43:63:79:5C:11
X509v3 Extended Key Usage:
TLS Web Client Authentication
X509v3 Key Usage:
Digital Signature
X509v3 Subject Alternative Name:
DNS:jobpc
Signature Algorithm: sha256WithRSAEncryption
99:1a:db:bf:c3:55:d1:b9:c3:c2:99:f4:1e:81:4d:d6:bf:98:
0f:e0:0e:0b:f0:db:59:14:4b:29:f7:89:7d:07:4f:06:5f:76:
a7:f7:ba:35:f8:93:e9:53:8a:b4:13:25:f0:ff:a6:51:60:2e:
77:0e:22:dc:7a:5a:23:86:c1:99:24:a5:b1:ce:74:2c:14:00:
28:e3:2c:e0:11:9d:4a:eb:a5:d4:f3:d2:ef:b2:a8:a5:91:2a:
0b:6b:15:37:1f:bd:03:41:12:95:f5:12:a4:81:8c:78:f9:7d:
ea:99:3f:25:07:1d:d1:b2:27:b9:1f:5c:22:50:f5:6d:98:81:
71:6c:06:8c:88:0d:27:bc:05:02:65:f6:96:41:c6:a6:67:a6:
42:66:51:bb:2f:40:39:c0:fa:e9:49:3e:e2:93:f6:f8:5d:a8:
08:9e:b5:b7:87:40:d1:c4:13:78:aa:18:ea:e3:d2:be:0c:1c:
df:eb:5b:92:1d:c2:92:de:25:6a:49:d1:c9:da:44:50:0d:39:
ee:50:fe:25:3e:98:e0:fa:09:96:ff:7e:5b:a3:4d:d7:8f:dd:
c8:9f:d2:ef:1e:13:0a:56:fd:ee:57:33:e8:89:3b:52:68:04:
66:da:a2:78:a9:22:a8:15:c6:66:98:a5:60:af:a3:91:98:85:
32:90:c7:5d
-----BEGIN CERTIFICATE-----
MIIFCjCCA/KgAwIBAgIBAzANBgkqhkiG9w0BAQsFADCBmDELMAkGA1UEBhMCUlUx
DTALBgNVBAgTBFRVTEExDTALBgNVBAcTBFRVTEExETAPBgNVBAoTCDRtYWluZXJh
MQ4wDAYDVQQLEwV2cG5jYTEUMBIGA1UEAxMLNG1haW5lcmEgQ0ExDzANBgNVBCkT
BnNlcnZlcjEhMB8GCSqGSIb3DQEJARYSNG1haW5lcmFAZ21haWwuY29tMB4XDTE3
MDMyODEyMzE0NVoXDTI3MDMyNjEyMzE0NVowgZIxCzAJBgNVBAYTAlJVMQ0wCwYD
VQQIEwRUVUxBMQ0wCwYDVQQHEwRUVUxBMREwDwYDVQQKEwg0bWFpbmVyYTEOMAwG
A1UECxMFam9icGMxDjAMBgNVBAMTBWpvYnBjMQ8wDQYDVQQpEwZzZXJ2ZXIxITAf
BgkqhkiG9w0BCQEWEjRtYWluZXJhQGdtYWlsLmNvbTCCASIwDQYJKoZIhvcNAQEB
BQADggEPADCCAQoCggEBAJf95B1KdJ1pbRVv0Vm0DEpMu3Dom/EAZmqmvDMmbkzP
IM1mwnAUJFE5nTelYe0WIhIm0U+j3r9FB9ZSdhMw3WCUdheJJM1+WLP2aY/0Ag5T
mzSZC30XK7PQn38cnDWkJFiDUkJJ/Kr++PbmIpd5yakFhdAzHY4qn5sbQXj2Gvu/
UcapaL3Onpqx5QplE3RSVAbs7zP2cbnlVyPXi3YzVgYtzdjtxcLsDhmtQlcwkD2h
HqvfU2qQ0RjpAXBLDupM///ytYGe87GhYO6QD1QpFBc0KKoKBwFWTQxuMutb51sb
cp3kksvGZ5RlhyEIfMw7PaWJ/fRxIciJW/Dx0Pw3u20CAwEAAaOCAWEwggFdMAkG
A1UdEwQCMAAwLQYJYIZIAYb4QgENBCAWHkVhc3ktUlNBIEdlbmVyYXRlZCBDZXJ0
aWZpY2F0ZTAdBgNVHQ4EFgQUSLvVdTqOI56xv9VlIfcm4c6i/iswgc0GA1UdIwSB
xTCBwoAU07nScNxxN42Px+sBVxFmzKlrIqWhgZ6kgZswgZgxCzAJBgNVBAYTAlJV
MQ0wCwYDVQQIEwRUVUxBMQ0wCwYDVQQHEwRUVUxBMREwDwYDVQQKEwg0bWFpbmVy
YTEOMAwGA1UECxMFdnBuY2ExFDASBgNVBAMTCzRtYWluZXJhIENBMQ8wDQYDVQQp
EwZzZXJ2ZXIxITAfBgkqhkiG9w0BCQEWEjRtYWluZXJhQGdtYWlsLmNvbYIJAOPJ
HUNjeVwRMBMGA1UdJQQMMAoGCCsGAQUFBwMCMAsGA1UdDwQEAwIHgDAQBgNVHREE
CTAHggVqb2JwYzANBgkуhkiG9w0BAQsFAAOCAQEAmRrbv8NV0bnDwpn0HoFN1r+Y
D+AOC/DbWRRLKfeJfQdPBl92p/e6NfiT6VOKtBMl8P+mUWAudw4i3HpaI4bBmSSl
sc50LBQAKOMs4BGdSuul1PPS77KopZEqC2sVNx+9A0ESlfUSpIGMePl96pk/JQcd
0bInuR9cIlD1bZiBcWwGjIgNJ7wFAmX2lkHGpmemQmZRuy9AOcD66Uk+4pP2+F2o
CJ61t4dA0cQTeKoY6uPSvgwc3+tbkh3Ckt4laknRydpEUA057lD+JT6Y4PoJlv9+
W6NN14/dyJ/S7x4TClb97lcz6Ik7UmgEZtqieKkiqBXGZpilYK+jkZiFMpDHXQ==
-----END CERTIFICATE-----
</cert>
<key>
-----BEGIN PRIVATE KEY-----
MIIEvQIBADANBgkqhkiG9w0BAQEFAASCBKcwggSjAgEAAoIBAQCX/eQdSnSdaW0V
b9FZtAxKTLtw6JvxAGZqprwzJm5MzyDNZsJwFCRROZ03pWHtFiISJtFPo96/RQfW
UnYTMN1glHYXiSTNfliz9mmP9AIOU5s0mQt9Fyuz0J9/HJw1pCRYg1JCSfyq/vj2
5iKXecmpBYXQMx2OKp+bG0F49hr7v1HGqWi9zp6aseUKZRN0UlQG7O8z9nG55Vcj
14t2M1YGLc3Y7cXC7A4ZrUJXMJA9oR6r31NqkNEY6QFwSw7qTP//8rWBnvOxoWDu
kA9UKRQXNCiqCgcBVk0MbjLrW+dbG3Kd5JLLxmeUZYchCHzMOz2lif30cSHIiVvw
8dD8N7ttAgMBAAECggEAKjO35B4pVQ/R1xLuKR8iDntRzF759afryA810GoKVE9q
xz2SHXaqQtdhfPLxxtfPbATVN2zDy44KSAsrd9aokUmHpK9SxbAgRw/TbcIN1BaI
0Mjx9LC7VLlHoA68nPRPlzgXXgqXGo+jZ0KtNiv9v22mIxIeUbwqBvJBcqm7Ak1G
h4+ocph3/pYjc4Wv7v8qXFaMaSIhlTBk2SsYW3lTCKJeQxBQSC6d+oqvJRbr9+nc
sNz+BNqUab56FnF3760mqEypHrPLf4Jl/o1skexT5BhGtrsio6rlHfV/SesW+lw1
j9CLHWIubngdzRgzKhBf91czDkxhtli8c3suH4xf4QKBgQDGHwooEIiWqCjb1VwS
Sj4oieCnbci50e1NWuotOfadnno//ajGJdhuemA9Rodc2OIVp1nFCqoJ2lsXvx+A
NWWjierI+UglS6cxmgSOtFJGTEtiMSXGk7cZxZqbKJAyU0vObXlfNxsfZtaWmRtI
Yp0CUv7ErPjj69enH+cCqv4lVQKBgQDEZPMyohcpUQemU4FLt2vPYGRoTe36p83O
B3KESCvqaxYPvhysjDI4Pxуc/q5HUQZhgsZQYMPp1Wjm0sHfE5iPaPFoqm17QC1m
en7E2bs7k0fzH/Cuy+K+uSaMwPKNEgII8hSyYQGbeyMWqsJymsdv7XmlnJ5hapgl
q0Yt9QO9uQKBgAj2nIoFfXh7cSXI+Fpne3pwCnbos50cj0ThqRiUt8CXy+YbPsiA
K9OLu9Dp4PPlaA0cviX4/oplk5t2bSFqyQdmFPY0uPve+Vh4JF6kb9h4WSy/Fntu
cWk8FGuSoTt1o0dakpQpNRPtniXAFYjn1TymrpoNTVFaeS45dkUboVXlAoGAekGR
dzqaCnlLtsmS2myTK2QI/TlN5NRi9FeEfT5kQChrcl9ZgDxB4uu9//T2zqRswXTk
ORMTwlO8WrxmPZT4SoX8ibhWMPxxhrLIiYg02tBDYODINjfrreiaS9Ks6w6Dv8fb
BHQIyR4taKXiJ++cKVv+dw75NRFjJ0fohyFYM9kCgYEArhnpGxneLFxLXW4lvIOR
q18kGXfjKmKAi1vmiNkHQCpjcOWYKWjKEvb0L4Z7J9rsUrDj7YrfBnLGeMAqF+kF
/qgxowidFtUIaLzo6fGXcDaJBvs2rsFN4X93ydHaYvbZ2mWdRA2paROUvS2p1UAO
NeX9gqYAwgE6zAzi4uMSXDo=
-----END PRIVATE KEY-----
</key>
<tls-auth>
#
# 2048 bit OpenVPN static key
#
-----BEGIN OpenVPN Static key V1-----
26ec47ccb054c7f5caa3955818954483
9e3445e409da82cead0d676195c2041d
370449236f45af3fd3e2d303580bd121
0fb4aeb714db05405e54b3678686ee9f
6eb40b150cbcccc52ac17ef3e57bf000
0c5572d41f370f21e1be45ef706c2d9a
209a6c0a6e2c36a1fbf92279090c790e
56c53f68fc12c5c719676b2ddc969e95
64d589e2f4333d1c6de5497e8cb09d75
30c4816aa9b1500524f975a1233b76a6
7a81b7a9895dcff66725b7f715e7c79f
bae51779a16630dd166f7762759e98c2
be5b71c292d5cc71adу1a615c1848007
b9a28d020dfca144810387f72cf590b2
8db86130e64f8e15877eb4fc66775acd
a824536f760bf8611fcdf7b8758d22ab
-----END OpenVPN Static key V1-----
</tls-auth>
Лог сервера
Tue Mar 28 23:53:14 2017 OpenVPN 2.3.2 x86_64-pc-linux-gnu [SSL (OpenSSL)] [LZO] [EPOLL] [PKCS11] [eurephia] $Лог клиента:
Tue Mar 28 23:53:14 2017 Diffie-Hellman initialized with 2048 bit key
Tue Mar 28 23:53:14 2017 Control Channel Authentication: using 'ta.key' as a OpenVPN static key file
Tue Mar 28 23:53:14 2017 Outgoing Control Channel Authentication: Using 256 bit message hash 'SHA256' for HMA$
Tue Mar 28 23:53:14 2017 Incoming Control Channel Authentication: Using 256 bit message hash 'SHA256' for HMA$
Tue Mar 28 23:53:14 2017 Socket Buffers: R=[212992->131072] S=[212992->131072]
Tue Mar 28 23:53:14 2017 ROUTE_GATEWAY 212.109.218.1/255.255.254.0 IFACE=eth0 HWADDR=52:54:00:09:f3:34
Tue Mar 28 23:53:14 2017 TUN/TAP device tun0 opened
Tue Mar 28 23:53:14 2017 TUN/TAP TX queue length set to 100
Tue Mar 28 23:53:14 2017 do_ifconfig, tt->ipv6=0, tt->did_ifconfig_ipv6_setup=0
Tue Mar 28 23:53:14 2017 /sbin/ip link set dev tun0 up mtu 1500
Tue Mar 28 23:53:14 2017 /sbin/ip addr add dev tun0 local 10.8.0.1 peer 10.8.0.2
Tue Mar 28 23:53:14 2017 /sbin/ip route add 10.8.0.0/24 via 10.8.0.2
Tue Mar 28 23:53:14 2017 GID set to nogroup
Tue Mar 28 23:53:14 2017 UID set to nobody
Tue Mar 28 23:53:14 2017 UDPv4 link local (bound): [undef]
Tue Mar 28 23:53:14 2017 UDPv4 link remote: [undef]
Tue Mar 28 23:53:14 2017 MULTI: multi_init called, r=256 v=256
Tue Mar 28 23:53:14 2017 IFCONFIG POOL: base=10.8.0.4 size=62, ipv6=0
Tue Mar 28 23:53:14 2017 IFCONFIG POOL LIST
Tue Mar 28 23:53:14 2017 Initialization Sequence Completed
Wed Mar 29 00:15:02 2017 NOTE: --user option is not implemented on Windowssudo ufw status
Wed Mar 29 00:15:02 2017 NOTE: --group option is not implemented on Windows
Wed Mar 29 00:15:02 2017 OpenVPN 2.3.14 x86_64-w64-mingw32 [SSL (OpenSSL)] [LZO] [PKCS11] [IPv6] built on Dec 7 2016
Wed Mar 29 00:15:02 2017 Windows version 6.2 (Windows 8 or greater) 64bit
Wed Mar 29 00:15:02 2017 library versions: OpenSSL 1.0.2i 22 Sep 2016, LZO 2.09
Enter Management Password:
Wed Mar 29 00:15:02 2017 MANAGEMENT: TCP Socket listening on [AF_INET]127.0.0.1:25341
Wed Mar 29 00:15:02 2017 Need hold release from management interface, waiting...
Wed Mar 29 00:15:03 2017 MANAGEMENT: Client connected from [AF_INET]127.0.0.1:25341
Wed Mar 29 00:15:03 2017 MANAGEMENT: CMD 'state on'
Wed Mar 29 00:15:03 2017 MANAGEMENT: CMD 'log all on'
Wed Mar 29 00:15:03 2017 MANAGEMENT: CMD 'hold off'
Wed Mar 29 00:15:03 2017 MANAGEMENT: CMD 'hold release'
Wed Mar 29 00:15:03 2017 Control Channel Authentication: tls-auth using INLINE static key file
Wed Mar 29 00:15:03 2017 Outgoing Control Channel Authentication: Using 256 bit message hash 'SHA256' for HMAC authentication
Wed Mar 29 00:15:03 2017 Incoming Control Channel Authentication: Using 256 bit message hash 'SHA256' for HMAC authentication
Wed Mar 29 00:15:03 2017 Socket Buffers: R=[65536->65536] S=[65536->65536]
Wed Mar 29 00:15:03 2017 UDPv4 link local: [undef]
Wed Mar 29 00:15:03 2017 UDPv4 link remote: [AF_INET]*.*.*.*:1194
Wed Mar 29 00:15:03 2017 MANAGEMENT: >STATE:1490735703,WAIT,,,
Wed Mar 29 00:16:03 2017 TLS Error: TLS key negotiation failed to occur within 60 seconds (check your network connectivity)
Wed Mar 29 00:16:03 2017 TLS Error: TLS handshake failed
Wed Mar 29 00:16:03 2017 SIGUSR1[soft,tls-error] received, process restarting
Wed Mar 29 00:16:03 2017 MANAGEMENT: >STATE:1490735763,RECONNECTING,tls-error,,
Wed Mar 29 00:16:03 2017 Restart pause, 2 second(s)
Wed Mar 29 00:16:05 2017 Socket Buffers: R=[65536->65536] S=[65536->65536]
Wed Mar 29 00:16:05 2017 UDPv4 link local: [undef]
Wed Mar 29 00:16:05 2017 UDPv4 link remote: [AF_INET]*.*.*.*:1194
Wed Mar 29 00:16:05 2017 MANAGEMENT: >STATE:1490735765,WAIT,,,
Wed Mar 29 00:17:05 2017 TLS Error: TLS key negotiation failed to occur within 60 seconds (check your network connectivity)
Wed Mar 29 00:17:05 2017 TLS Error: TLS handshake failed
Wed Mar 29 00:17:05 2017 SIGUSR1[soft,tls-error] received, process restarting
Wed Mar 29 00:17:05 2017 MANAGEMENT: >STATE:1490735825,RECONNECTING,tls-error,,
Wed Mar 29 00:17:05 2017 Restart pause, 2 second(s)
Wed Mar 29 00:17:07 2017 Socket Buffers: R=[65536->65536] S=[65536->65536]
Wed Mar 29 00:17:07 2017 UDPv4 link local: [undef]
Wed Mar 29 00:17:07 2017 UDPv4 link remote: [AF_INET]*.*.*.*:1194
Wed Mar 29 00:17:07 2017 MANAGEMENT: >STATE:1490735827,WAIT,,,
To Action Fromsudo netstat -ntulp
-- ------ ----
1194/udp ALLOW Anywhere
1194/udp (v6) ALLOW Anywhere (v6)
Active Internet connections (only servers)
Proto Recv-Q Send-Q Local Address           Foreign Address         State       PID/Program name
tcp        0      0 0.0.0.0:2222            0.0.0.0:*               LISTEN      782/sshd
tcp        0      0 127.0.0.1:3306          0.0.0.0:*               LISTEN      854/mysqld
tcp6       0      0 :::2222                 :::*                    LISTEN      782/sshd
tcp6       0      0 :::80                   :::*                    LISTEN      977/apache2
udp        0      0 0.0.0.0:1194            0.0.0.0:*                           2339/openvpn
I have configured OpenVPN server on windows server 2008 and client on windows 7. Connection between them is ok, there is a server default gateway in route table (192.168.0.1) but i can’t see another machines in network and field with gateway address for TAP-Windows Adapter V9 is empty. I’ve added push «redirect-gateway def1» on server and push «redirect-gateway def1 bypass-dhcp» on client, firewall is off… Please help me, because I’m a new OpenVPN user and I’ve spent a lot of time trying to solve this problem, but still nothing:(
server.ovpn
mode server

local 192.168.0.197

port 1194

proto udp

dev tap0

persist-key

persist-tun

ca "C:\Program Files\OpenVPN\config\ca.crt"

cert "C:\Program Files\OpenVPN\config\albaserver.crt"

key "C:\Program Files\OpenVPN\config\albaserver.key"

dh "C:\Program Files\OpenVPN\config\dh1024.pem"

tls-auth "C:\Program Files\OpenVPN\config\ta.key" 0

cipher BF-CBC

comp-lzo

server-bridge 192.168.0.197 255.255.255.0 192.168.0.171 192.168.0.180

push "dhcp-option DNS 192.168.0.1"

push "redirect-gateway def1"

max-clients 10

user nobody

group nogroup

keepalive 10 120

status openvpn-status.log
client.ovpn
client

dev tap0

proto udp

remote my_remote_server_address 1194

nobind

resolv-retry infinite

persist-key

persist-tun

ca "C:\Program Files\OpenVPN\config\ca.crt"

cert "C:\Program Files\OpenVPN\config\albaclient2.crt"

key "C:\Program Files\OpenVPN\config\albaclient2.key"

tls-auth "C:\Program Files\OpenVPN\config\ta.key" 1

push "redirect-gateway def1 bypass-dhcp"

cipher BF-CBC

comp-lzo
server log
Mon Jul 22 13:34:46 2013 NOTE: --user option is not implemented on Windows

Mon Jul 22 13:34:46 2013 NOTE: --group option is not implemented on Windows

Mon Jul 22 13:34:46 2013 OpenVPN 2.3.2 x86_64-w64-mingw32 [SSL (OpenSSL)] [LZO] [PKCS11]
[eurephia] [IPv6] built on Jun  3 2013
Mon Jul 22 13:34:46 2013 NOTE: when bridging your LAN adapter with the TAP adapter, note
that the new bridge adapter will often take on its own IP address that is different from what the LAN adapter was previously set to

Mon Jul 22 13:34:46 2013 NOTE: your local LAN uses the extremely common subnet address
192.168.0.x or 192.168.1.x.  Be aware that this might create routing conflicts if you connect to the VPN server from public locations such as internet cafes that use the same
subnet.
Mon Jul 22 13:34:47 2013 Control Channel Authentication: using 'C:Program FilesOpenVPN
configta.key' as a OpenVPN static key file
Mon Jul 22 13:34:47 2013 open_tun, tt->ipv6=0

Mon Jul 22 13:34:47 2013 TAP-WIN32 device [Po?czenie lokalne 3] opened: \.Global
{4E9F5624-F9C6-47F8-BA83-FF44BD7E8F62}.tap
Mon Jul 22 13:34:47 2013 Sleeping for 10 seconds...

Mon Jul 22 13:34:57 2013 Successful ARP Flush on interface [25] {4E9F5624-F9C6-47F8-
BA83-FF44BD7E8F62}
Mon Jul 22 13:34:57 2013 UDPv4 link local (bound): [AF_INET]192.168.0.197:1194

Mon Jul 22 13:34:57 2013 UDPv4 link remote: [undef]

Mon Jul 22 13:34:57 2013 Initialization Sequence Completed

Mon Jul 22 13:35:25 2013 ADDRESS:64329 [albaclient2] Peer Connection Initiated with
[AF_INET]ADDRESS:64329
Mon Jul 22 13:35:25 2013 albaclient2/ADDRESS:64329 MULTI_sva: pool returned
IPv4=192.168.0.171, IPv6=(Not enabled)
Mon Jul 22 13:35:28 2013 albaclient2/ADDRESS:64329 send_push_reply(): safe_cap=940
client log
Mon Jul 22 13:35:15 2013 OpenVPN 2.3.2 x86_64-w64-mingw32 [SSL (OpenSSL)] [LZO] [PKCS11] [eurephia] [IPv6] built on Jun  3 2013

Mon Jul 22 13:35:15 2013 WARNING: No server certificate verification method has been enabled.  See http://openvpn.net/howto.html#mitm for more info.

Mon Jul 22 13:35:16 2013 Control Channel Authentication: using 'C:Program FilesOpenVPNconfigta.key' as a OpenVPN static key file

Mon Jul 22 13:35:16 2013 UDPv4 link local: [undef]

Mon Jul 22 13:35:16 2013 UDPv4 link remote: [AF_INET]MY REMOTE SERVER ADDRESS:1194

Mon Jul 22 13:35:22 2013 [albaserver] Peer Connection Initiated with [AF_INET]MY REMOTE
SERVER ADDRESS:1194
Mon Jul 22 13:35:25 2013 do_ifconfig, tt->ipv6=0, tt->did_ifconfig_ipv6_setup=0

Mon Jul 22 13:35:25 2013 open_tun, tt->ipv6=0

Mon Jul 22 13:35:25 2013 TAP-WIN32 device [Po?czenie lokalne 2] opened: \.Global
{D5B721DA-C466-472E-846B-A1915686F314}.tap
Mon Jul 22 13:35:25 2013 Notified TAP-Windows driver to set a DHCP IP/netmask of
192.168.0.171/255.255.255.0 on interface {D5B721DA-C466-472E-846B-A1915686F314} [DHCP-serv: 192.168.0.0, lease-time: 31536000]

Mon Jul 22 13:35:25 2013 Successful ARP Flush on interface [45] {D5B721DA-C466-472E-
846B-A1915686F314}
Mon Jul 22 13:35:30 2013 Initialization Sequence Completed
ipconfig
![[IMG]http://imageshack.us/a/img694/6686/cmq5.png[/IMG]](https://i.stack.imgur.com/ODYO7.png)
route -n
![[IMG]http://imageshack.us/a/img843/6918/a8ml.png[/IMG]](https://i.stack.imgur.com/5f79L.png)
Всем привет!
Openvpn 2.3.1-I001-x86_64, Windows 2008 R2 SP1, брандмауэр включен, из того что возможно будет интересно знать, стоит secret net 6, kaspersky security 10. Есть ещё uniper SRX210H к которому прямого доступа нет, ssh тоже нет, только веб.
Решил настроить OpenVPN вместо pptp т.к. у клиента как я уже написал есть Juniper и пробросить порт 1723 не получается в виду ограниченного опыта… 
В общем настроил всё на локальном тестовом сервере по этой инструкции:
http://www.sysadmin.in.ua/info/index/19/27/39
Изнутри работает, единственное со внешки ещё не успел попробовать подключатся, позже попробую.
У клиента всё по аналогии настроил, пинги по виртуальному ip проходят, единственное порт изменил на 443.
Пробую подключиться, пишет:
Thu Nov 30 13:38:44 2017 NOTE: —user option is not implemented on Windows
Thu Nov 30 13:38:44 2017 NOTE: —group option is not implemented on Windows
Thu Nov 30 13:38:44 2017 WARNING: Ignoring option ‘dh’ in tls-client mode, please only include this in your server configuration
Thu Nov 30 13:38:44 2017 OpenVPN 2.4.4 x86_64-w64-mingw32 [SSL (OpenSSL)] [LZO] [LZ4] [PKCS11] [AEAD] built on Sep 26 2017
Thu Nov 30 13:38:44 2017 Windows version 6.2 (Windows 8 or greater) 64bit
Thu Nov 30 13:38:44 2017 library versions: OpenSSL 1.0.2l 25 May 2017, LZO 2.10
Thu Nov 30 13:38:45 2017 WARNING: No server certificate verification method has been enabled. See
http://openvpn.net/howto.html#mitm
for more info.
Thu Nov 30 13:38:45 2017 TCP/UDP: Preserving recently used remote address: [AF_INET]10.0.0.19:443
Thu Nov 30 13:38:45 2017 UDP link local: (not bound)
Thu Nov 30 13:38:45 2017 UDP link remote: [AF_INET]10.0.0.19:443
Thu Nov 30 13:39:45 2017 TLS Error: TLS key negotiation failed to occur within 60 seconds (check your network connectivity)
Thu Nov 30 13:39:45 2017 TLS Error: TLS handshake failed
Thu Nov 30 13:39:45 2017 SIGUSR1[soft,tls-error] received, process restarting
Thu Nov 30 13:39:50 2017 WARNING: No server certificate verification method has been enabled. See
http://openvpn.net/howto.html#mitm
for more info.
Thu Nov 30 13:39:50 2017 TCP/UDP: Preserving recently used remote address: [AF_INET]10.0.0.19:443
Thu Nov 30 13:39:50 2017 UDP link local: (not bound)
Thu Nov 30 13:39:50 2017 UDP link remote: [AF_INET]10.0.0.19:443
В конфиге изменил UDP на TCP, пишет следущее:
Thu Nov 30 14:23:15 2017 NOTE: —user option is not implemented on Windows
Thu Nov 30 14:23:15 2017 NOTE: —group option is not implemented on Windows
Thu Nov 30 14:23:15 2017 WARNING: Ignoring option ‘dh’ in tls-client mode, please only include this in your server configuration
Thu Nov 30 14:23:15 2017 OpenVPN 2.4.4 x86_64-w64-mingw32 [SSL (OpenSSL)] [LZO] [LZ4] [PKCS11] [AEAD] built on Sep 26 2017
Thu Nov 30 14:23:15 2017 Windows version 6.2 (Windows 8 or greater) 64bit
Thu Nov 30 14:23:15 2017 library versions: OpenSSL 1.0.2l 25 May 2017, LZO 2.10
Thu Nov 30 14:23:16 2017 WARNING: No server certificate verification method has been enabled. See
http://openvpn.net/howto.html#mitm
for more info.
Thu Nov 30 14:23:16 2017 TCP/UDP: Preserving recently used remote address: [AF_INET]10.0.0.19:443
Thu Nov 30 14:23:16 2017 Attempting to establish TCP connection with [AF_INET]10.0.0.19:443 [nonblock]
Thu Nov 30 14:25:16 2017 TCP: connect to [AF_INET]10.0.0.19:443 failed: Unknown error
Thu Nov 30 14:25:16 2017 SIGUSR1[connection failed(soft),init_instance] received, process restarting
Thu Nov 30 14:25:21 2017 WARNING: No server certificate verification method has been enabled. See
http://openvpn.net/howto.html#mitm
for more info.
Thu Nov 30 14:25:21 2017 TCP/UDP: Preserving recently used remote address: [AF_INET]10.0.0.19:443
Thu Nov 30 14:25:21 2017 Attempting to establish TCP connection with [AF_INET]10.0.0.19:443 [nonblock]
Thu Nov 30 14:27:21 2017 TCP: connect to [AF_INET]10.0.0.19:443 failed: Unknown error
Thu Nov 30 14:27:21 2017 SIGUSR1[connection failed(soft),init_instance] received, process restarting
Thu Nov 30 14:27:26 2017 WARNING: No server certificate verification method has been enabled. See
http://openvpn.net/howto.html#mitm
for more info.
Thu Nov 30 14:27:26 2017 TCP/UDP: Preserving recently used remote address: [AF_INET]10.0.0.19:443
Thu Nov 30 14:27:26 2017 Attempting to establish TCP connection with [AF_INET]10.0.0.19:443 [nonblock]
Thu Nov 30 14:29:26 2017 TCP: connect to [AF_INET]10.0.0.19:443 failed: Unknown error
Thu Nov 30 14:29:26 2017 SIGUSR1[connection failed(soft),init_instance] received, process restarting
Thu Nov 30 14:29:31 2017 WARNING: No server certificate verification method has been enabled. See
http://openvpn.net/howto.html#mitm
for more info.
Thu Nov 30 14:29:31 2017 TCP/UDP: Preserving recently used remote address: [AF_INET]10.0.0.19:443
Thu Nov 30 14:29:31 2017 Attempting to establish TCP connection with [AF_INET]10.0.0.19:443 [nonblock]
Thu Nov 30 14:31:31 2017 TCP: connect to [AF_INET]10.0.0.19:443 failed: Unknown error
Thu Nov 30 14:31:31 2017 SIGUSR1[connection failed(soft),init_instance] received, process restarting
Thu Nov 30 14:31:36 2017 WARNING: No server certificate verification method has been enabled. See
http://openvpn.net/howto.html#mitm
for more info.
Thu Nov 30 14:31:36 2017 TCP/UDP: Preserving recently used remote address: [AF_INET]10.0.0.19:443
Thu Nov 30 14:31:36 2017 Attempting to establish TCP connection with [AF_INET]10.0.0.19:443 [nonblock]
Thu Nov 30 14:33:36 2017 TCP: connect to [AF_INET]10.0.0.19:443 failed: Unknown error
Thu Nov 30 14:33:36 2017 SIGUSR1[connection failed(soft),init_instance] received, process restarting
Thu Nov 30 14:33:46 2017 WARNING: No server certificate verification method has been enabled. See
http://openvpn.net/howto.html#mitm
for more info.
Thu Nov 30 14:33:46 2017 TCP/UDP: Preserving recently used remote address: [AF_INET]10.0.0.19:443
Thu Nov 30 14:33:46 2017 Attempting to establish TCP connection with [AF_INET]10.0.0.19:443 [nonblock]
Thu Nov 30 14:35:46 2017 TCP: connect to [AF_INET]10.0.0.19:443 failed: Unknown error
Thu Nov 30 14:35:46 2017 SIGUSR1[connection failed(soft),init_instance] received, process restarting
Thu Nov 30 14:36:06 2017 WARNING: No server certificate verification method has been enabled. See
http://openvpn.net/howto.html#mitm
for more info.
Thu Nov 30 14:36:06 2017 TCP/UDP: Preserving recently used remote address: [AF_INET]10.0.0.19:443
Thu Nov 30 14:36:06 2017 Attempting to establish TCP connection with [AF_INET]10.0.0.19:443 [nonblock]
Thu Nov 30 14:38:06 2017 TCP: connect to [AF_INET]10.0.0.19:443 failed: Unknown error
Thu Nov 30 14:38:06 2017 SIGUSR1[connection failed(soft),init_instance] received, process restarting
Thu Nov 30 14:38:46 2017 WARNING: No server certificate verification method has been enabled. See
http://openvpn.net/howto.html#mitm
for more info.
Thu Nov 30 14:38:46 2017 TCP/UDP: Preserving recently used remote address: [AF_INET]10.0.0.19:443
Thu Nov 30 14:38:46 2017 Attempting to establish TCP connection with [AF_INET]10.0.0.19:443 [nonblock]
Thu Nov 30 14:40:46 2017 TCP: connect to [AF_INET]10.0.0.19:443 failed: Unknown error
Thu Nov 30 14:40:46 2017 SIGUSR1[connection failed(soft),init_instance] received, process restarting
Thu Nov 30 14:42:06 2017 WARNING: No server certificate verification method has been enabled. See
http://openvpn.net/howto.html#mitm
for more info.
Thu Nov 30 14:42:06 2017 TCP/UDP: Preserving recently used remote address: [AF_INET]10.0.0.19:443
Thu Nov 30 14:42:06 2017 Attempting to establish TCP connection with [AF_INET]10.0.0.19:443 [nonblock]
Thu Nov 30 14:44:06 2017 TCP: connect to [AF_INET]10.0.0.19:443 failed: Unknown error
Thu Nov 30 14:44:06 2017 SIGUSR1[connection failed(soft),init_instance] received, process restarting
Поняв что я делаю не так, сейчас вопрос получается в следующем, как повернуть всё это дело на внешний адрес?
I am attempting to connect to another location using OpenVPN. I have been provided a script however once it runs through and says «Initialization Sequence Completed» I check my IP and it remains as is. The output is as follows:
Fri Jul 08 16:04:20 2016 NOTE: --group option is not implemented on Windows
Fri Jul 08 16:04:20 2016 NOTE: --user option is not implemented on Windows
Fri Jul 08 16:04:20 2016 OpenVPN 2.3.11 x86_64-w64-mingw32 [SSL (OpenSSL)] [LZO] [PKCS11] [IPv6] built on May 10 2016
Fri Jul 08 16:04:20 2016 Windows version 6.2 (Windows 8 or greater) 64bit
Fri Jul 08 16:04:20 2016 library versions: OpenSSL 1.0.1t  3 May 2016, LZO 2.09
Fri Jul 08 16:04:20 2016 Control Channel Authentication: tls-auth using INLINE static key file
Fri Jul 08 16:04:20 2016 Attempting to establish TCP connection with [AF_INET]103.240.178.197:21194 [nonblock]
Fri Jul 08 16:04:21 2016 TCP connection established with [AF_INET]103.240.178.197:21194
Fri Jul 08 16:04:21 2016 TCPv4_CLIENT link local: [undef]
Fri Jul 08 16:04:21 2016 TCPv4_CLIENT link remote: [AF_INET]???.???.???.???:?????
Fri Jul 08 16:04:21 2016 WARNING: this configuration may cache passwords in memory -- use the auth-nocache option to prevent this
Fri Jul 08 16:04:27 2016 [OpenVPN Server] Peer Connection Initiated with [AF_INET]???.???.???.???:?????
Fri Jul 08 16:04:31 2016 Options error: --dhcp-option: unknown option type 'domain-name-servers' or missing parameter
Fri Jul 08 16:04:31 2016 Options error: --dhcp-option: unknown option type 'domain-name-servers' or missing parameter
Fri Jul 08 16:04:32 2016 do_ifconfig, tt->ipv6=0, tt->did_ifconfig_ipv6_setup=0
Fri Jul 08 16:04:32 2016 open_tun, tt->ipv6=0
Fri Jul 08 16:04:32 2016 TAP-WIN32 device [Ethernet] opened: ???.tap
Fri Jul 08 16:04:32 2016 Notified TAP-Windows driver to set a DHCP IP/netmask of ???.??.??.???(hidden for security reasons)/255.255.255.252 on interface {???-???-???-???} [DHCP-serv: ???.??.??.???, lease-time: 31536000]
Fri Jul 08 16:04:32 2016 Successful ARP Flush on interface [42] {???-???-???-???-????}
Fri Jul 08 16:04:34 2016 env_block: add PATH=C:windowsSystem32;C:windows;C:windowsSystem32Wbem
Fri Jul 08 16:04:34 2016 env_block: add PATH=C:windowsSystem32;C:windows;C:windowsSystem32Wbem
Fri Jul 08 16:04:34 2016 env_block: add PATH=C:windowsSystem32;C:windows;C:windowsSystem32Wbem
Fri Jul 08 16:04:35 2016 env_block: add PATH=C:windowsSystem32;C:windows;C:windowsSystem32Wbem
Fri Jul 08 16:04:35 2016 env_block: add PATH=C:windowsSystem32;C:windows;C:windowsSystem32Wbem
Fri Jul 08 16:04:35 2016 env_block: add PATH=C:windowsSystem32;C:windows;C:windowsSystem32Wbem
Fri Jul 08 16:04:35 2016 env_block: add PATH=C:windowsSystem32;C:windows;C:windowsSystem32Wbem
Fri Jul 08 16:04:35 2016 env_block: add PATH=C:windowsSystem32;C:windows;C:windowsSystem32Wbem
Fri Jul 08 16:04:35 2016 env_block: add PATH=C:windowsSystem32;C:windows;C:windowsSystem32Wbem
Fri Jul 08 16:04:35 2016 env_block: add PATH=C:windowsSystem32;C:windows;C:windowsSystem32Wbem
Fri Jul 08 16:04:35 2016 env_block: add PATH=C:windowsSystem32;C:windows;C:windowsSystem32Wbem
Fri Jul 08 16:04:35 2016 env_block: add PATH=C:windowsSystem32;C:windows;C:windowsSystem32Wbem
Fri Jul 08 16:04:35 2016 env_block: add PATH=C:windowsSystem32;C:windows;C:windowsSystem32Wbem
Fri Jul 08 16:04:35 2016 env_block: add PATH=C:windowsSystem32;C:windows;C:windowsSystem32Wbem
Fri Jul 08 16:04:35 2016 env_block: add PATH=C:windowsSystem32;C:windows;C:windowsSystem32Wbem
Fri Jul 08 16:04:35 2016 env_block: add PATH=C:windowsSystem32;C:windows;C:windowsSystem32Wbem
Fri Jul 08 16:04:35 2016 env_block: add PATH=C:windowsSystem32;C:windows;C:windowsSystem32Wbem
Fri Jul 08 16:04:35 2016 env_block: add PATH=C:windowsSystem32;C:windows;C:windowsSystem32Wbem
Fri Jul 08 16:04:35 2016 env_block: add PATH=C:windowsSystem32;C:windows;C:windowsSystem32Wbem
Fri Jul 08 16:04:35 2016 env_block: add PATH=C:windowsSystem32;C:windows;C:windowsSystem32Wbem
Fri Jul 08 16:04:35 2016 env_block: add PATH=C:windowsSystem32;C:windows;C:windowsSystem32Wbem
Fri Jul 08 16:04:35 2016 env_block: add PATH=C:windowsSystem32;C:windows;C:windowsSystem32Wbem
Fri Jul 08 16:04:35 2016 env_block: add PATH=C:windowsSystem32;C:windows;C:windowsSystem32Wbem
Fri Jul 08 16:04:35 2016 env_block: add PATH=C:windowsSystem32;C:windows;C:windowsSystem32Wbem
Fri Jul 08 16:04:35 2016 env_block: add PATH=C:windowsSystem32;C:windows;C:windowsSystem32Wbem
Fri Jul 08 16:04:35 2016 env_block: add PATH=C:windowsSystem32;C:windows;C:windowsSystem32Wbem
Fri Jul 08 16:04:35 2016 env_block: add PATH=C:windowsSystem32;C:windows;C:windowsSystem32Wbem
Fri Jul 08 16:04:35 2016 env_block: add PATH=C:windowsSystem32;C:windows;C:windowsSystem32Wbem
Fri Jul 08 16:04:35 2016 env_block: add PATH=C:windowsSystem32;C:windows;C:windowsSystem32Wbem
Fri Jul 08 16:04:35 2016 env_block: add PATH=C:windowsSystem32;C:windows;C:windowsSystem32Wbem
Fri Jul 08 16:04:35 2016 env_block: add PATH=C:windowsSystem32;C:windows;C:windowsSystem32Wbem
Fri Jul 08 16:04:35 2016 env_block: add PATH=C:windowsSystem32;C:windows;C:windowsSystem32Wbem
Fri Jul 08 16:04:35 2016 env_block: add PATH=C:windowsSystem32;C:windows;C:windowsSystem32Wbem
Fri Jul 08 16:04:35 2016 env_block: add PATH=C:windowsSystem32;C:windows;C:windowsSystem32Wbem
Fri Jul 08 16:04:36 2016 env_block: add PATH=C:windowsSystem32;C:windows;C:windowsSystem32Wbem
Fri Jul 08 16:04:36 2016 env_block: add PATH=C:windowsSystem32;C:windows;C:windowsSystem32Wbem
Fri Jul 08 16:04:36 2016 env_block: add PATH=C:windowsSystem32;C:windows;C:windowsSystem32Wbem
Fri Jul 08 16:04:36 2016 env_block: add PATH=C:windowsSystem32;C:windows;C:windowsSystem32Wbem
Fri Jul 08 16:04:36 2016 env_block: add PATH=C:windowsSystem32;C:windows;C:windowsSystem32Wbem
Fri Jul 08 16:04:36 2016 env_block: add PATH=C:windowsSystem32;C:windows;C:windowsSystem32Wbem
Fri Jul 08 16:04:36 2016 env_block: add PATH=C:windowsSystem32;C:windows;C:windowsSystem32Wbem
Fri Jul 08 16:04:36 2016 Initialization Sequence Completed
Fri Jul 08 16:05:54 2016 Connection reset, restarting [0]
Fri Jul 08 16:05:54 2016 SIGUSR1[soft,connection-reset] received, process restarting
Fri Jul 08 16:05:59 2016 Attempting to establish TCP connection with [AF_INET]103.240.178.197:21194 [nonblock]
Fri Jul 08 16:06:00 2016 TCP connection established with [AF_INET]103.240.178.197:21194
Fri Jul 08 16:06:00 2016 TCPv4_CLIENT link local: [undef]
Fri Jul 08 16:06:00 2016 TCPv4_CLIENT link remote: [AF_INET]103.240.178.197:21194
Fri Jul 08 16:06:07 2016 [OpenVPN Server] Peer Connection Initiated with [AF_INET]???.???.???.???:?????
Fri Jul 08 16:06:11 2016 Options error: --dhcp-option: unknown option type 'domain-name-servers' or missing parameter
Fri Jul 08 16:06:11 2016 Options error: --dhcp-option: unknown option type 'domain-name-servers' or missing parameter
Fri Jul 08 16:06:12 2016 Preserving previous TUN/TAP instance: Ethernet
Fri Jul 08 16:06:12 2016 Initialization Sequence Completed
Fri Jul 08 17:10:22 2016 TUN/TAP I/O operation aborted, restarting
Fri Jul 08 17:10:22 2016 env_block: add PATH=C:windowsSystem32;C:windows;C:windowsSystem32Wbem
Fri Jul 08 17:10:23 2016 env_block: add PATH=C:windowsSystem32;C:windows;C:windowsSystem32Wbem
Fri Jul 08 17:10:23 2016 env_block: add PATH=C:windowsSystem32;C:windows;C:windowsSystem32Wbem
Fri Jul 08 17:10:23 2016 env_block: add PATH=C:windowsSystem32;C:windows;C:windowsSystem32Wbem
Fri Jul 08 17:10:23 2016 env_block: add PATH=C:windowsSystem32;C:windows;C:windowsSystem32Wbem
Fri Jul 08 17:10:23 2016 env_block: add PATH=C:windowsSystem32;C:windows;C:windowsSystem32Wbem
Fri Jul 08 17:10:23 2016 env_block: add PATH=C:windowsSystem32;C:windows;C:windowsSystem32Wbem
Fri Jul 08 17:10:23 2016 env_block: add PATH=C:windowsSystem32;C:windows;C:windowsSystem32Wbem
Fri Jul 08 17:10:23 2016 env_block: add PATH=C:windowsSystem32;C:windows;C:windowsSystem32Wbem
Fri Jul 08 17:10:23 2016 env_block: add PATH=C:windowsSystem32;C:windows;C:windowsSystem32Wbem
Fri Jul 08 17:10:23 2016 env_block: add PATH=C:windowsSystem32;C:windows;C:windowsSystem32Wbem
Fri Jul 08 17:10:23 2016 env_block: add PATH=C:windowsSystem32;C:windows;C:windowsSystem32Wbem
Fri Jul 08 17:10:23 2016 env_block: add PATH=C:windowsSystem32;C:windows;C:windowsSystem32Wbem
Fri Jul 08 17:10:23 2016 env_block: add PATH=C:windowsSystem32;C:windows;C:windowsSystem32Wbem
Fri Jul 08 17:10:23 2016 env_block: add PATH=C:windowsSystem32;C:windows;C:windowsSystem32Wbem
Fri Jul 08 17:10:23 2016 env_block: add PATH=C:windowsSystem32;C:windows;C:windowsSystem32Wbem
Fri Jul 08 17:10:23 2016 env_block: add PATH=C:windowsSystem32;C:windows;C:windowsSystem32Wbem
Fri Jul 08 17:10:23 2016 env_block: add PATH=C:windowsSystem32;C:windows;C:windowsSystem32Wbem
Fri Jul 08 17:10:23 2016 env_block: add PATH=C:windowsSystem32;C:windows;C:windowsSystem32Wbem
Fri Jul 08 17:10:23 2016 env_block: add PATH=C:windowsSystem32;C:windows;C:windowsSystem32Wbem
Fri Jul 08 17:10:23 2016 env_block: add PATH=C:windowsSystem32;C:windows;C:windowsSystem32Wbem
Fri Jul 08 17:10:23 2016 env_block: add PATH=C:windowsSystem32;C:windows;C:windowsSystem32Wbem
Fri Jul 08 17:10:23 2016 env_block: add PATH=C:windowsSystem32;C:windows;C:windowsSystem32Wbem
Fri Jul 08 17:10:23 2016 env_block: add PATH=C:windowsSystem32;C:windows;C:windowsSystem32Wbem
Fri Jul 08 17:10:23 2016 env_block: add PATH=C:windowsSystem32;C:windows;C:windowsSystem32Wbem
Fri Jul 08 17:10:23 2016 env_block: add PATH=C:windowsSystem32;C:windows;C:windowsSystem32Wbem
Fri Jul 08 17:10:23 2016 env_block: add PATH=C:windowsSystem32;C:windows;C:windowsSystem32Wbem
How can i diagnose the problem? The fact that it runs env_block multiple times has me concerned but not too sure where to start.
asked Jul 11, 2016 at 7:47
![]()
From what I understand of your log: env_block is an error message meaning that there is a problem with environment variables. More specifically, the variable PATH, which does not contain elements needed by OpenVPN. That means OpenVPN can’t start the tools it needs to configure Windows correctly.
To check if that really is the problem:
- Open Control Pannel
- Go to System Properties
- On the left, click Advanced System Parameters
- Click Environment variables
- Find «Path» in ne of the lists, slect it and click Modify
- Check it to make sure there is
C:windowsSystem32;C:windows;C:windowsSystem32Wbemin it - If there it or part of it is not there, add it. Make sure whatever you add starts and ends with a semicolon.
Note that C:windows can be replaced by %SystemRoot% or %windir%.
answered Jul 11, 2016 at 8:10
![]()
5
Contents
- What is it?
- What is it for?
- Summary of the cryptography to use
- Steps to follow to work with OpenVPN
- Download and install
- Easy-RSA 3 download for certificates
- Configure Easy-RSA 3 «vars»
- PKI creation: CA, server and client certificates
- Create the Diffie-Hellmann parameters and the key tls-crypt (tls-auth on older systems)
- Configure the OpenVPN server and start it
- Configure the client (or clients)
- Create static route in our router
- Main problems and connection failures when connecting
- RESOLVE: Cannot resolve host address: xxxx.no-ip.org:11949 (Unknown host.)
- Could not determine IPv4 / IPv6 protocol
- SIGUSR1 [soft, init_instance] received, process restarting
- MANAGEMENT:> STATE: 1603127258, WAIT ,,,,,,
- NOTE: –user option is not implemented on Windows
- NOTE: –group option is not implemented on Windows
- WARNING: Ignoring option ‘dh’ in tls-client mode, please only include this in your server configuration
- tls-crypt unwrap error: packet authentication failed and TLS Error: tls-crypt unwrapping failed from [AF_INET]
- TLS Error: Unroutable control packet received from [AF_INET] and TLS Error: local / remote TLS keys are out of sync
- TLS Error: Unroutable control packet received from
- WARNING: ‘link-mtu’ is used inconsistently, local = ‘link-mtu 1549 ′, remote =’ link-mtu 1550 ′
- WARNING: ‘comp-lzo’ is present in remote config but missing in local config, remote = ‘comp-lzo’
- TLS Error: TLS handshake failed
- Updates and news in the new versions of OpenVPN
- Tls-crypt-v2 is added
- ChaCha20-Poly1305 encryption support
- Enhanced encryption negotiation on the data channel
- Support for BF-CBC is removed in default settings
What is it?
OpenVPN is a software based on free software that allows us to build a virtual private network (VPN), to connect remotely to the server. This software allows us to configure two types of VPN architectures:

- Remote Access VPN: We have a central VPN server, and several VPN clients with the software installed on your computer, smartphone, tablet or other device, and they all connect centrally to the VPN server.
- Site-to-Site VPN: this architecture allows us to intercommunicate between different sites to share resources through a secure network, protected with end-to-end encryption. This type of VPN allows us to intercommunicate offices, company headquarters, etc.
Some very important features of OpenVPN are that it supports extensive configuration, both to improve performance as well as security. It is based on SSL / TLS, therefore, we can create digital certificates for the authentication of VPN clients, in addition, we could also authenticate with certificates plus a username / password that we add to the system. OpenVPN is much easier to configure than IPsec, and thanks to the great support from the community, we will be able to find OpenVPN on all desktop operating systems, servers and even on smartphones and tablets.
What is it for?
If we create an OpenVPN server in our home, it can help us to connect to the Internet in a secure way from any network, be it wired or WiFi, with WEP / WPA encryption or without encryption. All traffic will be encrypted through a tunnel from our computer where we connect to our home and from there it will go to the Internet, it is like being connected to the Internet at home. We must take into account several factors, such as having a good upload speed (30Mbps or higher), and having a public IP address in our home, since if we have CG-NAT we will not be able to connect because we will not be able to do port forwarding in the router.
By mounting an OpenVPN server in our home, we can also access each and every one of the shared resources we have, such as Samba servers, FTP and even access the printer, IP cameras that we have connected, etc. All access permits would be just as if we were physically in our home. OpenVPN is a solution for VPN that implements layer 2 or 3 connections, depending on the chosen connection mode, it will work in one way or another, in addition, an important detail is that the vast majority of operating systems today support OpenVPN, although not it is usually incorporated by hardware manufacturers for firewalls or routers.
OpenVPN uses a set of SSL / TLS protocols that work at the transport layer, and we have two types of operation:
- TUN : The TUN controller emulates a point-to-point device, it is used to create virtual tunnels operating with the IP protocol . In this way, all the packets that are transported through it can be encapsulated as TCP segments or UDP datagrams (later you will see that we choose UDP instead of TCP, and you will ask why, since TCP is connective, reliable and oriented to Connection). The machines behind each end of the link will belong to different subnets.
- TAP : Simulates an Ethernet network interface, more commonly known as bridge or bridge mode, these virtual tunnels directly encapsulate Ethernet packets . This situation allows packaging different fabrics than IP. The machines behind each end of the link can operate as part of the same subnet (if the IP protocol is used). The bridge operating mode is particularly useful to link remote users, since they can connect to the same server and virtually be part of the main network, however, if the private network where the origin is connected coincides with the destination, we will have Routing problems and communication will not work.
In the manual we will use TUN and see how we create a virtual subnet 10.8.0.0/24 where the OpenVPN clients will be when they connect. In this way, it will be much easier to identify the VPN clients that we have connected in the local network.
In this manual I am going to explain how to do it in GNU / Linux (in Debian 10) , although in essence, it is the same for Windows , only the commands in the console (cmd.exe), the certificates and the keys change, they are the The same for both , that is, you can create EVERYTHING in GNU / Linux and then pass it to Windows to use it (either client or server), you only have to change the client / server extension .conf to .ovpn , although in the latest versions OpenVPN for Windows already allows us to recognize and use .conf configuration files, so we will not have to change the extension.
In this manual I am going to show you how to make a very secure OpenVPN configuration, customizing the symmetric, asymmetric and hash encryption algorithms. In this way, we can have the best possible encryption of communications.
Summary of the cryptography to use
- Digital certificates : We will use EC (Elliptical Curves) for the creation of the Public Key Infrastructure . We will create both the certificates of the CA (Certification Authority), as well as the certificates of the server and VPN clients that want to connect. The EC algorithm used is secp521r1, although we have many others available. The hash algorithm that we will use will be SHA512 . An important detail is that not all OpenVPN clients / servers support it, we must have our OpenVPN and cryptographic libraries updated, but nowadays it is rare to find ourselves in a scenario that is not compatible.
- OpenVPN control channel : we will use at least TLS 1.2, and always using PFS (Perfect Forward Secrecy) based on Diffie-Hellmann with elliptic curves (ECDHE). That is, we will use a selection of secure crypto suites, such as TLS-ECDHE-RSA-WITH-AES-256-GCM-SHA384. If you want to check if your server or client supports this type of encryption, you should put in the console “openvpn –show-tls”.
- OpenVPN data channel : We will use the AES-256-GCM symmetric encryption algorithm, the most secure currently and which has been incorporated into OpenVPN 2.4 and later. If you want to check if your server or client supports this type of encryption, you must put in the console « openvpn –show-ciphers «. If we use AES-256-GCM as data channel encryption, we will not use any HASH algorithm since it is AEAD, however, if we use AES-256-CBC we will use SHA512.
In addition to these security measures, we will include an additional HMAC signature for the first TLS negotiation, in this way, we will protect the system from possible denial of service attacks, UDP Port Flooding attacks and also TCP SYN attacks. When connecting to the server, if the client does not have the correct HMAC signature, it will be blocked. In previous versions of OpenVPN 2.4 the directive was tls-auth , which was only responsible for the authentication of a pre-shared key generated by OpenVPN itself. Now in versions higher than OpenVPN 2.4 it is called tls-crypt , the main difference is that in addition to authenticating, it also encrypts the channel so that no one is able to capture said pre-shared key. The configuration is very similar, the generation of the key is exactly the same in both.
Finally, we will use the UDP protocol instead of TCP, because it is stronger against denial of service attacks, we must remember that UDP is non-connective, unreliable and connection-oriented. However, we can use TCP without any problem to provide the VPN with all the benefits of this protocol.
Steps to follow to work with OpenVPN
Below you will be able to see in detail how to install this software, and also everything you need to start it up with the best possible security provided by this solution to create a virtual private network.
Download and install
The first thing we have to do is install OpenVPN on our computer, either with Windows or Linux. If you use Windows you must go to the official OpenVPN download website and install everything in the installation wizard. If you use an operating system like Debian (we will be using Debian 10 throughout this manual), you will have to enter the following command:
sudo apt update
sudo apt install openvpn
Easy-RSA 3 download for certificates
Once installed, we must download the Easy-RSA 3 software package, this software package is used to create digital certificates easily and quickly. We can modify the length of the key, the type of key, if we want to put a password to the private keys etc. On the official website of the Easy-RSA 3 project on GitHub you have all the information and the possibility of downloading a .zip with everything.
If you are on a Linux system, we recommend using the wget command to download the .zip:
wget https://github.com/OpenVPN/easy-rsa/releases/download/v3.0.8/EasyRSA-3.0.8.tgz
Next, we must unzip this downloaded file and enter the folder to start configuring the vars file.
tar -zxvf EasyRSA-3.0.8.tgz
Configure Easy-RSA 3 «vars»
The vars.example file is the center of all the configuration of the certificates, it is where we must define if we want to create certificates based on RSA or based on EC. Likewise, it will also allow us to sign the certificates with SHA256 or SHA512 among others. That is, we must configure this configuration file correctly to later create the digital certificates.
The first thing we must do is copy the file vars.example in the same folder with name “vars”, if we do not have it with this name “vars” it will not work. We also have the possibility to rename the file vars.example in “vars”, but we recommend you better make a backup in case you delete something and then it doesn’t work for you.
We go to the main folder of Easy-RSA3 and copy the file in this way:
cp vars.example vars
Once we have the “vars” file, we must edit it with any file editor via console or graphical interface, we will use nano due to its ease. In the following «vars» configuration file you can see how EC would look with the secp521r1 algorithm, signed with SHA512 and we have used a DN (Distinguished Name) putting the CN (Common Name) instead of the typical «organization data »As we have always done before, in this way, we facilitate the creation of certificates, however, we could also do it by indicating the typical organization data.
In the file itself are the original comments in English, and in Spanish we have put ours to facilitate the location of what needs to be modified. A very important detail, WordPress automatically puts these symbols << and >> when it should just put double quotes: »
# Easy-RSA 3 parameter settings
# NOTE: If you installed Easy-RSA from your distro’s package manager, don’t edit
# this file in place – instead, you should copy the entire easy-rsa directory
# to another location so future upgrades don’t wipe out your changes.# HOW TO USE THIS FILE
#
# vars.example contains built-in examples to Easy-RSA settings. You MUST name
# this file ‘vars’ if you want it to be used as a configuration file. If you do
# not, it WILL NOT be automatically read when you call easyrsa commands.
#
# It is not necessary to use this config file unless you wish to change
# operational defaults. These defaults should be fine for many uses without the
# need to copy and edit the ‘vars’ file.
#
# All of the editable settings are shown commented and start with the command
# ‘set_var’ – this means any set_var command that is uncommented has been
# modified by the user. If you’re happy with a default, there is no need to
# define the value to its default.# NOTES FOR WINDOWS USERS
#
# Paths for Windows * MUST * use forward slashes, or optionally double-esscaped
# backslashes (single forward slashes are recommended.) This means your path to
# the openssl binary might look like this:
# “C: / Program Files / OpenSSL-Win32 / bin / openssl.exe”# A little housekeeping: DON’T EDIT THIS SECTION
#
# Easy-RSA 3.x doesn’t source into the environment directly.
# Complain if a user tries to do this:
if [-z “$ EASYRSA_CALLER”]; then
echo “You appear to be sourcing an Easy-RSA ‘vars’ file.” > & 2
echo «This is no longer necessary and is disallowed. See the section called »> & 2
echo “‘How to use this file’ near the top comments for more details.” > & 2
return 1
fi# DO YOUR EDITS BELOW THIS POINT
# This variable is used as the base location of configuration files needed by
# easyrsa. More specific variables for specific files (eg, EASYRSA_SSL_CONF)
# may override this default.
#
# The default value of this variable is the location of the easyrsa script
# itself, which is also where the configuration files are located in the
# easy-rsa tree.#set_var EASYRSA “$ {0% / *}”
# If your OpenSSL command is not in the system PATH, you will need to define the
# path to it here. Normally this means a full path to the executable, otherwise
# you could have left it undefined here and the shown default would be used.
#
# Windows users, remember to use paths with forward-slashes (or escaped
# back-slashes.) Windows users should declare the full path to the openssl
# binary here if it is not in their system PATH.#set_var EASYRSA_OPENSSL “openssl”
#
# This sample is in Windows syntax – edit it for your path if not using PATH:
#set_var EASYRSA_OPENSSL “C: / Program Files / OpenSSL-Win32 / bin / openssl.exe”# Edit this variable to point to your soon-to-be-created key directory. By
# default, this will be “$ PWD / pki” (ie the “pki” subdirectory of the
# directory you are currently in).
#
# WARNING: init-pki will do a rm -rf on this directory so make sure you define
# it correctly! (Interactive mode will prompt before acting.)#set_var EASYRSA_PKI “$ PWD / pki”
# Define X509 DN mode.
# This is used to adjust what elements are included in the Subject field as the DN
# (this is the «Distinguished Name.»)
# Note that in cn_only mode the Organizational fields further below aren’t used.
#
# Choices are:
# cn_only – use just a CN value
# org – use the “traditional” Country / Province / City / Org / OU / email / CN format#ELEGIMOS cn_only FOR THE CREATION OF CERTIFICATES
set_var EASYRSA_DN “cn_only”
# Organizational fields (used with ‘org’ mode and ignored in ‘cn_only’ mode.)
# These are the default values for fields which will be placed in the
# certificate. Don’t leave any of these fields blank, although interactively
# you may omit any specific field by typing the «.» symbol (not valid for
# email.)#set_var EASYRSA_REQ_COUNTRY “US”
#set_var EASYRSA_REQ_PROVINCE “California”
#set_var EASYRSA_REQ_CITY “San Francisco”
#set_var EASYRSA_REQ_ORG “Copyleft Certificate Co”
#set_var EASYRSA_REQ_EMAIL “me@example.net”
#set_var EASYRSA_REQ_OU “My Organizational Unit”# Choose a size in bits for your keypairs. The recommended value is 2048. Using
# 2048-bit keys is considered more than sufficient for many years into the
# future. Larger keysizes will slow down TLS negotiation and make key / DH param
# generation take much longer. Values up to 4096 should be accepted by most
# software. Only used when the crypto alg is rsa (see below.)#set_var EASYRSA_KEY_SIZE 2048
# The default crypto mode is rsa; ec can enable elliptic curve support.
# Note that not all software supports ECC, so use care when enabling it.
# Choices for crypto alg are: (each in lower-case)
# * rsa
# * ec# WE CHOOSE ELIPTICAL CURVE FOR THE CREATION OF CERTIFICATES, BY DEFAULT IT IS RSA.
set_var EASYRSA_ALGO ec
# WE DEFINE THE NAME OF THE ELIPTICAL CURVE CHOSEN
set_var EASYRSA_CURVE secp521r1
# WE CONFIGURE THE EXPIRY OF THE AC
set_var EASYRSA_CA_EXPIRE 3650
# WE CONFIGURE THE EXPIRY OF THE CERTIFICATES CREATED.
set_var EASYRSA_CERT_EXPIRE 1080
# How many days until the next CRL publish date? Note that the CRL can still be
# parsed after this timeframe passes. It is only used for an expected next
# publication date.# How many days before its expiration date a certificate is allowed to be
# renewed?
#set_var EASYRSA_CERT_RENEW 30#set_var EASYRSA_CRL_DAYS 180
# Support deprecated “Netscape” extensions? (choices “yes” or “no”.) The default
# is “no” to discourage use of deprecated extensions. If you require this
# feature to use with –ns-cert-type, set this to “yes” here. This support
# should be replaced with the more modern –remote-cert-tls feature. If you do
# not use –ns-cert-type in your configs, it is safe (and recommended) to leave
# this defined to “no”. When set to “yes”, server-signed certs get the
# nsCertType = server attribute, and also get any NS_COMMENT defined below in the
# nsComment field.#set_var EASYRSA_NS_SUPPORT “no”
# When NS_SUPPORT is set to «yes», this field is added as the nsComment field.
# Set this blank to omit it. With NS_SUPPORT set to “no” this field is ignored.#set_var EASYRSA_NS_COMMENT “Easy-RSA Generated Certificate”
# A temp file used to stage cert extensions during signing. The default should
# be fine for most users; however, some users might want an alternative under a
# RAM-based FS, such as / dev / shm or / tmp on some systems.#set_var EASYRSA_TEMP_FILE “$ EASYRSA_PKI / extensions.temp”
# !!
# NOTE: ADVANCED OPTIONS BELOW THIS POINT
# PLAY WITH THEM AT YOUR OWN RISK
# !!# Broken shell command aliases: If you have a largely broken shell that is
# missing any of these POSIX-required commands used by Easy-RSA, you will need
# to define an alias to the proper path for the command. The symptom will be
# some form of a ‘command not found’ error from your shell. This means your
# shell is BROKEN, but you can hack around it here if you really need. estos
# shown values are not defaults: it is up to you to know what you’re doing if
# you touch these.
#
#alias awk = »/ alt / bin / awk»
#alias cat = »/ alt / bin / cat»# X509 extensions directory:
# If you want to customize the X509 extensions used, set the directory to look
# for extensions here. Each cert type you sign must have a matching filename,
# and an optional file named ‘COMMON’ is included first when present. Note that
# when undefined here, default behavior is to look in $ EASYRSA_PKI first, then
# fallback to $ EASYRSA for the ‘x509-types’ dir. You may override this
# detection with an explicit dir here.
#
#set_var EASYRSA_EXT_DIR “$ EASYRSA / x509-types”# OpenSSL config file:
# If you need to use a specific openssl config file, you can reference it here.
# Normally this file is auto-detected from a file named openssl-easyrsa.cnf from the
# EASYRSA_PKI or EASYRSA dir (in that order.) NOTE that this file is Easy-RSA
# specific and you cannot just use a standard config file, so this is an
# advanced feature.#set_var EASYRSA_SSL_CONF “$ EASYRSA / openssl-easyrsa.cnf”
# Default CN:
# This is best left alone. Interactively you will set this manually, and BATCH
# callers are expected to set this themselves.#set_var EASYRSA_REQ_CN “ChangeMe”
# Cryptographic digest to use.
# Do not change this default unless you understand the security implications.
# Valid choices include: md5, sha1, sha256, sha224, sha384, sha512# WE SELECTED THE HASH SHA512
set_var EASYRSA_DIGEST “sha512”
# Batch mode. Leave this disabled unless you intend to call Easy-RSA explicitly
# in batch mode without any user input, confirmation on dangerous operations,
# or most output. Setting this to any non-blank string enables batch mode.#set_var EASYRSA_BATCH «»
Once we have modified everything, we save the file since later we are going to use it with these values.
PKI creation: CA, server and client certificates
When we have the «vars» file configured, we proceed to create the Public Key Infrastructure (PKI) with the following command (we assume that you are still in the main Easy-RSA3 directory):
./easyrsa init-pki
root @ debian-vm: /home/bron/EasyRSA-v3.0.6# ./easyrsa init-pki
Note: using Easy-RSA configuration from: ./vars
init-pki complete; you may now create a CA or requests.
Your newly created PKI dir is: /home/bron/EasyRSA-v3.0.6/pki
Once the PKI is initialized, we must create the Certification Authority (CA):
./easyrsa build-ca
Once executed, we must follow the simple CA generation wizard. The password that you ask us is to protect the private key of the CA, something fundamental.
root @ debian-vm: /home/bron/EasyRSA-v3.0.6# ./easyrsa build-ca
Note: using Easy-RSA configuration from: ./vars
Using SSL: openssl OpenSSL 1.1.1d 10 Sep 2019
Enter New CA Key Passphrase:
Re-Enter New CA Key Passphrase:
read EC key
writing EC key
Can’t load /home/bron/EasyRSA-v3.0.6/pki/.rnd into RNG
139864421569664: error: 2406F079: random number generator: RAND_load_file: Cannot open file: ../ crypto / rand / randfile.c: 98: Filename = / home / bron / EasyRSA-v3.0.6 / pki / .rnd
You are about to be asked to enter information that will be incorporated
into your certificate request.
What you are about to enter is what is called a Distinguished Name or a DN.
There are quite a few fields but you can leave some blank
For some fields there will be a default value,
If you enter ‘.’, The field will be left blank.
—–
Common Name (eg: your user, host, or server name) [Easy-RSA CA]: AUTHORITY-CERTIFICATIONCA creation complete and you may now import and sign cert requests.
Your new CA certificate file for publishing is at:
/home/bron/EasyRSA-v3.0.6/pki/ca.crt
If we do not want to enter a password in the private key of the CA (it is not recommended for security reasons), we must put this command:
./easyrsa build-ca nopass
Once we have created the CA, we must create the server certificate and the client certificates. Next, we must sign it with the CA.
Create the server certificate and sign it with the CA
When creating the server and client certificates, we can give them a password for the private key, however, it is not recommended to do it on the server since every time we start it, it will ask us for the password to use it. If we do not want a password, we will put “nopass” behind each order that you will see below.
./easyrsa gen-req servidor-openvpn-redeszone nopass
The output of the terminal is as follows:
root @ debian-vm: /home/bron/EasyRSA-v3.0.6# ./easyrsa gen-req server-openvpn-redeszone nopass
Note: using Easy-RSA configuration from: ./vars
Using SSL: openssl OpenSSL 1.1.1d 10 Sep 2019
Generating an EC private key
writing new private key to ‘/home/bron/EasyRSA-v3.0.6/pki/private/server-openvpn-redeszone.key.bHJsAFg0KR’
—–
You are about to be asked to enter information that will be incorporated
into your certificate request.
What you are about to enter is what is called a Distinguished Name or a DN.
There are quite a few fields but you can leave some blank
For some fields there will be a default value,
If you enter ‘.’, The field will be left blank.
—–
Common Name (eg: your user, host, or server name) [server-openvpn-redeszone]:Keypair and certificate request completed. Your files are:
req: /home/bron/EasyRSA-v3.0.6/pki/reqs/server-openvpn-redeszone.req
key: /home/bron/EasyRSA-v3.0.6/pki/private/servidor-openvpn-redeszone.key
Once the certificate is created, we must sign it with the CA in “server” mode:
./easyrsa sign-req server servidor-openvpn-redeszone
root @ debian-vm: /home/bron/EasyRSA-v3.0.6# ./easyrsa sign-req server server-openvpn-redeszone
Note: using Easy-RSA configuration from: ./vars
Using SSL: openssl OpenSSL 1.1.1d 10 Sep 2019
You are about to sign the following certificate.
Please check over the details shown below for accuracy. Note that this request
has not been cryptographically verified. Please be sure it came from a trusted
source or that you have verified the request checksum with the sender.Request subject, to be signed as a server certificate for 1080 days:
subject =
commonName = server-openvpn-redeszoneType the word ‘yes’ to continue, or any other input to abort.
Confirm request details: yes
Using configuration from /home/bron/EasyRSA-v3.0.6/pki/safessl-easyrsa.cnf
Enter pass phrase for /home/bron/EasyRSA-v3.0.6/pki/private/ca.key:
Check that the request matches the signature
Signature ok
The Subject’s Distinguished Name is as follows
commonName: ASN.1 12: ‘server-openvpn-redeszone’
Certificate is to be certified until Dec 23 11:40:22 2022 GMT (1080 days)Write out database with 1 new entries
Data Base UpdatedCertificate created at: /home/bron/EasyRSA-v3.0.6/pki/issued/servidor-openvpn-redeszone.crt
And we have already created the .crt that we will use later in the OpenVPN configuration file.
Create client certificates and sign them with the CA
The steps that you will see below, we will have to perform once FOR EACH CLIENT that we are going to create. That is, if we are going to create 2 clients, we must follow the steps of creating and signing twice. In this part, it is advisable to create the client’s certificates with a password, so we can be sure that if we lose the certificate, no one can use it. We are not going to introduce any password in the manual (we will put nopass at the end).
./easyrsa gen-req cliente1-openvpn-redeszone nopass
root @ debian-vm: /home/bron/EasyRSA-v3.0.6# ./easyrsa gen-req client1-openvpn-redeszone nopass
Note: using Easy-RSA configuration from: ./vars
Using SSL: openssl OpenSSL 1.1.1d 10 Sep 2019
Generating an EC private key
writing new private key to ‘/home/bron/EasyRSA-v3.0.6/pki/private/cliente1-openvpn-redeszone.key.YflrPvFgdV’
—–
You are about to be asked to enter information that will be incorporated
into your certificate request.
What you are about to enter is what is called a Distinguished Name or a DN.
There are quite a few fields but you can leave some blank
For some fields there will be a default value,
If you enter ‘.’, The field will be left blank.
—–
Common Name (eg: your user, host, or server name) [client1-openvpn-redeszone]:Keypair and certificate request completed. Your files are:
req: /home/bron/EasyRSA-v3.0.6/pki/reqs/cliente1-openvpn-redeszone.req
key: /home/bron/EasyRSA-v3.0.6/pki/private/cliente1-openvpn-redeszone.key
Once created, we must sign it:
./easyrsa sign-req client cliente1-openvpn-redeszone
root @ debian-vm: /home/bron/EasyRSA-v3.0.6# ./easyrsa sign-req client client1-openvpn-redeszone
Note: using Easy-RSA configuration from: ./vars
Using SSL: openssl OpenSSL 1.1.1d 10 Sep 2019
You are about to sign the following certificate.
Please check over the details shown below for accuracy. Note that this request
has not been cryptographically verified. Please be sure it came from a trusted
source or that you have verified the request checksum with the sender.Request subject, to be signed as a client certificate for 1080 days:
subject =
commonName = client1-openvpn-redeszoneType the word ‘yes’ to continue, or any other input to abort.
Confirm request details: yes
Using configuration from /home/bron/EasyRSA-v3.0.6/pki/safessl-easyrsa.cnf
Enter pass phrase for /home/bron/EasyRSA-v3.0.6/pki/private/ca.key:
Check that the request matches the signature
Signature ok
The Subject’s Distinguished Name is as follows
commonName: ASN.1 12: ‘client1-openvpn-redeszone’
Certificate is to be certified until Dec 23 11:41:36 2022 GMT (1080 days)Write out database with 1 new entries
Data Base UpdatedCertificate created at: /home/bron/EasyRSA-v3.0.6/pki/issued/cliente1-openvpn-redeszone.crt
If we wanted to create and sign a certificate number 2 for another client, we should put something like this:
./easyrsa gen-req cliente2-openvpn-redeszone nopass ./easyrsa sign-req client cliente2-openvpn-redeszone
Remember that if you want to put a password, we must remove the “nopass”.
Organize the server and client .crt and .key certificates
Something very important is to organize the server and client certificates by folders. The server and client certificates are in the path “/ pki / issued /” and the private keys are in “/ pki / private”, the ca.crt is in the root of the “pki” folder. We must create three folders with the following content (for now):
- server: ca.crt, server-openvpn-redeszone.crt, server-openvpn-redeszone.key
- client1: ca.crt, client1-openvpn-redeszone.crt, client1-openvpn-redeszone.key
- client2: ca.crt, client2-openvpn-redeszone.crt, client2-openvpn-redeszone.key
Create the Diffie-Hellmann parameters and the key tls-crypt (tls-auth on older systems)
Once we have the certificates created and signed, formerly we had to create the Diffie-Hellmann parameters to place them in the “server” folder, to generate them we used “./easyrsa gen-dh” but when using ECDHE it is not necessary to create or indicate it neither in the server configuration file. What we must create is the tls-crypt key with the name ta.key or whatever we want. The order that we must put is the following:
openvpn --genkey --secret ta.key
This key ta.key must be placed on the server and on ALL clients.
Once we get here, our folders with the certificates should have the following:
- server: ca.crt, server-openvpn-redeszone.crt, server-openvpn-redeszone.key, dh.pem (Diffie-Hellmann, OPTIONAL because we won’t use it with ECDHE), ta.key (tls-crypt)
- client1: ca.crt, client1-openvpn-redeszone.crt, client1-openvpn-redeszone.key, ta.key (tls-crypt)
- client2: ca.crt, client2-openvpn-redeszone.crt, client2-openvpn-redeszone.key, ta.key (tls-crypt)
If we are going to use tls-auth instead of tls-crypt (because it is not supported, for example), we must take this into account:
In the server configuration (server.conf or server.ovpn) we must put:
tls-auth ta.key 0 (0 from Incoming)
In the client configuration (client.conf or client.ovpn) we must put:
tls-auth ta.key 1 (1 from Outgoing)
Next, we put a table of what each certificate is (names vary).
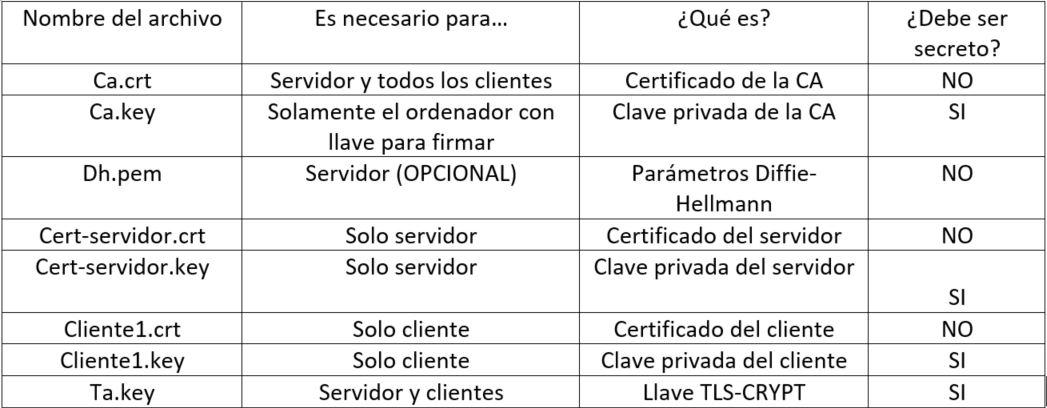
When we have everything organized in folders, now is when we must create the configuration file (.conf for Linux systems and .ovpn for Windows systems). There are examples of the configuration files on the official OpenVPN website , and also in the path “/ usr / share / doc / openvpn / examples / examples-config-files /”.
The first thing we have to verify is if our server and clients support symmetric ciphers, tls-ciphersuites (TLS 1.3) and tls-cipher (TLS 1.2) and the configured elliptical curves. We must take it into account, since otherwise it will give us an error. To carry out these verifications we must execute:
- openvpn –show-ciphers
- openvpn –show-tls (it will show us whether it supports TLS 1.3 and which ones, like TLS 1.2)
- openvpn –show-curves
Configure the OpenVPN server and start it
The configuration of the OpenVPN server is essential to give access permissions to clients to our local network, configure the TLS negotiation. Because we have hundreds of configurations available, we are going to put our configuration with some comments explaining each parameter, you can copy and paste the configuration without problems. Remember that for Linux it must have a .conf extension and for Windows .ovpn.
#PORT TO BE USED BY TCP OR UDP, BY DEFAULT IS 1194.
#PROTOCOL TO USE TCP OR UDP
#TUNNELING MODE
port 11949
proto udp
dev tun#CERTIFICATES
#IF WE HAVE THE .CONF IN THE SAME FOLDER, THERE IS NO MISSING TO METER ROUTE, ONLY THE NAME.
#IF THEY ARE ON ANOTHER ROUTE, WE SHOULD TEST THE ROUTE OF ALL OF THEMca ca.crt
cert server-openvpn-redeszone.crt
key server-openvpn-redeszone.key
#dh dh.pem (OPTIONAL BECAUSE WE USE ECDHE)
dh none
tls-crypt ta.key# WE CHECK CUSTOMERS ‘CERTIFICATES (GREATER SECURITY)
remote-cert-tls client# WE MODIFY THE SYMMETRIC ENCRYPTION OF THE DATA CHANNEL, THE TLS CONTROL CHANNEL AND THE ALGORITHM TO VERIFY THE INTEGRITY.
#IF WE USE AES-256-GCM IT IS NOT NECESSARY TO PUT THE AUTH DIRECTIVE SINCE IT IS NOT USED.cipher AES-256-GCM
tls-ciphersuites TLS_AES_256_GCM_SHA384: TLS_CHACHA20_POLY1305_SHA256
tls-cipher TLS-ECDHE-ECDSA-WITH-AES-256-GCM-SHA384: TLS-ECDHE-ECDSA-WITH-CHACHA20-POLY1305-SHA256
ecdh-curve secp521r1
tls-version-min 1.2
reneg-sec 0
auth SHA512# NETWORK TOPOLOGY (SUBNET RECOMMENDED) AND VIRTUAL SUBNET WHERE THE CLIENTS WILL BE.
subnet topology
server 10.8.0.0 255.255.255.0# WE CONFIGURE THE SERVER SO THAT THE CLIENTS HAVE THE SAME IP ALWAYS, ONCE THEY CONNECT.
ifconfig-pool-persist ipp.txt# WE PROVIDE THE CUSTOMER ACCESS TO THE HOME NETWORK, WE PERFORM INTERNET REDIRECTION AND PROVIDE OPENDNS DNS. WordPress automatically puts these symbols << and >> when it should just put double quotes: »
push “route 192.168.2.0 255.255.255.0”
push “redirect-gateway def1”
push “dhcp-option DNS 208.67.222.222”
push “dhcp-option DNS 208.67.220.220”# WE ENABLE COMMUNICATION BETWEEN CLIENTS, WE ENABLE KEEPALIVE TO KNOW IF THE TUNNEL HAS DROPPED, WE ENABLE COMPRESSION AND A MAXIMUM OF 100 CLIENTS SIMULTANEOUSLY
client-to-client
keepalive 10 120
max-clients 100#NO USER PERMISSIONS IN OPENVPN, FOR SERVER SECURITY
user nobody
group nogroup#KEY AND PERSISTENT TUNNEL
persist-key
persist-tun# THE SERVER LOGS IN THAT FILE, CONFIGURATION VERB 3 FOR THE LOGS.
status openvpn-status.log
verb 3
explicit-exit-notify 1
So far we have arrived with the configuration of the server, to start it we will simply have to put “openvpn server.conf” in Linux systems and it will start automatically, at the end of the boot you must put “Initialization Sequence Completed”.
Configure the client (or clients)
Next, you can see the client configuration associated with the server that we have seen previously. The only difference between the different clients.conf is the path of the certificates, for example. Very important that the cipher, tls-cipher and other parameters are exactly the same, otherwise it will not connect to the server. Remember that for Linux it must have a .conf extension and for Windows .ovpn.
# WE CONFIGURE IN THE CLIENT MODE, TUN MODE, UDP PROTOCOL.
client
dev tun
proto udp#THIS DIRECTIVE IS THE CONNECTION WITH THE PUBLIC IP OR DOMAIN OF THE OPENVPN SERVER, WE ALSO HAVE TO PUT THE SAME SERVER PORT
remote 127.0.0.1 11949# CONTINUOUSLY RESOLVE THE IP OR DOMAIN TO CONNECT US, KEY AND PERSISTENT TUN AS THE SERVER.
resolv-retry infinite
nobind
persist-key
persist-tun#RUTA DE LA CA, CLIENT CERTIFICATES AND TA.KEY.
#IF WE HAVE IT IN THE SAME FOLDER, IT IS NOT NECESSARY TO PUT THE ENTIRE ROUTE.
ca ca.crt
cert client1-openvpn-redeszone.crt
key client1-openvpn-redeszone.key
tls-crypt ta.key#CHECK THE SERVER IDENTITY, USE GCM SYMMETRIC ENCRYPTION, TLS 1.2 AND AUTH CONFIGURATION. If our client does not support TLS 1.3.
remote-cert-tls server
cipher AES-256-GCM
auth SHA512compress
#If our client supports TLS 1.3, we add this directive:
# tls-ciphersuites TLS_AES_256_GCM_SHA384: TLS_CHACHA20_POLY1305_SHA256#If our client supports TLS 1.2 only, we add this directive:
# tls-cipher TLS-ECDHE-ECDSA-WITH-AES-256-GCM-SHA384: TLS-ECDHE-ECDSA-WITH-CHACHA20-POLY1305-SHA256# ENABLE VERBOSE LEVEL 3 LOG
verb 3
If you use Windows, the folder of the certificates with the configuration file in the extension .ovpn must be in the default OpenVPN path, which is C: UsersBronOpenVPNconfig by default, although we can change it. Once this is done, if we right click on OpenVPN in the lower right bar we will see the name of the client file to connect successfully. At the end of the boot you must put “Initialization Sequence Completed” and we will have successfully connected to the configured OpenVPN server.
Create static route in our router
In order to have connectivity with the local network of our home, it is necessary to create a static route in our home router. With the configuration of 10.8.0.0/24 that we have configured in the OpenVPN server, we must create a static route with this information:
- Subnet IP: 10.8.0.0
- Mask: 255.255.255.0
- Gateway: local IP where we start the OpenVPN server, if for example we have installed on a Raspberry PI with IP 192.168.1.100, we must put this IP.
Main problems and connection failures when connecting
When we first set up an OpenVPN server, we may have different problems connecting the different clients. Before listing the different problems and connection failures that may appear, we must tell you that if you have followed the tutorial step by step, you should not have any errors when connecting, since we have checked the configuration in detail. The configuration of both the server and the clients is in “verb 3”, that is, a recommended registration level for all users, in case of having a connection problem, if we do not find the failure we will have to increase the registration level , and put “verb 5” to have more details of everything that happens in the connection.
RESOLVE: Cannot resolve host address: xxxx.no-ip.org:11949 (Unknown host.)
This error is because the OpenVPN server cannot be found, we must check that the domain that we put is correct, this error is because it cannot find any public IP associated with that domain. The most common is that we have put the domain wrong in the VPN client, that the domain that we have entered does not exist because we have not created it yet, or because the dynamic DNS service is not working correctly.
Could not determine IPv4 / IPv6 protocol
This error is related to the previous one, we have entered a domain that it is not able to find, either using the IPv4 protocol or the IPv6 protocol.
SIGUSR1 [soft, init_instance] received, process restarting
This warning tells us that the connection process with the VPN server is going to be restarted, it simply indicates that there has been an error previously and that it is going to try the connection again.
MANAGEMENT:> STATE: 1603127258, WAIT ,,,,,,
Although this is not an error itself, if the OpenVPN client continually stays in this section of the connection, it is because we do not have any open ports on our router or firewall to the VPN server, depending on whether we have used TCP or UDP, and of the selected port, we must open one port or another. This is because the client is able to locate the IP address without problems, but it waits for a response from the OpenVPN server, a response that will never arrive.
This error also usually happens when we do not have the VPN server started, if we have forgotten to start it at the beginning, we will have this problem. The solution is to start it up and wait for the first clients to appear.
NOTE: –user option is not implemented on Windows
In Windows operating systems we do not need to put the “user nobody” directive, something that in Linux-based operating systems it is advisable to put it.
NOTE: –group option is not implemented on Windows
In Windows operating systems we do not need to put the “group nogroup” directive, something that in Linux-based operating systems it is advisable to put it.
WARNING: Ignoring option ‘dh’ in tls-client mode, please only include this in your server configuration
In the VPN client we do not have to put anything related to Diffie-Hellmann, this directive is only in the server configuration file, in the client it is simply unnecessary.
tls-crypt unwrap error: packet authentication failed and TLS Error: tls-crypt unwrapping failed from [AF_INET]
Authentication with the tls-crypt directive has failed, this is usually because the content of the ta.key file on the server and the clients is different. We must remember that the ta.key must be exactly the same both on the server and on all the VPN clients that we are going to use.
TLS Error: Unroutable control packet received from [AF_INET] and TLS Error: local / remote TLS keys are out of sync
The TLS keys that we have used are not correct on the server and / or client, it is necessary to check the configuration of the certificates and also the ta.key. This error occurs especially when we have the ta.key incorrectly configured.
TLS Error: Unroutable control packet received from
This is a general error of the TLS connection, you may have wrongly copied the CA, the server certificate (in the server settings), the client certificate (in the client settings). This error is due to a failure when copying the different certificates.
WARNING: ‘link-mtu’ is used inconsistently, local = ‘link-mtu 1549 ′, remote =’ link-mtu 1550 ′
This error appears because it is necessary that the MTU is the same both in local (client) and also in remote (VPN server), if the MTU is incorrectly configured, the connection will be established, but we will have a very low performance, and it is possible that the VPN connection is cut at any time.
This error also occurs when we have activated data compression on the VPN server, and we do not have it configured on the client. It also happens when we have different compression algorithm on server / clients. It is necessary for the server and the clients to use the same compression, or not to use compression, which is the most recommended for security.
To solve this error, just put the directive: «compress» on the client, so that it accepts the compression sent by the server through the «PUSH» it performs.
WARNING: ‘comp-lzo’ is present in remote config but missing in local config, remote = ‘comp-lzo’
This error occurs when on the VPN server we have activated data compression with comp-lzo, and on the clients we have no compression at all. It is necessary that both the server and the clients have exactly the same compression algorithm. To solve this error, just put the directive: «compress» on the client, so that it accepts the compression sent by the server through the «PUSH» it performs.
The error “write to TUN / TAP: Unknown error (code = 122)” may also appear due to this compression feature.
TLS Error: TLS handshake failed
An error occurred when negotiating the information on the control channel, it is possible that we have different tls-cipher or tls-ciphersuites and there is no common control channel algorithm, this causes the “handshake” to fail and cannot continue.
Updates and news in the new versions of OpenVPN
OpenVPN does not stop updating and releasing new versions with bug fixes, performance improvements and also security improvements, with the ultimate goal that VPN connections are as secure as possible. Next, we are going to explain some of the improvements that OpenVPN 2.5 will have that will come very soon, since it is in the “Release Candidate” phase.
Tls-crypt-v2 is added
tls-crypt is a functionality that allows us to mitigate DoS and DDoS attacks on OpenVPN servers, thanks to these keys that we create directly in OpenVPN, we will be able to make each client pre-authenticate, to later enter the authentication phase with their client certificate. The first version tls-crypt requires that both the server and all clients have the exact same tls-crypt key. With tls-crypt-v2 we can make each client have their own tls-crypt key, in this way, very large organizations or OpenVPN providers can adequately protect their servers by creating several of these keys.
ChaCha20-Poly1305 encryption support
Currently the most secure symmetric encryption that can be used on the data channel is AES-256-GCM and AES-128-GCM. With the latest version of OpenVPN 2.5 we will also have the possibility to choose the popular ChaCha20-Poly1305 encryption that uses VPN like WireGuard.
Enhanced encryption negotiation on the data channel
Closely related to the previous point, we have that in the new version of OpenVPN 2.5, the ncp-ciphers option has been renamed to data-ciphers, although the old name will continue to be accepted. The change is in order to avoid the ambiguity of “–cipher” and “–tls-cipher”. Now the VPN clients will tell the server what type of ciphers it supports, and the server will choose the first common cipher from the list of supported data ciphers, instead of using the first one on the list, which will make the VPN establishment be faster. This also allows us that if the server has the configuration of “data-ciphers” ChaCha20-Poly1305: AES-256-GCM, and the client has ChaCha20-Poly1305, it will use it because the client supports it.
Support for BF-CBC is removed in default settings
Now the default OpenVPN configuration will not allow using BF-CBC, the latest version will only accept AES-256-GCM and AES-128-GCM ciphers for the data channel. We must remember that in OpenVPN we have BG-CBC when we do not have the option of –cipher or –ncp-ciphers in the configuration. If you want to use this type of encryption, you will need to explicitly enable it.
We hope this manual has been helpful to you. If you have any questions you can comment, we recommend you visit the official OpenVPN HOWTO where you will find all the information about the different parameters to use. The MAN PAGE of OpenVPN 2.4 where you have all the parameters available is also very helpful.
-
Summary
-
Reviews
-
Support
-
Git ▾
- easy-rsa
- openvpn
- openvpn-historical-cvs
- tap-windows
-
Mailing Lists
-
News
-
Donate
Menu
▾
▴
|
From: Walid Haider <wh…@od…> — 2005-03-21 11:07:10 |
Mathias Sundman <mathias <at> openvpn.se> writes: > > Have you had a look at line 43 in client.ovpn? Seems to be something wrong > with that line... > Thanks for the reply - there was definately something wring with line 43 - I had accidentally deleted the remote parameter, sorry about that. I am now getting these messages below when running client.ovpn (... represents Sat Mar 19 12:17:43 2005) ... NOTE: --user option is not implemented on Windows ... NOTE: --group option is not implemented on Windows ... OpenVPN 2.0_rc17 Win32-MinGW [SSL] [LZO] built on Mar 13 2005 ... IMPORTANT: OpenVPN's default port number is now 1194, based on an official port number assignment by IANA. OpenVPN 2.0-beta16 and earlier used 5000 as the default port. ... WARNING: No server certificate verification method has been enabled. See http://openvpn.net/howto.html#mitm for more info. ... Control Channel MTU parms [ L:1541 D:138 EF:38 EB:0 ET:0 EL:0 ] ... Data Channel MTU parms [ L:1541 D:1450 EF:41 EB:4 ET:0 EL:0 ] ... Local Options hash (VER=V4): '3514370b' ... Expected Remote Options hash (VER=V4): '239669a8' ... UDPv4 link local: [undef] ... UDPv4 link remote: 192.168.1.1:1194 ... read UDPv4: Connection reset by peer (WSAECONNRESET) (code=10054) ... read UDPv4: Connection reset by peer (WSAECONNRESET) (code=10054) ... read UDPv4: Connection reset by peer (WSAECONNRESET) (code=10054) ... read UDPv4: Connection reset by peer (WSAECONNRESET) (code=10054) ... read UDPv4: Connection reset by peer (WSAECONNRESET) (code=10054) ... read UDPv4: Connection reset by peer (WSAECONNRESET) (code=10054) ... read UDPv4: Connection reset by peer (WSAECONNRESET) (code=10054) ... read UDPv4: Connection reset by peer (WSAECONNRESET) (code=10054) ... read UDPv4: Connection reset by peer (WSAECONNRESET) (code=10054) ... read UDPv4: Connection reset by peer (WSAECONNRESET) (code=10054) ... read UDPv4: Connection reset by peer (WSAECONNRESET) (code=10054) ... read UDPv4: Connection reset by peer (WSAECONNRESET) (code=10054) ... read UDPv4: Connection reset by peer (WSAECONNRESET) (code=10054) ... read UDPv4: Connection reset by peer (WSAECONNRESET) (code=10054) ... read UDPv4: Connection reset by peer (WSAECONNRESET) (code=10054) ... read UDPv4: Connection reset by peer (WSAECONNRESET) (code=10054) ... read UDPv4: Connection reset by peer (WSAECONNRESET) (code=10054) ... TLS Error: TLS handshake failed ... TCP/UDP: Closing socket ... SIGUSR1[soft,tls-error] received, process restarting ... Restart pause, 2 second(s) |
View entire thread