Последнее обновление: 31.10.2015
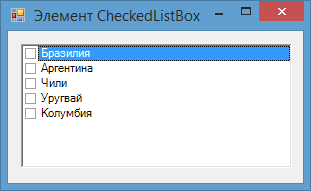
Элемент CheckedListBox представляет симбиоз компонентов ListBox и CheckBox. Для каждого элемента такого списка определено специальное поле CheckBox,
которое можно отметить.
Все элементы задаются в CheckedListBox задаются в свойстве Items. Также, как и для элементов ListBox и
ComboBox, мы можем задать набор элементов. По умолчанию для каждого добавляемого нового элемента флажок не отмечен:
Чтобы поставить отметку в checkBox рядом с элементом в списке, нам надо сначала выделить элемент и дополнительным щелчком уже установить
флажок. Однако это не всегда удобно, и с помощью свойства CheckOnClick и установке для него значения true мы
можем определить сразу выбор элемента и установку для него флажка в один клик.
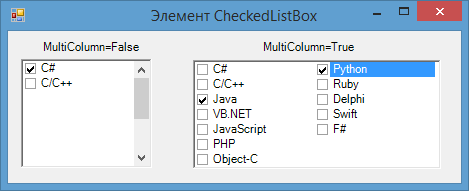
Другое свойство MultiColumn при значении true позволяет сделать многоколоночный список, если элементы
не помещаются по длине:
Выделенный элемент мы также можем получить с помощью свойства SelectedItem, а его индекс — с помощью свойства
SelectedIndex. Но это верно только, если для свойства SelectionMode установлено
значение One, что подразумевает выделение только одного элемента.
При установке для свойства SelectionMode значений MultiSmple и MultiExtended можно выбрать
сразу несколько элементов, и тогда все выбранные элементы будут доступны в свойстве SelectedItems, а их
индексы — в свойстве SelectedIndeces.
И поскольку мы можем поставить отметку не для всех выбранных элементов, то чтобы отдельно получить отмеченные элементы, у CheckedListBox
имеются свойства CheckedItems и CheckedIndices.
Для добавления и удаления элементов в CheckedListBox определены все те же методы, что и в LstBox:
-
Add(item): добавляет один элемент -
AddRange(array): добавляет в список массив элементов -
Insert(index, item): добавляет элемент по определенному индексу -
Remove(item): удаляет элемент -
RemoveAt(index): удаляет элемент по определенному индексу -
Clear(): полностью очищает список
SetItemChecked и SetItemCheckState
К особенностям элемента можно отнести методы SetItemChecked и SetItemCheckState.
Метод SetItemChecked позволяет установить или сбросить отметку на одном из элементов. А метод SetItemCheckState
позволяет установить флажок в одно из трех состояний: Checked (отмечено), Unchecked (неотмечено) и Indeterminate (промежуточное состояние):
checkedListBox1.SetItemChecked(0, true);
checkedListBox1.SetItemCheckState(1, CheckState.Indeterminate);
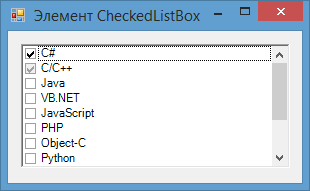
Table of Contents
- CheckedListBox overview
- Populating
- With string
- With classes
- Checking items
- Get checked items
- Disabling items from being checked
- Check one item
- Select all option
- Properties of interest
- CheckOnClick
- CheckedItems
- CheckedIndices
- Running sample code
- Required NuGet package
- Summary
- See also
- Source code
This article provides core basics for working with a Windows Form control CheckedListBox from populating with string, setting the DataSource to a DataTable to a List along with getting/setting checked items, finding items, limiting checked items and more. There
will be a discussion on creating a custom CheckedListBox control versus having a decent understanding of the CheckedListBox to decide if a custom CheckedListBox is needed or work with the standard CheckedListBox.


CheckedListBox overview
The CheckedListBox provides the capability to show text along with a Checkbox for each item within the control which allows a user to select one or more items. For example, presenting a options dialog for an application where each item presented in the CheckedListBox
would allow the user to customize the user experience, another case would be to present items for building a product with options to the standard product.
Populating
There are various ways to populate a CheckedListBox
With string
For fixed items that will not change type in items at design time.

Or use a standard collection like month names.
Imports
System.Globalization
Public
Class
Form1
Private
Sub
Form1_Load(sender As
Object, e As
EventArgs) Handles
MyBase.Load
MonthsCheckedListBox.Items.AddRange(
(
From month
In
CultureInfo.CurrentCulture.DateTimeFormat.MonthNames
Where
Not
String.IsNullOrEmpty(month)).ToArray
)
MonthsCheckedListBox.SelectedIndex = Now.Month -1
End
Sub
End
Class

With classes
A class may be used by setting the CheckedListBox.DataSource with a list of a concrete class. To display a specific property for the Text property set the DisplayMember or override the ToString method.
In the example below the class overrides ToString with ProductName so there is no need to set DisplayMember. If DisplayMember is not set and ToString is not overridden at runtime the object type is shown which does not good.
Namespace
DataClasses
Public
Class
Product
Public
Property
ProductID As
Integer
Public
Property
ProductName As
String
Public
Property
SupplierID As
Integer?
Public
Property
CategoryID As
Integer?
Public
Property
QuantityPerUnit As
String
Public
Property
UnitPrice As
Decimal?
Public
Property
UnitsInStock As
Short?
Public
Property
UnitsOnOrder As
Short?
Public
Property
ReorderLevel As
Short?
Public
Property
Discontinued As
Boolean
Public
Property
DiscontinuedDate As
DateTime?
Public
Overrides
FunctionToString() As
String
Return
ProductName
End
Function
End
Class
End
Namespace
Data is returned from a database table while other options range from reading items from a file or from a service.
Imports
System.Data.SqlClient
Imports
BaseConnectionLibrary
Namespace
DataClasses
Public
Class
SqlServerOperations
Inherits
ConnectionClasses.SqlServerConnection
Public
Sub
New()
DefaultCatalog =
"NorthWindAzure1"
DatabaseServer =
"KARENS-PC"
End
Sub
Public
Function
ProductsByCategoryIdentifier(pCategoryIdentifier As
Integer)
As
List(Of Product)
Dim
productList As
New
List(Of Product)
Dim
selectStatement =
<SQL>
SELECT ProductID
,ProductName
,SupplierID
,QuantityPerUnit
,UnitPrice
,UnitsInStock
,UnitsOnOrder
,ReorderLevel
,Discontinued
,DiscontinuedDate
FROM NorthWindAzure1.dbo.Products
WHERE CategoryID = <%= pCategoryIdentifier %>
</SQL>.Value
Using cn
As
NewSqlConnection With
{.ConnectionString = ConnectionString}
Using cmd
As
NewSqlCommand With
{.Connection = cn, .CommandText = selectStatement}
Try
cn.Open()
Dim
reader = cmd.ExecuteReader()
While
reader.Read()
productList.Add(New
Product() With
{
.ProductID = reader.GetInt32(0),
.ProductName = reader.GetString(1),
.Discontinued = reader.GetBoolean(8)
})
End
While
Catch
ex As
Exception
mHasException =
True
mLastException = ex
End
Try
End
Using
End
Using
Return
productList
End
Function
End
Class
End
Namespace
In the form an import statement is used as the class above is in a different namespace than the form. The SqlServerOperations class is created as a private variable which means methods are always available in the form. a List of Product is returned and set
as the DataSource for the CheckedListBox.
Imports
CheckOnlyOneItem.DataClasses
Public
Class
Form1
Private
operations As
SqlServerOperations = New
SqlServerOperations()
Private
Sub
Form1_Load(sender As
Object, e As
EventArgs) Handles
MyBase.Load
Dim
products = operations.ProductsByCategoryIdentifier(1)
CheckedListBox1.DataSource = products
End
Sub
Presentation at runtime.

To select an item, in this case, the selected item, cast to Product as the DataSource is a List(Of Product). Some property is Nothing because they were never set.

To check an item use SetItemChecked which accepts the index of the item to check and the checked state of true or false.
CheckedListBox1.SetItemChecked(0,
True)
Checking items
For CheckedListBox populated with string cast Items property to string and using a for next to find the item then use the indexer of the for as the index into the CheckedListBox to use SetItemChecked(foundIndex, true or false).
When dealing with a List or a DataTable the following extension methods keep code clean and perform similarly as with using string but with LINQ statements.
Imports
FindAndCheckItem.DataClasses
Namespace
Extensions
Module
ExtensionMethods
''' <summary>
''' Find a specific product by name and check or uncheck the item if found
''' </summary>
''' <param name="sender"></param>
''' <param name="pValueToLocate">Product name</param>
''' <param name="pChecked">True to check, False to uncheck</param>
<Runtime.CompilerServices.Extension()>
Public
Sub
FindItemAndSetChecked(
sender
As
CheckedListBox,
pValueToLocate
As
String,
Optional
pChecked As
Boolean
= True)
Dim
result =
(
From this
In
sender.Items.Cast(Of Product)().Select(Function(item, index)
New
With
{
.Item = item,
.Index = index
})
Where this.Item.ProductName = pValueToLocate
).FirstOrDefault
If
result IsNot Nothing
Then
sender.SetItemChecked(result.Index, pChecked)
End
If
End
Sub
''' <summary>
''' Find a specific value by field name and value in a DataTable
''' </summary>
''' <param name="sender"></param>
''' <param name="pValueToLocate">Value to find</param>
''' <param name="pFieldName">Field to locate in</param>
''' <param name="pChecked">True to check, False to uncheck</param>
<Runtime.CompilerServices.Extension()>
Public
Sub
FindItemAndSetChecked(
sender
As
CheckedListBox,
pValueToLocate
As
String,
pFieldName
As
String,
Optional
pChecked As
Boolean
= True)
Dim
result =
(
From this
In
sender.Items.Cast(Of DataRowView)().Select(Function(item, index)
New
With
{.Item = item, .Index = index})
Where this.Item.Row.Field(Of
String)(pFieldName).ToLower = pValueToLocate.ToLower
).FirstOrDefault
If
result IsNot Nothing
Then
sender.SetItemChecked(result.Index, pChecked)
End
If
End
Sub
End
Module
End
Namespace
To check in the List(Of Product) the following seeks two products and if found checks each product in the CheckedListBox.
Imports
FindAndCheckItem.DataClasses
Imports
FindAndCheckItem.Extensions
Public
Class
Form1
Private
operations As
SqlServerOperations = New
SqlServerOperations()
Private
Sub
Form1_Load(sender As
Object, e As
EventArgs) Handles
MyBase.Load
Dim
products = operations.ProductsByCategoryIdentifier(1)
CheckedListBox1.DataSource = products
CheckedListBox1.FindItemAndSetChecked("Steeleye Stout")
CheckedListBox1.FindItemAndSetChecked("Outback Lager")
End
Sub
End
Class
Get checked items
Use GetItemChecked(desired index). In the following example, ItemCheck event is used to see if the current item is checked and if so append or remove from a multi-line TextBox.
Imports
TrackingCheckedItems.DataClasses
Public
Class
Form1
Private
operations As
SqlServerOperations = New
SqlServerOperations()
Private
Sub
Form1_Load(sender As
Object, e As
EventArgs) Handles
MyBase.Load
Dim
products = operations.ProductsByCategoryIdentifier()
CheckedListBox1.DataSource = products
End
Sub
''' <summary>
''' Change Product.Selected dependent on the check state of the current item.
'''
''' Show checked products in the TextBox, in a real application this might be
''' done in a button click for making a final selection for the current process.
'''
''' </summary>
''' <param name="sender"></param>
''' <param name="e"></param>
Private
Sub
CheckedListBox1_ItemCheck(sender As
Object, e
As
ItemCheckEventArgs) Handles
CheckedListBox1.ItemCheck
CType(CheckedListBox1.Items(e.Index), Product).Selected =
Not
CheckedListBox1.GetItemChecked(e.Index)
TextBox1.Text =
String.Join(Environment.NewLine,
CType(CheckedListBox1.DataSource, List(Of Product)).
Where(Function(product)
product.Selected).
Select(Function(product)
product.DisplayData).ToArray())
End
Sub
End
Class

Obtain checked item names the following extension method provides names.
<Runtime.CompilerServices.Extension()>
Public
Function
CheckedItemsNamesList(sender As
CheckedListBox) As
List(Of String)
Dim
results As
New
List(Of String)
For
index As
Integer
= 0 To
(sender.Items.Count - 1)
If
sender.GetItemChecked(index) Then
results.Add(sender.Items(index).ToString)
End
If
Next
Return
results
End
Function
Usage
Dim
productItems = CheckedListBox1.CheckedItemsNamesList()
For
Each
productItem As
StringIn
productItems
Console.WriteLine(productItem)
Next
The above is works but means to gain access to each product a find operation must be performed on the CheckedListBox.DataSource casted as a List(Of Product), a better method are to get checked indexes of the CheckedListBox using the following language extension.
<Runtime.CompilerServices.Extension()>
Public
Function
CheckedItemsIndexesList(sender As
CheckedListBox) As
List(Of Integer)
Dim
results As
New
List(Of Integer)
For
index As
Integer
= 0 To
(sender.Items.Count - 1)
If
sender.GetItemChecked(index) Then
results.Add(index)
End
If
Next
Return
results
End
Function
The usage which gets each product using the index returned from the extension method above. In this case, the ProductName is shown as ToString has been overridden as shown above in the Product class.
For
index As
Integer
= 0 To
productItems.Count - 1
Dim
product = CType(CheckedListBox1.Items(index), Product)
Console.WriteLine(product)
Next
Disabling items from being checked

Consider an application which allows users to purchase items using a CheckedListBox. They open the application on Monday and a product they want appears, they end up thinking about the product and not purchase but come back the next day and the product is not
shown. The developer dynamically populated the CheckedListBox with available items and on the next day it’s out of stock and not shown. This may leave the customer frustrated. Consider checking specific items disallows other options in the CheckedListBox.
There are several options, remove/add using business logic, presenting a message if the item is not available because other options are checked or disable the item(s).
Disabling items coupled with text on the form to indicate why one or more items are not available or use a tooltip. To disable item(s) a
custom CheckedListBox which requires a fair amount of knowledge for coding may be used or write a few lines of code.
In this case for using a standard CheckedListBox against products that are discontinued. Products are loaded including the field which indicates if the product is discontinued (another option is to check stock level available).
Public
Function
ProductsByCategoryIdentifier(pCategoryIdentifier As
Integer)
As
List(Of Product)
Dim
productList As
New
List(Of Product)
Dim
selectStatement =
<SQL>
SELECT ProductID
,ProductName
,SupplierID
,QuantityPerUnit
,UnitPrice
,UnitsInStock
,UnitsOnOrder
,ReorderLevel
,Discontinued
,DiscontinuedDate
FROM NorthWindAzure1.dbo.Products
WHERE CategoryID = <%= pCategoryIdentifier %>
</SQL>.Value
Using cn
As
NewSqlConnection With
{.ConnectionString = ConnectionString}
Using cmd
As
NewSqlCommand With
{.Connection = cn, .CommandText = selectStatement}
Try
cn.Open()
Dim
reader = cmd.ExecuteReader()
While
reader.Read()
productList.Add(New
Product() With
{
.ProductID = reader.GetInt32(0),
.ProductName = reader.GetString(1),
.Discontinued = reader.GetBoolean(8)
})
End
While
Catch
ex As
Exception
mHasException =
True
mLastException = ex
End
Try
End
Using
End
Using
Return
productList
End
Function
Products are loaded by a category identifier, in a real application there would be control, ComboBox or ListBox populated with a List(Of Category), upon selected item change cast the selected item to a Category and get the Category id.
Dim
products = operations.ProductsByCategoryIdentifier(6)
In the form Load or Shown event add items to the CheckedListBox as follows marking discontinued products with an Indeterminate CheckState.
'
' Set state to Indeterminate then enforce the state in ItemCheck event
'
For
Each
product As
Product In
products
If
product.Discontinued Then
CheckedListBox1.Items.Add(product, CheckState.Indeterminate)
Else
CheckedListBox1.Items.Add(product)
End
If
Next
Subscribe to ItemCheck event of the CheckedListBox, if the CurrentValue is Indeterminate then reset it which keeps the item disabled.
Check one item
Although only permitting one checked item is not something normally done this question has been asked on the web several times. To only permit one checked item subscribe to the ItemCheck event and check the current item NewValue for CheckState.Checked, if so
iterate all items and if a checked item is found other than the current item using SetItemChecked to false.
Imports
CheckOnlyOneItem.DataClasses
Public
Class
Form1
Private
operations As
SqlServerOperations = New
SqlServerOperations()
Private
Sub
Form1_Load(sender As
Object, e As
EventArgs) Handles
MyBase.Load
Dim
products = operations.ProductsByCategoryIdentifier(1)
CheckedListBox1.DataSource = products
End
Sub
Private
Sub
CheckedListBox1_ItemCheck(sender As
Object, e
As
ItemCheckEventArgs) Handles
CheckedListBox1.ItemCheck
If
e.NewValue = CheckState.Checked Then
For
index As
Integer
= 0 To
CheckedListBox1.Items.Count - 1
If
index <> e.Index Then
CheckedListBox1.SetItemChecked(index,
False)
End
If
Next
End
If
End
Sub
End
Class
Select all option

For providing the ability to check or uncheck all iterate all items in a button click event using SetItemChecked or use a custom CheckedListBox
found here in the included source code.
Properties of interest
CheckOnClick
By default two clicks are required to check or uncheck items, to perform a check or uncheck with one click set the property CheckOnClick in the CheckedListBox property window of in code.
CheckedItems
A collection of checked items, when the DataSource is a List using Cast to cast the items to the specific type
Dim
checkedProducts = CheckedListBox1.CheckedItems.Cast(Of Product)
CheckedIndices
This property provides a collection of checked indexes in the CheckedListBox.
Dim
productIndexes = CheckedListBox1.CheckedIndices
For
index As
Integer
= 0 To
productIndexes.Count - 1
Dim
product = CType(CheckedListBox1.Items(index), Product)
Console.WriteLine(product)
Next
Running sample code
- Create a SQL-Server database and running
the following script. - Each project with SqlServerOperation class change the server name and default catalog as per
this sample.
- Right click on solution explorer top node, select «Restore NuGet Packages»
- Build the solution
- Run each project.
Required NuGet package
BaseConnectionLibrary — source
code project.
Summary
This article has shown how to utilize a CheckedListBox in common scenarios and several uncommon scenarios using classes as the data source for the CheckedListBox while use of DataTable may be used although using a DataTable has extra baggage not needed e.g.
events, methods to change the state of data rows etc. Keep in mind when considering a CheckedListBox if this is the right option over conventional Checkbox controls.
See also
VB.NET: Defensive data programming (Part 3)
VB.NET Working with parameterized SQL operations part 2
C# DataGridView — ListBox — CheckListBox — ListView move items up/down
Source code
Source code provided in the following
GitHub repository.

|
Глава 11. Компоненты, создающие интерфейс между пользователем и приложением |
321 |
this->textBox1->Clear(); this->maskedTextBox1->Clear();
return;
}
this->textBox1->Text=this->maskedTextBox1->Text;
}
}
Рис. 11.57. Контроль на полноту ввода по маске
Text — возвращает строку, введенную по маске.
TextMaskFormat — определяет, как символы-литералы и подсказка взаимодейст-
вуют, когда генерируется форматная строка (т. е. строка, введенная по маске). Точнее, это свойство задает, будут ли они (оба вместе или по отдельности) включены в итоговую строку (в свойство Text). Если исключаются символыподсказки, то они заменяются пробелами.
AsciiOnly — используется для ограничения ввода (могут вводиться только символы a—z, A—Z и 0—9), хотя среда программирования поддерживает все символы Unicode. Их, как известно, намного больше, чем символов ASCII (послед-
ние кодируются на основе кода длиной в 8 битов, а первые — на основе 16 битов, т. е. ясно, что 216 > 28).
Компонент находится в списке All Windows Forms палитры компонентов. Компонент CheckedListBox является расширением ListBox. Он делает почти все, что дела-

|
322 |
Часть II. Приложения Windows Form |
ет ListBox, но дополнительно выводит окна контроля (флажки-переключатели), в которых можно делать отметку галочкой. Вид компонента показан на рис. 11.58.
Пользователь может помечать элементы списка, щелкая мышью на одной или нескольких позициях (устанавливать флажок). Повторный щелчок снимает включение флажка. Выбор элемента списка еще не означает, что флажок устанавливается/снимается.
Рис. 11.58. Вид компонента CheckedListBox, помещенного в форму
Существует свойство CheckOnClick, которое разрешает/запрещает делать пометку (устанавливать/снимать флажок). Если это свойство установлено в false, то при щелчке мышью на позиции галочка (флажок) в ней не появится. Но одновременно со щелчком на позиции идет подсветка строки. Если повторно щелкнуть на отмеченной строке, то галочка появится. Таким образом, при значении свойства CheckOnClick, установленным в false, для включения флажка надо сначала отметить элемент списка (щелчком на строке), потом сделать повторный щелчок.
А выключается флажок при щелчке на строке или на нем самом.
Если же CheckOnClick установлено в true, то флажок включается одновременно с выбором элемента (и выключается при повторном щелчке на нем).
Существует свойство ThreeDCheckBoxes, которое определяет стиль окна флажка (будет ли оно в стиле Flat или Normal). Если значение свойства равно true, то стиль
Flat, иначе — Normal.
Перечень свойств компонента, отображенных в его окне Properties, показан на рис. 11.59.

|
Глава 11. Компоненты, создающие интерфейс между пользователем и приложением |
323 |
||
Рис. 11.59. Свойства компонента CheckedListBox
Компонент CheckedListBox поддерживает три состояния флажка:
Checked — флажок включен;
Unchecked — флажок выключен;
Indeterminate — состояние неопределенности (флажок закрашен в серый цвет).
Такое состояние можно устанавливать только в режиме исполнения, т. е. программно (т. к. этого механизма выполнения в режиме дизайна нет).
Существуют методы CheckedListBox, с помощью которых можно определять и устанавливать состояние флажка:
GetItemCheckState (int index);
SetItemCheckState (int index, CheckState value).
Здесь:
index — это индекс того элемента, состояние флажка которого определяется;
CheckState value — значение состояния флажка. Состояние определено классом
CheckState и имеет три значения (Checked, Unchecked, Indeterminate — им соот-
ветствуют числовые значения 1, 0 и 2).
Приведем пример задания состояния флажков и определения их состояния. Текст обработчика события DoubleClick компонента CheckedListBox приведен в лис-
тинге 11.10.

|
324 |
Часть II. Приложения Windows Form |
Листинг 11.10
private: System::Void checkedListBox1_DoubleClick(System::Object^ sender, System::EventArgs^ e)
{
this->checkedListBox1->SetItemCheckState(0, CheckState::Checked);
this->checkedListBox1->SetItemCheckState(1, CheckState::Unchecked);
this->checkedListBox1->SetItemCheckState(2, CheckState::Indeterminate);
int i=(int)this->checkedListBox1->GetItemCheckState(0);
}
Здесь задаются состояния для флажков 1, 2 и 3-й строк. Последний оператор определяет состояние 1-й строки. Так как тип результата, выдаваемого методом GetItemCheckState(), — это тип CheckState, то, чтобы увидеть состояние, надо этот тип привести к типу int принудительно. Поэтому после знака присвоения стоит
(int).
Чтобы узнать, помечен ли элемент списка, можно выполнить оператор:
bool b=this->checkedListBox1->GetItemChecked(i);
Результат метода GetItemChecked() — логическая переменная, i — индекс элемента.
Можно и другим способом установить флажок. Для этого следует выполнить оператор:
this->checkedListBox1->SetItemChecked(3, 1);
Здесь:
3 — индекс элемента (4-я строка);
1 — булево значение true (второй параметр этого метода имеет булевый тип).
Обратим внимание на событие ItemCheck, которое возникает, когда состояние флажка меняется. Оно пригодится при обработке выборки из СheckedListBox.
В СheckedListBox можно также загружать текстовые строки из файла, как и для ListBox. Программа будет такая же, только в ней надо заменить ListBox на
СheckedListBox.
Пример: домашний телефонный справочник
Приведем пример приложения для домашнего телефонного справочника, построенного с использованием компонента СheckedListBox. Справочник должен содержать номера телефонов и специальный ящик (горячий ящик), в котором будут храниться самые необходимые из всего списка телефоны (чтобы ими можно было бы-

|
Глава 11. Компоненты, создающие интерфейс между пользователем и приложением |
325 |
стро воспользоваться). В ящик будут посылаться только те телефоны, которые в списке будут помечаться галочками (т. е. их флажки будут включены). Как только флажок выключается, номер телефона из горячего ящика удаляется. Однако строку из горячего ящика можно удалить и по щелчку мыши на ней.
Итак, приложение работает следующим образом: как только оно загружается для выполнения (фактически загружается форма), автоматически читаются два текстовых файла, в которых находятся сведения о предыдущей работе приложения (перед тем, как форме появиться на экране, срабатывает событие Shown, в обработчик которого помещены операторы загрузки файлов). Этими файлами заполняется содержимое двух контейнеров: компонента ChekedListBox и компонента ComboBox. Далее приложение работает в обычном режиме: строки можно добавлять в оба контейнера и удалять из каждого в отдельности. Как только приложение завершит свою работу (кнопка Выход), содержимое контейнеров сохранится в соответствующих файлах (чтобы оно при выгрузке не исчезало).
Отсюда возникает проблема первоначального запуска приложения: надо вручную сформировать указанные два файла (их имена указаны в тексте приложения, которое, надеюсь, читатель сам создаст у себя заново и выберет те имена файлов, которые ему подойдут). Надо взять обыкновенный WordPad (но не Блокнот: будут проблемы с кодировкой) и с его помощью создать пустые текстовые файлы… А далее в приложении вы сами введете те тексты, которые вам нужны.
Форма приложения в режиме дизайна приведена на рис. 11.60, а текст — в листинге 11.11 (приведен полностью h-файл, чтобы можно было видеть всю структуру приложения и места вставки пользовательских функций работы с файлами).
Результаты работы приложения показаны на рис. 11.61—11.63.
Рис. 11.60. Форма приложения «Домашний телефонный справочник»

Рис. 11.61.
Работа с телефонным
справочником. Часть 1
Рис. 11.62.
Работа с телефонным
справочником. Часть 2
326
Form Windows риложенияП .II Часть

|
Глава 11. Компоненты, создающие интерфейс между пользователем и приложением |
327 |
||
Рис. 11.63. Работа с телефонным справочником. Часть 3
Листинг 11.11
#pragma once
namespace Tel_Sprav2011 {
using namespace System;
using namespace System::ComponentModel; using namespace System::Collections; using namespace System::Windows::Forms; using namespace System::Data;
using namespace System::Drawing; using namespace System::IO; //using namespace System::IO::File; using namespace System::Text; //using namespace std;
///<summary>
///Summary for Form1
///</summary>
public ref class Form1 : public System::Windows::Forms::Form
{
public:
Form1(void)
{
InitializeComponent();
|
328 |
Часть II. Приложения Windows Form |
//
//TODO: Add the constructor code here
//
}
protected:
///<summary>
///Clean up any resources being used.
///</summary>
~Form1()
{
if (components)
{
delete components;
}
}
private: System::Windows::Forms::Label^ label1; protected:
private: System::Windows::Forms::ComboBox^ comboBox1; private: System::Windows::Forms::Label^ label2; private: System::Windows::Forms::Label^ label3; private: System::Windows::Forms::Button^ button1;
private: System::Windows::Forms::CheckedListBox^ checkedListBox1; private: System::Windows::Forms::TextBox^ textBox1;
private: System::Windows::Forms::TextBox^ textBox2; private: System::Windows::Forms::Button^ button2; private: System::Windows::Forms::Button^ button3; private: System::Windows::Forms::Label^ label4; private: System::Windows::Forms::Button^ button4;
private:
///<summary>
///Required designer variable.
int fix; StreamWriter ^sw;
/// </summary> System::ComponentModel::Container ^components;
#pragma region Windows Form Designer generated code
///<summary>
///Required method for Designer support — do not modify
///the contents of this method with the code editor.
///</summary>
void InitializeComponent(void)
{
this->label1 = (gcnew System::Windows::Forms::Label());
|
Глава 11. Компоненты, создающие интерфейс между пользователем и приложением |
329 |
this->comboBox1 = (gcnew System::Windows::Forms::ComboBox()); this->label2 = (gcnew System::Windows::Forms::Label()); this->label3 = (gcnew System::Windows::Forms::Label()); this->button1 = (gcnew System::Windows::Forms::Button());
this->checkedListBox1 = (gcnew System::Windows:: Forms::CheckedListBox());
this->textBox1 = (gcnew System::Windows::Forms::TextBox()); this->textBox2 = (gcnew System::Windows::Forms::TextBox()); this->button2 = (gcnew System::Windows::Forms::Button()); this->button3 = (gcnew System::Windows::Forms::Button()); this->label4 = (gcnew System::Windows::Forms::Label()); this->button4 = (gcnew System::Windows::Forms::Button()); this->SuspendLayout();
//
// label1
//
this->label1->AutoSize = true;
this->label1->Font = (gcnew System::Drawing::Font(L»Microsoft Sans Serif», 7.8F, System::Drawing::FontStyle::Bold, System::Drawing::GraphicsUnit::Point,
static_cast<System::Byte>(204))); this->label1->Location = System::Drawing::Point(15, 13); this->label1->Name = L»label1″;
this->label1->Size = System::Drawing::Size(378, 17); this->label1->TabIndex = 0;
this->label1->Text = L»Десять самых нужных телефонов (горячий ящик)»;
//
// comboBox1
//
this->comboBox1->FormattingEnabled = true; this->comboBox1->Location = System::Drawing::Point(44, 33); this->comboBox1->Name = L»comboBox1″; this->comboBox1->Size = System::Drawing::Size(289, 24); this->comboBox1->TabIndex = 1;
this->comboBox1->Click += gcnew System::EventHandler(this, &Form1::comboBox1_Click);
//
//label2
this->label2->AutoSize = true;
this->label2->Location = System::Drawing::Point(41, 72); this->label2->Name = L»label2″;
this->label2->Size = System::Drawing::Size(118, 17); this->label2->TabIndex = 2;
this->label2->Text = L»Номер абонента»;
//label3
//
|
330 |
Часть II. Приложения Windows Form |
this->label3->AutoSize = true;
this->label3->Location = System::Drawing::Point(231, 72); this->label3->Name = L»label3″;
this->label3->Size = System::Drawing::Size(98, 17); this->label3->TabIndex = 3;
this->label3->Text = L»Комментарий»;
//
// button1
//
this->button1->Location = System::Drawing::Point(399, -1); this->button1->Name = L»button1″;
this->button1->Size = System::Drawing::Size(116, 101); this->button1->TabIndex = 4;
this->button1->Text = L»Выход»; this->button1->UseVisualStyleBackColor = true;
this->button1->Click += gcnew System::EventHandler(this, &Form1::button1_Click);
//
// checkedListBox1
//
this->checkedListBox1->FormattingEnabled = true; this->checkedListBox1->Location = System::Drawing::Point(18, 106); this->checkedListBox1->Name = L»checkedListBox1″; this->checkedListBox1->Size = System::Drawing::Size(497, 89); this->checkedListBox1->TabIndex = 5;
this->checkedListBox1->ItemCheck += gcnew System::Windows::Forms:: ItemCheckEventHandler(this, &Form1::checkedListBox1_ItemCheck);
//
// textBox1
//
this->textBox1->Location = System::Drawing::Point(18, 216); this->textBox1->Name = L»textBox1″;
this->textBox1->Size = System::Drawing::Size(100, 22); this->textBox1->TabIndex = 6;
this->textBox1->KeyDown += gcnew System::Windows::Forms:: KeyEventHandler(this, &Form1::textBox1_KeyDown);
//
// textBox2
//
this->textBox2->Location = System::Drawing::Point(414, 215); this->textBox2->Name = L»textBox2″;
this->textBox2->Size = System::Drawing::Size(100, 22); this->textBox2->TabIndex = 7;
this->textBox2->KeyDown += gcnew System::Windows::Forms:: KeyEventHandler(this, &Form1::textBox2_KeyDown);
//
// button2
//
|
Глава 11. Компоненты, создающие интерфейс между пользователем и приложением |
331 |
this->button2->Location = System::Drawing::Point(18, 255); this->button2->Name = L»button2″;
this->button2->Size = System::Drawing::Size(100, 48); this->button2->TabIndex = 8;
this->button2->Text = L»Добавить в список»; this->button2->UseVisualStyleBackColor = true;
this->button2->Click += gcnew System::EventHandler(this, &Form1::button2_Click);
//
// button3
//
this->button3->Location = System::Drawing::Point(423, 255); this->button3->Name = L»button3″;
this->button3->Size = System::Drawing::Size(91, 48); this->button3->TabIndex = 9;
this->button3->Text = L»Удалить из списка»; this->button3->UseVisualStyleBackColor = true;
this->button3->Click += gcnew System::EventHandler(this, &Form1::button3_Click);
//
//label4
this->label4->AutoSize = true;
this->label4->Location = System::Drawing::Point(-147, 241); this->label4->Name = L»label4″;
this->label4->Size = System::Drawing::Size(16, 17); this->label4->TabIndex = 10;
this->label4->Text = L»>»;
//button4
//
this->button4->Location = System::Drawing::Point(157, 216); this->button4->Name = L»button4″;
this->button4->Size = System::Drawing::Size(227, 112); this->button4->TabIndex = 11;
this->button4->Text = L»Перед нажатием на кнопку «Добавить» введите номер телефона и комментарий в левое»
L» и правое поля ввода, заканчивая каждый раз ввод нажатием
<Enter>»;
this->button4->UseVisualStyleBackColor = true;
//
// Form1
//
this->AutoScaleDimensions = System::Drawing::SizeF(8, 16); this->AutoScaleMode = System::Windows::Forms::AutoScaleMode::Font; this->ClientSize = System::Drawing::Size(522, 331); this->Controls->Add(this->button4);
|
332 |
Часть II. Приложения Windows Form |
this->Controls->Add(this->label4); this->Controls->Add(this->button3); this->Controls->Add(this->button2); this->Controls->Add(this->textBox2); this->Controls->Add(this->textBox1); this->Controls->Add(this->checkedListBox1); this->Controls->Add(this->button1); this->Controls->Add(this->label3); this->Controls->Add(this->label2); this->Controls->Add(this->comboBox1); this->Controls->Add(this->label1); this->Name = L»Form1″;
this->Text = L»Form1″;
this->Shown += gcnew System::EventHandler(this, &Form1::Form1_Shown); this->ResumeLayout(false);
this->PerformLayout();
}
#pragma endregion
private: System::Void comboBox1_Click(System::Object^ sender, System::EventArgs^ e)
{
//Удаление строки из ComboBox по щелчку на ней int i=this->comboBox1->SelectedIndex;
if(i== -1) return; this->comboBox1->Items->Remove(this->comboBox1->SelectedItem);
}
private: System::Void button1_Click(System::Object^ sender, System::EventArgs^ e)
{
/*Когда приложение завершается,
надо сохранить данные ChekedListBox и ComboBox в файлах*/
//Сохранение checkedListBox
// Create a file to write to
String^ path = «d:\for_tel_sprav_chb.txt»;
sw = File::CreateText( path ); //StreamWriter ^
String ^s;
int y=this->checkedListBox1->Items->Count;
for ( this->checkedListBox1->SelectedIndex = 0; this->checkedListBox1-> SelectedIndex < y-1; this->checkedListBox1->SelectedIndex++ )
{
s=this->checkedListBox1->Items[this->checkedListBox1->SelectedIndex]-> ToString();
sw->WriteLine(s);
}
|
Глава 11. Компоненты, создающие интерфейс между пользователем и приложением |
333 |
s=this->checkedListBox1->Items[this->checkedListBox1->SelectedIndex]-> ToString();
sw->WriteLine(s); sw->Close();
//Сохранение ComboBox
path = «d:\for_tel_sprav_cb.txt»;
sw = File::CreateText( path ); //StreamWriter ^
y=this->comboBox1->Items->Count; if(y==0)
{
sw->Close(); this->Close(); return;
}
for ( this->comboBox1->SelectedIndex = 0; this->comboBox1->
SelectedIndex < y-1; this->comboBox1->SelectedIndex++ )
{
s=this->comboBox1->Items[this->comboBox1->SelectedIndex]->ToString(); sw->WriteLine(s);
}
s=this->comboBox1->Items[this->comboBox1->SelectedIndex]->ToString(); sw->WriteLine(s);
sw->Close();
this->Close();
}
private: System::Void button2_Click(System::Object^ sender, System::EventArgs^ e)
{
//Добавить в список
String^ r = «
«;
/*Формирование в строке r данных, введенных в поля ввода для телефона и комментария*/ r=r->Concat(this->textBox1->Text, r);
r=r->Insert(35, this->textBox2->Text); this->checkedListBox1->Items->Add(r,0);//состояние = 0 отключен this->textBox1->Text=»»;
this->textBox2->Text=»»; this->textBox1->Focus();
}
private: System::Void textBox1_KeyDown(System::Object^ sender, System::Windows::Forms::KeyEventArgs^ e)
{
if(e->KeyCode == Keys::Enter)
|
334 |
Часть II. Приложения Windows Form |
{
this->textBox2->Focus();
}
}
private: System::Void textBox2_KeyDown(System::Object^ sender, System::Windows::Forms::KeyEventArgs^ e)
{
if(e->KeyCode == Keys::Enter)
{
this->button2->Focus();
}
}
private: System::Void Form1_Shown(System::Object^ sender, System::EventArgs^ e)
{
//Загрузка компонентов из сохраненных от пред. сеанса файлов //Ввод первоначальных данных в ComboBox и CheckedListBox //Файл из одной строки, т. к. для ввода применен while()
//Файл должен быть записан WordPad’ом как текстовый в кодировке Юникод
//Очистка компонентов this->comboBox1->Items->Clear(); this->checkedListBox1->Items->Clear();
//Запись в checkedListBox
String^ path = «d:\for_tel_sprav_chb.txt»; if ( !File::Exists( path ) )
{
// Create a file to write to
sw = File::CreateText( path ); // StreamWriter^ try
{
sw->WriteLine( «Hello» ); //Это данные для контроля ввода. sw->WriteLine( «And» ); //Если читаемый файл не найден, sw->WriteLine( «Welcome» );//эти данные выведутся
}
finally
{
if ( sw )
delete (IDisposable^)(sw);
}
}
// Open the file to read from
TextReader ^ sr = File::OpenText( path ); try
|
Глава 11. Компоненты, создающие интерфейс между пользователем и приложением |
335 |
{
String^ s = «»;
while ( s = sr->ReadLine() )
{
this->checkedListBox1->Items->Add(s);
}
}
finally
{
if ( sr )
delete (IDisposable^)(sr);
}
//Чтение файла для ComboBox
path = «d:\for_tel_sprav_cb.txt»; if ( !File::Exists( path ) )
{
// Create a file to write to
sw = File::CreateText( path ); // StreamWriter^ try
{
sw->WriteLine( «Hello» ); //Это данные для контроля ввода. sw->WriteLine( «And» ); //Если читаемый файл не найден, sw->WriteLine( «Welcome» );//эти данные выведутся
}
finally
{
if ( sw )
delete (IDisposable^)(sw);
}
}
// Open the file to read from sr = File::OpenText( path ); try
{
String^ s = «»;
while ( s = sr->ReadLine() )
{
this->comboBox1->Items->Add(s);
}
}
finally
{
if ( sr )
delete (IDisposable^)(sr);
}
}
|
336 |
Часть II. Приложения Windows Form |
private: System::Void button3_Click(System::Object^ sender, System::EventArgs^ e)
{
// Обработка кнопки «Удалить из списка» if(this->checkedListBox1->SelectedIndex == -1)
//строку не отметили для удаления
{
MessageBox::Show(«Отметьте строку для удаления», «Приложение Пользователя»,
MessageBoxButtons::OK,MessageBoxIcon::Asterisk);
return;
}
this->checkedListBox1->Items->Remove(this->checkedListBox1->SelectedItem);
}
private: System::Void checkedListBox1_ItemCheck(System::Object^ sender, System::Windows::Forms::ItemCheckEventArgs^ e)
{
/*Обработка выборки из списка.
В зависимости от свойства CheckOnClick состояние флажка меняется либо от одного щелчка, либо от повторного.
Здесь установлено, что от одного щелчка.
Сюда попадаем, когда щелчком мыши выбираем строку из списка */
String ^str,^tel,^str1;
int i=this->checkedListBox1->SelectedIndex;
/*Здесь будет индекс выбранной строки после клика (щелчка) на ней*/
str=dynamic_cast <String ^>(this->checkedListBox1->SelectedItem);//перевод из типа Object ^ в String ^
//Здесь будет выбранная строка после клика на ней
tel=str->Substring(0,str->Length); //выделили номер телефона
//Добавка или удаление номера телефона в (из) ComboBox /*Поиск строки в ComboBox: если она найдена,
то удаляется, если не найдена, то после этого блока она добавляется*/
int k=0,j=this->comboBox1->Items->Count; for(int i=0; i < j; i++)
{
str1=dynamic_cast <String ^>(this->comboBox1->Items[i]); if(System::String::Compare(str1,tel) != 0)
//Строки не сравнились continue;
|
Глава 11. Компоненты, создающие интерфейс между пользователем и приложением |
337 |
else
{
Object ^str2=dynamic_cast <Object ^> (str1);
/*Метод Remove() требует типа Object ^,
поэтому мы перевели тип String ^ в тип Object ^ */
this->comboBox1->Items->Remove(str2); k=1;
break;
}
} //for()
if(k == 1) //Строку удалили return;
/*Здесь ситуация, когда строки в ящике нет, поэтому ее надо в него добавить */
if(this->comboBox1->Items->Count > 10) return;
/*Если в ящике уже 10 строк, то вставлять не надо (так мы договорились, что ящик будет содержать не более 10-ти строк) */
this->comboBox1->Items->Add(tel);
}
};
}
Чтобы добавить новую строку в список, надо активизировать щелчком мыши поле ввода номера телефона (оно расположено над кнопкой Добавить в список). Затем нужно ввести в это поле текст и нажать клавишу <Enter>.
Фокус ввода перейдет к полю над кнопкой Удалить из списка (туда вводится второй текст, например комментарий к первому введенному тексту, и снова нажимается клавиша <Enter>). Фокус ввода перейдет к кнопке Добавить в список, после чего надо снова нажать клавишу <Enter>. Обе введенные строки перенесутся в поле
CheckedListBox.
Чтобы удалить строку из CheckedListBox, ее надо пометить, щелкнув на ней мышью, а затем нажать кнопку Удалить из списка.
Чтобы удалить строку из ComboBox, надо открыть выпадающий список и щелкнуть на строке, которую требуется удалить.
Просмотров 1.5к. Обновлено 27 августа 2020
Урок из серии: «Программирование на Visual Basic.NET для школьников»
На этом уроке будет рассмотрен элемент управления Windows Forms CheckedListBox. Он является расширением элемента управления ListBox (Список). Выполняет практически все его функции, а кроме того, в нем может отображаться галочка рядом с элементами списка.
В ходе построения проекта мы создадим компьютерную версию одной из простых головоломок Самуэля Лойда. Лойд – известный американский автор головоломок и шахматных задач – жил и работал во второй половине XIX и в начале XX века.
В этой головоломке используется список флажков и ещё один дополнительный обыкновенный список. Мы научимся обрабатывать помеченные пользователем элементы в списке флажков CheckedListBox, заодно закрепим свои знания по работе с обыкновенным списком ListBox.
Краткая справочная информация
В элементе управления CheckedListBox элементы списка можно выделять цветом, кроме того их можно помечать галочкой.

В отличии от обычного списка, выделить в списке можно только один элемент. Помеченных галочкой элементов может быть несколько.
Выделенный элемент не обязательно должен быть помеченным элементом. За то, следует ли переключать флажок, когда выделяется элемент, отвечает свойство CheckOnClick. По умолчанию свойство имеет значение False и при выделении элемента флажок не переключается. В этом случае, чтобы переключить флажок, нужно выполнить щелчок в области флажка.
Проект «Головоломка «
Головоломка, которую мы решаем. Из заданного набора чисел надо выбрать те, сумма которых составит 50. Числа такие:
25, 27, 3, 12, 6, 15, 9, 30. 21. 19.

Несмотря на кажущуюся простоту, головоломка может доставить немало хлопот.
Какие элементы управления нам понадобятся?
Во-первых, мы используем список флажков. Он похож на обычный список, но возле каждого пункта имеется флажок. Его можно установить или сбросить.
Еще нам понадобится обычный список, без флажков. В него мы поместим выбранные числа. Сумму этих чисел покажем в виде надписи. Окно нашей программы должно выглядеть примерно так, как показано на рисунке.

Технология выполнения
-
- Запустите систему Visual Basic и создайте новый проект под именем Головоломка.
- Установите на форме элементы управления в соответствии с образцом. Мы уже решили, что нам нужны три элемента управления: список флажков (CheckedListBox), простой список (ListBox) и надпись (Label).
- Настройте свойства объектов в соответствии с таблицей:
Объект Свойства Значения Примечание Form1 Text «Головоломка» CheckedListBox Text пусто Items 25, 27, 3, 12, 6, 15, 9, 30, 21, 19 Щелкните в значении свойства Items (Коллекция), на многоточии, появится окно Редактор коллекции строк. Введите числа по одному в строке. ListBox1 Text Пусто Label Text «Сумма: 0» Начальное значение суммы выбранных чисел (пока ничего не выбрано). Alignment MiddleCenter Выравнивание
по центруОкно программы готово и можно приступить к программированию.
- Установка и сброс флажков. В окне программы только один элемент управления способен к диалогу – это список флажков. Программа должна что-то делать только в том случае, если дин из флажков устанавливается или сбрасывается. В этом случае возникает событие ItemCheck (Пометка пункта). Нам надо описать реакцию на него.
- Щелкните на списке флажков правой кнопкой мыши. Выберите в открывшемся контекстном меню пункт View Code (Просмотреть код)
- В окне кода выберите в раскрывающемся списке справа событие ItemCheck (Пометка пункта). Система Visual Basic выдаст заготовку процедуры для обработки этого события.
CheckedListBox1_ItemCheck(ByVal sender As Object, ByVal e As
System.Windows.Forms.ItemCheckEventArgs)
Информация о пункте списка, для которого был установлен флажок, передается через параметр процедур
ByVal e As System.Windows.Forms.ItemCheckEventArgs.
Состояние флажка после изменения состояния флажка хранится в свойстве e.NewValue (Новое значение). Индекс измененной записи хранится в свойстве e.Index.
- Описываем переменные, которые будут использоваться в программном коде:
Здесь: S — сумма выбранных чисел, i — переменная цикла.
- Теперь нам нужно выяснить, установлен был флажок или сброшен. Оператор проверки состояния флажка должен выглядеть так:
If e.NewValue = CheckState.Checked Then
- Процедура обработки события вызывается уже после того, как состояние флажка изменилось.
Если условие истинно (флажок был только что установлен), то мы должны добавить во второй список новый пункт. Это делается при помощи метода Add. Его параметр — содержимое добавляемого пункта. Нужный нам оператор такой:ListBox1.Items.Add(CheckedListBox1.Items(e.Index))
- Если флажок сброшен, нам будет чуть труднее. Надо удалить пункт из второго списка, а мы не знаем, где именно он находится. Поэтому нам придеться перебрать все элементы второго списка и сравнить его с текущим элементом первого списка. Для этого нам понадобится цикл, выполняющий перебор.Число элементов в списке задается свойством ListCount.Нужные операторы будут выглядеть следующим образом:
 For i = 0 To ListBox1.Items.Count - 1
    If ListBox1.Items(i) = CheckedListBox1.Items(e.Index) Then
      ListBox1.Items.RemoveAt(i)
      Exit For
    End If
 Next i
End If
Из значения свойства ListCount мы вычли единичку потому, что нумерация элементов массива ведется не с единицы, а с нуля.
Если условие ListBox1.Items(i) = CheckedListBox1.Items(e.Index) истинно, значит, нужный элемент найден. Его номер совпадает с текущим значением переменной i.
В этом случае надо удалить этот элемент из списка. Это делается при помощи метода RemoveItem. - Теперь наша программа умеет правильно реагировать на установку или сброс флажка в списке.
- Обновление суммы. Итак, списки обновлены. Теперь надо заново подсчитать сумму выбранных чисел. Здесь нас ждет небольшой подводный камень. Хотя элементы списка выглядят как числа, они, на самом деле, являются текстовыми строками. Поэтому при суммировании нам придется воспользоваться функцией Val().Это тоже удобно сделать в цикле. Пусть сумма накапливается в переменной S. Ее расчет можно выполнить так:
s = 0
For i = 0 To ListBox1.Items.Count - 1
   s = s + Val(ListBox1.Items(i))
Next i
- Чтобы представить вычисленную сумму в поле надписи , она должна быть текстовой строкой. Поэтому преобразовали ее в текстовый тип с помощью функции STR(). Присоединим ее к тексту подсказки с помощью операции слияния строк:
Label1.Text = "Сумма: " + Str(s)
- Проверка решения. Осталось сделать последний шаг: проверить, решена ли головоломка. Так как значение суммы выбранных чисел у нас уже есть, надо сравнить его с заданным числом 50:
If S = 50 Then
- Если головоломка еще не решена, делать ничего не надо и решение можно продолжить. Если же решение найдено, давайте отключим все элементы управления (изменим свойство Enabled) Кроме того, выведем в поле надписи сообщение «Победа». Это можно сделать так:
If s = 50 Then Label1.Text = "Победа: " + Str(s) ListBox1.Enabled = False CheckedListBox1.Enabled = False End If - Программа готова. На этом наша программа готова, и ее можно испытать. Полный ее текст, как он виден в окне кода, написан ниже.
Private Sub CheckedListBox1_ItemCheck(ByVal sender As Object, ByVal e As
System.Windows.Forms.ItemCheckEventArgs) Handles heckedListBox1.ItemCheck Dim i, s As Integer If e.NewValue = CheckState.Checked Then ListBox1.Items.Add(CheckedListBox1.Items(e.Index)) Else For i = 0 To ListBox1.Items.Count - 1 If ListBox1.Items(i) = CheckedListBox1.Items(e.Index) Then ListBox1.Items.RemoveAt(i) Exit For End If Next i End If s = 0 For i = 0 To ListBox1.Items.Count - 1 s = s + Val(ListBox1.Items(i)) Next i Label1.Text = "Сумма: " + Str(s) If s = 50 Then Label1.Text = "Победа: " + Str(s) ListBox1.Enabled = False CheckedListBox1.Enabled = False End If End Sub - Нажмите клавишу F5, чтобы запустить программу. При установке флажков выбранные числа попадают во второй список, а при сбросе – удаляются из него.
- Когда программа заработает, попробуйте решить головоломку. Это далеко не самая сложная из головоломок Лойда. На всякий случай примите подсказку: чтобы получить сумму 50, надо выбрать три числа.
В этом уроке мы познакомились с элементом управления CheckedListBox (Список флажков), узнали, как обрабатывать в программном коде установку флажков пользователем. Поработали с обычным списком без флажков ListBox, производили в нем поиск, добавление и удаление записей, суммирование записей.
До встречи в следующем уроке.
The CheckedListBox control is similar to the ListBox control except that each item is represented by a CheckBox control. You can select each item like an ordinary ListBox, but in addition, you can also check the box beside each item.
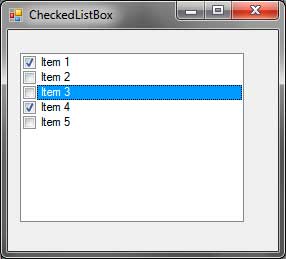
Figure 1 – Appearance of CheckedListBox Control
The properties and methods of the ListBox control can also be found in the CheckedListBox control. But the CheckedBoxControl has some exclusive properties listed below.
| Properties | Description |
|---|---|
| CheckedIndices | A collection of checked indices of the CheckedListBox control. |
| CheckedItems | A collection of checked items. |
| CheckOnClick | Specifies whether to check the box of an item if the item is selected. |
| ThreeDCheckBoxes | Specifies whether the checkbox should be flat(two-dimensional appearance) or normal(three-dimensional appearance). |
Figure 2 – CheckedListBox Properties
The following are methods exclusive to the CheckedListBox control.
| Methods | Description |
|---|---|
| GetItemChecked() | Tells whether the item at the specified index is checked. |
| GetItemCheckState() | Returns the CheckState value of the item at the specified index. |
| SetItemChecked() | Checks or unchecks the item at the specified index. |
| SetItemCheckState() | Sets the CheckState of the item at the specified index. |
Figure 3 – CheckedListBox Methods
Let’s create an example application that uses the CheckedListBox control. Create a new form and add a CheckedListBox control and name it checkedListBoxProducts. Add a ListBox and name it listBoxShoppingCart. Your form should look like this:

Find the Items property of the CheckedListBox control in the Properties Window. Click the button with three dots to open the String Collection Editor. Add the following values.

Press OK and the items should now appear inside the CheckedListBox.

The default event of the CheckedListBox is the SelectedIndexChanged event which is same as the ListBox. What we want to do is add the checked items to the shopping cart. The CheckedListBox control has an ItemCheck event which occurs when the check state of one of the items is changed. Since this event is not the default event of the CheckedListBox, we can’t simply double-click the control. We need to go the Events portion of the Properties Window and find the ItemCheck event.

Double click the ItemCheck to create an event handler for this event. Now add the following code.
private void checkedListBoxProducts_ItemCheck(object sender, ItemCheckEventArgs e)
{
    if (e.NewValue == CheckState.Checked)
        listBoxShoppingCart.Items.Add(checkedListBoxProducts.Items[e.Index]);
    else if (e.NewValue == CheckState.Unchecked)
        listBoxShoppingCart.Items.Remove(checkedListBoxProducts.Items[e.Index]);

}
Inside the event handler for the ItemCheck event has a second parameter of type ItemCheckEventArgs which contains the properties CurrentValue, NewValue, and Index. The CurrentValue property is the CheckState value of the item that triggered the event before it was changed. The NewValue property is the new CheckState value of the item. The Index property is the zero-based index of the item. We test if the NewValue of the item is checked, and if it is, we add that item to the shopping cart. If the NewValue is unchecked, then we remove the item from the shopping cart.
