Last Updated on 1st February 2023
If you searched for this guide, you either have Windows 11 already installed on your PC or looking forward to installing it as soon as possible. Whatever the case, you did the best thing because the truth is that you will need to optimize your Windows 11 operating system to get the most performance out of it.
This post will focus on optimizing your Windows 11, optimizing your BIOS settings, configuring your hardware & software for the lowest input lag, lowest latency, and the max FPS possible, and overall getting the most out of your system.
We will talk about every little thing in Windows 11, but I will focus only on the things that matter and actually make a difference.
A significant percentage of the performance gains you can expect are related to your actual hardware and BIOS settings. The rest is stuff in Windows, like power plans, graphics drivers, game settings, driver settings, etc.
PART 0: Factory Reset / Fresh Install (Optional but highly recommended)
You don’t have to do a fresh install if you don’t want to, but at least do a factory reset. Ideally, the best method is to wipe your disk and completely fresh install Windows 11.
There are a few reasons why the ideal solution is to fresh install Windows, which you can see below:
- Right now, you might be logged in to a Microsoft account, and it will be good to just get yourself on a local account because sometimes Microsoft accounts can act weirdly and automatically change settings for you.
- There will be many drivers, services, and dead registry keys left behind on your PC from software you’ve previously installed, which takes a lot of time to manually find and remove.
- Generally speaking, from my experience, Windows feels much better when it’s freshly installed, especially if you haven’t done it in a long time.
- There are a couple more reasons, but these are the most important ones.
So to sum it up, I highly recommend you do a fresh Windows installation unless you are uncomfortable that you will mess things up, which is understandable. But at least do a Factory reset.

How to factory reset Windows 11
- Go to your Windows search bar and type “Settings“, and click on the option available.
- Navigate to “Update & Security“.
- Look for the “Recovery” option on the side panel and click on it.
- Under the “Reset this PC” option, click on “Get started“.
Once you do that, you’ll get a few options, like if you want to keep your files or not, etc. These are personal preferences so choose accordingly. The process will take some time, so be patient, and once completed, you can move on to PART 1 of this guide.
How to Fresh Install Windows 11
To install Windows 11 on your PC fresh, you’ll need a USB stick(8 GB at least) and preferably a 3.0 USB stick to make the whole process much quicker.
Go ahead and plug in your USB stick.
Go to the Microsoft website and download the Media Creation Tool to download Windows 11.
Navigate to “This PC“, find the USB stick, and make sure there are no files on it. If there are files, make sure to back up the important ones because the USB stick will be wiped entirely, and you’ll not be able to recover your files.
Run the Media Creation Tool you previously downloaded and click “Accept” on the first screen you’ll get.

Select the option “Create installation media (USB flash drive, DVD, or ISO file) for another PC“, and click “Next“.

On the next window, tick the option “Use the recommended options for this PC” and then click on “Next“.

Choose “USB Flash Drive“, and click “Next“.

Now, make sure your USB flash drive is connected to your PC, refresh the drive’s list, and choose it from the list. Then click on “Next“, and wait for the process to complete.

Now that you have a bootable Windows 11 USB stick, it’s time to tell our motherboard to start booting from it so we can finally install Windows 11.
Leave the USB drive connected to your computer, and restart.
Once the screen goes black, start spamming the DEL button to access BIOS.
Now that you are into BIOS, try to find the Boot menu and click on it.

Click on BOOT OPTION 1 and change it from your disk to your USB.

Look for the option to “Save changes and Exit” Bios, and click on it.
Now your computer will restart, and it should start booting from the USB drive.
Choose your preferred language of Windows 11 and keyboard input language and click “Next“.

Next, choose your preferred Windows 11 version.

Choose the option “Custom: Install Windows only (advanced)“.

Select the disk or partition you want to install Windows 11 on and click on “Delete“.

Select the same disk or partition as above, but click on “New” this time.

Choose the size, and click “Apply“.

Select the same disk or partition again, and this time click on “Next“.

Click on Install Now.

Windows 11 should start installing on your disk; this process can take some time, so sit back and relax.

Once this process is complete, your computer will restart and start booting in Windows 11. The first time it boots, it might take longer than usual, so please be patient and don’t turn off your PC.
After a while, you should get into the Windows 11 environment.
Part 1: Windows 11 Maintenance & Prerequisites
In this part of the guide, we will make sure to update our system with the latest Windows updates, install the latest network drivers depending on your network card, clean up junk files to free up some disk space, and install files you’ll need on your computer to run apps and games.
Update Windows 11 network drivers
Windows, most of the time, will have an old network driver installed on your PC, or there will be no network driver at all. You will have to update or install it manually, so let’s go ahead and do it right now!
Navigate to your search bar and type “Device Manager“, and click on it.
Look for Network Adapters and once you find it, click on the bottom arrow to collapse the list. Your ethernet adapter should look like the one in the photo below.

If you can not find it, there is a good chance that there is no driver installed, so you’ll have to download it from another PC and move it to your current one via a USB stick.
Before you download anything, you need to find your network adapter model.
To do that, navigate to the Windows search bar and type “Control Panel” Then click on -> Network and Internet, and choose -> Network and Sharing Center. You should see the option -> Change adapter settings on the left side, click on it, and now you can see all your network adapters. Under the adapter name, you can see the adapter’s model, ex—Realtek, Intel, Killer, etc.

Depending on your model, there is a different process to update your drivers. I will go through the update process of the three most used ones. ( Realtek, Intel, and Killer )
Update Realtek Network Drivers

Visit Realtek’s official website to download the latest drivers for your network adapter.
Scroll down below and look for the “Win10 Auto Installation Program” option and click on the blue button to download it.
A new webpage will open, asking you for an email address. You can place any email address since there is no verification process. Once you enter your email, click on the download button.
Once downloaded, right-click on the folder and extract the files. Next, search in the folder for setup.exe and right-click on it, and choose” Run as administrator“. A window should pop up. Click next and install. If an older version is installed, you may not see the option “Install“. Instead, click the repair option.
Update Killer Network Drivers

Visit Killer Networking’s official website to download the latest drivers.
You must be able to see the form below.
Choose your operating system and your Killer Device and click on filter.
Now, navigate to the middle of the page, look for a tab named “Driver Only Packages“, click on it, and click download.
Once downloaded, right-click on the file, choose Run as administrator, and follow the on-screen instructions to complete the installation.
Update Intel Network Drivers

Visit Intel’s official website to download the latest drivers available.
On the left side of the website, you should see two options :
PROWIN32.zip and PROWINx64.zip. If your system is 32bits, choose and download the PROWIN32.zip. If it’s 64bits, then select and download PROWINx64.zip.
Once you download the file, right-click on it, and extract it. Look for the setup file, right-click on it, choose run as administrator and follow Intel’s on-screen instructions to complete the installation.
Optimize Windows 11 Network Driver
Now that you’ve installed the latest network driver, go into Device Manager, look for your network adapter, right-click on it, and choose Properties.
Navigate to the Power Management tab and uncheck the option: “Allow the computer to turn off this device to save power“.

Navigate to the Advanced tab, and disable any power-saving feature like:
- Energy-Efficient Ethernet

- Green ethernet

- Power saving mode

- Disable any other power-saving feature.
Update Windows 11
Before we get into optimizing Windows 11 properly, there are a couple of things we should do. The most important thing is making sure that Windows 11 is the most up-to-date that it could possibly be.
Navigate to your Windows search bar and type “Check for updates“, and click on the option that will pop up.

Choose the optional updates as well, and click on Download & Install.

Once Windows 11 updates are complete, restart your computer, go back to the Windows update page, and check if there are any other updates left to be installed.
If there are, make sure to install them and restart your PC again!
Install the latest version of DirectX in Windows 11
DirectX is a set of components that allows software, especially games, to work directly with your video and audio cards. It’s crucial to have the latest version of DirectX and ensure that your current one is not corrupt.
Navigate to Microsoft’s DirectX official download page, choose your preferred language and click the download button.

Once the file downloads, go ahead and run it.

Accept the agreement and click next.

Untick the option to “Install the Bing Bar” on your PC, click next, and wait for the installation to finish.

Once completed, move on to the next step.
Install all Microsoft Visual C++ Redistributables for Windows 11
These are files needed for running applications that Microsoft developers develop in the Visual C++ programming language.
If you’ve ever run into errors while trying to run your favorite game, it could be because you didn’t have some of these files installed on your PC.
There are many Microsoft Redistributable packages available. You can either navigate to Microsoft’s official download page and start downloading them one by one, or you can download the package by techpowerup.
Activate Windows 11

Many people will skip activating Windows, but I highly recommend and encourage you to Activate Windows, and I will explain the reason below.
You want to activate Windows because, after some time, you’ll get that little message on the bottom left that says “Activate Windows“.
The problem is neither the message on the bottom right corner nor the personalization settings limit. The fundamental problem is that Windows adds an overlay and will cause your apps and games to not run on full screen properly and probably cause frame drops since the game won’t have the highest priority.
To sum it up, get a cheap Windows key and save yourself all the trouble later on.
Go to MMOGA and type Windows key in the search bar, find the best deal, purchase, and you’ll get a Windows key delivered in your email. Once you have it, go to your Windows activation, and enter the key you just received.

Pause Windows updates in Windows 11
I recommend pausing Windows updates on this guide and on most of my guides because you don’t want them running in the background, causing issues while playing your favorite game, or automatically updating and restarting your pc. The most important thing about Windows updates is that the minor updates between the major releases are sometimes buggy and may cause issues.

So the best practice would be to pause Windows updates for as long as possible, and when big Windows updates are available, go ahead and fully update your PC, and then pause them again for as long as possible.
Turn off Store apps updating automatically in Windows 11
Go ahead and open the Microsoft Store and navigate to the settings.

Disable “Update apps automatically“, and you can disable the other two options as well, but that’s a personal preference.
The reason for disabling Microsoft store automatic updates is that you don’t want it to ping the Microsoft servers consistently and update apps and games while you are playing or working on your computer. It can cause high and unstable ping.

Disable Offline Maps in Windows 11
The same thing as above, we want to disable automatic Offline maps updates for the same reasons as the Microsoft store updates.
Go to your search bar and type “Offline maps“, and click on it
Now, go ahead and disable “Metered connections” and “Map updates” and then click on “Delete all maps“.

The automatic maps updates on Windows are disabled, and you’ve also saved some space on your disk by deleting the old maps(if there were any).
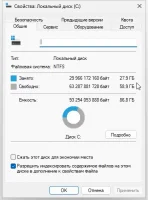
Clear Cache, Disks, and useless Files in Windows 11
If you didn’t install Windows fresh at the beginning of this guide, you probably want to follow the steps to clean up caches, useless files, and your disks because you can probably save a lot of space.
On the other hand, if you just did a fresh Windows 11 installation, there won’t be many files to clean up.
Go to your search bar and type “%temp%“, hit enter, and click on the folder that will show up. Select all the files and folders inside the temp folder, and delete them.


Next, navigate to your C: drive -> Windows -> Temp, and select all files and delete them.

Apply the next step to every single drive connected to your PC.
Navigate to your drives, right-click on them, click on properties and choose Disk Cleanup, select all the available options and click on Clean up system files, then again tick every single box, and finally click OK.


Once the process is done, you can move on to the next steps.
Optimize Startup apps and processes in Windows 11
Many apps that you don’t even use may be running in the background of your computer, eating up your valuable resources like ram and CPU. You don’t want that because that means fewer resources for your apps and games.
So let’s start disabling every application we are not using from running in the background.
Go to the Windows search bar and type Background Apps, and click on it.
You should now see a list of all the apps running in the background.
Go ahead and toggle off the option “Let apps run in the background“, and that’s enough to automatically disable every single Windows app from running in the background.
Next, go to Startup Apps, and you’ll see a list of your apps that automatically start when your pc boots up. You want to eliminate most of them, if not all.

Another thing I recommend doing at this point is to navigate to the “Sign in options” and disable the “Restart apps” option and the “Privacy settings“.
This will prevent Windows from automatically restarting apps when you restart your computer.


Uninstall Bloat and Disable Apps in Windows 11
It’s a very good idea to uninstall software that you are not actively using.
Navigate to Apps and Features and look for programs you don’t use anymore or barely use that you think are running in the background.
Once you identify those, go ahead and uninstall every single one.

Eliminate Startup Processes
We will now disable some startup apps and processes that we don’t need and are bloating our system. We won’t go with the traditional way from the task manager, but instead, we will go more in-depth in the processes with the help of Autoruns by Microsoft.
Autoruns will allow us to see every app and process running and automatically start when our computer turns on.
Go ahead and download Autorun as shown in the image below or if you already have downloaded my files, you will find it there.
*If you downloaded my files, you don’t have to download Autoruns.*

Once downloaded, extract the files to a folder, right-click on Autoruns.exe, and choose Run as Administrator.

Now a tab should open and look like this

Move to the Logon tab, and go ahead and untick every single service you don’t need to start up with your computer.
My Logon tab looks like this :

Once you are done with the Logon tab, let’s move on to the Scheduled Tasks tab.
On the Scheduled Tasks tab, I prefer to keep enabled only what’s related to my GPU/CPU software updates. I disable everything related to browsers, automatic updates, and other software that I barely use.
My Scheduled Tasks tab looks like this:

On the Services tab, we don’t want to disable anything that will make our game/program unstable or don’t even start. For example, if you disable EasyAntiCheat, you may get errors when playing online games that depend on it.
There is a description box in every service that will give you an idea of what this service is about and what you should expect if you disable/enable it.
Here is a screenshot of my Services tab :

Once you are done with the Services tab, close autoruns.
If you experience errors in specific programs or games after disabling any of these services, go back and enable any process related to those programs.
Part 2: Graphics Optimizations in Windows 11
In this part of the guide, we are going to focus solely on graphics, which includes properly uninstalling and reinstalling our GPU driver, optimizing GPU settings for both AMD and NVIDIA graphics cards, checking that everything is working as intended, and making sure the graphics card is on MSI Mode.
Let’s start!
What I want you to do is go ahead and download Display Driver Uninstaller and save it.

The next step is to download the graphics card driver. Depending on your GPU, navigate to either AMD or NVidia website and download the latest ( recommend ) driver.
Do not download the optional driver because sometimes they may not function as expected and cause issues later.


Now that you have both DDU and GPU drivers saved on your pc, I want you to go ahead and boot into safe mode.
To do that, follow the steps below:
Go to the search bar and type System Configuration, and click on it.

Navigate to the Boot tab, and tick the option Safe boot.
Open this guide on your phone, or get the E-book because you won’t have internet access on safe mode.
Click Apply, OK, and then Restart.

Properly Uninstalling Graphics Card Driver in Windows 11
After the restart, you should be in a Safe Mode environment.
Go ahead and look for the Display Driver Uninstaller folder you previously downloaded, extract it, and run the file as administrator.


Once the program is up and running, go to the top left corner and click on Options, scroll down, and tick the option “Prevent downloads of drivers from “Windows Update”……..”.
You may notice that we already paused Windows updates on a previous step, but we are doing this just to ensure nothing goes wrong. So, once you tick that option, click OK and close.


On the right side, click on the option “Select Device Type” and choose GPU, and under that, select the manufacturer of your GPU(NVIDIA, AMD, INTEL).
Press “Clean and do not Restart“.

This process will take a few minutes to do its thing, and it will let you know when everything is done with a pop-up message.
Your screen might flash during the process, and you may notice that if you have more than one monitor, the second and so on may not be working, but that’s fine since it will get back to working in the next step.
Once you get the message that the uninstallation has been completed, press Yes to exit the program.
Now you want to boot back to normal mode, so you will have to revert to the previously changed setting. To do that, follow the steps below:
Go to the search bar and type System Configuration, and click on it.
Navigate to the Boot tab, and untick the option Safe boot.

Click Apply, OK, and then Restart.
Install Graphics Drivers for Windows 11
Your PC doesn’t have a driver installed right now, so let’s install the one you previously downloaded.
Go ahead, run the driver file you downloaded(Run as administrator), and follow the on-screen instructions. Make sure to tick the option “Perform a clean install“.
Installing NVidia Drivers

Unmark any feature you don’t need, and make sure to tick the option “Perform a clean installation” and click on Next.

Now your screen may start flickering and going black for a few seconds. That’s normal, no worries. Once the installation is completed, restart your PC and come back to this post, so you start optimizing the Nvidia settings.
Installing AMD Drivers


MSI mode for GPU
The next step is to go ahead and run the MSI mode for the GPU tool as administrator. It’s a simple tool to put your graphics card driver into MSI mode.
This is done by default on the newest graphics cards, and it can give you a little bit of extra performance, so it’s worth checking it.
Look for your graphics card, and once you find it ticks the MSI box, click Apply and Exit. That’s all you have to do, don’t edit any of the priorities if you don’t know what you are doing.

Best AMD driver settings for Windows 11
Go ahead and optimize your AMD driver settings. You can either copy the settings from the photo below, or if you want a more in-depth guide, you can go ahead and read my guide on how to optimize AMD driver settings.
Here is a quick sum-up of what matters:
- Turn animations and effects off.
- Turn overlays off.
- Freesync is mostly a personal preference but if you are aiming for the lowest input lag and latency, then just turn it off. Freesync adds a tiny bit of input lag, and it’s useless if you are playing over your refresh rate. For example, if you got a 144hz monitor and you are playing on 200+ fps constantly, then freesync is useless for you, but on the other hand, if you got a 240hz monitor and you are playing on 140-200fps then it can make your whole experience smoother with the only disadvantage of adding a little bit(some times not even noticeable) input lag.
- Almost all of the settings are turned off and set to performance where applicable.
- Do some tests with the Anti-Lag option. I’ve found out that on high-end GPU’s you shouldn’t be using it, but on older ones, it really helps. So take like few minutes and do some tests with it.
- Set your resolution to your monitor’s native resolution.
- Set the refresh rate to the highest possible.


Best NVidia drivers settings for Windows 11
Go ahead and optimize your Nvidia driver settings. You can either copy the settings from the photo below or if you want a more in-depth guide, you can go ahead and read my guide on how to optimize NVidia driver settings.
Here is a quick sum-up of what matters:
- Almost all of the settings are turned off and set to performance where applicable.
- Set the refresh rate to the highest possible.
- Set your resolution to your monitor’s native resolution.
- Choose No Scaling, unless you play on stretched resolutions.
- G-Sync is mostly a personal preference but if you are aiming for the lowest input lag and latency, then just turn it off. G-Sync adds a tiny bit of input lag, and it’s useless if you are playing over your refresh rate. For example, if you got a 144hz monitor and you are playing on 200+ fps constantly, then G-Sync is useless for you, but on the other hand, if you got a 240hz monitor and you are playing on 140-200fps, then it can make your whole experience smoother with the only disadvantage of adding a little bit(some times not even noticeable) input lag.


![]()


Enable Hardware-Accelerated GPU scheduling in Windows 11
If you are streaming on OBS or Streamlabs, then don’t enable this setting because it can cause lags and micro stutters in your stream and recording enable it and if there are no issues with your stream, keep it enabled; if you notice anything weird, just turn it off and restart your PC.
On the other hand, if you are not streaming, turn it on because it will give you extra performance and frames per second.
We are pretty much done with the graphics part of this guide. We are almost halfway done, so keep up!

Part 3: Windows 11 Settings & Optimizations
Let’s continue with the Windows optimizations part, where we will configure properly the Windows settings that matter and make a difference.
Best Windows 11 settings
Xbox Game Bar
Go to your search bar and type Xbox game bar, click on it, and turn both options OFF.

Game Mode
While you are on the Xbox game bar tab, on your left side, you should see Game Mode, click on it, and make sure to enable it. The game mode was not working as intended on previous Windows builds and versions, but that seems to be fixed on the latest versions, and it’s running smoothly.

Scaling
Navigate to Display settings, and make sure scaling is set to 100%. Even if you are on a 2k or 4k monitor and might want to downscale, I highly recommend you keep the scaling to 100% because there may be issues later.

Advanced Scaling Options
Go to Advanced Scaling Options, look for Fix scaling for apps, and toggle it to Disabled. This option just doesn’t work, so keep it off.
Mouse Settings
Disable “Enhance pointer precision” and set the pointer speed on a value to 6(default). If you need to change your mouse speed, I highly recommend changing your mouse DPI settings instead of the Windows setting.

Performance Options
Navigate to Performance Options, and on the Visual Effects tab, you can either turn everything off or just leave it as default to make Windows look a little more beautiful. It won’t affect your performance and FPS, so decide on your own.

Once you are done with the Visual Effects tab, move to the Advanced tab, and make sure the Adjust for the best performance of option is set to Programs, click Apply, and OK.

Best Power Plan for Gaming in Windows 11
Let’s get to optimizing our Windows 11 power plan.
Go to the search bar and type “power” and you should see the option “Choose a power plan“. Click on it, and it will take you to a window with all the available power plans for Windows 11.
There will be three different power plans by default: Balanced, Power Saver, and Performance.
There is something better than these power plans and that’s the Ultimate Performance power plan which is hidden away in Windows 11.
To add the Ultimate Performance power plan in Windows 11, please, follow the steps below:
Hit “Start“, type in “CMD“, right-click on “Command Prompt” and choose “Run as Administrator“.
Copy this: powercfg -duplicatescheme e9a42b02-d5df-448d-aa00-03f14749eb61
and paste it into the Command Prompt, and hit Enter.
Now refresh the Power Plans window you were in, and you should see the Ultimate Performance power plan. Make sure to select it, and you are good to go.
ISLC(Intelligent Standby List Cleaner)
You’ll find many different theories about this app on the internet. It does not tremendously help your overall system performance, but it helps a little bit with system and driver latency and makes things just a little bit snappier. Hence, it makes it worth running on your system.
Go ahead and download ISLC,then open the folder, run ISLC as administrator, and do the following:
- Set Wanted Timer Resolution to 0.5
- Tick Enable Custom Resolution
- Tick Start ISLC minimized and auto-Start monitoring
- Tick Launch ISLC on user logon
- Change the “Free memory is lower than” option from 1024 to any of the values below(depending on your RAM)
- Take half of your RAM and multiply by 1024. Put the number you got on the “Free memory is lower than” option.
- For example, if you have 16 GB of RAM installed on your computer, the number should be 8192. ( 16/2*1024). You can check the table below with all the values.
- Once you’ve done that, click on Start and that’s it.
- ISLC will start running automatically every time your PC boots up, so you don’t have to worry again about it.
| YOUR RAM | VALUE TO ADD |
|---|---|
| 2GB | 1024 |
| 4 GB. | 2048 |
| 8GB | 4096 |
| 16GB | 8192 |
| 32GB | 16384 |
| 64GB | 32768 |

If, after restarting your PC, you notice that “Current timer resolution” is not 0.5ms exactly, and it’s a number like 0.4988, do the following:
Run CMD as Administrator and type the following commands one by one:

- bcdedit /set useplatformtick yes
- bcdedit /set disabledynamictick yes
- bcdedit /deletevalue useplatformclock
If the last one gives back an error that the value doesn’t exist, that’s fine. If the value doesn’t exist, it’s already off.
Rebuild Performance Counters
Sometimes performance counters get corrupted, so it’s a good practice to rebuild everything.
Go ahead and create a new txt file, copy the text below and paste it into the text file.
Go ahead and save the txt file with .cmd extension.
Make sure to run it as an administrator.
@echo off
@echo Rebuild Performance Counters 1
lodctr /r
@echo
@echo Rebuild Performance Counters 2
lodctr /r
@echo
pause
Best Registry tweaks for Windows 11
Go ahead and create a new txt file, copy the text below and paste it into the text file.
Go ahead and save the txt file with .reg extension.
These are the most basic stuff you may have seen before but believe me, and it’s like the 95% that matters from the registry tweaks you can do.
The following registry tweaks are included in the file:
[HKEY_LOCAL_MACHINESYSTEMCurrentControlSetControlPowerPowerThrottling]
"PowerThrottlingOff"=dword:00000001

[HKEY_LOCAL_MACHINESOFTWAREMicrosoftWindows NTCurrentVersionMultimediaSystemProfile]
"NetworkThrottlingIndex"=dword:ffffffff
"SystemResponsiveness"=dword:00000000

[HKEY_LOCAL_MACHINESOFTWAREMicrosoftWindows NTCurrentVersionMultimediaSystemProfileTasksGames]
"Affinity"=dword:00000000
"Background Only"="False"
"Clock Rate"=dword:00002710
"GPU Priority"=dword:00000008
"Priority"=dword:00000006
"Scheduling Category"="High"
"SFIO Priority"="High"

[HKEY_CURRENT_USERSystemGameConfigStore]
"GameDVR_Enabled"=dword:00000000

[HKEY_LOCAL_MACHINESOFTWAREMicrosoftWindows NTCurrentVersionScheduleMaintenance]
"MaintenanceDisabled"=dword:00000001

[HKEY_CURRENT_USERSoftwareMicrosoftWindowsCurrentVersionBackgroundAccessApplications]
"GlobalUserDisabled"=dword:00000001

[HKEY_CURRENT_USERControl PanelDesktop]
"MenuShowDelay"="0"
Best Sound settings for Windows 11
Find the little sound icon on your toolbar, right-click on it, and click Sounds.

Navigate to the PlayBack tab, and disable any sound device you are not using. Do the same for the Recording tab.
Go to your active sound devices, right-click, Properties, Enhancements, and tick the option Disable all enhancements.

Change Quality to 24 bit 48000hz.

Click Apply and OK, and that’s pretty much it about the sound settings.
Create a restore point in Windows 11
Now that we are done with most Windows optimizations, I highly recommend creating a restore point before going to the next part.
To create a restore point, follow the steps below :
- In the search box, type Create a restore point and select the option from the results list.

2. On the System Protection tab, click on your system drive and press on configure. Enable the option Turn on system protection, and on Max usage, choose a value between 5% and 10%. It should be enough to save your new restore point.

3. Click on Create, type a description, for example, “After Optimizations,” and again click on Create.

Part 4: How To Optimize BIOS
One of the most critical parts of this guide is the BIOS part. We will make sure we are running on the latest bios version, configure fans and hardware correctly, apply basic overclocks, and ensure everything is running perfectly and stable.
Check RAM Channels and Position
Before we get into BIOS, run memtest64, and if you have two sticks of rams on your computer, make sure it is showing on Module 1 and Module 3. Some motherboards are different, so to be 100% sure that your RAM is correctly placed, I would suggest looking at the manual of your motherboard.
You can always find the motherboard manual online.
You don’t want to have your ram sticks misplaced because they can cause XMP issues and dramatically decrease your PC’s performance.
You can also check by yourself physically, look at your motherboard and make sure they are in the same position as memtest64 says.

Updating BIOS to the latest version
It is always recommended to run on the latest BIOS version since manufacturers provide frequent updates(every few months) to address issues and fix stability problems or even enhance performance in some cases.
You’ll need a USB stick; the size doesn’t matter since the BIOS update files are small.
Once you get a USB stick, you’ll need to know the exact model of your BIOS. If you don’t know it, no worries; you can find it by typing System Information in your search bar, hitting enter, and looking for BaseBoard Product; once you locate it, click on it, and press CTRL + C to copy it.

Open up your browser, and press CTRL + V to paste the motherboard model.
Navigate to the official page of your motherboard manufacturer and look for Support or Updates (the names may be a little different on different manufacturers’ websites).
Look for BIOS updates, find the latest available BIOS Update file and click on download.
Extract the folder you just downloaded, and read the manufacturer’s instructions (sometimes you might have to run a renamer.exe file before moving the bios file into your USB). Instructions can be found either on their website or in a text file in your downloaded folder.
Once you do that, move the BIOS update file into your USB, and you are good to go. Make sure the USB is in FAT32 format and not NTFS.
Now go ahead and restart your computer, and once the screen goes black, start spamming the DEL button. If it doesn’t work, it could be the F2, F5, or F8.
It depends on the motherboard, but if you can’t find it, you can search for the specific motherboard bios button on the internet.
Assuming that you are into BIOS, the updating process is the same, but the names of the options may differ.
On some boards, you’ll see a TOOL tab and then the update option, while on others, you may see an option M-Flash. If you are unsure or can’t find the option on your board, you can search it up on google to find the exact steps for finding it.
Once you are on the BIOS update tab, choose your USB and select the file you previously moved into the USB. Proceed with the on-screen instructions and let BIOS update.
PLEASE DO NOT TURN OFF YOUR PC OR TAKE OUT THE POWER CABLE WHILE UPDATING YOUR BIOS.
Once the process is done, it will most likely take you back to BIOS. Now it’s time to optimize your BIOS settings.
Best BIOS Settings
Since this guide is primarily for people who are not PC experts, I will keep everything straight. We will only change basic settings that make the most significant difference. If you want more advanced BIOS / RAM tweaking, you can join my Discord or follow me on Twitter to get complete guides for more advanced users.
Optimize AMD system BIOS Settings
- Make sure XMP or D.O.C.P is set to Profile 1 / Enabled.
- Precision Boost Overdrive: Enabled
- Re-size BAR support: Enabled
- Find the options for FAN controls, and if you have a water cooler make sure to set it to 100% at all times, as well as optimize the rest of the coolers to work on higher speeds to keep temperatures as low as possible.

Optimize Intel system BIOS settings
The Intel settings below can be found under your BIOS’s CPU features/CPU configuration/Overclocking/Ai Tweaker tabs. If it’s your first time entering BIOS, it may take some time, but I am sure you will find them easily.
- Make sure XMP or D.O.C.P is set to Profile 1 / Enabled.
- Intel SpeedStep: Disabled
- Intel speed shift technology: Disabled
- Intel C-state: disabled
- Turbo Mode: Enabled
- CPU Ratio Offset when running AVX: 0
- Re-Size BAR support: Enabled
- Find the options for FAN controls, and if you have a water cooler make sure to set it to 100% at all times, as well as optimize the rest of the coolers to work on higher speeds to keep temperatures as low as possible.

Once you are done with all the settings, you can go ahead and save these settings as a profile and then find the option to Save & Exit BIOS.
Check Temperatures in Windows 11
Before we proceed to stress testing your system, I recommend you look at your CPU/GPU idle temperatures in case you can spot anything weird. By strange, I mean high temperatures while you are not doing anything on your computer.
You can monitor every pc component part using HWinfo, which is included in the folder you downloaded at the beginning of this guide. Go ahead and run it, choose sensors only, and go ahead and check your temperatures.
Many AMD CPUs may experience high idle temps because of PBO setting high voltages, but that gets better while you are gaming or running any programs.
If you are experiencing high temperatures and you didn’t put your fans previously to full speed, maybe it’s time to go back to BIOS and do it right now.


Stress Test in Windows 11
Now that you’ve done most of the optimizations is time to make sure everything is stable and is running better than before with no errors.
Download OCCT, install it, and open it. Navigate to the home screen and choose CPU, choose 30 minutes, and click on TEST.
If you can get 30 minutes to an hour of this without any errors, you should be good to go. If you get errors there, you will have to troubleshoot further since it could be a hardware error, and I can’t point you in a good direction without looking at your PC.

Part 5: Cleanup and Protect your System
Now, go ahead and download Malwarebytes. You can get the free version or the 14day trial. After the free premium trial ends, you can still use Malwarebytes free version. Keep in mind that the free version doesn’t provide real-time protection. It’s only useful for manual scans. ( If you want to be safe on the internet and can afford it, you can get the premium version and then disable Windows defender.
Install Malwarebytes and then open it. Click on Scanner -> Advanced Scanners ->Configure scan, and select the option scan for rootkits and also, on the right side, select all your drives and click on scan. This scan may take a lot of time, but it can save you from very unwanted situations.

Once the scan is completed, quarantine everything and restart your PC.
Disable automatic scans, and you should be good to go!
If you get the full version, you won’t have to worry again about viruses, malware, etc., infecting your pc. If you keep free, you’ll have to do some manual scans from time to time to make sure everything is OK.
Part 6: Suggested Software to Install in Windows 11
Here is a list of software I recommend using on your PC for different usages.
Compress & Extract Files
Nothing to say here; just download 7ZIP at some point; you’ll need it.

Text Editor
Notepad ++ is one of the best and well-organized text editors out there, and it’s completely free.

Music / Videos
VLC can run any video/music format you throw at it, and it’s completely free!

Organize Emails
If you want to have all your emails in one place, then ThunderBird is the app for you.

VPN
I recommend NordVPN because apart from you being able to access all the public IP addresses of the service; they will provide you with a dedicated IP address which you will be the only “owner”, so no one else can access it. Not all VPN services have this feature.

Part 7: Optimize your Games in Windows 11
Now that your pc is fully optimized and you got all your needed software setup, it’s time to optimize your game settings and config files accordingly.
Below you can find guides on how to optimize every single game that you might be playing. The list will update every time I upload a new game optimization guide.
- Roblox Optimization Guide
- Fortnite Optimization Guide
- Warzone 2 Optimization Guide
- Valorant Optimization Guide
- Smite Optimization Guide
- Dota 2 Optimization Guide
- Rust Optimization Guide
- Apex Legends Optimization Guide
- League of Legends Optimization Guide
- Rocket League Optimization Guide
- World of Warcraft Optimization Guide
- Albion Online Optimization Guide
- Fifa 21 Optimization Guide
- Minecraft Optimization Guide
- FFXIV Optimization Guide
- Elder Scrolls Online Optimization Guide
- Path of Exile Optimization Guide
- Escape from Tarkov Optimization Guide
- Black Desert Online Optimization Guide
- Valheim Optimization Guide
- Genshin Impact Optimization Guide
Optimize Windows 11: Frequently Asked Questions
Is Windows 11 better for gaming than Windows 10?
It’s impossible to draw hard conclusions like “Windows 11 is better than Windows 10” or “Windows 11 will give you much more FPS than Windows 10” but we can make some observations.
As with any operating system, you shouldn’t expect miracles. Obviously, there are optimizations on Windows 11, but they will not make your hardware magically better.
The performance difference between the two operating systems regarding gaming is minimal.
What are the disadvantages of Windows 11?
Below you can find some of the biggest disadvantages of using Windows 11:
1. Unless you pay for the PRO version, you can not create a local account. (You will always need to have internet access to log in with your Microsoft Account).
2. Random “File Explorer” crashes.
3. Taskbar customization is almost gone.
4. Issues with Scaling.
5. Issues with Windows updates.
6. Windows search bar still works with “Web results” being the priority.
Is Windows 11 stable now?
Many issues of the first build have been addressed right now, and things only get better. While there are still a lot of issues with Windows 11, I could say that it’s stable enough to use as your primary operating system.
Как установить 7-zip, как сжать, извлечь и зашифровать файлы и папки с помощью 7-zip в Windows 11
Для сжатия, архивирования или удобного и безопасного хранения обычно используют файловый «компрессор». Существует множество хороших программ-архиваторов, включая самые популярные, «WinZip» и «WinRAR», но единственный минус этих двух программ в том, что они платные. В качестве альтернативы можно использовать очень простое и бесплатное приложение — «7-zip».
«7-zip» — один из лучших файловых архиваторов, доступных для Windows. Это ПО для архивирования файлов с открытым исходным кодом, которое может сжимать и распаковывать файлы, а также шифровать файлы.
В этой статье мы разберем, как использовать 7-zip в Windows 11, в том числе как загрузить и установить 7-zip, как сжимать, как извлекать и шифровать архивные файлы и папки с помощью 7-zip.
- 7-zip можно использовать совершенно бесплатно — как в личных, так и в коммерческих целях.
- Программа поддерживает 87 языков.
- Высокий степень сжатия для таких форматов как 7z, ZIP и GZIP.
- Поддерживает 256-битное шифрование AES для форматов 7z и ZIP.
- Упаковка и распаковка: 7z, BZIP2 (BZ2, TB2, TBZ, TBZ2), GZIP (GZ, TGZ), TAR, ZIP (JAR), XZ, WIM.
- Только распаковка: AR, ARJ, CAB, CHM, CPIO, CramFS, DMG, EXT, FAT, GPT, HFS, IHEX, ISO, LZH, LZMA, MBR, MSI, NSIS, NTFS, QCOW2, RAR, RPM, SquashFS, UDF, UEFI, VDI, VHD, VMDK, WIM, XAR, and Z.
- Мощная версия для командной строки.
7-zip постоянно усовершенствуется разработчиками, это еще не предел всех его возможжностей.
Как установить 7-zip в Windows 11
Если вы еще не устанавливали 7-zip в Windows, выполните следующие шаги для того, чтобы загрузить и установить 7-zip.
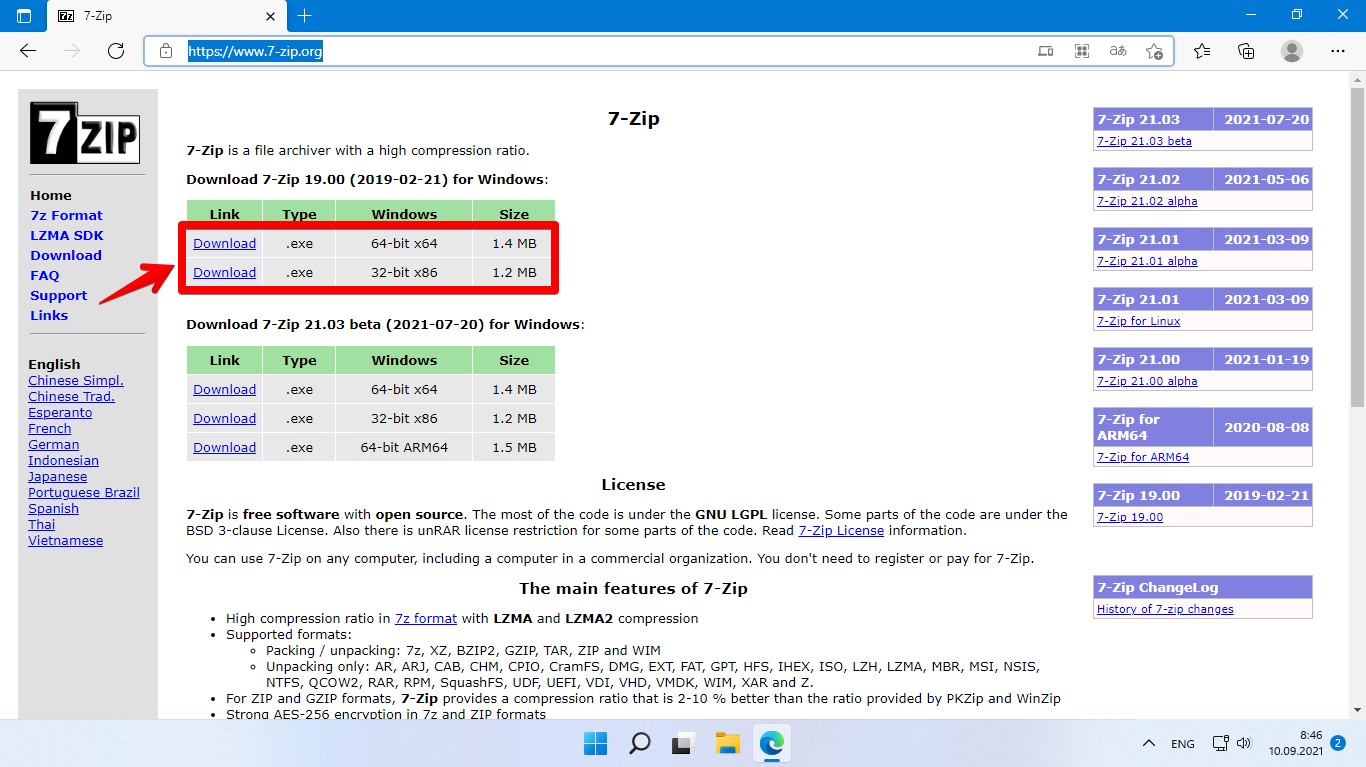
Сперва перейдем на сайт https://www.7-zip.org через веб-браузер. Затем выбираем версию 7-zip, которую хотим загрузить — если у вас 32-битная Windows, выберите 32-битную версию x86 или выберите 64-битную версию x64 для 64-битной Windows.
Щелкаем ссылку «Загрузить», чтобы загрузить файл установки.
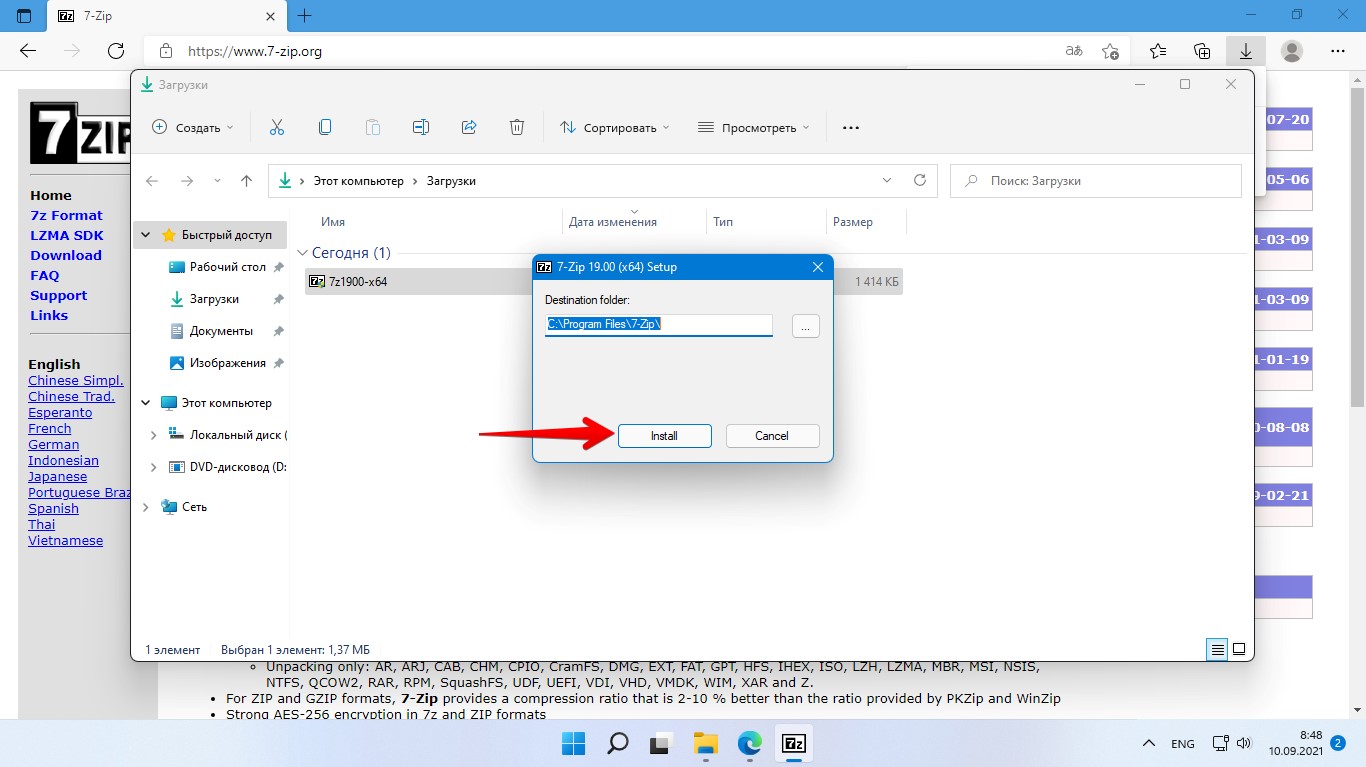
Находим инсталлятор в папке «Загрузки» и запускам двойным кликом мыши (либо через «Открыть»).

Выбираем путь для установки, либо оставляем как есть и нажимаем кнопку «Install».
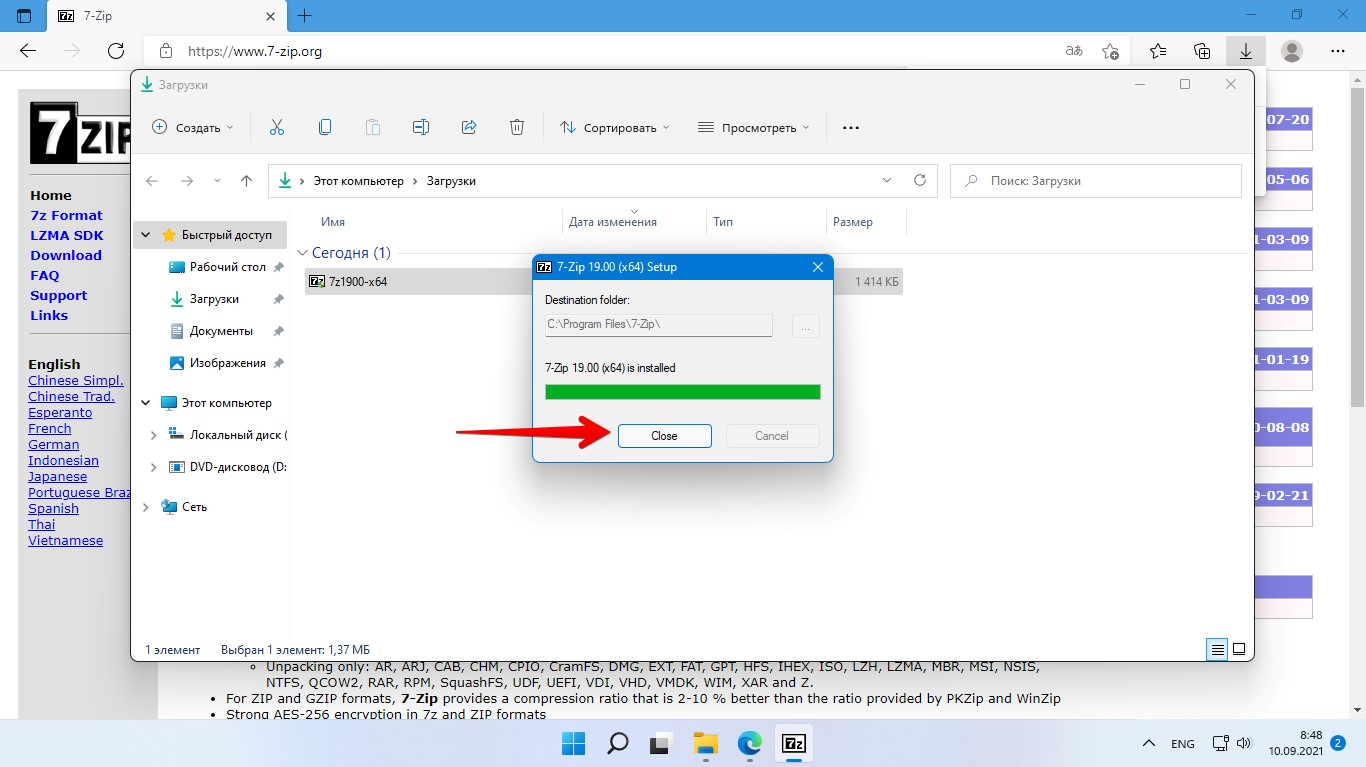
По окончанию установки нажимаем кнопку «Close».
Теперь архиватор 7-zip установлен и найти его можно во всех приложениях через меню «Пуск».
Настройка 7-zip в Windows 11
Прежде чем начать пользоваться 7-zip, необходимо установить это приложение как программу по умолчанию для открытия архивных файлов. Сделать это можно следующим способом:
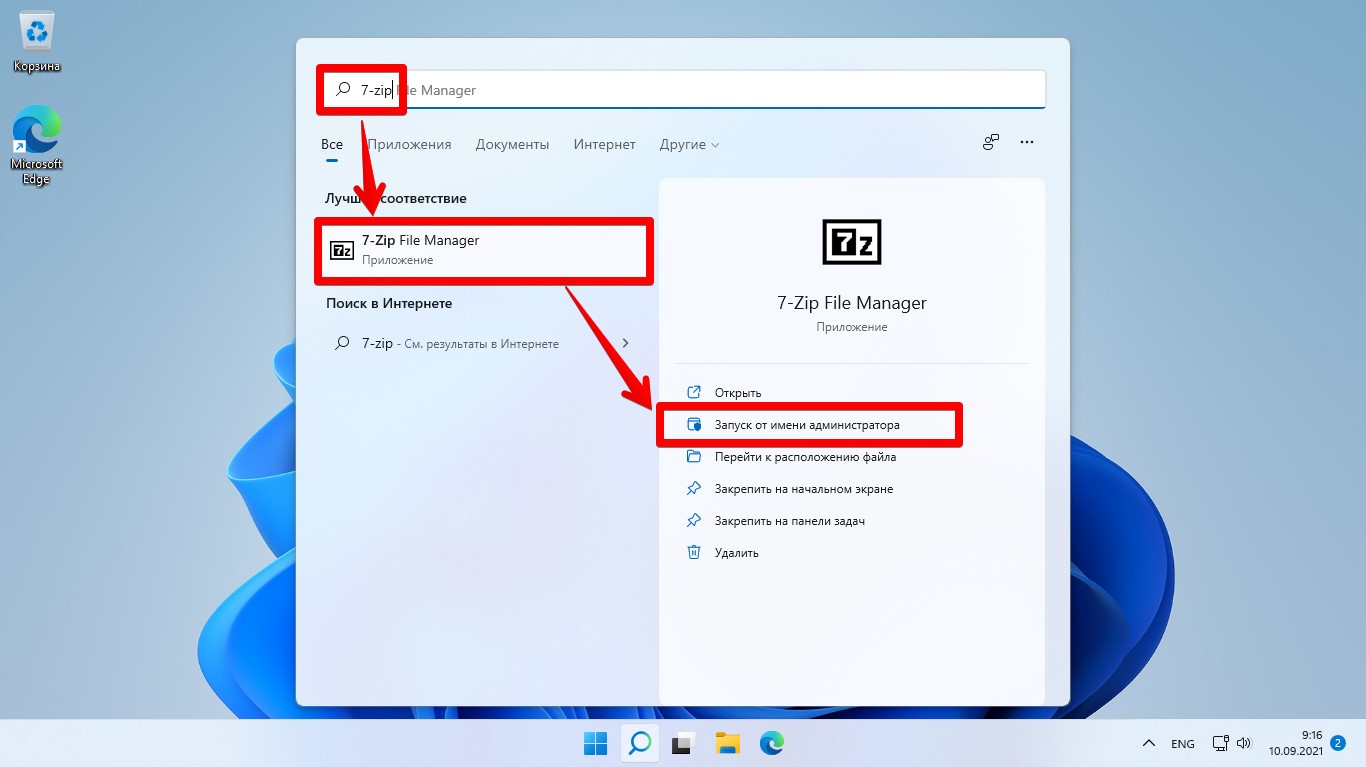
После установки приложения находим «7-zip» в поиске Windows 11 и открываем его от имени администратора.
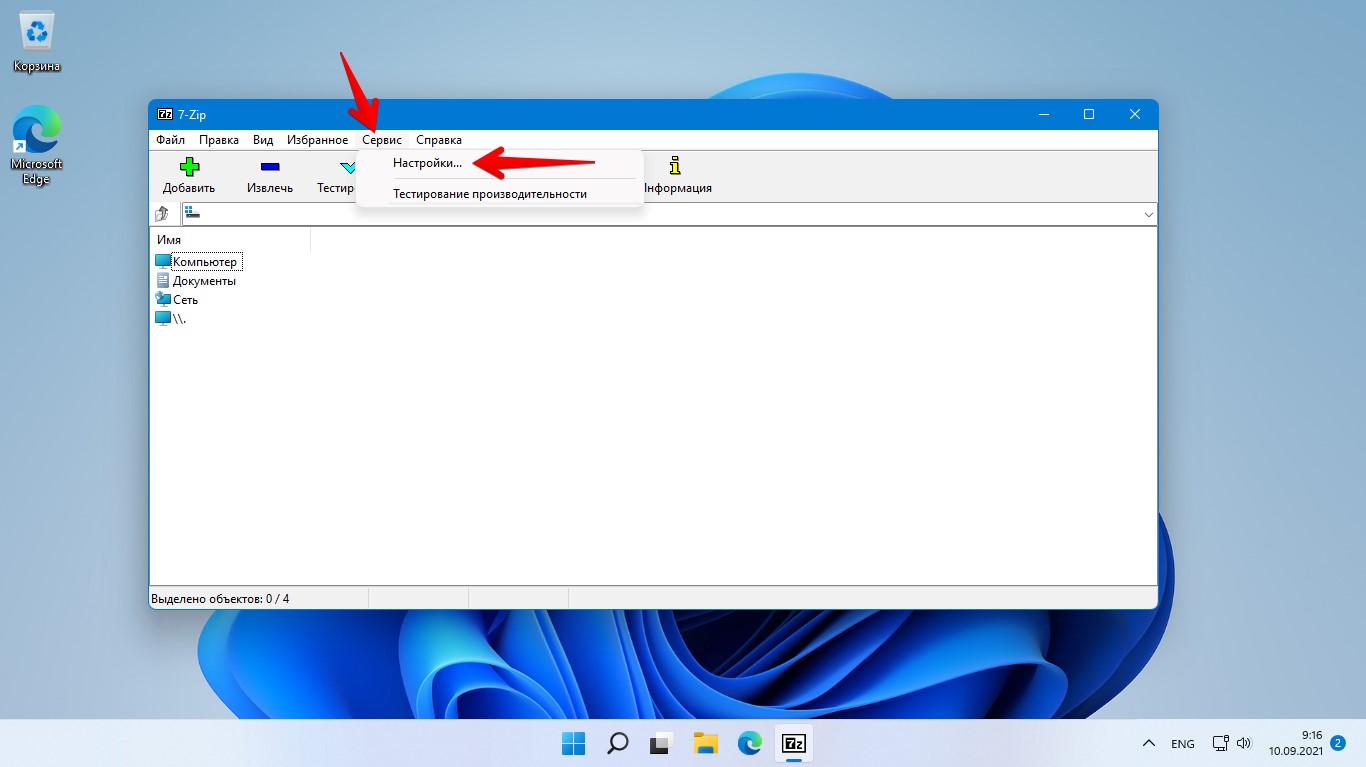
Открываем пункт меню «Сервис» — «Настройки».
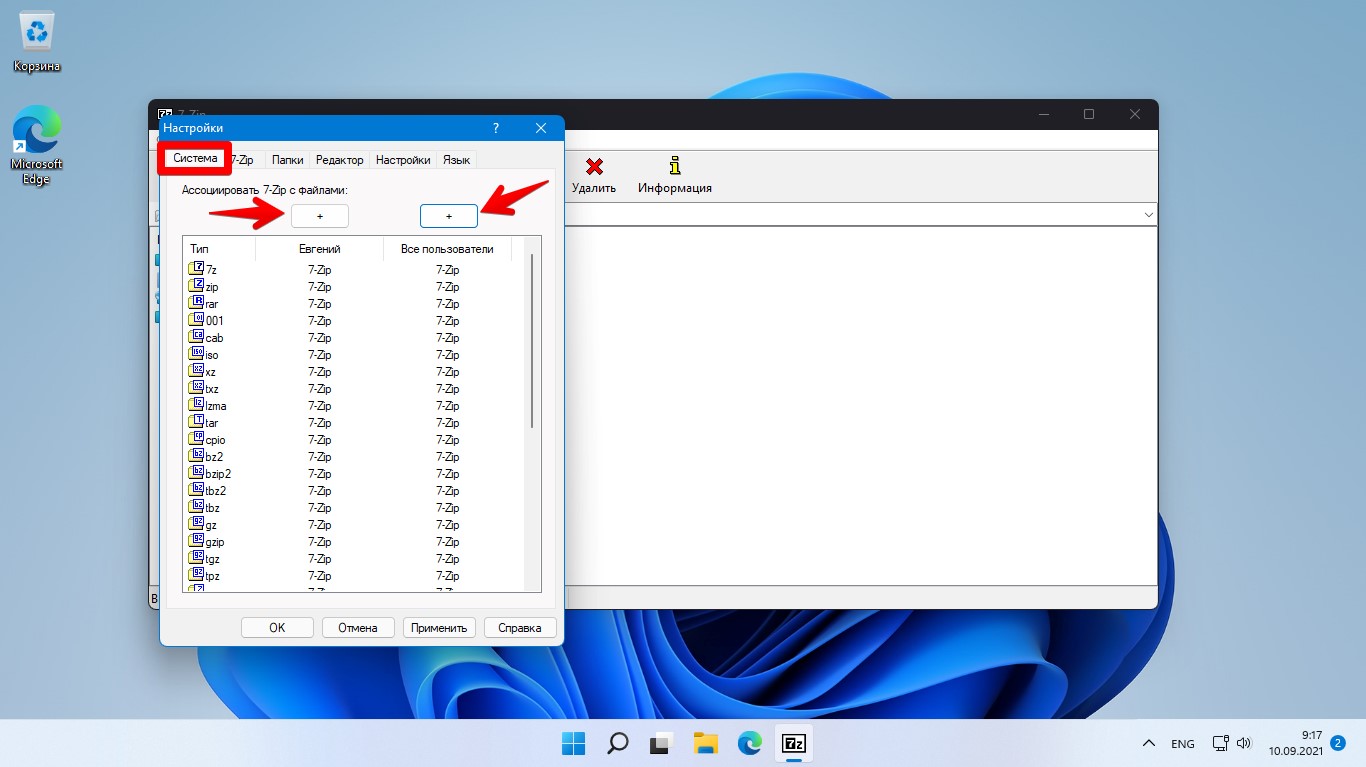
На вкладке «Система» нажимаем первую кнопку «+», чтобы сделать 7-Zip архиватором по умолчанию для всех типов архивов текущего пользователя. Даже если в системе установлено другое ПО для архивирования, нажатие этой кнопки сделает 7-zip архиватором по умолчанию.
Далее нажимаем вторую кнопку «+», чтобы сделать это приложение по умолчанию для всех пользователей. Затем нажмите «Применить», чтобы сохранить настройки, и нажмите «ОК», чтобы закрыть диалоговое окно.
Также можно настраивать типы файлов по отдельности, просто нажимая на них.
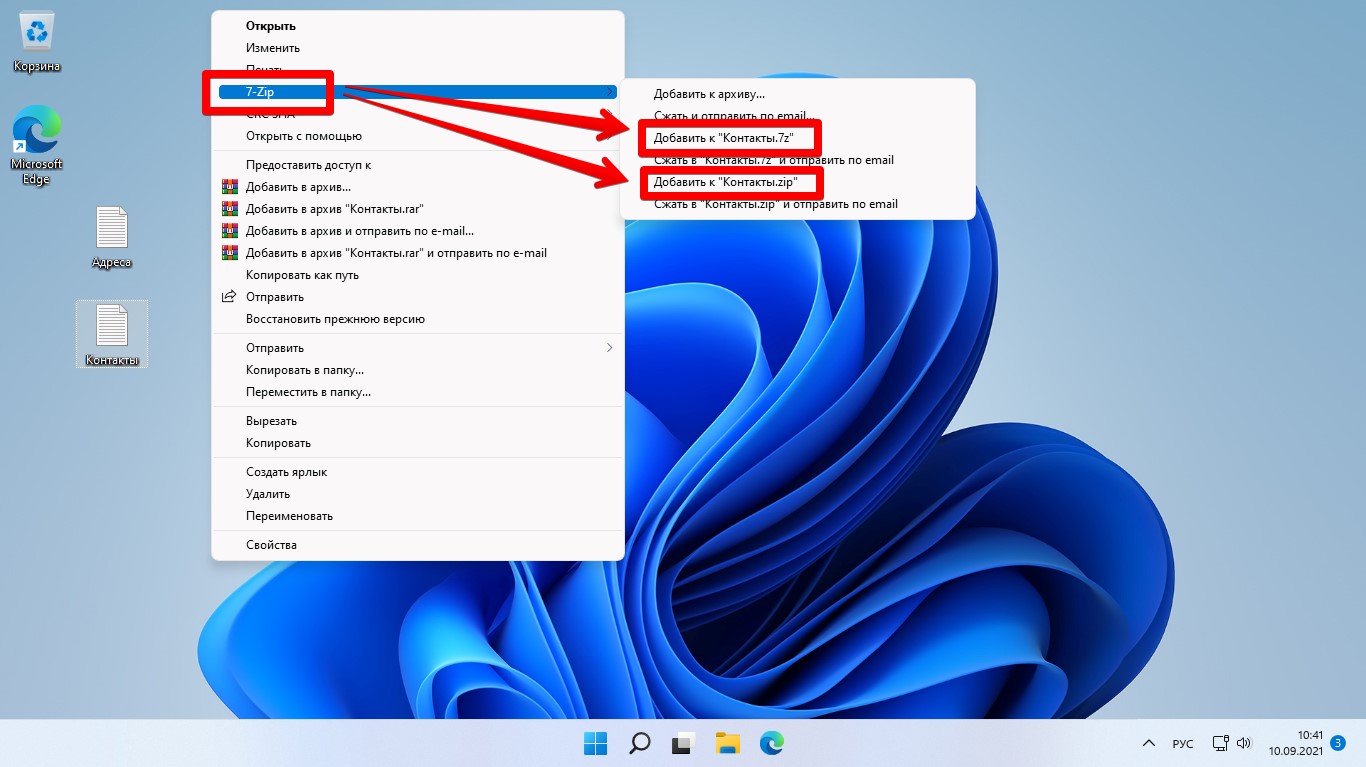
В Windows 11, когда вы щелкаете правой кнопкой мыши по архиву, появляется новое контекстное меню без дополнительных параметров для 7-zip. Для просмотра контекстного меню с дополнительными параметрами 7-zip, вам нужно нажать «Показать дополнительные параметры».

Теперь появится пункт «7-Zip», при наведении на который мы увидим еще больше параметров для работы с архиватором.
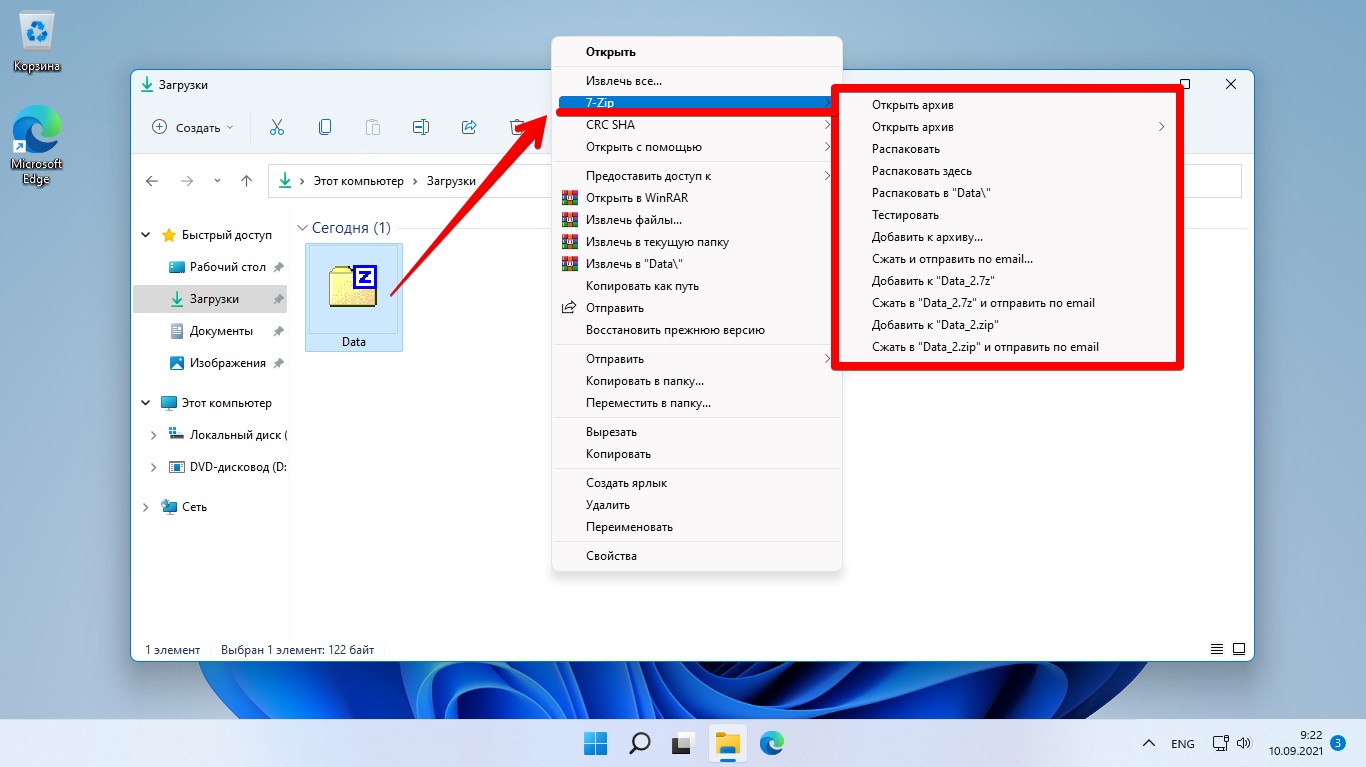
Параметры в контекстном меню можно настраивать по своему желанию. Для этого переходим в приложение «7-zip» —
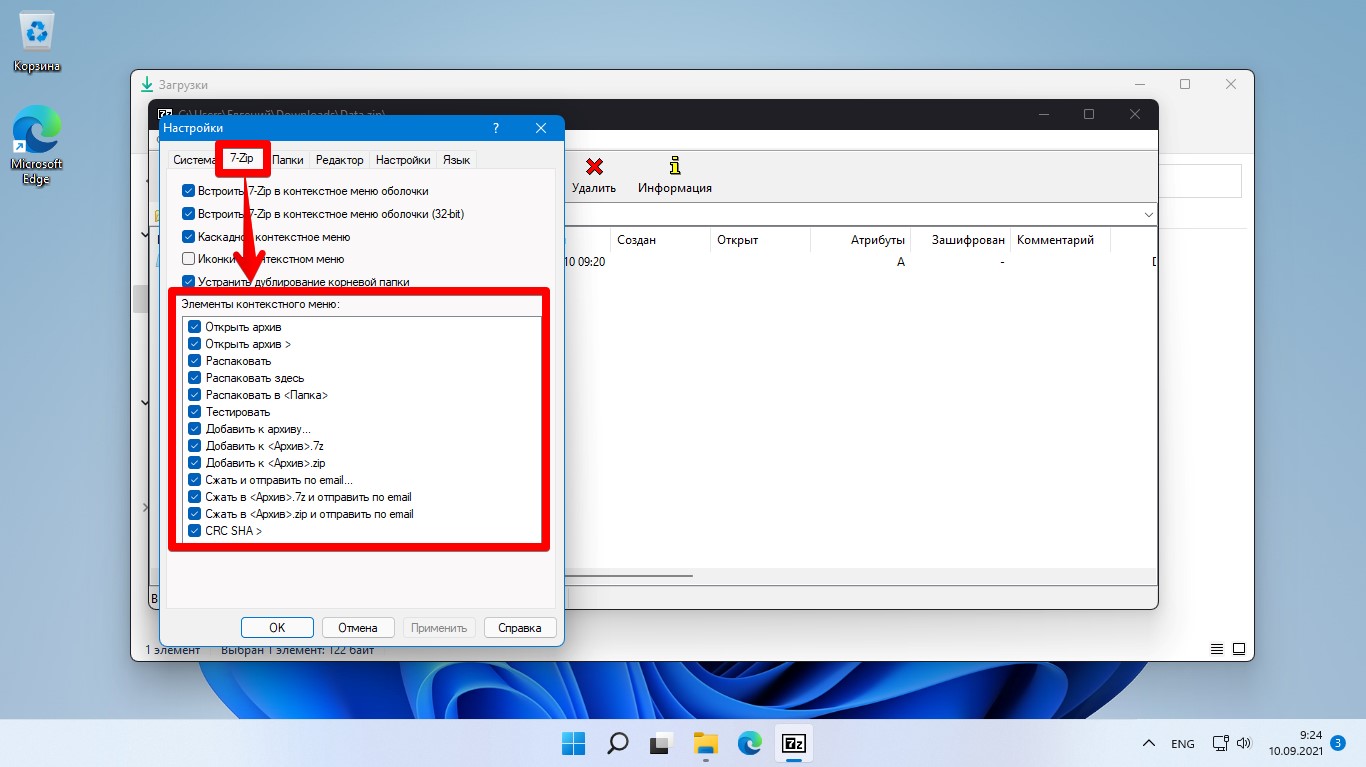
«Сервис» — «Настройки» — вкладка «7-Zip» — «Элементы контекстного меню». Отмечаем элементы, которые хотим видеть в меню.
Как сжимать файлы с помощью 7-zip в Windows 11
Мы рассмотрели, как установить и настроить 7-zip. Теперь рассмотрим, как использовать 7-Zip для сжатия и извлечения файлов. Давайте сначала рассмотрим, как сжимать файлы.
Выберите один или несколько файлов, которые вы хотите заархивировать, затем щелкните правой кнопкой мыши по выбранному файлу и выберите опцию «Показать дополнительные параметры».

Затем наведите указатель мыши на «7-Zip» и выберите «Добавить в Имя_файла.zip» или «Добавить в Имя_файла.7z» для быстрого сжатия.
Поскольку форматы «zip» и «7z» являются самыми популярными типами архивов, эти форматы указаны как форматы архивов по умолчанию в контекстном меню. Но 7-zip может архивировать файлы и в других форматах, включая zip, tar, wim и 7z.
Чтобы выбрать другой формат файла и настроить параметры сжатия, выберите файлы, которые нужно заархивировать, щелкните правой кнопкой мыши — «Показать дополнительные параметры» — «7-Zip» — «Добавить к архиву…».

В окне «Добавить в архив» у вас есть различные настройки для управления сжатием. Вы можете переименовать файл в поле «Архив». Вы также можете изменить место сохранения сжатого файла, нажав кнопку с квадратными точками рядом с полем «Архив».
Если вы хотите выбрать другой тип архива, выберите тип файла в раскрывающемся списке «Формат архива». Вы можете выбрать форматы «7z», «tar», «wim», «zip», «xz», «bzip2» и «gzip».
Увеличить и уменьшить время сжатия можно при помощи настройки «Уровень сжатия» (от «Без сжатия» до «Ультра»). По умолчанию выбран вариант «Нормальный», который обеспечивает более стабильную скорость сжатия.
Изменить степень сжатия можно при помощи различных алгоритмов в опции «Метод сжатия» (доступны «LZMA2», «LZMA», «PPMd», «BZip2»).
Если необходимо разделить архив на несколько частей, установите размер файла в настройке «Разбить на тома размером (в байтах)».

По завершении настройки параметров нажмите «ОК», чтобы начать сжатие.
Архиватор 7-zip создаст новый сжатый файл в выбранном вами формате и с выбранными вами настройками. Время сжатия файлов может составлять от нескольких секунд до нескольких часов, в зависимости от количества файлов, папок, размера и производительности вашего ПК.
Как зашифровать файлы с парольной защитой 7-zip в Windows 11
7-zip не только архивирует файлы, но также может и защищать ваши файлы паролем. 7-zip поддерживает шифрование с помощью алгоритма AES-256, который является одной из самых надежных версий AES. Это означает, что зашифрованные файлы не могут быть прочитаны без правильного ввода пароля. Это очень удобно, когда у вас есть файлы с важной информацией.
Сначала выбираем файл(ы) или папку, которые мы хотим зашифровать, далее щелкаем правой кнопкой мыши, выбираем «7-Zip», а затем нажимаем пункт «Добавить к архиву…».
В окне «Добавить к архиву» выбираем имя и путь для шифруемого файла, затем выбираем формат архива «zip» или «7z».
Затем вводим и повторяем пароль в разделе «Шифрование». «Метод шифрования» выбираем «AES-256». Если вы используете формат 7z, вы также можете установить флажок «Шифровать имена файлов» для дополнительной безопасности. По завершении нажимаем «ОК», чтобы начать сжатие.
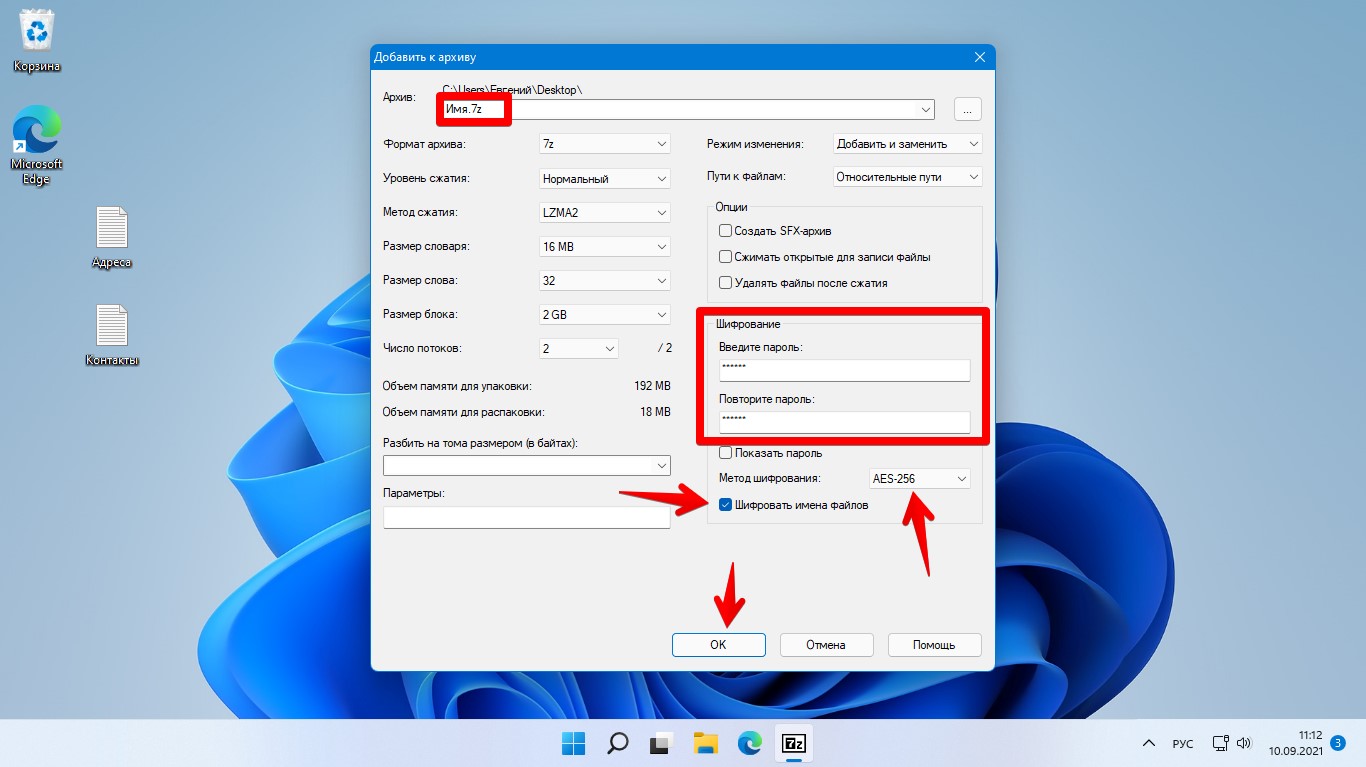
Для создания надежного пароля рекомендуется использовать пароль, содержащий хотя бы одну цифру, хотя бы одну заглавную букву, одну строчную букву и специальные символы.
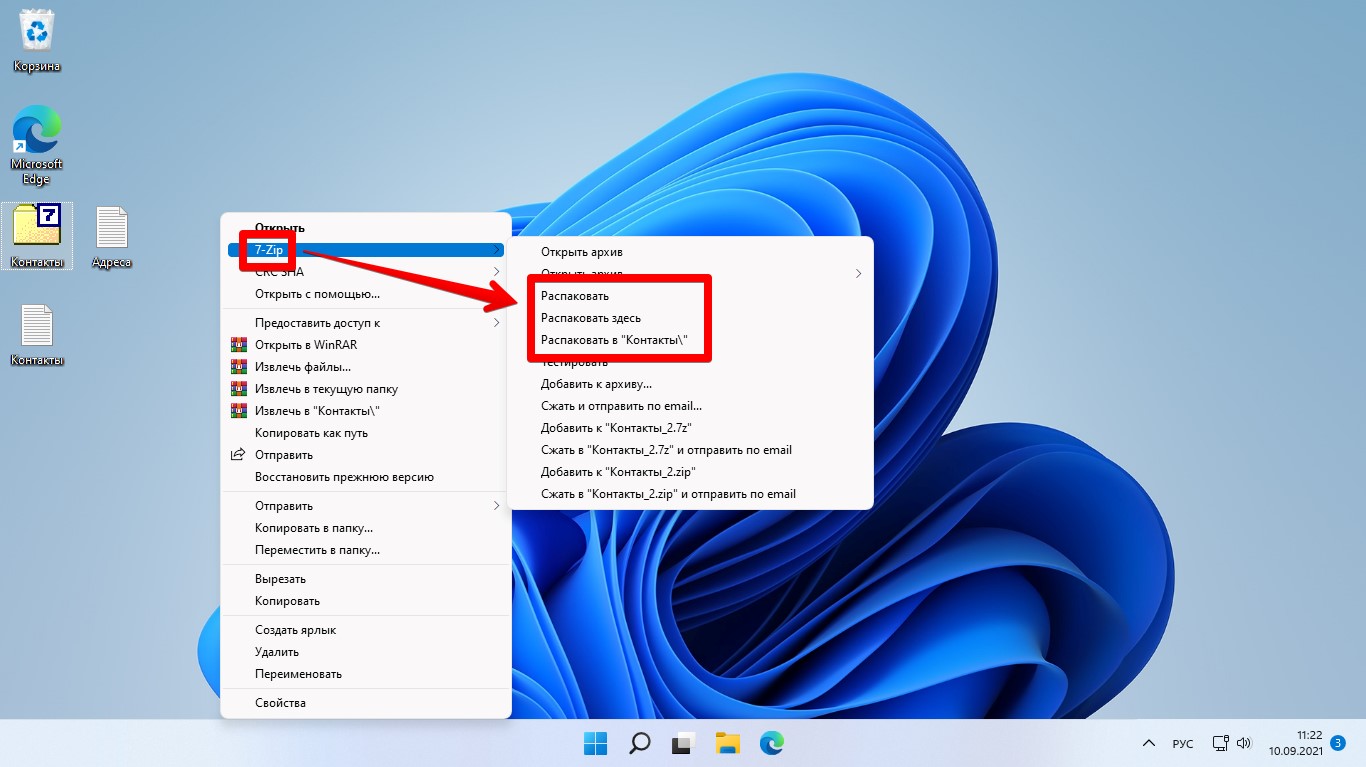
Как извлечь файлы через 7-zip в Windows 11
Извлечь файлы проще, чем их сжать. Открываем архив, нажимаем кнопку «Извлечь» — кнопка с тремя точками «Обзор» — выбираем папку, куда будем извлекать файлы и нажимаем «ОК» и еще раз «ОК» в окне «Копировать».

Еще один вариант для извлечения файлов — щелкаем правой кнопкой мыши по архиву — «Показать дополнительные параметры» — «7-Zip» — в дополнительном меню выбираем любой из трех вариантов в зависимости от назначения — «Распаковать», «Распаковать здесь», «Распаковать в Имя_файла».
Пожалуй это все, что вам нужно знать об использовании 7-zip в Windows 11. Удачного архивирования!
Версия 22H2 22621.1105
Первая в наступившем 2023 году полная сборка Windows 11 Pro, интегрированы январские критические обновления. Установка полуавтоматическая с выбором раздела и именем пользователя, сняты ограничения Windows 11 (установится на любой компьютер). При создании сборки не использовался режим аудита.
Компьютер для системы:
• Процессор: не менее двух ядер с тактовой частотой не менее 1 гигагерца (ГГц) или SoC
• ОЗУ: 4 гигабайта (ГБ)
• Место на диске: 20 ГБ или больше
• Видеоадаптер: DirectX 12 или более поздней версии с драйвером WDDM 2.0
• Экран: (720p) с диагональю более 9 дюймов, 8 бит на цветовой канал
•
SecureBoot и TPM 2.0 не требуется
(Возможна установка на любой ПК)
Windows 11 Pro 22H2 22621.1105 Full January 2023 by WebUser торрент, изменения:
Изменения в системе:
Данное обновление включает обновления качества. Новые функции системы не представлены.
Список ключевых изменений:
• Обновление содержит различные улучшения безопасности внутренних функций ОС. Вторник патчей, январь 2023: Microsoft исправила 98 проблем безопасности, в том числе одна уязвимость «нулевого дня».
• Исправлены проблемы, влияющие на диспетчер локальных сеансов (LSM) и позволяющие пользователям, не имеющим прав администратора, выполнять действия, которые может выполнять только администратор.
• Исправлена известная проблема, которая затрагивает приложения, использующие драйвер SQL Server Microsoft Open Database Connectivity (ODBC) (sqlsrv32.dll) для подключения к базам данных. Проблема приводила к неудчному выполнению соединения. Вы также можете получить сообщение об ошибке в приложении или сообщение об ошибке от SQL Server.
Установлено:
• Обновления по Январь 2023 года
• Быстрый и современный браузер от Яндекса
Запись на носитель:
• рекомендую использовать Rufus >>> как наиболее подходящую для таких целей программу.
Установка:
• установку производить на отформатированный жесткий диск
• процесс установки полуавтоматический (только выбор раздела и имя пользователя)
Активация:
• сборка автоматически активируется (цифровая лицензия) при подключении к интернету, никаких дополнительных действий не требуется.
Контрольные суммы:
CRC32: 8D429038
MD5: 8762D090F291C994F1719B37C84A92EE
SHA-1: 8D98B7F16833D6760DD52B9F2319F252A1EC54D9
Скриншоты Windows 11 Pro 22H2 22621.1105 Full January 2023 by WebUser торрент:

Скачать Windows 11 Pro 22H2 22621.1105 Full January 2023 by WebUser через торрент:

Чтобы закачать ISO образ с Виндовс 11 на русском языке билд 22000.51, жмите на скачать Windows 11 x64 Pro 21H2 RUS с активатором 3.71Gb торрент бесплатно, для установки одиннадцатой операционной системы на ПК, через флешку 4Гб.
Сборщики потихоньку осваивают Windows 11, и вот уже появляются первые сборки с нее. Самым первым, выпустившим сборку Win 11 (причем, на русском), был Лопаткин, затем подтянулись Flibustier и geepnozeex (GX). На сегодняшний день сборка Win 11 GX — одна из самых беспроблемных и достаточно надежных (несмотря на свою инсайдерскую основу). Пользователи ее очень активно скачивают и по большому счету довольны ее качеством, хотя сама по себе новая Windows 11 нравится далеко не всем. Причем, не только юзерам, но и сборщикам. Новую Виндовс критикуют в основном за интерфейс, в ней также наблюдаются некоторые проблемы с русификацией, много чего непривычно. Насчет производительности – мнения самые разные. Одни очень довольны, другие указывают на сниженный FPS – в сравнению с Виндовс 10 21H1. Хватает также и таких пользователей, которые считают Win 11 полностью бредовой и очень тяжелой системой. Такие мнения тоже имеют основу, но нужно учесть, что это пока еще инсайдерский выпуск, и не все проблемы решены с совместимостью. Кстати, geepnozeex со своей стороны сделал все возможное, чтобы улучшить и совместимость, и дизайн. Все сборки этого специалиста выглядят стильно и современно, убрано и отключено все явно лишнее из системы, сборка вполне надежная и работает хорошо. И если вы предпочитаете устанавливать все самое новейшее, то обязательно протестируйте данный образ. Ваше мнение о системе по результатам ее тестов будет очень важно и очень актуально. Многие уже перешли на Win 11 и даже не хотят возвращаться на 10-ку или другие предыдущие версии.
Дата обновлений: 3 июля 2021
Версия: Виндовс 11 Insider (22000.51) Pro
Разрядность: 64-бит
Язык Интерфейса: RUS Русский
Таблетка: W10Digital в раздаче (пароль 1123)
Первоисточник: www.microsoft.com
Автор сборки: by geepnozeex
Размер образа: 3,71 GB
Загрузить Windows 11 x64 Pro 21H2 RUS с активатором torrent
Рекомендованные характеристики ПК/ноута: проц 4 ядра по 3+ ГГц, 8 ГБ RAM, video под DX9 и 35 ГБ пространства.
Скриншоты Windows 11 64bit 21h2 2021 года
Главные особенности
-Вы сможете установить эту сборку не только лишь на самое современное оборудование, потому что geepnozeex обеспечил ей установщик от Windows 10.
-Сборка создавалась самыми надежными средствами, это Dism и Powershell, а не какие-либо посторонние вспомогательные программы.
-Включение/отключение Защитника можете осуществлять даже без перезагрузки – с помощью соответствующего переключателя в «Специальных возможностях».
-Магазин добавляется по желанию, причем, доступно будет его последующее удаление в «Приложениях» (которые в «Параметрах»).
-Будет автоматически добавлен свежайший WinRar в систему. Его все равно почти все устанавливают. Простой удобный привычный архиватор.
-Телеметрия убрана. Как правило, geepnozeex отключает лишь самую основную слежку Microsoft и не заморачивается на мелких ее деталях, как SanLex.
-Было возвращено привычное меню Пуск (из 10-ки). Команда для обратного включения Пуска нового типа:
reg delete «HKCUSoftwareMicrosoftWindowsCurrentVersionExplorerAdvanced» /v Start_ShowClassicMode /f
Затем перезапускаете Проводник. Вообще, по мнению многих сборщиков (да и пользователей тоже) новые варианты Пуска и Панели задач – далеко не самые удачные.
Вырезанные компоненты в Win 11 GX
-OneDrive.
-Метрострой (все UWP-приложения).
Настройки
-Кнопкой Проводника (Панель задач) открывается Этот компьютер.
-7-гигабайтное зарезервированное хранилище выключено. Экономит место такой твик.
-Самопроизвольный выход из спящего режима для тех или иных системных задач по обслуживанию – выключен.
-Нет автоустановки драйверов. Но можете их вручную из ЦО установить.
-SnapAssist выключен.
-Обои – в максимальном качестве.
-Нет предупреждений, когда запускаете скачанные вами exe-файлы и прочих типов.
-Ликвидированы UAC-оповещения.
-Опции Копировать/Переместить в папку – как и в сборках уважаемого OVGorskiy.
-Простой просмотрщик фоток, а не его метро-аналог, причем, с темным фоном, а не светлым.
-Фреймворк 4.8 работает за двоих (за себя и за Framework 3.5).
-В случае BSOD автоперезагрузка не производится.
-Высокопроизводительный режим энергопитания.
-«Этот компьютер» — не отображает пользовательские папки.
-Обновы ставиться сами по себе не будут. Когда посчитаете нужным – нажмете их поиск.
-Журналы избыточные выключены.
-Для питающегося от сети устройства отсутствует уход для сна и автоотключение монитора.
-Отключен диспетчер доставки (чтоб разный хлам не устанавливал).
Рекомендации
-Смело ставьте на не слишком новые ПК. Тут установщик 10-ки, так что можно даже на диски с MBR ставить. Если на ваш ПК ставится 10-ка, то и Win 11 GX тоже должна установиться.
-Записывайте той программой, которой привыкли. Нет каких-то определенных дополнительных условий. С помощью Rufus, UltraIso записываете образ как обычно.
-Если у вас есть лицензия на 10 Pro, можете ее использовать. Если ее нет, то лекарство идет комплектом. Рекомендуем сохранить этот активатор на будущее, он всегда может пригодиться.
-Не нужно сильно серьезно относиться к недочетам инсайдерских образов. Различные баги в таких системах гораздо чаще обнаруживается, чем в официальных релизах.
Стоит ли переходить на Windows 11 GX
Если система вас устраивает – почему бы и нет. Но на сегодняшний день Win 10 21H1 умеет все нужное и даже больше. А Windows 11 еще пока чересчур сырая, в то же время она на определенных компьютерах (современных) показывает очень хорошую производительность. Но если железо – старых времен, то имеет смысл пользоваться пока что 10-кой (или даже более старой версией).
Вас также может не устроить интерфейс Win 11, хотя geepnozeex и приложил все усилия, чтобы он был удобней. Единой рекомендации, переходить или нет, быть не может, т.к. система – это дело вкуса. Она должна соответствовать пользовательским требованиям, обеспечивать комфорт для работы, отдыха, поддерживать максимум софта. И, к сожалению, уже многими было отмечено, что некоторый софт попросту не желает устанавливаться на Windows 11. Поступали также жалобы, что некоторые репаки игр не работают как надо, а также были замечены определенные баги в работе интерфейса.
Исходя из этого, мы не можем пока рекомендовать Win 11 как самый универсальный и лучший вариант. Но если именно для вашего ПК и для ваших запросов она идеально подходит, то вы наверняка останетесь довольны этой сборкой и вряд ли захотите ее переустанавливать (в ближайшем будущем).
Дополнительная информация
Нельзя дать однозначный ответ – тяжелее Windows 11 для компьютера или нет (чем 10-ка), потому что на многом железе (особенно, самом современном), она работает явно производительнее предыдущих версий. Что касается этой сборки Win 11 GX, то в ней все важные показатели (для игр и т.д.) еще будут лучше за счет отключения различных фоновых сервисов и небольшой общей оптимизации. Сборщик geepnozeex лишь чуть-чуть улучшает стандартную конфигурацию, он не привык сильно урезать ее или использовать самые рискованные твики. Благодаря надежности своих релизов, geepnozeex – очень популярный и уважаемый автор, он стабильно находится в 10-ке лучших сборщиков, много работает над качеством своих систем. Так что сборкой можно с комфортом пользоваться — вплоть до появления официального релиза Windows 11. В ISO образах допускается установщик браузера на рабочий стол и некоторые пользовательские изменения по умолчнию для браузера Chrome, каждый может без проблем изменить настройки браузера на свои предпочтительные. Все авторские сборки перед публикацией на сайте, проходят проверку на вирусы. ISO образ открывается через dism, и всё содержимое сканируется антивирусом на вредоносные файлы.
Параметры образа Windows 11 x64 Pro 21H2 RUS с активатором:
Поиск в Панели задач:
Есть
Наличие Магазина Microsoft Store:
Есть
Способность обновляться (по Windows Update) :
Есть
Адаптация сборки для игр:
Средняя
Степень урезки:
Низкая
Уровень популярности по скачиваниям:
Высокая
Репутация автора:
Высокая
Оценка качеству сборки (от windows64.net):
8/10

- Размер: 3.73 Gb
- Категория: Windows 11 / виндовс
- Загрузок: 4 151
- Комментарии: 2
- Дата обновления:24.01.2023
полный обзор Windows 11 Pro
Обновленная русская сборка Windows 11 Pro с минимальными, относительно оригинала, изменениями. Из основного — частично отключена телеметрия, удалены метро приложения (самые часто используемые оставлены), полностью отключен защитник Windows. Произведенные изменения положительно сказались на быстродействии и стабильности системы. Сборка не была в режиме аудита.
Требования для нормального функционирования:
• Процессор: не менее двух ядер с тактовой частотой не менее 1 гигагерца (ГГц) или SoC
• ОЗУ: 4 гигабайта (ГБ)
• Место на диске: 20 ГБ или больше
• Видеоадаптер: DirectX 12 или более поздней версии с драйвером WDDM 2.0
• Экран: (720p) с диагональю более 9 дюймов, 8 бит на цветовой канал
• SecureBoot и TPM 2.0 не требуется (Возможна установка на любой ПК)
Торрент Windows 11 Pro 22621.1192 no Defender by WebUser, возможности и способности:
Удалено/Отключено:
• Cortana
• Microsoft Teams
• Microsoft Defender
• Windows SmartScreen
• Зарезервированное хранилище
• Автообновление Windows
• Автообновление драйверов
• Распознавание лиц
• Служба определения местоположения
• Центр предварительной оценки Windows
• Программа улучшения качества обслуживания клиентов
• Windows To Go
• Регистратор шагов
• Инструменты специальных возможностей
• Windows Apps (метро приложения)
Магазин Windows оставлен, необходимое можно скачать самостоятельно.
Установлено:
• Microsoft Visual C++
• .Net Framework 3.5 (включая 2.0 и 3.0)
• Yandex браузер
Запись на носитель:
• рекомендую использовать Rufus >>> как наиболее подходящую для таких целей программу.
Установка:
• установку производить на отформатированный жесткий диск
• процесс установки полуавтоматический (только выбор раздела и имя пользователя)
Активация:
• сборка автоматически активируется (цифровая лицензия) при подключении к интернету, никаких дополнительных действий не требуется.
Контрольные суммы:
CRC32: E7D7AD97
MD5: 26C20718BF4C341437C59F1B402022A2
SHA-1: CB5F2E8B8637A9215512D7EB48217968D01BB904


с нашего сервера
Релиз проверен Администрацией! Можно качать, На этой странице доступно для скачивания Windows 11 Pro 22621.1192 no Defender by WebUser
оставайтесь на раздаче, оставляйте комментарии и помогите другим оценить качество сборки windows и программы
- 40
- 1
- 2
- 3
- 4
- 5
Update: 29/09/2022
 Урезанная версия Windows 11 без хлама, сборка винды 11 без ограничений TPM 2.0 и SecureBoot, с обновлениями — скачать торрент. Проверенный образ Windows 11 64 bit для флешки iso. Совместимая Виндовс 11 – для игр и любых других задач. OneSmile всегда создает свои сборки в соответствии с пользовательскими запросами и пожеланиями. Например, подавляющее большинство юзеров предпочитает, когда есть включатель/выключатель Защитника. Без проблем, добавлен Defender Switch. Также очень удобно, что драйвера сами по себе не подгружаются (а добавляются через Центр обновлений). Многим также нравится, что есть вариант «Копировать/Переместить в папку» — причем, в классическом контекстном меню. Почти все пользователи единодушно одобряют отключение Meltdown/Spectre, а также отключение UAC, возможность установки Магазина по желанию и т.д. Т.е. конфигурация создана не случайно – а по итогам многочисленных отзывов. И, поскольку OneSmile создает сборки очень часто, все примененные настройки тщательно проверены на практике. Стабильность, надежность, скорость – лучшие преимущества представленного релиза. Дополнительно встроены Яндекс.Браузер и бесплатный 7-zip. Использованы официальные подписанные инсталляторы, а не репаки. Яндекс.Браузер – один из самых защищенных в наши дни, плюс к этому в нем самом встроена блокировка рекламы, шифрование трафика и другие полезные опции.
Версия: Windows 11 22H2 без TPM2/UEFI [build-22621.601] с обновлениями по 29 сентября 2022
Встроенные редакции: Pro, Enterprise, IoT-Enterprise
Разрядность: x64
Язык Интерфейса: Русский
Таблетка: автоактивация через W10_Digital
Первоисточник: www.microsoft.com
Автор сборки: by OneSmile
Размер образа: 2.77 GB
Windows 11 урезанная сборка 64 без TPM и SecureBoot скачать торрент
Максимальная совместимость со старым и новым «железом»
-
Проц 2 ядра – от 2+ ГГц. Если есть 4 ядра по 3+ ГГц, то система просто летает.
-
Оперативка 4 ГБ. Даже при таком объеме сборка работает очень достойно.
-
Место 20 ГБ. OneSmile убрал также ограничение и на пространство диска (при установке).
-
DX9-видеокарта.
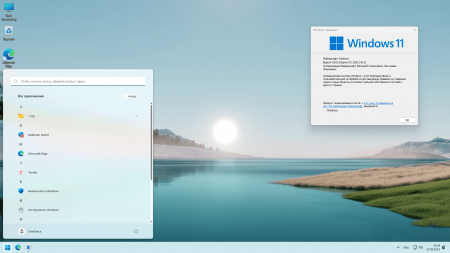
Скриншоты Windows 11 урезанная сборка 64 без TPM и SecureBoot

Как записать совместимую Виндовс 11 на флешку
Эта сборка записывается точно так же, как обычная Windows 10. Никаких особых условий нет, т.к. ограничения убраны полностью. Полностью идеальный вариант – запись через UltraIso. Открываете iso в этой программе, затем «Самозагрузка» -> «Записать образ диска», кнопкой «Записать» подтверждаете операцию, и через каких-то несколько минут флешка создана. Кстати, благодаря компактному размеру образа, даже флешка с маленькой емкостью на 4 ГБ успешно подойдет.
Сборка винды 11 без лишнего хлама, вырезано только самое ненужное
- Система ориентирована строго на локальную учетку и не содержит мусорный рекламный хлам Microsoft.
- Несмотря на то, что Store удален, его возврат легко осуществляется в PowerShell — короткой командой wsreset –i
- Удален различный корпоративный сетевой функционал, который домашнему юзеру не нужен вообще. DataCenterBridging и т.д.
- Убран ContentDeliveryManager, призванный подгружать разнообразный «сверхважный» хлам от Майкрософт на ваш ПК.
- Компонент MobilePC удален.
- Вырезан Hello-Face, который является довольно-таки неконфиденциальным компонентом и используется для учетки Майкрософт.
- Удаленное ассистирование, а также удаленная помощь от Microsoft тоже вырезаны, т.к. юзерам они далеко не всегда нужны.
- Добавленный от Microsoft текстовый функционал (распознавание, прогноз) успешно удален, чтоб RAM не загромождать.
- Кортана, естественно, тоже вырезана, она вас не побеспокоит и шпионить не будет. Сам Поиск при этом работает нормально.
- Много ненужных мелочей также было удалено: TFTP-клиент, ProjFS, Steps_Recorder, MultiPoint.
- WinRE вырезан (это образ восстановления).
- OneDrive вырезан на корню, т.к. является тормозящим и неконфиденциальным облаком, не получившим популярности.
Конфигурация настроек в оптимизированной Windows 11 22H2
- По умолчанию сразу после установки Защитник выключен. Если он кому-то нужен, то Defender Switch (в Пуске) его включит.
- UAC (если кто не знает – это Контроль учетных записей) – тотально выключен. Очень удобно для файловых операций.
- Контекстное меню избавлено от нагромождения малоиспользуемых пунктов. Само меню используется классическое.
- Сборка мало места займет – в основном благодаря выключенной резервации места. Подойдут накопители даже малых размеров.
- Удерживая Shift на файлах .cab и .msi, вы увидите пункты «Установить» и «Извлечь все» в контекстном меню.
- Просмотрщик стандартный, он более удобен и быстр, но не со всеми форматами работает. Есть варианты и получше.
- Фикс Meltdown/Spectre убран. Microsoft часто стремится ограничить скорость старых процессоров, чтоб покупали новые. Это как раз тот случай.
- Вместо шрифта Segoue UI, OneSmile установил его полужирный вариант. Но вообще это спорно: лучше ли Segoue UI Semibold или нет.
- Отключены: история файлов, тормозящий GameDVR, ненужное размытие экрана блокировки, Пуск – слева и другие мелкие твики.
- Оптимизация под SSD. Некоторые спрашивают – будет ли эта винда 11 работать на HDD. Конечно же, будет, но HDD не рекомендован для Win 11 в принципе.
- Запрещена телеметрия.
Если помогло — расскажи друзьям!