Содержание
- writer.logalhost.ru
- Инструменты пользователя
- Инструменты сайта
- Боковая панель
- Configuration of Orthanc
- Environment variables
- DICOM Basics using .NET and C# — Orthanc DICOM Server for Testing
- Contents
- Introduction
- Quick Introduction to PACS and Orthanc Capabilities
- Installing Orthanc Server
- Some Notes on Orthanc Configuration
- Fellow Oak (fo-dicom) DICOM Toolkit — Quick Overview
- Other Setup Required…
- Testing Connectivity using Fellow Oak(fo-dicom) Toolkit
- Other Tools for Connectivity Tests
- Conclusion
writer.logalhost.ru
Инструменты пользователя
Инструменты сайта
Боковая панель
Навигация
Внешние ссылки
Раньше ничем таким не занимался, знания о DICOM заканчиваются на том, что это формат медицинских изображений…
На работе есть несколько медицинских устройств, которые обмениваются снимками с компа оператора на комп врача.
На каждом оборудовании есть своя программа и на станциях врачей своя.
Решил попробовать сделать единое хранилище.
Конечно, можно купить и платные продукты, но это не наш метод.
Поиск выдал Orthanc, система у меня Debian 10, так что решил поставить из репозитория:
Установил, поправил конфиг для того что бы зайти в WEB, загрузил несколько картинок…
В последних версиях пользователи хранятся тут :
Включение http сервера и авторизации тут:
Что-то мне не понравился стандартный web viewer…
Решил прикрутить viewer от Osimis.
по умолчанию подгружаются все плагины находящиеся в папке /usr/share/orthanc/plugins
поэтому директиву Plugins править не нужно.
скаченную библиотеку надо поместить в папку: /usr/share/orthanc/plugins
и перезапустить orthanc.
TITLE AE -сервера, собственно куда отправляются снимки И кодировка в которую они будут преобразованы «DefaultEncoding» : «Windows1251»,
Подключение к СУБД:
Увеличиваем размер блока данных:
создаем пользователя и бд, подключаемся:
Контроль доступа и отправка на другие модальности:
Разрешения выполнять запросы к Orthanc, с помощью этого скрипта можно разграничить права доступа к web интерфейсу Orthanc
С помощью этого скрипта можно отправлять снимки которые пришли в Orthanc на другие DICOM сервера или на рабочие станции врачей.
С помощью этого скрипта можно разбирать изображение которые приходят на Orthanc и маршрутизировать их на другие сервера.
Источник
Configuration of Orthanc
Configuring Orthanc simply consists in providing a configuration file. Orthanc has numerous configuration that are documented in the default configuration file. This file is in the JSON file format. You can generate this file file with the following call:
The default configuration file would:
- Create a DICOM server with the DICOM AET (Application Entity Title) ORTHANC that listens on the port 4242.
- Create a HTTP server for the REST API that listens on the port 8042.
- Store the Orthanc database in a folder called OrthancStorage .
However, we recommend that you start from an empty configuration file and only specify the options for which you don’t wan’t to use the default value. In example, a simple configuration file would be:
It’s also a very good practice to split your configuration files per topic. In example, have a dicom.json for everything that is related to DICOM, a http.json for all HTTP related configurations, one file per plugin. This is how the configuration files are provided with the Windows Installer.
Once your configuration file is ready, start Orthanc by giving it the path to the configuration file path as a command-line argument. If you use multiple configuration files, you may provide the path to the folder containing all configuration files (all .json files will be loaded):
Remark 1: When specifying paths under Microsoft Windows, backslashes (i.e. ) should be either escaped by doubling them (as in \ ), or replaced by forward slashes (as in / ).
Remark 2: When installing Orthanc using the Windows installer by Osimis, you won’t be able to edit your files unless you start your editor with Run as administrator . We recommend to edit your configuration file with an editor such as Notepad++. It shall warn you that this file can be edited only by an admin, and will suggest you to restart Notepad++ as an admin such that you’ll be able to save it.
Remark 3: The Windows installers by Osimis provide a Windows service that automatically starts Orthanc during the startup of Microsoft Windows. You can control the parameters of the service by typing services.msc at a command-line prompt. The Windows service of Orthanc will do its best to cleanly stop Orthanc at the shutdown of Windows, but there are some caveats.
Remark 4: To obtain more diagnostic, you can use the —verbose or the —trace options:
To learn more about the Orthanc logs, check out the dedicated page .
Environment variables
Starting with Orthanc 1.5.0, the configuration file can include the value of environment variables. Consider the following configuration:
In this case, once Orthanc starts, the configuration option Name will be read from the value of the environment variable ORTHANC_NAME . For instance:
It is also possible to set a default value if the environment variable is not set. Here is the syntax in the configuration file:
If the environment variable ORTHANC_NAME is not set, here is the result:
Источник
Contents
Introduction
This is the next installment in my series of articles on the DICOM standard in which I want to introduce you to a charming little DICOM server called Orthanc that is powerful enough and production-ready and yet is simple enough to use in the subsequent articles in this series. In this tutorial, we will learn to quickly install and configure Orthanc server and then quickly perform a DICOM echo/verification using Fellow Oak (fo-dicom) DICOM toolkit as well as a standalone DICOM command line testing tool to verify basic connectivity. In the subsequent tutorials, I will cover DICOM network-related operations such as C-Find, C-Move, C-Store, etc by using this server and hopefully illustrate what happens during many communication-related operations using the DICOM standard. Let’s go!
Quick Introduction to PACS and Orthanc Capabilities
When building DICOM applications, one actor that will almost always be present in the overall workflow is a PACS system. PACS stands for Picture Archival and Communication System. A PACS system typically comprises of several sub-components namely imaging machines(called ‘modalities’ in DICOM) where images may be generated , a mechanism for distribution and exchange of these images securely, facilities in the form of workstations and other mobile devices to enable viewing, processing and interpretation of these images as well as a mechanism for storage and retrieval of these images (as well as related documentation and reports) in the form of digital archives. PACS systems come in all shapes and sizes consisting of one or more of these components and vary in cost and complexity. For our tutorial series, my goal is to illustrate many DICOM-related network operations using one such PACS system namely, Orthanc DICOM Server.
“Coding like poetry should be short and concise.”
Orthanc is a production-ready DICOM server was built using a popular DICOM toolkit/library called DCMTK which has been around for a long time. Orthanc seems to have been primarily developed at the Department of Medical Physics the University Hospital of LiГЁge in Belgium by SГ©bastien Jodogne. The source code for this server is copyrighted under the GPLv3 license. Orthanc DICOM server is very popular and has been deployed in numerous research as well as commercial situations around the world. It can be installed on any computer (supports Windows, Linux and OS X at the time of this writing) and can be considered a «mini-PACS» in terms of its feature set and has been designed to be lightweight and standalone and requires very little administrative overhead. Besides being easy to install and configure, Orthanc also provides a simple web user interface and supports various DICOM services such as C-Move, C-Store and C-Find SCU. It also supports a REST API to enable integration of DICOM data within non-DICOM applications.
Installing Orthanc Server
Installing Orthanc is very easy. It took me only two minutes to install and configure the application to be able to talk to small .NET client that I wrote. The installers for the various operating systems that are supported can be found here. The steps to download and configure the Orthanc server on the Windows operating system are specifically described at this location. The instructions for install and configuration on other operating systems vary and so always refer to the latest documentation on their website. Also, please read the information provided in the FAQ section, or contact their support team directly for any questions. Once you have completed the install and configuration steps, you should be able to use the web interface (called Orthanc Explorer) and follow along with the rest of this tutorial.
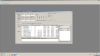
Once the Orthanc server set up has been successfully completed on your machine, you may wish to upload some sample DICOM images into it to enable you to get a quick feel for its user interface and its features. Please seen screenshot below showing me uploading a set of sample DICOM images into Orthanc using the «Upload» screen. Command line upload is also available. In real-life, you will most likely pull images from a remote destination such as a modality or another PACS system into Orthanc Server instead of performing a manual upload. However, that is beyond the scope of this quick overview of its features.
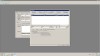
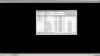
Some Notes on Orthanc Configuration
Orthanc Server enables you to control many aspects of its behavior using a special JSON formatted configuration file that is found under the «configuration» folder where the application is installed. There are sensible defaults for most settings and you don’t need to change any of them for playing around initially. However, the DicomModalities setting is something you would need to change when you are setting up connections with other DICOM service providers during testing. See screenshot below of my configuration file on my local machine showing how this setting is utilized. Firewalls are another thing to consider in the overall scheme of things as DICOM traffic is not through HTTP typically and so, DICOM-related ports (inbound and outbound) have to enabled as well. You can also use the log files as well as use the verbose/trace options when running Orthanc Server to see more details when it is running, and you need to troubleshoot issues. Please see their FAQ section for more details.
Fellow Oak (fo-dicom) DICOM Toolkit — Quick Overview
For the purposes of illustrating a basic echo verification (called ‘C-ECHO’ in DICOM) with this server as part of the initial set up, I will be using a freely available and powerful DICOM toolkit called fo-dicom DICOM Toolkit. This is a completely stand-alone DICOM toolkit that implements functionality such as DICOM file and directory processing as well DICOM networking-related operations. This toolkit is completely free for both commercial or non-profit use. The use of this toolkit in my tutorial does not in anyway imply my official endorsement of it for implementing a production application. Every situation is unique, and only you are ultimately in the best position to decide that. This article is also not meant to be a tutorial on the Fellow Oak DICOM Toolkit, and my focus here is simply to tie DICOM theory to what a practical (although simple) implementation might look like. So, if your goal is to learn how to use the Fellow Oak DICOM library, I would encourage you to visit its website itself or check out the fo-dicom issues pages for details.
Other Setup Required…
Much like my previous programming examples, I will use the most bare minimum code and approach to help illustrate the concepts that I cover in this tutorial. This means that the code I write here is best suited to simply show the concept that I am trying to explain and is not necessarily the most efficient code to deploy in real life and in a production setting.
To get started, you will need to configure a few things on your machine including a .NET development environment as well as the Fellow Oak (fo-dicom) DICOM library before you can run the example if you want to try this out yourself.
Download a .NET IDE or Editor such as Visual Studio IDE or Visual Studio Code (even a text editor should suffice)
Download the Fellow Oak DICOM library either through NuGet Package Manager or download the source code directly from here
I have included some sample DICOM images along with the source code to follow along. However, please feel free to use your own images as required
Also included with the source code is the Orthanc Server configuration file (orthanc.json) for your reference
Testing Connectivity using Fellow Oak(fo-dicom) Toolkit
We are going to use the same DICOM verification client we developed in the earlier tutorial on DICOM C-Echo verification. This is one of the first steps undertaken in the discovery protocol before any other DICOM-related information exchanges are undertaken between the communicating devices. Please note that in DICOM both devices need to have their peer information registered on each other’s system before any communication is typically allowed («old school security»). This also happens to be one of the frequent issues that arises when setting up DICOM connectivity between two devices. The code illustration shows a small .NET client communicating with an Orthanc DICOM server that is running locally on my machine. See my earlier DICOM tutorials for setting up a devevlopment environment to work with PixelMed. The results of the connection are shown in the screenhot below.
Results of running the program is shown below. You can see the client establishing the association with the Orthanc Server, invoking the C-ECHO operation on it as well as closing the association. If there are any errors during the association establishment or if the connection was aborted by the remote party, those will be logged to the console as well. Congratulations if you were able to successfully connect to a DICOM server running locally or remote. There is lot more to learn about DICOM networking but hopefully, this gave a small taste for what is involved.
“Sometimes the poorest man leaves his children the richest inheritance.”
Other Tools for Connectivity Tests
When you need to troubleshoot echo verification operations in DICOM, it will helpful to use one of the many useful DICOM testing tools out there. The one that I have used in the past and have liked is DCMTK. The toolkit comes with many standalone testing utilities that help you test various aspects of DICOM through a command line interface. The echoscu command is the one that will be very useful in our situation as we want to verify if our installed Orthanc application responds to DICOM «ping requests» from other DICOM-enabled applications. This command implements the Service Class User (SCU) functionality for the Verification SOP Class. It helps send a DICOM C-ECHO message to the Orthanc DICOM server which is the Service Class Provider (SCP) for the Verification SOP class in this case and waits for a response. The command takes two parameters namely hostname of the device you are connecting to and the tcp/ip port number that you are communicating through. The full console output of the command line operation performed on my machine is shown below for reference. If you see any issues with this on Windows, then try launching Orthanc manually instead of running it as a Windows service and repeat the same steps. Here, I am running the command with «debug» mode and verifying connectivity against the Orthanc Server running locally on port 104.
Conclusion
This concludes my short tutorial covering Orthanc server which we will utilize for some of the subsequent tutorials in my series of articles on the DICOM standard. If you have any questions or comments regarding this tutorial, please feel free to send me an email. Please note that I may not get back to you right away due to work and other commitments. In my next tutorial in this series, I will dive further into DICOM networking operations. See you then.
Copyright © 2004-2020 Saravanan Subramanian
Источник

На днях закончил внедрение DICOM / PACS-сервера в одном Московском медицинском центре, эта задача для меня была совершенно новая и на её решение ушло пару недель времени. К моему сожалению опыт показал, что знания в области медицинских технологий в нашей стране взять просто неоткуда и практика это показала. Но не будем о грустном и перейдём ближе к делу. Клиника закупила магнитно-резонансный томограф, в связи с чем возникла необходимость организовать передачу и хранение медицинских изображений, получаемых при обследовании пациентов. Как многим уже известно, современная медицинская техника общается с внешними устройствами по стандартизированному протоколу DICOM, а для того, что бы наладить работу медицинской информационной системы желательно обзавестись DICOM / PACS сервером.
Так что же нам нужно для построения системы передачи и архивации медицинских изображений? DICOM-сервер или PACS-сервер? Этот вопрос наверняка задаст себе каждый, кто впервые сталкивается с ИТ в медицине. Вот что говорит на этот счёт Википедия:
PACS (Picture Archiving and Communication System) — система передачи и архивации медицинских изображений в формате DICOM, предполагают создание специальных удаленных архивов на DICOM серверах-ах, где весьма объемный архив может длительное время существовать в «горячем» виде и быть быстро доступным для поиска и просмотра интересующей информации по DICOM сети.
DICOM (Digital Imaging and Communications in Medicine) — отраслевой стандарт создания, хранения, передачи и визуализации медицинских изображений и документов обследованных пациентов.
Вы наверняка часто будете видеть в интернете использование той или иной аббревиатуры, хотя речь скорее всего будет идти об одной и той же по функциям системе.
Мир софта для DICOM серверов просто впечатляет разнообразием решений, есть дорогие и сложные громадины из разряда Enterprise, есть масса платных DICOM/PACS-серверов малого и среднего уровня, но наиболее популярные и массовые это бесплатные и Open-Source проекты.
Для реализации DICOM сервера я решил остановиться на Open-Source. Список основных и наиболее известных бесплатных PACS / DICOM серверов:
— Dcm4che
— Conquest DICOM software
— ClearCanvas
— DICoogle
— CDMEDIC PACS WEB
— Orthanc
Я «сломал» голову и потратил уйму времени, что бы определиться какая из них лучше и какую выбрать для создания своего первого DICOM-сервера.
Основа выбора от части была в определении платформы, делать сервер на Windows совсем не хотелось, душа больше лежала к Linux. Второй и немаловажный аспект это наличие и объём полезной информации в русскоязычных сообществах, т.к. на этапе знакомства с DICOM не очень то хотелось тратить силы на перевод иностранных и вовсе не прозаических текстов. Третьим и не менее важным моментом конечно же является функционал системы, а так же простота установки, конфигурирования и использования.
Orthanc направлен на предоставление простой, но мощный автономный сервер DICOM. Он предназначен для улучшения потоков DICOM в больницах и поддержки исследований о автоматизированного анализа медицинских изображений. Orthanc позволяет его пользователям сосредоточиться на содержание файлов DICOM, скрывая сложность формата DICOM и протокола DICOM.
Orthanc может превратить любой компьютер с операционной системой Windows, Linux или OS X в магазин DICOM (другими словами, система мини-PACS). Его архитектура является легким и автономным, это означает, что никакого комплекса управления базами данных не требуется, ни установка зависимостей сторонних.
Что делает Ортханк уникальным является тот факт, что она обеспечивает RESTful API. Благодаря этому главной особенностью, можно ездить Ортханка из любого языка программирования. В DICOM теги сохраненных медицинских изображений могут быть загружены в формате JSON файла. Кроме того, стандартные изображения PNG могут генерироваться на лету из экземпляров DICOM по Ортханка.
Ортханк также имеет механизм плагинов для добавления новых модулей, который расширяет базовые возможности его REST API. Веб зритель, база данных PostgreSQL фоновых и эталонную реализацию DICOMweb настоящее время в свободном доступе в виде плагинов.
Стоимость коммерческого ПО для хранения медицинских изображений давно превысила разумные значения.
Не каждая медицинская организация готова вкладывать с трудом заработанные средства в новую программу.
Некоторые Open Source решения стремительно развиваются и зачастую не уступают коммерческим программам, пример тому бесплатный DICOM PACS Orthanc.
Наша команда освоила работу с этим продуктом и готова предложить свои услуги по установке, настройке и обслуживанию.
Подробности можно узнать на сайте по ссылке
Изменение настроек программ с сохранением персональных параметров
Предыстория
В одной медицинской организации внедряли решения на базе PACS-серверов Orthanc и DICOM-клиента Radiant. В ходе настройки выяснили, что каждый DICOM-клиент должен быть описан в PACS-серверах следующим образом:
- Имя клиента
- AE-имя (должно быть уникально)
- TCP-порт, который автоматически открывается на стороне клиента и принимает DICOM-обследования от PACS-сервера (т.е. сервер как бы толкает их в сторону клиента – инициируя соединение первым)
- IP-адрес
После настройки Radiant клиентов получили следующую информацию к размышлению – у каждого клиента настройка ПО с указанными выше параметрами приводила к заполнению файла pacs.xml, который располагался в профиле пользователя (путь: %APPDATA%RadiantViewerpacs.xml). При этом конфиг одного клиента от другого отличался минимум двумя параметрами (AE-имя у всех разное, а порт в основном одинаковый, кроме терминальных клиентов, работающих на одном и том же сервере – там порты тоже приходилось назначать разными).
Пример файла pacs.xml по ссылке:
Примерно полгода все было хорошо, система заработала…и тут до нас дошли «подводные камни»:
- Нам нужно ввести в строй несколько новых PACS-серверов, которые подменят старые (где стало заканчиваться место на дисках). PACS сервера в виртуальных машинах, но речь не об этом;
- Нам нужно как-то централизованно изменить уникальные конфигурации (двумя отличающимися параметрами) на 200 машинах (их количество регулярно увеличивалось);
- Учитывая темпы роста объемов обследований, решение нужно не разовое, а тиражируемое и регулярное (например, 1 раз в 3-5 месяцев).
Решение ниже.
Выбор инструментария для решения задачи
Вначале были попытки найти какое-то решение, которое на стороне клиента изменяло файл pacs.xml, и вносило в него изменения в список PACS-серверов, не трогая настройки AE-имени и TCP-порта. Windows клиенты на тот момент были на базе как Windows XP, так и Windows 7 – поэтому были попытки написать что-то такое на базе VBScript. Но увы – осилить такую задачу не получилось, ввиду полного отсутствия опыта написания чего-либо сложного и комплексного на этом языке. Попытки же найти и переписать также не увенчались успехом (тут надо отметить, что в голове уже был другой план, поэтому я не долбился с VBScript больше 3-4 часов).
В итоге я остановился на следующем решении:
- Собрать групповой политикой все файлы pacs.xml в одном месте на каком ни будь сервере в сетевом ресурсе;
- Изменить файлы скопом (опыт решения таких задач уже был – с использованием Perl);
- Также с помощью групповых политик обновить настройки клиентов.
Сбор файлов с помощью групповой политики
Самая простая часть – при входе клиента в свой профиль он со своими правами выполняет некий .bat файл, в котором прописано:
echo off
If exist %APPDATA%RadiantViewerpacs.xml copy %APPDATA%RadiantViewerpacs.xml \srv.test.localpconfigs$pacs-%COMPUTERNAME%-%USERNAME%.xml
Таким образом на сервере в скрытом ресурсе будут накапливаться файлы pacs.xml, в имени которых есть информация с какого компьютера и с какого пользователя был скопирован данный конфиг.
Самое сложное было – дождаться, когда у всех пользователей отработает данная политика.
Изменение конфигураций с помощью Perl скрипта
Нам потребуется Active Perl под Windows от компании ActiveState, а также модуль XML::Writer, который можно установить с помощью команды ppm install XML-Writer.
Сам же скрипт получился довольно простой:
use XML::Writer;

# Открываем папку с отчетами, обрабатываем ссписок (удаляем лишнее):
	$report_dir = "C:\Perl64\WORK\PACS-xml3\";
	opendir(DIR, "$report_dir") or die "Не могу открыть папку с отчетами!";
	@report_files = readdir DIR;
	shift (@report_files); # удаляем точку из элементов массива (.)
	shift (@report_files); # удаляем две точки из элементов массива (..)
#	print "@report_files";
	closedir(DIR);

# Начинаем обрабатывать файлы - по одному за раз. Нужно считать параметр AET и номер порта в переменные.
foreach $analiz_file (@report_files)
{
	$full_path_to_file="C:\Perl64\WORK\PACS-xml3\".$analiz_file;
	open (INFO, $full_path_to_file);

	while ($line = <INFO>)
	{
		# Переменные $aet и $port содержат уникальные данные для каждого XML файла:
		my ($other1, $aet, $other2, $port, $other3) = split /"/, $line, 5;
		# Если встречается строка listener - то мы дошли до нужной строчки и можно формировать новый XML:
		if ($other1 =~ 'listener')
			{
				# Формируем новый XML c нужными полями и данными:
				my $writer = XML::Writer->new(OUTPUT => 'self', DATA_MODE => 1, DATA_INDENT => 2, );
				$writer->xmlDecl('utf-8');
				$writer->startTag('pacs');
				$writer->startTag('listener', ae => $aet, port => $port);
				$writer->endTag();
				$writer->startTag('hosts');
				$writer->startTag('host', name => 'MRT', ae => 'ORTHANC', ip => 'XX.YY.214.17', ts => '1.2.840.10008.1.2.1', port => '4242', maxassoc => '1', allpres => '0', search => '1', protocol => '1', searchcharset => '', wildcards => '3', carets => '0');
				$writer->endTag();
				$writer->startTag('host', name => 'KT', ae => 'ORTHANC2', ip => 'XX.YY.215.253', ts => '1.2.840.10008.1.2.1', port => '4242', maxassoc => '1', allpres => '0', search => '1', protocol => '1', searchcharset => '', wildcards => '3', carets => '0');
				$writer->endTag();
				$writer->startTag('host', name => 'R', ae => 'ORTHANC3', ip => 'XX.YY.215.252', ts => '1.2.840.10008.1.2.1', port => '4242', maxassoc => '1', allpres => '0', search => '1', protocol => '1', searchcharset => '', wildcards => '3', carets => '0');
				$writer->endTag();
				$writer->startTag('host', name => 'KT-20180501-20180831', ae => 'ORTHANC4', ip => 'XX.YY.215.251', ts => '1.2.840.10008.1.2.1', port => '4242', maxassoc => '1', allpres => '0', search => '1', protocol => '1', searchcharset => '', wildcards => '3', carets => '0');
				$writer->endTag();
				$writer->startTag('host', name => 'KT-20180901-20181130', ae => 'ORTHANC5', ip => 'XX.YY.215.250', ts => '1.2.840.10008.1.2.1', port => '4242', maxassoc => '1', allpres => '0', search => '1', protocol => '1', searchcharset => '', wildcards => '3', carets => '0');
				$writer->endTag();
				$writer->endTag('hosts');
				$writer->startTag('presets');
				$writer->endTag();
				$writer->startTag('lastsearch', dt => '4', mfid => '1048592');
				$writer->endTag();
				$writer->endTag('pacs');

				# Помещаем готовый XML в переменную:
				my $xml = $writer->end();
				# Подготавливаем файл для перезаписи:
				$rewritexml = $full_path_to_file;
				# Переписываем XML файлы новыми данными:
				open (NEWXML, ">$rewritexml");
				print NEWXML $xml;
				close (NEWXML);
			}
	}

}
Принцип его работы:
- Открываем каталог, в котором у нас собраны конфигурации pacs.xml от клиентов и помещаем список файлов в массив скаляров (@report_files);
- В цикле обрабатываем по одному файлу и считываем его построчно;
- С помощью split дробим каждую строку на 5 частей, используя кавычки как разделитель;
- Находим строку с словом listener и помещаем в две переменные уникальные для каждого файла данные (AE-имя клиента и номер TCP-порта);
- После этого просто формируем новый XML-файл, вписываем в него уникальные параметры и далее вставляем нужное количество PACS-серверов с их параметрами – т.е. то, ради чего все затевалось)
- Переписываем новый XML-файл поверх старого.
Надо отметить, что на самом деле я использую данный скрипт не полностью автоматически – по сути я копирую собираемые конфиги в отдельный каталог и потом запуская скрипт изменяю их всем скопом. Далее выборочная проверка – и конфиги можно разливать обратно по машинам.
Распространение измененных pacs.xml файлов по клиентам
Самое простое, что пришло в голову – внести изменения в уже работающий .bat файл, который собирает конфигурации с клиентов и добавить строку:
If exist %APPDATA%RadiantViewerpacs.xml copy /Y \srv.test.localpconfigsnew$pacs-%COMPUTERNAME%-%USERNAME%.xml %APPDATA%RadiantViewerpacs.xml
Итоговый .bat файл выглядит так:
@echo off
If exist %APPDATA%RadiantViewerpacs.xml copy %APPDATA%RadiantViewerpacs.xml \srv.test.localpconfigs$pacs-%COMPUTERNAME%-%USERNAME%.xml
If exist %APPDATA%RadiantViewerpacs.xml copy /Y \srv.test.localpconfigsnew$pacs-%COMPUTERNAME%-%USERNAME%.xml %APPDATA%RadiantViewerpacs.xml
Заключение
Такое вот «наколеночное» решение. Опробовали его уже два раза (в сентябре 2018 и в феврале 2019), пока полет нормальный. Конечно обновляет не 100% клиентов, но близко к этому значению — остальных доделываем удаленно. Скрипт по ссылке.
Лучшие бесплатные DICOMPACS серверы.
PACS (Picture Archiving and Communication System) — технология медицинской визуализации, которая обеспечивает экономичное хранение и удобный доступ к изображениям, полученным с помощью нескольких модальностей (типов исходного оборудования).
Компоненты PACS состоят из: цифрового электронного архива для хранения, индексации и поиска изображений или отчетов, рабочей станции для запроса и обработки изображений (веб-просмотрщиков, мобильных/планшетных или настольных клиентов), защищенной сети для передачи данных и, конечно же, машин для визуализации.
Мы подобрали для вас 3 наиболее простые в установке и настройке DICOMPACS системы. Все 3 системы относятся к програмному обеспечению с открытым исходным кодом.
1. Orthanc
Orthanc — это проект DICOM-сервера с открытым исходным кодом, модульный и легкий, созданный в Бельгии Себастьеном Жодонье. Он поставляется с богатым API и несколькими плагинами, которые поддерживают различные базы данных и программы просмотра DICOM.
Цель Orthanc — предоставить простой, но мощный автономный DICOM-сервер. Orthanc позволяет пользователям сосредоточиться на содержании файлов DICOM, скрывая сложность формата DICOM и протокола DICOM.
Orthanc может превратить любой компьютер под управлением Windows, Linux или OS X в хранилище DICOM (другими словами, мини-систему PACS). Его архитектура легкая и автономная, что означает, что не требуется сложного администрирования базы данных или установки сторонних зависимостей.
Теги DICOM хранящихся медицинских изображений могут быть загружены в формате JSON. Кроме того, стандартные PNG-изображения могут быть сгенерированы Orthanc «на лету» из DICOM-экземпляров.
Orthanc также имеет механизм плагинов для добавления новых модулей, расширяющих основные возможности его REST API. В настоящее время в качестве подключаемых модулей свободно доступны веб-просмотрщик, внутренняя часть базы данных PostgreSQL, внутренняя часть базы данных MySQL и эталонная реализация DICOMweb.
Сайт: https://www.orthanc-server.com/
2. Dicoogle

Dicoogle — это корпоративная PACS-система с открытым исходным кодом, имеющая модульную структуру и SDK для разработчиков, что позволяет им создавать серверные приложения для работы с медицинскими изображениями.
Dicoogle имеет мощные возможности архивирования, индексирования и запросов с высокомасштабируемой инфраструктурой, которая была протестирована с +25 миллионами индексированных DICOM объектов.
Dicoogle поставляется с набором API для создания облачных DICOM-приложений. Документация Dicoogle включает подробное руководство по установке, конфигурации и настройке Dicoogle, а также полное руководство по созданию плагинов для Dicoogle и веб-/облачных приложений.
Разработчики Dicoogle выпустили его под лицензией GPLv3.0.
Сайт: https://dicoogle.com/
3. Dcm4Che

Dcm4Che — это мощная DICOM-библиотека с открытым исходным кодом. Библиотека используется по всему миру во многих открытых и коммерческих проектах. Проект dcm4che включает набор корпоративных сервисов, основанных на библиотеке с открытым исходным кодом Dcm4Chee. В то время как Dcm4Che ориентирована на разработчиков, сервисы Dcm4Chee содержат DICOM-сервер, HL7-сервер, Web-интерфейс. В основе проекта dcm4che лежит надежная реализация стандарта DICOM. Текущая версия (5.x) была переработана для обеспечения высокой производительности и гибкости.
Сайт: https://www.dcm4che.org/
Полезные ссылки:
1. Видео о DICOM/PACS;
2. Литература по информационным технологиям в медицине.
3. Лучшие бесплатные программы для просмотра DICOM изображений.
|
Сервер Orthanc и программа eFilm |
||||||
|
||||||
|
||||||
|
||||||
|
||||||
|
||||||
|
||||||
|
||||||
|
||||||
|
||||||
|
||||||
|
||||||
|
||||||
|
||||||
|
||||||
|
||||||
|
||||||
|
||||||
|
||||||
|
||||||
|
||||||
|
||||||
|
||||||
|
||||||
|
||||||
|
||||||
|


 и выкрутить нормально не выходит
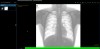
 , но поиском ничего на нём не находит


 передать на него снимок, но не может
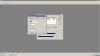


{
  /**
   * General configuration of Orthanc
   **/

  // The logical name of this instance of Orthanc. This one is
  // displayed in Orthanc Explorer and at the URI "/system".
  "Name" : "CHPC Orthanc",

  "RemoteAccessAllowed" : true,
  // "AuthenticationEnabled" : true,

  // "RegisteredUsers" : {
  //  "admin" : "fakepassword"
  // },

  // Path to the directory that holds the heavyweight files
  // (i.e. the raw DICOM instances)
  "StorageDirectory" : "/var/lib/orthanc/db-v6",

  // Path to the directory that holds the SQLite index (if unset,
  // the value of StorageDirectory is used). This index could be
  // stored on a RAM-drive or a SSD device for performance reasons.
  // "IndexDirectory" : "/var/lib/orthanc/db-v6"

  "PostgreSQL" : {
    "EnableIndex" : true,
    "EnableStorage" : false,
    "Host" : "localhost",
    "Port" : "5432",
    "Database" : "orthancdb",
    "Username" : "orthanc",
    "Password" : "Notreallythepassword"
  },

  // Enable the transparent compression of the DICOM instances
  "StorageCompression" : false,

  // Maximum size of the storage in MB (a value of "0" indicates no
  // limit on the storage size)
  "MaximumStorageSize" : 0,

  // Maximum number of patients that can be stored at a given time
  // in the storage (a value of "0" indicates no limit on the number
  // of patients)
  "MaximumPatientCount" : 0,

  // List of paths to the custom Lua scripts that are to be loaded
  // into this instance of Orthanc
  "LuaScripts" : [
  ],

  // List of paths to the plugins that are to be loaded into this
  // instance of Orthanc (e.g. "./libPluginTest.so" for Linux, or
  // "./PluginTest.dll" for Windows). These paths can refer to
  // folders, in which case they will be scanned non-recursively to
  // find shared libraries.
  "Plugins" : [
    "/usr/share/orthanc/plugins/"
  ],


  /**
   * Configuration of the HTTP server
   **/

  // Enable the HTTP server. If this parameter is set to "false",
  // Orthanc acts as a pure DICOM server. The REST API and Orthanc
  // Explorer will not be available.
  "HttpServerEnabled" : true,

  // HTTP port for the REST services and for the GUI
  "HttpPort" : 8042,

  // When the following option is "true", if an error is encountered
  // while calling the REST API, a JSON message describing the error
  // is put in the HTTP answer. This feature can be disabled if the
  // HTTP client does not properly handles such answers.
  "HttpDescribeErrors" : true,

  // Enable HTTP compression to improve network bandwidth utilization,
  // at the expense of more computations on the server. Orthanc
  // supports the "gzip" and "deflate" HTTP encodings.
  "HttpCompressionEnabled" : true,


  /**
   * Configuration of the DICOM server
   **/

  // Enable the DICOM server. If this parameter is set to "false",
  // Orthanc acts as a pure REST server. It will not be possible to
  // receive files or to do query/retrieve through the DICOM protocol.
  "DicomServerEnabled" : true,

  // The DICOM Application Entity Title
  "DicomAet" : "ORCHPC",

  // Check whether the called AET corresponds during a DICOM request
  "DicomCheckCalledAet" : false,

  // The DICOM port
  "DicomPort" : 4242,

  // The default encoding that is assumed for DICOM files without
  // "SpecificCharacterSet" DICOM tag. The allowed values are "Ascii",
  // "Utf8", "Latin1", "Latin2", "Latin3", "Latin4", "Latin5",
  // "Cyrillic", "Windows1251", "Arabic", "Greek", "Hebrew", "Thai",
  // "Japanese", and "Chinese".
  "DefaultEncoding" : "Latin1",

  // The transfer syntaxes that are accepted by Orthanc C-Store SCP
  "DeflatedTransferSyntaxAccepted"     : true,
  "JpegTransferSyntaxAccepted"         : true,
  "Jpeg2000TransferSyntaxAccepted"     : true,
  "JpegLosslessTransferSyntaxAccepted" : true,
  "JpipTransferSyntaxAccepted"         : true,
  "Mpeg2TransferSyntaxAccepted"        : true,
  "RleTransferSyntaxAccepted"          : true,

  // Whether Orthanc accepts to act as C-Store SCP for unknown storage
  // SOP classes (aka. "promiscuous mode")
  "UnknownSopClassAccepted"            : false,
  "DicomScpTimeout" : 60,


  /**
   * Security-related options for the HTTP server
   **/

  // Whether remote hosts can connect to the HTTP server
  "RemoteAccessAllowed" : true,

  // Whether or not SSL is enabled
  "SslEnabled" : false,

  // Path to the SSL certificate (meaningful only if SSL is enabled)
  "SslCertificate" : "certificate.pem",

  // Whether or not the password protection is enabled
  "AuthenticationEnabled" : false,

  // The list of the registered users. Because Orthanc uses HTTP
  // Basic Authentication, the passwords are stored as plain text.
  "RegisteredUsers" : {
    // "alice" : "alicePassword"
  },


  /**
   * Network topology
   **/

  // The list of the known DICOM modalities
  "DicomModalities" : {
    /**
     * Uncommenting the following line would enable Orthanc to
     * connect to an instance of the "storescp" open-source DICOM
     * store (shipped in the DCMTK distribution) started by the
     * command line "storescp 2000".
     **/
    // "sample" : [ "STORESCP", "localhost", 2000 ]
	"UMedPACS" : [ "STENTOR_QRP", "155.100.49.210", 107 ]


    /**
     * A fourth parameter is available to enable patches for a
     * specific PACS manufacturer. The allowed values are currently
     * "Generic" (default value), "StoreScp" (storescp tool from
     * DCMTK), "ClearCanvas", "MedInria", "Dcm4Chee", "SyngoVia",
     * "AgfaImpax" (Agfa IMPAX), "EFilm2" (eFilm version 2), and
     * "Vitrea". This parameter is case-sensitive.
     **/
    // "clearcanvas" : [ "CLEARCANVAS", "192.168.1.1", 104, "ClearCanvas" ]
  },

  // Whether the Orthanc SCP allows incoming C-Store requests, even
  // from SCU modalities it does not know about (i.e. that are not
  // listed in the "DicomModalities" option above)
  "DicomAlwaysAllowStore" : true,

  // Whether Orthanc checks the IP/hostname address of the remote
  // modality initiating a DICOM connection (as listed in the
  // "DicomModalities" option above). If this option is set to
  // "false", Orthanc only checks the AET of the remote modality.
  "DicomCheckModalityHost" : false,

  // The timeout (in seconds) after which the DICOM associations are
  // considered as closed by the Orthanc SCU (client) if the remote
  // DICOM SCP (server) does not answer.
  "DicomScuTimeout" : 60,

  // The list of the known Orthanc peers
  "OrthancPeers" : {
    /**
     * Each line gives the base URL of an Orthanc peer, possibly
     * followed by the username/password pair (if the password
     * protection is enabled on the peer).
     **/
    // "peer"  : [ "http://localhost:8043/", "alice", "alicePassword" ]
    // "peer2" : [ "http://localhost:8044/" ]
  },

  // Parameters of the HTTP proxy to be used by Orthanc. If set to the
  // empty string, no HTTP proxy is used. For instance:
  //   "HttpProxy" : "192.168.0.1:3128"
  //   "HttpProxy" : "proxyUser:proxyPassword@192.168.0.1:3128"
  "HttpProxy" : "",

  // Set the timeout for HTTP requests issued by Orthanc (in seconds).
  "HttpTimeout" : 60,

  // Enable the verification of the peers during HTTPS requests.
  // Reference: http://curl.haxx.se/docs/sslcerts.html
  "HttpsVerifyPeers" : false,

  // Path to the CA (certification authority) certificates to validate
  // peers in HTTPS requests. From curl documentation ("--cacert"
  // option): "Tells curl to use the specified certificate file to
  // verify the peers. The file may contain multiple CA
  // certificates. The certificate(s) must be in PEM format."
  "HttpsCACertificates" : "",


  /**
   * Advanced options
   **/

  // Dictionary of symbolic names for the user-defined metadata. Each
  // entry must map an unique string to an unique number between 1024
  // and 65535.
  "UserMetadata" : {
    // "Sample" : 1024
  },

  // Dictionary of symbolic names for the user-defined types of
  // attached files. Each entry must map an unique string to an unique
  // number between 1024 and 65535. Optionally, a second argument can
  // provided to specify a MIME content type for the attachment.
  "UserContentType" : {
    // "sample" : 1024
    // "sample2" : [ 1025, "application/pdf" ]
  },

  // Number of seconds without receiving any instance before a
  // patient, a study or a series is considered as stable.
  "StableAge" : 60,

  // By default, Orthanc compares AET (Application Entity Titles) in a
  // case-insensitive way. Setting this option to "true" will enable
  // case-sensitive matching.
  "StrictAetComparison" : false,

  // When the following option is "true", the MD5 of the DICOM files
  // will be computed and stored in the Orthanc database. This
  // information can be used to detect disk corruption, at the price
  // of a small performance overhead.
  "StoreMD5ForAttachments" : true,

  // The maximum number of results for a single C-FIND request at the
  // Patient, Study or Series level. Setting this option to "0" means
  // no limit.
  "LimitFindResults" : 0,

  // The maximum number of results for a single C-FIND request at the
  // Instance level. Setting this option to "0" means no limit.
  "LimitFindInstances" : 0,

  // The maximum number of active jobs in the Orthanc scheduler. When
  // this limit is reached, the addition of new jobs is blocked until
  // some job finishes.
  "LimitJobs" : 10,

  // If this option is set to "false", Orthanc will not log the
  // resources that are exported to other DICOM modalities of Orthanc
  // peers in the URI "/exports". This is useful to prevent the index
  // to grow indefinitely in auto-routing tasks.
  "LogExportedResources" : true,

  // Enable or disable HTTP Keep-Alive (deprecated). Set this option
  // to "true" only in the case of high HTTP loads.
  "KeepAlive" : false,

  // If this option is set to "false", Orthanc will run in index-only
  // mode. The DICOM files will not be stored on the drive. Note that
  // this option might prevent the upgrade to newer versions of Orthanc.
  "StoreDicom" : true,

  // DICOM associations are kept open as long as new DICOM commands
  // are issued. This option sets the number of seconds of inactivity
  // to wait before automatically closing a DICOM association. If set
  // to 0, the connection is closed immediately.
  "DicomAssociationCloseDelay" : 5,

  // Maximum number of query/retrieve DICOM requests that are
  // maintained by Orthanc. The least recently used requests get
  // deleted as new requests are issued.
  "QueryRetrieveSize" : 10,

  // When handling a C-Find SCP request, setting this flag to "true"
  // will enable case-sensitive match for PN value representation
  // (such as PatientName). By default, the search is
  // case-insensitive, which does not follow the DICOM standard.
  "CaseSensitivePN" : false,

  // Register a new tag in the dictionary of DICOM tags that are known
  // to Orthanc. Each line must contain the tag (formatted as 2
  // hexadecimal numbers), the value representation (2 upcase
  // characters), a nickname for the tag, possibly the minimum
  // multiplicity (> 0 with defaults to 1), and possibly the maximum
  // multiplicity (0 means arbitrary multiplicity, defaults to 1).
  "Dictionary" : {
    // "0014,1020" : [ "DA", "ValidationExpiryDate", 1, 1 ]
  }
}
orthanc
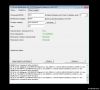
Раньше ничем таким не занимался, знания о DICOM заканчиваются на том, что это формат медицинских изображений…
На работе есть несколько медицинских устройств, которые обмениваются снимками с компа оператора на комп врача.
На каждом оборудовании есть своя программа и на станциях врачей своя.
Решил попробовать сделать единое хранилище.
Конечно, можно купить и платные продукты, но это не наш метод.
Поиск выдал Orthanc, система у меня Debian 10, так что решил поставить из репозитория:
- ini
-
apt-get install Orthanc
Установил, поправил конфиг для того что бы зайти в WEB, загрузил несколько картинок…
В последних версиях пользователи хранятся тут :
- ini
-
credentials.json

{
  /**
   * Sensitive configuration options. This file must *not* be
   * publicly-readable. It must only be readable by the users that run
   * the "orthanc" service.
   **/

  // The list of the registered users. Because Orthanc uses HTTP
  // Basic Authentication, the passwords are stored as plain text.
  "RegisteredUsers" : {
    "alice" : "alicePassword"
    "admin" : "adminPassword",
  }
}
Включение http сервера и авторизации тут:
- ini
-
Orthanc.json
 "HttpServerEnabled" : true,


 "AuthenticationEnabled" : true,
Что-то мне не понравился стандартный web viewer…
Решил прикрутить viewer от Osimis.
скачиваем:
- ini
-
wget http://orthanc.osimis.io/lsb/plugin-osimis-webviewer/releases/1.2.0/libOsimisWebViewer.so
нужно посмотреть → http://orthanc.osimis.io/lsb/plugin-osimis-webviewer/releases/1.3.1/libOsimisWebViewer.so
по умолчанию подгружаются все плагины находящиеся в папке /usr/share/orthanc/plugins
поэтому директиву Plugins править не нужно.
скаченную библиотеку надо поместить в папку: /usr/share/orthanc/plugins
и перезапустить orthanc.
- ini
-
// Whether remote hosts can connect to the HTTP server
  "RemoteAccessAllowed" : false, -  исправить на true что бы зайти в  WEB

  "Plugins" : [
    "/home/user/ libOsimisWebViewer.so r.so",
]
TITLE AE -сервера, собственно куда отправляются снимки
И кодировка в которую они будут преобразованы «DefaultEncoding» : «Windows1251»,
- ini
-
  // The DICOM Application Entity Title
  "DicomAet" : "ORTHANC",

  // Check whether the called AET corresponds to the AET of Orthanc
  // during an incoming DICOM SCU request
  "DicomCheckCalledAet" : false,

  // The DICOM port
  "DicomPort" : 4242,

  // The default encoding that is assumed for DICOM files without
  // "SpecificCharacterSet" DICOM tag, and that is used when answering
  // C-Find requests (including worklists). The allowed values are
  // "Ascii", "Utf8", "Latin1", "Latin2", "Latin3", "Latin4",
  // "Latin5", "Cyrillic", "Windows1251", "Arabic", "Greek", "Hebrew",
  // "Thai", "Japanese", "Chinese", "JapaneseKanji", "Korean", and
  // "SimplifiedChinese".
  //"DefaultEncoding" : "Latin1",
  "DefaultEncoding" : "Windows1251",
- ini
-
WEB-интерфейс тут http://ваш ip:8042/app/explorer.html

Подключение к СУБД:
- ini
-
apt-get install default-mysql-server default-mysql-clietn defaultlt-libmysqlclient-dev orthanc-mysql
Увеличиваем размер блока данных:
- ini
-
mcedit my.cnf

max_allowed_packet = 128M
создаем пользователя и бд, подключаемся:
- ini
-
mcedit /etc/orthanc/mysql.json

cat /etc/orthanc/mysql.json
{
  /**
   * Configuration to use MySQL or MariaDB instead of the default
   * SQLite back-end of Orthanc. You will have to install the
   * "orthanc-mysql" package to take advantage of this feature.
   **/
  "MySQL" : {
    // Enable the use of MySQL to store the Orthanc index?
    "EnableIndex" : true,

    // Enable the use of MySQL to store the DICOM files?
    "EnableStorage" : true,

    // Parameters of the MySLQ database
    "Host" : "localhost",
    "Port" : 3306,
    "Database" : "orthanc",
    "Username" : "orthanc",
    "UnixSocket" : "/var/run/mysqld/mysqld.sock",
    "Password" : "dDE4dkULEYrbBZxc",

    // Optional: Disable the locking of the MySQL database
    "Lock" : true
  }
}
Контроль доступа и отправка на другие модальности:
- ini
-
Orthanc.json

  "LuaScripts" : [
    "/etc/orthanc/lua/access.lua",
    "/etc/orthanc/lua/send.lua"
  ],

"sample" : [ "AE_TITLE", "192.168.1.235", 4006 ]
Lua:
Разрешения выполнять запросы к Orthanc, с помощью этого скрипта можно разграничить права доступа к web интерфейсу Orthanc
- ini
-
cat access.lua
function IncomingHttpRequestFilter(method, uri, ip, username, httpHeaders)
   -- Only allow GET requests for non-admin users

  if method == 'GET' or method == 'POST' then
      return true
   elseif username == 'admin' then
      return true
   else
      return false
   end
end
Можно по ip
- ini
-
function IncomingHttpRequestFilter(method, uri, ip, username, httpHeaders)
  if method == 'GET' and (username == 'user' or username == 'admin') then
    -- Read-only access (only GET method is allowed)
    return true
  elseif username == 'admin' and ip == '127.0.0.1' then
    -- Read-write access for administrator (any HTTP method is allowed on localhost)
    return true
  else
    -- Access is disallowed by default
    return false
  end
end
С помощью этого скрипта можно отправлять снимки которые пришли в Orthanc на другие DICOM сервера или на рабочие станции врачей.
- ini
-
cat send.lua
function OnStoredInstance(instanceId, tags, metadata)
    SendToModality(instanceId, 'sample')
end
С помощью этого скрипта можно разбирать изображение которые приходят на Orthanc и маршрутизировать их на другие сервера.
- ini
-
cat /etc/orthanc/lua/send.lua
function OnStoredInstance(instanceId, tags, metadata)
    local Modality = tags['Modality']
        if string.find(Modality, 'CR') ~= nil then
            SendToModality(instanceId, 'sample')
        elseif string.find(Modality, 'MR') ~= nil then
            SendToModality(instanceId, 'sample')
        end
end
перезапускаем:
- ini
-
services orthanc restart
Удаление старых записей
- ini
-
 $ curl --user admin:password http://localhost:8042/tools/find -d '{"Level":"Study","Query":{"StudyDate":"20120101-20121231"}}'
[
   "6e2c0ec2-5d99c8ca-c1c21cee-79a09605-68391d12",
   "ef2ce55f-9342856a-aee23907-2667e859-9f3b734d"
]
$ curl -X DELETE http://localhost:8042/studies/6e2c0ec2-5d99c8ca-c1c21cee-79a09605-68391d12
$ curl -X DELETE http://localhost:8042/studies/ef2ce55f-9342856a-aee23907-2667e859-9f3b734d
· Последнее изменение: 2022/05/27 02:34 —
sector